Embed Size (px)
Citation preview
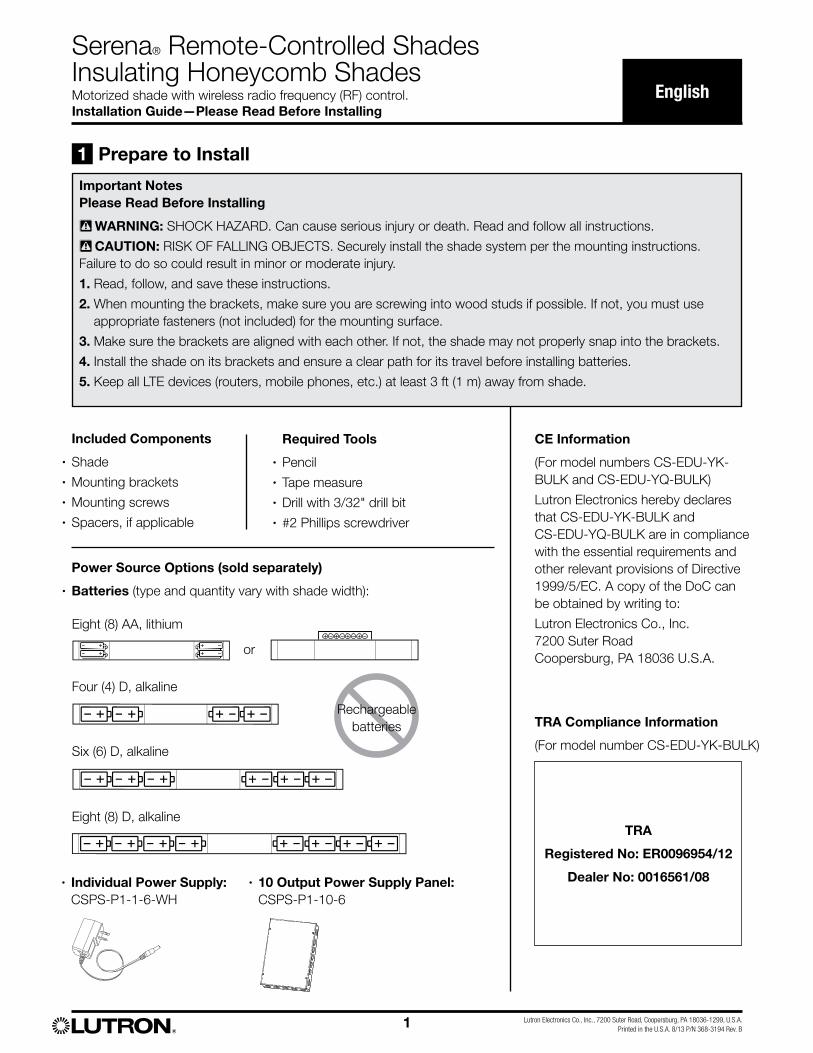
Motorized shade with wireless radio frequency (RF) control.Installation Guide—Please Read Before Installing
Serena® Remote-Controlled Shades Insulating Honeycomb Shades
English
1 Lutron Electronics Co., Inc., 7200 Suter Road, Coopersburg, PA 18036-1299, U.S.A.Printed in the U.S.A. 8/13 P/N 368-3194 Rev. B
Important NotesPlease Read Before Installing
! WARNING: SHOCK HAZARD. Can cause serious injury or death. Read and follow all instructions.! CAUTION: RISK OF FALLING OBJECTS. Securely install the shade system per the mounting instructions. Failure to do so could result in minor or moderate injury.
1. Read, follow, and save these instructions.
2. When mounting the brackets, make sure you are screwing into wood studs if possible. If not, you must use appropriate fasteners (not included) for the mounting surface.
3. Make sure the brackets are aligned with each other. If not, the shade may not properly snap into the brackets.
4. Install the shade on its brackets and ensure a clear path for its travel before installing batteries.
5. Keep all LTE devices (routers, mobile phones, etc.) at least 3 ft (1 m) away from shade.
Included Components
• Shade• Mounting brackets• Mounting screws• Spacers, if applicable
Required Tools
• Pencil• Tape measure• Drill with 3/32" drill bit• #2 Phillips screwdriver
CE Information
(For model numbers CS-EDU-YK-BULK and CS-EDU-YQ-BULK)
Lutron Electronics hereby declares that CS-EDU-YK-BULK and CS-EDU-YQ-BULK are in compliance with the essential requirements and other relevant provisions of Directive 1999/5/EC. A copy of the DoC can be obtained by writing to:
Lutron Electronics Co., Inc. 7200 Suter Road Coopersburg, PA 18036 U.S.A.
TRA
Registered No: ER0096954/12
Dealer No: 0016561/08
TRA Compliance Information
(For model number CS-EDU-YK-BULK)
Power Source Options (sold separately)
• Batteries (type and quantity vary with shade width):
Eight (8) AA, lithium
or
Four (4) D, alkaline
Six (6) D, alkaline
Eight (8) D, alkaline
Rechargeable batteries
• Individual Power Supply: CSPS-P1-1-6-WH
• 10 Output Power Supply Panel: CSPS-P1-10-6
1 Prepare to Install
Motorized shade with wireless radio frequency (RF) control.Installation Guide—Please Read Before Installing
Serena® Remote-Controlled Shades Insulating Honeycomb Shades
English
2 Lutron Electronics Co., Inc., 7200 Suter Road, Coopersburg, PA 18036-1299, U.S.A.Printed in the U.S.A. 8/13 P/N 368-3194 Rev. B
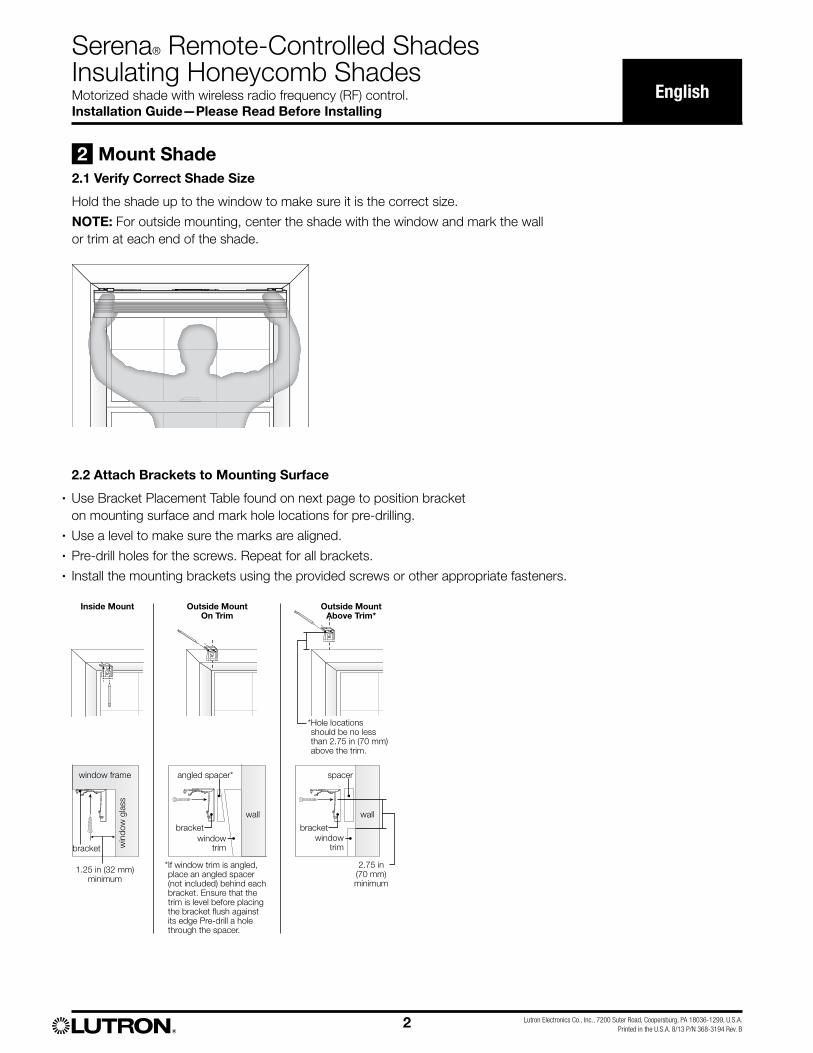
2.1 Verify Correct Shade Size
Hold the shade up to the window to make sure it is the correct size.
NOTE: For outside mounting, center the shade with the window and mark the wall or trim at each end of the shade.
2.2 Attach Brackets to Mounting Surface
• Use Bracket Placement Table found on next page to position bracket on mounting surface and mark hole locations for pre-drilling.
• Use a level to make sure the marks are aligned.• Pre-drill holes for the screws. Repeat for all brackets.• Install the mounting brackets using the provided screws or other appropriate fasteners.
Inside Mount Outside Mount On Trim
* Hole locations should be no less than 2.75 in (70 mm) above the trim.
Outside Mount Above Trim*
* If window trim is angled, place an angled spacer (not included) behind each bracket. Ensure that the trim is level before placing the bracket flush against its edge Pre-drill a hole through the spacer.
2.75 in (70 mm)minimum
bracketwindow
trim
spacer
wall
angled spacer*
wall
window trim
bracket
window frame
win
dow
gla
ss
bracket
1.25 in (32 mm) minimum
2 Mount Shade
www.lutron.com/honeycombmaintenance www.lutron.com/honeycombmaintenance
Motorized shade with wireless radio frequency (RF) control.Installation Guide—Please Read Before Installing
Serena® Remote-Controlled Shades Insulating Honeycomb Shades
English
3 Lutron Electronics Co., Inc., 7200 Suter Road, Coopersburg, PA 18036-1299, U.S.A.Printed in the U.S.A. 8/13 P/N 368-3194 Rev. B
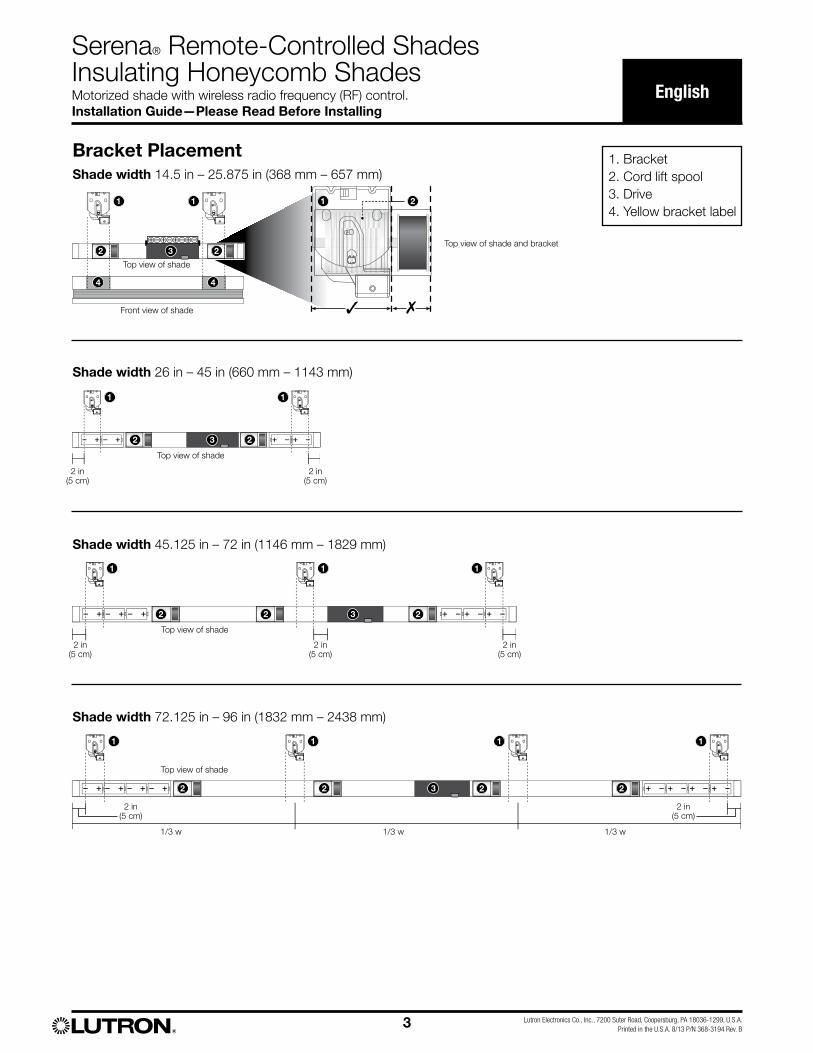
Bracket PlacementShade width 14.5 in – 25.875 in (368 mm – 657 mm)
Top view of shade
Top view of shade
Top view of shade
Front view of shade
Shade width 26 in – 45 in (660 mm – 1143 mm)
2 in(5 cm)
2 in(5 cm)
Shade width 45.125 in – 72 in (1146 mm – 1829 mm)
2 in(5 cm)
2 in(5 cm)
2 in(5 cm)
Shade width 72.125 in – 96 in (1832 mm – 2438 mm)
2 in(5 cm)
2 in(5 cm)
1/3 w 1/3 w1/3 w
1. Bracket2. Cord lift spool3. Drive4. Yellow bracket label
1 1 1
2
2
2
2
2
2 2 2
2
2
2
2
3
3
3
3
4 4
Top view of shade and bracket
1
1
1 1 1 1
1 1
1
Top view of shade
Motorized shade with wireless radio frequency (RF) control.Installation Guide—Please Read Before Installing
Serena® Remote-Controlled Shades Insulating Honeycomb Shades
English
4 Lutron Electronics Co., Inc., 7200 Suter Road, Coopersburg, PA 18036-1299, U.S.A.Printed in the U.S.A. 8/13 P/N 368-3194 Rev. B
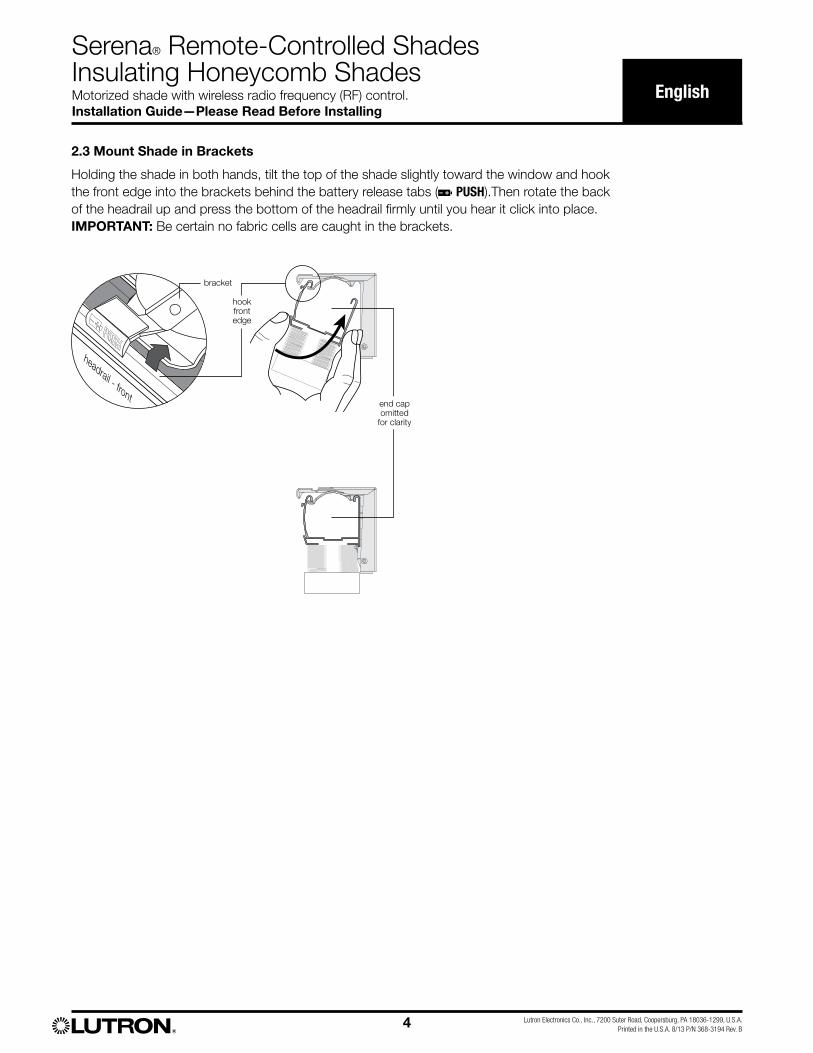
2.3 Mount Shade in Brackets
Holding the shade in both hands, tilt the top of the shade slightly toward the window and hook the front edge into the brackets behind the battery release tabs ( PUSH).Then rotate the back of the headrail up and press the bottom of the headrail firmly until you hear it click into place. IMPORTANT: Be certain no fabric cells are caught in the brackets.
bracket
hook front edge
end capomitted
for clarity
headrail - front
ee
Motorized shade with wireless radio frequency (RF) control.Installation Guide—Please Read Before Installing
Serena® Remote-Controlled Shades Insulating Honeycomb Shades
English
5 Lutron Electronics Co., Inc., 7200 Suter Road, Coopersburg, PA 18036-1299, U.S.A.Printed in the U.S.A. 8/13 P/N 368-3194 Rev. B
3.2 Connect Power Source
NOTE: Shades are manufactured for battery power or wired power according to the original order. The two types are not interchangeable or convertible.
Battery powered shades
Install the batteries as indicated in the battery holders (so the +/- signs match). Make sure the batteries are fully inserted into the trays. The “shade button” will blink red/green 3 times when shade is powered.
NOTE: For best battery life, DO NOT mix old and new batteries. Use ONLY alkaline D size batteries or lithium AA size batteries. DO NOT install carbon-zinc or rechargeable batteries, and DO NOT mix battery types.
Wired-power shades
With individual plug-in power supply Uncoil the cable from inside the headrail and plug it into the individual power supply. Plug the individual power supply into an outlet. The “shade button” will blink red/green 3 times when shade is powered.
Connected to 10-output power supply panel For wiring instructions from a 10 output power supply, refer to the power panel instruction guide (P/N 045-348) that came with the 10-output power supply panel.
3.3 Return Shade to Operating Position
Tilt the shade back into the brackets; pressing gently until you hear a click.
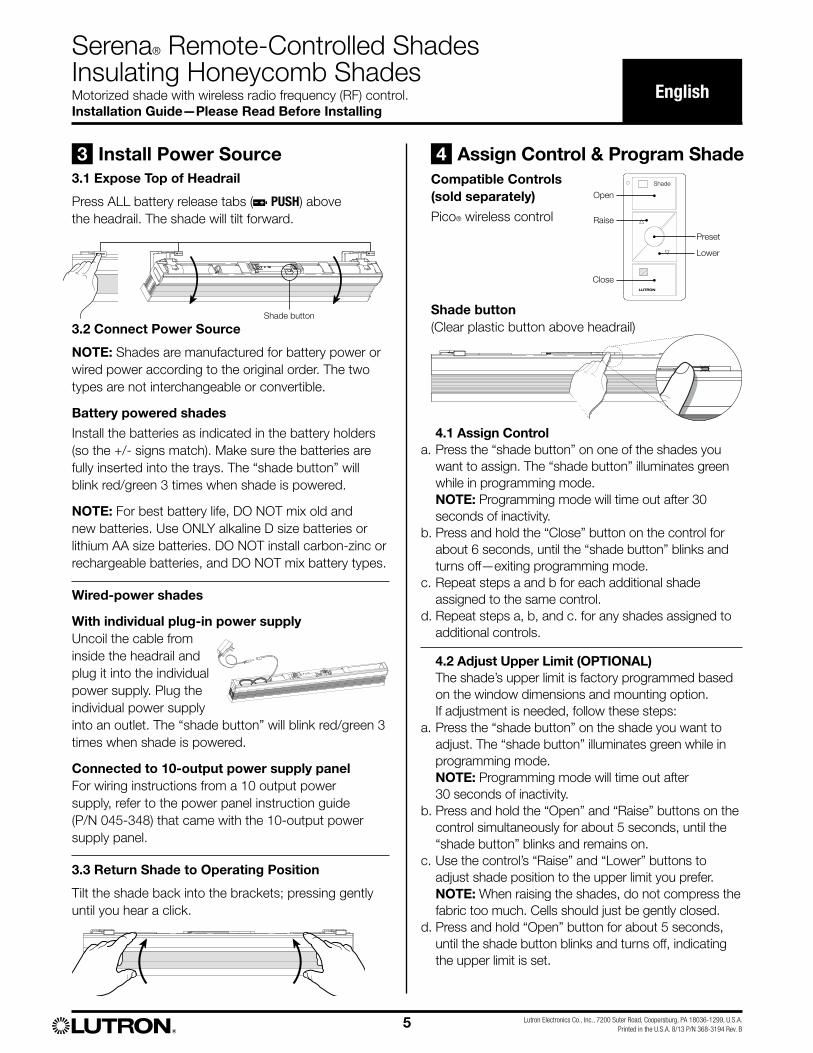
3.1 Expose Top of Headrail
Press ALL battery release tabs ( PUSH) above the headrail. The shade will tilt forward.
Shade button
Compatible Controls (sold separately)
Pico® wireless control
Shade button(Clear plastic button above headrail)
Shade
Open
Preset
Close
Lower
Raise
4.1 Assign Controla. Press the “shade button” on one of the shades you
want to assign. The “shade button” illuminates green while in programming mode.
NOTE: Programming mode will time out after 30 seconds of inactivity.
b. Press and hold the “Close” button on the control for about 6 seconds, until the “shade button” blinks and turns off—exiting programming mode.
c. Repeat steps a and b for each additional shade assigned to the same control.
d. Repeat steps a, b, and c. for any shades assigned to additional controls.
4.2 Adjust Upper Limit (OPTIONAL) The shade’s upper limit is factory programmed based
on the window dimensions and mounting option. If adjustment is needed, follow these steps:
a. Press the “shade button” on the shade you want to adjust. The “shade button” illuminates green while in programming mode.
NOTE: Programming mode will time out after 30 seconds of inactivity.
b. Press and hold the “Open” and “Raise” buttons on the control simultaneously for about 5 seconds, until the “shade button” blinks and remains on.
c. Use the control’s “Raise” and “Lower” buttons to adjust shade position to the upper limit you prefer.
NOTE: When raising the shades, do not compress the fabric too much. Cells should just be gently closed.
d. Press and hold “Open” button for about 5 seconds, until the shade button blinks and turns off, indicating the upper limit is set.
3 4Install Power Source Assign Control & Program Shade
Motorized shade with wireless radio frequency (RF) control.Installation Guide—Please Read Before Installing
Serena® Remote-Controlled Shades Insulating Honeycomb Shades
English
6 Lutron Electronics Co., Inc., 7200 Suter Road, Coopersburg, PA 18036-1299, U.S.A.Printed in the U.S.A. 8/13 P/N 368-3194 Rev. B
Restoring Factory Default• This step will remove any controls assigned to
the shade. It will not affect the shade’s upper and lower limits.
• Tap the “shade button” quickly 3 times, and hold the “shade button” after the third tap until the “shade button” LED blinks green rapidly.
• Immediately tap the “shade button” quickly three more times, until the “shade button” LED blinks green rapidly, then blinks red/green three times, and turns off.
Cleaning the FabricTo keep your shades looking their best, regularly brush them with a feather duster or lightly vacuum them with a clean brush-type attachment.
If your shades get a spot of dirt or a stain on them use a clean, soft cloth and a solution of mild detergent and warm water (1 part detergent to 3 parts water) to blot or lightly rub the spot or stain.
DO NOT use strong detergents or spot removers, and DO NOT have your shades dry cleaned.
IMPORTANT: Be extra careful if you are cleaning a room darkening fabric because you could permanently crease the fabric.
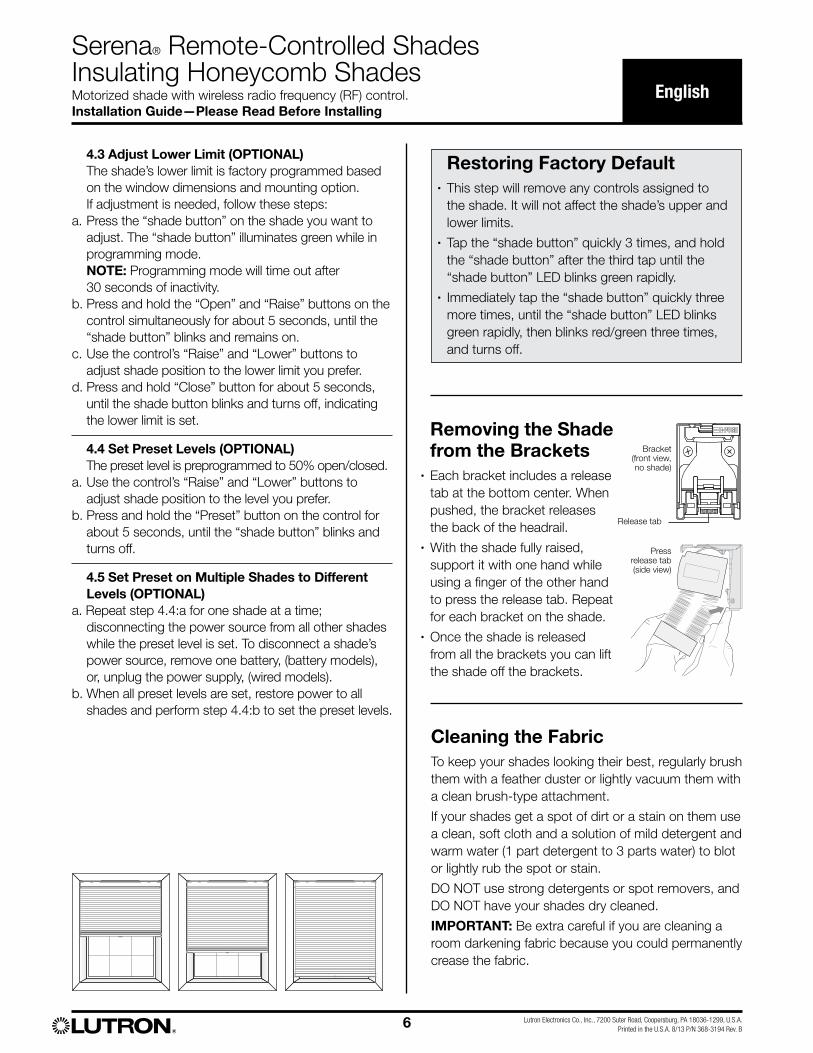
Removing the Shade from the Brackets
• Each bracket includes a release tab at the bottom center. When pushed, the bracket releases the back of the headrail.
• With the shade fully raised, support it with one hand while using a finger of the other hand to press the release tab. Repeat for each bracket on the shade.
• Once the shade is released from all the brackets you can lift the shade off the brackets.
Release tab
Bracket (front view, no shade)
Press release tab (side view)
4.3 Adjust Lower Limit (OPTIONAL) The shade’s lower limit is factory programmed based
on the window dimensions and mounting option. If adjustment is needed, follow these steps:
a. Press the “shade button” on the shade you want to adjust. The “shade button” illuminates green while in programming mode.
NOTE: Programming mode will time out after 30 seconds of inactivity.
b. Press and hold the “Open” and “Raise” buttons on the control simultaneously for about 5 seconds, until the “shade button” blinks and remains on.
c. Use the control’s “Raise” and “Lower” buttons to adjust shade position to the lower limit you prefer.
d. Press and hold “Close” button for about 5 seconds, until the shade button blinks and turns off, indicating the lower limit is set.
4.4 Set Preset Levels (OPTIONAL) The preset level is preprogrammed to 50% open/closed.a. Use the control’s “Raise” and “Lower” buttons to
adjust shade position to the level you prefer.b. Press and hold the “Preset” button on the control for
about 5 seconds, until the “shade button” blinks and turns off.
4.5 Set Preset on Multiple Shades to Different Levels (OPTIONAL)
a. Repeat step 4.4:a for one shade at a time; disconnecting the power source from all other shades while the preset level is set. To disconnect a shade’s power source, remove one battery, (battery models), or, unplug the power supply, (wired models).
b. When all preset levels are set, restore power to all shades and perform step 4.4:b to set the preset levels.
Motorized shade with wireless radio frequency (RF) control.Installation Guide—Please Read Before Installing
Serena® Remote-Controlled Shades Insulating Honeycomb Shades
English
7 Lutron Electronics Co., Inc., 7200 Suter Road, Coopersburg, PA 18036-1299, U.S.A.Printed in the U.S.A. 8/13 P/N 368-3194 Rev. B
Troubleshooting
D-1 Reset the lower limit. See section 4.3: “Adjust Lower Limit” of the installation instructions.
D-2 Leave shade in lowered position to allow fabric to relax. Time required to relax may vary (up to 24 hours).
D-3 Check the window measurements, shade measurements, and the mounting height.
“Shade Button” Blink Codes Red/green red/green red/green Over a 3-second
span indicates normal power-up when batteries are inserted or power connected.
One red blink every 5 seconds = low batteries. Install new batteries.
Solid red during shade movement = low batteries. Install new batteries.
If you have any questions regarding your Serena remote control shades, please visit www.lutron.com, or call Lutron Technical Support at 1.800.523.9466. Our technical support staff is available 24 hours a day, 7 days a week.
C-1 Leave shade in lowered position to allow fabric to relax. Time required to relax may vary (up to 24 hours).
IMPORTANT: The shade is designed to respond when a control button is released. For best response during normal operation, tap and release control buttons. DO NOT press and hold unless instructed.
A-1 Tap the “shade button.” Does the “shade button” LED light up green? NO, the “shade button” LED doesn't light up at all.
Battery powered shade: 1) Make sure the batteries are installed in the correct orientation. 2) Make sure the batteries are fresh, or install new batteries.
Wired shade: 1) Make sure the power supply/panel is plugged into a powered outlet. 2) Make sure the shade power cable is properly connected to the plug-in supply or power panel, and system power is available.
NO, the “shade button” LED is red and/or blinking. See “‘Shade Button’ Blink Codes”
YES Continue to A-2 below...
A-2 Make sure the control is assigned to the shade by performing the steps in section 4.1: “Assign Controls” of the installation instructions. Does the “shade button” LED blink green while assigning controls? NO, the “shade button” LED does not respond to control input
1) See section 2.3: “Reposition Antenna Clip...” of the installation instructions.
2) Restore the shade’s factory default settings. See the section: “Restoring Factory Default” of the installation instructions.
NO, the “shade button” LED is red and/or blinking. See “‘shade button’ Blink Codes”
YES, the “shade button” LED responds correctly, but the shade still doesn’t move.
1) Repeat section 4.1: “Assign Controls” of the installation instructions, and be sure to hold the “close” button until the “shade button” LED blinks.
2) Reset the upper and lower limits. See sections 4.2: “Adjust Upper Limit” and 4.3: “Adjust Lower Limit” of the installation instructions.
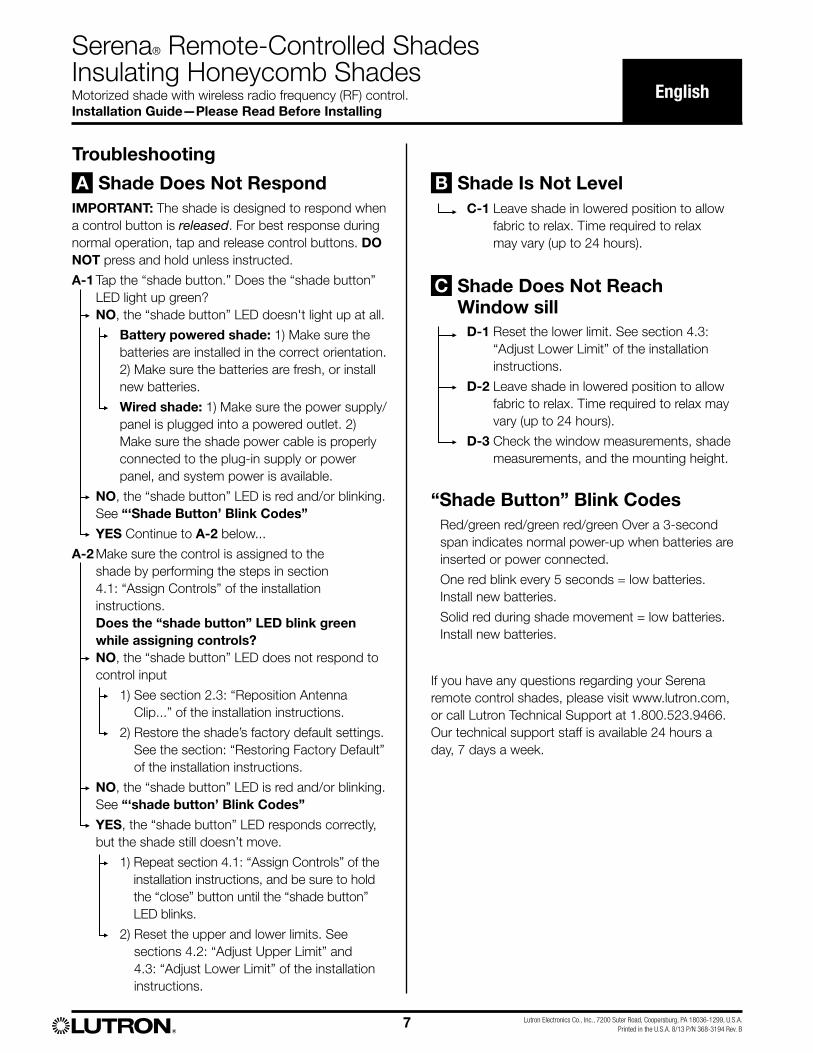
A B
C
Shade Does Not Respond Shade Is Not Level
Shade Does Not Reach Window sill
Motorized shade with wireless radio frequency (RF) control.Installation Guide—Please Read Before Installing
Serena® Remote-Controlled Shades Insulating Honeycomb Shades
English
8 Lutron Electronics Co., Inc., 7200 Suter Road, Coopersburg, PA 18036-1299, U.S.A.Printed in the U.S.A. 8/13 P/N 368-3194 Rev. B
Worldwide Headquarters | USA
Lutron Electronics Co., Inc.
7200 Suter Road
Coopersburg, PA 18036-1299 USA
TEL: 1.610.282.3800
FAX: 1.610.282.3090
Technical Support: 1.800.523.9466
Toll Free: 1.888.LUTRON1
EMAIL: [email protected]
WEB: www.lutron.com/shadingsolutions