Embed Size (px)
Citation preview

RayFlow 2.1Server Installation Guide

2
RayFlow 2.1 Server Installation Guide
RayFlow 2.1
Copyright © Raynet GmbH (Germany, Paderborn HRB 3524). All rights reserved.Complete or partial reproduction, adaptation, or translation without prior written permission is prohibited.
Server Installation Guide RayFlow 2.1
Raynet and RayFlow are trademarks or registered trademarks of Raynet GmbH protected by patents in European Union,USA and Australia, other patents pending. Other company names and product names are trademarks of their respectiveowners and are used to their credit.
The content of this document is furnished for informational use only, is subject to change without notice, and should notbe construed as a commitment by Raynet GmbH. Raynet GmbH assumes no responsibility or liability for any errors orinaccuracies that may appear in this document. All names and data used in examples are fictitious unless otherwisenoted.
Any type of software or data file can be packaged for software management using packaging tools from Raynet or thosepublicly purchasable in the market. The resulting package is referred to as a Raynet package. Copyright for any third partysoftware and/or data described in a Raynet package remains the property of the relevant software vendor and/ordeveloper. Raynet GmbH does not accept any liability arising from the distribution and/or use of third party softwareand/or data described in Raynet packages. Please refer to your Raynet license agreement for complete warranty andliability information.
Raynet GmbH GermanySee our website for locations.
www.ra ynet.de
04.02.2016
3
RayFlow 2.1 Server Installation Guide
RayFlow 2.1
Server Installation Guide RayFlow 2.1
Table of Contents
................................................................................................................................................................................................... 4Overview
................................................................................................................................................................................................... 4Who should use this guide?
................................................................................................................................................................................................... 4Support Hotline
................................................................................................................................................................................................... 4Documentation requests
................................................................................................................................................................................................... 5Requirements
........................................................................................................................................................................................ 5Hardware Requirements
........................................................................................................................................................................................ 5Software Requirements
................................................................................................................................................................................................... 6Preparing the OS
................................................................................................................................................................................................... 6Domain Join
................................................................................................................................................................................................... 7Installing the Prerequisites
........................................................................................................................................................................................ 7Microsoft .NET Framework
........................................................................................................................................................................................ 8Installing the Web Server Role(IIS)
........................................................................................................................................................................................ 18SQL Server Installation
........................................................................................................................................................................................ 31Installing Crystral Reports
........................................................................................................................................................................................ 32Installing Microsoft Report Viewer Runtime
................................................................................................................................................................................................... 39RayFlow Server Deployment
................................................................................................................................................................................................... 49Establish ODBC Connection
................................................................................................................................................................................................... 56Web.config
................................................................................................................................................................................................... 58RayFlow Server Upgrade
4
RayFlow 2.1 Server Installation Guide
RayFlow 2.1
OverviewRayFlow is a software management workflow tool that helps to control and monitor the complicated ITprocesses in an enterprise. This guide shows how to can setup RayFlow web server in your environment.
Not only is RayFlow straightforward and easy to use it is highly customizable. To know more about, how RayFlowcan help you monitor and control your enterprise IT process, contact RayNet.
Who should use this guide?This guide is for administrators, consultants and users responsible for deployment of the RayFlow Web Server.
Support HotlineFor any questions about the order process and documentation, please contact the Raynet Support Team:
Email: suppor t @ r a yne t .de (available 24h/7d)Phone: +49-5251-54009-200 (available from 8 am to 4 pm, GMT + 1 hour)
If you need a RayFlow account, please contact:
Email: suppor t @ r a yne t .de (please always name your RayFlow SPOC)
Documentation requestsWe welcome all suggestions and feedback on the various documentation resources available with RayFlow andits components. Customer comments and concerns can be forwarded through a local Raynet supportrepresentative.
5
RayFlow 2.1 Server Installation Guide
RayFlow 2.1
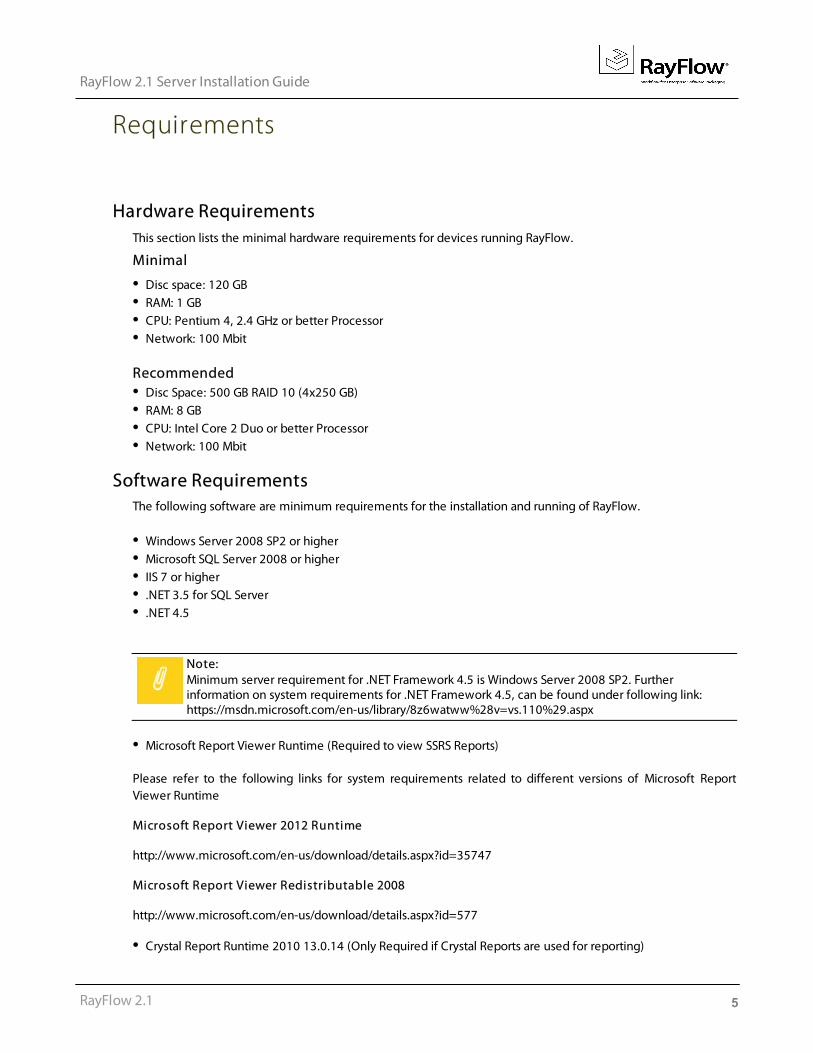
Requirements
Hardware RequirementsThis section lists the minimal hardware requirements for devices running RayFlow.
Minimal
Disc space: 120 GBRAM: 1 GBCPU: Pentium 4, 2.4 GHz or better ProcessorNetwork: 100 Mbit
Recommended
Disc Space: 500 GB RAID 10 (4x250 GB)RAM: 8 GBCPU: Intel Core 2 Duo or better ProcessorNetwork: 100 Mbit
Software RequirementsThe following software are minimum requirements for the installation and running of RayFlow.
Windows Server 2008 SP2 or higherMicrosoft SQL Server 2008 or higherIIS 7 or higher.NET 3.5 for SQL Server.NET 4.5
Note: Minimum server requirement for .NET Framework 4.5 is Windows Server 2008 SP2. Furtherinformation on system requirements for .NET Framework 4.5, can be found under following link: https://msdn.microsoft.com/en-us/library/8z6watww%28v=vs.110%29.aspx
Microsoft Report Viewer Runtime (Required to view SSRS Reports)
Please refer to the following links for system requirements related to different versions of Microsoft ReportViewer Runtime
Microsoft Report Viewer 2012 Runtime
http://www.microsoft.com/en-us/download/details.aspx?id=35747
Microsoft Report Viewer Redistributable 2008
http://www.microsoft.com/en-us/download/details.aspx?id=577
Crystal Report Runtime 2010 13.0.14 (Only Required if Crystal Reports are used for reporting)
6
RayFlow 2.1 Server Installation Guide
RayFlow 2.1
Preparing the OS
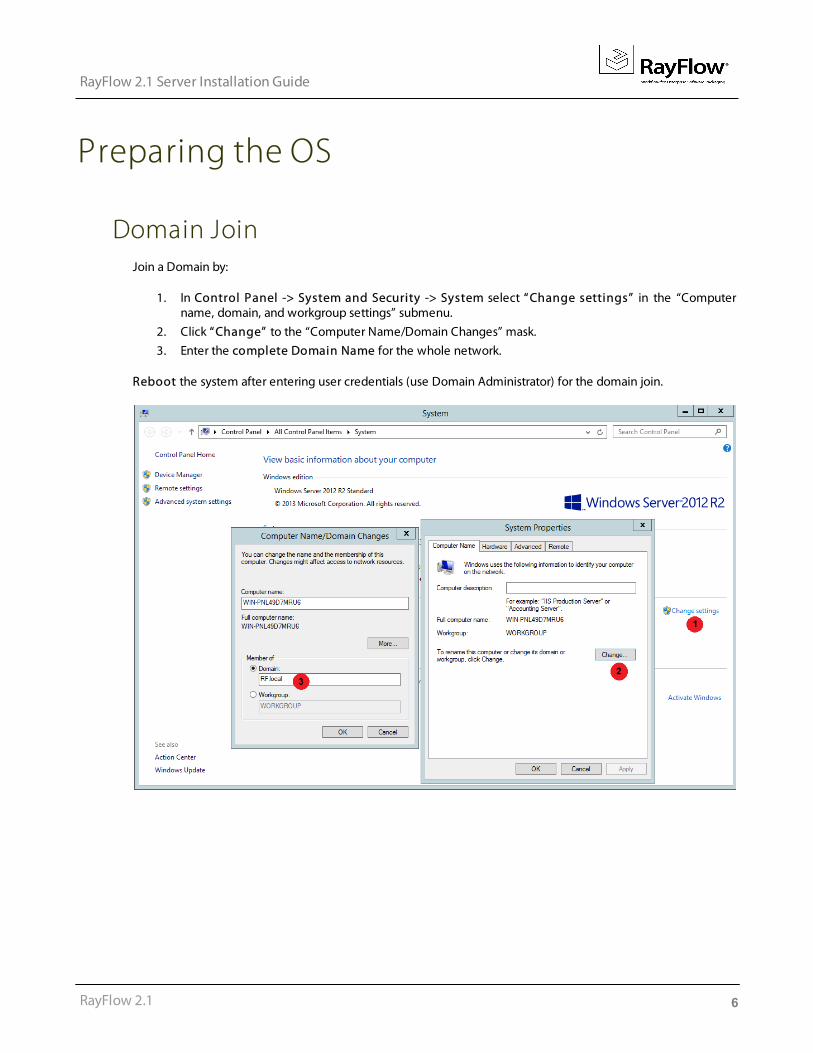
Domain JoinJoin a Domain by:
1. In Control Panel -> System and Security -> System select “ Change settings” in the “Computername, domain, and workgroup settings” submenu.
2. Click “ Change” to the “Computer Name/Domain Changes” mask.
3. Enter the complete Domain Name for the whole network.
Reboot the system after entering user credentials (use Domain Administrator) for the domain join.
7
RayFlow 2.1 Server Installation Guide
RayFlow 2.1
Installing the PrerequisitesFor successful RayFlow web server setup, there are several prerequisites necessary on the systems.
Microsoft .NET Framework
Microsoft .NET Framework 3.5
.NET 3.5 SP1 is a requirement for installation of Microsoft SQL Server 2012 Express Advanced SP2. If your SQLserver is on-box; follow the steps to install .NET 3.5 on Windows Server 2012 R2.
Note: .NET Framework 3.5 is not part of Windows Server 2012 R2. Hence while trying to install it from the ServerManager UI, you will be asked to specify alternate source path of the installation files.
Start command prompt in administrative mode and enter this:
dism /online /enable-feature /featurename:NetFX3 /all /Source:d:\sources\sxs /LimitAccess
Note: Source should be Windows installation disk. In this case located on D:
Microsoft .NET Framework 4.5
Fully update the Windows Server 2012 R2, as this will add .NET 4.5 which includes .NET 4.0
8
RayFlow 2.1 Server Installation Guide
RayFlow 2.1
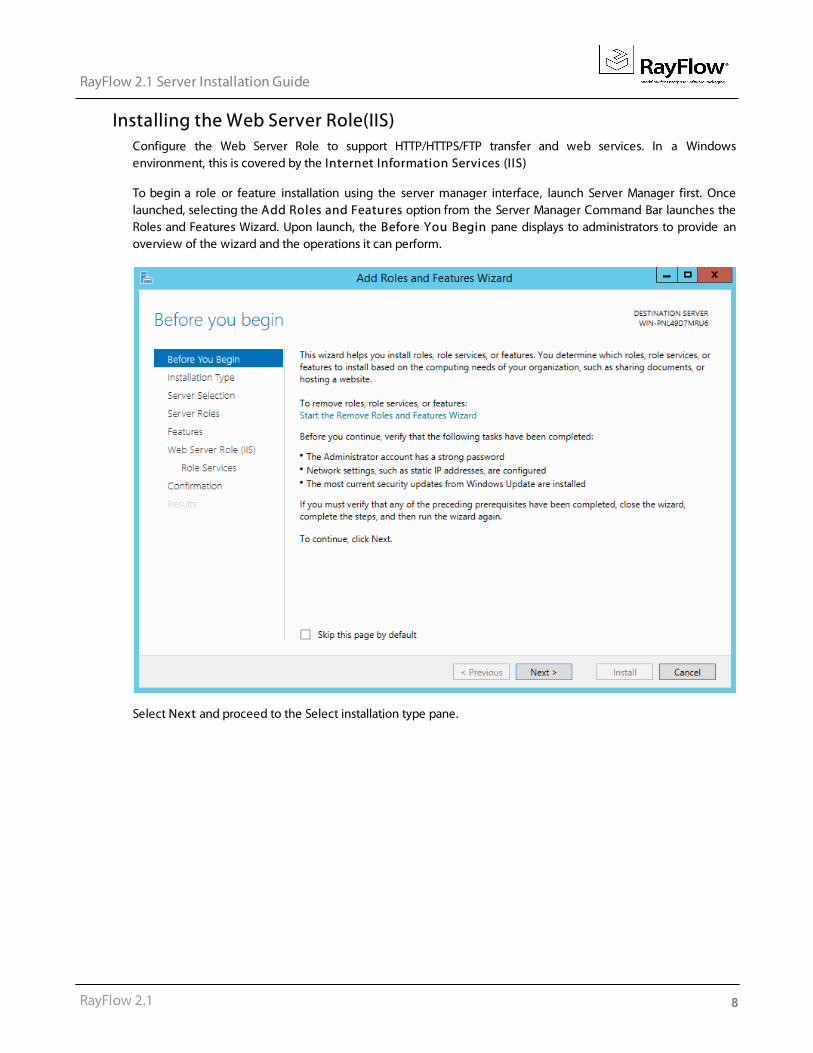
Installing the Web Server Role(IIS)Configure the Web Server Role to support HTTP/HTTPS/FTP transfer and web services. In a Windowsenvironment, this is covered by the Internet Information Services (IIS)
To begin a role or feature installation using the server manager interface, launch Server Manager first. Oncelaunched, selecting the Add Roles and Features option from the Server Manager Command Bar launches theRoles and Features Wizard. Upon launch, the Before You Begin pane displays to administrators to provide anoverview of the wizard and the operations it can perform.
Select Next and proceed to the Select installation type pane.
9
RayFlow 2.1 Server Installation Guide
RayFlow 2.1
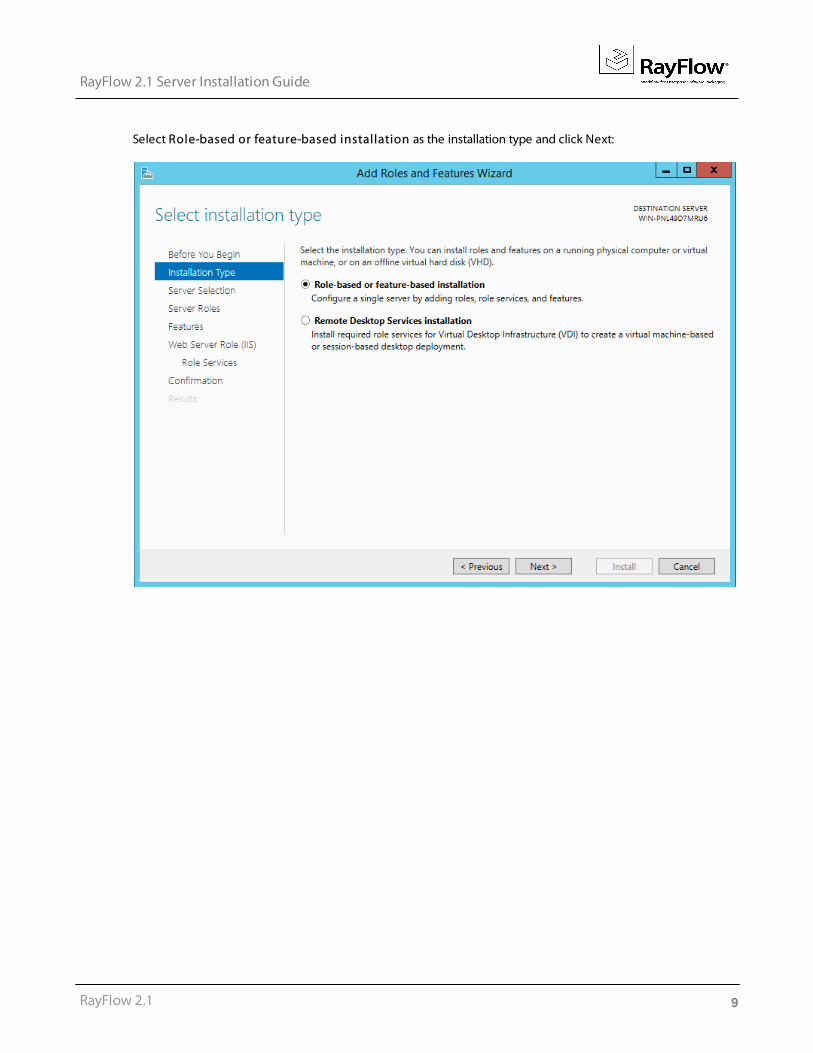
Select Role-based or feature-based installation as the installation type and click Next:
10
RayFlow 2.1 Server Installation Guide
RayFlow 2.1
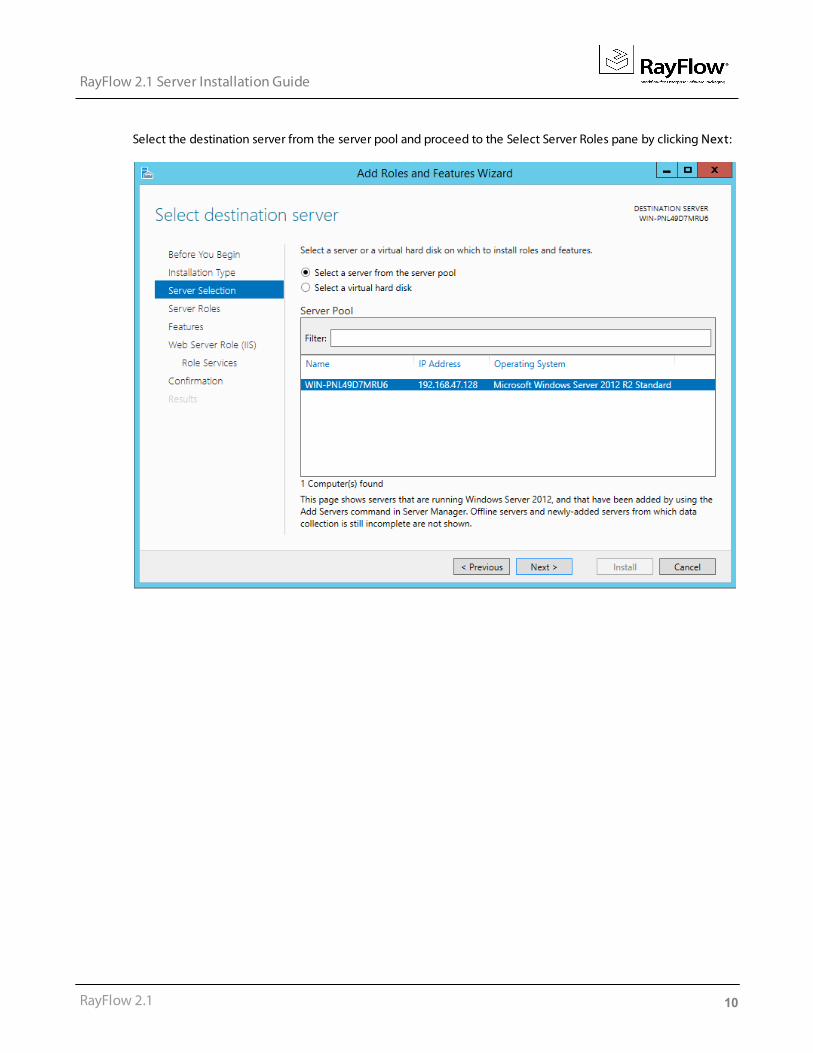
Select the destination server from the server pool and proceed to the Select Server Roles pane by clicking Next:
11
RayFlow 2.1 Server Installation Guide
RayFlow 2.1
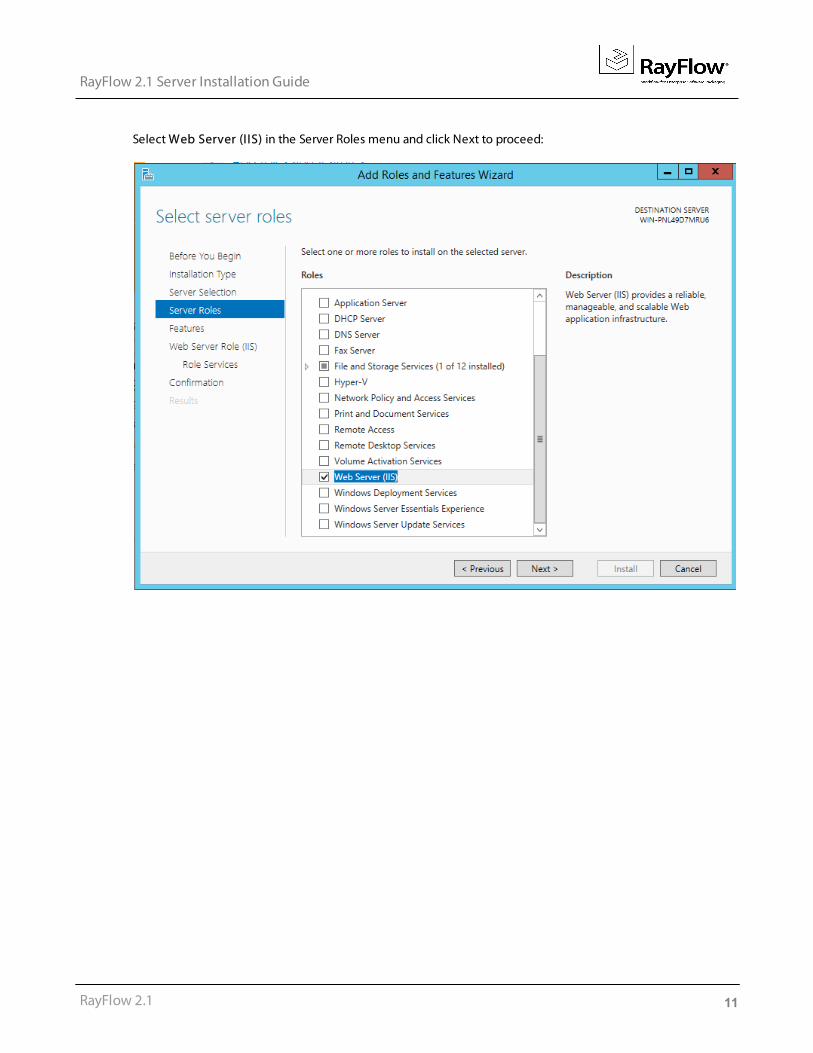
Select Web Server (IIS) in the Server Roles menu and click Next to proceed:

12
RayFlow 2.1 Server Installation Guide
RayFlow 2.1
On the Features window, expand the .NET Framework 4.5 Features and then select ASP.NET 4.5
13
RayFlow 2.1 Server Installation Guide
RayFlow 2.1
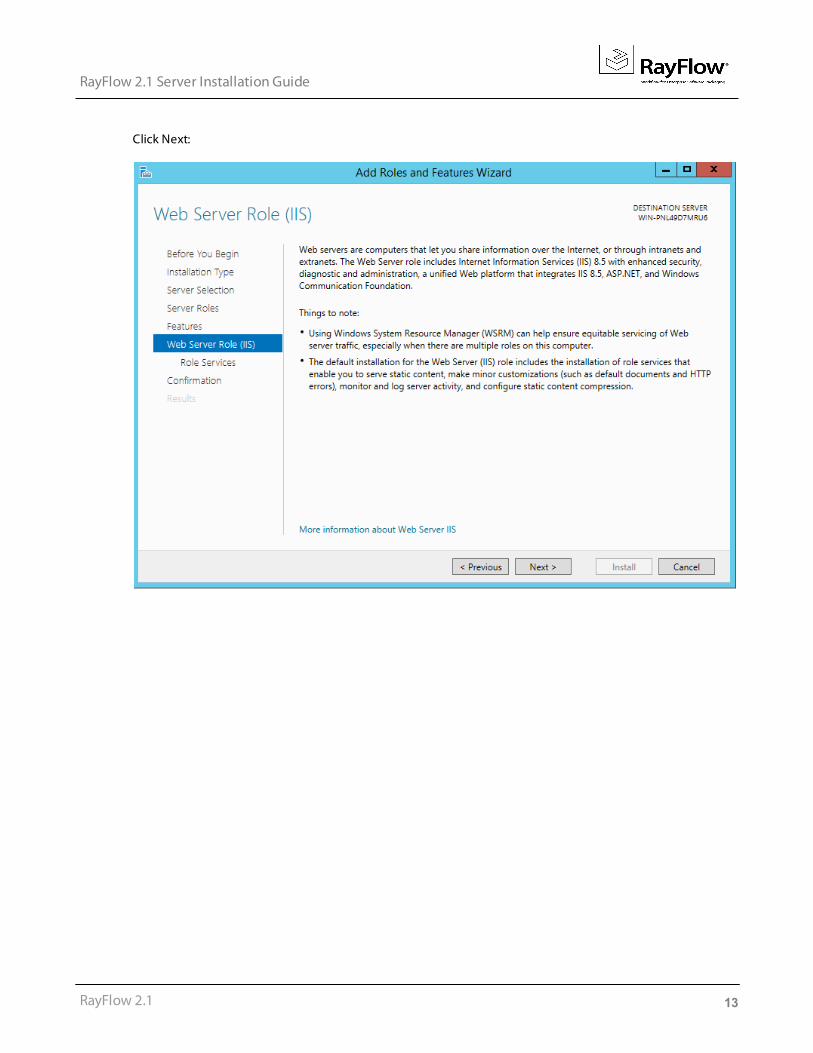
Click Next:
14
RayFlow 2.1 Server Installation Guide
RayFlow 2.1
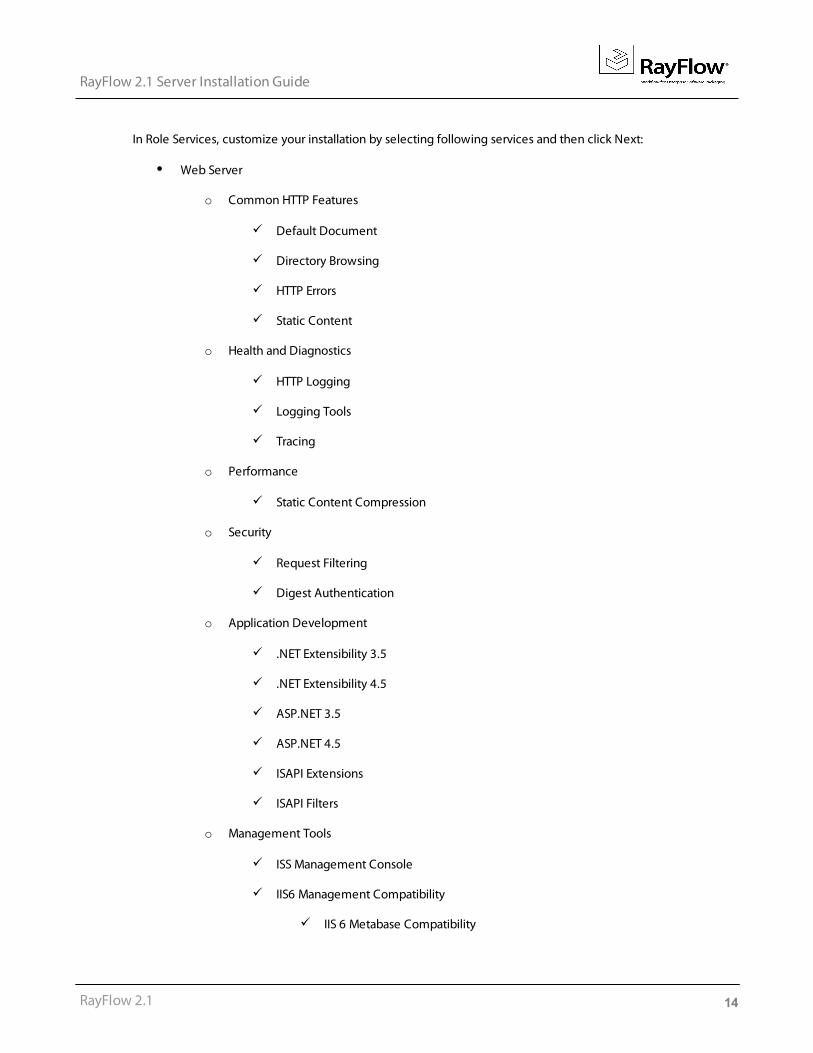
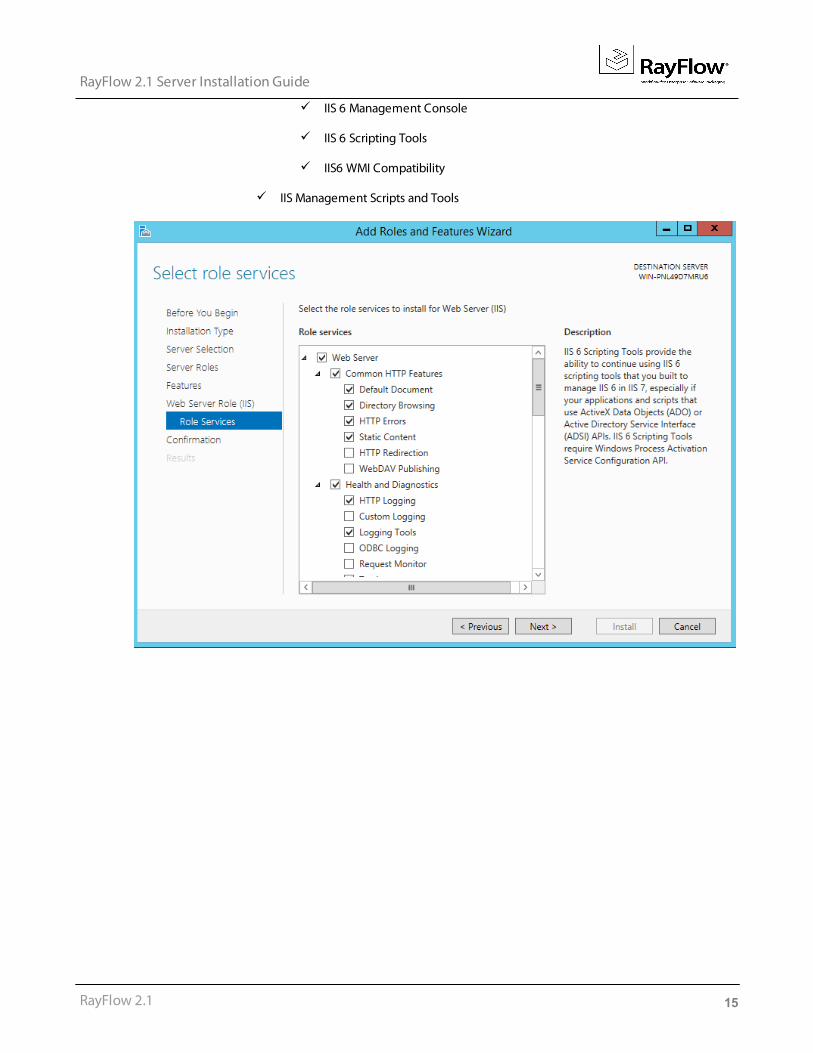
In Role Services, customize your installation by selecting following services and then click Next:
Web Server
o Common HTTP Features
Default Document
Directory Browsing
HTTP Errors
Static Content
o Health and Diagnostics
HTTP Logging
Logging Tools
Tracing
o Performance
Static Content Compression
o Security
Request Filtering
Digest Authentication
o Application Development
.NET Extensibility 3.5
.NET Extensibility 4.5
ASP.NET 3.5
ASP.NET 4.5
ISAPI Extensions
ISAPI Filters
o Management Tools
ISS Management Console
IIS6 Management Compatibility
IIS 6 Metabase Compatibility
15
RayFlow 2.1 Server Installation Guide
RayFlow 2.1
IIS 6 Management Console
IIS 6 Scripting Tools
IIS6 WMI Compatibility
IIS Management Scripts and Tools
16
RayFlow 2.1 Server Installation Guide
RayFlow 2.1
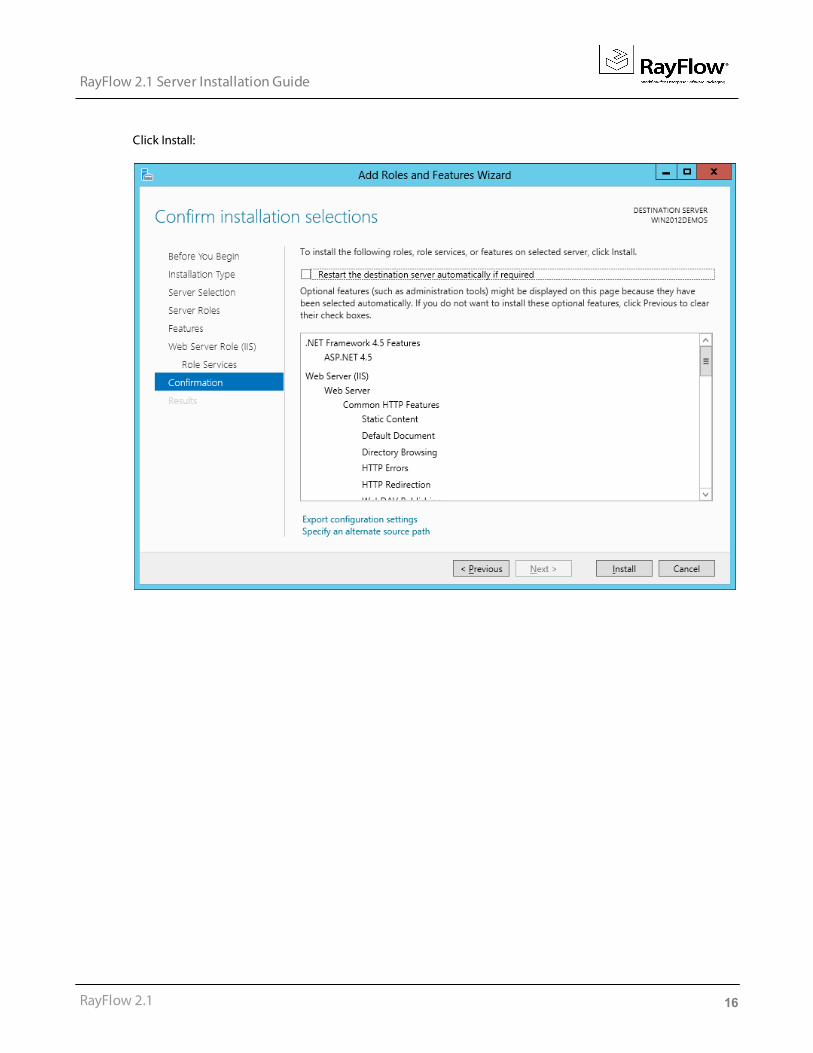
Click Install:
17
RayFlow 2.1 Server Installation Guide
RayFlow 2.1
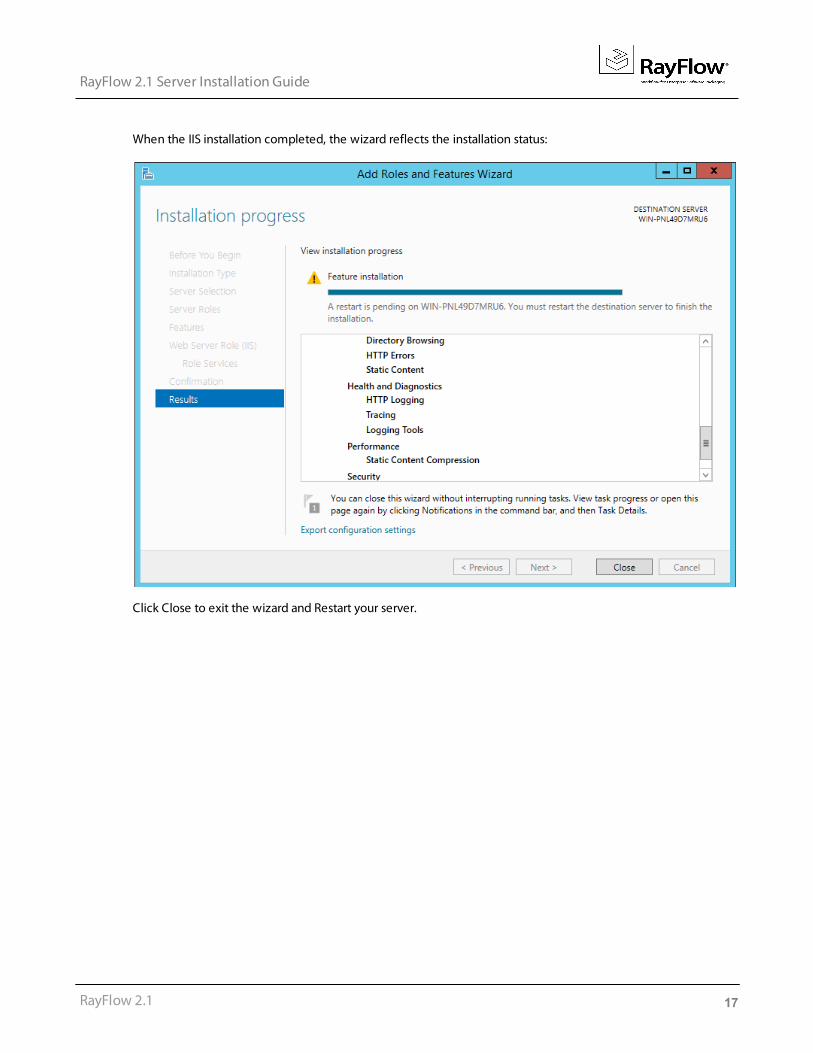
When the IIS installation completed, the wizard reflects the installation status:
Click Close to exit the wizard and Restart your server.
18
RayFlow 2.1 Server Installation Guide
RayFlow 2.1
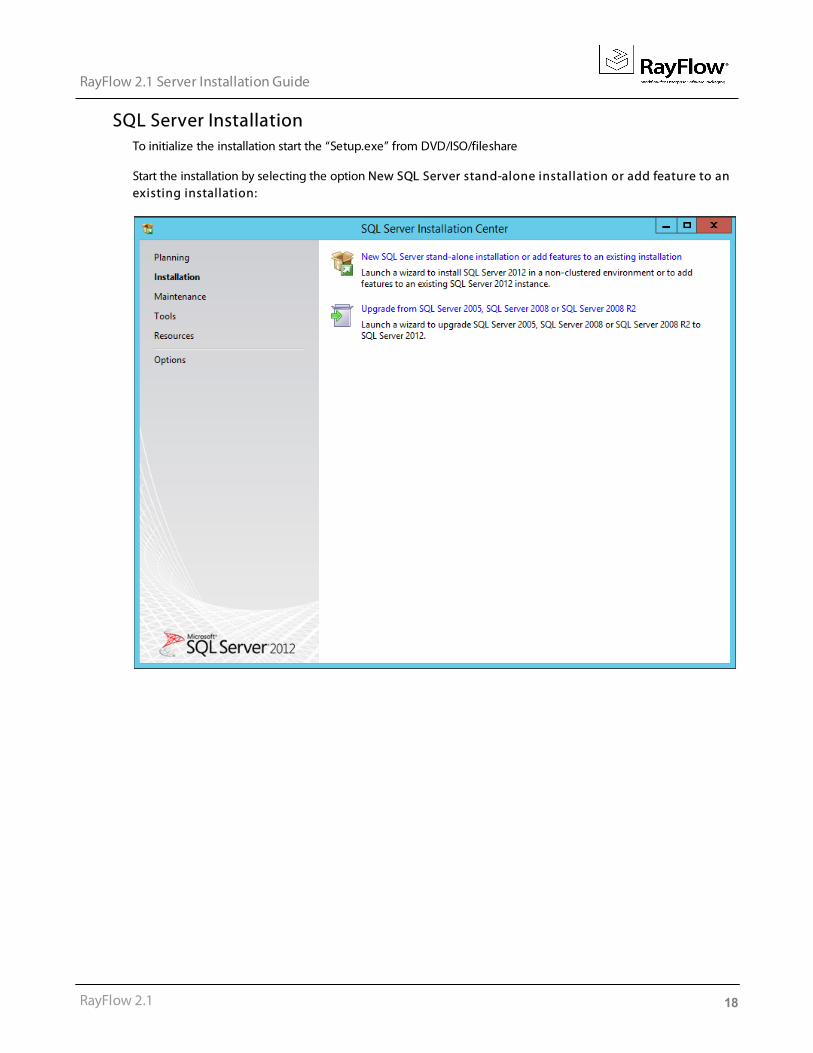
SQL Server InstallationTo initialize the installation start the “Setup.exe” from DVD/ISO/fileshare
Start the installation by selecting the option New SQL Server stand-alone installation or add feature to anexisting installation:
19
RayFlow 2.1 Server Installation Guide
RayFlow 2.1
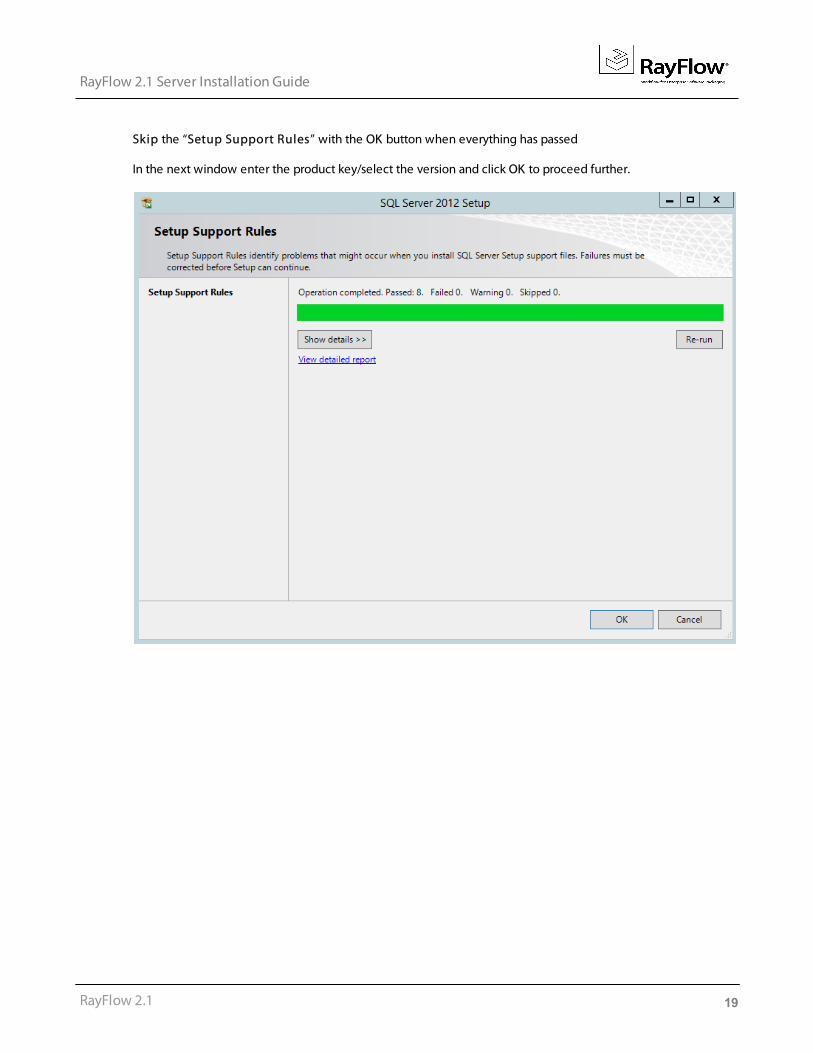
Skip the “Setup Support Rules” with the OK button when everything has passed
In the next window enter the product key/select the version and click OK to proceed further.
20
RayFlow 2.1 Server Installation Guide
RayFlow 2.1
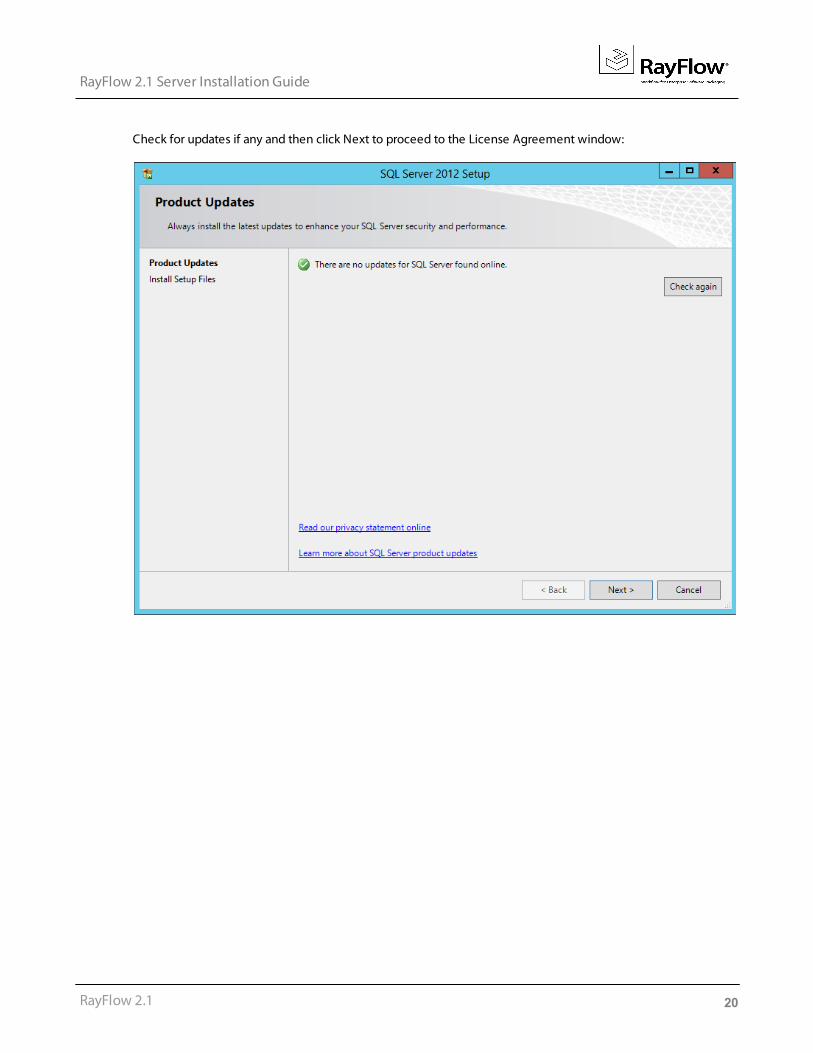
Check for updates if any and then click Next to proceed to the License Agreement window:

21
RayFlow 2.1 Server Installation Guide
RayFlow 2.1
Accept the license terms and proceed further with Next:
22
RayFlow 2.1 Server Installation Guide
RayFlow 2.1
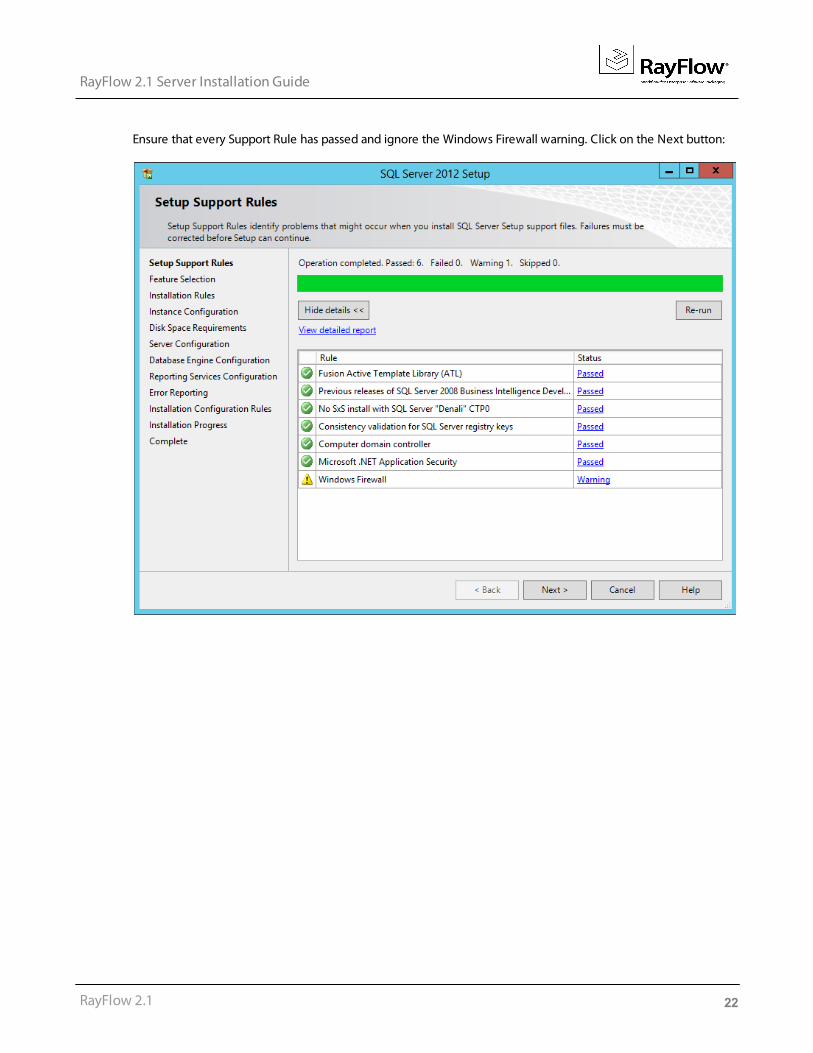
Ensure that every Support Rule has passed and ignore the Windows Firewall warning. Click on the Next button:
23
RayFlow 2.1 Server Installation Guide
RayFlow 2.1
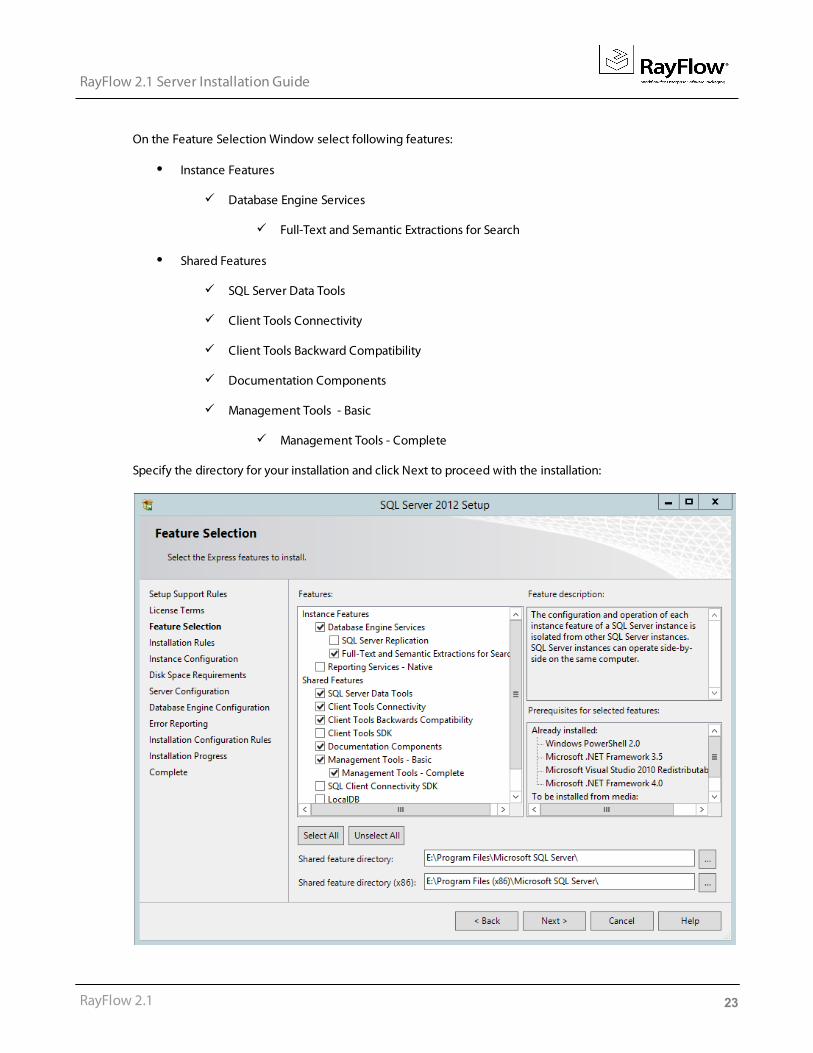
On the Feature Selection Window select following features:
Instance Features
Database Engine Services
Full-Text and Semantic Extractions for Search
Shared Features
SQL Server Data Tools
Client Tools Connectivity
Client Tools Backward Compatibility
Documentation Components
Management Tools - Basic
Management Tools - Complete
Specify the directory for your installation and click Next to proceed with the installation:

24
RayFlow 2.1 Server Installation Guide
RayFlow 2.1
In the next step verify the installation Rules for Passed or Not Applicable and go on with the Next to the instanceConfiguration.
Keep the configuration to the Default instance, settings and directory:
25
RayFlow 2.1 Server Installation Guide
RayFlow 2.1
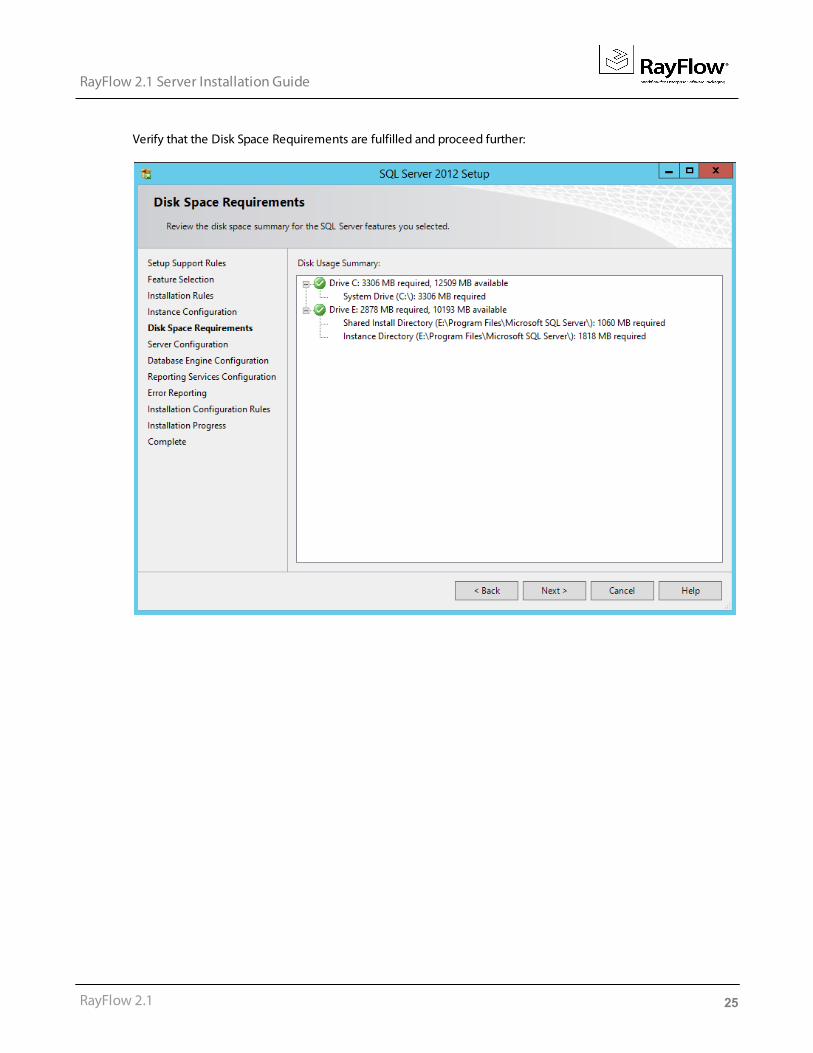
Verify that the Disk Space Requirements are fulfilled and proceed further:
26
RayFlow 2.1 Server Installation Guide
RayFlow 2.1
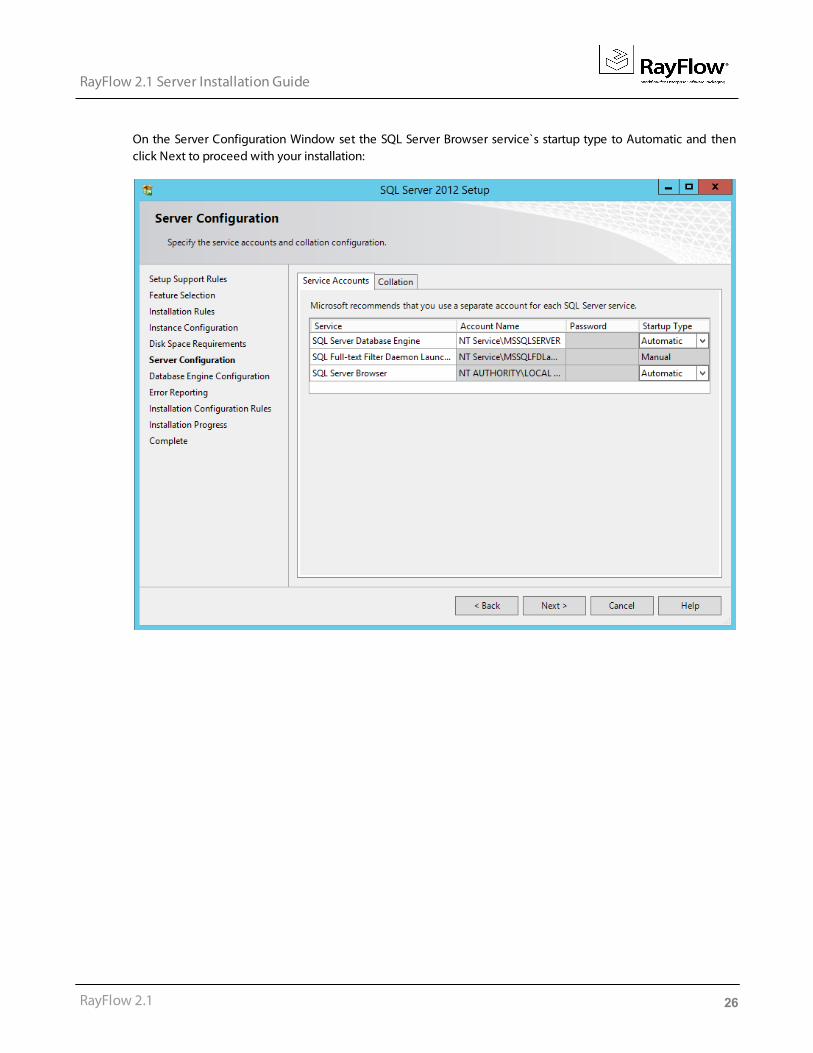
On the Server Configuration Window set the SQL Server Browser service`s startup type to Automatic and thenclick Next to proceed with your installation:
27
RayFlow 2.1 Server Installation Guide
RayFlow 2.1
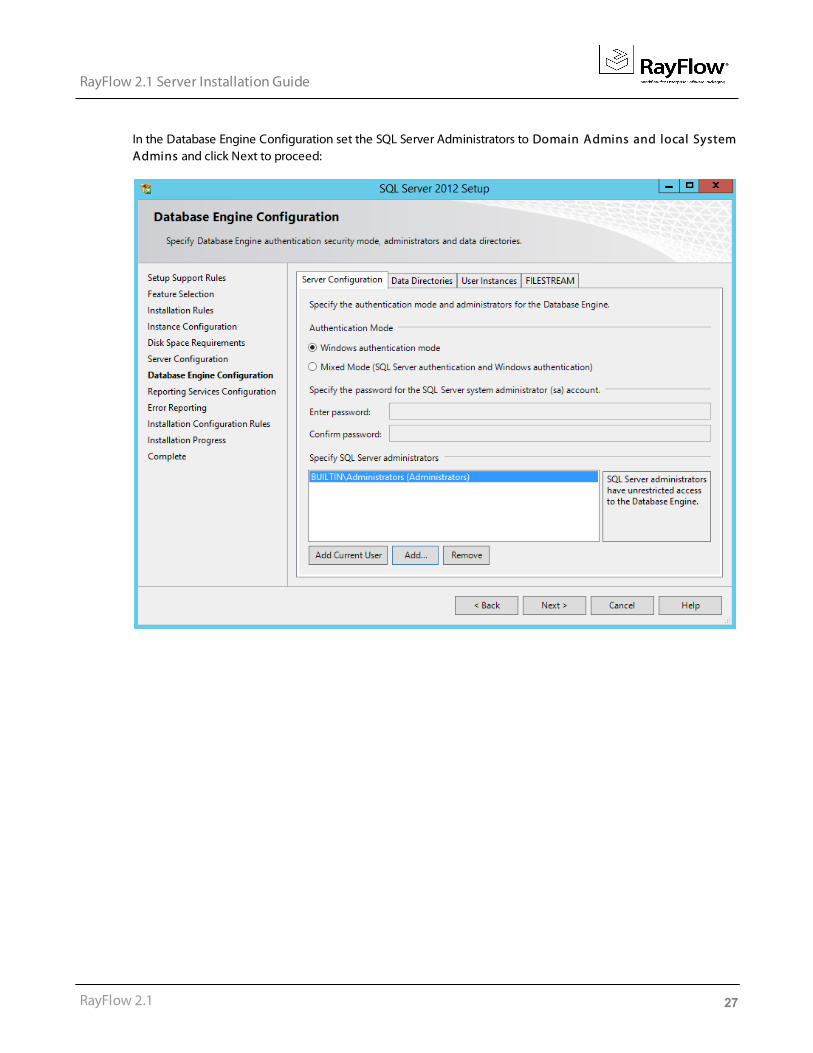
In the Database Engine Configuration set the SQL Server Administrators to Domain Admins and local SystemAdmins and click Next to proceed:
28
RayFlow 2.1 Server Installation Guide
RayFlow 2.1
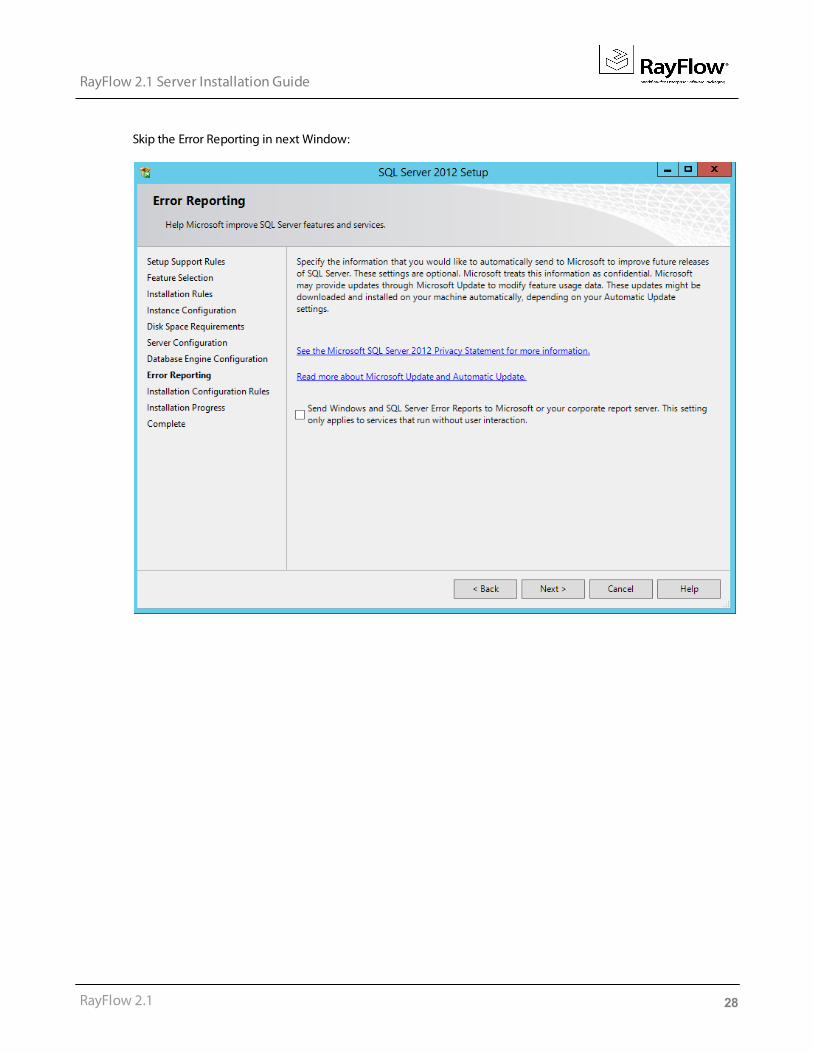
Skip the Error Reporting in next Window:
29
RayFlow 2.1 Server Installation Guide
RayFlow 2.1
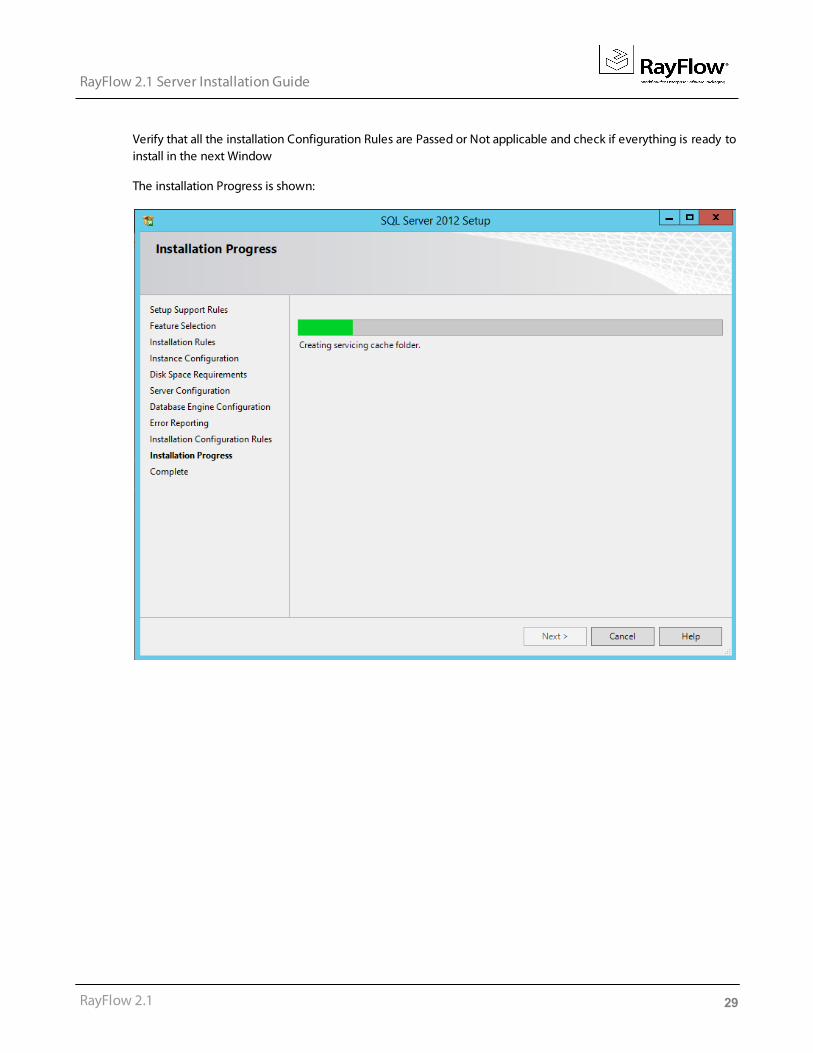
Verify that all the installation Configuration Rules are Passed or Not applicable and check if everything is ready toinstall in the next Window
The installation Progress is shown:
30
RayFlow 2.1 Server Installation Guide
RayFlow 2.1
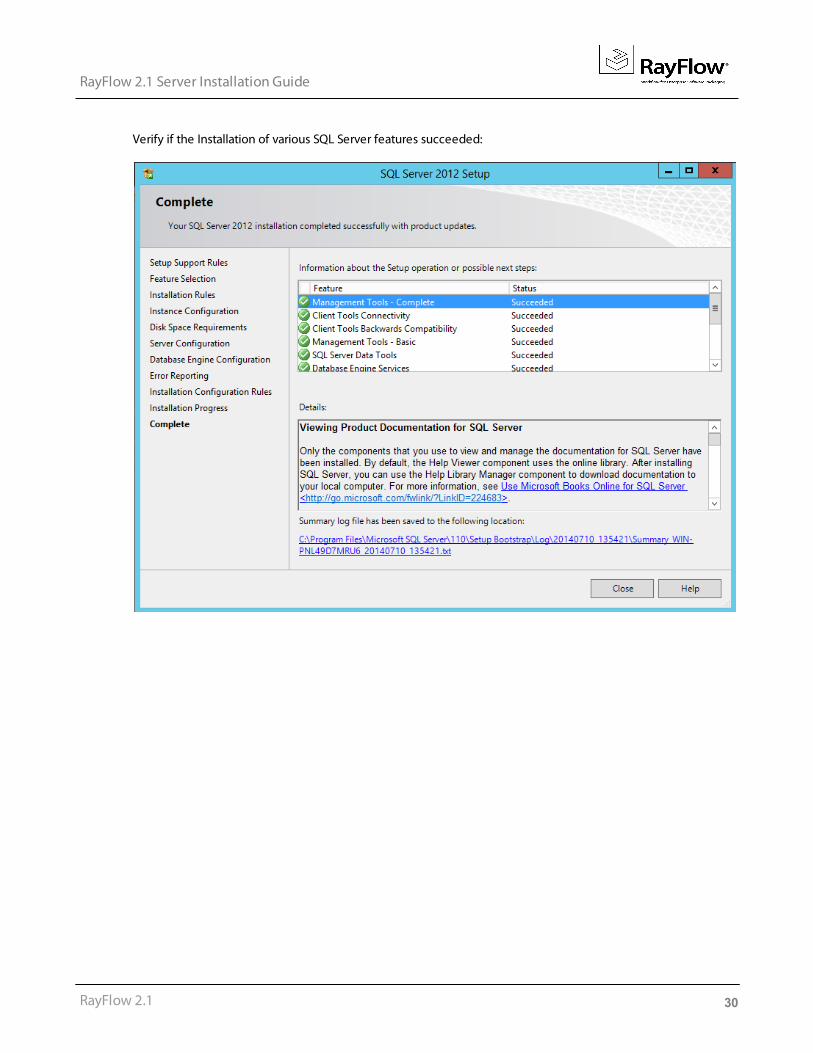
Verify if the Installation of various SQL Server features succeeded:

31
RayFlow 2.1 Server Installation Guide
RayFlow 2.1
Installing Crystral ReportsInstallation of Crystal Reports is only required for users who are using Crystal Reports for Reporting
Install Crystal Reports 12.0 by running the following administrative command line:
msiexec.exe /I .\CRRuntime_12_0_mlb.msi /quiet /l*vx E:\crruntime.log
Crystal Reports will use the IIS’s DefaultAppPool application pool as well as create the following IIS virtualdirectory and application:
32
RayFlow 2.1 Server Installation Guide
RayFlow 2.1
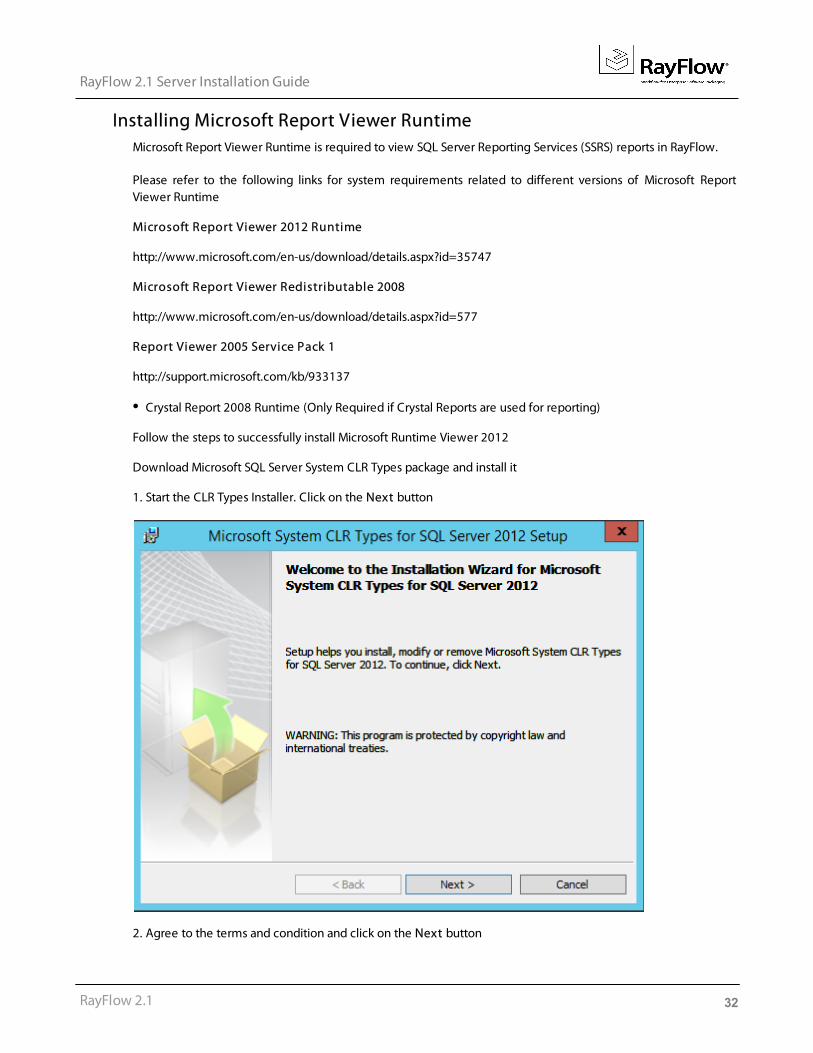
Installing Microsoft Report Viewer RuntimeMicrosoft Report Viewer Runtime is required to view SQL Server Reporting Services (SSRS) reports in RayFlow.
Please refer to the following links for system requirements related to different versions of Microsoft ReportViewer Runtime
Microsoft Report Viewer 2012 Runtime
http://www.microsoft.com/en-us/download/details.aspx?id=35747
Microsoft Report Viewer Redistributable 2008
http://www.microsoft.com/en-us/download/details.aspx?id=577
Report Viewer 2005 Service Pack 1
http://support.microsoft.com/kb/933137
Crystal Report 2008 Runtime (Only Required if Crystal Reports are used for reporting)
Follow the steps to successfully install Microsoft Runtime Viewer 2012
Download Microsoft SQL Server System CLR Types package and install it
1. Start the CLR Types Installer. Click on the Next button
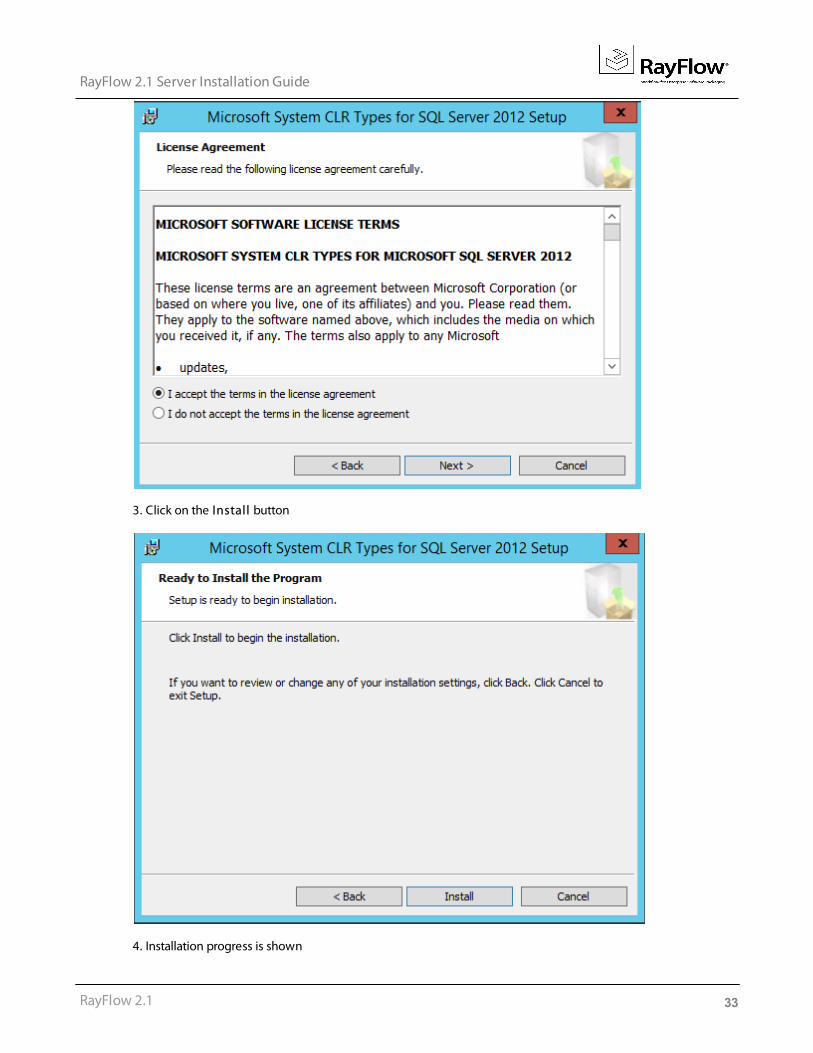
2. Agree to the terms and condition and click on the Next button
33
RayFlow 2.1 Server Installation Guide
RayFlow 2.1
3. Click on the Install button
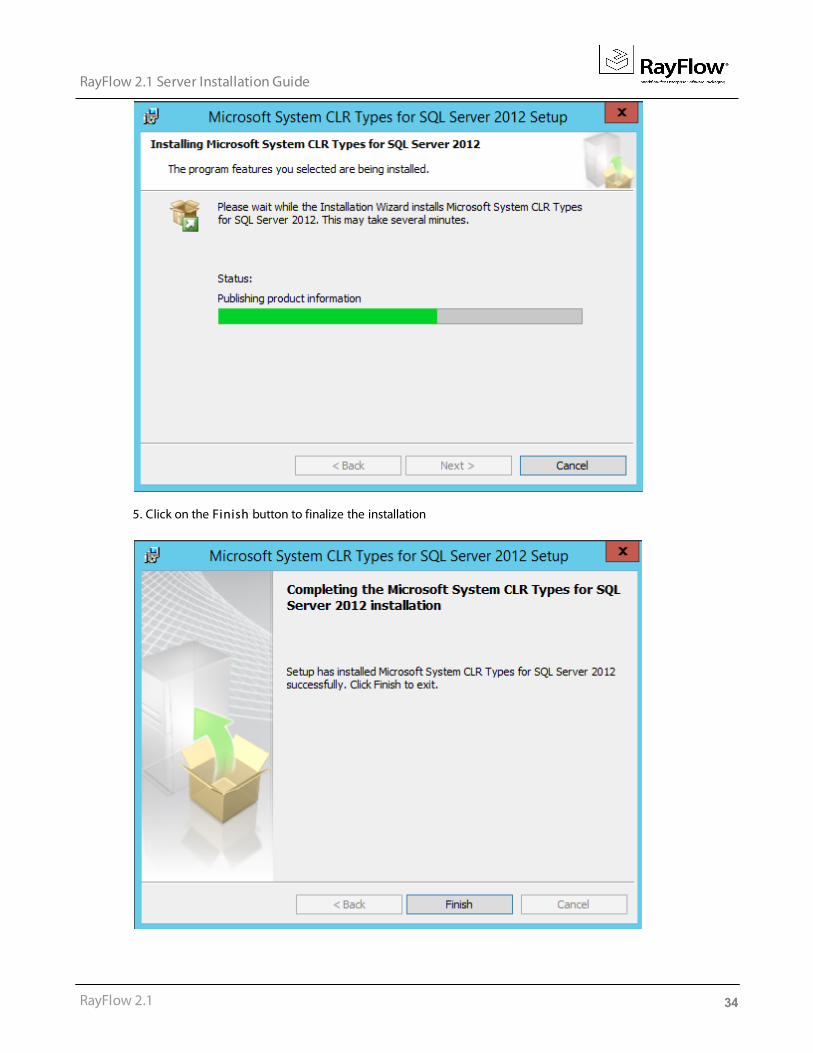
4. Installation progress is shown
34
RayFlow 2.1 Server Installation Guide
RayFlow 2.1
5. Click on the Finish button to finalize the installation
35
RayFlow 2.1 Server Installation Guide
RayFlow 2.1
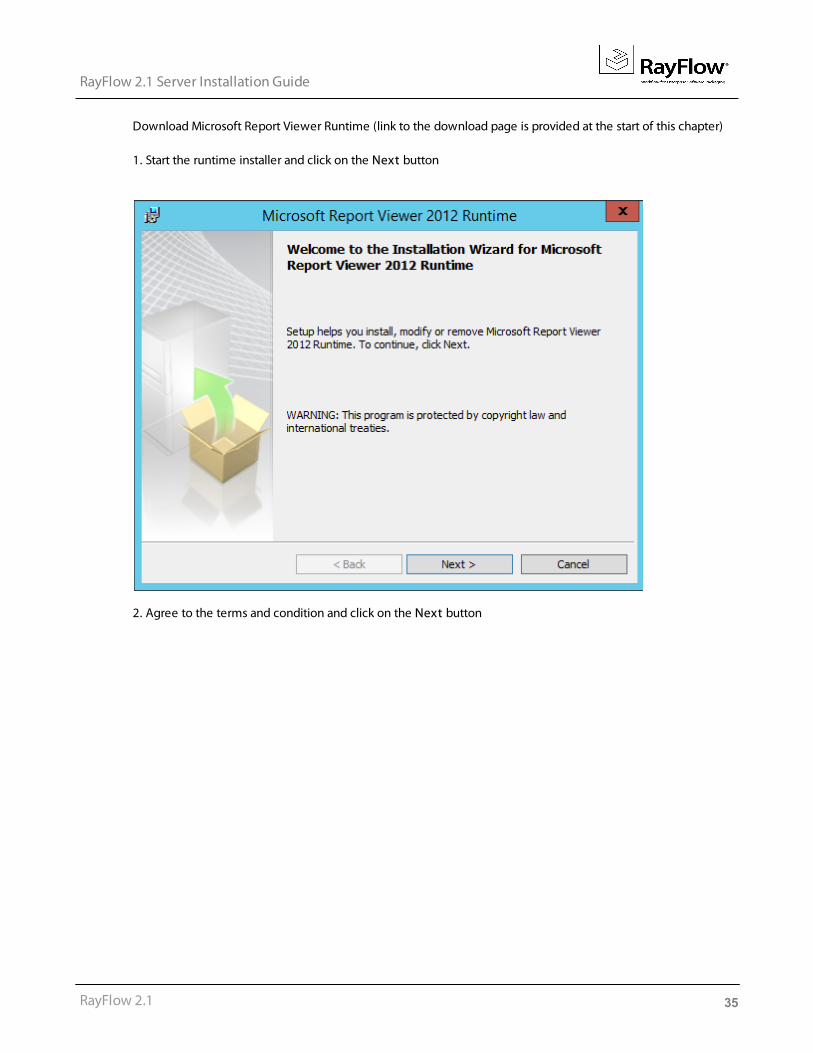
Download Microsoft Report Viewer Runtime (link to the download page is provided at the start of this chapter)
1. Start the runtime installer and click on the Next button
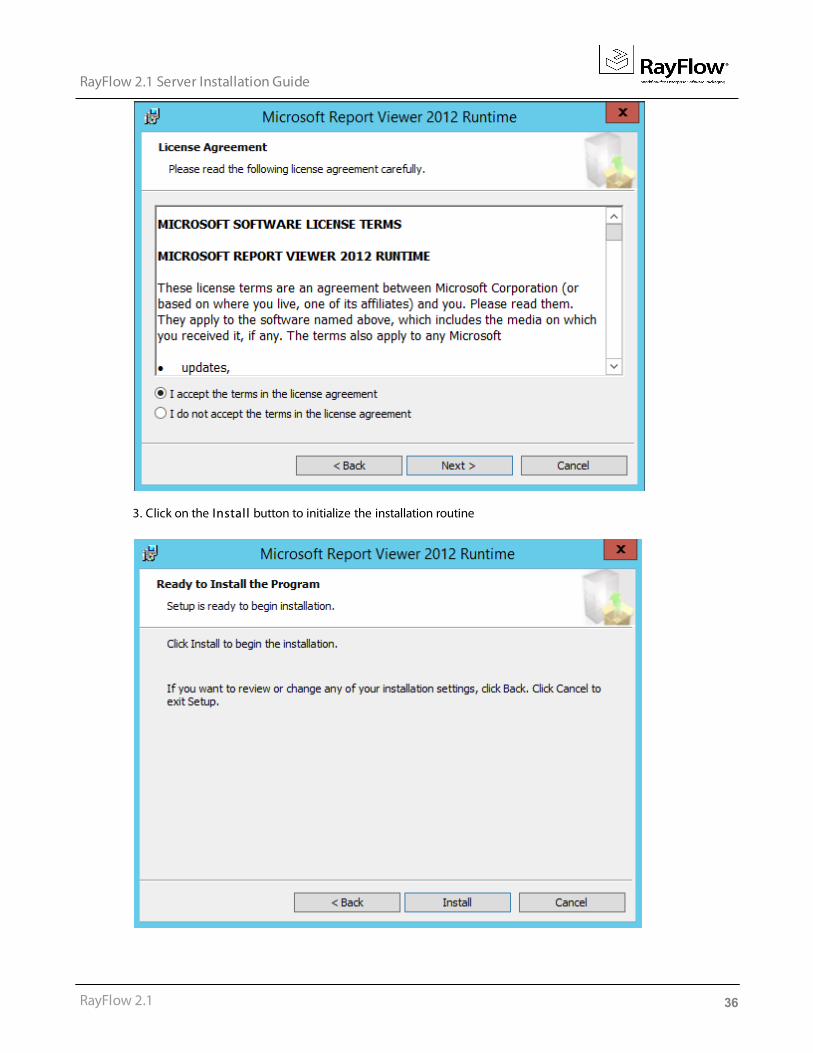
2. Agree to the terms and condition and click on the Next button
36
RayFlow 2.1 Server Installation Guide
RayFlow 2.1
3. Click on the Install button to initialize the installation routine
37
RayFlow 2.1 Server Installation Guide
RayFlow 2.1
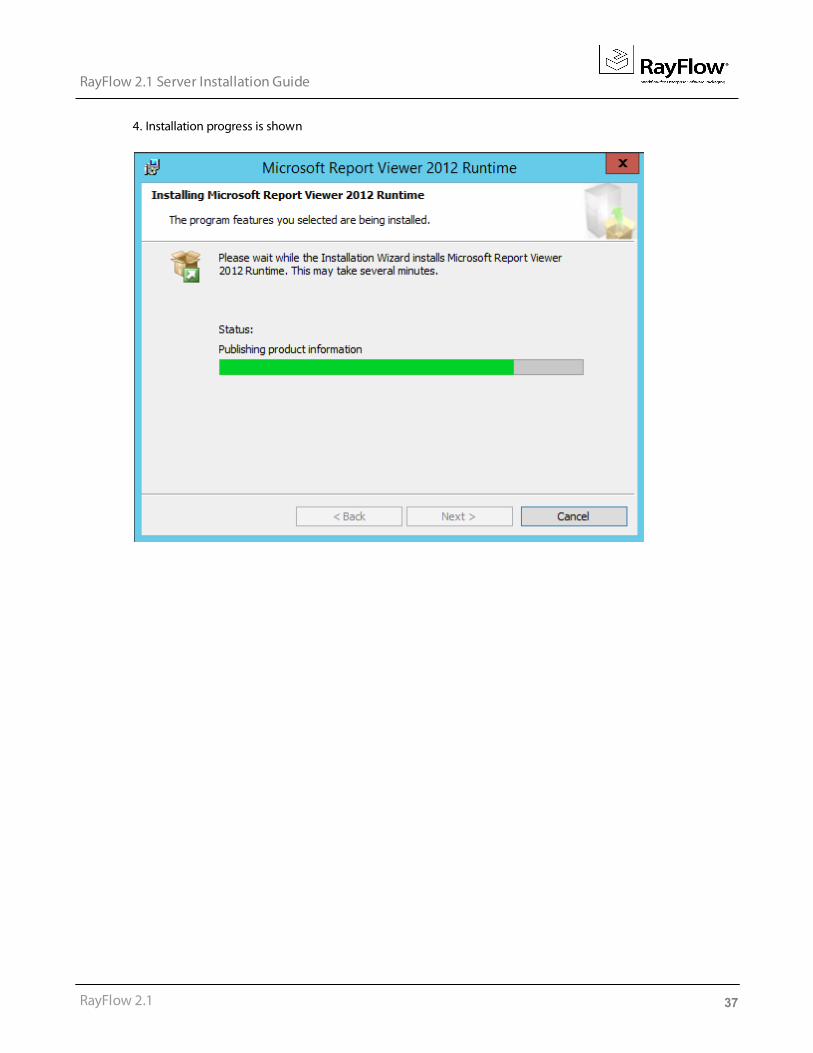
4. Installation progress is shown
38
RayFlow 2.1 Server Installation Guide
RayFlow 2.1
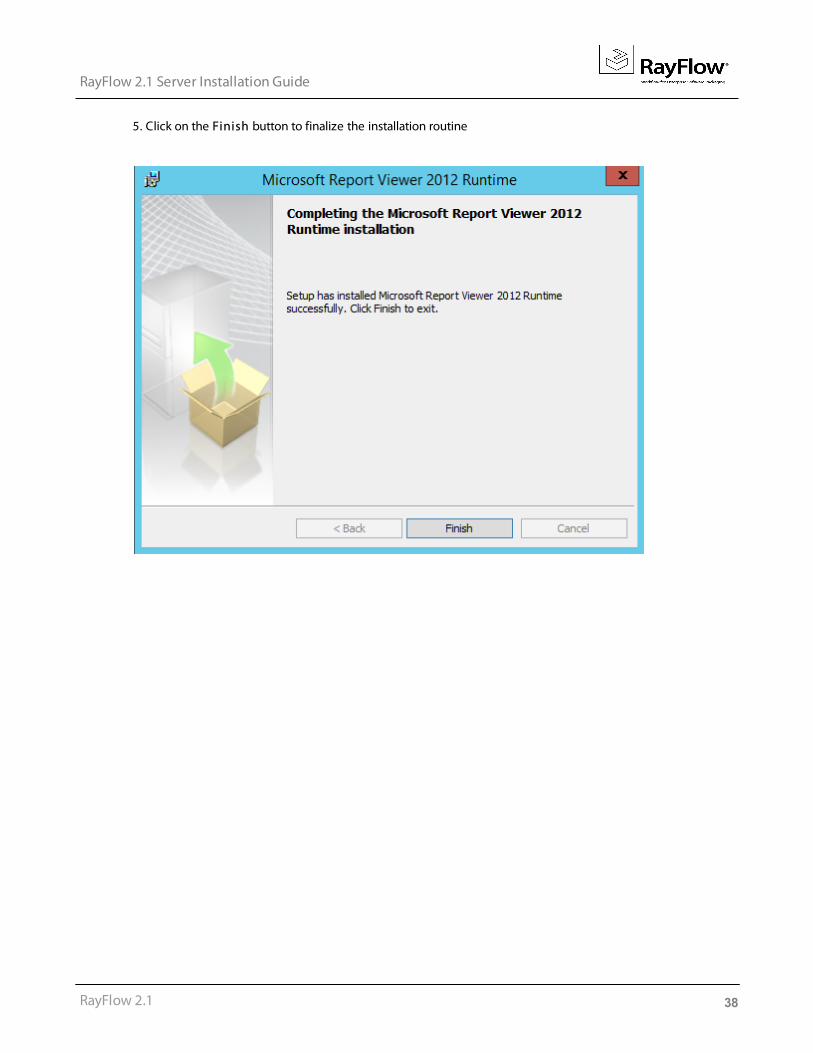
5. Click on the Finish button to finalize the installation routine
39
RayFlow 2.1 Server Installation Guide
RayFlow 2.1
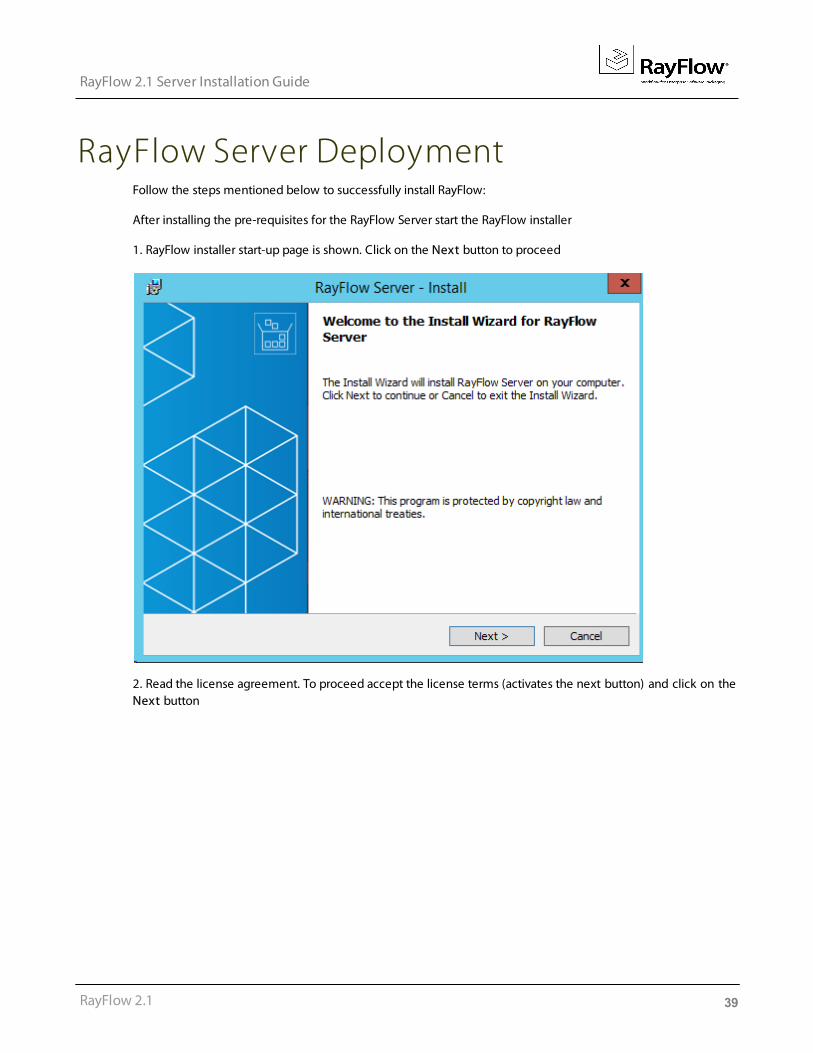
RayFlow Server DeploymentFollow the steps mentioned below to successfully install RayFlow:
After installing the pre-requisites for the RayFlow Server start the RayFlow installer
1. RayFlow installer start-up page is shown. Click on the Next button to proceed
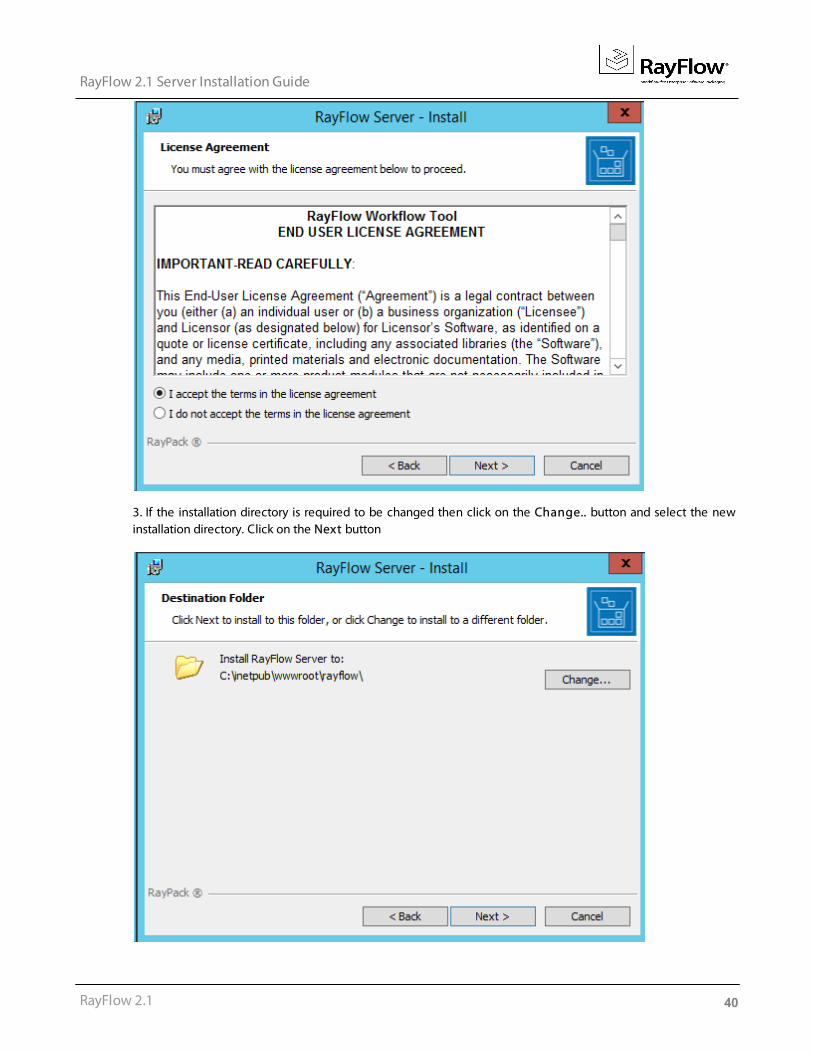
2. Read the license agreement. To proceed accept the license terms (activates the next button) and click on theNext button
40
RayFlow 2.1 Server Installation Guide
RayFlow 2.1
3. If the installation directory is required to be changed then click on the Change.. button and select the newinstallation directory. Click on the Next button
41
RayFlow 2.1 Server Installation Guide
RayFlow 2.1
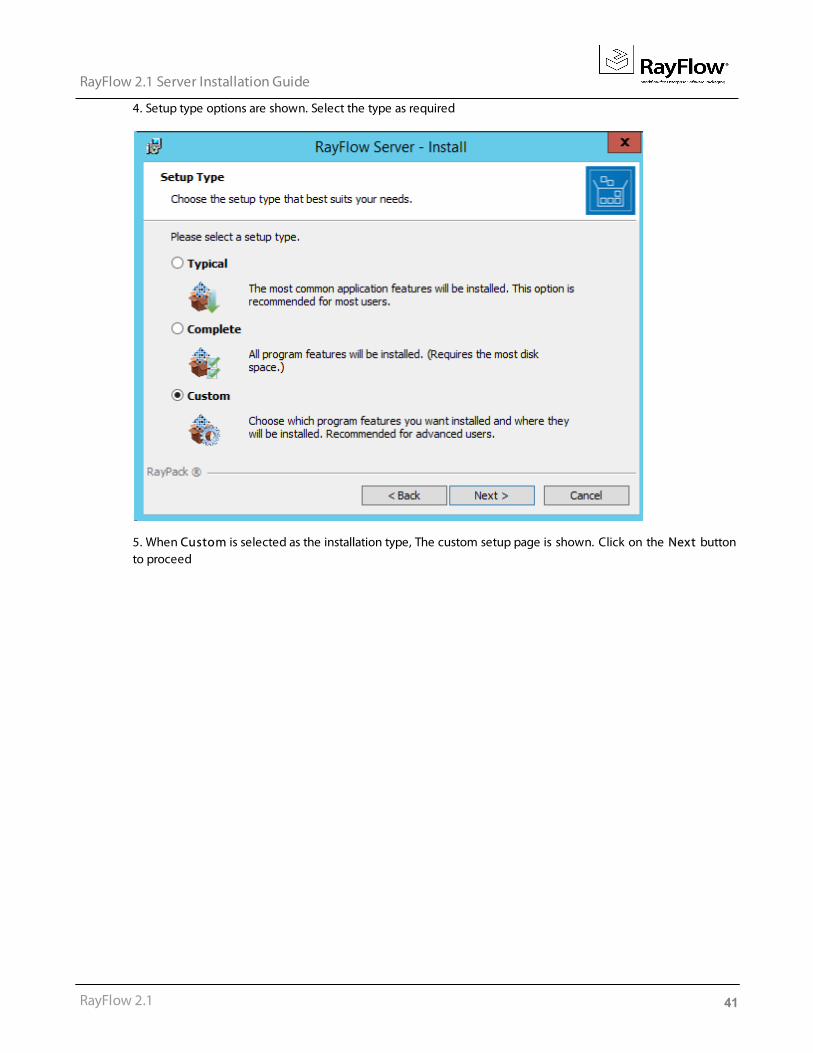
4. Setup type options are shown. Select the type as required
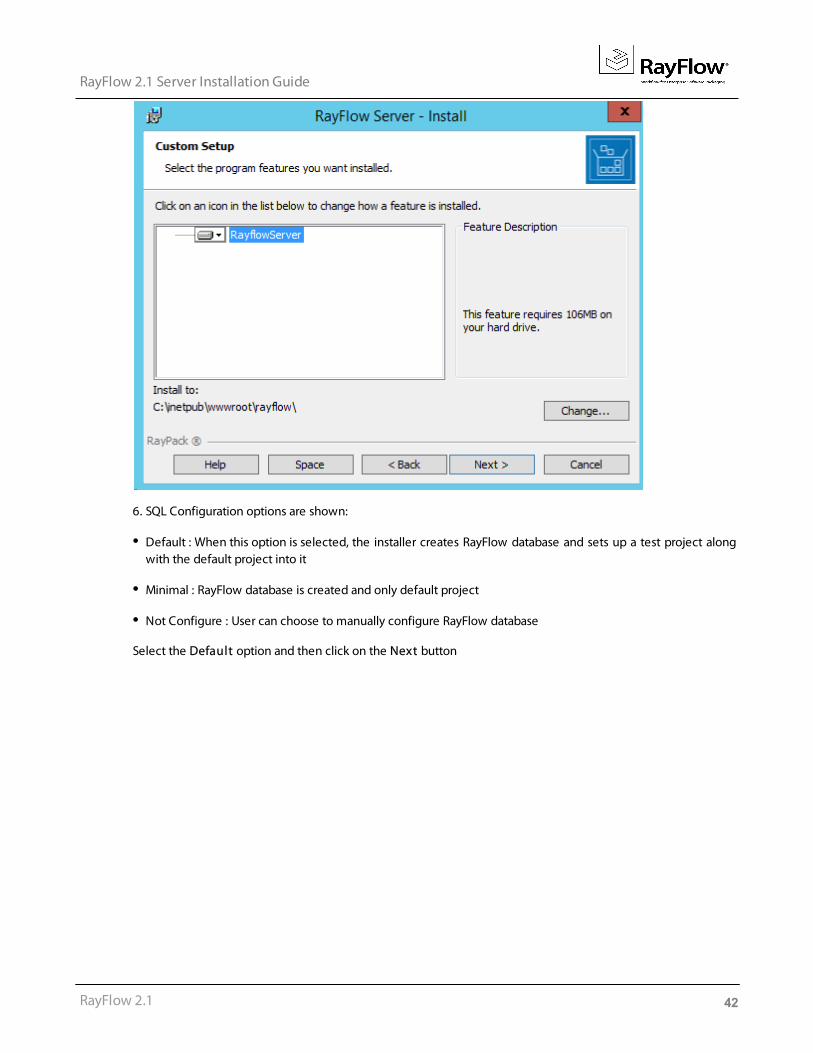
5. When Custom is selected as the installation type, The custom setup page is shown. Click on the Next buttonto proceed
42
RayFlow 2.1 Server Installation Guide
RayFlow 2.1
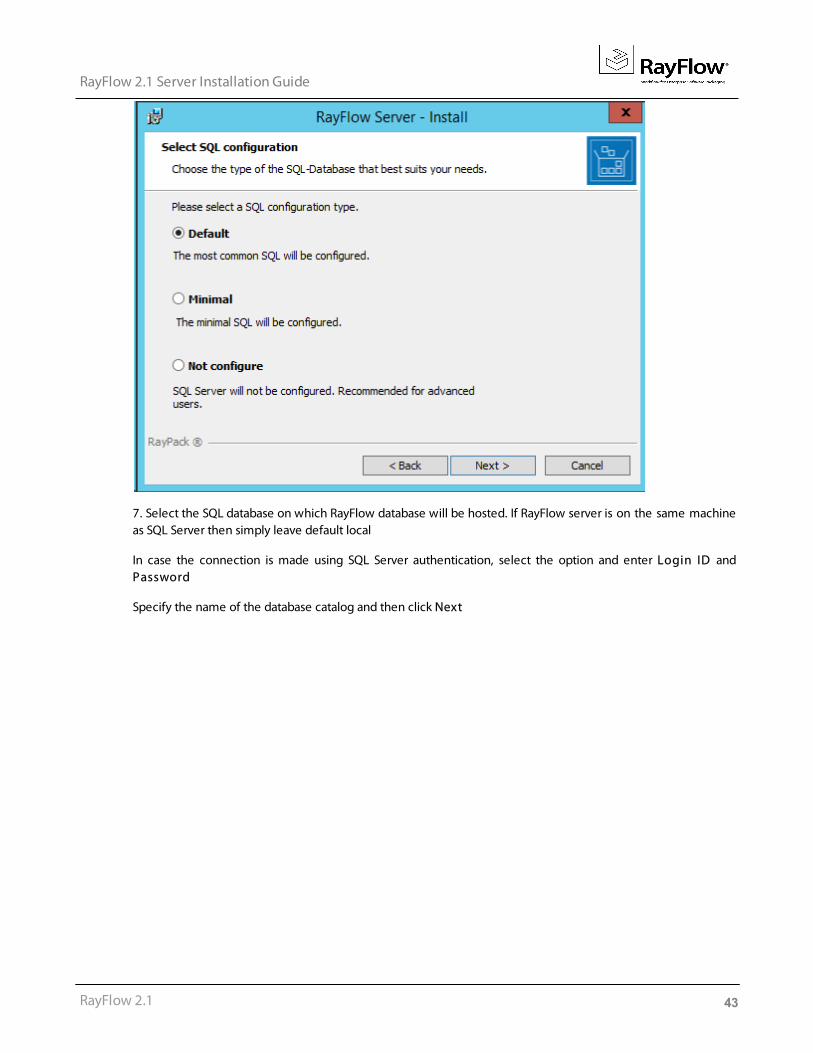
6. SQL Configuration options are shown:
Default : When this option is selected, the installer creates RayFlow database and sets up a test project alongwith the default project into it
Minimal : RayFlow database is created and only default project
Not Configure : User can choose to manually configure RayFlow database
Select the Default option and then click on the Next button
43
RayFlow 2.1 Server Installation Guide
RayFlow 2.1
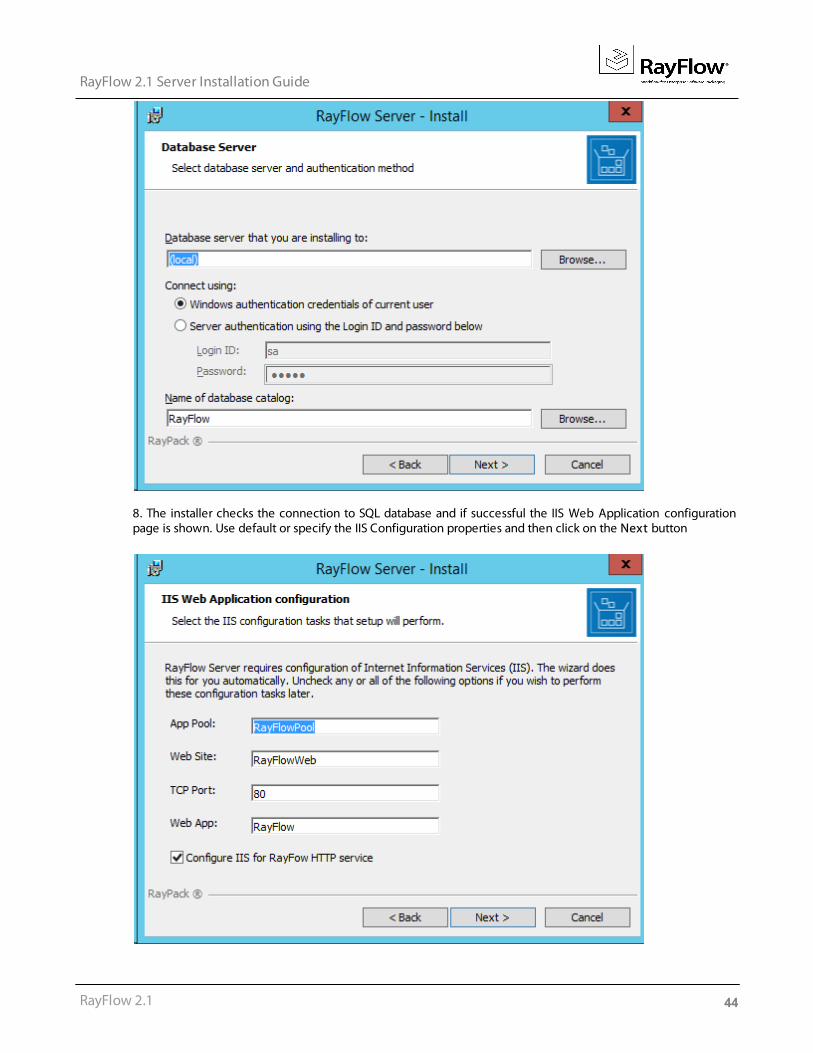
7. Select the SQL database on which RayFlow database will be hosted. If RayFlow server is on the same machineas SQL Server then simply leave default local
In case the connection is made using SQL Server authentication, select the option and enter Login ID andPassword
Specify the name of the database catalog and then click Next
44
RayFlow 2.1 Server Installation Guide
RayFlow 2.1
8. The installer checks the connection to SQL database and if successful the IIS Web Application configurationpage is shown. Use default or specify the IIS Configuration properties and then click on the Next button
45
RayFlow 2.1 Server Installation Guide
RayFlow 2.1
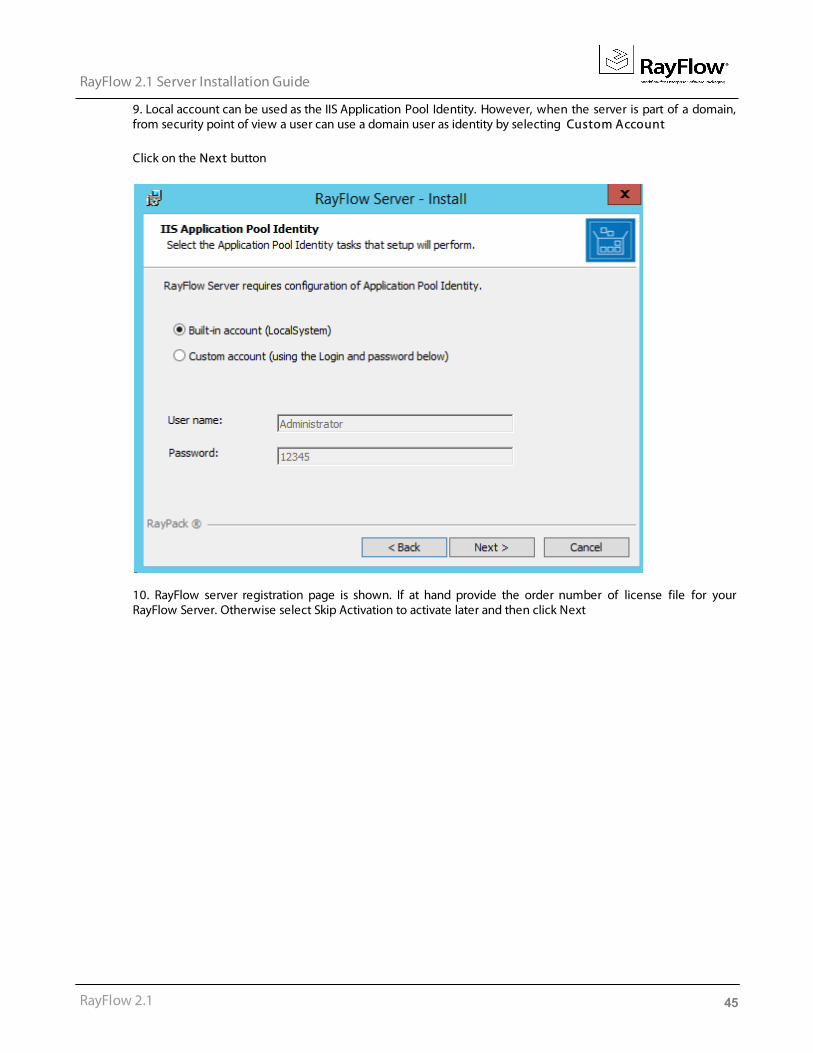
9. Local account can be used as the IIS Application Pool Identity. However, when the server is part of a domain,from security point of view a user can use a domain user as identity by selecting Custom Account
Click on the Next button
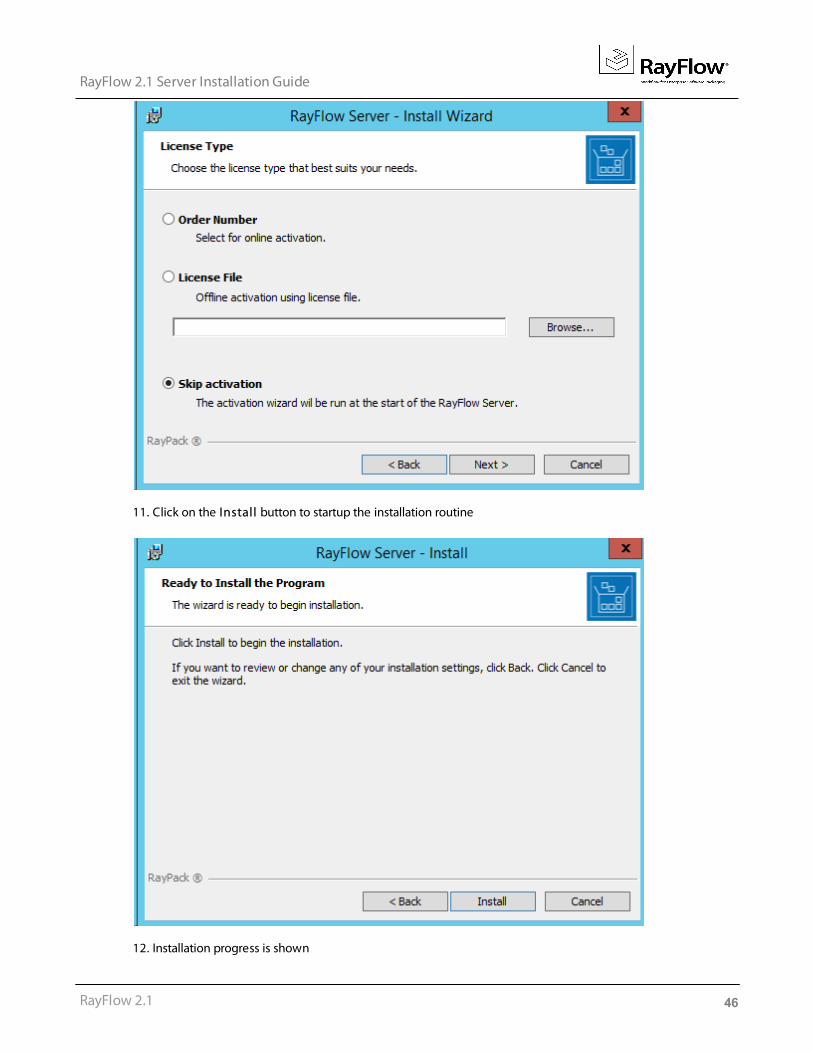
10. RayFlow server registration page is shown. If at hand provide the order number of license file for yourRayFlow Server. Otherwise select Skip Activation to activate later and then click Next
46
RayFlow 2.1 Server Installation Guide
RayFlow 2.1
11. Click on the Install button to startup the installation routine
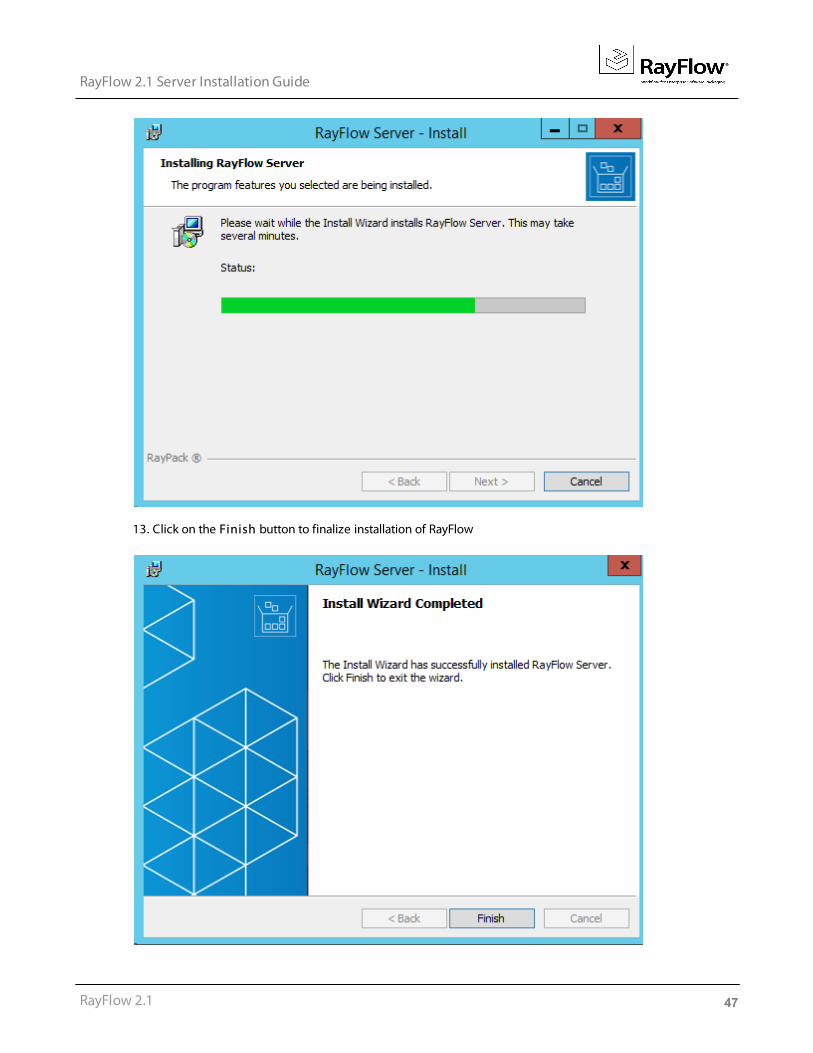
12. Installation progress is shown
47
RayFlow 2.1 Server Installation Guide
RayFlow 2.1
13. Click on the Finish button to finalize installation of RayFlow

48
RayFlow 2.1 Server Installation Guide
RayFlow 2.1
13. Launch RayFlow. The login page is loaded into the view. To continue to work on a project, a user will firstneed to activate RayFlow with a valid licence. For more information on license activation, please refer to ProductActivation chapter of the RayFlow Web User and Administration Guide.
49
RayFlow 2.1 Server Installation Guide
RayFlow 2.1
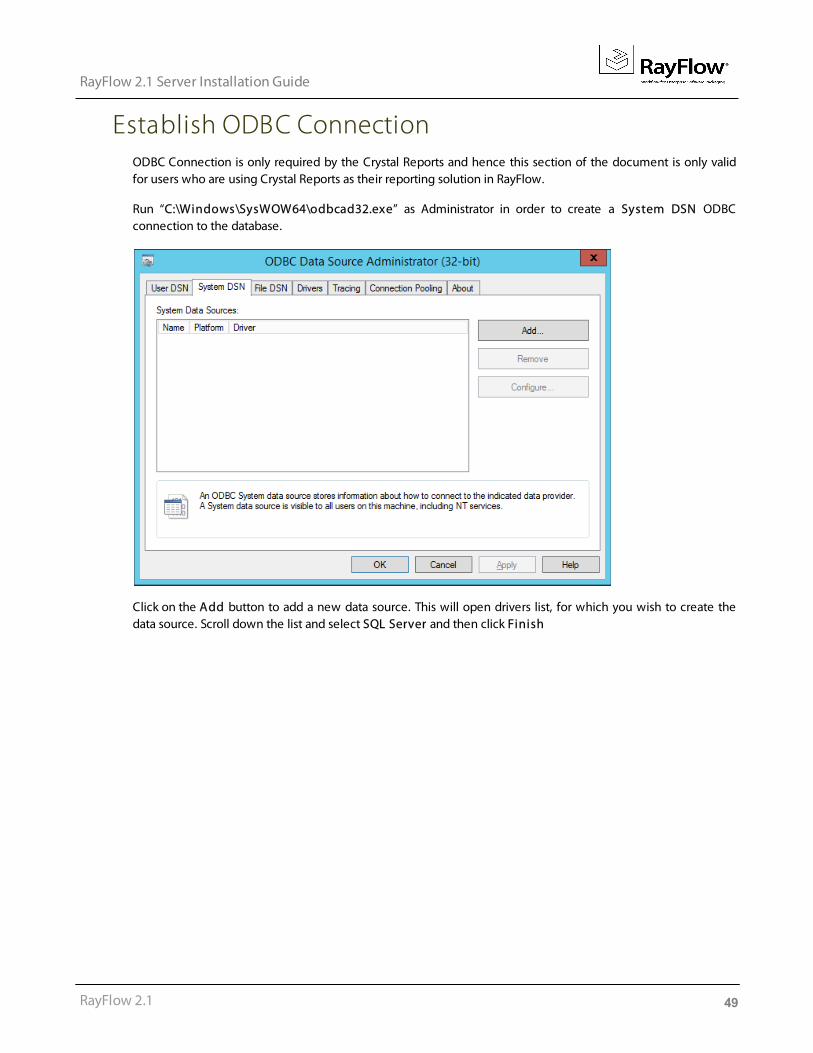
Establish ODBC ConnectionODBC Connection is only required by the Crystal Reports and hence this section of the document is only validfor users who are using Crystal Reports as their reporting solution in RayFlow.
Run “C:\Windows\SysWOW64\odbcad32.exe” as Administrator in order to create a System DSN ODBCconnection to the database.
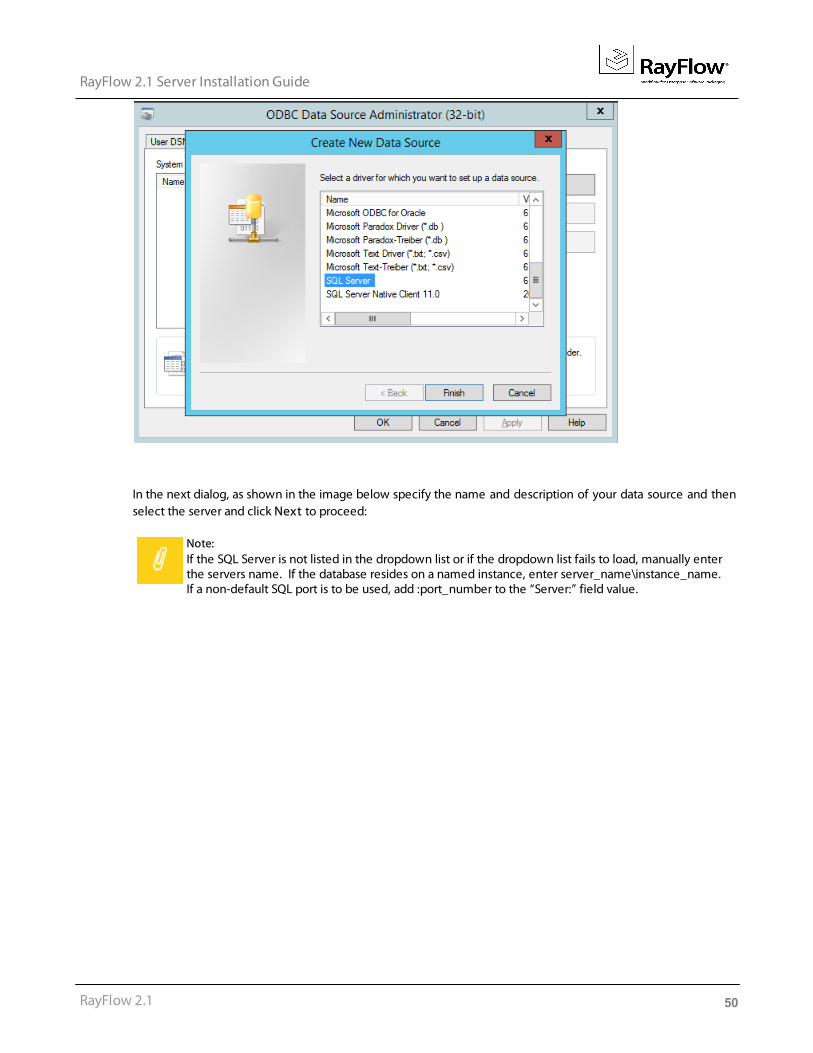
Click on the Add button to add a new data source. This will open drivers list, for which you wish to create thedata source. Scroll down the list and select SQL Server and then click Finish
50
RayFlow 2.1 Server Installation Guide
RayFlow 2.1
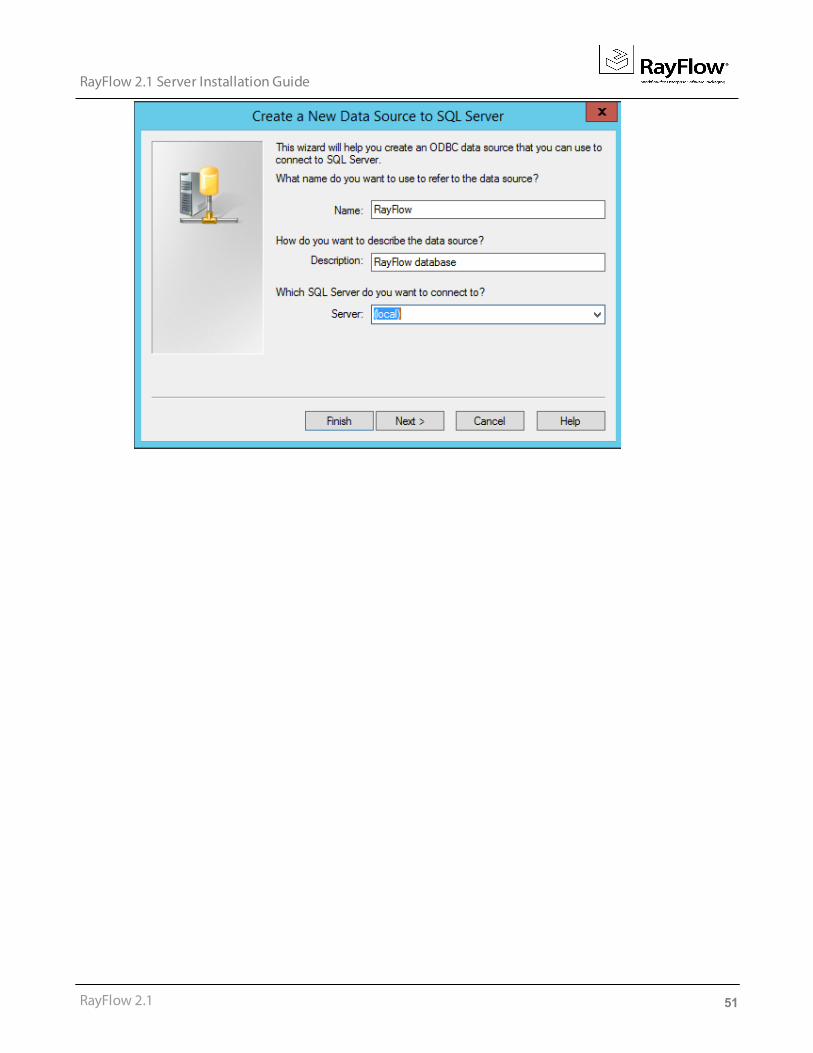
In the next dialog, as shown in the image below specify the name and description of your data source and thenselect the server and click Next to proceed:
Note: If the SQL Server is not listed in the dropdown list or if the dropdown list fails to load, manually enterthe servers name. If the database resides on a named instance, enter server_name\instance_name. If a non-default SQL port is to be used, add :port_number to the “Server:” field value.
51
RayFlow 2.1 Server Installation Guide
RayFlow 2.1
52
RayFlow 2.1 Server Installation Guide
RayFlow 2.1
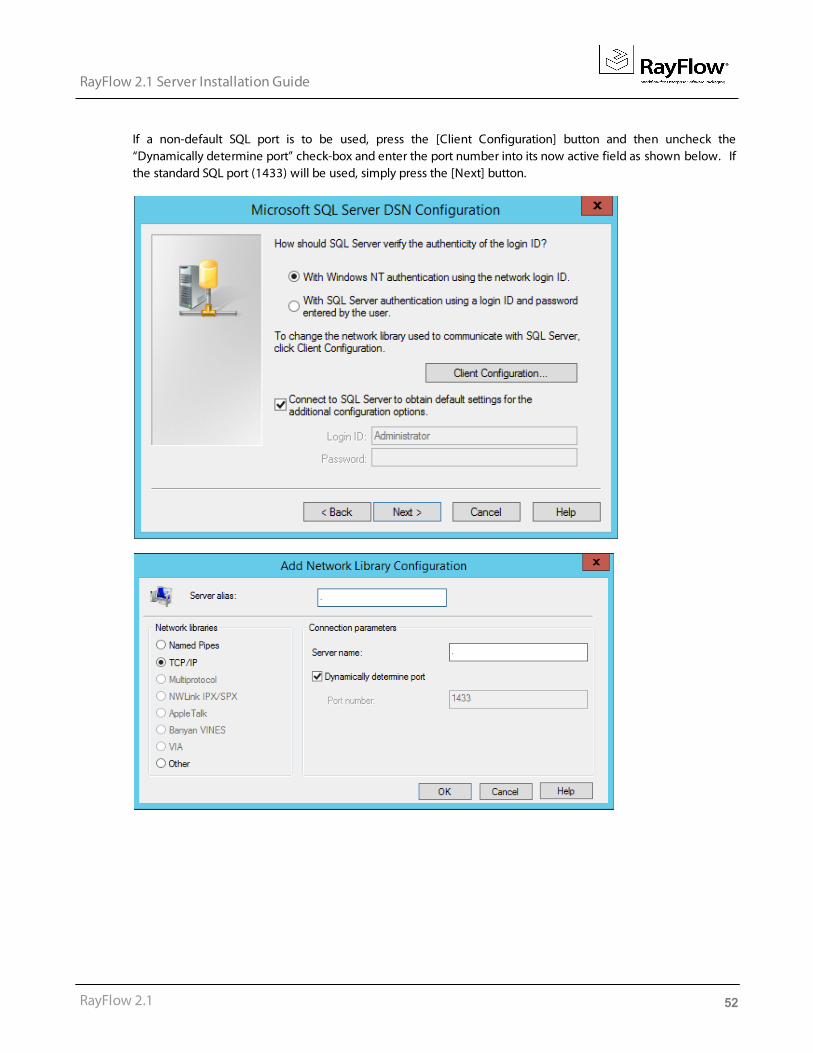
If a non-default SQL port is to be used, press the [Client Configuration] button and then uncheck the“Dynamically determine port” check-box and enter the port number into its now active field as shown below. Ifthe standard SQL port (1433) will be used, simply press the [Next] button.
53
RayFlow 2.1 Server Installation Guide
RayFlow 2.1
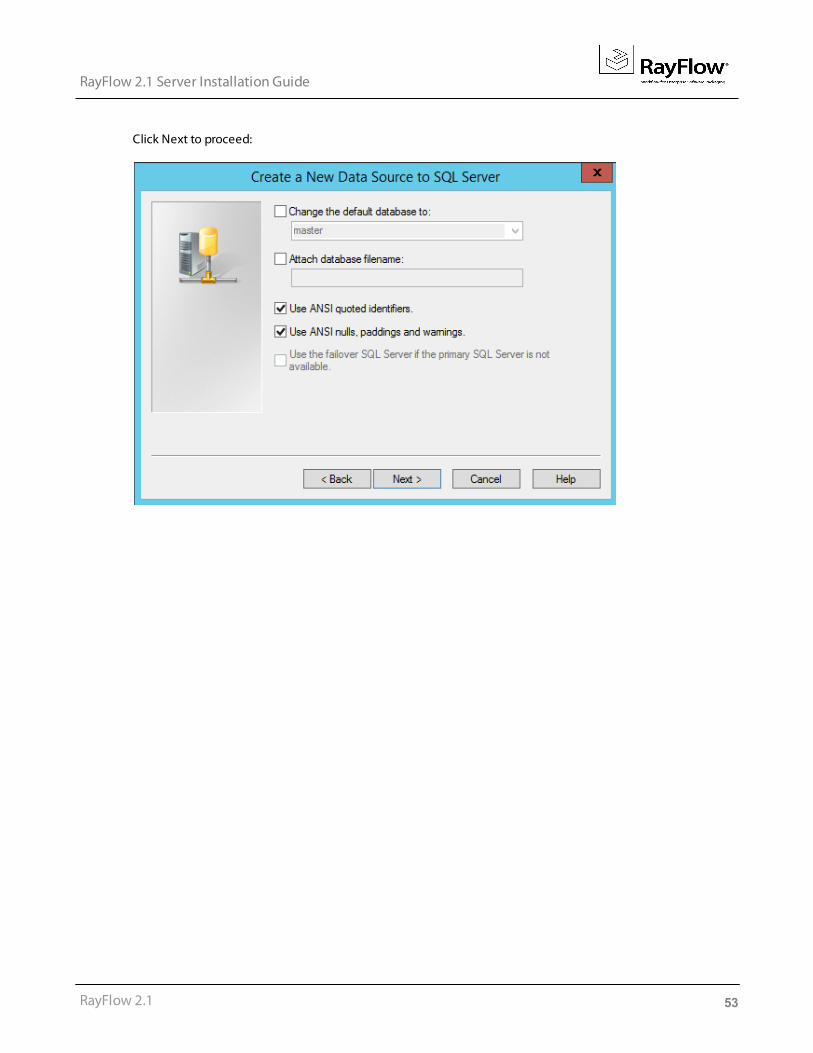
Click Next to proceed:
54
RayFlow 2.1 Server Installation Guide
RayFlow 2.1
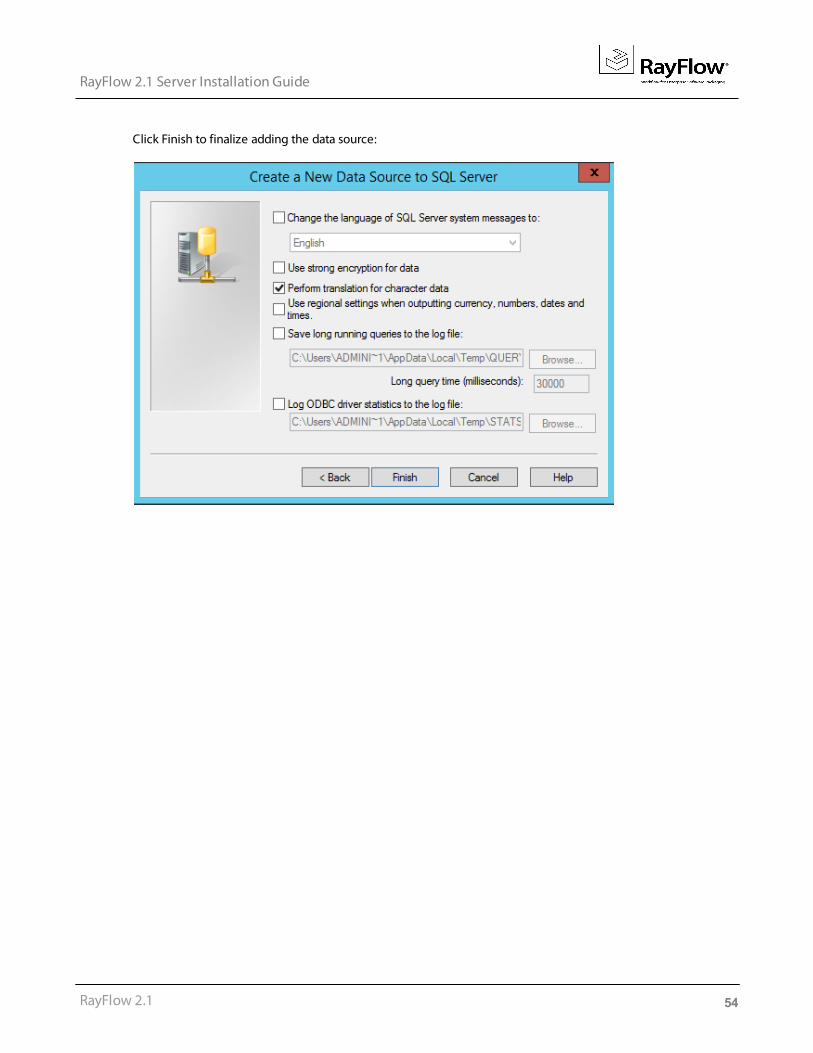
Click Finish to finalize adding the data source:
55
RayFlow 2.1 Server Installation Guide
RayFlow 2.1
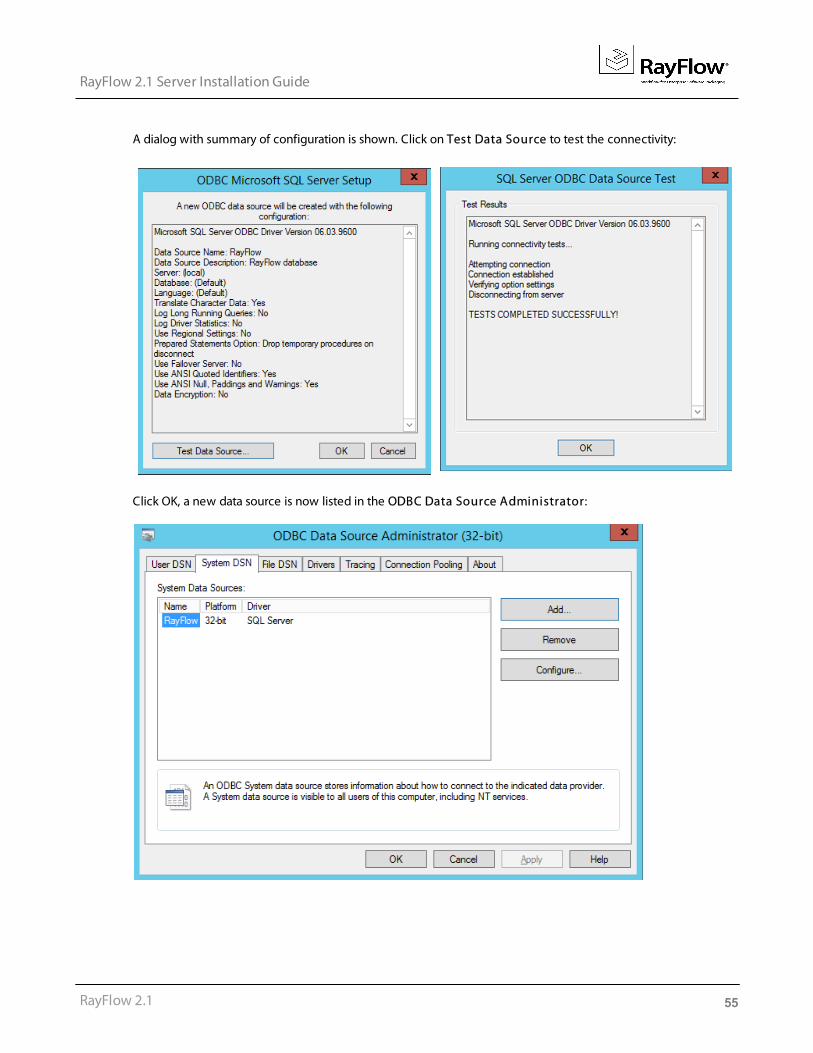
A dialog with summary of configuration is shown. Click on Test Data Source to test the connectivity:
Click OK, a new data source is now listed in the ODBC Data Source Administrator:
56
RayFlow 2.1 Server Installation Guide
RayFlow 2.1
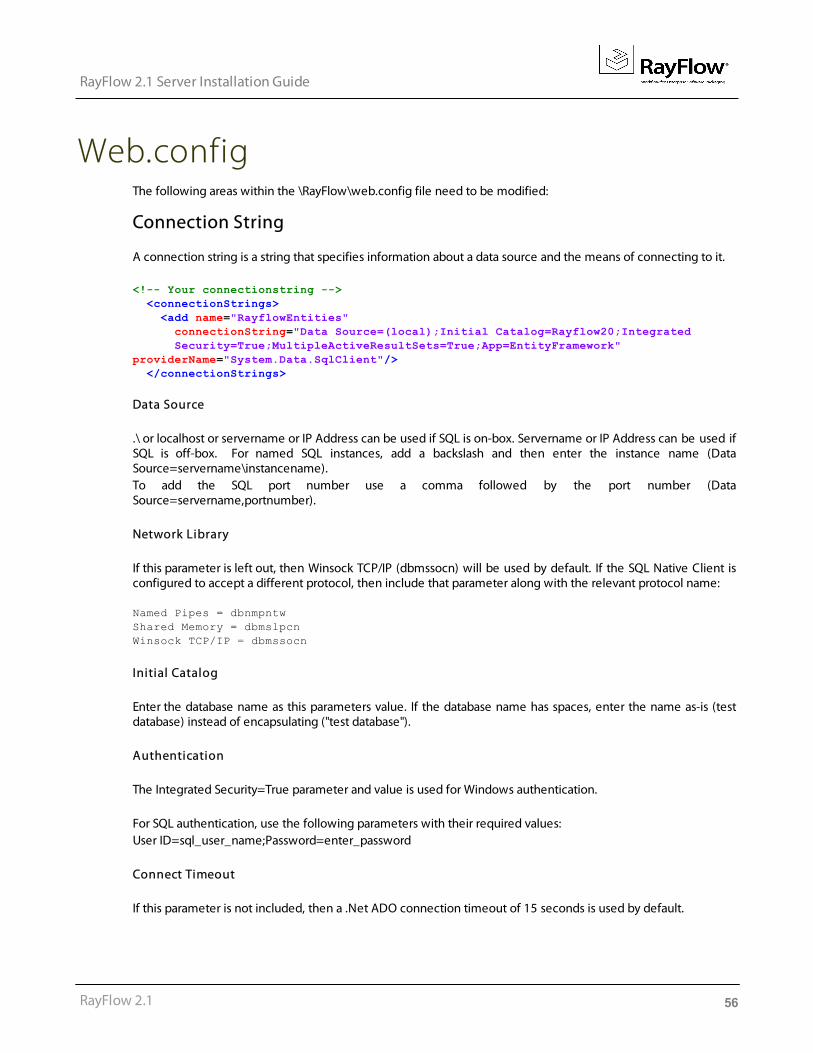
Web.configThe following areas within the \RayFlow\web.config file need to be modified:
Connection String
A connection string is a string that specifies information about a data source and the means of connecting to it.
<!-- Your connectionstring -->
<connectionStrings>
<add name="RayflowEntities"
connectionString="Data Source=(local);Initial Catalog=Rayflow20;Integrated
Security=True;MultipleActiveResultSets=True;App=EntityFramework"
providerName="System.Data.SqlClient"/>
</connectionStrings>
Data Source
.\ or localhost or servername or IP Address can be used if SQL is on-box. Servername or IP Address can be used ifSQL is off-box. For named SQL instances, add a backslash and then enter the instance name (DataSource=servername\instancename). To add the SQL port number use a comma followed by the port number (DataSource=servername,portnumber).
Network Library
If this parameter is left out, then Winsock TCP/IP (dbmssocn) will be used by default. If the SQL Native Client isconfigured to accept a different protocol, then include that parameter along with the relevant protocol name:
Named Pipes = dbnmpntw
Shared Memory = dbmslpcn
Winsock TCP/IP = dbmssocn
Initial Catalog
Enter the database name as this parameters value. If the database name has spaces, enter the name as-is (testdatabase) instead of encapsulating ("test database").
Authentication
The Integrated Security=True parameter and value is used for Windows authentication.
For SQL authentication, use the following parameters with their required values:User ID=sql_user_name;Password=enter_password
Connect Timeout
If this parameter is not included, then a .Net ADO connection timeout of 15 seconds is used by default.
57
RayFlow 2.1 Server Installation Guide
RayFlow 2.1
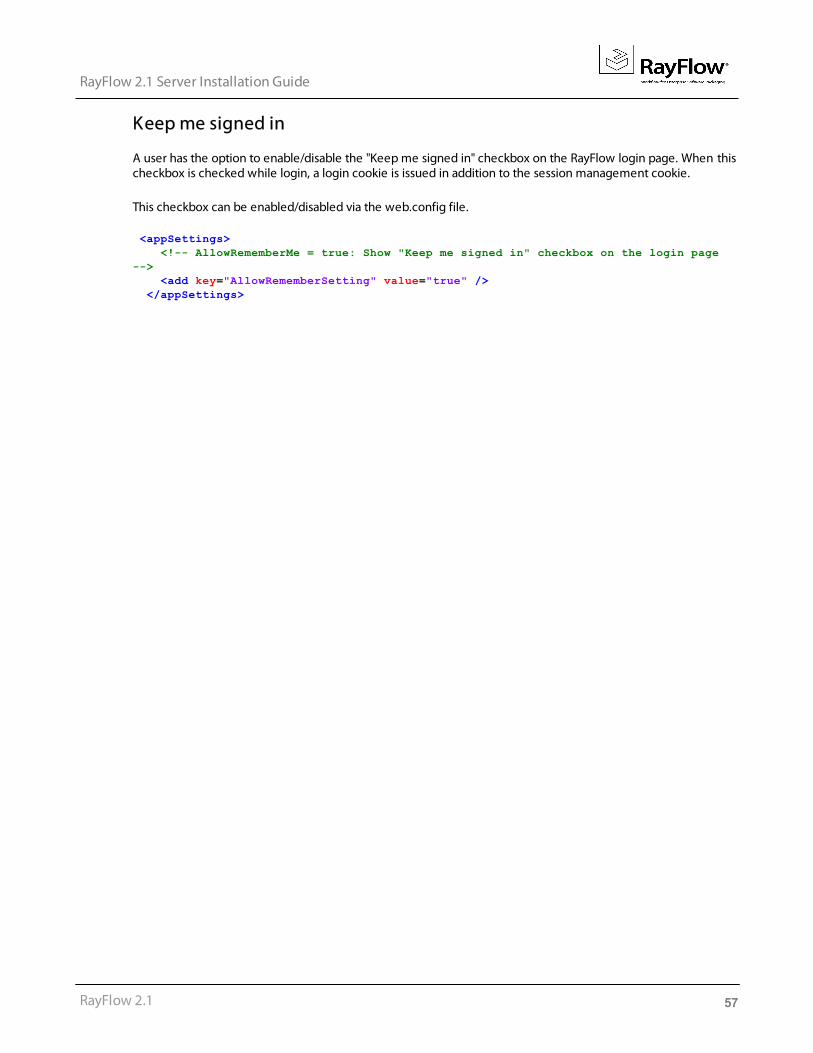
Keep me signed in
A user has the option to enable/disable the "Keep me signed in" checkbox on the RayFlow login page. When thischeckbox is checked while login, a login cookie is issued in addition to the session management cookie.
This checkbox can be enabled/disabled via the web.config file.
<appSettings>
<!-- AllowRememberMe = true: Show "Keep me signed in" checkbox on the login page
-->
<add key="AllowRememberSetting" value="true" />
</appSettings>
58
RayFlow 2.1 Server Installation Guide
RayFlow 2.1
RayFlow Server UpgradeThis chapter of the document is meant to help users upgrade from their existing RayFlow version to RayFlow 2.1.This chapter is divided into three parts:
1. Migration from RayFlow 1.6 to the current version2. Migration from RayFlow 1.11 to the current version3. Migration from RayFlow 2.0 (SP1) to the current version
Migration from 1.6 to 2.1
To migrate from RayFlow 1.6 to RayFlow 2.1 you first have to migrate from 1.6 to 1.11 . After this follow theinstructions for migrating from version 1.11 to RayFlow 2.1
Migration from 1.11 to 2.1
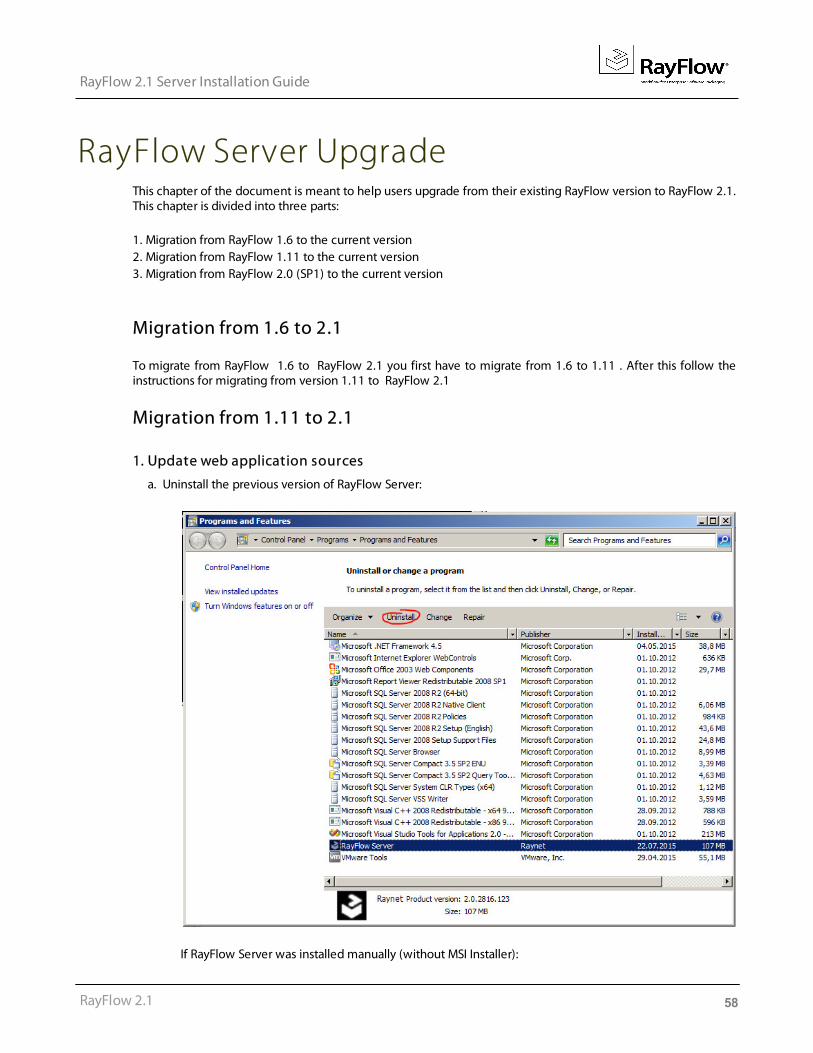
1. Update web application sources
a. Uninstall the previous version of RayFlow Server:
If RayFlow Server was installed manually (without MSI Installer):
59
RayFlow 2.1 Server Installation Guide
RayFlow 2.1
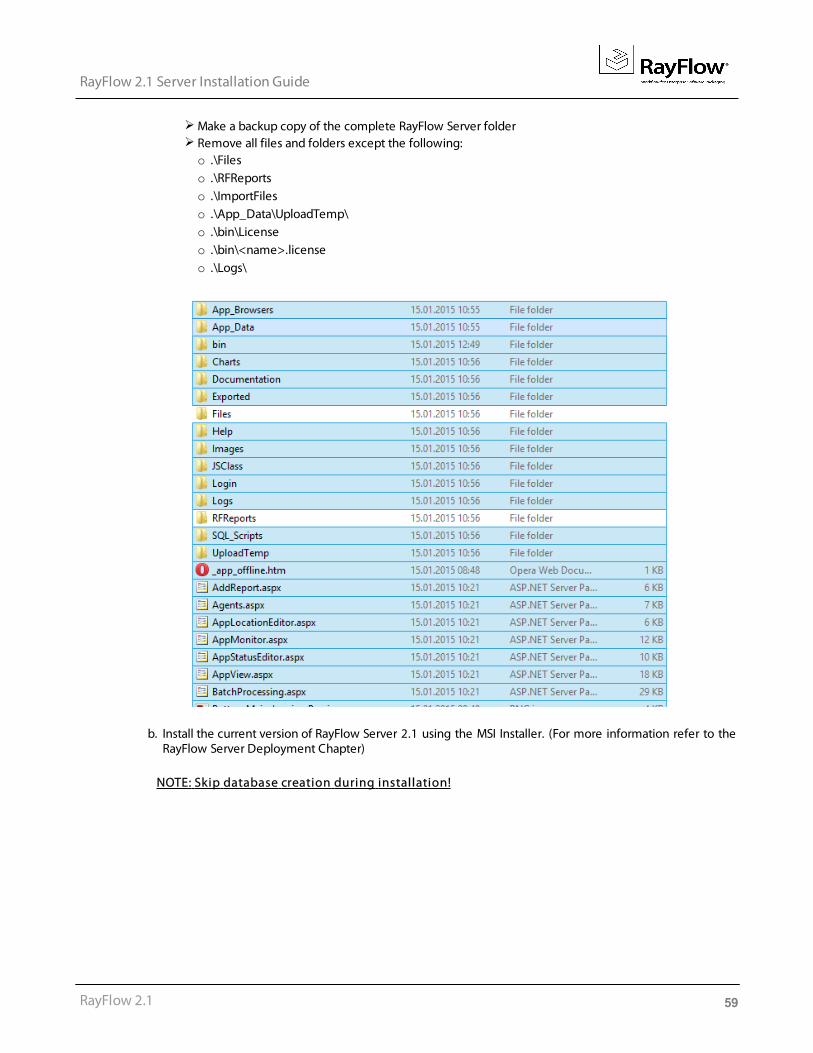
Make a backup copy of the complete RayFlow Server folderRemove all files and folders except the following:o .\Fileso .\RFReportso .\ImportFileso .\App_Data\UploadTemp\o .\bin\Licenseo .\bin\<name>.licenseo .\Logs\
b. Install the current version of RayFlow Server 2.1 using the MSI Installer. (For more information refer to theRayFlow Server Deployment Chapter)
NOTE: Skip database creation during installation!
60
RayFlow 2.1 Server Installation Guide
RayFlow 2.1
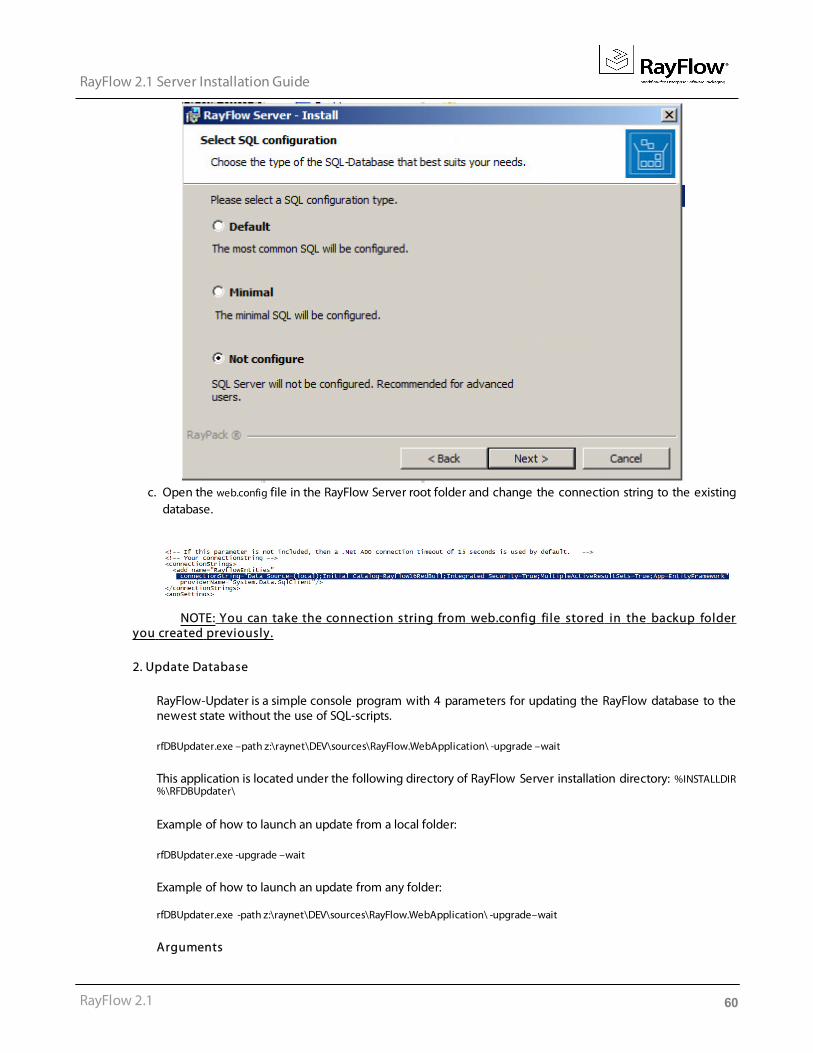
c. Open the web.config file in the RayFlow Server root folder and change the connection string to the existingdatabase.
NOTE: You can take the connection string from web.config file stored in the backup folderyou created previously.
2. Update Database
RayFlow-Updater is a simple console program with 4 parameters for updating the RayFlow database to thenewest state without the use of SQL-scripts.
rfDBUpdater.exe –path z:\raynet\DEV\sources\RayFlow.WebApplication\ -upgrade –wait
This application is located under the following directory of RayFlow Server installation directory: %INSTALLDIR%\RFDBUpdater\
Example of how to launch an update from a local folder:
rfDBUpdater.exe -upgrade –wait
Example of how to launch an update from any folder:
rfDBUpdater.exe -path z:\raynet\DEV\sources\RayFlow.WebApplication\ -upgrade–wait
Arguments
61
RayFlow 2.1 Server Installation Guide
RayFlow 2.1
-path: The path containing the RayFlow Server installation. It is necessary for the Database/Connection stringwhich will be taken from web.config in the given path. The path is, at the same time, the address to yourSQL_Scripts folder which also resides in the same Folder. The path can be omitted if the command islaunched from the RayFlow Server installation folder
-upgrade:Using this parameter will update your database to the newest state
-version: Get current version of RayFlow
-wait: Wait until any key action is taken by the user
Developer guide
SQL-Script changes
All database changes should be added to the file Updatescript.sql which you will find in RayFlow_Web_folderinsubfolder SQL_Scripts.Reserved indexes for future use can be found in the index.sql file.
Structure of Updatescript.sql script
This file consists of two parts: version delimiter and SQL statements which are delimited by GO. In theexample below, you can see how a version delimiter should be.!!! GO is a delimiter and should always be in a single line
Line ###version-1.7### is a version delimiter
Build-explanation
SQL-Statement! Please no transaction commands in your sql statement.In the example (Table acme) below you can see how your statement should look like.
IF NOT EXISTS(--in comment please only
SELECT NULL FROM sys.tables WHERE name = 'Acme' and type_desc = 'USER_TABLE')BEGINCREATE TABLE ACME (…)/UPDATE TABLE ACME(…)/INSERT INTO (…)/DELETE ACME(…)ENDGO
Follow these steps to successfully upgrade your RayFlow database from 1.11 to 2.1
1. Backup the database
Start SQL Server Management StudioRight click on your existing RayFlow database and select Task -> Backup from the context menu
2. Backup the file system
Go to your RayFlow Server Installation directoryRight click on it and then select Send To -> Compressed Zip Folder
62
RayFlow 2.1 Server Installation Guide
RayFlow 2.1
Store your database and file system backup to a safe location
3. Old web.config
Take note of the connection string entry within the %INSTALLDIR%\web.config file which can be foundbelow the following line: <!--Your connectionstring-->
4. Delete old file system
Delete all files and folders from D:\RayFlow\customer_name\ except for the following folders: Files, Images, Import, ImportFiles, Logs, RFReports and UploadTemp.
5. Implement new file system
Copy the RayFlow 1.10 source to your existing RayFlow directory. Merge the new folders with theexisting ones, and choose the “Copy and Replace” command for the files that still exist.
6. Edit the new web.config file
Open the web.config file in a text editor and add the connection string, which you previously noted intoit. Save the changes to the new web.config file
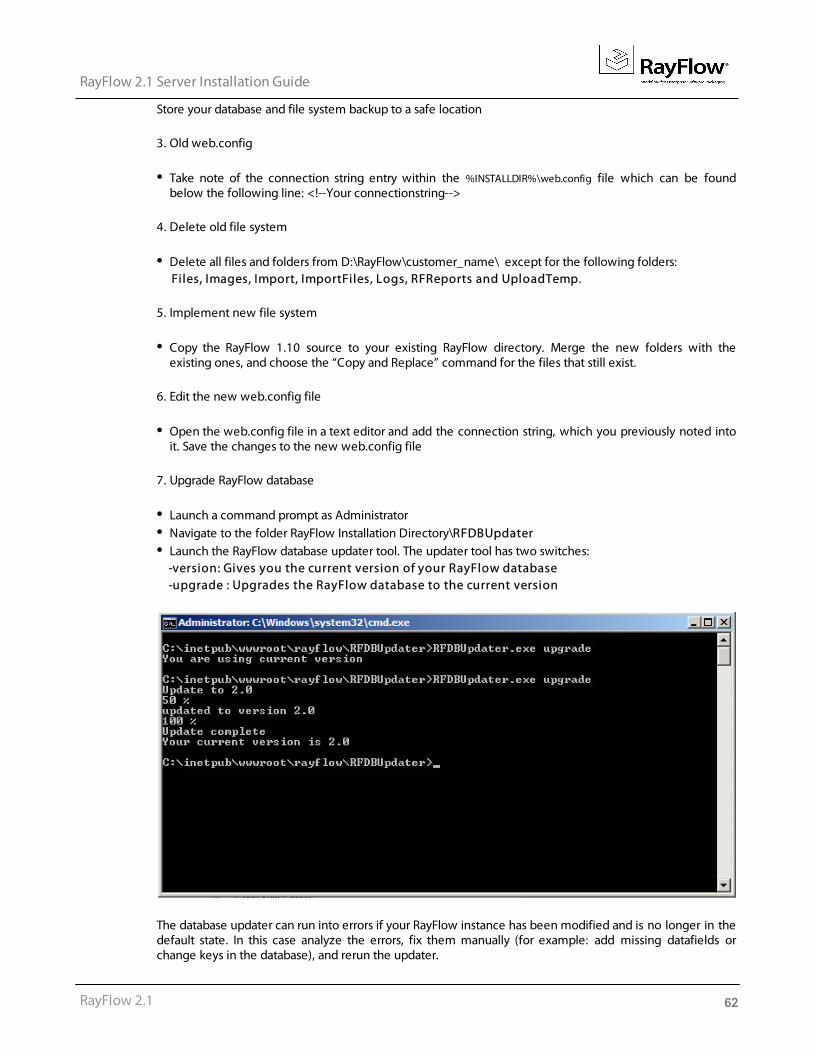
7. Upgrade RayFlow database
Launch a command prompt as AdministratorNavigate to the folder RayFlow Installation Directory\RFDBUpdaterLaunch the RayFlow database updater tool. The updater tool has two switches:
-version: Gives you the current version of your RayFlow database -upgrade : Upgrades the RayFlow database to the current version
The database updater can run into errors if your RayFlow instance has been modified and is no longer in thedefault state. In this case analyze the errors, fix them manually (for example: add missing datafields orchange keys in the database), and rerun the updater.
63
RayFlow 2.1 Server Installation Guide
RayFlow 2.1
NOTE: You can repeat the execution of the updater several times until it finishes without anyerrors.
3. Manual configuration
LicenseReactivate RayFlow license by using the license wizard, or copy the old license file from the backuprayflow1.x\bin to the new RayFlow folder rayflow2.1\bin
Phase icons,Copy all needed phase icons from the backup rayflow1.x\Images to rayflow2.1\Content\Images\Icons\PhaseRecreate the icons to match the new style of RayFlow Server 2.1. The images must be in png format, blackand white and 16 x 16 pixels.See how to upload icons for phases in the user manual.
ImportCopy all import files from the backup rayflow1.x\ImportFiles to the new RayFlow folder rayflow2.1\ImportFiles
Custom fieldsReactivate the needed custom fields. Go to configuration/customfields and perform the needed changes.NOTE: After the migration all custom fields will be activated.
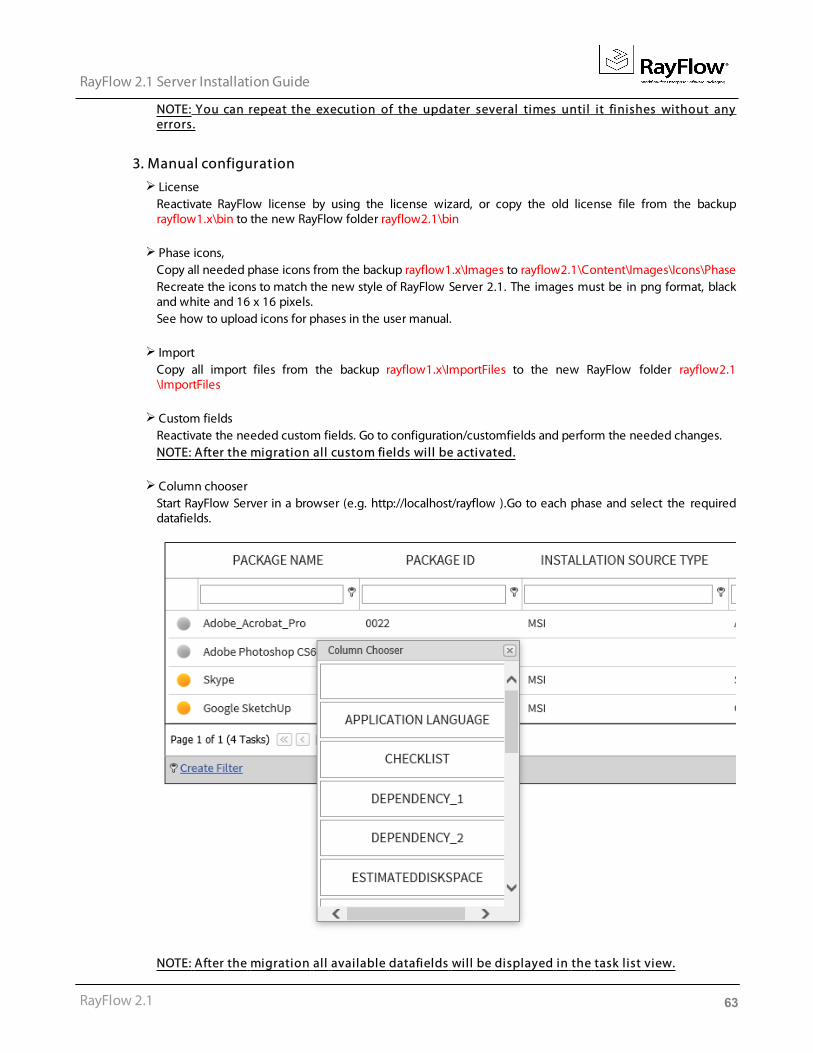
Column chooserStart RayFlow Server in a browser (e.g. http://localhost/rayflow ).Go to each phase and select the requireddatafields.
NOTE: After the migration all available datafields will be displayed in the task list view.
64
RayFlow 2.1 Server Installation Guide
RayFlow 2.1
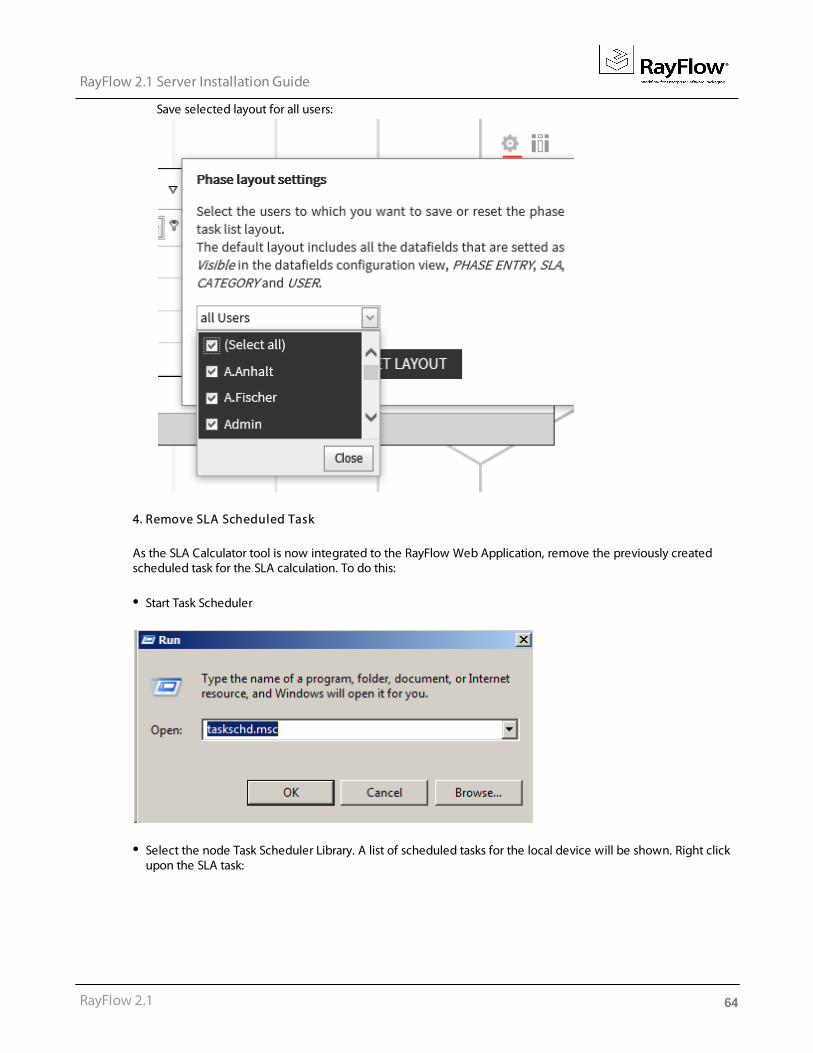
Save selected layout for all users:
4. Remove SLA Scheduled Task
As the SLA Calculator tool is now integrated to the RayFlow Web Application, remove the previously createdscheduled task for the SLA calculation. To do this:
Start Task Scheduler
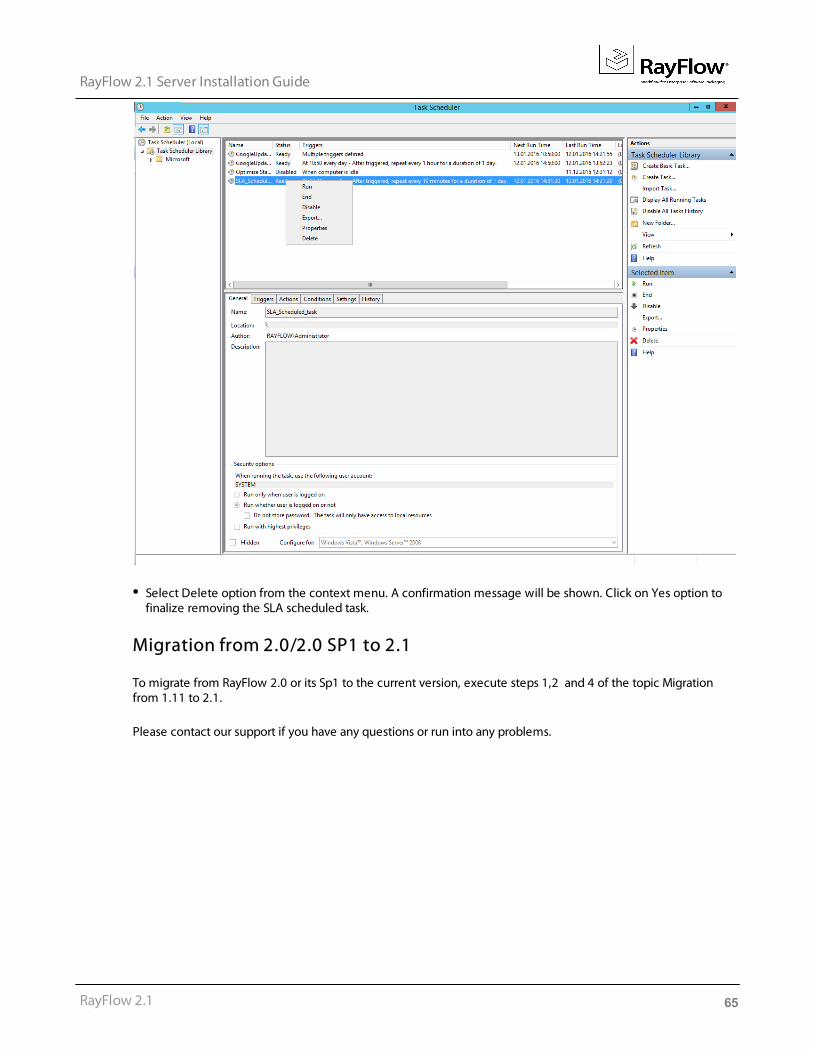
Select the node Task Scheduler Library. A list of scheduled tasks for the local device will be shown. Right clickupon the SLA task:
65
RayFlow 2.1 Server Installation Guide
RayFlow 2.1
Select Delete option from the context menu. A confirmation message will be shown. Click on Yes option tofinalize removing the SLA scheduled task.
Migration from 2.0/2.0 SP1 to 2.1
To migrate from RayFlow 2.0 or its Sp1 to the current version, execute steps 1,2 and 4 of the topic Migrationfrom 1.11 to 2.1.
Please contact our support if you have any questions or run into any problems.

66
RayFlow 2.1 Server Installation Guide
RayFlow 2.1