Embed Size (px)
Citation preview
SERVICE INSTRUCTION
SERVICE INSTRUCTIONSI-07-07.1Replaces (SI-07-07)
TEST PROCESS FOR 79010 HP404 CASCADES
Recalibrate tester every 2 years or less to verify functions and equipment damage.
Visual or Pre-conditions:1. Ensure cascade has been cooled to room temperature.
2. Ensure cascade has no residue and was cleaned with a non-polar solvent such as Naphtha, etc.
3. Ensure MicroPak switch SW7, switch 6 is in the off position.
4. Warning: Connect test tank to a known earth ground. Failure to do so will present an arcing condition that may create a personal hazard condition and possible equipment damage.
No Load Testing:1. Turn off MicroPak and turn kV knob fully counter-clockwise.
2. Place µA overload in full clockwise position.
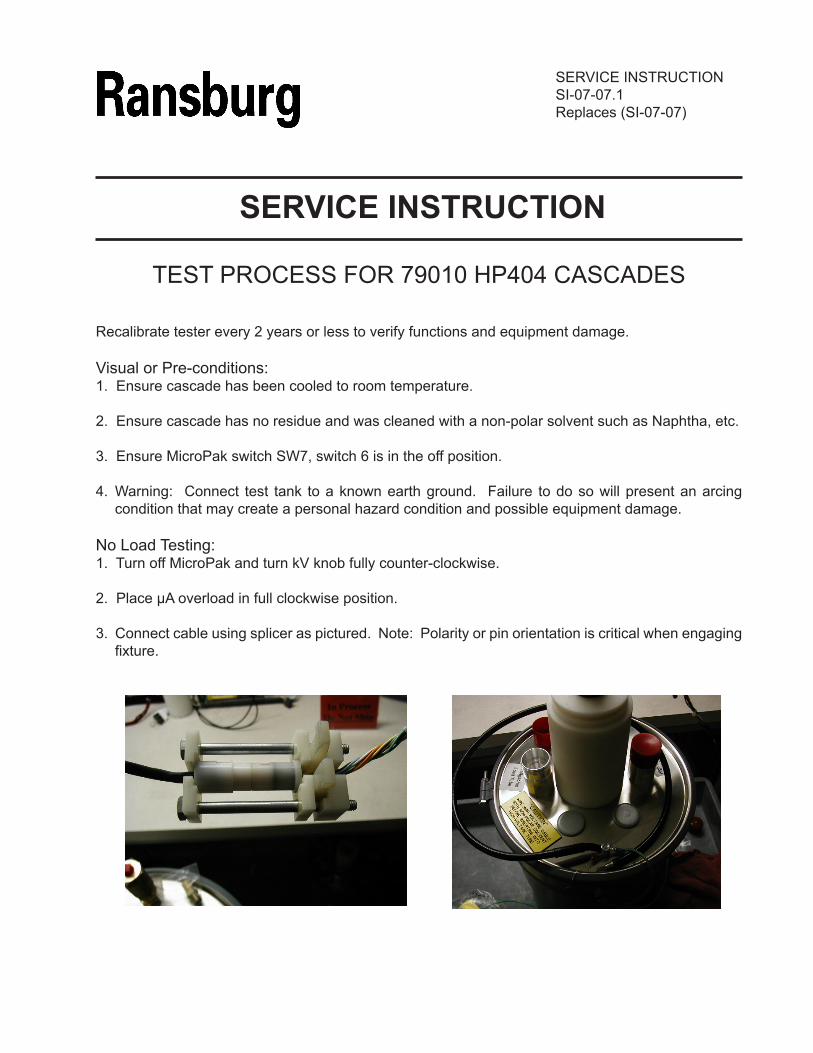
3. Connect cable using splicer as pictured. Note: Polarity or pin orientation is critical when engaging fixture.

SI-07-07.1
4. Place a small bead of dielectric grease completely around all three (3) inner circles.
5. Attach low voltage cable plug to cascade. Insert cascade by twisting inward into high voltage receptacle and apply pressure until fully inserted.
6. Turn on MicroPak and turn up voltage slowly until kV adjustment is fully counter-clockwise and stable, display output must be 100 kV on display at 20µAs or less. Reading must be stable with noexternalarcing.Staticchargingandtickinginopenairisallowed.
Grounding Test: Take ground wire with banana plug and rub around cascade surface to ensure no lightening type arc-ing is seen. Note: An arcing sound can be heard or "blue corona" may be seen. If bad grounding, the reading on the MicroPak may jump around on kV and µAs scales.
7. Test for 20 seconds, turn voltage down and turn MicroPak off.
8. Place kV adjustment in full counter-clockwise position.

2. Turn on MicroPak and turn up kV adjustment clockwise slowly.
3. Read kVdisplay output must be within 75 kV +/- 5 kV @ 75 µAs +/- 5 µAs. Readings must be stablewithnoexternalarcing.Note:Staticchargingandtickingfromchargingairisallowed.
4. Let run for 20 seconds. Turn down kV adjustment voltage and turn off MicroPak.
5. Record data and place in record book.
One Gig Resistive Load Testing1. Insert jumper cable connecting 1 gig on load tank and push high voltage wire down until you feel ittouchthebottomorfeelagrippingfit.Ensuretheoneendisconnectedorahazardoussituation may be present which can cause equipment damage or personal injury.
Manufacturing1910 North Wayne StreetAngola, Indiana 46703-9100Telephone: 260/665-8800Fax:260/665-8516
Technical/ServiceAssistance Telephone:800/233-3366Fax:419/470-2071www.ransburg.com
Technical Support Representative will direct you to the appropriate telephone number for ordering Spare Parts.
Form No. SI-07-07.1Litho in U.S.A.
© 2013 Ransburg. All rights reserved.Modelsandspecificationssubjecttochangewithoutnotice.