Embed Size (px)
Citation preview

SET UP GUIDE Dentrix ePrescribe

1 | P a g e
Table of Contents What to Expect ............................................................................................................................................. 3
Things You’ll Need ........................................................................................................................................ 3
Pre-Requisites ............................................................................................................................................... 3
Activating ePrescribe ................................................................................................................................... 5
Setting up eRx Users..................................................................................................................................... 5
Account Creation .......................................................................................................................................... 6
1st Identity Proofing For Non-EPCS Access (CFR T21 §1311.105) ............................................................... 8
Password Setup ............................................................................................................................................ 9
NPI Verification .......................................................................................................................................... 10
Electronic Prescription of Controlled Substances Setup ........................................................................... 10
Grant EPCS Access ...................................................................................................................................... 11
2nd Identity Proofing for EPCS Access ....................................................................................................... 11
Enable EPCS/Second Factor Approval ....................................................................................................... 16
Verify EPCS Registration was Successful ................................................................................................... 17
Write a prescription within 24 hours to finalize your setup ..................................................................... 17
Contact Information ................................................................................................................................... 18

2 | P a g e
PUBLICATION DATE January 2016
COPYRIGHT © 2015 Henry Schein, Inc. All rights reserved. No part of this publication may be reproduced, transmitted, transcribed, stored in a retrieval system, or translated into any language in any form by any means without the prior written permission of Henry Schein, Inc.
SOFTWARE LICENSE NOTICE Your license agreement with Henry Schein Practice Solutions, which is included with the product, specifies the permitted and prohibited uses of the product. Any unauthorized duplication or use of Easy Dental in whole or in part, in print, or in any other storage and retrieval system is forbidden.
LICENSES AND TRADEMARKS Dentrix, Henry Schein, and the “S” logo are registered trademarks of Henry Schein, Inc

3 | P a g e
Please read and follow the instructions carefully.
What to Expect Average Setup Time: 2.5 Hours
1. Pre-Requisites (10 – 90 minutes) 2. Activate ePrescribe (5 Minutes) 3. Setting up ePrescribe Users (20 Minutes) 4. Account Creation (15 Minutes) 5. 1st Identity Proofing For Non-EPCS Access (30 Minutes) 6. NPI Verification (5 Minutes) 7. EPCS Setup (45 Minutes)
a. Grant EPCS Access (15 Minutes) b. 2nd Identity Proofing for EPCS Access (30 Minutes ea. Provider)
8. Enable EPCS/Second Factor Approval (30 Minutes) 9. Verify EPCS Registration was Successful (5 Minutes) 10. Instructions on how to write a Prescription
Things You’ll Need
1. A Desktop/Laptop with Internet Explorer 11 2. Providers DEA License [CFR T21 §1306.03(a)(1)] 3. Providers Individual NPI (NOT the practice NPI) [CFR T21 §1306.03(a)(1)]
a. You can find the Providers individual NPI on this website: https://nppes.cms.hhs.gov/NPPESRegistry/NPIRegistrySearch.do?subAction=reset&searchType=ind
4. State License [CFR T21 §1306.03(a)(1)] 5. Cell phone that can receive text messages (One Time Password Device) [CFR T21 §1311.115(3)] 6. A Non-Prescribing Staff Admin for Multiple Provider Practices [CFR T21 §1311.125(a)]
Pre-Requisites
1. Updates a. Ensure that your version of Dentrix is 15.2.239.0 or higher
i. To Verify, Open Office Manager > Click Help > About Dentrix. The version must be 15.2.239.0 or higher, if not please contact Dentrix 1.800.336.8749 to schedule a time to upgrade to the appropriate version.
b. Verify that ePrescribe is up to date i. Office Manager > Click Help > About Dentrix > Check for Updates > Only Select
ePrescribe Updates > Click Install. Once installed Close the updater. ii. If you do not see an ePrescribe update then it is already installed
2. Enable Secure Passwords
a. Video Tutorials on how to Setup Secure Passwords
i. Step One: Enabling Passwords https://youtu.be/PZarJxfppWE
ii. Step Two: Changing them to Secure https://youtu.be/h189vn9f3CQ
b. For assistance with enabling secure passwords please contact Dentrix at
1.800.336.8749.

4 | P a g e
3. Enter Practice Fax
a. Open Office Manager > Maintenance > Practice Setup > Practice Resource Setup. The
Practice Resource Setup dialog box will appear. Under Practice Information Click Edit >
Type in practice fax number.
4. Provider Information
a. Office Manager > Maintenance > Practice Setup > Practice Resource Setup > Under
Provider(s) select Provider > Click Edit. Enter the following Provider information:
i. Email Address
ii. DEA Number
iii. DEA Schedule
iv. State ID Number
v. State License Expiration
vi. Providers Individual NPI
5. Admin Staff Information (In Multiple Provider Practices)
a. Office Manager > Maintenance > Practice Setup > Practice Resource Setup > Under
Staff select desired individual for Staff Admin > Click Edit. Enter the following Staff
information:

5 | P a g e
i. Email Address
Activating ePrescribe 1. Office Manager > Maintenance > Practice Setup > Practice Resource Setup > Under Practice
Information click Edit > in the ePrescribe section click Setup. An ePrescribe Settings dialog box will appear > Select Activate > Copy and Paste License Key from Welcome to ePrescribe email > Click OK > Click I Agree in End User License Agreement Dialog Box. > Click Close
2. For assistance with the license key please reach out to support for help. a. http://hseprescribe.com/setup/ > Click to Chat b. Support Phone number 1.888.278.3685
Setting up eRx Users 1. Office Manager > Maintenance > Practice Setup > Practice Resource Setup > Edit > Administer
> Enable > Users > Click Add
2. In the User Details dialog box > Select Provider from the User List > Select the Administrator box
> Click Upload
a. Add a Staff Administrator if more than one provider will be prescribing in office. Click
Add > Select Staff Administrator > Click Upload [CFR T21 §1311.125(a)]
b. If sections have a yellow warning icon the information is missing from the Practice
Resource. Review requirements under Number Four of the Pre-Requisites section.

6 | P a g e
Account Creation
1. As the provider, login to Office Manager > Electronic Rx Task Mode > Click Sign Up > Fill
out Required information
a. If you have already Fully setup ePrescribe at another location and would like to
integrate that same account at this location follow the Linked Account instructions at
http://hseprescribe.com/setup/

7 | P a g e
b. Personal Information
i. Name
ii. Personal Email
iii. Desired Account Login
iv. Desired Password
1. Eight Characters Long
2. Upper Case Letters
3. Lower Case Letters
4. Punctuation Characters (!, ?, ., :, etc.)
5. Numbers (1, 2, 3 etc.)
c. Security Questions and Answers
i. Select 3 Security Questions and answer Questions
d. Verify you are a real person

8 | P a g e
i. Enter the Captcha Code
2. Select I have reviewed my registration entries > Click Submit
3. A window will open directing you to close ePrescribe > Close ePrescribe. > Log out of Dentrix
1st Identity Proofing For Non-EPCS Access (CFR T21 §1311.105)
1. Login to Office Manager as Provider Click the Electronic RX Task Mode Icon
a. If you cannot find the eRx Icon go to Office Manager > Maintenance > Practice Setup >
Practice Resource Setup > Edit > Administer > ePrescribe Website
i. Fill out required information
1. Name
2. Home Address
3. Year of Birth
4. Email
5. Last for of SSN
6. DEA Information
7. NPI Information
ii. Click Submit > Select Go to Next Step

9 | P a g e
2. Provider will verify the requested information & answer the five ID Proofing Questions > Click
Submit.
a. If provider Passes the ID Proofing click Next
b. If provider do not pass the background they are required to submit a Notarized Manual
Registration to Allscripts for review. Notarized Forms can be sent via Fax or Email [CFR
T21 §1311.05]
i. Fax – 1.919.800.6001
ii. Email – [email protected]
iii. If you closed the page for the Manual Registration you can access it here:
https://erxnowregistration.allscripts.com/ManualForm.aspx
iv. Manual Registrations may take 5-10 business days to pass. If you do not receive
a confirmation email you can log into Dentrix as the provider and click on the
ePrescribe Icon . If it was approved you will be prompted to create an
account. If you need assistance you can contact us at 1.888.278.3685
3. Click I Agree to agree to the End User License Agreement
Password Setup 1. You will be prompted to create another password. Create a Secure Password & Confirm entry >
Click Setup Password
a. Eight Characters Long
b. Upper Case Letters
c. Lower Case Letters
d. Punctuation Characters (!, ?, ., :, etc.)
e. Numbers (1, 2, 3 etc.)

10 | P a g e
2. Click Submit > A window will open directing you to close ePrescribe > Close ePrescribe.
NPI Verification
4. As the Provider Login to Office Manager > Electronic Rx Task Mode 5. Read the End user License Agreement (EULA) > Click I Agree 6. Verify Providers Individual NPI > Click Submit
a. If the NPI Verification fails, fill out the NPI Manual Registration form and have it Notarized. Notarized Forms can be sent via Fax or Email [CFR T21 §1311.05]
i. Fax – 1.919.800.6001 ii. Email – [email protected]
iii. If you closed the page for the Manual Registration you can access it here: https://erxnowregistration.allscripts.com/ManualForm.aspx
iv. Manual NPI Registrations may take 5-10 business days to pass. If you do not receive a confirmation email you can log into Dentrix as the provider and click
on the ePrescribe Icon . If it was approved you will be prompted to create an account. If you need assistance you can contact us at 1.888.278.3685
The provider is now set up to prescribe non-controlled substance prescriptions. If the provider needs to send controlled substances please continue with the EPCS setup.
Electronic Prescription of Controlled Substances Setup In practices where there are multiple providers the DEA requires that each provider designate at least two individuals aside from themselves to assist with the EPCS Setup. One of the individuals will be a Non Prescribing Staff Admin, the other is a Provider who is also registered with the DEA. Please make sure all providers have completed Account activation and NPI verification prior to continuing. [CFR T21 §1311.125(a)] If you are a single provider practice, you do not need other individuals to help you with the setup and will perform the admin & provider steps listed below from the providers account.

11 | P a g e
Our ePrescribe Partner, Allscripts hosts webinars on how to setup EPCS every Monday 8am EST, Wednesday 6pm EST, & Friday 1pm EST, until April 25th 2015.
Grant EPCS Access
1. Login to Office Manager as Administrator > Electronic Rx Task Mode > Click Settings Tab > Select Manage EPCS > Click the dropdown and choose Grant EPCS Privilege – View > Select
Provider(s) to grant EPCS Privileges so that they may begin their registration > Click Grant EPCS Privilege > Click Back > Close out of Dentrix
2nd Identity Proofing for EPCS Access
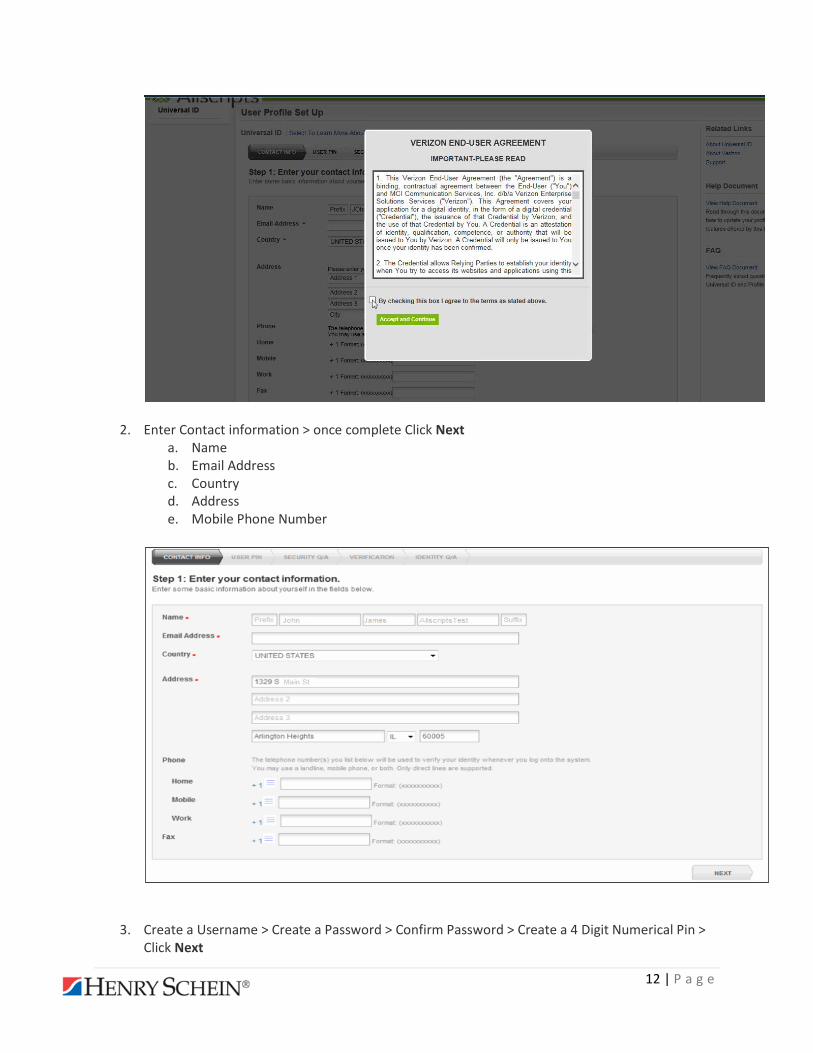
1. From Providers account Open Office Manager > Electronic Rx Task Mode > On the right hand side of the screen under Urgent Messages Click Start EPCS Registration link > Check Agree > Click Accept and Continue > Click Next
12 | P a g e
2. Enter Contact information > once complete Click Next a. Name b. Email Address c. Country d. Address e. Mobile Phone Number
3. Create a Username > Create a Password > Confirm Password > Create a 4 Digit Numerical Pin > Click Next

13 | P a g e
a. Password Requirements: i. Eight Characters Long
ii. Upper Case Letters iii. Lower Case Letters iv. Punctuation Characters (!, ?, ., :, etc.) v. Numbers (1, 2, 3 etc.)
NOTE: Please remember the Username and password that you create. If you need to edit your phone number or add a One Time Password Device you will need this information to edit your Verizon EPCS Account.
4. Select three (3) Security questions and answer each of them > Click Next
5. Under Text Messages Click the box to the right of Mobile > You will receive a text, enter in the 6-Digit OTP into the Passcode field > Click Verify > Click Next
a. If you do not receive a text message call your cell phone carrier and unblock premium texts. Once allowed on your account click the box again to resend the text.

14 | P a g e
b. If you do not have a cell phone that can receive text messages you can order a Key FOB by contacting ePrescribe Sales at 1.888.278.3685
i. To set up the Key FOB type in the Key FOB Serial Number from the back of the device into the field next to VASCO Digipass > Click the box to the right > press the button on the Key FOB to generate a 6-Digit OTP> Enter the OTP into the Passcode field > Click Verify > Click Next
6. Enter your full SSN and the Day, Month, and Year that you were born > Once you click Next you will have Two (2) Minutes to answer the Five (5) ID Proofing Questions.

15 | P a g e
a. If provider Passes the ID Proofing with a HIGH assurance level they may continue
Enabling EPCS > Close ePrescribe & Dentrix b. If provider passed with a MEDIUM or LOW assurance level they are required by law to
submit a Notarized Manual Registration to Verizon for review. Notarized Forms can be sent via Fax [CFR T21 §1311.05]
i. Fax – 1.800.701.9814 ii. If you closed the page for the Manual Registration you can access it here:
http://hseprescribe.com/setup/ > Click Verizon Notary Form at bottom of page iii. Once faxed it may take 5-10 business days for Verizon to notify you to continue
the setup.
7. If you are in a Multiple Provider Practice have every provider complete the 2nd Background Check before continuing to Enabling EPCS.

16 | P a g e
Enable EPCS/Second Factor Approval
1. As the Administrator, open Office Manager > Electronic Rx Task Mode > Click Settings Tab > Select Edit Users > Click Edit next to the provider who will be the EPCS Approver > Scroll to the bottom and click the EPCS Approver Checkbox > Click Save > Close Dentrix
2. Open Office Manager as the EPCS Approver Provider > On right hand side of screen click Manage EPCS Approvals under Urgent Messages > Select Provider(s) that you want to Approve EPCS for > Click Approve EPCS Signing Privilege Button > Review the Due Diligence Dialog, Check all four (4) boxes > Enter Username and Password > Generate One Time Password (OTP) > Enter into Token Field > Click Accept > Log Out

17 | P a g e
Verify EPCS Registration was Successful
1. From the Providers account Open Office Manager > Electronic Rx Task Mode > In the upper right hand corner next to your name click > scroll to bottom of page, under EPCS Settings you will see that EPCS Permission is set to ON.
You can now prescribe and sign Controlled Substance Prescriptions.
Write a prescription within 24 hours to finalize your setup 1. Login to Dentrix as the provider 2. Open the Patient Chart and select a patient.

18 | P a g e
3. Click the Prescriptions button in the toolbar. 4. Click Electronic RX and the eRx window will appear. 5. Click Select Med. Type the medication name, and then select search parameters (Patient
History, My History, All Meds). 6. Select the desired medication and strength combination. 7. Click Select Sig. You can write your own directions (write free text SIG), or you can select from
Preferred directions. 8. Enter the day’s supply, quantity, and number of refills. 9. Click Add and Review. 10. Click Select Pharmacy ensuring that CS is next to the pharmacy name, and then click Process
Script Pad. To write a prescription for a controlled substance
1. Select how you would like to receive the OTP. 2. Select CS Medications. 3. Enter your Shield password. 4. Press the button on the key fob token to generate the OTP. 5. Type OTP. 6. Click Sign and Send Electronically.
Congratulations! You have completed your setup of ePrescribe. You can find tutorials on the right hand side of the ePrescribe screen if you would like to learn more features of the eRx
product.
Contact Information If you require assistance, please contact the ePrescribe Team Support Hours are Monday – Friday 7-330 PM MST.
Chat: http://hseprescribe.com/setup/ > Click to Chat
ePrescribe Support/Implementation: 1.888.278.3685
Dentrix Support: 1.800.336.8749
For instructions on Setting up eRx App Click here: http://hseprescribe.com/setup/ ePrescribe App
For instructions on Setting up this account at another location click here: http://hseprescribe.com/setup/ > Link accounts