Embed Size (px)
Citation preview

8/2/2019 Setting Up an Exhibition - Teaching Activities for Secondary School Students
http://slidepdf.com/reader/full/setting-up-an-exhibition-teaching-activities-for-secondary-school-students 1/29
Setting up an Exhibition
Teaching Activities for Secondary School Students
Charlot Cassar
8/2/2019 Setting Up an Exhibition - Teaching Activities for Secondary School Students
http://slidepdf.com/reader/full/setting-up-an-exhibition-teaching-activities-for-secondary-school-students 2/29
Page 2
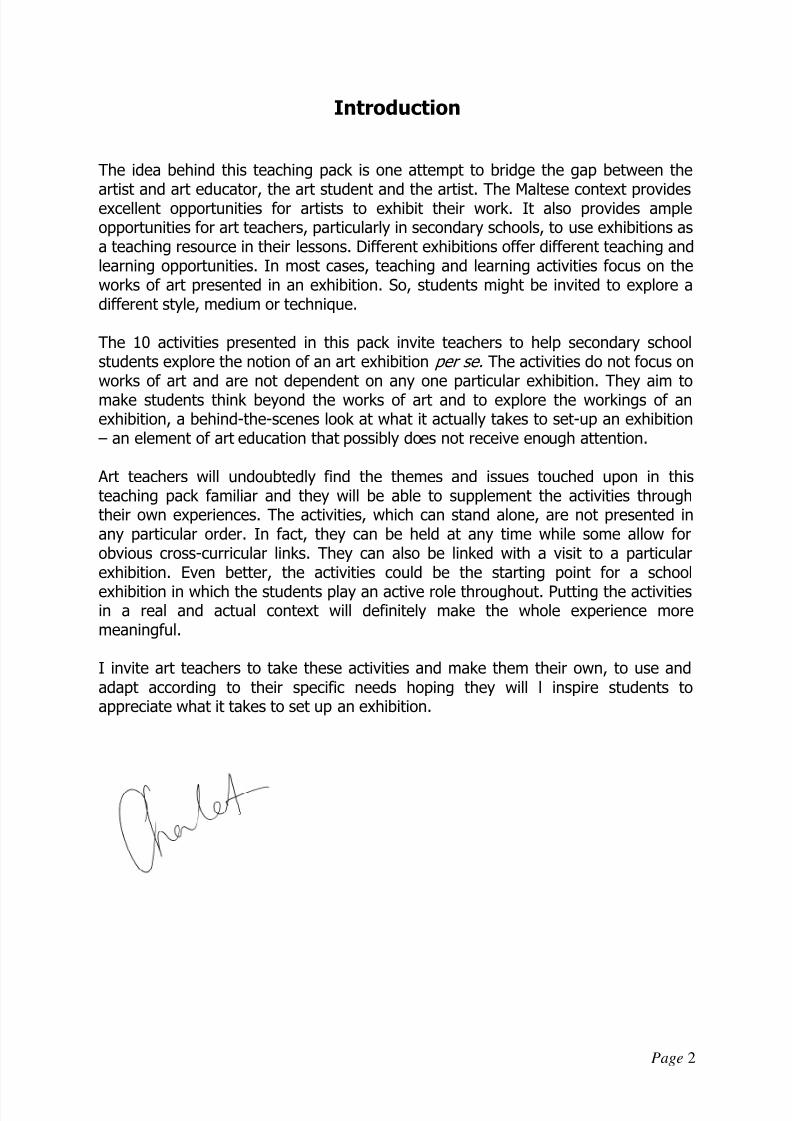
Introduction
The idea behind this teaching pack is one attempt to bridge the gap between the
artist and art educator, the art student and the artist. The Maltese context providesexcellent opportunities for artists to exhibit their work. It also provides ampleopportunities for art teachers, particularly in secondary schools, to use exhibitions asa teaching resource in their lessons. Different exhibitions offer different teaching andlearning opportunities. In most cases, teaching and learning activities focus on theworks of art presented in an exhibition. So, students might be invited to explore adifferent style, medium or technique.
The 10 activities presented in this pack invite teachers to help secondary schoolstudents explore the notion of an art exhibition per se. The activities do not focus onworks of art and are not dependent on any one particular exhibition. They aim tomake students think beyond the works of art and to explore the workings of anexhibition, a behind-the-scenes look at what it actually takes to set-up an exhibition
– an element of art education that possibly does not receive enough attention.
Art teachers will undoubtedly find the themes and issues touched upon in thisteaching pack familiar and they will be able to supplement the activities throughtheir own experiences. The activities, which can stand alone, are not presented inany particular order. In fact, they can be held at any time while some allow forobvious cross-curricular links. They can also be linked with a visit to a particularexhibition. Even better, the activities could be the starting point for a school
exhibition in which the students play an active role throughout. Putting the activitiesin a real and actual context will definitely make the whole experience moremeaningful.
I invite art teachers to take these activities and make them their own, to use andadapt according to their specific needs hoping they will l inspire students toappreciate what it takes to set up an exhibition.
8/2/2019 Setting Up an Exhibition - Teaching Activities for Secondary School Students
http://slidepdf.com/reader/full/setting-up-an-exhibition-teaching-activities-for-secondary-school-students 3/29
Page 3
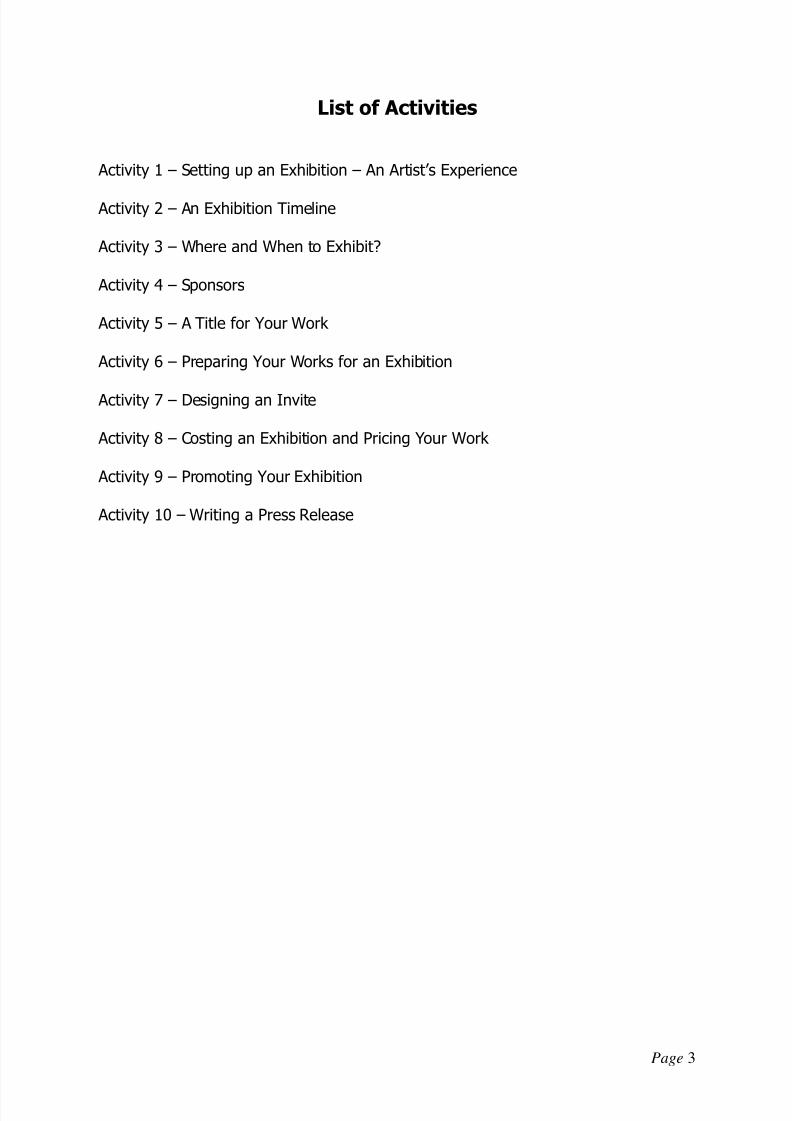
List of Activities
Activity 1 – Setting up an Exhibition – An Artist’s Experience
Activity 2 – An Exhibition Timeline
Activity 3 – Where and When to Exhibit?
Activity 4 – Sponsors
Activity 5 – A Title for Your Work
Activity 6 – Preparing Your Works for an Exhibition
Activity 7 – Designing an Invite
Activity 8 – Costing an Exhibition and Pricing Your Work
Activity 9 – Promoting Your Exhibition
Activity 10 – Writing a Press Release

8/2/2019 Setting Up an Exhibition - Teaching Activities for Secondary School Students
http://slidepdf.com/reader/full/setting-up-an-exhibition-teaching-activities-for-secondary-school-students 4/29
Page 4
Activity 1 – Setting up an Exhibition - An Artist’s Experience
This activity encourages students to explore what it takes to set up an exhibition.
Ask students to imagine that they are about to have their own exhibition. Ask them
to write down what they think to be the most important things that they must
consider. Here are some questions that might facilitate the exercise:
• Why would you want to hold an exhibition?
• What do you need to hold an exhibition?
• Where can you hold an exhibition?
• When should you hold an exhibition?
• When do you start?
• What or where do you start from?
• What are some of the things that will directly affect your exhibition?
• What other things will you have to take into consideration?
Ask each student to share his or her notes with the rest of the class. Next, provide
students with a copy of “Setting up an Exhibition - An Artist’s Experience”. Ask them
to read it and to compare it with their own notes. Ask students to react to the text.
8/2/2019 Setting Up an Exhibition - Teaching Activities for Secondary School Students
http://slidepdf.com/reader/full/setting-up-an-exhibition-teaching-activities-for-secondary-school-students 5/29
8/2/2019 Setting Up an Exhibition - Teaching Activities for Secondary School Students
http://slidepdf.com/reader/full/setting-up-an-exhibition-teaching-activities-for-secondary-school-students 6/29
8/2/2019 Setting Up an Exhibition - Teaching Activities for Secondary School Students
http://slidepdf.com/reader/full/setting-up-an-exhibition-teaching-activities-for-secondary-school-students 7/29
Page 7
To create a piece, I start by rolling out several slabs of clay. I allow them to dry just
enough for me to be able to handle them without the clay loosing shape and then I
cut them to shape and size. Then, based on sketches that I would have made
previously, and several ideas that I would have been thinking about, I use a sharptool to sketch a first design on the clay surface. This is just a surface scratch on the
clay, something which I can easily remove by wiping the clay clean, with a finger tip
or a wet sponge. Once I am completely satisfied with the composition I cut the clay
with a sharp knife. At this stage I allow the clay to dry some more. This could take a
few hours or even days, depending on the weather. If at any point I need to stop,
then I wrap the clay in plastic. As long as clay is carefully wrapped in plastic, it
remains workable. When the clay is leather hard, I carefully clean each individual
piece, make sure the edges are neat and just as I want them to be. At this stage I
may also choose to add some textural quality.
When I am completely satisfied with the composition of my work, I allow the clay to
dry out completely. This is a very slow process. The clay needs to be weighted down
so that it remains as flat as possible. Each piece is checked throughout to ensure
that it is not getting out of shape and if it is, then this is rectified before the clay
dries completely.
The dry pieces are carefully loaded into the kiln and bisque fired to 1000ºC. The
firing process has to be carefully controlled. The kiln is programmed so that the
temperature rises 100ºC every hour until it reaches 600ºC. Then it continues to top
temperature, in this case 1000ºC, at about 150ºC per hour. The actual firing takes
about 9 hours. The kiln is then turned off and allowed to cool. The entire process
may take 24 hours or even more sometimes, depending on the size of the kiln and
the work in it.
While doing all this, I am also thinking and experimenting with colours and glazes. A
glaze is a glass like material that is used to colour and decorate work. Glazes can be
made from raw materials, including stuff like limestone, sand, ash and talc or they
can be bought ready made. Glazes will work differently on different clays so before
8/2/2019 Setting Up an Exhibition - Teaching Activities for Secondary School Students
http://slidepdf.com/reader/full/setting-up-an-exhibition-teaching-activities-for-secondary-school-students 8/29
Page 8
you use them on a prized piece of work, you need to ensure that they will work and
look good.
Mixing your own glazes is fun but also time consuming. Each glaze that is mixedneeds to be tested first and it takes time and hard work until you find the glazes that
you want and are right for you. The slightest variation in the ingredients could
change the way your glaze looks. Raw material can also be quite expensive so you
cannot just mix large quantities of glazes hoping that they will turn out right. When
testing glazes, a potter will usually make test batches, each weighing 100gr. The
test glaze is then applied to a small piece of clay and fired. Only once the potter is
sure that the glaze meets all his or her requirements will large quantities of the glaze
be mixed.
Eventually, the bisque fired works are glazed. Each colour is a different glaze which
needs to be applied separately. The bottom and sides of each individual piece is
then very carefully cleaned of glaze as otherwise the glaze will melt and stick to the
kiln shelves. Each piece is then reloaded in the kiln and fired again, this time to
1060ºC. The work is soaked at top temperature for about 15 minutes and then the
kiln is turned off and allowed to cool. If all has gone according to plan, after about
24 hours I take the pieces out of the kiln. The work is now almost ready!
The work I produce is mounted and framed. The frames are made to measure and a
lot of thought goes into this process. The wrong frame could very easily spoil an
otherwise very nice piece of work. The wood finishing and colour are extremely
important. You also need a frame maker who understands what your needs are.
As the date of the exhibition moves closer you start thinking of other things apart
from the works of art that are also extremely important. Invitations for the opening
night need to be designed and printed. The same can be said for any brochure,
poster or flyer accompanying the exhibition. You need to consider the kind of
opening you would like to have for your exhibition. In most cases, some important
personality is invited to open the exhibition. This person, whoever it is, needs to be

8/2/2019 Setting Up an Exhibition - Teaching Activities for Secondary School Students
http://slidepdf.com/reader/full/setting-up-an-exhibition-teaching-activities-for-secondary-school-students 9/29
Page 9
contacted and his or her availability checked well in advance. You must also think of
the opening reception. Then you must think of titles for your works, prices, labels,
price lists and who to invite, you need to contact the press, promote your exhibition
so that people get to know about it.
The last few days before the opening are usually very hectic. Usually you only have
a couple of days to mount the actual exhibition and you may need to work long
hours before you are done. You need to decide how and where to hang your work.
You need to make sure you have the necessary tools to do so. You have to make
sure that the whole set up looks just right and if not make whatever adjustments
that are needed. Sometimes, you might have to sacrifice one or more works for the
sake of the exhibition – particularly if you have too many pieces for the space in
which you are showing your work. In the end, everything needs to fall in place.
However not everything always goes smoothly and as planned so you have to be
prepared for all eventualities.
By the end of it, you are usually exhausted. However, it is also extremely rewarding
and worth the time and effort.

8/2/2019 Setting Up an Exhibition - Teaching Activities for Secondary School Students
http://slidepdf.com/reader/full/setting-up-an-exhibition-teaching-activities-for-secondary-school-students 10/29
Page 10
Activity 2 – An Exhibition Timeline
This activity encourages students to explore the amount of time it takes to hold anexhibition.
Print and cut out the cards for this activity. Divide the students in groups. Ask them
to create a timeline along which they are to place each card. Compare what the
different groups have done and ask them to justify their decisions. Challenge them
to think whether they are being realistic or not. Here are some questions that can
facilitate the discussion:
• Have you considered all eventualities?
• What if something unexpected happens?
• Have you allocated enough time for this particular activity?
• Why have you allocated so much time for this particular activity?

8/2/2019 Setting Up an Exhibition - Teaching Activities for Secondary School Students
http://slidepdf.com/reader/full/setting-up-an-exhibition-teaching-activities-for-secondary-school-students 11/29
Page 11
Activity 2 – Time Line Cards
Start creating the works tobe exhibited.
Rent/Book a venue.
Finish creating the works tobe exhibited.
Send press-releases.
Frame your work. Market your exhibition.
Design invites/brochures. Print invites/brochures.
Post invitations. Name your works.

8/2/2019 Setting Up an Exhibition - Teaching Activities for Secondary School Students
http://slidepdf.com/reader/full/setting-up-an-exhibition-teaching-activities-for-secondary-school-students 12/29
Page 12
Activity 2 – Time Line Cards (cont.)
Contact the press/media. Organise opening night.
Invite someone toinaugurate your exhibition. Set up the exhibition.
Find a name to yourexhibition.
Strike the exhibition.
Do the accounts. Price your work.
Apply for sponsors/grants. The opening night.
8/2/2019 Setting Up an Exhibition - Teaching Activities for Secondary School Students
http://slidepdf.com/reader/full/setting-up-an-exhibition-teaching-activities-for-secondary-school-students 13/29
Page 13
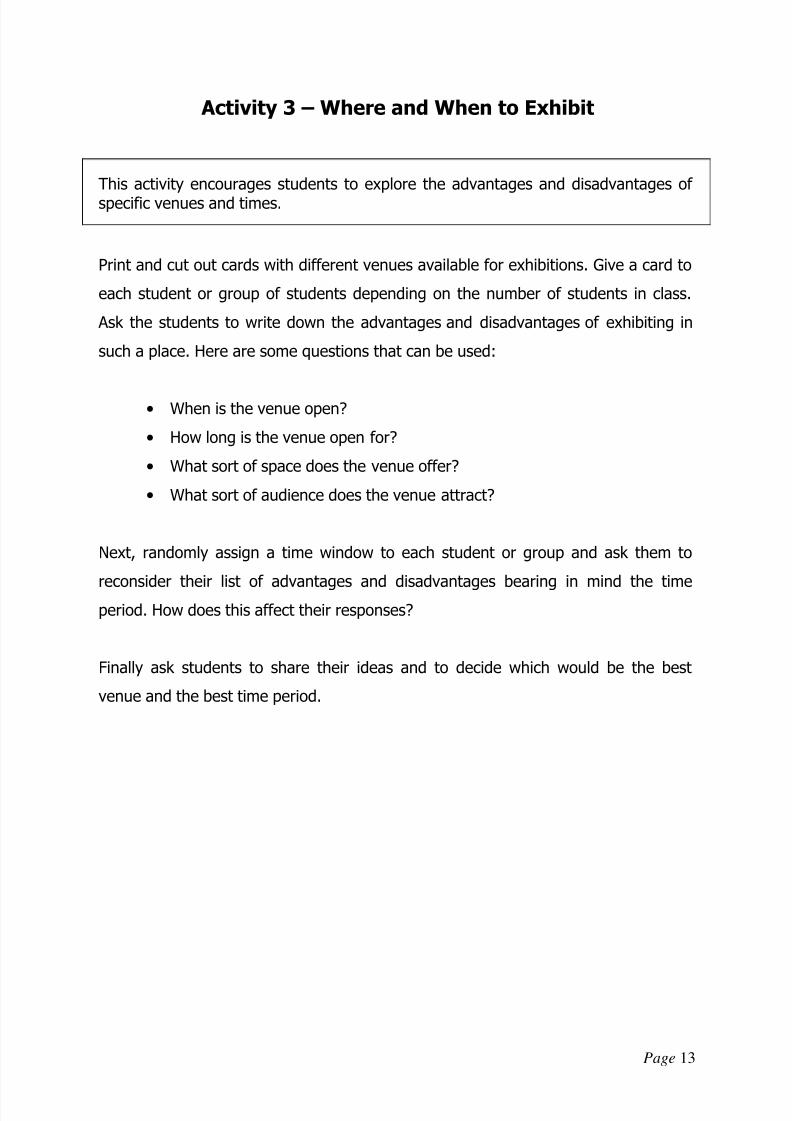
Activity 3 – Where and When to Exhibit
This activity encourages students to explore the advantages and disadvantages of specific venues and times.
Print and cut out cards with different venues available for exhibitions. Give a card to
each student or group of students depending on the number of students in class.
Ask the students to write down the advantages and disadvantages of exhibiting in
such a place. Here are some questions that can be used:
• When is the venue open?
• How long is the venue open for?
• What sort of space does the venue offer?
• What sort of audience does the venue attract?
Next, randomly assign a time window to each student or group and ask them to
reconsider their list of advantages and disadvantages bearing in mind the timeperiod. How does this affect their responses?
Finally ask students to share their ideas and to decide which would be the best
venue and the best time period.
8/2/2019 Setting Up an Exhibition - Teaching Activities for Secondary School Students
http://slidepdf.com/reader/full/setting-up-an-exhibition-teaching-activities-for-secondary-school-students 14/29
Page 14
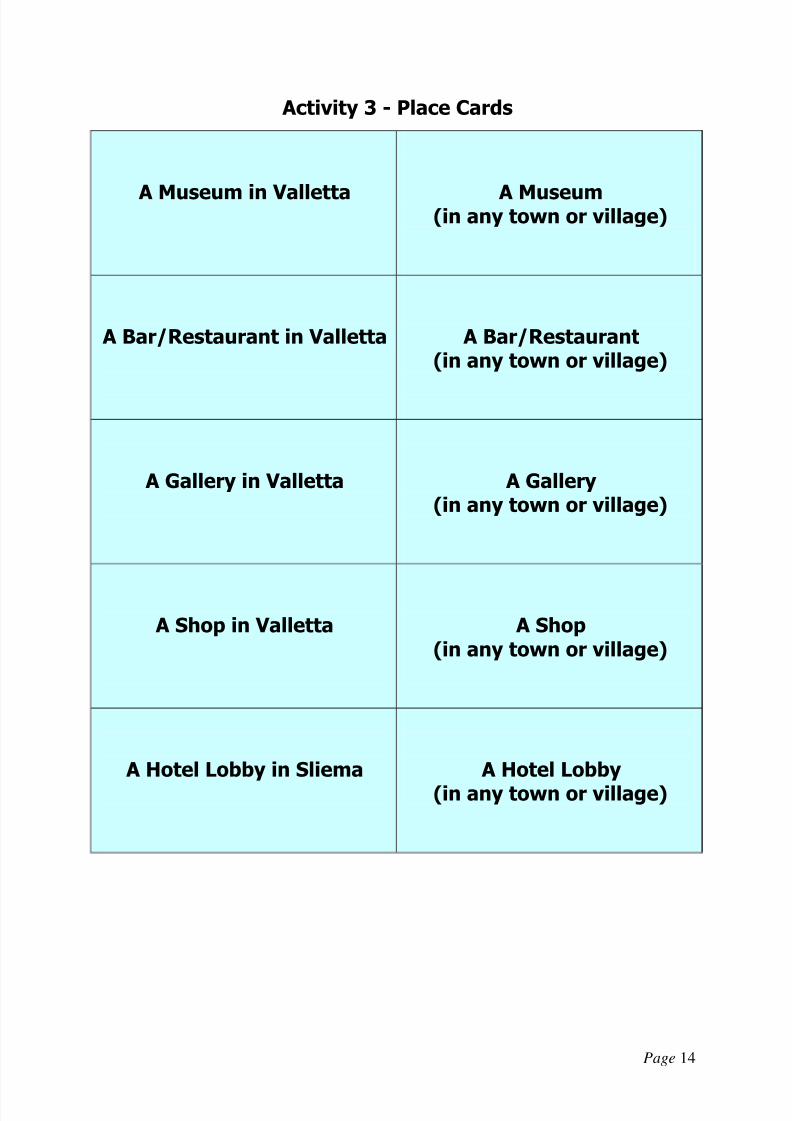
Activity 3 - Place Cards
A Museum in Valletta A Museum(in any town or village)
A Bar/Restaurant in Valletta A Bar/Restaurant(in any town or village)
A Gallery in Valletta A Gallery(in any town or village)
A Shop in Valletta A Shop(in any town or village)
A Hotel Lobby in Sliema A Hotel Lobby
(in any town or village)

8/2/2019 Setting Up an Exhibition - Teaching Activities for Secondary School Students
http://slidepdf.com/reader/full/setting-up-an-exhibition-teaching-activities-for-secondary-school-students 15/29
Page 15
Activity 3 – Time Cards
20 December – 20 January August
Summer Spring
January Carnival
10 September – 10 October Easter
20 January – 20 February November
8/2/2019 Setting Up an Exhibition - Teaching Activities for Secondary School Students
http://slidepdf.com/reader/full/setting-up-an-exhibition-teaching-activities-for-secondary-school-students 16/29
Page 16
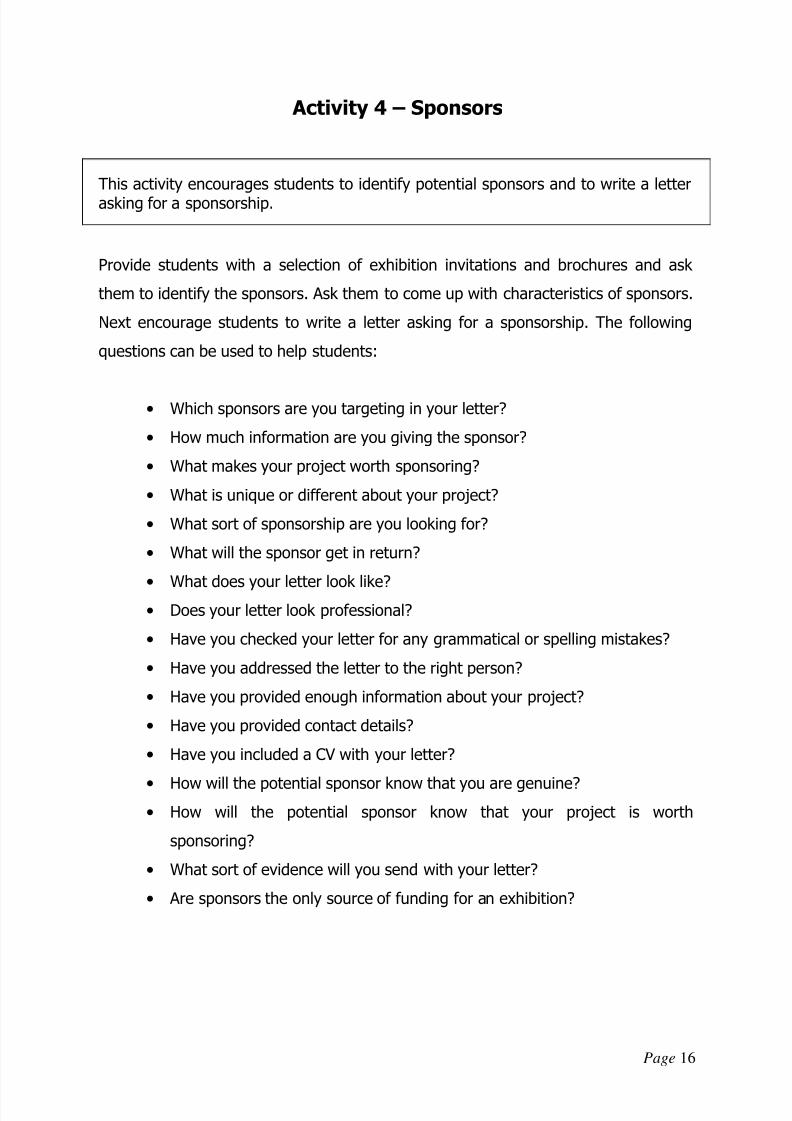
Activity 4 – Sponsors
This activity encourages students to identify potential sponsors and to write a letterasking for a sponsorship.
Provide students with a selection of exhibition invitations and brochures and ask
them to identify the sponsors. Ask them to come up with characteristics of sponsors.
Next encourage students to write a letter asking for a sponsorship. The following
questions can be used to help students:
• Which sponsors are you targeting in your letter?
• How much information are you giving the sponsor?
• What makes your project worth sponsoring?
• What is unique or different about your project?
• What sort of sponsorship are you looking for?
• What will the sponsor get in return?
• What does your letter look like?
• Does your letter look professional?
• Have you checked your letter for any grammatical or spelling mistakes?
• Have you addressed the letter to the right person?
• Have you provided enough information about your project?
• Have you provided contact details?
• Have you included a CV with your letter?
• How will the potential sponsor know that you are genuine?
• How will the potential sponsor know that your project is worth
sponsoring?
• What sort of evidence will you send with your letter?
• Are sponsors the only source of funding for an exhibition?
8/2/2019 Setting Up an Exhibition - Teaching Activities for Secondary School Students
http://slidepdf.com/reader/full/setting-up-an-exhibition-teaching-activities-for-secondary-school-students 17/29
Page 17
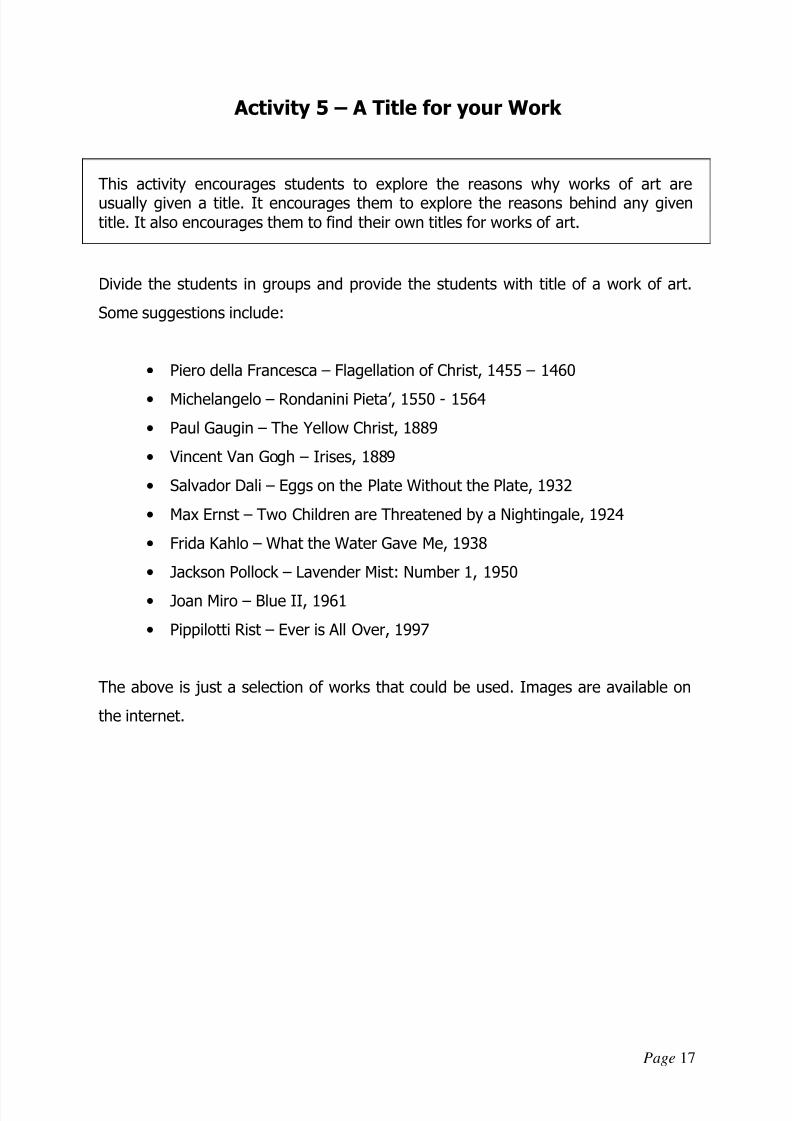
Activity 5 – A Title for your Work
This activity encourages students to explore the reasons why works of art areusually given a title. It encourages them to explore the reasons behind any giventitle. It also encourages them to find their own titles for works of art.
Divide the students in groups and provide the students with title of a work of art.
Some suggestions include:
• Piero della Francesca – Flagellation of Christ, 1455 – 1460
• Michelangelo – Rondanini Pieta’, 1550 - 1564
• Paul Gaugin – The Yellow Christ, 1889
• Vincent Van Gogh – Irises, 1889
• Salvador Dali – Eggs on the Plate Without the Plate, 1932
• Max Ernst – Two Children are Threatened by a Nightingale, 1924
• Frida Kahlo – What the Water Gave Me, 1938
• Jackson Pollock – Lavender Mist: Number 1, 1950
• Joan Miro – Blue II, 1961
• Pippilotti Rist – Ever is All Over, 1997
The above is just a selection of works that could be used. Images are available on
the internet.

8/2/2019 Setting Up an Exhibition - Teaching Activities for Secondary School Students
http://slidepdf.com/reader/full/setting-up-an-exhibition-teaching-activities-for-secondary-school-students 18/29
Page 18
Activity 5 – A Title for your Work (cont.)
Ask students to describe or even draw the work of art based on what they can make
out from the title. Ask students to share their ideas. Show the students the relative
work of art. Encourage them to explore the relationship between the title, what they
made out of it and the actual work of art. The following questions can facilitate the
discussion:
• Could you have imagined what the work of art was like just by knowing its
title?
• What other information did you need to form a more accurate impression
of the work of art?
• Do you think the title does justice to the work of art?
• Why do you think the artist titled his or her work so?
• Could someone else have titled the work of art rather than the artist?
• Why do works of art need a title, if at all?
Divide the students in groups. Give a copy of the works of art included with this
activity to each group. Ask students to find a suitable name for each work.
Encourage students to share their ideas with the class. Finally, provide the students
with the artists’ titles and comments about their respective works. Compare and
contrast this with what the students would have come up with.
8/2/2019 Setting Up an Exhibition - Teaching Activities for Secondary School Students
http://slidepdf.com/reader/full/setting-up-an-exhibition-teaching-activities-for-secondary-school-students 19/29
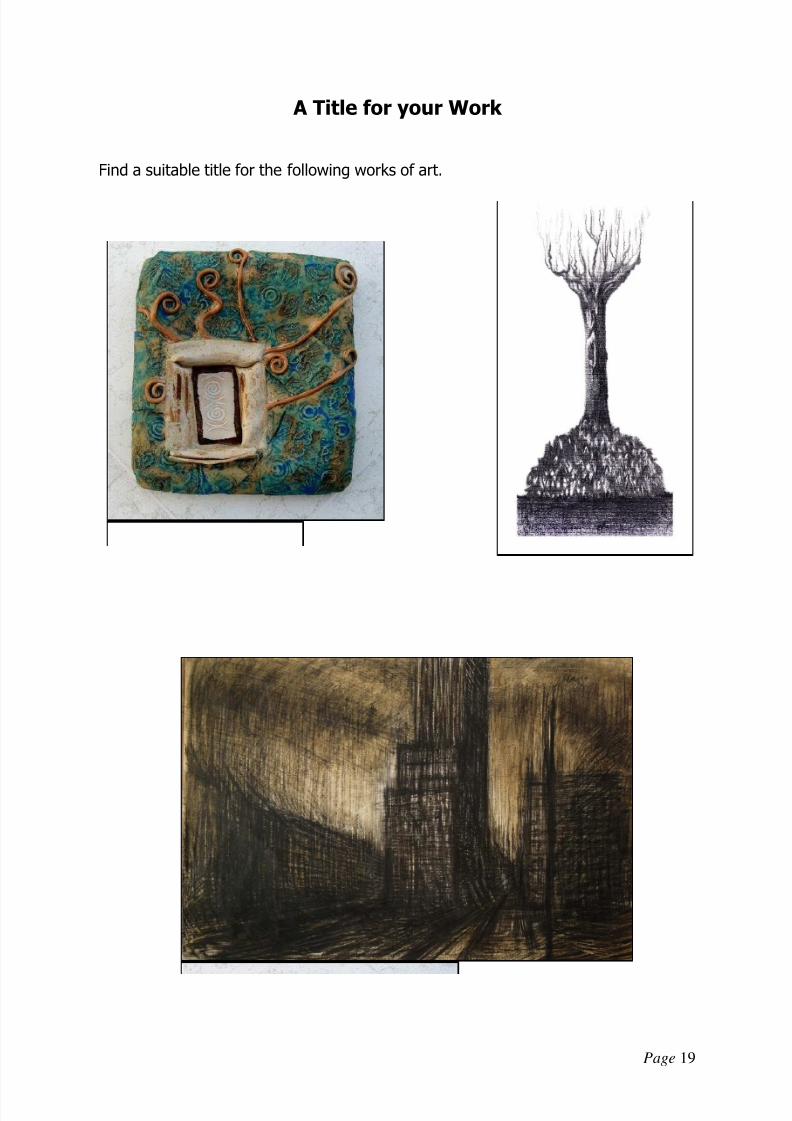
Page 19
A Title for your Work
Find a suitable title for the following works of art.
8/2/2019 Setting Up an Exhibition - Teaching Activities for Secondary School Students
http://slidepdf.com/reader/full/setting-up-an-exhibition-teaching-activities-for-secondary-school-students 20/29
Page 20
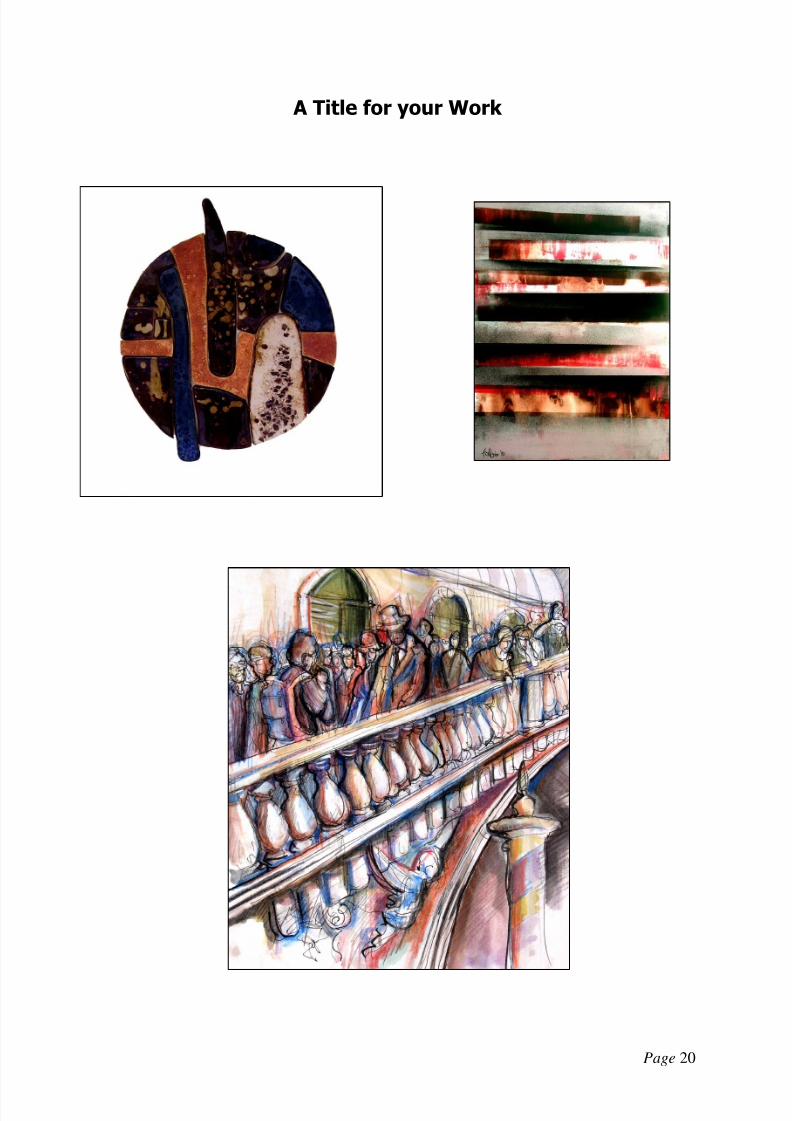
A Title for your Work

8/2/2019 Setting Up an Exhibition - Teaching Activities for Secondary School Students
http://slidepdf.com/reader/full/setting-up-an-exhibition-teaching-activities-for-secondary-school-students 21/29
Page 21
A Title for your Work
This is what artists had to say about their own work.
Artist - Julie Apap
Title - The Magic Remains
This is stoneware wall piece inspired by the Maltese Temples, which hold a secret that intrigues and fascinates us, almost as if they contain a code that speaks to our subconscious. I see the energy in the stones or from the ground around, as hypnotic and magical.
Artist - Trevor Borg
Title – Up Rooted
The title of this work is a play on words.While normally roots are not visible because they are situated underground in this case they are on top of
the tree structure.
Artist – Robert Zahra
Title - Untitled
I never gave a title to these works because they were part of a series of developments from studies of
cityscapes. When I chose the different areas of the city to study, I had no particular story to tell. I was more after the character of the city and how this can be transmitted through a personal image. I could have named the paintings by referring to their formal content - Two Towers, Tram Lines, the Tree or the Bridge - but I never really felt the necessity to do so.Some artworks do not really need a title to help you decipher what's going on, or transmit emotions.

8/2/2019 Setting Up an Exhibition - Teaching Activities for Secondary School Students
http://slidepdf.com/reader/full/setting-up-an-exhibition-teaching-activities-for-secondary-school-students 22/29
Page 22
Artist – Charlot Cassar
Title - Tondo
Titles are something that I usually think of after the work is finished. Most of my work starts from a
specific idea which then develops into something else altogether. I keep on making changes almost until the very end. This stoneware piece was called Tondo simply because of its shape. I was intrigued by the idea of a circular composition and the challenges this offered, hence the name.
Artist – Fabio Borg
Title – Fortifying the Future
I believe that paintings need to have a name. Every child that is born is given a name. I always name a
piece of work. Usually, when I finish a painting I try to see what it has to tell me. When I finished this
particular painting, somehow it reminded me of the future. I noticed that the orange colour in this composition was particularly powerful. It is said that orange stimulates enthusiasm and creativity. I named the painting 'Fortifying the Future'
because I try to look at the future with enthusiasm.
Artist – Keith Balzan
Title – Rialto Traffic
Rialto Traffic narrates the constant hustle and bustle that is so characteristic of this famous bridge. Sinewy bodies glide busily up and down the stairs, dodge each other, briefly pause to talk or simply take in the canal's view whilst catching breath. The technique used is quite fresh, sketchy and spontaneous,executed with hurried lines and selective, pale wet in wet colouring.

8/2/2019 Setting Up an Exhibition - Teaching Activities for Secondary School Students
http://slidepdf.com/reader/full/setting-up-an-exhibition-teaching-activities-for-secondary-school-students 23/29
Page 23
Activity 6 – Preparing your Works for an Exhibition
This activity encourages students to explore the processes involved in preparingworks of art for an exhibition, from the moment the artist finishes the work to themoment it is exhibited.
Encourage students to visit an art exhibition and to look at the way the works are
presented. The following questions ought to facilitate the investigation:
• How were the works of art presented?
• Where they mounted/framed?
• How were they mounted/framed?
• Did the frames do justice to the work?
• Were they hung/set on plinths?
• How were they hung?
Ask the children to choose one of their own works. Ask them to imagine that this
work was going to be entered in an exhibition. How would they prepare the work for
the exhibition? This could include trimming the work, mounting it, having it mounted
professionally, framing it. Encourage them to discuss different possibilities, taking
into consideration the nature of the exhibition (a school exhibition as against a
national juried exhibition for example). Also encourage them to consider the costs
involved.

8/2/2019 Setting Up an Exhibition - Teaching Activities for Secondary School Students
http://slidepdf.com/reader/full/setting-up-an-exhibition-teaching-activities-for-secondary-school-students 24/29
Page 24
Activity 7- Designing an Invite
This activity encourages students to look at different exhibition invites and design aninvitation for a school exhibition. This activity could also be adapted to exploreexhibition flyers, brochures or posters.
Divide the students in groups. Provide each group with a number of exhibition
invites. Encourage them to look at the invites objectively. The following questions
can help guide the discussions:
• What size is the invite?
• Is it printed on both sides?
• Is it printed in full colour?
• What sort of paper is the invite printed on?
• What is the information provided on the invitation?
• What does the invitation say about the exhibition?
• What does the invitation say about the artist?
• What does the invitation say about the works of art in the exhibition?
• Are any works of art from the exhibition included in the invite?
• How are these presented?
• Is there enough/too much/too little information?
• Which of the invites do you think works best?
• Which exhibition would you be enticed to visit based on the invites?
• Why?
• What are the elements of a successful invite?
Ask students to imagine that they are going to have a school exhibition with their
own work. Provide them with the basic information required (date, place and time)
and ask them to design an invite for this exhibition. The students can be set specific
parameters within which to work (size of invite, colours, sponsor logos, etc).
8/2/2019 Setting Up an Exhibition - Teaching Activities for Secondary School Students
http://slidepdf.com/reader/full/setting-up-an-exhibition-teaching-activities-for-secondary-school-students 25/29
Page 25
Activity 8 – Costing an Exhibition and Pricing your Work
This activity is aimed at making students realise the costs involved in setting up anexhibition and how artists go about pricing their work.
Exhibiting artists know too well that exhibiting is an expensive process. However, the
public may not necessarily be fully aware of the costs involved. This project involves
students identifying all the potential costs of an exhibition that follows a given brief.
Based on this, the students are then asked to give a tentative price to their work.
Divide the students in groups and present each group with a brief for an exhibition.
An example is included with this exhibition. Ask each group to list all the expenses
related to the exhibition. Some information is readily provided for the students but
they should be encouraged to procure real quotations.
This project ought to be developed over a period of time, possibly 2 weeks or more.
8/2/2019 Setting Up an Exhibition - Teaching Activities for Secondary School Students
http://slidepdf.com/reader/full/setting-up-an-exhibition-teaching-activities-for-secondary-school-students 26/29
Page 26
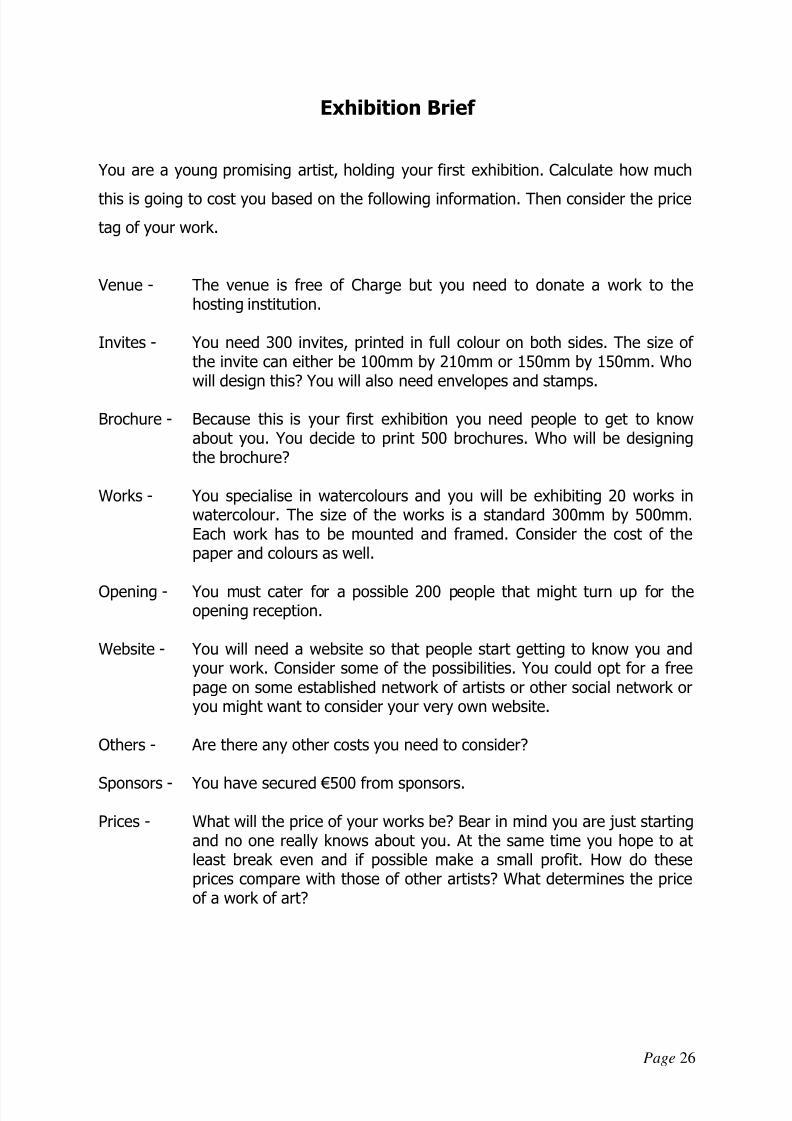
Exhibition Brief
You are a young promising artist, holding your first exhibition. Calculate how much
this is going to cost you based on the following information. Then consider the price
tag of your work.
Venue - The venue is free of Charge but you need to donate a work to thehosting institution.
Invites - You need 300 invites, printed in full colour on both sides. The size of the invite can either be 100mm by 210mm or 150mm by 150mm. Whowill design this? You will also need envelopes and stamps.
Brochure - Because this is your first exhibition you need people to get to knowabout you. You decide to print 500 brochures. Who will be designingthe brochure?
Works - You specialise in watercolours and you will be exhibiting 20 works inwatercolour. The size of the works is a standard 300mm by 500mm.Each work has to be mounted and framed. Consider the cost of thepaper and colours as well.
Opening - You must cater for a possible 200 people that might turn up for theopening reception.
Website - You will need a website so that people start getting to know you andyour work. Consider some of the possibilities. You could opt for a freepage on some established network of artists or other social network oryou might want to consider your very own website.
Others - Are there any other costs you need to consider?
Sponsors - You have secured €500 from sponsors.
Prices - What will the price of your works be? Bear in mind you are just startingand no one really knows about you. At the same time you hope to atleast break even and if possible make a small profit. How do theseprices compare with those of other artists? What determines the priceof a work of art?

8/2/2019 Setting Up an Exhibition - Teaching Activities for Secondary School Students
http://slidepdf.com/reader/full/setting-up-an-exhibition-teaching-activities-for-secondary-school-students 27/29
Page 27
Activity 9 – Promoting an Exhibition
This activity aims to help students think about the ways in which exhibitions arepromoted.
Divide the students in groups and ask them to brain storm all the possible ways in
which an art exhibition can be promoted. Encourage them to look at what exhibiting
artists are doing. Provide them with some newspapers and magazines and ask them
to identify ways in which exhibitions are being promoted. The following questions
can help guide the students:
• How do artists promote their exhibitions?
• Where and when should artists promote their events?
• Who else might have an interest in promoting an artist’s exhibition?
• What means do artists use to promote their work?
• What are the most effective means for promoting an exhibition?
• What is the role of internet in promoting an art exhibition?
• What online applications and channels could be used to promote an
exhibition?
• Where can artists promote their events online?
• What role if any, do artists’ websites play in promoting an exhibition?
Invite students to explore such sites as www.sjcav.org, www.heritagemalta.org,
www.visitmalta.com and www.creativeurope.com amongst others.
Ask students to come up with a promotion campaign for a school exhibition. Ask
them to draw a detailed action plan that indicates what they are going to do and
when. Encourage them to think of the costs that might be involved and to find
cheaper or free alternatives.

8/2/2019 Setting Up an Exhibition - Teaching Activities for Secondary School Students
http://slidepdf.com/reader/full/setting-up-an-exhibition-teaching-activities-for-secondary-school-students 28/29
Page 28
Activity 10 - Write a Press Release
An exhibiting artist needs to be able to write about his or her own work. This activityencourages students to write their own press release for an art exhibition.
Provide students with a number of press releases related to art exhibitions. Various
examples can be found online on local press websites. Encourage them to read the
press releases and identify key elements in each press release. The following
questions can help guide the students:
• What sort of information is provided in the press release?
• How is the exhibition described?
• What adjectives are used to describe the works of art?
• How long is the press release?
• Who is the press release addressed to?
• Is the press release in the first or third person?
• Is the press release effective?
• What makes a press release effective?
• Based on the press release, would you consider visiting the exhibition it
talks about?
• Is there any information that you think is missing?
Ask students to write their own press release to promote a school exhibition. The
press release should be approximately 250 words long and should provide all therelevant information about the exhibition, artists and works of art presented.

8/2/2019 Setting Up an Exhibition - Teaching Activities for Secondary School Students
http://slidepdf.com/reader/full/setting-up-an-exhibition-teaching-activities-for-secondary-school-students 29/29
Acknowledgments
Julie Apap
Robert Zahra
Trevor Borg
Fabio Borg
Keith Balzan
Viki D. Thompson Wylder
Supported by:
www.charlotcassar.com