Embed Size (px)
Citation preview
Setting up APRSIS32
Andy Russell G0VRM
North Humber Raynet
1
Overview
This document provides a walkthrough of the installation and setup process for APRSIS32. If you
have not heard of APRSIS32, it is an APRS program for Microsoft Windows that is both versatile and
easy to set up. It can be operated without a radio in its most basic configuration, which makes it
ideal for a beginner, and can be easily expanded to support a number of external devices (such as
packet radio modems and GPS receivers) as your set up grows.
Another feature which makes it ideal for beginners is that it automatically downloads the map data
it requires on the fly from OpenStreetMap, a free service which offers street-level mapping with a
similar quality to Google Maps™ – for situations where an internet connection is not available, these
maps can be “cached” for access later.
Installing the Software
The software can be downloaded the APRSISCE Yahoo Groupi or from the APRSISCE/32 Wiki Page.ii
Although the installation and setup process is straightforward, I recommend that first-time users
watch the excellent videos produced by Julian Moss G4ILOiii before proceeding.
To install the program, simply extract the file APRSIS32.EXE from the zip archive you have
downloaded and copy it into a suitable folder and double-click it. Please note that the program
cannot be run from within the “C:\Program Files\” folder, as it protected in later versions of
Windows and the software will not be able to create its configuration files or download maps.
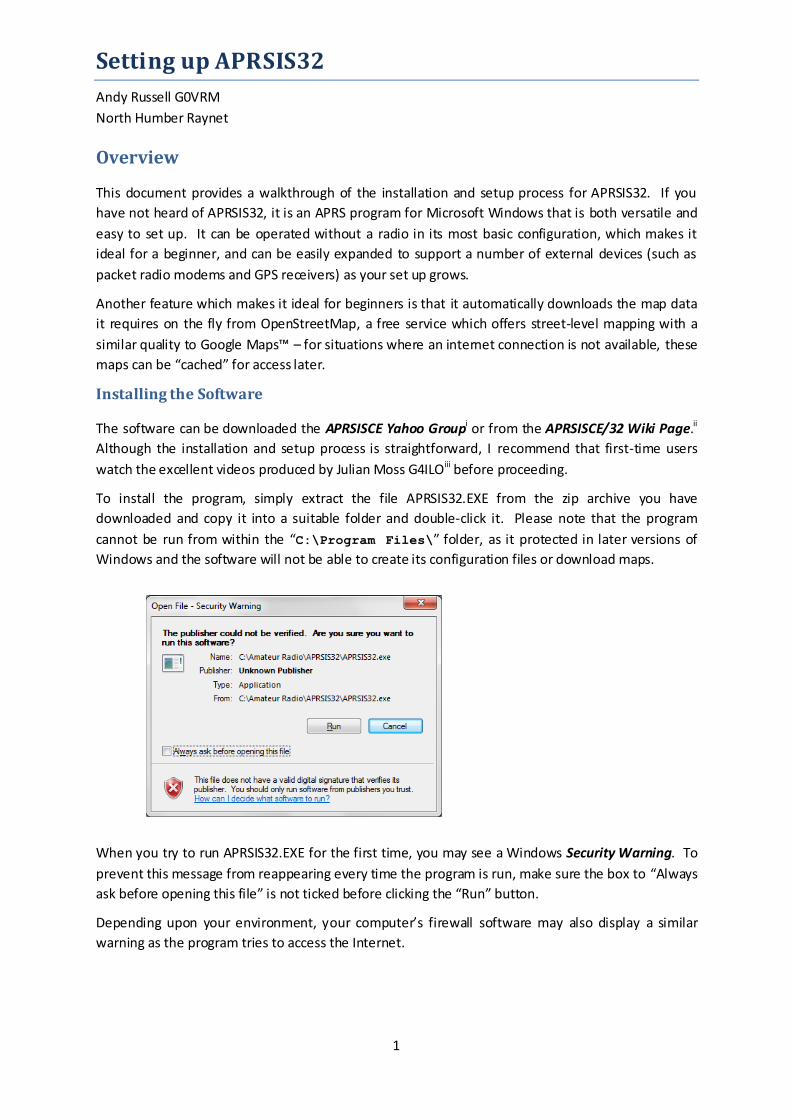
When you try to run APRSIS32.EXE for the first time, you may see a Windows Security Warning. To
prevent this message from reappearing every time the program is run, make sure the box to “Always
ask before opening this file” is not ticked before clicking the “Run” button.
Depending upon your environment, your computer’s firewall software may also display a similar
warning as the program tries to access the Internet.
2
Configuring APRSIS32
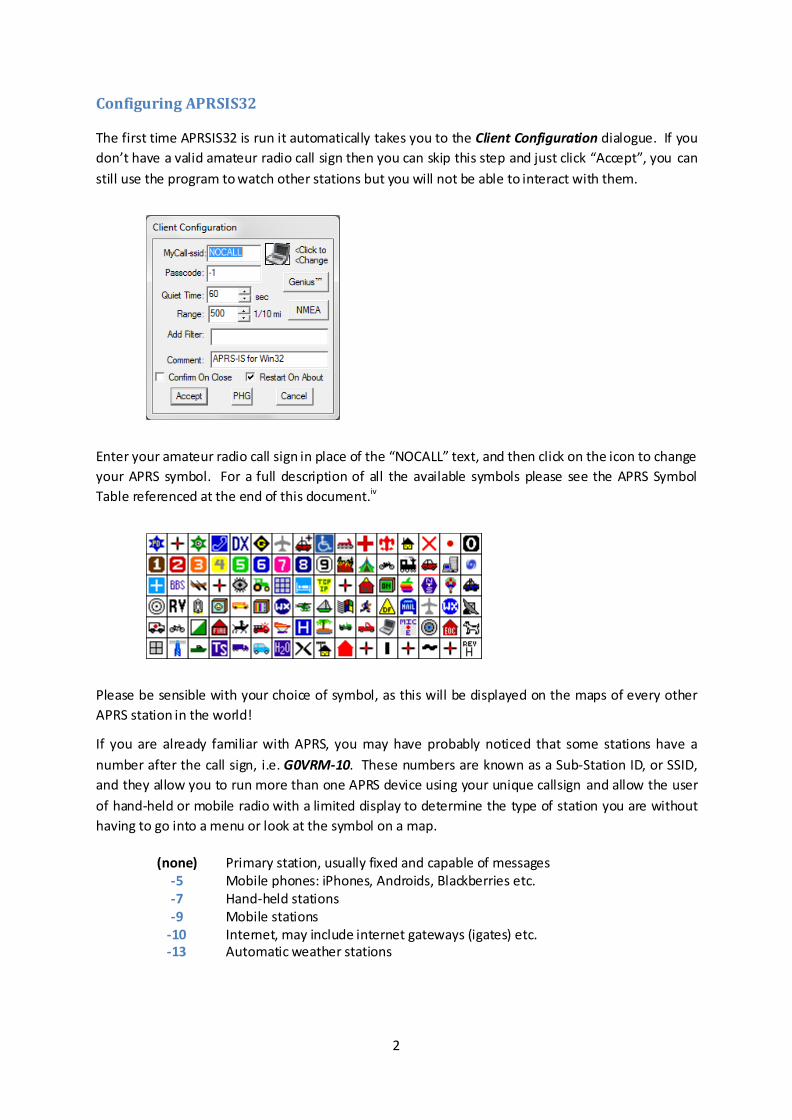
The first time APRSIS32 is run it automatically takes you to the Client Configuration dialogue. If you
don’t have a valid amateur radio call sign then you can skip this step and just click “Accept”, you can
still use the program to watch other stations but you will not be able to interact with them.
Enter your amateur radio call sign in place of the “NOCALL” text, and then click on the icon to change
your APRS symbol. For a full description of all the available symbols please see the APRS Symbol
Table referenced at the end of this document.iv
Please be sensible with your choice of symbol, as this will be displayed on the maps of every other
APRS station in the world!
If you are already familiar with APRS, you may have probably noticed that some stations have a
number after the call sign, i.e. G0VRM-10. These numbers are known as a Sub-Station ID, or SSID,
and they allow you to run more than one APRS device using your unique callsign and allow the user
of hand-held or mobile radio with a limited display to determine the type of station you are without
having to go into a menu or look at the symbol on a map.
(none) Primary station, usually fixed and capable of messages -5 Mobile phones: iPhones, Androids, Blackberries etc. -7 Hand-held stations -9 Mobile stations
-10 Internet, may include internet gateways (igates) etc. -13 Automatic weather stations
3
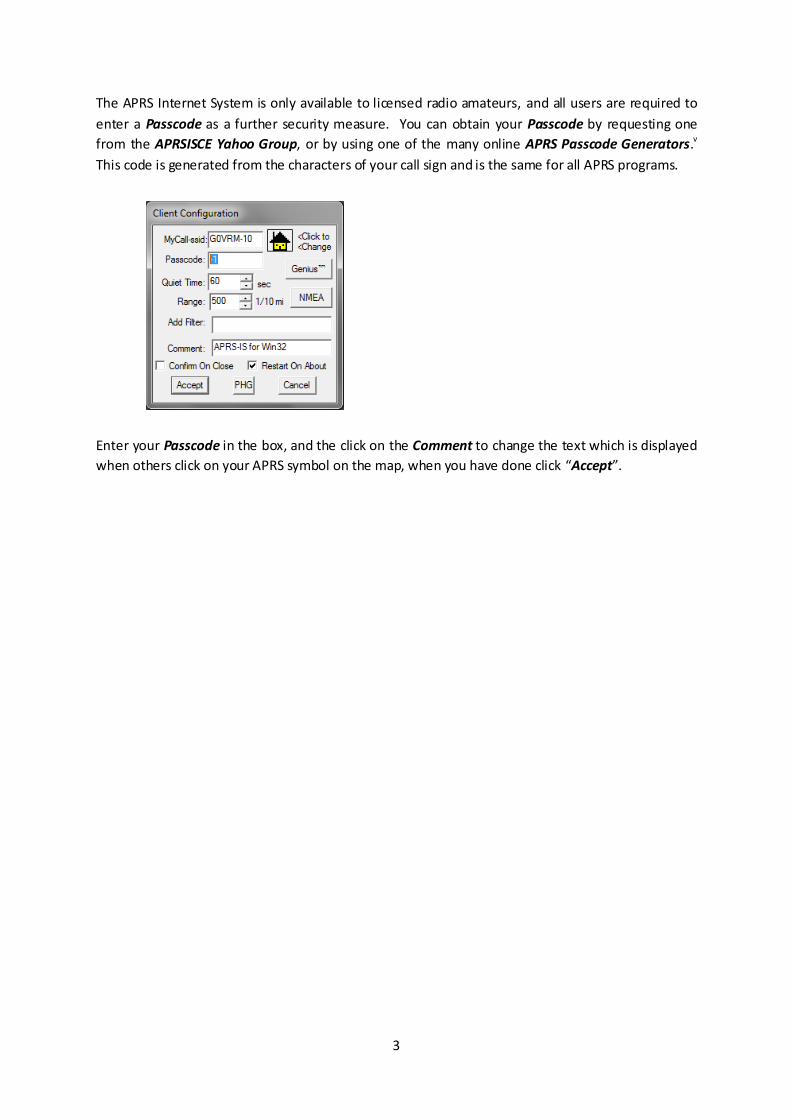
The APRS Internet System is only available to licensed radio amateurs, and all users are required to
enter a Passcode as a further security measure. You can obtain your Passcode by requesting one
from the APRSISCE Yahoo Group, or by using one of the many online APRS Passcode Generators.v
This code is generated from the characters of your call sign and is the same for all APRS programs.
Enter your Passcode in the box, and the click on the Comment to change the text which is displayed
when others click on your APRS symbol on the map, when you have done click “Accept”.

4
Setting Your Position
Depending upon your display, you may need to adjust the map transparency in order to make the
map dark enough to see the underlying detail . To do this, press the right arrow key several times
until the grid appears, and then press the left arrow key to back off.
Use the mouse to drag and zoom into your local area on the map, using either the scroll wheel or the
up and down arrow keys. As you zoom in to your regional area, icons from other APRS stations
downloaded from the Internet may start appearing on the map.
Zoom in, and when you have centred the crosshairs on your home location, select “Transmit” from
the menu bar at the top of the screen. Your home location is now saved and your chosen APRS
symbol will appear on the map. Your call sign (and SSID if you’ve used one) will now appear on the
list of stations at the top left – you should now be visible to all other APRS users worldwide!
Finally, you should zoom out so that the map covers a county-wide area, and leave it to build up the
display over the next 15 minutes or so. You should now be able to see the icons from the stations
that are active in your area; to display their call signs on the map, select “Screen” from the menu
bar, followed by “Labels” and then “Callsign”. This can be toggled on and off.
That’s about all there is to setting up your own Internet-based APRSIS32 station. If you want to go
further and attach other devices such as a packet radio modem or a GPS receiver then continue
reading!
5
Connecting to a Packet Radio Modem
APRSIS32 communicates with external devices such as packet radio modems and GPS receivers
through software ports, which are then connected to either a TCP/IP network connection or a COM:
port – either a physical COM port or one created by a USB or Bluetooth driver.
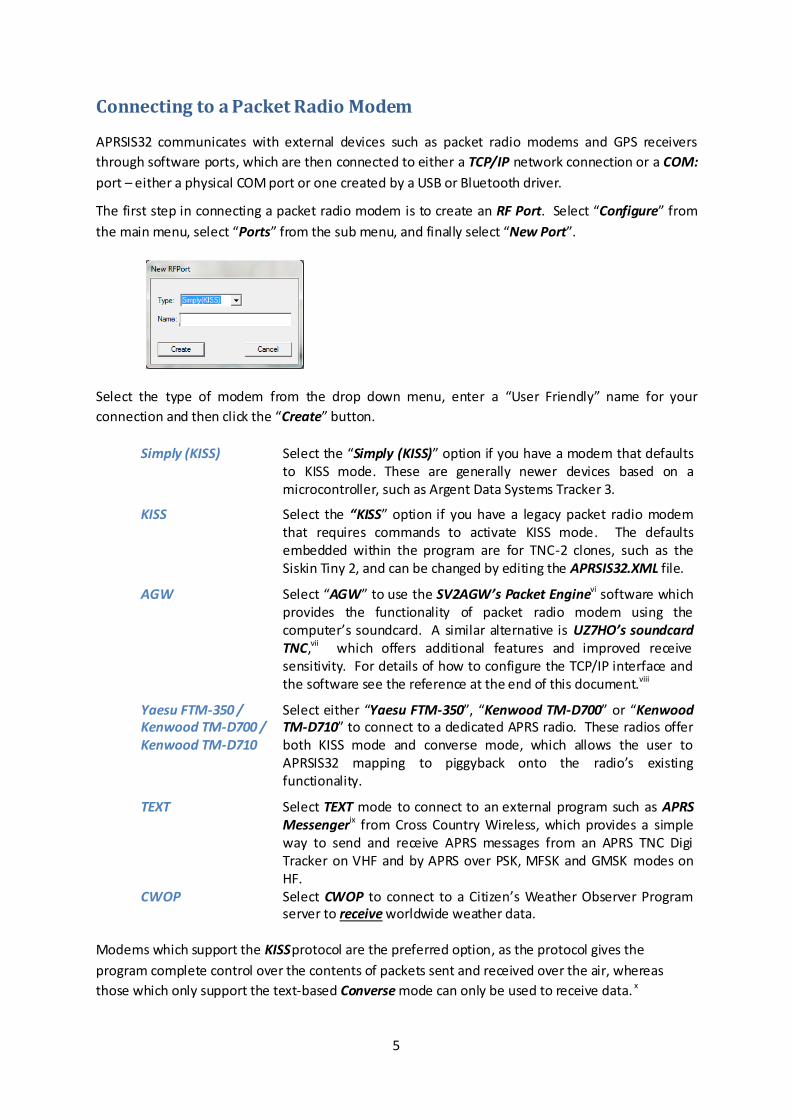
The first step in connecting a packet radio modem is to create an RF Port. Select “Configure” from
the main menu, select “Ports” from the sub menu, and finally select “New Port”.
Select the type of modem from the drop down menu, enter a “User Friendly” name for your
connection and then click the “Create” button.
Simply (KISS) Select the “Simply (KISS)” option if you have a modem that defaults to KISS mode. These are generally newer devices based on a microcontroller, such as Argent Data Systems Tracker 3.
KISS Select the “KISS” option if you have a legacy packet radio modem that requires commands to activate KISS mode. The defaults embedded within the program are for TNC-2 clones, such as the Siskin Tiny 2, and can be changed by editing the APRSIS32.XML file.
AGW Select “AGW” to use the SV2AGW’s Packet Enginevi software which provides the functionality of packet radio modem using the computer’s soundcard. A similar alternative is UZ7HO’s soundcard TNC,vii which offers additional features and improved receive sensitivity. For details of how to configure the TCP/IP interface and the software see the reference at the end of this document.viii
Yaesu FTM-350 / Kenwood TM-D700 / Kenwood TM-D710
Select either “Yaesu FTM-350”, “Kenwood TM-D700” or “Kenwood TM-D710” to connect to a dedicated APRS radio. These radios offer both KISS mode and converse mode, which allows the user to APRSIS32 mapping to piggyback onto the radio’s existing functionality.
TEXT Select TEXT mode to connect to an external program such as APRS Messengerix from Cross Country Wireless, which provides a simple way to send and receive APRS messages from an APRS TNC Digi Tracker on VHF and by APRS over PSK, MFSK and GMSK modes on HF.
CWOP Select CWOP to connect to a Citizen’s Weather Observer Program server to receive worldwide weather data.
Modems which support the KISS protocol are the preferred option, as the protocol gives the
program complete control over the contents of packets sent and received over the air, whereas
those which only support the text-based Converse mode can only be used to receive data. x
6
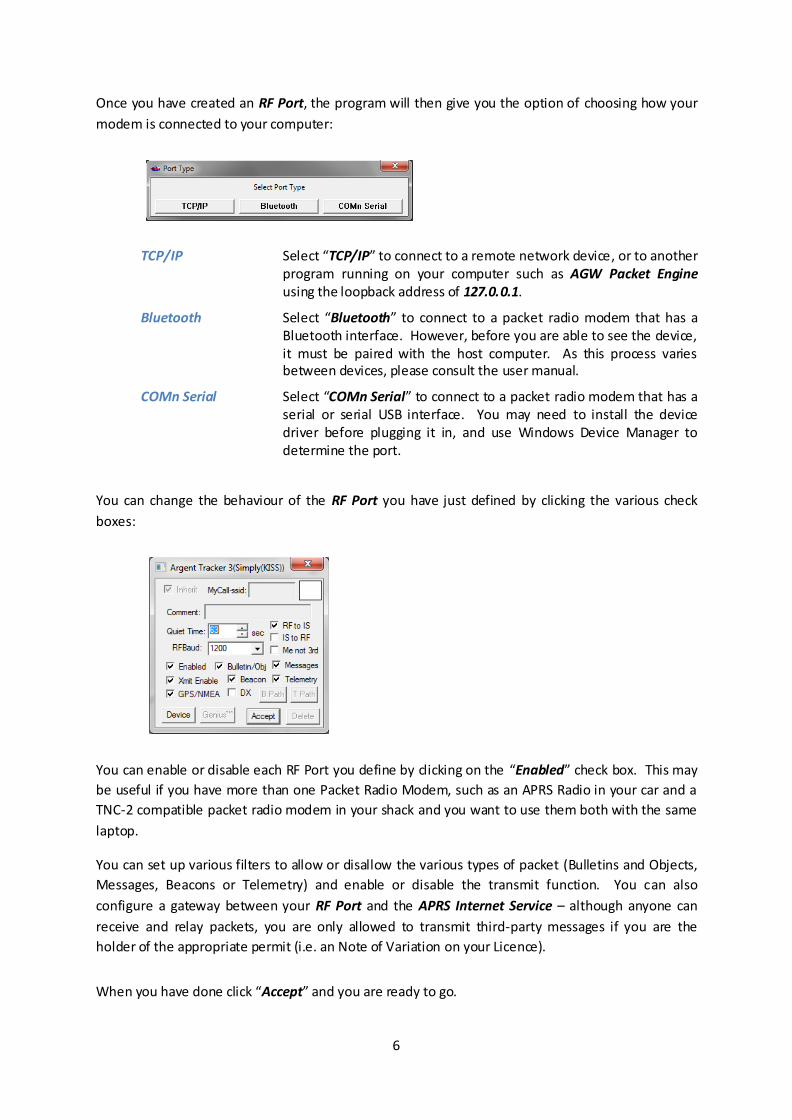
Once you have created an RF Port, the program will then give you the option of choosing how your
modem is connected to your computer:
TCP/IP Select “TCP/IP” to connect to a remote network device, or to another program running on your computer such as AGW Packet Engine using the loopback address of 127.0.0.1.
Bluetooth Select “Bluetooth” to connect to a packet radio modem that has a Bluetooth interface. However, before you are able to see the device, it must be paired with the host computer. As this process varies between devices, please consult the user manual.
COMn Serial Select “COMn Serial” to connect to a packet radio modem that has a serial or serial USB interface. You may need to install the device driver before plugging it in, and use Windows Device Manager to determine the port.
You can change the behaviour of the RF Port you have just defined by clicking the various check
boxes:
You can enable or disable each RF Port you define by clicking on the “Enabled” check box. This may
be useful if you have more than one Packet Radio Modem, such as an APRS Radio in your car and a
TNC-2 compatible packet radio modem in your shack and you want to use them both with the same
laptop.
You can set up various filters to allow or disallow the various types of packet (Bulletins and Objects,
Messages, Beacons or Telemetry) and enable or disable the transmit function. You can also
configure a gateway between your RF Port and the APRS Internet Service – although anyone can
receive and relay packets, you are only allowed to transmit third-party messages if you are the
holder of the appropriate permit (i.e. an Note of Variation on your Licence).
When you have done click “Accept” and you are ready to go.
7
Configuring your connection to the APRS Internet Service
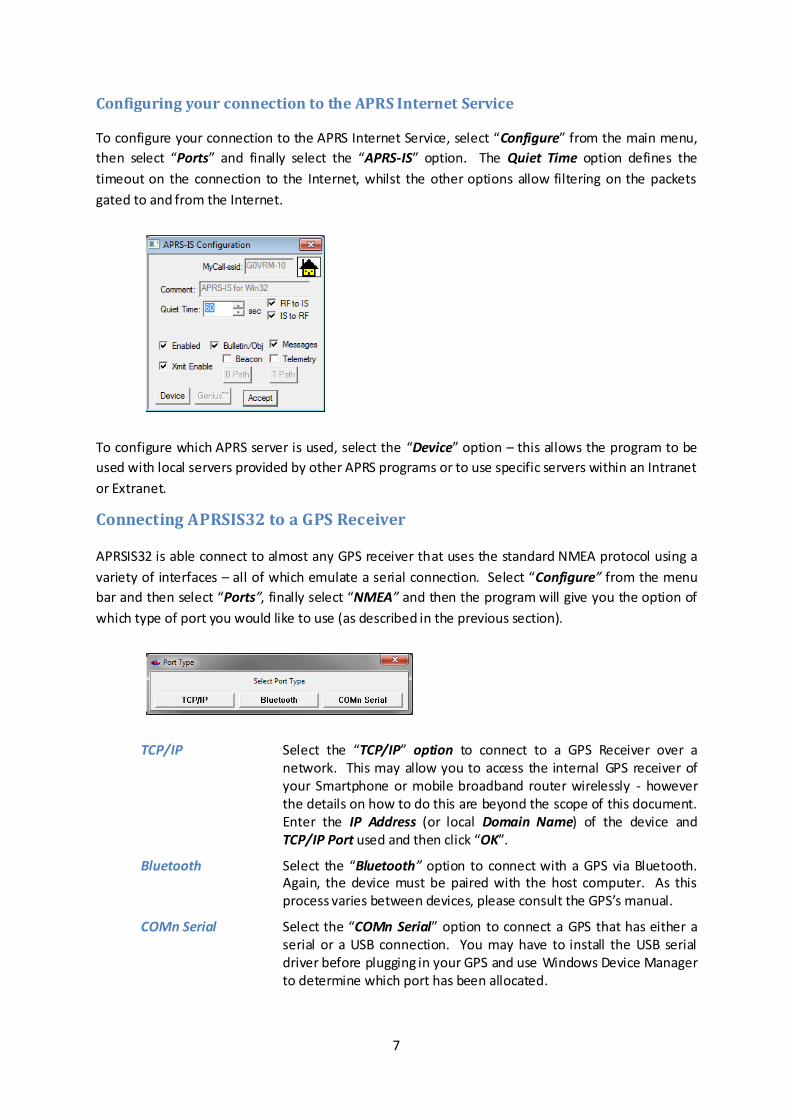
To configure your connection to the APRS Internet Service, select “Configure” from the main menu,
then select “Ports” and finally select the “APRS-IS” option. The Quiet Time option defines the
timeout on the connection to the Internet, whilst the other options allow filtering on the packets
gated to and from the Internet.
To configure which APRS server is used, select the “Device” option – this allows the program to be
used with local servers provided by other APRS programs or to use specific servers within an Intranet
or Extranet.
Connecting APRSIS32 to a GPS Receiver
APRSIS32 is able connect to almost any GPS receiver that uses the standard NMEA protocol using a
variety of interfaces – all of which emulate a serial connection. Select “Configure” from the menu
bar and then select “Ports”, finally select “NMEA” and then the program will give you the option of
which type of port you would like to use (as described in the previous section).
TCP/IP Select the “TCP/IP” option to connect to a GPS Receiver over a network. This may allow you to access the internal GPS receiver of your Smartphone or mobile broadband router wirelessly - however the details on how to do this are beyond the scope of this document. Enter the IP Address (or local Domain Name) of the device and TCP/IP Port used and then click “OK”.
Bluetooth Select the “Bluetooth” option to connect with a GPS via Bluetooth. Again, the device must be paired with the host computer. As this process varies between devices, please consult the GPS’s manual.
COMn Serial Select the “COMn Serial” option to connect a GPS that has either a serial or a USB connection. You may have to install the USB serial driver before plugging in your GPS and use Windows Device Manager to determine which port has been allocated.
8
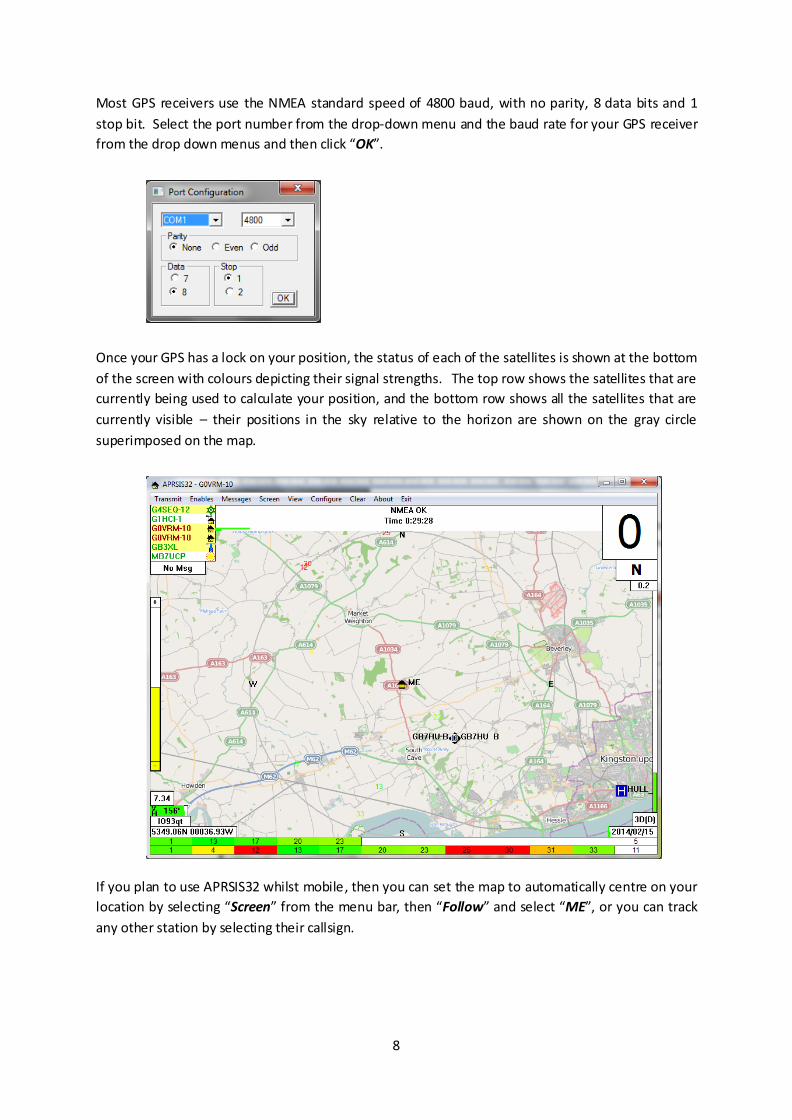
Most GPS receivers use the NMEA standard speed of 4800 baud, with no parity, 8 data bits and 1
stop bit. Select the port number from the drop-down menu and the baud rate for your GPS receiver
from the drop down menus and then click “OK”.
Once your GPS has a lock on your position, the status of each of the satellites is shown at the bottom
of the screen with colours depicting their signal strengths. The top row shows the satellites that are
currently being used to calculate your position, and the bottom row shows all the satellites that are
currently visible – their positions in the sky relative to the horizon are shown on the gray circle
superimposed on the map.
If you plan to use APRSIS32 whilst mobile, then you can set the map to automatically centre on your
location by selecting “Screen” from the menu bar, then “Follow” and select “ME”, or you can track
any other station by selecting their callsign.
9
That is about all there is to setting up APRSIS32 and connecting it to a packet radio modem and a
GPS receiver. A future article is planned which will explain how to setup APRSIS32 with AGW Packet
Engine and use your computer’s soundcard as a modem – very useful if you have a laptop and a
radio that operates on VOX such as the low-cost Baofeng handhelds.
Have fun with APRS and feel free to experiment as you can’t break anything!
i Yahoo Groups. APRSISCE for Windows Mobile and Win32 Available from < http://groups.yahoo.com/neo/groups/aprsisce/info >
ii APRSISCE/32 The Future of Amateur Radio APRS
Available from < http://aprsisce.wikidot.com >
iii Moss, Julian G4ILO (2012). Installing APRSISCE/32
Available from < http://www.g4ilo.com/aprsisce_install.html >
iv Smith, Stephen WA8LMF. (Sept 2009). Automatic Position Reporting System (APRS) Symbol Table – Rev. H
Available from < http://wa8lmf.net/miscinfo/APRS_Symbol_Chart_Rev-H.pdf >
v Goodall, Peter. APRS Passcode Generator
Available from < http://apps.magicbug.co.uk/passcode/ >
vi Milnes, Ralph NM5RM. Sound Card Packet
Available from < http://www.soundcardpacket.org/index.html >
vii Kopanchuk, Andrei UZ7HO. Personal page - Packet-Radio (English version)
Available from <http://uz7.ho.ua/packetradio.htm >
viii Eyes, Jon G7OMN. UZ7HO Soundcard Modem – Setup Guide for UIVIEW
Available from < http://uz7.ho.ua/modem_beta/user_guide_v045b_EN.pdf >
ix Cross Country Wireless APRS Messenger program
Available from < http://www.crosscountrywireless.net/aprs_messenger.htm >
x Karn, Phil KA9Q (1987). The KISS TNC: A simple Host-to-TNC communications protocol
Available from < http://www.ka9q.net/papers/kiss.html >