Embed Size (px)
Citation preview

1
LABORATORY
EVOLVINGARTIFICIALINTELLIGENCE
Setup and Installation
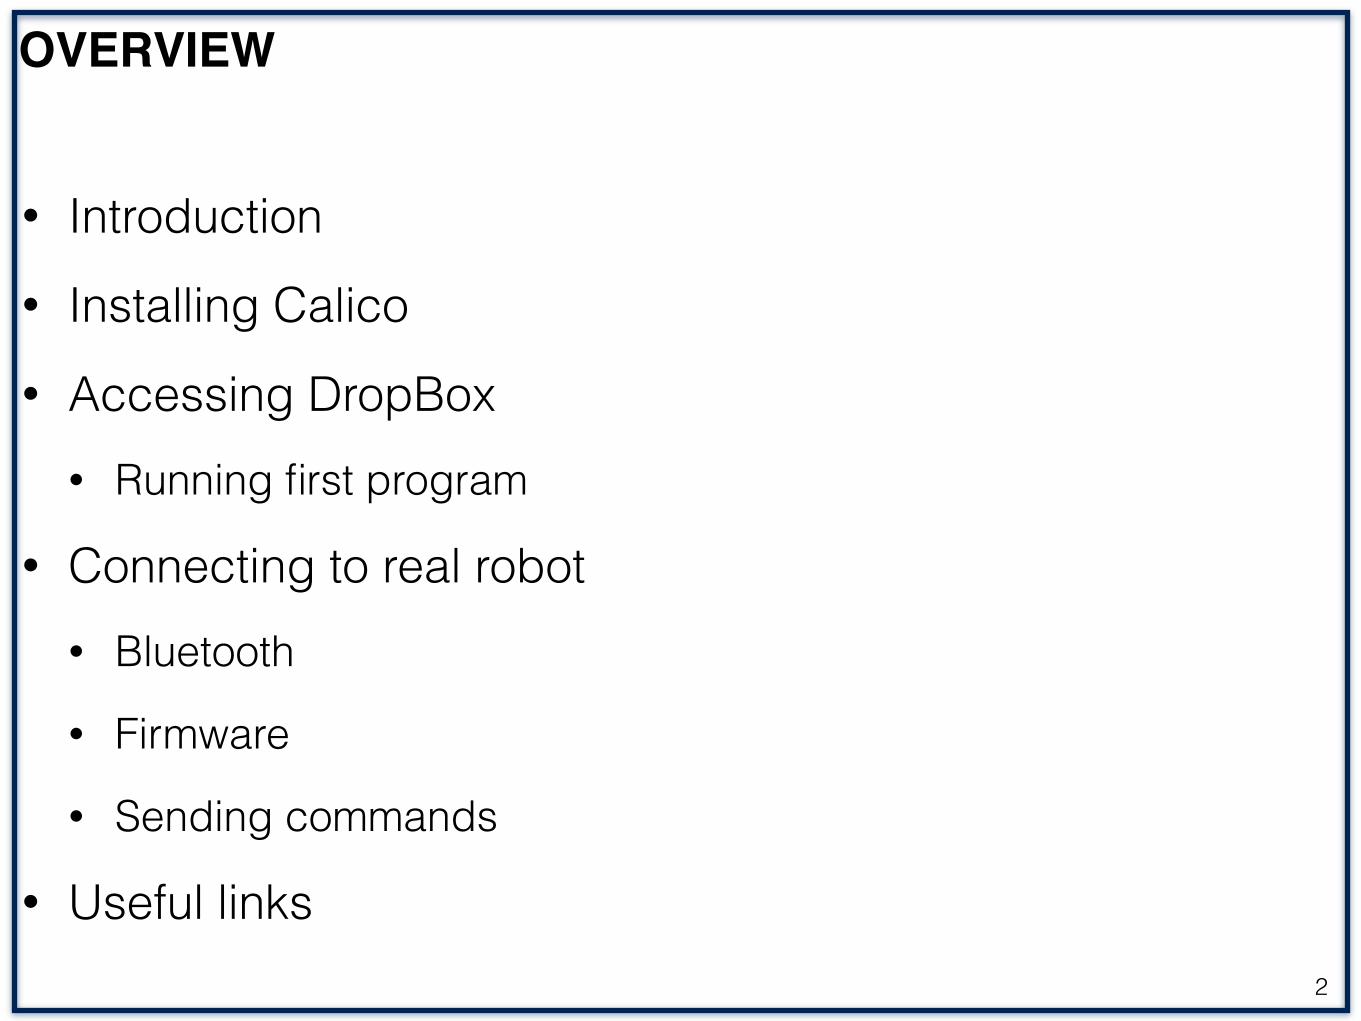
OVERVIEW
• Introduction • Installing Calico • Accessing DropBox
• Running first program
• Connecting to real robot • Bluetooth
• Firmware
• Sending commands
• Useful links2
INTRODUCTION
• Mission:For students to have fun playing with robotics, and learn important skills while doing so such as math, programming, robotics, teamwork, dedication, time management, and resourcefulness.
• Structure:Day to day activities in the LRC are broken into two groups. 1. The first group consists of students working solely with the Calico simulator and completing a series of Labs to level up their programming abilities.2. The second groups consists of students who have already completed the Labs and are working on real world robot Challenges. The goal of the Challenges is to take the skills students have learned in the Calico simulator and apply them to the real world. The Challenges are far harder than the Lab exercises, but are also more rewarding.
3
INSTALLING CALICO
• Calico is the main programming tool used in the LRC. It comes with a robot simulator so students can gain practice sending motor commands and programming robot behaviors in a simple environment before moving onto to real world robots, which is far more difficult.
• The specifics of working with Calico such as bringing up the simulator, writing code, and navigating the menus will be covered in the first part of Lab1. Here will will simply focus on installing Calico and to run a simple example program.
4
INSTALLING CALICO LRC VERSION
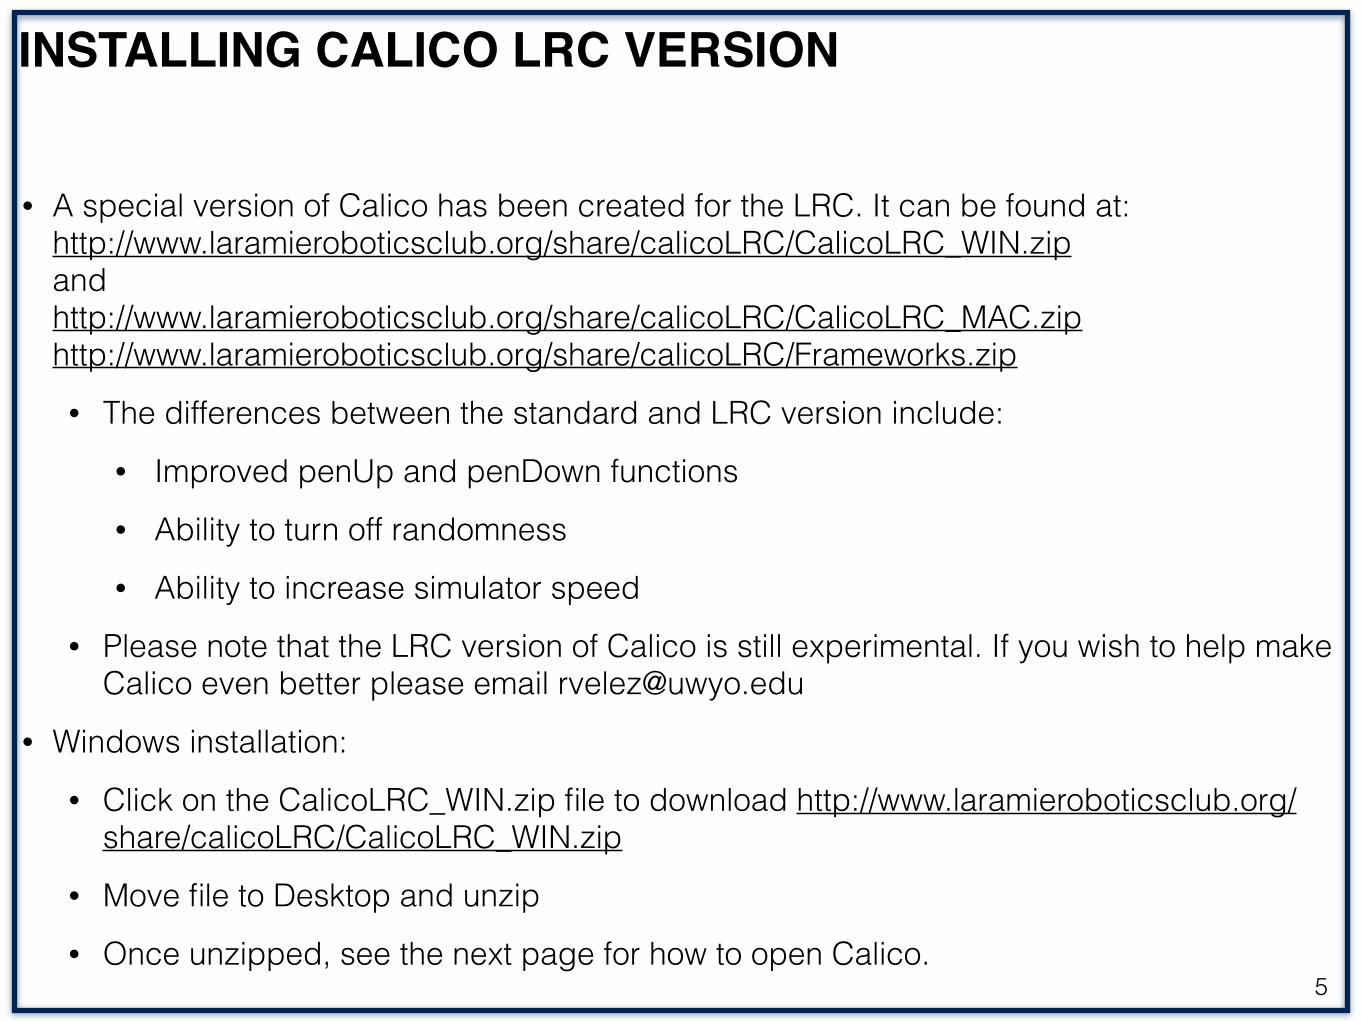
• A special version of Calico has been created for the LRC. It can be found at: http://www.laramieroboticsclub.org/share/calicoLRC/CalicoLRC_WIN.zip andhttp://www.laramieroboticsclub.org/share/calicoLRC/CalicoLRC_MAC.ziphttp://www.laramieroboticsclub.org/share/calicoLRC/Frameworks.zip
• The differences between the standard and LRC version include: • Improved penUp and penDown functions • Ability to turn off randomness • Ability to increase simulator speed
• Please note that the LRC version of Calico is still experimental. If you wish to help make Calico even better please email [email protected]
• Windows installation: • Click on the CalicoLRC_WIN.zip file to download http://www.laramieroboticsclub.org/
share/calicoLRC/CalicoLRC_WIN.zip • Move file to Desktop and unzip • Once unzipped, see the next page for how to open Calico.
5
OPENING CALICO - WINDOWS
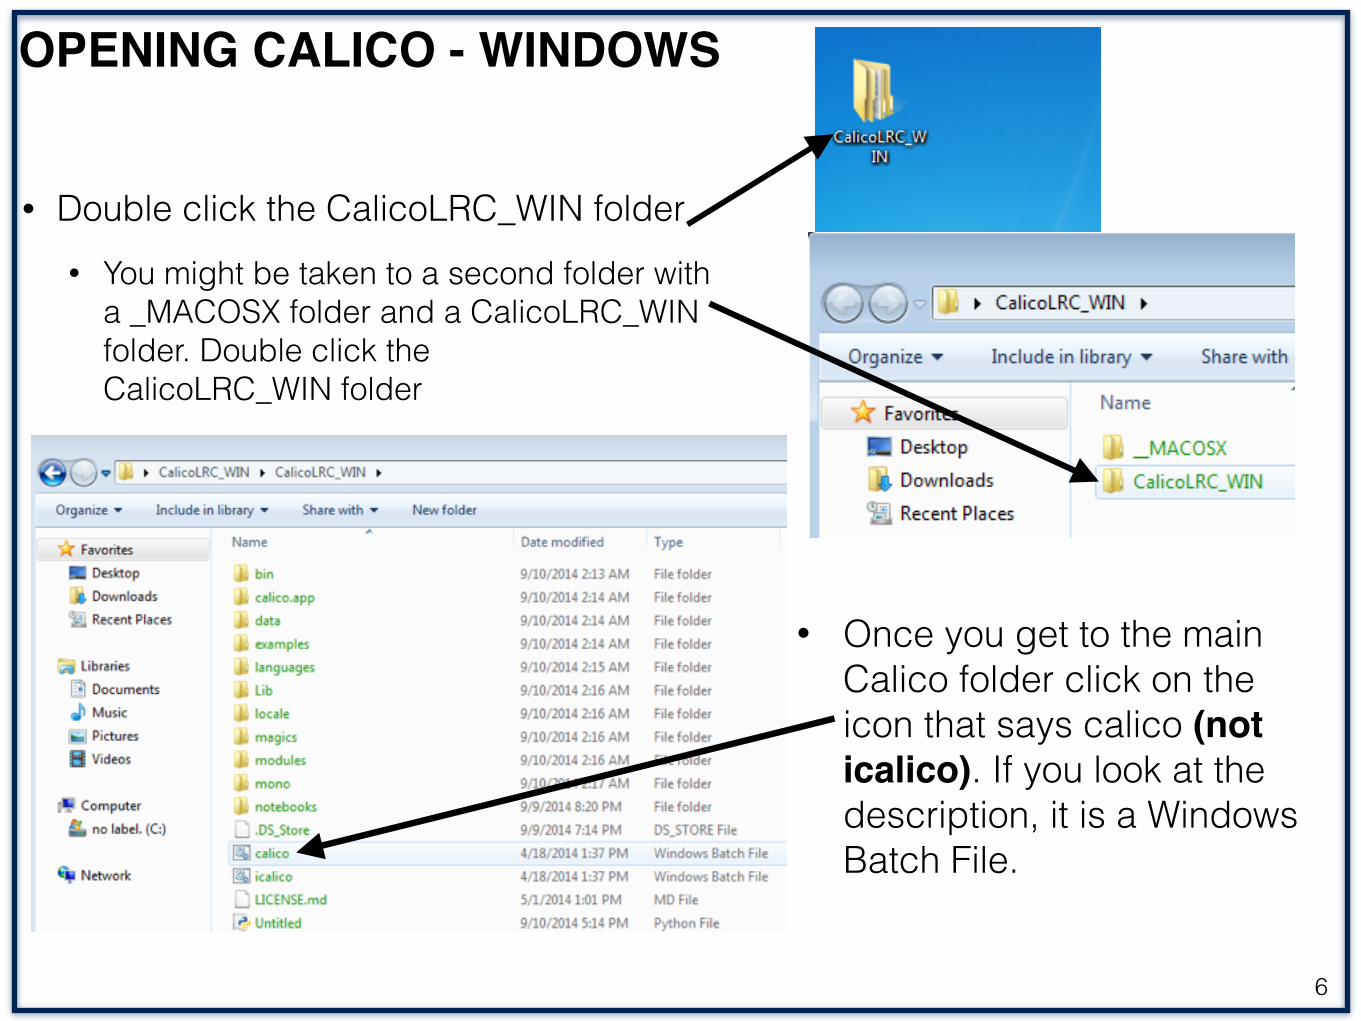
• Double click the CalicoLRC_WIN folder • You might be taken to a second folder with
a _MACOSX folder and a CalicoLRC_WIN folder. Double click the CalicoLRC_WIN folder
6
• Once you get to the main Calico folder click on the icon that says calico (not icalico). If you look at the description, it is a Windows Batch File.
INSTALLING CALICO LRC VERSION
• Mac Installation: • Click on the CalicoLRC_MAC.zip file to download http://www.laramieroboticsclub.org/share/calicoLRC/
CalicoLRC_MAC.zip • Click on the Frameworks.zip file to download http://www.laramieroboticsclub.org/share/calicoLRC/
Frameworks.zip • Note, the first time you install Calico you will have to install special Frameworks libraries as well as
the Mono Run Time libraries. If you upgrade Calico (new LRC version or standard version) you don’t have to reinstall the Frameworks libraries or Mono.
• Once downloaded, move to the Desktop and unzip the folders.
• SDL Frameworks (Note, you will need system password.)
• Copy contents of Calico/Frameworks folder to your /Library/Frameworks. Detailed instructions on how to do this can be found here: http://calicoproject.org/Calico_Download#Macintosh
• Mono (Note, you will need system password) • In order for Calico to run on a Mac, Mono needs to be installed from: http://www.go-mono.com/mono-downloads/download.html
• Click OSX latest version (3.6.0 as of this writing) and then click Mono MRE Installer to download
• Once downloaded open and install like any MAC package
• Once Mono, and the SDL frameworks libraries are installed and in place, see the next page for instructions on how to open.
• Note, you may have to restart your computer for the framework libraries to take effect, and Calico to open properly. 7
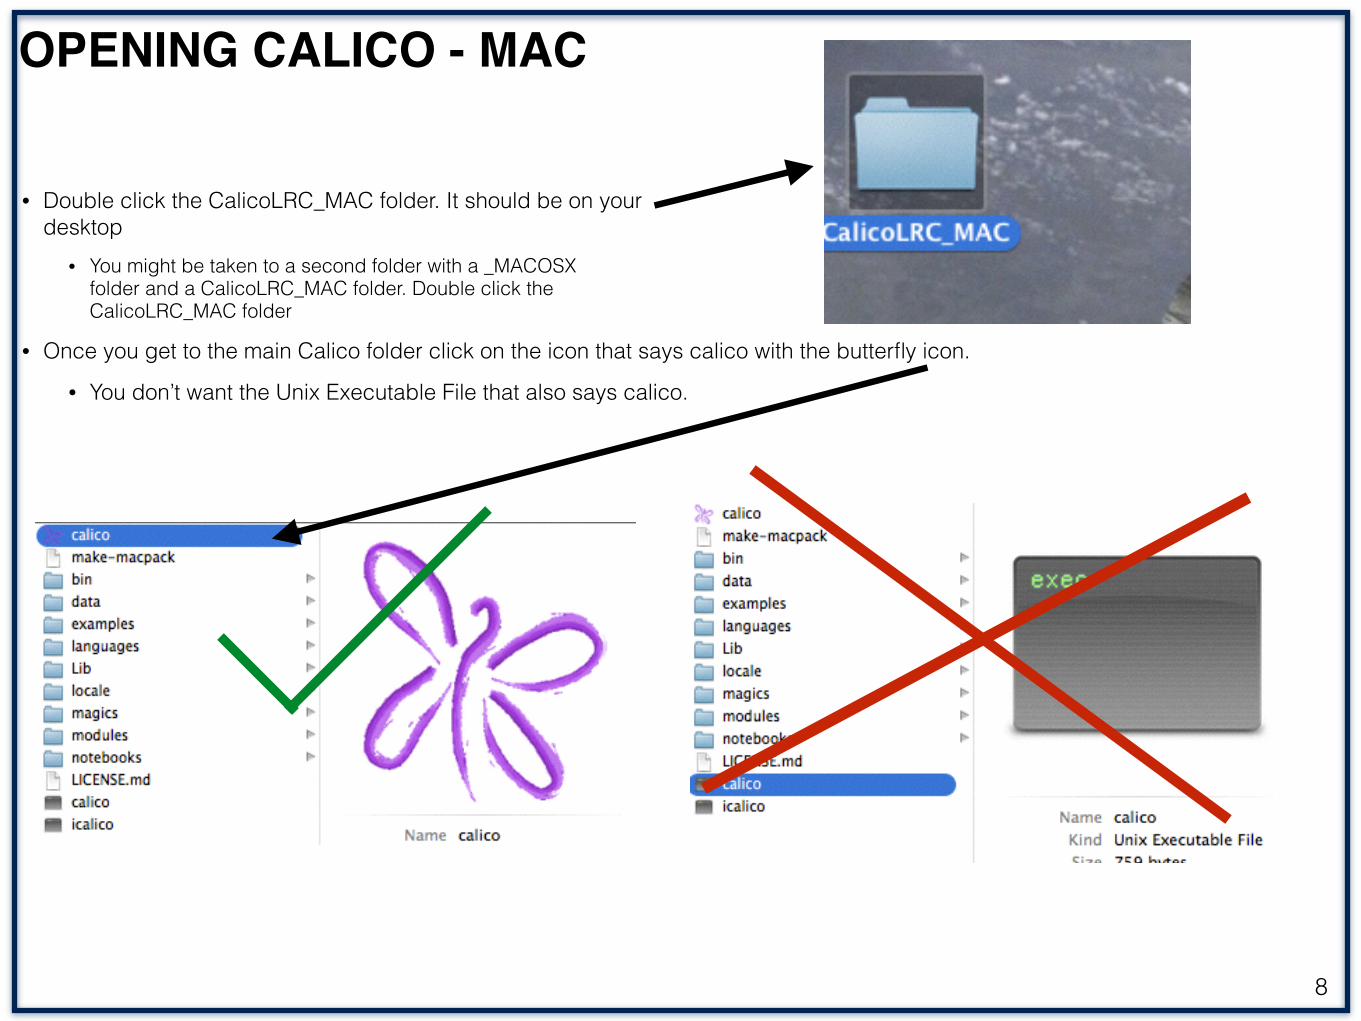
OPENING CALICO - MAC
• Double click the CalicoLRC_MAC folder. It should be on your desktop
• You might be taken to a second folder with a _MACOSX folder and a CalicoLRC_MAC folder. Double click the CalicoLRC_MAC folder
• Once you get to the main Calico folder click on the icon that says calico with the butterfly icon.
• You don’t want the Unix Executable File that also says calico.
8
INSTALLING CALICO STANDARD VERSION
• The standard version of Calico, that doesn’t have the LRC specific modifications, can be found at: • Windows: http://myro.roboteducation.org/~dblank/download/?
C=N;O=D;P=*-windows-all.zip
• Click on the topmost link (Calico-3.0.1-windows-all.zip at the time of writing) to download.
• Mac: http://myro.roboteducation.org/~dblank/download/?C=N;O=D;P=*-mac*.zip
• Click on the topmost with “all” in it. E.g. Calico-3.0.1-mac-all.zip at the time of writing.
• The installation of the Standard Calico is the same as the LRC specific version.
9
INSTALLING CALICO LINUX
• Linux: http://calicoproject.org/Calico_Download#Linux • Calico can also be installed via a linux machine, but has yet to
be tested by anyone at LRC. Instructions can be found in the link above. If you manage to install Calico (LRC or Standard version) on Linux please document your process so we can expand our installation instructions.
10

DROPBOX
• Before we go into how to use Calico we’ll go over how to access dropbox.com which is where we will store all of the LRC labs, challenges, and student code. We will download a sample program and run it in Calico to make sure everything is working properly.
• Go to dropbox.com and log in to the LRC account. Username: [email protected]: robotics
• On the main page will be a few folders, but we will only look at two right now. • Exercises:
• Here you will find the Labs and Challenges. Each exercise will come with a pdf describing the exercise as well as any supplementary code. This setup guide can also be found there as Setup.
• Students: • Here you will create a folder with your name. You can save any code you’ve worked
on during here. This will allow you to continue the work you’ve started as well as access your work from anywhere. 11
LAB01 AND EXAMPLE CODE
• Lab01 • Navigate to the Exercises/Labs/Lab1 folder. In the Lab1 folder you will see Lab1.pdf.
Right click the file and select download.
• In the Calico folder you downloaded to your desktop create a Labs folder. Within that create another folder called Lab01. Move Lab1.pdf to this folder.
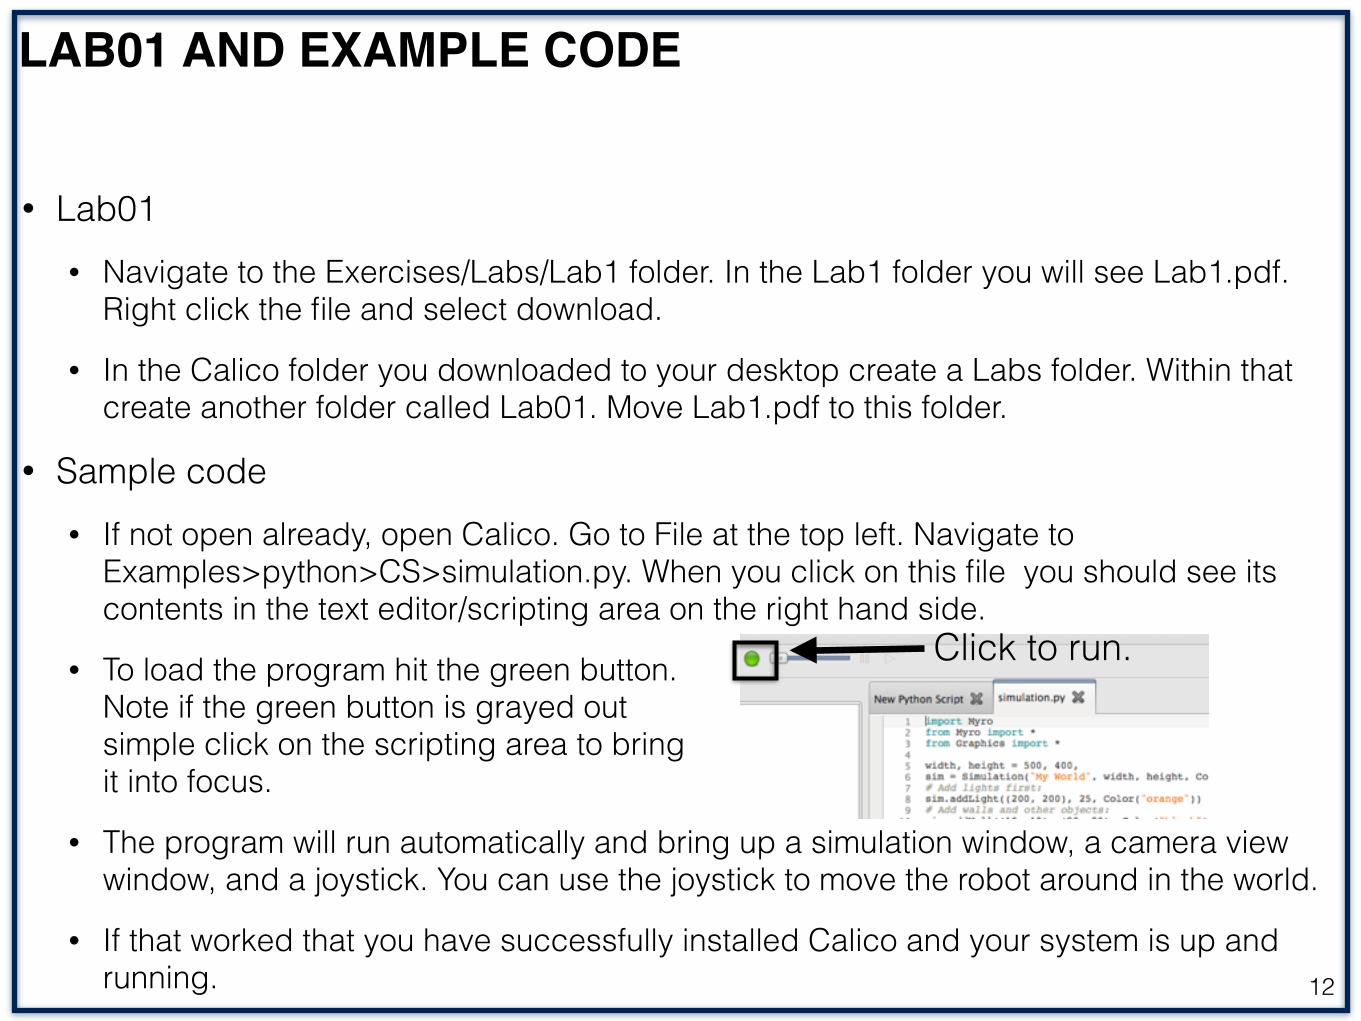
• Sample code • If not open already, open Calico. Go to File at the top left. Navigate to
Examples>python>CS>simulation.py. When you click on this file you should see its contents in the text editor/scripting area on the right hand side.
• To load the program hit the green button. Note if the green button is grayed out simple click on the scripting area to bring it into focus.
• The program will run automatically and bring up a simulation window, a camera view window, and a joystick. You can use the joystick to move the robot around in the world.
• If that worked that you have successfully installed Calico and your system is up and running. 12
Click to run.
WORKING WITH CALICO!
• The specifics of working with Calico such as bringing up the simulator, writing code, and navigating the menus will be covered in the first part of Lab01.
• The next section involves connecting and controlling a real robot.
13

REAL ROBOT
• The details of the Scribbler’s sensors and actuators will not be extensively covered here. Instead this is a simple guide to connect to the Scribbler2 robots with a IPRE Fluke 2 board via Calico.
• The robot and board can be found for sale here: http://www.betterbots.com/
• Before starting: • Install Calico
• Plug Fluke board into the robot and take note of it’s ID. 0737 in the example to the right.
• If your computer does not have onboard bluetooth you will need a bluetooth adapter.
14
ID
CONFIGURE BLUETOOTH: MAC
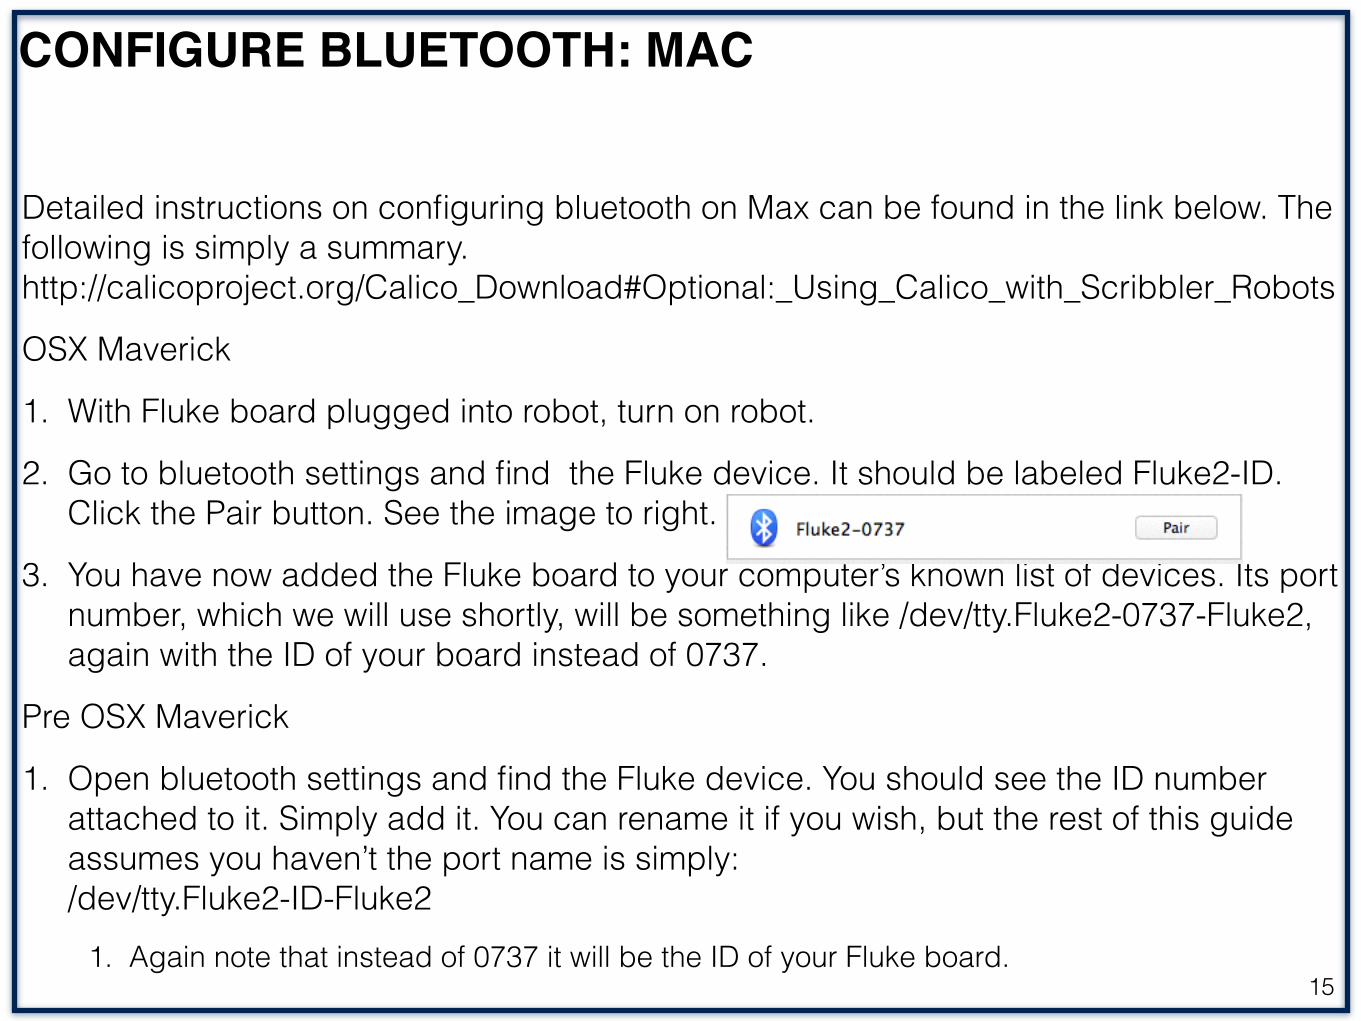
Detailed instructions on configuring bluetooth on Max can be found in the link below. The following is simply a summary. http://calicoproject.org/Calico_Download#Optional:_Using_Calico_with_Scribbler_Robots
OSX Maverick
1. With Fluke board plugged into robot, turn on robot.
2. Go to bluetooth settings and find the Fluke device. It should be labeled Fluke2-ID. Click the Pair button. See the image to right.
3. You have now added the Fluke board to your computer’s known list of devices. Its port number, which we will use shortly, will be something like /dev/tty.Fluke2-0737-Fluke2, again with the ID of your board instead of 0737.
Pre OSX Maverick
1. Open bluetooth settings and find the Fluke device. You should see the ID number attached to it. Simply add it. You can rename it if you wish, but the rest of this guide assumes you haven’t the port name is simply: /dev/tty.Fluke2-ID-Fluke2
1. Again note that instead of 0737 it will be the ID of your Fluke board.15

CONFIGURE BLUETOOTH: WINDOWS
Detailed instructions on configuring bluetooth on Windows can be found in link below. The following is a general guide. http://calicoproject.org/Calico_Download#Optional:_Using_Calico_with_Scribbler_Robots
1. With Fluke board plugged into robot, turn on robot.
2. Open up your bluetooth settings. You should see a device with the name Fluke2 and the ID of the board. Add the device.
3. Close your bluetooth setting and go to your Devices window. Find the icon for the bluetooth device you just added. It should be something like “Fluke2-0737”. Right click and select “Properties”. Take note of the COM number (for example COM4) because we will use it shortly.16
CONNECT TO ROBOT AND FIRMWARE
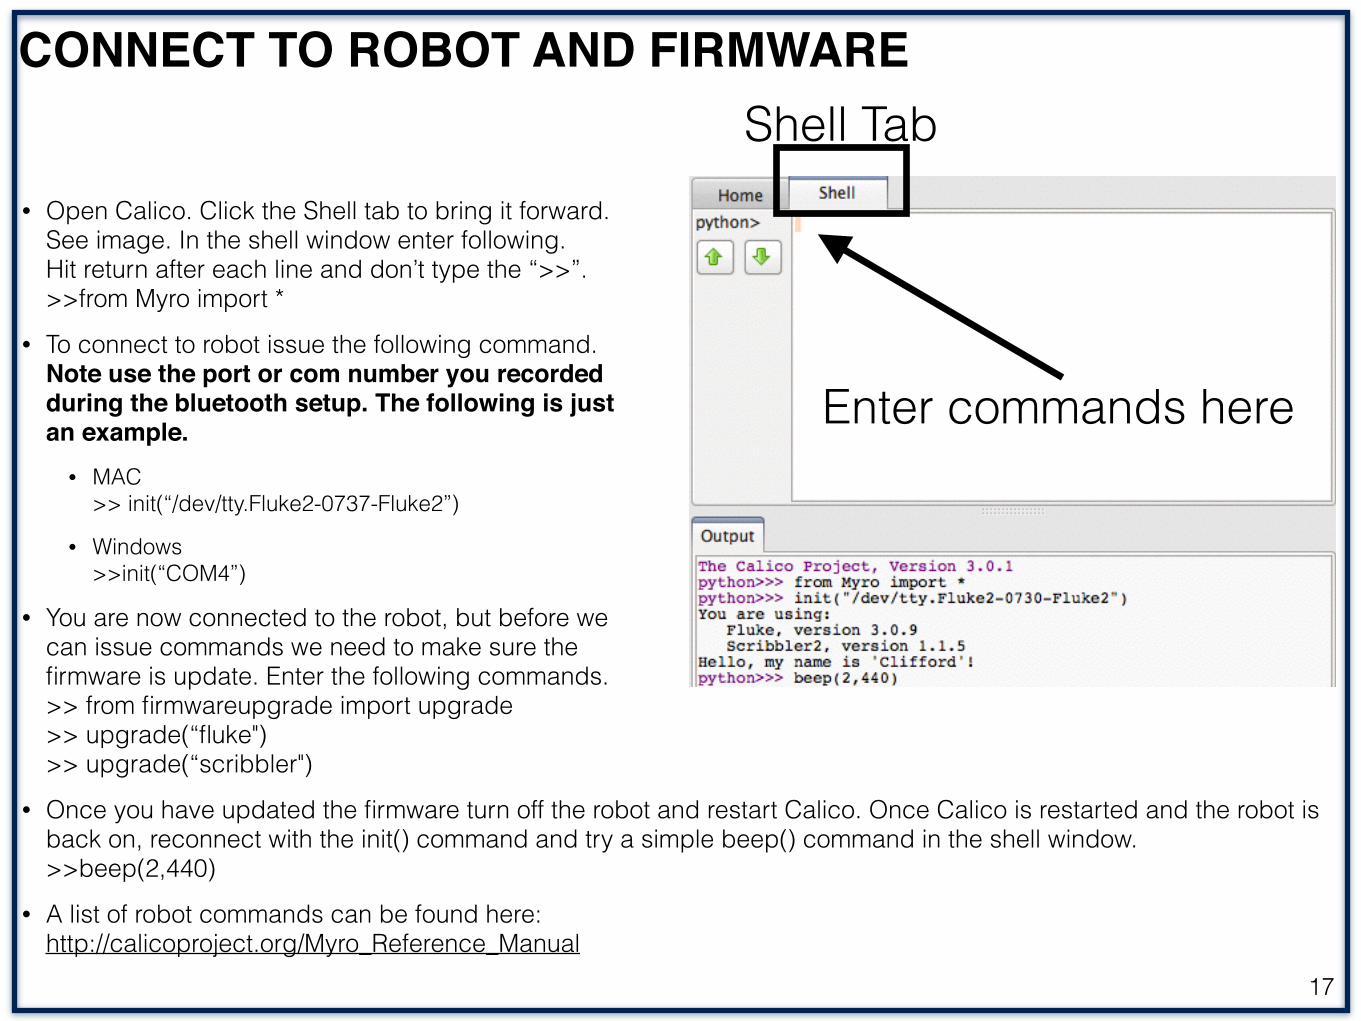
• Open Calico. Click the Shell tab to bring it forward.See image. In the shell window enter following. Hit return after each line and don’t type the “>>”.>>from Myro import *
• To connect to robot issue the following command. Note use the port or com number you recorded during the bluetooth setup. The following is just an example.!
• MAC>> init(“/dev/tty.Fluke2-0737-Fluke2”)
• Windows>>init(“COM4”)
• You are now connected to the robot, but before we can issue commands we need to make sure the firmware is update. Enter the following commands.>> from firmwareupgrade import upgrade>> upgrade(“fluke")>> upgrade(“scribbler")
• Once you have updated the firmware turn off the robot and restart Calico. Once Calico is restarted and the robot is back on, reconnect with the init() command and try a simple beep() command in the shell window.>>beep(2,440)
• A list of robot commands can be found here:http://calicoproject.org/Myro_Reference_Manual
17
Shell Tab
Enter commands here
TROUBLESHOOTING
• Working with real world robots is notoriously difficult and may not work the first time. The following is a list of suggestions if you come across an issue.
1. Throughout this guide links to the calicoproject.org have been provided. If this general guide has not worked for you try the links provided for more detailed instructions. 1. Another resource is the LRC wiki which may have more detailed instructions to
the machines used in the LRC. http://cobi.cs.uwyo.edu/lrc/index.php/Main_Page
2. Sometimes you just have to turn Calico, the robot, or your computer off and on again for the configuration changes to take effect.
3. If you open Calico and launch the simulation (init(“sim”)) you will have to relaunch Calico in order to connect to the real robot. This has to do with the port in which Calico is sending commands. If you open the simulator first Calico will think the active robot is the simulated one and will ignore the real one.
18
USEFUL LINKS
• Calico website:calicoproject.org
• Installation instructions:http://calicoproject.org/Calico_Download
• Bluetooth instructions:http://calicoproject.org/Calico_Download#Optional:_Using_Calico_with_Scribbler_Robots
• Firmware instructions:http://calicoproject.org/Firmware_Upgrade
• LRC wiki:http://cobi.cs.uwyo.edu/lrc/index.php/Main_Page
• Links to LRC Codehttp://www.laramieroboticsclub.org/share/calicoLRC/shareLinks
19