Embed Size (px)
Citation preview

Setup and Licensing Guide
All trademarks, service marks, and trade names referenced in this material are the property of their respective owners and are used only for identification and
explanation without intent to infringe. spBeam, spColumn, spFrame, spMats, spSlab, spWall are trademarks of STRUCTUREPOINT, LLC.
Copyright © 2002 – 2016, STRUCTUREPOINT, LLC. All Rights Reserved.
i
Table of Contents Licensing Overview .................................................................................................................... 1
License Types ........................................................................................................................ 1 System Requirements ............................................................................................................ 4
Licensing - Network ................................................................................................................... 5 Introduction ............................................................................................................................ 5 Setup & Installation................................................................................................................. 6 Troubleshooting .....................................................................................................................10
Licensing - Standalone ..............................................................................................................13 Introduction ...........................................................................................................................13 Setup & Installation................................................................................................................13 Troubleshooting .....................................................................................................................20
Licensing - Commuter ...............................................................................................................27 Introduction ...........................................................................................................................27 Setup & Installation................................................................................................................28 Troubleshooting .....................................................................................................................31 Remote Commuter Licensing ................................................................................................32
Introduction ........................................................................................................................32 Setup & Installation ............................................................................................................33
Licensing - Redundant ..............................................................................................................37 Introduction ...........................................................................................................................37 Setup & Installation................................................................................................................37 Troubleshooting .....................................................................................................................39
Licensing - USB Key .................................................................................................................41 Introduction ...........................................................................................................................41 Setup & Installation................................................................................................................41 Troubleshooting .....................................................................................................................44
Licensing Toolbox .....................................................................................................................45 Licensing Error Messages .....................................................................................................45 Firewall Settings - Adding Port & Inbound Rules ...................................................................49 RMS 8.5.0 Override ...............................................................................................................61 SLM User's Guide .................................................................................................................61 Reporting Tools .....................................................................................................................61 Silent Installation ...................................................................................................................61 Linux Support ........................................................................................................................63 Citrix Thin Client ....................................................................................................................63 Download Links .....................................................................................................................63 User Account Control Issues .................................................................................................64 Sentinel License Server Download ........................................................................................64

1
Licensing Overview
License Types
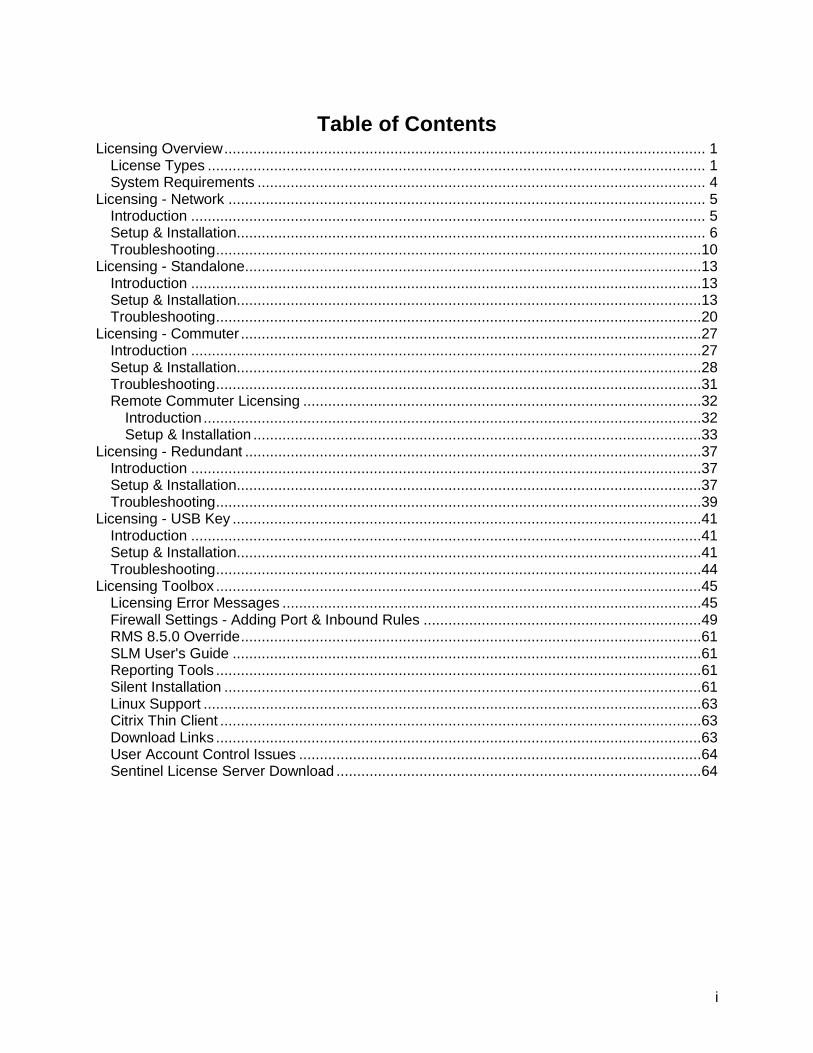
Network A network (concurrent) license is the most widely used license type for StructurePoint software. This type of license allows a specific number of users to run the protected application at the same time.
Licensing Overview
2
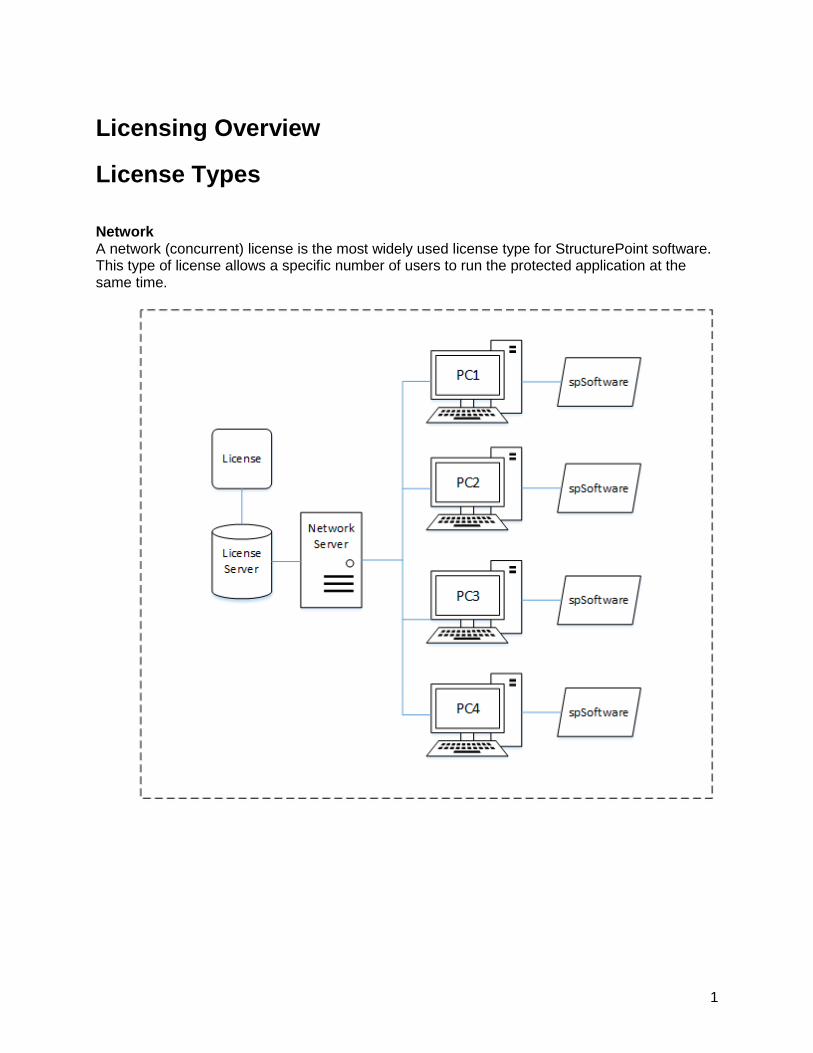
Standalone A standalone (individual) license permits use of the protected application on a single computer. License management is done on that computer without the need for a network server.
New Printed Documentation Output_31
3
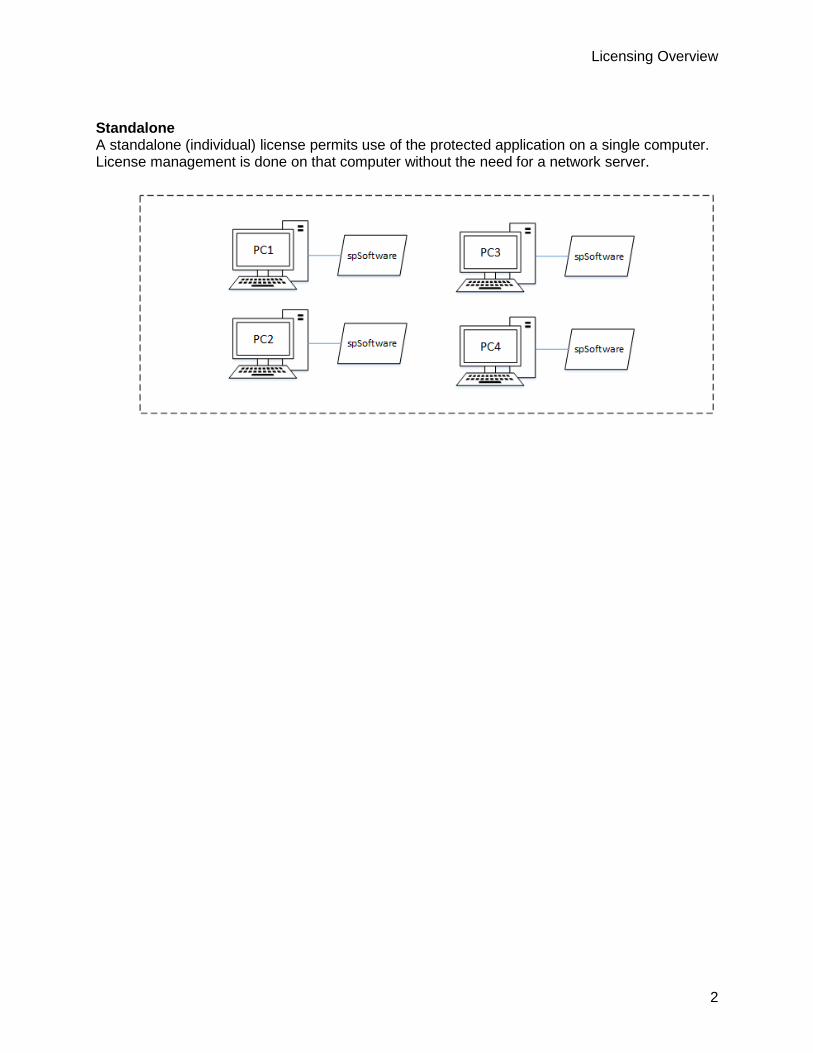
Commuter A commuter (field) license allows a traveler to check out a temporary authorization from the network to use the application on a laptop, and then check it back into the network when the traveler returns. A commuter license is included as an option for all network license applications or is granted by Structurepoint for remote use.

Licensing Overview
4
USB Key USB (portable) licensing requires a USB Key (dongle) in order to check out a license and operate StructurePoint software.
System Requirements
StructurePoint programs are 32-bit applications that run on Microsoft Windows operating systems.
Operating Systems
Workstation computers: Windows Vista SP2 and Windows 7/8/10 require administrator privileges during initial installation and license activation. Server Computers: Windows Server 2003 or later is recommended as the license server in a network license setup. For virtual servers, contact StructurePoint.
Network Requirements (Network License only)
-LAN or WAN running TCP/IP or IPX/SPX network protocol -SentinelLM 7.2.0.23 or higher
5
Licensing - Network
Introduction
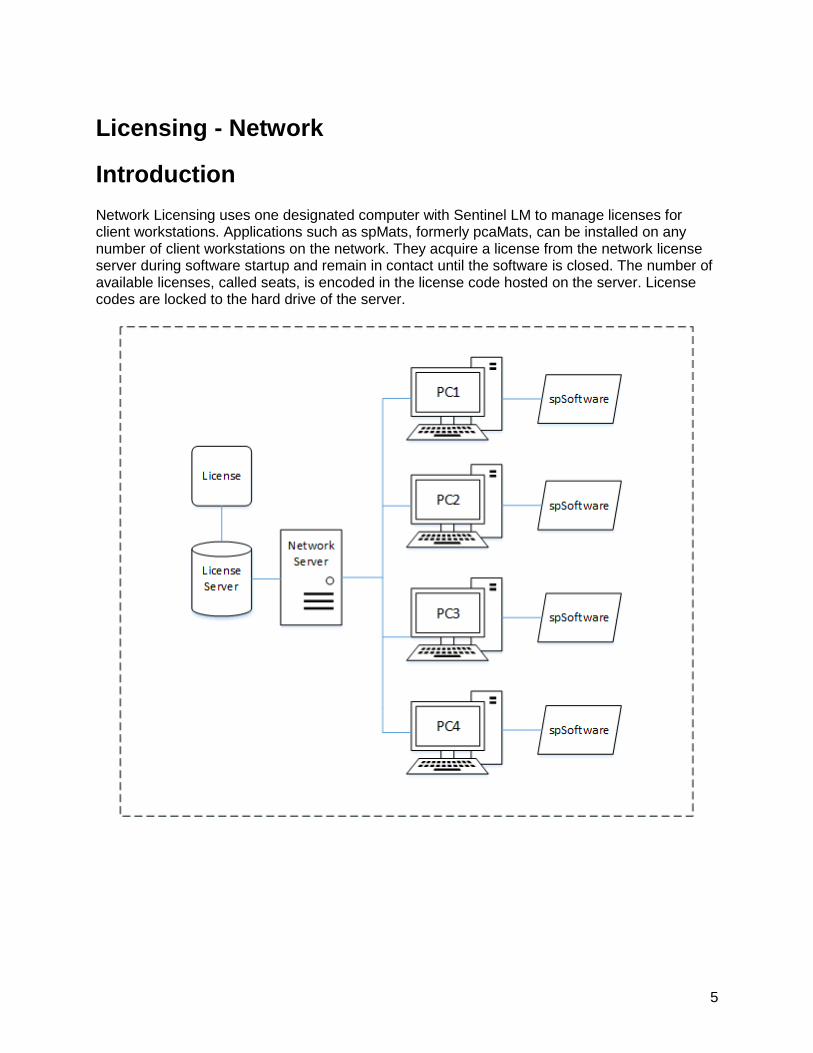
Network Licensing uses one designated computer with Sentinel LM to manage licenses for client workstations. Applications such as spMats, formerly pcaMats, can be installed on any number of client workstations on the network. They acquire a license from the network license server during software startup and remain in contact until the software is closed. The number of available licenses, called seats, is encoded in the license code hosted on the server. License codes are locked to the hard drive of the server.
Licensing - Network
6
Setup & Installation
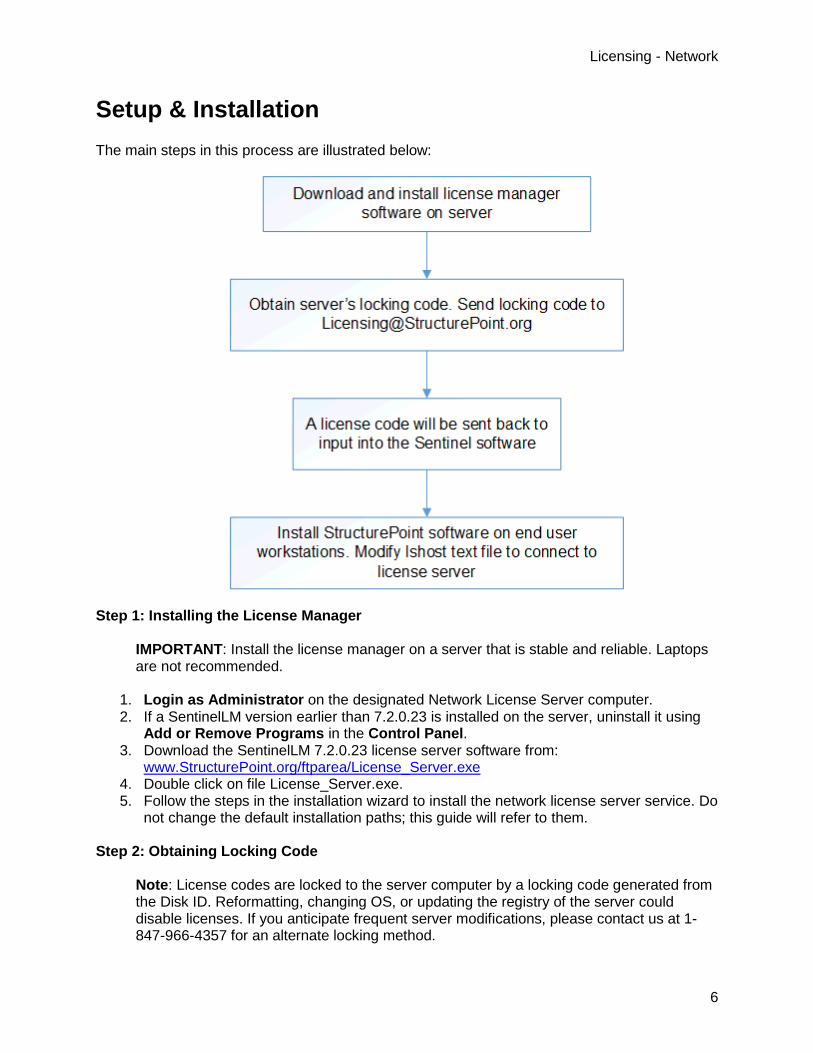
The main steps in this process are illustrated below:
Step 1: Installing the License Manager
IMPORTANT: Install the license manager on a server that is stable and reliable. Laptops are not recommended.
1. Login as Administrator on the designated Network License Server computer. 2. If a SentinelLM version earlier than 7.2.0.23 is installed on the server, uninstall it using
Add or Remove Programs in the Control Panel. 3. Download the SentinelLM 7.2.0.23 license server software from:
www.StructurePoint.org/ftparea/License_Server.exe 4. Double click on file License_Server.exe. 5. Follow the steps in the installation wizard to install the network license server service. Do
not change the default installation paths; this guide will refer to them. Step 2: Obtaining Locking Code
Note: License codes are locked to the server computer by a locking code generated from the Disk ID. Reformatting, changing OS, or updating the registry of the server could disable licenses. If you anticipate frequent server modifications, please contact us at 1-847-966-4357 for an alternate locking method.

New Printed Documentation Output_31
7
1. Start Windows Explorer and go to the folder containing SentinelLM applications (C:\Program Files\Rainbow Technologies\ Admin\Admin.net\Win32). If you are unable to find the folder on your hard drive, search for the files mentioned in the following steps.
2. Double click on wechoid.exe. A dialog box will appear.
3. IMPORTANT: Uncheck everything except Disk ID. 4. Save the Locking Code and the IP Address or Host Name of the server for later use. For
example, the Locking Code above is 4-123AB (yours will be different). 5. E-mail the above information (preferably as a screenshot) along with order # and serial #
to [email protected]. StructurePoint will process the license request and send the License Code via e-mail.
Note: Locking codes come in new style for Sentinel RMS 8.0+. To generate a StructurePoint license, the old style format needs to be selected in wechoid to get the familiar 5 character hexadecimal code.

Licensing - Network
8
Step 3: Configuring License Server
1. Run the WlmAdmin.exe tool. By default this utility is installed in the C:\Program Files\Rainbow Technologies\Admin\Admin.NET\Win32 folder. If SentinelLM is not installed in the default folder, search for the WlmAdmin.exe file.
2. On the left pane of the WlmAdmin window, click on the + sign in front of Subnet Servers, and then click on the + sign in front of the server name (e.g. P340-268 in example, yours will be different). Currently installed applications will be shown under the server name.
3. Right click the server name and select Add Feature | From a String from the pop-up menu.
4. Copy the license code for one StructurePoint product (e.g. spSlab, formerly pcaSlab) from the license code e-mail and then paste it into the License code field.
New Printed Documentation Output_31
9
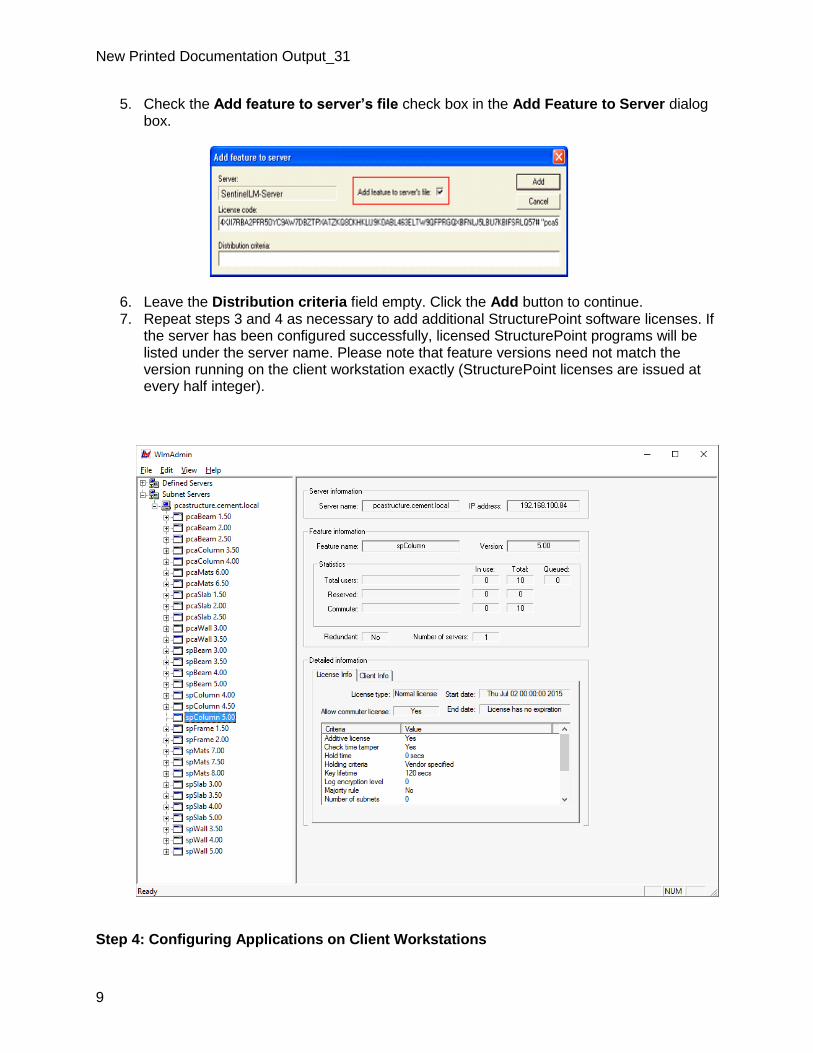
5. Check the Add feature to server’s file check box in the Add Feature to Server dialog box.
6. Leave the Distribution criteria field empty. Click the Add button to continue. 7. Repeat steps 3 and 4 as necessary to add additional StructurePoint software licenses. If
the server has been configured successfully, licensed StructurePoint programs will be listed under the server name. Please note that feature versions need not match the version running on the client workstation exactly (StructurePoint licenses are issued at every half integer).
Step 4: Configuring Applications on Client Workstations
Licensing - Network
10
This step must be repeated for each StructurePoint application (e.g. spWall) on each client workstation. By default, the StructurePoint software applications are installed in C:\Program Files\StructurePoint\. The default location for older versions of StructurePoint software is C:\Program Files\PCA\.
1. Login as Administrator on the client workstation. 2. Install StructurePoint software (e.g. spWall). 3. On the client workstation, open Windows Explorer and go to the client application
folder (e.g. C:\Program Files\StructurePoint\spWall\). 4. Using a text editor (e.g. Notepad), open the lshost.txt file. 5. Delete any text that may be present (e.g. no-net) and type in the license server name or
IP address in the first line. Save and close lshost.txt.
The license server and client installation is now complete. You are ready to run and use the application from the Windows Start Menu.
Troubleshooting
1. License Server Does Not Appear on Subnet
1. If the license server is not listed under the subnet servers when running the WlmAdmin.exe application (C:\Program Files\Rainbow Technologies\Admin\ Admin.net\Win32), it may be necessary to modify Windows Firewall settings by adding an exception for UDP port 5093. Visit the Firewall Settings page for port opening instructions for your specific server operating system.
2. Please check the services running on the machine to ensure that the “Sentinel LM” service is running. If “Sentinel LM” does not appear in Services, please run the “loadls” from C:\Program Files (x86)\Rainbow Technologies\SentinelLM 7.2.0.23 Server\English. Proceed to add license codes to WlmAdmin.
2. Client Computer Cannot Find License Server If the workstation cannot checkout a license after completion of installation steps, please consider the following actions:
1. Open the StructurePoint software folder. The default path for spMats is C:\Program Files\ StructurePoint\spMats. Open lshost.txt. Make sure that either the IP address or the license server name is in this file (these can be used interchangeably). One may work better than the other depending on the IP and DNS settings in your network.
2. Using the WlmAdmin.exe tool (located in C:\Program Files\ Rainbow Technologies\Admin\Admin.net\Win32), make sure the license server is running properly. Note the feature name and version listed under the server name.
3. Verify that the software version installed on the client workstation is supported by the version of the license installed on the license server. Please refer to http://www.structurepoint.org/update/index.asp for details.
New Printed Documentation Output_31
11
4. Restart SentinelLM or reboot the server. 5. Uninstall and reinstall Sentinel LM. 6. Visit Firewall Settings Page and follow instruction to Create a custom inbound rule to
permit SP programs through the firewall. 3. License Server Does Not Release Licenses When StructurePoint software is closed on a client workstation, the license is released and becomes available to other client workstations. If the license is not released automatically, try the following:
- Wait 10 minutes and run the application on client computer again. SentinelLM checks the status of all the licenses on client computers and releases a license automatically if a connection has been inactive for about 10 minutes. - Restart the SentinelLM service (see Problem: License server does not run, Part 2). - Reboot the license server.


13
Licensing - Standalone
Introduction
The standalone license permits the use of StructurePoint applications on one computer; it will only work on the computer for which the license code is generated. Each application requires its own license code. Under special circumstances, a license can be transferred from one computer to another. To learn about the license transfer procedure, please contact the StructurePoint licensing team by phone at 1-847-966-4357 or via e-mail at [email protected]. This chapter uses spMats as an example but the installation procedure is identical for spColumn, spSlab, spBeam, spWall, and spFrame.
Setup & Installation
The main steps in this process are illustrated below:

Licensing - Standalone
14
Step 1: Download StructurePoint software from either www.StructurePoint.org, from your order
confirmation e-mail, or from the Download Links section. Step 2: Install software.
1. Open the installation file to begin the process. Please read all the information, and then click the Next button to continue.
2. Carefully read and review the End User License Agreement. Click the I Agree button to continue the installation.
3. Review program release notes along with other useful information then click Next to continue.
4. Enter the Registration Information (User Name and Company Name). Click the Next button to continue.
5. Select the destination folder in which the application will be installed. By default, StructurePoint software is installed in: C:\Program Files\StructurePoint
Click Browse if you want to install the program in a different folder. If the destination folder does not exist, the setup program will create it. Click the Next button to continue.
If you are evaluating a newer version of the StructurePoint application that has already been installed on your computer and do not want to overwrite the existing version, you must select a different folder by clicking the Browse button.
6. Select the program group name. Windows will use this name in the Start | Programs menu. Click the Next button to continue.
If you are evaluating a new version of an installed application and do not want to overwrite the existing version, you must specify a new group name (e.g. StructurePoint\spMats v8.12).
7. Click Next in the Start Installation dialog box to begin the installation of the application software and evaluation license.
8. After the installation is complete, a dialog box will appear. Click the Finish button to finish the installation.
Step 3: License Activation

New Printed Documentation Output_31
15
This procedure is for standalone licenses only. If you have a network license and are installing the software on client workstations, please refer to Network Licensing Setup & Installation.
A. You may request a license online by clicking this Online Licensing button and providing your order number and serial number.
B. Use the License Activation button to activate purchased software licenses or to obtain your computer's locking code.
C. Use Evaluate to activate your 15-day trial license. IMPORTANT: Any tampering with system clock will invalidate the evaluation license.
D. The About button will give information about the software version. E. Quit exits the software. F. This indicates the days remaining of the evaluation license. Each program starts with a
15 day evaluation license. Step 3.1: Run the software and click license activation. Step 3.2: To begin the license activation, choose the activation method and click next.

Licensing - Standalone
16
For either entering a license code or to obtain a locking code for a computer, click Next with
"Enter a License Code".
New Printed Documentation Output_31
17
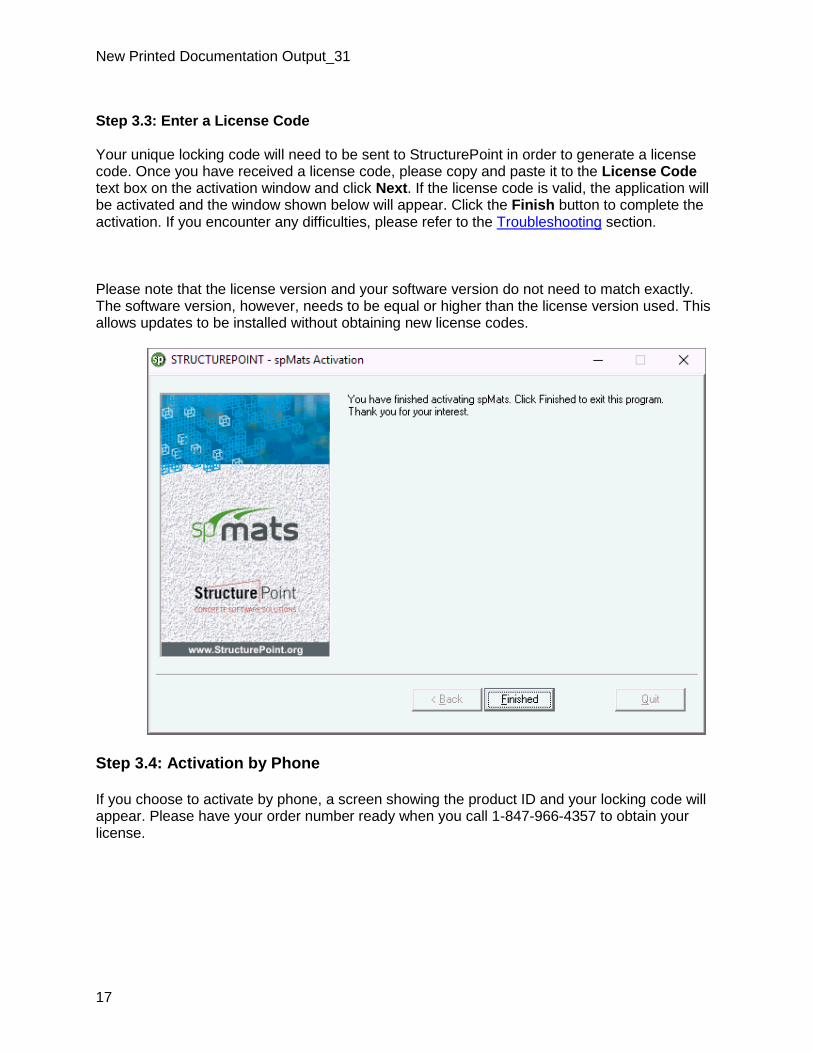
Step 3.3: Enter a License Code Your unique locking code will need to be sent to StructurePoint in order to generate a license code. Once you have received a license code, please copy and paste it to the License Code text box on the activation window and click Next. If the license code is valid, the application will be activated and the window shown below will appear. Click the Finish button to complete the activation. If you encounter any difficulties, please refer to the Troubleshooting section.
Please note that the license version and your software version do not need to match exactly. The software version, however, needs to be equal or higher than the license version used. This allows updates to be installed without obtaining new license codes.
Step 3.4: Activation by Phone
If you choose to activate by phone, a screen showing the product ID and your locking code will appear. Please have your order number ready when you call 1-847-966-4357 to obtain your license.

Licensing - Standalone
18
After your information is verified, a license code will be generated and sent via e-mail. After you receive the e-mail, copy and paste the license code into the License Code text box and click the Next button. If the license code is entered correctly an activation confirmation window will appear. Click Finish to complete the activation.
Step 3.5: Activation by E-mail
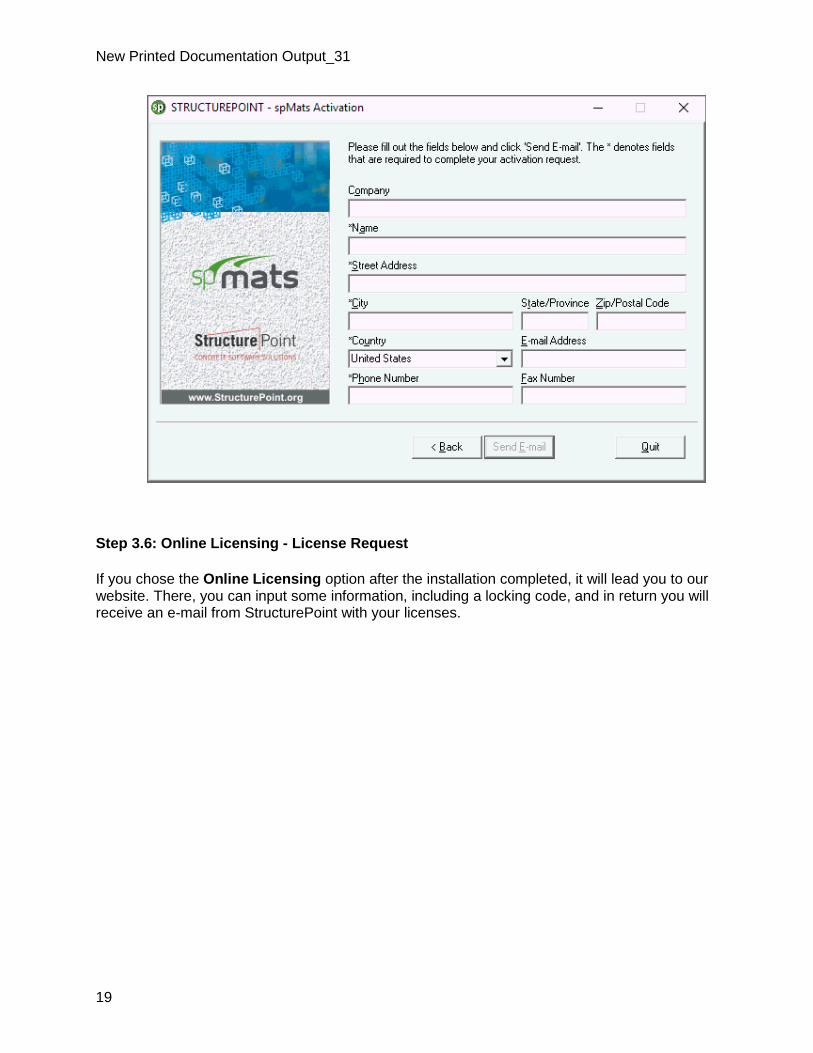
If you choose to activate via E-mail, a screen prompting you to provide your name and contact information will appear. After you enter all the information, click the Send E-mail button to send a license request. Once the information is received and verified, the license code will be generated and sent to you via e-mail. IMPORTANT: If you encounter any difficulties sending the e-mail automatically from the license activator please call us at 1-847-966-4357 or e-mail us at [email protected]. After receiving the license code, click the License Activation button in the start-up dialog box and choose the Enter License Code option. Then copy and paste the code into the License Code box. If the license code is valid, the software will be activated. Click the Finish button to complete the activation. If you encounter any difficulties please refer to the online installation manual at www.structurepoint.org/support_doc.asp.
New Printed Documentation Output_31
19
Step 3.6: Online Licensing - License Request
If you chose the Online Licensing option after the installation completed, it will lead you to our website. There, you can input some information, including a locking code, and in return you will receive an e-mail from StructurePoint with your licenses.

Licensing - Standalone
20
Troubleshooting
Potential error messages when installing and activating a standalone license code are listed below with their possible resolution: Sequence Error 17, 4, 30004: These errors may happen in sequence. The user is advised to close the software and then open it again by "Run as Administrator" Error 17: "No servers are running on this subnet."
Most commonly the result of putting a network license in a standalone activation (or vice versa)
Run the StructurePoint software as an administrator (right-click + ‘Run as Administrator’) Incomplete license code is pasted. Copy the license code into a Notepad (uncheck word
wrap formatting) first to ensure that the license string is complete and on a single line. Copy the license code from the Notepad to the license activation window
Another option is to set the environment variable LSFORCEHOST to “no-net” because of another software possibly forcing the program to look for a license on another network server (see detailed instructions below)
If RMS is not used, review list of “Services”. If Sentinel LM does not show up, run loadls (for LMS: Program files\Rainbow Technologies\Admin\Server\WinNT\loadls) to restart the service
Error 19: "Failed to add license code to the license server on host."
The locking code used to generate the license may have been incorrect. Run the program as administrator (right-click + ‘Run as Administrator’) and inform StructurePoint of the new locking code
New Printed Documentation Output_31
21
If the locking code is correct and the license is still not working and the environmental variable is not an issue, the license code can be added to the lservrc file manually (see detailed instructions below)
Error 26: "Request denied due to clock tamper."
Run the program as administrator (right-click + ‘Run as Administrator’) and if the problem isn't resolved, contact StructurePoint
Error 92: "Failed to add license code to the license server on host no-net. License code is invalid."
Incomplete license code. Make sure the entire license code is applied. Some email viewers truncate the license and show it in multiple lines causing incomplete copy and paste
Error-Trial period has expired: "Evaluate button is unavailable and program can't start."
Run as administrator if evaluating the software or contact StructurePoint to obtain a new license
If you have a network license, see Network License setup
Set environment variable LSFORCEHOST to no-net if above steps do not resolve license acceptance.
To add a standalone license, set the environment variable LSFORCEHOST to “no-net.” To add an environment variable, follow the steps below (shown in Windows XP, but newer Windows versions are treated the same).
1. Open Control Panel, and then double click on System. 2. Click on the Advanced tab on the System Properties box, and then click the Environment
Variables button.

Licensing - Standalone
22
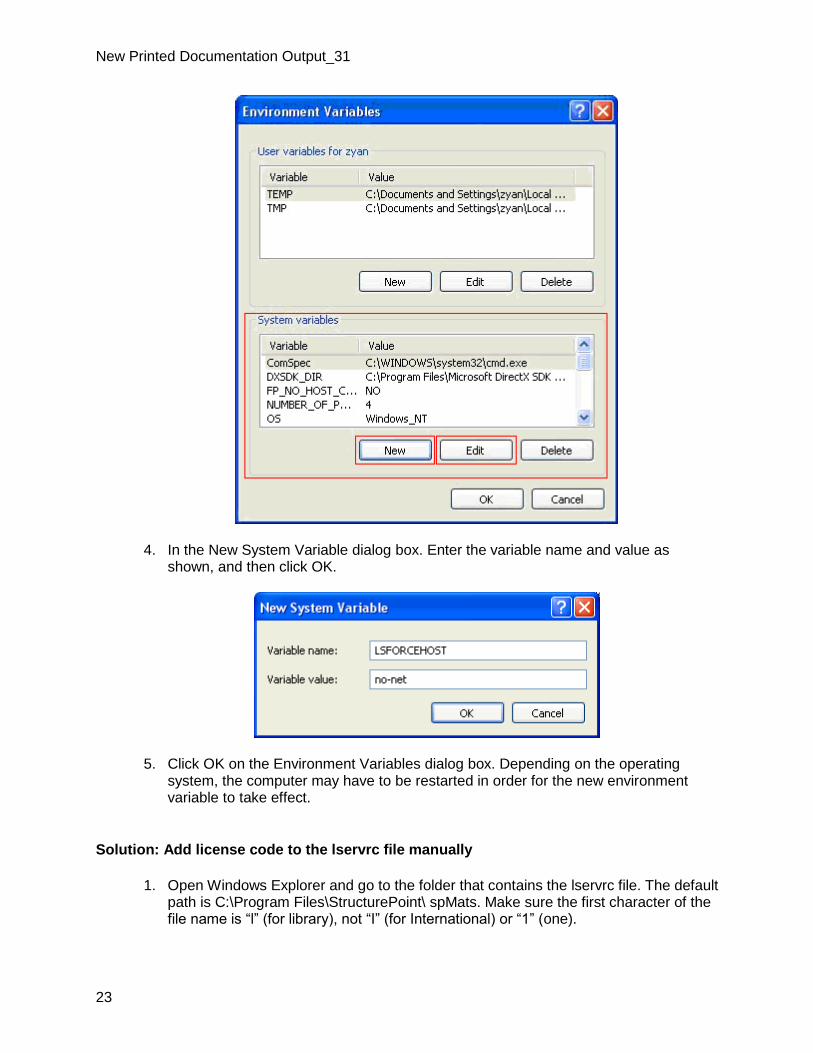
3. In the System Variables group box, look for a variable named LSFORCEHOST. If the variable already exists, click the Edit button, and then change the Value to “no-net.” If the variable does not exist, click New.
New Printed Documentation Output_31
23
4. In the New System Variable dialog box. Enter the variable name and value as
shown, and then click OK.
5. Click OK on the Environment Variables dialog box. Depending on the operating system, the computer may have to be restarted in order for the new environment variable to take effect.
Solution: Add license code to the lservrc file manually
1. Open Windows Explorer and go to the folder that contains the lservrc file. The default path is C:\Program Files\StructurePoint\ spMats. Make sure the first character of the file name is “l” (for library), not “I” (for International) or “1” (one).
Licensing - Standalone
24
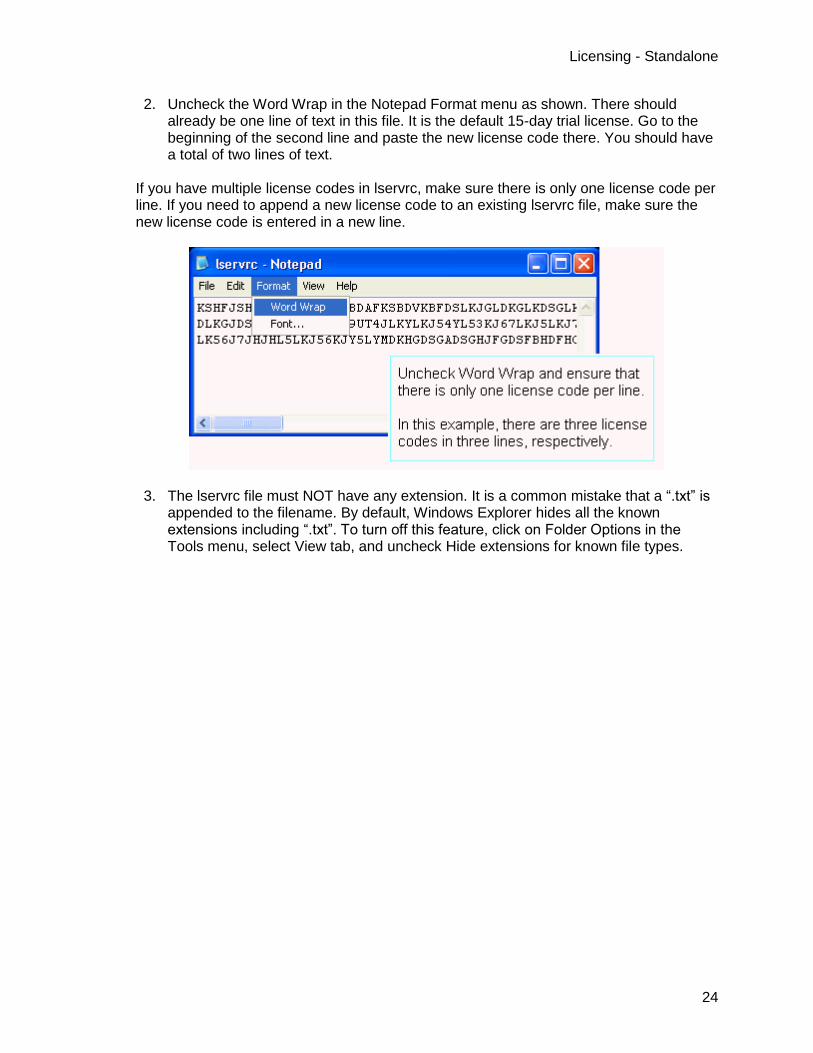
2. Uncheck the Word Wrap in the Notepad Format menu as shown. There should already be one line of text in this file. It is the default 15-day trial license. Go to the beginning of the second line and paste the new license code there. You should have a total of two lines of text.
If you have multiple license codes in lservrc, make sure there is only one license code per line. If you need to append a new license code to an existing lservrc file, make sure the new license code is entered in a new line.
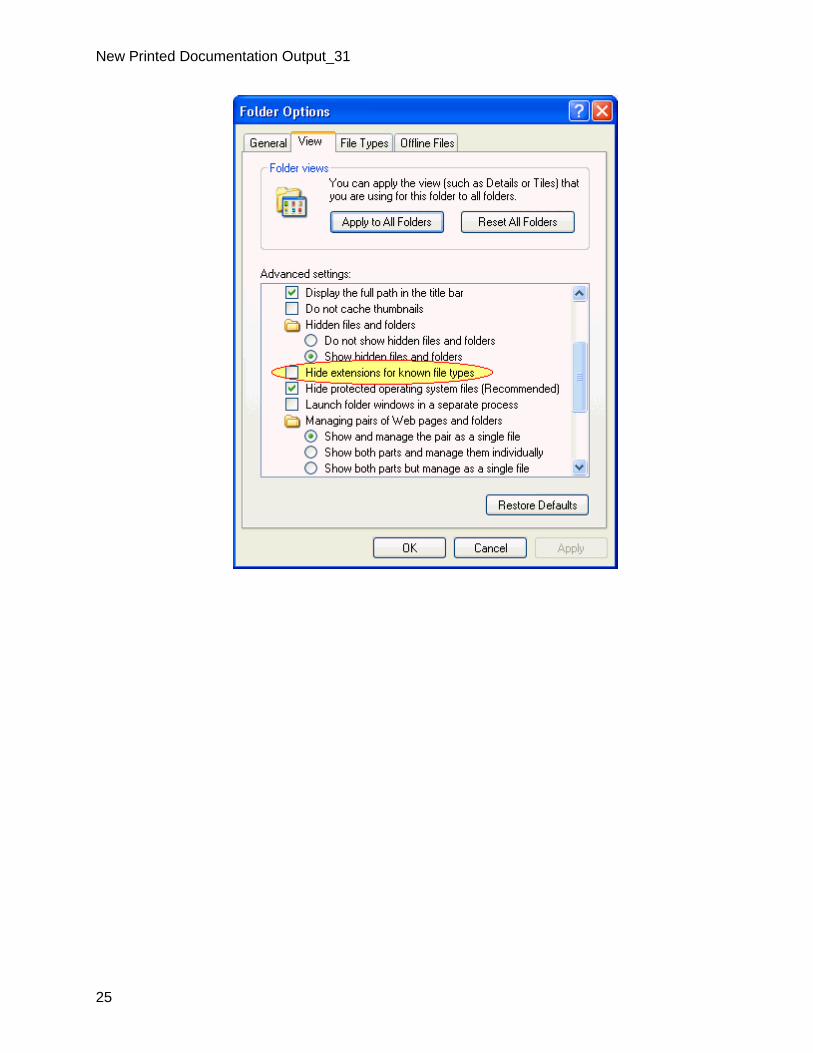
3. The lservrc file must NOT have any extension. It is a common mistake that a “.txt” is appended to the filename. By default, Windows Explorer hides all the known extensions including “.txt”. To turn off this feature, click on Folder Options in the Tools menu, select View tab, and uncheck Hide extensions for known file types.
New Printed Documentation Output_31
25


27
Licensing - Commuter
Introduction
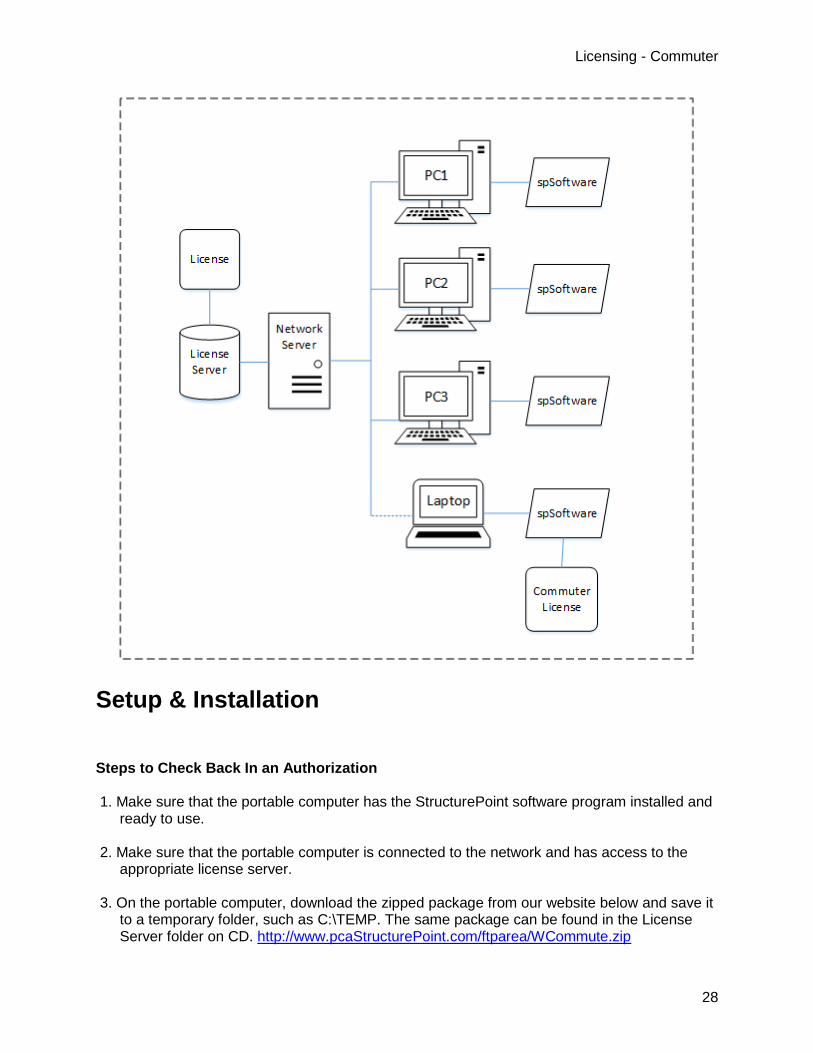
Commuter licensing allows you to temporarily use licensed StructurePoint software programs on a portable computer that is not connected to the network. The most common use of commuter licensing is when you want to travel on business and need to take along the licensed software program. You can check out an authorization to use the application for the duration of the trip, and then check the authorization back in on returning. To check out an authorization, the portable computer (for example, a laptop) on which the application will be used must be attached to the network and have access to a license server containing the license for that application. The application must also be installed on that laptop. After checking out an authorization, you may disconnect the laptop from the network. When checking out an authorization, you may request authorization for a specific number of days (the default is 180). Since the authorization expires after that many days, you are not required to check in the authorization after returning. You do need the license tokens for that application for network use, you may want to check authorizations back in as soon as possible into the same license server from which the authorization was checked out. If you need to check out a license to a remote computer that cannot be connected to the network, please refer to the Remote Commuter License Guide.
Licensing - Commuter
28
Setup & Installation
Steps to Check Back In an Authorization 1. Make sure that the portable computer has the StructurePoint software program installed and
ready to use. 2. Make sure that the portable computer is connected to the network and has access to the
appropriate license server. 3. On the portable computer, download the zipped package from our website below and save it
to a temporary folder, such as C:\TEMP. The same package can be found in the License Server folder on CD. http://www.pcaStructurePoint.com/ftparea/WCommute.zip
New Printed Documentation Output_31
29
4. On the portable computer, open Windows Explorer and go to the temporary folder (or the
License Server folder on CD), and then double click on the zipped package. The zipped package needs to be unzipped. Extract the two files from the zipped package and save them into another temporary folder, such as C:\Commute.
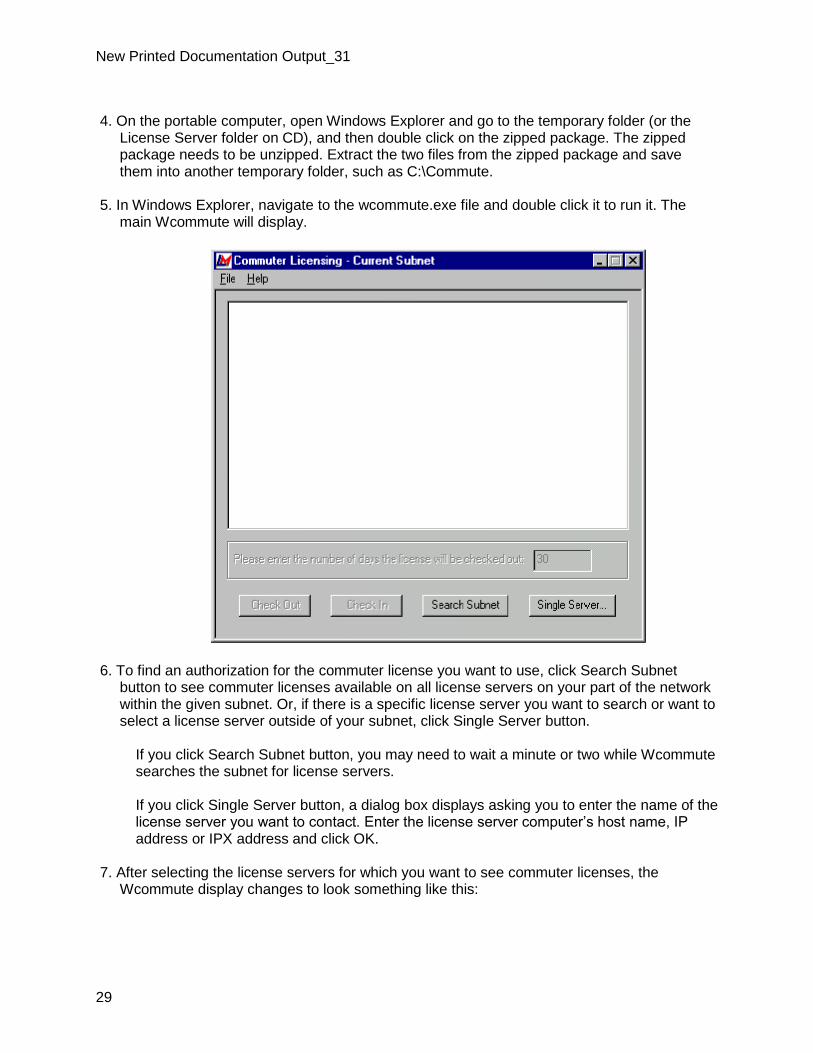
5. In Windows Explorer, navigate to the wcommute.exe file and double click it to run it. The
main Wcommute will display.
6. To find an authorization for the commuter license you want to use, click Search Subnet
button to see commuter licenses available on all license servers on your part of the network within the given subnet. Or, if there is a specific license server you want to search or want to select a license server outside of your subnet, click Single Server button.
If you click Search Subnet button, you may need to wait a minute or two while Wcommute searches the subnet for license servers.
If you click Single Server button, a dialog box displays asking you to enter the name of the license server you want to contact. Enter the license server computer’s host name, IP address or IPX address and click OK.
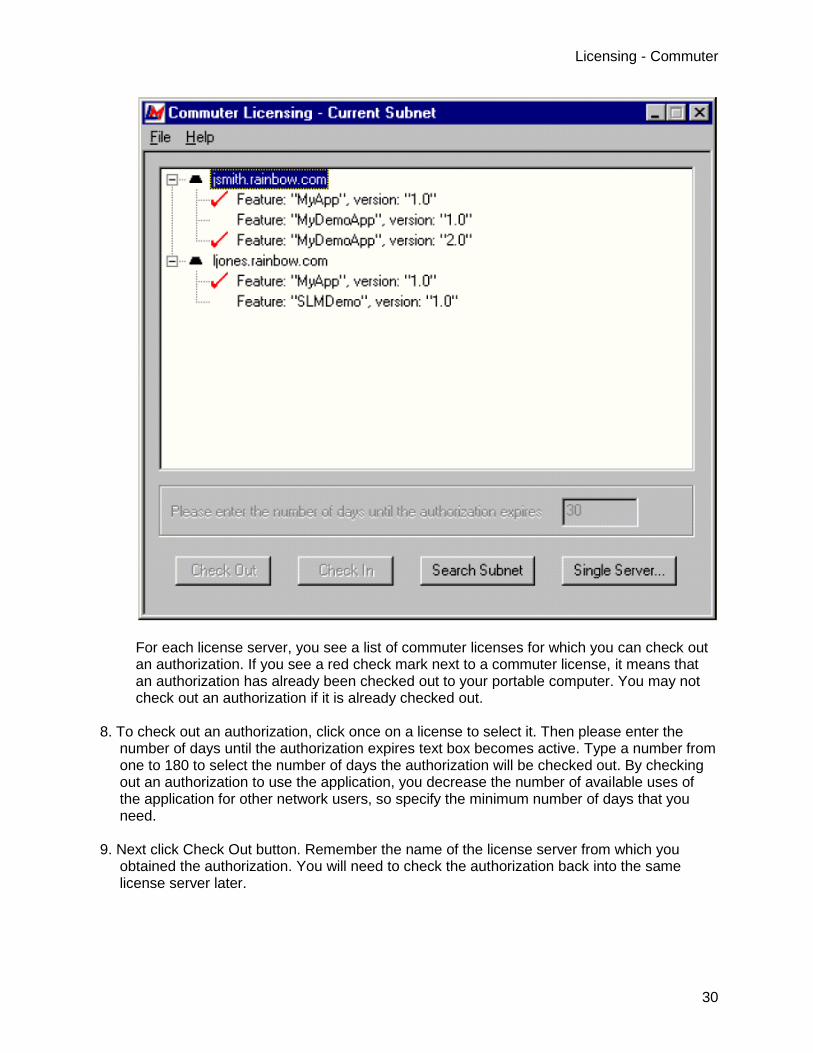
7. After selecting the license servers for which you want to see commuter licenses, the
Wcommute display changes to look something like this:
Licensing - Commuter
30
For each license server, you see a list of commuter licenses for which you can check out an authorization. If you see a red check mark next to a commuter license, it means that an authorization has already been checked out to your portable computer. You may not check out an authorization if it is already checked out.
8. To check out an authorization, click once on a license to select it. Then please enter the
number of days until the authorization expires text box becomes active. Type a number from one to 180 to select the number of days the authorization will be checked out. By checking out an authorization to use the application, you decrease the number of available uses of the application for other network users, so specify the minimum number of days that you need.
9. Next click Check Out button. Remember the name of the license server from which you
obtained the authorization. You will need to check the authorization back into the same license server later.
New Printed Documentation Output_31
31
10. To check in an authorization, look for the license under the license server from which you checked it out. Click once on it in the display to select it. (There should be a red check mark next to it, indicating that you have it checked out.) Click Check In.
Note: You must check the authorization back into the same license server from which you checked it out.
11. To exit Wcommute, go to the File menu and select Exit.
Troubleshooting
Problem 1: My portable computer cannot be connected to the network, what should I do? Solution: Please refer to the Remote Commuter License Guide. Problem 2: After the Search Subnet button is pressed, no license server is displayed in the list. Solution:
1. Make sure the portable computer is connected to the network. 2. Make sure the portable computer is in the same subnet as the license server. 3. If the portable computer is not in the same subnet as the license server, click the Single
Server button, and then enter host name, IP address or IPX address of the license server you want to contact.
Problem 3: After the Search Subnet button is pressed, no application is listed under the server name. Solution: This probably means that the license is not commute enabled. Please contact us. Problem 4: After Check Out button is pressed, the following error appears. SentinelLM: Error[18]: No license code is available for feature “product name and version” on host “license server name”. Solution: Error #18 is because you are running Wcommute.exe and lsapiw32.dll files that are issued by other software vendors. Wcommute.exe and lsapiw32.dll files are vendor specific. In other words, in order to check out a license on your portable computer you must run Wcommute.exe and lsapiw32.dll files issued by StructurePoint. These two files are available in the WCommute.zip file in the License Server folder on CD. Alternatively, they can be downloaded at our website below. Extract the two files from the

Licensing - Commuter
32
zipped package into the same folder on the portable computer so that the correct DLL file will be used. http://www.pcaStructurePoint.com/ftparea/WCommute.zip Problem 5: After the Check Out button is pressed, the following error appears. SentinelLM: Error[75]: Unable to issue a commuter license to client “product name and version”. Solution: Error #75 has been resolved in SentinelLM 7.2.0.23. If your license server is running an earlier version, download the version 7.2.0.23 from our website below. If your license server is already running version 7.2.0.23 or higher, please contact us. http://www.pcaStructurePoint.com/ftparea/License_Server.exe Problem 6: When I try to commute a second license I get error 79, why? Solution: Error 79 means that the client has already checked out a license. If you get this when trying to check out a license from a different client, it is typically because the machines on the network are cloned, and all have the same hard drive image. LM defaults to a disk ID locking for commuting. Since all machines have the same disk ID, you will need to either add a commute.dat file configured to lock to something else in addition to or rather than, or, you will need to change the volume serial labels on all of the cloned machines.
Remote Commuter Licensing
Introduction
The purpose of this document is to show how to transfer a license from network license server to a remote computer that is not physically connected to the network. In order to simplify the procedures, floppy disks are used to transfer data between license server and remote computer in this document. Transferring data via e-mail is also available. Here is an overview of how to obtain and install a remote commuter authorization:
1. On license server computer, locate WRCommute.exe and lsapiw32.dll and copy them to a flash drive.
2. A remote user runs WRCommute to generate a commuter locking code for the remote computer, and sends the commuter locking code to the local user who has access to the SentinelLM license server.
3. The local user runs WCommute.exe (entering the remote user’s commuter locking code) to check out a remote commuter authorization, and sends it to the remote user.
4. The remote user runs WRCommute to install the remote commuter authorization.

New Printed Documentation Output_31
33
Setup & Installation
Step 1: Locate WRCommute.exe and lsapiw32.dll
These two files are located in the following folder on license server if the license server software is installed in default directory.
C:\Program Files\Rainbow Technologies\Admin\Admin.net\Win32\
Copy these two files.
Step 2: Getting a Remote Commuter Locking Code
Copy WRCommute.exe and lsapiw32.dll to a temporary folder on the remote computer’s hard drive. Both of them should be copied to the same folder.
The remote user must generate a commuter locking code for his or her remote computer and send it to the network user. Run WRCommute and click the Get Locking Code tab. You see the commuter locking code for the current computer.
Press the Save button to save the commuter locking code to a file. Step 3: Checking Out a Random Commuter License
The next step is to use WCommute on a computer connected to the network containing the SentinelLM license server to check out a commuter authorization for the remote user.
1. Run WCommute and select the commuter authorization you want to use from the
network as you normally would. By default, WCommute is located in the following folder.
Licensing - Commuter
34
C:\Program Files\Rainbow Technologies\Admin\Admin.net\Win32
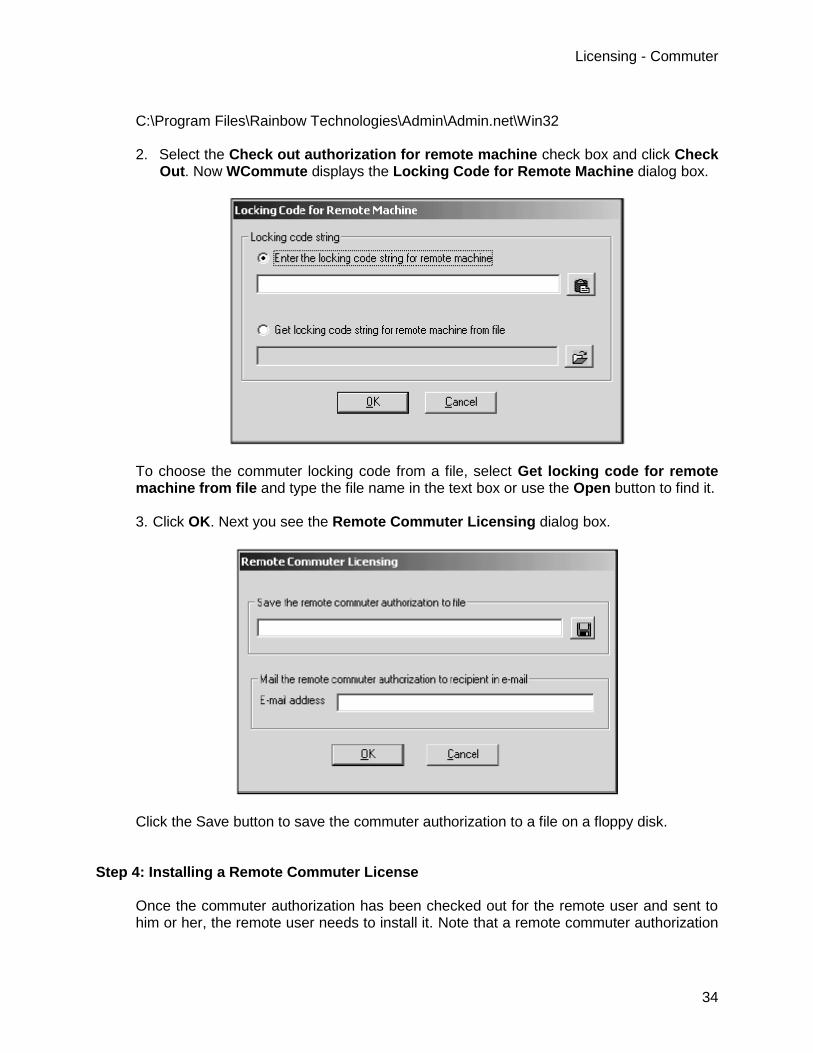
2. Select the Check out authorization for remote machine check box and click Check
Out. Now WCommute displays the Locking Code for Remote Machine dialog box.
To choose the commuter locking code from a file, select Get locking code for remote machine from file and type the file name in the text box or use the Open button to find it.
3. Click OK. Next you see the Remote Commuter Licensing dialog box.
Click the Save button to save the commuter authorization to a file on a floppy disk. Step 4: Installing a Remote Commuter License
Once the commuter authorization has been checked out for the remote user and sent to him or her, the remote user needs to install it. Note that a remote commuter authorization

New Printed Documentation Output_31
35
cannot be checked back into the license server, but will simply expire on the remote computer.
1. Run WRCommute and click the Install Remote Authorization Code tab.
To install the authorization code from a file, select Get remote authorization code(s) from file and type the file name in the text box or use the Open button to find it.
2. Click Install.


37
Licensing - Redundant
Introduction
Redundant license servers and license balancing offer several important benefits to StructurePoint users. It provides a flexible and easy way to acquire license tokens even if a particular license server goes down (license server backup). This ensures maximum uptime and license availability. The speed with which an end user acquires a license token is optimized by distributing tokens among multiple license servers to reduce the traffic for a particular license server (license balancing). License tokens can be allocated among multiple license servers, but a minimum of three is required. License manager (SentinelLM) will, over time, adjust the allocations to the optimal pattern based on actual license use.
Setup & Installation
License Balancing versus License Server Backup: SentinelLM implements license balancing and license server backup by using redundant license servers. Each license server that runs on a separate computer on the network can be used as a redundant license server at your site to form a license server pool. Each of the license servers in the pool can take over for any other if one of the license servers goes down.

Licensing - Redundant
38
For example, there could be a wide-area network serving three basic engineering groups of end users: Southeast region, Northeast region, and the Midwest region. Computers on this network might be in the same building, data center, or might be in different cities or countries. You have a license code that permits 12 users of spWall to run wherever and whenever. (We say that the license code authorizes 12 licenses or that it has 12 tokens.) The first diagram below shows one possible configuration. You select three server computers on the network and install a license server on each. Typically, each license server computer is on the same subnet as the majority of the end users that will acquire licenses from it. (However, each license server may be on a different subnet.) Note that the license server computers do not have to be on the same subnet—license servers can be in geographically separate locations on subnets connected to one another via internet connections. Typically, the software order from StructurePoint delineates in written authorization the usage agreement. Licenses can be evenly distributed among all three license servers (e.g. 4 each), assuming that each group of users will use the StructurePoint programs about the same number of times. This increases performance by distributing the load between multiple license servers. However, if a group of users ends up having a higher demand for licenses than the others, that group’s license server can be set up to borrow licenses from the other license servers automatically. This improves performance and speeds license acquisition. Alternatively, license servers can be configured so that only one is active and the others are solely backup license servers. In this case, all of the license tokens should be allocated to just a single license server and license balancing turned off. Then the other license servers would only be used if the main license server went down. This is the most common approach used by StructurePoint users.
There are three aspects to setting up and using redundant license servers:
Determine how many redundant license servers to set up and select the computers on which they will reside. (Three are required as a minimum; we recommend a maximum of five.) Various factors, including network performance, affect this decision.
New Printed Documentation Output_31
39
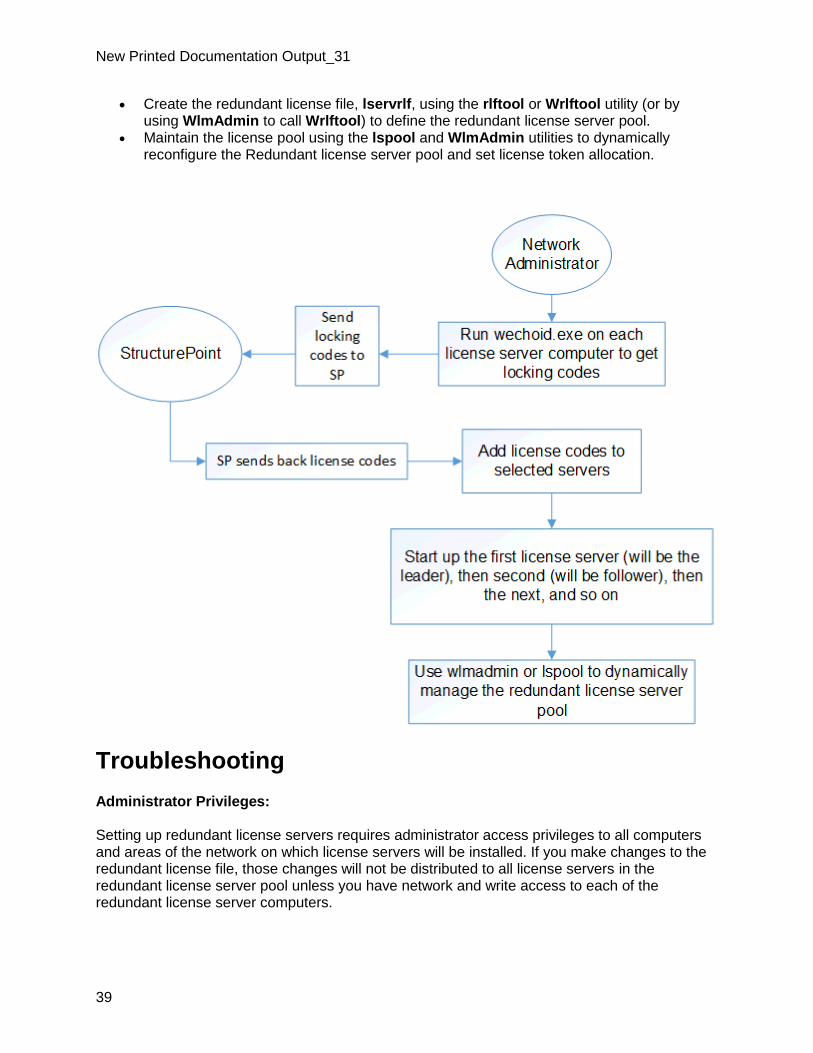
Create the redundant license file, lservrlf, using the rlftool or Wrlftool utility (or by using WlmAdmin to call Wrlftool) to define the redundant license server pool.
Maintain the license pool using the lspool and WlmAdmin utilities to dynamically reconfigure the Redundant license server pool and set license token allocation.
Troubleshooting
Administrator Privileges: Setting up redundant license servers requires administrator access privileges to all computers and areas of the network on which license servers will be installed. If you make changes to the redundant license file, those changes will not be distributed to all license servers in the redundant license server pool unless you have network and write access to each of the redundant license server computers.

41
Licensing - USB Key
Introduction
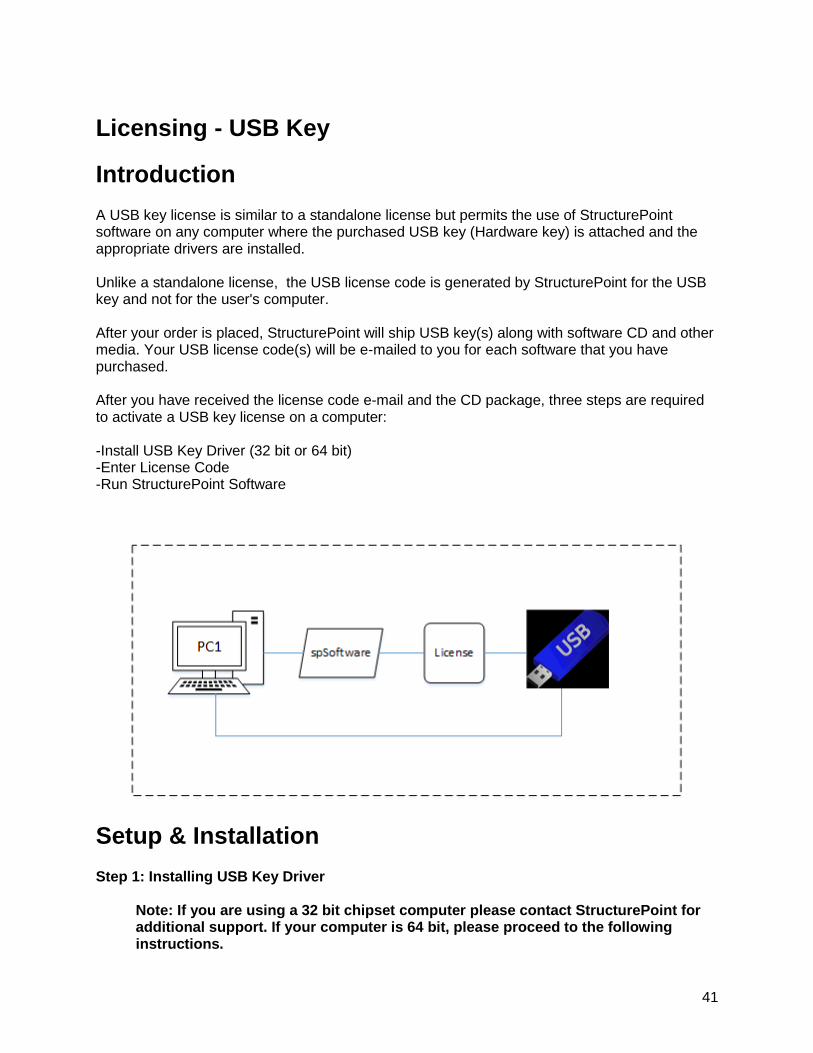
A USB key license is similar to a standalone license but permits the use of StructurePoint software on any computer where the purchased USB key (Hardware key) is attached and the appropriate drivers are installed. Unlike a standalone license, the USB license code is generated by StructurePoint for the USB key and not for the user's computer. After your order is placed, StructurePoint will ship USB key(s) along with software CD and other media. Your USB license code(s) will be e-mailed to you for each software that you have purchased. After you have received the license code e-mail and the CD package, three steps are required to activate a USB key license on a computer: -Install USB Key Driver (32 bit or 64 bit) -Enter License Code -Run StructurePoint Software
Setup & Installation
Step 1: Installing USB Key Driver
Note: If you are using a 32 bit chipset computer please contact StructurePoint for additional support. If your computer is 64 bit, please proceed to the following instructions.
Licensing - USB Key
42
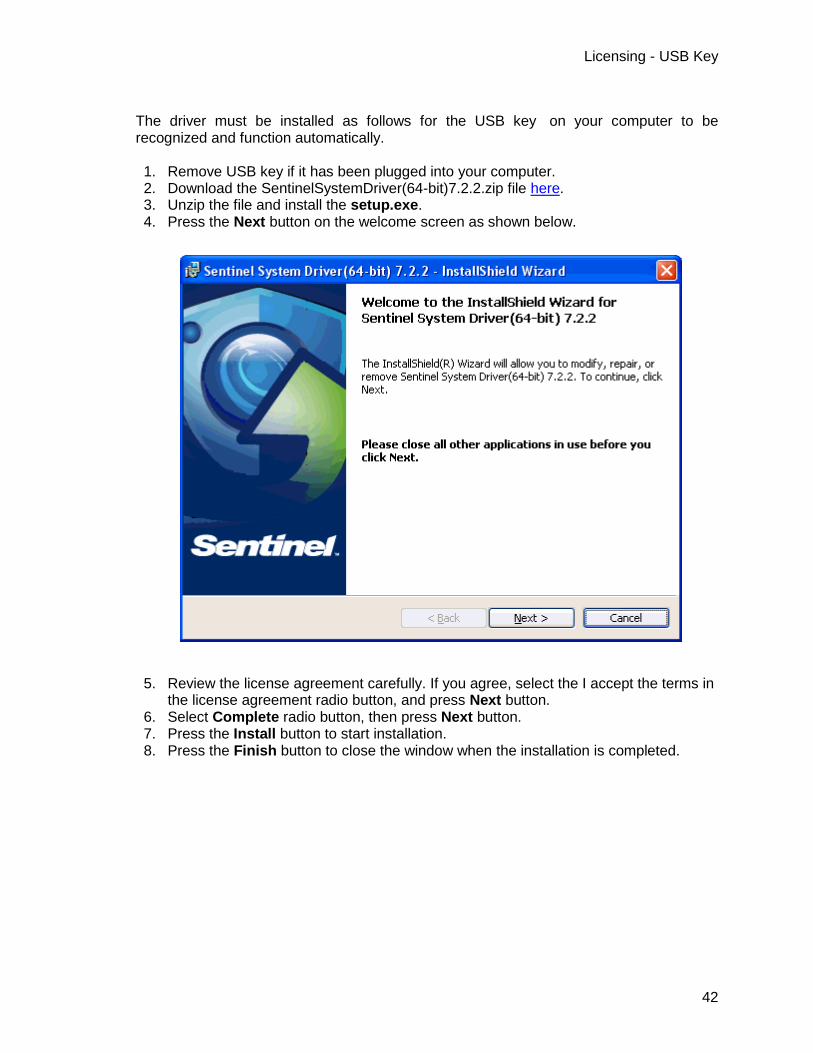
The driver must be installed as follows for the USB key on your computer to be recognized and function automatically.
1. Remove USB key if it has been plugged into your computer. 2. Download the SentinelSystemDriver(64-bit)7.2.2.zip file here. 3. Unzip the file and install the setup.exe. 4. Press the Next button on the welcome screen as shown below.
5. Review the license agreement carefully. If you agree, select the I accept the terms in the license agreement radio button, and press Next button.
6. Select Complete radio button, then press Next button. 7. Press the Install button to start installation. 8. Press the Finish button to close the window when the installation is completed.

New Printed Documentation Output_31
43
9. To complete the installation, a computer restart is required.
Step 2: Entering License Code
If you have not received the license code please e-mail StructurePoint at [email protected].
1. Install StructurePoint software (e.g. spSlab) if it has not been installed. 2. Open Windows Explorer. 3. Go to the StructurePoint software folder (i.e. C:\Program
Files\StructurePoint\pcaSlab). 4. Replace the lservrc file with the new file provided to you in the e-mail from
StructurePoint. Make sure this file is named correctly as lservrc without any extension.
If you have ordered a network license locked to a USB key, please contact StructurePoint for instructions.
Step 3: Running SP Software
Before you run SP software, make sure the USB key is properly plugged into a USB port of your computer. The instructions above (Installing USB Key Driver and Entering License Code) must be performed on each computer that requires the SP software. If you have more than one USB key for StructurePoint software, you may save all the license codes (one license code for each key) into the same lservrc file in the SP software folder so that any of the keys can be used to run the SP software.

Licensing - USB Key
44
Troubleshooting
USB Key Installation is very sensitive to hardware and software environment used. Please contact StructurePoint via email to request assistance Each USB key contains a unique locking code. Your license code is generated based on the locking code by StructurePoint and sent to you in a license file via e-mail. It is not necessary for you to know the USB key locking code. In case you need to, however, please follow the steps below.
1. Make sure the driver for the USB key has been installed. If the drive has not been installed, please follow the instructions here.
2. Plug USB key into a USB port of your computer.
3. Run the file wechoid.exe. This file can be downloaded from our website here.
4. Check only the Computer ID box and uncheck all others. If this check box is disabled, it means that the driver is not installed properly or the key is not plugged into the USB port. If the Selector text box does not show 0x80, please make sure that only the Computer ID check box is checked. On the sample screenshot below, the locking code is 80-AB56E. Please note that yours may be different.

45
Licensing Toolbox
Licensing Error Messages
Error 4: See Sequence Error 17, 4, 30004. Error 5: "Cannot talk to the license server on host." Applies to: Network License Solution:
On the server, open a port or disable windows firewall. Refer to Troubleshooting/Firewall Settings instructions under Network Licensing (e.g. here)
Check services on server. Sentinel LM or RMS should be running. If not running, start the service using loadls from the Sentinel folder. If service is started and still receiving error, restart the sever.
Error 6: "Lock code mismatch – Uploaded code no longer works." Applies to: Network License Solution:
On the server, remove the license and post it again or get a new locking code and add a new license for the new locking code
Error 17: "No servers are running on this subnet." Applies to: Network License or Standalone License Solution:
Most commonly the result of putting a network license in a standalone activation (or vice versa)
Running the StructurePoint software as an administrator (right-click + ‘Run as Administrator’)
Incomplete license code is pasted. E-mail viewers often truncate the license string when copying from within
For standalone licensing, another option is to set the environment variable to “no-net” because of another software possibly forcing the program to look for a license on another network server
If RMS is not used, review list of “Services”. If Sentinel LM does not show up, run loadls (for LMS: Program files\Rainbow Technologies\Admin\Server\WinNT\loadls) to restart the service

Licensing Toolbox
46
Error 18: "No license code is available on host for feature." Applies to: Network License Solution:
Verify license code has been added to the server and make sure the end user is running the correct version of the program to match the license version on the server. This can happen when the end-user has two versions of WlmAdmin tool open and has made changes to one and not the other
Error 19: "Failed to add license code to the license server on host." Applies to: Network License or Standalone License Solution:
In Windows 7/8/10, the locking code changes based on admin or not admin being logged in. Sometimes using the “IP address” as a locking criteria is more reliable depending on the network situation. Using the IP-Lock has successfully fixed error #19, when running as admin did not fix
If the locking code is correct and the complete license is still not working and the environmental variable is not an issue for STA, the license code can be added to the lservrc file manually. Refer to Standalone Troubleshooting here
If the client is running a different license manager (RMS), sometimes they will get error #19 when attempting to enter the license code into LMS 7.2.3 when it needs to be entered in RMS 8.5.x. Make sure LMS and RMS are not running simultaneously by going to “Services”. Have client stop service “sentinel LM”. Make sure their service “Sentinel RMS” is “Started”. If not, right click, and “Start” the service
Remove old/expired StructurePoint licenses (“features”) from the server. After removing old licenses, new strings may add successfully
RMS is provided in different versions depending on the supplier. The StructurePoint version can be added to all versions except 8.5.0 which requires special authorization from StructurePoint
Error 25: "Client – Server version mismatch." Applies to: Network License Solution:
Upgrade to RMS license manager from LMS Error 26: "Request denied due to clock tamper." Applies to: Network License or Standalone License Solution:
Make sure the end user is running the correct version of the software and that the lshost.txt file is pointing to the correct license server
Request the new Nqmath.dll authorization file if customer is using 8.5.0 version of the license server
Run the program as administrator (right-click + ‘Run as Administrator’) and if the problem isn't resolved, contact StructurePoint
Error 75: "Failed to issue commuter license."
New Printed Documentation Output_31
47
Applies to: Commuter License Solution:
This may occur if a commuter license is already on the system or the commuter license is corrupt. It may be necessary to clean the system with lsclean utility
Error 92 (with RMS 8.5.x): Failed to add license code to the license server on host “no-net”. License code is invalid. Applies to: Network License and Standalone License Solution:
Incomplete license code. Make sure the entire license code is applied. Some e-mail viewers truncate the license and show it in multiple lines causing an incomplete copy and paste
Error 93 (with RMS 8.5.x): Failed to add license code. License already added on host. Applies to: Network License Solution:
Verify the seat count has changed in WlmAdmin on the server. This indicates new licenses have been added to active licenses and show a new higher total. Newer licenses will remain with a new end date after older licenses have expired and the license count drops. Verify programs works on end-user machine
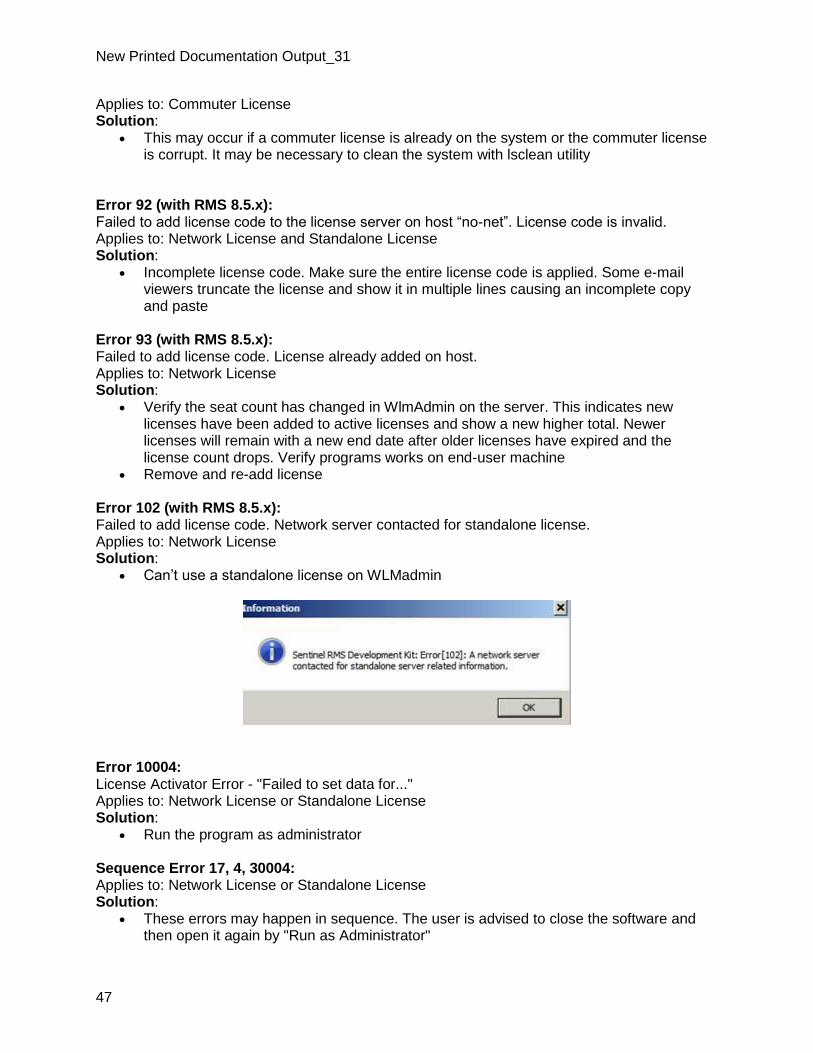
Remove and re-add license Error 102 (with RMS 8.5.x): Failed to add license code. Network server contacted for standalone license. Applies to: Network License Solution:
Can’t use a standalone license on WLMadmin
Error 10004: License Activator Error - "Failed to set data for..." Applies to: Network License or Standalone License Solution:
Run the program as administrator Sequence Error 17, 4, 30004: Applies to: Network License or Standalone License Solution:
These errors may happen in sequence. The user is advised to close the software and then open it again by "Run as Administrator"

Licensing Toolbox
48
Error: License does not work but older license versions work. Applies to: Network License Solution:
Remove the license for old PCA program versions as they interfere with the ability of StructurePoint licenses to work correctly
Error: Remote commuter license can’t be checked back in.
New Printed Documentation Output_31
49
Applies to: Commuter License Solution:
This is by design. Remote commuter licenses aren’t supposed to be checked back in. It will expire and then the license will be released
"All network license tokens in use or none is found." Applies to: Network License Solution:
Verify start and end date in WlmAdmin. Expired license will continue to be displayed in list but cannot support program operation
Verify end user is pointed to the active server using lshost.txt and the server has active licenses
Investigate whether active users occupying all available licenses Review network license troubleshooting section
License date not updating: Additive Network License. Applies to: Network License Solution:
Adding a new network license to a non-expired license will combine them with the seats added together and the older expiration will persist. When older license expires, the expiration date of the newer license will show up
Error-Trial period has expired: Evaluate button is unavailable and program can't start. Applies to: Standalone License Solution:
Run as administrator if evaluating the software or contact StructurePoint to obtain a new license
If you have a network license, see Network License setup
Firewall Settings - Adding Port & Inbound Rules
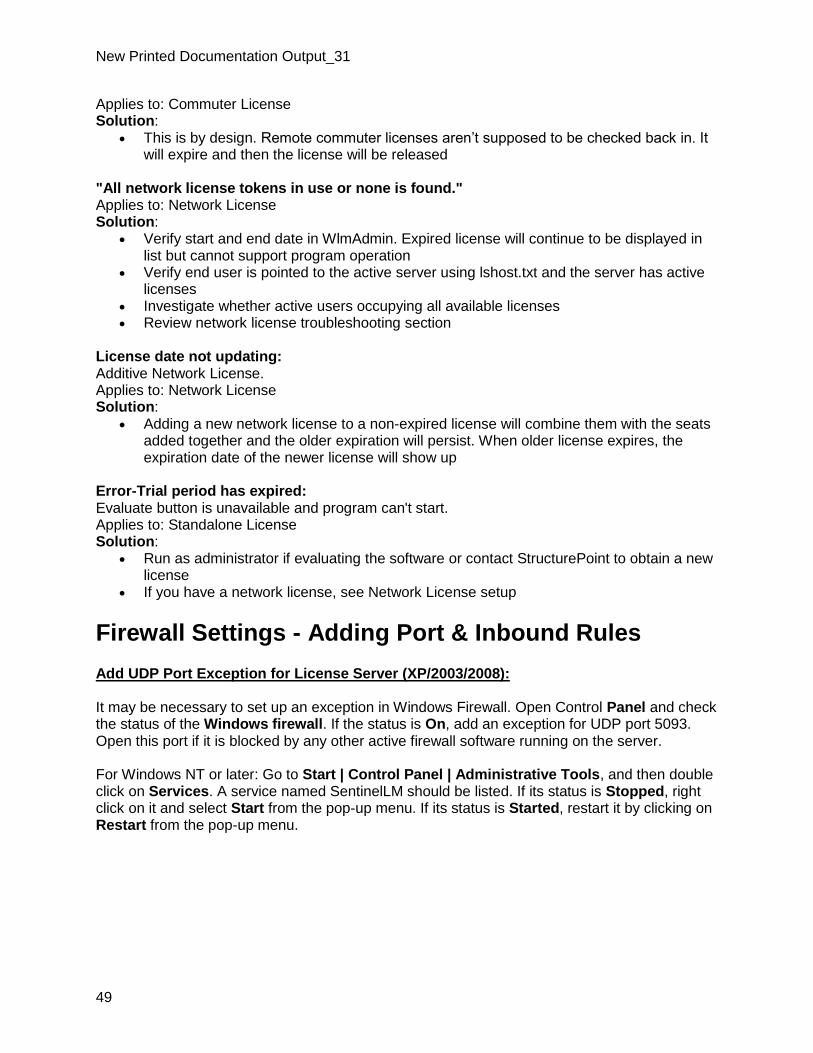
Add UDP Port Exception for License Server (XP/2003/2008): It may be necessary to set up an exception in Windows Firewall. Open Control Panel and check the status of the Windows firewall. If the status is On, add an exception for UDP port 5093. Open this port if it is blocked by any other active firewall software running on the server. For Windows NT or later: Go to Start | Control Panel | Administrative Tools, and then double click on Services. A service named SentinelLM should be listed. If its status is Stopped, right click on it and select Start from the pop-up menu. If its status is Started, restart it by clicking on Restart from the pop-up menu.
Licensing Toolbox
50
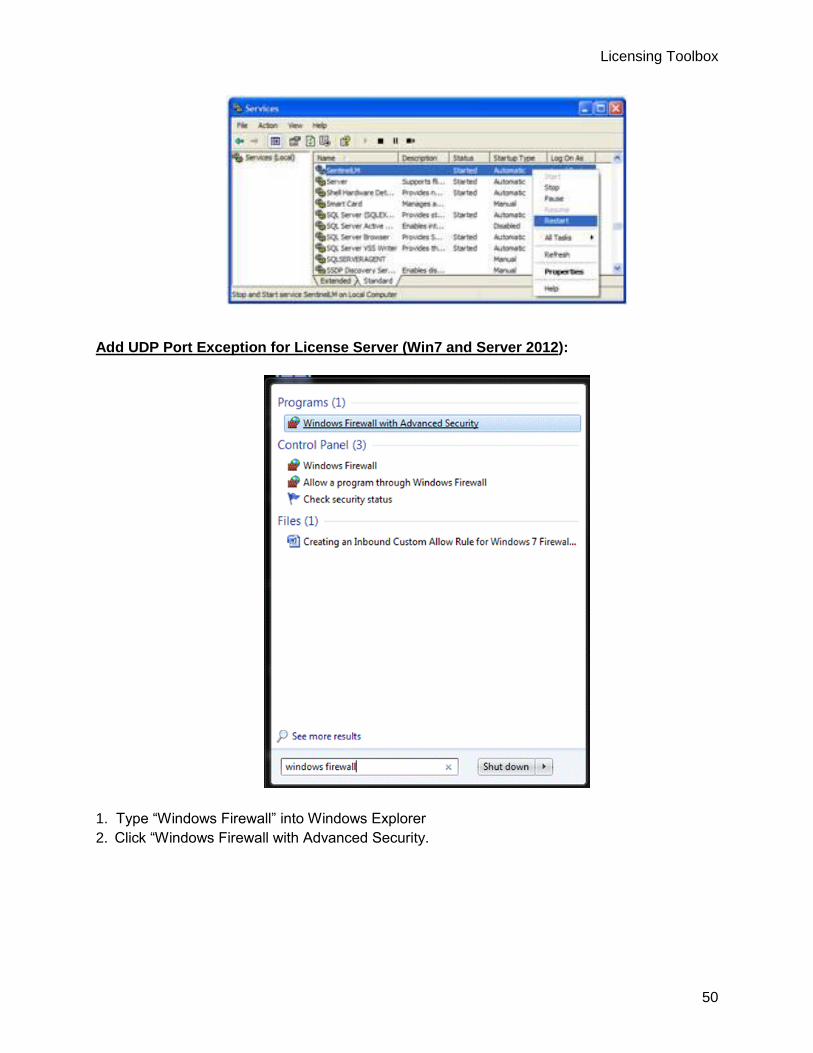
Add UDP Port Exception for License Server (Win7 and Server 2012):
1. Type “Windows Firewall” into Windows Explorer
2. Click “Windows Firewall with Advanced Security.
New Printed Documentation Output_31
51
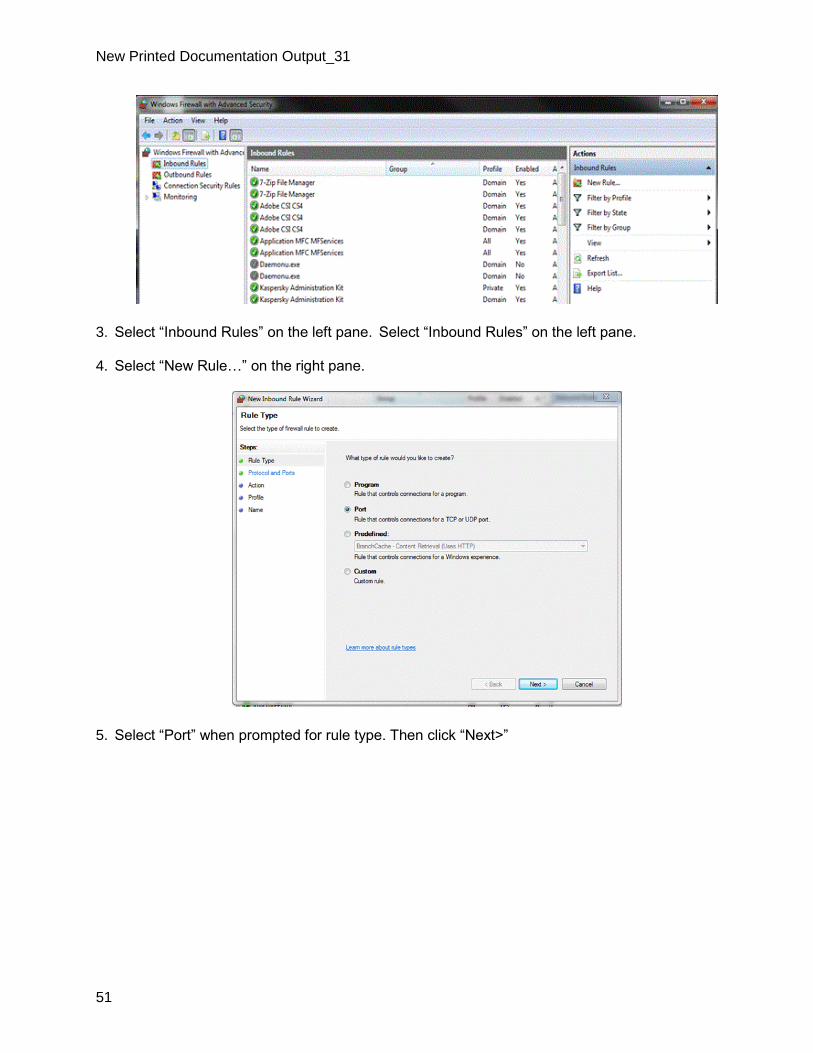
3. Select “Inbound Rules” on the left pane. Select “Inbound Rules” on the left pane. 4. Select “New Rule…” on the right pane.
5. Select “Port” when prompted for rule type. Then click “Next>”

Licensing Toolbox
52
6. Select “UDP” when prompted. 7. Select “Specific local ports” and enter “5093” in the text box. Then click “Next>”
8. Select “Allow the connection”. StructurePoint programs use the specific UDP port 5093 to communicate with the License Manager.
New Printed Documentation Output_31
53
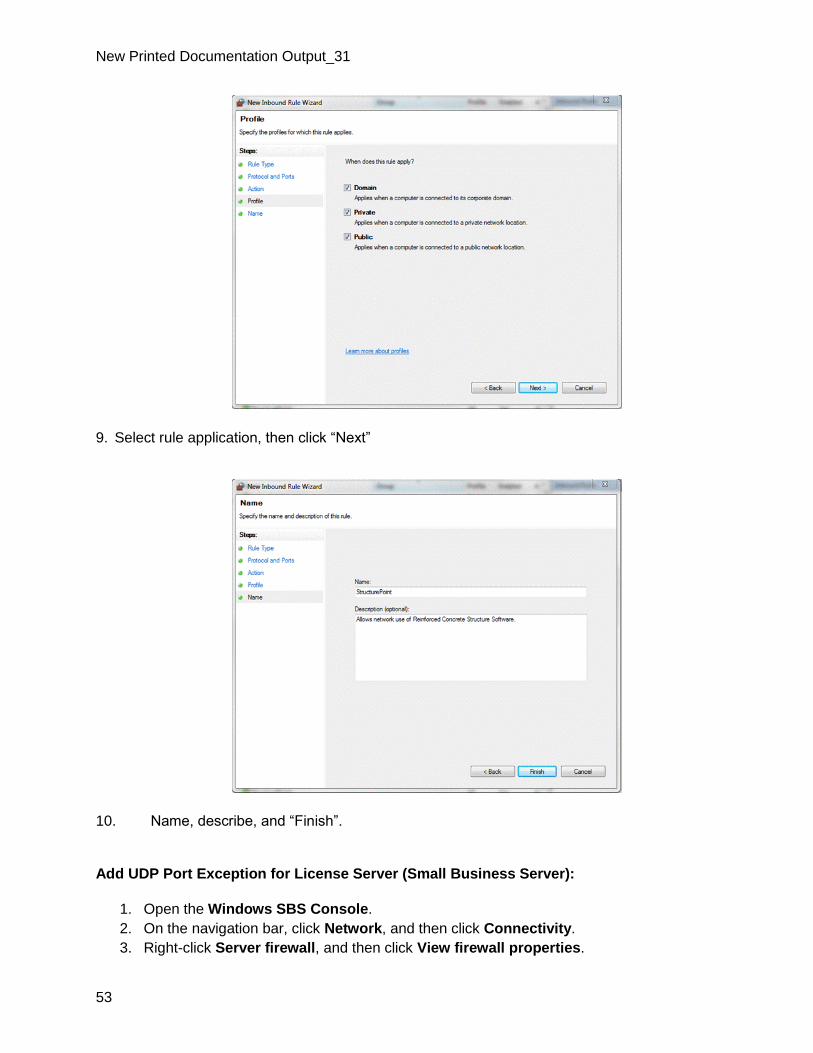
9. Select rule application, then click “Next”
10. Name, describe, and “Finish”.
Add UDP Port Exception for License Server (Small Business Server):
1. Open the Windows SBS Console.
2. On the navigation bar, click Network, and then click Connectivity.
3. Right-click Server firewall, and then click View firewall properties.

Licensing Toolbox
54
4. Click the Advanced tab, and then click Manage rules.
5. Click Allow a program through Windows Firewall.
6. On the Exceptions tab, click Add port.
7. In the text boxes, type a name for the port that you want to open and the port number,
click TCP or UDP, and then click OK.
8. Verify that the name of the port is listed in the Program or port text box, with the check
box selected. Click OK.
Custom Inbound Rule for Windows Firewall: When the license server and the StructurePoint software program are installed properly but fail to communicate one of the likely reasons could be a firewall restriction. An inbound rule can be created to permit the connection between the server and the workstation through the firewall. Creating an Inbound Custom Allow Rule
1. Launch Windows Firewall with Advanced Security by clicking on Start > Administrative Tools > Windows Firewall with Advanced Security.
2. Select Inbound Rules in the left pane and click New Rule under Inbound Rules in the Actions Pane.
3. The New Inbound Rule Wizard will launch. Select Custom and click Next. 4. This screen is to determine if this rule applies to all programs or a specific program. If it
is for all programs select that option or if this rule is to apply to a specific program then you will need to click the "This program path:" radio button and then browse to the specific program (image 4a). If the rule applies to a specific service click the customize button next to services and select the service from the Customize Service Settings window. You options are to apply to all programs and servers, services only, a specific service or apply to a service by the Short Name (image 4b). Click Next to continue.
4a.

New Printed Documentation Output_31
55
4b.
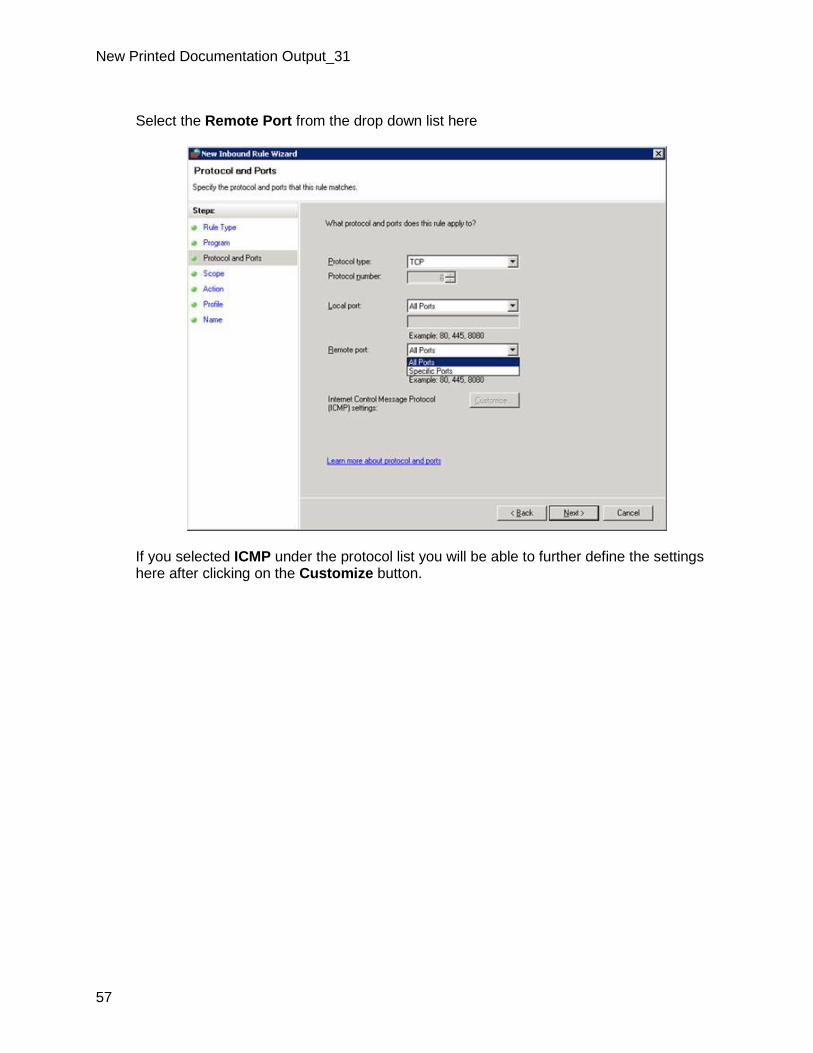
5. This page will allow you to select a protocol, a local port, a remote port and if you select ICMP you can customize the settings for ICMP as well. After setting all the options in this section click Next to continue.
Select a protocol from the drop down list here.

Licensing Toolbox
56
Select the Local Port from the drop down list here
New Printed Documentation Output_31
57
Select the Remote Port from the drop down list here
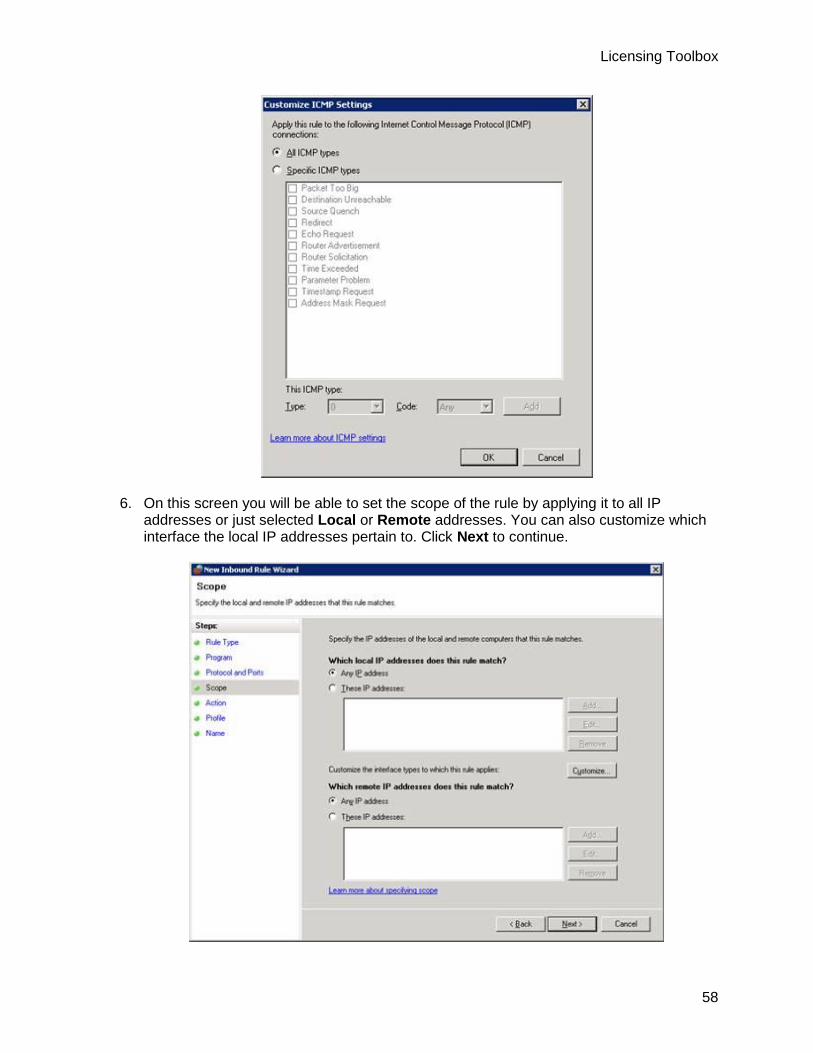
If you selected ICMP under the protocol list you will be able to further define the settings here after clicking on the Customize button.
Licensing Toolbox
58
6. On this screen you will be able to set the scope of the rule by applying it to all IP addresses or just selected Local or Remote addresses. You can also customize which interface the local IP addresses pertain to. Click Next to continue.

New Printed Documentation Output_31
59
7. Since this is for an allow rule you will need to select whether to allow this traffic for all
connections (secure and insecure) or only if the connection is secure. If you require the connection to be secure you can also specify if it also requires Encryption or if it overrides block rules. Click Next to continue.
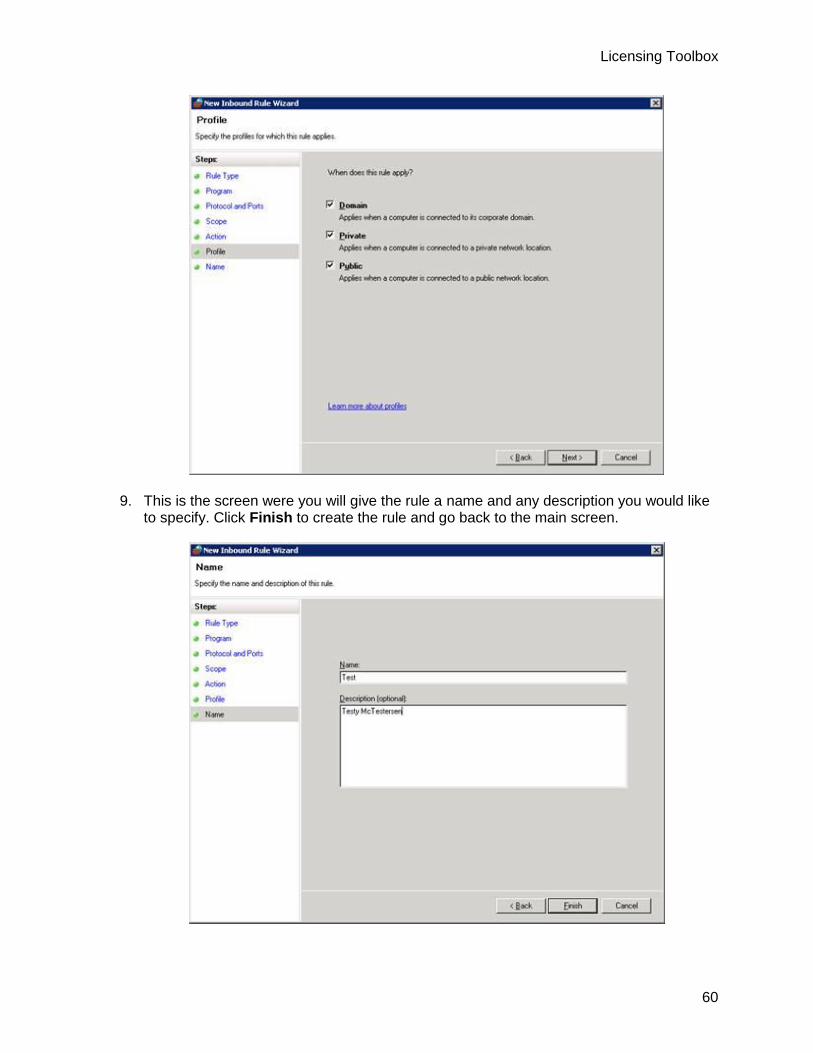
8. On this screen you can select which profiles the rule applies to. Domain applies when the inbound connection is coming from a computer within the domain. Private applies when the inbound connection is coming from a source that has selected Private for it's profile. Public applies to all connections coming from a source whose profile is set to Public. You can select one, two, or all three. Click Next to continue.
Licensing Toolbox
60
9. This is the screen were you will give the rule a name and any description you would like to specify. Click Finish to create the rule and go back to the main screen.

New Printed Documentation Output_31
61
RMS 8.5.0 Override
This is required for Network License setups with servers running Sentinel RMS 8.5.0. This license server version requires authorization from StructurePoint to replace a file in each of StructurePoint's program folders on every end user's machine.
Please contact StructurePoint to request the RMS 8.5.0 patch
In program folders (e.g. C:\Program Files\StructurePoint\spColumn or c:\Program Files (x86)\StructurePoint\spColumn) on the client computers, replace existing NqMath.dll with the downloaded 2.0.4 version (administrator privileges may be required)
SLM User's Guide
The Sentinel License Manager is used by StructurePoint to manage licensing in multi-user environments. It keeps track of all licenses and handles requests from network users who want to run StructurePoint programs, granting authorization to the requesters to allow them to run the program, and denying requests when all licenses are in use. It is an integral component of the network licensing systems that can be implemented with Sentinel LMS/RMS, namely server-locked licenses, site licenses, and commuter licenses.
The License Manager usually runs on a computer within the network where users (clients) have installed the licensed software. LMS/RMS does not support servers with numeric host names. The License Manager may not start on such machines due to external dependencies.
Usually the licenses reside on the License Manager in a license file. On startup, the License Manager reads the licenses from the file and creates a license table. Otherwise, these are added dynamically to the License Manager. The dynamically added licenses are only available in the License Manager memory. Once the License Manager is stopped, the availability of these licenses is lost.
StructurePoint programs look for a License Manager with available licenses upon starting. When the licensed program is run on a client, a request is sent to the License Manager for obtaining an authorization. The License Manager processes the request (including the task of authenticating the clients, if required) and returns the status to the client. The License Manager maintains each request separately, treating these authorizations as separate clients.
Sentinel License Manager manual can be found here.
Reporting Tools
Sentinel License Manager allows the creation of usage reports. For further instructions or for the reportdb.mdb file itself, please contact StructurePoint.
Silent Installation
Licensing Toolbox
62
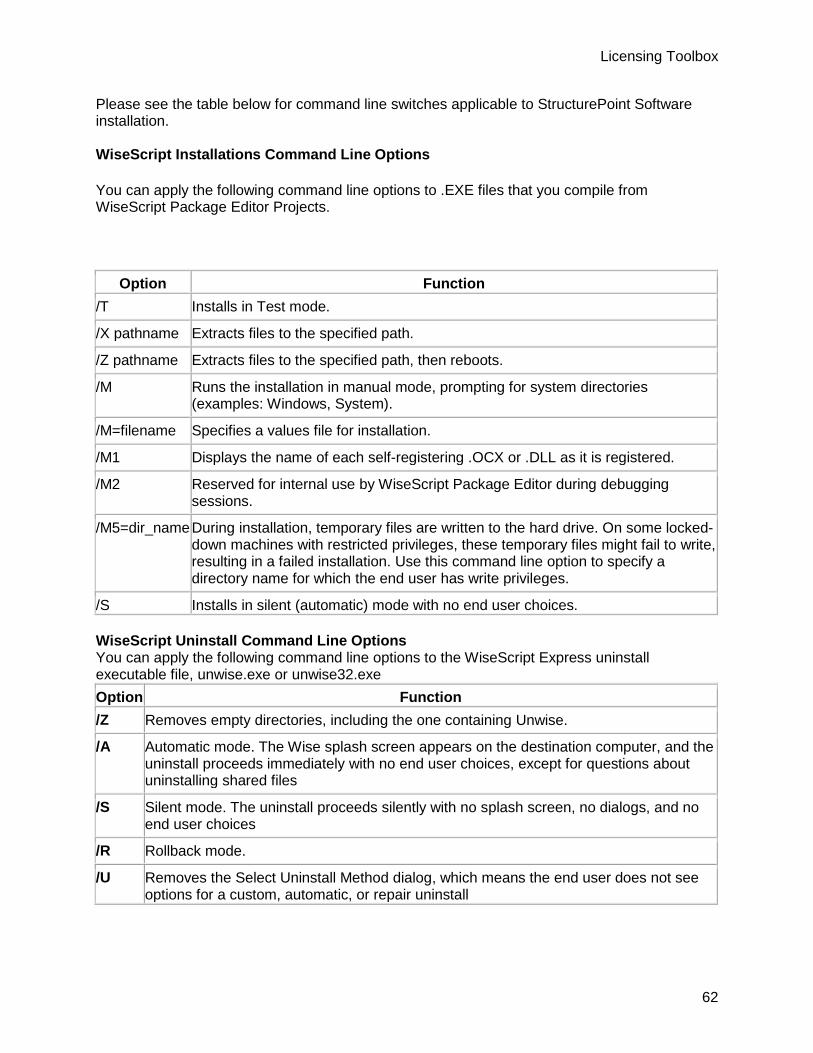
Please see the table below for command line switches applicable to StructurePoint Software installation. WiseScript Installations Command Line Options
You can apply the following command line options to .EXE files that you compile from WiseScript Package Editor Projects.
Option Function
/T Installs in Test mode.
/X pathname Extracts files to the specified path.
/Z pathname Extracts files to the specified path, then reboots.
/M Runs the installation in manual mode, prompting for system directories (examples: Windows, System).
/M=filename Specifies a values file for installation.
/M1 Displays the name of each self-registering .OCX or .DLL as it is registered.
/M2 Reserved for internal use by WiseScript Package Editor during debugging sessions.
/M5=dir_name During installation, temporary files are written to the hard drive. On some locked-down machines with restricted privileges, these temporary files might fail to write, resulting in a failed installation. Use this command line option to specify a directory name for which the end user has write privileges.
/S Installs in silent (automatic) mode with no end user choices.
WiseScript Uninstall Command Line Options You can apply the following command line options to the WiseScript Express uninstall executable file, unwise.exe or unwise32.exe
Option Function
/Z Removes empty directories, including the one containing Unwise.
/A Automatic mode. The Wise splash screen appears on the destination computer, and the uninstall proceeds immediately with no end user choices, except for questions about uninstalling shared files
/S Silent mode. The uninstall proceeds silently with no splash screen, no dialogs, and no end user choices
/R Rollback mode.
/U Removes the Select Uninstall Method dialog, which means the end user does not see options for a custom, automatic, or repair uninstall
New Printed Documentation Output_31
63
When you use command line options for the uninstall program, you must send it the path to the log file as a parameter. It must be the log file that is in the same folder as unwise.exe. If the path to the log file contains spaces, it must be surrounded by quotation marks. Example: "C:\Program Files\Application\UNWISE.EXE" /A "C:\Program Files\Application\INSTALL.LOG" Application Uninstall
Linux Support
Sentinel License Manager (LMS and RMS) supports Windows 32 and 64 bit operating systems. Non-windows operating systems such as Solaris, Linux, and Macintosh are also supported. On UNIX, you can place the License Manager executable (lserv) at any chosen location. The License Managers may exist on different platforms than the clients running the licensed application. For example, a License Manager running on UNIX may administer Windows clients. The system administrators, who will be deploying StructurePoint software and administering the License Managers in a Linux environment, may require additional documentation provided by Safenet. More information can be found here.
Citrix Thin Client
Support for thin clients is available. However, performance on a thin-client terminal with limited
resources may be inadequate for structural modeling using StructurePoint software. The optimal
method of operating StructurePoint software is to run on a high performance desktop computer
with hardware specifications suitable for CAD operations. Contact StructurePoint for more
information.
Download Links
The most current versions of all of our software products can be installed from the following links. - spBeam (formerly pcaBeam/PCABEAM) v5.00 - spSlab (formerly pcaSlab/ADOSS) v5.00 - spColumn (formerly pcaColumn/PCACOL/irrCOL) v5.11 - spMats (formerly pcaMats/MATS) v8.12 - spWall (formerly pcaWall/TILT) v5.01 - spFrame (formerly pcaFrame/pcaCAD) v1.50a Review StructurePoint Manuals, Release Notes, and Resources.

Licensing Toolbox
64
User Account Control Issues
User Account Control may come up multiple times in the installation and use of StructurePoint software. It is to ensure the security of your computer. Microsoft describes it more in detail here.
Also, when prompted by Windows to confirm if program was installed correctly, choose Yes. Otherwise, it will change the properties to require Administrator credentials at every startup.
Sentinel License Server Download
For Network License setups, a license service running on a network server to distribute licenses to end users is needed. If network licensed software is already running on the network, it is likely that Sentinel or something similar has been previously installed. If not, please download the License Server. Additional instructions can be found in the Setup & Installation page under Network Licensing.