Embed Size (px)
Citation preview
2017/05 Edition 03
Setup Guide
HFAS1-XS20UHFAS1-S10U
Network Audio Server
© I-O DATA DEVICE, INC.
Before reading this Setup Guide, please be sure to look at “Quick Guide” and “Conformity Information and Warranty”.

2Go to [Table of Contents]
Table of Contents
1. Composition of the Instruction Manual ............................................................................... 3
2. Getting More out of this Unit ......................................................................................... 4
2.1. Open the Settings Screen 5
2.2. Saving Audio Files from a USB HDD 6
2.3. Streaming Music on a USB HDD as it is 10
2.4. Confirming the Amount of Free Space 12
2.5. Adjusting the Brightness and Colour of the Front Indicator 13
2.6. Turning off the LAN Port indicator 15
2.7. Backing Up Music 17
2.8. Switching the Mode of the Built-in Disk (RAID) 22
2.9. Setting the Time Zone 25
2.10. Keeping the Firmware/Software of this Unit up to Date 27
3. Details of the Settings screen ..................................................................................... 29
3.1. HOME 30
3.2. SYSTEM INFORMATION 31
3.3. SYSTEM SETTINGS 33
3.4. USB DEVICE SETTINGS 38
3.5. USB CD/DVD/BD DRIVE SETTINGS 39
3.6. DISK MANAGEMENT 42
3.7. SYSTEM INITIALIZATION 43
3.8. FIRMWARE UPDATE 44
4. Troubleshooting ........................................................................................................... 45
* Gracenote, the Gracenote logo and logotype, “Powered by Gracenote” and Gracenote MusicID are either registered trademarks or trademarks of Gracenote,Inc. in the United States and/or other countries. Portions of the content is copyright © of Gracenote or its providers.

3Go to [Table of Contents]
1. Composition of the Instruction ManualThe instruction manual of this unit includes the following.
• Quick Guide:Describes the basic way to use this unit.
• Conformity Information and Warranty:Provides guidance on the warranty and standards of this unit and contact information.
• Setup Guide (this document):Describes detailed settings to this unit.
• Twonky Server Reference:Describes the Twonky Server that is employed in this unit.
You can download these instruction manuals from the following website
http://www.iodata.jp/fidata/en/support/#download
4Go to [Table of Contents]
2. Getting More out of this Unit
2.1. Open the Settings Screen 5
2.2. Saving Audio Files from a USB HDD 6
2.3. Streaming Music on a USB HDD as it is 10
2.4. Confirming the Amount of Free Space 12
2.5. Adjusting the Brightness and Colour of the Front Indicator 13
2.6. Turning off the LAN Port indicator 15
2.7. Backing Up Music 17
2.8. Switching the Mode of the Built-in Disk (RAID) 22
2.9. Setting the Time Zone 25
2.10. Keeping the Firmware/Software of this Unit up to Date 27
5Go to [Table of Contents]
2. Getting More out of this Unit – 2.1. Open the Settings Screen
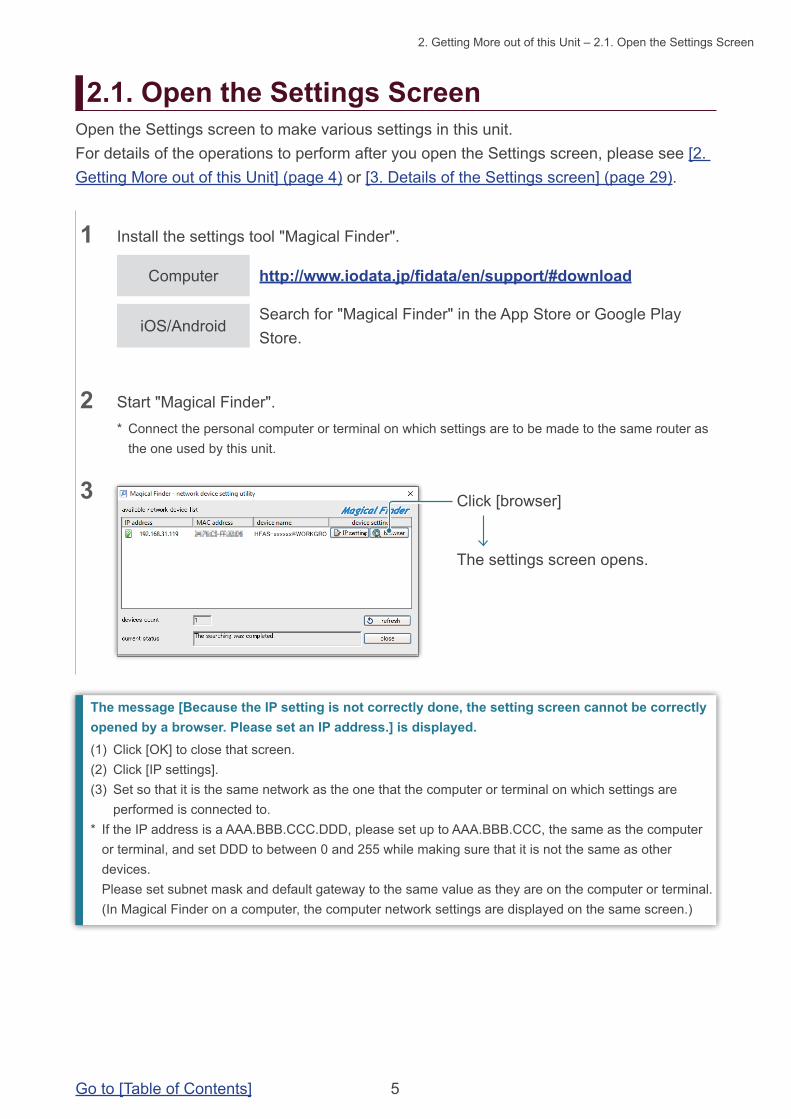
2.1. Open the Settings Screen
1 Install the settings tool "Magical Finder".
Open the Settings screen to make various settings in this unit.For details of the operations to perform after you open the Settings screen, please see [2. Getting More out of this Unit] (page 4) or [3. Details of the Settings screen] (page 29).
3
2 Start "Magical Finder".* Connect the personal computer or terminal on which settings are to be made to the same router as
the one used by this unit.
Click [browser]
The settings screen opens.
The message [Because the IP setting is not correctly done, the setting screen cannot be correctly opened by a browser. Please set an IP address.] is displayed.(1) Click [OK] to close that screen.(2) Click [IP settings].(3) Set so that it is the same network as the one that the computer or terminal on which settings are
performed is connected to.* If the IP address is a AAA.BBB.CCC.DDD, please set up to AAA.BBB.CCC, the same as the computer
or terminal, and set DDD to between 0 and 255 while making sure that it is not the same as other devices. Please set subnet mask and default gateway to the same value as they are on the computer or terminal. (In Magical Finder on a computer, the computer network settings are displayed on the same screen.)
Computer http://www.iodata.jp/fidata/en/support/#download
iOS/AndroidSearch for "Magical Finder" in the App Store or Google Play Store.

6Go to [Table of Contents]
2. Getting More out of this Unit – 2.2. Saving Audio Files from a USB HDD
2.2. Saving Audio Files from a USB HDDBy connecting and operating a USB HDD that contains audio files, you can copy them to this unit.
Please copy audio files from a computer or such like to a USB HDD.
2.2.1. Copying Audio Files to a USB HDD
2 2.1. Open the Settings Screen
1 Connect a USB HDD to a USB port on the back of this unit.
Using a multi-port card reader.If you use a multi-port card reader instead of a USB HDD, please insert only one piece of media.
2.2.2. Saving Audio Files from a USB HDD
3
Click [USB DEVICE SETTINGS]
A sudden failure could corrupt any saved audio files and lead to a loss of data.For details of this unit’s backup function, please see "2.7. Backing Up Music (page 17)”.
[Important] As a precaution, please back up data regularly.
Get audio files ready.You can get audio files by downloading from a music distribution site or ripping them from a music CD. For details of the supported formats of audio files, please see the Quick Guide.
Supported USB HDDDrive formats : FAT32, NTFSCapacity : up to 2TB

7Go to [Table of Contents]
2. Getting More out of this Unit – 2.2. Saving Audio Files from a USB HDD
4
Click [Data import]
Click [NEXT]
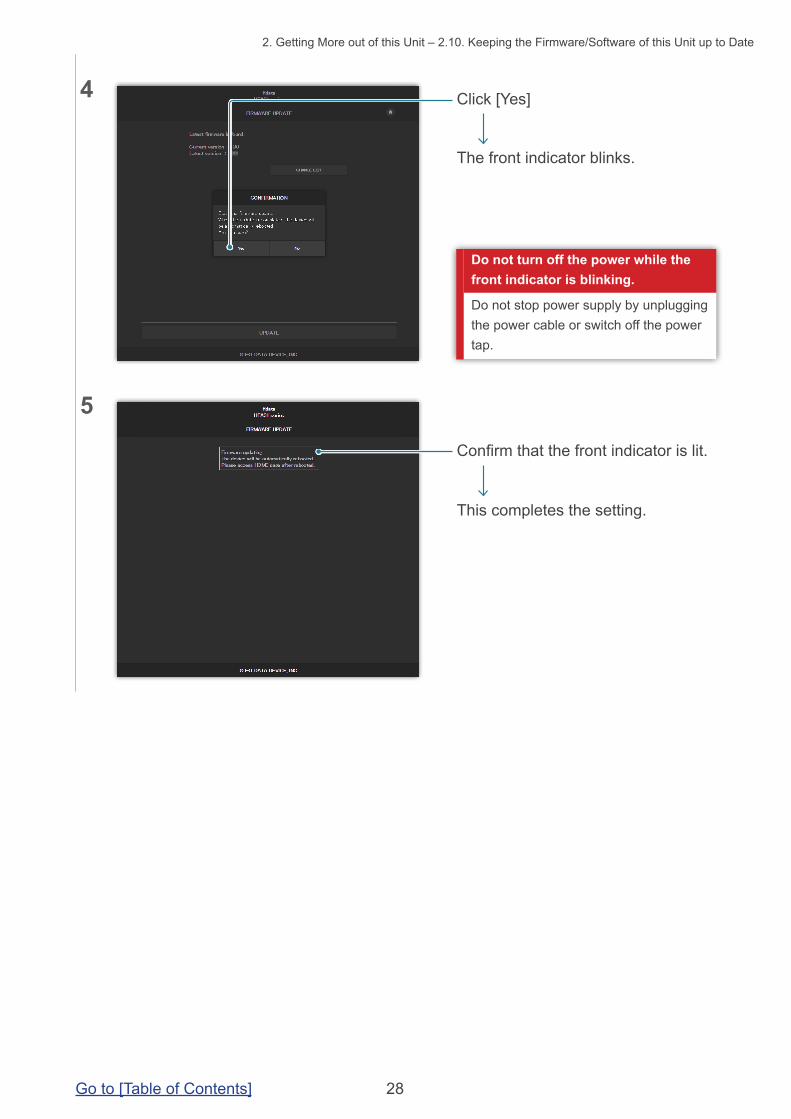
The front indicator blinks.
5
6
Click [IMPORT]
Click [Yes]
If you click [Yes], audio files start to be copied and the front indicator blinks.Please do not remove the USB HDD while the front indicator is blinking.
Caution: Do not remove the USB HDD

8Go to [Table of Contents]
2. Getting More out of this Unit – 2.2. Saving Audio Files from a USB HDD
Confirm that the front indicator is lit.
Remove the USB HDD.
This completes the operation.
7
2.2.3. Removing the USB HDDIf you want to remove a USB HDD when the power to this unit is on, please do so with the following operation.
1 2.1. Open the Settings Screen
2
Click [USB DEVICE SETTINGS]
3
Click [Removal of the USB device]
Click [NEXT]
9Go to [Table of Contents]
2. Getting More out of this Unit – 2.2. Saving Audio Files from a USB HDD
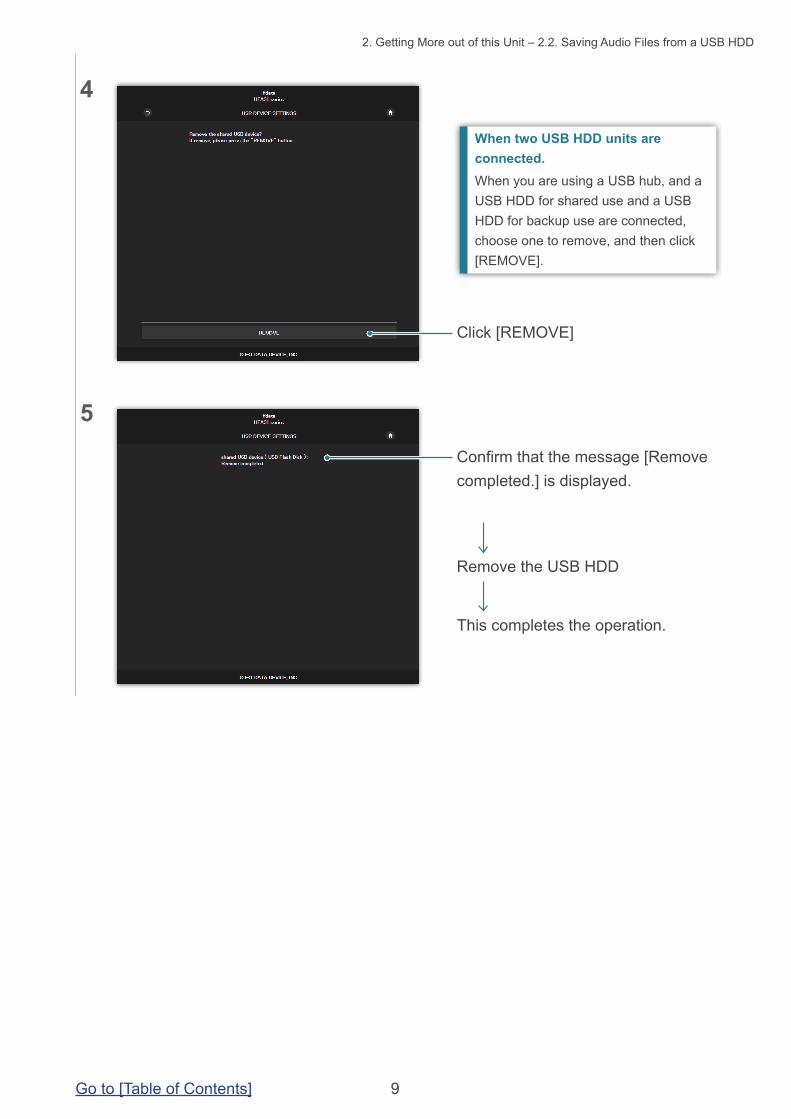
Confirm that the message [Remove completed.] is displayed.
Remove the USB HDD
This completes the operation.
4
5
Click [REMOVE]
When two USB HDD units are connected.When you are using a USB hub, and a USB HDD for shared use and a USB HDD for backup use are connected, choose one to remove, and then click [REMOVE].
10Go to [Table of Contents]
2. Getting More out of this Unit – 2.3. Streaming Music on a USB HDD as it is
2.3. Streaming Music on a USB HDD as it isBy connecting a USB HDD that contains audio files to this unit and operating it, you can stream the music on the USB HDD as if it were saved on this unit.
Please copy audio files from a computer or such like to a USB HDD.
2.3.1. Copying Audio Files to a USB HDD
2 Confirm that the front indicator has gone from blinking to lit.
You are now able to stream the music on the USB HDD as if it were saved on this unit.
1 Connect a USB HDD to a USB port at the back.
Using a computer to confirm the audio files on the USB HDD that is connected to this unit.While referring to “Saving Audio Files” in the Quick Guide, access this unit from a computer.There is a [usb1] folder in the same place as the [contents] folder. The files in this folder are the audio files on the USB HDD.* The [usb1] folder is read-only in order to protect the music (you cannot write to it or delete files in it).
2.3.2. Streaming Music on a USB HDD as it is
A sudden failure could corrupt any saved audio files and lead to a loss of data.It should be noted that this unit’s backup function will not backup the music stored on the USB HDD.
[Important] As a precaution, please back up data regularly.
Get audio files ready.You can get audio files by downloading from a music distribution site or ripping them from a music CD. For details of the supported formats of audio files, please see the Quick Guide.

11Go to [Table of Contents]
2. Getting More out of this Unit – 2.3. Streaming Music on a USB HDD as it is
2.3.3. Removing the USB HDDIf you want to remove a USB HDD when the power to this unit is on, please do so with the following operation 2.2.3. Removing the USB HDD (page 8).
Using a USB hub and two USB HDD units.If you use a USB hub, you can connect two USB HDD units, one for shared use and one for backup use.* We recommend a type of USB HDD that is connected to an electrical outlet for most types of USB hub.* Even if you connect two or more USB HDD units for the same application (for shared use / for backup
use), you will not be able to use them.* For details of the backup function, please see "2.7. Backing Up Music (page 17)”.

12Go to [Table of Contents]
2. Getting More out of this Unit – 2.4. Confirming the Amount of Free Space
2.4. Confirming the Amount of Free Space
1 2.1. Open the Settings Screen
2
3
Click .
Confirm the amount of free space on this unit (Internal disk) or a USB HDD (USB disk).
[SYSTEM INFORMATION] opens.
When the amount of free space is lowPlease delete any unwanted music.* Please back up music to your computer
or another HDD unit.
13Go to [Table of Contents]
2. Getting More out of this Unit – 2.5. Adjusting the Brightness and Colour of the Front Indicator
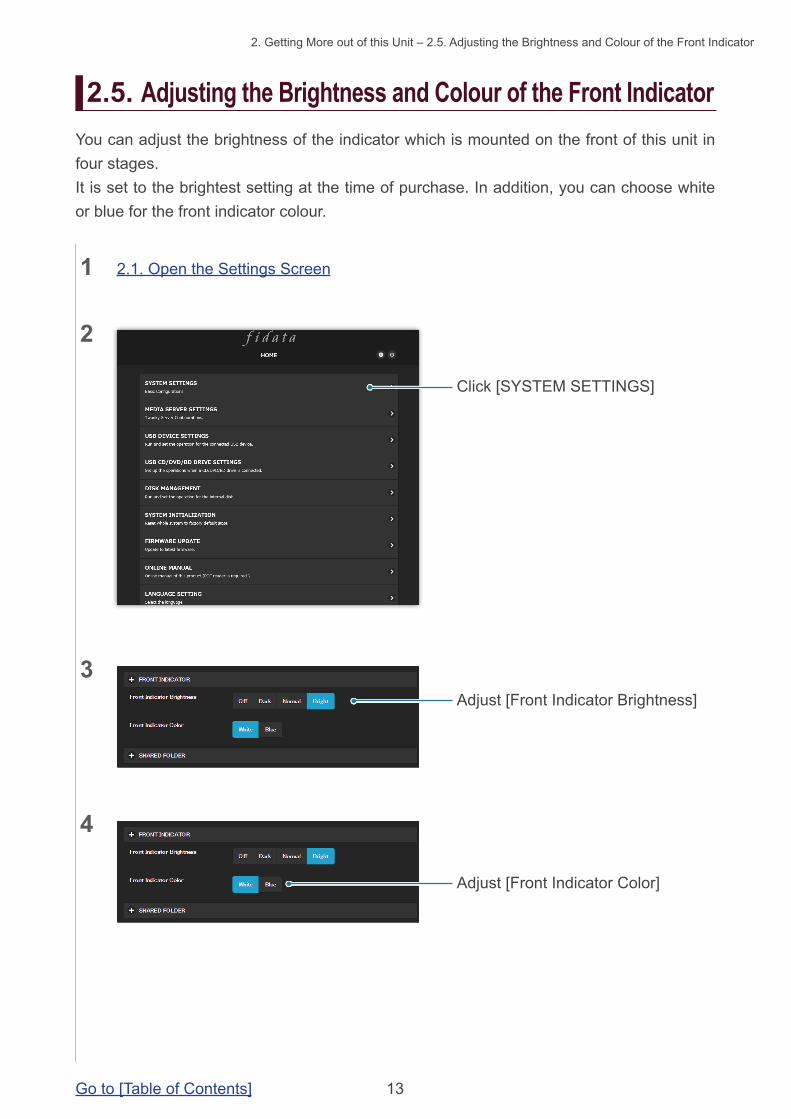
2.5. Adjusting the Brightness and Colour of the Front IndicatorYou can adjust the brightness of the indicator which is mounted on the front of this unit in four stages.It is set to the brightest setting at the time of purchase. In addition, you can choose white or blue for the front indicator colour.
1 2.1. Open the Settings Screen
2
3 Adjust [Front Indicator Brightness]
Click [SYSTEM SETTINGS]
4
Adjust [Front Indicator Color]

14Go to [Table of Contents]
2. Getting More out of this Unit – 2.5. Adjusting the Brightness and Colour of the Front Indicator
6
7
Click [SET]
Please wait for a while until the setting has finished.
This confirms the settings.
The front indicator blinks.
Confirm that the front indicator is lit.
This completes the setting.
5
Click [CONFIRM]
15Go to [Table of Contents]
2. Getting More out of this Unit – 2.6. Turning off the LAN Port indicator
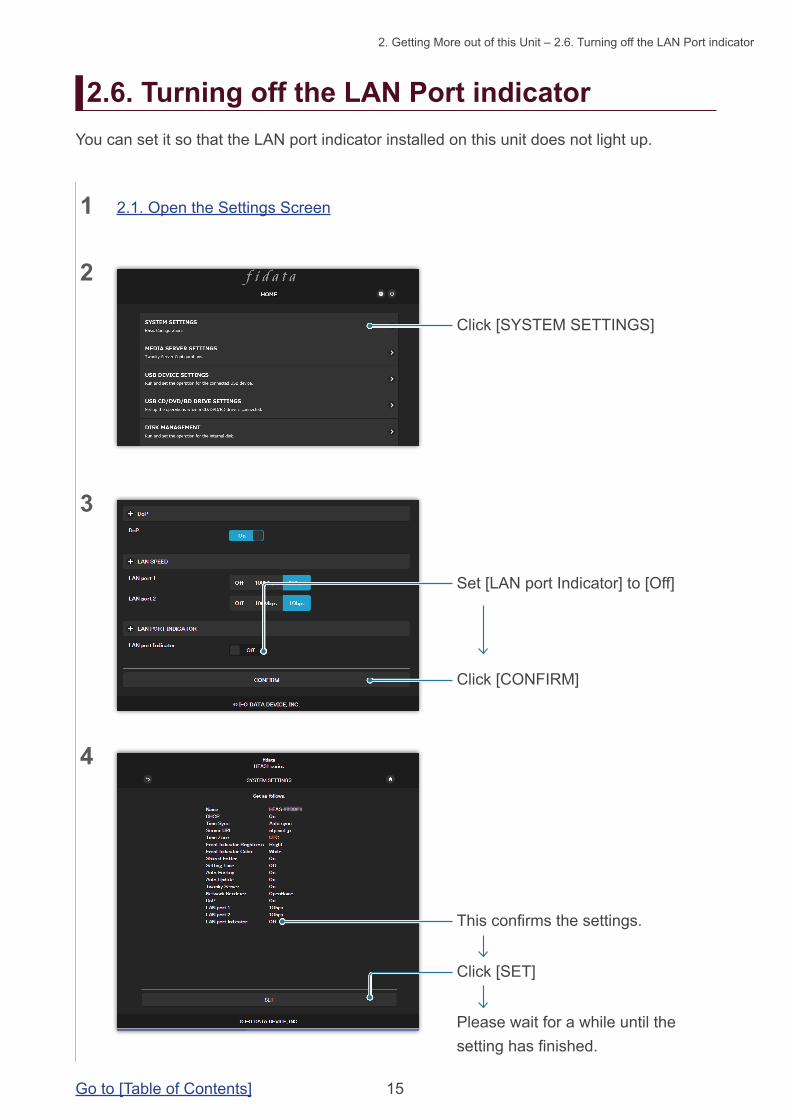
2.6. Turning off the LAN Port indicatorYou can set it so that the LAN port indicator installed on this unit does not light up.
1 2.1. Open the Settings Screen
2
3
4
Set [LAN port Indicator] to [Off]
Click [CONFIRM]
Click [SYSTEM SETTINGS]
Click [SET]
Please wait for a while until the setting has finished.
This confirms the settings.
16Go to [Table of Contents]
2. Getting More out of this Unit – 2.6. Turning off the LAN Port indicator
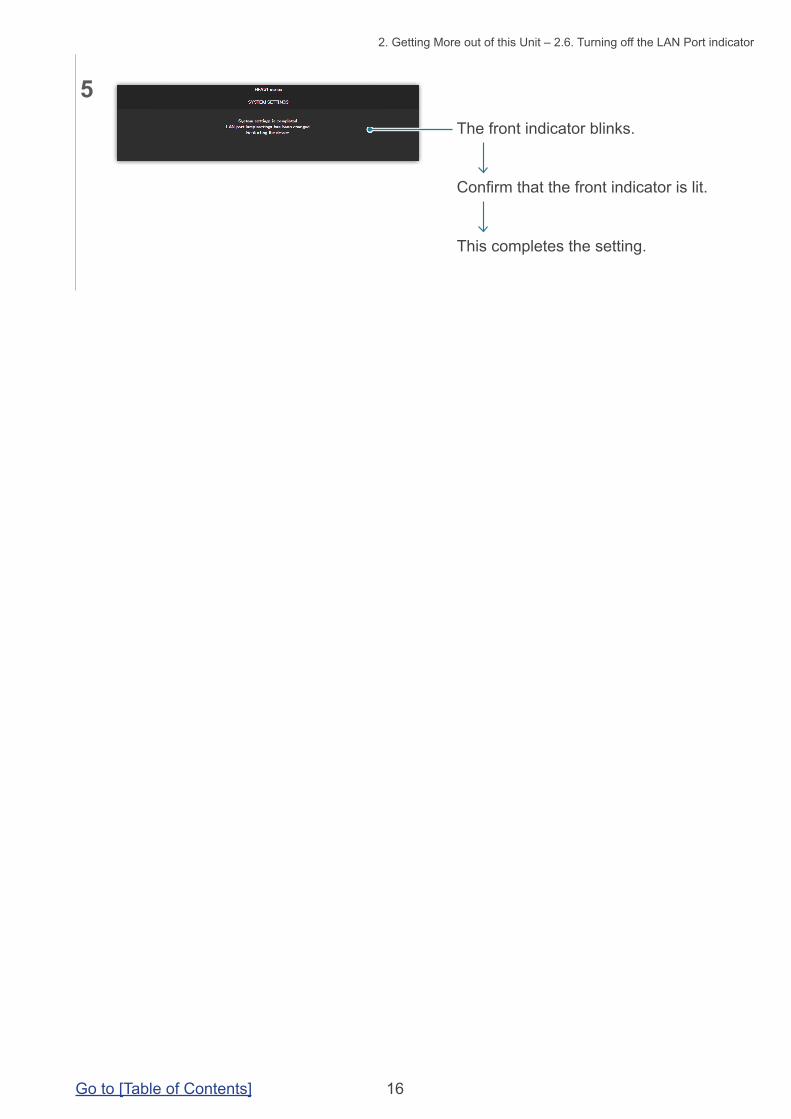
5 The front indicator blinks.
Confirm that the front indicator is lit.
This completes the setting.
17Go to [Table of Contents]
2. Getting More out of this Unit – 2.7. Backing Up Music
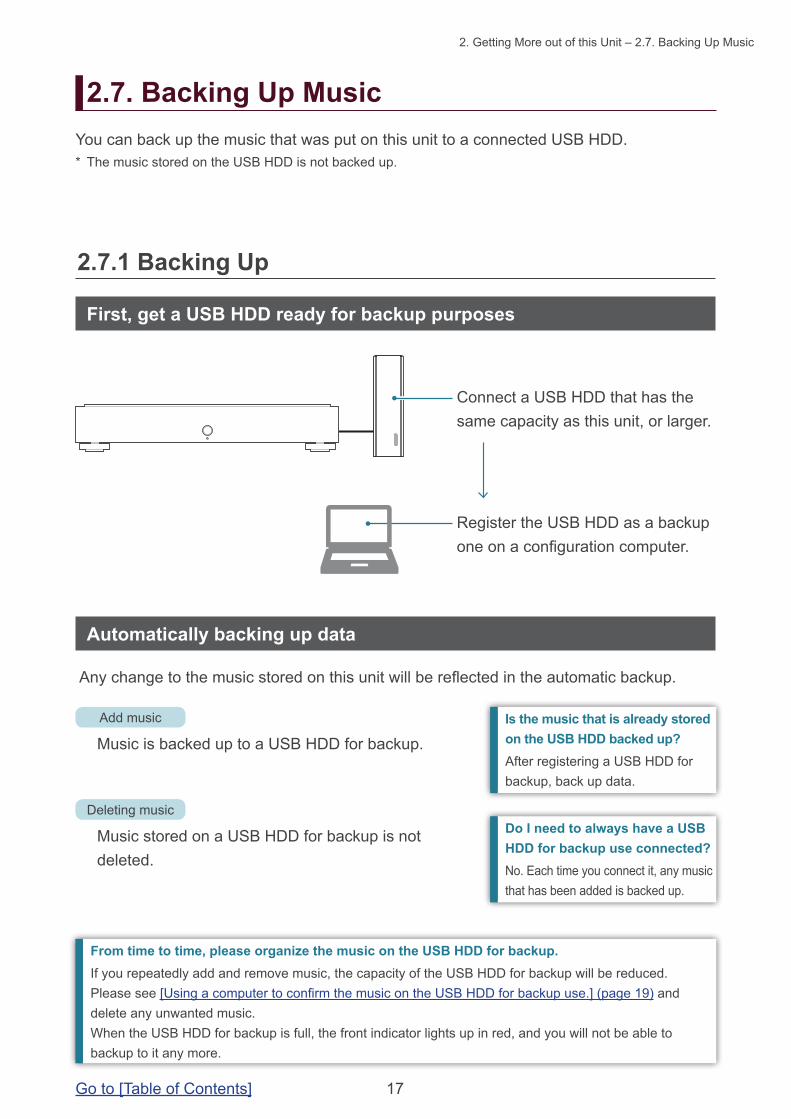
2.7. Backing Up MusicYou can back up the music that was put on this unit to a connected USB HDD.* The music stored on the USB HDD is not backed up.
2.7.1 Backing Up
First, get a USB HDD ready for backup purposes
Automatically backing up data
Connect a USB HDD that has the same capacity as this unit, or larger.
Any change to the music stored on this unit will be reflected in the automatic backup.
Register the USB HDD as a backup one on a configuration computer.
Music is backed up to a USB HDD for backup.
Music stored on a USB HDD for backup is not deleted.
Add music
Deleting music
Is the music that is already stored on the USB HDD backed up?After registering a USB HDD for backup, back up data.
Do I need to always have a USB HDD for backup use connected?No. Each time you connect it, any music that has been added is backed up.
From time to time, please organize the music on the USB HDD for backup.If you repeatedly add and remove music, the capacity of the USB HDD for backup will be reduced.Please see [Using a computer to confirm the music on the USB HDD for backup use.] (page 19) and delete any unwanted music.When the USB HDD for backup is full, the front indicator lights up in red, and you will not be able to backup to it any more.

18Go to [Table of Contents]
2. Getting More out of this Unit – 2.7. Backing Up Music
2 2.1. Open the Settings Screen
3
4
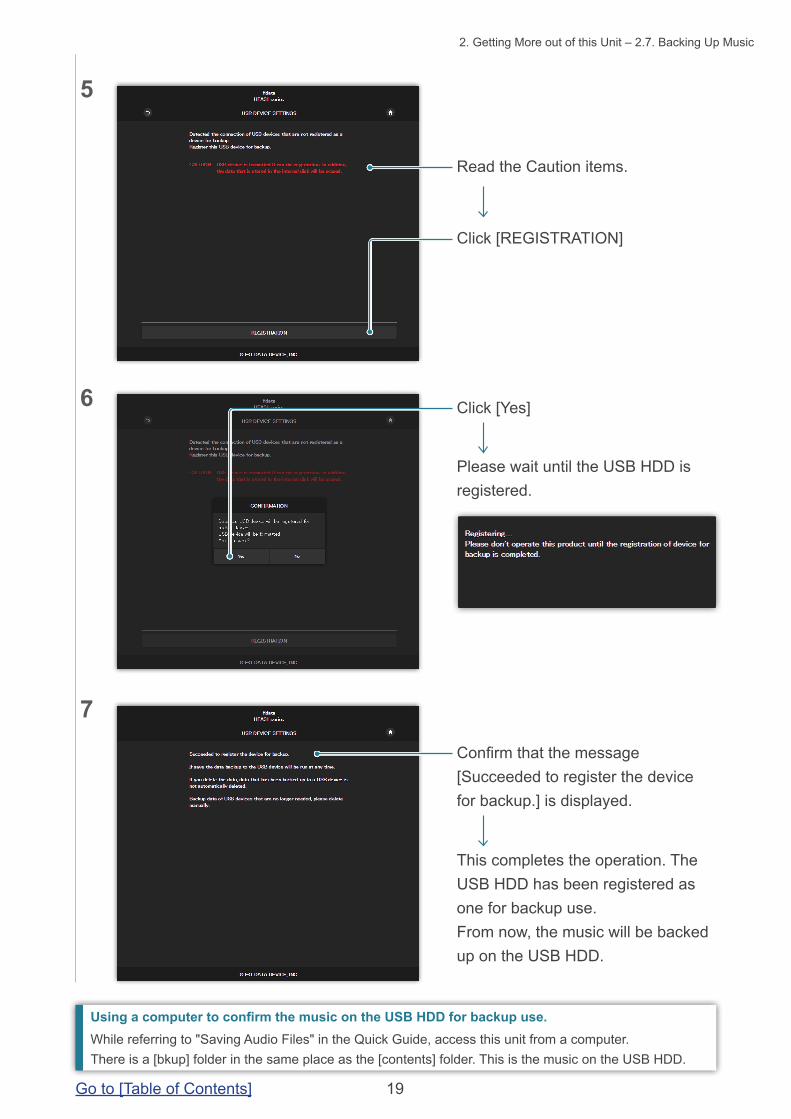
Click [Registration of the device for backup]
Click [USB DEVICE SETTINGS]
Click [NEXT]
1 Connect a USB HDD that has the same capacity as this unit, or larger, to a USB port
on the back of this unit.
Please connect only one USB HDD.A USB HDD for backup is registered as one for backup use, and any data on it will be deleted.So that you do not make a mistake and lose any important data, please only connect one USB HDD with this operation.
2.7.2. Registering the USB HDD as a backup one
19Go to [Table of Contents]
2. Getting More out of this Unit – 2.7. Backing Up Music
Confirm that the message [Succeeded to register the device for backup.] is displayed.
This completes the operation. The USB HDD has been registered as one for backup use.From now, the music will be backed up on the USB HDD.
Please wait until the USB HDD is registered.
5
6
7
Click [Yes]
Read the Caution items.
Click [REGISTRATION]
Using a computer to confirm the music on the USB HDD for backup use.While referring to "Saving Audio Files" in the Quick Guide, access this unit from a computer.There is a [bkup] folder in the same place as the [contents] folder. This is the music on the USB HDD.
20Go to [Table of Contents]
2. Getting More out of this Unit – 2.7. Backing Up Music
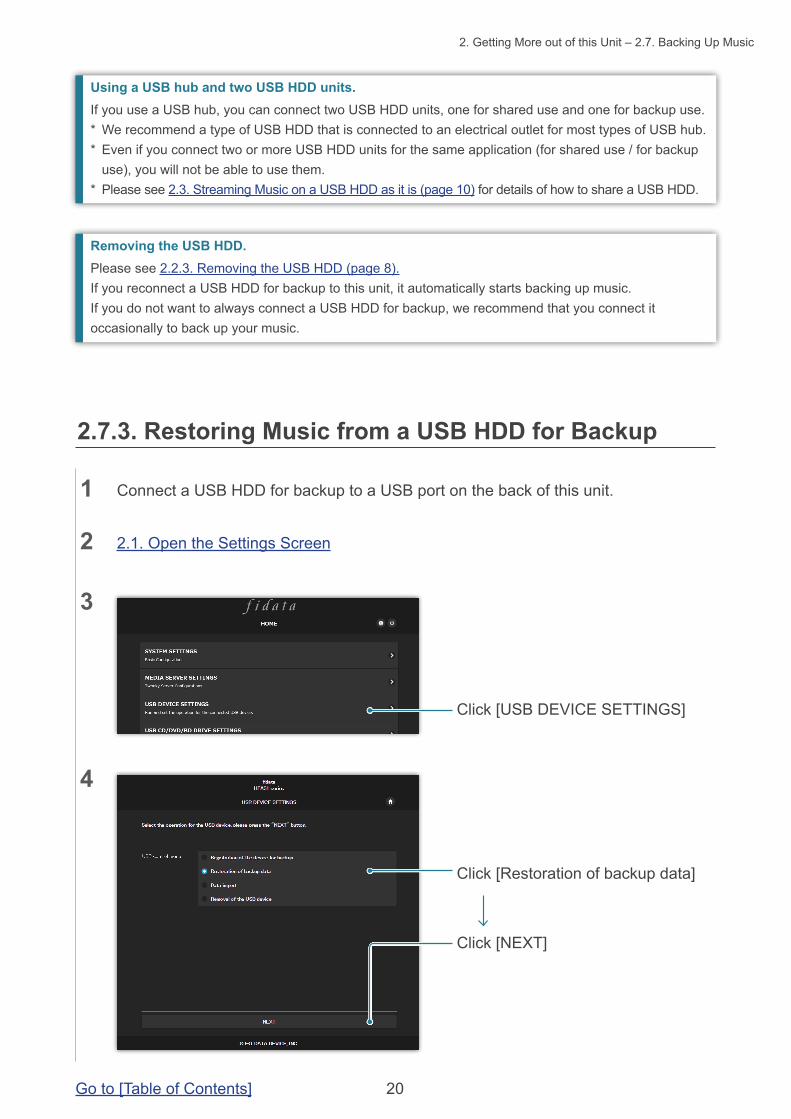
Using a USB hub and two USB HDD units.If you use a USB hub, you can connect two USB HDD units, one for shared use and one for backup use.* We recommend a type of USB HDD that is connected to an electrical outlet for most types of USB hub.* Even if you connect two or more USB HDD units for the same application (for shared use / for backup
use), you will not be able to use them.* Please see 2.3. Streaming Music on a USB HDD as it is (page 10) for details of how to share a USB HDD.
2 2.1. Open the Settings Screen
3
4
Click [Restoration of backup data]
Click [USB DEVICE SETTINGS]
Click [NEXT]
1 Connect a USB HDD for backup to a USB port on the back of this unit.
2.7.3. Restoring Music from a USB HDD for Backup
Removing the USB HDD.Please see 2.2.3. Removing the USB HDD (page 8).If you reconnect a USB HDD for backup to this unit, it automatically starts backing up music.If you do not want to always connect a USB HDD for backup, we recommend that you connect it occasionally to back up your music.

21Go to [Table of Contents]
2. Getting More out of this Unit – 2.7. Backing Up Music
Confirm that the front indicator is lit.
Remove the USB HDD.
This completes the operation.
5
6
7
Click [Yes]
Read the Caution items.
Click [RESTORE]
The front indicator blinks.

22Go to [Table of Contents]
2. Getting More out of this Unit – 2.8. Switching the Mode of the Built-in Disk (RAID)
2.8. Switching the Mode of the Built-in Disk (RAID)The two internal disks that are installed in this unit operate in several modes (RAID mode).By switching the mode, you can increase the capacity that can be utilized or duplicate music to increase safety.However, you will need to format (initialize) the built-in disk in accordance with the mode, and so if you switch the mode then the music on this unit will be lost.
When you switch the mode, the music on this unit will be lost.Therefore, please use a USB HDD and back up the music on this unit.>> 2.7.2. Registering the USB HDD as a backup one 18
This unit supports three modes.
Mode Spanning Striping MirroringAvailable capacity*1 Very good Very good Good
Duplication of music*2 none none Very goodRead/write speed*3 Good Very good Good
*1 With mirroring, music is written on each of the two internal disks, and so the available capacity will be that of one built-in disk. Therefore, if mirroring is currently set then switching to another mode will double the capacity available for use.
*2 With mirroring, music is written on each of the two internal disks, and so you will not lose any music even in the unlikely event that one disk fails. (Our repair center handles requests for replacing the internal disk. Note that the music will be lost if both of the built-in disks have failed.)
*3 With striping, music is written on the two internal disks by being distributed over them, and so the read and write speed is faster.
2.8.1 Modes
2.8.2. Backing Up before Switching
Confirming the current mode.You can see the [RAID mode] in 3.2. SYSTEM INFORMATION here.Note that the mode at the time of purchase is as shown below.
Product Number Mode Available capacityHFAS1-XS20U Striping 2 terabytesHFAS1-S10U Spanning 1 terabyte

23Go to [Table of Contents]
2. Getting More out of this Unit – 2.8. Switching the Mode of the Built-in Disk (RAID)
3
4
5
Click on the format of the mode to switch to.
Click [Yes]
Click [Yes]
2.8.3. Switching the Mode of the Built-in Disk
1 2.1. Open the Settings Screen
2
Click [DISK MANAGEMENT]
Confirm the mode.

24Go to [Table of Contents]
2. Getting More out of this Unit – 2.8. Switching the Mode of the Built-in Disk (RAID)
7
Click.
If you switch the mode to mirroring.You can use this unit, but it will take a while until the music is duplicated.Please see [RAID status] in 3.2. SYSTEM INFORMATION for the state of duplication.[Rebuilding: ●% complete] is displayed, and then the operation is finished when [Normal] is displayed.
The mode of the internal disk has been switched.
Please use a backed up USB HDD and return the music to this unit.>> 2.7.3. Restoring Music from a USB HDD for Backup 20
2.8.4. Returning Backed Up Music to this Unit
6 Please wait for a while when this screen is displayed.

25Go to [Table of Contents]
2. Getting More out of this Unit – 2.9. Setting the Time Zone
2.9. Setting the Time ZoneSet the time zone (standard time zone) of the clock of this unit.Usually, you do not need to change this, but if you would like to change the time stamp of the music data stored on this item then please set it.
1 2.1. Open the Settings Screen
2
3
Set [Time Zone] to the area you live in.
Click [CONFIRM]
Click [SYSTEM SETTINGS]
4

26Go to [Table of Contents]
2. Getting More out of this Unit – 2.9. Setting the Time Zone
5
Click [SET]
Please wait for a while until the setting has finished.
This confirms the settings.

27Go to [Table of Contents]
2. Getting More out of this Unit – 2.10. Keeping the Firmware/Software of this Unit up to Date
2.10. Keeping the Firmware/Software of this Unit up to DateUpdate the firmware (internal software) of this unit, and keep it up to date.
When this unit can be updated, the front indicator is lit in orange.In this state, this unit will be updated to the latest state when you turn off the power to it.
2.10.1. Updating with the Automatic Update Function
2.10.2. Updating Manually
1 2.1. Open the Settings Screen
2
3
Click [UPDATE]
Click [FIRMWARE UPDATE]
The message [Unable to get the update information of the firmware!!] is displayed.This product is in the latest state.There is no need to carry out the operation of this procedure.
28Go to [Table of Contents]
2. Getting More out of this Unit – 2.10. Keeping the Firmware/Software of this Unit up to Date
Confirm that the front indicator is lit.
This completes the setting.
4
5
Click [Yes]
The front indicator blinks.
Do not stop power supply by unplugging the power cable or switch off the power tap.
Do not turn off the power while the front indicator is blinking.
29Go to [Table of Contents]
3. Details of the Settings screen
3.1. HOME 30
3.2. SYSTEM INFORMATION 31
3.3. SYSTEM SETTINGS 33
3.4. USB DEVICE SETTINGS 38
3.5. USB CD/DVD/BD DRIVE SETTINGS 39
3.6. DISK MANAGEMENT 42
3.7. SYSTEM INITIALIZATION 43
3.8. FIRMWARE UPDATE 44

30Go to [Table of Contents]
3. Details of the Settings screen – 3.1. HOME
3.1. HOME
3.2. SYSTEM INFORMATION (page 31) is displayed.
Turn off the power to this unit (shut down), and reboot.
Each item The page showing each item is displayed.>> 3.3. SYSTEM SETTINGS 33>> 3.4. USB DEVICE SETTINGS 38>> 3.5. USB CD/DVD/BD DRIVE SETTINGS 39>> 3.6. DISK MANAGEMENT 42>> 3.7. SYSTEM INITIALIZATION 43>> 3.8. FIRMWARE UPDATE 44
* On [MEDIA SERVER SETTINGS], you can make detailed settings for the Twonky Server. For details of this screen, please see "Twonky Server Reference" here.
The [ONLINE MANUAL] shows a Web page on which this document and others have been released.In [LANGUAGE SETTING], you can set the language of the Settings screen to either [Auto], [English] or [Japanese].
31Go to [Table of Contents]
3. Details of the Settings screen – 3.2. SYSTEM INFORMATION
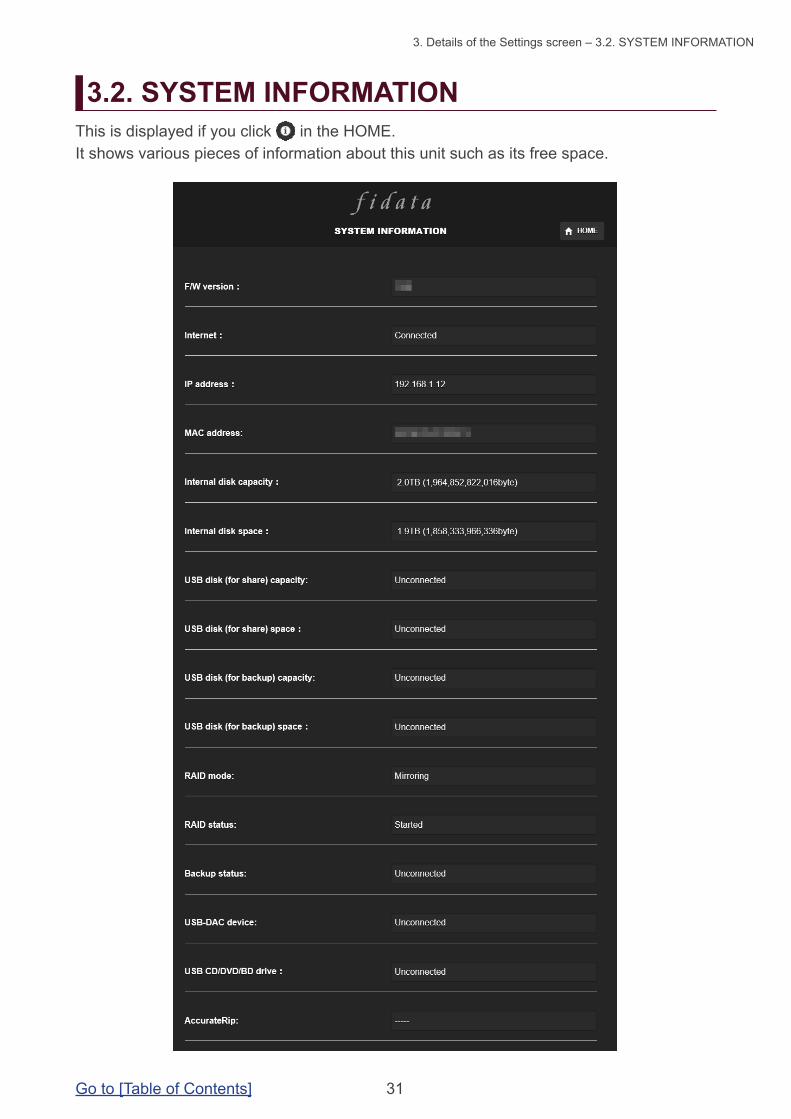
3.2. SYSTEM INFORMATIONThis is displayed if you click in the HOME.It shows various pieces of information about this unit such as its free space.
32Go to [Table of Contents]
3. Details of the Settings screen – 3.2. SYSTEM INFORMATION
Backup statusDisplays the status of the backup function.
Off [AUTO BACKUP] (3.3. SYSTEM SETTINGS (page 33) is off.Running A USB HDD for backup is connected, and the system is in a state where
backup is possible.Running (currently backing up)
Music is being backed up to a USB HDD for backup.
Unconnected A USB HDD for backup is not connected.Stopping A USB HDD for backup is connected, but is not being used.
The following situations can be considered.• It is not a USB HDD for backup that is registered in this unit.• After the USB HDD for backup was registered, this unit was formatted/
initialized.Unknown An unknown error occurred in the backup.
Operation has become unstable for some reason.Please remove the USB HDD for backup and reboot this unit.>> 2.2.3. Removing the USB HDD 8
Error An error occurred in the backup.The following situations can be considered.• There is not enough space on the USB HDD for backup.
Please see the Quick Guide, access the backup destination (bkup folder) from a computer, and delete any unnecessary files.
• A USB HDD for backup is not correctly connected.
RAID statusDisplays the status of this unit.If an error such as [RAID starting failed] or [Degraded] is displayed in red, please reboot this unit once.If you the same error is still displayed, please see the Quick Guide or contact our Support.
AccurateRipDisplays the AccurateRip support status of the connected CD/DVD/BD drive.

33Go to [Table of Contents]
3. Details of the Settings screen – 3.3. SYSTEM SETTINGS
3.3. SYSTEM SETTINGSYou can apply various settings to this unit.Click the [+] symbol to see a detailed description of each item.
NAME You can decide on a name for this unit.Please do not choose the same name as that used for other devices, and select an easy-to-understand one.If you want to revert to the default settings, please run [AUTO].
Name You can decide on a name for this unit.AUTO Reverts to the name that was set at the time of purchase.
NETWORK In the default settings, [DHCP], which is used to automatically obtain an IP address, is set to [On].Please set it to [Off] if you cannot easily get an IP address in this setting, and manually enter the IP address.* If you switch DHCP from [Off] to [On], this unit will automatically reboot.
DHCP Set whether to automatically obtain data such as an IP address from a DHCP server (Wi-Fi router, etc.).
IP addressWhen [DHCP] is [Off], set it manually.Please set it according to the network environment.
Subnet maskDefault gatewayDNS server

34Go to [Table of Contents]
3. Details of the Settings screen – 3.3. SYSTEM SETTINGS
FRONT INDICATOR Specifies the brightness and color of this unit’s front indicator.Front Indicator Brightness
Specifies the brightness of the front indicator.When it is set to [Off], the indicator will not show a white light or green light. However, when you turn on the power or use the settings screen, the indicator lights up for only five seconds in order to show that the operation is complete (lights up after flashing).
Front Indicator Color
Specifies the color of the front indicator.
TIME You can Time Sync with a time server over the Internet.When performing Time Sync with a time server, set [Time Sync] to [On], and specify the URL of the time server in [Server URL].
Time Sync Set whether to perform Time Sync with a time server over the Internet.Server URL When [Time Sync] is set to [On], specify the URL of the time server that will perform
the Time Sync.Time When [Time Sync] is set to [Off], specify the date and time.
AUTO Aligns to the time of the terminal on which the settings screen is open.Time Zone Specify the area in which you live, and set the standard time there.
SHARED FOLDER Specifies [On] or [Off] for the SHARED FOLDER.Please change the settings after confirming that no device is accessing the Shared Folder.
Shared Folder When this is set to [Off], it is not possible to access the [Contents], [usb1] and [bkup] folders. Usually, you do not need to set this to [Off].

35Go to [Table of Contents]
3. Details of the Settings screen – 3.3. SYSTEM SETTINGS
POWER SAVING This specifies the time before the internal hard disk switches to power saving mode.In an SSD-equipped model, this setting will be [Off].
Setting Time This unit is an SSD-equipped model, so this setting is [Off].
AUTO BACKUP Specifies whether the Auto Backup function of the USB HDD is [On] or [Off].By setting this to [On], data is regularly backed up to the registered USB device.
Auto Backup When it is set to [On] and the system connects to the registered USB HDD, audio data is regularly backed up to the USB HDD.
AUTO UPDATE Specifies whether the function to automatically update firmware is [On] or [Off].If this unit is connected to the Internet and there is a firmware update, when this unit shuts down or reboots it will automatically update to the latest firmware.
Auto Update When it is set to [On], when this unit shuts down or reboots and there is a firmware update, it will automatically update to the latest firmware.* This unit must be connected to the Internet for this function.
MEDIA SERVER Specifies [On] or [Off] for the Twonky Server to be used as a media server.Twonky Server When it is set to [On], the media server [Twonky Server] publicly releases the saved
audio data.

36Go to [Table of Contents]
3. Details of the Settings screen – 3.3. SYSTEM SETTINGS
NETWORK RENDERER
Set the operation mode during USB-DAC connection.In OpenHome mode, even if you stop the controller app, it can be the play of the playlist.OpenHome mode is available in the corresponding controller app.If you want to use the unsupported controller app to OpenHome, please set the DMR.
Network Renderer Set it according to the controller app you use.This unit is set to [OpenHome] at the time of purchase. Therefore, if you are unable to operate this unit on your controller app, please try switching to [DMR].
USB PERFECT PLAY
Depending on the USB-DAC to be connected, the beginning of the music contents may not be played.This function can be played correctly from the beginning of the music contents by setting the silent playing time.
Setting Time Sets the silent playing time.* If your USB-DAC is the validated model, setting [Auto] sets the optimum value.
DoP When connecting to a USB-DAC that supports DoP (DSD Audio over PCM Frames), you can set whether or not to play music with DoP.When DoP is set to [On], you can use the DoP system to play back DSD content.When using a USB-DAC that does not support DoP, this is set to [Off].
DoP This is set to [On] at the time of purchase, and you can use the DoP system to play back DSD content.When connecting a USB-DAC that does not support DoP, this is set to [Off].
37Go to [Table of Contents]
3. Details of the Settings screen – 3.3. SYSTEM SETTINGS
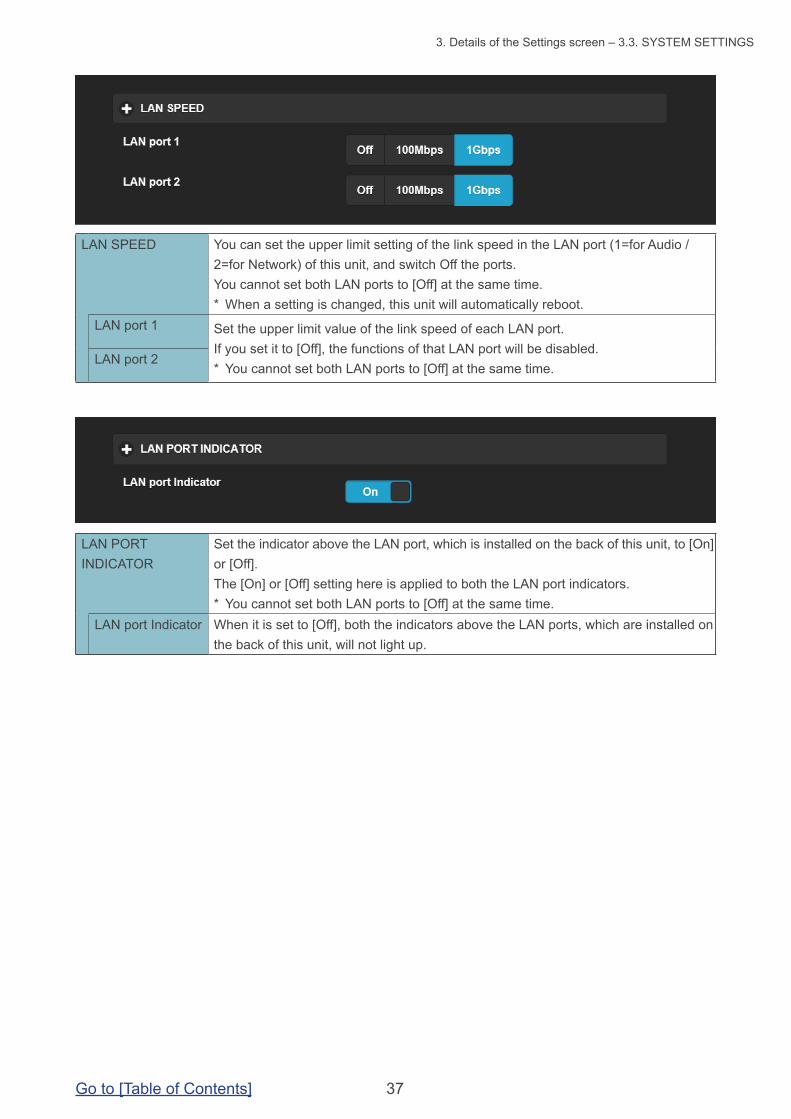
LAN PORT INDICATOR
Set the indicator above the LAN port, which is installed on the back of this unit, to [On] or [Off].The [On] or [Off] setting here is applied to both the LAN port indicators.* You cannot set both LAN ports to [Off] at the same time.
LAN port Indicator When it is set to [Off], both the indicators above the LAN ports, which are installed on the back of this unit, will not light up.
LAN SPEED You can set the upper limit setting of the link speed in the LAN port (1=for Audio / 2=for Network) of this unit, and switch Off the ports.You cannot set both LAN ports to [Off] at the same time.* When a setting is changed, this unit will automatically reboot.
LAN port 1 Set the upper limit value of the link speed of each LAN port. If you set it to [Off], the functions of that LAN port will be disabled.* You cannot set both LAN ports to [Off] at the same time.
LAN port 2

38Go to [Table of Contents]
3. Details of the Settings screen – 3.4. USB DEVICE SETTINGS
3.4. USB DEVICE SETTINGS
Registration of the device for backup
Register a connected USB HDD as one for backup use.>> 2.7.2. Registering the USB HDD as a backup one 18
Restoration of backup data Returns backed up music to this unit.>> 2.7.3. Restoring Music from a USB HDD for Backup 20
Data import Connect a USB HDD containing music to this unit with a computer or such like, and then copy the music to this unit.>> 2.2. Saving Audio Files from a USB HDD 6
Removal of the USB device Removes a USB HDD for backup or a shared USB HDD.* When you connect a normal USB HDD, the USB HDD is shared.>> 2.2.3. Removing the USB HDD 8>> 2.3. Streaming Music on a USB HDD as it is 10
39Go to [Table of Contents]
3. Details of the Settings screen – 3.5. USB CD/DVD/BD DRIVE SETTINGS
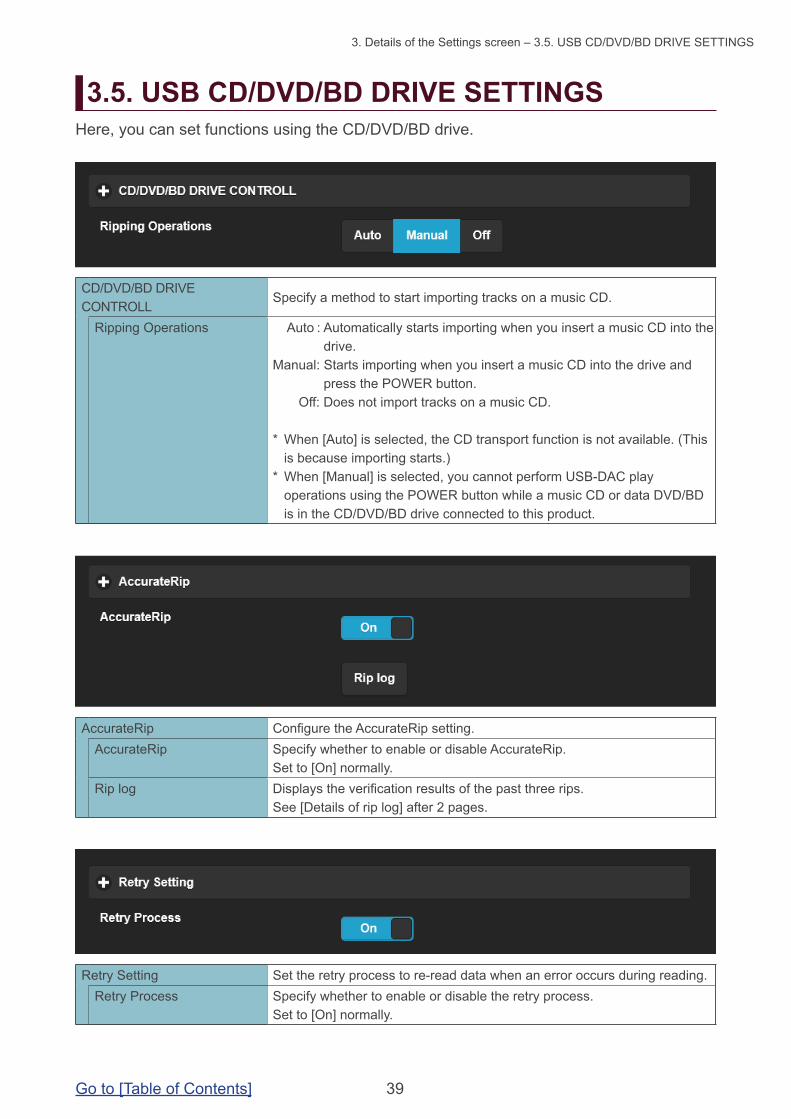
3.5. USB CD/DVD/BD DRIVE SETTINGSHere, you can set functions using the CD/DVD/BD drive.
CD/DVD/BD DRIVE CONTROLL
Specify a method to start importing tracks on a music CD.
Ripping Operations Auto : Automatically starts importing when you insert a music CD into the drive.
Manual: Starts importing when you insert a music CD into the drive and press the POWER button.
Off: Does not import tracks on a music CD.
* When [Auto] is selected, the CD transport function is not available. (This is because importing starts.)
* When [Manual] is selected, you cannot perform USB-DAC play operations using the POWER button while a music CD or data DVD/BD is in the CD/DVD/BD drive connected to this product.
AccurateRip Configure the AccurateRip setting.AccurateRip Specify whether to enable or disable AccurateRip.
Set to [On] normally.Rip log Displays the verification results of the past three rips.
See [Details of rip log] after 2 pages.
Retry Setting Set the retry process to re-read data when an error occurs during reading.Retry Process Specify whether to enable or disable the retry process.
Set to [On] normally.

40Go to [Table of Contents]
3. Details of the Settings screen – 3.5. USB CD/DVD/BD DRIVE SETTINGS
CD READ SPEED Specify the speed to read a music CD.Read Speed Normal: Reads a music CD at the slowest speed of the CD/DVD/BD
drive. High Speed: Reads a music CD at the maximum speed of the CD/DVD/
BD drive.
ENCODE Configure settings for the imported music data.Data Format Select the music format from [WAV] and [FLAC].FLAC compression level This item is available when [FLAC] is selected in [Data Format].
You can specify the compression level in FLAC format.
CD/DVD/BD DRIVE OFFSET Specify the offset value depending on the characteristics of the CD/DVD/BD drive.
Offset Auto: Obtains the offset value from the online database. Manual: Manually enter the offset value.
Offset value This item is available when [Manual] is selected in [Offset].Manually enter the offset value.

41Go to [Table of Contents]
3. Details of the Settings screen – 3.5. USB CD/DVD/BD DRIVE SETTINGS
GRACENOTE Specify how to use the Gracenote-supplied information database for music CD.
Language Specify the language of the music information you want to import.Unregistered music Retrieve None: Stops importing tracks on a music CD when there is no
music information. This prevents a music CD from being imported with no music information assigned.
Retrieve: Imports a music CD without assigning meta information when there is no music information.
Details of rip logThe rip log is displayed as shown below. #Track No. Album name Result CRC value (confidence value)Example: When the verification of the second track in the album, "Album Name", succeeds with
AccurateRip, the rip log is displayed as shown below. #02 Album Name OK 7f08bf02(123)
• Result OK: Imports data with the matched contents when the AccurateRip result matches
another person’s result (CRC value). NOT ACCURATE: Retries verification up to three times when the AccurateRip result does not match
another person’s result. When the same result is obtained for all, its data is imported.
ABORT: Does not import data when the system stopped the import process because it failed to read data due to damage or dirt on the disc surface.
SKIP: Imports the current data when the collation with AccurateRip failed because this product is not connected to the Internet or for other reasons.
• CRC value: Used to collate the importing result. AccurateRip collates this value for importing.• Confidence value: When the results match, the another person's matching count is displayed. As the
confidence value is greater, the reliability is higher.
42Go to [Table of Contents]
3. Details of the Settings screen – 3.6. DISK MANAGEMENT
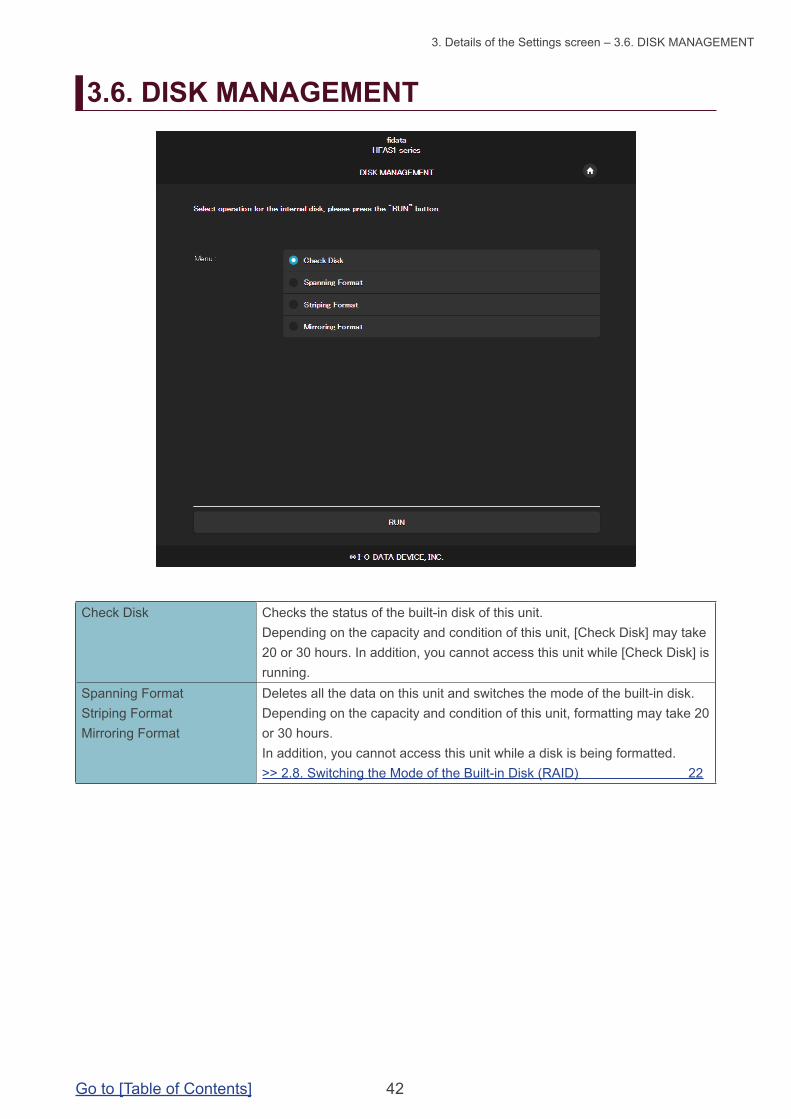
3.6. DISK MANAGEMENT
Check Disk Checks the status of the built-in disk of this unit.Depending on the capacity and condition of this unit, [Check Disk] may take 20 or 30 hours. In addition, you cannot access this unit while [Check Disk] is running.
Spanning FormatStriping FormatMirroring Format
Deletes all the data on this unit and switches the mode of the built-in disk.Depending on the capacity and condition of this unit, formatting may take 20 or 30 hours.In addition, you cannot access this unit while a disk is being formatted.>> 2.8. Switching the Mode of the Built-in Disk (RAID) 22
43Go to [Table of Contents]
3. Details of the Settings screen – 3.7. SYSTEM INITIALIZATION
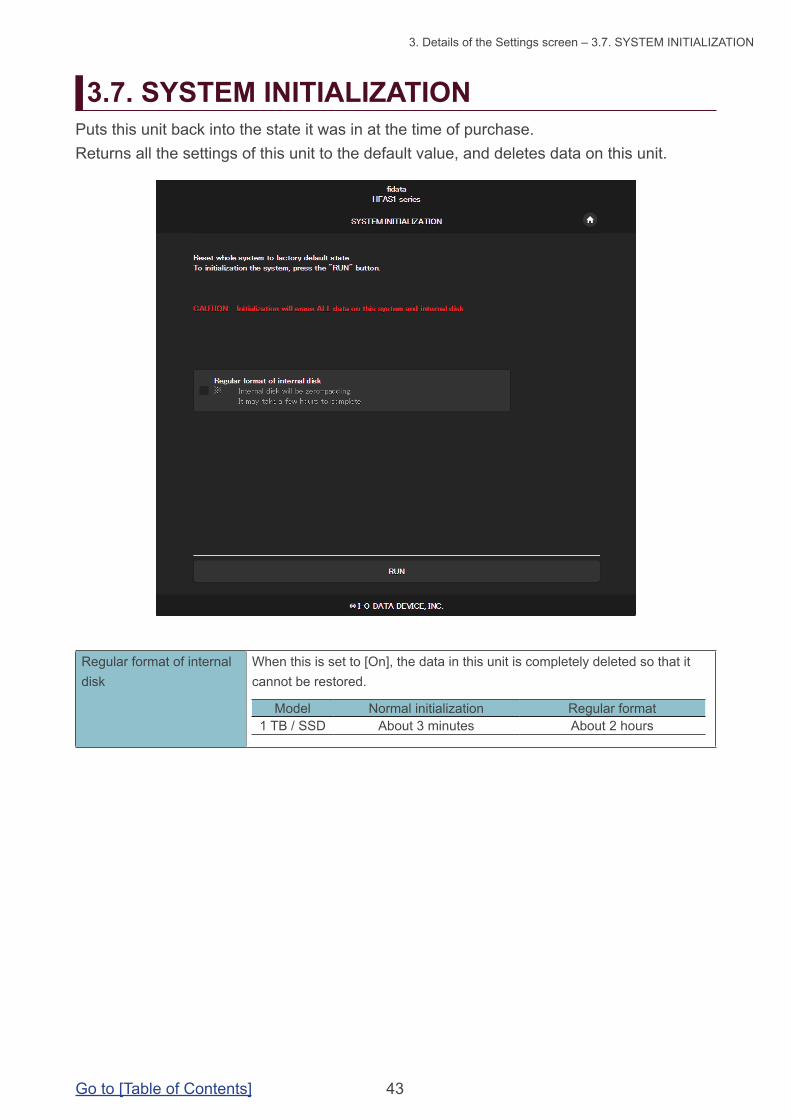
3.7. SYSTEM INITIALIZATIONPuts this unit back into the state it was in at the time of purchase.Returns all the settings of this unit to the default value, and deletes data on this unit.
Regular format of internal disk
When this is set to [On], the data in this unit is completely deleted so that it cannot be restored.
Model Normal initialization Regular format1 TB / SSD About 3 minutes About 2 hours
44Go to [Table of Contents]
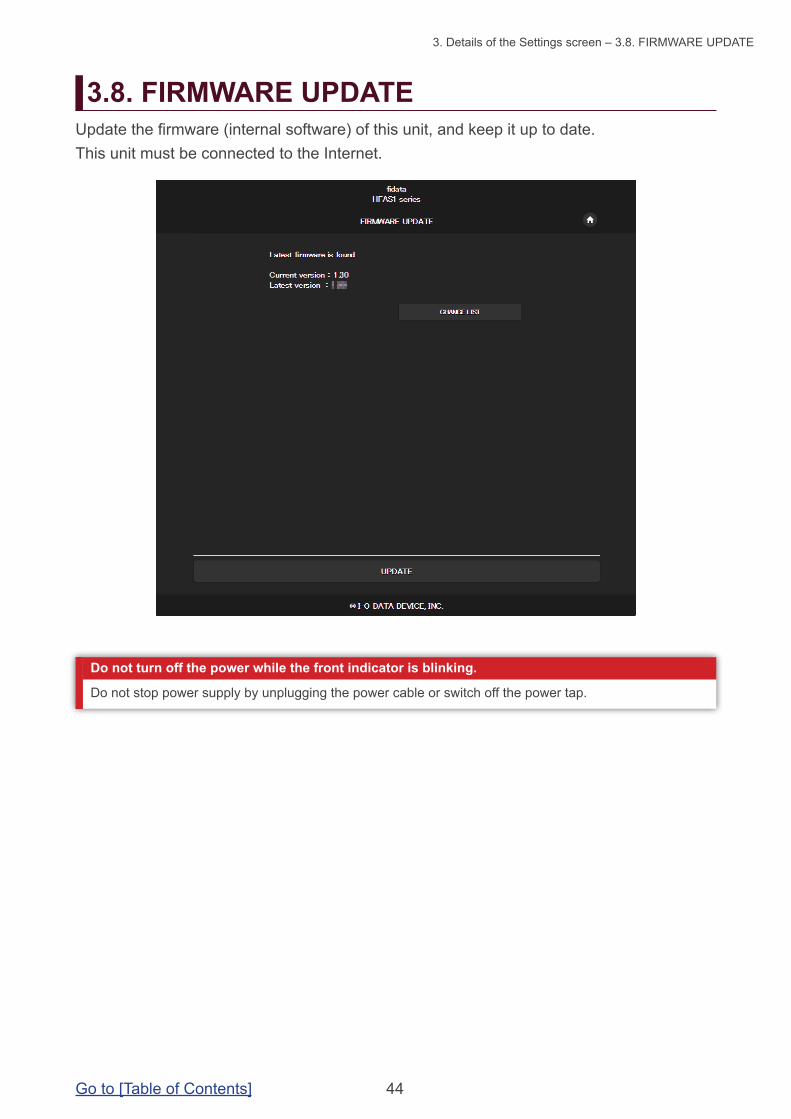
3. Details of the Settings screen – 3.8. FIRMWARE UPDATE
3.8. FIRMWARE UPDATEUpdate the firmware (internal software) of this unit, and keep it up to date.This unit must be connected to the Internet.
Do not stop power supply by unplugging the power cable or switch off the power tap.
Do not turn off the power while the front indicator is blinking.
45Go to [Table of Contents]
4. Troubleshooting
The front indicator is lit in orange. 46
The front indicator is lit in red. 46
I want to put this unit back into the state it was in at the time of purchase. 46
Artwork is not displayed / has stopped being displayed. 48
I want to see the music that was backed up on a computer. 49
I cannot play music when I am using this unit as an audio player. 49
Musics don't play from the beginning when I am using this unit as an audio player. 49
This unit does not appear in Magical Finder. 49

46Go to [Table of Contents]
4. Troubleshooting
The front indicator is lit in orange.
• A new version of firmware/software for this unit has been detected.Please turn off the power supply to this unit, and then turn it on again.This firmware/software for this unit will be updated to the latest version.
The front indicator is lit in red.
• It is possible that the USB HDD for backup does not have enough free space.Please see the Quick Guide, access the USB HDD for backup from a computer, and delete any unnecessary files.
• It is possible that a problem has occurred with the USB HDD for backup.Please confirm whether the USB HDD for backup is correctly connected.If it is connected correctly, there is a possibility that the USB HDD has failed.In addition, please use this unit to format the USB HDD when connecting it for the first time.
• It is possible that a problem has occurred with the internal disk of this unit.Remove a USB HDD if it is connected. (>> 2.2.3. Removing the USB HDD 8) Then, please turn off the power supply to this unit, and then turn it on again.After the start-up process has completed, if the lamp is lit in red then a problem has occurred with the built-in disk.Please see the "Conformity Information and Warranty", and contact our Support.
I want to put this unit back into the state it was in at the time of purchase.By initializing the system, you can return all the settings of this unit to those at the time of purchase, and delete data on this unit.
1 2.1. Open the Settings Screen
2
Click [SYSTEM INITIALIZATION]

47Go to [Table of Contents]
4. Troubleshooting
Click [RUN].
3
4
5
[Regular format of internal disk]When this is set to [On], the data in this unit is completely deleted so that it cannot be restored.Data will be written to all parts of the built-in disk, and so it will take a very long time.(For a guide to the time required, please see here (page 43).)
Click [Yes]
Click [Yes]
The front indicator blinks.
Confirm that the front indicator is lit.
This completes the operation.
System initialization begins.

48Go to [Table of Contents]
4. Troubleshooting
Artwork is not displayed / has stopped being displayed.
• From version 1.10 of this unit, the default setting for artwork has changed to high image quality.Therefore, if you are using an audio device that does not support high-quality artwork, you may find that artwork is not displayed.Please try the following actions.
1 2.1. Open the Settings Screen
2
3
4
Click [MEDIA SERVER SETTINGS]
Click [Sharing]
Click [Show], and show the contents of the media receiver.
Set the [Media Receiver Type] of an audio device that does not show artwork to [Generic Media Receiver (BC)].
Click [Save Changes]
How to tell which audio device does not show artwork.The list shows the [MAC] (MAC address), [IP] (IP address), and [Friendly Name] of the audio device. Please confirm these details of the audio device.You can confirm the MAC address on a sticker that is attached to the audio device or on its Settings screen.

49Go to [Table of Contents]
4. Troubleshooting
I want to see the music that was backed up on a computer.
• You can see it on [LAN DISK Backup Reader].For details, please visit our web page (in English).http://www.iodata.jp/fidata/en/support/#download
I cannot play music when I am using this unit as an audio player.
• The type of controller app does not match the [NETWORK RENDERER].Please open the Settings screen, and switch the [NETWORK RENDERER] settings (page 36).
Musics don't play from the beginning when I am using this unit as an audio player.
• Please set [USB PERFECT PLAY].Please open the Settings screen, and switch the [USB PERFECT PLAY] settings.By setting silent playback time between songs, it prevents the beginning of the song from being cut off.Please set it so as to be optimal for your environment other than [Auto].* [USB PERFECT PLAY] is set to [Auto] by default.
In the [Auto] setting, the optimum value is automatically set when using verified USB-DAC.
This unit does not appear in Magical Finder.
• The computer or smart device running Magical Finder is not on the same network as this unit.Please connect the computer or smart device to the same Wi-Fi router as this unit.