Embed Size (px)
Citation preview
©2016 CorTechs Labs, Inc. All rights reserved. CTXNode Quick Start Guide - NeuroQuant
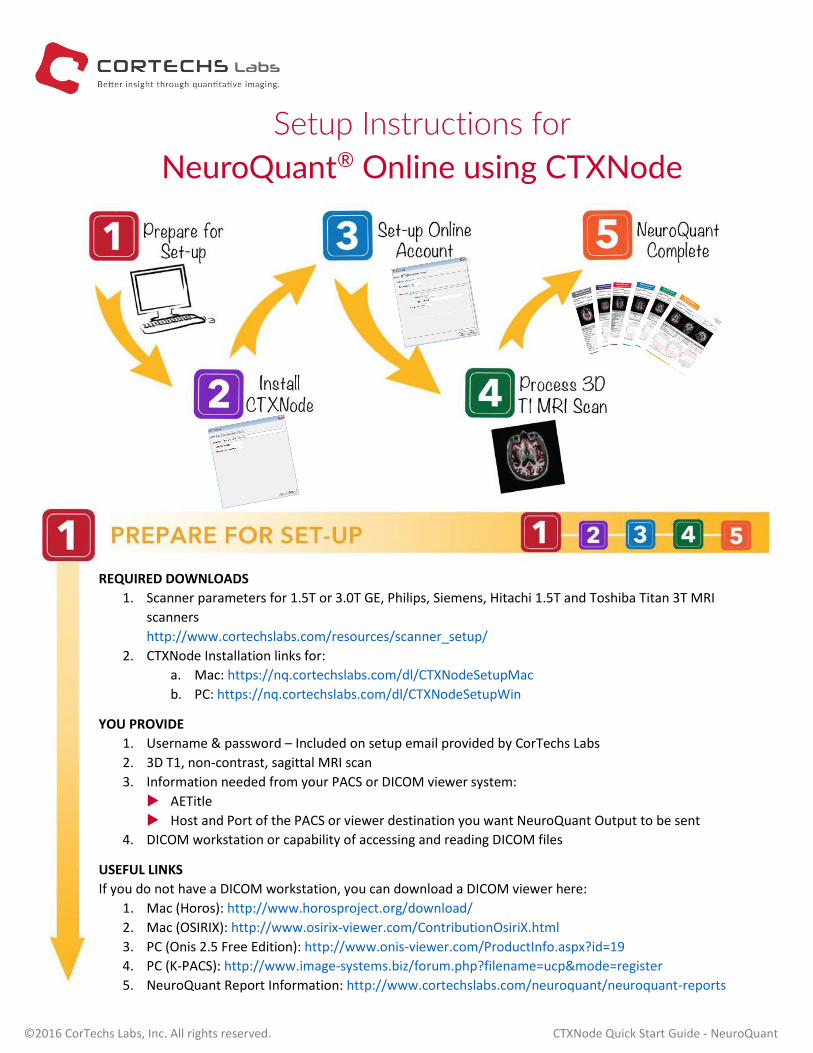
Setup Instructions for
NeuroQuant® Online using CTXNode
REQUIRED DOWNLOADS
1. Scanner parameters for 1.5T or 3.0T GE, Philips, Siemens, Hitachi 1.5T and Toshiba Titan 3T MRI
scanners
http://www.cortechslabs.com/resources/scanner_setup/
2. CTXNode Installation links for:
a. Mac: https://nq.cortechslabs.com/dl/CTXNodeSetupMac
b. PC: https://nq.cortechslabs.com/dl/CTXNodeSetupWin
YOU PROVIDE
1. Username & password – Included on setup email provided by CorTechs Labs
2. 3D T1, non-contrast, sagittal MRI scan
3. Information needed from your PACS or DICOM viewer system:
AETitle
Host and Port of the PACS or viewer destination you want NeuroQuant Output to be sent
4. DICOM workstation or capability of accessing and reading DICOM files
USEFUL LINKS
If you do not have a DICOM workstation, you can download a DICOM viewer here:
1. Mac (Horos): http://www.horosproject.org/download/
2. Mac (OSIRIX): http://www.osirix-viewer.com/ContributionOsiriX.html
3. PC (Onis 2.5 Free Edition): http://www.onis-viewer.com/ProductInfo.aspx?id=19
4. PC (K-PACS): http://www.image-systems.biz/forum.php?filename=ucp&mode=register
5. NeuroQuant Report Information: http://www.cortechslabs.com/neuroquant/neuroquant-reports
©2016 CorTechs Labs, Inc. All rights reserved.
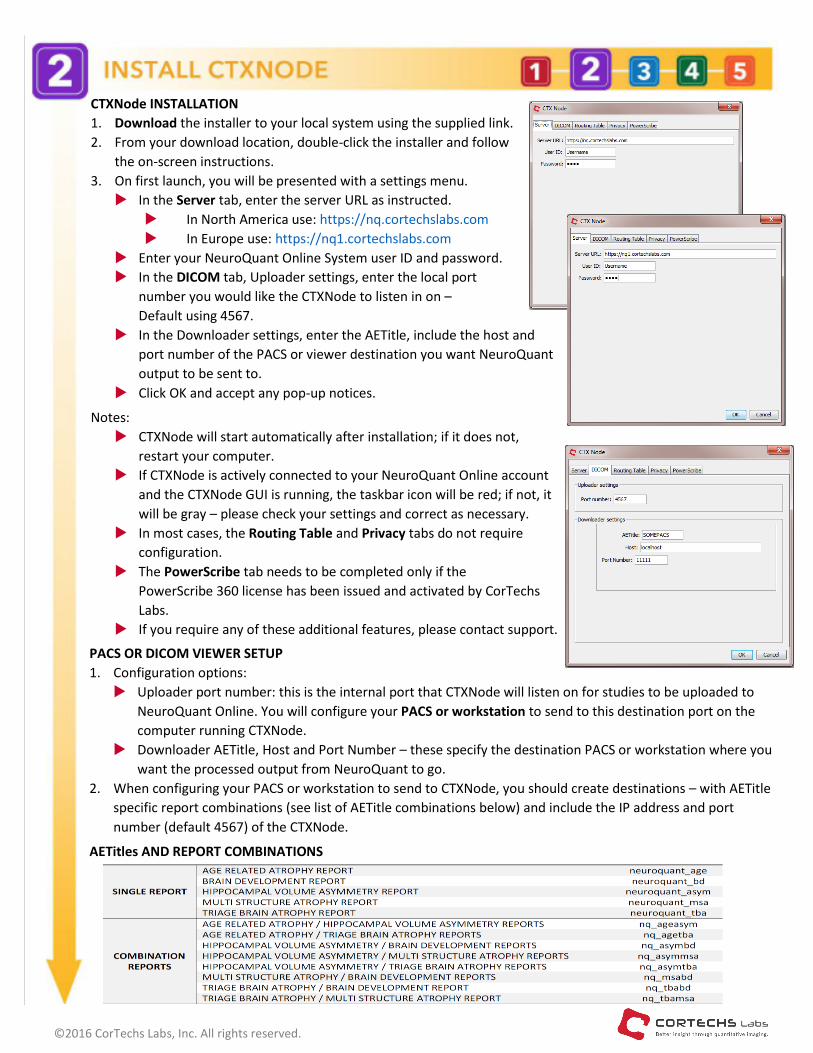
CTXNode INSTALLATION
1. Download the installer to your local system using the supplied link.
2. From your download location, double-click the installer and follow
the on-screen instructions.
3. On first launch, you will be presented with a settings menu.
In the Server tab, enter the server URL as instructed.
In North America use: https://nq.cortechslabs.com
In Europe use: https://nq1.cortechslabs.com
Enter your NeuroQuant Online System user ID and password.
In the DICOM tab, Uploader settings, enter the local port
number you would like the CTXNode to listen in on –
Default using 4567.
In the Downloader settings, enter the AETitle, include the host and
port number of the PACS or viewer destination you want NeuroQuant
output to be sent to.
Click OK and accept any pop-up notices.
Notes:
CTXNode will start automatically after installation; if it does not,
restart your computer.
If CTXNode is actively connected to your NeuroQuant Online account
and the CTXNode GUI is running, the taskbar icon will be red; if not, it
will be gray – please check your settings and correct as necessary.
In most cases, the Routing Table and Privacy tabs do not require
configuration.
The PowerScribe tab needs to be completed only if the
PowerScribe 360 license has been issued and activated by CorTechs
Labs.
If you require any of these additional features, please contact support.
PACS OR DICOM VIEWER SETUP
1. Configuration options:
Uploader port number: this is the internal port that CTXNode will listen on for studies to be uploaded to
NeuroQuant Online. You will configure your PACS or workstation to send to this destination port on the
computer running CTXNode.
Downloader AETitle, Host and Port Number – these specify the destination PACS or workstation where you
want the processed output from NeuroQuant to go.
2. When configuring your PACS or workstation to send to CTXNode, you should create destinations – with AETitle
specific report combinations (see list of AETitle combinations below) and include the IP address and port
number (default 4567) of the CTXNode.
AETitles AND REPORT COMBINATIONS
©2016 CorTechs Labs, Inc. All rights reserved.
FROM YOUR COMPUTER
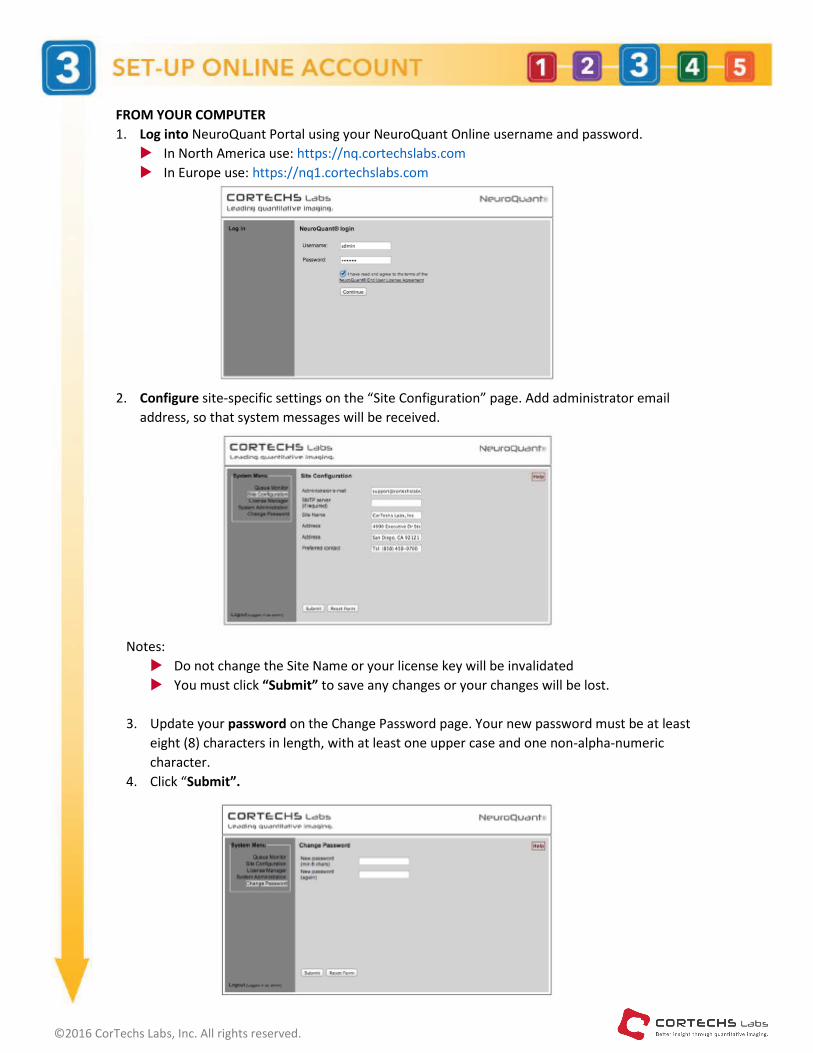
1. Log into NeuroQuant Portal using your NeuroQuant Online username and password.
In North America use: https://nq.cortechslabs.com
In Europe use: https://nq1.cortechslabs.com
2. Configure site-specific settings on the “Site Configuration” page. Add administrator email
address, so that system messages will be received.
Notes:
Do not change the Site Name or your license key will be invalidated
You must click “Submit” to save any changes or your changes will be lost.
3. Update your password on the Change Password page. Your new password must be at least
eight (8) characters in length, with at least one upper case and one non-alpha-numeric
character.
4. Click “Submit”.
©2016 CorTechs Labs, Inc. All rights reserved.
FROM YOUR DICOM WORKSTATION
1. Send your T1-weighted, sagittal, non-contrast-enhanced 3D MR series as DICOM images to the
host and port you configured when you set you the CTXNode DICOM upload proxy. Use
destination AETitle to specify the report or report combination needed.
Notes:
Check scan capability at http://www.cortechslabs.com/resources/scanner_setup/
See report information at http://www.cortechslabs.com/neuroquant/neuroquant-reports/
2. Upload progress will be displayed and processing will commence automatically, taking 5-7
minutes to complete.
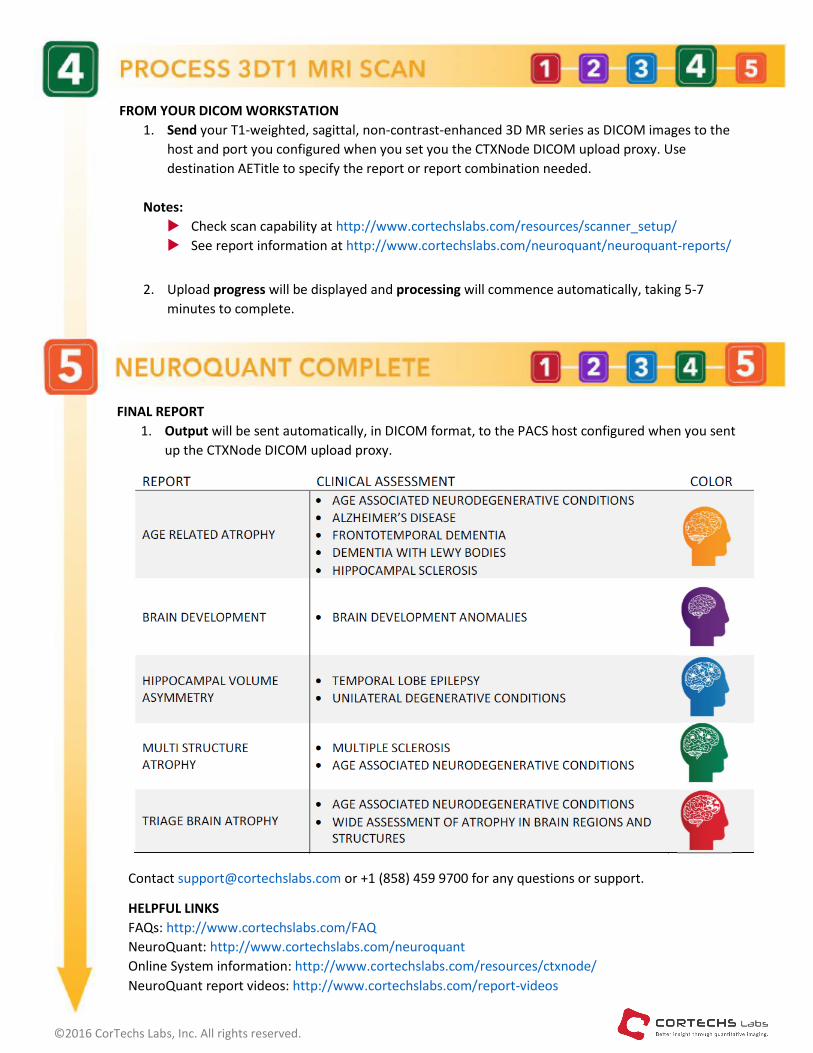
FINAL REPORT
1. Output will be sent automatically, in DICOM format, to the PACS host configured when you sent
up the CTXNode DICOM upload proxy.
Contact [email protected] or +1 (858) 459 9700 for any questions or support.
HELPFUL LINKS
FAQs: http://www.cortechslabs.com/FAQ
NeuroQuant: http://www.cortechslabs.com/neuroquant
Online System information: http://www.cortechslabs.com/resources/ctxnode/
NeuroQuant report videos: http://www.cortechslabs.com/report-videos