Embed Size (px)
Citation preview
Woodworking Crafts issue 15 7
Hand woodworking
1
3
2
4➤
Scale 1 to 8Scale 1 to 8
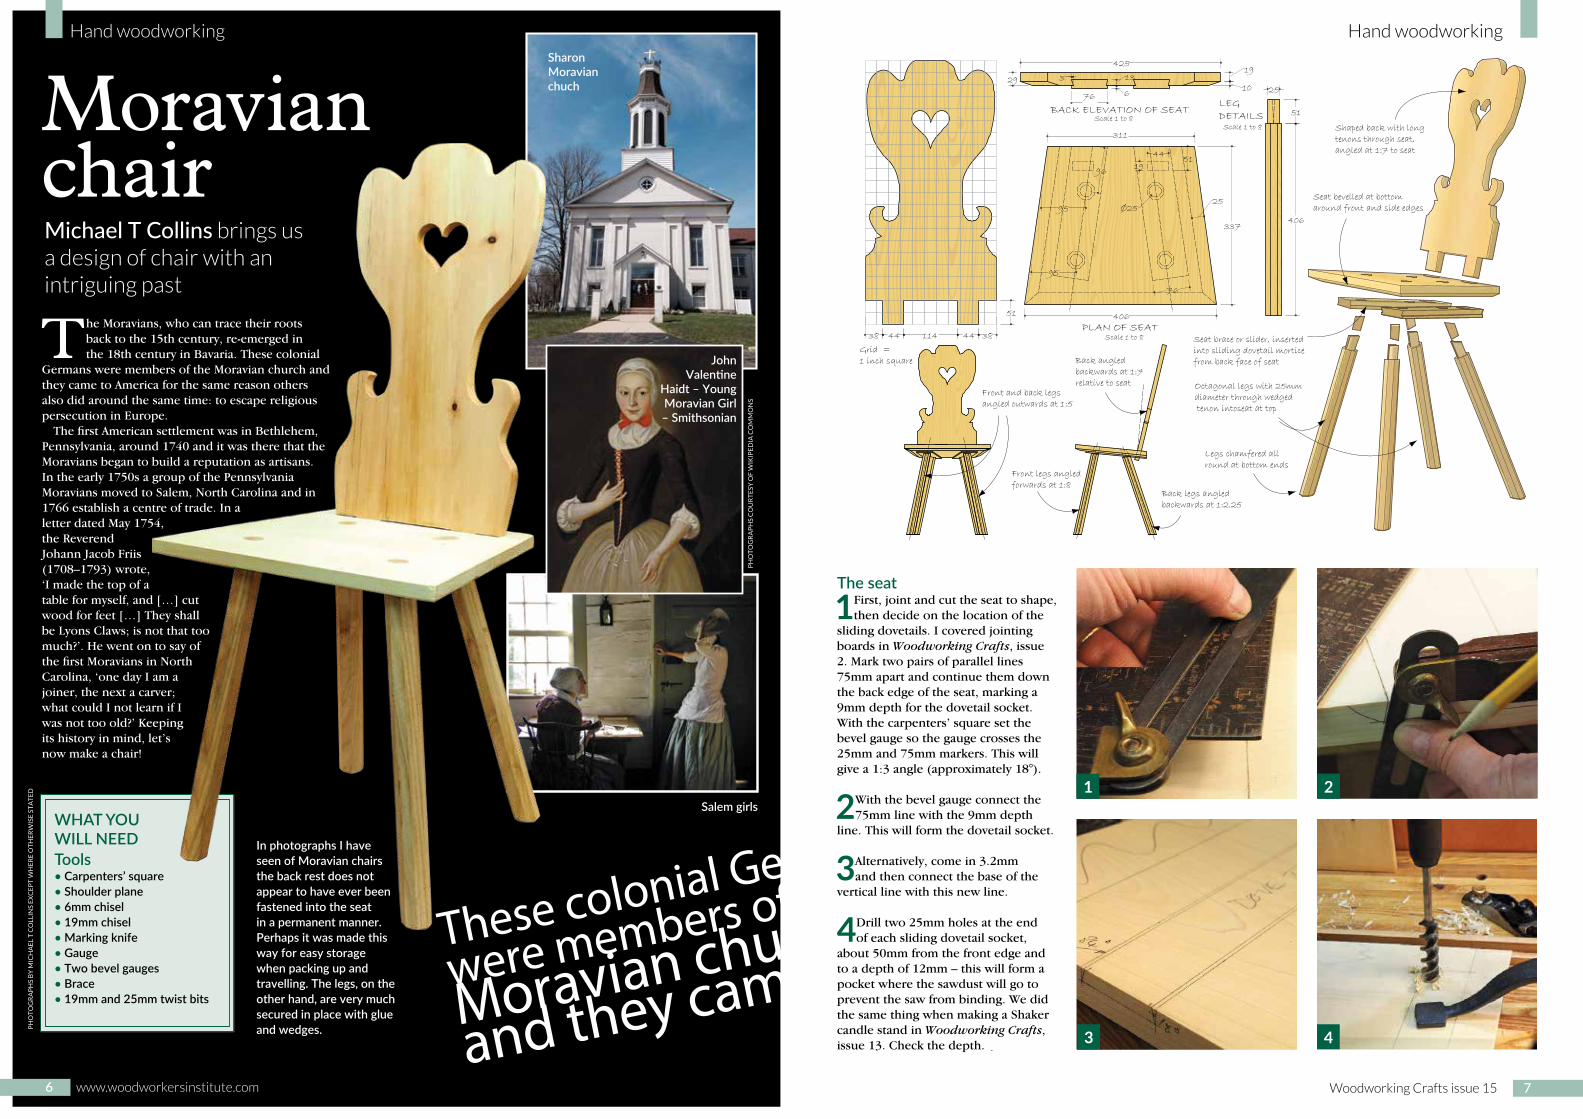
BACK ELEVATION OF SEAT
Scale 1 to 8PLAN OF SEAT
LEGDETAILS
38 44 114 44 38
51
425
2919
10
406
51
Ø25
44
19
311
76
337
406
25
25
95
96
51
95
76
6
133
Shaped back with long tenons through seat, angled at 1:7 to seat
Seat bevelled at bottom around front and side edges
Octagonal legs with 25mm diameter through wedged tenon intoseat at top
Legs chamfered all round at bottom ends
Front and back legs angled outwards at 1:5
Grid = 1 inch square
Front legs angled forwards at 1:8
Back legs angled backwards at 1:2.25
Seat brace or slider, inserted into sliding dovetail mortice from back face of seatBack angled
backwards at 1:7relative to seat
Hand woodworking P
HO
TO
GR
AP
HS
BY
MIC
HA
EL
T C
OLL
INS
EX
CE
PT
WH
ER
E O
TH
ER
WIS
E S
TA
TE
D
Moravian chairMichael T Collins brings us a design of chair with an intriguing past
The Moravians, who can trace their roots back to the 15th century, re-emerged in the 18th century in Bavaria. These colonial
Germans were members of the Moravian church and they came to America for the same reason others also did around the same time: to escape religious persecution in Europe.
The first American settlement was in Bethlehem, Pennsylvania, around 1740 and it was there that the Moravians began to build a reputation as artisans. In the early 1750s a group of the Pennsylvania Moravians moved to Salem, North Carolina and in 1766 establish a centre of trade. In a letter dated May 1754, the Reverend Johann Jacob Friis (1708–1793) wrote, ‘I made the top of a table for myself, and […] cut wood for feet […] They shall be Lyons Claws; is not that too much?’. He went on to say of the first Moravians in North Carolina, ‘one day I am a joiner, the next a carver; what could I not learn if I was not too old?’ Keeping its history in mind, let’s now make a chair!
What you Will needtools• Carpenters’ square• Shoulder plane• 6mm chisel• 19mm chisel• Marking knife • Gauge• two bevel gauges• Brace • 19mm and 25mm twist bits
These colonial Germans
were members of the
Moravian church
and they came
6 www.woodworkersinstitute.com
Salem girls
in photographs i have seen of Moravian chairs the back rest does not appear to have ever been fastened into the seat in a permanent manner. Perhaps it was made this way for easy storage when packing up and travelling. the legs, on the other hand, are very much secured in place with glue and wedges.
Sharon Moravian chuch
John Valentine
haidt – young Moravian Girl – Smithsonian
the seat
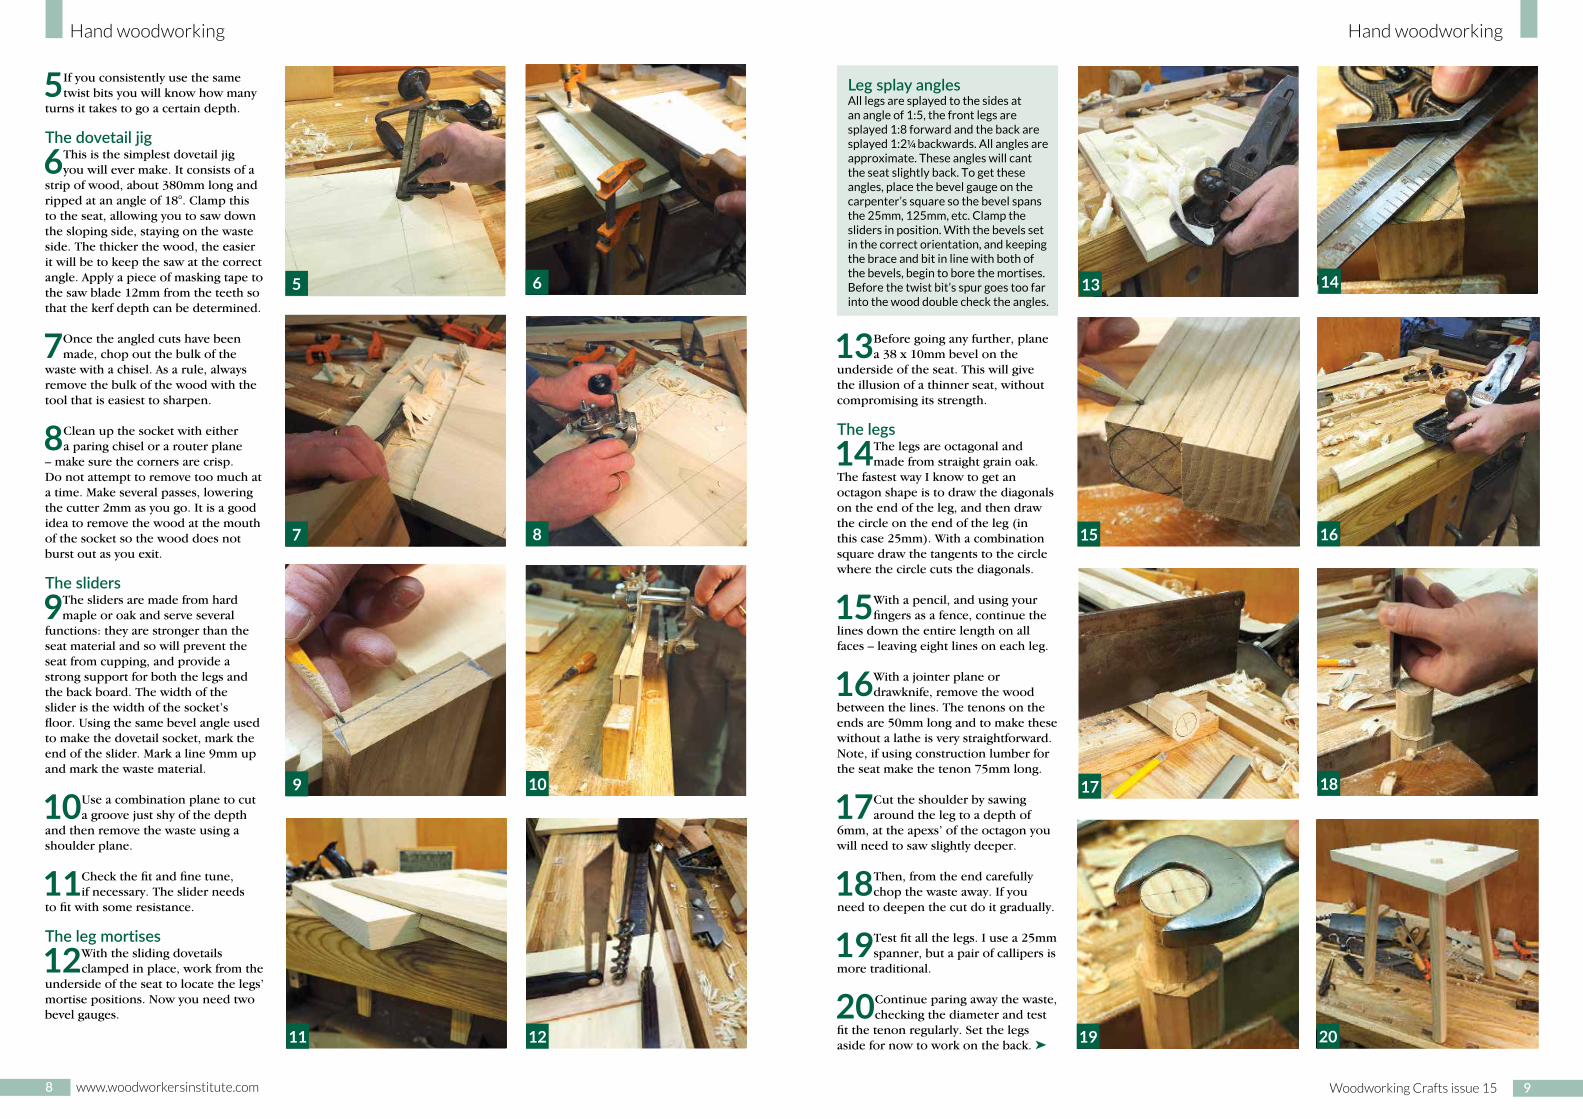
1First, joint and cut the seat to shape, then decide on the location of the
sliding dovetails. I covered jointing boards in Woodworking Crafts, issue 2. Mark two pairs of parallel lines 75mm apart and continue them down the back edge of the seat, marking a 9mm depth for the dovetail socket. With the carpenters’ square set the bevel gauge so the gauge crosses the 25mm and 75mm markers. This will give a 1:3 angle (approximately 18°).
2With the bevel gauge connect the 75mm line with the 9mm depth
line. This will form the dovetail socket.
3Alternatively, come in 3.2mm and then connect the base of the
vertical line with this new line.
4Drill two 25mm holes at the end of each sliding dovetail socket,
about 50mm from the front edge and to a depth of 12mm – this will form a pocket where the sawdust will go to prevent the saw from binding. We did the same thing when making a Shaker candle stand in Woodworking Crafts, issue 13. Check the depth.
PH
OT
OG
RA
PH
S C
OU
RT
ESY
OF
WIK
IPE
DIA
CO
MM
ON
S
Hand woodworking
8 www.woodworkersinstitute.com Woodworking Crafts issue 15 9
Hand woodworking
7 8
6
5If you consistently use the same twist bits you will know how many
turns it takes to go a certain depth.
the dovetail jig
6This is the simplest dovetail jig you will ever make. It consists of a
strip of wood, about 380mm long and ripped at an angle of 18°. Clamp this to the seat, allowing you to saw down the sloping side, staying on the waste side. The thicker the wood, the easier it will be to keep the saw at the correct angle. Apply a piece of masking tape to the saw blade 12mm from the teeth so that the kerf depth can be determined.
7Once the angled cuts have been made, chop out the bulk of the
waste with a chisel. As a rule, always remove the bulk of the wood with the tool that is easiest to sharpen.
8Clean up the socket with either a paring chisel or a router plane
– make sure the corners are crisp. Do not attempt to remove too much at a time. Make several passes, lowering the cutter 2mm as you go. It is a good idea to remove the wood at the mouth of the socket so the wood does not burst out as you exit.
the sliders
9The sliders are made from hard maple or oak and serve several
functions: they are stronger than the seat material and so will prevent the seat from cupping, and provide a strong support for both the legs and the back board. The width of the slider is the width of the socket’s floor. Using the same bevel angle used to make the dovetail socket, mark the end of the slider. Mark a line 9mm up and mark the waste material.
10Use a combination plane to cut a groove just shy of the depth
and then remove the waste using a shoulder plane.
11Check the fit and fine tune, if necessary. The slider needs
to fit with some resistance.
the leg mortises
12With the sliding dovetails clamped in place, work from the
underside of the seat to locate the legs’ mortise positions. Now you need two bevel gauges.
17
19
18
5
13Before going any further, plane a 38 x 10mm bevel on the
underside of the seat. This will give the illusion of a thinner seat, without compromising its strength.
the legs
14The legs are octagonal and made from straight grain oak.
The fastest way I know to get an octagon shape is to draw the diagonals on the end of the leg, and then draw the circle on the end of the leg (in this case 25mm). With a combination square draw the tangents to the circle where the circle cuts the diagonals.
15With a pencil, and using your fingers as a fence, continue the
lines down the entire length on all faces – leaving eight lines on each leg.
16With a jointer plane or drawknife, remove the wood
between the lines. The tenons on the ends are 50mm long and to make these without a lathe is very straightforward. Note, if using construction lumber for the seat make the tenon 75mm long.
17Cut the shoulder by sawing around the leg to a depth of
6mm, at the apexs’ of the octagon you will need to saw slightly deeper.
18Then, from the end carefully chop the waste away. If you
need to deepen the cut do it gradually.
19Test fit all the legs. I use a 25mm spanner, but a pair of callipers is
more traditional.
20Continue paring away the waste, checking the diameter and test
fit the tenon regularly. Set the legs aside for now to work on the back. ➤
9 10
11 12 20
13
15
14
16
leg splay anglesAll legs are splayed to the sides at an angle of 1:5, the front legs are splayed 1:8 forward and the back are splayed 1:21/4 backwards. All angles are approximate. These angles will cant the seat slightly back. To get these angles, place the bevel gauge on the carpenter’s square so the bevel spans the 25mm, 125mm, etc. Clamp the sliders in position. With the bevels set in the correct orientation, and keeping the brace and bit in line with both of the bevels, begin to bore the mortises. Before the twist bit’s spur goes too far into the wood double check the angles.
Hand woodworking
10 www.woodworkersinstitute.com
21 The back is made from a piece of 19mm straight grained pine,
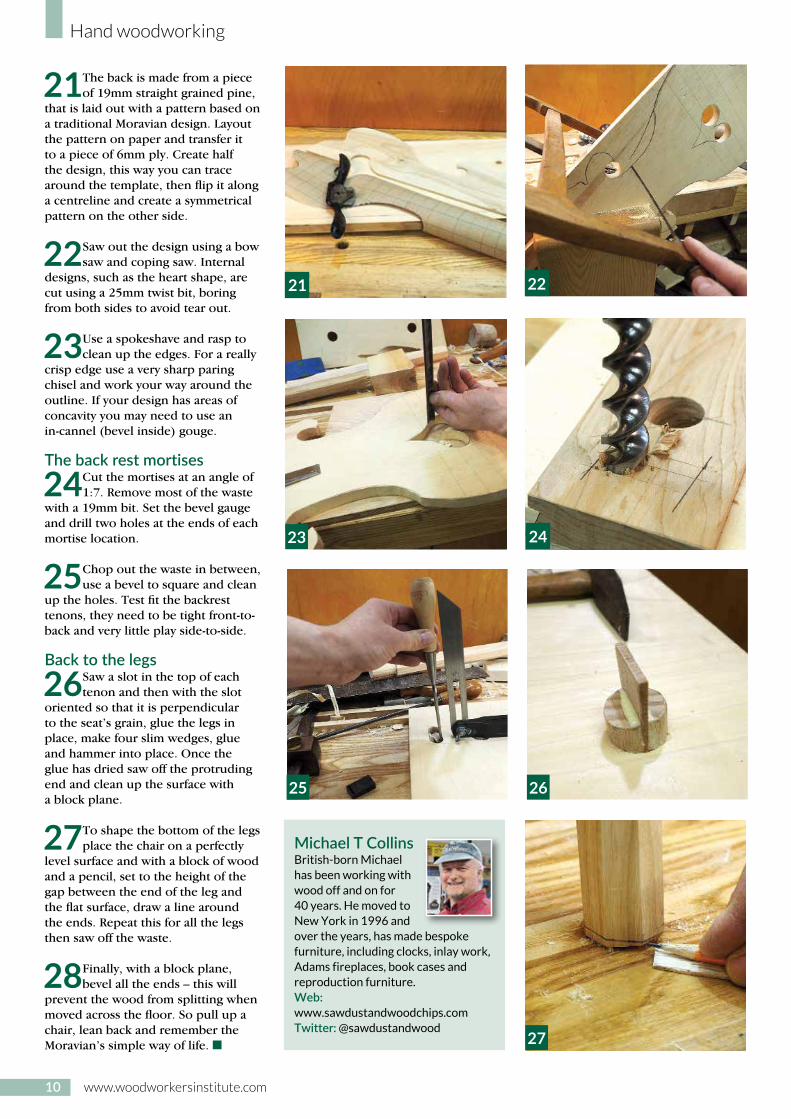
that is laid out with a pattern based on a traditional Moravian design. Layout the pattern on paper and transfer it to a piece of 6mm ply. Create half the design, this way you can trace around the template, then flip it along a centreline and create a symmetrical pattern on the other side.
22Saw out the design using a bow saw and coping saw. Internal
designs, such as the heart shape, are cut using a 25mm twist bit, boring from both sides to avoid tear out.
23Use a spokeshave and rasp to clean up the edges. For a really
crisp edge use a very sharp paring chisel and work your way around the outline. If your design has areas of concavity you may need to use an in-cannel (bevel inside) gouge.
the back rest mortises
24Cut the mortises at an angle of 1:7. Remove most of the waste
with a 19mm bit. Set the bevel gauge and drill two holes at the ends of each mortise location.
25Chop out the waste in between, use a bevel to square and clean
up the holes. Test fit the backrest tenons, they need to be tight front-to-back and very little play side-to-side.
Back to the legs
26 Saw a slot in the top of each tenon and then with the slot
oriented so that it is perpendicular to the seat’s grain, glue the legs in place, make four slim wedges, glue and hammer into place. Once the glue has dried saw off the protruding end and clean up the surface with a block plane.
27To shape the bottom of the legs place the chair on a perfectly
level surface and with a block of wood and a pencil, set to the height of the gap between the end of the leg and the flat surface, draw a line around the ends. Repeat this for all the legs then saw off the waste.
28Finally, with a block plane, bevel all the ends – this will
prevent the wood from splitting when moved across the floor. So pull up a chair, lean back and remember the Moravian’s simple way of life. ■
25 26
Michael t CollinsBritish-born Michael has been working with wood off and on for 40 years. He moved to New York in 1996 and over the years, has made bespoke furniture, including clocks, inlay work, Adams fireplaces, book cases and reproduction furniture. Web: www.sawdustandwoodchips.com twitter: @sawdustandwood
2423
22
27
21