Embed Size (px)
Citation preview

Service Managed GatewayTM
SHDSL Application and Configuration Guide
Issue 1.0
Date 14 August 2007

© 2007 Virtual Access (Irl) Ltd. This material is protected by copyright. No part of this material may be reproduced,
distributed, or altered without the written consent of Virtual Access. All rights reserved. All trademarks, service
marks, registered trademarks and registered service marks are the property of their respective owners. Virtual Access
is an ISO 9001 certified company.
1.0 Introduction ...................................................................................... 3
1.1 What is SHDSL technology? ............................................................ 3
1.2 Types of SHDSL connections ........................................................... 3
1.3 SHDSL Connection Options on your Service Managed Gateway....... 4
2.0 Configuring SHDSL connections......................................................... 7
2.1 Configuring an SHDSL connection over PPP .................................... 7
2.1.1 Opening the Fast Start Wizard.......................................................... 7
2.1.2 Disabling Activation ........................................................................ 8
2.1.3 Generating an SHDSL Connection over PPP .......................................11
2.1.4 Saving your PPP Configuration ........................................................16
2.2 Configuring a bridged SHDSL connection ...................................... 20
2.2.1 Opening the Fast Start Wizard.........................................................20
2.2.2 Disabling Activation .......................................................................21
2.2.3 Generating a Bridged Connection.....................................................23
2.2.4 Setting the Service Managed Gateway’s LAN IP Address .....................25
2.2.5 Saving your Bridged Configuration...................................................26

SHDSL Application and Configuration Guide Introduction
© Virtual Access Ltd. Page 3 of 27
1.0 Introduction
1.1 What is SHDSL technology?
SHDSL (single-pair high-speed digital subscriber line) is the international standard
for symmetric DSL developed by the ITU (International Telecommunication Union).
It enables the sending and receiving of high-speed symmetrical data streams over
a single telephone line at rates between 192 kbps and 2.31 Mbps. Unlike a regular
dialup telephone service, SHDSL provides a continuously available, "always on"
connection. SHDSL was specifically designed to provide equal capacity in both
directions of the link. It was ratified by the ITU in February 2001, and is also known
as G.991.2.
1.2 Types of SHDSL connections
SHDSL access services typically use the Asynchronous Transfer Mode (ATM)
protocol to provide a low-level communications path between the user's access
equipment and the service provider head end. The head end may be a Broadband
Access Server (BAS) that sits (logically) behind the SHDSL central office Digital
Subscriber Line Access Multiplexer (DSLAM) and is connected using an
Asynchronous Transfer Mode (ATM) backbone. ATM is a high-speed switching
technology where data is grouped into cells.
Connection between the user equipment and the BAS is then achieved using the
Point- to-Point Protocol (PPP) running over the ATM connection path. PPP is a
defined industry standard used widely to allow two devices to communicate across
a logical link. It is extensively deployed by service providers as a means of
connecting customers to Internet Protocol (IP)-based services, such as the
Internet.
Figure 1: a PPP connection between user equipment and a broadband access server
SHDSL Application and Configuration Guide Introduction
© Virtual Access Ltd. Page 4 of 27
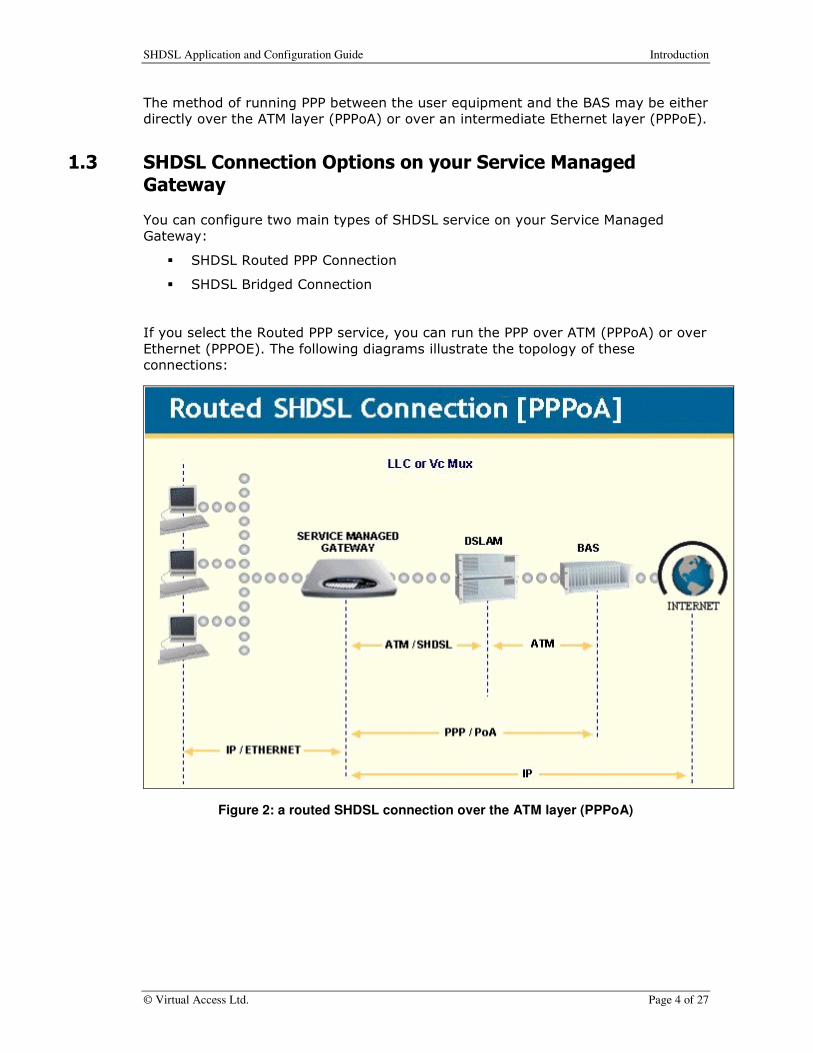
The method of running PPP between the user equipment and the BAS may be either
directly over the ATM layer (PPPoA) or over an intermediate Ethernet layer (PPPoE).
1.3 SHDSL Connection Options on your Service Managed Gateway
You can configure two main types of SHDSL service on your Service Managed
Gateway:
� SHDSL Routed PPP Connection
� SHDSL Bridged Connection
If you select the Routed PPP service, you can run the PPP over ATM (PPPoA) or over
Ethernet (PPPOE). The following diagrams illustrate the topology of these
connections:
Figure 2: a routed SHDSL connection over the ATM layer (PPPoA)

SHDSL Application and Configuration Guide Introduction
© Virtual Access Ltd. Page 5 of 27
Figure 3: a routed SHDSL connection over an Ethernet layer (PPPoE)
SHDSL Application and Configuration Guide Introduction
© Virtual Access Ltd. Page 6 of 27
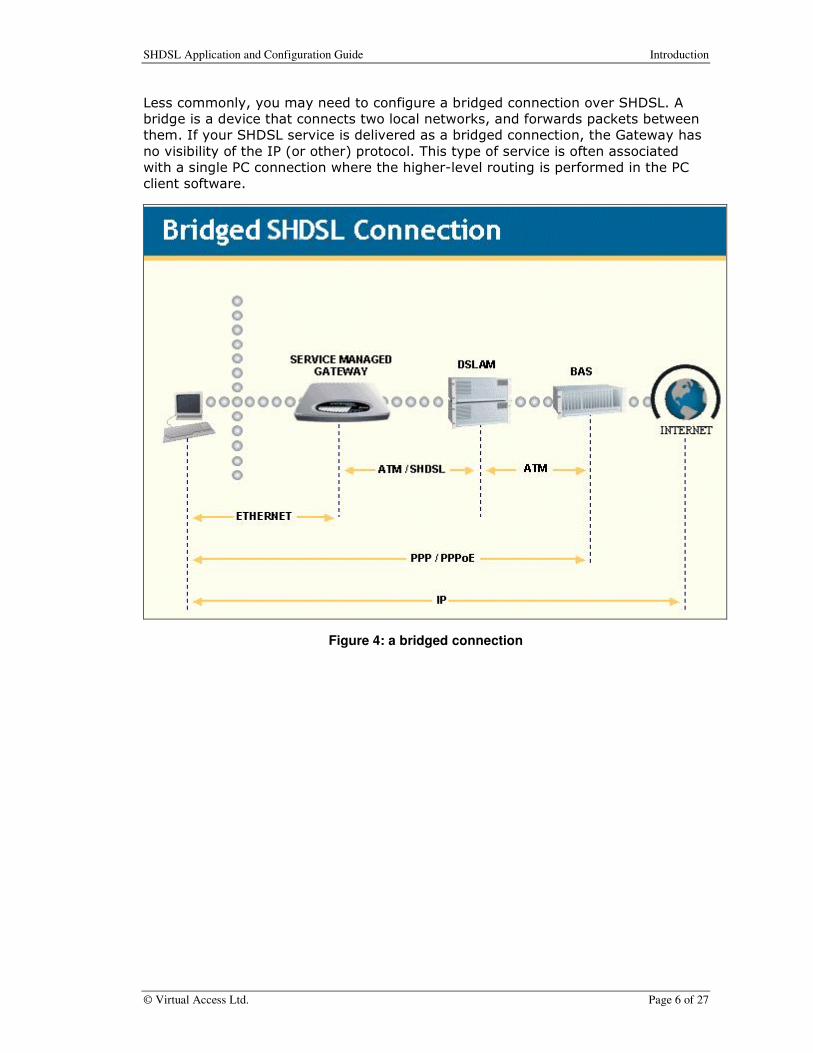
Less commonly, you may need to configure a bridged connection over SHDSL. A
bridge is a device that connects two local networks, and forwards packets between
them. If your SHDSL service is delivered as a bridged connection, the Gateway has
no visibility of the IP (or other) protocol. This type of service is often associated
with a single PC connection where the higher-level routing is performed in the PC
client software.
Figure 4: a bridged connection

SHDSL Application and Configuration Guide Configuring SHDSL Connections
© Virtual Access Ltd. Page 7 of 27
2.0 Configuring SHDSL connections
2.1 Configuring an SHDSL connection over PPP
2.1.1 Opening the Fast Start Wizard
Your Service Managed Gateway is designed to be automatically configured by the
Activator Distributed System (DSS) upon correct installation of the Gateway.
If necessary, you can bypass Activation and use the Fast Start Wizard to manually
configure your Gateway. See the SHDSL installation guide for details of how to
connect the router to your computer or network. When your Gateway is correctly
connected to your PC, type fast.start into the Address field of your browser.
Figure 5: The Service Managed Gateway home page
The Service Managed Gateway home page is displayed. Click the Fast.Start icon to
open the Fast Start wizard. The wizard will guide you through a series of forms that
you must complete to configure your Gateway.

SHDSL Application and Configuration Guide Configuring SHDSL Connections
© Virtual Access Ltd. Page 8 of 27
2.1.2 Disabling Activation
When you click the Fast.Start icon, the page that is displayed is called Activation
in progress. It displays the status of the Activation process.
Figure 6: The Activation in progress page
To manually configure your Gateway, you must disable Activation. To do this, click
the Continue button. If you do not need to stop Activation, click Close.
Warning! Do not disable Activation unless you are sure there is a problem or if you must manually Activate your Service Managed Gateway.

SHDSL Application and Configuration Guide Configuring SHDSL Connections
© Virtual Access Ltd. Page 9 of 27
When you click Continue, a page entitled Welcome to your Service Managed
Gateway is displayed.
Figure 7: the Welcome page
Select GSHDSL Routed PPP Connection in the Service type drop-down list. A
dialog box is displayed. Carefully read the warning in the dialog box.
Figure 8: the dialog box that lets you cancel Activation
To allow Activation to continue, click Cancel. The dialog box is closed and
Activation continues.
To disable Activation, click OK. If you click OK, the Activation process ends and the
next page of the Fast Start wizard is displayed.

SHDSL Application and Configuration Guide Configuring SHDSL Connections
© Virtual Access Ltd. Page 10 of 27
Figure 9: the Welcome page after you disable Activation
Click the Connection Wizard button to open the Connections page

SHDSL Application and Configuration Guide Configuring SHDSL Connections
© Virtual Access Ltd. Page 11 of 27
2.1.3 Generating an SHDSL Connection over PPP
The Connections page lets you enter details about the connection you are creating
or updating.
Figure 10: the Connections page
In the Connection name field, specify a descriptive name for your connection.
This name identifies the connection for maintenance functions such as connecting,
disconnecting, and viewing connection statistics.
From the Connection Type drop-down list, select PPP over Ethernet (PPPoE), PPP
(RFC2364 vc mux), or PPP (RFC 2364 llc).
If you are unsure which connection type to use for a service over PPPoA, check with
your service provider.
In most cases, your service provider gives you a user name and password so you
can access Internet services.
In the Connection username field, type the user name your service provider gave
you.
In the Connection password field, type the password your service provider gave
you.
For security, an asterisk (*) appears each time you type a character. To verify that
you typed the password correctly, type it again in the Re-enter connection
password field.

SHDSL Application and Configuration Guide Configuring SHDSL Connections
© Virtual Access Ltd. Page 12 of 27
The virtual path identifier and the virtual connection identifier relate to the
Asynchronous Transfer Mode (ATM) channel on which the link is established. They
allow all packets sent out to have a unique identification number. Use the defaults
provided here unless your service provider gives you different numbers.
The Gateway is configured to allow your service provider to assign an IP address to
the connection. If this is how your service is provided and you are using the default
LAN configuration so that the Gateway allocates addresses and acts as DNS server
to the PCs on the LAN, then click Next. If this is not how your service is provided,
click the Advanced Options button to open the Advanced Network Options pop-up
window.
2.1.3.1 Configuring advanced options for your PPP network
You do not have to configure advanced options to Activate your router. If you are
not familiar with advanced network options or your service provider has not given
you advanced option settings, you can skip this section.
Figure 11: The Advanced Network Options window
Select yes in the IP address obtained automatically drop-down list to obtain
the IP address automatically.
SHDSL Application and Configuration Guide Configuring SHDSL Connections
© Virtual Access Ltd. Page 13 of 27
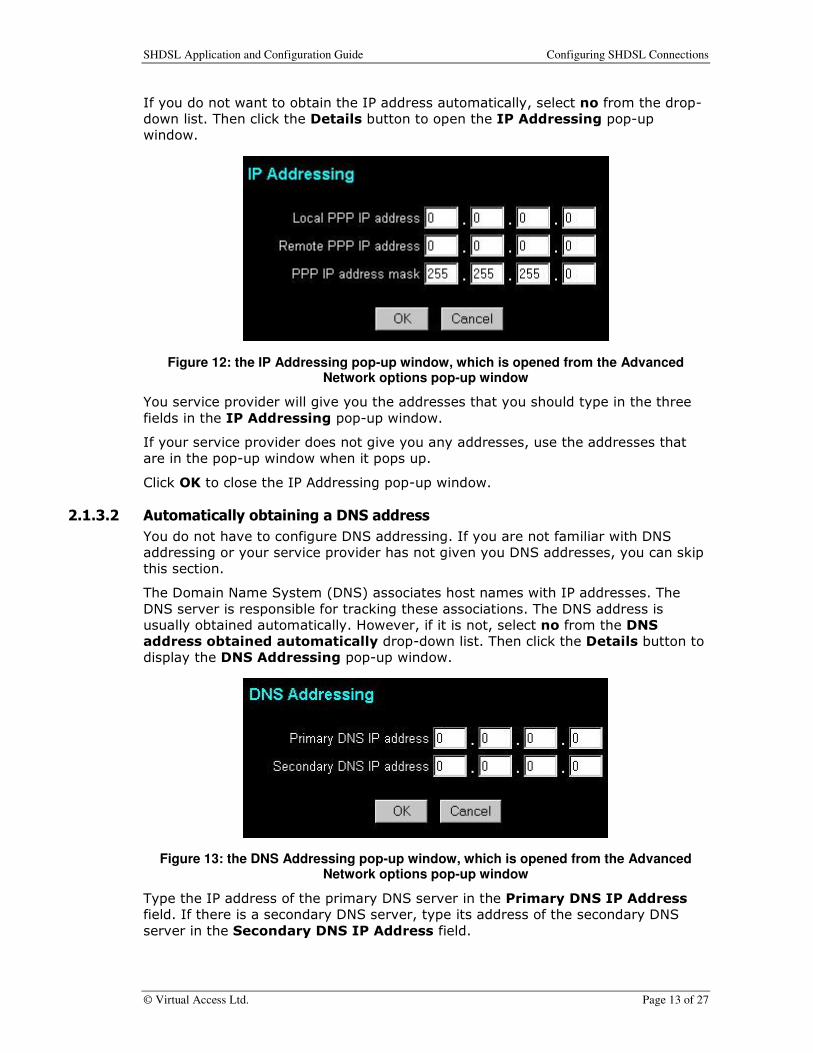
If you do not want to obtain the IP address automatically, select no from the drop-
down list. Then click the Details button to open the IP Addressing pop-up
window.
Figure 12: the IP Addressing pop-up window, which is opened from the Advanced Network options pop-up window
You service provider will give you the addresses that you should type in the three
fields in the IP Addressing pop-up window.
If your service provider does not give you any addresses, use the addresses that
are in the pop-up window when it pops up.
Click OK to close the IP Addressing pop-up window.
2.1.3.2 Automatically obtaining a DNS address
You do not have to configure DNS addressing. If you are not familiar with DNS
addressing or your service provider has not given you DNS addresses, you can skip
this section.
The Domain Name System (DNS) associates host names with IP addresses. The
DNS server is responsible for tracking these associations. The DNS address is
usually obtained automatically. However, if it is not, select no from the DNS
address obtained automatically drop-down list. Then click the Details button to
display the DNS Addressing pop-up window.
Figure 13: the DNS Addressing pop-up window, which is opened from the Advanced Network options pop-up window
Type the IP address of the primary DNS server in the Primary DNS IP Address
field. If there is a secondary DNS server, type its address of the secondary DNS
server in the Secondary DNS IP Address field.

SHDSL Application and Configuration Guide Configuring SHDSL Connections
© Virtual Access Ltd. Page 14 of 27
Click OK to close the DNS Addressing pop-up window.
2.1.3.3 Enabling IP address translation
IP address translation (IPAT) can hide the devices on the local LAN by substituting
the IP address of the originating device with the IP address of the Gateway. If you
need to disable IP address translation for the leased line connection, select no from
the IP address translation enabled drop-down list in the Advanced Network
Options pop-up window.
Figure 14: the Advanced Network Options pop-up window

SHDSL Application and Configuration Guide Configuring SHDSL Connections
© Virtual Access Ltd. Page 15 of 27
2.1.3.4 Configuring the LAN
If you need to configure your LAN settings, click the LAN Settings button in the
Advanced Network Options window. The LAN Configuration pop-up window is
displayed.
Figure 15: The LAN Configuration pop-up window for a PPP connection
To configure IP details for the LAN, type the IP address in the IP address fields,
and type the IP address mask in the IP address mask fields.
2.1.3.5 Enabling the Dynamic Host Configuration Protocol
When it is enabled, Dynamic Host Configuration Protocol (DHCP) allows the
Gateway to act as a server and assign IP addresses to other IP-addressable devices
on the local LAN as they attach to the network.
To configure the Dynamic Host Configuration Protocol (DHCP) to provide addresses
automatically, select yes from the Enabled drop-down list. To prevent the DHCP
from distributing addresses automatically, select no from the Enabled drop-down
list.
Figure 15a: The DHCP section of the LAN Configuration pop-up window

SHDSL Application and Configuration Guide Configuring SHDSL Connections
© Virtual Access Ltd. Page 16 of 27
The values in the Addresses from and to fields determine the range of IP
addresses available for clients when the DHCP server is enabled. In the example in
Figure 14a, Addresses from is 100 and to is 150, which means that 49 IP
addresses are available for local clients. Two addresses are reserved for IP
broadcasts.
After you configure the LAN settings, click OK to close the pop-up window.
Click OK to close the Advanced Network Options pop-up window. Then click the
Next button on the Connections page.
2.1.4 Saving your PPP Configuration
Figure 16: the first Finished page for a PPP connection, where you save the configuration
To save the new or updated SHDSL over PPP connection, click Save
configuration. When the Gateway has reloaded, click the Close button to display
a page where you can test the connection and register your Gateway:

SHDSL Application and Configuration Guide Configuring SHDSL Connections
© Virtual Access Ltd. Page 17 of 27
Figure 17: the second Finished page for a PPP connection
To register your product, click the Register button. A registration form is
displayed. Fill in the form, print it, and fax it to the fax number on the form.
Before you click Finish, you can test your connection to ensure that you have
configured it correctly. Click the Test Connection button on the Finished page to
access the Connection Monitor.

SHDSL Application and Configuration Guide Configuring SHDSL Connections
© Virtual Access Ltd. Page 18 of 27
Figure 18: the Connection Monitor
If no connection details are displayed in the Connection Monitor, click a gray ATM
VC box. A list of active VPI/VCI numbers is displayed. You can use these numbers
to reconfigure the default value in the wizard.
For more information about the Connection Monitor, read the Expert Web Full
Reference Documentation in the Service Managed Gateway documentation.

SHDSL Application and Configuration Guide Configuring SHDSL Connections
© Virtual Access Ltd. Page 19 of 27
Figure 19: the second Finished page for a PPP connection
Click Finish to return to the Gateway home page. From the home page you can
access the Advanced and Status menus to further configure, view, and monitor
your Gateway.

SHDSL Application and Configuration Guide Configuring SHDSL Connections
© Virtual Access Ltd. Page 20 of 27
2.2 Configuring a bridged SHDSL connection
If you configure a bridged connection on your Gateway, your service provider
allocates one or more IP addresses to devices on the local network. You can still
access the Internet, but in order to regain management access, you must:
� reset the Gateway using the RESET button at the back of the box, or
� assign an ISP-supported IP address to the Service Managed Gateway using
the Advanced Options feature (see the section LAN configuration).
2.2.1 Opening the Fast Start Wizard
Your Service Managed Gateway is designed to be automatically configured by the
Activator Distributed System (DSS) upon correct installation of the Gateway.
If necessary, you can bypass Activation and use the Fast Start Wizard to manually
configure your Gateway. See the SHDSL installation guide for details of how to
connect the router to your computer or network. When your Gateway is correctly
connected to your PC, type fast.start into the Address field of your browser.
Figure 20: the home page of the Service Managed Gateway
The Service Managed Gateway home page is displayed. Click the Fast.Start icon to
open the Fast Start wizard. The wizard will guide you through a series of forms that
you must complete to configure your Gateway.
SHDSL Application and Configuration Guide Configuring SHDSL Connections
© Virtual Access Ltd. Page 21 of 27
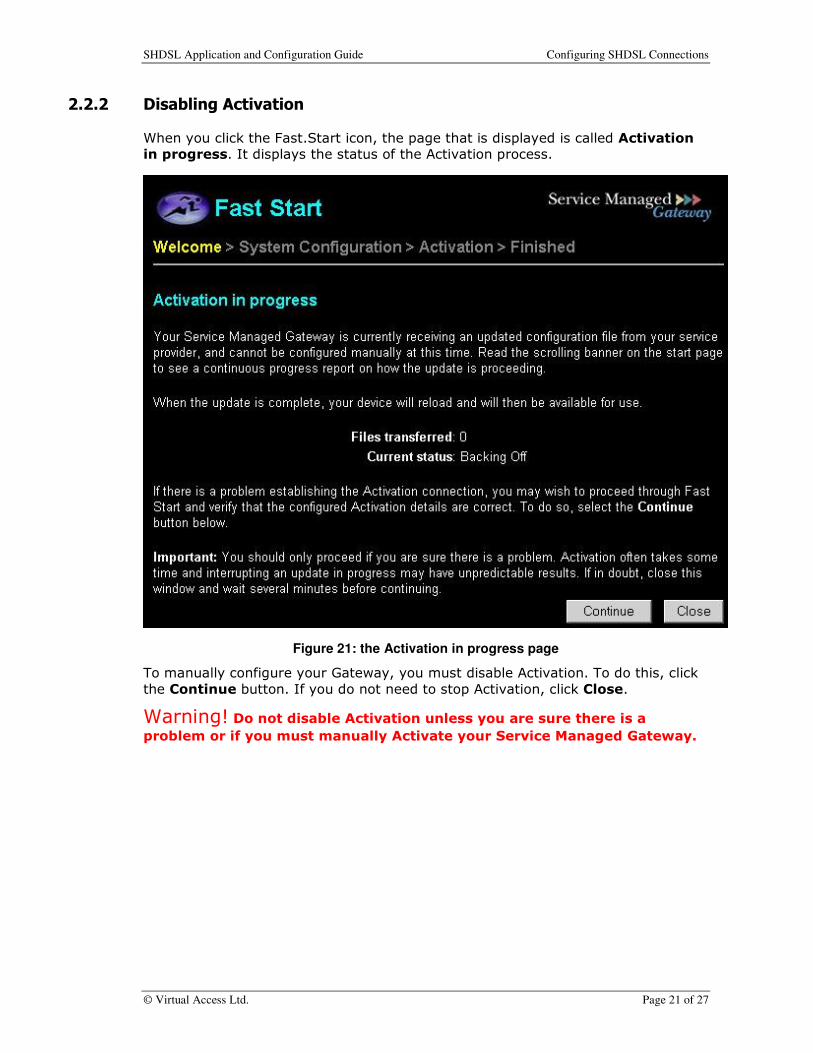
2.2.2 Disabling Activation
When you click the Fast.Start icon, the page that is displayed is called Activation
in progress. It displays the status of the Activation process.
Figure 21: the Activation in progress page
To manually configure your Gateway, you must disable Activation. To do this, click
the Continue button. If you do not need to stop Activation, click Close.
Warning! Do not disable Activation unless you are sure there is a problem or if you must manually Activate your Service Managed Gateway.

SHDSL Application and Configuration Guide Configuring SHDSL Connections
© Virtual Access Ltd. Page 22 of 27
Figure 22: the Welcome page
From the Service type drop-down list, select GSHDSL Bridged Connection.
Carefully read the warning in the dialog box.
Figure 23: the dialog box that lets you cancel Activation
To allow Activation to continue, click Cancel. The dialog box is closed and
Activation continues.
To disable Activation, click OK. If you click OK, the Activation process ends and the
next page of the Fast Start wizard is displayed.
SHDSL Application and Configuration Guide Configuring SHDSL Connections
© Virtual Access Ltd. Page 23 of 27
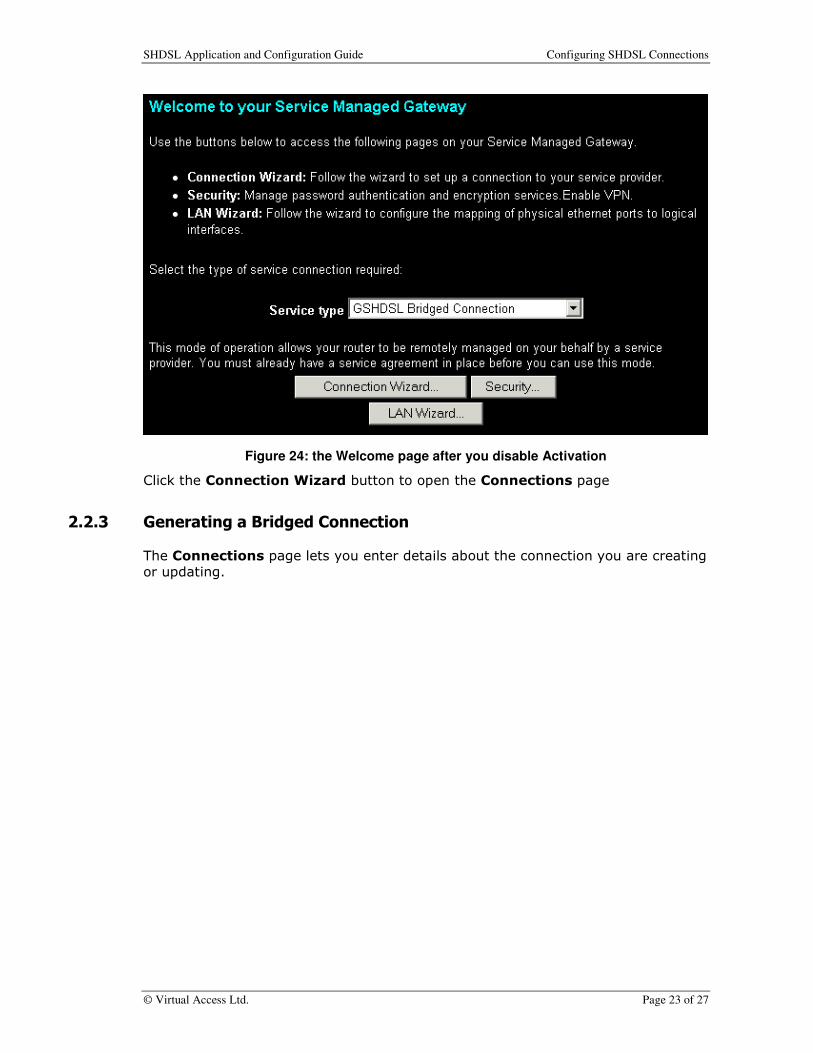
Figure 24: the Welcome page after you disable Activation
Click the Connection Wizard button to open the Connections page
2.2.3 Generating a Bridged Connection
The Connections page lets you enter details about the connection you are creating
or updating.
SHDSL Application and Configuration Guide Configuring SHDSL Connections
© Virtual Access Ltd. Page 24 of 27
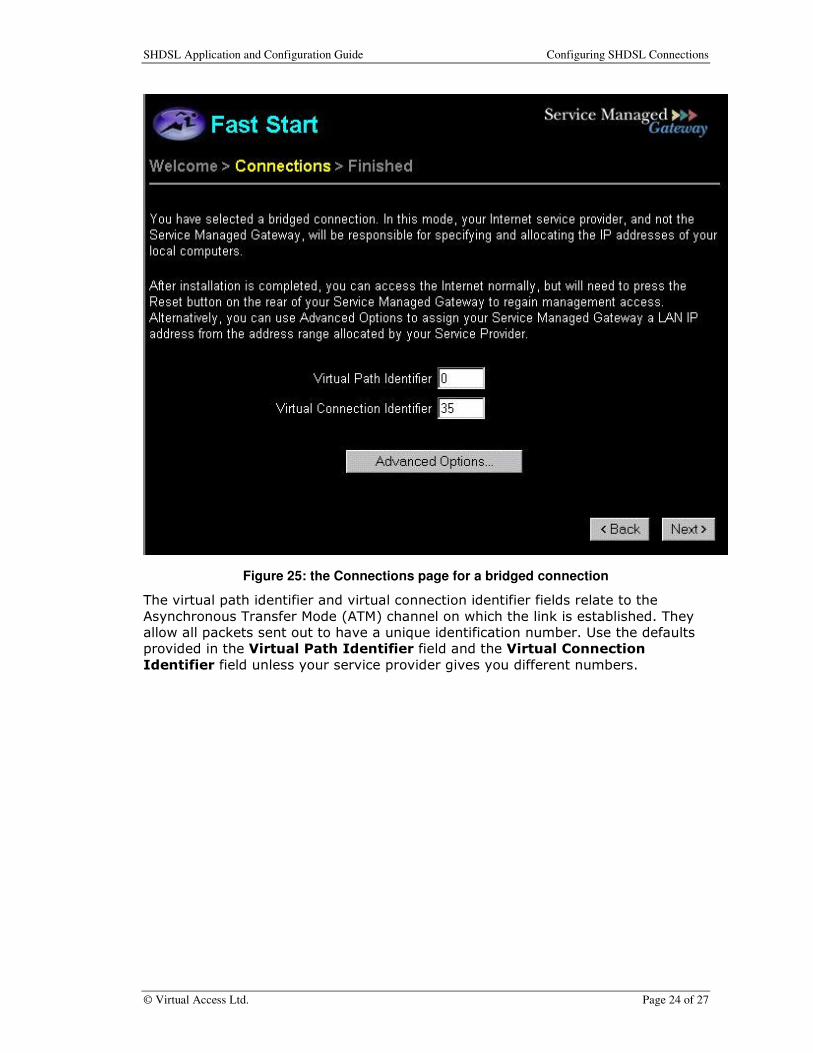
Figure 25: the Connections page for a bridged connection
The virtual path identifier and virtual connection identifier fields relate to the
Asynchronous Transfer Mode (ATM) channel on which the link is established. They
allow all packets sent out to have a unique identification number. Use the defaults
provided in the Virtual Path Identifier field and the Virtual Connection
Identifier field unless your service provider gives you different numbers.

SHDSL Application and Configuration Guide Configuring SHDSL Connections
© Virtual Access Ltd. Page 25 of 27
2.2.4 Setting the Service Managed Gateway’s LAN IP Address
To manage Internet access through your Service Managed Gateway bridge, you can
assign a LAN IP address to the Gateway. This address must be allocated by your
service provider.
To assign a LAN IP address to your Service Managed Gateway, click the Advanced
Options button on the Connections page. The LAN Configuration pop-up window
is displayed.
Figure 26: the LAN Configuration pop-up window for a bridged connection
To use your Gateway as a router as well as a bridge, select yes from the
IP Enabled drop-down menu.
Type the IP address in the IP address fields. Contact your service provider if you
are not sure of the correct address for these fields.
Warning: Unless you are sure that the address you are assigning is unique and part of the same address scheme, do not fill in this form.
Type the IP address mask in the IP address mask fields
After you have configured the local settings, click OK to close the LAN Configuration
window.
Click Next on the Connections page.

SHDSL Application and Configuration Guide Configuring SHDSL Connections
© Virtual Access Ltd. Page 26 of 27
2.2.5 Saving your Bridged Configuration
Figure 27: the Finished page for a bridged connection
To save the new or updated bridged connection, click Save configuration. The
Reloading device page is displayed.

SHDSL Application and Configuration Guide Configuring SHDSL Connections
© Virtual Access Ltd. Page 27 of 27
Figure 28: the Reloading device pop-up window
When the Gateway has reloaded, click the Close window button.