Embed Size (px)
Citation preview

1
®
Ship Repair
From Customer RFP to Customer Invoicing

1. Introduction to Perception
a) What is ERP and EVM
b) The shipyard information flow
c) The Perception information flow
d) The central database
e) The WBS structure
2. Cost Estimating
a) Overview of the Project Estimate
b) The Cost Estimating Environment
c) Responding to the RFP – Creating the WBS structure
d) Building the Cost Estimate
e) Reports – monitoring the Estimate
f) Creating the Quotation
3. Proposal Acceptance - The ERP and EVM Process
a) Creating the Labor and Material requirement s for Production
b) The Material Requirements – Requisitions and Purchasing
c) The Labor Requirements – Work Orders
d) Reviewing and Monitoring the Project Cost and Performance
4. Customer Billing
a) Compare the Project Cost with the Estimate
b) Create the Bill
Agenda
2

“An Enterprise Resource Planning (ERP) system is an
integrated computer-based application used to manage internal
and external resources, including tangible assets, financial
resources, materials, and human resources.
Its purpose is to facilitate the flow of information between all
business functions inside the boundaries of the organization and
manage the connections to outside stakeholders. Built on a
centralized database and normally utilizing a common
computing platform, ERP systems consolidate all business
operations into a uniform and enterprise-wide system
environment.” From Wikipedia, the free encyclopedia
What is ERP?
3

“Earned value management (EVM) is a project management
technique for measuring project progress in an objective
manner.
EVM has the ability to combine measurements of scope,
schedule, and cost in a single integrated system. When properly
applied, EVM provides an early warning of performance
problems.
Additionally, EVM promises to improve the definition of
project scope, prevent scope creep, communicate objective
progress to stakeholders, and keep the project team focused on
achieving progress.” From Wikipedia, the free encyclopedia
What is EVM?
4

ERP EVM
Coordinate Resources Measure Progress &
Performance
SPAR’s PERCEPTION© System Combines ERP & EVM to
better plan, coordinate and manage the shipyard.
Unlike other ERP and EVM systems, PERCEPTION was
designed specifically for shipyards.
5

ShipConstructor
AutoCAD
AutoShip, etc.
Cost
Estimating
Planning
Scheduling
Purchasing
Manpower
Control
Drawing
Control
Material
Control
Performance
Reporting
Customer
Billings
Accounting
Systems Accounts
Payable
Accounts
Receivable
Time Charges
3rd Party Software
Information Flow for the PERCEPTION Integrated
Shipyard Resource Management System
CAD Interface
Accounting System
Interface
6

Cost Estimating
Planning
Budgeting & Scheduling
Labor, Manpower
Cost Management
Earned Value
Performance Reporting
Purchasing & Material
Cost Management
Cost Analysis
7

8
Each project has a hierarchy of information managed by the
system, flowing from lowest level details to the highest level
summary.
Contract
Project
WBS
WBS WBS
WBS WBS
Cost Items Material Requisitions Work Orders
Cost Estimate Material Resources Labor Resources
The “Contract” is the
highest project level
The “Project” is the highest
operations project level
A contract may have
multiple projects (e.g.,
multiple ship programs).
The Project
Work
Breakdown
Structure
(“WBS”) is an
intermediary
hierarchy
depending on
the project
requirements.
The lowest level of project information

9
Project transactions can reference one or more different
work breakdown structures. The WBS can be as simple
or as complex as needed, contract by contract.
Planning
Activity
Contract
Project
Ship Zones
Outfit Zones
Grand Blocks
Units
Blocks
Assemblies
Sub-
assemblies
Mfg Parts
PWBS SWBS COA SWBS
Groups
SWBS
Accounts
Departments
Stages
Work Centers
•Stock issues
•Direct Purchase Materials
•Owner Furnished
Materials
•Manufactured Parts
Work Order
Requisition
Pallet Pallet
Time
Charge
Cost Item
Contract Line Items (CLINS)

10
The Centralized Database.
The PERCEPTION Work Breakdown Structure
1. User can define.
2. Can be different for every
project.
3. Can be copied from one project
to another.
4. Provides multiple different views
of the same cost data.
SWBS – The System (Shipyard)
Work Breakdown Structure.
PWBS – The Product Work
Breakdown Structure.
COA – The Organizational Work
Breakdown Structure.

11
PERCEPTION was developed to permit cost estimating that can
reflect modern ship design and production methods.
Using product- and process-based information, cost estimates can be
generated quickly and accurately at any level of detail:
• Parametric cost estimates based upon modifiable ship design
and mission characteristics
• Standard shipbuilding & ship repair interim products & services
• Detail cost estimates based upon engineered bills of material
and equipment specifications.
Cost Estimating
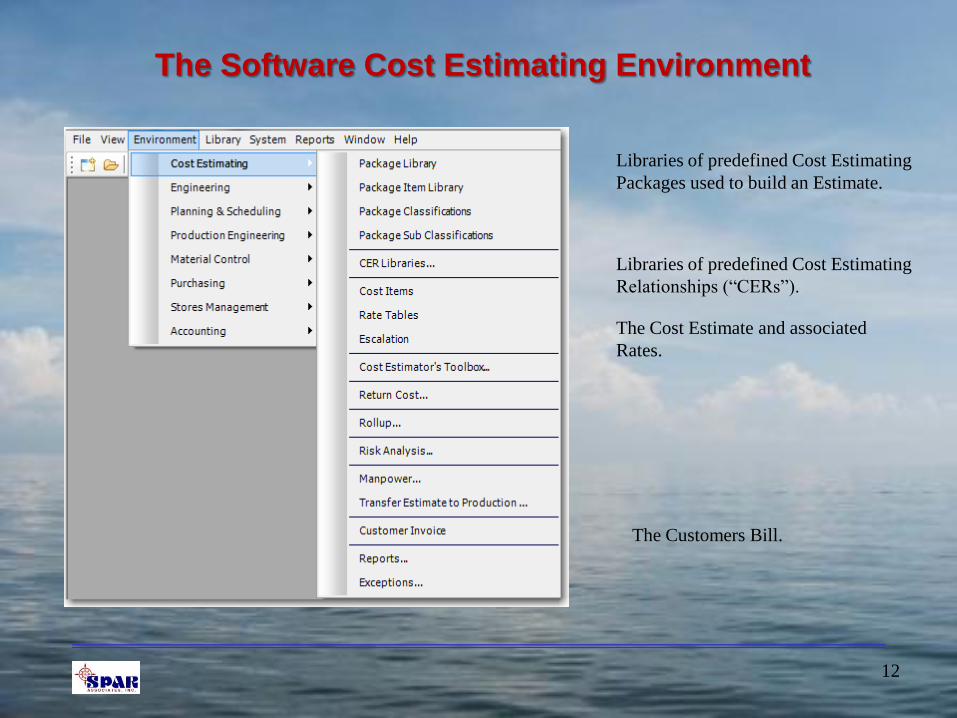
The Software Cost Estimating Environment
12
Libraries of predefined Cost Estimating
Packages used to build an Estimate.
Libraries of predefined Cost Estimating
Relationships (“CERs”).
The Cost Estimate and associated
Rates.
The Customers Bill.

Project Estimate
Manual Cost Items
Standard
Package Library
Cost Items
Parts Catalog CER Libraries
Putting together an Estimate from Various Sources of Cost Data:
Prior Estimates, Cost Libraries, Cost Models &
Manual Cost Entries
Prior Estimates
13
Pre-Defined
Excel Cost Models

Responding to the RFP - Putting Together the Estimate and the
Bid Package
Defining the New Project
14
1. First we must define the WBS structure.
2. Create the Contract ID for this RFP.

Responding to the RFP - Putting together the Estimate and the Bid
Package
Now Define the Project WBS
15
2. Now add the Contract WBS. This can be done by entering the data or copy the project WBS from an existing
project. We elect to copy it from a project we setup previously which defines our default WBS used for repair
projects. This method is faster and easier. It also provides a standard structure for all of our repair estimates.

Responding to the RFP - Putting together the Estimate and the Bid
Package
Copying the WBS
16
1. Select the Contract and project to
Copy from using the drop downs list.
2. Now Select the Contract to copy to.
3. Enter the Project number to Create
for this Contract.
4. Select which WBS elements to copy.

Responding to the RFP - Putting together the Estimate and the Bid Package
Complete Any Optional Project Setups
17
1. Drill down to the Contract details by double clicking on the contract we created previously.
2. Add the Contract Line Items (CLINs, optional; only if needed).
3. Add the Ship Characteristics (optional, only if needed).

Responding to the RFP - Putting together the Estimate and the Bid Package
Now Start the Estimate – Enter Cost Items into the WBS
18
1. Drill down from the Contract to the Project details by switching to the Project tab and double clicking
on the project.
2. Click on the Project SWBS Groups tab.
3. Now Select the row you wish to add Cost Items to.
4. Switch to the SWBS Accounts tab and select the Account you wish to add Cost Items to.
Add SWBS Accounts worksheet
Add SWBS Groups worksheet
Add “Project”worksheet

Responding to the RFP - Putting together the Estimate and the Bid Package
Adding Cost Item Using Manual Entry Method
19
1. Click on the Cost Items tab to begin adding Cost Items to the Estimate.
2. Since we selected a SWBS Group and Account, the software will automatically assign that WBS to each Cost
Item you add. You can override this.
3. Click on the Add button to add an item.

Responding to the RFP - Putting together the Estimate and the Bid Package
Adding Cost Item Using the Package Method
20
1. On the Cost Item window, click on the Add IP Package(s) button. This will open the Package “shopping cart”
so that you may select the package(s) you wish to add to your estimate.
2. Select the type of Package from the
drop down list.
3. Click on the Retrieve button to get the
packages form the database.

Responding to the RFP - Putting together the Estimate and the Bid Package
Adding a Cost Item Using the Package Method
21
1. On the Cost Item window, click on the Add IP Package(s) button. This will open the Package “shopping cart”
so that you may select the package(s) you wish to add to your estimate.
2. Select the Package on the left from the List and drag it to the window on the right.
3. Enter the quantity you wish. You can add as many packages as you want. You can even retrieve different
Package Classifications and add them.
4. When done, click on the Add
Packages Button.

Responding to the RFP - Putting together the Estimate and the Bid Package
Adding a Cost Item Using the CER Library Method
22
1. On the Cost Item window, click on the Add Library CERs button. This will open the CER “shopping cart” so
that you may select the CERs you wish to add to your estimate.

Responding to the RFP - Putting together the Estimate and the Bid Package
Adding a Cost Item Using the CER Library Method
23
2. The CER shopping cart works just
like the Package shopping cart.
3. Here we added a CER for
refurbishing a Globe Valve. Notice
that this CER is based on the size of
the Valve.

Responding to the RFP - Putting together the Estimate and the Bid Package
Adding a Cost Items Using the Cost Model Transfer
Method
24
Detail Cost Items can be developed using SPAR Cost Model
Worksheets. This data can be downloaded into PERCEPTION.

Responding to the RFP - Putting together the Estimate and the Bid Package
Adding a Cost Items Using the Cost Model Transfer
Method
25
Drilling Down from the Contract to the Detail Cost Item Worksheet

Responding to the RFP - Putting together the Estimate and the Bid Package
Adding a Cost Items Using the Cost Model Transfer
Method
26
Begin the Import of Cost Model Data

Responding to the RFP - Putting together the Estimate and the Bid Package
Adding a Cost Items Using the Cost Model Transfer
Method
27
Locate the Cost Model Workbook File to Import Data

Responding to the RFP - Putting together the Estimate and the Bid Package
Reports
28
1. There are many reports that you can run to review your estimate, including printing the Estimate for the
Customer.
2. The software will always ask you what you want to report.

Responding to the RFP - Putting together
the Estimate and the Bid Package
29

Proposal Acceptance – The ERP and EVM
Process
30

The RFP is Done and the Customer Accepts. Now What?
Initializing the Labor & Material
Requirements for Production
31
1. Select the function to
Transfer the Estimate to
Production from the Menu.
2. From the Transfer Options
pop up window select the
information you wish to
transfer.

The RFP is done and the Customer Accepts. Now What?
Reports for Monitoring the Project
32
The PERCEPTION software has hundreds of
reports for monitoring the project. These
include status report for Labor and Material
and Earned Value reports for monitoring the
progress.
Most reports have the option to view the
information by each WBS structure
independently.

The RFP is done and the Customer Accepts. Now What?
Material Requirements for Production
33
Material Requisition
Purchase Order

The RFP is done and the Customer Accepts. Now What?
Labor Work Orders for Production
34
Work Order Listing
Work Order Time Charge Listing

The Project has Started. Monitoring the Progress.
35
Labor and Material Progress reports for Production

The Project is Nearing Completion
Comparing the Production Cost to the Estimate
36

The Customer Billing Process
Before the Ship Sails Away
37

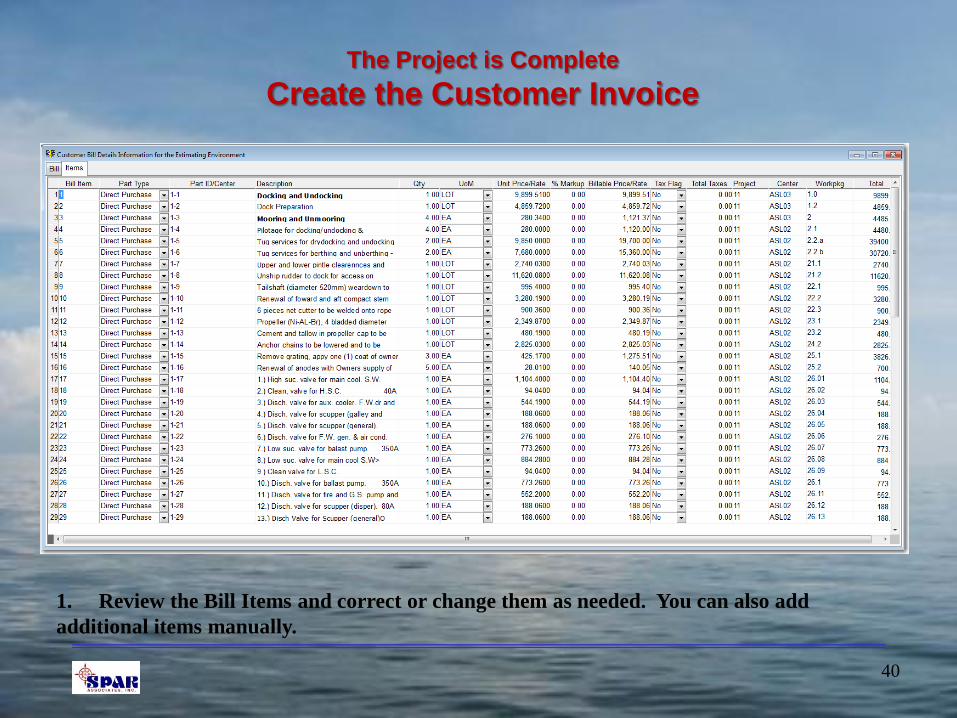
The Project is Complete
Create the Customer Invoice
38
1. Select the Customer Invoice from the Menu.
2. Click on the Add Record button to create a new bill.
3. Select the Contract for the Bill then enter the Bill Number.
4. Select the Project for the Bill.
5. Click on the save button.

39
1. Double click on the saved Bill and you will drill down to the Bill Details window.
2. Now click on the Create Bill Items button to
automatically create the line items for the bill.
3. From the pop up window select the method (type)
for generating the Bill Items. 4. You can now select
specific elements of
the WBS to scan for
the Bill Items.
5. Click on the OK
button when you
finish your selection
or to Select all
items for the
Project.
The Project is Complete
Create the Customer Invoice
40
1. Review the Bill Items and correct or change them as needed. You can also add
additional items manually.
The Project is Complete
Create the Customer Invoice

41
1. After you complete the Bill Creation process you
can print a Draft copy to review.
2. Once you are satisfied with the Bill contents, then
you Issue the Bill to the Customer.
3. When printing the Draft or the Issued Billed you
have the option to group the Bill Items by the
Customers WBS (CLIN) or your WBS (SWBS)
The Project is Complete
Create the Customer Invoice

42
The Project is Complete
Create the Customer Invoice

43
Over 40 Years Serving the Shipbuilding &
Repair Industry