Embed Size (px)
Citation preview

SHO
WER
Installation Manual
1
2 people are required for the installation.
This shower absolutely needs 3 walls surrounding it.
The rail wall brackets screws must be installed in wall studs to
support the weight of the doors.
rev. 6-3-2013

2
Installation Manual
IMPORTANT NOTE
Dimensions
The glass door can be installed on the left or right side.
Artika recommends installing the glass door adjacent to the shower faucet wall.
This instruction manual is showing a right side installation. For a left side installation, follow the instructions as though the slidding door was ont he left.
Questions? [email protected] 1-866-661-9606
208 cm(81.8 in/po)
152.4 cm(60 in/po)81.3 cm
(32 in/po)

3
You will need- Screwdrivers
- Drill
- Drill bits 1/4 in. & 1/8 in. (speci�c drill bit may be required for ceramic tiles)
- Silicone
- Tape measure
- Pencil
- Level
- If needed: cutting pliers
Parts List
Hardware list (included)- 3 Allen keys- 2 regular screws- 4 wall screws- 14 Self-drilling 1 inch screws - 14 Self-drilling 1,25 inch screws
Installation Manual
FE
D
L
M
GF
K
N
C
O
K
P
B
I Q
HA
JP
Item Description
A Base 1B Fixed glass panel 1C Sliding door panel 1D Rail 1E Stoppers 2F Wall brackets 2G Rail brackets 2H Double bottom bracket 1I Single bottom bracket 1J Door panel gasket 2*K Vertical gaskets 3*L Wheels 4M Fixed panel bracket 2N Handle 1O Bottom door gasket 1P Bottom panel gasket 2Q Threshold 1R 60 inch (152.4 cm) tiling �ange 1S 32 inch (81.3 cm) tiling �ange 2T Drain 1
*NOTE: Extra gaskets are included. Only one J gasket and two K gaskets are necessary.
Questions? [email protected] 1-866-661-9606
RS
S
Artika Part # Quantity
999-359/P1999-359/P2999-359/P3999-359/P4999-359/P5999-359/P6999-359/P7999-359/P8999-359/P9
999-359/P10999-359/P11999-359/P12999-359/P13999-359/P14999-359/P15999-359/P16999-359/P17999-359/P18999-359/P19999-359/P20

Installation Manual
InstructionsThe Atlantis shower enclosure is designed to replace a standard
60 by 32 inch (152.4 x 81.3 cm) tub.
The shower enclosure needs to be encased by 3 surrounding walls.
The shower base can be positioned with the drain on the right or left side.
It is recommend the drain be position next to the wall with the shower faucet.
Important : Wall studs will be
needed to install the shower
enclosure.
IMPORTANTIt is recommended that drainage pipes, drains, water lines should all be installed prior to
installing the base. Please follow your local building codes.
Verify the distance between the wall studs. Minimal distance = 60 inches (152.4 cm) Maximum distance = 60.5 inches (153.8 cm)
Ensure drainage pipe is centered underneath the shower base drain hole. The distance between the faucet wall and the center of the drain pipe should be 9.25 inches. The distance between the 60 inch (152.4 cm) long wall and the drain pipe should be 16 inches.
If your measurements are di�erent from above, you will need to relocate the position of the
drain pipe in the �oor. Artika recommends you contact a professional plumber to modify
the drain position in the �oor.
*
4
1- Validate dimensions
2- Test the fit of the shower base
Wall this side
Mandatorywall stud
Mandatorywall stud
Right installation
Questions? [email protected] 1-866-661-9606
- 3 Allen keys- 2 regular screws- 4 wall screws- 14 Self-drilling 1 inch screws - 14 Self-drilling 1,25 inch screws

Exploded view
3- Install the tiling flange
Installation Manual
Determine the 60 inch (152.4 cm) side of the shower base that will installed next to the 60 inch wall. This is the side where you will install the long tiling �ange.
Start with the long tiling �ange. The side with the groove in the middle of the �ange will face down on the top of the threshold of the shower base.
Apply a bead of silicone along the groove.
Use the 1 inch self-drilling screws to install the tiling �ange to the side of the base. Use the bottom groove on the back of the tiling �ange as a guide.
Repeat for the 32 inch (81.3 cm) sides of the shower base.
I-
II-
III-
IV-
V-
5
Tiling �ange
Bead of silicone
Screw - 1 inch
Shower base
Bottom part
Middle grooveBott
om g
roov
e Top part
Questions? [email protected] 1-866-661-9606

4. Install the drain
Installation Manual
Disassemble the drain. Remove the stainless cap, tightening tool, adaptor ring, rubber ring, large nut, cardboard gasket and rubber gasket.
Apply a bead of silicone underneath the drain body and the drain hole on the underside of the drain body and the edge of the drain hole in the shower base.
Insert the drain body in the drain hole.
Place the rubber gasket, cardboard gasket and then the large nut onto the drain body from underneath the shower base and tighten.
Wipe excess silicone from the drain.
Place the stainless cap, tightening tool, adap-tor ring and the rubber ring in a safe place. They will be installed in a few steps.
I-
II-
III-
IV-
V-
VI-
6
Cap
Tightingtool
Adaptorring
Rubberring
Drain body
Drain body(inverted) Rubber
gasket
Cardboardgasket
Drain nut
Questions? [email protected] 1-866-661-9606
Installation Manual
I-
II-
III-
IV-
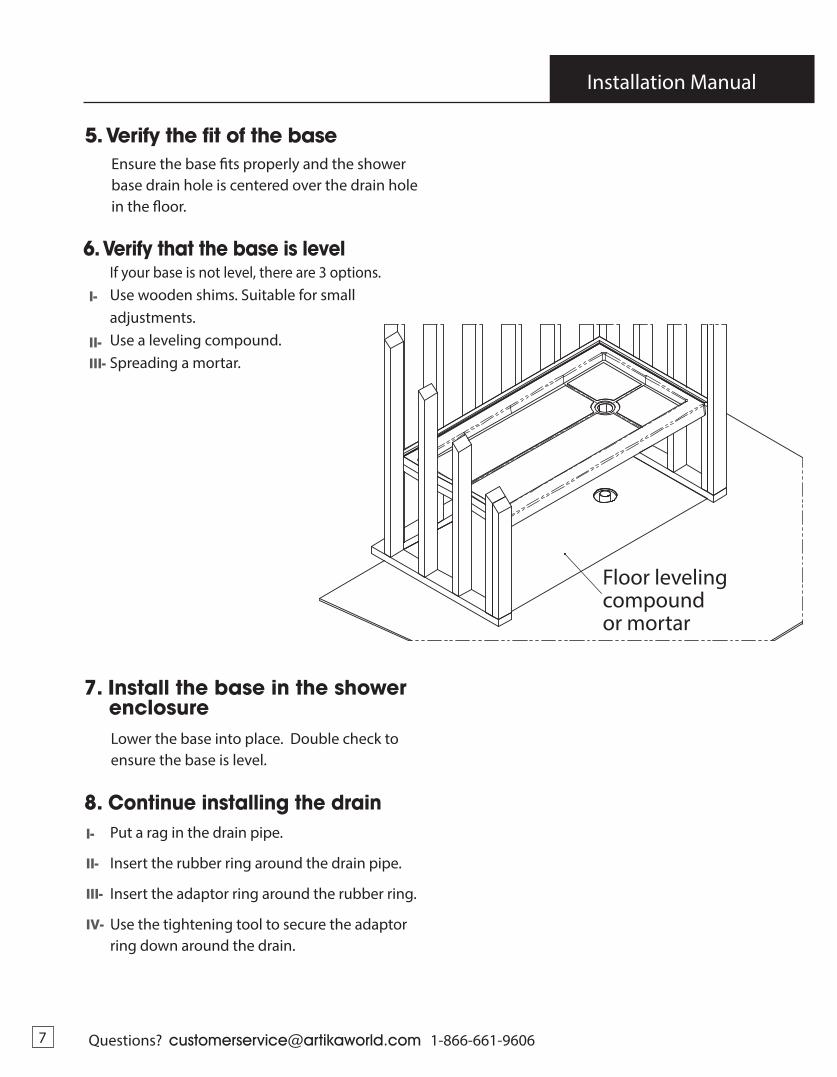
7. Install the base in the shower enclosure
Lower the base into place. Double check to ensure the base is level.
8. Continue installing the drainPut a rag in the drain pipe.
Insert the rubber ring around the drain pipe.
Insert the adaptor ring around the rubber ring.
Use the tightening tool to secure the adaptor ring down around the drain.
7
I-
II-III-
5. Verify the fit of the base Ensure the base �ts properly and the shower base drain hole is centered over the drain hole in the �oor.
6. Verify that the base is levelIf your base is not level, there are 3 options. Use wooden shims. Suitable for small adjustments.Use a leveling compound.Spreading a mortar.
Floor levelingcompound or mortar
Questions? [email protected] 1-866-661-9606

8
Installation Manual
9. Check for leaksWith the drain still plugged, check for water leaks by �lling the shower base with 1 gallon (3.5 liters) of water. Look for air bubbles forming near the drain. If possible, check drainage pipes below the �oor for leaks. Remove the rag and the tightening tool. Install the stainless steel drain cover.
10. Secure the tiling flange to the studs
Using the 1.25 inch screws, fasten the tiling �ange to each stud. If required use shims to prevent the tiling �ange from lifting up from the shower base.
11. Silicone Apply a bead silicone in each of the two corners
where the tiling �anges meet.
12. Install your shower wall material Install drywall, water proof membrane and tiles.
Allow the tiles to fully dry and adhere to the wall (24 hours).
Drywall with waterproof membrane.
Bead of silicone
Tile Adhesive
Shower base
Stud
Tile
Tiling �ange
4 mm
Questions? [email protected] 1-866-661-9606

9
Installation Manual
IMPORTANT NOTEThe glass door can be installed on the left or right side.
Artika recommends installing the glass door adjacent to the shower faucet wall.
This instruction manual is showing a right side door installation. For a left side door installation, follow the instructions as though the sliding door was on the left.
The sliding door must be on the interior side of the shower.
Questions? [email protected] 1-866-661-9606

Installation Manual
13. Gaskets placement
14. Bottom gasket installationProtect the shower base using a thick piece of cardboard.
Install bottom door gasket O onto the sliding door panel. Make sure the �ap is inside the shower.
Place the sliding door panel inside the shower carefully on top of the cardboard.
*NOTE: Extra gaskets are included. Only one J gasket and two K gaskets are necessary.
K
O
K
P JP
SIDE VIEW FRONT VIEW
OQuestions? [email protected] 1-866-661-9606 10

Installation Manual
15. Vertical gasket installationInstall one vertical gasket K on the �xed glass panel. The �ap goes inside the shower. Install on the side adjacent to the wall.
16. Stoppers installationPut the stoppers on the rail.
Temporarily �x them with the 6 mm Allen key.
17. Wall brackets installation
Put the wall brackets on the rail. Temporarily �x them with the 3 mm Allen key.
Questions? [email protected] 1-866-661-960611

Installation Manual
18. Verify the fit of the barInsert the bar in the shower. Adjust wall brackets so both ends touch a wall.
Important: Depending on the thickness of tile used, it could be possible that the bar is too long. Artika recommends that you deal with a profes-sional to cut the bar to the right length.
IF NEEDED, CUT THIS END
Questions? [email protected] 1-866-661-9606 12

Installation Manual
19. Rail installation Install the rail to the �xed door panel using �xed panel bracket M. Temporarily �x it.
Questions? [email protected] 1-866-661-960613

Installation Manual
20. Bottom gaskets installation
Place the bottom gaskets P on the �xed panel.Slide them into the bottom brackets I and H.
H
I
P
P
1.500''(38 mm)
FLUSH WITHGLASS
1.500''(38 mm)
Questions? [email protected] 1-866-661-9606 14

Installation Manual
21. Pre installation of the fixed panel.
Two people are required to perform this step. Carefully lift the �xed glass panel in the shower. Verify the rail is leveled. Verify the �xed glass panel is leveled vertically. Verify the �xed glass panel and gasket K are �at against the tiles.
J
90
90
Questions? [email protected] 1-866-661-960615

Installation Manual
22. Continued
Mark screws locations for the wall brackets. Important: Wall brackets must be aligning with wall studs.Mark where bottom brackets I and H will be installed.
IH
Questions? [email protected] 1-866-661-9606 16
Installation Manual
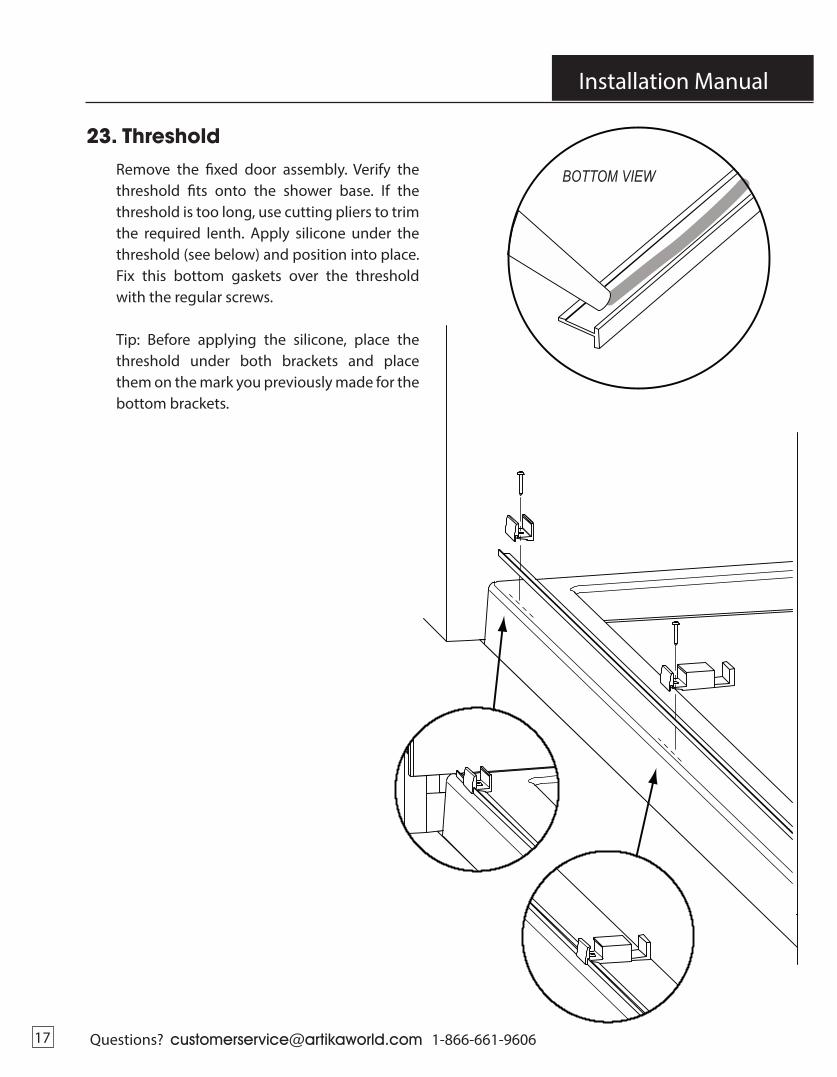
23. ThresholdRemove the �xed door assembly. Verify the threshold �ts onto the shower base. If the threshold is too long, use cutting pliers to trim the required lenth. Apply silicone under the threshold (see below) and position into place. Fix this bottom gaskets over the threshold with the regular screws.
Tip: Before applying the silicone, place the threshold under both brackets and place them on the mark you previously made for the bottom brackets.
BOTTOM VIEW
Questions? [email protected] 1-866-661-960617

Installation Manual
24. Wall brackets installationUsing the pencil mark from step 11, drill two holes on each side.Use the ceramic drill bit to drill through tiles.Install wall bracket plates.
Reinstall the �xed panel assembly.Slide the collar into place.
WALL STUD
PLATE
COLLAR
DRY WALL
TILES
Questions? [email protected] 1-866-661-9606 18

Installation Manual
25. Wheels installationAssemble the two top wheels on the sliding door panel. Wheels have to be installed on the outside of glass door.
Note: At this step, you have to insert the blue dry-adhesive washers to the screw of the wheels before instaling on the glass door.
Two people are required for this step. Carefully lift the shower door into the channel of the double bracket and position the wheels onto the rail simultaneously.
INSIDE VIEW
Questions? [email protected] 1-866-661-960619

Installation Manual
25. ContinuedInstall the bottom wheels.
26. Handle installationInstall the handle onto the sliding door panel.
RAIL
Questions? [email protected] 1-866-661-9606 20

Installation Manual
27. Gaskets installationInstall the gasket J onto the sliding door panel. The �ap goes between the two panels.
You may cut gasket J to make spacefor the support bar.
Install the side gasket K onto the sliding door panel. The �ap goes inside the shower.
FRONT VIEW
DOOR
Cut hereFIXED PANEL
INSIDE VIEW
DOORFIXED PANEL
Questions? [email protected] 1-866-661-960621

Installation Manual
28. StoppersAdjust one stopper to ensure the glass door does not hit the wall of the shower. Adjust the other stopper to prevent the handle from
panel. Check stoppers are secure.
Questions? [email protected] 1-866-661-9606 22
coming into contact with the fixed glass
Critical Step!

23
Installation Manual
29. SiliconeApply silicone along the outside edge of the
threshold.
Do not shower for 24 hours
Questions? [email protected] 1-866-661-9606

WARRANTY
Artika For Living Inc. is proud to offer you a five (5) year Warranty. We guarantee our
product to be free of manufacturing defects in material and workmanship for a period
of five (5) years from the date of purchase. Should a defect arise within the warranty
period, Artika For Living Inc. will provide replacement product or parts free of charge.
-Our warranty does not cover products installed incorrectly, or subjected to abnormal
use. Normal wear and tear, misuse, improper maintenance, alteration of the product or
units not installed in accordance to the installation manual will not be covered.
-Our shower enclosure is intended for residential use only. The Warranty does not
cover shipping costs, labor costs or any other cost associated with the installation or
replacement of the product. The Warranty is extended to the original consumer.
-The amount of the claim cannot exceed the original purchase price of the item. The
Warranty does not cover glass breakage.
Artika strongly recommend having the unit installed by professionals in order to avoid
glass breakage and, subsequently, injuries. We will not be liable for any defect or
breakage that could have been discovered, repaired or avoided prior to installation.
Artika For Living Inc. is not responsible for indirect or consequential damages arising
from improper use or installation of this shower unit.
For more information:
1-866-661-9606