Embed Size (px)
Citation preview
Kenmore,Side-by-SideRefrigeratorUse and Care Guide

Contents
InstallationElectrical Requirements 2Model Identification 3
Refdgeretor/Freezer Feature DiagramGeneral Features 4
Setting ControlsFrost-Free System 5Refrigerator and Freezer Controls 5
Installing and Using Specific FeaturesRefrigerator
Dairy Storage 6Butter Dish 6
Adjustable Door Bucket 6Door Shelves 7
Adjustable Cantilever Shelves 7Egg Storage 8Temperature Controlled
Meat Drawer 8
Crispers 9
FreezerDoor Shelves. 9
Adjustable Door Bucket 10First-to-Freeze Shelf 10
Adjustable Compartment Shelves -- 10Glide-Out Wire Basket 11
Ice and Water Dispenser 11Care and Cleaning
Adhesives 15Exterior and Interior 15Door Gaskets 15Condenser Coil and Drain Pan 15Odor Removal 15
Light Bulbs 16Energy Tips 18Vacation Tips 18Non-Use Periods 18
Normal Operating Sounds 19Before Calling For Service 20Sears Warranty _ 24
INSTALLATION
Electrical Requirements and Safety Precautions
RECOGNIZE THIS SYMBOL AS A SAFETY PRECAUTION
kWARNINGElectrical Grounding InstructionsThis appliance is equippedwitha three-prong (grounding) plugfor your protectionagainstpossible shockhazards.Inlocations with two-prongwall receptacles, customers havethe persona{responsibility and obligation to contacta qualifiedelectrician to replace two-prong wallreceptacleswith properly grounded three-prong wall receptacles, in accordance withthe National Electrical Code.
Unit is designed to operate on a separate103-126 volt,15 amp, 60 cycle line.DO NOT. UNDER ANY CIRCUMSTANCES. CUT OR REMOVE ROUND GROUNDING PRONG FROM PLUG.THE UNIT MUST BE GROUNDED A TALL TIMES. DO NOT REMOVE WARNINGTAG FROM POWER CORD.
WARNINGDO NOT USE A TWO-PRONG ADAPTER,DO NOT USE AN EXTENSION CORD.
EL_C3'F_ICALPLU_
ROUND GROUNDING PR
ELECTRICALRECEPTACLE
2
Sears Service Is At Your Service
The value of your Kenmore appliance increases through Sears' nationwide service units staffed by Sears-trained technicians. Sears professional technicians are specifically trained to service SEARS appliances,with parts, tools and equipment, insuring we meet our pledge to you: "We Service What We Sell."
Add to the value of your Kenmore. Buy a SEARS Maintenance AgreemenLSears Kenmore refrigerators are designed, built and tested for years of dependable use. Yet any modem
appliance may need service from time to time. The Sears Warranty, plus the Sears Maintenance
Agreement, gives protection from unexpected repair bills. Contact the nearest sales office or service centerfor details.
Whenever calling or writing Sears, have the following information available. Take a moment now to locate
the nameplate, inside the front upper left comer of the refrigerator compartment, and copy the necessary
information into the spaces below.
Serial Number
Model Number
Manufacturing Number
Please also record:
Date of Purchase
Name of Selling Dealer
Dealer Address
Keep a copy of the sales receipt for future reference, in case warranty service is required.
Enjoy your new Kenmore refrigerator!
3
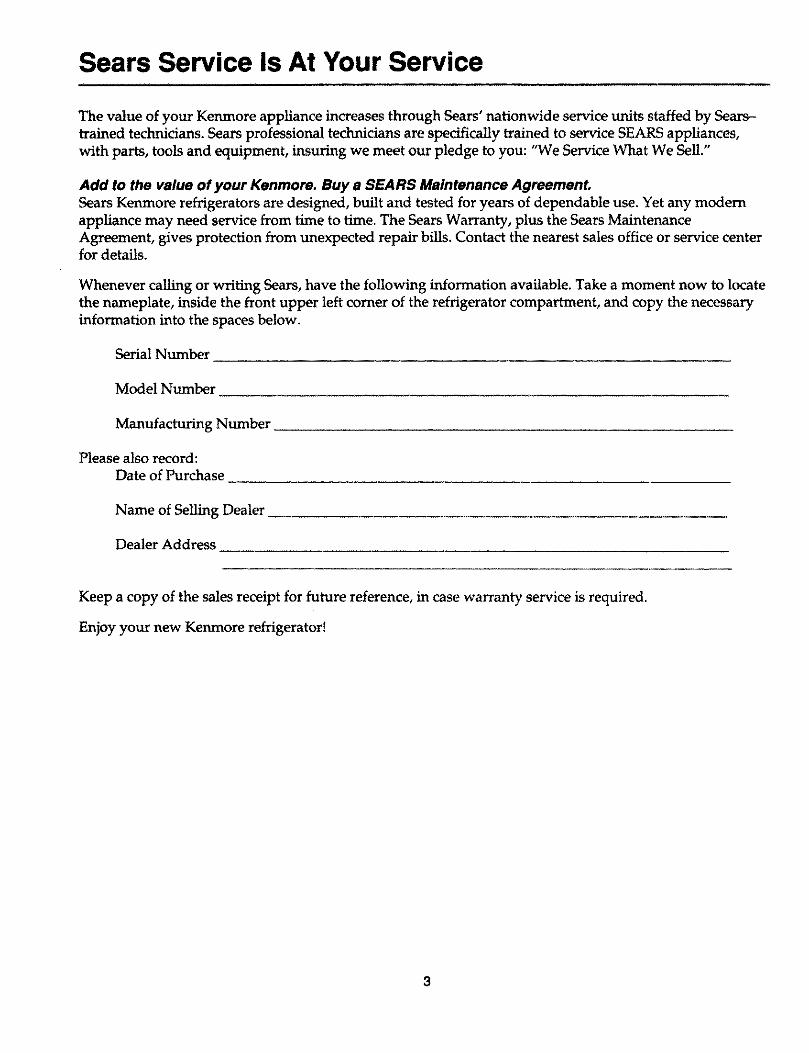
General Features
25 cu. ft. Model, with Ice and Water Dispenser
IMPORTANT
Features vary from model to model. Your refrigerator may not have all features shown.
UpperTop Freezer F_rst-to- Refdprstor/Freezer Refrigerator
Door Shelf Freeze Shelf Controls Light
AdjustableCantileverShelves
DairyStmsge
Ice StorageBin
Ice endWater
Dispenser
coverecJEggStorage
FreeZer
Ught
AdjustableDoorBucket
FreezerShelves
TemperatureConfro/_MeatDrawer
Gailon
StorageShelf
AdjustableFreezer Door
_helves
Glide-outWire Freezer
Basket Toe Grille AdJusteb_Defrost Drain Pan Humldl_
endCondenser Drawer(behindtoegdlle) Control
Humldl_controlled
CdsperDmwens
Rernov_eDoorShelves
4

Setting the Controls
Frost-Free SystemRefrigerator and freezer compartments are
automatically kept completely frost-free. Under
normal operating conditions, manual defrosting
is not necessary. Proper placement of refrigerator
is necessary for adequate air circulation and
operation.
Refrigerator and FreezerControlsWhen freezer control is OFF, neither refrigerator
nor freezer compartments cool Allow 24 hours
after installation for refrigerator and freezer
temperatures to stabilize,
a. Locate refrigerator control inside compartment
on upper rear wall. Set control to "2-1/2" andadjust as desired after 24 hours. "1" is warmest
setting; "4" is coldest setting. See Figure 1.
FRESH FOOD TEMPERATURE
1 _ 4 COLDER
To adjust temperatures more precisely, use ahousehold thermometer (usually available athardware stores) with a temperature rangebetween -5°F and +50°F (-20.5°C and +10°C).
a. In freezer compartment, place thermometer
snugly between packages of frozen food for 5
to 8 hours. See Figure 3. If temperature is not
between 0°F and +2°F (-18°C and -17°C), adjust
control one number at a time and check againafter 5 to 8 hours.
Figure 3
b. In refrigerator, place a glass of water holding
thermometer in center of compartment for 5 to
8 hours. See Figure 4. If temperature is not
between 38°F and 40°F (3°C to 4°C), adjust
control one number at a time and check againafter 5 to 8 hours.
Figure I
b. Locate freezer control inside compartment at
upper left front comer. Set control to "2-1/2"
and adjust as desired after 24 hours, "1" is
warmest setting; "4" is coldest. See Figure 2.
FREEZER TEMPERATURE
Figure 2
1 _ 4 COLDERoff
Figure 4
5
Installing and Using Specific Features
R_: _#eratorF_ JresStarting with the refrigerator door, features are
outlined from top to bottom of unit, and from the
door into the refrigerator compartment.
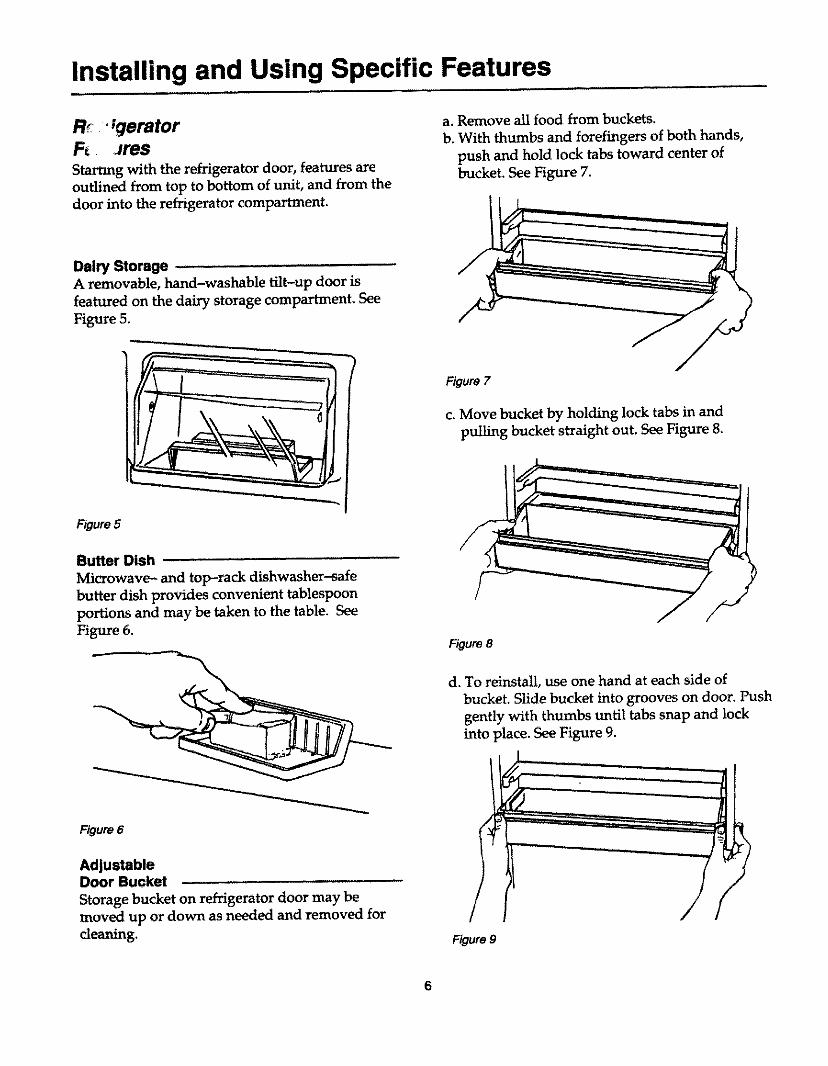
a. Remove all food from buckets.
b. With thumbs and forefingers of both hands,
push and hold lock tabs toward center of
bucket. See Figure 7.
Dairy Storage ........
A removable, hand-washable tilt-up door is
featured on the dairy storage compartment. See
Figure 5.
Figure 7
c. Move bucket by holding lock tabs in and
pulling bucket straight out. See Figure 8,
Figure 5
Butter Dish
Microwave- and top-rack dishwasher-safebutter dish provides convenient tablespoonportions and may be taken to the table. SeeFigure 6.
Figure 8
d. To reinstall, use one hand at each side of
bucket. Slide bucket into grooves on door. l_sh
gently with thumbs until tabs snap and lockinto place. See Figure 9.
Figure 6
AdjustableDoor Bucket
Storage bucket on refrigerator door may be
moved up or down as needed and removed for
cleaning.Figure 9
6

Installing and Using Specific Features (continued)
Door Shelves
Two styles of shelves on refrigerator door can beremoved for cleaning.
a. Remove all food from shelves.
b. Move shde-'m--style shelf by grasping each side
of shelf retainer. Pull shelf straight up and out.
See Figure 10.
AdjustableCantilever Shelves
Supported by metal tracks on the rear wall of
refrigerator compartment, shelves can be
adjusted to best match size of stored items. See
Figure 12,
Figure 10
c. To remove hook-style shelves for cleaning,
gently tap upward underneath both ends. Liftand rotate bottom of shelf outward to release
hooks from door slots.
d. To reinstall, tilt shelf and insert upper hooksinto selected slots. Rotate shelf toward door
and insert lower hooks into door slots.
e. Hold shelf against door and tap down gently
on both ends until shelf is seated securely. See
Figure 11.
Figure 12
a. Remove cantilever shelf by lifting upward atback edge of shelf near metal track to loosenshelf hooks, See Figure 13,
Figure 11
I
f
CAUTION
Gently apply pressure to front edgeof shelf to insure proper installation.
Handle tempered-glass shelves withcare. Place on soft surface afterremoving. Do not expose shelves torapid temperature changes. Replaceshelves immediately if they becomechipped or cracked, as suddenbreakage could occur.
Figure13
b. Tilt up on front edge of shelf and pull out. See
Figure 14,
7
Figure 14
c. Reinstall shelf by inserting upper rear metalshelf hooks into desired wall slots, as front
edge of shelf is tilted up. Gently press down on
front edge of shelf until lower hooks are firmlyseated in rear wall slots and shelf is level.
Installing and Using Specific Features (continued)
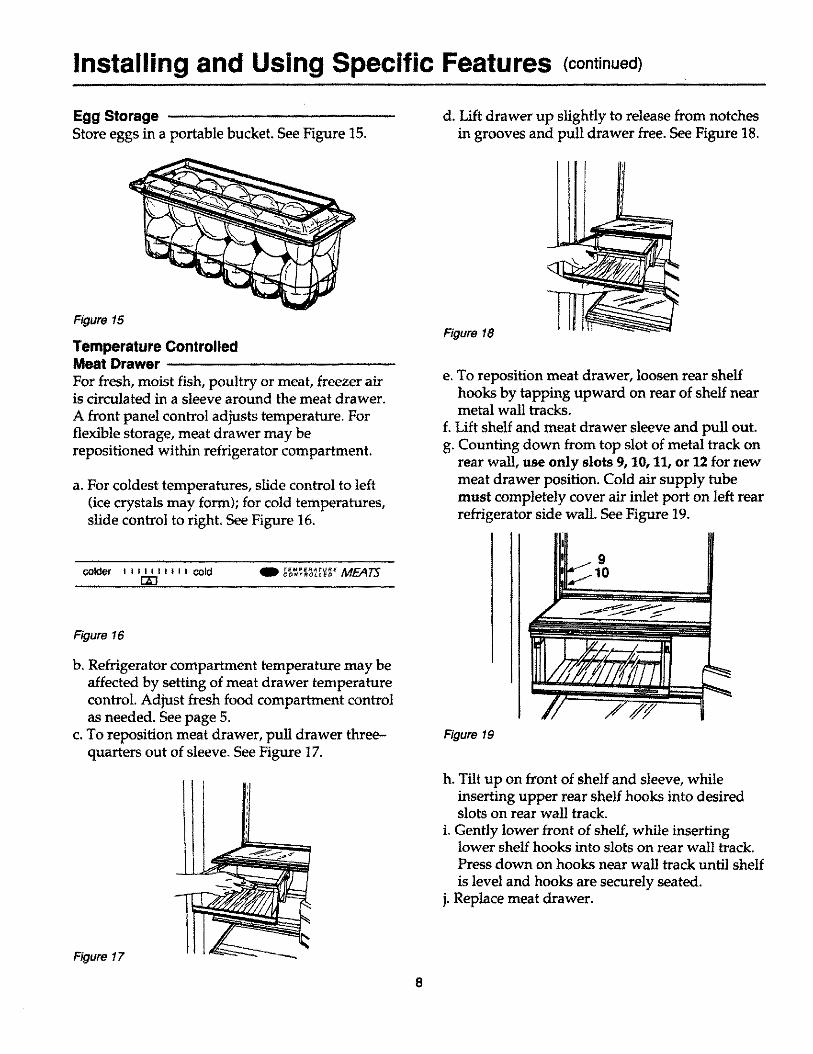
Egg StorageStore eggs in a portable bucket. See Figure 15.
d. Lift drawer up slightly to release from notchesin grooves and pull drawer free. See Figure 18.
Figure 15
Temperature ControlledMeat Drawer
For fresh, moist fish, poultry or meat, freezer airis circulated in a sleeve around the meat drawer,
A front panel control adjusts temperature. For
flexible storage, meat drawer may be
repositioned within refrigerator compartment,
a. For coldest temperatures, slide control to left
(ice crystals may form); for cold temperatures,
slide control to right. See Figure 16.
Figure 18
e, To reposition meat drawer, loosen rear shelf
hooks by tapping upward on rear of shelf nearmetal wall tracks.
f. Lift shelf and meat drawer sleeve and pull out.
g. Counting down from top slot of metal track on
rear wall, use only slots 9, 10, 11, or 12 for new
meat drawer position. Cold air supply tube
must completely cover air inlet port on left rear
refrigerator side wall. See Figure 19.
colder i _ i i J =, I, i cold qlD ;_';_'_1_'_ MEATS[2D
Figure 16
b. Refrigerator compartment temperature may be
affected by setting of meat drawer temperature
control. Adjust fresh food compartment control
as needed. See page 5.
c. To reposition meat drawer, pull drawer three-
quarters out of sleeve. See Figure 17.
Figure 19
h. Tilt up on front of shelf and sleeve, while
inserting upper rear shelf hooks into desiredslots on rear wall track.
i. Gently lower front of shelf, while insertinglower shelf hooks into slots on rear wall track.
Press down on hooks near wall track until shelf
is level and hooks are securely seated.
j. Replace meat drawer.
Figure 17
8

Installing and Using Specific Features (continued)
Crispers ' 'Store fresh fruits and vegetables in the crisper
drawers. See Figure 20.
Figure20
Normally, some moisture accumulates insidedrawers.
a. For leafy vegetables such as lettuce, spinach or
cabbage, slide control to HIGH humidity
setting. See Figure 21.
b. For fresh produce with skins such as apples,
oranges or tomatoes, slide control to LOW
humidity setting. See Figure 21.
, ,, i,,, .,, .
Figure 21
c. Crisper drawers glide out full length, even
when door is open at 90 ° angle. To completely
remove crisper drawers when door is opened90 °, remove two lower door shelves.
See Figure 22.
FreezerFeaturesStarting with the freezer door, features are out-
lined from top to bottom of unit, and move from
the door into the freezer compartment.
Door Shelves
Two styles of shelves on freezer door are remov-
able for cleaning. One style can be moved up or
down to fit storage needs.
a. To remove non-adjustable hook-style shelves,
gently tap upward underneath both ends. Liftand rotate bottom of shelf outward to release
hooks from door slots.
b. To reinstall, tilt shelf and insert upper hooksinto slots. Rotate shelf toward door and insert
lower hooks into door slots.
c. Hold shelf against door and tap down gentlyon both ends unti! shelf is seated securely. See
Figure 23.
fFigure 23
Figure 22
Installing and Using Specific Features (continued)
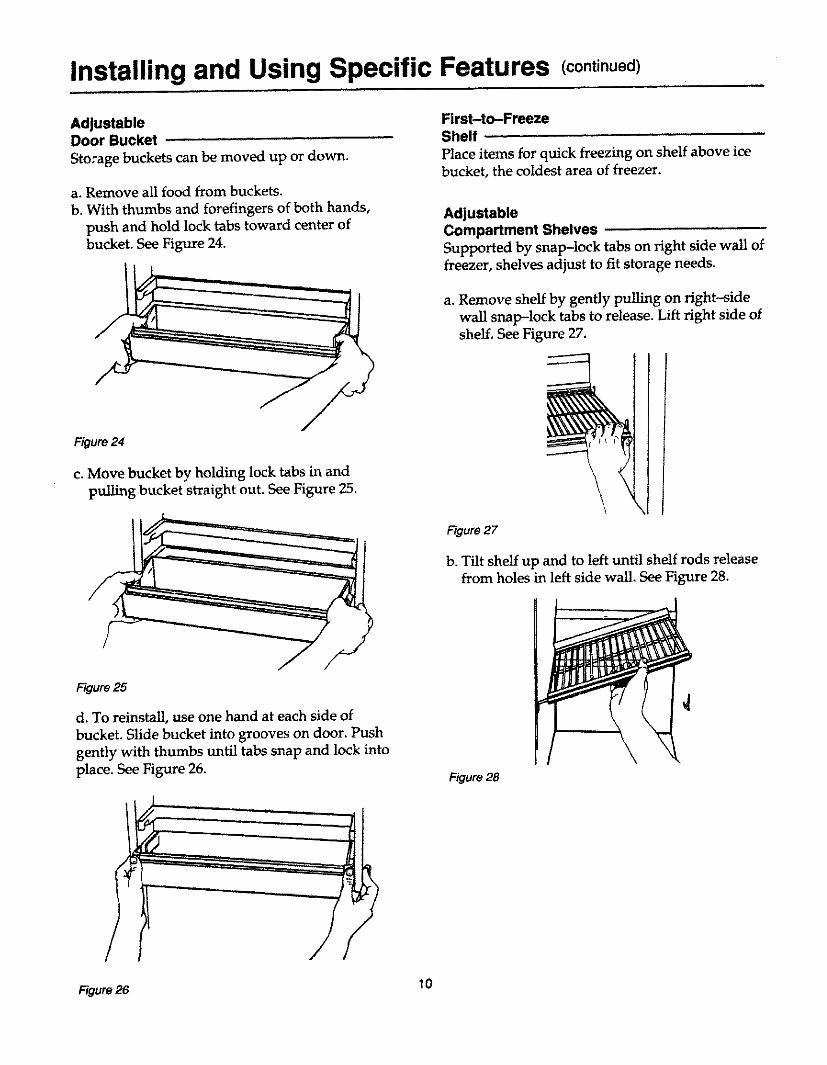
AdjustableDoor Bucket
Storage buckets can be moved up or down.
a. Remove all food from buckets.
b. With thumbs and forefingers of both hands,
push and hold lock tabs toward center of
bucket. See Figure 24.
First-to-FreezeShelf ,,
Place items for quick freezing on shelf above icebucket, the coldest area of freezer.
AdjustableCompartment ShelvesSupported by snap-lock tabs on right side wall offreezer, shelves adjust to fit storage needs.
a. Remove shelf by gently pulling on fight-side
wall snap-lock tabs to release. Lift right side of
shelf. See Figure 27,
Figure24
c. Move bucket by holding lock tabs in and
pulling bucket straight out. See Figure 25.
Figure 27
b. Tilt shelf up and to left until shelf rods release
from holes in left side wall. See Figure 28.
Figure 25
d° To reinstall, use one hand at each side of
bucket, Slide bucket into grooves on door. Push
gently with thumbs until tabs snap and lock into
place. See Figure 26.Figure 28
Figure 26 10

Installing and Using Specific Features (continued)
c. Select desired shelf height. Insert shelf rods intoholes in left freezer wall.
d. Lower shelf onto snap-lock support tabs andpress down until shelf is secure. See Figure 29.
Ice and Water DispenserThe Ice and Water Dispenser, a feature of the
Kenmore Side-by-Side Freezer Refrigerator, offersaccess to cold water and ice cubes at any time of
day or night, while keeping doors closed.
a. Refrigerator must be connected to householdcold water service.
b. Dispenser is interrupted when freezer door
opens. Ice bucket may then be safely serviced.
c. Spill shelf is not self-draining, so excess water
should be poured into sink or wiped dry
immediately. See Figure 31.
Figure 29
Glide-Out Wire Basket
Bulky, odd-shaped food items can be stored in a
large wire freezer basket. See Figure 30.
Figure 30
Figure 31
,J
\
CAUTION
k o avoid persona/injury or property damage,freezer door must remain c/osed whenoperating dispenser.
Refrigerator must be unplugged and icestorage bin must be removed beforeattempting to service dispenser system.
Never put fingers, hands, or any foreignobject into ice dispenser opening whileattempting to manually clear stalls or jams.
Never use sharp objects to break ice.
11
Installing and Using Specific Features (continued)r,,, ,
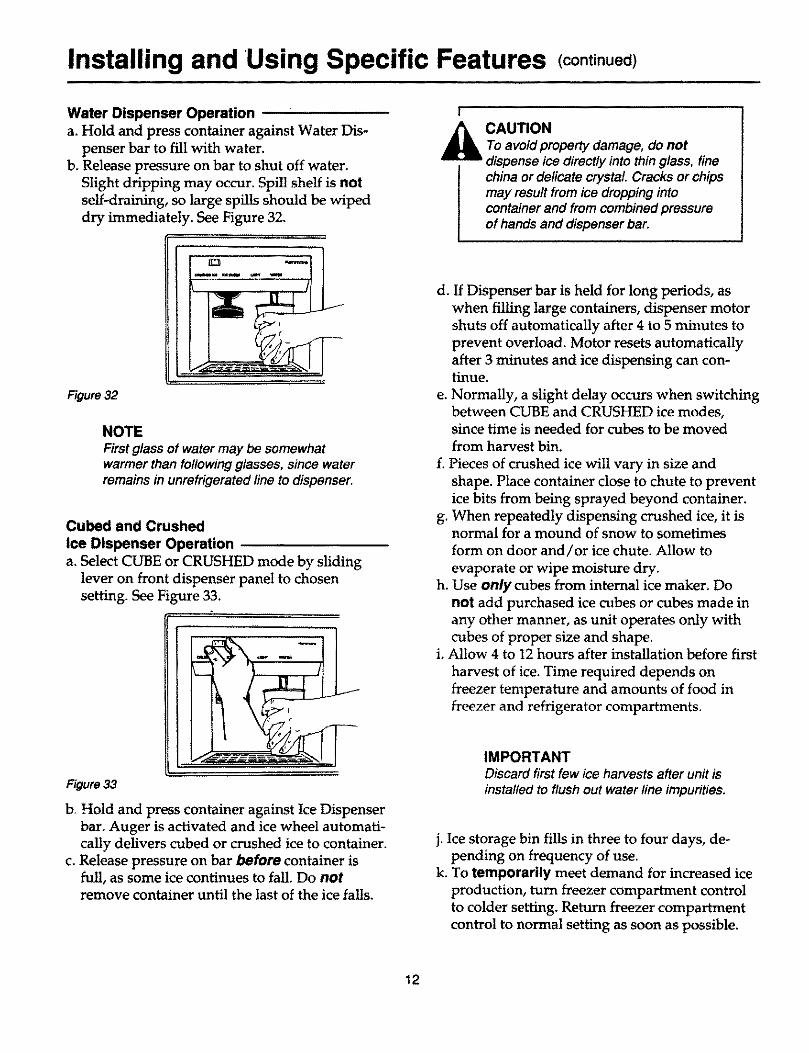
Water Dispenser Operation
a. Hold and press container against Water Dis-
penser bar to fill with water.
b. Release pressure on bar to shut off water.
Slight dripping may occur. Spill shelf is not
self-draining, so large spills should be wiped
dry immediately. See Figure 32.
I
_1_ AUTIONTo avoid property damage, do notdispense ice directly into thin glass, finechina or delicate crystal. Cracks or chipsmay result from ice dropping intocontainer and from combined pressureof hands and dispenser bar.
Figure 32
NOTE
First glass of water may be somewhatwarmer than following glasses, since waterremains in unrefrigerated line to dispenser,
Cubed and Crushed
Ice Dispenser Operation
a. Select CUBE or CRUSHED mode by sliding
lever on front dispenser panel to chosen
setting. See Fi I v_re 33.
Figure 33
b, Hold and press container against Ice Dispenser
bar. Auger Ksactivated and ice wheel automati-
cally delivers cubed or crushed ice to container.
c. Release pressure on bar before container isfull, as some ice continues to fall. Do notremove container until the last of the ice falls.
d. If Dispenser bar is held for long periods, as
when filling large containers, dispenser motor
shuts off automatically after 4 to 5 minutes to
prevent overload. Motor resets automatically
after 3 minutes and ice dispensing can con-tinue.
e. Normally, a slight delay occurs when switchingbetween CUBE and CRUSHED ice modes,since time is needed for cubes to be moved
from harvest bin.
f. Pieces of crushed ice will vary in size and
shape. Place container close to chute to prevent
ice bits from being sprayed beyond container.
g. When repeatedly dispensing crushed ice, it isnormal for a mound of snow to sometimes
form on door and/or ice chute. Allow to
evaporate or wipe moisture dry.h. Use only cubes from internal ice maker. Do
not add purchased ice cubes or cubes made in
any other manner, as unit operates only with
cubes of proper size and shape.i. Allow 4 to 12 hours after installation before first
harvest of ice. Time required depends onfreezer temperature and amounts of food in
freezer and refrigerator compartments.
IMPORTANTDiscard first few ice harvests after unit isinstalled to flush out water line impurities.
j. Ice storage bin fills in three to four days, de-pending on frequency of use.
k. To temporarily meet demand for increased ice
production, turn freezer compartment control
to colder setting. Return freezer compartment
control to normal setting as soon as possible.
12
Installing and Using Specific Features (continued)
Dispenser LightA control panel light turns on automaticallywhen dispensing ice or water.
a. To turn light on or off, push in on front panelswitch, located to left of ice dispenser bar.
b. Regardless of switch position, light is activated
when refrigerator is dispensing ice or water.
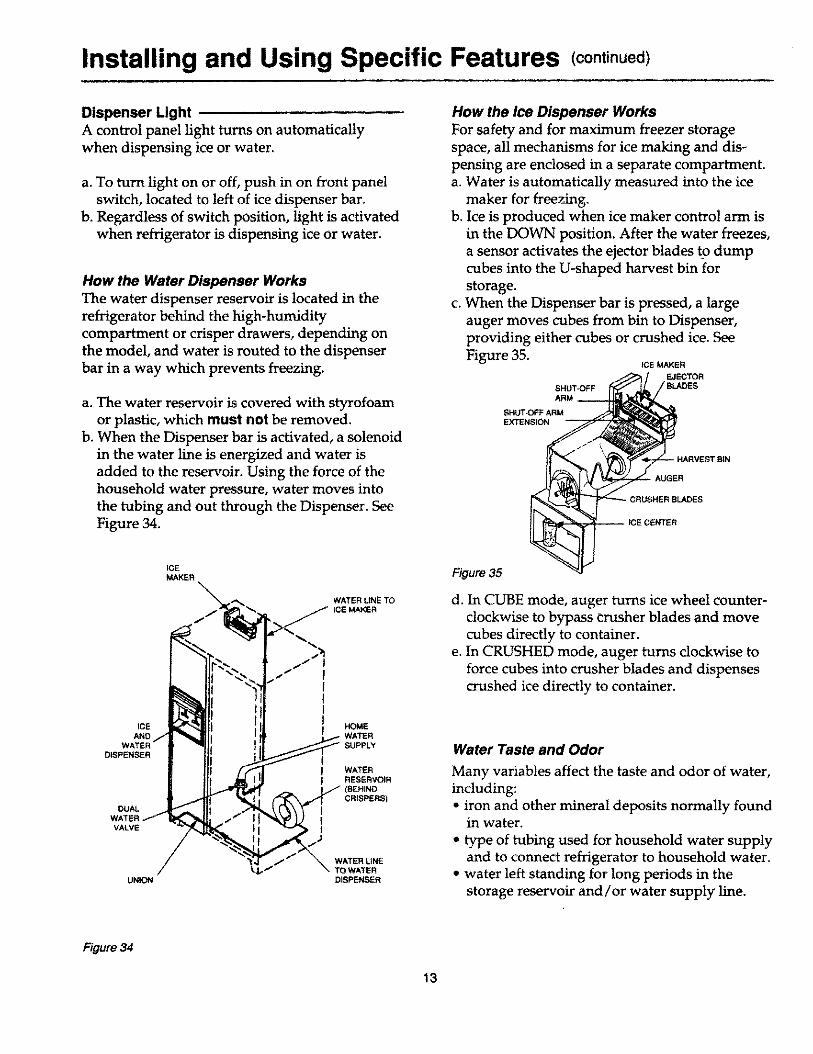
How the Water Dispenser WorksThe water dispenser reservoir is located in therefrigerator behind the high-humiditycompartment or crisper drawers, depending onthe model, and water is routed to the dispenserbar in a way which prevents freezing.
a. The water reservoir is covered with styrofoam
or plastic, which must not be removed.
b. When the Dispenser bar is activated, a solenoid
in the water line is energized and water is
added to the reservoir. Using the force of the
household water pressure, water moves into
the tubing and out through the Dispenser. See
Figure 34.
How the Ice Dispenser Works
For safety and for maximum freezer storage
space, all mechanisms for ice making and dis-
pensing are enclosed in a separate compartment.
a. Water is automatically measured into the icemaker for freezing.
b. Ice is produced when ice maker control arm is
in the DOWN position. After the water freezes,
a sensor activates the ejector blades t9 dump
cubes into the U-shaped harvest bin for
storage.
c. When the Dispenser bar is pressed, a large
auger moves cubes from bin to Dispenser,
providing either cubes or crushed ice. See
Figure 35. ICEUAKEREJECTOR
SHUTOFF
SHUT.OFF ARMEXTENSION
IT BiN
AUGER
ICEMAKER
WATER LiNE TOICE MAKER
IIIII
ICE I HOMEWATERSUPPLY
DISPENSER I
I WATERRESERVOIR(BEHIND
CRISPERS)
IVALVE l
UNION
WATER LINEroWATERDISPENSER
Figure35
d. In CUBE mode, auger turns ice wheel counter-
clockwise to bypass crusher blades and move
cubes directly to container.
e. In CRUSHED mode, auger turns clockwise to
force cubes into crusher blades and dispenses
crushed ice directly to container.
Water Taste and Odor
Many variables affect the taste and odor of water,
including:
• iron and other mineral deposits normally foundin water.
• type of tubing used for household water supplyand to connect refrigerator to household water.
• water left standing for long periods in the
storage reservoir and/or water supply line.
Figure 34
13
Installing and Using Specific Features (continued)
Take the following recommended steps to ensurea fresh supply of water at all times and minimizeta_t_ and odor problems:
1. Thoroughly flush the water dispenser system
after initially connecting it to the household
water supply by throwing away the first 10 to14 eight-ounce glasses of water.
2. After extended periods of non-use, flush the
water system and reservoir as above,
3. If problems persist, contact the local water
treatment company for specialized help.
Servicing theIce Dispenser
Ice maker design allows basic self-servicing withminimum effort for the following situations.
• Clearing stalls or jams.
= Removing ice bin and/or solid ice mass.
• Stopping ice production.• Extended absences.
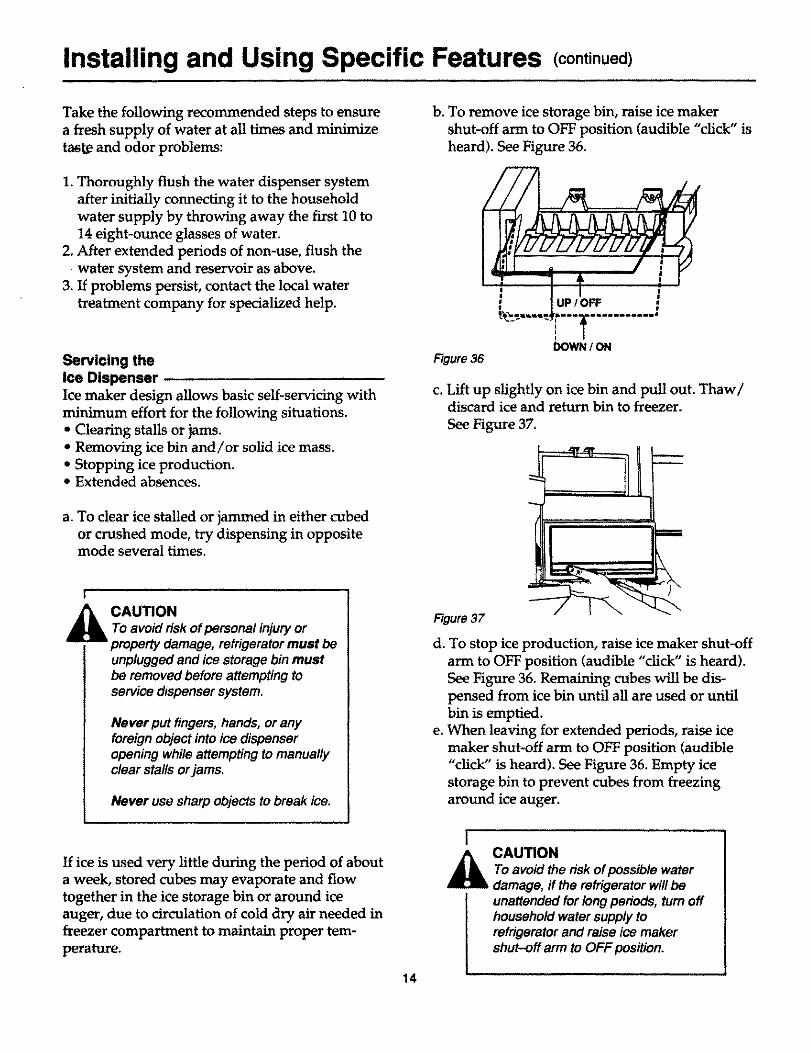
a. To clear ice stalled or jammed in either cubed
or crushed mode, try dispensing in oppositemode several times.
I
_IL AUTION
To avoid risk of personal injury orproperty damage, refrigerator must beunplugged and ice storage bin mustbe removed before attempting toservice dispenser system.
Never put fingers, hands, or anyforeign object into ice dispenseropening while attempting to manuallyclear sta/fs or jams.
Never use sharp objects to break ice.
b. To remove ice storage bin, raise ice maker
shut-off arm to OFF position (audible "click" is
heard). See Figure 36.
I
UP/OFF
I
DOWN/ONFigum 36
c. Lift up slightly on ice bin and pull out. Thaw/discard ice and return bin to freezer.
See Figure 37.
Figum 37
d. To stop ice production, raise ice maker shut-off
arm to OFF position (audible "click" is heard).
See Figure 36. Remaining cubes will be dis-
pensed from ice bin until all are used or until
bin is emptied.
e. When leaving for extended periods, raise ice
maker shut-off arm to OFF position (audible
"click" is heard). See Figure 36. Empty icestorage bin to prevent cubes from freezing
around ice auger.
If ice is used very little during the period of about
a week, stored cubes may evaporate and flow
together in the ice storage bin or around ice
auger, due to circulation of cold dry air needed in
freezer compartment to maintain proper tem-
perature.
I
,_ CAUTIONTo avoid the risk of possible waterdamage, if the refrigerator will beunattended for long periods, turn offhousehold water supply torefrigerator and raise ice makershut-off arm to OFF position.
14

Care and Cleaning
I
A WARNING
To avoid electrical shock, persona/injury or death, unp/_g refrigeratorpower cord or open householdcircuit breaker to refrigerator beforerep/acing fight bulbs or cleaning.
All removable refrigerator and freezer features
should be cleaned regularly. Refer to appropriate
section of Installing and Using Specific Fea-tures for removal and replacement instructions,
IMPORTANT
Avoid using the fol/owing rnateria/sor tools, which can cause surfaces toscratch, crack and disco/or.. concentrated liquid detergent• abrasive heavy-duty cleaners orpowders, such as COMET or AJAX
. meta/or abrasive cleaning pads• solvents
Adhesivesa. To remove adhesive residue from items such as
stickers, labels, or strapping tape, coveradhesive residue with non-abrasive toothpaste.
b. Gently rub toothpaste over adhesive residue
with fingers to remove. Wash cabinet surfaces
with warm, soapy water. Rinse with clear
water and dry thoroughly.
Exterior and Interiora. Use warm, soapy water to wash exterior and
interior of refrigerator and freezer, as needed.
b. Rinse surfaces with clear water and dry withsoft cloth.
Condenser Coil and Drain PanEvery three months, clean refrigerator condenser
coil, located behind toe grille. Accumulated dust
and lint reduce cooling performance, cause the
refrigerator to waste energy, and shorten the life
of the compressor and other components.
a. Grasp toe grille at each end and pull forward toremove,
b. Drain pan is not removable, but it can becleaned.
c. Use a long-handled bottle brush and a vacuumcleaner hose nozzle to remove dust and lint
from condenser coil under refrigerator.
d. Replace toe grille by matching toe grille tabs
with square holes in bottom of cabinet front.
Odor Removal
a. Disconnect electrical power plug.
b. Remove all food from freezer and refrigerator.
c. Wash and dry all food containers.
d. Wash compartment with mixture of 4 Tblsp.
baking soda to one quart warm water.e. Wash all shelves, drawers, accessories, and
gaskets, especially corners, crevices or grooves.
f. Rinse compartment interior with clear water
and dry all surfaces thoroughly with soft cloth.
g. Return cleaned containers and food to
refrigerator and freezer compartments.
h. Plug in refrigerator and set at normal operating
temperature.
Door Gasketsa. Use mild detergent diluted in water to clean
refrigerator and freezer door gaskets at least
twice a year. Do not use cleaners containingammonia or chlorine bleach.
b. Rinse gaskets with clear water and dry withsoftcloth.
c.Apply a thinfilmofpetroleum jellytogaskets
tohelp keep them softand pliable.
15
Care and Cleaning (continued)
L_htBu_s
IWARNING
To avoid electrica/ shock, personalinjury or death, unplug refrigeratorpower cord or open householdcircuitbreaker to refrigeratorbefore replacing light bulbs.
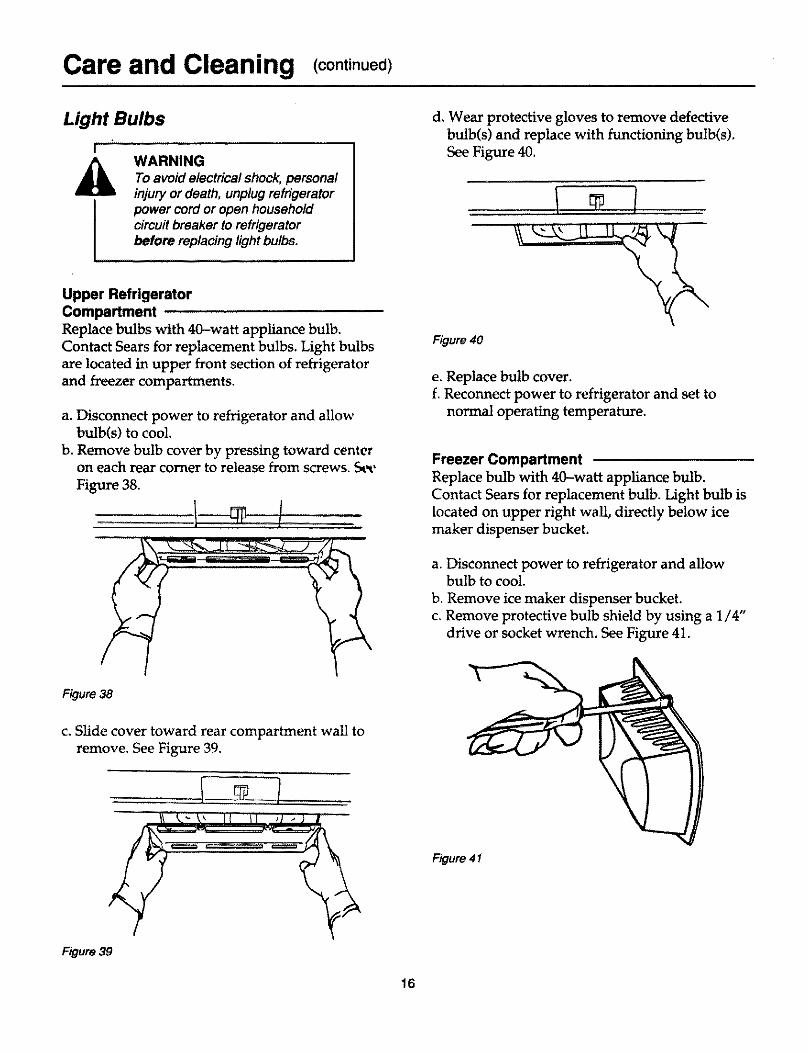
Upper RefrigeratorCompartmentReplace bulbs with 40-watt appliance bulb.Contact Sears for replacement bulbs. Light bulbs
are located in upper front section of refrigerator
and freezer compartments.
a. Disconnect power to refrigerator and allowbulb(s) to cool.
b. Remove bulb cover by pressing toward centeron each rear corner to release from screws. S_,
Figure 38.
d. Wear protective gloves to remove defective
bulb(s) and replace with functioning bulb(s).
See Figure 40.
Figure 40
e. Replace bulb cover.f. Reconnect power to refrigerator and set to
normal operating temperature,
Freezer CompartmentReplace bulb with 40-watt appliance bulb.
Contact Sears for replacement bulb. Light bulb is
located on upper right wall, directly below ice
maker dispenser bucket.
a. Disconnect power to refrigerator and allowbulb to cool.
b. Remove ice maker dispenser bucket.
c, Remove protective bulb shield by using a 1/4"
drive or socket wrench. See Figure 41.
Figure38
c. Slide cover toward rear compartment wall to
remove. See Figure 39.
I/ _,'-V tl I= ,1_ !
Figure 39
Figure 41
16

Care and Cleaning (continued)
d. Wear protective gloves to remove defective
bulb and replace with functioning bulb, See
Figure 42.
Figure 42
e. Replace protective bulb shield, using a 1/4"drive or socket wrench.
f. Reconnect power to refrigerator and set to
normal operating temperature,
Ice and Water Dispenser
Replace bulb with (>-watt, 120-volt bulb. Contact
Sears for replacement bulb. Light bulb is located
between dispenser bars.
a. Disconnect power to refrigerator and allowbulb to cool.
b. Wear protective gloves to remove defective
bulb and replace with functioning bulb. See
Figure 43,
Figure 43
c. Reconnect power to refrigerator and set to
normal operating temperature.
17
Energy Tips
This Kenmore refrigerator is designed to be one
of the most energy-efficient refrigerators
available. Help reduce energy consumption by
using the following suggestions.
a. Set temperature controls for compartments andchillers so unit is not cooling more thannecessary. See page 5 for details,
b. Keep freezer section full to use less energy andto help maintain frozen temperatures whendoor is opened.
c. Clean and lubricate door gaskets regularly,Gaskets seal doors and reduce leakage of coldair, Replace worn gaskets.
d, Install refrigerator away from direct sunlightand block from heat sources.
e. Clean condenser coil regularly, Dirtycondenser increases energy use,
Vacation Tips
a. Remove perishable foods from refrigerator.b, Shut off ice maker by moving wire "arm" to
upper position.c, Turn off household water supply to refrigerator
at saddle valve,
d. When leaving for extended periods:
• empty refrigerator completely;
• unplug unit;
• clean compartment interior;
• prop compartment door open, soair can circulate inside; and
• if ice maker is installed, turn off
household water supply to
refrigerator at saddle valve.
Non-Use Periods
Household Moves
a. Unplug and dean unit.
b. To prevent damage during shipment, use tape
with non-permanent adhesive to secure all
trays, shelves and other loose parts.
c. Re-open unit as soon as possible after
household move is complete.
Long-Term Storage
For storage in sub-freezing environment, take the
following precautions to protect water valve.
a. Disconnect refrigerator from power source.
b. Turn off household water supply at saddlevalve.
c. Disconnect hoses from water valve couplings:• Remove lower rear cabinet cover.
• Place a container under valve to catch
water.
• Remove brass tube fitting from valve
coupling.• Label two plastic tubes attached to valve.
• Unscrew compression nuts and push
tubes away from valve fittings.
• Use compressed air to remove all water
from plasting tubing to water dispenserand ice maker.
18
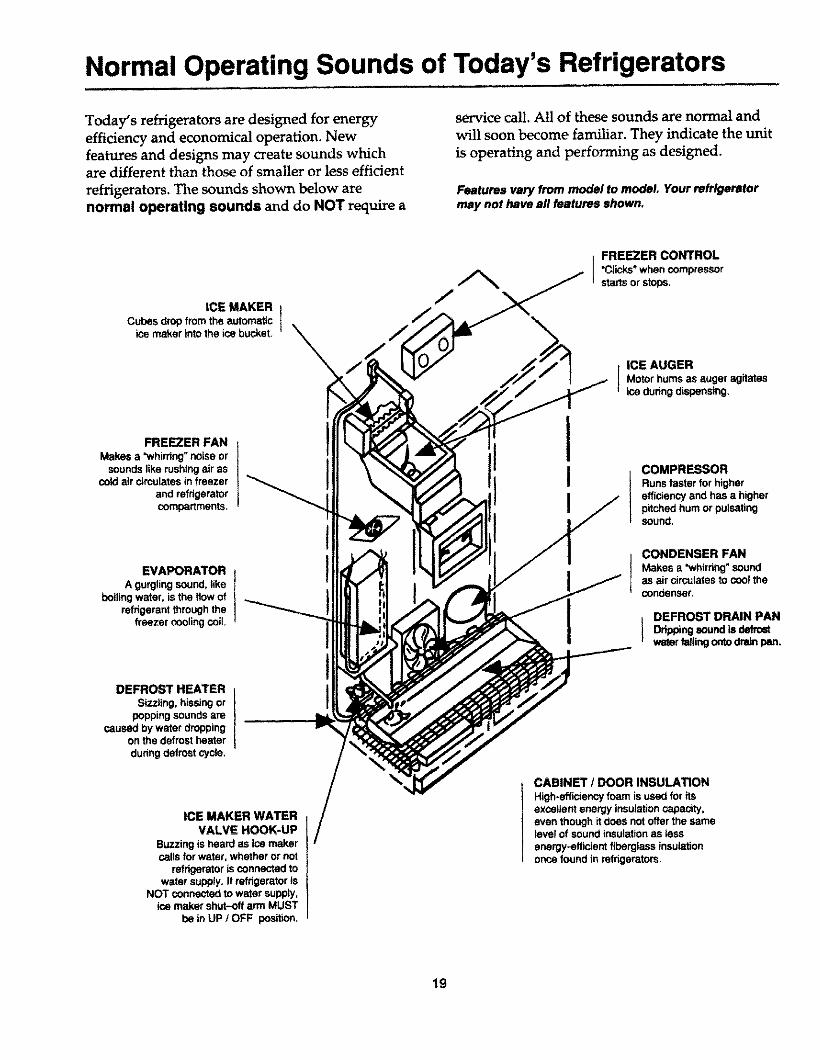
Normal Operating Sounds of Today's Refrigerators
Today's refrigerators are designed for energyefficiency and economical operation_ Newfeatures and designs may create sounds whichare different than those of smaller or less efficient
refrigerators. The sounds shown below arenormal operating sounds and do NOT requ_e a
seJ'vice call. All of these sounds are normal and
will soon become familiar, They indicate the unitis operating and performing as designed.
Features vary from model to model Your refrigeratormay not have eft features shown,
ICE MAKER ICubes drop from the automaticice maker into the ice bucket.
FREEZER FAN
Makes a "whirring" noise orsounds like rushing air as
cold air circulates in freezerend refrigeratorcompartments.
Ii
FREEZER CONTROL
"Clicks"when compressorstartsor stops.
ICE AUGER
Motor as auger agitateshumsiceduringdispensing_
COMPRESSOR
Runs taster for higherefficiency and has a higherpitched hum or pulsatingsound.
EVAPORATOR
A gurgling sound, likeboiling water, is the flow of
refdgerant through thefreezer cooling coil
CONDENSER FANMakes a 'whirring"soundas air circulatesto coatthecondenser,
DEFROST DRAIN PAN
waterfallingontodndn pan.
DEFROST HEATER
Sizzling, hissing orpooping sounds are
caused by water droppingon the defrost heaterdudng defrost cycle.
ICE MAKER WATERVALVE HOOK-UP
Buzzing is heard as ice makersails for water, whether or not
refrigerator is connected towater supply. If reffigerator is
NOT connected to water supply,ice maker shut-off arm MUST
be in UP / OFF poaition.
/
CABINET / DOOR INSULATION
High*efficiency foam is used for itsexcellent energy insulation capacity,even though it does not offer the samelevel of sound insulation as less
energy_efficient tibergtess insulationonce found in refdgeratom.
19
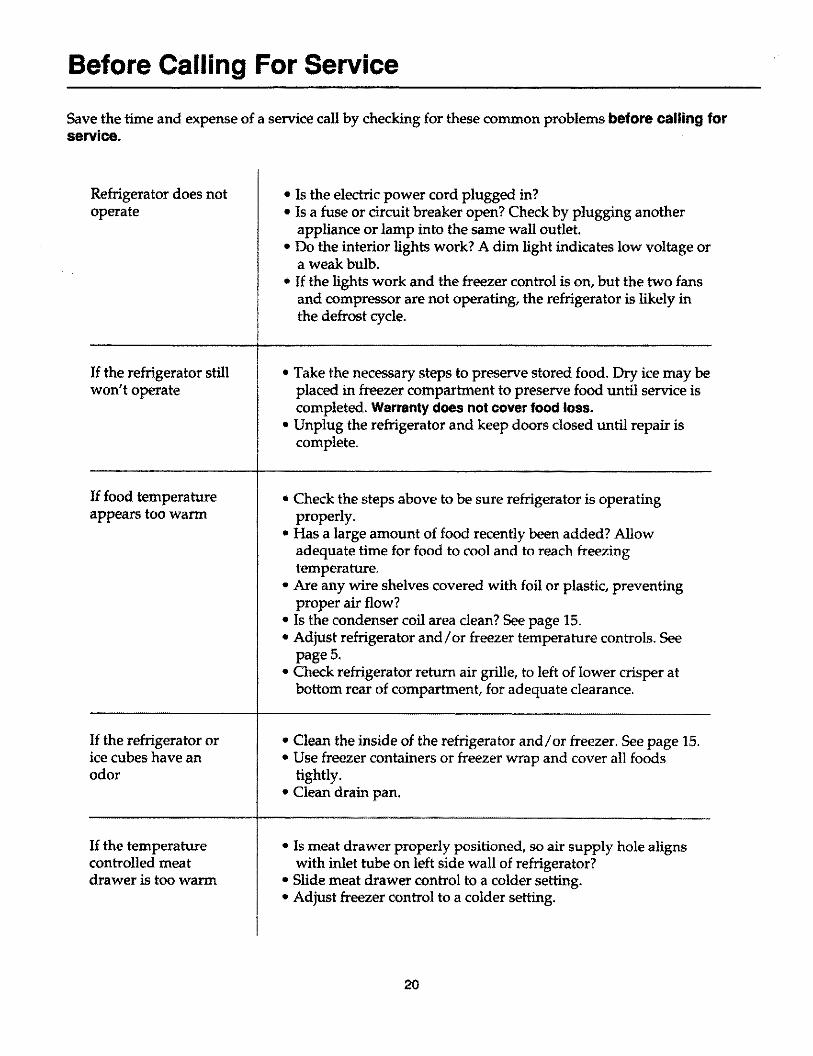
Before Calling For Service
Save the time and expense of a service call by checking for these common problems before calling forservice.
Refrigerator does not
operate
If the refrigerator stillwon't operate
If food temperature
appears too warm
If the refrigerator orice cubes have anodor
If the temperaturecontrolled meat
drawer is too warm
Is the electric power cord plugged in?
Is a fuse or circuit breaker open? Check by plugging another
appliance or lamp into the same wall outlet.
Do the interior lights work? A dim light indicates low voltage ora weak bulb.
If the lights work and the freezer control is on, but the two fans
and compressor are not operating, the refrigerator is likely in
the defrost cycle.
• Take the necessary steps to preserve stored food. Dry ice may be
placed in freezer compartment to preserve food until service is
completed. Warranty does not cover food loss,• Unplug the refrigerator and keep doors closed until repair is
complete.
• Check the steps above to be sure refrigerator is operating
properly.
• Has a large amount of food recently been added? Allow
adequate time for food to cool and to reach freezing
temperature.
• Are any wire shelves covered with foil or plastic, preventing
proper air flow?• Is the condenser coil area clean? See page 15.
• Adjust refrigerator and/or freezer temperature controls. See
page 5.
• Check refrigerator return air grille, to left of lower crisper at
bottom rear of compartment, for adequate clearance.
• Clean the inside of the refrigerator and/or freezer. See page 15.• Use freezer containers or freezer wrap and cover all foods
tightly.• Clean drain pan.
• Is meat drawer properly positioned, so air supply hole alignswith inlet tube on left side wall of refrigerator?
• Slide meat drawer control to a colder setting.
• Adjust freezer control to a colder setting.
2O
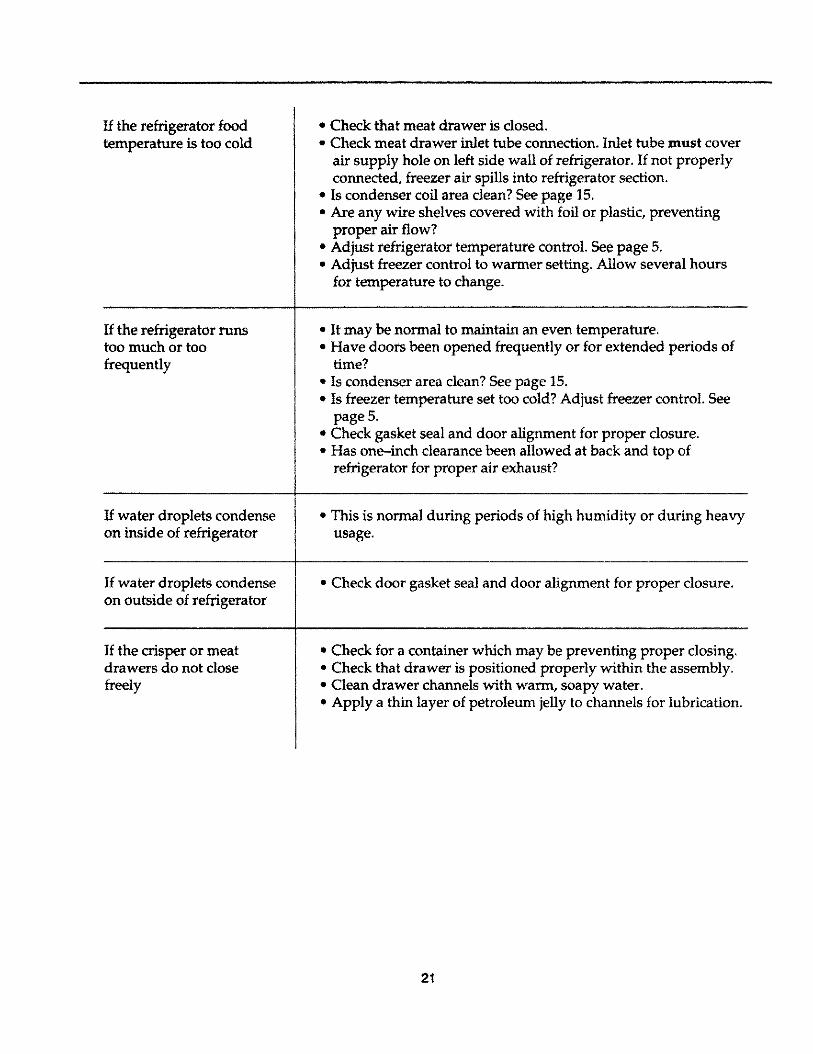
If the refrigerator foodtemperature is too cold
If the refrigerator runstoo much or too
frequently
• Check that meat drawer is closed.
• Check meat drawer inlet tube connection. Inlet tube must cover
air supply hole on left side wall of refrigerator. If not properlyconnected, freezer air spills into refrigerator section.
• Is condenser coil area clean? See page 15.
• Are any wire shelves covered with foil or plastic, preventing
proper air flow?• Adjust refrigerator temperature control. See page 5.
• Adjust freezer control to warmer setting. Allow several hours
for temperature to change.
• It may be normal to maintain an even temperature.• Have doors been opened frequently or for extended periods of
time?
• Is condenser area clean? See page 15.
• Is freezer temperature set too cold? Adjust freezer control. See
page 5.
• Check gasket seal and door alignment for proper closure.
• Has one-inch clearance been allowed at back and top of
refrigerator for proper air exhaust?
If water droplets condense • This is normal during periods of high humidity or during heavy
on inside of refrigerator usage.
If water droplets condense • Check door gasket seal and door alignment for proper closure.
on outside of refrigerator
If the crisper or meatdrawers do not close
freely
• Check for a container which may be preventing proper closing.
• Check that drawer is positioned properly within the assembly.
• Clean drawer channels with warm, soapy water.
• Apply a thin layer of petroleum jelly to channels for lubrication.
21
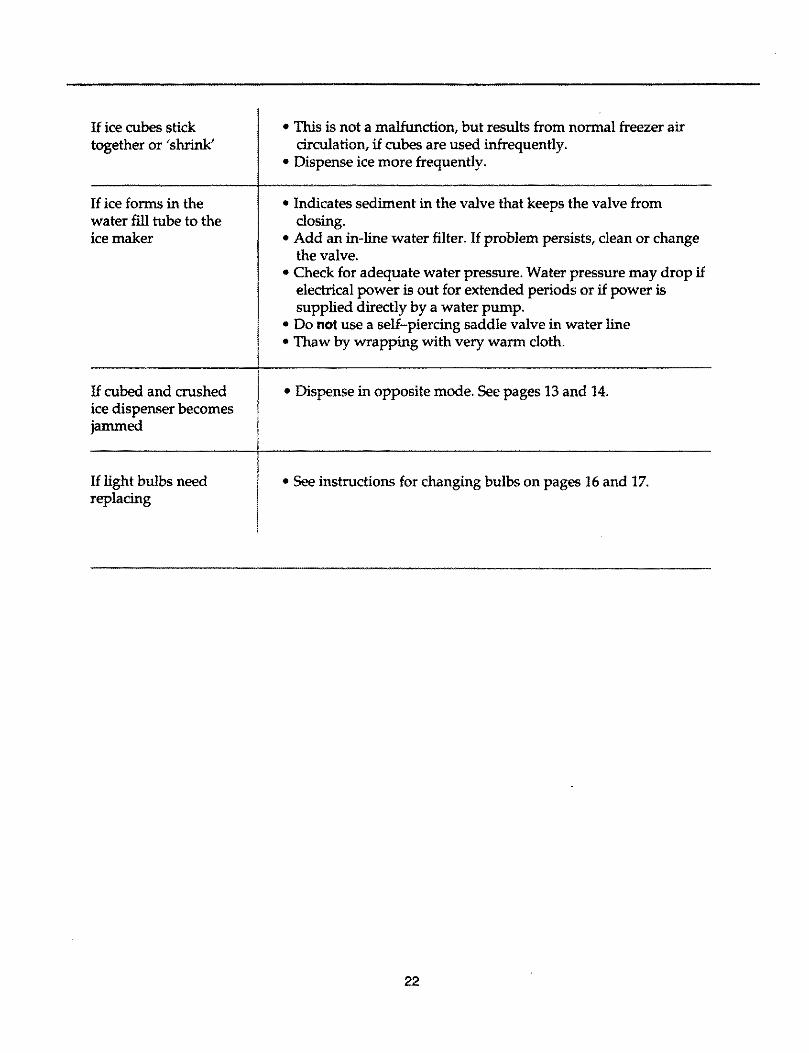
If ice cubes stick
together or 'shrink'
If ice forms in thewater fill tube to theice maker
If cubed and crushed
ice dispenser becomes
jammed
If light bulbs need
replacing
• This is not a malfunction, but results from normal freezer air
circulation, if cubes are used infrequently,
• Dispense ice more frequently,
• Indicates sediment in the valve that keeps the valve from
closing.
• Add an in-line water filter. If problem persists, clean or changethe valve.
• Check for adequate water pressure. Water pressure may drop if
electrical power is out for extended periods or if power is
supplied directly by a water pump.
• Do not use a self-piercing saddle valve in water line• Thaw by wrapping with very warm cloth.
• Dispense in opposite mode. See pages 13 and 14.
• See instructions for changing bulbs on pages 16 and 17.
22

Notes
23
Full One-Year WarrantyOn Refrigerator
For one year from the date of purchase, when this refrigerator is operated and maintained according toinstructions attached to or furnished with the product, Sears will repair this refrigerator, free of charge, ifdefective in matedal or workmanship.
Full Five-Year WarrantyOn Sealed Refrigeration SystemFor five years from the date of pumhase, when this refrigerator is operated and maintained according toinstructions attached to or furnished with the product, Sears will repair the sealed system (consisting ofrefrigerant, connecting tubing and compressor motor) free of charge, if defective in material orworkmanship.
The abovewarrantycoverageappliesonlyto refrigeratorswhichare usedfor storageof food for privatehouseholdpurposes.
Warranty Service is available by contacting the nearest Sears Service Center/Department In theUnited States.
This warranty applies only while this pr_uct is in use in the United States.This warranty gives you specific legal rights, and you may also have other rights, which.vary from stateto state.
SEARS, ROEBUCK AND CO,, D/817WA, Hoffman Estates, IL 60195
SEARS
Part No. 10062606Printed in U. S. A.