Embed Size (px)
Citation preview

Page: 1 SideArm User Manual Document Number: i07178
Total Pages: 16 Date: 2018/04/18 Revision: 01
The information contained in this document is the sole property of GearWurx. Any reproduction in part or whole
without the written permission of GearWurx is prohibited. All rights reserved. © 2018.
Figure 1
1. PRODUCT DESCRIPTION
The SideArm is a clip-on robotic arm that fits DJI Phantom 3 drones (See Par. 16). It is a self-contained system consisting of a SideArm Controller unit and a SideArm robotic arm. Each has an internal rechargeable battery. The SideArm is a two degree of freedom robotic arm that allows the gripper Talon to be deployed beneath the drone to allow pick-up and drop-off of parcels.
2. APPLICATIONS
The SideArm is designed to be compatible with the following drones: DJI Phantom 3 Standard (See SideArm Controller compatibility notes below) DJI Phantom 3 Advanced DJI Phantom 3 4k DJI Phantom 3 Professional Drones
The SideArm Controller is designed to be compatible with the following drones using DJI model GL300C controllers:
DJI Phantom 3 Advanced DJI Phantom 3 4k DJI Phantom 3 Professional Drones
Page: 2 SideArm User Manual Document Number: i07178
Total Pages: 16 Date: 2018/04/18 Revision: 01
The information contained in this document is the sole property of GearWurx. Any reproduction in part or whole
without the written permission of GearWurx is prohibited. All rights reserved. © 2018.
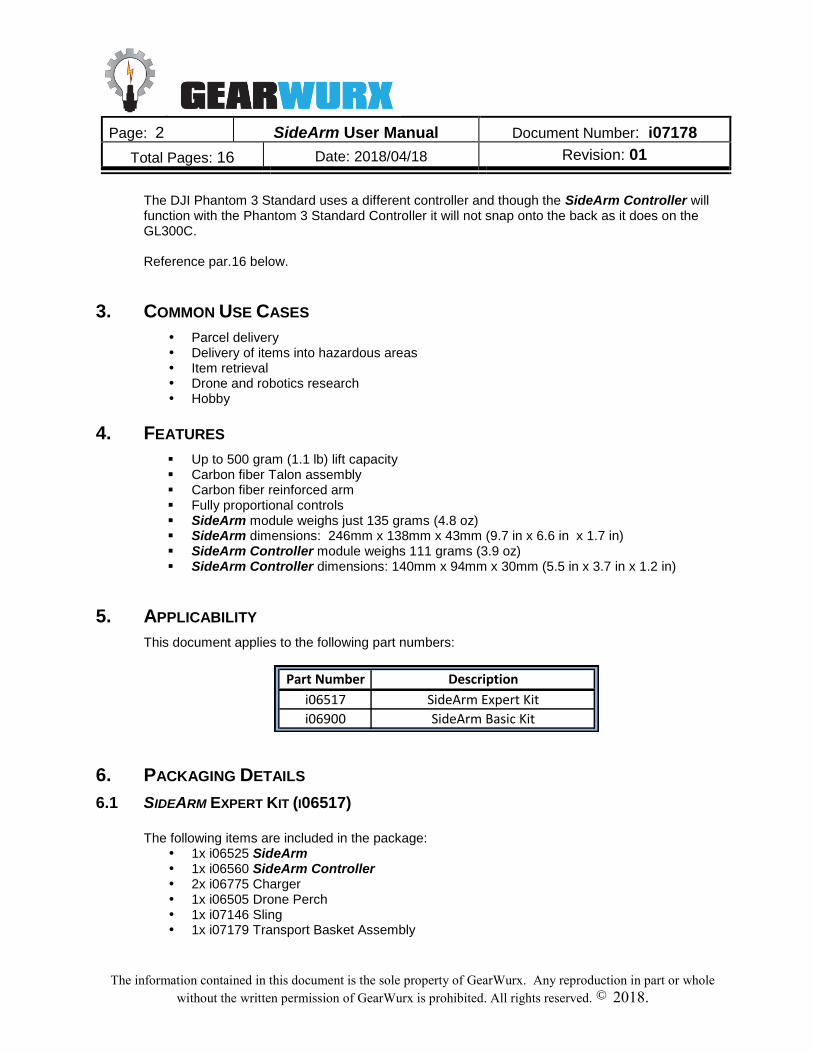
The DJI Phantom 3 Standard uses a different controller and though the SideArm Controller will function with the Phantom 3 Standard Controller it will not snap onto the back as it does on the GL300C. Reference par.16 below.
3. COMMON USE CASES
Parcel delivery Delivery of items into hazardous areas Item retrieval Drone and robotics research Hobby
4. FEATURES
Up to 500 gram (1.1 lb) lift capacity Carbon fiber Talon assembly Carbon fiber reinforced arm Fully proportional controls SideArm module weighs just 135 grams (4.8 oz) SideArm dimensions: 246mm x 138mm x 43mm (9.7 in x 6.6 in x 1.7 in) SideArm Controller module weighs 111 grams (3.9 oz) SideArm Controller dimensions: 140mm x 94mm x 30mm (5.5 in x 3.7 in x 1.2 in)
5. APPLICABILITY
This document applies to the following part numbers:
Part Number Description
i06517 SideArm Expert Kit
i06900 SideArm Basic Kit
6. PACKAGING DETAILS
6.1 SIDEARM EXPERT KIT (I06517)
The following items are included in the package: 1x i06525 SideArm 1x i06560 SideArm Controller 2x i06775 Charger 1x i06505 Drone Perch 1x i07146 Sling 1x i07179 Transport Basket Assembly
Page: 3 SideArm User Manual Document Number: i07178
Total Pages: 16 Date: 2018/04/18 Revision: 01
The information contained in this document is the sole property of GearWurx. Any reproduction in part or whole
without the written permission of GearWurx is prohibited. All rights reserved. © 2018.
6.2 SIDEARM BASIC KIT (I06900)
The following items are included in the package: 1x i06525 SideArm 1x i06560 SideArm Controller 1x i06775 Charger
7. PERFORMANCE
7.1 ARM TRAVEL
The total travel of the SideArm is 80 degrees from stowed position to fully deployed. The proportional control allows it to be stopped in any position. For optimal drone and SideArm stability, it should be fully deployed when carrying loads.
7.2 TALON TRAVEL
Each part of the Talon of the SideArm moves approximately 90 degrees. The slider controller allows the Talon to be stopped in any position. The Talon is protected against over-loading and will release loads that are too heavy for it to handle.
8. SET-UP AND USE
The following details how to install, power up, and use your SideArm, SideArm Controller and Accessories.
8.1 CHARGE THE BATTERIES
Before using the SideArm, it is important to fully change the batteries in the SideArm Controller and in the SideArm with the included charger. The charge indicator LED on the charger will illuminate red when charging is started. The LED will gradually change from red to orange and finally to green when each battery is fully charged. The charger connector is keyed and can only be
Page: 4 SideArm User Manual Document Number: i07178
Total Pages: 16 Date: 2018/04/18 Revision: 01
The information contained in this document is the sole property of GearWurx. Any reproduction in part or whole
without the written permission of GearWurx is prohibited. All rights reserved. © 2018.
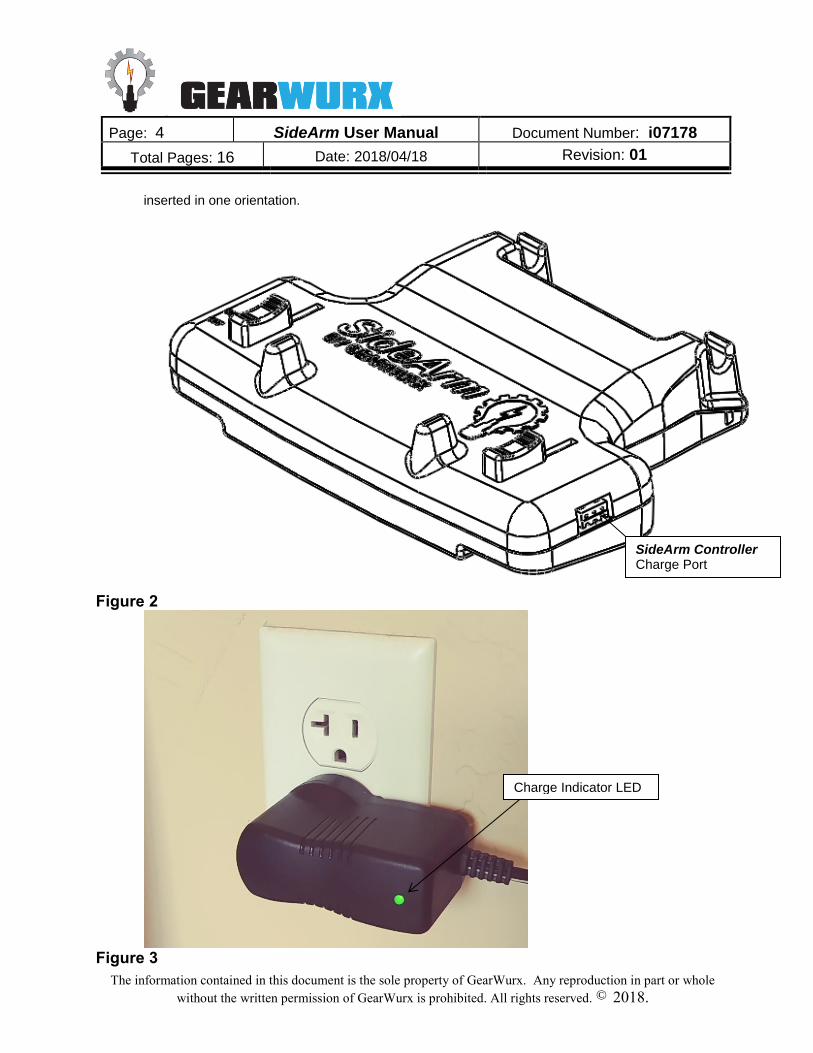
inserted in one orientation.
Figure 2
Figure 3
SideArm Controller Charge Port
Charge Indicator LED
Page: 5 SideArm User Manual Document Number: i07178
Total Pages: 16 Date: 2018/04/18 Revision: 01
The information contained in this document is the sole property of GearWurx. Any reproduction in part or whole
without the written permission of GearWurx is prohibited. All rights reserved. © 2018.
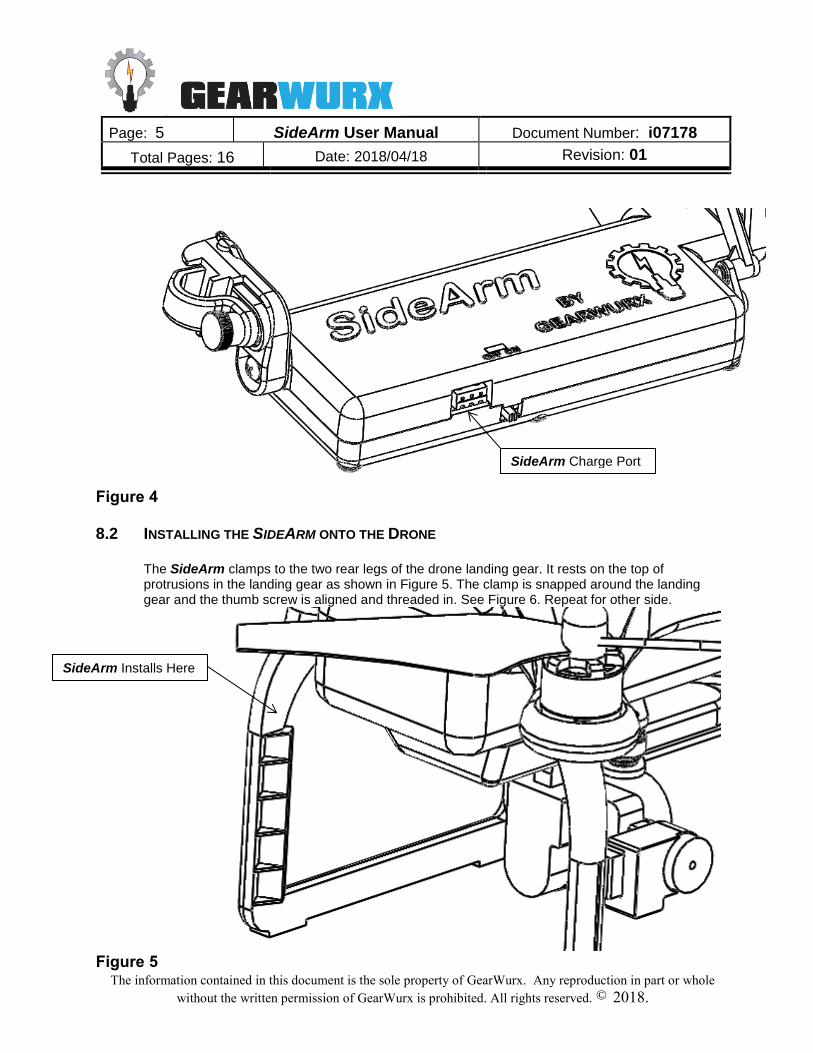
Figure 4
8.2 INSTALLING THE SIDEARM ONTO THE DRONE
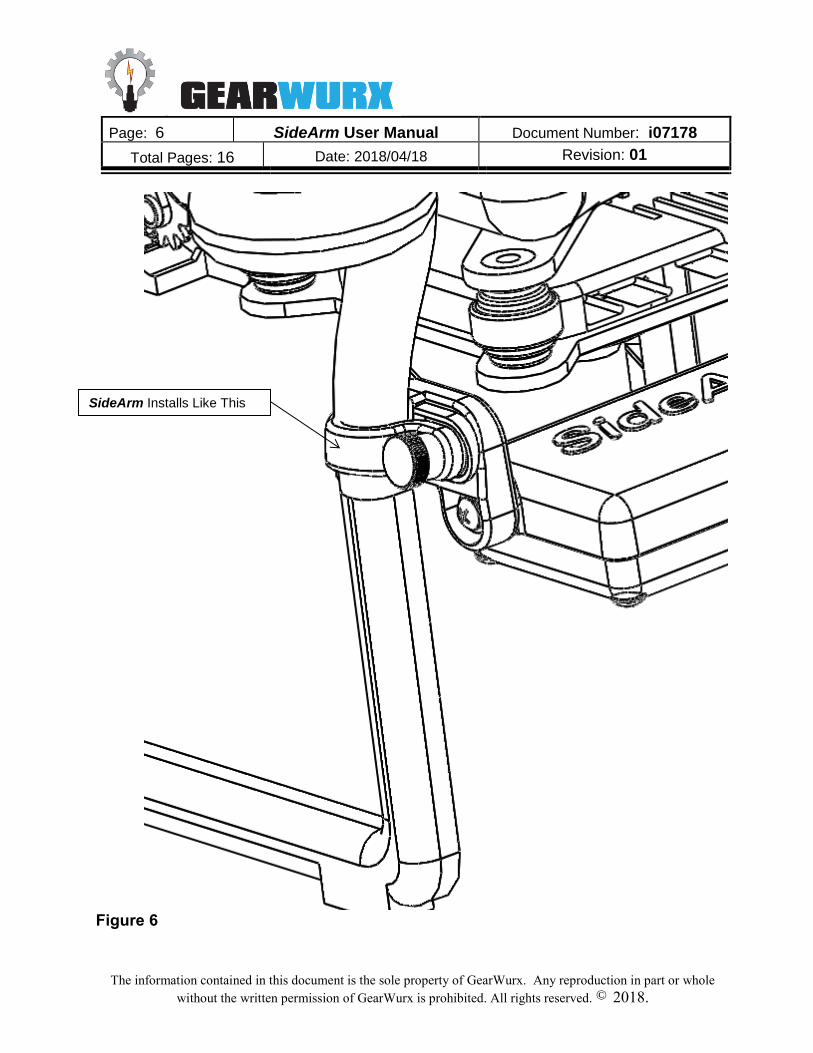
The SideArm clamps to the two rear legs of the drone landing gear. It rests on the top of protrusions in the landing gear as shown in Figure 5. The clamp is snapped around the landing gear and the thumb screw is aligned and threaded in. See Figure 6. Repeat for other side.
Figure 5
SideArm Installs Here
SideArm Charge Port
Page: 6 SideArm User Manual Document Number: i07178
Total Pages: 16 Date: 2018/04/18 Revision: 01
The information contained in this document is the sole property of GearWurx. Any reproduction in part or whole
without the written permission of GearWurx is prohibited. All rights reserved. © 2018.
Figure 6
SideArm Installs Like This
Page: 7 SideArm User Manual Document Number: i07178
Total Pages: 16 Date: 2018/04/18 Revision: 01
The information contained in this document is the sole property of GearWurx. Any reproduction in part or whole
without the written permission of GearWurx is prohibited. All rights reserved. © 2018.
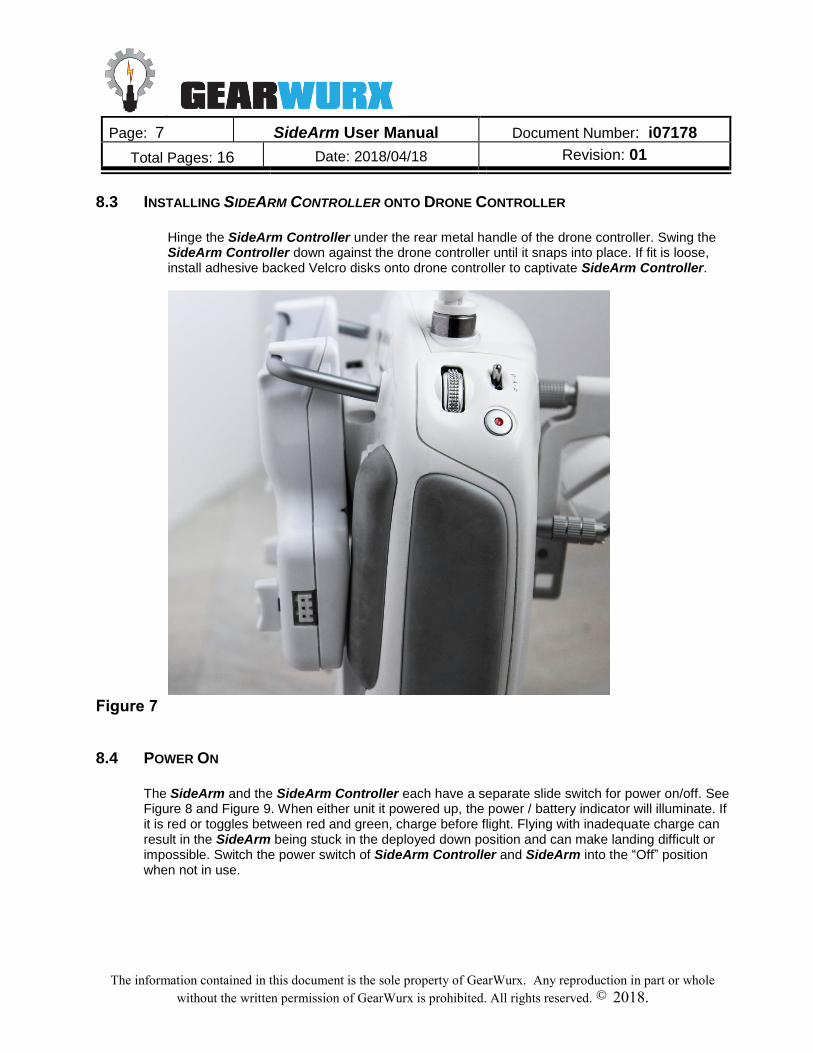
8.3 INSTALLING SIDEARM CONTROLLER ONTO DRONE CONTROLLER
Hinge the SideArm Controller under the rear metal handle of the drone controller. Swing the SideArm Controller down against the drone controller until it snaps into place. If fit is loose, install adhesive backed Velcro disks onto drone controller to captivate SideArm Controller.
Figure 7
8.4 POWER ON
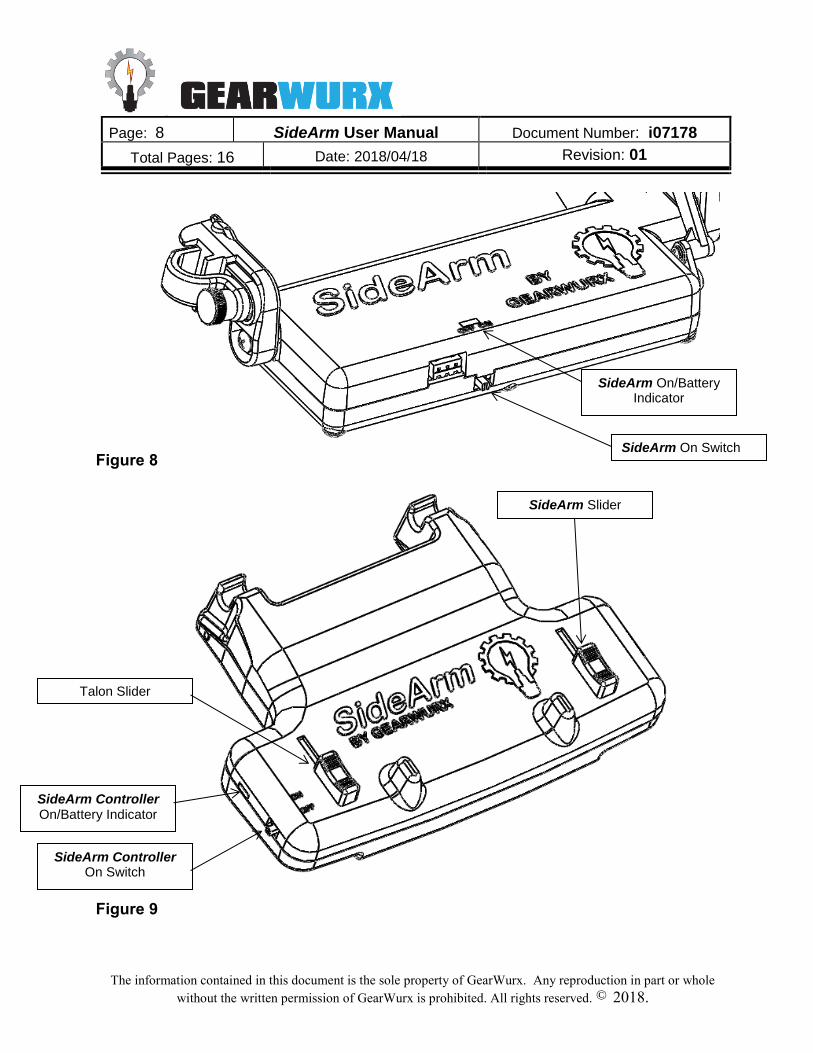
The SideArm and the SideArm Controller each have a separate slide switch for power on/off. See Figure 8 and Figure 9. When either unit it powered up, the power / battery indicator will illuminate. If it is red or toggles between red and green, charge before flight. Flying with inadequate charge can result in the SideArm being stuck in the deployed down position and can make landing difficult or impossible. Switch the power switch of SideArm Controller and SideArm into the “Off” position when not in use.
Page: 8 SideArm User Manual Document Number: i07178
Total Pages: 16 Date: 2018/04/18 Revision: 01
The information contained in this document is the sole property of GearWurx. Any reproduction in part or whole
without the written permission of GearWurx is prohibited. All rights reserved. © 2018.
Figure 8
Figure 9
SideArm On Switch
SideArm On/Battery Indicator
SideArm Controller On/Battery Indicator
SideArm Controller On Switch
Talon Slider
SideArm Slider

Page: 9 SideArm User Manual Document Number: i07178
Total Pages: 16 Date: 2018/04/18 Revision: 01
The information contained in this document is the sole property of GearWurx. Any reproduction in part or whole
without the written permission of GearWurx is prohibited. All rights reserved. © 2018.
8.5 SLIDER CONTROLS
When the SideArm Controller is attached to the back of a drone controller, the power “On” switch of the SideArm Controller is positioned near the right side of the drone controller as viewed from the front. The slider nearest the power switch controls the Talon as shown in Figure 9. Sliding this control down closes the Talon. Sliding it up opens the Talon. The slider on the left (as viewed from the drone controller) deploys the SideArm. Sliding it downward moves the SideArm down into the deployed position. Sliding it up moves the SideArm upward into the stowed position. The SideArm must be in the stowed position for landing. . Warning: Attempting to land without having the SideArm in the stowed position will cause the drone to crash and will likely cause damage to the drone, nearby people and property.
8.6 ACCESSORY ITEMS
The following items are accessory items to extend and simplify the use of the SideArm. The use of each is depicted below:
8.6.1 Drone Perch The Drone Perch allows the drone to be perched high enough that the SideArm can be fully extended below the drone before flight. This allows the Talon to grip a payload before starting the drone. Once the payload is securely gripped in the Talon, the drone can be started and can take off from the Drone Perch. The Drone Perch is assembled by sliding the four legs into the four square holes on the base (Figure 10). The legs should be inserted completely through both the upper and lower sheets of plastic on the base and should feel secure and not wobbly. Warning: The Drone Perch is only intended to be used for take-off. It is not intended to be used for landing. Attempting to land on the Drone Perch will likely damage the drone. Be sure that home settings (if your drone is so equipped) do not cause your drone to return to the Drone Perch.
Figure 10
Page: 10 SideArm User Manual Document Number: i07178
Total Pages: 16 Date: 2018/04/18 Revision: 01
The information contained in this document is the sole property of GearWurx. Any reproduction in part or whole
without the written permission of GearWurx is prohibited. All rights reserved. © 2018.
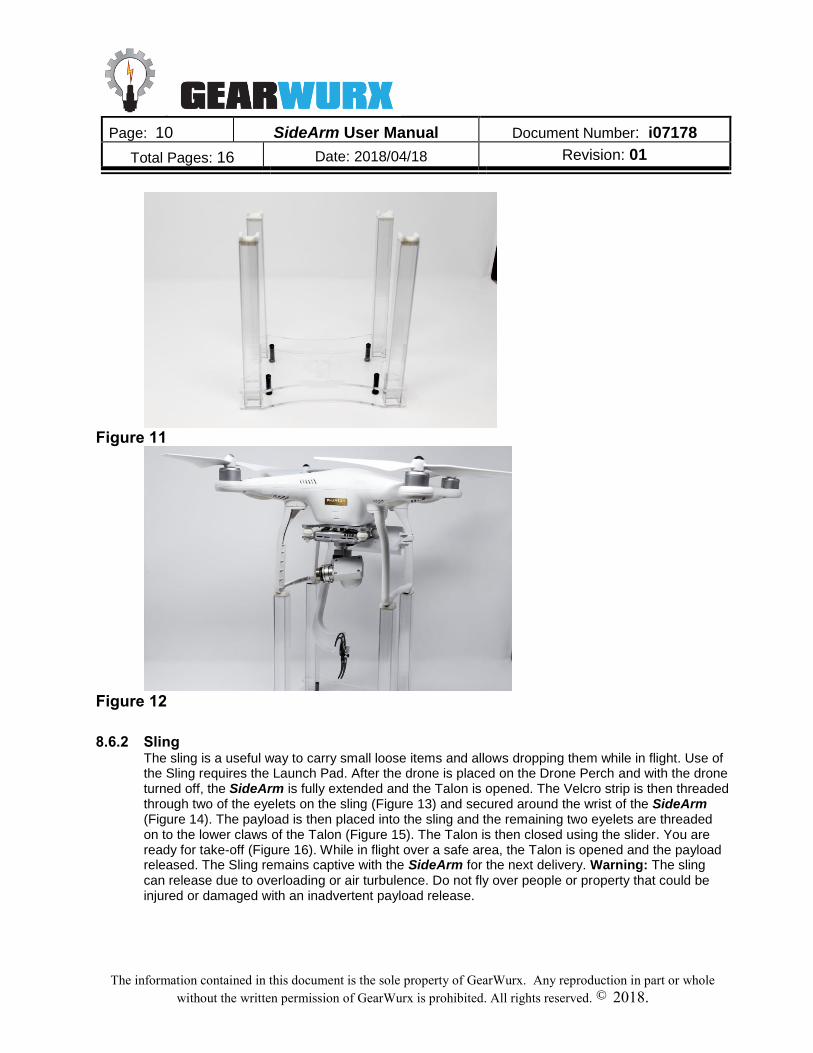
Figure 11
Figure 12
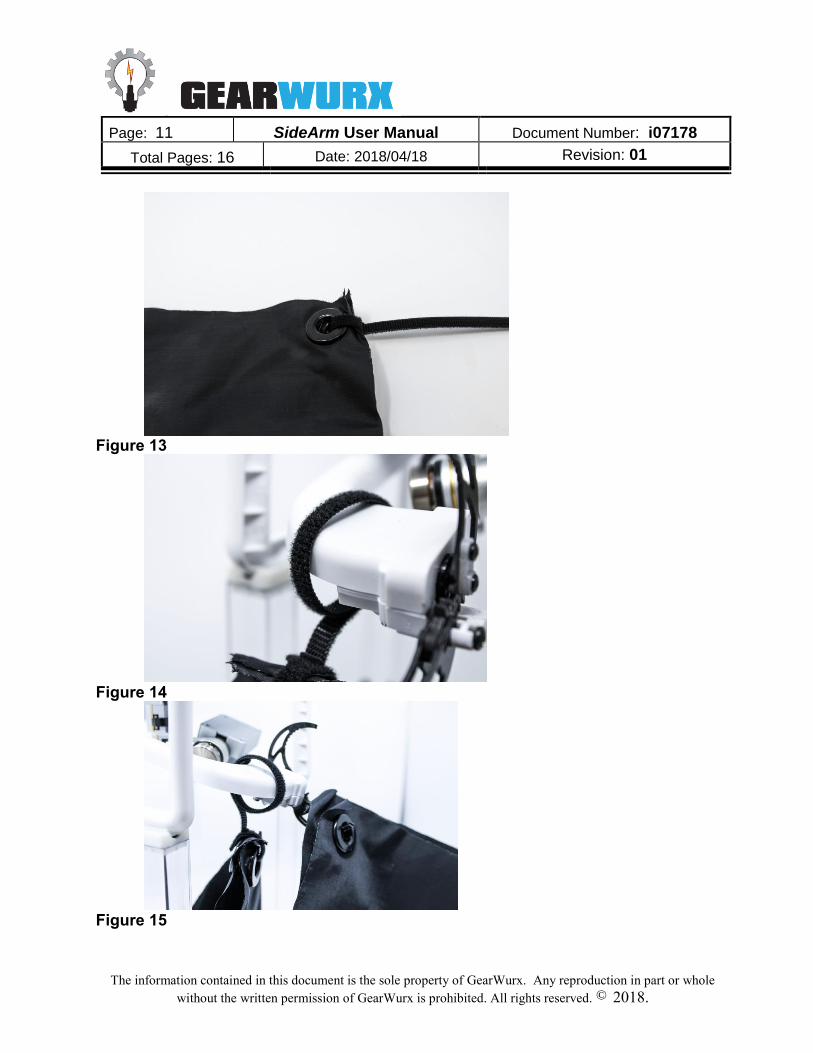
8.6.2 Sling The sling is a useful way to carry small loose items and allows dropping them while in flight. Use of the Sling requires the Launch Pad. After the drone is placed on the Drone Perch and with the drone turned off, the SideArm is fully extended and the Talon is opened. The Velcro strip is then threaded through two of the eyelets on the sling (Figure 13) and secured around the wrist of the SideArm (Figure 14). The payload is then placed into the sling and the remaining two eyelets are threaded on to the lower claws of the Talon (Figure 15). The Talon is then closed using the slider. You are ready for take-off (Figure 16). While in flight over a safe area, the Talon is opened and the payload released. The Sling remains captive with the SideArm for the next delivery. Warning: The sling can release due to overloading or air turbulence. Do not fly over people or property that could be injured or damaged with an inadvertent payload release.
Page: 11 SideArm User Manual Document Number: i07178
Total Pages: 16 Date: 2018/04/18 Revision: 01
The information contained in this document is the sole property of GearWurx. Any reproduction in part or whole
without the written permission of GearWurx is prohibited. All rights reserved. © 2018.
Figure 13
Figure 14
Figure 15
Page: 12 SideArm User Manual Document Number: i07178
Total Pages: 16 Date: 2018/04/18 Revision: 01
The information contained in this document is the sole property of GearWurx. Any reproduction in part or whole
without the written permission of GearWurx is prohibited. All rights reserved. © 2018.
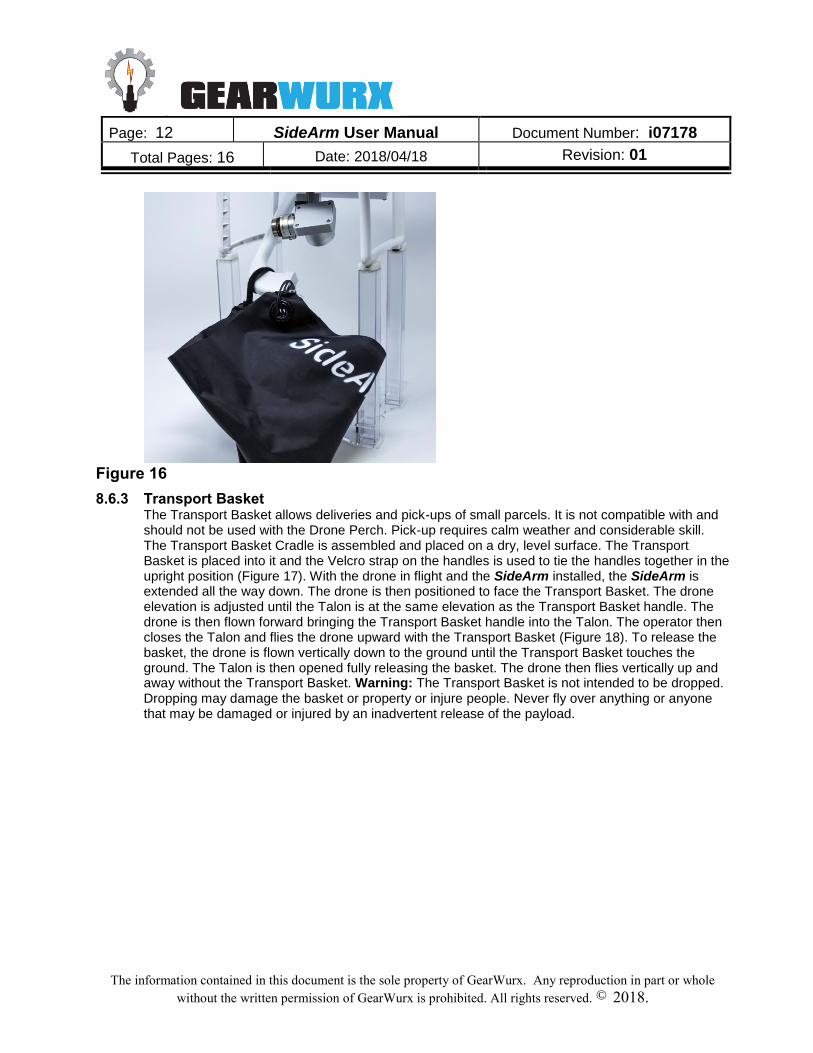
Figure 16
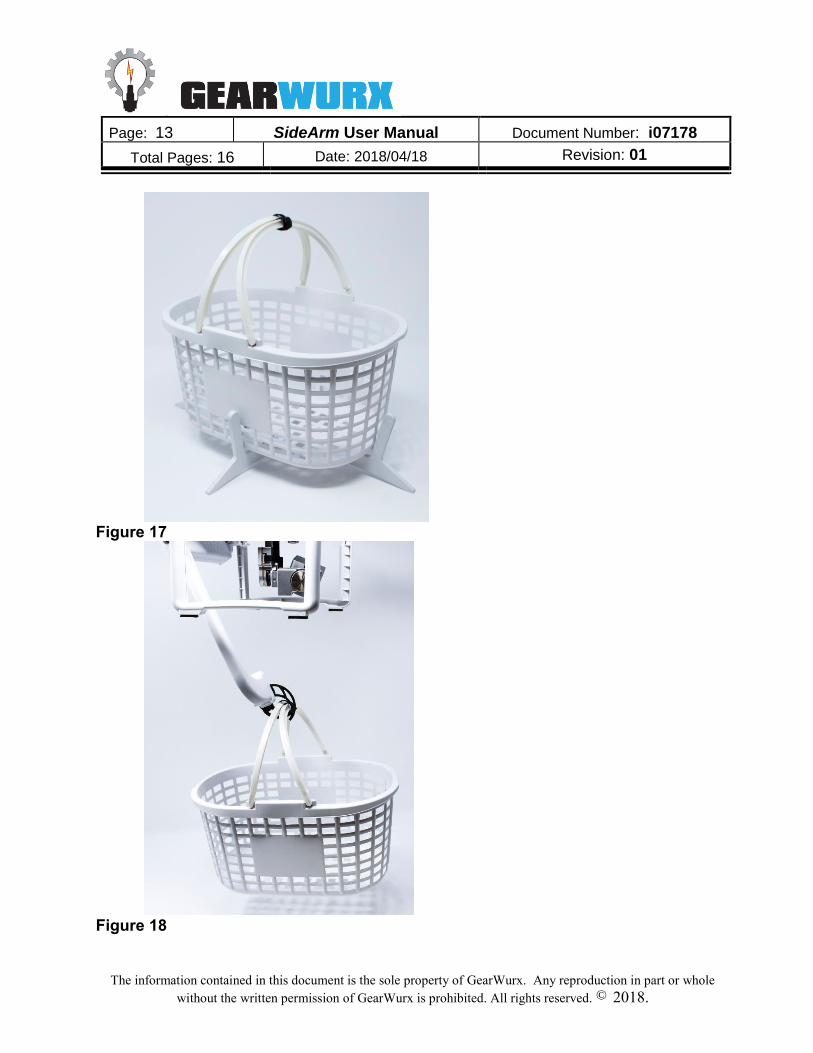
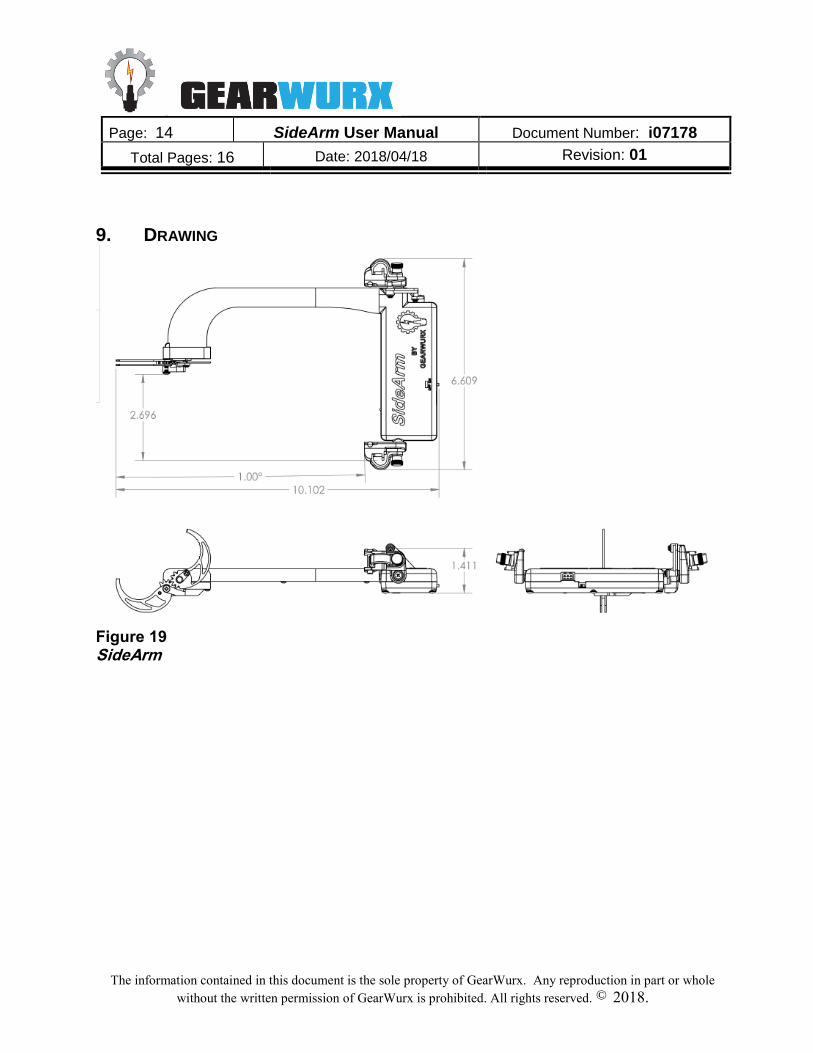
8.6.3 Transport Basket The Transport Basket allows deliveries and pick-ups of small parcels. It is not compatible with and should not be used with the Drone Perch. Pick-up requires calm weather and considerable skill. The Transport Basket Cradle is assembled and placed on a dry, level surface. The Transport Basket is placed into it and the Velcro strap on the handles is used to tie the handles together in the upright position (Figure 17). With the drone in flight and the SideArm installed, the SideArm is extended all the way down. The drone is then positioned to face the Transport Basket. The drone elevation is adjusted until the Talon is at the same elevation as the Transport Basket handle. The drone is then flown forward bringing the Transport Basket handle into the Talon. The operator then closes the Talon and flies the drone upward with the Transport Basket (Figure 18). To release the basket, the drone is flown vertically down to the ground until the Transport Basket touches the ground. The Talon is then opened fully releasing the basket. The drone then flies vertically up and away without the Transport Basket. Warning: The Transport Basket is not intended to be dropped. Dropping may damage the basket or property or injure people. Never fly over anything or anyone that may be damaged or injured by an inadvertent release of the payload.
Page: 13 SideArm User Manual Document Number: i07178
Total Pages: 16 Date: 2018/04/18 Revision: 01
The information contained in this document is the sole property of GearWurx. Any reproduction in part or whole
without the written permission of GearWurx is prohibited. All rights reserved. © 2018.
Figure 17
Figure 18
Page: 14 SideArm User Manual Document Number: i07178
Total Pages: 16 Date: 2018/04/18 Revision: 01
The information contained in this document is the sole property of GearWurx. Any reproduction in part or whole
without the written permission of GearWurx is prohibited. All rights reserved. © 2018.
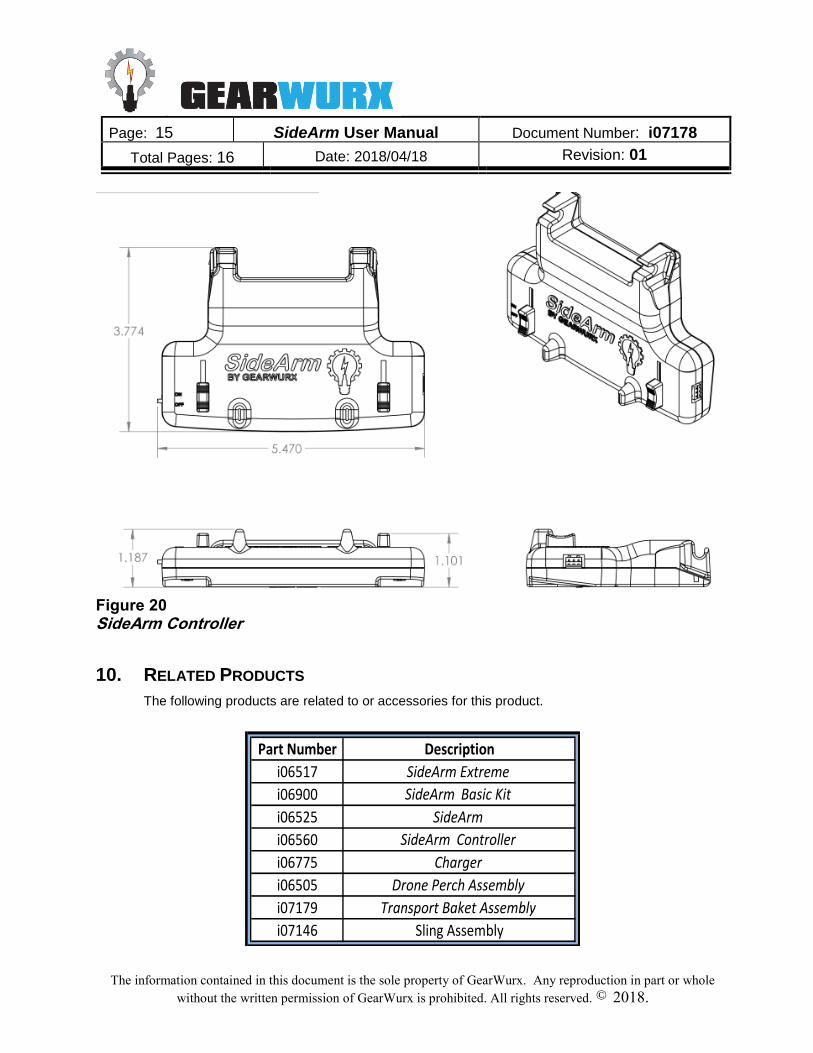
9. DRAWING
Figure 19 SideArm
Page: 15 SideArm User Manual Document Number: i07178
Total Pages: 16 Date: 2018/04/18 Revision: 01
The information contained in this document is the sole property of GearWurx. Any reproduction in part or whole
without the written permission of GearWurx is prohibited. All rights reserved. © 2018.
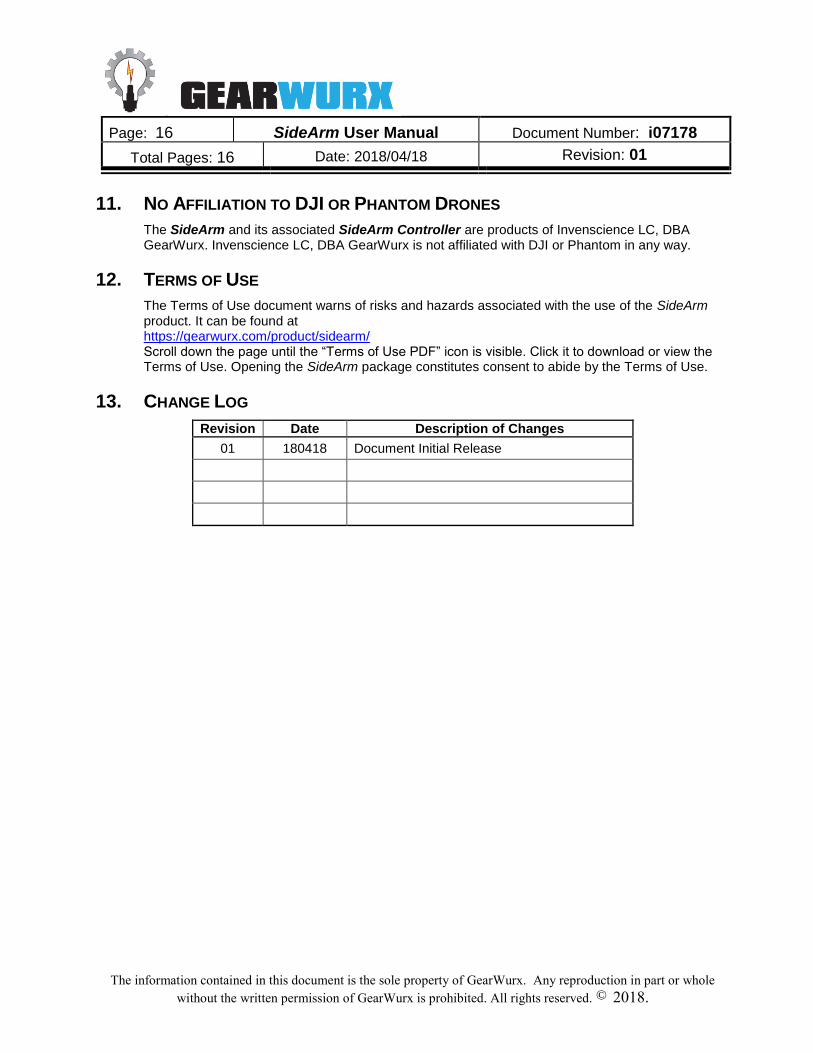
Figure 20 SideArm Controller
10. RELATED PRODUCTS
The following products are related to or accessories for this product.
Part Number Description
i06517 SideArm Extreme
i06900 SideArm Basic Kit
i06525 SideArm
i06560 SideArm Controller
i06775 Charger
i06505 Drone Perch Assembly
i07179 Transport Baket Assembly
i07146 Sling Assembly
Page: 16 SideArm User Manual Document Number: i07178
Total Pages: 16 Date: 2018/04/18 Revision: 01
The information contained in this document is the sole property of GearWurx. Any reproduction in part or whole
without the written permission of GearWurx is prohibited. All rights reserved. © 2018.
11. NO AFFILIATION TO DJI OR PHANTOM DRONES
The SideArm and its associated SideArm Controller are products of Invenscience LC, DBA GearWurx. Invenscience LC, DBA GearWurx is not affiliated with DJI or Phantom in any way.
12. TERMS OF USE
The Terms of Use document warns of risks and hazards associated with the use of the SideArm product. It can be found at https://gearwurx.com/product/sidearm/ Scroll down the page until the “Terms of Use PDF” icon is visible. Click it to download or view the Terms of Use. Opening the SideArm package constitutes consent to abide by the Terms of Use.
13. CHANGE LOG
Revision Date Description of Changes
01 180418 Document Initial Release


![933 dji phantom-4 spec-sheet-rev[1] - PLASTICASE · 2019. 10. 23. · 933 DJI™ PHANTOM 4 For all DJI™ Phantom 4 models Phantom 4 Phantom 4 Pro Phantom 4 Pro + 2.0 Phantom 4 RTK](https://img.pdfslide.net/doc/110x75/60c827405a7e465133218fc4/933-dji-phantom-4-spec-sheet-rev1-plasticase-2019-10-23-933-djia-phantom.jpg)