Embed Size (px)
Citation preview

Sign Administration Plan ReviewStep-by-step user guide to the electronic plan review process

SIGNS USER GUIDE Version 2.0 ELECTRONIC PLAN REVIEW3
SAVE PAPER, HELP THE ENVIRONMENT!
Revisions to User Guide 04
Overview 05
iPermits Registration 06
Complete an Application 11
Pay the Fees 19
Invitation to ProjectDox 21
Log into ProjectDox 22
Navigation Basics 23
Standards 25
Upload Files 27
Managing Files 29
Complete Assigned Task 30
Formal Review of Plans 33
Download Plans 35
Table of Contents

© HOUSTON PERMITTING CENTER SIGNS USER GUIDE Version 2.0www.hpceservices.org ELECTRONIC PLAN REVIEW4 5
OverviewELECTRONIC PLAN REVIEW
This document will guide first-time users through the electronic plan review (EPR) process for on-premises signs only, including wall, projecting, marquee, directional and ground signs. Off-premises signs must follow the current manual process (i.e. via paper plans).
Two online systems are used to complete the steps in the EPR process: iPermits and ProjectDox. The iPermits portal is used for the completion of permit applications, address verification and payments. The ProjectDox system is used to upload plans, receive and respond to comments, and download approved plans.
ProjectDox was upgraded from version 8.3 to verion 8.6. New features include:• Quick Review• Discussion Board• Add and remove team members• Improved browser support
Projects that were created prior to March 5, 2018 will see and interact with features from version 8.3, while those submitted after will interact with the new version. This user guide includes instructions for both versions of ProjectDox.
Revisions to User GuideVERSION 2.0
Version Published Date1.0 March 20172.0 March 2018
© HOUSTON PERMITTING CENTER SIGNS USER GUIDE Version 2.0www.hpceservices.org ELECTRONIC PLAN REVIEW6 7
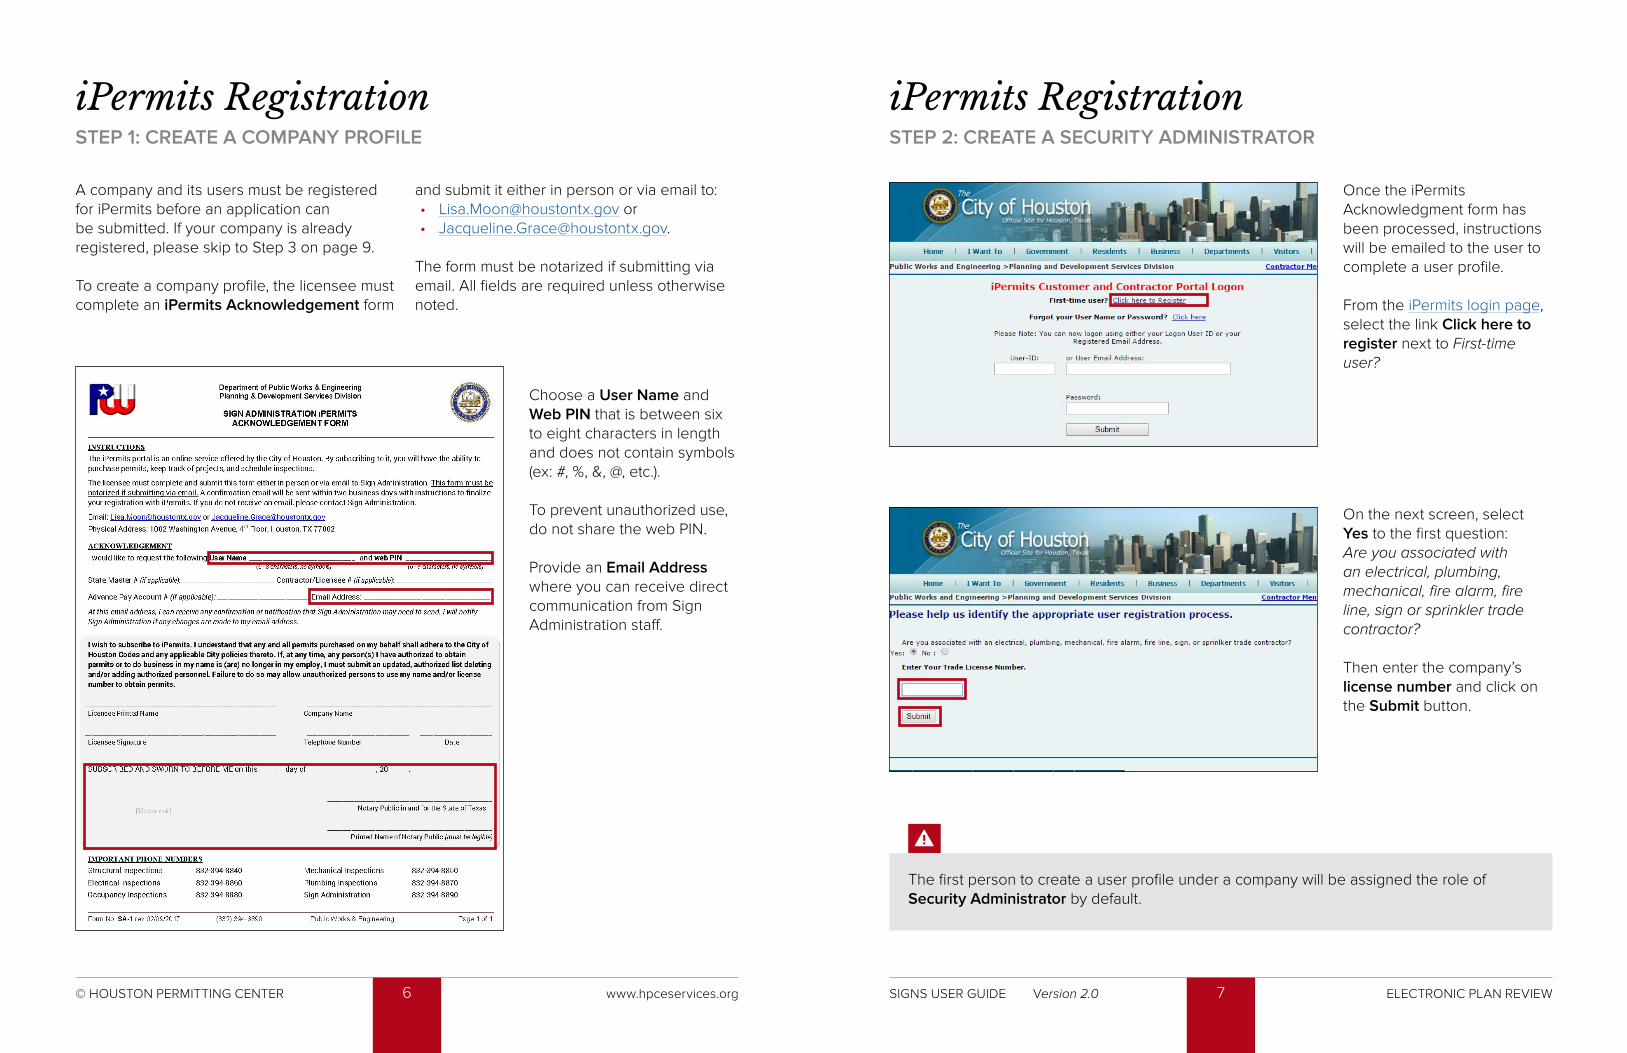
iPermits RegistrationSTEP 1: CREATE A COMPANY PROFILE
Choose a User Name and Web PIN that is between six to eight characters in length and does not contain symbols (ex: #, %, &, @, etc.).
To prevent unauthorized use, do not share the web PIN.
Provide an Email Address where you can receive direct communication from Sign Administration staff.
iPermits RegistrationSTEP 2: CREATE A SECURITY ADMINISTRATOR
Once the iPermits Acknowledgment form has been processed, instructions will be emailed to the user to complete a user profile.
From the iPermits login page, select the link Click here to register next to First-time user?
On the next screen, select Yes to the first question: Are you associated with an electrical, plumbing, mechanical, fire alarm, fire line, sign or sprinkler trade contractor?
Then enter the company’s license number and click on the Submit button.
A company and its users must be registered for iPermits before an application can be submitted. If your company is already registered, please skip to Step 3 on page 9.
To create a company profile, the licensee must complete an iPermits Acknowledgement form
and submit it either in person or via email to:• [email protected] or• [email protected].
The form must be notarized if submitting via email. All fields are required unless otherwise noted.
The first person to create a user profile under a company will be assigned the role of Security Administrator by default.

1
2
3
4
5
1
2
3
4
5
© HOUSTON PERMITTING CENTER SIGNS USER GUIDE Version 2.0www.hpceservices.org ELECTRONIC PLAN REVIEW8 9
Additional company users may self-register for iPermits under the company’s license number. From the iPermits login page, select the link Click here to Register.
Answer Yes to the first question. Enter the company’s license number and click on the Submit button.
1. Select the appropriate company and licensee from the list. The license information will display below.
2. Check the box for PIN Override.
3. Under Security Level select the option: The user being added is a staff member. Restrict his/her web portal access rights to my license.
4. Choose a User ID and Password between 6-8 characters.
5. Complete the remaining required fields and click on the Submit Add button.
The account is now pending activation by the Security Administrator(s).
iPermits RegistrationSTEP 2: CREATE A SECURITY ADMINISTRATOR
1. Select the appropriate company and licensee from the list. The license information will display below.
2. Enter the iPermits PIN submitted with the iPermits Acknowledgment form.
3. Under Security Level select the option: This is my license. Do not restrict user access.
4. Enter the User ID submitted with the iPermits Acknowledgment form. Choose a Password between 6-8 characters (no symbols).
5. Complete the remaining required fields and click on the Submit Add button.
The Security Administrator is responsible for managing corporate users, overseeing the advance pay account, and associating other licensed contractors or companies to the company profile. This role may be re-assigned once additional users are registered.
iPermits RegistrationSTEP 3: REGISTER ADDITIONAL USERS

1
2
3
4
© HOUSTON PERMITTING CENTER SIGNS USER GUIDE Version 2.0www.hpceservices.org ELECTRONIC PLAN REVIEW10 11
iPermits RegistrationSTEP 3: REGISTER ADDITIONAL USERS
1. The Security Administrator (SA) will receive an email whenever a new user account is requested. To approve a request, the SA will log into iPermits and select Corporate User Roster from the iPermits Online Service Menu.
2. Click on the User-ID with the Pending Activation status.
3. Change the User Status to Active. Optionally, you may assign the role of Corporate Security Administrator to the new user by checking the box.
4. Select the Update Profile button to complete activation.
To remove a user, change the user status to Inactive and un-check the box for Allow User Access to the company’s license(s).
Complete an ApplicationSIGN PERMIT APPLICATION
Log into your iPermits Portal account.
Under the iPermits Online Service Menu, click on the Sign Administration Plan Review Application button.
To submit a new application, click on the Begin New Application button.
A list of existing sign applications will display with their status in red. Click on an application number to continue the process.

© HOUSTON PERMITTING CENTER SIGNS USER GUIDE Version 2.0www.hpceservices.org ELECTRONIC PLAN REVIEW12 13
Complete the street number, abbreviated as Street No, and Street Name fields. Then click the Search for Address button.
Do not enter street directions (e.g. N, S, E, W) nor street types (e.g. Dr., Rd., Ave., etc.) into the address search.
Complete an ApplicationADDRESS SEARCH
Click on the correct street name from the generated list to continue.
If your street name does not appear, click on the button The needed street name is not listed and contact the Permits Section for assistance.
All sign applications must be associated with an address and a Certificate of Occupancy (CO). An erroneous address can delay the review process.
Complete an ApplicationCO SELECTION
From the generated list, click on the correct street number to continue.
If a suite, floor, or building number is not listed, click on the address that most closely matches.
If the street number is not listed, click on the button The needed property address is not listed and contact the Permits Section for assistance.
Select the appropriate Project No. which corresponds to the Certificate of Occupancy (CO) for that address.
Click on the Back button to return to the list of qualified addresses. If a project number is not listed, it is important to confirm that a CO exists for that address. Please contact Occupancy Inspections section or Open Records section for further assistance.

4
12
3
4
5
1
23
5
6
7
© HOUSTON PERMITTING CENTER SIGNS USER GUIDE Version 2.0www.hpceservices.org ELECTRONIC PLAN REVIEW14 15
Complete an ApplicationSIGN PERMIT APPLICATION - PAGE 1
1. Select the option Electronic/ProjectDox Plan Submission.
2. Choose the County in which the project is located. Note: if other parts of the project address are changed, the address verification process is triggered.
3. Choose the appropriate contractor license from the drop-down list.
4. Select the applicant's Relationship to project.
5. If the applicant is not the owner, complete the Owner Information fields.
6. Complete the Billing Information fields, if known.
7. Once all required fields are completed, click the Save & Continue button to go to the next page.
1. Enter a Project Description.
2. Enter the appropriate Sign Category. Click on the Review sign category guidelines button for assistance.
3. If the sign requires illumination, an Electrical Master must be identified on the application.• If electrical master licenses
have been associated with the Sign company profile, choose the appropriate license number from the drop-down list.
• Otherwise, enter the electrical master’s license number and license type (i.e. EM, EMS, ESM, or ESS) for the project.
4. Enter all sign attributes, messages, sign types, and illumination methods for up to five signs.
5. Once all required fields are completed, click the Update button. The page will refresh.
Complete an ApplicationSIGN PERMIT APPLICATION - PAGE 2
You will receive a project number for each sign entered. If you require more than five signs, please submit multiple applications.

1
2
3
3
4
2
1
© HOUSTON PERMITTING CENTER SIGNS USER GUIDE Version 2.0www.hpceservices.org ELECTRONIC PLAN REVIEW16 17
Complete an Application UPLOAD AFFIDAVIT
2. Select the Choose File button and navigate to the saved application file.
3. The selected file will be listed.
4. Click on the Begin Upload button to complete the upload.
1. Go back to Application Page 2 screen, and select the Documents Attached button to upload the notarized application.
Complete an ApplicationGENERATE AFFIDAVIT
After the page refreshes, two additional buttons will now appear at the top of Page 2. Click the Generate PDF button.
1. From the pop-up window, print or save the application.
2. If any proposed sign is a changeable message sign, please complete the Electronic (LED) Signs- Changeable Message and High Technology Acknowledgement Receipt section.
3. All applicants must sign and notarize the Deed Restrictions Compliance Affidavit section. Note: the full date (i.e. month, day and year) must be captured for proper notarization.
4. Scan and save the notarized application to your computer.
3
2
1
© HOUSTON PERMITTING CENTER SIGNS USER GUIDE Version 2.0www.hpceservices.org ELECTRONIC PLAN REVIEW18 19
Pay the Fees CREDIT CARD OR E-CHECK
On the Shopping Cart Maintenance screen, check the box of permit(s) to be paid. Then click the Make Online Payment via Credit Card or Electronic Check button.
Processed payments are indicated by a project number in red.
Review the payer information and update as needed. Select the Update Payer Information button to save the changes.
Then select the Continue the Credit Card/Electronic Check Payment Process button to be transferred to the Chase® Pay Connexion website. A receipt will be emailed to you from Chase. You may need to check your spam or junk folder.
Chase® Pay Connexion no longer charges a convenience fee for its service. Accepted credit card types include American Express, Visa, Discover, and MasterCard.
Complete an ApplicationFINALIZE APPLICATION
1. The page will refresh and the attached files will be dis-played with a green document number. Click on the button to review the uploaded file.
DO NOT UPLOAD PROJECT DRAWINGS.
2. To finalize and submit the application to Sign Administration, click on the Application Page 2 button.
3. Scroll to the bottom of Application Page 2 and click on the Finalize Application button.
Upon finalizing the application, the plan exam fee and site inspection fee are due.
If address verification is required, the Finalize Application button will not be visible. Once approval is granted, the applicant will be notified via email to proceed with finalization.

© HOUSTON PERMITTING CENTER SIGNS USER GUIDE Version 2.0www.hpceservices.org ELECTRONIC PLAN REVIEW20 21
If an Advanced Pay Account (APA) has been established, this payment option will be included on your Shopping Cart Maintenance screen.
Check the box of permit(s) to be paid, then click the Charge This to My APA Account button.
Pay the Fees ADVANCED PAYMENT ACCOUNT
Select the appropriate account number associated with your iPermits user profile. Then click on the Submit APA Payment button to complete the transaction.
Don’t want to pay for the fees? A third-party can import a shopping cart number to their iPermits user account and complete the sales transaction.
Once payment is received, an invitation email will be sent to the applicant to upload plans into ProjectDox for review.
For new users, the invitation will contain a temporary password. Subsequent project invitations will not contain a password.
First-time users should review the User PC Settings guide to ensure proper configuration of web browsers and computer settings. Your browser must allow for pop-ups from the ProjectDox site.
Depending upon your organization’s security settings, a network administrator or IT department may need to complete the steps required for system set up.
From the invitation, click on the Login to ProjectDox link or Project Access link to open the login page using your default web browser or copy and paste the link into another web browser.
Invitation to ProjectDoxNEW USER ACCOUNT
SAMPLE INVITATION

© HOUSTON PERMITTING CENTER SIGNS USER GUIDE Version 2.0www.hpceservices.org ELECTRONIC PLAN REVIEW22 23
Log into ProjectDoxNEW USER ACCOUNT
Enter your email address and temporary password and click the Login button. Note: the password is case sensitive.
Complete the required Profile Information fields in yellow:• Change your password • Create a security question
and answer • Contact information
Click the Save button to continue onto the home page. You will use the password that you entered in your Profile page thereafter.
Should you forget your new password, click on the Forgot Your Password? link on the login page. You will be prompted to enter your email address, first name and last name to display your security question.
Note: this feature requires that the user has logged in at least once and no longer has a temporary password.
ProjectDox can be used in multiple browsers, including Chrome, Safari, FireFox, Edge and Internet Explorer. It can be used on Windows or Mac devices.
Navigation BasicsHOME PAGE LAYOUT & TOOLBARS
The home page appears after completing your profile on your first login and appears immediately after future successful logins. It displays:• Active Projects List• Standard Workflow Task
List• ProjectFlow Task List
The Active Projects List shows information about every project of which you are the main applicant or a project member including project number, description and status.
Each project moves through a series of steps called a workflow. The status changes to reflect its progress through the workflow:• First Submission Pending• Routing• Awaiting Review• In Review• Resubmit Requested• Resubmit Received• Final Processing• Approved• Rejected
The most recently accessed projects are listed by default, with the most recent at the top. Select the All Projects button to display all projects to
which you have been invited. Select the Recent Projects button to go back to the default view.
To move to the next step in the workflow, tasks must be completed. Those assigned to the main applicant either display under the Standard Workflow Task List (for projects submitted prior to March 5, 2018) or the ProjectFlow Task List (for projects submitted on or after March 5).
All lists are set to display a limited number of entries at a time. Use these buttons
to move to the first, previous, next, or last page in the list. The lists can be sorted by clicking on a column header.
Your primary navigation buttons are located in the upper right corner of the home page: • The Back and Forward
buttons function much like the back and forward buttons in a web browser, taking you to the screen you previously or subsequently viewed.
• The Projects button will take you back to the home page.
• The Profile button will take you to your User Profile, where you can edit your personal information or change your password.
• The Reload button will refresh the current page you are on.
• The Search button allows you to search for a project based on the key information entered into the Project Info Page, or it allows you to search for keywords within a project.
• The Help button takes you to the ProjectDox help site. Use the index or search functions to find instructions on specific aspects of ProjectDox.
• The Logout button logs you out of ProjectDox.
• The Task List button will display all of your outstanding tasks in a separate pop-up window.
• The Press Enter to Search field will search the columns under the Active Projects List.

© HOUSTON PERMITTING CENTER SIGNS USER GUIDE Version 2.0www.hpceservices.org ELECTRONIC PLAN REVIEW24 25
SAMPLE HOME PAGE
Navigation BasicsHOME PAGE LAYOUT & TOOLBARS
Prior to upload, ensure that all files comply with the following standards. Failure to meet the City’s standards may delay your review.
ACCEPTED FILE TYPES• Supported file types for
documents include DOC, DOCX, PDF, XLS, XLSX, JPEG, GIF, PNG, etc.
• Vector PDF, DWG, DGN, DWF, etc. files will be acceptable for drawings.
BORDER STANDARDS• 1” clear border with a 4 ½”
title block• Reserve 2 ½” W X 3 ½”
H area on the upper right corner of the drawing for the approval stamp.
• The City of Houston’s approval stamp will be placed on all drawing and document pages and will be opaque to read text or images underneath.
• The City of Houston requires that plans be uploaded in an approved format, to scale, with a
minimum output dimension of 8.5” x 11”.
FILE NAMING CONVENTIONSAll file names are limited to 40 characters.
File names for drawings should include the first character of the discipline name, followed by the 3-digit sheet number and a short description of the file. If decimals are needed in the sheet number, place a decimal after the third digit, for example: S.001.99.Corrected files should always be resubmitted with the SAME FILE NAME as the original submittal.
Note: If this is not followed the submitted file will appear as a NEW file, and not a correction to an existing file.
FOLDER STRUCTUREFiles are securely managed through a pre-defined folder structure. Users cannot
rename or add folders to the structure. • Drawings• Documents and Photos• Approved• Reject• Changemark Reports
All drawings should be uploaded as single-page files into the Drawings folder. (Ex: 4 electrical pages = 4 files in the drawings folder).
All documents (any non-drawing files, supporting documents, etc.) should be uploaded as multi-page files into the Documents and Photos folder.
MARKUP NAME AND COLOR STANDARDSStandard markup names and colors will be used for each reviewing discipline for easy identification. A markup can have more than one changemark. Changemarks are created to quickly identify a markup and associated comments.
StandardsFILE TYPES AND BORDERS
Drawings should be uploaded in landscape mode.

© HOUSTON PERMITTING CENTER SIGNS USER GUIDE Version 2.0www.hpceservices.org ELECTRONIC PLAN REVIEW26 27
Drawing Type Discipline Sheet No. ExampleDemo D 000-999 D.001Architectural A 000-999 A.010.PARTITION TYPESLandscape/Site Plan L 000-999 L.018 SURVEYStructural S 000-999 S.022.FIRST FLOOR FRAMINGElectrical E 000-999 E.004-LIGHTING PLANPlumbing P 000-999 P.005.99_NOTES & SCHEDULES
StandardsFILE NAMING AND FOLDER STRUCTURE
Upload FilesFIRST SUBMISSION
To access a project’s files and folders, select the appropriate project number link under the Project column from either the Active Projects List or the Task List.
1. Click on the name of the folder to which you want to upload.
2. On the next screen select the Upload Files button. A pop-up window will appear to upload files.
Select the View Folders button to go back to the list of folders.

© HOUSTON PERMITTING CENTER SIGNS USER GUIDE Version 2.0www.hpceservices.org ELECTRONIC PLAN REVIEW28 29
With the HTML5 uploader, you can upload up to 200 files at a time or up to 10 GB, whichever comes first. A single file cannot be more than 2MB.
There are two ways to batch upload files. Either click the Browse for Files button and navigate to your files or drag and drop files in between the gray dashed lines ---
Then click the Upload Files button. A confirmation window will pop up.
By default, up to 5 files can be uploaded at the same time. 1. Select Choose File and navigate to the file.
2. Select the file and click Open.
3. Once all 5 files have been selected, click the Upload button.
Upload FilesFIRST SUBMISSION
The thumbnail images do not need to finish processing before uploading files to another folder.
Managing FilesADD, DELETE AND SORT
Once files are uploaded to a folder, thumbnail images of the files will be visible, along with the filename, upload date and time, file size, and name of the user who uploaded that file.
Files may be sorted in ascending or descending order by file name, date, and uploaded by.
To upload more files to the selected folder, click on
the Upload Files button and repeat the process on previous page. To upload files into another folder, click on the View Folders button.
If a file is uploaded to the wrong folder, check the box next to the file name and select the red “X” icon.
To delete all files in a folder, check the box at the top of the list and then click on delete
icon in the top row.
The ability to delete files is permitted whenever a task is assigned to the applicant. Files with markups cannot be deleted.
Individuals invited to a project will not have this ability and should contact the main applicant to have files deleted.

© HOUSTON PERMITTING CENTER SIGNS USER GUIDE Version 2.0www.hpceservices.org ELECTRONIC PLAN REVIEW30 31
To notify the City of Houston that your plans are ready for review, the applicant must complete the ApplicantUpload task.
An email notification is sent to the applicant when the task is assigned. Reminder notifications are sent at designated intervals while the task is outstanding, up to 180 days.
Alternatively, tasks can be accessed via the Standard Workflow Task List or the ProjectFlow Task List on the home page.
Under the Task column, select the link for the corresponding project.
The eForm will pop up in a new window.
Complete Assigned TaskAPPLICANT UPLOAD
From the project’s main page, click on the Workflow Portals button to display the assigned task. Click on the Applicant Upload task link, and then click OK to accept ownership of the task.
If the files are not ready for review by City staff, click on the Save & Close button to close the eForm.
If the files are ready for review, click the Submission Complete- Notify Sign Administration button. Once the button is clicked, all access to modify files is removed and your project status will now update from First Submission Pending to Routing.
Through the eForm, the main applicant can invite individuals to the project to upload and/or view files. Invited users cannot complete a task, however they will receive the same email notifications that the main applicant receives about the assigned task.
Enter the individual's name and email address. Then select the Invite User link. An email will be sent to the user to create an account. In Version 8.3, invited users cannot be removed.
Complete Assigned TaskAPPLICANT UPLOAD
VERSION 8.3

© HOUSTON PERMITTING CENTER SIGNS USER GUIDE Version 2.0www.hpceservices.org ELECTRONIC PLAN REVIEW32 33
Formal Review of PlansPROCESS OVERVIEW
The City’s Coordinator group will assign the Plan Analyst and performs routing to the required review departments. Each assigned department may approve or reject their review, and may add a status, check list comments, free form comment and/or changemark to the drawings.
If all reviews have been approved, the Coordinator applies the final City of Houston approval stamp and the applicant will receive an Approved email with instructions.
In version 8.3, if at least one reviewer has selected “Rejected”, the applicant will receive
an email notification of the ApplicantResubmit task with instructions on how to resubmit to fix the issues. An task is not assigned until all assigned Plan Analysts have completed their review.
In version 8.6, a new feature called Quick Review may help shorten the approval process. Quick Reivew is an ad-hoc workflow tool that enables a Plan Analyst to ask questions or request additional information from the applicant independent of the master workflow. This new feature could prevent a project from having to be resubmitted through another review cycle entirely.
Complete Assigned TaskAPPLICANT UPLOAD
If the files are not ready for review by City staff, click on the Complete Later button to close the eForm.
If the files are ready for review, check the box acknowledging that all required files have been uploaded to reveal the Submission Complete- Notify Sign Administration button. Once clicked, all access to modify files is removed. A confirmation email is sent and your project status update from First Submission Pending to Routing.
Through the eForm, the main applicant can invite or remove individuals to the project. Click on the Invite Owner tab. Under Additional Team Members section, enter the individual’s name, email address, and then click on the Invite User button. An email will be sent to the user to create an account. Under Remove Team Members section, select the User name from the drop down list and click Remove User button.
VERSION 8.6

© HOUSTON PERMITTING CENTER SIGNS USER GUIDE Version 2.0www.hpceservices.org ELECTRONIC PLAN REVIEW34 35
To complete the ApplicantResubmit task: 1. Log into ProjectDox and select the
Applicant Resubmit task link from the Standard Workflow Task List or ProjectFlow Task List.
2. A dialog box displays, Do you want to accept this task? Select OK to accept responsibility for completing the task.
3. Comments may be found in three sections in the eForm: • View Changemark Item button • View/Edit Checklist Items button • Reviewer Comments table
4. Make corrections to the files and upload them to their orginal folder and with their original file name (i.e. do not rename v2). Keeping the same name allows for automatic versioning.
5. Complete the Applicant Comments box.
6. Once revisions are complete, select the check boxes to enable the Resubmit Complete button.
7. Select the Resubmit Complete button. • Click OK on the dialog message to
complete the task and close the eForm.• Click Close to remain on the current view.
Selection of the Complete and OK buttons will update the project status to Resubmit Received. In addition, an email notification will be sent to the applicant confirming the resubmittal was received.
Formal Review of PlansAPPLICANT RESUBMIT TASK
Download PlansAPPROVED PLAN SET
After all departments have approved their review, each page of the approved plan set will be stamped with the City of Houston seal in red, and a cover sheet will be stamped by each individual reviewer. An email will be sent indicating the files are available for download in the Approved folder. It will also include the remaining balance due prior to starting construction.
To download the entire folder, select the box at the top of the thumbnails. Uncheck any pages that you do not want to download. When your selection is complete, click on the download icon.
A single zip file will be created for the selected pages.
Click the Download Zip File button to continue. Select Save or Save As in the pop-up window.
The approved plan set must be printed at a minimum size of 8.5” x 11” and kept on the job site throughout the duration of construction.

© HOUSTON PERMITTING CENTER www.hpceservices.org36
Thanks for using electronic plan review!
If you need further assistance, please contact us via email [email protected].
Live chat is available during regular business hours (8 am to 5 pm)at www.hpceservices.org.
1002 Washington AvenueHouston, Texas 77002
www.houstonpermittingcenter.org