Embed Size (px)
Citation preview
Silect MP Author for Microsoft
System Center Operations Manager
Silect Software’s
MP Author/MP Author Pro
User Guide
Mar 30, 2018

MP Author User Guide 1 Copyright © 2018 Silect Software, Inc. All rights reserved. Unauthorized reproduction or distribution prohibited
Disclaimer The information in this document is furnished for informational use only and is subject to change without
notice. Silect Software, Inc. assumes no responsibility or liability for any errors or inaccuracies that may
appear in this document.
The information contained herein is the property of Silect Software, Inc. and is strictly confidential. Except
as expressly authorized in writing by Silect Software, Inc., the holder of this document shall keep all
information contained herein confidential. Except as expressly authorized in writing by Silect Software,
Inc., the holder is granted no rights to use, reproduce, or otherwise disclose or disseminate the
information contained herein.
Copyright © 2018
Silect Software, Inc.
6333 Rideau Valley Dr. N.
Manotick, Ontario K4M 1B3
Canada
www.silect.com

MP Author User Guide 2 Copyright © 2018 Silect Software, Inc. All rights reserved. Unauthorized reproduction or distribution prohibited
Contents Contents ......................................................................................................................................... 2
Preface ........................................................................................................................................... 4
About Silect Software’s MP Author User Guide .......................................................................................................................................... 4
Audience ...................................................................................................................................................................................... 4 Document conventions ................................................................................................................................................................. 4
Command syntax .................................................................................................................................................................... 4 Notes, tips and cautions .......................................................................................................................................................... 5
Chapter 1 ........................................................................................................................................ 6
About Silect MP Author/MP Author Pro ........................................................................................................................................................ 6
Hardware and software requirements .......................................................................................................................................... 6
Differences Between MP Author & MP Author Pro ...................................................................................................................................... 6
Chapter 2 ........................................................................................................................................ 7
Installing and configuring Silect MP Author ................................................................................................................................................ 7
Prerequisites ................................................................................................................................................................................ 7 Installing and Uninstalling Silect MP Author ................................................................................................................................. 7 Configuring Silect MP Author ....................................................................................................................................................... 7 Configuring Operations Manager to Monitor SNMP Devices ....................................................................................................... 8
Chapter 3 ........................................................................................................................................ 9
Working with Silect MP Author ...................................................................................................................................................................... 9
Starting Silect MP Author ............................................................................................................................................................. 9 To Open the Silect MP Author Console .................................................................................................................................. 9 To Troubleshoot Silect MP Author Startup Problems ............................................................................................................. 9
Creating New Management Packs ............................................................................................................................................... 9 To Start the Management Pack Creation Wizard .................................................................................................................. 10 Empty Management Pack ..................................................................................................................................................... 11 Single Server Management Pack .......................................................................................................................................... 11 Distributed Application Management Pack ........................................................................................................................... 14
Customizing Existing Management Packs ................................................................................................................................. 15 Adding and Editing Folders ................................................................................................................................................... 16 Adding and Editing Classes and Discoveries ........................................................................................................................ 17 Adding and Editing Rules ...................................................................................................................................................... 24 Adding and Editing Monitors ................................................................................................................................................. 28 Adding and Editing Views ..................................................................................................................................................... 36 Adding and Editing Relationships ......................................................................................................................................... 39 Adding and Editing Secure References ................................................................................................................................ 40 Adding and Editing Tasks ..................................................................................................................................................... 41 Adding and Editing Diagnostics and Recoveries .................................................................................................................. 42 Authoring with Fragments ..................................................................................................................................................... 44 Creating Fragments .............................................................................................................................................................. 45 Editing Fragments ................................................................................................................................................................. 47
MP Author User Guide 3 Copyright © 2018 Silect Software, Inc. All rights reserved. Unauthorized reproduction or distribution prohibited
Managing Fragments ............................................................................................................................................................ 48 Management Pack Options ........................................................................................................................................................ 48
Chapter 4 ...................................................................................................................................... 55
Getting Technical Support ........................................................................................................................................................................... 55
Self–Service Support Portal ....................................................................................................................................................... 55 Electronic Support ...................................................................................................................................................................... 55 Premium Support ....................................................................................................................................................................... 55 Other Resources ........................................................................................................................................................................ 55
MP Author User Guide 4 Copyright © 2018 Silect Software, Inc. All rights reserved. Unauthorized reproduction or distribution prohibited
Preface
About Silect Software’s MP Author User Guide The Silect Software’s MP Author User Guide describes how to install, configure, work with and
troubleshoot MP Author for use with Microsoft System Center Operations Manager. It contains the
following chapters:
• About Silect MP Author/MP Author Pro
• Installing and configuring Silect MP Author
• Working with Silect MP Author
• Getting Technical Support
Audience This document is intended for the following users:
• Network planners
• Installers
• Administrators
• Operators
• Maintenance personnel
Document conventions This document uses bold to identify the following:
• File and directory names, as follows:
For details, refer to the readme.txt file.
• User interface names, titles, buttons, and tabs, as follows:
To display the Open dialog, choose File, Open... • Command names, as follows:
To display a list of available diagnostics, use the show list command.
Command syntax Table 1: Command syntax rules describes the command syntax rules used in this document.
Table 1: Command syntax rules
Syntax format Description
Bold Commands and keywords. Enter command line arguments
that are in bold exactly as written.
<variable> Variables. You must substitute a value for command line
arguments that are enclosed in angle brackets.
[optional keyword] Optional keywords or <variables>. Enter command line
MP Author User Guide 5 Copyright © 2018 Silect Software, Inc. All rights reserved. Unauthorized reproduction or distribution prohibited
[<optional variable>] arguments that are enclosed in square brackets, if desired.
{ a | b | c }
{<a> | <b> | <c>}
Required alternate keywords or <variables>. You must
choose one command line argument enclosed within the
braces. Choices are separated by vertical (OR) bars.
[ a | b | c ]
[<a> | <b> | <c>]
Optional alternate keywords or <variables>. Choose one
command line argument enclosed within the braces, if
desired. Choices are separated by vertical (OR) bars.
Notes, tips and cautions Notes and cautions are used to alert you to important information or risks.
Notes
Notes use the following convention:
Note Take note. Contains important and helpful information.
Tips
Tips use the following convention:
Tip Review and consider. An alternative or faster method is being suggested.
Cautions
Cautions use the following convention:
CAUTION! Be careful. In this situation, you might do something that could result in a service
interruption, or the loss of data.

MP Author User Guide 6 Copyright © 2018 Silect Software, Inc. All rights reserved. Unauthorized reproduction or distribution prohibited
Chapter 1
About Silect MP Author/MP Author Pro Silect Software’s MP Author is a management pack (MP) design, development and customization
software program for Microsoft System Center Operations Manager (SCOM) 2012, 2016 or 1801. It
allows users to create completely new MPs or customize existing MPs—whether they are provided by
Microsoft or by other third-party vendors.
This chapter provides an overview of the functionality of Silect MP Author. It contains the following
sections:
• Hardware and software requirements
• Differences Between MP Author & MP Author Pro
Hardware and software requirements Please refer to the MP Author Installation Guide for hardware and software requirements.
Differences Between MP Author & MP Author Pro There is a single installation used for both MP Author and MP Author Pro – the software for the two
versions are identical. The only difference between the two is that MP Author Pro has a valid license file,
which if it exists, is used to turn on the professional level authoring features, not available in the free
version. If you purchase MP Author Pro this license file will be provided to you by Silect.
When this document describes features in MP Author, these features will also be included in MP Author
Pro. MP Author Pro contains all the features in MP Author, along with additional advanced authoring
capabilities not available in the free MP Author product. MP Studio also provides the same level of
professional authoring provided by MP Author Pro.
MP Author User Guide 7 Copyright © 2018 Silect Software, Inc. All rights reserved. Unauthorized reproduction or distribution prohibited
Chapter 2
Installing and configuring Silect MP Author This chapter describes the requirements and procedures for installing, configuring and uninstalling Silect
MP Author. It contains the following sections:
• Prerequisites.
• Installing Silect MP Author.
• Configuring Silect MP Author.
• Uninstalling Silect MP Author.
• Configuring Operations Manager to Monitor SNMP Devices.
Prerequisites Please refer to the MP Author Installation Guide for prerequisites.
Installing and Uninstalling Silect MP Author Please refer to the MP Author Installation Guide for installation and removal instructions.
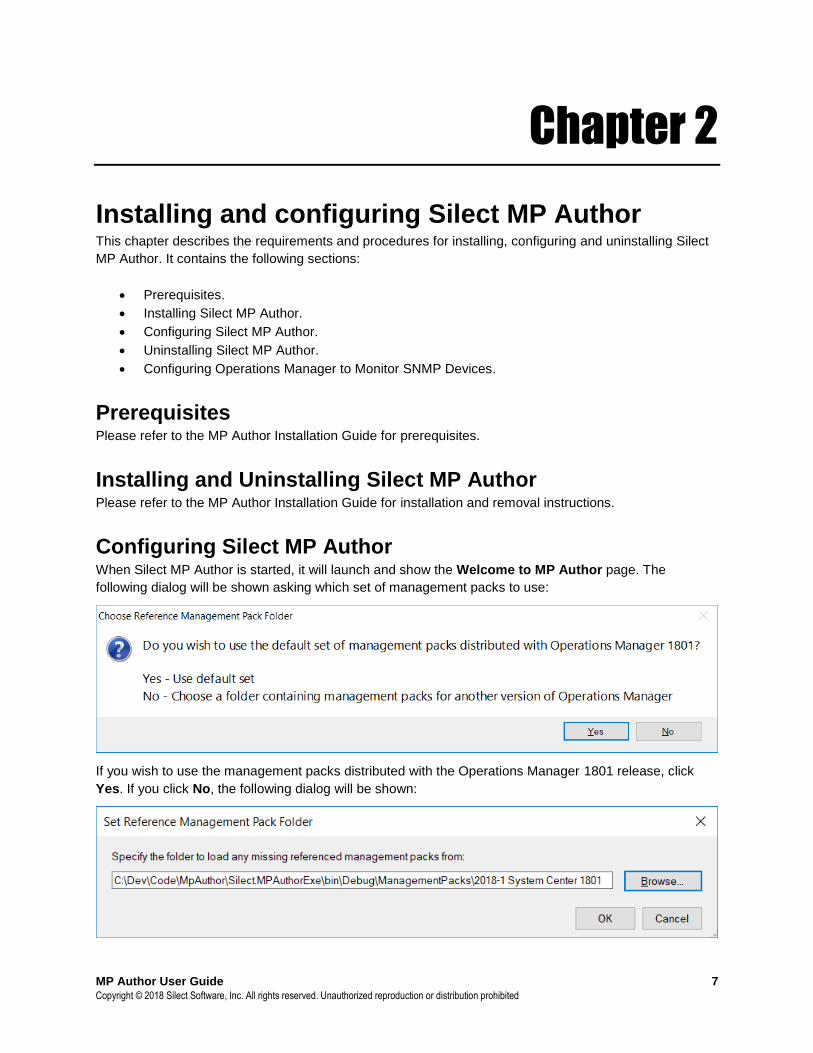
Configuring Silect MP Author When Silect MP Author is started, it will launch and show the Welcome to MP Author page. The
following dialog will be shown asking which set of management packs to use:
If you wish to use the management packs distributed with the Operations Manager 1801 release, click
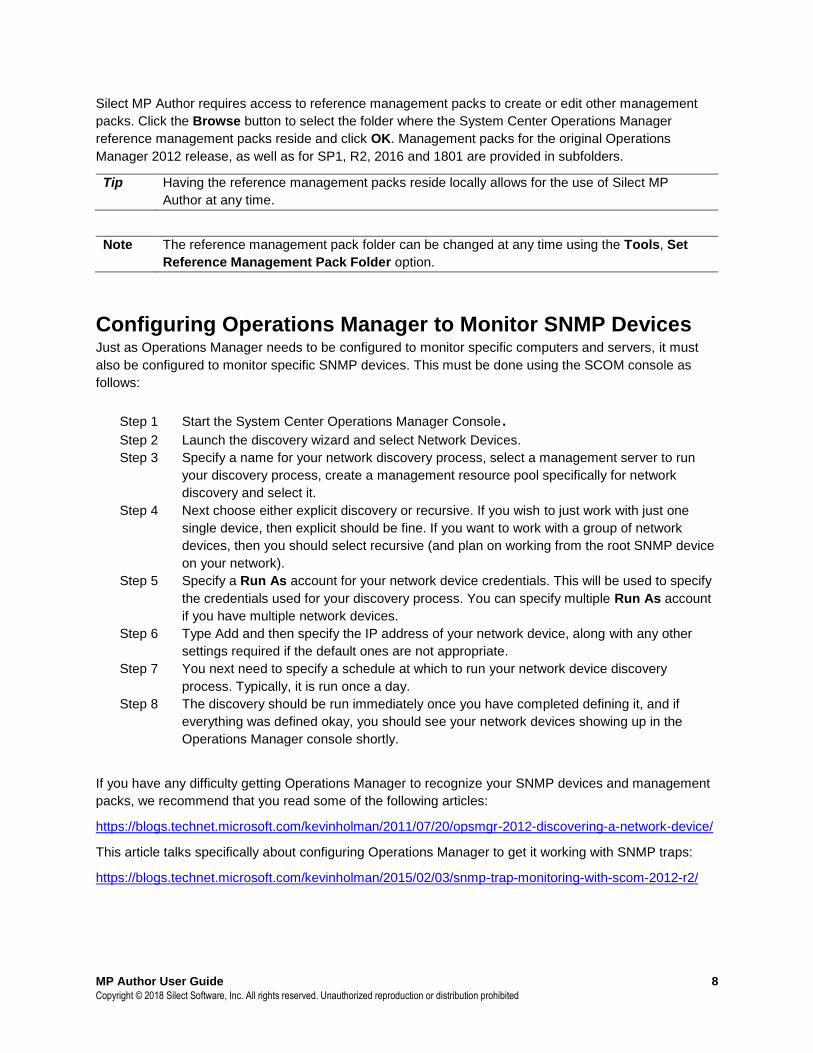
Yes. If you click No, the following dialog will be shown:
MP Author User Guide 8 Copyright © 2018 Silect Software, Inc. All rights reserved. Unauthorized reproduction or distribution prohibited
Silect MP Author requires access to reference management packs to create or edit other management
packs. Click the Browse button to select the folder where the System Center Operations Manager
reference management packs reside and click OK. Management packs for the original Operations
Manager 2012 release, as well as for SP1, R2, 2016 and 1801 are provided in subfolders.
Tip Having the reference management packs reside locally allows for the use of Silect MP
Author at any time.
Note The reference management pack folder can be changed at any time using the Tools, Set
Reference Management Pack Folder option.
Configuring Operations Manager to Monitor SNMP Devices Just as Operations Manager needs to be configured to monitor specific computers and servers, it must
also be configured to monitor specific SNMP devices. This must be done using the SCOM console as
follows:
Step 1 Start the System Center Operations Manager Console. Step 2 Launch the discovery wizard and select Network Devices.
Step 3 Specify a name for your network discovery process, select a management server to run
your discovery process, create a management resource pool specifically for network
discovery and select it.
Step 4 Next choose either explicit discovery or recursive. If you wish to just work with just one
single device, then explicit should be fine. If you want to work with a group of network
devices, then you should select recursive (and plan on working from the root SNMP device
on your network).
Step 5 Specify a Run As account for your network device credentials. This will be used to specify
the credentials used for your discovery process. You can specify multiple Run As account
if you have multiple network devices.
Step 6 Type Add and then specify the IP address of your network device, along with any other
settings required if the default ones are not appropriate.
Step 7 You next need to specify a schedule at which to run your network device discovery
process. Typically, it is run once a day.
Step 8 The discovery should be run immediately once you have completed defining it, and if
everything was defined okay, you should see your network devices showing up in the
Operations Manager console shortly.
If you have any difficulty getting Operations Manager to recognize your SNMP devices and management
packs, we recommend that you read some of the following articles:
https://blogs.technet.microsoft.com/kevinholman/2011/07/20/opsmgr-2012-discovering-a-network-device/
This article talks specifically about configuring Operations Manager to get it working with SNMP traps:
https://blogs.technet.microsoft.com/kevinholman/2015/02/03/snmp-trap-monitoring-with-scom-2012-r2/
MP Author User Guide 9 Copyright © 2018 Silect Software, Inc. All rights reserved. Unauthorized reproduction or distribution prohibited
Chapter 3
Working with Silect MP Author This chapter describes how to work with Silect MP Author. It contains the following sections:
• Starting Silect MP Author.
• Creating new management packs.
• Customizing existing management packs.
• Management Pack Options.
Starting Silect MP Author Once Silect MP Author has been installed, it will be added to the Start menu and as well a shortcut will be
added to the desktop on the system where it is installed. This section describes how to start Silect MP
Author and how to troubleshoot if Silect MP Author doesn’t start properly.
Note Before starting the Silect MP Author console for the first time ensure the location of the
reference management packs is known.
To Open the Silect MP Author Console Step 1 Click the Start menu, locate and select Silect and click MP Author.
Step 2 The Silect MP Author console should appear and the Welcome to MP Author page will be
displayed.
To Troubleshoot Silect MP Author Startup Problems If there are errors or problems when starting Silect MP Author, please ensure the hardware and software
prerequisites are met including the installation and operation of the System Center Operations Manager
console on the system where Silect MP Author is installed. Once these prerequisites are met please see
the section entitled Contacting Technical Support for further assistance.
Creating New Management Packs There are several scenarios where the creation of a new management pack (MP) is required. For
example, an MP may not exist for a specific application you need to monitor with Operations Manager. Or
perhaps the MP that came with a system you are managing is not meeting your needs and a new MP
with more (or less) information can optimize the management of the system.
Silect MP Author supports a wizard-based MP creation capability. You will be guided through creating the
key elements of an MP and when the wizard completes you can further modify the MP to meet your
requirements. In virtually all cases the Management Pack Creation Wizard allows you to browse the
application or system you are building the MP for which provides an easier, more accurate means of
defining the necessary MP elements.
MP Author User Guide 10 Copyright © 2018 Silect Software, Inc. All rights reserved. Unauthorized reproduction or distribution prohibited
Tip Before starting the Management Pack Creation Wizard, ensure you have network access
to the system or application you are creating an MP for. Credentials used for browsing can
be managed using the Tools, Manage Server Credentials menu command.
Note It is recommended to have a separate file folder structure for each MP that you plan on
creating. Creating separate MPs for each application or device is recommended, rather than
having one MP which monitors several unrelated applications and/or devices.
To Start the Management Pack Creation Wizard
Step 1 From the Silect MP Author console click the New toolbar icon ( ) or go to File, New.
Step 2 The Management Pack Creation Wizard Introduction screen will be displayed. Click
Next.
Step 3 Input manifest information for the management pack including name, display name,
version and a description. Click Next.
Step 4 Specify or use the Browse button select an existing folder to be used as the management
pack working folder. Click Next.
Note It is recommended to have a separate file folder structure for each MP that you plan on
creating.
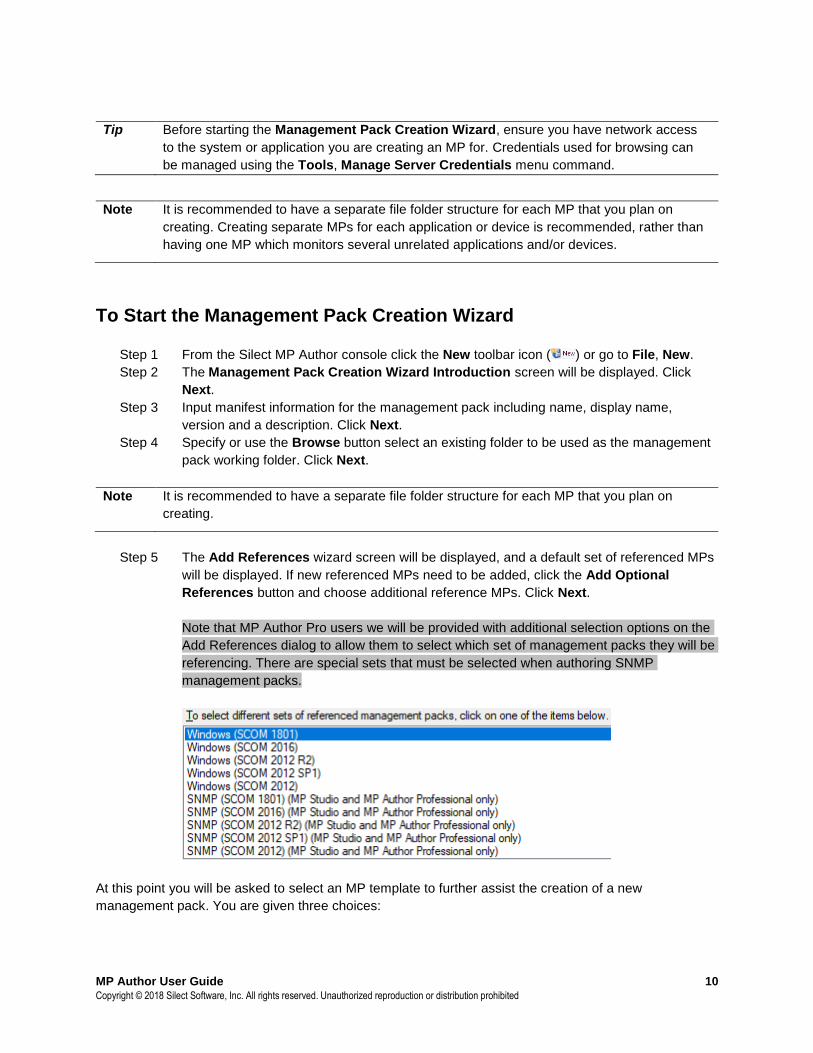
Step 5 The Add References wizard screen will be displayed, and a default set of referenced MPs
will be displayed. If new referenced MPs need to be added, click the Add Optional
References button and choose additional reference MPs. Click Next.
Note that MP Author Pro users we will be provided with additional selection options on the
Add References dialog to allow them to select which set of management packs they will be
referencing. There are special sets that must be selected when authoring SNMP
management packs.
At this point you will be asked to select an MP template to further assist the creation of a new
management pack. You are given three choices:
MP Author User Guide 11 Copyright © 2018 Silect Software, Inc. All rights reserved. Unauthorized reproduction or distribution prohibited
• Empty Management Pack: Select this option if you are a more advanced user and would like to
work with an empty MP with minimal details required by the wizard. The Empty Management
Pack template requires the user to manually configure all elements of the MP.
• Single Server Application: Select this option to create a new MP that targets a single
component (application or Windows Service etc.).
• Distributed Application: Select this option to create a new MP that targets a distributed
application. Distributed applications typically have a back-end database, service middle tier and a
client front-end.
Follow the appropriate section below that corresponds to the type of MP you are creating.
Empty Management Pack This option is for an advanced user who wants to manually create all elements of an MP. To create a new
empty MP, follow these steps:
Step 1 From the Select the MP Template to Use wizard screen select the Empty Management
Pack option. Click Next.
Step 2 At the Create the Management Pack wizard screen click Finish.
At this point a new MP will be created and you will be returned to the Silect MP Author designer window
to manually make changes to the MP.
Single Server Management Pack This option is for an advanced user who wants to create an MP for a simple application or system
consisting of a single component. To create a new single server MP, follow these steps:
Step 1 From the Select the MP Template to Use wizard screen select the Single Server
Application option. Click Next.
Note You will next be guided through the creation of classes with discoveries and monitors for
your single server MP.
Step 2 At the Define the Role (Target) the MP will monitor wizard screen, select the appropriate
setting used to discover the application. Choices are Registry Setting, Script Setting or
WMI Setting.
Follow the appropriate section below that corresponds to the type of role being added to the MP.
Creating a New Windows Registry Target A registry target is used to identify the existence of an application or system using a registry entry or
value. To create a new registry target:
Step 1 At the Define the Role (Target) the MP will monitor wizard screen click Use Registry
Setting.
Step 2 Follow the instructions, starting at Step 2 from Creating a New Windows Registry Target
below.
MP Author User Guide 12 Copyright © 2018 Silect Software, Inc. All rights reserved. Unauthorized reproduction or distribution prohibited
When you have completed adding a new registry target you will be returned to the Management Pack
Creation Wizard. Click Next to create monitors to be added to the MP. See the sections below on adding
monitors to the MP.
Creating a New Windows Script Target A script target is used to identify the existence of an application or system using the results of running a
script. To create a new script target:
Step 1 At the Define the Role (Target) the MP will monitor wizard screen click Use Script
Setting.
Step 2 Follow the instructions, starting at Step 2 from Creating a New Windows Script Target
below.
When you have completed adding a new script target you will be returned to the Management Pack
Creation Wizard. Click Next to create monitors to be added to the MP. See the sections below on adding
monitors to the MP.
Creating a New Windows WMI Target A WMI target is used to identify the existence of an application or system using information from the WMI
database. To create a new WMI target:
Step 1 At the Define the Role (Target) the MP will monitor wizard screen click Use WMI
Setting.
Step 2 Follow the instructions, starting at Step 2 from Creating a New Windows WMI Target
below.
When you have completed adding a new WMI target you will be returned to the Management Pack
Creation Wizard. Click Next to create monitors to be added to the MP. See the sections below on adding
monitors to the MP.
Monitors
At the Define the Monitors for this MP wizard screen click New and select the appropriate type of
monitor to add to the MP. Choices are Database Monitor, Event Monitor, Performance Monitor, Script
Monitor, Service Monitor and Web Site Monitor.
Follow the appropriate section below that corresponds to the type of monitors being added to the MP.
Creating a New Windows Database Monitor
A database monitor is used to determine the health state of a database component either on its own or
part of a larger application or system. To create a new database monitor:
Step 1 At the Define the Monitors for this MP wizard screen click New, then click New
Database Monitor.
Step 2 Follow the instructions, starting at Step 2 from Creating a New Windows Database Monitor
below.
MP Author User Guide 13 Copyright © 2018 Silect Software, Inc. All rights reserved. Unauthorized reproduction or distribution prohibited
When you have completed adding a new database monitor you will be returned to the Define the
Monitors for this MP wizard screen. You can choose to create another monitor, or you can complete the
creation of the MP by clicking Next.
Creating a New Windows Event Monitor An event monitor is used to determine the health state of an application or system based on Event Log
entries. To create a new event monitor:
Step 1 At the Define the Monitors for this MP wizard screen click New, then click New Event
Monitor.
Step 2 Follow the instructions, starting at Step 2 from Creating a New Windows Event Monitor
below.
When you have completed adding a new event monitor you will be returned to the Define the Monitors
for this MP wizard screen. You can choose to create another monitor, or you can complete the creation
of the MP by clicking Next.
Creating a New Windows Performance Monitor A performance monitor is used to determine the health state of an application or system based on
Windows performance information. To create a new performance monitor:
Step 1 At the Define the Monitors for this MP wizard screen click New, then click New
Performance Monitor.
Step 2 Follow the instructions, starting at Step 2 from Creating a New Windows Performance
Monitor below.
When you have completed adding a new performance monitor you will be returned to the Define the
Monitors for this MP wizard screen. You can choose to create another monitor, or you can complete the
creation of the MP by clicking Next.
Creating a New Windows Script Monitor A script monitor is used to determine the health state of an application or system based on the results of
running a script. To create a new script monitor:
Step 1 At the Define the Monitors for this MP wizard screen click New, then click New Script
Monitor.
Step 2 Follow the instructions, starting at Step 2 from Creating a New Windows Script Monitor
below.
When you have completed adding a new script monitor you will be returned to the Define the Monitors
for this MP wizard screen. You can choose to create another monitor, or you can complete the creation
of the MP by clicking Next.
Creating a New Windows Service Monitor A service monitor is used to determine the health state of an application or system based on the state of a
Windows service. To create a new service monitor:
Step 1 At the Define the Monitors for this MP wizard screen click New, then click New Service
Monitor.
MP Author User Guide 14 Copyright © 2018 Silect Software, Inc. All rights reserved. Unauthorized reproduction or distribution prohibited
Step 2 Follow the instructions, starting at Step 2 from Creating a New Windows Service Monitor
below.
When you have completed adding a new service monitor you will be returned to the Define the Monitors
for this MP wizard screen. You can choose to create another monitor, or you can complete the creation
of the MP by clicking Next.
Creating a New Windows Web Site Monitor A web site monitor is used to determine the health state of a web service component either on its own or
part of a larger application or system. To create a new web site monitor:
Step 1 At the Define the Monitors for this MP wizard screen click New, then click New Web Site
Monitor.
Step 2 Follow the instructions, starting at Step 2 from Creating a New Windows Web Site Monitor
below.
When you have completed adding a new web site monitor you will be returned to the Define the
Monitors for this MP wizard screen. You can choose to create another monitor, or you can complete the
creation of the MP by clicking Next.
Rollup Algorithm On the Define the Rollup Algorithm wizard screen, select the algorithm to use. Worst Of is the most
common. Click Next.
Review the settings and click Finish to complete the creation of the new management pack.
Distributed Application Management Pack This option is for an advanced user who wants to create an MP for an application or system consisting of
a front-end or client component, a middle-tier component and a back-end or database component. The
Distributed Application wizard will guide you through the creation of targets (classes/discoveries) used to
discover these components and monitors used to determine the health of these components.
The wizard sequence is as follows:
Create Targets
Step 1 Create targets for Front-End (at least one target must be defined)
a. Create Registry Targets;
b. Create Script Targets;
c. Create WMI Targets;
Step 2 Create targets for Middle-Tier as in Step 1 (this step is optional)
Step 3 Create targets for Back-End as in Step 1 (at least one target must be defined)
Create Monitors:
Step 4 Create monitors for Front-End (at least one monitor must be defined)
a. Create Database Monitors
b. Create Event Monitors
c. Create Performance Monitors
d. Create Script Monitors
e. Create Service Monitors
MP Author User Guide 15 Copyright © 2018 Silect Software, Inc. All rights reserved. Unauthorized reproduction or distribution prohibited
f. Create Web Site Monitors
Step 5 Create monitors for Middle-Tier as in Step 4 (this step is optional)
Step 6 Create monitors for Back-End as in Step 4 (at least one monitor must be defined)
For complete information on creating targets, please refer to these sections:
Create Registry Targets
Create Script Targets
Create WMI Targets
For complete information on creating monitors, please refer to these sections:
Create Database Monitors
Create Event Monitors
Create Performance Monitors
Create Script Monitors
Create Service Monitors
Create Web Site Monitors
Customizing Existing Management Packs Silect MP Author provides the ability to edit existing unsealed management packs. MP objects can be
added, removed and edited using Silect MP Author.
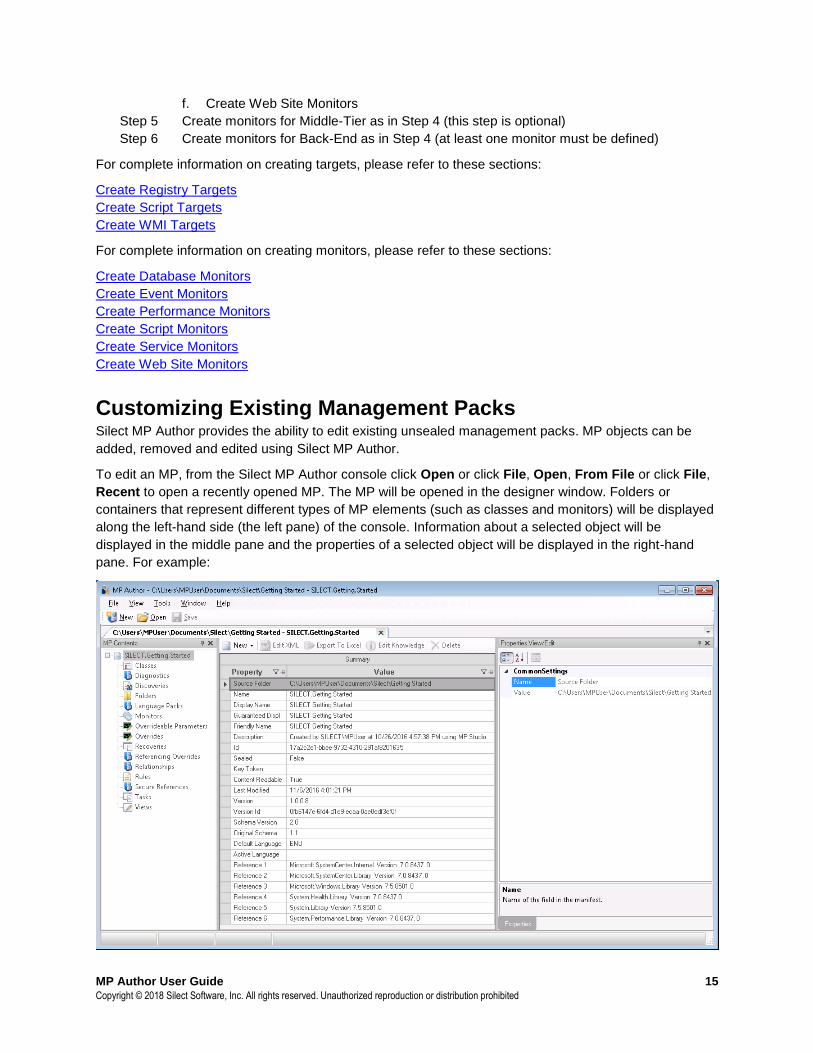
To edit an MP, from the Silect MP Author console click Open or click File, Open, From File or click File,
Recent to open a recently opened MP. The MP will be opened in the designer window. Folders or
containers that represent different types of MP elements (such as classes and monitors) will be displayed
along the left-hand side (the left pane) of the console. Information about a selected object will be
displayed in the middle pane and the properties of a selected object will be displayed in the right-hand
pane. For example:
MP Author User Guide 16 Copyright © 2018 Silect Software, Inc. All rights reserved. Unauthorized reproduction or distribution prohibited
To make changes to the MP, right-click the appropriate object container and select the appropriate
options. For example, for MP features such as importing into Operations Manager, right-click on the top-
level node in the left-hand tree and select the appropriate option. One of the top-level options is to import
a fragment, which is discussed in Authoring With Fragments below. To view options associated with an
object container right click on that container.
The Edit with Wizard… option is available to edit any elements created with MP Author wizards. It is also
available if the element appears to be compatible with the wizard. For elements created using some
method other than the wizard, there may be some differences between the original element and the
edited element, so users are requested to examine the differences to ensure that nothing was changed
unexpectedly.
For specific details on adding or editing MP components, please see the sections below.
Adding and Editing Folders Folders are used by Operations Manager to organize and present information in the Operations Manager
Console. To add a new folder to an MP, follow these steps:
Step 1 Open an unsealed MP by clicking Open or click File, Open, From File or click File,
Recent to open a recently opened MP.
Step 2 When the MP has been opened, right-click the Folders container and select Create New
Folder.
Step 3 Select the name of the parent folder from the drop-down. Click Next.
Step 4 Enter the name and description for the new folder. Click Next.
Step 5 Review the settings and click Finish to create the new folder.
To save these changes, click the Save toolbar button or select File, Save.
To edit a folder, follow these steps:
Step 1 With the MP already opened, click the Folders container to view the folders currently
defined in the MP.
Step 2 Right-click one of the folders displayed and select:
a. Edit with Wizard… to edit with the same wizard used to create the folder,
b. View/Edit XML to edit the underlying XML,
c. Delete… to remove the folder,
d. Properties… to view detailed properties of the folder.
Step 3 Or click on one of the folders and change the properties which are not greyed out in the
Properties View/Edit window.
MP Author User Guide 17 Copyright © 2018 Silect Software, Inc. All rights reserved. Unauthorized reproduction or distribution prohibited
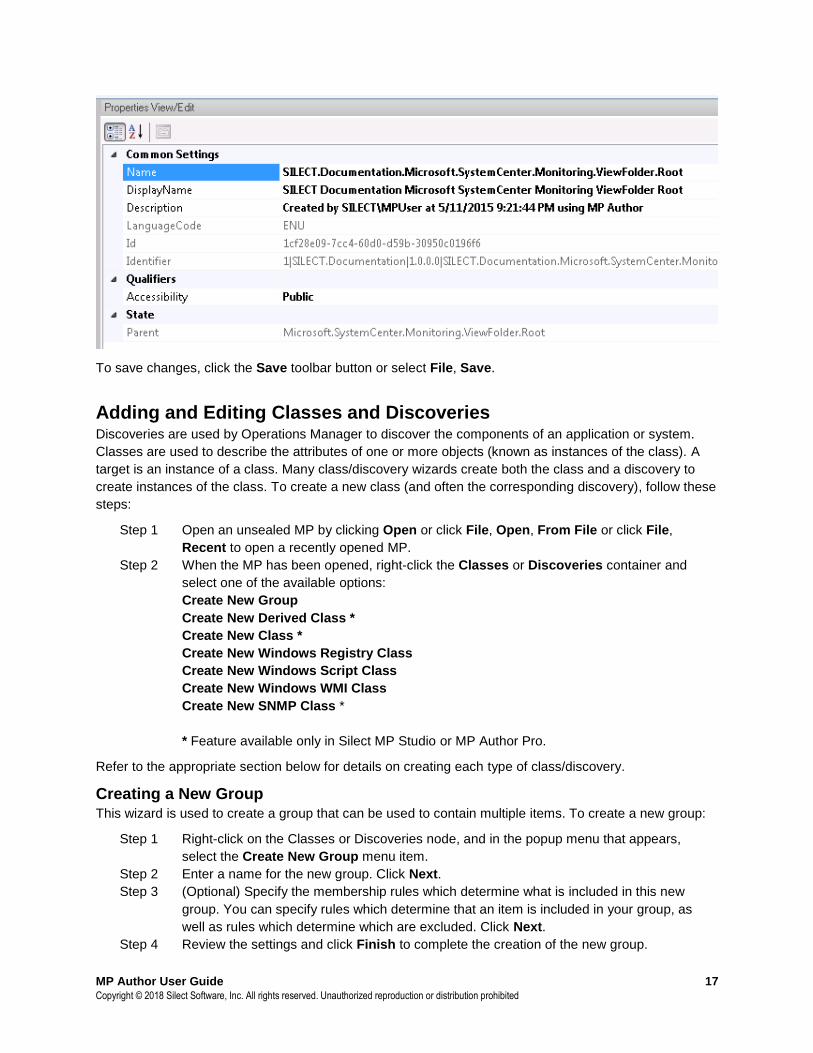
To save changes, click the Save toolbar button or select File, Save.
Adding and Editing Classes and Discoveries Discoveries are used by Operations Manager to discover the components of an application or system.
Classes are used to describe the attributes of one or more objects (known as instances of the class). A
target is an instance of a class. Many class/discovery wizards create both the class and a discovery to
create instances of the class. To create a new class (and often the corresponding discovery), follow these
steps:
Step 1 Open an unsealed MP by clicking Open or click File, Open, From File or click File,
Recent to open a recently opened MP.
Step 2 When the MP has been opened, right-click the Classes or Discoveries container and
select one of the available options:
Create New Group
Create New Derived Class *
Create New Class *
Create New Windows Registry Class
Create New Windows Script Class
Create New Windows WMI Class
Create New SNMP Class *
* Feature available only in Silect MP Studio or MP Author Pro.
Refer to the appropriate section below for details on creating each type of class/discovery.
Creating a New Group This wizard is used to create a group that can be used to contain multiple items. To create a new group:
Step 1 Right-click on the Classes or Discoveries node, and in the popup menu that appears,
select the Create New Group menu item.
Step 2 Enter a name for the new group. Click Next.
Step 3 (Optional) Specify the membership rules which determine what is included in this new
group. You can specify rules which determine that an item is included in your group, as
well as rules which determine which are excluded. Click Next.
Step 4 Review the settings and click Finish to complete the creation of the new group.
MP Author User Guide 18 Copyright © 2018 Silect Software, Inc. All rights reserved. Unauthorized reproduction or distribution prohibited
Creating a New Class (MP Studio & MP Author Pro only)
This wizard is used to create a new class, without a discovery. To create a new class:
Step 1 Right-click on the Classes node, and in the popup menu that appears, select the Create
New Class menu item.
Step 2 Specify any properties you wish to define for your new class. Click Next.
Step 3 Specify the Base Class for your new class, and specify whether it is to be Abstract, Hosted
and/or a Singleton class (these selections determine whether you must later specify a
Hosting Class or a Relationship Class). Click Next.
Step 4 If a Hosting Class must be specified, you will be asked to specify it. Click Next.
Step 5 Enter the name and description for the new class. Click Next.
Step 6 If a relationship must be specified for your new class, you will be asked to specify the name
and description for the new relationship. Click Next.
Step 7 Review the settings and click Finish to complete the creation of the new Class.
Creating a New Derived Class (MP Studio & MP Author Pro only)
This wizard is used to create a new class, without a discovery, from an existing class. To create a new
derived class:
Step 1 Right-click on the Classes node, and in the popup menu that appears, select the Create
New Derived Class menu item.
Step 2 Specify the target class. You can use a group filter here to create classes for each member
of a group. Click Next.
Step 3 Enter the name and description for the new class. Click Next.
Step 4 Specify the Base Class for your new class. Click Next.
Step 5 Enter a name for the new derived discovery. Choose to enable (default) or disable this new
derived discovery. Click Next.
Step 6 Specify an optional expression. If specified, then only target class instances where the
expression is true will be used to create new derived class instances. Click Next.
Step 7 Enter the discovery schedule. By default, it will run every 4 hours (since it has a very low
impact). Click Next.
Step 8 Review the settings and click Finish to complete the creation of the new Derived Class.
Creating a New Windows Registry Target A registry target is used to identify the existence of an application or system using a registry entry or
value. To create a new registry target:
Step 1 Right-click on the Classes node, and in the popup menu that appears, select the Create
New Windows Registry Class menu item.
Step 2 Next you will be prompted to enter the name of a machine to browse the registry to help
define the new registry target. Enter the name of a machine or click the Browse button to
browse the network. Click Next.
Tip Browsing a computer where the application or system you want to monitor is installed will
help create the objects in the new MP. Credentials used for browsing remote systems are
managed using the Tools, Manager Server Credentials dialog.
MP Author User Guide 19 Copyright © 2018 Silect Software, Inc. All rights reserved. Unauthorized reproduction or distribution prohibited
Step 3 Click the Browse button to open the registry on the machine specified earlier. Navigate
thru the registry settings to find the setting or settings you want to include for targets. Add
additional mandatory and optional properties as required. Click Next.
Step 4 If optional properties were specified, you may wish to adjust the information about the class
properties which will be created. Click Next.
Step 4 Enter a name for the new registry class. Click Next.
Step 5 Choose the base class to use for this new class. Click Next.
Step 6 Enter a name for the new registry discovery. Choose to enable (default) or disable this new
registry discovery. Click Next.
Step 7 Choose the target class to run this discovery against. A group can be specified to filter the
target class instances. Click Next.
Step 8 If you have multiple settings, enter the expression you want to use for the target. You can
use a logical expression or simply check the existence of a registry key. Click Next.
Step 9 Enter the discovery schedule. By default, it will run once per day. Click Next.
Step 10 Review the settings and click Finish to complete the creation of the new registry target.
Creating a New Windows Script Target A script target is used to identify the existence of an application or system using the results of running a
script. To create a new script target:
Step 1 Right-click on the Classes node, and in the popup menu that appears, select the Create
New Windows Script Class menu item.
Step 2 Enter the name of the script or use the Browse button the find the script that will be used
to discover the target. The class name and any properties will be parsed from the script.
Step 3 You can optionally add parameters to the script. Click the Add button to add a parameter
to the script. Specify the name of the parameter, the initial value (these can be overridden)
and the data type. Repeat to include as many parameters as required. For PowerShell
scripts, the list of parameters will be already filled in, but you will need to provide default
values. Double click on the parameter and enter the parameter value as needed. Click
Next.
Step 4 The script will have been parsed to determine the class properties. You can add optional
properties for the new class. Click the Add button to add a property. Click Next.
Step 5 The script will have been parsed to determine the class name, which cannot be changed.
Enter a display name for the new script class. Click Next.
Step 6 Choose the base class to use for this new class. Click Next.
Step 7 Enter a name for the new script discovery. Choose to enable (default) or disable this new
script discovery. Click Next.
Step 8 Choose the target class to run this discovery against. A group can be specified to filter the
target class instances. Click Next.
Step 9 Enter the discovery schedule. By default, it will run once per day. Click Next.
Step 10 Review the settings and click Finish to complete the creation of the new script target.
Creating a New Windows WMI Target A WMI target is used to identify the existence of an application or system using information from the WMI
database. To create a new WMI target:
Step 1 Right-click on the Classes node, and in the popup menu that appears, select the Create
New Windows WMI Class menu item.
Step 2 Next you will be prompted to enter the name of a machine to browse the WMI database to
help define the new WMI target. Enter the name of a machine or click the Browse button
MP Author User Guide 20 Copyright © 2018 Silect Software, Inc. All rights reserved. Unauthorized reproduction or distribution prohibited
to browse the network. Click Next.
Tip Browsing a computer where the application or system you want to monitor is installed will
help create the objects in the new MP. Credentials used for browsing remote systems are
managed using the Tools, Manager Server Credentials dialog.
Step 3 Click the Browse button to open the WMI database on the machine specified earlier.
Navigate thru the WMI database to find the class you want to use for the WMI target
setting.
Note These next steps will help create a WQL statement used for the WMI target. This can be
entered manually as well.
Step 4 Select an appropriate namespace and class in the Step 1 - Select namespace/class
window. Click the Retrieve button to retrieve instances of the selected object.
Step 5 Select an appropriate record in the Step 2 - Select a record window. This will display all
property values for the record.
Step 6 In the Step 3 - Create query definition window, check the properties on the left to include
them in the SELECT clause (to retrieve those values).
Step 7 Check the properties on the right to include them in the WHERE clause, which must
uniquely identify a record. Selecting the key properties ( ) can be very helpful here.
Step 8 Click the OK button.
Step 9 Click Next.
Step 10 Add optional properties for the new class by clicking Add. Click Next when you have
completed adding optional properties. Step 11 Enter a name for the new WMI class. Click Next.
Step 12 Choose the base class to use for this new role. Click Next.
Step 13 Enter a name for the new WMI discovery. Choose to enable (default) or disable this new
WMI discovery. Click Next.
Step 14 Choose the target class to run this discovery against. A group can be specified to filter the
target class instances. Click Next.
Step 15 Enter the discovery schedule. By default, it will run once per day. Click Next.
Step 16 Review the settings and click Finish to complete the creation of the new WMI target.
Creating a New SNMP Target (MP Studio & MP Author Pro only)
An SNMP target is used to identify the existence of a device or computer that communicates using the
SNMP protocol. To create a new SNMP target:
Step 1 Right-click on the Classes node, and in the popup menu that appears, select the Create
New SNMP Class menu item.
Step 2 In the Introduction step for the wizard, if you are working on with a new SNMP device,
click on the Browse button to specify the SNMP device you wish to connect to.
Step 3 In the Select the network device to read data from dialog, specify the IP address of the
network device, and the SNMP protocol version and credentials which you wish to use to
connect to your device.
Step 4 Once you have input the required information, click on the Validate button to ensure that
you have specified the network device information correctly. If you have, the name of the
MP Author User Guide 21 Copyright © 2018 Silect Software, Inc. All rights reserved. Unauthorized reproduction or distribution prohibited
device you connected to should be displayed in the Name field (this can be changed, if
desired).
Step 5 Click on the Save button to save the connection settings for your SNMP device with the
specified name.
Step 6 Then click on the OK button to return to the Introduction step for your wizard. The
Introduction step should now have filled in the name of the new device that you just
connected to.
Step 7 Click Next to proceed to the Variables step.
Step 8 In the mandatory Discovery Variables section click Browse to view the SNMP variables
returned from the device that can be used for discovery. This will result in the Add
Network Device Variables dialog appearing.
Step 9 On the Add Network Device Variables dialog, if the MIB files used to decode the SNMP
variables are not specific enough to have interpreted all the SNMP variables, a warning will
be displayed and the MIBs button in the dialog will be displayed in red. Click on it, which
will pop up the Manage MIBs dialog which can be used to locate and load the correct MIBs
for your device (best place to get this will always be from your device manufacturer). Once
you have located and installed the correct MIB files, you can click on OK to return to the
Add Network Device Variables dialog.
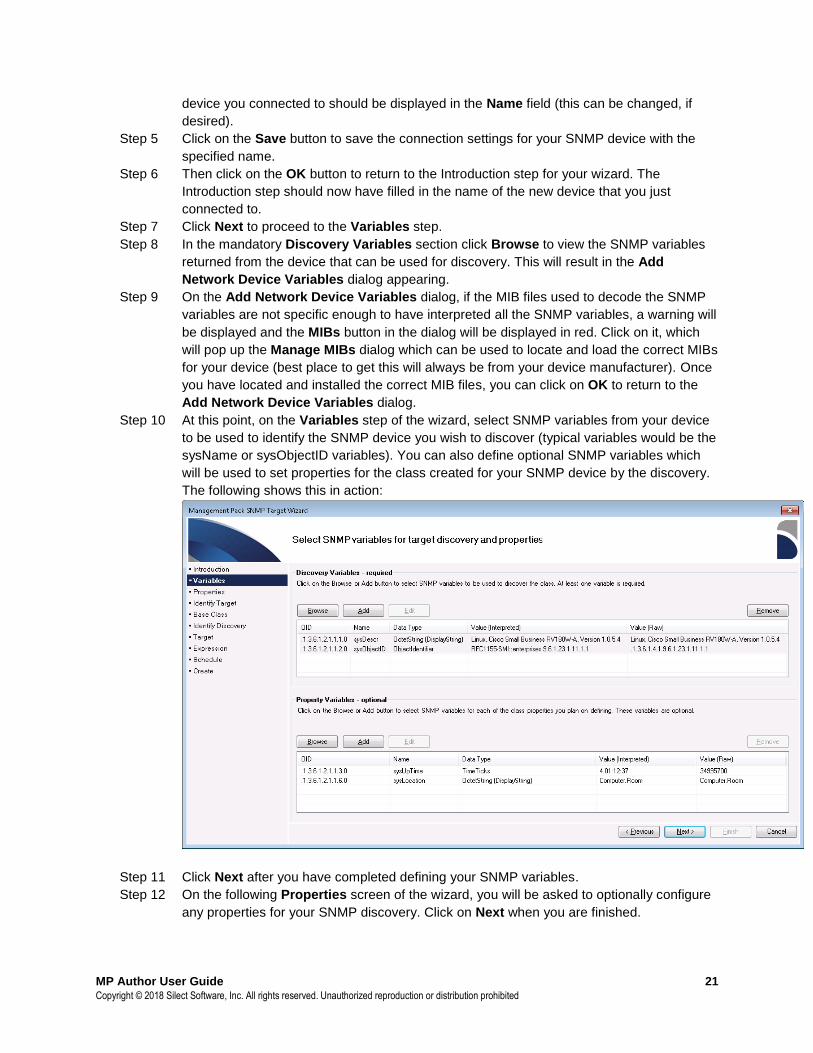
Step 10 At this point, on the Variables step of the wizard, select SNMP variables from your device
to be used to identify the SNMP device you wish to discover (typical variables would be the
sysName or sysObjectID variables). You can also define optional SNMP variables which
will be used to set properties for the class created for your SNMP device by the discovery.
The following shows this in action:
Step 11 Click Next after you have completed defining your SNMP variables.
Step 12 On the following Properties screen of the wizard, you will be asked to optionally configure
any properties for your SNMP discovery. Click on Next when you are finished.
MP Author User Guide 22 Copyright © 2018 Silect Software, Inc. All rights reserved. Unauthorized reproduction or distribution prohibited
Step 13 On the next Identify Target screen, you will be asked to create a name for the class which
you will discover. You would typically do this by changing the text in the Name field from
«Name» to the name of your SNMP device. Once you are finished, you can click on Next.
Step 14 On the next Base class screen, you will be asked to identify the base class of your target
class. Click Next when you have selected your base class.
Step 15 On the next Identify Discovery screen, you will be given the opportunity to edit the name
of your discovery. For most users, the default value should be okay. Click Next when you
are finished.
Step 16 On the next Target screen, you will be given the opportunity to change the target class for
your discovery. For most users, the default value of System.NetworkManagement.Node
should be okay. A group can be specified to filter the target class instances. Click Next
when you are finished.
Step 17 On the next Expression screen, you are given the opportunity to fine tune the expression
used to discover the instances of your SNMP device. When you are happy with the
expression, click Next to proceed. Step 18 On the next Schedule screen, you can configure the discovery schedule. By default, it will
run once per day. Click Next.
Step 19 Review the settings and click Finish to complete the creation of the new SNMP target.
To save these changes, click the Save toolbar button or select File, Save.
Editing a Class To edit a class, follow these steps:
Step 1 With the MP already opened, click the Classes container to view the classes currently
defined in the MP.
Step 2 Right-click one of the classes displayed and select:
a. Edit with Wizard… to edit with the same wizard used to create the class,
b. View/Edit XML to edit the underlying XML,
c. Delete… to remove the class,
d. Properties… to view detailed properties of the class.
Step 3 Or click on one of the classes and change the properties which are not greyed out in the
Properties View/Edit window.
MP Author User Guide 23 Copyright © 2018 Silect Software, Inc. All rights reserved. Unauthorized reproduction or distribution prohibited
To save these changes, click the Save toolbar button or select File, Save.
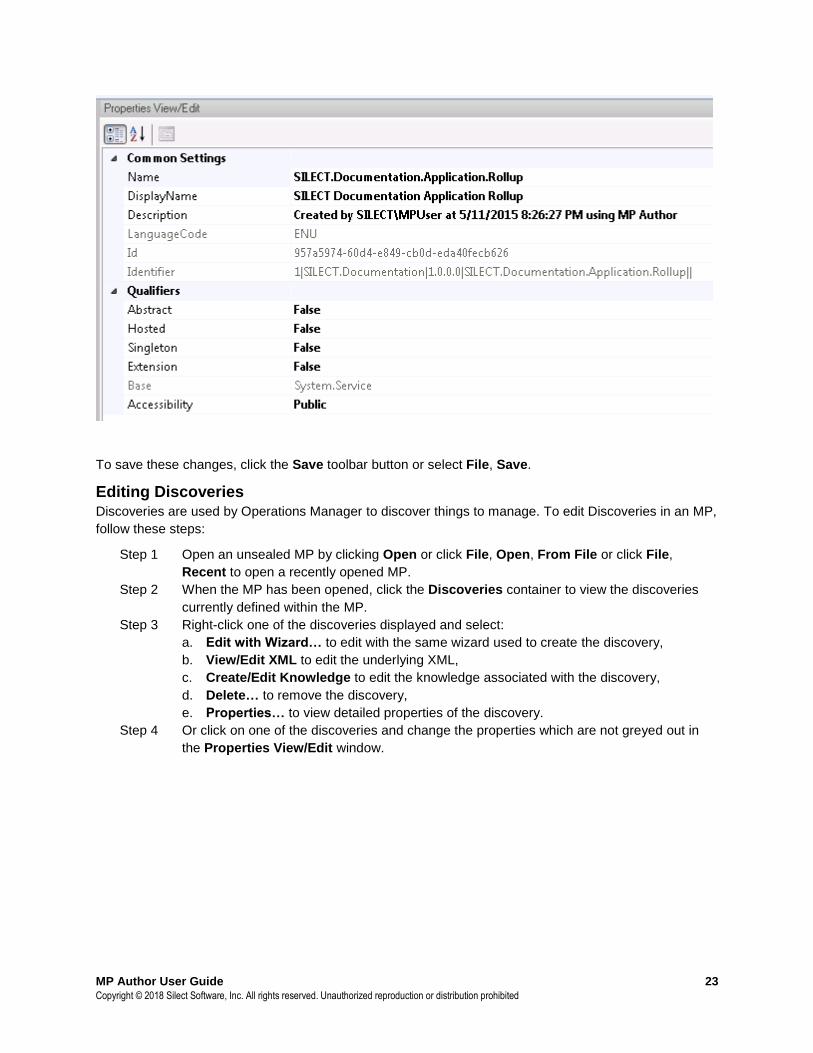
Editing Discoveries Discoveries are used by Operations Manager to discover things to manage. To edit Discoveries in an MP,
follow these steps:
Step 1 Open an unsealed MP by clicking Open or click File, Open, From File or click File,
Recent to open a recently opened MP.
Step 2 When the MP has been opened, click the Discoveries container to view the discoveries
currently defined within the MP.
Step 3 Right-click one of the discoveries displayed and select:
a. Edit with Wizard… to edit with the same wizard used to create the discovery,
b. View/Edit XML to edit the underlying XML,
c. Create/Edit Knowledge to edit the knowledge associated with the discovery,
d. Delete… to remove the discovery,
e. Properties… to view detailed properties of the discovery.
Step 4 Or click on one of the discoveries and change the properties which are not greyed out in
the Properties View/Edit window.

MP Author User Guide 24 Copyright © 2018 Silect Software, Inc. All rights reserved. Unauthorized reproduction or distribution prohibited
To save these changes, click the Save toolbar button or select File, Save.
Adding and Editing Rules Rules are used by Operations Manager to collect information about components of an application or
system. To add a new rule to an existing MP, follow these steps:
Step 1 Open an unsealed MP by clicking Open or click File, Open, From File or click File,
Recent to open a recently opened MP.
Step 2 When the MP has been opened, right-click the Rules container and select one of the
available options:
Create New Windows Event/Alert Rule
Create New Windows Performance Rule
Create New Windows Script Performance Rule
Create New SNMP Probe Event Rule *
Create New SNMP Probe Performance Rule *
Create New SNMP Trap Event/Alert Rule *
* Feature available only in Silect MP Studio and MP Author Pro.
Refer to the appropriate section below for details on creating each type of rule.
Creating an Event/Alert Rule An event rule is used to collect information from the Windows Event Log. To create a new event rule with
an optional alert, follow these steps:
Step 1 Right-click on the Rules node, and in the popup menu that appears, select the Create
New Windows Event/Alert Rule menu item.
MP Author User Guide 25 Copyright © 2018 Silect Software, Inc. All rights reserved. Unauthorized reproduction or distribution prohibited
Step 2 Enter the name of a machine to browse the Event Log to help define the new event rule. Or
click the Browse button to browse the network. Click Next.
Tip Browsing a computer where the application or system you want to monitor is installed will
help create the objects in the new MP. Credentials used for browsing remote systems are
managed using the Tools, Manager Server Credentials dialog.
Step 3 Select the Event Log for this rule from the drop-down list of event logs.
Next enter the expression to evaluate event log entries. By default, you will be prompted
for an Event ID number and optionally an Event Source, but you can select any other
properties of the event by clicking on the drop down.
Specify if the rule is to collect data (otherwise you will be required to generate an alert).
Click Next.
Step 4 Select the Target for this rule from the drop-down list of targets. Optionally, filter the target
by a group (suitable overrides will be created). Click Next.
Step 5 Enter a name for the new event rule. Click Next.
Step 6 Optionally choose to create an Alert for this monitor including Priority, Severity and
Message text. In Step 2, if you chose to not collect data, then this is required. Click Next.
Step 7 Specify the schedule to run event rule. Click Next.
Step 8 Review the settings and click Finish to complete the creation of the new event rule.
To save these changes, click the Save toolbar button or select File, Save.
Creating a New Windows Performance Rule A performance rule is used to collect Windows Performance information. To create a new performance
rule:
Step 1 Right-click on the Rules node, and in the popup menu that appears, select the Create
New Windows Performance Rule menu item.
Step 2 Enter the name of a machine to browse the Windows Performance Monitor to help define
the new performance rule. Or click the Browse button to browse the network. Click Next.
Tip Browsing a computer where the application or system you want to monitor is installed will
help create the objects in the new MP. Credentials used for browsing remote systems are
managed using the Tools, Manager Server Credentials dialog.
Step 3 Select the Windows Performance Monitor Object, Counter, Instance and Sampling Rate
to define this rule. Click Next.
Step 4 Select the Target for this rule from the drop-down list of targets. Optionally, filter the target
by a group (suitable overrides will be created). Click Next.
Step 5 Enter a name for the new performance rule. Click Next.
Step 6 Optionally create a view for this rule, and/or save to the data warehouse. Click Next.
Step 7 Specify the schedule to run performance rule. Click Next.
Step 8 Review the settings and click Finish to complete the creation of the new performance rule.
To save these changes, click the Save toolbar button or select File, Save.
MP Author User Guide 26 Copyright © 2018 Silect Software, Inc. All rights reserved. Unauthorized reproduction or distribution prohibited
Creating a New Windows Script Performance Rule A script performance rule is used to capture performance information using a PowerShell script file. To
create a new script performance rule:
Step 1 Right-click on the Rules node, and in the popup menu that appears, select the Create
New Windows Script Performance Rule menu item.
Step 2 Select the Target for this rule from the drop-down list of targets. Optionally, filter the target
by a group (suitable overrides will be created). Click Next.
Step 3 Enter the name of the script or use the Browse button the find the script that will be used
to collect the performance data. You can optionally add parameters to the script. Click the
Add button to add a parameter to the script. Specify the name of the parameter, the initial
value (these can be overridden) and the data type. Repeat to include as many parameters
as required. For PowerShell scripts, the list of parameters will be already filled in, but you
will need to provide default values. Double click on the parameter and enter the parameter
value as needed. Click Next.
Step 4 Enter the Object, Counter, Instance and Value mappings. A list of properties returned in
the property bag is displayed to make it easier to specify property names. Click Next.
Step 5 Enter a name for the new script rule. Click Next.
Step 6 Optionally create a view for this rule, and/or save to the data warehouse. Click Next.
Step 7 Specify the schedule to run the script rule. Click Next.
Step 8 Review the settings and click Finish to complete the creation of the new script
performance rule.
To save these changes, click the Save toolbar button or select File, Save.
Creating a New SNMP Probe Event Rule (MP Studio & MP Author Pro only)
An SNMP probe event rule is used to capture event type information from an SNMP device using an
SNMP probe. To create a new SNMP probe event rule:
Step 1 Right-click on the Rules node, and in the popup menu that appears, select the Create
New SNMP Probe Event Rule menu item.
Step 2 Enter the name of the previously defined SNMP device to browse its SNMP variables to
help define the new event rule. Or click the Browse button to browse the network and
define a new SNMP device to collect variables from. Click Next.
Step 3 Use the Browse or Add buttons on this dialog to add the SNMP variables to choose to
identify events. Click Next.
Step 4 Specify the configuration for the event information that you will be collecting from the
SNMP device. Click Next.
Step 5 Select the target class for the rule. Optionally, filter the target by a group (suitable overrides
will be created). Click Next.
Step 6 Enter a name, display name and description for the new SNMP event rule. Click Next.
Step 7 Specify the schedule to run the event rule. Click Next.
Step 8 Review the settings and click Finish to complete the creation of the new event rule.
To save these changes, click the Save toolbar button or select File, Save.
Creating a New SNMP Probe Performance Rule (MP Studio & MP Author Pro only)
MP Author User Guide 27 Copyright © 2018 Silect Software, Inc. All rights reserved. Unauthorized reproduction or distribution prohibited
An SNMP probe performance rule is used to capture performance information from an SNMP device
using an SNMP probe. To create a new SNMP probe performance rule:
Step 1 Right-click on the Rules node, and in the popup menu that appears, select the Create
New SNMP Probe Performance Rule menu item.
Step 2 Enter the name of the previously defined SNMP device to browse its SNMP variables to
help define the new performance rule. Or click the Browse button to browse the network
and define a new SNMP device to collect variables from. Click Next.
Step 3 Use the Browse or Add buttons on this dialog to add SNMP variables to probe for
performance information. Multiple variables can be collected and used in an expression in
Step 8 below. Click Next.
Step 4 Enter the configuration information for the rule. Click Next.
Step 5 Select the target class for the rule. Optionally, filter the target by a group (suitable overrides
will be created). Click Next.
Step 6 Enter a name, display name and description for the new SNMP probe performance rule.
Click Next.
Step 7 Specify the schedule to run the event rule. Click Next.
Step 8 Optionally add an expression performing numeric calculations on the variables specified in
Step 2. Click Next.
Step 9 Review the settings and click Finish to complete the creation of the new SNMP probe
performance rule.
To save these changes, click the Save toolbar button or select File, Save.
Creating a New SNMP Trap Event/Alert Rule (MP Studio & MP Author Pro only)
An SNMP trap event/alert rule is used to create event type information from an SNMP device using a
trap. An optional alert can also be created based on the occurrence of the trap. To create a new SNMP
trap event/alert rule:
Step 1 Right-click on the Rules node, and in the popup menu that appears, select the Create
New SNMP Trap Event/Alert Rule menu item.
Step 2 Enter the name of the previously defined SNMP device to browse its SNMP traps to help
define the new SNMP trap event/alert rule. Or click the Browse button to browse the
network and define a new SNMP device to collect traps from. Click Next.
Step 3 Use the Browse or Add buttons on this dialog to add the SNMP traps to associate with
your event. When you are finished adding traps to associate with your event, click Next.
Step 4 Specify the configuration for the event information that you will be generating for the SNMP
device when the trap occurs. Click Next.
Step 5 Select the target class for the rule. Optionally, filter the target by a group (suitable overrides
will be created). Click Next.
Step 6 You can optionally define an expression that would be used to filter the traps. Click Next.
Step 7 Enter a name, display name and description for the new SNMP trap event/alert rule. Click
Next.
Step 8 Optionally specify the alert to be raised when the trap event occurs. Click Next.
Step 9 Review the settings and click Finish to complete the creation of the new SNMP trap
event/alert rule.
To save these changes, click the Save toolbar button or select File, Save.
MP Author User Guide 28 Copyright © 2018 Silect Software, Inc. All rights reserved. Unauthorized reproduction or distribution prohibited
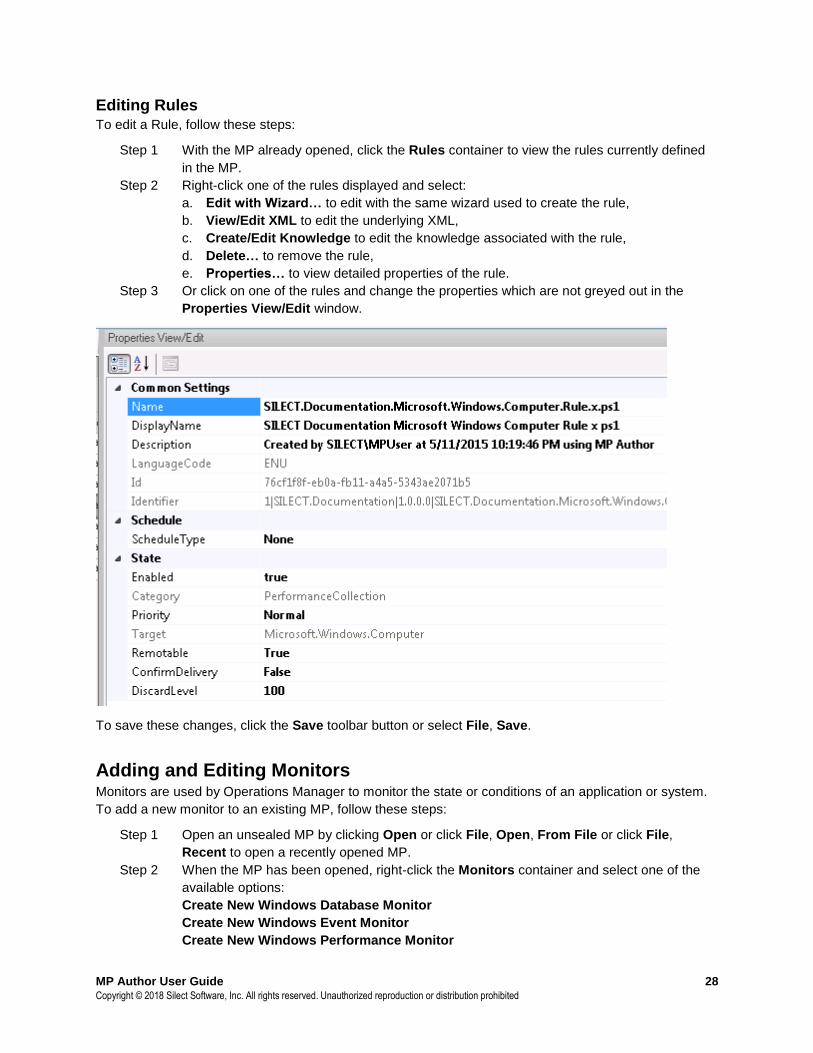
Editing Rules To edit a Rule, follow these steps:
Step 1 With the MP already opened, click the Rules container to view the rules currently defined
in the MP.
Step 2 Right-click one of the rules displayed and select:
a. Edit with Wizard… to edit with the same wizard used to create the rule,
b. View/Edit XML to edit the underlying XML,
c. Create/Edit Knowledge to edit the knowledge associated with the rule,
d. Delete… to remove the rule,
e. Properties… to view detailed properties of the rule.
Step 3 Or click on one of the rules and change the properties which are not greyed out in the
Properties View/Edit window.
To save these changes, click the Save toolbar button or select File, Save.
Adding and Editing Monitors Monitors are used by Operations Manager to monitor the state or conditions of an application or system.
To add a new monitor to an existing MP, follow these steps:
Step 1 Open an unsealed MP by clicking Open or click File, Open, From File or click File,
Recent to open a recently opened MP.
Step 2 When the MP has been opened, right-click the Monitors container and select one of the
available options:
Create New Windows Database Monitor
Create New Windows Event Monitor
Create New Windows Performance Monitor
MP Author User Guide 29 Copyright © 2018 Silect Software, Inc. All rights reserved. Unauthorized reproduction or distribution prohibited
Create New Windows Process Monitor *
Create New Windows Script Monitor
Create New Windows Service Monitor
Create New Windows Web Site Monitor
Create New SNMP 2-State 2-Probe Monitor *
Create New SNMP 2-State 2-Trap Monitor *
Create New Dependency Rollup Monitor *
Create New Aggregate Rollup Monitor *
* Feature available only in Silect MP Studio and MP Author Pro.
Refer to the appropriate section below for details on creating each type of monitor.
Creating a New Windows Database Monitor A database monitor is used to determine the health state of a database component either on its own or
part of a larger application or system. To create a new database monitor:
Step 1 Right-click on Monitors and select Create New Windows Database Monitor.
Step 2 Next you will be prompted to enter a database connection string. Click Edit to browse and
edit SQL connection information. If you want to run a SQL query as part of this monitor,
click the Query String to Execute (Optional) check box and enter an appropriate SQL
statement. Next specify the SQL timeout value. Click Next.
Tip Browsing a computer where the application or system you want to monitor is installed will
help create the objects in the new MP. Credentials used for browsing remote systems are
managed using the Tools, Manager Server Credentials dialog.
Step 3 Select the Polling Interval to determine the frequency of polling the monitor.
Select Connection Time warning and error thresholds.
If you have specified a SQL query as part of this monitor, specify the Query Time and
Fetch Time thresholds. Click Next.
Step 4 Enter a display name for the new database monitor (the template does not allow a name to
be specified). Click Next.
Step 5 Specify the Run As credentials to be used by this monitor or leave (none / default)
specified to use the default credentials. Click Next.
Step 6 Specify the Watcher Nodes for this monitor. You can use the default machine name or
browse for other watcher nodes. Click Next.
Step 7 Review the settings and click Finish to complete the creation of the new database monitor.
To save these changes, click the Save toolbar button or select File, Save.
Creating a New Windows Event Monitor An event monitor is used to determine the health state of an application or system based on Event Log
entries. To create a new event monitor:
Step 1 Right-click on Monitors and select Create New Windows Event Monitor.
Step 2 Next you will be prompted to enter the name of a machine to browse the Event Log to help
define the new event monitor. Enter the name of a machine or click the Browse button to
browse the network. Click Next.
Tip Browsing a computer where the application or system you want to monitor is installed will

MP Author User Guide 30 Copyright © 2018 Silect Software, Inc. All rights reserved. Unauthorized reproduction or distribution prohibited
help create the objects in the new MP. Credentials used for browsing remote systems are
managed using the Tools, Manager Server Credentials dialog.
Step 3 Select the Event Log for this Monitor from the drop-down list of Event Logs.
Next enter the expression to evaluate event log entries. By default, you will be prompted
for an Event ID number and optionally an Event Source, but you can choose any property
of the event by clicking the drop down.
Click Next.
Step 4 Select the Target for this monitor from the drop-down list of targets. Optionally, filter the
target by a group (suitable overrides will be created). Select the Parent Monitor from the
list of parent monitors. Click Next.
Step 5 Specify either a wait time before resetting the health state of this monitor or specify an
event used to reset the health state. Click Next.
Step 6 Enter a name for the new event monitor. Click Next.
Step 7 Specify the Run As credentials to be used by this monitor or leave (none / default)
specified to use the default credentials. Click Next.
Step 8 Specify the health state for each of the detected conditions. Click Next.
Step 9 Optionally choose to create an Alert for this monitor including Priority, Severity and
Message text. Click Next.
Step 10 Review the settings and click Finish to complete the creation of the new event monitor.
To save these changes, click the Save toolbar button or select File, Save.
Creating a New Windows Performance Monitor A performance monitor is used to determine the health state of an application or system based on
Windows performance information. To create a new performance monitor:
Step 1 Right-click on Monitors and select Create New Windows Performance Monitor.
Step 2 Next you will be prompted to enter the name of a machine to browse the Windows
Performance Monitor to help define the new performance monitor. Enter the name of a
machine or click the Browse button to browse the network. Click Next.
Tip Browsing a computer where the application or system you want to monitor is installed will
help create the objects in the new MP. Credentials used for browsing remote systems are
managed using the Tools, Manager Server Credentials dialog.
Step 3 Select the Windows Performance Monitor Object, Counter, Instance, Number of
Samples and Sampling Rate to define this monitor.
Optionally create a rule to collect the performance data.
Click Next.
Step 4 Select the Target for this monitor from the drop-down list of targets. Optionally, filter the
target by a group (suitable overrides will be created). Select the Parent Monitor from the
list of parent monitors. Click Next.
Step 5 Enter a name for the new performance monitor. Click Next.
Step 6 Specify the Run As credentials to be used by this monitor or leave (none / default)
specified to use the default credentials. Click Next.
Step 7 Specify the type of monitor, condition to test, number of samples and thresholds for the
monitor. Click Next.
MP Author User Guide 31 Copyright © 2018 Silect Software, Inc. All rights reserved. Unauthorized reproduction or distribution prohibited
Step 8 Optionally choose to create an Alert for this monitor including Priority, Severity and
Message text. Click Next.
Step 9 Review the settings and click Finish to complete the creation of the new performance
monitor.
To save these changes, click the Save toolbar button or select File, Save.
Creating a New Windows Process Monitor (MP Studio & MP Author Pro only)
A process monitor is used to determine the health state of an application or system based on whether a
process is running or not running. To create a new process monitor:
Step 1 Right-click on Monitors and select Create New Windows Process Monitor.
Step 2 Next you will be prompted to enter the name of a machine to browse the processes to help
define the new process monitor. Enter the name of a machine or click the Browse button
to browse the network. Click Next.
Tip Browsing a computer where the application or system you want to monitor is installed will
help create the objects in the new MP. Credentials used for browsing remote systems are
managed using the Tools, Manager Server Credentials dialog.
Step 3 Select the process to be monitored. Click Next.
Step 4 Select the Target for this monitor from the drop-down list of targets. Optionally, filter the
target by a group (suitable overrides will be created). Select the Parent Monitor from the
list of parent monitors. Click Next.
Step 5 Specify whether the process is to be running, and the number of processes, or whether it
must not be running. Click Next.
Step 6 Enter a name for the new process monitor. Click Next.
Step 7 Specify the Run As credentials to be used by this monitor or leave (none / default)
specified to use the default credentials. Click Next.
Step 8 Optionally choose to create an Alert for this monitor including Priority, Severity and
Message text. Click Next.
Step 9 Review the settings and click Finish to complete the creation of the new process monitor.
To save these changes, click the Save toolbar button or select File, Save.
Creating a New Windows Script Monitor A script monitor is used to determine the health state of an application or system based on the results of
running a script. To create a new script monitor:
Step 1 Right-click on Monitors and select Create New Windows Script Monitor.
Step 2 Select the Target for this monitor from the drop-down list of targets. Optionally, filter the
target by a group (suitable overrides will be created). Select the Parent Monitor from the
list of parent monitors. Click Next.
Step 3 Enter the name of the script or use the Browse button the find the script that will be used
to determine the target. You can optionally add parameters to the script. Click the Add
button to add a parameter to the script. Specify the name of the parameter, the initial value
(these can be overridden) and the data type. Repeat to include as many parameters as
required. For PowerShell scripts, the list of parameters will be already filled in, but you will
need to provide default values. Double click on the parameter and enter the parameter
value as needed. Click Next.
MP Author User Guide 32 Copyright © 2018 Silect Software, Inc. All rights reserved. Unauthorized reproduction or distribution prohibited
Step 4 Select monitor states and criteria. For each criterion, replace «Name» with the name of a
value returned in the property bag from the script and set the condition. A list of properties
returned in the property bag is displayed to make it easier to specify property names. Click
Next.
Step 5 Enter a name for the new script monitor. Click Next.
Step 6 Specify the Run As credentials to be used by this monitor or leave (none / default)
specified to use the default credentials. Click Next.
Step 7 Specify the schedule to run the script monitor. Click Next.
Step 8 Optionally choose to create an Alert for this monitor including Priority, Severity and
Message text. Click Next.
Step 9 Review the settings and click Finish to complete the creation of the new script monitor.
To save these changes, click the Save toolbar button or select File, Save.
Creating a New Windows Service Monitor A service monitor is used to determine the health state of an application or system based on the state of a
Windows service. To create a new service monitor:
Step 1 Right-click on Monitors and select Create New Windows Service Monitor.
Step 2 Next you will be prompted to enter the name of a machine to browse installed services to
help define the new service monitor. Enter the name of a machine or click the Browse
button to browse the network. Click Next.
Tip Browsing a computer where the application or system you want to monitor is installed will
help create the objects in the new MP. Credentials used for browsing remote systems are
managed using the Tools, Manager Server Credentials dialog.
Step 3 Select the Windows Service to monitor. Click Next.
Step 4 Select the Target for this monitor from the drop-down list of targets. Optionally, filter the
target by a group (suitable overrides will be created). Select the Parent Monitor from the
list of parent monitors. Click Next.
Step 5 Enter a name for the new service monitor. Click Next.
Step 6 Specify the Run As credentials to be used by this monitor or leave (none / default)
specified to use the default credentials. Click Next.
Step 7 Specify the health states for the various service states. Click Next.
Step 8 Optionally choose to create an Alert for this monitor including Priority, Severity and
Message text. Click Next.
Step 9 Review the settings and click Finish to complete the creation of the new service monitor.
To save these changes, click the Save toolbar button or select File, Save.
Creating a New Windows Web Site Monitor A web site monitor is used to determine the health state of a web service component either on its own or
part of a larger application or system. To create a new web site monitor:
Step 1 Right-click on Monitors and select Create New Windows Web Site Monitor.
Step 2 Next you will be prompted to enter the URL of the web server to monitor and polling
interval. Click Next.
Step 3 Enter a display name for the new web site monitor (the template does not allow a name to
be specified). Click Next.
MP Author User Guide 33 Copyright © 2018 Silect Software, Inc. All rights reserved. Unauthorized reproduction or distribution prohibited
Step 4 Specify the Watcher Nodes for this monitor. You can use the default machine name or
browse for other watcher nodes. Click Next.
Step 5 Review the settings and click Finish to complete the creation of the new web site monitor.
To save these changes, click the Save toolbar button or select File, Save.
Creating a New Dependency Rollup Monitor (MP Studio & MP Author Pro only)
A dependency rollup monitor is used to roll up the health state of an application or system from low level
components to a higher-level component. To create a new dependency rollup monitor:
Step 1 Right-click on Monitors and select Create New Dependency Rollup Monitor.
Step 2 Select which health categories you wish to create dependency rollup monitors for. More
than one can be selected. Select the rollup policy (Worst Of is most common). Click Next.
Step 3 Select the Relationship from the drop-down list of relationships. The relationship
determines what rolls up to what. Click Next.
Step 4 Enter a name for the new dependency rollup monitor. Names will have the category added
automatically (if not present). Click Next.
Step 5 Optionally choose to create an Alert for this monitor including Priority, Severity and
Message text. Click Next.
Step 6 Review the settings and click Finish to complete the creation of the new dependency
rollup monitor. If more than one category was selected, a dependency rollup monitor will be
created for each category.
To save these changes, click the Save toolbar button or select File, Save.
Creating a New Aggregate Rollup Monitor (MP Studio & MP Author Pro only)
An aggregate rollup monitor is used to roll up the health state of several unit monitors into a single parent
monitor. To create a new aggregate rollup monitor:
Step 1 Right-click on Monitors and select Create New Aggregate Rollup Monitor.
Step 2 Select which health categories you wish to create aggregate rollup monitors for. More than
one can be selected. The categories are also used to select which unit monitors can be
rolled up by the wizard. Select the rollup policy (Worst Of is most common). Click Next.
Step 3 Select the Target from the drop-down list of targets. The target is also used to select which
unit monitors can be rolled up by the wizard. Click Next.
Step 4 Enter a name for the new aggregate rollup monitor. Names will have the category added
automatically (if not present). Click Next.
Step 5 Optionally choose to create an Alert for this monitor including Priority, Severity and
Message text. Click Next.
Step 6 If the current MP has unit monitors with the same target, and of any of the selected
categories, the wizard will present a list of eligible unit monitors. You may select (check)
those that you want to be re-targeted to the new aggregate monitor. You may also choose
to have the alerts from the unit monitors disabled so the only alerts are raised by the
aggregate monitor.
Step 7 Review the settings and click Finish to complete the creation of the new aggregate rollup
monitor. If more than one category was selected, an aggregate rollup monitor will be
created for each category. Any selected unit monitors will also be re-targeted to the new
aggregate rollup monitor and alerts will be disabled (if requested).
MP Author User Guide 34 Copyright © 2018 Silect Software, Inc. All rights reserved. Unauthorized reproduction or distribution prohibited
To save these changes, click the Save toolbar button or select File, Save.
Creating a New SNMP 2-State 2-Probe Monitor (MP Studio & MP Author Pro only)
An SNMP 2-state 2-probe monitor is used to determine the health state of a device based on probing
monitor variables. To create a new SNMP 2-state 2-probe monitor:
Step 1 Right-click on Monitors and select Create New SNMP 2-State 2-Probe Monitor.
Step 2 Enter the name of the previously defined SNMP device to browse its SNMP variables to
help define the new probe monitor. Or click the Browse button to browse the network and
define a new SNMP device to collect variables from. Click Next.
Step 3 Use the Browse or Add buttons on this page to add the SNMP variables to identify the first
and second (optional) probe monitor events. Click Next.
Step 4 Select the Target for this monitor from the drop-down list of targets monitor (the default is
typically okay). Optionally, filter the target by a group (suitable overrides will be created).
Select the Parent Monitor from the list of parent monitors. Click Next.
Step 5 Enter a name, display name and description for the new SNMP probe monitor. Click Next.
Step 6 Specify the Run As credentials to be used by this monitor or leave (none / default)
specified to use the default credentials. Click Next.
Step 7 Specify the schedule to run the SNMP probe monitor. Click Next.
Step 8 Specify the expression used to define the first SNMP probe to trigger on. Click Next.
Step 9 Specify the expression used to define the second SNMP probe to trigger on. Click Next.
Step 10 Specify the health state for both generated conditions for the SNMP probes. Click Next.
Step 11 Optionally choose to create an Alert for this monitor including Priority, Severity and
Message text. Click Next.
Step 12 Review the settings and click Finish to complete the creation of the new SNMP probe
monitor.
To save these changes, click the Save toolbar button or select File, Save.
Creating a New SNMP 2-State 2-Trap Monitor (MP Studio & MP Author Pro only)
An SNMP 2-state 2-trap monitor is used to determine the health state of a device based on trap events
that occur. To create a new SNMP 2-state 2-trap monitor:
Step 1 Right-click on Monitors and select Create New SNMP 2-State 2-Trap Monitor.
Step 2 Enter the name of the previously defined SNMP device to browse its SNMP traps to help
define the new trap monitor. Or click the Browse button to browse the network and define
a new SNMP device to collect variables from. Click Next.
Step 3 Use the Browse or Add buttons on this dialog to add the SNMP traps to monitor. Click
Next.
Step 4 Select the Target for this monitor from the drop-down list of target classes. Optionally, filter
the target by a group (suitable overrides will be created). Select the Parent Monitor from
the list of parent monitors. Click Next.
Step 5 Enter a name, display name and description for the new SNMP trap monitor. Click Next.
Step 6 Specify the Run As credentials to be used by this monitor or leave (none / default)
specified to use the default credentials. Click Next.
Step 7 Specify the expression used to define the first SNMP trap to trigger on. Click Next.
Step 8 Specify the expression used to define the second SNMP trap to trigger on. Click Next.
Step 9 Specify the health state for both generated conditions for the SNMP traps. Click Next.
MP Author User Guide 35 Copyright © 2018 Silect Software, Inc. All rights reserved. Unauthorized reproduction or distribution prohibited
Step 10 Optionally choose to create an Alert for this monitor including Priority, Severity and
Message text. Click Next.
Step 11 Review the settings and click Finish to complete the creation of the new SNMP trap
monitor.
To save these changes, click the Save toolbar button or select File, Save.
Editing a Monitor To edit a monitor, follow these steps:
Step 1 With the MP already opened, click the Monitors container to view the monitors currently
defined in the MP.
Step 2 Right-click one of the monitors displayed and select:
a. Edit with Wizard… to edit with the same wizard used to create the monitor,
b. View/Edit XML to edit the underlying XML,
c. Create/Edit Knowledge to edit the knowledge associated with the monitor,
d. Delete… to remove the monitor,
e. Properties… to view detailed properties of the monitor.
Step 3 Or click on one of the monitors and change the properties which are not greyed out in the
Properties View/Edit window.
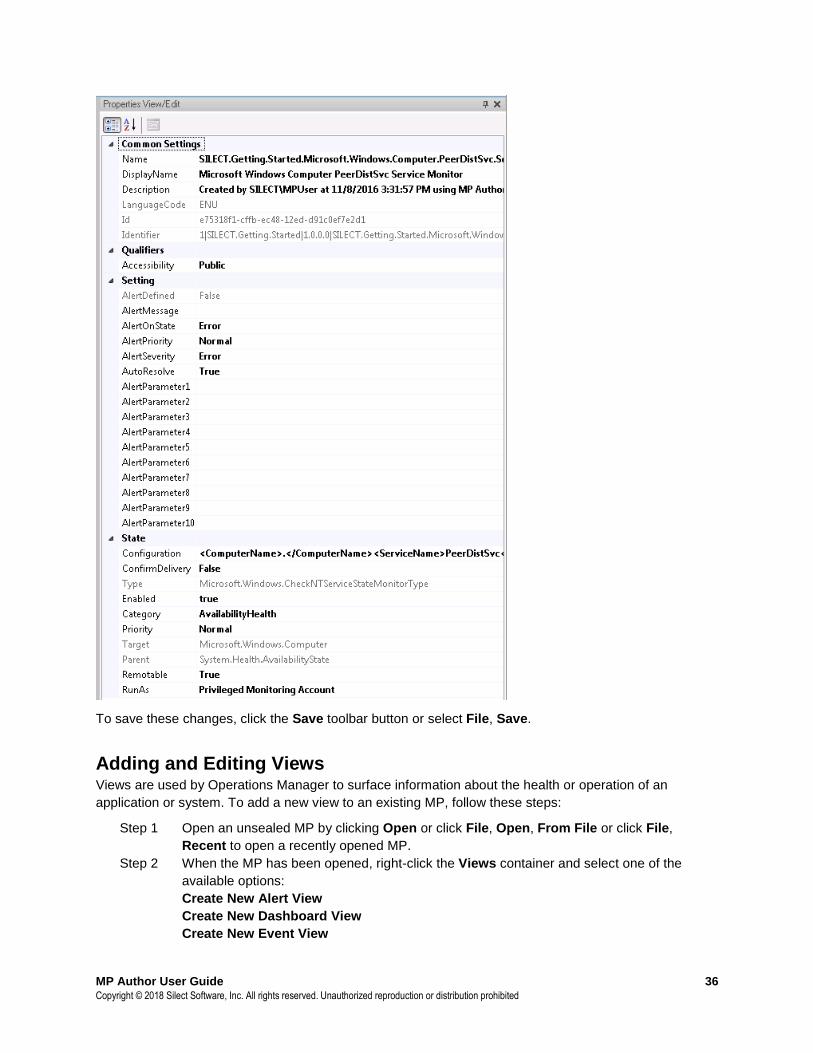
MP Author User Guide 36 Copyright © 2018 Silect Software, Inc. All rights reserved. Unauthorized reproduction or distribution prohibited
To save these changes, click the Save toolbar button or select File, Save.
Adding and Editing Views Views are used by Operations Manager to surface information about the health or operation of an
application or system. To add a new view to an existing MP, follow these steps:
Step 1 Open an unsealed MP by clicking Open or click File, Open, From File or click File,
Recent to open a recently opened MP.
Step 2 When the MP has been opened, right-click the Views container and select one of the
available options:
Create New Alert View
Create New Dashboard View
Create New Event View
MP Author User Guide 37 Copyright © 2018 Silect Software, Inc. All rights reserved. Unauthorized reproduction or distribution prohibited
Create New Performance View
Create New State View
Refer to the appropriate section below for details on creating each type of View.
Creating a New Alert View An alert view provides information about alerts within the Operations Manager environment. To create a
new alert view:
Step 1 Right-click on Views and select Create New Alert View.
Step 2 Specify the Folder name and the Category for the new alert view. Click Next.
Step 3 Select the Severity from the drop-down list of severities.
Select the Priority from the drop-down list of priorities.
Select the Resolution State from the drop-down list.
Select the Alert Source from the drop-down list of available alert sources.
Click Next.
Step 4 Select the Target for this view from the drop-down list of targets. Specifying a Group Filter
will restrict the view to only show the members of the specified group. Click Next.
Step 5 Enter a name for the new alert view. Click Next.
Step 6 Review the settings and click Finish to complete the creation of the new alert view.
To save these changes, click the Save toolbar button or select File, Save.
Creating a New Dashboard View A dashboard view provides a single pane to look at several other views. To create a new dashboard view:
Step 1 Right-click on Views and select Create New Dashboard View.
Step 2 Specify the Folder name and the Category for the new dashboard view. Click Next.
Step 3 Select the Dashboard Configuration. Choices include anything from a 1 x 1 dashboard
grid to a 3 x 3 grid.
Then click each empty cell in the grid and select the View to be displayed in that cell from
the drop-down list of views. If the same view name is specified in two or more adjacent
cells (horizontally or vertically), then the view will span those columns or rows.
Click Next.
Step 4 Select the Target for this view from the drop-down list of targets. Click Next.
Step 5 Enter a name for the new dashboard view. Click Next.
Step 6 Review the settings and click Finish to complete the creation of the new dashboard view.
To save these changes, click the Save toolbar button or select File, Save.
Creating a New Event View An event view provides information about events within the Operations Manager environment. To create
a new event view:
Step 1 Right-click on Views and select Create New Event View.
Step 2 Specify name of the computer to browse for events as well as the Folder name and the
Category for the new event view. Click Next.
Tip Browsing a computer where the application or system you want to monitor is installed will
help create the objects in the new MP. Credentials used for browsing remote systems are
managed using the Tools, Manager Server Credentials dialog.
MP Author User Guide 38 Copyright © 2018 Silect Software, Inc. All rights reserved. Unauthorized reproduction or distribution prohibited
Step 3 Add the Event IDs to be included in the new event view.
Or:
Select an event rule to be used as the source for the view.
Click Next.
Step 4 Select the Target for this view from the drop-down list of targets. Specifying a Group Filter
will restrict the view to only show the members of the specified group. Click Next.
Step 5 Enter a name for the new event view. Click Next.
Step 6 Review the settings and click Finish to complete the creation of the new event view.
To save these changes, click the Save toolbar button or select File, Save.
Creating a New Performance View A performance view surfaces information about performance data from within the Operations Manager
environment. To create a new performance view:
Step 1 Right-click on Views and select Create New Performance View.
Step 2 Specify name of the computer to browse for performance data as well as the Folder name
and the Category for the new event view. Click Next.
Tip Browsing a computer where the application or system you want to monitor is installed will
help create the objects in the new MP. Credentials used for browsing remote systems are
managed using the Tools, Manager Server Credentials dialog.
Step 3 Select one or more of the following: Rule, Object, Counter and Instance. Click Next.
Step 4 Select the Target for this view from the drop-down list of targets. Specifying a Group Filter
will restrict the view to only show the members of the specified group. Click Next.
Step 5 Enter a name for the new performance view. Click Next.
Step 6 Review the settings and click Finish to complete the creation of the new performance
view.
To save these changes, click the Save toolbar button or select File, Save.
Creating a New State View A state view surfaces information about state data within the Operations Manager environment. To create
a new state view:
Step 1 Right-click on Views and select Create New State View.
Step 2 Specify the Folder name and the Category for the new state view. Click Next.
Step 3 Select one or more Severities from the list.
Select the Maintenance Modes to report.
Optionally, specify a filer with wildcards to only display matching display names.
Click Next.
Step 4 Select the Target for this view from the drop-down list of targets. Specifying a Group Filter
will restrict the view to only show the members of the specified group. Click Next.
Step 5 Enter a name for the new state view. Click Next.
Step 6 Review the settings and click Finish to complete the creation of the new state view.
To save these changes, click the Save toolbar button or select File, Save.
Editing Views To edit a view, follow these steps:
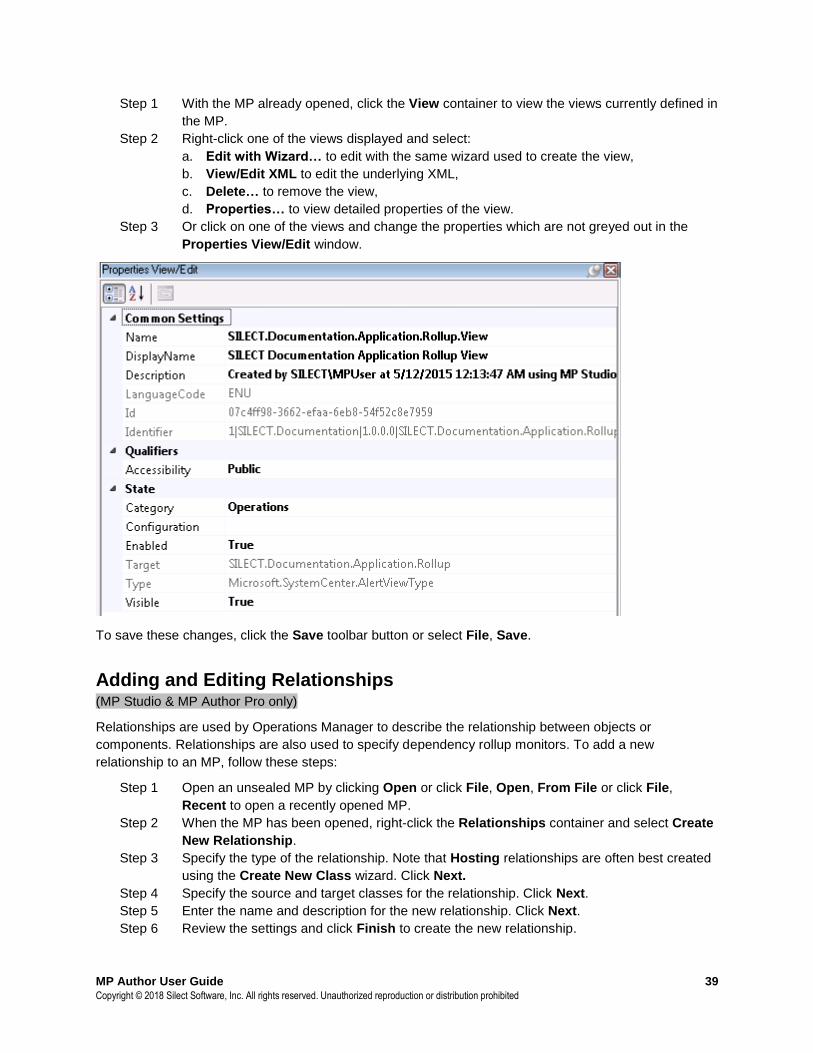
MP Author User Guide 39 Copyright © 2018 Silect Software, Inc. All rights reserved. Unauthorized reproduction or distribution prohibited
Step 1 With the MP already opened, click the View container to view the views currently defined in
the MP.
Step 2 Right-click one of the views displayed and select:
a. Edit with Wizard… to edit with the same wizard used to create the view,
b. View/Edit XML to edit the underlying XML,
c. Delete… to remove the view,
d. Properties… to view detailed properties of the view.
Step 3 Or click on one of the views and change the properties which are not greyed out in the
Properties View/Edit window.
To save these changes, click the Save toolbar button or select File, Save.
Adding and Editing Relationships (MP Studio & MP Author Pro only)
Relationships are used by Operations Manager to describe the relationship between objects or
components. Relationships are also used to specify dependency rollup monitors. To add a new
relationship to an MP, follow these steps:
Step 1 Open an unsealed MP by clicking Open or click File, Open, From File or click File,
Recent to open a recently opened MP.
Step 2 When the MP has been opened, right-click the Relationships container and select Create
New Relationship.
Step 3 Specify the type of the relationship. Note that Hosting relationships are often best created
using the Create New Class wizard. Click Next.
Step 4 Specify the source and target classes for the relationship. Click Next.
Step 5 Enter the name and description for the new relationship. Click Next.
Step 6 Review the settings and click Finish to create the new relationship.

MP Author User Guide 40 Copyright © 2018 Silect Software, Inc. All rights reserved. Unauthorized reproduction or distribution prohibited
To save these changes, click the Save toolbar button or select File, Save.
To edit a relationship, follow these steps:
Step 1 With the MP already opened, click the Relationships container to view the relationships
currently defined in the MP.
Step 2 Right-click one of the relationships displayed and select:
a. Edit with Wizard… to edit with the same wizard used to create the relationship,
b. View/Edit XML to edit the underlying XML,
c. Delete… to remove the relationships,
d. Properties… to view detailed properties of the relationship.
Step 3 Or click on one of the relationships and change the properties which are not greyed out in
the Properties View/Edit window.
To save changes, click the Save toolbar button or select File, Save.
Adding and Editing Secure References (MP Studio & MP Author Pro only)
Secure references are used by Operations Manager to centralize and control the credentials used
perform various operations on target computers/devices. To add a new secure reference to an MP, follow
these steps:
Step 1 Open an unsealed MP by clicking Open or click File, Open, From File or click File,
Recent to open a recently opened MP.
Step 2 When the MP has been opened, right-click the Secure References container and select
Create New Secure Reference.
Step 3 Specify the target class for the secure reference. This is typically System.Entity (Object).
Click Next.
Step 4 Enter the name and description for the new secure reference. Click Next.
Step 5 Review the settings and click Finish to create the new secure reference.
To save these changes, click the Save toolbar button or select File, Save.
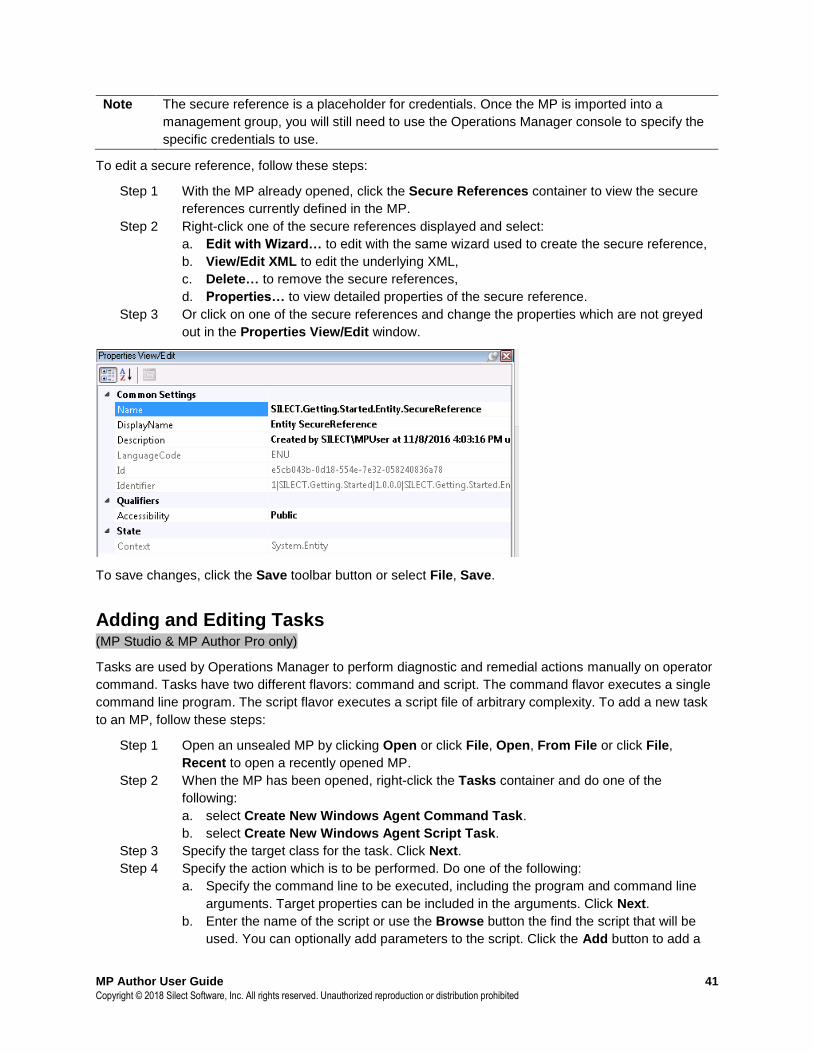
MP Author User Guide 41 Copyright © 2018 Silect Software, Inc. All rights reserved. Unauthorized reproduction or distribution prohibited
Note The secure reference is a placeholder for credentials. Once the MP is imported into a
management group, you will still need to use the Operations Manager console to specify the
specific credentials to use.
To edit a secure reference, follow these steps:
Step 1 With the MP already opened, click the Secure References container to view the secure
references currently defined in the MP.
Step 2 Right-click one of the secure references displayed and select:
a. Edit with Wizard… to edit with the same wizard used to create the secure reference,
b. View/Edit XML to edit the underlying XML,
c. Delete… to remove the secure references,
d. Properties… to view detailed properties of the secure reference.
Step 3 Or click on one of the secure references and change the properties which are not greyed
out in the Properties View/Edit window.
To save changes, click the Save toolbar button or select File, Save.
Adding and Editing Tasks (MP Studio & MP Author Pro only)
Tasks are used by Operations Manager to perform diagnostic and remedial actions manually on operator
command. Tasks have two different flavors: command and script. The command flavor executes a single
command line program. The script flavor executes a script file of arbitrary complexity. To add a new task
to an MP, follow these steps:
Step 1 Open an unsealed MP by clicking Open or click File, Open, From File or click File,
Recent to open a recently opened MP.
Step 2 When the MP has been opened, right-click the Tasks container and do one of the
following:
a. select Create New Windows Agent Command Task.
b. select Create New Windows Agent Script Task.
Step 3 Specify the target class for the task. Click Next.
Step 4 Specify the action which is to be performed. Do one of the following:
a. Specify the command line to be executed, including the program and command line
arguments. Target properties can be included in the arguments. Click Next.
b. Enter the name of the script or use the Browse button the find the script that will be
used. You can optionally add parameters to the script. Click the Add button to add a
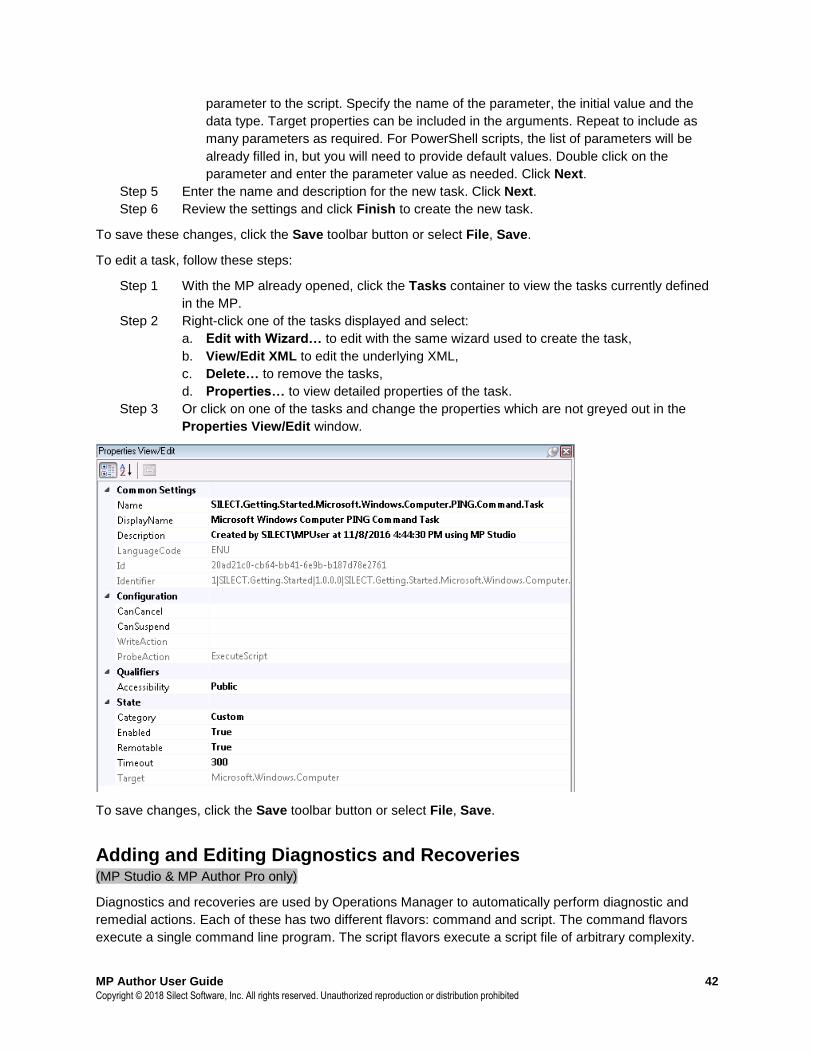
MP Author User Guide 42 Copyright © 2018 Silect Software, Inc. All rights reserved. Unauthorized reproduction or distribution prohibited
parameter to the script. Specify the name of the parameter, the initial value and the
data type. Target properties can be included in the arguments. Repeat to include as
many parameters as required. For PowerShell scripts, the list of parameters will be
already filled in, but you will need to provide default values. Double click on the
parameter and enter the parameter value as needed. Click Next.
Step 5 Enter the name and description for the new task. Click Next.
Step 6 Review the settings and click Finish to create the new task.
To save these changes, click the Save toolbar button or select File, Save.
To edit a task, follow these steps:
Step 1 With the MP already opened, click the Tasks container to view the tasks currently defined
in the MP.
Step 2 Right-click one of the tasks displayed and select:
a. Edit with Wizard… to edit with the same wizard used to create the task,
b. View/Edit XML to edit the underlying XML,
c. Delete… to remove the tasks,
d. Properties… to view detailed properties of the task.
Step 3 Or click on one of the tasks and change the properties which are not greyed out in the
Properties View/Edit window.
To save changes, click the Save toolbar button or select File, Save.
Adding and Editing Diagnostics and Recoveries (MP Studio & MP Author Pro only)
Diagnostics and recoveries are used by Operations Manager to automatically perform diagnostic and
remedial actions. Each of these has two different flavors: command and script. The command flavors
execute a single command line program. The script flavors execute a script file of arbitrary complexity.
MP Author User Guide 43 Copyright © 2018 Silect Software, Inc. All rights reserved. Unauthorized reproduction or distribution prohibited
Diagnostics can be run automatically when a monitor enters a specified health state to provide additional
diagnostic information. Recoveries can be run automatically when a monitor enters a specified health
state to attempt to bring the system back into a healthy state. To add a new diagnostic or recovery to an
MP, follow these steps:
Step 1 Open an unsealed MP by clicking Open or click File, Open, From File or click File,
Recent to open a recently opened MP.
Step 2 When the MP has been opened, do one of the following:
a. right-click the Diagnostics container and select Create New Command Diagnostics.
b. right-click the Diagnostics container and select Create New Script Diagnostics.
c. right-click the Recoveries container and select Create New Command Recoveries.
d. right-click the Recoveries container and select Create New Script Recoveries.
Step 3 Specify the target class for the diagnostic or recovery. Click Next.
Step 4 Specify the action which is to be performed. Do one of the following:
a. Specify the command line to be executed, including the program and command line
arguments. Target properties can be included in the arguments. Click Next.
b. Enter the name of the script or use the Browse button the find the script that will be
used. You can optionally add parameters to the script. Click the Add button to add a
parameter to the script. Specify the name of the parameter, the initial value and the
data type. Target properties can be included in the arguments. Repeat to include as
many parameters as required. For PowerShell scripts, the list of parameters will be
already filled in, but you will need to provide default values. Double click on the
parameter and enter the parameter value as needed. Click Next.
Step 5 Specify the health state which will automatically trigger the diagnostic or recovery. Click
Next.
Step 6 Select one or more monitors which you wish to add this diagnostic or recovery to. If more
than one is selected, multiple diagnostics or recoveries will be created, one for each
selected monitor. Click Next.
Step 7 Enter suffixes for the name and description for the new diagnostic or recovery. The name
specified will be applied as a suffix to the name of the monitor to create the final name.
Click Next.
Step 8 Review the settings and click Finish to create the new diagnostic or recovery.
To save these changes, click the Save toolbar button or select File, Save.
To edit a diagnostic or recovery, follow these steps:
Step 1 With the MP already opened, click the Diagnostics or Recoveries container to view the
diagnostics or recoveries currently defined in the MP.
Step 2 Right-click one of the diagnostics or recoveries displayed and select:
a. Edit with Wizard… to edit with the same wizard used to create the diagnostic or
recovery,
b. View/Edit XML to edit the underlying XML,
c. Delete… to remove the diagnostics or recoveries,
d. Properties… to view detailed properties of the diagnostic or recovery.
Step 3 Or click on one of the diagnostics or recoveries and change the properties which are not
greyed out in the Properties View/Edit window.
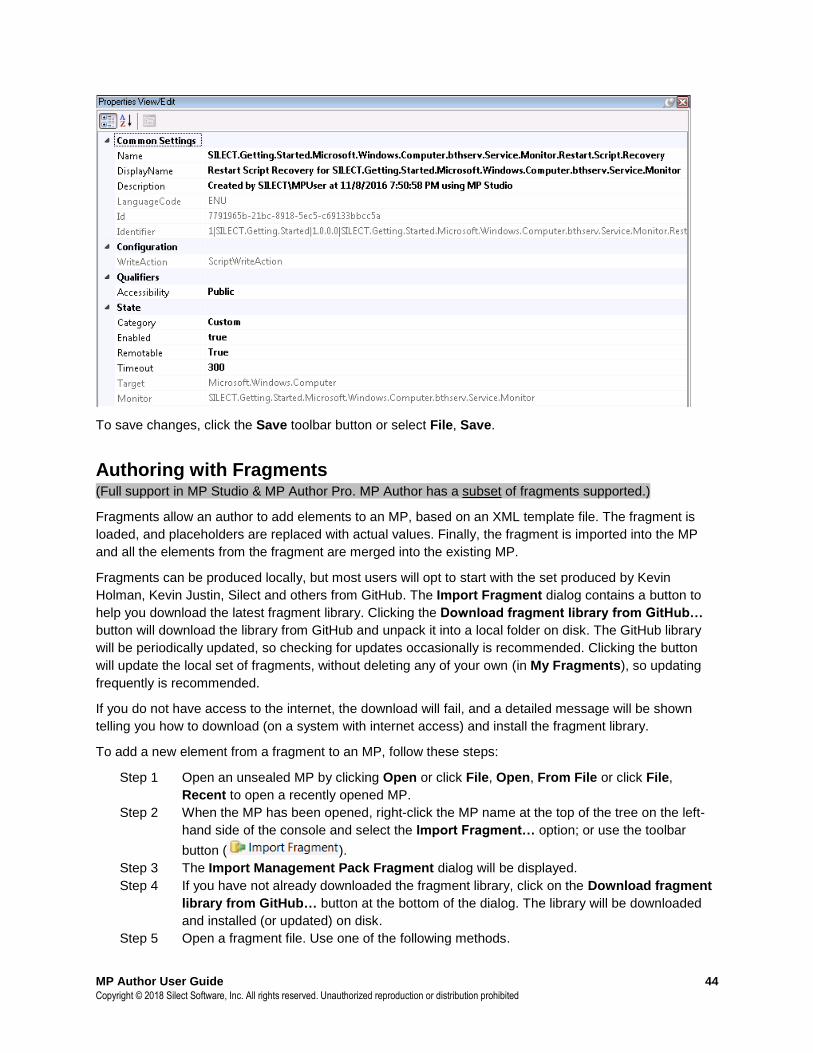
MP Author User Guide 44 Copyright © 2018 Silect Software, Inc. All rights reserved. Unauthorized reproduction or distribution prohibited
To save changes, click the Save toolbar button or select File, Save.
Authoring with Fragments (Full support in MP Studio & MP Author Pro. MP Author has a subset of fragments supported.)
Fragments allow an author to add elements to an MP, based on an XML template file. The fragment is
loaded, and placeholders are replaced with actual values. Finally, the fragment is imported into the MP
and all the elements from the fragment are merged into the existing MP.
Fragments can be produced locally, but most users will opt to start with the set produced by Kevin
Holman, Kevin Justin, Silect and others from GitHub. The Import Fragment dialog contains a button to
help you download the latest fragment library. Clicking the Download fragment library from GitHub…
button will download the library from GitHub and unpack it into a local folder on disk. The GitHub library
will be periodically updated, so checking for updates occasionally is recommended. Clicking the button
will update the local set of fragments, without deleting any of your own (in My Fragments), so updating
frequently is recommended.
If you do not have access to the internet, the download will fail, and a detailed message will be shown
telling you how to download (on a system with internet access) and install the fragment library.
To add a new element from a fragment to an MP, follow these steps:
Step 1 Open an unsealed MP by clicking Open or click File, Open, From File or click File,
Recent to open a recently opened MP.
Step 2 When the MP has been opened, right-click the MP name at the top of the tree on the left-
hand side of the console and select the Import Fragment… option; or use the toolbar
button ( ).
Step 3 The Import Management Pack Fragment dialog will be displayed.
Step 4 If you have not already downloaded the fragment library, click on the Download fragment
library from GitHub… button at the bottom of the dialog. The library will be downloaded
and installed (or updated) on disk.
Step 5 Open a fragment file. Use one of the following methods.

MP Author User Guide 45 Copyright © 2018 Silect Software, Inc. All rights reserved. Unauthorized reproduction or distribution prohibited
a. Use the Browse… button to locate one of the fragment (.mpx) files. The file names
describe what the fragment will create. Click Open.
b. Use the Search… button to bring up the Search for Fragments dialog. This dialog
allows you to filter the list of fragments down until you find the one you are interested
in. You can filter by: element type created by the fragment; parameter names used in
the fragment; keywords defined in the fragment; or a full text search. Select one of the
fragment files (.mpx) and click OK.
Step 6 In the Parameters area at the top, you will need to provide values for any parameter which
is showing the error indicator ( ). Many parameters will have Browse… buttons to allow
you to select correct values from live systems. As each parameter value is entered, it will
replace the placeholders in the Preview area. The current parameter will be highlighted in
the Preview area to help make it clear where that value will be used. For convenience,
parameter values are remembered, and parameters will be initialized with the last value
when importing subsequent fragments.
Step 7 Be sure to review the text in the Preview area in case there are things that will still need to
be changed manually. Scripts may have items which need further editing. If edits are
required, use the Edit XML… button at the bottom of the window to edit the XML (which
will not have the parameter values replaced like you see in the Preview area).
Note The XML view/edit window allows control over whether the XML code is color coded and how
attributes are wrapped. Right-click in the XML view/edit window and select Colorize XML
and/or Attribute Wrapping to select your preference. These settings will be remembered.
Step 8 When all the parameters have been specified, the Import button will be enabled. Click
Import to add the elements defined by the fragment to the MP.
To save these changes, click the Save toolbar button or select File, Save.
Creating Fragments (MP Studio & MP Author Pro only)
Creating your own fragments allows you to easily create customized workflows for your environment.
Within MP Studio and MP Author Pro, users can select many existing elements (like rules, monitors, and
discoveries) and create a fragment from the specified element and all required parts (module types,
knowledge, etc.). The user controls which parts of the fragment use parameters to allow substitution
during fragment import. The resultant fragment is saved to disk, where it can be used to create new
elements, and can be shared with the fragment community on GitHub.
To create a new fragment from an MP, follow these steps:
Step 1 Open a sealed or unsealed MP by clicking Open or click File, Open, From File or click
File, Recent to open a recently opened MP.
Step 2 When the MP has been opened, right-click any of the following elements and select Create
Fragment…:
Monitors
Rules
Discoveries
Overrides
Tasks
Diagnostics
Recoveries
Views

MP Author User Guide 46 Copyright © 2018 Silect Software, Inc. All rights reserved. Unauthorized reproduction or distribution prohibited
Folders
String Resources
Step 3 Use the Edit Header… button to edit the description of the fragment and a version number
(if desired). The last modified date will be automatically updated whenever the fragment is
created or edited.
Step 4 Add parameters by selecting some text and clicking the Add Parameter From
Selection… button. Normally you will select either all the text between the start and end
tag, or all or part of an attribute value, like the following:
or
or
If your selection looks like you have included part of the XML you will be asked to confirm
your selection (to avoid inadvertently creating invalid XML).
Step 5 In the Add Fragment Parameter dialog you will need to specify a name for the parameter.
In some cases, a suitable name will be suggested, based on the surrounding XML tags.
There are fly-out buttons on the right-hand side which will give you lists of common names
that you might want to choose. The Recent button will show you a list of the names you
have used recently. The Browsable button will show you a list of names which will allow
you to browse for values when importing the fragment (very helpful!). The All button will
show you a list of all parameter names used in all fragments on your system, to help you
select from a common set of names.
Step 6 After specifying a name, you can use the check boxes to control how the parameter is
applied. Normally, the selected text will be replaced with the parameter name wherever it
occurs in the fragment. By using the Match case and Match whole word options you can
assure that replacement is only done where needed. The Replace only this one
occurrence option only replaces the selected text, not everywhere the text occurs in the
fragment.
Step 7 Click OK and the parameter name is put in place of the selected text and in the header and
list of parameters.
Step 8 Repeat the above steps to add more parameters, if required.
Step 9 You can add a parameter without selecting text, if required. You can also rename or delete
parameters.
Step 10 When the header has been edited and all the parameters have been defined, you may
need to make some other edits to finalize the fragment. The Edit XML… button can be
used to do that.
Note The XML view/edit window allows control over whether the XML code is color coded and how
attributes are wrapped. Right-click in the XML view/edit window and select Colorize XML
and/or Attribute Wrapping to select your preference. These settings will be remembered.
Step 11 When finished, press the Save As… button to save the fragment. You will be prompted for
a name for the fragment and allowed to specify which folder to save it in. Silect
recommends you use the My Fragments folder to store your fragments. The My
Fragments folder is treated specially and when updated fragments are loaded from
GitHub, fragment files in the My Fragments folder will not be touched (but will show up in
the fragment search dialog).
MP Author User Guide 47 Copyright © 2018 Silect Software, Inc. All rights reserved. Unauthorized reproduction or distribution prohibited
The list of browsable parameter names lists only the base names. If you wish to have multiple browsable
parameters (of the same type), you can add a prefix or suffix to the browsable name. The Import
Management Pack Fragment dialog will still recognize them as browsable, and with different names the
parameter values are handled as separate entities. For example, you may have a monitor which monitors
one class and is hosted by a second class. To support this, you might name one parameter
MonitorClassID and the second HostClassID.
If you have created a new fragment that you think might be useful for others, consider sharing it with the
world on GitHub! Contact Silect support for details.
Editing Fragments (MP Studio & MP Author Pro only)
Existing fragments can be edited, whether they are your own fragments, or fragments from the GitHub
library. Editing is like creating fragments (above), so only the differences will be discussed here. The
resultant fragment is saved to disk, where it can be used to create new elements, and can be shared with
the fragment community on GitHub.
To edit a fragment, follow these steps:
Step 1 Select the Edit Fragment button ( ) on the toolbar or select a fragment in
the Manage Fragments dialog and click Edit… (see Managing Fragments below).
Step 2 The Edit Fragment dialog will be displayed, showing the last selected fragment (if any).
Step 3 You can use the Search… or Browse… buttons to select the fragment to edit (if not
already loaded).
Step 4 Edit the fragment as discussed above in Creating Fragments.
Step 5 When finished, press the Save button to save the fragment using the existing file name. Or
press the Save As… button to save the fragment with a new file name. You will be
prompted for a name for the fragment file and allowed to specify which folder to save it in.
Silect recommends you use the My Fragments folder to store your fragments. The My
Fragments folder is treated specially and when updated fragments are loaded from
GitHub, fragment files in the My Fragments folder will not be touched (but will show up in
the fragment search dialog).
Step 6 You can also Browse or Search to change the fragment being edited (although you will
lose any changes).
Fragments can also have additional elements added to create more complex fragments. For example, a
fragment might be created with a discovery (which will also include the class definition). Then a user
could add a monitor to that fragment, as well as rules and/or views, etc. to create a fragment which
defines the complete monitoring of certain types of application.
To add more elements to a fragment, follow these steps:
Step 1 Open a sealed or unsealed MP by clicking Open or click File, Open, From File or click
File, Recent to open a recently opened MP.
Step 2 When the MP has been opened, right-click any of the following elements and select Add to
Fragment…:
Monitors
Rules
Discoveries
Overrides
MP Author User Guide 48 Copyright © 2018 Silect Software, Inc. All rights reserved. Unauthorized reproduction or distribution prohibited
Tasks
Diagnostics
Recoveries
Views
Folders
String Resources
Step 3 You will be prompted to select an existing fragment file which the new elements will be
added to.
Step 4 Edit the fragment as discussed above in Creating Fragments and then save as discussed
in Step 5 for Editing Fragments above.
If you have updated or created a new fragment that you think might be useful for others, consider sharing
it with the world on GitHub! Contact Silect support for details.
Managing Fragments (MP Studio & MP Author Pro only)
To allow users to manage fragments, the Tools, Manage Fragments… menu item is provided. The
Manage Fragments dialog allows the following operations.
• Users can change the folder where fragments are stored and where search will look for
fragments. Use the Browse… button to select a different folder. By default, the users
Documents folder is used, and fragments will be stored in the Silect\Fragments folder below
Documents. Fragments will be stored in subfolders. Silect recommends customers keep their
fragments in the My Fragments folder. Downloading fragments from GitHub will not touch
fragments in the My Fragments folder, but will update, replace and delete fragments in the other
sub-folders as needed.
• Users can download, or update, the library of fragments from GitHub using the Download
fragment library from GitHub… button. Fragments in the My Fragments folder will not be
touched by this operation.
• Users can select one or more fragments from the list of fragments or use the filter to find
fragments of interest.
• When a single fragment is selected, the user may choose to edit, rename, or delete that
fragment.
• When more than one fragment is selected, the user may choose to delete those fragments or
combine them into a single new fragment file.
• Clicking the Combine… button will merge the selected fragments into a new fragment file. The
combined fragment will be loaded into the Create Management Pack Fragment dialog and
further editing, and parameterization is as described above in Creating Fragments.
Management Pack Options There are several options available for management packs that you work with within Silect MP Author. To
access the available options, open an MP then right-click the MP name at the top of the tree structure in
the left-hand side of the console.
The following MP options are available:
View/Edit XML… *
Edit References…
MP Author User Guide 49 Copyright © 2018 Silect Software, Inc. All rights reserved. Unauthorized reproduction or distribution prohibited
Import Fragment…
Check For Missing Display Names…
Verify…
Run Best Practices Analyzer…
Seal…
Deploy…
Compare *
Document *
Test… *
View Reference Tree *
View Summary *
Show All Elements
* Feature available only in Silect MP Studio or Silect MP Author Professional.
The following sections describe how to use each of these features.
View/Edit XML (MP Studio & MP Author Pro only) To view or edit the XML code for an entire MP, follow these steps:
Step 1 Open an MP by clicking Open or click File, Open, From File or click File, Recent to open
a recently opened MP.
Step 2 Right-click the MP name at the top of the tree on the left-hand side of the console.
Step 3 Select the View/Edit XML… or View XML… option.
Step 4 A new Edit – ‘MP Name’ window will be shown. If the file is unsealed, the XML code can
be edited. Sealed MP’s will be displayed but the XML cannot be edited.
Step 5 Make any required changes to the XML and click OK.
Note The XML view/edit window allows control over whether the XML code is color coded and how
attributes are wrapped. Right-click in the XML view/edit window and select Colorize XML
and/or Attribute Wrapping to select your preference. These settings will be remembered.
CAUTION! Detailed knowledge of the MP XML schema is required to successfully make changes to
the XML form of an MP.
Edit References MPs reference information and libraries in other MPs. To add a reference to an MP, follow these steps:
Step 1 Open an unsealed MP by clicking Open or click File, Open, From File or click File,
Recent to open a recently opened MP.
Step 2 Right-click the MP name at the top of the tree on the left-hand side of the console.
Step 3 Select the Edit References… option.
Step 4 Click the Add / Update Version… button.
Step 5 Click one or more MPs (use the Ctrl click option to multi-select) the click OK when done.
Step 6 Click Close.
Note Selecting an existing reference MP, will update the reference to the version of the newly
selected MP. This allows an easy way to update references as new MPs are released.
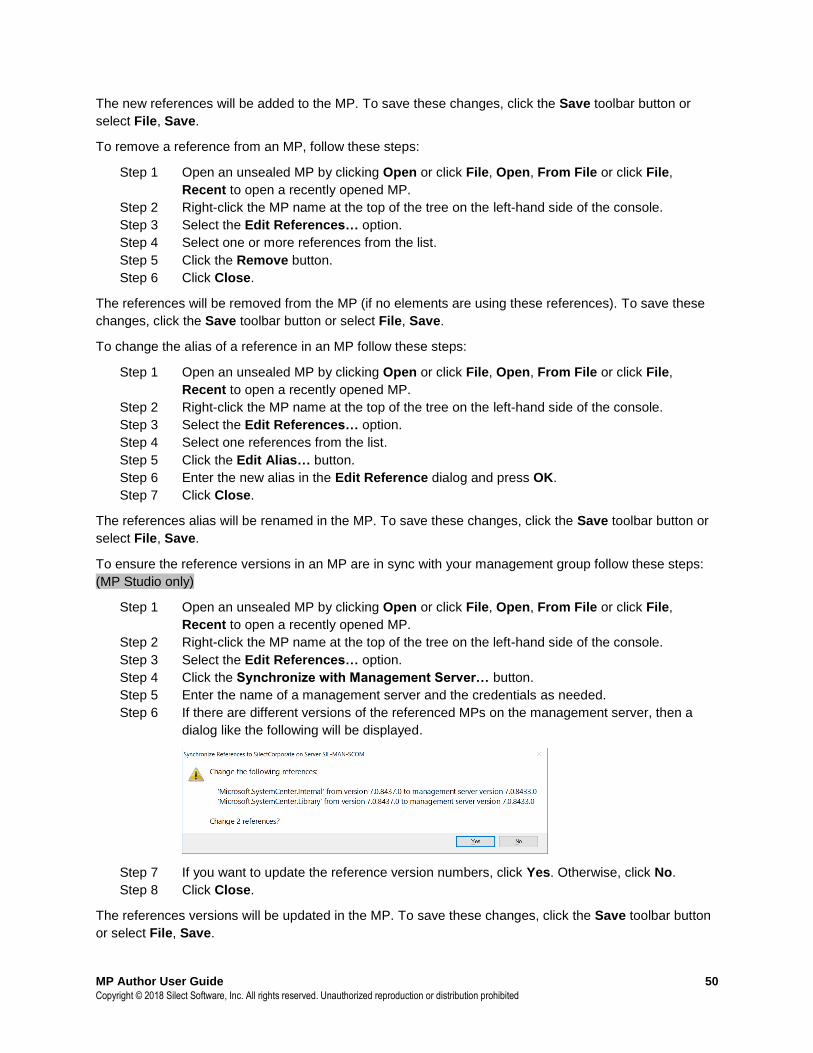
MP Author User Guide 50 Copyright © 2018 Silect Software, Inc. All rights reserved. Unauthorized reproduction or distribution prohibited
The new references will be added to the MP. To save these changes, click the Save toolbar button or
select File, Save.
To remove a reference from an MP, follow these steps:
Step 1 Open an unsealed MP by clicking Open or click File, Open, From File or click File,
Recent to open a recently opened MP.
Step 2 Right-click the MP name at the top of the tree on the left-hand side of the console.
Step 3 Select the Edit References… option.
Step 4 Select one or more references from the list.
Step 5 Click the Remove button.
Step 6 Click Close.
The references will be removed from the MP (if no elements are using these references). To save these
changes, click the Save toolbar button or select File, Save.
To change the alias of a reference in an MP follow these steps:
Step 1 Open an unsealed MP by clicking Open or click File, Open, From File or click File,
Recent to open a recently opened MP.
Step 2 Right-click the MP name at the top of the tree on the left-hand side of the console.
Step 3 Select the Edit References… option.
Step 4 Select one references from the list.
Step 5 Click the Edit Alias… button.
Step 6 Enter the new alias in the Edit Reference dialog and press OK.
Step 7 Click Close.
The references alias will be renamed in the MP. To save these changes, click the Save toolbar button or
select File, Save.
To ensure the reference versions in an MP are in sync with your management group follow these steps:
(MP Studio only)
Step 1 Open an unsealed MP by clicking Open or click File, Open, From File or click File,
Recent to open a recently opened MP.
Step 2 Right-click the MP name at the top of the tree on the left-hand side of the console.
Step 3 Select the Edit References… option.
Step 4 Click the Synchronize with Management Server… button.
Step 5 Enter the name of a management server and the credentials as needed.
Step 6 If there are different versions of the referenced MPs on the management server, then a
dialog like the following will be displayed.
Step 7 If you want to update the reference version numbers, click Yes. Otherwise, click No.
Step 8 Click Close.
The references versions will be updated in the MP. To save these changes, click the Save toolbar button
or select File, Save.
MP Author User Guide 51 Copyright © 2018 Silect Software, Inc. All rights reserved. Unauthorized reproduction or distribution prohibited
Import Fragment See Authoring With Fragments above for complete details.
Check For Missing Display Names Management pack elements all have a display name which is shown in the Operations Manager console.
If the display name is missing, the identifier is usually shown, but these cannot be localized. Display
names should be provided to give the best user experience. To check for missing display names, follow
these steps:
Step 1 Open an unsealed MP by clicking Open or click File, Open, From File or click File,
Recent to open a recently opened MP.
Step 2 Right-click the MP name at the top of the tree on the left-hand side of the console.
Step 3 Select the Check For Missing Display Names option.
Step 4 A list of elements and sub-elements with missing display names will be shown. Select each
you wish to edit and click Edit, or you can double-click the item. You can add missing
Display Names and Descriptions. Click Save when done.
Step 5 After each item has the missing display names defined, it will be removed from the list
making it easy to keep track of your progress.
Step 6 When finished, click Close.
The new display names and descriptions will be added to the MP. To save these changes, click the Save
toolbar button or select File, Save.
Verify MPs created or edited within Silect MP Author can be verified before being imported into Operations
Manager. To verify an MP, follow these steps:
Step 1 Open an MP by clicking Open or click File, Open, From File or click File, Recent to open
a recently opened MP.
Step 2 Right-click the MP name at the top of the tree on the left-hand side of the console.
Step 3 Select the Verify option.
The MP will be verified, and any problems or issues will be identified, and a detailed message will be
provided.
Note The Verify command will warn about Classes and Relationships in unsealed MP’s. These
warnings can usually be ignored.
Run Best Practices Analyzer MPs created or edited within Silect MP Author can be run through the Microsoft MP Best Practices
Analyzer (MPBPA) before being imported into Operations Manager. To run the MPBPA on an MP follow
these steps:
Step 1 Open an MP by clicking Open or click File, Open, From File or click File, Recent to open
a recently opened MP.
Step 2 Right-click the MP name at the top of the tree on the left-hand side of the console.
Step 3 Select the Run Best Practices Analyzer option.

MP Author User Guide 52 Copyright © 2018 Silect Software, Inc. All rights reserved. Unauthorized reproduction or distribution prohibited
Step 4 You will be asked to choose the location for your report, select your preferred option.
The MP Best Practices Analyzer will be run, and the results will be displayed.
Note MPBPA is provided as part of this software but is written and maintained by Microsoft.
MPBPA has some issues that should be noted.
- MPBPA requires an exact version match for referenced MPs where MP Author and
MP Studio will allow a match of a reference MP with the same or greater version
number. You may find that MPBPA does not work properly unless you acquire the
exact versions referenced.
- MPBPA does not accept Management Pack Bundle (.mpb) files. If your MP
references MPB files, then MPBPA will not be able to validate your MP file.
- MPBPA uses .NET 2.0/3.5. You may need to enable/install the earlier version of
.NET to allow MPBPA to run.
Seal MPs created or edited within Silect MP Author can be sealed before being imported into Operations
Manager. Sealing can optionally save the sealed MP to the Store (if available) and can optionally deploy
the newly sealed MP to a management server. To seal an MP, follow these steps:
Step 1 Open an unsealed MP by clicking Open or click File, Open, From File or click File,
Recent to open a recently opened MP.
Step 2 Right-click the MP name at the top of the tree on the left-hand side of the console.
Step 3 Select the Seal option.
Step 4 Provide the name of the folder where the sealed MP will be saved, the name of the Key
File as well as the Company name.
Step 5 If the Store database is available, check the Add to Store? check box to have the newly
sealed MP saved to the Store database.
Step 6 If you wish to deploy the newly sealed MP, check the Deploy? check box and select a
management server from the drop-down list.
Step 7 Click OK.
The MP will be sealed using the information provided. If you choose the default values, then the MP will
be sealed using a Silect MP Author specific license, which should not be considered secure enough to
use for anything other than testing purposes. The newly sealed MP will also be added to the Store
database (if requested) and/or deployed to a management group. All settings will be remembered and
used to initialize this dialog the next time this operation is performed.
Deploy MPs created or edited within Silect MP Author can be deployed directly to Operations Manager. To
deploy an MP, follow these steps:
Step 1 Open an MP by clicking Open or click File, Open, From File or click File, Recent to open
a recently opened MP.
Step 2 Right-click the MP name at the top of the tree on the left-hand side of the console.
MP Author User Guide 53 Copyright © 2018 Silect Software, Inc. All rights reserved. Unauthorized reproduction or distribution prohibited
Step 3 Select the Deploy option.
Step 4 Specify the name of the Operations Manager server to connect to. If different credentials
are required enter them in this dialog as well.
Step 5 Click OK.
Step 6 The Deploy Management Pack dialog will be displayed showing which MPs and their
versions are to be deployed. If reference MPs need to be deployed (because they are
missing or out of date on the management server), they will be listed here as well. Click
Deploy.
The MP will be deployed to Operations Manager. A message box will be shown when the operation is
complete.
Compare (MP Studio only) MPs can be compared to other MPs to determine the differences. To compare an MP, follow these steps:
Step 1 Open an MP by clicking Open or click File, Open, From File or click File, Recent to open
a recently opened MP.
Step 2 Right-click the MP name at the top of the tree on the left-hand side of the console.
Step 3 Select the Compare option, followed by selecting where the second MP is located.
Step 4 Use the browser to identify the second MP. Click OK.
A new window will open showing the differences between the two MPs.
Document (MP Studio only) MPs can be documented by producing an HTML report or an Excel spreadsheet. To document an MP,
follow these steps:
Step 1 Open an MP by clicking Open or click File, Open, From File or click File, Recent to open
a recently opened MP.
Step 2 Right-click the MP name at the top of the tree on the left-hand side of the console.
Step 3 Select the Document option, followed by selecting the type of document to create.
Step 4 For Excel, use the browser to specify where to store the Excel document. Click OK.
A new window will open documenting the MP.
Test (MP Studio only) MPs can be tested before deployment to determine what to expect in production. This is an advanced
feature. See the MP Studio documentation for details.
View Reference Tree (MP Studio only) MPs reference other MPs to provide classes, relationships, monitor types, etc. To view the reference tree
of an MP, follow these steps:
Step 1 Open an MP by clicking Open or click File, Open, From File or click File, Recent to open
a recently opened MP.
Step 2 Right-click the MP name at the top of the tree on the left-hand side of the console.
Step 3 Select the View Reference Tree option.
A new window will open showing the reference tree for the MP. Click on each MP to see the relationships
for that MP. Right-click for more options.
View Summary (MP Studio only) MPs can contain numerous elements such as rules, monitors, discoveries, etc. To view the summary of
an MP, follow these steps:
MP Author User Guide 54 Copyright © 2018 Silect Software, Inc. All rights reserved. Unauthorized reproduction or distribution prohibited
Step 1 Open an MP by clicking Open or click File, Open, From File or click File, Recent to open
a recently opened MP.
Step 2 Right-click the MP name at the top of the tree on the left-hand side of the console.
Step 3 Select the View Summary option.
A new window will open showing a summary for the MP.
Show All Elements MPs can contain many elements such as rules, monitors, discoveries, etc. Normally only the elements
which are present, or can be created, will be shown. To view all elements of an MP, follow these steps:
Step 1 Open an MP by clicking Open or click File, Open, From File or click File, Recent to open
a recently opened MP.
Step 2 Right-click the MP name at the top of the tree on the left-hand side of the console.
Step 3 Select the Show All Elements option.
The list of MP elements will be redrawn showing all elements. Repeat this procedure to show the more
limited set of elements.
MP Author User Guide 55 Copyright © 2018 Silect Software, Inc. All rights reserved. Unauthorized reproduction or distribution prohibited
Chapter 4
Getting Technical Support Silect MP Author users have several options for technical support.
Self–Service Support Portal Users can access FAQs, training videos and other Silect MP Author support information at:
https://www.silect.com/mp-author-support
Electronic Support A ticketed support system is also available for registered MP Author Pro and MP Studio users who cannot
find the information required to help them address their issue on the Silect MP Author support portal
(https://www.silect.com/mp-author-support). Registered users can email [email protected] with the
following information:
- A detailed description about the problem
- The Silect MP Author log files (located via the View – MP Author Log Folder menu item)
- Screen shots if applicable
Response times are not guaranteed using this support service for MP Author customers. MP Studio and
MP Author Professional customers will get support priority.
Including the log files corresponding to the time that the problem occurred, will improve the ability of
support to help with your problem.
Premium Support Silect Software also makes a pay-based premium support service available. This service provides
telephone and electronic support with guaranteed response times. For more information on Premium
Support please go to https://www.silect.com/mp-author-support
Other Resources https://www.youtube.com/user/SilectSoftware is a YouTube video channel published by Silect, that
contains useful videos describing how to use Silect products, such as MP Author.