Embed Size (px)
Citation preview

Silent Hunter III
Mission Editor Users Guide DRAFT COPY ONLY ! v0.6, 25 September 2006 [email protected]

2
Table of Contents Table of Contents...........................................................................................................2 1 Introduction............................................................................................................5
1.1 Important sections..........................................................................................5 2 Acknowledgements................................................................................................6 3 Updates ..................................................................................................................6 4 Creating a Single-player mission...........................................................................7
4.1 Building the mission ......................................................................................7 4.1.1 Setting up ...............................................................................................7 4.1.2 Navigating about the map ......................................................................7 4.1.3 Placing a target ship ...............................................................................8 4.1.4 Placing additional ships .......................................................................11 4.1.5 Placing the U-Boat...............................................................................13 4.1.6 Setting the mission parameters ............................................................14
4.2 Installing the mission ...................................................................................16 4.3 Playing the mission ......................................................................................17
5 Creating a Multi-player mission ..........................................................................19 6 Mission editor concepts .......................................................................................20
6.1 Distance and speed.......................................................................................20 6.2 The Simulator...............................................................................................20 6.3 Files..............................................................................................................21
7 How to implement…............................................................................................22 7.1 Removal of ships..........................................................................................22 7.2 Ships that patrol in loops..............................................................................22 7.3 Ships that can take different routes..............................................................22 7.4 How to spawn a Random Generated Group ................................................23 7.5 Aeroplanes ...................................................................................................25
7.5.1 How to ensure that aeroplanes attack...................................................25 7.6 Capital ship battles.......................................................................................26 7.7 Docked and stationary ships ........................................................................26 7.8 Icebergs ........................................................................................................27 7.9 Missions in different languages ...................................................................27 7.10 Placing minefields........................................................................................28 7.11 Adding radio messages ................................................................................29 7.12 German characters .......................................................................................30 7.13 Different background loading screens .........................................................30 7.14 Different types of victory conditions ...........................................................30 7.15 Changing victory conditions during the game .............................................32
8 Troubleshooting ...................................................................................................33 8.1.1 Vanishing units in the editor ................................................................33 8.1.2 Convoys breaking formation................................................................33
9 Tips on creating good missions............................................................................34 9.1 Prevailing conditions ...................................................................................34 9.2 The right start ...............................................................................................34 9.3 Historically feasible .....................................................................................34 9.4 Balanced game-play.....................................................................................34 9.5 Timing considerations..................................................................................35

3
9.6 Don’t overdo it!............................................................................................35 9.7 Test it! ..........................................................................................................35 9.8 Professional finish........................................................................................35
10 Mission ideas ...................................................................................................37 11 Mission Editor Reference ................................................................................39
11.1.1 SH3 Mission Editor Window...............................................................39 11.2 Menu bar ......................................................................................................39
11.2.1 File .......................................................................................................40 11.2.2 Edit.......................................................................................................41 11.2.3 Mission.................................................................................................41 11.2.4 Tools ....................................................................................................48 11.2.5 View.....................................................................................................48 11.2.6 Performance .........................................................................................49 11.2.7 Help......................................................................................................50
11.3 Controls tool bar ..........................................................................................50 11.3.1 File controls .........................................................................................50 11.3.2 Mode controls ......................................................................................51 11.3.3 Simulator controls................................................................................51
11.4 Tools’ Panel .................................................................................................52 11.5 The map interface ........................................................................................52
11.5.1 Add Map Note......................................................................................53 11.5.2 Add Map Zone .....................................................................................53 11.5.3 Add Random Generated Group ...........................................................54 11.5.4 Centre View .........................................................................................54
11.6 Individual unit icons ....................................................................................55 11.6.1 Add Waypoint ......................................................................................55 11.6.2 Unit Properties .....................................................................................55 11.6.3 Create Group from Unit .......................................................................58 11.6.4 Join Group............................................................................................58 11.6.5 Head to Waypoint ................................................................................58 11.6.6 Centre View .........................................................................................58
11.7 Group leader icons .......................................................................................58 11.7.1 Add Waypoint ......................................................................................58 11.7.2 Group Properties ..................................................................................58 11.7.3 Unit Properties .....................................................................................60 11.7.4 Head to Waypoint ................................................................................60 11.7.5 Pivot to Heading ..................................................................................60 11.7.6 Centre View .........................................................................................60 11.7.7 Arrange Group .....................................................................................60
11.8 Group member icons....................................................................................62 11.8.1 Properties .............................................................................................63 11.8.2 Detach from Group ..............................................................................63 11.8.3 Centre View .........................................................................................63
11.9 Random Group icons ...................................................................................63 11.9.1 Add Waypoint ......................................................................................63 11.9.2 Head To Waypoint ...............................................................................63 11.9.3 Group Properties ..................................................................................63 11.9.4 Define Group Contents ........................................................................65 11.9.5 Centre View .........................................................................................66
11.10 Waypoint icons ........................................................................................66

4
11.10.1 Add Waypoint ..................................................................................66 11.10.2 Properties .........................................................................................67 11.10.3 Centre View .....................................................................................68
11.11 Status Bar .................................................................................................68 11.12 Keyboard shortcuts ..................................................................................69
12 Further reading.................................................................................................70

5
1 Introduction This manual describes how to create missions for the U-Boat game/simulator called Silent Hunter III (SH3). It assumes that you have this game, patched to version 1.4b, and the mission editor that comes with it. One of the great things about SH3 is that the publisher shipped the game editor, allowing players to create their own missions. Thus the playability of the game is greatly increased, and the community can share ideas, scenarios and even campaigns with each other. What you are now reading is my attempt at a Users Guide to help you get started with creating your own missions with this tool. It acts as both a tutorial and a reference manual. This guide deals only with creating missions, not campaigns. It has been written so that it is readable when printed – it is often easier to have a printed version, than to constantly be switching between windows while actually trying to create a mission. (I have no intention of creating a cross-linked hypertext version, so don’t bother asking.) It also collates as much information as possible into a single document. While all of this material is available on the Internet, it is widely scattered, making it difficult to use for general work.
1.1 Important sections The manual is split into several sections, and I will not go through them all here – check the Table of Contents for the full list. However, the important sections if you are new to the editor are these ones: Creating a Single-player mission
If you are new to the mission editor, this chapter will explain how to create a simple mission. It assumes no prior knowledge. The idea of this section is to get you making missions as quickly and simply as possible. Creating a Multi-player mission
This chapter describes how to create a multi-player mission for LAN or online play. It builds on the single player version, and tells you what extra things you need to do to make a multi-player mission. Mission editor concepts Here, the basic concepts used in the editor are explained. How to implement
This section gives step-by-step instructions on how to put certain mission features into your game.

6
Mission Editor Reference
This section goes through all the menus, buttons and icons that you will find in the Mission Editor. If you are wondering what something means or how to use it, this is the place to look.
The SH3 Mission Editor is a bit “rough” in places, and there are a few quirks which can easily catch the novice unawares. If there is something important to note, it will be marked with a warning sign like the one shown here.
2 Acknowledgements This manual was created in response to the needs of the online mission design workshops given for members of www.34thflotilla.com . It has been created by drawing on the experience of the community and various pieces of documentation. In particular, the author has used some material from RedDevil, Drebbel, edpet23, Gizzmoe, Neal Stevens, and other contributors to www.subsim.com and www.silenthunteriii.co.uk . He is also grateful to members of www.34thflotilla.com, members of www.sturmgruppewulf.co.uk and everyone on the Silent Hunter III Community Manual project. Silent Hunter III is ©2005 Ubisoft Entertainment. Silent Hunter, Ubisoft and ubi.com are trademarks of Ubisoft Entertainment in the U.S. and/or other countries. This manual is provided for free as a service to the community. Feel free to distribute it, copy it, host it, print it, or whatever, as you wish. I do not ask for any money, credit or thanks, but if you would like to offer me a job as a technical writer, then let me know! ☺
3 Updates This manual is being actively worked on. If you have comments, suggestions, requests or anything else pertaining to this document, please let me know. The sections below that are highlighted in cyan, and are marked TBD are sections that I am working on at the moment, so I know about them, and will get to them as soon as I can. Thanks for your patience.

7
4 Creating a Single-player mission This section shows you how to create a very simple, single-player mission. It has been kept as simple as possible, to get you started as quickly as possible. On the other hand, it assumes nothing, and will take you through the creation process step by step. Once you have a mission working, you can then refer to Section 6 below in order to find out how to add the more advanced features that you’d like to put into your missions.
4.1 Building the mission The basic premise of most missions is simple: place some ships, place a U-Boat, and then let the player sink those ships.
4.1.1 Setting up
Start the Mission Editor. It will open with a blank work area, menu bar and controls at the top and a “Tools’ Panel” on the right. Start creating the mission by selecting “New” from the “File” menu, or by clicking the “New” icon, just under it. A window will appear, requesting that you enter the starting date and time for the mission. Choose sensible values; in this example we shall make the mission start at a quarter to six in the evening, on the 13th May, 1942. (You will have the opportunity to change this later, so you don’t have to be too careful here.)
The press “Select”, and the world map will appear.
4.1.2 Navigating about the map
The map is very large, so moving around it can be tricky. The mouse wheel will allow you to zoom in/out and the scroll bars on the sides of the map will let you pan about. However, when zoomed in close (which is typical when creating a mission), the scrollbars are not particularly useful, as they jump too much. However, there are some alternative ways to navigate about the map. In the control bar at the top of the editor, there are three icons, as follows:

8
1. Radius-ruler tool. When selected, you can measure the distances between points on the map. Move the mouse cursor to one position, press the left mouse button, and drag it to the other position. A black line will be shown with the distance in kilometres printed beside is. This function will override the Pan-View function.
2. Times. When selected, the estimated time of arrival for units will be printed above each waypoint. This is useful to check that the mission will not require an inordinate amount of time.
3. Pan-View function. When selected, you can click-hold-and-drag the map about. When zoomed in, this is the easiest way of moving around.
As these controls are used often, it is useful to note a couple of keyboard shortcuts for toggling them on and off.
Now, using the view-pan function and the zoom function, scroll to a portion of the map where you would like the mission to take place and zoom in.
Note that your mission will take place against the backdrop of the full SH3 campaign. This is good in that the world is already “populated”, but you do
need to be careful that your mission is “disrupted” by prowling destroyers, other convoys, the Luftwaffe, and so on.
4.1.3 Placing a target ship
On the right hand side of the Mission Editor you will find the “Tools’ Panel”. There are six tabs there; the first five are categories of objects you can place in the mission, and the sixth “Explorer” is used to examine units that have already been placed. The categories are as follows:
• Sea – these are surface ships, allied and axis, merchants and warships. • Sub – these are the German U-Boats (in other words, the “player-units”) • Air – these are individual aeroplanes (not air-bases, which generate aircraft) • Land – these are ground-based installations (AA-guns, air-bases, and so on) • Ordnance – special objects (anti-submarine nets and minefields)
To place an object, select the appropriate tab, then open the “Roster”, by clicking on the little “+” icon, and then do the same for the country you want to use. You will then see a list of all available units for that country. Click-and-hold on the unit you

9
want, and then drag the unit to the position where you want it on the map and release the mouse button.
When choosing units, make sure that their availability is appropriate for the date on which the mission is set. Also bear in mind that some nations may be
neutral or may change sides at various stages during the war. For our example, let’s place a British Auxiliary Cruiser.
Click on the Auxiliary Cruiser text and drag it out over the map (as you do so, a little black ship icon will appear). Place it somewhere out in the open ocean. When you release the mouse button to place the unit on the map, a new window will appear.

10
Units default by travelling at 5 knots, heading north. It is possible to change this here, but we shall set the speed and heading in another way, so just leave it for now. The other parameters may also be tweaked, but the defaults are perfectly reasonably for the purposes of this exercise. So just click “Accept”. You can return to the unit properties by left-clicking on the icon to select it (the icon will go from white to green) and then right-clicking on it to bring up the unit menu. If the unit is not selected you’ll only get the map-options menu (adding a map note, and so on). The reason why it is green is because the time filter in the control bar at the top is set to 1938, when Britain was “still” neutral. When Britain enters the war, the

11
icon will change to red. By changing the time filters in the control bar at the top of the window, you can control the displayed time. But we’ll discuss that in a later section, as it is no important just at the moment. We now need to add a waypoint to the ship. Select the unit and then right-click to show the unit menu. Select the “Add Waypoint” option, and then move the mouse cursor to where you want the ship to go. Left click to place way points as necessary and then right-click to stop.
Note that all units must have at least one way point. That means ALL units, including stationary ships, land bases, the player’s U-boat… everything. If
there are any units without waypoints, the mission will not work. (The Mission Editor will not let you save such games.)
Waypoints must be located at least 1000 m away from the previous waypoint (or the ship itself, in the case of the first waypoint). This is so the ships have a
chance of being able to make the turn. Again, the Mission Editor will not let you save games that violate this rule. Having placed the waypoints, right-click on the selected unit again and select “Head to Waypoint”. This will make the unit start off heading in the correct direction.
We now have a ship! If you want to adjust its characteristics, you can select the “Properties” item from the unit menu and tweak to your heart’s content. See Section Error! Reference source not found. for details as to what all the parameters mean. However, for now, there is no need to change anything.
4.1.4 Placing additional ships
In principle, you can go ahead and place as many ships as you like onto the map using exactly the same technique. However, for ships that are meant to be traveling together, you need to create a group. In our example, let’s make the Auxiliary Cruiser the leader of a new group and add some ships to it. Start by selecting the cruiser. Then right-click to show the unit menu, and then select “Create Group From Unit”. Type in a name for the group – it doesn’t matter what it is called, as the player will never see it, but if you are creating a complicated mission it will help you if you call it something meaningful. For now, let’s call this group “Aux Group 1”.

12
Now go back to the “Tools’ Panel” and choose another vessel to add to our auxiliary cruiser. Let’s choose an “Armed Trawler”. Click on it’s entry in the British roster and drag it out to somewhere near the cruiser. Again, simply accept the default properties for that ship; they will be fine for now. Now you need to associate this new trawler with the cruiser. Right-click to show the unit menu, and then select “Join Group”. A line will join the new unit to the group leader. Of course, you can add as many ships as you want, to build up al manner of groups. For now, add two more Armed Trawlers (so there are three in total), adding them each one-by-one to “Aux Group 1” to join the cruiser. Once you have built up the group, you can drag them around to place them how you would like. Ships cannot be closer to each other than 300 m.
Warning. In the unit menu of the group leader, there is an option to “Arrange Group”. You can use this to arrange the group into convoy-style columns.
However, make sure that there are at least as many ships as there are columns. If there are not, the Mission Editor will crash!
Also, set the separation to slightly more than 300 m. If it is exactly 300 m, then the round-off error may result in some 299.9 m separations, which will mean
that the mission is invalid. Anything from 301 m or more is fine. You can also right-click on the leader and select “Group Properties”. Now you should set the speed to some suitable value (for example 8 knots). As you have already set the auxiliary cruiser to “Head to Waypoint”, the “Heading” in the group properties will already be set. When you click “Accept”, the entire group will be set to these new values (and the trawlers will all adopt the same speed and course).
Make sure that the waypoints take the ships far enough. Although you might be able to complete the mission in 30 minutes, another player might not, and then the ships will disappear or stop when they reach their final waypoint (there is a check-box in the group properties that will let you control which of these two eventualities will come to pass). We now have a ship group, ready for our U-Boat to intercept.

13
4.1.5 Placing the U-Boat
In addition to any shipping, you must also place the player’s U-Boat. The selection of U-Boats can be found in the “Sub” tab of the “Tools’ Panel”. Just like the ships, drag one out of the German Roster and onto the map. The unit properties will appear, and we should set a few things here. Most importantly, the “Human Control” check box must be ticked. This let’s the game know that this is the unit that the player will run. You can set the speed if you like, but the mission will start with the U-Boat engines “All Stop”, so it will just slow down to zero anyway. The “Height” parameter can be set to “0” for a boat on the surface, or a negative number for a submerged boat. A good value to start with is –15 m, as this is just below periscope depth, so there is no risk of the U-Boat being out of the water, even in rough weather. Of course you could make it deeper or shallower, as you see fit. Also change the “Unit Name” to something more appropriate. This will be displayed to the player on their “Crew Management” screen and in any received radio messages. Accept the changes and then create a waypoint for the U-Boat. Set the heading of the U-Boat to match the direction to the waypoint.
The targets and the U-Boat are now in place, and we are ready to move onto the final stage of the mission construction.

14
4.1.6 Setting the mission parameters
The final part of the mission construction, is setting the overall mission parameters. These can be found in the “Mission” menu. First, select “Mission � Parameters”. This will bring up an editing window for the mission’s description, date/time and weather conditions.
The “Title” is not actually used – the players never see it. However it can be used as a way of injecting a comment about the mission or something similar. On the other hand, “Briefing” is very important. Make it informative! This is what the player reads when deciding whether or not to play the mission. It is also what he or she would read while the mission is loading (which takes a while, so make it

15
something more than just a few words). The Briefing should instruct the player on what he or she should do when the mission starts. Don’t leave the player guessing! If you want, you can change the date/time here. You can also set the weather. The conditions of the atmosphere and sea have a big impact on the game. They will determine at what range visible contact will be possible, alter the chances of the U-Boat being detected underwater, govern whether or not Flak- and deck-guns may be used and alter the mood of the mission (see Section 9.1). Once satisfied, select “Accept”. Now select “Mission � Objectives”. This is where you can set what the player actually needs to do in the mission. Click on “Add Objective” and give it a name. This will be printed on the orders screen in the game, so word it carefully.
The easiest mission objective is simply to sink something. The default objective is to sink some tonnage, which is perfect for most missions, so simply leave the defaults as they are. The final step is to “validate” the mission. This is where the Mission Editor performs a range of internal checks on the mission, to check it for consistency, playability and so on. To do this, select “Mission � Validate Mission”. A window will pop up. Simply click on check mission, and examine the results.

16
If the mission passes the tests, then the only message that will appear will be the “Mission Title”. If there are warnings or errors, you will need to deal with them before you can save the mission. Typically it is better to validate your mission as you go along. That will make it easier to figure out to which part the messages apply. It will also mean you can save as you go along. Now save the mission. We shall call this mission “Encounter.mis”.
4.2 Installing the mission The mission file needs to be placed in a folder with the same name as the mission file, located in the appropriate language of the “data\SingleMissions” folder. In our example, this would be: ……\SilentHunterIII\data\SingleMissions\English\Encounter\Encounter.mis Typically you would save the mission directly to this location, but you can move it in as well. You can also save it to the equivalent German (or other language) directory. Ideally, you will have translated all the text and made a separate version, but the only difference between to the two folders is that if the player has their language set to German, only the missions in the German folder will show up in the list.

17
Note that the file name is the name that will appear in the missions list in the game, so choose a suitable filename, “Encounter” is okay – “file_1” is not so good.
4.3 Playing the mission Now it is time to play your new mission – either for you own enjoyment or because you are testing it before you let your friends loose on it. Start-up Silent Hunter III and go to the Single-Player missions. Your new creation should now appear in the list. Notice that for a Single Player mission, the U-Boat type is that specified in the mission, by the type of U-Boat that you deployed. The name displayed in the list is the filename (not the title in the mission parameters window). Also, the description shown here (and on the following loading screen, as well as on the in-boat mission orders) is the same as what you typed into the Briefing in the mission parameters window.
Then set your difficulty level, press start and your (hopefully!) loading. If all has gone well, you’ll soon be playing your newly created mission. Of course, when you do so, it is wise to have a piece of paper and a pencil to hand, in case you notice any minor problems in your creation. Jot them down and go back to fix them later.

18
Have a lot of fun! ☺

19
5 Creating a Multi-player mission Making a multi-player mission is as easy as creating a single player mission. The only difference is that you need to add more human-playable U-Boats! When playing a multiplayer mission, the player is often allowed to choose the U-Boat type that he or she plays. That means that the U-Boat type that you put into the mission may be over-ruled when the mission is played. Multiplayer missions may have up to eight players. Therefore, unless you wish to limit the number of players to an exact number, you must put in a total of eight U-Boats, even if all of them are not necessarily going to be used. Each U-Boat should have its own waypoint and starting direction. These need to be set so that U-Boats don’t easily collide (so try not to make the U-Boat routes cross each other). The U-Boats should also be arranged such that no one U-Boat has a major advantage in position over the others (unless you are specifically trying to do such a thing). Bear in mind that mission objectives are shared between the players. This means that what works for a single player mission may not be suitable for a multi-player mission and vice versa.

20
6 Mission editor concepts This section discusses how a mission is put together and what the basic concepts are. It is not a “how-to”, but rather a look at the overall structure, which will help you get a feel for how the system works.
6.1 Units and waypoints All ships, U-Boats, aeroplanes, subnets, minefields, aerodromes, and so on are units. Every unit must have at least one waypoint, regardless as to whether it can move or not (yes, even a shore-emplacement needs a waypoint!) Waypoints for moving units may be specified as circular areas, thus randomising the paths somewhat. Speeds can also be changed at the waypoint. Waypoints must be separated from each other by at least 1000 metres.
6.2 Distance and speed In general, distances within the Mission Editor (and the game) are in either metres or kilometres. The rule is: 1 kilometre (km) = 1000 metres (m) For those more familiar with the old Imperial system,
1 km = 3280.8399 feet = 1093.6133 yards = 0.621371192 miles
Speeds are given in knots (kt). A knot is one nautical mile per hour, and a nautical mile is defined as being exactly 1852 m. That means: 1 kt = 1.852 km/h
= 0.5144444 m/s = 1.687810 foot/second = 1.150779 mph
Note that the world map is planar. Thus, the shortest distance between two points is actually a straight line, and not a great circle. As one approaches the poles, the land masses distort, but from the perspective of a U-Boat, this is not a major issue.
6.3 The Simulator There is a simulator built into the Mission Editor, which is a very powerful tool for checking that your mission performs the way it should.

21
The simulator works within the confines of a time filter. This controls when the simulation begins and when it ends.
The resolution of the simulator is only accurate to the month. Individual days are not listed, although while the simulator itself is running, it internally tracks time at the 1-minute accuracy level. The controls allow the simulator to be started, paused and stopped. There are also buttons to control the time compression, so you can speed up or slow down the action to skip the “boring bits” or to get a better overview of the long-term actions of units.
A display shows the current time compression value as well as the time that is currently being represented by the running simulator.
Note that if you stop the simulator, the time display does not reset until you actually restart the simulator.
6.4 Files Missions are written as “.mis” files and are stored in either the “SingleMissions” or “MultiMissions” folders, which are located in the “data” folder of your SH3 installation. In each of these directories, there will a folder for each of the available languages (typically German and English). In these folders there will be a folder for each mission and the mission files themselves are each located therein.
Remember that the mission and the mission folder must have the same names! As an example, if the mission file is “mymission.mis”, the folder name must be
"...\Program Files\Ubisoft\SilentHunterIII\data\SingleMissions\ English\mymission\". The folder name (which is the mission file without the “.mis”) will be the name that appears in the list of missions when the player selects single- or multi-player missions. Also in each of the mission folders, there may be a file “media.cfg”. It sets the loading screen and the path to the loading bar. This is not actually needed for a mission to work.

22
7 How to implement… This section covers some of the common features that people would like to implement in their missions, but are not covered by Sections 4 or 5.
7.1 Removal of ships If you just mean removing a ship from a mission that you no longer want to be there, then select the ship by left-clicking on its icon and press the “Del” key. If you want a ship to vanish when it reaches it’s last waypoint, then check the appropriate “Delete on last waypoint” box in the unit properties window. Sometimes you may have a ship in the Explorer section of the Tools’ Panel, but it doesn’t appear on the map. Check Section 8.1.1 for how to deal with this problem.
7.2 Ships that patrol in loops While some ships will travel from port to port, with fixed end-point destinations, for others it is desirable to have them simply patrolling in a circle. A good example of this is the destroyer that guards a harbour entrance. However, there is no need to put in 50,000 way points to keep a ship there for months on end, simply use the loopback feature of the waypoints. For instructions on how to do this, see the Loopback section of Section 11.10.2.
7.3 Ships that can take different routes In addition to using loopback for cyclic paths, you can also use it to make ships take alternate routes. In a way, you are not looping back, but looping forwards. Thus, to make a ship take a random path around something, put in one route, and then “short-cut” it with a loopback from the earlier waypoint, forward to the later waypoint. Here’s an example of a convoy route that may go either north or south of Bjørnøya.

23
Note that the shortcut route must be a straight line. You cannot put intermediate waypoints on the shortcut! For instructions on how to do this, see the Loopback section of Section 11.10.2.
7.4 How to spawn a Random Generated Group Random(ly) Generated Groups (RGGs) are a way of creating groups of units with random units therein. It is useful for put random units into missions, but bear in mind that RGGs are really intended for campaign use. This section is a tutorial for placing an RGG in your mission, for details on the RGG controls, refer to Section 11.9. A random group is placed on the map by clicking on the desired location, right-clicking and selecting the “Add Random Generated Group” menu option. (See Section 11.5.3.) Place waypoints as you would for any unit or group.
When placing the group, make sure any human-controlled U-Boats are at least 20 km away from it. If you put a player unit to close to it at the start of the
mission, it will not spawn a group (to avoid units suddenly “appearing” in the game). For air units, make this distance even larger – perhaps 30 km – which is actually not as much of a problem, as aeroplanes travel a lot faster. Left-click on the RGG icon to select it, and then right-click to bring up the RGG menu. Choose the “Define Group Contents” option. Choose the units for the group. You must have a minimum of one ship, which will act as the leader. Each ship may be given an individual spawn probability; however the spawn probability of the leader is irrelevant, as it will always spawn.

24
For instance, in the example shown here, there will always be a King George V battleship and two V&W destroyers. However, on average, only every second group that is spawned will have a Clemson destroyer too. Obviously, you can make groups as routine or as random as you want. While random groups can be lots of fun – owing to the we-don’t-know-what’s-out-there factor – it also has the potential to be unbalanced, so do be careful, especially on a limited mission. Note that under “Group Settings” at the bottom of that window, there is a section for the formation spacing and the number of columns. Ensure that the formation spacing is larger, if there are large ships in the group (for example passenger liners, T3 tankers, and so on). 500 m is usually plenty. When you are happy with the composition of the group, click “Accept”. From the main menu, select “Mission � Parameters” and check your mission’s starting date and time. Now, right-click on the RGG icon again and choose “Group Properties”. Firstly, set the “Repeat Interval” to how often a new RGG should appear. For example, “1” means that a new group will spawn every hour. Now look at the “Entry Date”. It should be set to exactly the same as your mission date except for one setting. Depending on “Repeat Interval” setting, you need to

25
subtract that amount of time from the “Entry Date”. This will cause the RGG to spawn right at the start of the mission. To check on group generation, use the simulator, by settings the “Time Filter Start” to the correct month and year of the mission start (the day itself is irrelevant – it automatically adjusts to adapt). Then click on the “Start” icon to get the simulator going, and you can watch them being created and moving towards their waypoints. Speed up the time a little and you should see another group spawn some time later according to the repeat interval. For additional randomness, stop the simulator and go back to “Group Properties”. Set the Random Area Radius to, say, 10 km. You will now see a white circle around your RGG and when a new group is generated, it will appear anywhere within that circle. If you keep clicking stop and start, you will see the RGG spawn in random locations within the 10 km circle. (Remember that the radius is measured from the centre to the edge, so the circle is actually 20 km in diameter.)
Don’t forget that the minimum distance between the RGG and the player’s U-Boat must be 20 km. If you use random spawning locations, ensure that this
rule is held by the circumferences of the random spawn areas. Obviously, this needs to be done because the units can spawn anywhere within the Random Area Radius but the 20 km minimum still needs to be observed. You can also add random areas to the waypoints themselves (see Section 11.10.2). And, finally, you can also randomise whether an RGG even spawns. To do this, go back to “Group Properties” and adjust the “Group Spawn Probability(%)”. This setting is for the RGG group itself. If you set this to 40%, the RGG will only spawn a group 40% of the time. Try it and use the simulator with time acceleration to see how what happens.
7.5 Aeroplanes Air units may be placed in the game, the same as any other unit. You can drag air units from the “Air” section of the Tools’ Panel to the game map, the same as you would for a ship or U-Boat. Note however, that an aeroplane needs a reasonable height and speed, otherwise it will crash as soon as it makes any attempt at manoeuvring.
7.5.1 How to ensure that aeroplanes attack
If you are not careful, the aircraft will just fly right by, without doing anything. To avoid this:
• Make sure the aircraft are not flying too high or too wide of the target. Sometimes the flak guns will outreach the aircraft's visual sighting (well, that's what it seems like).
• Make the aircraft "Elite". This makes them much more aggressive. • Make sure they have a "payload". If they are set to basic, they've nothing to
drop, so they don't deviate from their course. Give them at least some bombs.

26
7.6 Capital ship battles This has nothing to do with U-Boats, but let’s face it, it is rather nice to watch when some battleships open fire on each other.
To do this in a mission, simply place two opposing units or groups, and then set some waypoints so that they pass within firing range of each other. Generally the AI for capital ships is poor, so set their “Crew Rating” to “Elite”. This will ensure that as many poor actions are avoided as possible. Destroyers act much better and will go and chase smaller targets (Schnellboote and so on).
7.7 Docked and stationary ships Docked ships can be added to harbour quaysides; it can be done for single missions and for the campaign_SCR, the steps are the same for both. The following instructions
are based on some notes that were posted by Edpet23 on the subsim boards.
7.7.1 Placing the ships
Open or create a mission, choose a harbour and zoom into it with mouse wheel. Then once you zoom in simply select a ship and place it between the piers of the harbour, zoom as close as you can and place the ship dead centre between the piers. Remember your icon represents where the centre of the ship will dock on the pier. Once the ship is added, then add one waypoint; 1000-2000m distance should be sufficient. However make sure the waypoint goes in the same heading as the dock. This waypoint may need to be on land in order to get the alignment correct.

27
7.7.2 Ship speed
Right click the ship icon and select properties and set the speed to 5 knots or above, say 9 knots. Just make sure it's above 5 knots; setting it any lower will make it more difficult to be precise with the ship’s alignment on the pier. Close properties and then right click the ship icon and select “Head to waypoint”. This will make the ship face in the correct direction, next open properties again and once again reset the speed to zero “0” km. check “docked ship” and uncheck “Delete on last waypoint” and accept the properties.
Be sure the “Docked ship” is checked and “Delete on last waypoint” is un-checked!!
7.7.3 Fix the waypoint
Now select the single waypoint you added and move it to somewhere that the ship would move to, should it be attacked and start to move. If you leave it over land, the ship will move up to the shore line and stop.
7.8 Icebergs For a bit of extra atmosphere in the far north (or far south!) don’t forget icebergs. To place them, you simply drag them out of the “Environmental” folder in the “Tools’ Panel” like a normal unit.
In properties, you should set the speed to something slow – 1 km/h is typical for icebergs. They generally move in a direction away from the pole where they originated, although wind conditions will affect this. In the game, an iceberg moves to its waypoint – so it’s up to you to choose appropriate waypoints to make it realistic.
7.9 Missions in different languages When a mission is saved, it is placed in one of the language directories in the data\SingleMissions or data\MultiMissions folders. This does not depend on the

28
language in which the mission is written, but rather whether it will appear in the game for the selected language. That is, if the player has selected “German” as their language in the game, then only missions placed in the SingleMissions\German and MultiMissions\German folders will appear. This is regardless as to whether those missions are written in German or English or anything else. This means, that a German player can put an English mission into his or her German folders and still see it. Of course, the other side of this is that if you, as a mission developer, wish to develop a mission for multiple languages, that appear in the correct manner depending on the players language choice, you must create multiple version of the mission (that is, change the mission briefings, radio messages, and so on) and then create a distribution (say, a zip file) that will place them into the correct folders in the players game installation.
7.10 Placing minefields This advice was written by Neil Stevens on the subsim forums:
To place a minefield, open the Mission Editor and click on the “Ordnance” tab in the “Tools’ Panel”. Choose a Country and click on “MN Minefield”. Drag the Minefield and place it on the map. The icon will look like double triangles. This is not where your minefield will be located. You must first place at least one waypoint. Do that now and drag it about 2000 meters from the Minefield icon. Left-click on the waypoint and then right-click to bring up the Properties. Place a 1 (one) in the “Radius” box. This will be your minefield. The minefield will be located inside this circle. Click on Accept. Now, click on the Minefield icon and bring up the Properties. Enter a number in the “Density” box. Try 100, for now. This will give you 100 mines per square km. You will have to experiment with the “Min height” and “Max height” boxes. The default values will place the mines just under the waterline. Click on Accept. Now, click on the Minefield icon and then press “M” on your keyboard and you should see your minefield. Note that you click the Minefield icon, but the mines themselves will be in the radii associated with the waypoints. You can place more WP's and string them out, if you want.

29
As an alternative to using the “M” key, there is a menu option: “View � Show minefield distribution”. Remember that the mines are placed in the radii about the minefields waypoints, but not about the minefield icon itself. To check out your mines, run the mission and dive to periscope depth. Raise your periscope just a little bit, so it is beneath the surface. Or, go to external view and direct the camera beneath the surface.
7.11 Adding radio messages A radio message is a way to convey additional information to the player, such as changed mission objectives, some additional flavour to the mission, congratulations on a sinking or perhaps to give some hints or clues for where to go or what to do. In the game mechanics, a radio message is an event, and it is activated in response to a trigger. To set up a radio message, first create a trigger from the “Mission � Triggers” menu. This may be at a particular time or in response to certain conditions. Then go to the “Mission � Events” menu, and add a new event. Make the event type message, and add your message text in the appropriate box. For details on how to perform these steps, refer to Sections 11.2.3.3 and 11.2.3.4.

30
7.12 German characters The German language has a few special letters: “Ä”, “Ö”, “Ü”, “ä”, “ö”, “ü” and “ß”. Even though you might be creating a mission in English, it is sometimes necessary to use these characters for names, places, or just some “flavour” (for example, starting a radio message with “Achtung Kapitäne!” in a multiplayer mission). To insert these characters from a non-German keyboard, you need the following trick. Hold down the “Alt” key, then press the following four digit code on the numeric keypad: Ä – 0196 Ö – 0214 Ü – 0220 ä – 0228 ö – 0246 ü – 0252 ß – 0223 Then release the “Alt” key, and the character will appear. Note that you must use the numeric keypad numbers (the normal keyboard numbers will not work) and that “NumLock” must be on. Do not release the “Alt” key until all four numbers have been pressed. To find other such combinations search for “alt key” (or something similar) with an Internet search engine. Viel Spaß!
7.13 Different background loading screens TBD
7.14 Different types of victory conditions Setting objectives is done via the “Mission � Objective” menu option, which generates the following window.

31
The name that you give the objective is the one that shows up in the “Mission Orders” screen in the game.
If you are creating missions in multiple languages, you will need to re-make the objectives with the appropriate language used for the objective name, and save that

32
second version to the other language folder in the SingleMissions or MultiMissions folders.
7.15 Changing victory conditions during the game Although it is not strictly possible to change a victory condition during the game, it is possible to “sign off” victory conditions and to display new ones. To do this, you need to generate an event that modifies the victory condition – either showing it, or modifying its state. See Section 11.2.3.4 for more information about this.

33
8 Troubleshooting This section is for troubleshooting any problems. As most of the potential difficulties are covered elsewhere, there is little to go in here. However, if I receive any questions, I will update this section in subsequent versions of this manual.
8.1.1 Vanishing units in the editor
Occasionally you will go to drag a unit from the Tools’ Panel onto the map, whereupon it vanishes instantly! This can then later cause problems, because if that unit doesn’t have a waypoint, then it won’t let you validate and save the mission. The problem comes about from the simulator filter. If it is set to a narrow range, then some units will have default entry/exit dates outside of this range. As a result, they are placed on the map, but are not shown. To fix the problem, simply set the simulator range to something large; 1938/1 to 1945/12, say. Then all units will appear, and you will be able to edit/delete those elusive vanishing ones.
8.1.2 Ships continue sailing past their last waypoint
Sometimes you want ships to continue sailing when they reach their last waypoint, but more often you want them to stop (because they have reached a port). To fix this, select the last waypoint, and then select properties. Make the speed that the unit takes at the last waypoint zero. Thus, when it arrives, it will stop, rather than travel onwards (adopting the waypoint speed, and maintaining the previous heading). Note that if the “Delete on last waypoint” box in the unit properties is selected, then the unit will simply vanish at that point (which can be most disconcerting for the player!).
8.1.3 Convoys breaking formation
Sometimes you will have placed a convoy and have used the arrange group facility to set it up. However, on starting the mission, the convoy seems to scramble itself, ships go everywhere and there may even be collisions! To avoid this, make sure that the group does not start at 0 knots and that the separation is large enough. Typically, 500 m or more will suffice, but for large ships (such as passenger liners), separations of 700 or 800 m might be necessary.

34
9 Tips on creating good missions As you will have noticed, creating a simple mission that works is not too difficult. You can then add features to make it a bit more sophisticated; that’s also fine. But how do you make the mission really shine? This section discusses some of the things to consider if you want to make the mission immersive, professional and exciting.
9.1 Prevailing conditions A lot of the mood of the scenario comes from the sea and weather conditions. A good range of wind, rain and visibility conditions are possible, but choose something appropriate. But the weather can also make play prohibitive. In the case of a storm, visibility may be next to zero, and the U-Boat could be rocking so much that targeting becomes a nightmare. Don’t forget that the weather should not only match the location, but the seasons and even the time of day. Storms are less likely to occur at dawn, for instance. Here are some examples of how weather conditions could be used.
• Mediterranean taskforce attack – parching sun, high in a cloudless sky with a glassy-flat sea.
• Arctic convoy attack – clear skies and midnight sun, but heavy seas and the occasional iceberg.
• Irish Sea operations – calm seas and little wind, but poor visibility and lots of rain.
• Storm on the high Atlantic – reasonable visibility, but heavy rain and high winds.
Make a point of choosing a suitable time of day too. The position of the sun and moon and the lighting conditions can do a lot to help.
9.2 The right start Pay attention to how the game commences for the player. Make sure the U-Boat starts at an appropriate depth. Ensure that it is heading towards its first waypoint and make that waypoint reasonable.
9.3 Historically feasible Playing out some “what-if” scenarios is always fun, but if taken to extremes, it detracts from the game. For example, attacking a task force comprising eleven Nelson-class battleships may actually be so contrived that the game loses its appeal. Read some books, check some websites and plan a mission accordingly.
9.4 Balanced game-play Make sure that the mission is possible, but not too easy. It should be able to challenge the players, and give them a sense of accomplishment when they succeed. And there

35
are more factors to consider than simply the number of destroyers in the area. Also allow for the prevailing weather, lighting conditions, depth of the sea (the escape route!), visibility, expected type of U-Boat, and so on. The depth is particularly important. While ships fight or flee in two dimensions, the U-Boat operates in three. Make sure there is enough water under the keel for the U-Boat to manoeuvre. You can find out the depth in any given place by pressing “H” while the cursor is over the map. The depth of the water will be displayed in the status bar at the bottom of the map. Of course, if your cursor is over land, it will display the height.
9.5 Timing considerations Make sure that the time is sufficient for the U-Boat to get into position for the attack. It doesn’t make any sense for the Kapitän to have no choice whatsoever. Different players prefer different tactics, and may not perform the same mission in the same way that you might. For example, some would prefer to fire torpedoes at a convoy from a range of 3 km, while others would prefer to infiltrate the columns and fire from 400 m.
9.6 Don’t overdo it! When presented with everything, it is so tempting to use everything. Don’t! A mission to sink a combined taskforce/convoy with one of every class of ship, guarded by tug-boat and patrol-boat escorts, being lead by six Nelson-class battleships, under heavy air cover, near minefields, past sub-nets, and icebergs, in a port in New Zeeland, with extreme weather, and eight U-boats, backed up by a supporting flotilla of Italian destroyers… well, yes it’s possible, but when the “wow factor” is over, it will be all a bit silly.
9.7 Test it! If you are creating a mission for others, make sure you play it through yourself first. Although you thought you built the mission correctly, you may have forgotten to set a unit’s initial heading, or you may discover that the convoy moving at 2 knots is taking far too long to reach. Even before you test-play the mission, you can use the time controls to run the simulation and see which units are where at what time. See Sections 6.3 and 11.3.3.
9.8 Professional finish Write a proper Objectives statement (after all, this is all the players have to read while the mission loads). Use proper grammar, capital letters and formatting. Spell-check it. Translate it so there is both English and German. Choose good filenames that give the player an idea of what is going on. These are the sorts of details that will make your mission easy to use and worth keeping. And keep your missions somewhere safe; back them up too! While you may not play that mission again yourself, you might join an online clan and want to pass them on to fellow players, or use them as part of a

36
competition, or publish them in an online archive. If the mission has been decently made, and have been named and stored well, then this will be easy. If not, you’ll need to actually play “test.mis” to find out if it was that cool battleship mission that you vaguely remembered playing a year ago.

37
10 Mission ideas In case you are wondering what to create with all of the tips and techniques described in this document, here are some ideas to get you going.
• Arctic convoy – attack a convoy in Arctic Ocean north of Nord Kapp (Norway). Fill the convoy with lots of C2-Cargo ships, loaded with tanks and planes on their way to Murmansk. Put an extra Luftwaffe base in northern Norway to assist in the assault against the convoy.
• Intercept a passenger liner than is making a course through iceberg infested waters off the coast of Greenland. Make it at night for the extra challenge; icebergs are not plotted on the U-Boat’s map!
• Put a special target in the Bristol Channel, perhaps a battleship or liner. There is already some traffic in the campaign for that area, so there is no need to add more. Make the weather calm, but with very poor visibility.
• Generate an invasion fleet for the Allied invasion of Sicily. Include landing craft and troop transports, and set them as the primary targets. Make the players intercept this fleet.
• Try a South Atlantic convoy attack, but have a German commerce raider turn up to join in the action.
• Rescue another U-Boat. Put a stranded U-Boat somewhere and use “area objectives” for the player(s) to find it and simulate a rescue of the crew or cargo. Use a second area objective for the port, so that the player(s) need to make it back to port (or wherever) to have succeeded.
• Don’t limit yourself to short patrols either. How about a mission to escape from the collapse of the Reich? Can the player take a Type-XXI and make it to a target area in South America or flee with a IXD2 to Japan? Such a mission would last weeks at least! (Single-player only – if anyone manages a three-week multi-player game... !)
• Hunt down a supply ship. While there were Milchkuhe for the Germans, why not supply ships for the Allied forces too? Hunting down a stationary ship in the open seas may not be easy when there is no hydrophone to help, but you could assist the player by feeding him or her radio reports of suspected positions.
• Design some training missions to improve your skills. For example, the Flak mission in the Naval Academy in the game is a bit limited. Try something in 1945, with a VIIC/41 with a Flakvierling. Do the same for the other Academy missions. Deck gun practice could be more interesting when the merchant can fire back!
• For January 1941, assist the German commerce raider PINGUIN operate in the Antarctic Ocean against a Norwegian whaling fleet. Don’t forget lots of icebergs!
• Secret agent drop-off. Various U-Boats (U-202, U-213, U-584, U-1229 and U-1230) were used to attempt to drop off secret agents on the enemy coast; some of them succeeded. Use “area objectives” to recreate similar missions.
• Recreate some other famous sinkings or near-sinkings by the deutsche U-Waffe. Examples include the sinking of HMS ARK ROYAL by U-81 or the damage dealt to HMS MALAYA by U-106. Do some research and make them

38
historically accurate, and then let the players see if they can match or beat the historical result.
• Spice up a harbour; put U-boats in pens and have C-3 cargo ships under those large cranes. Add a fishing ship leaving the piers and then stopping to fish in an area off to the side or have a patrol boat or "Schnellboot" prowl around the entrance to the harbour and be there upon your arrival. And then put in the air-raid by the RAF. (See Section 7.7 for information about placing docked ships.)

39
11 Mission Editor Reference This section works through the entire Mission Editor as the software is presented. It is not really a useful place to learn how to create missions, but if you are wondering about a particular feature or what some icon or menu means, then it should be all systematically documented here.
11.1.1 SH3 Mission Editor Window
There is only one window for the Mission Editor, although there are several smaller windows that pop-up every now and then for data entry. These will be covered later. The main interface is split into the window border itself, the menu bar, the controls tool bar, the Tools’ Panel, the map itself and the unit icons that are placed on it. The title bar of the window will show the name of the current mission and, in square brackets after it, will be the working mode. This indicates the types of data to be written when the file is saved and the requirements needed for validating the file. Possible working modes are:
• [Normal mission]: The mission must have human-controlled units. The save operation saves everything in the “scene” and validates triggers, objectives and so on.
• [Random data layer] – No validation is performed and only random groups are saved.
• [Scripted data layer] – No validation is performed and everything is saved with the exception of random groups.
• [Land Units Layer] – No validation performed and only land units are saved. • [Map notes layer] – No validation is performed and only map notes are saved.
Normal missions are designed to be single engagements with a limited duration in time. They should focus on limited areas of the map, but there are no limits imposed to the designer. Missions are run over the campaign engine, so you do not need to cover the whole world with shipping and units. The campaign engine itself comprises three layers:
• The Random Layer – includes all the naval traffic, from convoys to local fishing boats
• The Scripted Layer – includes all the warship patrols, hunter-killer groups, military task forces and the mine fields.
• The Land Unit Layer – includes the naval bases, the air bases and the coastal defenses
11.2 Menu bar The menu bar is normally found at the top of the window, under the window title bar. It has seven menus.

40
11.2.1 File
As one might expect, the “File” menu allows the loading and saving of mission files.
11.2.1.1 New
This starts a new mission. No confirmation is asked before doing so, so make sure your work from any previous mission editing was saved.
11.2.1.2 Open (Normal Mission)
This opens a mission that you have already created.
11.2.1.3 Open Rnd Layer
This is used for building campaigns – a topic that is not covered by this User Guide. Basically, it opens only the Random Groups into a new mission editing session.
11.2.1.4 Open Scripted Layer
This is the same as above, but for the non-random units.
11.2.1.5 Open MapNotes Layer
Same as above, but for map notes only.
11.2.1.6 Open LandUnits Layer
Same as above, but for the land units (ports, aerodromes, and so on).
11.2.1.7 Merge
TBD
11.2.1.8 Save
This saves the existing mission. If you haven’t saved the mission before (or it was not opened from a pre-existing file) you will be prompted to enter a file name.
11.2.1.9 Save (Normal Mission) As…
This saves the mission, prompting you for a filename. If you are creating missions then this is the way to save the file.
11.2.1.10 Save Rnd Layer As…
This is used for building campaigns – a topic that is not covered by this User Guide. Basically, it saves only the Random Groups into a new file.
11.2.1.11 Save Scripted Layer As…
This is the same as above, but for the non-random units.
11.2.1.12 Save MapNotes Layer As…
Same as above, but for map notes only.
11.2.1.13 Save LandUnits Layer As…
Same as above, but for the land units (ports, aerodromes, and so on).

41
11.2.1.14 Exit
This option will close the Mission Editor.
Note that opening new missions, or exiting the Mission Editor, will occur without question. If you haven’t saved your work, you will lose it!
11.2.2 Edit
The “Edit” menu provides menu-accessible variants of the standard “Ctrl-C” and “Ctrl-V” copy and paste functions. There is no “Ctrl-X” cut at all.
11.2.2.1 Copy
If a unit is selection the copy function will copy it to an internal buffer. You may then paste it somewhere else. Note that the copy function does not work for multiply selected units. The keyboard shortcut for the copy function is “Ctrl-C”. An alternative shortcut is “Ctrl-Insert”.
11.2.2.2 Paste
When you paste a unit, it will take whatever the last unit was that was “copied” (see previous) and put it under the current location of the mouse cursor. In reality, this means that the menu option for “Paste” is rather useless, as the new unit always lands up underneath the menu bar. Instead, you should use the keyboard shortcut, which is the standard “Ctrl-V”. An alternative shortcut is “Shift-Insert”.
11.2.3 Mission
The menu items here create sub-windows, from where you can control various features of the mission. Most of them have “Accept” and “Cancel” buttons to either implement the changes since opening that window, or to discard them.
11.2.3.1 Parameters
This brings up the mission parameters window, where you can set various features of the mission. This has no bearing on a campaign, but is vitally important for an individual mission. Title
This neither appears in the mission briefing, nor file name nor anywhere else. However it is a useful development tool, as it allows the mission builder to associate some information with the mission that the player would not otherwise see. For example a title like “Surprise air-raid” might be used in a mission called “Just another patrol”. Of course, don’t forget that there is nothing to stop the player using his or her own mission editor to investigate what you have in store for them – but if they are more likely to see the 25 converging Wellington bombers than the mission title! Mission Start
This is the current mission starting date and time. It can be changed further down the window (we’ll get to that in a bit). Briefing

42
This section is very important. It is what the players have to go on, when the game starts. It should be in the appropriate language for the game (German, English, or whatever) and should be nicely formatted and well written. It appears in the mission selection screen and the loading screen when the game starts, and the orders screen (Key = “F8”) – click on details – inside the U-Boat itself. Mission Type
Select whether it is a single-player or multi-player mission. Note that you must also then install the game into the correct folder. If you do not, then on starting the mission, the game will likely crash.
Don’t forget to deploy the appropriate number of “human controlled” U-Boats, depending on the mission type, and to add/delete them, if you change it later.
Start Date
This allows you to change the starting date of the mission. Bear in mind that the layout and availability of units may change if you change the starting date. Start Time
This allows you to change the starting time. Don’t forget that the time of day has a large impact on the mood and difficulty of the mission. Weather
The remaining parameters in this window pertain to the weather conditions. Select these carefully, as they can have a large impact on the game (see Section 9.1). The following parameters may be altered:
• Clouds • Precipitation • Fog • Wind speed • Wind heading • Variations • Weather Changing interval
11.2.3.2 Objectives
This menu item allows the developer to control what the mission objectives are (these will appear in game – usually by pressing “F8”). Once selected a window will appear. You can use the “Add Objective” and “Delete Objective” buttons to put in new objectives or remove ones that are already there. Note that you cannot change the order of the objectives. On adding a new objective, a little dialogue box will appear, requesting a name for the objective. This will be displayed to the players in-game, so please use the appropriate language and make it readable! For example, “Sink the Ark Royal” is much more meaningful than “Objective_26B” (unless you back up Objective 26B with some radio message, explaining how it is a secret mission, and…).
43
Each objective has various parameters associated with it. Click on the objective on the left hand side, and then edit the parameters on the right. Objective
There are three options, “Sink Tonnage”, “Reach Zone” and “Destroy Unit Class”. The default is to “Sink Tonnage”. Objective Type
This can be “Primary”, “Secondary”, “Hidden Primary” or “Hidden Secondary”. The “Hidden” objectives are not initially shown to the player. However, they can be “displayed” by triggering an Event to show them. See Section 11.2.3.4 for details about events and updating objectives. There is no difference between primary and secondary, but it can be used to indicate to the player what is important and what is not. Choose objective aims and award renown to match this. Unit Class
Use this to select the class that must be destroyed to complete the objective. If you want to sink a specific ship, then there must only be one of that class. This parameter only applies to “Destroy Unit Class” objectives. If there are no units yet in the game, you cannot use this option. Map Zone This option may be used to select a map zone. If the U-Boat reaches this zone, then the mission objective is regarded as fulfilled. If there are no map zones in the game, you cannot use this option. So place the map zones first! See Section 11.5.2 for more information about map zones. Tons
Defines how many tonnes must be sunk to fulfil a “Sink Tonnage” mission. Tonnage Type
A further limitation can be placed on the tonnage sunk, but insisting that it is either “Merchant” or “Warship” tonnage. The default is “Any” – which means that both classes count. Renown Awarded When the objective is satisfied, this amount of renown is awarded. This value may not be negative. Also, keep the renown awarded within reason and commensurate with the task. Use the renown awarded for destroying certain targets as a guide:
• Downing an aeroplane: 20-100 • Sinking a small merchant: 50-100 • Sinking a destroyer: 100-150 • Sinking a large merchant: 150-400 • Sinking a cruiser, liner or carrier: 400-1000 • Sinking a capital ship: 1000+

44
Note that some mods alter the renown system (for example the “Tonnage War Mod”). If you are designing a mission for that system, adjust your renowns accordingly.
11.2.3.3 Triggers
The Triggers menu item will bring up a window which allows you to add, delete or edit any of the game triggers. Triggers are the mechanism by which various events and occurrences happen. They are a powerful way of making your missions “react” and feel dynamic. On the left hand side of the Triggers window, are a list of the existing triggers, and two buttons to add/delete triggers. Note that there are no “Are You Sure?” messages on the delete option! When creating a new trigger, you are required to give it a unique name. Choose this name carefully – not only should it be descriptive, but you are unable to change it once you’ve chosen it. Furthermore, as time goes on, you may have events depending on that trigger name, which makes deleting it and starting again quite bothersome.
On the right-hand side of the window, are the controls for the triggers. The parameters displayed there apply to the trigger that is currently highlighted on the left. If you select a different trigger, the parameters are saved immediately, and the parameters for the new trigger are shown. You do not need to “Accept” each change before moving on. Clicking on “Accept” will cause the window to close. The main parameter is what type the trigger is. The following options are available:

45
• Time When a certain time is reached, then the trigger will occur.
Bear in mind that if you change the starting time/date of your mission, these events will change accordingly. So, this means
that even though you have input in an absolute time, it is stored internally as a relative time with respect to the mission start. This feature is usually (but not always) very useful!
• Objective When a certain objective has been satisfied, then the trigger will occur. This is useful for establishing new objectives, and stringing together complicated “quests”.
• Unit Destroyed This is used to indicate when a specific unit has been destroyed. Thus it requires the unit name. Fortunately, this may be selected from a drop down menu.
Note that if you change the instance name of the unit, you must revisit the Trigger for that option, and then select “Accept”. This is not as onerous as it first seems. Simply select the
Triggers menu option, use the arrow key to scroll down through all the triggers, and when you get to the end of the list, click on “Accept”. Everything will have been updated.
• Class Destroyed This option allows for the destruction of any unit of a particular class. You can specify how many of that class are required to be sunk for the trigger to occur.
• Tonnage This is the most generic of the “sinking” options. You can make it for any type of warship, any type of merchantman, or simply any type of ship. There is a minimum tonnage associated with the trigger, so can be used for determining things such as the start of an attack (1 tonne sunk), the elimination of the escorts (count up how much warship tonnage is in your escort and use that), or the destruction of the convoy (count up the merchant tonnage).
11.2.3.4 Events
The Events menu option will bring up a window from which you can edit all the events in your mission. Events can be either Objective or Instance updates, or can be messages sent to the player.

46
Like the Triggers window, the Events window is partitioned so that on the left is the list of existing events, and some buttons to create new ones or to remove existing ones. To create a new Event, click on the “Add Event” button. This will bring up a small window, asking you for the name of the Event. When creating a new event, you are required to give it a unique name. Choose this name carefully – not only should it be descriptive, but you are unable to change it once you’ve chosen it. On the right are the parameters associated with the given event. The first one decides what type the event is. These are as follows:
• Message The simplest event is to send a message to the player. When the event occurs this message will be sent to the player. There are two types of messages: “critical” and “non-critical”. A “critical” message will appear on the screen as a darkened box. There is no choice – the player must react to it. Generally, “critical” messages are only suitable for tutorials or for messages to say there is no point continuing. For better immersion, use just the normal messages. A normal message will be a radio message; the radio officer will announce its arrival, but it is up to the player to deal with it in their own time – via the radio messages screen (in-game shortcut “M”).

47
The radio transmitter in Germany for broadcasting to U-Boats was so powerful, that U-Boats could receive messages even when submerged to a depth of 15 metres. However, if deeper than that, the message would be missed. However, for important messages, there is the option of repeating them at semi-regular intervals until they have been received. Finally, there is the content of the message itself. This will appear on the next line after the “header” (so you can extend the header if you want). If you wish to start with normal text, leave a blank line. Note that the text is automatically line-wrapped by the game, thus each paragraph will look like a single line, separated by blank lines.
• Update Objective This event allows you to display objectives or to render them completed or not. If an objective starts hidden, you can use this mechanism to show them to the player. Don’t forget to send them a radio message, if you think that this change of objectives should be noted! If the “Update Objective” option is selected, you should then use the drop down menu to select which objective is affected. There are three commands that can be then performed:
o Show – This is used to display an objective that was hitherto hidden. See Section 11.2.3.2 for information about how to create a hidden objective.
o Fail – This will force the status of the objective to be changed to “Failed”. For example, this can be useful if there was a time-limit associated with the objective.
o Complete – This will force the status of the objective to be changed to “Complete”. Sometimes this can be useful if the objective requirements are too complicated for the objective mechanics, but can be determined by other factors that can result in a trigger (see below). An example of this might be surviving until a certain time.
• Update Instant This can be used to spawn or delete individual units. This can be useful for calling in reinforcements that come into the game at an appropriate time – thus not turning up to late or early!
Triggers for Events For each event, there is a box with the triggers that are used to cause the event to happen. Use the “Add” and “Delete” buttons to manage the list of all the triggers that will result in that event occurring. Note that is it possible to hang multiple events off a single trigger. For example, you could spawn a new unit, display the objective to sink it and send the player a radio message, all off a single trigger. For more information about triggers, see Section 11.2.3.3.

48
11.2.3.5 Validate Mission
The last menu item in the “Mission” menu is “Validate Mission”. This handy function will check whether or not your mission is ready for use. Select the menu item, and a blank window will appear with a couple of buttons at the bottom of it. Select “Validate Mission” and the Mission Editor will check your mission for you. If the mission is ready to go, then the only message that will appear in the top message box is “Mission Title:” followed by the title of the mission that you gave in the mission parameters (Section 11.2.3.1). If there are any errors, they will be listed after this. Typically these will be things like missing waypoints, the wrong number of human-controlled units, units too close together, and so on. Before you can save the mission, you’ll need to go back and fix them all. As a result, it is a good habit to get into to validate your mission regularly as you build it. That will make finding the problems easier.
11.2.4 Tools
These control the way the map interface behaves. See Section 11.3.2 for full details.
11.2.4.1 Radius Ruler
When selected, you can measure the distances between points on the map. See Section 11.3.2.1.
11.2.4.2 Show Estimated Time of Arrival
When selected, the estimated time of arrival for units will be printed above each waypoint. See Section 11.3.2.2.
11.2.4.3 Pan View
When selected, you can click-hold-and-drag the map about. See Section 11.3.2.3.
11.2.5 View
The “View” menu has a number of options that will reduce screen clutter.
11.2.5.1 Toolbar
Toggle this option to show/hide the toolbar
11.2.5.2 Status bar
Toggle this option to show/hide the status bar at the bottom of the screen.
11.2.5.3 Render accurate shore line
As far as I can tell, this option makes no difference.

49
11.2.5.4 Show minefield distribution
This is used to toggle whether or not individual mines are shown in a minefield. For more on minefields, see Section 7.10.
11.2.6 Performance
The “Performance” menu is split into two parts: “Editing” and “Simulation”. The Editing menu has less options, but they are the same as their counterparts in the Simulation menu, so they won’t be discussed separately. Basically the options toggle whether certain items are plotted on the map; just dots and labels for the most part. At first you would think that this was just to save on clutter or something, but that it wouldn’t have a great impact on “performance” as such. Well, that’s true enough for a single mission, but try loading the Campaign_RND.mis (“File � Open Rnd Layer”), and you’ll see why performance is actually an issue. Actually, this is a really good thing to do. It makes you appreciate how much traffic there was during the war (and how much is modelled in the game).
11.2.6.1 Editing
These are the items to be plotted when editing the mission – that is, the simulation is stopped. Click on the menu items to toggle whether they are displayed. See below for a description of what each option means.
11.2.6.2 Simulation
When you run the simulator, you make the editor run the units to plot their positions as time progresses. The simulator is a way of previewing the campaign before actually playing it in the game. It is described in Section 6.1. Click on the menu items to toggle whether they are displayed. See below for a description of what each option means. Note that you can turn the options on and off while the simulation is running (although the simulation will pause while you access the menu).
11.2.6.3 Show WP icons
The path of each unit is shown as a dark grey line, and loopback lines are shown in light grey. At each waypoint (vertex in the path), there may be a small black plotted. This is the “WP icon”.
11.2.6.4 Show WP radius
One of the nice things about the waypoint system implemented in SH3, is that when traveling to a waypoint, it is possible to define a circle, and the waypoint will occur randomly within it for each time it is used. This means that some paths can be defined as tight, with little variation (such as a channel or port), and others can be very open (like a convoy turning point in the open Atlantic Ocean). The WP radius is a dark grey circle that is plotted to show where the jitter in the waypoint may lie.

50
11.2.6.5 Show random instance parent
This option only applies to random groups. It plots a dark grey line between the unit and the point from where that unit spawns. It sometimes makes it easier to trace from whence things came, rather than trying to carefully trace back along the waypoints or stopping the simulation to go back to editing mode.
11.2.6.6 Show random instance name
This option only applies to random groups. This will show the name of the unit that was spawned by the random group. The name will be the parent name, plus a sequential number of two or more digits, as required.
11.2.6.7 Show random instance path
This option only applies to random groups. This shows the path of individual units that have been spawned by a random group. As a new unit is spawned, its individual path is calculated (allowing for randomness at any waypoints). This path is plotted on the map, and if you are running the simulation, you will see the newly created units follow this track.
11.2.7 Help
The last of the menus is the so-called “Help” menu. This is a complete misnomer. The user will not find any help here.
11.2.7.1 About SH3 Editor…
Try it. It doesn’t even tell you what the date, version number or build number of the editor is! See what I mean about the lack of help? Hence this manual… ☺
11.3 Controls tool bar The controls tool bar is normally located directly under the menu bar. It contains various file, operating mode and simulator controls.
11.3.1 File controls
These are the typical controls for files as you would expect in most applications.
There is no “are you sure?” question with any of these operations. If you haven’t saved your work, you will lose it!
11.3.1.1 New Mission
This is the equivalent of opening a new mission (see Section 11.2.1.1). The keyboard shortcut is “Ctrl-N”.
11.3.1.2 Open Mission
This is the equivalent of opening a pre-existing mission (see Section 11.2.1.2). The keyboard shortcut is “Ctrl-O” (the letter “o”, not the number “0”).

51
11.3.1.3 Save Mission
This is the equivalent of saving the current mission (see Section 11.2.1.8). The keyboard shortcut is “Ctrl-S”.
11.3.2 Mode controls
11.3.2.1 Radius-ruler tool
When selected, you can measure the distances between points on the map. Move the mouse cursor to one position, press the left mouse button, and drag it to the other position. A black line will be shown with the distance in kilometres printed beside is. This function will override the Pan View function. The keyboard shortcut for toggling this mode on and off is “R”.
11.3.2.2 Times
When selected, the estimated time of arrival (ETA) for units will be printed above each waypoint. This is useful to check that the mission will not require an inordinate amount of time. The ETA is based on the unit speed, time of departure and distance to travel. It can be used to synchronise the arrival of multiple units at one location, such as an assembling convoy or recreating an historic battle encounter.
11.3.2.3 Pan-View function
When selected, you can click-hold-and-drag the map about. When zoomed in, this is the easiest way of moving around. You can use the spacebar as a keyboard shortcut for toggling this mode on and off. If neither theRadius-rule or Pan-View functions are selected, then the mouse can be used for selecting and deselecting units on the map (see Section 11.5).
11.3.3 Simulator controls
There are several controls in the tool bar which are used to control the simulator. See also Section 6.3 for more general information.
11.3.3.1 Time Filter Start/End
These are the year and month of the start and end of the filter. Only units which exist during this time are show, and they are rendered in allied/axis/neutral colours as they would be at the filter start time.
11.3.3.2 Play
Causes the simulator to start running. While it is running, it is not possible to perform all editing functions.
11.3.3.3 Pause
Causes the simulator to temporarily stop. Press it again to start the simulator from the point at which it was paused.
11.3.3.4 Stop
Terminated the simulator and resets all units back to their starting positions.

52
11.3.3.5 Time compress
Increases the rate of time acceleration by a factor of two. The maximum value is 67108864x.
11.3.3.6 Time decompress
Decreases the rate of time acceleration by a factor of two. The minimum value is 1x (which is “real time”). You cannot run the simulator any slower than this, other than pausing it.
11.3.3.7 Display
Shows the current time acceleration rate and the date and time while the simulator is running. When the simulator is stopped, it will show the time that it was stopped, rather than resetting to the initial time. The time will reset when the simulator is restarted.
11.4 Tools’ Panel Yes, the “Tools’ Panel” is incorrectly spelled “Tools Pannel” in the Mission Editor! It is divided into different sections for the different types of units that can be placed into the game. Note that all units that go into the game are placed in addition to those
that are already in the campaign. Thus, if you put a unit into, say, the English Channel, you can expect there to be a commensurate amount of shipping already there. This can be good for “filling out” a mission, but it can be awkward if you have a specific scenario that you want to play out without “interference” from the normal maritime traffic. The use of the Tools’ Panel for placing units is described in Section 4.1.3. The last section of the Tools’ Panel is the “Explorer” tab. This contains a hierarchical list of all the units in the mission. It can be used to find particular units or groups, and by clicking on the unit in the list, and then pressing “X”, the map can be centred on that unit.
11.5 The map interface The world map is where the units are places, as well as their waypoints and other information. The Radius Ruler and Pan View are used on the map, but are described in Sections 11.2.4. When neither the Radius Ruler or Pan View are selected, clicking on a unit on the map will select it. Clicking on a patch of blank map will deselect the unit(s). If you click on a patch of blank map and hold the mouse button down, you can drag the mouse to define a box on the map. On releasing the mouse button, all units within this box will be selected. You can then click and drag one unit to move all the selected units with it. This is very useful for repositioning large numbers of units or for moving groups of units when you wish to preserve their formation.

53
If more than one unit is selected, then it is not possible to open the unit menu with the right mouse button. Click on some blank map to deselect all units, then re-select the unit whose menu you wish to access. If no units are selected, and you right-click on the map, the map menu will appear. It has four options:
11.5.1 Add Map Note
This allows you to place a note icon on the map. It will not appear in the game, but can be used to keep track of your mission design. It is like sticking one of those little yellow notes to your screen. When you click on the “Add Map Note” option, a window will appear. There are three items therein:
• Note Title: This is the label that will be printed under the map note icon that appears on the map. Note that once you’ve clicked “OK”, it is not possible to change this; you have to delete the map note and start again.
• Note Text: This is the text that you can put with the note. You can read the text again later, by selecting the map note, right-clicking and selecting the “Edit Map Note” item. You can then change the text too.
• Is Saveable: This seems to make no difference whatsoever, but leave it checked.
Once a map note has been placed, you can select it, drag it about and edit it. To edit it, select it, and then right-click on it. You then have the option to either centre the view on this map note or edit it. With editing, you can only change the note text (not the title!). Also, this is the only way to view the note text – there is no “View Note Text” option as such.
11.5.2 Add Map Zone
You can add a “map zone” by right clicking on the map interface when no units are selected. Then select the “Add Map Zone” item from the menu. You will be presented with the following window.

54
• Zone Name: This must be unique – no two zones may have the same name. If you try to create a second zone with a name the same as the first, you will be warned. Note that once you have named the zone and clicked OK, you cannot change it. While all the other parameters my be edited later, the zone name cannot be changed. To change it, you actually need to delete the zone (select it, and press the “Del” key) and create a new one.
• Area Radius (km): This is the radius of the zone. All zones are cylinders; circles on the map, that project up and down.
• Max Height (m): This is the upper altitude bound of the zone. The default is 1000 m. Remember that U-Boats cannot generally travel higher than about -6 m.
• Min Height (m): This is the lower altitude bound of the zone. The default is -1000 m. Again, remember that U-Boats cannot generally travel higher than about -6 m. Also, bear in mind the crush depth and operation depths of U-Boats, before using map zones as objectives. It may be that in trying to reach the objective area, the U-Boat will be destroyed!
• Is Saveable: As far as I can tell, this seems to make little difference, but leave it checked.
11.5.3 Add Random Generated Group
A random group is not just a single group, but is actually a spawning point for multiple, randomly generated groups. It can be used for generating regular, repeated shipping, without the need to create and control each individual unit. Many of the options can be randomised, allowing for a more realistic feel. When you create a random group, you are first asked for the type of group: naval, air or land, as well as a name for the group. This random group name must be unique, and cannot be altered later, so choose it carefully. After that, the group contents definition screen is displayed. This is described more fully in Section 11.9.4.
11.5.4 Centre View
This will cause the map view to shift so that the select unit is at the centre of the map. It will also work for a selected waypoint. The keyboard shortcut for it is “X”. Note

55
that if there is no unit selected, and you press “X”, the map will centre to where your mouse cursor was.
11.6 Individual unit icons Once a unit has been placed, it will be white with a coloured outline (Red=Allied, Blue=Axis, Green=Neutral) which will change according to the year specified in the “Time filter start”, and according to the date, should the simulator be running. If you click on the icon, the colouring inverts, and the unit is regarded as “Selected”. Right-clicking with a single (not multiple!) unit, will bring up the individual unit icon’s menu. (Note, this menu is different for units that lead or are attached to groups – see Sections 11.7 and 11.8).
11.6.1 Add Waypoint
This will allow you to place an additional waypoint. If the unit has no waypoints, you will get a black line between it and your mouse cursor. When you left click, you will put the first waypoint for that unit at that location, and another black line will appear. Thus, you can string way points out as much as you want to draw the path for the object.
Note that the first waypoint must be at least 1000 metres from the unit itself and each subsequent waypoint must be at least 1000 metres from the previous
one. If they are not, the mission validation process will warn you. Once you have finished adding waypoints, right click to stop. If you select “Add Waypoint” for a unit which already has one or more waypoints, a new waypoint will be inserted exactly halfway between the unit and its first waypoint.
11.6.2 Unit Properties
This opens a window where the unit properties may be altered.

56
The following lists the parameters that are presented:
• Country: Nationality of the unit – determined from which Roster it was dragged onto the map.
• Class: The type of the unit – again determined from the Roster selection. • Unit Name: This is the name not of the type, but of the individual ship (this
can be changed further down the window).

57
• Side: This can be “Allied”, “Axis” or “Neutral”, and will reflect the side on which the nationality fought according to the “Entry Date” of the unit in question.
• Speed: Starting speed (in knots) of the unit. This speed will be maintained until the first waypoint is reached.
• Heading: Starting heading of the unit in degrees from North. (So, North = 0, East = 90, South = 180, West = 270, and so forth.)
• Human Control: (U-Boats only.) Select this check box to make the unit controllable by a player.
• Height: (U-Boats and aeroplanes only.) This is the height of the unit when it starts. Use negative values for U-Boats that start below the surface (0 = surface). Use positive values for air-units.
• Crew Rating: Determines the experience level of the crew. Generally, the better the crew, the more aggressive, accurate and efficient they are.
• Docked Ship: Used to mark ships that are (supposedly) docked. • Delete of last waypoint: If checked, when the unit reaches its last waypoint it
will vanish from the game. Useful for campaigns, when the units would overload the game. Probably wise not to check this for single-player missions.
• Unit Version Date: (Month 1-12, plus Year). Determines if improved versions of the unit are used.
• Loadout: This controls what payload an aeroplane carries (typically different quantities of bombs). The “Basic” setting means no weaponry is carried, apart from any guns.
• Internal Cargo: Allocates the type of internal cargo. This will affect the chances of the ship slowly sinking (= freight), burning (= fuel) or exploding in spectacular fashion (= ammunition). Note that any ship may still burn or explode if a critical hit to some part of the ship is achieved (such as the magazine or engine).
• External Cargo: This is more for show than for practical value, but is important nonetheless. It allows you to control what cargo is visible on the deck of some ships, whether it is crates of ammunition, tanks, drums of oil, shipping containers or various other options. If you are going for an historical campaign, be careful placing some cargo types (for example tanks) as they are not always appropriate for the era.
• Entry/Exit: This is when the unit will appear in, or vanish from, the game. Within these dates and times, the unit will be present, but outside of the times it will not. If the game is in-progress as the entry date/time occurs, the unit will be spawned. If the exit date/time occurs, the unit will disappear.
• Contact automatic report: TBD (default is -1) • Probability: TBD (default is 100%) • Evolve from date: If checked, then the position of the unit will be determined
with respect to its Entry date/time position (see above). If not, then the unit position will be determined with respect to the start of the mission. For example, consider a unit with entry date 1st January 1940, in a mission which starts of 3rd January 1940. If the “Evolve from date” box is checked, the unit’s starting position will be calculated along its waypoint route for two days of travel. If it is not checked then when the mission begins, then unit will start at its initial position and start moving from there. Another way of thinking of it, is that the unit will appear at its entry date. If
58
the mission hasn’t “started” as such then, if the “Evolve from date” box is checked, it will start moving anyway, and when the mission “starts”, it will be already going along its route. If the box was not checked, the unit will wait until the mission begins before starting to move.
• Unit new name: To change the name of the instance, enter a new one here. • Is saveable: (leave it checked)
11.6.3 Create Group from Unit
In order to create a group of units, you must first select one, and then the “Create Group from Unit” option. You will then be asked to create a name for the group. Make it meaningful, so that if you add lots of groups later, you can distinguish them from each other. Group names must be unique.
11.6.4 Join Group
As it implies, this option allows you to attach this unit to an already existing group. It will not move the unit – you must either move it manually, or select the “Arrange Group” option from the group leader.
11.6.5 Head to Waypoint
Although you can manually set the heading of the unit in the “Unit Properties” option (Section 11.6.2), the most common heading will be in the direction of the first way point. This option will do this for you. It is good practise to use this anyway, as if you do not, the unit will spend time turning, which could either disrupt the timing of the mission or interfere with other units.
11.6.6 Centre View
This will cause the map view to shift so that the select unit is at the centre of the map. You can also use the “X” key shortcut.
11.7 Group leader icons Left-click to select the leader of the group, and then right-click to bring up a small menu with a list of group controls. They are described below.
11.7.1 Add Waypoint
This is exactly the same as for an individual unit, as described in Section 11.6.1.
11.7.2 Group Properties
This allows control of the attributes of the entire group.

59
The following lists the parameters that are presented:
• Group Name: This is the name of the group, as it was specified when the group was created (see Section 11.6.3)
• Leader Unit: This is the name of the instance that acts as the group leader. • Speed: This is the speed of all units in the group in knots. It can not be greater
than the fastest unit in the group, although owing to slight variations or reactions of units to attacks, it is wise to make this slightly lower than the permitted maximum to give the slower units a chance to catch up or manoeuvre back into formation. This speed is maintained until the first waypoint is reached.
• Heading: Starting heading of all units in the group in degrees from North. (So, North = 0, East = 90, South = 180, West = 270, and so forth.)
• Random Area Radius: It is possible to make the starting position of the group random within a certain area. This parameter controls that starting area.
• Height: (U-Boats and aeroplanes only.) This selects the starting altitude (positive) or depth (negative) of these units.
• Delete of last waypoint: If checked, when the unit reaches its last waypoint it will vanish from the game. Useful for campaigns, when the units would overload the game. Probably wise not to check this for single-player missions.
• Contact automatic report: TBD (default is -1) • Probability: TBD (default is 100%) • Evolve from date: If checked, then the position of the group will be
determined with respect to the Entry date/time position of the lead unit. If not, then the group position will be determined with respect to the start of the mission.
• Is saveable: (leave it checked).

60
11.7.3 Unit Properties
This is the same as that of an individual unit (see Section 11.6.2), but with a few options not datable, as they have been deferred to the group level.
11.7.4 Head to Waypoint
Causes all units in the group to begin pointing in the direction of the first waypoint.
11.7.5 Pivot to Heading
TBD
11.7.6 Centre View
This will cause the map view to shift so that the select unit is at the centre of the map. You can also use the “X” key shortcut.
11.7.7 Arrange Group
This option causes all the units in the group to be arranged in a box-convoy formation with escort ships scattered about it. There are two control parameters: number of columns and separation between columns. Superficially, the “Arrange Group” is easy to understand, but there are some nasty traps and getting to grips with ship placement within the group can be perplexing.
Warning: If you set the number of columns to be more than the number of ships in the group, the Mission Editor will crash to desktop.
To avoid problems with ships jostling for position, you should generally set the separation between columns to at least 500 metres. See Section 8.1.1 on how to
avoid ships breaking formation. So, how is the group actually arranged? The next two subsections will discuss this, although it should be noted that these “rules” do not always apply.
11.7.7.1 Merchants
The following rule usually applies for groups with 10 or more merchants.
• The ships are divided into two groups: those that fit into a “full box” and the “left overs” (that is, ships that can’t fit into a full row).
• The ships in the group, in the order that they were added to the group, fill the columns one at a time.
• When the first column is filled, the second column is started to the right of it. • Subsequent columns are added to alternating sides of the group. Odd-
numbered columns on the left, even-numbered columns to the right. • Once the “full box” is filled, the “left-overs” are added in a row by themselves
at the back of the convoy, following the same rules.

61
As that is all very complicated in text, here is an example of 11 ships in groups with varying numbers of columns. The ship numbers refer to the order in which they were added to the group – the leader (from which the group was created) is number 1. The group’s direction of travel is “up the page”.
1 2 3 1 2 3 1 2 4 5 3 1 2 4 Row = 1 1 6 7 1 4 5 1 3 7 9 5 1 3 7
2 2 7 8 2 5 6 2 4 8 10 6 2 4 8 3 3 8 9 3 6 11 9 10 11 4 4 9 10 11 5 5 10 6 11
So, for odd-numbers of columns, in a fully-filled box formation, the auto-arrange does what you expect it to, provided you build up the group starting with the most important units first. However, if you want to specifically put two important ships in the middle of a convoy with an even number of columns, then you may want them in positions 2 and 4, in which case you need to add them as second and fourth units when building the convoy.
Note that if there are less than 10 merchants in the group, the rules change. It more-or-less follows the above pattern, but unit #2 is placed in the last
available position, and units 3 to N are moved forwards. With 11 merchants, it works as advertised above, but with 10 or less, the “#2 at the end” rule applies. Certain ships seem to cause the rules to break entirely. Escorts in the group are placed around the group. Escorts include destroyers, destroyer escorts, frigates, corvettes, armed trawlers and schnell-/patrol-boats. They are arranged in on a circle, whose centre is on the middle unit in column 1 (using the column numbering system as shown above). If there are an even number of ships in column one, then it the centre is the first ship after the mid-point on that column. The circle is always centred on a unit in the group – never on a gap in between units in the group. Thus a convoy with an even number of columns will always have its escorts closer to it on the right, than the left. (I’m sure some crafty SH3-U-Boat Kapitäne use this knowledge to their advantage!)
11.7.7.2 Escorts
How the escorts are arranged around the circle, comes down to how they were added to the group. The rules are as follows: 1 escort: Is always placed at the front. 2 or more escorts: Escort #2 is always placed at the front. The others are then ordered sequentially around it in a clockwise fashion. That means that Escort #1 will be one position anti-clockwise of the leader. (Crafty SH3-U-Boat Kapitäne use this knowledge to their advantage too!)

62
The following example is for a group of 12 merchants (LST 1 – 12) and 5 escorts (PT Boat 1 – 5).
Notice that although the lines are always drawn to the leader, the circle centre is the middle ship of column 1. Notice too that escort #1 is always one position anti-clockwise from the front position (except in the single-escort case).
So… if there’s one escort, it goes to the front. If there are two or more, then the second escort that was added to the group will go to the front.
(Apologies if I laboured this point, but so often designers want a particular escort in the lead, and then wonder why it doesn’t go there.)
11.8 Group member icons Individual members of a group – but not the group leader itself – have a very limited set of options in their menu.

63
11.8.1 Properties
This is the same as that of an individual unit (see Section 11.6.2), but with a few options not datable, as they have been deferred to the group level.
11.8.2 Detach from Group
Takes the unit out of the group and makes it an individual unit once more.
11.8.3 Centre View
This will cause the map view to shift so that the select unit is at the centre of the map. You can also use the “X” key shortcut.
11.9 Random Group icons Once a random group has been placed on the map, you can edit several aspects of it.
11.9.1 Add Waypoint
As per the same option for an individual unit (see Section 11.6.1).
11.9.2 Head To Waypoint
Causes all units in the random group to spawn already pointing in the direction of the first waypoint.
11.9.3 Group Properties
This menu option brings up the group properties window. From here, multiple parameters about the group can be controlled.

64
The parameters that may be controlled on this screen are basically the same as those of an individual unit (see Section 11.6.2). The following items are the exceptions.
• Group name: This is the name of the random group spawning point. • Leader Unit: This is the type of unit that the group leader will be. • Update waypoints speed: When selected, it will apply this speed to all of the
waypoints of this random group. • Repeat Interval: A random group unit is not the actual group itself, but rather
the spawning point for multiple groups. The first group will appear at the time of the entry date (or the start of the mission, if that is later), and then new groups may appear at regular intervals thereafter (until the “Exit” date/time has expired). The “Repeat Interval” indicates how often a check is made to see if a new group is spawned (based on the “Group Spawn Probability”).
• Group Spawn Probability: When it is time for a new group to appear, a check is made to see whether one actually spawns. Between the “Group

65
Spawn Probability” and the “Repeat Interval”, you can control the sporadicity of the unit generation.
11.9.4 Define Group Contents
This menu item brings up a window which allows you to control the contents of the randomly spawned groups.
Select the settings of the unit to add and then press “Add Entry” to add it to the list. If “Add Entry” is not pressed, then the settings will apply to the currently selected entry when either a different entry is selected or “Accept” is pressed.
• Country: Nationality of the unit. Depending on the date, this will affect whether the unit is Allied, Axis or neutral.
• Unit Class: Once the nationality is selected the Unit Class menu will contain the types of units available to that nation. Additionally, there are “GENERIC” units that will result in the random select of any unit of the appropriate type at run time.
• Units No: The number of units that will be spawned. • Spawn Probability: The chance that these units will actually appear in a
given random group. For example at 100%, the unit will always be there. At 50%, the unit will only appear half the time.

66
• Crew Rating: Defines how competent the crew is. The more experienced the crew, the better they will be at repairing damage, firing the deck guns, and so on.
• Units Version Date: Some units come with multiple version, improving as the war went on. This allows you to control this aspect of the unit.
• Internal Cargo: See Section 11.6.2. • External Cargo: See Section 11.6.2. • Loadout: (air units only) What bombs are carried. Aeroplanes with the
“basic” loadout will only act as reconnaissance or machine gun strafing. • Position as escort: For destroyers and some other ships, there is a choice
between putting the unit in the convoy proper or locating it outside the columns in the traditional escort position.
Group Settings These control the placement of the convoy units and define the group leader.
The Group Leader will always spawn, regardless of its spawn probability.
Game behaviour is undefined if there are not enough ships to fill all the columns. The formation spacing must be large enough to accommodate a “safe” distance between ships. 300 metres is not enough for larger ships like T3 Tankers or Passenger Liners. To be safe in all circumstances, use 500 metres.
11.9.5 Centre View
The last item in the waypoint menu is “Centre View”, which will cause the map to shift so that this waypoint is in the centre. The keyboard shortcut for this is “X”.
11.10 Waypoint icons Waypoint icons, when selected will either be red (for intermediate waypoints) or black-and-white-cheques for the final waypoint. They will be numbered WP1, WP2, and so on. If you click on a waypoint and the right click, there are three options.
11.10.1 Add Waypoint
This will allow you to place an additional waypoint. If you select this for the final waypoint, you will get a black line between it and your mouse cursor. When you left click, you will put a new waypoint at that location, and another black line will appear. Thus, you can string way points out as much as you want to draw the path for the object.
Note that waypoints must be at least 1000 metres apart from one another. If they are not, the mission validation process will warn you.
Once you have finished adding waypoints, right click to stop.

67
If you select “Add Waypoint” for an intermediate waypoint, a new waypoint will be inserted exactly halfway between that waypoint and the next one.
If you are zoomed out, and you click on a group of waypoints, then you may not get the last one. If this happens, when you select “Add Waypoint”, it will just add another into this cluster, rather than giving you the black line allowing
to place new ones at the end. Superficially it looks like it’s not working – but it is, and not in the way you intended!
11.10.2 Properties
If you select the waypoint “Properties” menu item, a window will appear which will show you the parameters that are set when the unit reaches that waypoint.
• Unit Name: is the name of the unit, to whom this waypoint belongs. You cannot change this.
• Speed: is the new speed the unit will adopt on reaching this waypoint. This is useful for making ships speed up and slow down (for example, as they arrive and leave port).
• Height: is normally greyed-out for ships, but may be set for certain units such as aeroplanes (positive numbers only!) or U-Boats (negative numbers only, or zero for surfaced).
• Loop to Waypoint: is normally set to “Do not loop”. This means that the unit, on reaching this waypoint, will simply move on to the next one. However, it is possible to set this so that the unit may loop to another earlier waypoint.
• Loop Probability: is the percentage chance that the unit will go to the alternative waypoint, rather than the next one. A zero percent chance is the same as “Do no loop”, and a 100 percent chance guarantees a loop. This is useful for patrolling ships and chances of alternative routes. See Sections 7.1 and 7.3 for ideas.
• Radius: defines a circle around the waypoint position. When a ship is going to this waypoint, it actually heads to random point anywhere within this circle. For ships that must traverse a particular path, then this should be zero, but to randomise the courses, this “Radius” tool is extremely useful.

68
11.10.3 Centre View
The last item in the waypoint menu is “Centre View”, which will cause the map to shift so that this waypoint is in the centre. The keyboard shortcut for this is “X”.
11.11 Status Bar When the mouse cursor is over the map, the coordinates will be displayed in the status bar underneath the map itself. The map itself is flat, so the values in metres are linear (thus allowing the preservation of circular geometry in the game. The Longitude and Latitude are also given, but these, and thus the coastlines, are distorted as you approach the poles. This generally isn’t a problem, but for the fanatical sub-simmer, who plots a great-circle course for him- or herself, will actually find that the straight line would have been shorter (and quicker)! Coordinates are measured in metres and degrees. North and East are positive numbers, South and West are negative. A useful feature is the “height check”. If the mouse is in the map area, press and hold “H”. This will cause an additional display to appear in the status bar below the map, showing the height above sea level. This will be positive for land masses and negative for bodies of water. This is a useful feature, as it allows the mission designer to check the actual depth where the mission will take place, to ensure that there is enough depth for the U-Boat(s) to dive.
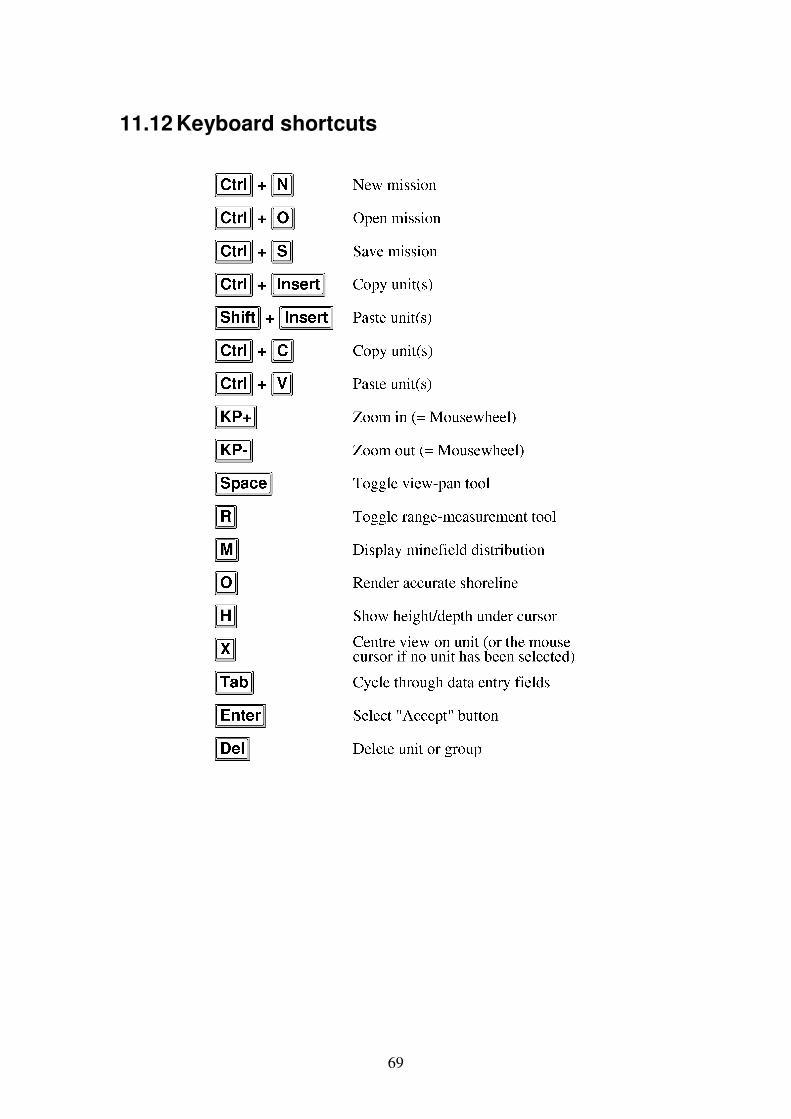
69
11.12 Keyboard shortcuts
70
12 Further reading If you want to read further, you should check the official Mission Editor manual that comes with the game. It can be found in the “\documentation” directory in your installed Silent Hunter III game. It is available in English and German. You can also refer to the SH3 Community Manual: http://www.communitymanuals.com/shiii/ If you can read Spanish, you may wish to read the “Tutorial de Uso del Editor de
Misiones” – http://www.24flotilla.com/tutoriales/tutorial-editmis.htm Members of 34th Flotilla should check the article archives on www.34thflotill.com . Otherwise refer to the “SH3 Mission Designers Forum” on www.subsim.com .
— Ende —

![Welcome [static9.cdn.ubi.com]static9.cdn.ubi.com/customersupportfaqfiles/archived/1351_SH2.pdf · Getting Started SILENT HUNTER II 7 Getting Started 6 by moving the mouse. Whether](https://img.pdfslide.net/doc/110x75/5f5acd81da53783f3c266dc6/welcome-getting-started-silent-hunter-ii-7-getting-started-6-by-moving-the-mouse.jpg)