Embed Size (px)
Citation preview

Building Business Applications in Silverlight 4
User Registration 1 | P a g e
Hands-On Lab
Building Applications in Silverlight 4
Module 3: User Registration with Authentication, Validation, MVVM, Implicit Styles and RichTextBox

Building Business Applications in Silverlight 4
User Registration 2 | P a g e
Contents
Introduction ...................................................................................................................................... 3
Exercise 1: Introducing MVVM and Customizing the UI by UI Role ..................................................... 4
Setup Authentication ................................................................................................................. 4
Create Registration Buttons ....................................................................................................... 7
Create the ViewModel ............................................................................................................... 8
Exercise 2: Commands and the ViewModel ..................................................................................... 12
Commanding ........................................................................................................................... 12
Add Authentication Based Custom Domain Service Methods ................................................... 16
Implement the Bindings ........................................................................................................... 19
Exercise 3: Server-Side Access Control ............................................................................................. 23
Exercise 4: Validation ...................................................................................................................... 24
Exercise 5: RichTextBox ................................................................................................................... 25
Whitespace Handling ............................................................................................................... 27
Nested Formatting ................................................................................................................... 28
Read-only RichTextBox ............................................................................................................ 28
Programming the RichTextBox ................................................................................................. 29
Exercise 6: Implicit Styling................................................................................................................ 32

Building Business Applications in Silverlight 4
User Registration 3 | P a g e
Introduction
In this lab, you will modify the example application to customize data and behavior based on the
logged in user, using the Model-View-ViewModel pattern. You will also implement server-side access
control, and explore how WCF RIA Services data annotations work with data forms to provide end to
end validation in Silverlight applications.
You can start from where you left off with the previous lab, if you completed it. But if you did not get
to the end, or if it you would just prefer to work from a fresh starting point, make a copy of the
solution in the StartingPoint folder for this lab—it contains the completed solution from the
previous lab.
In the lab for the previous module, your Silverlight application used a simple approach that works for
very basic applications, but which can run into problems as your program grows. You were binding
controls directly to data sources that came back from WCF RIA Services, and putting all the code into
the code behind for your XAML pages. This is problematic for a number of reasons. Embedding
application behavior into the code behind makes that behavior hard to test in isolation. You cannot
write unit tests for that code without somehow loading the XAML. Binding directly to objects
returned by a service raises problems when your application needs to show state that doesn’t
correspond directly to properties those objects already have. You certainly wouldn’t want to go
adding new items to the object model returned by a domain service simply to support user interface
status such as knowing whether the user has dismissed a notification in the UI yet, but it’s entirely
reasonable (a good idea in fact) to use data binding to work with that sort of state.
Non-trivial Silverlight applications typically add an extra layer between the XAML and the underlying
data model to provide flexibility and testability. You will use this approach in this part of the lab. You
will customize the user interface based on whether the user is logged in, and if so, which role their
account belongs to.
Obviously, concepts such as account and role are as much server-side concerns as client-side ones,
so these ideas belong in the world of the domain model. In fact the Silverlight Business Application
template adds some services to support these features to any new application. The logic for deciding
which specific UI elements should be available to which users is clearly specific to the client-side
code, and that’s the logic that will go into the extra layer. We call this layer the ViewModel, because
it sits between the View (the XAML with its codebehind) and the Model (the client-side wrappers
generated by WCF RIA Services for our domain service, in this case).

Building Business Applications in Silverlight 4
User Registration 4 | P a g e
Exercise 1: Introducing MVVM and
Customizing the UI by UI Role
This exercise will add a ViewModel to the application’s home screen (view) while introducing MVVM
practices. Authentication features will be modified to check against the sample database’s user and
roles tables.
Setup Authentication
1. Open the SlEventManager solution in Visual Studio 2010 (copy the Starting Point solution).
This lab uses the aspnet_ tables and ASP.NET authentication. You can see the tables in the
application’s database by following the steps below.
Expand the App_Data folder and double click SlEventManager.mdf. This will show the
Server Explorer panel, and will expand the Data Connections entry for your project’s
database. Expand the Tables item for this database, and you’ll see various tables whose
names begin with aspnet_.
Right click on aspnet_Users and select Show Table Data, and it will show the contents of
the table. You should see two rows, representing two user accounts (ian and
administrator) that are present in the database provided for this example project.
These aspnet_ tables are standard ones recognized by various ASP.NET features for
working with users, role-based security, and profiles. It’s common for these tables to end
up in an auto-generated SQL Express database called ASPNETDB.MDF—Visual Studio can
arrange for this database to be generated for you. (And in fact it will hide it by default, so
it’s not always obvious that it’s done it.) But we’re not going to use a generated database.
We’re going to use the tables already present in the SlEventManager.mdf database, for
two reasons. First, the database is preloaded with some user accounts and roles that you’ll
be using in this lab. Second, keeping everything in one database is simpler for deployment
reasons.
The one downside is that we need to configure the ASP.NET web application to use our
database. By default it will go ahead and generate one for you. In fact, if you’ve already
been playing with the login controls that the Silverlight Business Application template adds
to new applications, it’s possible that this has already happened. Select the App_Data
folder and then click the Show All Files button at the top of Solution Explorer, and if you
see an ASPNETDB.MDF, that means the automatic generation has already happened. Not
that this is a problem. We’ll switch to the example database now.
2. Open the SlEventManager.Web project’s web.config file.
3. Find the <system.web> element.

Building Business Applications in Silverlight 4
User Registration 5 | P a g e
4. Delete the <roleManager enabled="true" /> element.
5. Delete the <profile> element and all its children.
6. Inside the <system.web> element, add the following:
XML
<membership defaultProvider="SlEventManagerMembershipProvider"
userIsOnlineTimeWindow="15">
<providers>
<clear />
<add name="SlEventManagerMembershipProvider"
type="System.Web.Security.SqlMembershipProvider, System.Web,
Version=4.0.0.0, Culture=neutral, PublicKeyToken=b03f5f7f11d50a3a"
connectionStringName="SlEventManagerDb"
applicationName="/SlEventManager" enablePasswordRetrieval="false"
enablePasswordReset="true" requiresQuestionAndAnswer="true"
requiresUniqueEmail="true"
passwordFormat="Hashed" />
</providers>
</membership>
<roleManager enabled="true" defaultProvider="SlEventManagerRoleProvider">
<providers>
<clear />
<add name="SlEventManagerRoleProvider"
type="System.Web.Security.SqlRoleProvider, System.Web,
Version=4.0.0.0, Culture=neutral, PublicKeyToken=b03f5f7f11d50a3a"
connectionStringName="SlEventManagerDb"
applicationName="/SlEventManager" />
</providers>
</roleManager>
<profile enabled="true" defaultProvider="SlEventManagerProfileProvider">
<providers>
<clear />
<add name="SlEventManagerProfileProvider"
connectionStringName="SlEventManagerDb"
applicationName="/SlEventManager"
type="System.Web.Profile.SqlProfileProvider, System.Web,
Version=4.0.0.0, Culture=neutral, PublicKeyToken=b03f5f7f11d50a3a" />
</providers>
<properties>
<add name="FriendlyName" />
</properties>
</profile>
The editorial process has split some of the lines to fit them on the page. If you copy and
paste this in you should be fine, but don’t try to reproduce the line breaks in the middle of
the type attributes.

Building Business Applications in Silverlight 4
User Registration 6 | P a g e
This explicitly configures Membership, Role, and Profile providers. Silverlight Business
Applications use all three of these. (The Membership feature is the one that deals with
user logins, by the way.)
This explicit configuration lets us do two things. First, it lets us specify an applicationName;
this scopes the user accounts, roles, and profiles to our application, and it’s considered
good practice always to set this. Second, it lets us specify the database connection string to
be used for each of these features, which is how ASP.NET will know to use our database.
All three are using the SlEventManagerDb connection string.
7. Find the <connectionStrings> section of the web.config. Add another entry for the
authentication database:
XML
<add name="SlEventManagerDb"
connectionString="Data
Source=.\SQLEXPRESS;AttachDbFilename=|DataDirectory|\SlEventManager.mdf;Int
egrated Security=True;User Instance=True;MultipleActiveResultSets=True"
providerName="System.Data.SqlClient" />
The connectionString should not have any line breaks in your web.config.
8. Run the application.
9. Click on the login link at the top right of the page. A login UI will appear.
10. Log in with a username of administrator, and a password of P@ssw0rd (that’s a number
zero after the w).
The login should succeed, verifying that your application is successfully using the
aspnet_Users table (and associated tables such as aspnet_Membership) to for managing
logins. (Feel free to verify that it’s not simply allowing any credentials, by trying to log in
with a non-existent account, or the wrong password. The login should fail when you try
that.)
11. Close the application.
12. Back in Visual Studio, inspect the data in the aspnet_Roles table.
This contains two rows, defining two roles: Event Administrators and Registered Users. (In
the database supplied, the administrator account belongs to both roles, while the ian
account belongs only to the second. Role membership is defined in the
aspnet_UsersInRoles table.) The Registered Users role is one you’ll typically get by default
in this sort of application, because the Silverlight Business Application template includes
code to generate it.
The AddUser method in the SlEventManager.Web project’s
UserRegistrationService.cs(C#) or UserRegistrationService.vb(VB) file uses the ASP.NET
Roles class to create the Registered Users role if it doesn’t already exist, and automatically
adds newly-created users to that role.

Building Business Applications in Silverlight 4
User Registration 7 | P a g e
13. Run the application
14. If the application still shows you as being logged in, log out.
15. Use the login UI to create a new user account (all the code for registering as a new user is
built into the template).
Once you’ve done this you should see new entries in the aspnet_Users,
aspnet_Membership, and aspnet_UsersInRoles tables, representing your new account,
and its membership of the Registered Users role.
Create Registration Buttons
1. Go to Home.xaml in the SlEventManager project’s Views folder.
2. Add the following StackPanel after the existing one:
XAML
<StackPanel Orientation="Horizontal" HorizontalAlignment="Right">
<Button x:Name="registerForEventButton" Content="Register" />
<Button x:Name="unregisterForEventButton" Content="Unregister" />
</StackPanel>
Right now both panels will be visible at once, but we’ll fix that with a ViewModel that will
provide bindable properties to control the visibility of these two panels.
3. Add a new class to your SlEventManager project (with Shift+Alt+C or the Add→Class…
context menu in the Solution Explorer) called ViewModelBase.
A ViewModel needs to notify Silverlight whenever its properties change so that and data
binding expressions that connect to the ViewModel know to update the target UI element.
The usual way to do this is to implement INotifyPropertyChanged. So it’s common to
define a base class to provide a common implementation of this interface for all
ViewModels.
4. Add this using declaration:
C#
using System.ComponentModel;
Visual Basic
Imports System.ComponentModel
5. Implement the class as shown here:
C#
public class ViewModelBase : INotifyPropertyChanged
{
public event PropertyChangedEventHandler PropertyChanged;
protected void OnPropertyChanged(string propertyName)
{

Building Business Applications in Silverlight 4
User Registration 8 | P a g e
if (PropertyChanged != null)
{
PropertyChanged(this,
new PropertyChangedEventArgs(propertyName));
}
}
}
Visual Basic
Public Class ViewModelBase
Implements INotifyPropertyChanged
Public Event PropertyChanged As PropertyChangedEventHandler Implements
System.ComponentModel.INotifyPropertyChanged.PropertyChanged
Protected Sub OnPropertyChanged(ByVal propertyName As String)
RaiseEvent PropertyChanged(Me, New
PropertyChangedEventArgs(propertyName))
End Sub
End Class
Create the ViewModel
1. Add a new folder to the SlEventManager project called ViewModels.
ViewModels are typically designed either for a particular view (i.e. a particular XAML file
and its code behind) or some part of the view (e.g., an individual item in a list inside a
view). You will be defining a ViewModel for the Home.xaml view.
2. Add a class called HomeViewModel in the ViewModels folder.
3. Make this new class derive from the ViewModelBase class you created.
4. The ViewModel needs to determine the visibility of the administrator buttons, so add the
following property definition:
C#
private Visibility _adminButtonsVisibility;
public Visibility AdminButtonsVisibility
{
get { return _adminButtonsVisibility; }
set
{
if (_adminButtonsVisibility != value)
{
_adminButtonsVisibility = value;
OnPropertyChanged("AdminButtonsVisibility");
}
}
}
Visual Basic
Private _adminButtonsVisibility As Visibility

Building Business Applications in Silverlight 4
User Registration 9 | P a g e
Public Property AdminButtonsVisibility() As Visibility
Get
Return _adminButtonsVisibility
End Get
Set(ByVal value As Visibility)
If _adminButtonsVisibility <> value Then
_adminButtonsVisibility = value
OnPropertyChanged("AdminButtonsVisibility")
End If
End Set
End Property
This is the typical boilerplate implementation for a property that raises change
notifications. This particular property’s type is Visibility—that’s because we’re going bind
this to one of the StackPanels’ Visibility properties.
5. Add another similar property called AttendeeButtonsVisibility.
C#
private Visibility _attendeeButtonsVisibility;
public Visibility AttendeeButtonsVisibility
{
get { return _attendeeButtonsVisibility; }
set
{
if (_attendeeButtonsVisibility != value)
{
_attendeeButtonsVisibility = value;
OnPropertyChanged("AttendeeButtonsVisibility");
}
}
}
Visual Basic
Private _attendeeButtonsVisibility As Visibility
Public Property AttendeeButtonsVisibility() As Visibility
Get
Return _attendeeButtonsVisibility
End Get
Set(ByVal value As Visibility)
If _attendeeButtonsVisibility <> value Then
_attendeeButtonsVisibility = value
OnPropertyChanged("AttendeeButtonsVisibility")
End If
End Set
End Property
6. Add the following code to have the ViewModel set these properties :
C#
private void UpdateForUserRole()
{

Building Business Applications in Silverlight 4
User Registration 10 | P a g e
bool isLoggedIn = WebContext.Current.User.IsAuthenticated;
bool isAdmin = isLoggedIn &&
WebContext.Current.User.IsInRole("Event
Administrators");
AdminButtonsVisibility = isAdmin ?
Visibility.Visible : Visibility.Collapsed;
AttendeeButtonsVisibility = (isLoggedIn && !isAdmin) ?
Visibility.Visible : Visibility.Collapsed;
}
Visual Basic
Private Sub UpdateForUserRole()
Dim isLoggedIn As Boolean = WebContext.Current.User.IsAuthenticated
Dim isAdmin As Boolean = isLoggedIn AndAlso
WebContext.Current.User.IsInRole("Event Administrators")
AdminButtonsVisibility = If(isAdmin, Visibility.Visible,
Visibility.Collapsed)
AttendeeButtonsVisibility = If((isLoggedIn AndAlso (Not isAdmin)),
Visibility.Visible, Visibility.Collapsed)
End Sub
This uses the WebContext class, which is provided by WCF RIA Services. This has built-in
support for the concept of user authentication and roles. This relies on the
AuthenticationService in the SlWebManager.Web project’s Services folder.
7. We need to call the UpdateForUserRole method when the UI first loads, but also whenever
the user logs in or out. So add the following constructor to your ViewModel:
C#
public HomeViewModel()
{
WebContext.Current.Authentication.LoggedIn += (s, e) =>
UpdateForUserRole();
WebContext.Current.Authentication.LoggedOut += (s, e) =>
UpdateForUserRole();
UpdateForUserRole();
}
Visual Basic
Public Sub New()
AddHandler WebContext.Current.Authentication.LoggedIn, Sub(s, e)
UpdateForUserRole()
AddHandler WebContext.Current.Authentication.LoggedOut, Sub(s, e)
UpdateForUserRole()
UpdateForUserRole()
End Sub

Building Business Applications in Silverlight 4
User Registration 11 | P a g e
The WebContext.Current.Authentication object offers these events to notify you when
the user logs in or out, enabling us to know when we should update the ViewModel’s
state.
8. Create an instance of this ViewModel and bind the view to it by adding the field declaration
and initializer in the Home.xaml.cs(C#) or Home.xaml.vb(VB) codebehind:
C#
HomeViewModel _viewModel = new HomeViewModel();
Visual Basic
Dim _viewModel As New HomeViewModel()
9. Add this using statement:
C#
using SlEventManager.ViewModels;
Visual Basic
Imports SlEventManager.ViewModels
10. In the view’s constructor, assign this into the DataContext for the view:
C#
this.DataContext = _viewModel;
Visual Basic
Me.DataContext = _viewModel
11. In Home.xaml, go to the original StackPanel, the one containing the buttons for editing and
creating events.
12. Add the following attribute to the 2 StackPanels to cause the panel’s visibility to be
controlled by the ViewModel.
XAML
Visibility="{Binding Path=AdminButtonsVisibility}"
13. Add a similar attribute to the other StackPanel, binding its Visibility to the
AttendeeButtonsVisibility property.
14. Run the application.
Initially you will most likely not be logged in (unless you checked the checkbox to remain
logged in earlier.) When not logged on, you will see no buttons at all. But if you log in as a
normal user (e.g. ian, password P@ssw0rd), you should see the Register and Unregister
buttons appear. If you log back out these will disappear again. If you log in as
administrator (P@ssw0rd) you will see the buttons for editing and creating events.

Building Business Applications in Silverlight 4
User Registration 12 | P a g e
Exercise 2: Commands and the
ViewModel
One of the goals of a ViewModel is to minimize the amount of code in the view, in order to facilitate
unit testing. The first part of this lab illustrated how data binding makes it possible for a ViewModel
to update properties of elements in the view. But what about when we need things to flow in the
other direction? How does the ViewModel discover user activity such as button clicks?
One solution is to have ordinary event handlers in the view’s code behind, and have those call into
methods on the ViewModel. For example, the ViewModel could define an OnRegisterButtonClicked
method to be called by the view. While this doesn’t quite meet the ideal of avoiding all code in the
view, that’s not a huge problem, because the only code required in the view is a single method call
through to the ViewModel. However, Silverlight 4 introduces a feature that was previously only
available on the desktop with WPF, which can help us do better: commands.
Commands are an abstraction representing an operation that can be invoked through some user
action such as a button click. You can data bind a Button’s Command property to a command object
exposed by a ViewModel, which avoids the need for a Click handler in the code behind. The button is
able to invoke the command directly. But it adds an additional benefit: the command abstraction
(represented by the ICommand interface) also supports the idea that a command may be enabled or
disabled from time to time. This means the ViewModel also has a way of controlling whether the
button associated with a command is enabled or disabled. (Of course, we could have done that by
offering a bool property on the ViewModel and binding a button’s IsEnabled property to that. But
commands let us kill two birds with one stone: by binding just the one property: Button.Command,
we can have the ViewModel both handle button clicks and set the enabled state of the button.
In this exercise, we’ll use this technique for the Register and Unregister buttons you added in the
previous part.
Commanding
1. Add a new class to the SlEventManager project called RelayCommand, with the following
implementation:
While Silverlight defines the ICommand interface, it doesn’t provide any implementations.
So the first thing we need to do is provide our own. The most flexible approach is to write
one class that simply relays the command invocation onto a delegate. That way we can use
one command implementation to implement any number of commands.
C#
public class RelayCommand : ICommand
{
private Action _handler;
public RelayCommand(Action handler)

Building Business Applications in Silverlight 4
User Registration 13 | P a g e
{
_handler = handler;
}
private bool _isEnabled;
public bool IsEnabled
{
get { return _isEnabled; }
set
{
if (value != _isEnabled)
{
_isEnabled = value;
if (CanExecuteChanged != null)
{
CanExecuteChanged(this, EventArgs.Empty);
}
}
}
}
public bool CanExecute(object parameter)
{
return IsEnabled;
}
public event EventHandler CanExecuteChanged;
public void Execute(object parameter)
{
_handler();
}
}
Visual Basic
Public Class RelayCommand
Implements ICommand
Private _handler As Action
Public Sub New(ByVal handler As Action)
_handler = handler
End Sub
Private _isEnabled As Boolean
Public Property IsEnabled() As Boolean
Get
Return _isEnabled
End Get
Set(ByVal value As Boolean)
If value <> _isEnabled Then
_isEnabled = value

Building Business Applications in Silverlight 4
User Registration 14 | P a g e
RaiseEvent CanExecuteChanged(Me, EventArgs.Empty)
End If
End Set
End Property
Public Function CanExecute(ByVal parameter As Object) As Boolean
Implements System.Windows.Input.ICommand.CanExecute
Return IsEnabled
End Function
Public Event CanExecuteChanged As EventHandler Implements
System.Windows.Input.ICommand.CanExecuteChanged
Public Sub Execute(ByVal parameter As Object) Implements
System.Windows.Input.ICommand.Execute
_handler()
End Sub
End Class
There are other common implementations of this general idea you can find on the Internet
that are also called RelayCommand. The variations are in details such as whether they use
the command parameter. This example doesn’t need it a command parameter, so we just
ignore it. Another variation is whether the CanExecute status is handled with a property or
a callback. But the basic principle is the same.
2. Add two methods OnRegister and OnUnregister to the HomeViewModel.cs(C#) or
HomeViewModel.vb(VB) ViewModel class. These will be used as handlers for the
commands:
C#
private void OnRegister()
{
}
private void OnUnregister()
{
}
Visual Basic
Private Sub OnRegister()
End Sub
Private Sub OnUnregister()
End Sub
3. Add the following property and field definitions to the HomeViewModel.cs(C#) or
HomeViewModel.vb(VB) ViewModel class:
C#
private readonly RelayCommand _registerCommand;

Building Business Applications in Silverlight 4
User Registration 15 | P a g e
public ICommand RegisterCommand { get { return _registerCommand; } }
private readonly RelayCommand _unregisterCommand;
public ICommand UnregisterCommand { get { return _unregisterCommand; } }
Visual Basic
Private ReadOnly _registerCommand As RelayCommand
Public ReadOnly Property RegisterCommand() As ICommand
Get
Return _registerCommand
End Get
End Property
Private ReadOnly _unregisterCommand As RelayCommand
Public ReadOnly Property UnregisterCommand() As ICommand
Get
Return _unregisterCommand
End Get
End Property
While these properties will be used for data binding, they never change, so there’s no need
to for set accessors nor any need to raise change notifications.
4. In the constructor, add the following code to initialize these command fields with
RelayCommand objects referring to the two handlers. Put these at the start of the
constructor before the call to UpdateUserForRole.
C#
_registerCommand = new RelayCommand(OnRegister);
_unregisterCommand = new RelayCommand(OnUnregister);
Visual Basic
_registerCommand = New RelayCommand(AddressOf OnRegister)
_unregisterCommand = New RelayCommand(AddressOf OnUnregister)
5. Add a property to track the current selection.
We need to write the logic that will determine whether these commands should be
enabled. This requires two things: we need to know events for which the user is already
registered, and we need to know which event has currently been selected in the grid.
C#
private Event _selectedEvent;
public Event SelectedEvent
{
get { return _selectedEvent; }
set
{
_selectedEvent = value;
UpdateRegistrationButtons();
}
}

Building Business Applications in Silverlight 4
User Registration 16 | P a g e
private void UpdateRegistrationButtons()
{
}
Visual Basic
Private _selectedEvent As [Event]
Public Property SelectedEvent() As [Event]
Get
Return _selectedEvent
End Get
Set(ByVal value As [Event])
_selectedEvent = value
UpdateRegistrationButtons()
End Set
End Property
Private Sub UpdateRegistrationButtons()
End Sub
6. Add the following using directive:
C#
using SlEventManager.Web;
Visual Basic
Imports SlEventManager.Web
Add Authentication Based Custom Domain Service Methods
1. Add the following using directive in the EventManagerDomainService class in the
SlEventManager.Web project:
C#
using System.Web.Security;
Visual Basic
Imports System.Web.Security
2. Add this method, which will retrieve the IDs of the events for which the current user is
registered.
This uses the ASP.NET Membership class to discover the current user, so there’s no need
for any parameters.
C#
[Invoke]
public IEnumerable<int> FetchEventsForWhichCurrentUserIsRegistered()
{
MembershipUser mu = Membership.GetUser();
if (mu == null)
{
return new int[0];

Building Business Applications in Silverlight 4
User Registration 17 | P a g e
}
var q = from attendeeEvent in this.ObjectContext.AttendeeEvents
where attendeeEvent.Attendee.AspNetUserId == (Guid)
mu.ProviderUserKey
select attendeeEvent.EventID;
return q;
}
Visual Basic
<Invoke()>
Public Function FetchEventsForWhichCurrentUserIsRegistered() As
IEnumerable(Of Integer)
Dim mu As MembershipUser = Membership.GetUser()
If mu Is Nothing Then
Return New Integer(){}
End If
Dim q = From attendeeEvent In Me.ObjectContext.AttendeeEvents
Where attendeeEvent.Attendee.AspNetUserId =
CType(mu.ProviderUserKey, Guid)
Select attendeeEvent.EventID
Return q
End Function
The [Invoke] (C#) or <Invoke()>(VB)attribute tells WCF RIA Services that this method does
not attempt to return any entities. By default, when a domain service method returns an
IEnumerable<T>, RIA Services presumes that the method intends to act as a query over
some domain entities. That would cause it to report an error here, because this method
enumerates ints, which are not valid entities. Declaring that this is simply an invocation-
style operation avoids the error.
3. A the following methods to handle registering and unregistering the current user for events:
C#
[Invoke]
public void RegisterCurrentUserForEvent(int eventId)
{
Attendee attendee = GetOrCreateAttendeeForCurrentUser();
if (!attendee.AttendeeEvents.Any(ev => ev.EventID == eventId))
{
attendee.AttendeeEvents.Add(new AttendeeEvent { EventID = eventId
});
}
this.ObjectContext.SaveChanges();
}
[Invoke]
public void UnregisterCurrentUserForEvent(int eventId)
{
Attendee attendee = GetOrCreateAttendeeForCurrentUser();
AttendeeEvent av = attendee.AttendeeEvents.SingleOrDefault(
x => x.EventID == eventId);

Building Business Applications in Silverlight 4
User Registration 18 | P a g e
if (av != null)
{
attendee.AttendeeEvents.Remove(av);
this.ObjectContext.AttendeeEvents.DeleteObject(av);
}
this.ObjectContext.SaveChanges();
}
private Attendee GetOrCreateAttendeeForCurrentUser()
{
MembershipUser mu = Membership.GetUser();
if (mu == null)
{
throw new InvalidOperationException("User not logged in");
}
Attendee at = this.ObjectContext.Attendees.FirstOrDefault(
x => x.AspNetUserId == (Guid) mu.ProviderUserKey);
if (at == null)
{
at = new Attendee
{
AspNetUserId = (Guid) mu.ProviderUserKey
};
this.ObjectContext.AddToAttendees(at);
}
return at;
}
Visual Basic
<Invoke()>
Public Sub RegisterCurrentUserForEvent(ByVal eventId As Integer)
Dim attendee As Attendee = GetOrCreateAttendeeForCurrentUser()
If Not attendee.AttendeeEvents.Any(Function(ev) ev.EventID =
eventId) Then
attendee.AttendeeEvents.Add(New AttendeeEvent With {.EventID =
eventId})
End If
Me.ObjectContext.SaveChanges()
End Sub
<Invoke()>
Public Sub UnregisterCurrentUserForEvent(ByVal eventId As Integer)
Dim attendee As Attendee = GetOrCreateAttendeeForCurrentUser()
Dim av As AttendeeEvent =
attendee.AttendeeEvents.SingleOrDefault(Function(x) x.EventID = eventId)
If av IsNot Nothing Then
attendee.AttendeeEvents.Remove(av)
Me.ObjectContext.AttendeeEvents.DeleteObject(av)
End If
Me.ObjectContext.SaveChanges()

Building Business Applications in Silverlight 4
User Registration 19 | P a g e
End Sub
Private Function GetOrCreateAttendeeForCurrentUser() As Attendee
Dim mu As MembershipUser = Membership.GetUser()
If mu Is Nothing Then
Throw New InvalidOperationException("User not logged in")
End If
Dim at As Attendee =
Me.ObjectContext.Attendees.FirstOrDefault(Function(x) x.AspNetUserId =
CType(mu.ProviderUserKey, Guid))
If at Is Nothing Then
at = New Attendee With {.AspNetUserId =
CType(mu.ProviderUserKey, Guid)}
Me.ObjectContext.AddToAttendees(at)
End If
Return at
End Function
Implement the Bindings
1. Add the following using declarations to HomeViewModel.cs(C#) or
HomeViewModel.vb(VB) so the ViewModel can use these methods and remember which
events the current user belongs to.
C#
using System.Collections.Generic;
using SlEventManager.Web.Services;
Visual Basic
Imports System.Collections.Generic
Imports SlEventManager.Web.Services
2. Add the following field to the ViewModel:
C#
private HashSet<int> _currentUserRegisteredEventIds;
Visual Basic
Private _currentUserRegisteredEventIds As HashSet(Of Integer)
3. Implement the UpdateRegistrationButton method that we added earlier.
This updates the button command status based on the current set of event ids:
C#
private void UpdateRegistrationButtons()
{
_registerCommand.IsEnabled = _currentUserRegisteredEventIds != null &&
SelectedEvent != null &&
!_currentUserRegisteredEventIds.Contains(SelectedEvent.EventID);
_unregisterCommand.IsEnabled = _currentUserRegisteredEventIds != null
&&

Building Business Applications in Silverlight 4
User Registration 20 | P a g e
SelectedEvent != null &&
_currentUserRegisteredEventIds.Contains(SelectedEvent.EventID);
}
Visual Basic
Private Sub UpdateRegistrationButtons()
_registerCommand.IsEnabled = _currentUserRegisteredEventIds IsNot
Nothing AndAlso SelectedEvent IsNot Nothing AndAlso Not
_currentUserRegisteredEventIds.Contains(SelectedEvent.EventID)
_unregisterCommand.IsEnabled = _currentUserRegisteredEventIds IsNot
Nothing AndAlso SelectedEvent IsNot Nothing AndAlso
_currentUserRegisteredEventIds.Contains(SelectedEvent.EventID)
End Sub
4. Add the following code at the end of the UpdateForUserRole method to populate the set of
registered events:
C#
if (isLoggedIn)
{
var ctx = new EventManagerDomainContext();
ctx.FetchEventsForWhichCurrentUserIsRegistered((op) =>
{
if (!op.HasError)
{
var items = op.Value;
_currentUserRegisteredEventIds = new HashSet<int>(items);
UpdateRegistrationButtons();
}
}, null);
}
else
{
_currentUserRegisteredEventIds = null;
UpdateRegistrationButtons();
}
Visual Basic
If isLoggedIn Then
Dim ctx = New EventManagerDomainContext()
ctx.FetchEventsForWhichCurrentUserIsRegistered(Sub(op)
If Not op.HasError Then
Dim items = op.Value
_currentUserRegisteredEventIds = New HashSet(Of
Integer)(items)
UpdateRegistrationButtons()
End If
End Sub, Nothing)
Else
_currentUserRegisteredEventIds = Nothing

Building Business Applications in Silverlight 4
User Registration 21 | P a g e
UpdateRegistrationButtons()
End If
5. Implement the button command handlers we previously added empty methods for:
C#
private void OnRegister()
{
if (SelectedEvent != null)
{
var ctx = new EventManagerDomainContext();
ctx.RegisterCurrentUserForEvent(SelectedEvent.EventID, (op) =>
{
UpdateForUserRole();
}, null);
}
}
private void OnUnregister()
{
if (SelectedEvent != null)
{
var ctx = new EventManagerDomainContext();
ctx.UnregisterCurrentUserForEvent(SelectedEvent.EventID, (op) =>
{
UpdateForUserRole();
}, null);
}
}
Visual Basic
Private Sub OnRegister()
If SelectedEvent IsNot Nothing Then
Dim ctx = New EventManagerDomainContext()
ctx.RegisterCurrentUserForEvent(SelectedEvent.EventID, Sub(op)
UpdateForUserRole(), Nothing)
End If
End Sub
Private Sub OnUnregister()
If SelectedEvent IsNot Nothing Then
Dim ctx = New EventManagerDomainContext()
ctx.UnregisterCurrentUserForEvent(SelectedEvent.EventID,
Sub(op) UpdateForUserRole(), Nothing)
End If
End Sub
6. Wire the view up to the commands. By binding the Command properties of the two buttons
to the command objects exposed by the ViewModel:
XAML
<Button x:Name="registerForEventButton" Content="Register"
Command="{Binding Path=RegisterCommand}" />
<Button x:Name="unregisterForEventButton" Content="Unregister"
Building Business Applications in Silverlight 4
User Registration 22 | P a g e
Command="{Binding Path=UnregisterCommand}" />
7. Bind the SelectedItem property of the data grid by adding the following attribute to the data
grid:
XAML
SelectedItem="{Binding Path=SelectedEvent, Mode=TwoWay}"
8. Run the application.
9. Log in as a non-admin user (e.g., ian, P@ssw0rd).
In the example database, the ian user is registered for the third event, so when you select
that event the Register button should become disabled and the Unregister button should
be enabled. For all other events, it should be the other way around. You should be able to
us the buttons to register and unregister the user for events in the list.

Building Business Applications in Silverlight 4
User Registration 23 | P a g e
Exercise 3: Server-Side Access Control
Changing the available UI elements on the client side based on the user’s identity is a useful
technique, but of course it’s not a secure one. We mustn’t rely on the client-side to enforce role-
based secure access. So in this part, you’ll add security measures on the server side to restrict
certain domain service facilities based on the role membership of the user. That way, even if a
malicious user subverts the client-side code to gain access to features that they’re not authorized to
use, their attempts will be foiled on the server side.
1. Run the application and log in as administrator (P@ssw0rd).
2. Select an event and click the button to edit it.
3. Copy the URL to the clipboard.
4. Edit the event, save the changes and return to the home page, verifying that the data
changed.
5. Log out of the application.
6. Paste the URL back in and this will take you to the editing page again.
7. Edit the event and save the changes again.
8. Go back to the home page to verify that you were able to modify the event despite not
being logged in.
9. Close the application.
10. In the SlEventManager.Web project, open the EventManagerDomainService.cs(C#) or
EventManagerDomainService.vb(VB) file in the Services folder.
11. Find the UpdateEvent method.
12. Add a [RequiresRole("Event Administrators")](C#) or <RequiresRole("Event
Administrators")>(VB) attribute.
13. Run the application again.
As before, paste in the URL for the editing page while not logged in. Make a change to the
event and click Save Changes. This time you should get an error. (Verify that you are still
able to save changes when logged in as the administrator though.)
Building Business Applications in Silverlight 4
User Registration 24 | P a g e
Exercise 4: Validation
The login UI allows new user accounts to be created. It performs some validation of data. In this final
step you will add an additional validation requirement.
1. Run the application.
2. Ensure you’re not already logged in and then click the login button.
3. Instead of logging in, click the Register Now link at the bottom of the dialog.
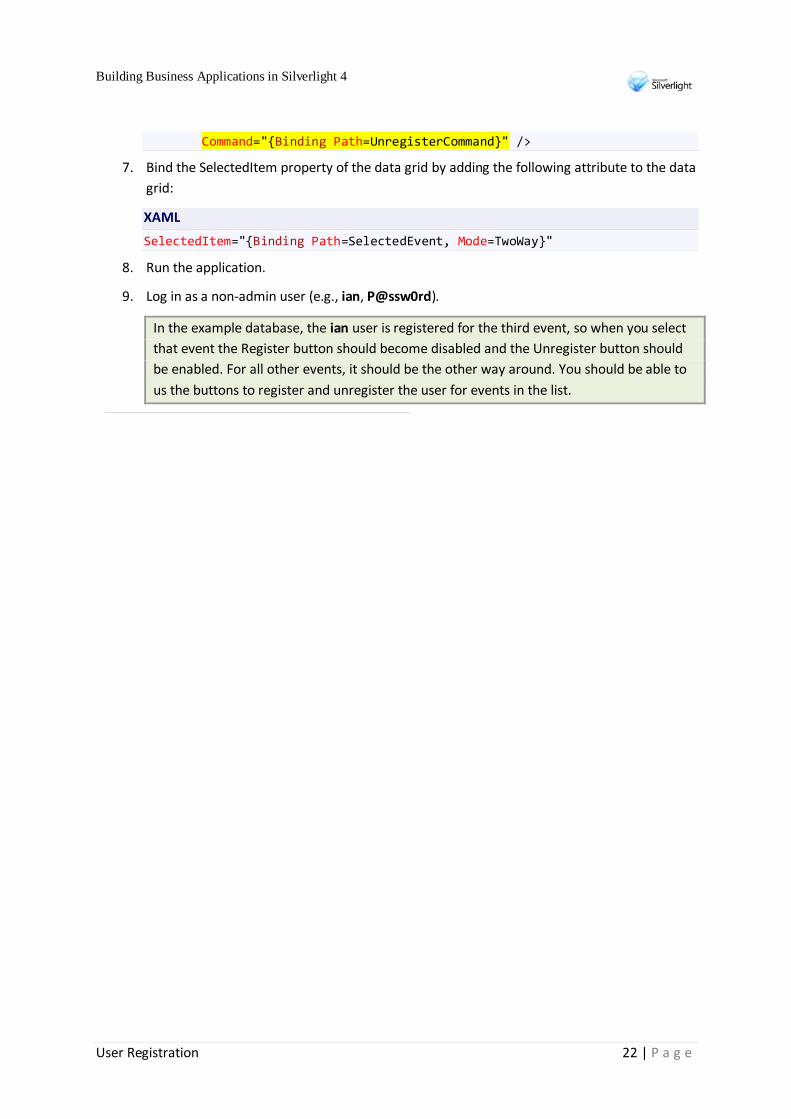
4. Try clicking OK without filling in any fields.
Most of the fields will light up red. If you click in them, you will see further details. This
behavior is controlled in the RegistrationData.cs(C#) or RegistrationData.vb(VB) file in the
Models folder of the SlEventManager.Web project.
Figure 1
Registration Validation
5. Close the browser.
6. Find the FriendlyName property in the RegistrationData class. (Currently this field is not
required.)
7. Add a [Required](C#) or <Required()>(VB) attribute to this property and run the application
again.
8. Try to register without filling any details in again. This time, the Friendly name field should
turn red like the rest.

Building Business Applications in Silverlight 4
User Registration 25 | P a g e
Exercise 5: RichTextBox
One way we could enhance user registration would be to enable users to supply some sort of text
about themselves—if we wanted to add some sort of forum system to the site, the ability to provide
a more detailed online identity would be important. We could add a simple text box to hold such
information, but that’s a little limited. It might be better to use the RichTextBox added in Silverlight
4, which provides a way to display and edit formatted text—unlike the plain TextBox, the edited text
can contain a mixture of plain, bold, or italic text, with different font sizes, colors, and typefaces if
you choose. And the RichTextBox offers a read-only mode enabling such formatted text to be
displayed easily. (It was possible to render formatted text in earlier versions of Silverlight, but the
RichTextBox makes it much easier.)
In fact we could use this feature in other places. For example, the event description itself is currently
just plain text, but could be enhanced with the use of more flexibly styled text. Since the
RichTextBox is very broadly applicable, this part of the lab will look at it in isolation, rather than
wiring it into a specific part of the example application, so that we can focus on the details of using
the RichTextBox itself.
1. Open Visual Studio 2010.
In Visual Studio 2010, press Ctrl+Shift+N, or use the File→New→Project... menu item.
2. Select Visual C#→Silverlight(C#) or Visual Basic→Silverlight(VB) in the treeview on the left.
3. In the center, select the Silverlight Application template.
4. Name the project RichTextApp.
C#:
Visual Basic:

Building Business Applications in Silverlight 4
User Registration 26 | P a g e
Figure 2
Add New Silverlight Application Project
5. This project does not need a web site, so uncheck the “Create directory for solution”
checkbox.
6. Click OK.
7. In the New Silverlight Application dialog that appears, uncheck the checkbox labeled Host
the Silverlight application in a new Web site. Click OK.
8. In the MainPage.xaml file that appears in Visual Studio, add the following inside the Grid:
XAML
<RichTextBox x:Name="rtb"> </RichTextBox>
9. Run the application. The empty rich text box will be filling the whole browser frame. Click in
it and try typing something—at this stage it will behave in the same way as an ordinary
TextBox. (It does not automatically handle common shortcuts such as Ctrl+B, so at this
stage, you can’t exploit the ‘rich’ in rich text box.)
10. A RichTextBox can be pre-loaded with formatted content. Inside the <RichTextBox>
element, add the following XAML:
XAML
<Paragraph> This is some text. <Bold>This is some bold text.</Bold> </Paragraph>
11. Run the application. You will see a mixture of normal and bold text. You can edit the text,
and whatever text you type will be in the same style as the surrounding text.

Building Business Applications in Silverlight 4
User Registration 27 | P a g e
The design surface in the Release Candidate of Visual Studio 2010 is not completely
consistent with what you’ll see at runtime. It handles whitespace differently. If you look
closely, you’ll see that in Visual Studio, there is no space between the period at the end of
the first sentence, and the start of the next sentence. But when you run the application,
there is a space.
The rules for whitespace handling in XAML are somewhat complex, but they are designed
to provide the results you are most likely to want most of the time while letting you indent
your XAML to reflect its structure. (They are similar in spirit to HTML’s whitespace
handling.) For example, although both lines containing text in the XAML are indented,
those indentation spaces do not appear at runtime. A run of whitespace in the middle of
mixed content typically collapses down to a single space—so although the XAML has a new
line, and space for indentation before the <Bold> tag, at runtime this is reduced to one
space, which is what we want here. Whitespace at the beginning and end is handled
differently—the whitespace between the opening <Paragraph> tag and the first bit of text
is collapsed down to nothing, as is the whitespace between the closing </Bold> and the
closing </Paragraph> tag.
Although the whitespace handling usually does what you what, it’s occasionally necessary
to take more control, so the next few steps will show the two ways to do this in XAML.
Whitespace Handling
1. In the XAML, add a couple of extra spaces between the words “is” and “some” on the first
line of text. Notice that this has no effect, either in the designer or when you run the
application.
2. Add an xml:space="preserve" attribute to the opening <Paragraph> tag. The extra spaces
you added will now be faithfully reproduced. So will any new lines—the two pieces of text
new appear on two separate lines. More subtly, there’s a blank line at the start, because the
opening <Paragraph> tag is followed immediately by a new line, and that has also been
preserved. Moreover, the indentation has carefully been maintained too, which is not
especially useful here.
The xml:space attribute is a standard feature of XML, and you can add it to any XML
document. The XML specification deliberately leaves some latitude for how applications
use this attribute, and XAML’s whitespace rules explicitly take this attribute into account.
So while this is a standard attribute, there is some XAML-specific behavior here.
3. Remove the xml:space attribute you just added.
4. Inside the <Paragraph> element, replace the first line of text with this:
XAML
<Run Text="This is some text." />

Building Business Applications in Silverlight 4
User Registration 28 | P a g e
5. Note that these extra spaces are honored for this particular run of text, but the other
whitespace is collapsed as before. This is the usual technique for taking fine-grained control
of whitespace when you only need precise control in a specific area.
This works because the whitespace processing rules are applied to plain text when it
appears as element content, but not to text inside attribute values.
Be aware that if you don’t specify a Run explicitly as we just have, the XAML compiler
converts plain textual content into Run elements for you—Run is the only type in the
RichTextBox text object model that is capable of containing text. If you look at the
properties offered by types such as Paragraph or Bold, you’ll see that that the only things
these elements are capable of containing are other text elements. Only Run has a Text
property. So you will end up with Run elements whether or not you put them explicitly in
the XAML.
Nested Formatting
1. Formatting tags can be nested within one another, and their settings combine. And you can
also apply text formatting attributes to the Paragraph container. Copy this XAML inside your
RichTextBox to see this in action:
XAML
<Paragraph FontStyle="Italic"> This is italic. <Bold>This is bold italic.</Bold> </Paragraph> <Paragraph> <Bold FontSize="20"> Bold <Italic>Italic</Italic>. Bold, <Span FontFamily="Georgia">and in a different font.</Span> </Bold> </Paragraph>
The <Span> element here is similar to <Bold> and <Italic> in that it can be used to apply
formatting to a range of text. In fact the Bold and Italic classes both derive from Span. The
difference is that Span has no intrinsic formatting of its own—it has no visible effect unless
you set one or more font properties. The Bold element is essentially just a Span that sets
the FontWeight to Bold for you.
Because Span supports the FontWeight and FontStyle properties, you can use a Span to do
anything you could do with Bold or Italic. Those elements are only provided for
convenience.
Read-only RichTextBox

Building Business Applications in Silverlight 4
User Registration 29 | P a g e
1. Add an IsReadOnly="True" attribute to the RichTextBox element. Run the application again.
Observe that the text is displayed but can no longer be edited. Instead, it can be selected
and copied.
This mode is useful for displaying formatted text. If you are familiar with WPF, you would
normally use one of the flow document reader controls for this purpose, but Silverlight
combines editing and viewing functionality into the one control, RichTextBox.
2. When using a RichTextBox in this way, it is common to want to support scrolling to show
more text than will fit. This is built in. Add a VerticalScrollBarVisibility="Visible" attribute to
the RichTextBox, and add some more paragraphs to the content so that you have enough
text to make a scrollbar necessary. Run the application to verify that the scrollbar works as
you’d expect.
3. When displaying large volumes of text, you will typically want text wrapping enabled. Add a
TextWrapping="Wrap" property to the RichTextBox.
Programming the RichTextBox
1. To enable the end user to apply formatting, we need to provide some additional UI and
code. Add the following XAML at the top of the Grid (before the RichTextBox).
XAML
<Grid.RowDefinitions> <RowDefinition Height="*" /> <RowDefinition Height="Auto" /> </Grid.RowDefinitions> <StackPanel Orientation="Horizontal" Grid.Row="1"> <Button x:Name="boldButton" Content="Bold" /> <Button x:Name="italicButton" Content="Italic" /> </StackPanel>
2. Add Click event handlers to both buttons.
3. In the code behind, add this helper:
C#
private void ToggleSetting(DependencyProperty property, object onValue, object offValue) { object currentValue = rtb.Selection.GetPropertyValue(property); bool alreadyApplied = currentValue.ToString() == onValue.ToString(); rtb.Selection.ApplyPropertyValue(property, alreadyApplied ? offValue : onValue); }
Visual Basic
Private Sub ToggleSetting(ByVal [property] As DependencyProperty, ByVal onValue As Object, ByVal offValue As Object)

Building Business Applications in Silverlight 4
User Registration 30 | P a g e
Dim currentValue As Object = rtb.Selection.GetPropertyValue([property]) Dim alreadyApplied As Boolean = currentValue.ToString() = onValue.ToString() rtb.Selection.ApplyPropertyValue([property],If(alreadyApplied, offValue, onValue)) End Sub
This detects whether a particular property is already applied across the current selection in
the RichTextBox. If it is not already present, then that property is applied. If it is already
present, then the ‘off’ value is applied instead. (We cannot just remove the property. For
one thing, the selection object does not offer a method for doing that, but in any case, the
property may be inherited from a containing element. For example, the entire Paragraph
might be bold, but we might want to unbold some selected text. So the absence of a
property on the selection is not enough—we need to explicitly apply a property forcing the
property back to normal to be able to override formatting applied at a containing scope.
4. Implement the bold button’s click handler like this:
C#
private void boldButton_Click(object sender, RoutedEventArgs e)
{
ToggleSetting(TextElement.FontWeightProperty,
FontWeights.Bold, FontWeights.Normal);
}
Visual Basic
Private Sub boldButton_Click(ByVal sender As Object, ByVal e As
RoutedEventArgs)
ToggleSetting(TextElement.FontWeightProperty, FontWeights.Bold,
FontWeights.Normal)
End Sub
5. Similarly, implement the italic button like this:
C#
private void italicButton_Click(object sender, RoutedEventArgs e)
{
ToggleSetting(TextElement.FontStyleProperty,
FontStyles.Italic, FontStyles.Normal);
}
Visual Basic
Private Sub italicButton_Click(ByVal sender As Object, ByVal e As
RoutedEventArgs)
ToggleSetting(TextElement.FontStyleProperty, FontStyles.Italic,
FontStyles.Normal)
End Sub
6. In the XAML, remove the IsReadOnly attribute from the RichTextBox.

Building Business Applications in Silverlight 4
User Registration 31 | P a g e
7. Run the application, select some text in the RichTextBox, and verify that the Bold and Italic
buttons toggle the bold and italic appearance of the text.
8. Finally, the ability to edit formatted text wouldn’t be much use if we couldn’t get hold of the
current contents, so we’ll see how to retrieve the formatted text. The RichTextBox makes
this available as XAML. Add the following to the XAML, after the Grid.RowDefinitions
element, but before the StackPanel:
XAML
<Grid.ColumnDefinitions> <ColumnDefinition Width="*" /> <ColumnDefinition Width="*" /> </Grid.ColumnDefinitions>
<ScrollViewer Grid.Column="1" Grid.RowSpan="2"> <TextBlock x:Name="textAsXaml" TextWrapping="Wrap" /> </ScrollViewer>
9. Add a handler for the RichTextBox element’s ContentChanged event. Implement it as
follows:
C#
private void rtb_ContentChanged(object sender, ContentChangedEventArgs e)
{
textAsXaml.Text = rtb.Xaml;
}
Visual Basic
Private Sub rtb_ContentChanged(ByVal sender As Object, ByVal e As
ContentChangedEventArgs)
textAsXaml.Text = rtb.Xaml
End Sub
10. Run the application, and make a modification to the contents of the RichTextBox. The right-
hand side of the UI should show the Xaml for the RichTextBox’s current contents.
Building Business Applications in Silverlight 4
User Registration 32 | P a g e
Exercise 6: Implicit Styling
Since the user registration features are, by definition, visible to the end user, visual design starts to
become more of a concern than it might be for a purely internal application. (Not that there’s
anything wrong with wanting internal LOB applications to look good. But appearance tends to
become a higher priority with UI that customers can see.) The buttons we added earlier in this lab
aren’t very consistent with the look of the rest of the application. The main navigation chrome’s link
buttons look like neither normal hyperlinks nor normal buttons. And even where moderately
normal-looking buttons appear (e.g. in the login UI) they don’t use the standard Silverlight
appearance for a button.
To make our buttons look more harmonious with the rest of the application, we’ll define a style for
them. We’ll use the implicit styling feature added in Silverlight 4 to apply this style automatically to
all buttons in the application that don’t specify their own custom style. That way, all the unstyled
buttons we have added already will pick up the new look, as will any more we add in the future.
1. Open the SlEventManager project in Visual Studio 2010.
2. Open the App.xaml file.
3. You’ll find the file already contains an <Application.Resources> element, with a
<ResourceDictionary> inside it. The ResourceDictionary contains a couple of merged
dictionaries. You’re going to add the style after the closing
</ResourceDictionary.MergedResources> tag and before the closing
</ResourceDictionary> tag. Paste in the following Xaml between those two closing tags:
XAML
<Style TargetType="Button">
<Setter Property="Background" Value="#FF484848"/>
<Setter Property="Foreground" Value="White"/>
<Setter Property="Padding" Value="6"/>
<Setter Property="Margin" Value="3"/>
<Setter Property="BorderThickness" Value="1"/>
<Setter Property="BorderBrush" Value="#FF1C1D33"/>
<Setter Property="Template">
<Setter.Value>
<ControlTemplate TargetType="Button">
<Grid>
<VisualStateManager.VisualStateGroups>
<VisualStateGroup x:Name="CommonStates">
<VisualState x:Name="Normal"/>
<VisualState x:Name="MouseOver">
<Storyboard>
<DoubleAnimation Duration="0" To="1"
Storyboard.TargetProperty="Opacity"
Storyboard.TargetName="BackgroundAnimation"/>
</Storyboard>
</VisualState>
Building Business Applications in Silverlight 4
User Registration 33 | P a g e
<VisualState x:Name="Pressed">
<Storyboard>
<DoubleAnimation Duration="0" To="1"
Storyboard.TargetProperty="Opacity"
Storyboard.TargetName="BackgroundAnimation"/>
<ColorAnimation Duration="0" To="#FF563AFF"
Storyboard.TargetProperty="(Border.Background).(SolidColorBrush.Color)"
Storyboard.TargetName="BackgroundAnimation" />
</Storyboard>
</VisualState>
<VisualState x:Name="Disabled">
<Storyboard>
<DoubleAnimation Duration="0" To=".55"
Storyboard.TargetProperty="Opacity"
Storyboard.TargetName="DisabledVisualElement"/>
</Storyboard>
</VisualState>
</VisualStateGroup>
<VisualStateGroup x:Name="FocusStates">
<VisualState x:Name="Focused">
<Storyboard>
<DoubleAnimation Duration="0" To="1"
Storyboard.TargetProperty="Opacity"
Storyboard.TargetName="FocusVisualElement"/>
</Storyboard>
</VisualState>
<VisualState x:Name="Unfocused"/>
</VisualStateGroup>
</VisualStateManager.VisualStateGroups>
<Border x:Name="Background"
BorderBrush="{TemplateBinding BorderBrush}"
BorderThickness="{TemplateBinding BorderThickness}"
Background="{TemplateBinding Background}"
CornerRadius="1"
Padding="1">
<Border x:Name="BackgroundAnimation" Background="#FF448DCA"
Opacity="0"/>
</Border>
<ContentPresenter
x:Name="contentPresenter"
ContentTemplate="{TemplateBinding ContentTemplate}"
Content="{TemplateBinding Content}"
HorizontalAlignment="{TemplateBinding HorizontalContentAlignment}"
Margin="{TemplateBinding Padding}"
VerticalAlignment="{TemplateBinding VerticalContentAlignment}"/>
<Rectangle x:Name="DisabledVisualElement" Fill="#FFFFFFFF"
IsHitTestVisible="false" Opacity="0" RadiusY="1" RadiusX="1"/>
<Rectangle x:Name="FocusVisualElement" IsHitTestVisible="false"
Margin="1" Opacity="0" RadiusY="0.5" RadiusX="0.5"
Stroke="#FF6DBDD1" StrokeThickness="1"/>
</Grid>

Building Business Applications in Silverlight 4
User Registration 34 | P a g e
</ControlTemplate>
</Setter.Value>
</Setter>
</Style>
4. Run the application.
5. Log in. (You can log in either as ian or administrator (P@ssw0rd, in either case), as either
kind of user will cause some buttons to appear.)
6. The buttons that appear when you log in should now look slightly more in keeping with the
overall look provided by the Silverlight Business Application template. (Feel free to express
your creativity by modifying the style to suit your own tastes.)