Embed Size (px)
Citation preview

PSB modules
___________________
___________________
___________________
___________________
___________________
___________________
___________________
___________________
___________________
___________________
___________________
SIMATIC
EMS400S PSB modules
Operating Instructions
03/2014 A5E03474166-03
Preface
Overview 1
Description of the PSB module functions
2
Safety instructions 3
Installing and wiring PSB module
4
Displays and address ranges 5
Data processing plant segment controller – carrier controller
6
Creating and transmitting projects
7
Diagnostics options for PSB modules
8
Maintenance and repairs 9
Technical specifications 10
Appendix A

Siemens AG Industry Sector Postfach 48 48 90026 NÜRNBERG GERMANY
A5E03474166-03 Ⓟ 03/2014 Subject to change
Copyright © Siemens AG 2014. All rights reserved
Legal information Warning notice system
This manual contains notices you have to observe in order to ensure your personal safety, as well as to prevent damage to property. The notices referring to your personal safety are highlighted in the manual by a safety alert symbol, notices referring only to property damage have no safety alert symbol. These notices shown below are graded according to the degree of danger.
DANGER indicates that death or severe personal injury will result if proper precautions are not taken.
WARNING indicates that death or severe personal injury may result if proper precautions are not taken.
CAUTION indicates that minor personal injury can result if proper precautions are not taken.
NOTICE indicates that property damage can result if proper precautions are not taken.
If more than one degree of danger is present, the warning notice representing the highest degree of danger will be used. A notice warning of injury to persons with a safety alert symbol may also include a warning relating to property damage.
Qualified Personnel The product/system described in this documentation may be operated only by personnel qualified for the specific task in accordance with the relevant documentation, in particular its warning notices and safety instructions. Qualified personnel are those who, based on their training and experience, are capable of identifying risks and avoiding potential hazards when working with these products/systems.
Proper use of Siemens products Note the following:
WARNING Siemens products may only be used for the applications described in the catalog and in the relevant technical documentation. If products and components from other manufacturers are used, these must be recommended or approved by Siemens. Proper transport, storage, installation, assembly, commissioning, operation and maintenance are required to ensure that the products operate safely and without any problems. The permissible ambient conditions must be complied with. The information in the relevant documentation must be observed.
Trademarks All names identified by ® are registered trademarks of Siemens AG. The remaining trademarks in this publication may be trademarks whose use by third parties for their own purposes could violate the rights of the owner.
Disclaimer of Liability We have reviewed the contents of this publication to ensure consistency with the hardware and software described. Since variance cannot be precluded entirely, we cannot guarantee full consistency. However, the information in this publication is reviewed regularly and any necessary corrections are included in subsequent editions.

PSB modules Operating Instructions, 03/2014, A5E03474166-03 3
Preface
Purpose of the operating instructions These operating instructions provide information based on the documentation requirements specified in IEC 62079. This information relates to the place of use, transport, storage, mounting, use and maintenance.
These operating instructions are intended for:
● Programmer
● Commissioning engineers
● Operators
● Maintenance personnel
Pay particular attention to section "Safety instructions (Page 15)".
Scope of documentation The following documents provide a full description of the "EMS400S Plant controller for Electrical Monorail Systems":
The documents in the figure are available at:
EMS400S product documentation (http://support.automation.siemens.com/WW/view/en/68156412/133300)

Preface
PSB modules 4 Operating Instructions, 03/2014, A5E03474166-03
Note
Read the "EMS400S Plant controller for Electrical Monorail Systems" system manual to enhance your understanding of the function and interaction of the devices described in the various documents.
The documents contain links to other relevant documents for Siemens standard modules that are used for the EMS. The "S7-1200 Automation System" System Manual for the SIMATIC-S7 CPU is of ultimate importance in this context.
Scope of validity This documents applies to:
● SIMATIC EMS400S PSB-S Module, order number 6ES7228-1RC52-0AA0
● SIMATIC EMS400S PSB-C Module, order number 6ES7228-1RC51-0AA0
Note
Observe the following points: • This information supplements the "EMS400S Plant controller for Electric Monorail
Systems" system manual. • You are also going to need this document whenever the system is recommissioned. Keep
this supplementary documentation in a safe place for the entire life cycle of the device. • Submit all of these documents to a future owner of the device.
Knowledge required General knowledge in the fields of electrical engineering, automation technology and process communication is prerequisite for comprehension of this documentation. This includes knowledge of the "TIA Portal" engineering software.

Preface
PSB modules Operating Instructions, 03/2014, A5E03474166-03 5
Style conventions Style Convention Scope "Add screen" • Terminology for the user interface, e.g. dialog name, tab,
button, menu command • Necessary entries, e.g. limit value, tag value • Path information
"File > Edit" Operational sequences, e.g, menu command, shortcut menu command
You should also observe notes that are marked as follows:
Note
A note contains important information about the product described in the document and its handling, or a specific section of the document to which you should pay particular attention.
Naming conventions Term Applies to Device, PSB module • PSB-S module
• PSB-C module
Control cabinet • Installation cabinet • Enclosure • Terminal box • Console • Switchboard
Controller • EMS plant control system • Plant segment controller • Carrier controller
Figures This document contains illustrations of the described devices. The illustrations may deviate from the particularities of the delivered device.

Preface
PSB modules 6 Operating Instructions, 03/2014, A5E03474166-03

PSB modules Operating Instructions, 03/2014, A5E03474166-03 7
Table of contents
Preface ................................................................................................................................................... 3
1 Overview................................................................................................................................................. 9
1.1 Product overview............................................................................................................................ 9
1.2 System limits ................................................................................................................................ 10
1.3 Scope of delivery.......................................................................................................................... 10
2 Description of the PSB module functions ............................................................................................... 11
2.1 Description of the PSB-S module functions ................................................................................. 11
2.2 Description of the PSB-C module functions ................................................................................. 12
2.3 Data flow between the PSB modules .......................................................................................... 13
3 Safety instructions ................................................................................................................................. 15
4 Installing and wiring PSB module .......................................................................................................... 19
4.1 Check the scope of delivery ......................................................................................................... 19
4.2 Determining the installation location and clearances................................................................... 19
4.3 48 V DC power supply requirements ........................................................................................... 20
4.4 Installing the PSB module ............................................................................................................ 21 4.4.1 Overview ...................................................................................................................................... 21 4.4.2 Control elements .......................................................................................................................... 22 4.4.3 Fastening the PSB module with screws ...................................................................................... 23 4.4.4 Installing the PSB module on a mounting rail .............................................................................. 24
4.5 Wiring PSB modules .................................................................................................................... 26 4.5.1 Wiring information ........................................................................................................................ 26 4.5.2 Wiring the power and data cables................................................................................................ 27
4.6 Securing the cables ..................................................................................................................... 28
5 Displays and address ranges ................................................................................................................ 29
5.1 General ........................................................................................................................................ 29
5.2 Plant segment controller .............................................................................................................. 29 5.2.1 LED display on the PSB-S module .............................................................................................. 29 5.2.2 Address ranges of the PSB-S module ......................................................................................... 32
5.3 Carrier control .............................................................................................................................. 34 5.3.1 LED display on the PSB-C module .............................................................................................. 35 5.3.2 Address ranges of the PSB-C module ......................................................................................... 36
6 Data processing plant segment controller – carrier controller ................................................................. 41

Table of contents
PSB modules 8 Operating Instructions, 03/2014, A5E03474166-03
7 Creating and transmitting projects ......................................................................................................... 43
7.1 Creating a project in the TIA Portal ............................................................................................. 43
7.2 Transferring the project ............................................................................................................... 46
7.3 Commissioning a project ............................................................................................................. 46
8 Diagnostics options for PSB modules .................................................................................................... 47
8.1 Diagnostics in STEP 7 ................................................................................................................ 47
8.2 Messages and errors .................................................................................................................. 48 8.2.1 Diagnostics error OB 82 .............................................................................................................. 48 8.2.2 List of diagnostic entries .............................................................................................................. 49 8.2.3 Power supply fault. ...................................................................................................................... 51
8.3 Diagnostics via S7-1200 Web server .......................................................................................... 52
8.4 Diagnostics by means of EMS400S function blocks ................................................................... 52
8.5 LED display on the PSB module ................................................................................................. 52
8.6 EMS400S diagnostics unit .......................................................................................................... 52
9 Maintenance and repairs ....................................................................................................................... 53
10 Technical specifications ........................................................................................................................ 55
10.1 Dimensional drawings ................................................................................................................. 55
10.2 Technical specifications .............................................................................................................. 56 10.2.1 PSB-S module ............................................................................................................................. 56 10.2.2 PSB-C module ............................................................................................................................ 59
0
Interface description ................................................................................................................................... 62 10.3.1 Interfaces of the PSB-S module .................................................................................................. 62 10.3.2 Interfaces of the PSB-C module ................................................................................................. 64
10.4 Bit assignment ............................................................................................................................. 65 10.4.1 Bit assignment of the IR remote control ...................................................................................... 65 10.4.2 Bit assignment of the display unit ............................................................................................... 66
10.5 Approvals .................................................................................................................................... 67
10.6 Electromagnetic compatibility...................................................................................................... 68
10.7 Environmental conditions ............................................................................................................ 71 10.7.1 Transportation and storage requirements ................................................................................... 71 10.7.2 Operational requirements ............................................................................................................ 72 10.7.3 Tests for compliance with environmental conditions .................................................................. 74
A Appendix .............................................................................................................................................. 75
A.1 Technical support ........................................................................................................................ 75
A.2 Abbreviations .............................................................................................................................. 76
Glossary ............................................................................................................................................... 77
Index .................................................................................................................................................... 81

PSB modules Operating Instructions, 03/2014, A5E03474166-03 9
Overview 1 1.1 Product overview
The PSB modules are conceived for an EMS that is equipped with the EMS400S plant controller. Operating in combination with an S7-1200 CPU, the PSB modules act as a plant segment controller and carrier controller.
Communication in the EMS is handled by the "PSB-S modules" and "PSB-C modules". These modules set up the connection for communication between the stationary and mobile sections of the unit. The PSB-S module is assigned to the stationary system section. The PSB-C module is part of the carrier controller and, therefore, the mobile part of the EMS.
The PSB modules are technology modules of the SIMATIC S7-1200 product series.
A PSB-S module supports communication with the EMS carriers. Up to three independent plant segments of an EMS can be connected to one PSB-S module. The PSB-S module is designed for communication with up to 30 PSB-C modules per plant segment.
The PSB-S modules in combination with a CPU form the EMS400S plant segment controller. The EMS400S carrier controller consists of a CPU and a PSB-C module.

Overview 1.2 System limits
PSB modules 10 Operating Instructions, 03/2014, A5E03474166-03
1.2 System limits The following applies to PSB-S and PSB-C modules:
● PSB-S module – PSB-C module communication
The communication between the plant segment controller and carrier controller and thus between PSB-S and PSB-C module is based on the following parameters.
Parameter Value Comment PSB-S module Maximum 30 PSB-C modules
per RAIL Applies to each connected segment. Up to 3 can be connected.
● Power supply
The value refers to the 48VDC input on the PSB-S module. Observe the specifications in the section "PSB-S module (Page 56)".
The following condition must be met for the load of each connected LOGO!Power power supply module to maintain the system limits:
4 A ≥ 0.22 A × n + 0.013 A × m 1 n … number of PSB-S modules m … number of PSB-C modules
1 The value 4 A refers to the maximum current-carrying capacity of a LOGO!Power power supply module.
Information can be found in the section "Interfaces of the PSB-S module (Page 62)".
Examples:
– 4 A ≥ 0.22 A × 5 PSB-S modules + 0.013 A × 223 PSB-C modules
When you use 5 PSB-S modules, up to 223 PSB-C modules and therefore up to 223 EMS carriers can be used.
– 4 A ≥ 0.22 A × 10 PSB-S modules + 0.013 A × 138 PSB-C modules
When you use 10 PSB-S modules, up to 138 PSB-C modules and therefore up to 138 EMS carriers can be used.
1.3 Scope of delivery The scope of delivery includes:
● 1 × PSB-S module, order number 6ES7228-1RC52-0AA0
or
● 1 × PSB-C module, order number 6ES7228-1RC51-0AA0

PSB modules Operating Instructions, 03/2014, A5E03474166-03 11
Description of the PSB module functions 2 2.1 Description of the PSB-S module functions
The following figure provides an overview of the components that can be connected to the PSB-S module.
Data transmission on RAIL 1 to RAIL 3 can be configured for specific plant segments in the TIA Portal. The plant segment controller communicates with carrier controllers via RAIL A and RAIL B. The associated EMS carriers can be located in three independent segments during communication.

Description of the PSB module functions 2.2 Description of the PSB-C module functions
PSB modules 12 Operating Instructions, 03/2014, A5E03474166-03
A description of the interfaces is provided in the section "Interfaces of the PSB-S module (Page 62)", while the LED functions are specified in the section "LED display on the PSB-S module (Page 29)".
2.2 Description of the PSB-C module functions The following figure provides an overview of the components that can be connected to the PSB-C module.
A description of the interfaces is provided in the section "Interfaces of the PSB-C module (Page 64)", while the LED functions are specified in the section "LED display on the PSB-C module (Page 35)".

Description of the PSB module functions 2.3 Data flow between the PSB modules
PSB modules Operating Instructions, 03/2014, A5E03474166-03 13
2.3 Data flow between the PSB modules The following figure demonstrates the principles of data flow for the synchronization signal and communication between the controllers of the EMS.
① Communication with the EMS controller ② Synchronization signal ③ Plant segment transition ④ Communication between plant segment controller and carrier controller
The control level 1 option is not necessarily required for interaction of the PSB modules. The synchronization signal must be generated by fast digital output of an S7-1200 CPU.
For more information, refer to the following sections:
● Address ranges of the PSB-S module (Page 32)
● Address ranges of the PSB-C module (Page 36)
● Glossary

Description of the PSB module functions 2.3 Data flow between the PSB modules
PSB modules 14 Operating Instructions, 03/2014, A5E03474166-03

PSB modules Operating Instructions, 03/2014, A5E03474166-03 15
Safety instructions 3
WARNING
Injury or material damage
You risk the development of danger sources and deactivation of safety functions if you neglect the safety and handling instructions provided in this document. This can result in personal injuries or material damage.
Strictly adhere to the safety and handling instructions.
Always adhere to the safety instructions and accident prevention regulations for the respective application, independent of the safety instructions provided in this document.
Safety in the project
WARNING
Injury or material damage
The configuration engineer for a plant controller must take appropriate measures to ensure the proper restart of an interrupted program after a voltage dip or power failure.
Dangerous operating states may not develop at any time during runtime of the program and during troubleshooting.
Safety during commissioning and operation
Note
It is strictly prohibited to commission the device unless compliance with Machinery Directive 2006/42/EC has been verified for the machine to be operated with this device. Verify that all requirements of the machinery directive have been met before you start commissioning.
Observe the relevant safety guidelines when using PSB modules in an EMS. For more information, refer to the section "Safety instructions" in the "EMS400S Carrier Controller for Electric Monorail Systems" system manual. The safety concept is also described there.

Safety instructions
PSB modules 16 Operating Instructions, 03/2014, A5E03474166-03
Note
The safety concept for overvoltage protection described in this section has been tested and approved by TÜV SÜD. You can find the technical report of the TÜV SÜD in the Internet under entry ID 134200 (http://support.automation.siemens.com/WW/view/en/68156412/134200).
The documents belonging to the EMS400S plant controller are listed in the preface.
Note
High-frequency radiation, e.g. from cellular phones, may cause unwanted operating states in the system.
Safety when working in and on electrical systems
WARNING
No SELV (safety extra-low voltage)
The "SELV" identifier no longer applies when PSB-S modules are operated on two Logo!Power power supply modules operating in serial mode, because the RAIL contact conductors also operate on 48 V DC potential. The corresponding conductors carry a dangerous live voltage.
Observe the following points to avoid danger: • Attach a corresponding warning note to the LOGO!Power power supply modules:
"Caution! Dangerous output voltage! Components may only be installed or removed while the power supply is shut down".
• Do not start to work in and on electrical systems before you have isolated the equipment from the power supply!
• Verify that the EMS is isolated from power supply!
Only authorized persons are allowed to work in or on electrical equipment. The following safety regulations for the prevention of electrical accidents apply in accordance with DIN VDE 0105:
1. Isolation of the system from power
2. Securing the system against restart
3. Verification of isolation from power at all poles
4. Grounding and shorting the system
5. Covering or fencing off adjacent live parts

Safety instructions
PSB modules Operating Instructions, 03/2014, A5E03474166-03 17
Note
Observe the following points: • The safety regulations must be applied in the aforementioned order before any work is
carried out on electrical systems. The safety regulations must be applied in reverse order on completion of all tasks on the electrical system.
• Identify the electrical system in accordance with valid safety regulations when working on this system.
Observe the valid safety regulations of the respective country.
Warranty Prerequisites for trouble-free and safe operation of the device:
● Proper transportation and storage
● Proper mounting and wiring
● Proper operation and repairs
Non-compliance with these regulations shall render the device warranty void.
ESD An ESD (Electrostatically Sensitive Device) is equipped with electronic components. Due to their design, electronic components are highly sensitive to overvoltage and electrostatic discharge. Observer the regulations governing the handling of ESD components.

Safety instructions
PSB modules 18 Operating Instructions, 03/2014, A5E03474166-03

PSB modules Operating Instructions, 03/2014, A5E03474166-03 19
Installing and wiring PSB module 4 4.1 Check the scope of delivery
Check the scope of delivery for completeness and visible signs of transport damage.
Note
You risk malfunctions if using faulty parts that have were delivered to you. Always use part that do not disclose any fault. Contact your Siemens partner for support for faulty parts.
4.2 Determining the installation location and clearances The mounting, mounting position and clearances of the PSB modules are specified in chapter "Installation" of the "S7-1200 Automation System" system manual. This document is available at:
"S7-1200 Automation System" system manual (http://support.automation.siemens.com/WW/view/de/36932465/0/en)
Selecting the mounting location The PSB module is designed for installation in a terminal box. The PSB module can be installed in horizontal and vertical mounting position.
● PSB-C module
The PSB-C module is part of the EMS400S carrier control system.
● PSB-S module
Installation depends on the plant layout. The PSB-S modules may be installed at central or distributed locations. For more information, refer to the "EMS400S Plant control system for EMS plants" system manual.
Make provision for adequate thermal convection when selecting the installation location for the PSB module. Exclude the existence of a heat source directly underneath the PSB module.
Clearance and mounting position One you have decided to install the PSB module on a horizontal mounting rail, you cannot modify the mounting position of the terminal box. Modification of the mounting position will also affect thermal convection in the terminal box. In this context, observe the information in the "S7-1200 Automation System" system manual.

Installing and wiring PSB module 4.3 48 V DC power supply requirements
PSB modules 20 Operating Instructions, 03/2014, A5E03474166-03
Safe operation of PSB modules For safe operation of a PSB module, the temperature range of the cables used must be suitable for use at the in situ temperatures to be expected.
Note
Non-compliance with valid environmental conditions at the mounting location may lead to malfunction of the PSB module.
Observe the environmental conditions for operation when selecting the installation location. The valid environmental conditions are specified in chapter "Operational requirements (Page 72)".
4.3 48 V DC power supply requirements The PSB-S module is operated on 48 V DC. Only the LOGO!Power modules of Siemens AG with order number 6EP1332-1SH52 are approved for supplying power. These modules must be wired in series. Additional information is available in the section "Interfaces of the PSB-S module (Page 62)".
Note
Ground of the DC 48 V supply on the PSB-S module may not be connected to PE. When using a shielded cable, the shielding must be connected to PE.
If the power supply consisting of the mentioned LOGO!Power power supply modules is not sufficient for the number of required PSB-S or PSB-C modules in the respective EMS, you can use several units of LOGO!Power power supply modules switched in series.
Electrical isolation
Note
Observe the following points: • Always use 24 V DC power supply modules with safe electrical isolation to
IEC 60364-4-41 or HD 384.04.41 (VDE 0100, Part 410), e.g. in accordance with the PELV standard.
• The supply voltage must be within the specified voltage range. Otherwise, function failures on the PSB modules cannot be excluded.
For more information, refer to the "S7-1200 Automation System (http://support.automation.siemens.com/WW/view/de/36932465/0/en)" and "EMS400S Plant controller for Electric Monorail Systems" system manuals. The latter documentation is available at:
EMS400S product documentation (http://support.automation.siemens.com/WW/view/en/68156412/133300)

Installing and wiring PSB module 4.4 Installing the PSB module
PSB modules Operating Instructions, 03/2014, A5E03474166-03 21
Overvoltage category The PSB module is compliant with overvoltage category II to EN 61010-1. Keep this overvoltage category in mind during system configuration.
4.4 Installing the PSB module
4.4.1 Overview
Note
Components may only be installed or removed while the power supply is shut down. Observe the section "Safety instructions (Page 15)" when working in and on electrical systems.
Mounting mode You can mount a PSB module as follows:
● The PSB-C module is installed on a mounting rail in the EMS400S carrier controller.
● The PSB-S module can be mounted using screws, or on a mounting rail.
The project engineer of the EMS plant has to decide on the respective mounting mode.

Installing and wiring PSB module 4.4 Installing the PSB module
PSB modules 22 Operating Instructions, 03/2014, A5E03474166-03
4.4.2 Control elements The PSB module is equipped with the following control elements:
① Contact cover, top ② Upper latch ③ SM bus slide ④ SM bus cover ⑤ Contact cover, bottom
Procedure 1. You can open the contact cover by pulling it forward at the marked position.
The contact cover is arrested at the position shown by means of a latching hook.
2. You may adjust the latch position by pushing it towards the required direction.
The latch engages at the respective position.
3. Push the SM bus slide towards the left if you want to interconnect the PSB module with the CPU.
Always verify that the CPU and the PSB module are off power when opening or closing the SM bus connection.
4. You can remove the SM bus cover to connected an additional PSB module.
For this purpose, take a suitable screwdriver, insert it into the position shown and then lever out the SM bus cover.
Keep the SM bus cover in a safe place for future use.
Note
The SM bus cover must be installed to ensure IP20 for the PSB module.

Installing and wiring PSB module 4.4 Installing the PSB module
PSB modules Operating Instructions, 03/2014, A5E03474166-03 23
4.4.3 Fastening the PSB module with screws
Requirement ● Two M4 cylindrical head screws, with nuts if required.
● A suitable mounting position was selected for the corresponding CPU in accordance with chapter "Determining the installation location and clearances (Page 19)".
● A PSB module
① Upper latch ② SM bus slide ③ Bottom latch
Procedure
Installation
1. Push the latch on the rear of the device towards the outside.
2. Place the PSB module onto the mounting surface.
3. Verify that you can insert the SM bus slide into the CPU enclosure at the selected mounting position.
4. Mark the mounting holes with a scriber.
5. Drill two through holes into the mounting panel, or produce two M4 tapped holes.
6. Use two M4 cylindrical head screws to bolt down the PSB module.
7. Push the SM bus slide towards the CPU.
Repeat this step for the number of required PSB modules.

Installing and wiring PSB module 4.4 Installing the PSB module
PSB modules 24 Operating Instructions, 03/2014, A5E03474166-03
Removal
1. Move the SM bus slide inside the housing.
2. Loosen the cylindrical head screws.
Secure the PSB module to prevent it from dropping down.
4.4.4 Installing the PSB module on a mounting rail The PSB-S module can typically be fastened to a mounting rail.
The PSB-C module is installed on a mounting rail in the EMS400S carrier controller.
The installation and removal procedure for repairs is described.
Requirement ● A 35 × 15 mm or 35 × 7.5 mm mounting rail to DIN EN 50022
● A CPU
● An activation tool for 2.5 mm² - 4.0 mm² tension springs, e.g. the tool "1207608 ST-BW http://catalog.phoenixcontact.net/phoenix/customerNavigation.do?action=selectlanguage"
● A PSB module
① Upper latch ② SM bus slide ③ Bottom latch

Installing and wiring PSB module 4.4 Installing the PSB module
PSB modules Operating Instructions, 03/2014, A5E03474166-03 25
Procedure
Removal
1. Press down on the slide and push it in direction
of the arrow until you hear a clicking noise indicating that the slide has reached its final position.
A hook is attached to the outer end of the slide. This hook secures the position of the slide when connected to the CPU.
2. Use a suitable tool and position the blade on the lower latch.
3. Push the tool in direction of the arrow.
The latch will move towards the bottom and release the module from the DIN rail.
4. Remove the PSB-C module from the DIN rail.
Installation
1. Push the upper latch on the rear side of the device towards the inside until it meets the engaging position.
2. Push the lower latch on the rear side towards the outside.
3. Place the PSB-C module on the upper latching hook onto the mounting rail.
Position the PSB-C module flush with the CPU.
4. Push the lower latch towards the inside until it engages with an audible click.
5. Push the SM bus slide towards the CPU.
A clicking noise indicates that the final position has been reached.

Installing and wiring PSB module 4.5 Wiring PSB modules
PSB modules 26 Operating Instructions, 03/2014, A5E03474166-03
4.5 Wiring PSB modules
4.5.1 Wiring information
Note
Observe the following points: • Safety instructions
Observe the safety instructions in the "EMS400S carrier controller for EMS plants" system manual.
• Device failure Moisture and condensation lead to malfunction. Moisture in the form of condensation on or in the device is formed: – When transporting a device at low temperatures – Under extreme temperature variations Bring the device to room temperature before operating.
• Condensation Do not expose the device to direct heat radiation from a heater. If condensation has developed, wait approximately 4 hours until the HMI device has dried completely before switching it on.
Wiring sequence
Note
You will risk damage to the device if you ignore the specified wiring sequence.
Wire the device in the following sequence:
1. I/O devices
2. Power supply
You can disconnect the device in reverse order.

Installing and wiring PSB module 4.5 Wiring PSB modules
PSB modules Operating Instructions, 03/2014, A5E03474166-03 27
4.5.2 Wiring the power and data cables The PSB modules are equipped with terminal blocks for wiring the power and data cables. The terminal block assignments are specified in the section "Interface description (Page 62)".
You may wire conductors with a cross-section from 0.3 mm2 to 2 mm2 (AWG 22 to 14) to the terminal boxes. The following connectors are suited for conductor cross-section from 0.2 mm2 to 3.3 mm2 (AWG 24 to 12):
● X11 on PSB-S module
● X12 on the PSB-C module
DANGER
Electrical accident through contact
The RAIL contact conductors are connected to 48 V AC, while the L1, L2 and L3 contact conductors are operated on a voltage of 400/500 V AC. Contact with components carrying these live voltages poses the risk of an electrical accident. Such an accident can result in physical injury or death.
Always adhere to the necessary safety measures taken for the respective electrical system components.
DANGER
Electrical accident through fault
A mechanical fault in the contact conductor system of the system can result in a short-circuit between the L1, L2 and L3 contact conductors and the RAIL contact conductors. Contact to components on live 400/500 V AC can result in an electrical accident. Such an accident can result in physical injury or death.
Always adhere to the necessary safety measures taken for the respective electrical system components.
Observe the "Safety instructions" section in the "EMS400S Plant controller for Electric Monorail Systems" system manual.
Requirement ● The terminal box is open.
● The conductor to be terminated is stripped to a length of 6 mm.
Note
Cables may only be wired or removed while the power supply is shut down. Observe the section "Safety instructions (Page 15)" when working in and on electrical systems.

Installing and wiring PSB module 4.6 Securing the cables
PSB modules 28 Operating Instructions, 03/2014, A5E03474166-03
NOTICE
Communication failure of PSB-S modules in case of polarity reversal
The polarity reversal of the 48 V connectors of a PSB-S module may result in the communication failure of several PSB S modules during travel.
Ensure the correct polarity.
Refer to the "EMS400S Plant controller for Electric Monorail Systems" system manual and the "EMS400S Diagnostics Unit" operating instructions, see Preface (Page 3). Malfunction or damage in case of polarity reversal on the PSB-C module
The polarity reversal of the 24 V connectors of a PSB-C module may result in equalizing currents and equalizing voltages at the analog output of the PSB C module. The result may be malfunctions or damage of the device connected to the analog output.
Ensure the correct polarity.
Additional information is available in the "S7-1200 Automation System" system manual.
Procedure 1. Open the contact cover.
2. Loosen the relevant clamping screw on the terminal block.
3. Insert the conductor into the corresponding terminal.
Observe the terminal labeling on the enclosure. Do not confuse the conductors.
When using flexible conductors:
Ensure that no wire strands protrude from the terminals.
4. Tighten the clamping screws.
Close all contact covers on the PSB module on completion of the wiring.
4.6 Securing the cables
Requirement ● All cables are connected.
Procedure 1. Tie the connected cables to form a harness.
2. Provide a suitable strain relief in the control cabinet to secure the cable harness.

PSB modules Operating Instructions, 03/2014, A5E03474166-03 29
Displays and address ranges 5 5.1 General
We distinguish between user and control data transmission between the carrier controller and the segment controller. The following "EMS400S" functions blocks are available for providing this data.
For more information, refer to:
EMS400S product documentation (http://support.automation.siemens.com/WW/view/en/68156412/133300)
5.2 Plant segment controller A segment controller consists of an S7-1200 CPU and up to eight PSB-S modules.
5.2.1 LED display on the PSB-S module The PSB-S module is equipped with two LED displays. The upper LED display is used for signaling. The lower LED has no function.

Displays and address ranges 5.2 Plant segment controller
PSB modules 30 Operating Instructions, 03/2014, A5E03474166-03
Meaning of the labeled LEDs: LED Status Meaning DIAG Green, on The PSB-S module ready for operation, or the program is running
Green, flashing
• The PSB-S module is not configured, is in startup mode or a firmware update is in progress
• The LED flashes briefly during booting
Red, on • The PSB-S module is booting • The CPU is in STOP mode • A firmware update was performed
Red, flashing
Shortly during the boot sequence
Off There is no 24 V DC supply voltage in the PSB-S module. Note: There is no 48 V DC supply voltage.
DI h.1 to DI h.6
On A valid high level signal is set at the input Off No signal detected
SYNC On Valid synchronization signal is set at input SYNC Off Valid synchronization signal missing for a duration of ≥ 1 s
ERR RAIL 1 On 1 • At least one error in the plant segment, or a firmware update is in progress
• No data transmission from the EMS carrier to the plant segment controller via RAIL 1
• Error in data transmission from the EMS carrier to the plant segment controller
• During transition of an EMS carrier from the previous to the current plant segment
• During transition of an EMS carrier to the next plant segment • Applies to firmware update:
The LED is off prior to the update. The LED starts flashing during the update and remains lit until the update has been completed
Flashing • The CPU of the plant segment controller is in STOP state • A firmware update is busy
Off No error in plant segment n

Displays and address ranges 5.2 Plant segment controller
PSB modules Operating Instructions, 03/2014, A5E03474166-03 31
LED Status Meaning ERR RAIL 2 On 1 • At least one error in the plant segment n + 1
• No data transmission from the EMS carrier to the plant segment controller via RAIL 2
• Error in data transmission from the EMS carrier to the plant segment controller
• During transition of an EMS carrier from the previous to the current plant segment
• During transition of an EMS carrier to the next plant segment
Flashing • The CPU of the plant segment controller is in STOP state
Off No error in plant segment n + 1 ERR RAIL 3 On 1 • At least one error in the plant segment n + 2, or a firmware update is
in progress • No data transmission from the EMS carrier to the plant segment
controller via RAIL 3 • Error in data transmission from the EMS carrier to the plant segment
controller • During transition of an EMS carrier from the previous to the current
plant segment • During transition of an EMS carrier to the next plant segment • Applies to firmware update:
The LED is off prior to the update. The LED starts flashing during the update and remains lit until the update has been completed
Flashing • The CPU of the plant segment controller is in STOP state • A firmware update is busy
Off No error in plant segment n + 2 1 LED ERR RAIL is lit for at least 1 s.
The following information relates to an EMS carrier that is currently at a plant segment transition.
Note
If an EMS carrier bridges two plant segments, the following applies: • The ERR RAIL LEDs on the PSB-S module light up when the EMS carriers on the
bridged plant segment transmit inconsistent data. • When the PSB-S modules send inconsistent data during the bridging of the RAIL, the
ERR RAIL LED is activated on the PSB-C module.
The ERR RAIL LEDs remain active as long the EMS carrier dwells on the plant segment transition. No entry is made in the diagnostic buffer.

Displays and address ranges 5.2 Plant segment controller
PSB modules 32 Operating Instructions, 03/2014, A5E03474166-03
5.2.2 Address ranges of the PSB-S module
NOTICE
Malfunction
8 bytes are reserved in the I/O address space of the PSB-S module for the EMS400S function blocks. These 8 bytes are managed by the EMS400S function blocks. You risk malfunctions if using these 8 bytes for other data
Do not use the reserved area.
The word and byte addresses specified in the following tables are relative addresses. This means that they depend on the respective start address.
Input address space The input address space of the PSB-S module is used to map the data and state of the digital inputs received from the carrier controllers of the corresponding plant segments.

Displays and address ranges 5.2 Plant segment controller
PSB modules Operating Instructions, 03/2014, A5E03474166-03 33
The input address space comprises 8 bytes.
Word Byte Bit Name Description Terminals 0 0, 1 – Data from plant segment n The data has a length of one
word 1 RAIL 1
2 2, 3 – Data from plant segment n + 1 RAIL 2 4 4, 5 – Data from plant segment n + 2 RAIL 3 6 6 0 Validation bit RAIL 1 0 = invalid or superimposed
data, or error 1 = valid, current data
RAIL 1 1 Validation bit RAIL 2 RAIL 2 2 Validation bit RAIL 3 RAIL 3 3 Presence bit RAIL 1 0 = plant segment not
occupied 1 = EMS carrier is present
RAIL 1 4 Presence bit RAIL 2 RAIL 2 5 Presence bit RAIL 3 RAIL 3 6 Acknowledgment bit RAIL 1 0 = data not to acknowledge
1 = data to acknowledge RAIL 1
7 Acknowledgment bit RAIL 2 RAIL 2 7 0 Acknowledgment bit RAIL 3 RAIL 3
1 … 6 Digital input 6 × DI DI h.1 to DI h.6
7 Reserved – – 1 The data word contains user data. This data serves for communication of the plant segment
controller with the carrier controller.
Output address space The output address space of the PSB-S module is used to map data that is broadcast to all connected plant segments.

Displays and address ranges 5.3 Carrier control
PSB modules 34 Operating Instructions, 03/2014, A5E03474166-03
The output address space comprises 8 bytes.
Word Byte Bit Name Description Terminals 0 0, 1 – Data transmitted to the carrier
controller in plant segment n The data has a length of one word 1
RAIL 1
2 2, 3 – Data transmitted to the carrier controller in plant segment n + 1
RAIL 2
4 4, 5 – Data transmitted to the carrier controller in plant segment n + 2
RAIL 3
6 6 0 Validation bit RAIL 1 0 = invalid data, or error 1 = valid, current data
RAIL 1 1 Validation bit RAIL 2 RAIL 2 2 Validation bit RAIL 3 RAIL 3 3 Enable bit RAIL 1 0 = disabled
1 = enabled RAIL 1
4 Enable bit RAIL 2 RAIL 2 5 Enable bit RAIL 3 RAIL 3 6 Acknowledgment bit RAIL 1 0 = data not to acknowledge
1 = data to acknowledge RAIL 1
7 Acknowledgment bit RAIL 2 RAIL 2 7 0 Acknowledgment bit RAIL 3 RAIL 3
1 Reserved – – 2 Parity bit RAIL 1 0 = Odd rail segment
1 = Even rail segment RAIL 1
3 Parity bit RAIL 2 RAIL 2 4 Parity bit RAIL 3 RAIL 3 5 … 7 Reserved – –
1 The data word contains user data. This data serves for communication of the plant segment controller with the carrier controller.
Observe the signal cycle times specified in the section "Data processing plant segment controller – carrier controller (Page 41)".
5.3 Carrier control The control unit of the carrier controller comprises an S7-1200 CPU and a PSB-C module.

Displays and address ranges 5.3 Carrier control
PSB modules Operating Instructions, 03/2014, A5E03474166-03 35
5.3.1 LED display on the PSB-C module The PSB-C module is equipped with two LED displays. The upper LED display is used for signaling. The lower LED has no function.
Meaning of the labeled LEDs:
LED Display Meaning DIAG Green, on The PSB-C module ready for operation, or the program is running
Green, flashing
The PSB-C module is not configured, is in startup mode or a firmware update is in progress
Red, on • The PSB-C module is booting • The CPU is in STOP mode • A firmware update was performed
Red, flashing
Shortly during the boot sequence
Off The PSB-C module is off voltage SYNC On Valid synchronization signal is received via RAIL
Off Valid synchronization signal missing for a duration of ≥ 1 s ERR RAIL On • At least one error has occurred in the plant segment or a firmware
update is in progress • No data transmission from the plant segment controller to the carrier
controller • Error in data transmission from the plant segment controller to the
carrier controller • During transition of the EMS carrier to the next plant segment
Flashes • The plant segment controller is in the STOP operating state. • A firmware update is busy
Off No error in plant segment Applies to firmware updates: The LED is off before the update. The LED starts flashing during the update and remains lit until the update has been completed.

Displays and address ranges 5.3 Carrier control
PSB modules 36 Operating Instructions, 03/2014, A5E03474166-03
LED Display Meaning ERR DISP
On • The display unit is not connected. • Error in communication between the PSB-C module and the display
unit • Firmware of the PSB-C module is incompatible with the firmware of the
display unit • A firmware update was performed
Off No error in communication between the PSB-C module and the display unit
5.3.2 Address ranges of the PSB-C module
NOTICE
Malfunction
8 bytes are reserved in the I/O address space of the PSB-C module for the EMS400S function blocks. These 8 bytes are managed by the EMS400S function blocks. You risk malfunctions if using these 8 bytes for other data.
Do not use the reserved area.
The word and byte addresses specified in the following tables are relative addresses. This means that they depend on the respective start address.
Input address space The input address space of the PSB-C module is used to map data that is received from the plant segment controller and display unit.

Displays and address ranges 5.3 Carrier control
PSB modules Operating Instructions, 03/2014, A5E03474166-03 37
The input address space comprises 8 bytes.
Word Byte Bit Name Description Terminals 0 0, 1 – Data from the plant
segment controller The data has a length of one word 1
RAIL
2 2, 3 – Reserved – 4 4 – Interface to the display
unit Serves to transmit data received from the remote control
DISP
– – "0" signal – default
"1" signal
0
Not activated Activated
1
2
3
4
5 Reserved – – 6
Not activated Activated
7

Displays and address ranges 5.3 Carrier control
PSB modules 38 Operating Instructions, 03/2014, A5E03474166-03
Word Byte Bit Name Description Terminals 5 0
1
2
3
4
5
6
7
6 6 0 Validation bit 0 = invalid or superimposed data, or error 1 = valid, current data
RAIL
– Toggle between "data to acknowledge" and "data not to acknowledge" 1 ACK bit 0 = data not to acknowledge
1 = data to acknowledge RAIL
2 Standby bit 0 = the enable bit of the plant segment controller for EMS carrier is set to logical 1 in this plant segment. 1 = the enable bit of the plant segment controller for EMS carrier is set to logical 0 in this plant segment.
–
3 … 7 Reserved – 7 0 … 1 Reserved –
2 Temperature ranges of the module
0 = Normal operation 1 = Overtemperature (the "Overtemperature" diagnostic is also output here.)
3 Reserved – 4 Bridge bit 0 = No bridging
1 = Bridging (segment transition) 5 … 7 Reserved – 1 The data word contains user data. This data serves for communication of the plant segment
controller with the carrier controller.

Displays and address ranges 5.3 Carrier control
PSB modules Operating Instructions, 03/2014, A5E03474166-03 39
Output address space The output address space of the PSB-C module is used to map data that is transmitted to the plant segment controller, to the display unit and to the analog output. The interfaces are specified in the section "Interfaces of the PSB-C module (Page 64)".
The output address space comprises 8 bytes.
Word Byte Bit Name Description Terminals 0 0, 1 – Data to the plant segment
controller The data has a length of one word 1
RAIL
2 2, 3 – Analog output Output of an analog voltage from 0 to 10 V at a resolution of 10 bits. If more than 10 bits are used, the maximum value is output when a range is exceeded.
AQ
4 4 0 Character 1 Bit 0, 7-segment display 1 – 1 Bit 1, 7-segment display 1 2 Bit 2, 7-segment display 1 3 Bit 3, 7-segment display 1 4 Character 2 Bit 0, 7-segment display 2 5 Bit 1, 7-segment display 2 6 Bit 2, 7-segment display 2 7 Bit 3, 7-segment display 2
5 0 Character 3 Bit 0, 7-segment display 3 1 Bit 1, 7-segment display 3 2 Bit 2, 7-segment display 3 3 Bit 3, 7-segment display 3 4 Dot of 7-segment display 1 0 = dot is OFF
1 = dot is ON 5 Dot of 7-segment display 2

Displays and address ranges 5.3 Carrier control
PSB modules 40 Operating Instructions, 03/2014, A5E03474166-03
Word Byte Bit Name Description Terminals 6 Dot of 7-segment display 3 7 7-segment displays On/Off 7-segment displays
0 = off 1 = on
6 6 0 Validation bit 0 = invalid data, or error 1 = valid, current data
RAIL
1 Enable bit 0 = disabled 1 = enabled
RAIL
2 ACK bit 0 = data not to acknowledge 1 = data to acknowledge
RAIL
3 … 7
Reserved – –
7 0 … 4 5 Display unit,
LED test 0 = test is OFF 1 = test is ON All LEDs of the 7-segment display and the signal lamps "red" and "green" are lit.
DISP
6 Display unit, "green" signal lamp
0 = LED is OFF 1 = LED is ON
7 Display unit, "red" signal lamp
1 The data word contains user data. This data serves for communication of the plant segment controller with the carrier controller.
Observe the signal cycle times specified in the section "Data processing plant segment controller – carrier controller (Page 41)".

PSB modules Operating Instructions, 03/2014, A5E03474166-03 41
Data processing plant segment controller – carrier controller 6
Duration of processing The time it takes to process the data is made up of the duration of internal processing on the controller and duration of the transmission of this data on the corresponding communication connections.
The following figure shows the flow of data that is not to be acknowledged.
The transmission time is doubled for data to be acknowledge. Moreover, the time it takes for processing in opposite direction must be added, i.e. from the carrier controller to the plant segment controller.
Note
The length of a data subframe can be determined via by the START signal with the diagnostics unit.

Data processing plant segment controller – carrier controller
PSB modules 42 Operating Instructions, 03/2014, A5E03474166-03
OB1 cycle time When creating the EMS project, observe the following information to ensure the proper response of the system:
The longer the OB1 cycle is, the higher the probability that the time available for the data subframe will be exceeded. If the time slice is exceeded, the PIO of the segment and carrier controllers will be transmitted in the next data subframe. This procedure delays the reaction time of the controller by the time it takes to transmit a data subframe.
Recommendation: The maximum OB1 cycle time of 10 ms should not be exceeded with a minimum SYNC time of 250 ms.
Data processing Keep in mind that the requirements on the synchronization signal must be observed during data transmission. See section "PSB-S module (Page 56)".
If the time slice configured for the data subframe is exceeded as a result of data processing, transmission of the completed data subframe is delayed until the next data subframe. Transmission is delayed by one synchronization clock cycle, depending on the time configured. For example, the delay would amount to 250 ms at a time of tSYNC = 250 ms for the synchronization signal.

PSB modules Operating Instructions, 03/2014, A5E03474166-03 43
Creating and transmitting projects 7 7.1 Creating a project in the TIA Portal
You need several projects to meet the technical requirements for operation of an EMS with EMS400S carrier controller.
● Control level 1 – project for the EMS controller
This project is optional. However, the following projects are indispensable for communication between the two controllers.
● Control level 2 – project for the plant segment controller
● Control level 3 – project for the EMS400S carrier controller
For more information, refer to the "EMS400S Plant control system for EMS plants" system manual.
Configuration software The following configuration software is approved:
● The plant segment and EMS400S carrier controllers can only be configured on the TIA Portal.
Approved version of the configuration software:
SIMATIC TIA Portal V12 SP1 or higher
For more information, refer to the corresponding Online Help.
An example is available for download from the following Internet URL:
EMS400S product documentation (http://support.automation.siemens.com/WW/view/en/68156412/133300)
Requirement ● The configuration software is installed on the configuration computer
● The add-on "Siemens TIA Portal Vxx EHB AddOn - S7-1200 PSB" is installed
"Vxx" stands for the installed version of the TIA Portal software.
● The TIA Portal is open.
You can find the EMS400S components in the TIA Portal hardware catalog as of V13 at:
– Catalog > Technology modules > Power Signal Booster Segment
– Catalog > Technology modules > Power Signal Booster Carrier

Creating and transmitting projects 7.1 Creating a project in the TIA Portal
PSB modules 44 Operating Instructions, 03/2014, A5E03474166-03
Procedure 1. Create a project in the TIA Portal.
2. Configure a CPU for a plant segment controller in the "Devices" editor.
3. Insert the required number of PSB-S modules from the hardware catalog.
The following figure shows the resultant modification of the device view. This view is valid as of TIA Portal V13.
① CPU ② PSB-S module in the device view ③ PSB-S module in the hardware catalog
4. Configure a CPU for a carrier controller in the "Devices" editor.
Note
Only the CPUs operated on DC voltage are approved for the PSB-C module. Project compilation will be aborted if an CPU that is operated on AC voltage is used for the link.

Creating and transmitting projects 7.1 Creating a project in the TIA Portal
PSB modules Operating Instructions, 03/2014, A5E03474166-03 45
5. Insert a PSB-C module from the hardware catalog.
The following figure shows the resultant modification of the device view. This view is valid as of TIA Portal V13.
① CPU ② PSB-C module in the device view ③ PSB-C module in the hardware catalog
6. Configure additional devices in accordance with the EMS requirements.
7. Save the project.

Creating and transmitting projects 7.2 Transferring the project
PSB modules 46 Operating Instructions, 03/2014, A5E03474166-03
7.2 Transferring the project It is prerequisite for operation of the plant segment or carrier control to provide a project in the corresponding CPU. The following routes are available for transmission of a project to the segment controller or carrier controller:
● PROFINET
The PROFINET interface is provided for data transmission from a stationary input device.
● Memory card
The memory card slot on the CPU.
The transmission routes are specified in the information system of the TIA Portal.
Note
The ERR RAIL LEDs of the PSB-S modules may flash asynchronously system-dependent during project download to a segment controller.
The data is transmitted separately to each PSB-S module via the SM bus. This operation results in runtime differences. Time offset of the flashing always occurs when the CPU is in STOP state.
7.3 Commissioning a project For information on commissioning of the project for control level 3 and accordingly of the PSB-C modules, refer to the "EMS400S plant control system for EMS plants" system manual.

PSB modules Operating Instructions, 03/2014, A5E03474166-03 47
Diagnostics options for PSB modules 8
The following diagnostics options are available for the PSB modules:
● Diagnostics in STEP 7
You can run the diagnostics online in the network and device view, and with the help of the diagnostic buffer of the CPU.
● Alarm messages in the user program
● Creating user-specific Web pages for the S7-1200 Web server
● Diagnostics by means of EMS400S function blocks
● LED display on the PSB module
● Diagnostics using the EMS400S diagnostics unit
The diagnostics options are described in the following sections.
8.1 Diagnostics in STEP 7 You may also view the diagnostics information of configured PSB modules in STEP 7.
The information of the PSB modules is symbolized in the device view. The status is also displayed in the "Local modules" area of the project navigation by an icon on the right side of the device. For information on the meaning of status icons, refer to the corresponding tooltip.
Requirement ● The respective controller was selected in the "Project navigation" window
● An online connection was set up between STEP 7 and the selected controller
Procedure
Overview of the diagnostics information
The structure of the "Project navigation" provides a fast overview of the plant status, as diagnostics information is distributed hierarchically to the higher-level components. For example, this means that the icon indicates an "Error in sublevel component" at the controller if one or several PSB modules report an error.
1. Select the device view.
The device view displays a status icon for each PSB module. The icon color signals the following states:
Red Error pending Green No error at the PSB module

Diagnostics options for PSB modules 8.2 Messages and errors
PSB modules 48 Operating Instructions, 03/2014, A5E03474166-03
Diagnostics information details
1. You can obtain detailed information by selecting "Project navigation" Controller > Online & Diagnostics in the window.
2. Select "Work area" Diagnostics > Diagnostic buffer in the window.
The "Diagnostic buffer" window displays all events, including their details.
For more information, refer to:
"S7-1200 Automation System" system manual (http://support.automation.siemens.com/WW/view/de/36932465/0/en)
8.2 Messages and errors The PSB module transmits a diagnostics interrupt request to the PU in the following situations:
● The PSB module has detected a problem – incoming event
● The problem was rectified or is no longer pending – outgoing event
● An event is pending and another event is detected.
If an event is pending and another event is detected, the first event is acknowledged as "outgoing event", while the new event is entered as "incoming event".
8.2.1 Diagnostics error OB 82 If an OB 82 exists, the operating system responds to incoming or outgoing events by calling OB 82. The S7-1200 CPU will then interrupt the cyclic user program and execute OB 82. You are provided diagnostics information in the local data of OB 82. This information may include:
● Which module has triggered the interrupt?
● Which type of error has occurred?
On completion of OB 82, the S7-1200 CPU resumes the cyclic program at the interrupt position.
For more information about OB 82, refer to:
● EMS400S product documentation (http://support.automation.siemens.com/WW/view/en/68156412/133300), "EMS400S Function Blocks" Application Manual
● "S7-1200 Automation System" system manual (http://support.automation.siemens.com/WW/view/de/36932465/0/en)
Note
Diagnostics information can only be read from the diagnostic buffer if OB 82 is missing.
Diagnostics options for PSB modules 8.2 Messages and errors
PSB modules Operating Instructions, 03/2014, A5E03474166-03 49
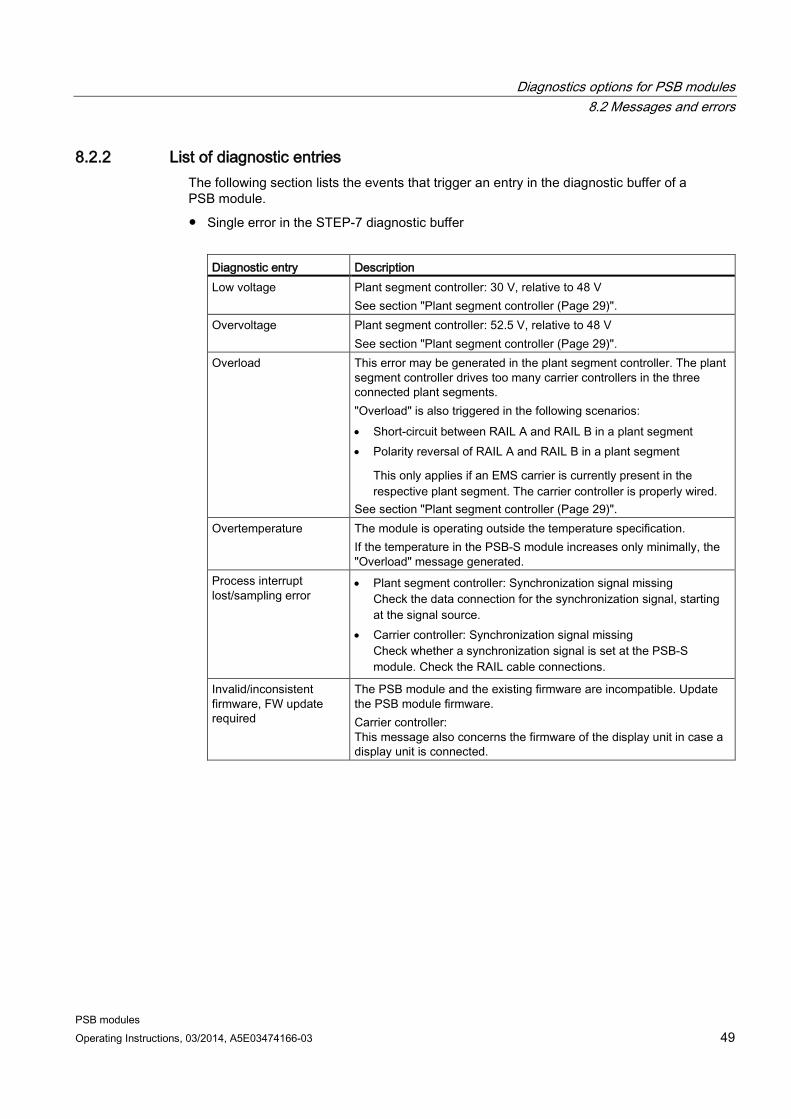
8.2.2 List of diagnostic entries The following section lists the events that trigger an entry in the diagnostic buffer of a PSB module.
● Single error in the STEP-7 diagnostic buffer
Diagnostic entry Description Low voltage Plant segment controller: 30 V, relative to 48 V
See section "Plant segment controller (Page 29)". Overvoltage Plant segment controller: 52.5 V, relative to 48 V
See section "Plant segment controller (Page 29)". Overload This error may be generated in the plant segment controller. The plant
segment controller drives too many carrier controllers in the three connected plant segments. "Overload" is also triggered in the following scenarios: • Short-circuit between RAIL A and RAIL B in a plant segment • Polarity reversal of RAIL A and RAIL B in a plant segment
This only applies if an EMS carrier is currently present in the respective plant segment. The carrier controller is properly wired.
See section "Plant segment controller (Page 29)". Overtemperature The module is operating outside the temperature specification.
If the temperature in the PSB-S module increases only minimally, the "Overload" message generated.
Process interrupt lost/sampling error
• Plant segment controller: Synchronization signal missing Check the data connection for the synchronization signal, starting at the signal source.
• Carrier controller: Synchronization signal missing Check whether a synchronization signal is set at the PSB-S module. Check the RAIL cable connections.
Invalid/inconsistent firmware, FW update required
The PSB module and the existing firmware are incompatible. Update the PSB module firmware. Carrier controller: This message also concerns the firmware of the display unit in case a display unit is connected.

Diagnostics options for PSB modules 8.2 Messages and errors
PSB modules 50 Operating Instructions, 03/2014, A5E03474166-03
● Group error in the STEP-7 diagnostic buffer
Diagnostic entry Description Error Applies to the plant segment controller:
General device error on RAIL 1 to 3 Error in carrier controller. Such events may, for example, include an interruption of the power supply. It is not necessary to examine the EMS carrier.
Unknown error 000B • Plant segment controller
Check whether the 48 V input voltage is present. If yes, the PBS-S module has failed. Return the PSB-S module to Siemens for repairs.
• Carrier controller Check whether the 24 V input voltage is present. If yes, the PBS-C module has failed. Return the PSB-C module to Siemens for repairs.
Unknown error 000C Applies only to the carrier controller: Configuration error. The 10-bit range of the analog output is exceeded. Check the corresponding STEP 7 project.
Note
The "Error" event is displayed as incoming and then immediately as outgoing at the startup of a PSB-S module. This system-related event is triggered during startup and does not represent an error.

Diagnostics options for PSB modules 8.2 Messages and errors
PSB modules Operating Instructions, 03/2014, A5E03474166-03 51
8.2.3 Power supply fault. The following table contains a selection of possible errors. You can see how these errors are displayed and what you have to do to rectify the error.
Error Diagnostics event 48 V input voltage is missing permanently
A combination of the following diagnostics events is triggered: • Error • Unknown error 000B
Input voltage 48 V missing max. 250 ms or short-term interruption of the synchronization signal at the PSB-C module
The following diagnostics event is triggered: • Error
Polarity reversal of the 48 V input voltage
A combination of the following diagnostics events is triggered: • Process interrupt lost/sampling error • Unknown error 000B The bridging of two PSB-S modules may result in the communication failure of several PSB-S modules.
Input SYNC is not connected, or the synchronization signal is not generated
• The SYNC LED is inactive • The ERR RAIL LEDs do not provide optical feedback • The "Process interrupt lost/sampling error" diagnostics event is
displayed in STEP 7
Input SYNC it is connected, the frequency of the synchronization signal is too high
• The SYNC LED is active • The "Process interrupt lost/sampling error" diagnostics event is
displayed in STEP 7 Reduce the clock frequency for the synchronization signal.
Short-circuit on RAIL Short-circuit at RAIL A and RAIL B of a plant segment.
• Plant segment controller
The following diagnostic events are triggered: – ERR RAIL LEDs 1 to 3 are active – The presence and validation bit in the PII are set to zero
• Carrier controller
The following diagnostic events are triggered: – SYNC LED is inactive – ERR RAIL LED is active – Process interrupt lost/sampling error
The data corresponds to the last data read. Polarity reversal on RAIL Polarity reversal at RAIL A and RAIL B of a plant segment.
Error on overload and short-circuit on RAIL While the polarity is reversed on rail RAIL, only the ERR RAIL LEDs of the PSB-S module at the plant segments where polarity is not reversed are lit. The ERR RAIL LED of the plant segment at which polarity is reversed is switched off.

Diagnostics options for PSB modules 8.3 Diagnostics via S7-1200 Web server
PSB modules 52 Operating Instructions, 03/2014, A5E03474166-03
8.3 Diagnostics via S7-1200 Web server The S7-1200 Web server provides Web pages that you can use to access your CPU and the connected components. The Web server lest you integrate user-defined Web pages that can be used to display the contents of the CPU and PSB modules. For this purpose, you can use the user program interface to determine diagnostics data, such as interrupts or diagnostics data records, for integration in the Web pages.
You may use any suitable HTML editor to create the Web pages with page layouts and design features to suit your requirements.
The contents of the Web pages and user program data are linked by means of AWP commands that you insert into the HTML code. For more information about these options, refer to:
System manual (http://support.automation.siemens.com/WW/view/de/36932465/0/en), chapter "Web server".
8.4 Diagnostics by means of EMS400S function blocks The diagnostics options provided by the function blocks are specified in the "EMS400S function blocks" configuration instructions. This document is available at:
EMS400S product documentation (http://support.automation.siemens.com/WW/view/en/68156412/133300)
8.5 LED display on the PSB module For information about the diagnostics messages of the LED display, refer to the following chapters:
● LED display on the PSB-S module (Page 29)
● LED display on the PSB-C module (Page 35)
8.6 EMS400S diagnostics unit The EMS400S diagnostics unit serves for the analysis of RAIL communication and the detection of errors. The diagnostics unit can be used to control cabinet installation, commissioning, and for repairs.
For information about the wiring and handling, refer to the "EMS400S Diagnostics Unit" operating instructions. This documentation is available at:
EMS400S product documentation (http://support.automation.siemens.com/WW/view/en/68156412/133300)

PSB modules Operating Instructions, 03/2014, A5E03474166-03 53
Maintenance and repairs 9
Maintenance The PSB-S and PSB-C modules are maintenance-free.
Repairs You must return the respective device for repairs to the Retouren-Center Fürth . Only the Retouren-Center Fürth is allowed to repair the device.
The address is:
Siemens AG Sektor Industry Retouren-Center Siemensstr. 2 90766 Fürth Germany
Recycling and disposal The products described in this manual can be recycled due to their low level of contaminants. Contact a certified disposal service company for environmentally sound recycling and disposal of your old devices.

Maintenance and repairs
PSB modules 54 Operating Instructions, 03/2014, A5E03474166-03

PSB modules Operating Instructions, 03/2014, A5E03474166-03 55
Technical specifications 10 10.1 Dimensional drawings
Additional images are available on the Internet at:
Image database (http://www.automation.siemens.com/bilddb)

Technical specifications 10.2 Technical specifications
PSB modules 56 Operating Instructions, 03/2014, A5E03474166-03
10.2 Technical specifications
10.2.1 PSB-S module
Mechanical system Parameter Value Order number 6ES7228-1RC52-0AA0 Dimensions (W × H × D) 70 × 100 × 75 mm Weight 230 g
24 V DC power supply Parameter Value Rated voltage 24 V DC Voltage range 20.4 to 28.8 V DC Surge voltage 35 V DC for 0.5 s Supply interruption, permitted 20 ms per 60 s Current consumption 0.1 A Power loss 2.5 W Overvoltage category II Transient voltage Vpeak ≤ 2 kV Starting current inrush ≤ 0.2 A²s Reverse polarity protection Yes Electrical isolation to the SM-Bus, to digital inputs, and to the SYNC input
500 V DC for 1 minute
Electrical isolation to the 48 V DC power supply 1.9 kV DC for 1 minute

Technical specifications 10.2 Technical specifications
PSB modules Operating Instructions, 03/2014, A5E03474166-03 57
48 V DC power supply Parameter Value Rated voltage 48 V DC Voltage range 45.6 to 50.4 V DC Continuous voltage DC ≤ 50.4 V Supply interruption Interruption not permitted Current consumption 2.2 A Power loss 5 W Overvoltage category II Transient voltage Vpeak ≤ 2 kV Starting current inrush ≤ 1 A²s Reverse polarity protection Yes Electrical isolation to the SM-Bus, to digital inputs, as well as to the 24 V DC and SYNC inputs
1.9 kV DC for 1 minute
Cable length < 30 m, unshielded ≥ 30 m, shielded (shield must be connected to PE)
Digital inputs Parameter Value Number of inputs 6 inputs in one group Number of simultaneously activated inputs 6 Type Current sinking, IEC type 1 Rated voltage 24 V DC Continuous voltage, permitted DC ≤ 30 V Surge voltage 35 V DC for 0.5 s Signal logical 1 DC ≥ 15 V at 2.5 mA Signal logical 0 DC ≤ 5 V at 1 mA Filter time 0.2; 0.4; 0.8; 1.6; 3.2; 6.4; 12.8 ms
The filter times relate to the groups of 4 and 2 inputs in the TIA Portal: • 1 × 4 inputs DI0 to DI3 and • 1 × 2 inputs DI4 to DI5
Electrical isolation, "field to logic" 500 V DC for 1 minute Electrical isolation to the 48 V DC input 1.9 kV DC for 1 minute Cable length • 500 m, shielded
• 300 m, unshielded

Technical specifications 10.2 Technical specifications
PSB modules 58 Operating Instructions, 03/2014, A5E03474166-03
SYNC input Parameter Value Number of inputs 1 Type Current sinking, IEC type 1 Rated voltage 24 V DC Continuous voltage, permitted DC ≤ 30 V Surge voltage 35 V DC for 0.5 s Signal logical 1 DC ≥ 15 V at 5 mA Signal logical 0 DC ≤ 5 V at 1 mA Increase of the synchronization signal ≥ 24 V/µs Filter time None Synchronization signal tSYNC 200 to 999 ms Electrical isolation, "field to logic" 500 V DC for 1 minute Electrical isolation to the 48 V DC input 1.9 kV DC for 1 minute Cable length • 500 m, shielded
• 300 m, unshielded
Interface via RAIL Parameter Value Number of outputs 3 Type Differential transmission Transmitter and receiver, internal operating voltage 48 V AC, potential connected to P48V Data transmission rate, rated value Each rated value corresponds to 1 data word
including the data subframe per synchronization signal.
Transmission frequency ≤ 5 data subframes, depending on the synchronization signal
Polarity reversal protection between RAIL 1 to 3 Yes Polarity reversal RAIL A of PSB-S module n with RAIL B of PSB-S module n+1, and RAIL B of the PSB-S module n with RAIL A of PSB-S module n+1
No
PSB-C modules per RAIL, rated 30 Cable length 1000 m, unshielded
Insulation strength The insulation strength of circuits with rated Vin to other circuits or ground was proven in a type test at the following test voltages to IEC 61131-2.

Technical specifications 10.2 Technical specifications
PSB modules Operating Instructions, 03/2014, A5E03474166-03 59
Protection class and degree of protection Characteristic Standard Classification Protection class EN 61131-2 Degree of protection II Degree of protection EN 60529 IP20
10.2.2 PSB-C module
Mechanical system Parameter Value Order number 6ES7228-1RC51-0AA0 Dimensions (W × H × D) 70 × 100 × 75 mm Weight 210 g
24 V DC power supply Parameter Value Rated voltage 24 V DC Voltage range 20.4 to 28.8 V DC Surge voltage 35 V DC for 0.5 s Supply interruption, permitted 20 ms per 60 s Current consumption 0.1 A Power loss 5 W Overvoltage category II Transient voltage Vpeak ≤ 2 kV Starting current inrush ≤ 17 mA²s Reverse polarity protection Yes Electrical isolation to the SM-Bus and to the interface of the display unit
500 V DC for 1 minute
Electrical isolation, "field to logic" 1.9 kV DC for 1 minute Cable length < 30 m

Technical specifications 10.2 Technical specifications
PSB modules 60 Operating Instructions, 03/2014, A5E03474166-03
Analog output Parameter Value Number of outputs 1 Type Voltage Range 0 to 10 V DC Data format for the user program Binary Resolution 10 bit Full scale (data word) 1023, decimal value Tolerance at 0 to 55 °C ± 1 % of the full scale Value of the least significant bit 9.8 mV per increment Settling time, for 95 % of the new value 50 ms Response to the change from RUN to STOP mode 0 V Response when the 10-bit range is exceeded The 10 V maximum value is output. Load impedance > 90 kΩ Electrical isolation, field to 24 V DC terminal None Cable length < 30 m, shielded
Interface via RAIL Parameter Value Quantity 1 Type Differential transmission Transmitters and receivers, output voltage 34 V AC (48 V peak) Input current (peak) 0.015 A Data transmission rate, rated value Each rated value corresponds to 1 data word
including the data subframe per synchronization signal.
Transmission frequency ≤ 5 data subframes, depending on the PSB-S module
Reverse polarity protection Yes, at least for 1 h This applies if there is no segment short circuit to a neighboring RAIL.
Electrical isolation, "field to logic" 1.9 kV DC for 1 minute Cable length 1000 m, unshielded

Technical specifications 10.2 Technical specifications
PSB modules Operating Instructions, 03/2014, A5E03474166-03 61
Interface to the display unit Parameter Value Input DC ≤ +5 V/≥ –5 V with RL = 3 kΩ Type Proprietary, RS-232-based Reverse polarity protection Yes Electrical isolation to the SM-Bus and to the 24 V DC input
500 V DC for 1 minute
Electrical isolation, RAIL to ground 500 V DC for 1 minute Electrical isolation, RAIL to CPU 1.9 kV DC for 1 minute Cable length 10 m, unshielded
Insulation strength The insulation strength of circuits with rated Vin to other circuits or ground was proven in a type test at the following test voltages to IEC 61131-2.
Protection class and degree of protection Characteristic Standard Classification Protection class EN 61131-2 Degree of protection II Degree of protection EN 60529 IP20

Technical specifications 10.3 Interface description
PSB modules 62 Operating Instructions, 03/2014, A5E03474166-03
10.3 Interface description
10.3.1 Interfaces of the PSB-S module The following figure shows the labeling of the terminal blocks on the PSB-S module.

Technical specifications 10.3 Interface description
PSB modules Operating Instructions, 03/2014, A5E03474166-03 63
Terminal block X10
Assignment Functions Physics L + Power supply to the PSB-S module 24 V DC, input M
SYNC 1M Input for the synchronization signal 24 V DC, digital input SYNC.0 DI h2M Serves for the connection of up to 6 sensors 24 V DC, digital input DI h.1 DI h.2 DI h.3 DI h.4 DI h.5 DI h.6
Terminal block X11
Assignment Functions Physics 3L+ Power terminal 48 V DC, input 3M – Reserved –
RAIL 1A Connection of RAIL 1A to plant segment n Communication RAIL 1B Connection of RAIL 1B to plant segment n
RAIL 2A Connection of RAIL 2A to plant segment n + 1 RAIL 2B Connection of RAIL 2B to plant segment n + 1 RAIL 3A Connection of RAIL 3A to plant segment n + 2 RAIL 3B Connection of RAIL 3B to plant segment n + 2

Technical specifications 10.3 Interface description
PSB modules 64 Operating Instructions, 03/2014, A5E03474166-03
10.3.2 Interfaces of the PSB-C module The following figure shows the labeling of the terminal blocks on the PSB-C module.
Terminal block X10
Designation Functions Physics L + Power supply to the PSB-C module 24 V DC, input M
Terminal block X11
Designation Functions Physics AQ, M The control voltage from 0 to 10 V can be adjusted
in 1024 increments. 0 to 10 V DC, analog output AQ 0

Technical specifications 10.4 Bit assignment
PSB modules Operating Instructions, 03/2014, A5E03474166-03 65
The following table contains the signal description of the "DISPLAY" terminals.
Designation Functions Physics
DISPLAY, 1L+ Power supply from the connected communication equipment
5 V DC, input DISPLAY, 1M
DISPLAY, RES Hardware reset Output DISPLAY, TxD Severs for data transmission PSB-C module –
display unit. Data is transmitted to: • Activate the 7-segment displays • Activate the red and green signal lamps • Read the IR interface signals
Output DISPLAY, RxD Input
The wiring of the power supply and frequency converter is specified in the corresponding operating instructions. This documentation is available at:
Overall SIMATIC documentation (http://www.siemens.com/simatic-tech-doku-portal)
Terminal block X12
Designation Functions Physics RAIL 1A Serves for communication between the segment
controller and carrier controller via RAIL Communication
RAIL 1B
10.4 Bit assignment
10.4.1 Bit assignment of the IR remote control Bit assignment of the keys of the remote control:
Bit Bit 0 Bit 1 Bit 2 Bit 3 Bit 4 Bit 5 Bit 6 Bit 7 Key
Bit Bit 8 Bit 9 Bit 10 Bit 11 Bit 12 Bit 13 Bit 14 Bit 15 Key
–
Additional information is available in the section "Address ranges of the PSB-C module (Page 36)".

Technical specifications 10.4 Bit assignment
PSB modules 66 Operating Instructions, 03/2014, A5E03474166-03
10.4.2 Bit assignment of the display unit The following table applies to all three 7-segment LED displays.
Characters 0 1 2 3 4 5 6 7 Bit 0 0 1 0 1 0 1 0 1 Bit 1 0 0 1 1 0 0 1 1 Bit 2 0 0 0 0 1 1 1 1 Bit 3 0 0 0 0 0 0 0 0 Layout
Characters 8 9 E F 1 P r – Bit 0 0 1 0 1 0 1 0 1 Bit 1 0 0 1 1 0 0 1 1 Bit 2 0 0 0 0 1 1 1 1 Bit 3 1 1 1 1 1 1 1 1 Layout
1 The character can be used as space character.
The bit assignment for the PSB-C module and the LED display is handled by means of the function blocks. This documentation is available at:
EMS400S product documentation (http://support.automation.siemens.com/WW/view/en/68156412/133300)

Technical specifications 10.5 Approvals
PSB modules Operating Instructions, 03/2014, A5E03474166-03 67
10.5 Approvals The following figure shows the rating plate with an example of possible approvals.
In addition to the device designation, the rating plate contains the technical specification and the order number of the PSB module.
Note
Only the approvals specified on the rating plate apply to the respective device.
The approvals are listed in the following section.
CE approval The PSB module meets the requirements and safety-relevant objectives of the following EC guidelines and is compliant with the harmonized European standards for programmable logic controllers that are listed in the official pamphlets of the European Union.
● EC Directive 2006/95/EC – low-voltage directive
"Electrical equipment for use within specific voltage limits"
– EN 61131-2:2007 Programmable logic controllers – equipment requirements and tests
● EC Directive 2004/108/EC – EMC directive
"Electromagnetic compatibility"
– Emitted interference to EN 61000-6-4:2007, industrial sector
– RF interference suppression to EN 61000-6-2:2005, industrial sector

Technical specifications 10.6 Electromagnetic compatibility
PSB modules 68 Operating Instructions, 03/2014, A5E03474166-03
UL approval Note the following:
● The device shall be supplied from an isolating source, rated 24 VDC.
"Underwriters Laboratories Inc." approval in accordance with:
● UL 508 (Industrial Control Equipment)
● CSA C22.2 No. 142 (Process Control Equipment)
Note
The cULus symbol indicates that the PSB modules have been tested and approved by Underwriters Laboratories in accordance with the UL 508 and CSA 22.2, No. 142 standards.
Approval for Australia and New Zealand The device meets the requirements of standard AS/NZS 2064 (Class A).
EC Declaration of Conformity The EC Declarations of Conformity are made available to the responsible authorities at:
Siemens AG Sektor Industry I IA AS FA DH AMB Postfach 1963 92209 Amberg Germany
10.6 Electromagnetic compatibility The device also meets requirements of the EMC legislation on internal European market. The EMC test of the device was passed in accordance with the following standards:
Standard Title Version EN 61000-6-2:2005 EMC: Basic technical standard – Immunity to
interference in industrial areas 01.05.2006
EN 61000-6-4:2007 EMC: Basic technical standard – Immunity to interference emission in industrial areas
01.11.2007

Technical specifications 10.6 Electromagnetic compatibility
PSB modules Operating Instructions, 03/2014, A5E03474166-03 69
EMC-compliant installation The EMC compliant installation of the device and the use of interference proof cables form the basics for error-free operation.
Disturbance EMC applies to the following disturbances:
● Pulse-shaped disturbance on PSB-S and PSB-C modules
The following table shows the EMC of the PSB-S and PSB-C modules with regard to pulse-shaped disturbance.
Pulse-shaped disturbance Tested with Corresponds to degree of severity
Electrostatic discharge to IEC 61000-4-2:2008
Air discharge: 8 kV Contact discharge: 6 kV
3
Burst pulses high-speed transient disturbance to IEC 61000-4-4
Power cable: ± 2 kV 3
● Pulse-shaped disturbance on the PSB-S module
Note
Wherever power is distributed from extended 24 V DC power circuits to the PSB modules, you need to take appropriate measures to prevent the coupling of strong pulsed electromagnetic interference on the power and signal cables. Strong electromagnetic pulses could be generated by lighting strike, for example, or the switching of a large inductive load.
The EMC tests for proving immunity to electromagnetic interference of the PSB modules include the "surge immunity test" according to EN 61000-4-5. The power and signal circuits must be protected for this test by means of surge protection elements. The Dehn lightning protection units listed in the table below are used accordingly.
The following table shows the EMC of the PSB modules when exposed to high-energy single pulses. The specifications apply to the lightning protection units of Dehn & Söhne GmbH & Co. KG, Hans-Dehn-Str. 1, PO Box 1640, 92306 Neumarkt, Germany.

Technical specifications 10.6 Electromagnetic compatibility
PSB modules 70 Operating Instructions, 03/2014, A5E03474166-03
Pulse-shaped disturbance Tested with Lightning protection unit
High-energy single pulse (surge) on the power supply cables, 24 V DC
± 1 kV, symmetrical surge 1 ± 2 kV, asymmetrical surge 1
BVT AD 24 Article no. 918 402
High-energy single pulse (surge) on the power supply cables, 48 V DC
± 2 kV, asymmetrical surge, shielded cable 1
–
High-energy single pulse (surge) on the signal cables SYNC
± 1 kV, symmetrical surge 1 ± 2 kV, asymmetrical surge 1
RK E 60 Article no. 919 990
High-energy single pulse (surge) on the signal cables 24 V DC input
± 1 kV, symmetrical surge 1 ± 2 kV, asymmetrical surge 1
1 Cable length > 30 m
● Pulse-shaped disturbance on PSB-S and PSB-C modules
Pulse-shaped disturbance Tested with Lightning protection unit
High-energy single pulse (surge) on the RAIL interfaces
± 1 kV, symmetrical surge 1 ± 2 kV, asymmetrical surge 1
–
1 Cable length > 30 m
● Sinusoidal disturbance
The following table shows the EMC of the device in terms of sinusoidal disturbance.
Sinusoidal disturbance Test values Corresponds to degree of severity
RF radiation (electromagnetic fields) to IEC 61000-4-3
80% amplitude modulation at 1 kHz • On 10 V/m in the range from
80 to 1000 MHz • On 3 V/m in the range of
1.4 to 2 GHz • On 1 V/m in the range of
2 to 2.7 GHz
3
RF interference current on cables and cable shielding conforming to IEC 61000-4-6
Test voltage 10 V at 80 % amplitude modulation of 1 kHz in the range of 150 kHz to 80 MHz
3

Technical specifications 10.7 Environmental conditions
PSB modules Operating Instructions, 03/2014, A5E03474166-03 71
RF interference emission Emission was tested and confirmed in accordance with EN 61000-6-4.
Cable-bound interference emission
Value
0.15 to 0.5 MHz 0.5 to 5 MHz 5 to 30 MHz
< 79 dB (μV) quasi peak, < 66 dB (μV) mean value < 73 dB (μV) quasi peak, < 60 dB (μV) mean value < 73 dB (μV) quasi peak, < 60 dB (μV) mean value
The table below shows the emission of electromagnetic interference measured at a distance of 10 m in accordance with EN 55011:2009, limit class A, Group 1:
Disturbance Value
30 to 230 MHz 230 to 1000 MHz
< 40 dB (μV/m) quasi peak, measured at a distance of 10 m < 47 dB (μV/m) quasi peak, measured at a distance of 10 m
10.7 Environmental conditions
10.7.1 Transportation and storage requirements The permitted environmental conditions of this device exceed requirements in accordance with IEC 61131-2:2007. The following specifications apply to devices that are shipped and stored in the original packaging.
● Mechanical environmental conditions
Standard Title Release IEC 60721-3-2:1997 Classification of environmental conditions – part 3: Classes
of environmental disturbances and their limits, section 2: Transport Class 2M2 applies.
01.03.1997
● Climatic environmental conditions
Standard Title Release IEC 60721-3-2:1997 Classification of environmental conditions – part 3: Classes
of environmental disturbances and their limits, section 2: Transport Class 2K4 applies.
01.03.1997

Technical specifications 10.7 Environmental conditions
PSB modules 72 Operating Instructions, 03/2014, A5E03474166-03
The following values are derived for the significant environmental conditions from the standards stated. The following specifications apply to the device transported and stored in the original package.
Environmental condition
Value Comment
Free fall EN 60068-2-32
≤ 0.3 m In the transport packaging 5 × free fall
Temperatures EN 60068-2-2
–40 to +70 °C Test Bb, dry heat
Temperatures EN 60068-2-1
–40 to +70 °C Test Ab, coldness
Temperatures EN 60068-2-30
–25 to +55 °C
Test Db, humid heat, air humidity 95 %
Temperatures EN 60068-2-14
–40 to +70 °C Test Na, hold time 3 h, 5 cycles
Air pressure IEC 60068-2-13
1140 to 660 hPa Corresponds to an altitude of –1000 to 3500 m
10.7.2 Operational requirements The following table shows the valid environmental conditions for the device.
● Mechanical environmental conditions
Standard Title Release IEC 60721-3-2:1997 Classification of environmental conditions – part 3:
Classes of environmental disturbances and their limits, section 3: Stationary operation, weather-proof The display unit is rated with class 3M3. The remote control was rated with class 3K7.
01.03.1997
● Climatic environmental conditions
Standard Title Release IEC 60721-3-3:1994 Classification of environmental conditions – part 3:
Classes of environmental disturbances and their limits, section 3: Stationary operation, weatherproof Class 3K3 applies.
01.12.1994

Technical specifications 10.7 Environmental conditions
PSB modules Operating Instructions, 03/2014, A5E03474166-03 73
The following values are derived for the significant environmental conditions from the standards stated.
Environmental condition Value Comment Temperature, horizontal mounting position
0 to 55 °C Air humidity 95 %, no condensation
Temperature, vertical mounting position
0 to 45 °C Air humidity 95 %, no condensation
Atmospheric pressure 1140 to 795 hPa Corresponds to an altitude of –1000 to 2500 m
Operation with additional protective measures You must take additional measures to operate the HMI device at the following locations:
● At locations with a high degree of ionizing radiation
● At locations with harsher operating conditions, for example due to:
– Corrosive vapors, gases, oils or chemicals
– Electrical or magnetic fields of high intensity
● In systems that require special monitoring, for example:
– Elevators
– Systems in especially hazardous rooms
Damping shock and vibration If the device is subject to severe shock or vibration, you must take appropriate measures to reduce the amplitude and/or acceleration. In such situations, use vibration damping or vibration absorber systems.

Technical specifications 10.7 Environmental conditions
PSB modules 74 Operating Instructions, 03/2014, A5E03474166-03
10.7.3 Tests for compliance with environmental conditions
Tests for compliance with mechanical environmental conditions The following table shows the type and scope of the tests of the device with regard to mechanical environmental conditions.
Test Physical variable Value, comment For rail mounting: Vibration IEC 60068-2-6:2007 Test Fc
Vibration 1 octave/min 10 cycles per axis
Frequency range 5 to 8.4 Hz Deflection 3.5 mm 8.4 to 150 Hz vibration acceleration 9.8 m/s2
For cabinet installation: Vibration IEC 60068-2-6:2007 Test Fc
Vibration 1 octave/min 10 cycles per axis
Frequency range 5 to 8.4 Hz Deflection 7 mm 8.4 to 150 Hz vibration acceleration 19.6 m/s2
Shock IEC 60068-2-27:2008
Shock form Half-wave sine Acceleration 15 g Duration 11 ms Number of shocks 6 per axis
Tests related to climatic environmental conditions The following table shows the type and scope of the tests of the device with regard to climatic environmental conditions.
Environmental condition Value Comment Temperature change EN 60068-2-14 Test Nb
3 K/min In the range from 5 °C to 55 °C
Concentration of pollutants IEC 60721-3-3:1994
SO2 < 0.5 ppm
Test: 10 cm3/m3; 10 days, relative humidity < 60 %, no condensation
H2S < 0.1 ppm
Test: 1 cm3/m3; 10 days, relative humidity < 60 %, no condensation

PSB modules Operating Instructions, 03/2014, A5E03474166-03 75
Appendix A A.1 Technical support
Technical support for the devices described in this document is available at:
● Technical Support (http://www.siemens.de/automation/csi_en_WW)
● Support Request (http://www.siemens.com/automation/support-request)
● Service (http://support.automation.siemens.com/WW/view/en/16604318)
● Contacts and office locations (http://www.automation.siemens.com/mcms/aspa-db/en/Pages/default.aspx)
● Training center (http://sitrain.automation.siemens.com/sitrainworld/?AppLang=en)
SIMATIC product information is available at:
● Industry Portal (http://www.automation.siemens.com/_en/portal/index.htm)
● Overall SIMATIC documentation (http://www.siemens.com/simatic-tech-doku-portal)

Appendix A.2 Abbreviations
PSB modules 76 Operating Instructions, 03/2014, A5E03474166-03
A.2 Abbreviations AC Alternating current AG Aktiengesellschaft AWP Automation Web Programming W Width CRC Cyclic redundancy check CSA Canadian Standards Association DC Direct Current DI Digital Input DIN German Institute for Standardization DO Digital Output EC European Community ESD Electrostatically sensitive modules EMS Electrical Monorail System EMS400S Electric Monorail System 400 Signal EMC Electromagnetic compatibility EN European standard Co. Company FB Function block GND Ground HF High Frequency H Height IEC International Electronically Commission IP Ingress Protection IR Infrared IT Information Technology K Kelvin LED Light Emitting Diode OB Organization block PIQ Process image of outputs PII Process image of inputs PELV Protective Extra Low Voltage PSB-C module Power Signal Booster carrier module PSB-S module Power Signal Booster segment module RJ45 Registered Jack Type 45 SELV Safety Extra Low Voltage SM bus System Management Bus D Depth UL Underwriters Laboratories Inc. VDE Verband der Elektrotechnik, Elektronik und Informationstechnik e. V.

PSB modules Operating Instructions, 03/2014, A5E03474166-03 77
Glossary
ACK bit Acknowledgment bit that is mapped to the PII and PIO of the plant segment controller and carrier controller.
The ACK bit is used to toggle the data flow on the → RAIL between the data to be acknowledged and data that is not acknowledged in the process image.
Bridge bit The bridge bit is used by EMS carriers to reliably recognize the segment bridges. To accomplish this, the parity bit configured in the data frame is formed in → 2 bridge bits as 01 or 10. The bridge bits 11 mean there is a segment bridge. The bridge bit is transferred via → RAIL.
Broadcast The term broadcast denotes the transmission of data packets from a source station to all other nodes on the data network.
Transmission to an → EMS with the carrier controller means the broadcast of dispatch data from one → plant segment controller to all → EMS carriers of a → plant segment.
C data Data that is sent the interface from the → PSB-C module over the → RAIL interface.
Carrier controller The control component of the EMS400S carrier controller consisting of a CPU and a → PSB-C module. The carrier controller controls the → EMS carrier.
Contact conductor Electrical part of the EMS rail. The EMS rail is equipped with 6 contact conductors. The contact conductors are used to supply power to the → EMS carrier and the data communication. The two contact conductors for data communication are called → RAIL.
Control data Data that controls → user data traffic between the PSB modules. The control data are resent with each → data subframe.

Glossary
PSB modules 78 Operating Instructions, 03/2014, A5E03474166-03
Current collector carrier 6 current collectors are mounted to the current collector carrier. The current collectors move inside the → contact conductors and maintain electrical contact. This system ensures uninterrupted power supply and data exchange while the → EMS carrier is moving.
Data subframe The data subframe relates to communication between the PSB-S and PSB-C modules. The data subframe encompasses the START and PRES signals, the → user data, the → control data, the checksum and the time for preparation of the user data.
Device error, general The general device error is a function failure of the → carrier controller that triggers the diagnostic entry → error.
EMS Automatically controlled electric monorail system for internal transport – e.g. a conveyor system.
EMS carrier Mobile component of the → EMS and carrier of the → carrier controller.
EMS rail Component of the carrying structure of the EMS. As carrier rail it serves to suspend and move the → EMS carriers. The → contact conductors installed on the EMS rail provide the means for the power supply and communication. The contact conductors are made of an insulated standard U profile that is contacted on its inside by the current collectors.
The combination of UMC rails and bypass sections forms the rail system of the → EMS.
EMS400S Siemens product name and type of → plant controller with a → carrier controller – particularly for → EMS.
Enable bit The enable bit is mapped to the PIQ of the plant segment/carrier controller and set by the function blocks.
The enable bit enables data transmission to the → RAIL. In the → PSB-S module, the enable signal applies simultaneously to all of its three connected → plant segments.
Glossary
PSB modules Operating Instructions, 03/2014, A5E03474166-03 79
Error The "error" event in the diagnostic buffer of the TIA Portal is equivalent to the "general device error". Such an error is reported, for example, if the → EMS carrier is off power, or if the CPU of the carrier controller is in STOP state. This means that the cause of a general device error is found in the carrier controller, i.e. in its CPU or corresponding → PSB-C module. The carrier controller reports the "error" and the plant segment controller maps it.
Infeed The term infeed denotes the supply of a corresponding medium to a network. In this document, this refers to the power input to a → contact conductor rail of the → EMS rail.
Parity bit The project engineer create a configuration once before commissioning the project to determine the → plant segments of parity 0 and the plant segments of parity 1 that are assigned. Adjacent plant segments require different parities. See also → Bridge bit. Bridge bits 01 are derived from parity 0 and bridge bits 10 are derived from parity 1.
PELV Protective extra-low voltage in accordance with the PELV standard for the protection against electrical shock. PELV is used whenever it is necessary for operational reasons to ground active conductor rails of the extra-low voltage, or equipment bodies.
Presence bit The presence bit is mapped to the PII of the plant segment controller.
The → carrier controller reports its presence by setting the PRES signal as soon as it detects the START signal on → RAIL. The presence bit indicates the PRES signal in the → plant segment controller.
PSB-C module Technology module that is linked to a CPU. The PSB-C module is part of the → carrier controller.
PSB-S module Technology module that is linked to a CPU. The PSB-C module is part of the → plant segment controller.
RAIL RAIL is derived from the English term Railing; in this document it relates to the → EMS rail. In an EMS, the term RAIL denotes the terminals on the → PSB-S and → PSB-C modules, as well as to the → RAIL contact conductor of the → EMS rail and, therefore, to the data connection between the PSB-S and PSB-C modules.

Glossary
PSB modules 80 Operating Instructions, 03/2014, A5E03474166-03
Rail intersection The rail intersection separates the → RAIL contact conductors electrically at the → plant segment transition.
Rail system The total of all → EMS rails of an → EMS.
S data Data that is sent the interface from the → PSB-S module over the → RAIL interface. The S data sent can be both acknowledged and unacknowledged data.
SELV Safety extra-low voltage in accordance with the SELV standard for the protection against electrical shock.
Standby bit The standby bit is mapped to the PII of the carrier controller.
The standby bit is set in the → EMS carrier if the → enable bit is not set in the plant segment controller; the corresponding communication link is free of error in this case. However, no → user data is transmitted.
Synchronization signal The synchronization signal serves to ensure synchronous data transmission from all → plant segment controllers to the → EMS carriers. The synchronization signal is generated by a plant segment controller and transmitted simultaneously to all → plant segment controllers of the → EMS.
User data User data are data and messages transferred between a → plant segment controller and a → carrier controller. User data can be acknowledged or unacknowledged data. User data are a subset of → S and C data. User data → can be sent with each → data subframe.
Validation bit The validation bit is mapped to the PII and PIO of the plant segment controller and carrier controller.
The validation bit identifies valid transmitted and received data.
PSB modules Operating Instructions, 03/2014, A5E03474166-03 81
Index
C Clearance
PSB module, 19 Condensation, 26 Contact person, 75 Convention
Style, 5 Term, 5
D Degree of protection, 59, 61 Device
EMC-compliant installation, 69 Disposal, 53 Disturbance
Pulse-shaped, 69 Sinusoidal, 69
Document Associated, 3 Scope of validity, 4 SIMATIC complete, 75
E EMC test, 68 Environmental condition, 73
Test, 74 ESD, 17
H High frequency radiation, 16
I Illustration, 5 Industry Portal, 75 Installation
EMC-compatible, 69 Intended, 15
Installation as intended, 15 Insulation strength, 58, 61
Interference Cable-bound, 71 Radiated, 71
L LED display, 29, 35
M Main dimensions
PSB module, 55 Moisture protection, 59, 61 Mounting location
PSB module, 19 Mounting position
PSB module, 19
O Office location, 75 Operator control, 22
P Protection against ingress of solid foreign bodies, 59, 61 Protection class, 59, 61 PSB module
Clearance, 19 Main dimensions, 55 Mounting location, 19 Mounting position, 19 Operator control, 22
PSB-C module LED display, 35
PSB-S module LED display, 29
R Radiation
High frequency, 16 Recycling, 53 Repairs, 53 Returns Center, 53

Index
PSB modules 82 Operating Instructions, 03/2014, A5E03474166-03
S Safety
Commissioning, 15 Operation, 15 Project, 15
Scope of delivery Checking, 19
Scope of validity Document, 4
Screw mounting, 23 Service, 75 Support
Technical, 75 Support request, 75
T Technical specifications
Digital input, 60 Electrical system, 59 Mechanical system, 56, 59
Technical support, 75 Technical Support, 75 Test
Climatic, 74 Mechanical, 74
Training center, 75 Transport damage, 19
W Warranty, 17 Wiring
Sequence, 26 Wiring sequence, 26