Embed Size (px)
Citation preview

SimPal-B3 GSM Alarm System User Manual
1

SimPal-B3 GSM Alarm System User Manual
2
CONTENTS Chapter 1: General system overview........................................... 5
1.1 Interview ............................................................................. 5 1.2 Package contents ............................................................... 5 1.3 Wireless alarm panel instruction ......................................... 6
1.3.1 LCD display .................................................................. 7 1.3.2 Keypad ....................................................................... 10 1.3.3 Beep tone ................................................................... 11
Chapter 2: Installation ................................................................ 12
2.1 Installing the wireless alarm panel..................................... 12 2.2 Wall-mounting the wireless alarm panel ............................ 12
Chapter 3: Basic use and settings ............................................. 14
3.1 User authorization level .................................................... 14 3.2 About the SMS Commands ............................................... 14 3.3 Add a Master number to the Wireless Alarm Panel ........... 15 3.4 Change the Master number .............................................. 15 3.5 Define the Family user ...................................................... 16 3.6 Change the password ....................................................... 17 3.7 Entering STANDBY status................................................. 18 3.8 Arming the Panel .............................................................. 18 3.9 ALERT(Doorbell) mode ..................................................... 20
3.9.1 Entering ALERT mode ................................................ 20 3.9.2 Exiting ALERT mode .................................................. 21

SimPal-B3 GSM Alarm System User Manual
3
3.10 HOME mode ................................................................... 22 3.10.1 Entering HOME mode .............................................. 22 3.10.2 Exiting HOME mode ................................................. 24
3.11 Telephone communication with the Panel area ................ 24 3.12 Emergency alarm ............................................................ 24
Chapter 4: Sensors and keychain remote controls .................. 26
4.1 Pairing sensors ................................................................. 26 4.2 Removing sensor from the Panel ...................................... 28 4.3 Renaming the sensor of a zone ........................................ 29 4.4 Special sensors ................................................................ 29
4.4.1 24-hour sensor ........................................................... 29 4.4.2 Accompany sensor ..................................................... 30 4.4.3 Doorbell sensor .......................................................... 31 4.4.4 Keychain remote control ............................................. 31
Chapter 5: Advanced settings .................................................... 34
5.1 Adjusting entry delay......................................................... 34 5.2 Adjusting exit delay ........................................................... 35 5.3 Timed arming the Panel .................................................... 36
5.3.1 Set time period to arm the Panel ................................ 36 5.3.2 Enable/Disable timing arming the Panel ..................... 37 5.3.3 Alarm settings ............................................................ 37
5.3.3.1 Built-in siren warning tone upon alarm triggering .. 37 5.3.3.2 SMS notification upon alarm ................................ 38 5.3.3.3 Call notification upon alarm .................................. 39
5.3.4 Arming/Disarming the Panel by call ............................ 39

SimPal-B3 GSM Alarm System User Manual
4
5.3.5 Acoustic & Optical Alarm ................ 错误!未定义书签。 5.3.6 The audible countdown(Beeper) ................................. 40 5.3.7 Key tones of the Panel ............................................... 41 5.3.8 Backlight of the Panel ................................................. 41 5.3.9 SMS notification upon the power supply changing ...... 42 5.3.10 Getting temperature data .......................................... 42 5.3.11 Temperature alarm.................................................... 43 5.3.12 Weak GSM signal strength alarm ............................. 43 5.3.13 Check working status of the Panel ............................ 44 5.3.14 Resetting the Panel .................................................. 44 5.3.15 Language settings .................................................... 45
Appendix: SMS commands list .................................................. 46

SimPal-B3 GSM Alarm System User Manual
5
Chapter 1: General system overview
1.1 Interview
Thank you for purchasing the SimPal-B3.
The SimPal™ Wireless Alarm System is a quality security system with a wide range of user friendly features. The system is controlled by a Wireless Alarm Panel, which gathers information from wireless sensors placed around and at the entry points of your home or office. If the Wireless Alarm Panel detects somebody moving or a security exceptions, the LCD display will flash and the siren will sound.
A SIM card can be used in the Panel to send out the alarm message by SMS, or making emergency phone calls. The user calls the Panel to listen in live voice or communicate with the morning area.
Details of the functioning and advanced operation of this device are described in this instruction manual.
1.2 Package contents
Please check that all of the following items were included in the package before installing the system:

SimPal-B3 GSM Alarm System User Manual
6
① Alarm panel:1 unit ② Door/Window sensors (433Mhz):1 units ③ PIR detector (433Mhz):1 units ④ Keychain remote controls (433Mhz):2 units ⑤ AC power adapter for wireless alarm panel (12V):1 unit ⑥ User manual:1 unit
1.3 Wireless alarm panel instruction

SimPal-B3 GSM Alarm System User Manual
7
1.3.1 LCD display

SimPal-B3 GSM Alarm System User Manual
8
. GSM Signal strength (only when the SIM card installed)
1- 8 zone status: The Wireless Alarm Panel supports up to 8 zones.
Each zone supports 1 sensor (A doorbell is recognized as a sensor).
After the sensor is loaded onto the zone and the alarm panel
entering into STANDBY status, the zone number will display
accordingly.
ARM mode icon: It shows that the alarm panel is working in
ARM mode. When any of the sensor be triggered, the built-in siren in
the alarm panel will emit loud sound. Meanwhile, all zone numbers
will be displayed as a white number with black background, such as
“ ”.
ALERT mode (doorbell) icon: It shows the Wireless Alarm
Panel is working in ALERT mode. When any of the sensor be
triggered, the doorbell will ring. Meanwhile, all numbers of zone

SimPal-B3 GSM Alarm System User Manual
9
which work in ALERT mode will display as a black number, such as
“2”.
HOME mode icon: It means the Wireless Alarm Panel is working
in HOME mode. Each of the zone can be set working in the ARM or
ALERT mode. The 1-8 zone number will display as a black number
(ALERT mode), or a white number with black background (ARM
mode).
Battery icon: This icon shows power status when the AC power
supply is unplugged or interrupted. 3.7V battery functions as
back-up only. The flashing icon means low battery and the alarm
panel will shut down automatically.
AC Adaptor icon: This icon will appear when the AC adaptor to
the alarm panel is connected to a wall socket.
Numbers: It shows number of phone number, password code,
temperature or time counting down for arming/disarming.
Keypad lock: This icon appears when the keypad operation
pauses for more than 10 seconds and the keypad is locked. Key in
the password code to unlock the keypad.

SimPal-B3 GSM Alarm System User Manual
10
Setting icon: This icon appears when the Wireless Alarm Panel
works in STANDBY mode and the button is pressed. It
means the working mode of the Panel can be set or the sensors can
be loaded.
SOS icon: This icon appears when the Wireless Alarm Panel is
making a panic phone call or the user is listening in the Panel area
by phone.
1.3.2 Keypad
0-9 numeric buttons and 6 function buttons for entering the number and setting the working modes.

SimPal-B3 GSM Alarm System User Manual
11
1.3.3 Beep tone
One beep indicates that you entered a valid password.
Two beeps indicate that an invalid operation was performed.

SimPal-B3 GSM Alarm System User Manual
12
Chapter 2: Installation
2.1 Installing the wireless alarm panel
l Unscrew the battery compartment and remove the battery cover by pulling up from the middle hollow.
l SIM card: Firstly, make sure the GSM SIM card have Caller ID functions activated and the PIN code of the SIM must be deactivated. (Contact your GSM network service provider for support.)
l Insert the SIM card into the slot. Note the metal circuit board is face down.
l Insert a back-up battery (noting the polarity) and plug the AC adaptor into the Wireless Alarm Panel.
l Power on/off: Turn the power switch to “On” position, the Wireless Alarm Panel will power up. Turn the power switch to “OFF” position and it will power off.
l Installing the battery cover by upward bending to make both sides buckle into the slot, drive in the screws, and connect the AC adaptor to a wall socket.
2.2 Wall-mounting the wireless alarm panel
l Locating the wireless alarm panel. The wireless alarm panel should be placed within a few feet of an electrical outlet where it is

SimPal-B3 GSM Alarm System User Manual
13
easily accessible.
l Mark on the wall the points for drilling holes for the wall plugs and mounting screws.
l Drill the holes, insert wall plugs and locate the mounting screws for the Wireless Alarm Panel.
l Drive in screw to fix the magnet on wall.
l Mount the Wireless Alarm Panel onto the wall.
SimPal-B3 GSM Alarm System User Manual
14
Chapter 3: Basic use and settings
3.1 User authorization level
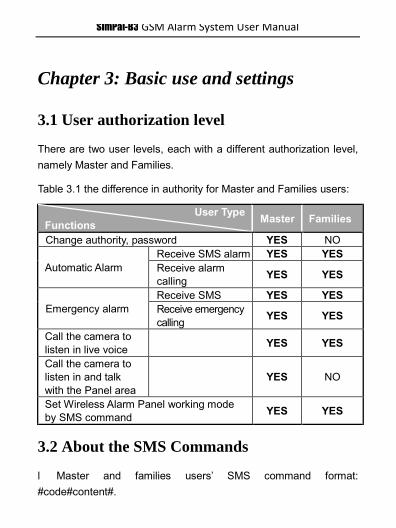
There are two user levels, each with a different authorization level, namely Master and Families.
Table 3.1 the difference in authority for Master and Families users:
User Type Functions Master Families
Change authority, password YES NO
Automatic Alarm Receive SMS alarm YES YES Receive alarm calling YES YES
Emergency alarm Receive SMS YES YES Receive emergency calling YES YES
Call the camera to listen in live voice YES YES
Call the camera to listen in and talk with the Panel area
YES NO
Set Wireless Alarm Panel working mode by SMS command YES YES
3.2 About the SMS Commands
l Master and families users’ SMS command format: #code#content#.

SimPal-B3 GSM Alarm System User Manual
15
l The password must be a four-digit number. The original password is 1234.
l The maximum digits that are allows for the phone number is sixteen.
l After receipt of the command, a SMS reply will be sent to user’s mobile phone.
l No allow any space within the commands.
l The “#” symbol must not be ignored when typing an SMS command.
3.3 Add a Master number to the Wireless Alarm Panel
Only one Master mobile number (Master number) is allowed for the Panel.
The Master user must edit and send the following SMS to the Panel via his/her mobile phone (the phone number will be the Master number) in order to:
Add a Master number to the Panel: #00# (1)
3.4 Change the Master number
The user sends following SMS message in order to:
Change the Master user’s number: #14# NewMaster# (2)

SimPal-B3 GSM Alarm System User Manual
16
l The NewMaster should be the Master user’s mobile phone number. The +CountryCode means the access code for country calling. For example:
In Germany, if the user mobile number is 01712345678, then this command should be #14#+491787654321# (+49 is the country code of Germany, 1787654321 is new Master number).
l In some countries, all that necessary is to send Area Code + the number. For example, the command #14#1787654321# would be sufficient.
3.5 Define the Family user
Up to 4 Family users are set by the Master user.
The Master user edits and sends the following SMS to the Panel in order to:
Add a Family number to the Panel: #06#FamilyNumber# (3)
If the Family number quality is over 4, old Family number must be removed at first and then new Family number can be set.
Delete a Family number: #11#FamilyNumber# (4)
Delete all Family numbers: #11# (5)
l The FamilyNumber should be the Family user’s mobile phone number.

SimPal-B3 GSM Alarm System User Manual
17
3.6 Change the password
In order to ensure your privacy and safety during the use of this Panel, it is recommended that you change the password. There are two methods to change the password:
Method 1: Change the password on the keypad:
Pressing keys Description Display
Ready STANDBY mode
Password (or
),
Unlock the keypad.
Set the password
LCD display flashes with “1”
New password, LCD display
flashes with “2”
New password,
Method 2: The user sends following SMS message in order to: Change the password: #04#oldpassword#newpassword# (6) l The password is a four digit number. l The original password is 1234.

SimPal-B3 GSM Alarm System User Manual
18
3.7 Entering STANDBY status
In STANDBY mode, the Wireless Alarm Panel is prepared for mode
selection and the Panel cannot send out alarm except special
sensor alarm and doorbell. The LCD screen will display the number
of sensors which were paired with the Panel.
There are three methods for entering STANDBY status:
Method 1: By the keypad.
Pressing keys Description Display
Password (or
),
Entering STANDBY
mode
Method 2: By SMS command. The user sends following SMS message in order to: Entering STANDBY status: #02# (7) Method 3: By pressing DISARM button on the keychain remote control.
3.8 Arming the Panel
In ARM mode, the Wireless Alarm Panel is prepared for alarm if any
of the sensor is triggered alarm. The LCD screen will display
icon and numbers of zone which be set working in ARM mode. When the Panel alarms, the built-in siren will be sound and the background light of LCD screen will flashing red.

SimPal-B3 GSM Alarm System User Manual
19
There are three methods for entering ARM mode: Method 1: Entering ARM mode by the keypad:
Pressing keys Description LCD Display
Password (or
),
Entering ARM mode
Numbers of zone which be set working in ARM mode will appear. Such as
Preset the zone which working in ARM mode:
Pressing keys Description LCD Display
Password (or
),
STANDBY mode
ARM mode
Settings
The zone numbers which do not selected in ARM mode will flash.
Pressing number buttons will cancel the ARM mode setting for the zone;
Sensor exits ARM mode
Numbers of zone will cancel.
Pressing again to preset the zone working in ARM mode.
Zone enters ARM mode
Numbers of zone which be set working in ARM mode will appear. Such as
Method 2: By SMS command.

SimPal-B3 GSM Alarm System User Manual
20
The user sends following SMS message in order to: Enter ARM mode: #01# (8) Method 3: By pressing ARM button on the keychain remote control.
3.9 ALERT(Doorbell) mode
In ALERT mode, the Wireless Alarm Panel is prepared for alarm if
any of the sensor is triggered alarm. The LCD screen will display
icon and numbers of zone will display as a black number.
When the Panel alarms, the doorbell will ring.
3.9.1 Entering ALERT mode
Method 1:
Entering ALERT mode by the keypad:
Pressing keys Description LCD Display
Password (or
),
Zone enters
ALERT mode
Numbers of zone which be set working in ALERT mode will display as a black number, such as “2”
Preset the zone which working in ALERT mode:

SimPal-B3 GSM Alarm System User Manual
21
Pressing keys Description LCD Display
Password (or
),
STANDBY
mode
ALERT mode
settings
The zone numbers which do not work in ALERT mode will flash.
Pressing number buttons will cancel the ALERT mode setting for the zone;
Sensor exits ALERT mode
Numbers of zone will cancel.
Pressing again to preset the zone working in ALERT mode.
Zone enters ALERT mode
Numbers of zone which be set working in ALERT mode will display as a black number, such as “2”
Method 2: By SMS command. The user sends following SMS message in order to: Enter ALERT Mode: #03#1# (9) Method 3: By pressing ALERT button on the keychain remote control.
3.9.2 Exiting ALERT mode
Refer to Chapter 3.7 Entering STANDBY mode.
SimPal-B3 GSM Alarm System User Manual
22
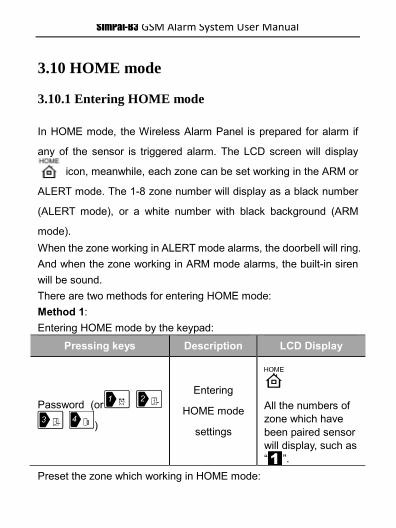
3.10 HOME mode
3.10.1 Entering HOME mode
In HOME mode, the Wireless Alarm Panel is prepared for alarm if
any of the sensor is triggered alarm. The LCD screen will display
icon, meanwhile, each zone can be set working in the ARM or
ALERT mode. The 1-8 zone number will display as a black number
(ALERT mode), or a white number with black background (ARM
mode). When the zone working in ALERT mode alarms, the doorbell will ring. And when the zone working in ARM mode alarms, the built-in siren will be sound. There are two methods for entering HOME mode: Method 1: Entering HOME mode by the keypad:
Pressing keys Description LCD Display
Password (or
)
Entering
HOME mode
settings
All the numbers of zone which have been paired sensor will display, such as “ ”.
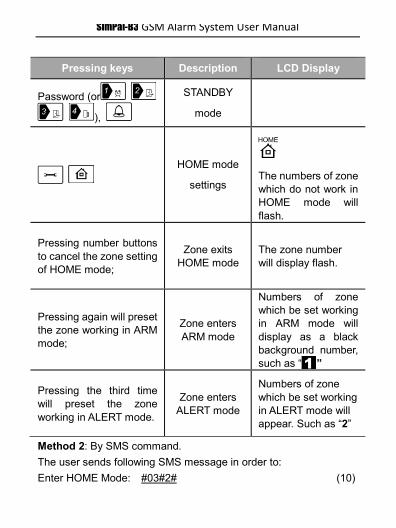
Preset the zone which working in HOME mode:
SimPal-B3 GSM Alarm System User Manual
23
Pressing keys Description LCD Display
Password (or
),
STANDBY
mode
HOME mode
settings
The numbers of zone which do not work in HOME mode will flash.
Pressing number buttons to cancel the zone setting of HOME mode;
Zone exits HOME mode
The zone number will display flash.
Pressing again will preset the zone working in ARM mode;
Zone enters ARM mode
Numbers of zone which be set working in ARM mode will display as a black background number, such as “ ”
Pressing the third time will preset the zone working in ALERT mode.
Zone enters ALERT mode
Numbers of zone which be set working in ALERT mode will appear. Such as “2”
Method 2: By SMS command. The user sends following SMS message in order to: Enter HOME Mode: #03#2# (10)

SimPal-B3 GSM Alarm System User Manual
24
3.10.2 Exiting HOME mode
Refer to Chapter 3.7 Entering STANDBY mode.
3.11 Telephone communication with the Panel area
The Master and Family users call the Wireless Alarm Panel after which it will answer automatically. The user can then listen in the live audio in the monitoring area. Only one line can be connected to the Panel at a time. When the Master user calls the Panel, its Speaker is default opening so that the Master user can communicate with the Panel area. The Master user sends following SMS message in order to: Deactivate the speaker and then listening in the Panel area:
#25#0# (11) Activate the speaker and then talking with the Panel area (Default):
#25#1# (12) Note: For the calling made by the Panel emergency alarm, the speaker could not deactivate by command 12.
3.12 Emergency alarm
When the emergency alarm is triggered, the Wireless Alarm Panel will dial the Master and Family users’ number. The Panel will repeat this process 3 times until someone answers. After 3 attempts, if there is no answer, the Panel will automatically stop dialing and

SimPal-B3 GSM Alarm System User Manual
25
revert to its preset mode. When someone answers the call, he/she will be able to listen in the live audio and talk with the Panel area. The Wireless Alarm Panel will be in emergency mode alarm unconditionally when the following two processes happen:
Method 1: button on the keychain remote control be pressed. Method 2: Sending emergency alarm by the keypad.
Pressing keys Description LCD Display
Password (or
),
Unlock the keypad
Pressing button for 3 seconds
Emergency alarm

SimPal-B3 GSM Alarm System User Manual
26
Chapter 4: Sensors and keychain remote
controls
4.1 Pairing sensors
User can pair wireless sensor with panel by following two methods: Method 1: Loading sensor by keypad.
Pressing keys Description LCD Display
Password (or
),
STANDBY
mode
Entering sensor setting
mode
The zone numbers which have been paired sensor will display with black background, such as “ ”; otherwise, they will display with a black number, such as “2”;
Pressing a number button to choose the zone which is prepare for loading a new sensor.
Choosing a zone
The zone number will flash.

SimPal-B3 GSM Alarm System User Manual
27
The user needs to make the sensor work and transmit signal to be studied by the Panel;
Loading sensor
The zone number which has been successfully loaded sensor will display with black background, such as “ ”
Method 2: By SMS command. 1. The user sends following SMS message in order to: Change the password: #05#ZoneNumber#SensorDescription# (13) l ZoneNumber is one digit zone number which hasn’t been loaded a sensor. l SensorDescription is used for identify different sensors affiliated with each zone. It can be numbers and letters. 2. When the Panel has received the SMS command, it will then send a notification message via SMS to the user stating “Waiting to load wireless sensor, make the sensor work immediately.”, otherwise, it will inform the zone numbers which haven’t been loaded a sensor and then user must resend a correct command to the Panel. 3. The user needs to make the sensor work and transmit signal to be studied by the Panel. E.g. For a wireless door sensor, open and close the door once to send the signal to the Panel. 4. When the Panel receives the sensor signal, it will send a notification message via SMS to the user. The zone number which has been successfully loaded sensor will display with black background, such as “ ”. 5. The Panel will emit “Beep, Beep…” tone if the user want to load

SimPal-B3 GSM Alarm System User Manual
28
an paired sensor which has already been loaded onto the other zone.
6. Press button of the Panel to exit the loading mode manually. Otherwise the Panel will exit the loading mode
automatically after 30 seconds.
4.2 Removing sensor from the Panel
Method 1: Removing sensor by the keypad:
Pressing keys Description LCD Display
Password (or
),
STANDBY
mode
Entering sensor setting
mode
The zone numbers which have been paired sensor will display, such as “ ”
Pressing a number button to choose the zone which is waiting for removing the sensor.
Choosing a zone
The zone number will flash.
Confirm
The sensor will be removed from the zone and then the zone number will display as a black number, such as

SimPal-B3 GSM Alarm System User Manual
29
“2”.
Method 2: By SMS command. The user sends following SMS message in order to: Removing the sensor from a zone: #26#ZoneNumber# (14) Removing all sensors from the Panel: #26# (15)
4.3 Renaming the sensor of a zone
The user sends following SMS message in order to: Renaming the sensor of a zone: (16)
#27#ZoneNumber#SensorDescription# l ZoneNumber is one digit zone number which the sensor is loaded.
l SensorDescription is used for identify sensor. It can be numbers and letters.
4.4 Special sensors
The Wireless Alarm Panel supports up to 8 special sensors which is paired with the Panel, but their information will not display on the zone.
4.4.1 24-hour sensor
No matter what working mode the Wireless Alarm Penal is working

SimPal-B3 GSM Alarm System User Manual
30
in, if the 24-hour sensor is triggered, the Panel will alarm unconditional, such as smoke sensor, gas sensor etc. The working status of 24-hour sensor do not show on the LCD screen. When it triggers alarm, the Panel will send notification message by SMS or make phone call to the user. The user sends following SMS message in order to: Pairing a 24-hour sensor: #15#1#SensorDescription# (17) Removing a 24-hour sensor: #15#1# (18)
4.4.2 Accompany sensor
An accompany sensor could be a PIR motion sensor which be used to take care of the elderly and children. If the Panel do not receive the accompany sensor alarm signal within a preset period of time, the Panel will send notification message by SMS or make phone call to the user. The user sends following SMS message in order to: Pairing an accompany sensor: #15#2#SensorDescription# (19) Set the time period for accompany sensor: #28#Time# (20) Activate the accompany sensor: #29#1# (21) Deactivate the accompany sensor: #29#0# (22) Removing all accompany sensors: #15#2# (23) l SensorDescription is used for identify different accompany sensor. It can be numbers and letters. l The Time is a minimum time period which the Panel receives alarm signal from accompany sensor. Its values should be in the range from 30-300 minutes. The default value is 30 minutes. l Note: The alarm signal from all activated accompany sensors

SimPal-B3 GSM Alarm System User Manual
31
could be a valid signal within the preset time period.
4.4.3 Doorbell sensor
When the Panel receives signal from doorbell sensor, the doorbell rings will be sound unconditional. The user sends following SMS message in order to: Pairing a doorbell sensor: #24#SensorDescription# (24) Removing all doorbell sensors: #24# (25) l SensorDescription is used for identify different doorbell sensor. It can be numbers and letters.
4.4.4 Keychain remote control
Arm the Panel button: Pressing this button to arm the Panel. The Panel will enter the preset working mode, such as ARM mode, ALERT mode or HOME mode. Disarm the Panel button: Pressing this button to disarm the Panel. The Panel will enter STANDBY mode.

SimPal-B3 GSM Alarm System User Manual
32
Panic button: Pressing this button, the Panel will be triggered emergency alarm. There are two methods for pairing/removing the keychain remote control: Method 1: By the keypad Pair keychain remote control:
Pressing keys Description LCD Display
Password (or
),
STANDBY mode
Entering remote control
settings
Press any button of keychain remote control.
Pairing remote control
One BEEP tone be sound.
The Panel will emit “Beep, Beep” tones if the keychain remote control has been paired with the Panel. Remove keychain remote control by the keypad:
Pressing keys Description LCD Display
Password (or
),
STANDBY mode
Entering remote control
settings

SimPal-B3 GSM Alarm System User Manual
33
Press button and hold for 3 seconds.
Removing remote control
One BEEP tone be sound.
Method 2: By sending SMS message The user sends following SMS message in order to: Removing all keychain remote controls: #17# (26)

SimPal-B3 GSM Alarm System User Manual
34
Chapter 5: Advanced settings
5.1 Adjusting entry delay
The default setting of the Wireless Alarm Panel allows the user 30 seconds to enter the property and DISARM the alarm before it is triggered. However, this Entry Delay can be adjusted to between 0-60 seconds. Method 1: By the keypad Presetting entry delay:
Pressing keys Description LCD Display
Password (or
),
STANDBY mode
Entering entry delay settings
The LCD screen flashes with the
number of seconds currently set for the Entry Delay (Default
setting is 30 seconds)
Each time is pressed the Entry Delay is increased by a further 10 seconds.
Setting entry delay
The Entry Delay time will be adjusted
between the adjustable range of
0-60 seconds.

SimPal-B3 GSM Alarm System User Manual
35
Confirm Return the Panel to STANDBY mode.
Method 2: By sending SMS message The user sends following SMS message in order to: Setting entry delay: #16#1#Time# (27) l The Time values should be in the range from 0-60 second(s). 0 means no entry delay.
5.2 Adjusting exit delay
The default setting of the Wireless Alarm Panel allows the user 30 seconds to exit the property before the alarm is ARMED. However, this Exit Delay can be adjusted to between 0-60 seconds. Method 1: By the keypad
Pressing keys Description LCD Display
Password (or
),
STANDBY mode
Entering Exit
Delay settings
The LCD screen flashes with the
number of seconds currently set for the Exit Delay (Default
setting is 30 seconds)
Each time is pressed the Exit Delay is increased by a further 10 seconds.
Setting Exit Delay
The Exit Delay time will be adjusted
between the adjustable range of
0-60 seconds.

SimPal-B3 GSM Alarm System User Manual
36
Confirm Return the Panel to STANDBY mode.
Method 2: By sending SMS message The user sends following SMS message in order to: Setting exit delay: #16#2#Time# (28) l The Time values should be in the range from 0-60 second(s). 0 means no entry delay.
5.3 Timed arming the Panel
The Wireless Alarm Panel will arm automatically according to the schedule.
5.3.1 Set time period to arm the Panel
The user sends the following SMS message in order to: Set time period to arm the Penal: #22#WorkDay#ArmTime1#DisarmTime1#ArmTime2#DisarmTime2# (29) l Up to 2 periods be allowed per workday. Each period time should set by ArmTime, DisarmTime. l WorkDay: single digit, in the range of “0” to “9”. The following table contains the descriptions of each value:
Value Corresponding day 0 Sunday 1 Monday 2 Tuesday 3 Wednesday 4 Thursday 5 Friday

SimPal-B3 GSM Alarm System User Manual
37
6 Saturday 7 Everyday 8 Monday to Friday 9 Saturday and Sunday
l ArmTime and DisarmTime: Be consists of 4 digits (hh:mm) and works on a 24 hour clock. For example: 0000 means time 00:00(hh:mm), 2359 means time 23:59(hh:mm). The ArmTime and DisarmTime should be in the same day, and the DisarmTime must be later than ArmTime during the same period.
5.3.2 Enable/Disable timing arming the Panel
The user sends the following SMS message in order to: Enable timing arming the Panel: #23#1# (30) Disable timing arming the Panel: #23#0# (31)
5.3.3 Alarm settings
5.3.3.1 Built-in siren warning tone upon alarm triggering
In ARM mode, when the Wireless Alarm Panel is triggered alarm, the built-in siren will be sound (110dB). Method 1: By the keypad
Pressing keys Description LCD Display
Password (or
),
STANDBY mode

SimPal-B3 GSM Alarm System User Manual
38
Entering time
settings
The LCD screen flashes with the
number of minutes currently set for the
siren sounded time(Default 1
minute) when the Panel alarms
Each time is pressed the time is increased by a further 1 minute.
Setting siren sounded time
The siren sounded time will be adjusted
between the adjustable range of 0-6 minutes. Time 0 means the siren will not sound when the
Panel alarms.
Confirm Return the Panel to STANDBY mode.
Method 2: By sending SMS message The user sends following SMS message in order to set: Siren sounded time: #12#Time# (32) l The Time values should be in the range from 0-6 minute(s). 0 means no siren sound. Default Time value is 1.
5.3.3.2 SMS notification upon alarm
When the Wireless Alarm Panel is triggered alarm by a sensor, it will send SMS notification message to the user’s mobile phone.

SimPal-B3 GSM Alarm System User Manual
39
The user sends the following message via SMS to the Wireless Alarm Panel in order to: Activate the SMS notification upon sensor alarm(Default):
#18#1# (33) No SMS notification upon sensor alarm: #18#0# (34) Activate the SMS notification upon doorbell alarm when in ALERT or HOME mode: #19#1# (35) No SMS notification upon doorbell alarm when in ALERT or HOME mode (Default): #19#0# (36)
5.3.3.3 Call notification upon alarm
When the Wireless Alarm Panel is triggered alarm, it will make phone call to the user’s mobile phone. The user sends the following message via SMS to the Wireless Alarm Panel in order to: Activate call notification upon alarm(Default): #20#1# (37) No call notification upon alarm: #20#0# (38) Activate call notification upon doorbell alarm: #21#1# (39) No call notification upon doorbell alarm(Default): #21#0# (40)
5.3.4 Arming/Disarming the Panel by call
The Wireless Alarm Panel can be set arming or disarming by making phone call remotely by the user. The user sends the following message via SMS to the Wireless Alarm Panel in order to:

SimPal-B3 GSM Alarm System User Manual
40
Activate arming/disarming by call(Default): #32#1# (41) Deactivate arming/disarming by call: #32#0# (42)
5.3.5 The audible countdown(Beeper)
When the Wireless Alarm Panel is ARMED the audible countdown
can be silenced by pressing the button during the countdown.
To reactivate the audible countdown simply press button
again. Method 1: By the keypad
Pressing keys Description LCD Display
Password (or
),
STANDBY mode
Audible countdown
settings
Audible countdown is default activated.
Press again will mute or activate the audible countdown.
Muting the audible
countdown
Method 2: By sending SMS message The user sends the following message in order to: Activate the audible countdown when entering (Default):
#09#1# (43) Mute the audible countdown when entering: #09#0# (44)

SimPal-B3 GSM Alarm System User Manual
41
5.3.6 Key tones of the Panel
When the buttons of the Panel is pressed, the key tones will default be sound. The user sends the following message in order to: Activate the key tones: #10#1# (45) Mute the key tones (Default): #10#0# (46)
5.3.7 Backlight of the Panel
The backlight of the Panel LCD screen can be turn on/off by the following two methods: Method 1: By the keypad
Pressing keys Description LCD Display
Password (or
),
STANDBY mode
Backlight settings
The backlight will flash red one time, that means it is turning on.
Press again will turn on or turn off the backlight.
Turning on/off the backlight
The backlight will turning off.
Method 2: By sending SMS message The user sends the following message in order to: Turning on the backlight (Default): #13#1# (47) Turning off the backlight: #13#0# (48)

SimPal-B3 GSM Alarm System User Manual
42
5.3.8 SMS notification upon the power supply changing
The Wireless Alarm Panel will notify the user whenever the power supply changes status. If the power adapter is disconnected or when a failure of the AC power occurs, the Panel will notify the user “External power cut. The device is operating on battery.” If the Panel is again connected to the external power, or the AC power is available again, a notification will be sent to the user stating “The device is now resuming the use of external power source.” The user sends the following message in order to: SMS notification upon the power supply changing (Default):
#35#1# (49) No SMS notification upon the power supply changing:
#35#0# (50)
5.3.9 Getting temperature data
The Wireless Alarm Panel has a built-in thermometer. It also supports an external wireless thermometer which should be placed near the Panel. The external wireless thermometer needn’t pair with the Panel. The user sends the following message in order to: Get the temperature data from the built-in thermometer:
#30#1# (51) Get the temperature data from the external wireless thermometer: #30#2# (52) After receipt of the command, the Panel will send the temperature data via SMS message to the user.

SimPal-B3 GSM Alarm System User Manual
43
5.3.10 Temperature alarm
The Wireless Alarm Panel has a built-in thermometer and it also supports an external wireless thermometer. A range of temperature can be pre-set for the thermometers. In this case, if the surroundings temperature is detected out of the pre-set temperature range, the Panel will auto-send the SMS alarm message to the user’s mobile phone. The user sends the following message in order to: Enable over-temperature alarm: #31#1# (53) Set limits of temperature for built-in thermometer:
#31#2#MinTemp#MaxTemp# (54) Set limits of temperature for external thermometer:
#31#3#MinTemp#MaxTemp# (55) l MinTemp and MaxTemp: The values can be set within the range of -20 to 60 centigrade degree. l Default MinTemp is 20 and MaxTemp is 30 centigrade degree. Disable the alarm upon going beyond limits temperature:
#31#0# (56)
5.3.11 Weak GSM signal strength alarm
The Wireless Alarm Panel can be set sending out alarm via SMS message when the GSM signal strength is too weak to maintain normal working status. The user sends the following message in order to: Get the GSM signal strength data: #36# (57) Activate the weak GSM signal strength alarm (Default):

SimPal-B3 GSM Alarm System User Manual
44
#36#1# (58) After receipt of this command, if the GSM signal strength level is below 10, the Panel will send weak GSM signal alarm message to the user by SMS. Deactivate the weak GSM signal strength alarm: #36#0# (59)
5.3.12 Check working status of the Panel
The user sends the following message in order to: Check the Panel operating status: #07# (60) After receiving the SMS commands, the Panel will reply one SMS message of working status checking for Master number, Arming/Disarming mode status, Temperature and GSM strength level.
5.3.13 Resetting the Panel
This function resets all programmed settings of Wireless Alarm Panel to their original factory values, including cleaning all user number, timing parameter and temperature parameter etc. If the setting status is wrong or the malfunctions can’t be corrected, the Panel can be restored to its original factory status to make it work normally. The connected sensors will not clean after resetting the panel. Method 1: Press the SET key of the Panel for 5 seconds. Method 2: The user sends the following message in order to: Check the Panel operating status: #08#Password# (61) After receiving the SMS commands, a long “Beep” tone will be heard,
SimPal-B3 GSM Alarm System User Manual
45
it means resetting the Panel successfully, and then the Panel will reply one message via SMS.
5.3.14 Language settings
The user sends the following message in order to: Choose English machine language: #37#1# (62) Choose optional machine language: #37#0# (63)

SimPal-B3 GSM Alarm System User Manual
46
Appendix: SMS commands list Function Command
(1)Add a Master number to the Panel #00#
(2) Change the Master user’s number #14#NewMaster#
(3) Add a Family number to the Panel #06#FamilyNumber#
(4) Delete a Family number #11#FamilyNumber#
(5) Delete all Family numbers #11#
(6)Change the password #04#Old#new#
(7)Entering STANDBY status #02#
(8)Entering ARM mode #01#
(9)Entering ALERT mode #03#1#
(10)Entering HOME mode #03#2#
(11)Deactivate the speaker and then listening in the Panel area #25#0#
(12)Activate the speaker and then talking with the Panel area (Default) #25#1#
(13)Loading sensor #05#ZoneNumber#SensorDescription#
(14)Removing the sensor from a zone #26#ZoneNumber# (15)Removing all sensors from the Panel #13#
(16)Renaming the sensor of a zone #27#ZoneNumber#SensorDescription#

SimPal-B3 GSM Alarm System User Manual
47
Function Command
(17)Pairing a 24-hour sensor #15#1#SensorDescription#
(18)Removing a 24-hour sensor #15#1#
(19)Pairing an accompany sensor #15#2#SensorDescription#
(20)Set the time period for accompany sensor #28#Time#
(21)Activate the accompany sensor #29#1#
(22)Deactivate the accompany sensor) #29#0#
(23)Removing all accompany sensors #15#2#
(24)Pairing a doorbell sensor #24#SensorDescription#
(25)Removing all doorbell sensors #24# (26)Removing all keychain remote controls。 #17#
(27)Setting entry delay #16#1#Time#
(28)Setting exit delay #16#2#Time#
(29) Set time period to arm the Penal #22#WorkDay#ArmTime1#DisarmTime1#ArmTime2#DisarmTime2#
(30) Enable timing arming the Panel #23#1#
(31) Disable timing arming the Panel #23#0#
(32) Siren sounded time #12#time# (33) Activate the SMS notification upon sensor alarm(Default) #18#1#
(34) No SMS notification upon sensor alarm #18#0#

SimPal-B3 GSM Alarm System User Manual
48
Function Command
(35) Activate the SMS notification upon doorbell alarm when in ALERT or HOME mode
#19#1#
(36) No SMS notification upon doorbell alarm when in ALERT or HOME mode (Default)
#19#0#
(37) Activate call notification upon alarm(Default) #20#1#
(38) No call notification upon alarm #20#0# (39) Activate call notification upon doorbell alarm #21#1#
(40) No call notification upon doorbell alarm(Default) #21#0#
(41) Activate arming/disarming by call(Default) #32#1#
(42) Deactivate arming/disarming by call #32#0#
(43) Activate the audible countdown when entering (Default) #09#1#
( 44) Mute the audible countdown when entering #09#0#
(45) Activate the key tones #10#1#
(46) Mute the key tones (Default) #10#0#
(47) Turning on the backlight (Default) #13#1#
(48) Turning off the backlight #13#0# (49) SMS notification upon the power supply changing (Default) #35#1#
(50) No SMS notification upon the #35#0#

SimPal-B3 GSM Alarm System User Manual
49
Function Command
power supply changing
(51) Get the temperature data from the built-in thermometer #30#
(52) Get the temperature data from the external wireless thermometer #30#2#
(53) Enable over-temperature alarm #31#1# (54) Set limits of temperature for built-in thermometer
#31#2#MinTemp#MaxTemp#
(55) Set limits of temperature for external thermometer
#31#3#MinTemp#MaxTemp#
(56) Disable the alarm upon going beyond limits temperature #31#0#
(57) Get the GSM signal strength data #36# (58) Activate the weak GSM signal strength alarm (Default) #36#1#
(59) Deactivate the weak GSM signal strength alarm #36#0#
(60) Check the Panel operating status #07#
(61) Check the Panel operating status #08#Password#
(64) Choose English machine language #37#1# (65) Choose optional machine language #37#0#

SimPal-B3 GSM Alarm System User Manual
50