Embed Size (px)
Citation preview

Simple and Compound Machines ModuleThird Grade
Grace BusseLaura Smalling
December 8th, 2008Elementary Science Curriculum and Instruction

2
Overview
Description of StudentsMrs. Miller’s class is a 3rd grade class at Stonehouse Elementary School in James City County, VA. The class
is made up of 22 students; 10 female students and 12 male students. The students are between the ages of 8 and 9. The students are primarily Caucasian, with two African American males, one biracial student of Caucasian and African American descent, and one biracial student of Caucasian and Bolivian descent. All of the students in the class speak English as their native language. Most of the students are of a middle class socioeconomic status, though there are a few students who live with their families in low-income housing. There are no special needs students in the classroom, however one student has been grouped in a low-ability math class and another is suspected of a possible attention disorder, but is undiagnosed. There are several gifted students in the class in both reading and math. Overall, the class is on grade level; there are only a handful of students who tested below grade level in reading and math.
This module is designed to be used in a third grade classroom. Ms. Mooney’s classroom is made up of 20 students, 11 male and 9 female. The student’s age range is between 8 and 9 years old. The range of students’ ability varies covering below grade level students to students who are above grade level and in the Visions program. It is an inclusive classroom which includes six children who are labeled special education for an assortment of reasons (hearing impairment, behavioral issues, attention deficit, etc.) The students are interested in science and enjoy discovering new things. The students prefer hands on activities where they are able to stretch their creativity and think in an inquisitive way. When grouping students the teacher should be mindful of creating heterogeneous groups varying the level of academic ability as well as being aware of students that would work well together. A few students will need extra support and attention when working in small groups as well as when doing individual assignments.
Theme/QuestionThe overarching question driving the investigation in this module is: “What are simple and compound machines?”
The module also attempts to address the following sub-questions: “What are simple machines?” and “what are examples of simple machines?” To answer these questions, the following questions will be asked and investigated: “what is a lever?”, “what is an inclined plane?”, “what is a wheel and axle?”, “what is a pulley?”, “what is a wedge?” and “what is a screw?”, as well as “what are examples of simple machines in our school” , “how are these simple machines used?”, and “what is the purpose of simple machines?” To investigate compound machines, the module asks “what are compound machines?” and “what makes up a compound machine?” Types of compound machines will be investigated by asking “what are examples of compound machines in our schools and at home?” Students will explore the construction of a compound machine in answering the questions “how are compound machines made from simple machines?” and will also explore the question “how do compound machines help us?”
3
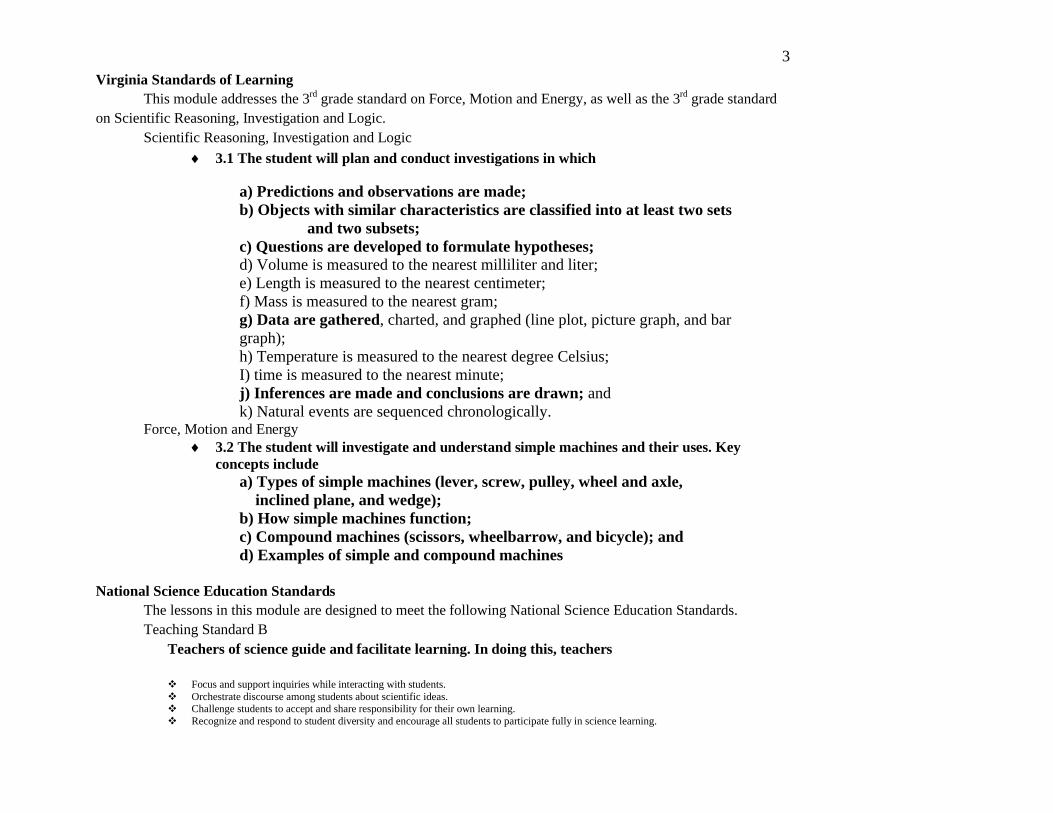
Virginia Standards of LearningThis module addresses the 3rd grade standard on Force, Motion and Energy, as well as the 3rd grade standard
on Scientific Reasoning, Investigation and Logic. Scientific Reasoning, Investigation and Logic
3.1 The student will plan and conduct investigations in which
a) Predictions and observations are made;b) Objects with similar characteristics are classified into at least two sets
and two subsets;c) Questions are developed to formulate hypotheses;d) Volume is measured to the nearest milliliter and liter;e) Length is measured to the nearest centimeter;f) Mass is measured to the nearest gram;g) Data are gathered, charted, and graphed (line plot, picture graph, and bar graph);h) Temperature is measured to the nearest degree Celsius;I) time is measured to the nearest minute;j) Inferences are made and conclusions are drawn; andk) Natural events are sequenced chronologically.
Force, Motion and Energy 3.2 The student will investigate and understand simple machines and their uses. Key
concepts includea) Types of simple machines (lever, screw, pulley, wheel and axle, inclined plane, and wedge);b) How simple machines function;c) Compound machines (scissors, wheelbarrow, and bicycle); andd) Examples of simple and compound machines
National Science Education StandardsThe lessons in this module are designed to meet the following National Science Education Standards.Teaching Standard B
Teachers of science guide and facilitate learning. In doing this, teachers
Focus and support inquiries while interacting with students. Orchestrate discourse among students about scientific ideas. Challenge students to accept and share responsibility for their own learning. Recognize and respond to student diversity and encourage all students to participate fully in science learning.

4 Encourage and model the skills of scientific inquiry, as well as the curiosity, openness to new ideas and data, and skepticism that
characterize science.
Teaching Standard CTeachers of science engage in ongoing assessment of their teaching and of student learning. In doing this, teachers
Use multiple methods and systematically gather data about student understanding and ability. Analyze assessment data to guide teaching. Guide students in self-assessment. Use student data, observations of teaching, and interactions with colleagues to reflect on and improve teaching practice. Use student data, observations of teaching, and interactions with colleagues to report student achievement and opportunities to learn to
students, teachers, parents, policy makers, and the general public.
Teaching Standard D
Teachers of science design and manage learning environments that provide students with the time, space, and resources needed for learning science. In doing this, teachers
Structure the time available so that students are able to engage in extended investigations. Create a setting for student work that is flexible and supportive of science inquiry. Ensure a safe working environment. Make the available science tools, materials, media, and technological resources accessible to students. Identify and use resources outside the school. Engage students in designing the learning environment.
Teaching Standard E
Teachers of science develop communities of science learners that reflect the intellectual rigor of scientific inquiry and the attitudes and social values conducive to science learning. In doing this, teachers
Display and demand respect for the diverse ideas, skills, and experiences of all students. Enable students to have a significant voice in decisions about the content and context of their work and require students to take
responsibility for the learning of all members of the community. Nurture collaboration among students. Structure and facilitate ongoing formal and informal discussion based on a shared understanding of rules of scientific discourse. Model and emphasize the skills, attitudes, and values of scientific inquiry.
Assessment Standard B
Achievement and opportunity to learn science must be assessed.
Achievement data collected focus on the science content that is most important for students to learn.

5 Opportunity-to-learn data collected focus on the most powerful indicators. Equal attention must be given to the assessment of opportunity to learn and to the assessment of student achievement.
Content Standard A
As a result of activities in grades K-4, all students should develop
Abilities necessary to do scientific inquiry Understanding about scientific inquiry
ConnectivityAll of the lessons in this module relate back to the main question of “what are simple and compound
machines?” Our first lesson, the Simple Machines Introduction, lays down the groundwork for students’ understanding of these concepts. In the first lesson, students are introduced to the term “simple machine” and are briefly exposed to the different types of simple machines. This lesson then goes on to teach students about the first type of simple machine on their list, the lever. Subsequent lessons will explore each of the remaining five simple machines: inclined planes, screws, wheels and axles, pulleys, and wedges. Each of these lessons relates back to the introductory lesson. Additionally, several lessons draw on information about other types of simple machines. In the lesson about screws, the relationship between inclined planes (discussed the previous day) and screws is explored. In the lesson about wedges, the relationship between wedges and inclined planes is discussed, relating back to a previous lesson. The final simple machine lesson, centered on exploring the simple machines found in the school, integrates knowledge learned in the previous six days about each different type of simple machine. Students conduct an investigation in which they must find examples in each of the six simple machine categories. Lessons about compound machines connect to those about simple machines because the relationship between compound machines and simple machines (that compound machines are made of two or more simple machines) is explored. In the introductory lesson on compound machines, students must identify the simple machines that compose different compound machines, drawing upon knowledge from previous lessons. In the subsequent lesson on compound machines, students must use the knowledge about compound machines acquired the previous day in order to identify how compound machines can be used in their school and at home. Finally, in a culminating project, students will synthesize the knowledge learned about each type of simple machine and compound machines in order to create a compound machine using simple machines.
The topic of simple machines is one that relates easily to the every day lives of students. Whether or not they have realized it, students use simple machines in their everyday routines, even in unexpected ways (such as opening a door or taking a lid off of a jar). To ensure that students see the connections between simple machines and compound machines discussed in class and their daily lives, several lessons in our module have been designed to explicitly relate

6
the content of simple and compound machines to the students. One lesson requires students to explore the variety of examples of simple machines found in their school. A second lesson requires students to propose a problem in school or at home that can be solved using a compound machine found in the home or school.
Nature of Science and Inquiry-Based ActivitiesThis module addresses some of the scientific reasoning, investigation, and logic standards of learning for the
3rd grade. Nearly every lesson requires students to make some sort of observations about an object and keep a record of their observations. Some of the lessons take this a step further, requiring students to record predictions before and observations during and after an activity. For instance, the lesson on inclined planes asks students to record predictions about whether the inclined plane will make lifting an object to a higher point easier. The lesson about screws asks students to record what they know about screws before experimenting and then record observations and create a personal definition of a screw during exploration. In the lessons about simple machines in the school and the lesson about wheel-and-axles, the students will make observations that require them to compare and contrast the characteristics of objects and determine what differentiates one set of objects from another (e.g. simple machines from non-simple machines). The lesson about simple machines in the school also requires students to research and gather data answering the question: “which simple machines are found in our school?” The lesson about compound machines in the school and home allows students to develop a question or pose a problem and then propose and investigate a solution to that question. The final lesson, in which students design compound machines, allows students to conduct their own scientific investigation, using self-selected materials to create a self-designed product that meets certain pre-established criteria (it must be a compound machine).
All of the lessons are designed to be inquiry based. In each lesson, students are given the opportunity to explore with materials, either making predictions or observations, conducting surveys and gathering data, or creating examples of the simple or compound machine being studied each day. Almost all of the lessons involve some sort of hands-on experience with a real example of a simple or compound machine, with the exception of the lessons about simple and compound machines found in the school and at home. Each lesson about a simple machine (lever, inclined plane, screw, pulley, wedge, and wheel-and-axle) provides students with the opportunity to either make observations about a real-world example of a simple machine that they can physically touch (e.g. the wheel-and-axle observations) or conduct an investigation using tools to make a simple machine (e.g. the cardboard tube lever).Many of the lessons, including those about the inclined plane, screw, pulley, wedge, and wheel-and-axle, as well as the introductory lesson about compound machines and the lesson in which students create a compound machine, allow students to investigate or use real materials (in this case, real examples of simple and compound machines brought into the classroom) in their exploration.

7
Technology and SafetyThough most of our lessons do not necessarily use technology explicitly, there are many opportunities to use
technology should one desire to do so. The lesson on simple machines in the school does require that the teacher use Microsoft Excel and a document camera in order to make a class master list of simple machines found in the school. One option would be to have students do the same task, either in Excel or in a program such as Kidspiration. Each group of students could be assigned a laptop and come up with a group list of simple machines to present to the class. Several of the lessons could allow students to use programs such as Microsoft PowerPoint in order to present their findings; for instance, in the lesson about compound machines in the school and home students could make a presentation to show the class the problem they posed and the compound machine they chose to solve it. With teacher and parent volunteer assistance, students can use tools such as drills to construct their own compound machines. Students could also use the internet to research how to build a compound machine.
Many of these lessons require the teacher to bring in materials that may pose a minor danger to students if used improperly. For instance, the lesson on levers includes students interacting with a cinderblock. Necessary precautions must be taken such that students do not injure themselves. The teacher will model appropriate behavior with any material that may be deemed dangerous to students. To minimize harm, one student in each group will be designated as the only person to use the potentially dangerous material. In the lessons that require examples of simple or compound machines, the teacher should take care to make sure that the objects students will be touching do not have sharp edges, or if they do, the teacher should closely monitor interaction with that object. One way to ensure a safe environment is to ask for parent volunteers to come in to the classroom to assist in monitoring the students’ activities. This is necessary on the day when students will be venturing out of the classroom and exploring examples of simple machines in the school; a parent should supervise each group. Additionally, the teacher should take care that proper safety is maintained whenever students are conducting an investigation. Gloves and goggles will be provided whenever necessary. On the day of compound machine construction, parent volunteers will come in to the classroom to help students use tools and other potentially harmful materials.
Rationale
In Third grade students are taught about the importance of simple and compound machines. When teaching about simple and compound machines students need to first understand that simple machines are tools that make work easier. Work is when you use force to move an object. Some examples of tasks made easer include lifting a heavy weight, moving a heavy object, pushing things apart, changing the direction of a force, or holding an object together. Students may not have thought about how many simple machines they use on a daily basis and how important they are to making our lives easier and accomplishing tasks that we could not without simple machines. This module will use inquiry based teaching through the learning

8
cycle to introduce all of the six simple machines: the lever, inclined plane, wedge, screw, pulley, and wheel and axle. Through exploring these simple machines students will learn firsthand how simple machines make it require less energy to do things or redirects energy to make a task easier and more efficient for people. In this module students will also learn about compound machines and how simple machines can be combined to create more useful tools. Children will conceptualize how these machines are useful to themselves and to our society by making work easier. This module will help develop student’s interest in building and creating new things that can improve people’s lives.

9
Schedule of Lessons
Day 1 What are simple machines? /What is a lever? Day 6 What is a wheel-and-axle?
Daily Question: What is a simple machine? What do simple machines do? What is a lever?
Daily Question: What is a wheel-and-axle? What objects have a wheel and axle?
Learning Outcomes: Students will be introduced to simple machines. They will become familiar with the terminology "simple machine" and will learn the different types of simple machines. Students will then conduct an exploration of the lever. They will see the lever in action and then create their own lever. The class will come up with a definition of "lever" and discuss the advantages of levers. They will explore other examples of levers, and then explore which items can be best used as a lever.
Learning Outcomes: Students will investigate the simple machine wheel-and-axle in this lesson. To start, students will explore three different examples of wheels and axles. They will investigate a doorknob, wagon, and rolling pin, thinking about how each item works and making comparisons between the three objects. Students will then discover how each is an example of a wheel and axle. Students will discuss each object, think of other examples of wheel-and-axles, and finally will create their own wheel-and-axle object.
Assessment: The teacher will observe students' contributions to class and group discussions about levers and their functions. For formal assessment, the teacher will collect the students' record sheet made about the students self-created lever exploration.
Assessment: Students will be informally assessed based on their responses in groups and in class discussions about wheels and axles. Students' answers will be recorded as a class list on chart paper for teacher reference. Students' ability to create a functioning wheel-and-axle will also be assessed.
Day 2 What is an inclined plane? Day 7 Which simple machines can I find at school?
Daily Question: What is an inclined plane? How is it used?
Daily Question: How are simple machines used in the world around me? Which simple machines can be found at our school?
Learning Outcomes: Students will explore a variety of examples of inclined planes. They will discuss obvious examples, such as ramps, as well as examples like stairs and ladders. Students will then experiment to observe differences in the amount of force needed to move objects using different methods (inclined plane and non-inclined plane). Students will determine that inclined planes make it easier to move objects with less work.
Learning Outcomes: Students will identify the differences between examples of simple and non-simple machines in their everyday world. They will be able to discuss what makes an object a simple machine. Students will then discover that simple machines can be found in their school and will explore the variety of examples of simple machines found at school. Finally, students will determine how simple machines help us at school.

10
Assessment: The teacher will assess student responses during class discussion. Students will write in their journals what they know about inclined planes, which the teacher will collect. Students will also make predictions about whether or not an inclined plane will make an object easier to move, and then write observations that support or disprove their predictions. The teacher will collect and assess student journal responses.
Assessment: Students will be assessed based on the quality of their responses in class discussions. Because they have had several days of instruction on the topic of simple machines, their explanations of what makes certain objects simple machines should reflect prior knowledge of the topic. Students will turn in to teacher a list of simple machines found in school and will be graded based upon creativity of their examples, number of examples found, and variety of examples.
Day 3 What is a screw? Day 8 What is a compound machine?
Daily Question: What is a screw? How are screws used in everyday life?
Daily Question:What makes something a compound machine? What are compound machines made of? Can you think of examples?
Learning Outcomes: Students will begin lesson by comparing screws of different lengths. Then, students will examine non-obvious examples of screws (jar lids, wrenches, spiral staircases, light bulbs, etc.) and determine whether they are a screw. The class will work together to determine a definition of a screw. Finally, students will do an activity investigating the relationship between inclined planes and screws.
Learning Outcomes: In this lesson, students will discover what a compound machine is and what it is made of. They will first observe how the separate parts of a bicycle (a compound machine) are also simple machines. They will then make observations about different examples of compound machines, making note of the function of the machines and how they make tasks easier. Finally, students will perform a task with and without the aid of a compound machine and reflect on how compound machines help the performance of a task.
Assessment: teacher will observe student responses during discussion. Students will record their own observations of the features of a screw and write their own definition. The teacher will collect student-written definitions and observations to grade.
Assessment: Students will be informally assessed during small-group observations and whole-group discussion of the uses of compound machines. Formally, students will write a reflection about how it feels to complete a task with and without a compound machine in their workbooks and turn it in to be graded.
Day 4 What is a pulley? Day 9 Which compound machines are found at school/home?
Daily Question: What is a pulley? In what way can a pulley be used?
Daily Question: How are compound machines used in our everyday world? Which compound machines are found at our school/home? What are they used for?

11
Learning Outcomes: The teacher will display several examples of a pulley to students (such as blinds and a crane). Students will then investigate how pulleys are used in groups. Students will be given string, buckets, and pulley wheels and asked to figure out how to put the materials together to move an object. Students will then discuss possible uses for pulleys in the real world.
Learning Outcomes: Students will explore the real-world uses of compound machines. Students will think about how compound machines can be used to make tasks easier. They will think of a problem that might develop in the classroom or at home, and then propose solutions to the problem using compound machines that can be found around the school or at home.
Assessment: The teacher will observe student responses in class discussions. The teacher will collect and assess students' observations made during exploration of pulley components. Teacher will also assess the pulley product created by students.
Assessment: Students will write up a solution to the problem they have posed and turn this write-up into the teacher to be graded based on creativity, reality of the posed problem, feasibility of the solution, and proper use of compound machines.
Day 5 What is a wedge?Day 10
How can I use simple machines to make a compound machine?
Daily Question: What is a wedge? What is a wedge used for? What are some examples of a wedge?
Daily Question: What makes up a compound machine? How can I use simple machines to make a compound machine?
Learning Outcomes: Students will investigate the simple machine 'wedge'. Students will be introduced to common examples of a wedge. Students will experiment with comparing the use of wedges and non-wedges for such tasks as splitting a piece of wood, sewing, and cutting, and reflect on their experiences. Students will then discuss uses of a wedge as a class and explore different examples of wedges in their world. Students will discuss how a wedge can be made up of two inclined planes.
Learning Outcomes: This lesson is intended to serve as a culminating lesson for the unit on simple and compound machines. In this lesson, students will draw on their previous lessons dealing with each of the simple machines and with compound machines. The students' task will be to create a compound machine using simple machines. This final project may be done in groups or independently and may last several days.
Assessment: The teacher will record student responses during class discussion about wedges. Students will also record their predictions and observations before and during experimentation with wedge/non-wedge materials, which the teacher will collect and grade.
Assessment: Student performance will be assessed based upon the compound machine product created by the student. Student will be assessed on creativity with materials, functionality of the machine (does it/would it work?), and whether the machine is effective at making a task more simple.

12
Lesson Plan Topic: Simple Machines Date: Day 1NSES: Teaching Standard D Grade level: Third GradeSOL: SOL 3.2: The Student will investigate and understand simple machines and their uses. Key concepts include
a) Types of simple machines (lever, screw, pulley, wheel and axle, inclined plane, and wedge)b) How simple machines function
Subject: Simple Machines Introduction and the LeverDaily Question: What are simple machines? How do simple machines help people?
Procedures for Learning Experience Guiding Questions Materials Needed
Evaluation (Assessment)
Approximate Time Needed
Engagement: In order to introduce simples machines the students will be presented with a song to the tune of “Wheels on the Bus” the mentions all of the simple machines. They will sing as a class about simple machines including the lever, wedge, wheel, inclined plane, screw, and pulley. Bring in a narrow piece of wood and a cement block. Show how the lever works but having a student’s lift the cement block with the piece of wood. Have the same student try to life the cement block without the piece of wood. Ask which was easier (the lever makes the lifting easier.) Let other students life the cement block.
Can you think of some examples of simple machines around your house?What can a lever do? What are some examples of levers? (eg. Hammer, see saw)
Printed copy of song for each student
Narrow piece of wood
Cement block
Teacher will write examples of simple machines and levers on chart paper.
5-10 minutes

13
Exploration: Students will be split into pairs and work with the student sitting next to them. Students will be given a cardboard tube cut in half the long way, a ruler, and 6 bear counters. Students will be asked to create a type of lever they should be familiar with, a seesaw. Allow students to explore what happens when they put different amounts of counter bears on either side of the seesaw. Then challenge students to balance two counter bears on one side of the lever and one on the other. Have students draw and record their successes on a record sheet. Share various ways of solving this challenge. (Either shorten the side with the two counters or move the two counters closer to the turning point.)
What happened when you put a counter bear on one end of the seesaw?What happened when you put a bear counter on each end? Where is the turning point of the seesaw lever?
Cardboard tubes cut in half the long way (1/2 tube per student)
1 ruler per student6 bear counters per student
Teacher will observe the exploration and redirect where necessary
Teacher will collect the students record sheet and assess for accuracy
15-20 minutes
Explanation: Ask students how they would define a lever. Then give students the definition of a lever on chart paper: A lever is a bar used for raising or moving a weight. The weight is placed at one end and a force pushes down the other end. All levers have a turning point (fulcrum), a place where an object is moved and an area where the force is applied. You can move the fulcrum point tochange how the lever is working. The balance of the lever changes depending on where the fulcrum is located and it can be at the front, middle, or end. Levers help us move things by pushing, pulling, or lifting. When you use a crowbar or screw driver to pry something open, you are using a lever. Explain that levers are used in your everyday life to make work easier for you. Give some examples of household levers (eg. Nail clippers, paddles
How would you define a lever?What is the fulcrum? Where is the fulcrum on a lever?Now that you have explored levers, what examples can you think of that you or your parent use?How do levers help people?
Chart paper
Pictures of examples of levers
Teacher will observe answers given by students.
5-10 minutes

14
in row boat, hammers, screwdriver, crowbar, seesaw. shovel, broom, pliers, rake, bottle opener)
Extension: Bring in 5 small metal containers (only nontoxic materials). Divide students into 5 small groups with 4 students in each group. Have students try to remove the lid using their bare hands. Next give students the bag of materials containing: a quarter, a counting bear, a straw and a paperclip. Allow students to try to open the can with these objects. If they are not successful allow them to predict what will help them open the metal container. Then give them a screw driver as a lever to do the same job. Guide a discussion of what happened. (A force was applied to one end of the lever; the other end lifted the lid up. The turning point was the edge of the paint can.)
Is it possible to open the can with just your hands?Did the lever make the work easier?How did it work?Where was the turning point (fulcrum)?
5 Metal containers with lid that must be pried up to open,
5 Screw drivers,5 paper clips,5 counting bears,5straws, 5 coins,5 Plastic baggies to hold suppliesSafety goggles for all students
Teacher will observe the answers given by the students.
5-10 minutes
Notes: This lesson is the first lesson in a series about simple and compound machines. It will introduce briefly the different kinds of simple machines and then focus specifically on The Lever. Safety Notes: Allow students who will lift the cinderblock to wear gloves for protections. Choose students who can support the weight of the cinderblock. Be sure to demonstrate how to lift the cinderblock so it is not dropped on anyone’s feet. Make sure the materials in the sealed metal container are nontoxic. Monitor the use of the screw driver carefully. Students who are trying to open the container should wear safety goggles.

15
Differentiation: In the exploration portion write up examples as well as show pictures and bring in concrete examples for visual learners. Pass around the concrete examples so children can use the lever themselves.
16
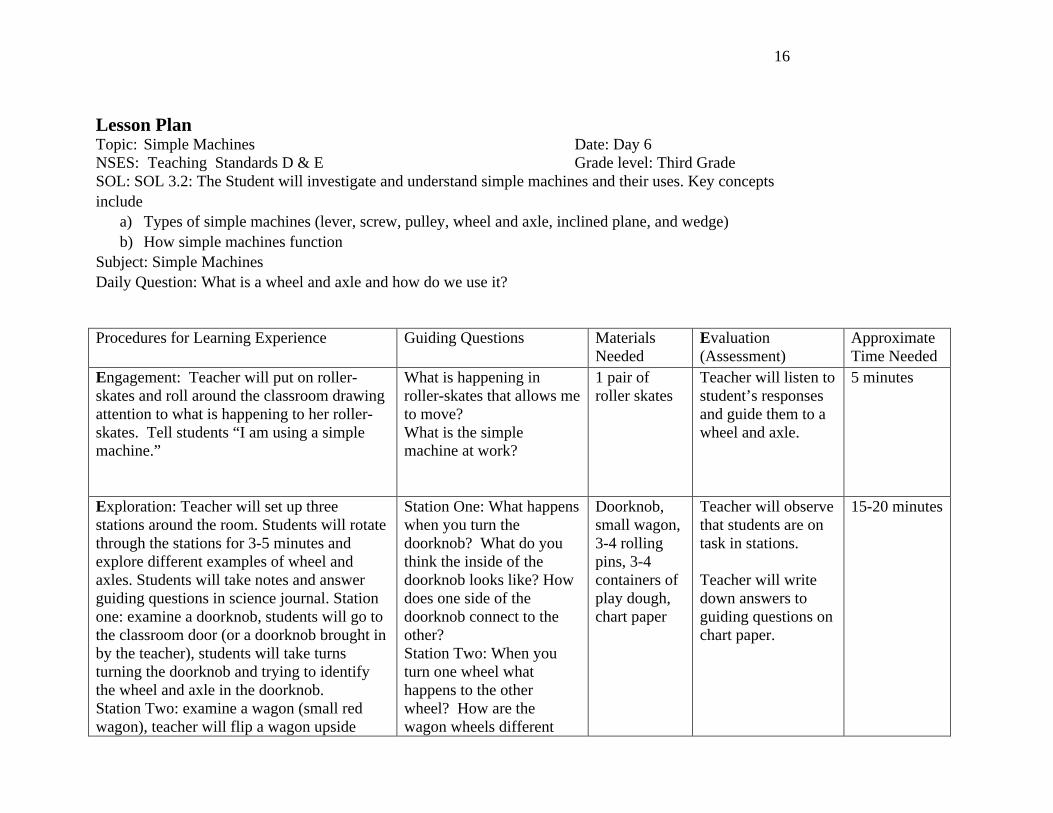
Lesson Plan Topic: Simple Machines Date: Day 6NSES: Teaching Standards D & E Grade level: Third GradeSOL: SOL 3.2: The Student will investigate and understand simple machines and their uses. Key concepts include
a) Types of simple machines (lever, screw, pulley, wheel and axle, inclined plane, and wedge)b) How simple machines function
Subject: Simple Machines Daily Question: What is a wheel and axle and how do we use it?
Procedures for Learning Experience Guiding Questions Materials Needed
Evaluation (Assessment)
Approximate Time Needed
Engagement: Teacher will put on roller-skates and roll around the classroom drawing attention to what is happening to her roller-skates. Tell students “I am using a simple machine.”
What is happening in roller-skates that allows me to move? What is the simple machine at work?
1 pair of roller skates
Teacher will listen to student’s responses and guide them to a wheel and axle.
5 minutes
Exploration: Teacher will set up three stations around the room. Students will rotate through the stations for 3-5 minutes and explore different examples of wheel and axles. Students will take notes and answer guiding questions in science journal. Station one: examine a doorknob, students will go to the classroom door (or a doorknob brought in by the teacher), students will take turns turning the doorknob and trying to identify the wheel and axle in the doorknob. Station Two: examine a wagon (small red wagon), teacher will flip a wagon upside
Station One: What happens when you turn the doorknob? What do you think the inside of the doorknob looks like? How does one side of the doorknob connect to the other?Station Two: When you turn one wheel what happens to the other wheel? How are the wagon wheels different
Doorknob, small wagon, 3-4 rolling pins, 3-4 containers of play dough, chart paper
Teacher will observe that students are on task in stations.
Teacher will write down answers to guiding questions on chart paper.
15-20 minutes

17
down and allow students to explore. Students will be instructed to turn one wheel and see what happens to the other wheel. Have each student in the group try and turn the wheel. Station three: using a rolling pin, teacher will set up a station with play dough and several rolling pins. Let students practice flattening the play dough with the rolling pin. Encourage them to think about what is happening when you push on the handles. Teacher will lead a discussion answering the guiding questions on chart paper.
from the doorknob? How are they the same?Station Three: What is happening to the dough when you push on the rolling pin handles? How many wheels are on the rolling pin?
Explanation: After a discussion about what happened at all of the stations the teacher will explain how each was an example of a wheel and axle. Teacher will show transparency of the inside of a doorknob and explain that turning the know 9wheel) turns the inner rod (axle) and moves the latch. The movement opens the door. Teacher will roll the wagon around the room. Teacher will then flip the wagon over and show the wheel and axle. Teacher will point out that the wagon has a wheel at either end of a long axle and the door knob has a wheel at either end of a short axle. Ask students for other examples like the wagon (wheelchair, bike, car wheels.)Teacher will present the rolling pin. Teacher will explain that the handles are the axle and when you push on the axle it makes the wheel turn and flatten what it underneath. Teacher will address the chart paper and talk about how a rolling pin has one wheel. Teacher will help students brainstorm other wheel and axles that have one wheel (wheelbarrow, top,
When a door is locked what is happening to the wheel and axle?
Have you ever used a wagon? What for? How does a wagon make work easier?
What kind of axle did roller-skates have?What else can you think of that have similar wheel and axles?
What are the wheel and axle on the rolling pin? What other common machines have one wheel?
Doorknob transparency, small wagon, Rolling pin
Teacher will observe students answers.
Teacher will check for student understanding.
10-15 minutes

18
merry-go-round, steeling wheel, bar stool.)
Extension: Create your own wheel and axle toy. Students can create a pinwheel as an example of a wheel and axle. A pinwheel turns because it has a wheel and axle. Wind is the force that turns it. Teacher will give the students the “A wheel-and-axle Toy” worksheet. Teacher will talk about how the students need to be careful not to lose the pin and that the pin is only to be used to stick into the eraser head. Students then follow steps 1-6 on the worksheet to create their pinwheel. After completing the pinwheel students will conduct a series of experiments to see what substance works as the best lubricant to make the wheel spin faster. Students will blow on pin wheel and count the number of spins in 10 seconds. They will record this information on a chart. Then Students will cover their pin with Vaseline and record how many spins in 10 seconds. They will use a tissue to clean the pin and repeat the process with vegetable oil and peanut butter. Students will then look at their results and draw conclusions about what worked.
What part of the pinwheel is the wheel? The axle?
What does adding these substances to the axle do the wheel? What do the Vaseline, oil, and peanut butter serve as?
What made the wheel spin fastest? Slowest?
How was this experiment like a car’s wheel and axle? How was it like a door knob?
a push pin for each student, an unsharpened eraser tipped pencil for each student, crayons, scissors,a tub of Vaseline, a bottle of vegetable oil, a jar of peanut butter,box of tissues
Teacher will walk around and observe that students are on task through the project.
Teacher will question students after completion to connect the pinwheel to the concepts of wheel and axle.
10-15 minutes
Notes: This lesson is part of a unit on simple machines. It will fit onto the schedule as the last day of simple machines. This lesson supports the inquiry based learning that makes up the entire unit.

19
Safety notes: When completing the pinwheel activity teacher should first model how to properly use the push pin to avoid student injuries. Differentiation: In the exploration portion teacher should group students of heterogeneous ability together. If there is a student in a wheelchair in the classroom allow them to come to the front and show how they use have an excellent example of a wheel and axle.

20
Lesson Plan Topic: Simple and Compound Machines Date: Day 7Grade level: 3rd
NSES Standards: Teaching Standard D, ESOL:Standard 3.2 The student will investigate and understand simple machines and their uses. Key concepts includea) types of simple machines (lever, screw, pulley, wheel and axle, inclined plane, and wedge);b) how simple machines function;c) compound machines (scissors, wheelbarrow, and bicycle); andd) examples of simple and compound machines found in the school, home, and work environment.
From Curriculum Framework:differentiate and classify specific examples of simplemachines found in school and household items. Theseinclude a screwdriver, nutcracker, screw, flagpole pulley,ramp, and seesaw.
Daily Question: Can you find simple and compound machines in our school?Subject: Simple Machines in our school and at home
Procedures for Learning Experience Guiding Questions Materials Needed
Evaluation (Assessment)
Approximate Time Needed
Engagement: Students will be in small groups at their desks. Bring in several real-world examples of simple machines such as a nutcracker and a screwdriver. Pass the examples around and have students observe them to determine which simple machines they represent. To add a challenge, bring in examples of objects that are not simple
What do these objects have in common?What is different about the objects?What function do these objects serve?Are these objects made of simple machines? If so,
Simple machine examples, such as a nutcracker and screwdriver. Non-simple
Observe student responses and record on the whiteboard.
5-10 minutes

21
machines as well as ones that are. Mix them up and charge students with the task of identifying which objects are simple machines and which are not.
which ones? machine examples, such as a bowl.
Exploration: Divide students into small groups with six students per group. Students will be given the task of exploring the school and looking for simple machines in their school environment. Each student will beresponsible for one type of simple machine. Students will go on a scavenger hunt around the school, taking note of the simple machines they find and their functions. They will need to be able to say why the object is a simple machine. At the end of the search across the school for simple machines, the groups will reconvene.
What simple machines can you find in our school?Why do you think the object is a simple machine?How do simple machines make a task easier?
Paper or simple machines worksheetSimplemachine task cards for each simple machine
Students will record their thoughts on a worksheet that will be collected.
20 minutes
Explanation:. Groups will reconvene and share their observations. We will make a class master list of the examples of simple machines students found around the school. We will discuss the function of each simple machine and why (and how) it makes work easier. We will observe which simple machine is the most prevalent in our school.
What simple machine examples did you find around our school?What makes the objects simple machines?What functions do these objects serve?How would our school be if we could not use these simple machines?Which simple machine had the most examples in our school?Do simple machines take more or less energy to use than doing a task without simple machines?
Computer Projector
Students will engage in a discussion based on the examples they found and recorded on their worksheets. Student responses will be recorded in a chart using Microsoft Excel on the computer projector.
5-10

22
Extension: Students are to pretend that their mom has given them the task of preparing dinner that evening. They go home and are asked to help make a thin crust pizza and must roll out the dough. At first, they cannot find the rolling pin. They must try to use several kitchen objects to flatten the dough. Then, they eventually are given the chance to use a rolling pin. Students will reflect which tool was the easiest to use when rolling out the dough, and which took more energy to use.
Was it easier to roll the dough with or without the rolling pin?How do simple machines help us in the real world?How do simple machines make tasks easier?Why are simple machines important to us?
Pizza doughRolling PinWooden SpoonWooden block
Record reactions in science journals; observe student responses
10 minutes
Notes: This lesson requires students to go off on their own in the school building. It might be useful to have parent volunteers come in and guide groups around the school in order to supervise learning and ensure student safety. Group students in mixed-ability groups. To make the extension even more rewarding, order pizza for the class to eat after the lesson.

23
Lesson Plan Topic: Simple and Compound Machines Date: Day 8Grade level: 3rd
NSES: Teaching Standard DSOL:Standard 3.2 The student will investigate and understand simple machines and their uses. Key concepts includea) types of simple machines (lever, screw, pulley, wheel and axle, inclined plane, and wedge);b) how simple machines function;c) compound machines (scissors, wheelbarrow, and bicycle); andd) examples of simple and compound machines found in the school, home, and work environment.
Daily Question: How are compound machines formed? What purpose do they serve?Subject: What is a compound machine?
Procedures for Learning Experience Guiding Questions Materials Needed
Evaluation (Assessment)
Approximate Time Needed
Engagement: Bring in a bicycle, taken apart into separate components. Have students observe the different parts of the bicycle. Ask them if they can determine why the bicycle is broken apart and identify the different parts of the bicycle. See if they can identify any similarities between the parts of the bicycle. Talk about the functions of each part and conclude, as a class, that the bicycle is made of simple machines.
Why is the bicycle broken apart?Do the different parts have anything in common?What function does each part serve?What is each part made up of? What is the bicycle made up of?
Bicycle parts (pedals-levers, chain-pulley, wheels-wheel and axle)
Student responses; record in Simple/Compound Machine journal
5-10 minutes

24
Exploration: Set up different stations around the room. Each station will be for a different example of a compound machine. Divide students into groups of 5 or 6 (depending on class size). Each group will rotate to every station. At each station, they will make observations about the compound machine located there. They will identify the machine, identify the simple machines that make it up, and identify its function. They will write in their words why it makes work easier to use the compound machine.
What do you observe about the object?What is it made up of?What simple machines is it made of?What function does it serve?Why and how does it make work easier?
WheelbarrowScissorsCraneShovelSimple and Compound Machine Journal
Students will make observations about each compound machine in their Simple and Compound Machines journal.
25 minutes
Explanation:Students will engage in a class discussion about each station. Introduce the word “compound” and explain that the machines they are observing are called compound machines. Groups will share their observations and responses about each compound machine. The group will determine why the machines are compound, what simple machines make them up, and why they make work easier. Students will discuss the value added by using compound machines on a task.
What did you observe at each station?What are these machines made up of?Why are they called compound machines?How do compound machines make work easier?
Whiteboard Record group answers on the whiteboard
5-10
Extension: Observe how compound machines make tasks much easier. Give each group of students the task of transporting a cinderblock across the classroom. Students will have several options – the wheelbarrow, the crane (were it real instead of a toy), and the shovel. They will experiment and determine which compound machine made the task easier to complete. They will talk about how the
Which compound machine made carrying the cinderblock the easiest?How did the compound machines make the task more efficient to complete?
Wheelbarrowtextbooks
Students will write a response in journal.
5 minutes
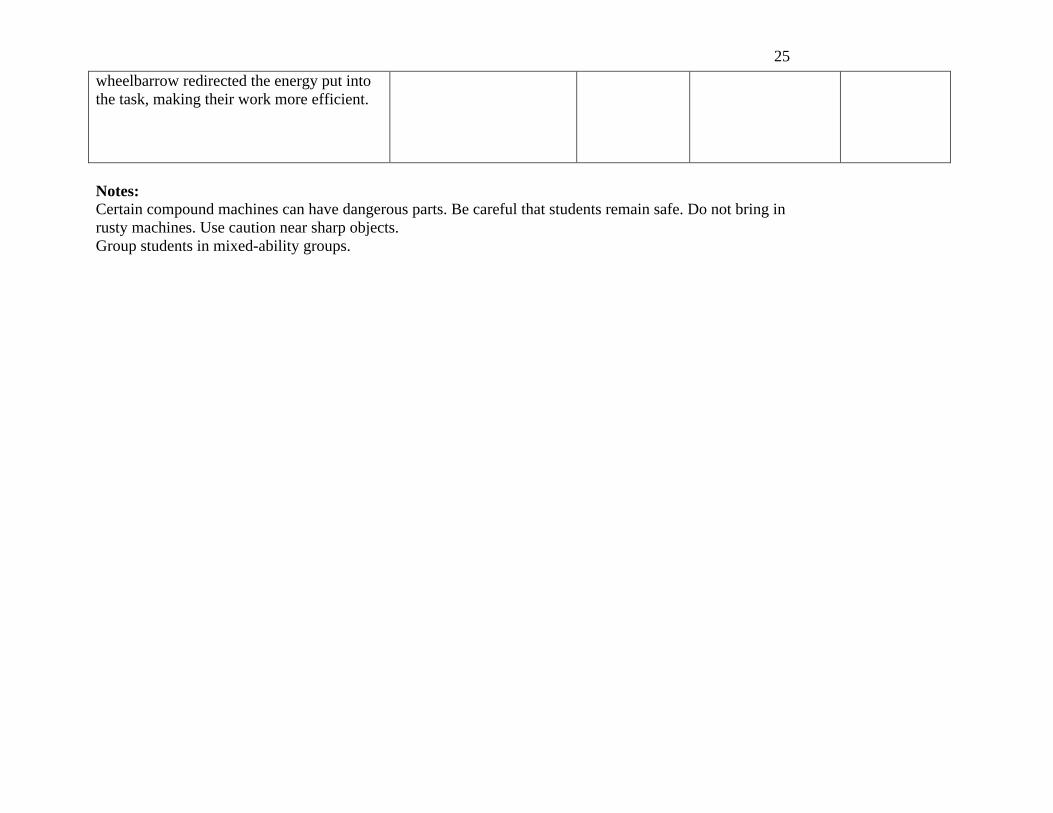
25
wheelbarrow redirected the energy put into the task, making their work more efficient.
Notes: Certain compound machines can have dangerous parts. Be careful that students remain safe. Do not bring in rusty machines. Use caution near sharp objects. Group students in mixed-ability groups.

26
Story of UseThis module is well developed to fit well into the Curriculum Framework for the Virginia Standards
of Learning for third grade. This unit was presented in the third grading period of the year. The students had been working in cooperative learning groups up to this point in the year so they were familiar with the routine and were able to work well though all of the activities in the module. I choose cooperative groups that contained varying abilities and was sure to pair students who need extra support with students who are strong leaders. By dividing the students this way, students were heterogeneous in ability level which allowed stronger students to help weaker students. Furthermore, students who had the potential to disrupt throughout the group work were placed in different groups, which help the module run more efficiently. I was also sure to differentiate the lessons to accommodate for the differences in students ability by providing additional guiding questions for students who were able to think further on the topic.
In this Simple Machines module several different methods of teaching were used and that meant that the classroom was organized in several different roles. I assigned the groups at the beginning of the unit and kept them throughout. Each time the groups were formed they would be assigned roles (the primary investigator, materials manager, communication specialist, and safety specialist.) This role assignment ensured that each student had an active role in the lesson. The students were kept engaged because there was a variety teaching methods. In the explanation portion of the learning cycle I taught to whole group allowing all of the groups to feel cohesion because the class came back together to talk through what they had learned in the exploration portion of the lesson. I feel as if this unit was very interesting to the students and they found much reward in the hands-on activities where they manipulated authentic materials.
The Simple Machines unit overall was a big success in the classroom. The goal of teaching students the importance of simple and compound machines was achieved because I could hear the students talking about the activities they participated in at the lunch table and days after they were done in class. They realized that simple and compound machines are all around them. I overheard a conversation between a few students in the lunch room saying, “I counted the doors in my house and we have 12, that means I have 12 wheel and axles in my house and two more on the car!” “Well we have a pulley in the garage to open the door and 4 compound machines in the garage- our bikes!” It was wonderful to see the students making connections to their own lives.
The students particularly enjoyed day seven because it put together all of the previous lessons where students were learning about the simple machines. Each day was focused on a specific simple machine and on day seven they went on a hunt around the school to find simple machines that are all around them. It was as if you could see a light bulb go off over their heads when they realized that the seesaw on the playground was a lever, and the door stopper was a wedge. One student even went up to the custodian at the end of lunch as they were folding up the lunch tables and said “You know those are easier to fold because they have a simple machine in them.” The custodian asked the child what he meant and he pointed to the wheels on the bottom and said “See a wheel and axle you would have to do more work if it wasn’t down there!”
27
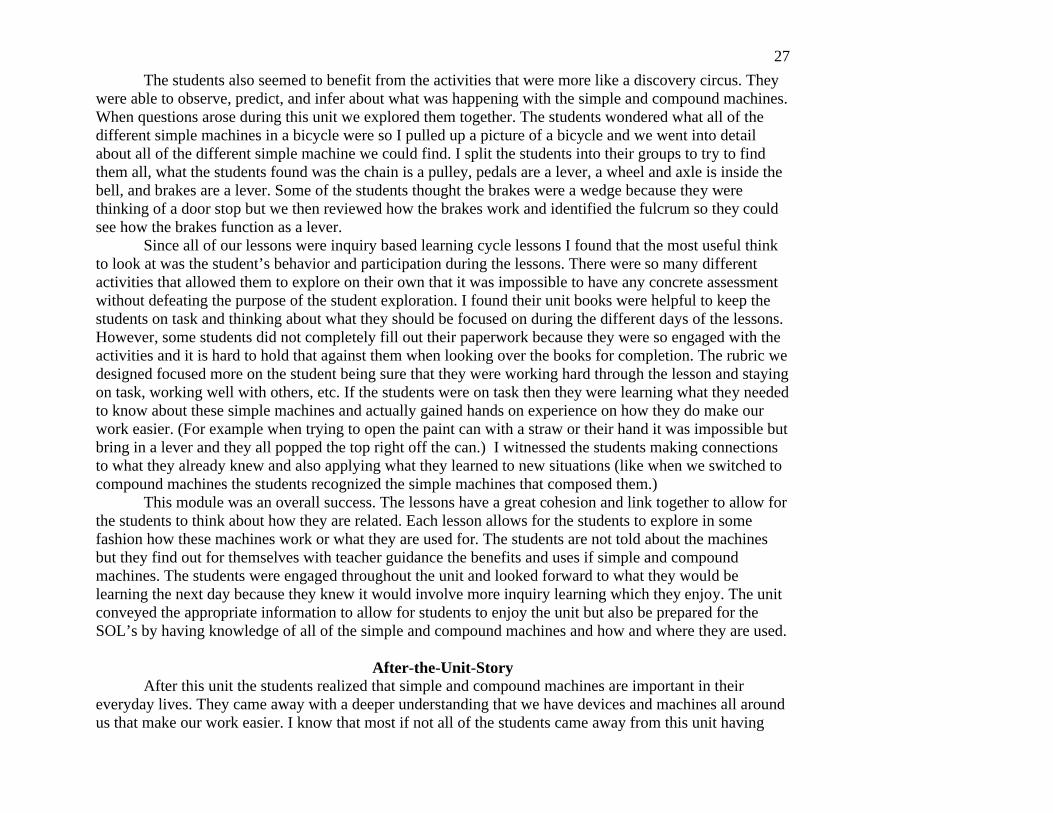
The students also seemed to benefit from the activities that were more like a discovery circus. They were able to observe, predict, and infer about what was happening with the simple and compound machines. When questions arose during this unit we explored them together. The students wondered what all of the different simple machines in a bicycle were so I pulled up a picture of a bicycle and we went into detail about all of the different simple machine we could find. I split the students into their groups to try to find them all, what the students found was the chain is a pulley, pedals are a lever, a wheel and axle is inside the bell, and brakes are a lever. Some of the students thought the brakes were a wedge because they were thinking of a door stop but we then reviewed how the brakes work and identified the fulcrum so they could see how the brakes function as a lever.
Since all of our lessons were inquiry based learning cycle lessons I found that the most useful think to look at was the student’s behavior and participation during the lessons. There were so many different activities that allowed them to explore on their own that it was impossible to have any concrete assessment without defeating the purpose of the student exploration. I found their unit books were helpful to keep the students on task and thinking about what they should be focused on during the different days of the lessons. However, some students did not completely fill out their paperwork because they were so engaged with the activities and it is hard to hold that against them when looking over the books for completion. The rubric we designed focused more on the student being sure that they were working hard through the lesson and staying on task, working well with others, etc. If the students were on task then they were learning what they needed to know about these simple machines and actually gained hands on experience on how they do make our work easier. (For example when trying to open the paint can with a straw or their hand it was impossible but bring in a lever and they all popped the top right off the can.) I witnessed the students making connections to what they already knew and also applying what they learned to new situations (like when we switched to compound machines the students recognized the simple machines that composed them.)
This module was an overall success. The lessons have a great cohesion and link together to allow forthe students to think about how they are related. Each lesson allows for the students to explore in some fashion how these machines work or what they are used for. The students are not told about the machines but they find out for themselves with teacher guidance the benefits and uses if simple and compound machines. The students were engaged throughout the unit and looked forward to what they would be learning the next day because they knew it would involve more inquiry learning which they enjoy. The unitconveyed the appropriate information to allow for students to enjoy the unit but also be prepared for the SOL’s by having knowledge of all of the simple and compound machines and how and where they are used.
After-the-Unit-StoryAfter this unit the students realized that simple and compound machines are important in their
everyday lives. They came away with a deeper understanding that we have devices and machines all around us that make our work easier. I know that most if not all of the students came away from this unit having
28
learned new information. It was nice to hear the students say that the activities were “cool”. Sometimes I even struggled to move onto another subject because the students were so engaged they wanted to keep thinking and exploring simple machines. Using the inquiry methods allowed the students to make observations and inferences while also guiding them to understanding what they needed to know for the Virginia Standards of Learning.
The students learned about a topic they can see in the world all around them in their everyday lives. It was really neat to see them brainstorming where there see simple machines and compound machines. One student realized “My Dad work construction and he uses a hammer as a lever, and a crane as a pulley. He probably uses screws too!” They were able to take away from the explorations a deep understanding of what the simple machines mean and why they are important to people. The students also seemed to communicate with their parents about this lesson. One parent called and asked me, “Why is my child asking if the blender is a wheel and axle?” The students are transferring what they learned into their homes and trying to find more examples of simple and compound machines. It makes me happy to think that they were intrigued enough in the material to continue independent exploration. The thinking behind simple machines is that they are tools that make work easier. Work is when you use force to move an object. Simple machines require less energy to do things or redirect energy to make a task easier and more efficient for people. This lesson fits in well with other units such as one on force and matter because students will already have an idea of force and how to control it. The last part of the unit is putting together simple machines to make compound machines.
As an extension students were asked to think more about machines from another point of view. What are the effects of machines on our lives? Yes, they make work easier but they use batteries, gas, or electricity to power in some cases and that can have many detrimental effects on the environment. Are these risks worth us? The students were asked to think about the negative side of machines and to pick a side and justify why they think it is good/bad that we use simple and compound machines that help us destroy the earth. Do the positives our weigh the negatives? The class was very torn on these issues and I could tell that they had not really thought about the other side because it seems like making work easier is a good thing and it had not occurred to them that these objects could be allowing more deforestation, oil drilling, air pollution, etc. The students really were interested throughout the unit and I hope that maybe they will be inspired to invent a new machine that will be beneficial to human kind!

29
Sources
Scott, Foresman. (1989) Discovery Science 4: Chapter 6 Simple Machines. Scott, Foresman and Company.
Greenberg, Dan. (2002). Amusement Park Science. Newbridge Educational Publishing: New York:NY
Unknown. (1998). Simple Machines: Science Works for Kids Series. Evan-Moor Educational Publisher: Monterey, California
Wheel and Axle Handout, Simple Machines Song:
Material from Robyn Mooney (Stonehouse Elementary) retrieved November 20, 2008