Embed Size (px)
Citation preview

Simple Searching with CAB Direct
The CAB Direct Home Page
This is the CAB Direct Home page from which you access the search interface by clicking on the “SEARCH” button. It is also the screen from which you may select the database or database subsets that you wish to search. This screen shows all the databases and database subsets available from CABI. Those databases that you have access to are highlighted, while those to which you do not have access are “greyed” out. If you click the SEARCH button without selecting any databases or subsets, the default option is to search all the databases to which you have access. If you wish to limit your search to one or more specific database or database subset(s), simply select the relevant subset(s) by clicking in the appropriate check box or boxes before clicking the SEARCH button. Once a selection is made, all searches performed in the current search session will be limited to the selection until the selection is changed or until you log out. Selections can be changed, at any time, by returning to this screen via the “Select Database” link on the top menu bar. In the box, at the bottom of the screen, is a list of broad subject specific subsets of both CAB Abstracts and Global Health. These can be selected as they are or expanded in order to narrow down the subject field even further before selection. You can select one or more of the narrower, subject specific subsets.

The CAB Direct default search screen
This is the CAB Direct “Quick Search” screen, which is the default search screen and the one in which most “basic” searches will be performed. It offers a limited number of search options including Free-Text searching and Author searching, plus a limit by Database Update date (“latest records since”) and “publication year” (of original article). At the top of the screen is a navigation bar which will appear on all the screens within the interface and which allows you to move from function to function. Searches will be performed across all the databases that were selected from the Home page. The default is to search all leased databases if a specific selection is not made. Any search performed in this screen will, by default, search across the full time span of any database or database subset(s) previously selected. To limit your search to a more recent time span, you simply add a “from” date (YYYYMMDD) in the box marked “latest records since”. This is particularly useful if you want to update a previously run search to find only the new records. Let’s try a simple search. The default search index is the Free-Text index which includes the terms from most of the fields within the database, including titles, abstracts, indexing fields, address fields, etc. Searching in the Free-Text index will retrieve the maximum number of records, but it will also produce the lowest level of relevance. That is to say, it will retrieve a higher level of less relevant records. In the Advanced Searching tutorial, we’ll see how we can limit our searches to specific database fields which will improve the relevancy of any search.

In a simple search for all records on Cattle, for example, we would simply enter the word cattle in the search box, as shown in the screenshot below.
To perform the search, you simply click on the “search” button. The results will then be displayed on the results screen, shown on the next page. The results screen displays the records in a brief display format. The records are displayed in the reverse order to which they were added to the database. This means that you will always see the latest (newest) records first. Records are displayed in blocks of 25 records at a time, and each record includes the title of the original article, the authors and editors names and the source details. From the top right corner of the display screen, you can choose to display 50 records at a time or 100 records at a time. Once the number has been selected, it remains set for the duration of the search session or until you change it again. Search terms that have been used in the search are highlighted in red so that you can see, at a glance, why any particular record was retrieved.
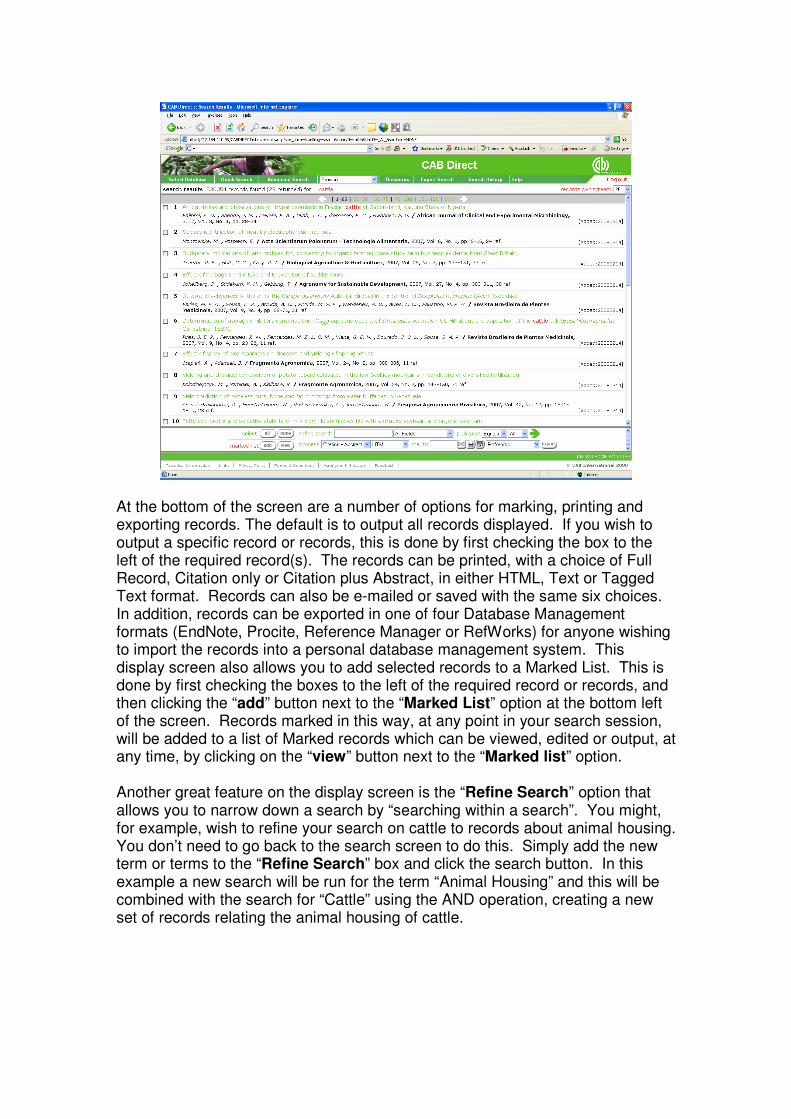
At the bottom of the screen are a number of options for marking, printing and exporting records. The default is to output all records displayed. If you wish to output a specific record or records, this is done by first checking the box to the left of the required record(s). The records can be printed, with a choice of Full Record, Citation only or Citation plus Abstract, in either HTML, Text or Tagged Text format. Records can also be e-mailed or saved with the same six choices. In addition, records can be exported in one of four Database Management formats (EndNote, Procite, Reference Manager or RefWorks) for anyone wishing to import the records into a personal database management system. This display screen also allows you to add selected records to a Marked List. This is done by first checking the boxes to the left of the required record or records, and then clicking the “add” button next to the “Marked List” option at the bottom left of the screen. Records marked in this way, at any point in your search session, will be added to a list of Marked records which can be viewed, edited or output, at any time, by clicking on the “view” button next to the “Marked list” option. Another great feature on the display screen is the “Refine Search” option that allows you to narrow down a search by “searching within a search”. You might, for example, wish to refine your search on cattle to records about animal housing. You don’t need to go back to the search screen to do this. Simply add the new term or terms to the “Refine Search” box and click the search button. In this example a new search will be run for the term “Animal Housing” and this will be combined with the search for “Cattle” using the AND operation, creating a new set of records relating the animal housing of cattle.

To see a display of the full record, simply click on the title of the record that you wish to see. This will open the full record display window as shown below.
Here we see the Bibliographic details and the Abstract. Scrolling down the screen, you will see the other fields, including the Indexing fields, CABICODES, etc.

Many of the field entries, including the author names, indexing fields, CABICODES, etc., are displayed in green and have check boxes next to them. The green text means that the terms are hyperlinks. Clicking directly on any of these terms will automatically perform a search on that term. If, for example, you click on the Descriptor Term “Calves”, the system will perform a search for you for any records that contain the word Calves as a Descriptor term. To select and combine multiple terms from this screen, you simply check the terms that you want to combine and click on the “related records” button to the top right of the record display area. The system will then perform a search for records containing all the terms that you selected. The terms will be automatically combined with the AND operator. To return to the Quick Search screen, click on the “Quick Search” link on the top navigation bar. To perform an Author Search, enter the Author name in the search box as Family Name followed by a space and then the Initials. An example of the format is shown on the search screen. Next, click the “Author search” radio button, as shown below, and then click search.
If you are not sure of the exact author name, truncation can be used (e.g. Smith A*) or you can browse the list of Author names. This is done by selecting “Author” from the drop down “Browse” menu in the top navigation bar. This is illustrated on the next page.

Clicking “Author” displays the Author Browse screen, as shown below. Simply type in the name or part of the name that you are looking for, and click the “browse” button. You will see a display similar to the following screenshot.

To select any name of interest, simply click on it. Each name selected will then be added to a list on the right of the screen, as shown above. When you have selected all the names you need, choose the operator with which you wish to combine the chosen terms. The default operator is OR, but this can be changed to AND from the drop-down list at the bottom of the screen. When all selections have been made, click the “view records” button. The search will be performed and the records displayed. Finally, in this session, we’ll look at the Search History screen. This screen is accessed by clicking on “Search History” in the top navigation bar.
This screen shows all the sets of records (search results/histories) that have been created during the current search session. They are numbered in the order in which they were created. Any of the Search Histories can be deleted or saved, either to the PC or to an external device such as a floppy disk. The Search History screen allows previously created searches to be combined using either AND, OR or NOT. To combine sets, simply check the box next to the sets you wish to combine, select the Boolean operator from the bottom of the screen, and click “search”. A new set of records is then created and added to the Search History screen.

To save a Search History to disc or an external device, simply click the “save” button next to the search set that you want to save. This will display the standard Windows “File Download” dialogue box:
Click the “Save” button to open the Windows “Save As” dialogue box, and save the file to a device and folder of your choice.

The History is saved as an HTML file and can be named with an appropriate file name. If the Histories are saved to a memory stick or other portable device, they can be re-run from any PC with access to the Internet. To re-run a search history, go to the Search History screen and click on the “load from file” button at the bottom of the screen. This will display a Browse box from which you locate the file you wish to load.
When you have found the file that you wish to load, select it and click “Open”.
Now click “Load Query” to rerun the search. The search will be performed in the usual way and the records will be displayed. A new set of records will then appear on the search history screen. It will be added to the bottom of the list and can then be combined with any of the other sets in the list.