Embed Size (px)
Citation preview

Single Sign-On and Launch Pad User Guide
7001 Weston Parkway, Suite 200 Cary, North Carolina 27513
© 2019 Railinc Corp. All Rights Reserved.
Last Updated: January 2019
SSO/Launch Pad User Guide
SSO/Launch Pad User Guide i Revised January 2019
Table of Contents Welcome to Single Sign-On/Launch Pad ..................................................................................... 1
System Requirements ................................................................................................................... 1 Accessing Single Sign-On ........................................................................................................... 1
Logging Into SSO ........................................................................................................................... 3 Two-Factor Authentication .......................................................................................................... 3 Unsuccessful Logins .................................................................................................................... 3 Successful Logins ........................................................................................................................ 4 SSO/Launch Pad Page Layout ..................................................................................................... 5 Handling a Forgotten Password or User ID ................................................................................. 7
Resetting a Forgotten Password ............................................................................................... 7 Retrieving a Forgotten User ID................................................................................................ 9
Revalidating a Locked Account ................................................................................................. 11 Signing Out of SSO ...................................................................................................................... 13 Changing Your Password............................................................................................................ 14 Registering as a New User ........................................................................................................... 16 Requesting Application Access ................................................................................................... 21
Access Request Emails .............................................................................................................. 24 Checking the Status of Permission Requests ............................................................................. 26
Working with Applications ......................................................................................................... 27 Launching a Single Application ................................................................................................. 27 Closing a Single Application ..................................................................................................... 27 Working with Multiple Applications ......................................................................................... 28
Opening Multiple Applications.............................................................................................. 28 Closing Multiple Applications ............................................................................................... 28
Viewing Additional Applications .............................................................................................. 29 Editing Your User Profile ........................................................................................................... 31 Using the Launch Pad .................................................................................................................. 32
Your Applications ...................................................................................................................... 33 User Services ............................................................................................................................. 33 Your Notifications ..................................................................................................................... 34 My Support Cases ...................................................................................................................... 35
Creating a Case ...................................................................................................................... 35 Viewing/Updating a Case ...................................................................................................... 37
Index .............................................................................................................................................. 39
SSO/Launch Pad User Guide
SSO/Launch Pad User Guide ii Revised January 2019
List of Exhibits Exhibit 1. Railinc Home page .......................................................................................................... 1 Exhibit 2. SSO Customer Login Panel ............................................................................................ 2 Exhibit 3. Using Temporary Password ............................................................................................ 4 Exhibit 4. Email Confirmation Reminder ........................................................................................ 4 Exhibit 5. Launch Pad ...................................................................................................................... 5 Exhibit 6. Forgotten Password ......................................................................................................... 7 Exhibit 7. Password Recovery Started ............................................................................................. 7 Exhibit 8. Email with Password Recovery Link .............................................................................. 8 Exhibit 9. Change Password ............................................................................................................ 8 Exhibit 10. Forgotten User ID ......................................................................................................... 9 Exhibit 11. User ID Sent to Email ................................................................................................... 9 Exhibit 12. Account Locked .......................................................................................................... 11 Exhibit 13. Password Change Initiated .......................................................................................... 12 Exhibit 14. Successful Password Change ...................................................................................... 12 Exhibit 15. Change Password ........................................................................................................ 14 Exhibit 16. Terms of Service ......................................................................................................... 16 Exhibit 17. Complete User Profile ................................................................................................. 17 Exhibit 18. Enter and Choose Employer ........................................................................................ 18 Exhibit 19. Employer with No Results .......................................................................................... 18 Exhibit 20. Confirmation Email Sent ............................................................................................. 19 Exhibit 21. Registration Email ....................................................................................................... 20 Exhibit 22. Email Confirmation ..................................................................................................... 20 Exhibit 23. Request Application Access ........................................................................................ 21 Exhibit 24. Request Permission for Umler Access ........................................................................ 22 Exhibit 25. Search a Company ....................................................................................................... 22 Exhibit 26. Request for Umler Access ........................................................................................... 23 Exhibit 27. Request for Umler Access Submission Confirmation ................................................. 23 Exhibit 28. Access Request Acknowledge Email .......................................................................... 24 Exhibit 29. Access Approval Email ............................................................................................... 25 Exhibit 30. Access Rejection Email ............................................................................................... 25 Exhibit 31. Permission Request Status Example ........................................................................... 26 Exhibit 32. Single Sign-On Applications ....................................................................................... 29 Exhibit 33. Unauthorized Access Attempt ..................................................................................... 30 Exhibit 34. Edit My Profile ............................................................................................................ 31 Exhibit 35. Launch Pad .................................................................................................................. 32 Exhibit 36. User Services ............................................................................................................... 33 Exhibit 37. Your Notifications Details .......................................................................................... 34 Exhibit 38. Customer Support ........................................................................................................ 35 Exhibit 39. Browse (for file attachment) ....................................................................................... 36 Exhibit 40. Customer Support Sample Confirmation .................................................................... 36 Exhibit 41. RAPID Case Confirmation Email ............................................................................... 37 Exhibit 42. Your Support Cases (Your Open Cases tab shown).................................................... 37 Exhibit 43. Case Details ................................................................................................................. 38
SSO/Launch Pad User Guide
SSO/Launch Pad User Guide 1 Revised January 2019
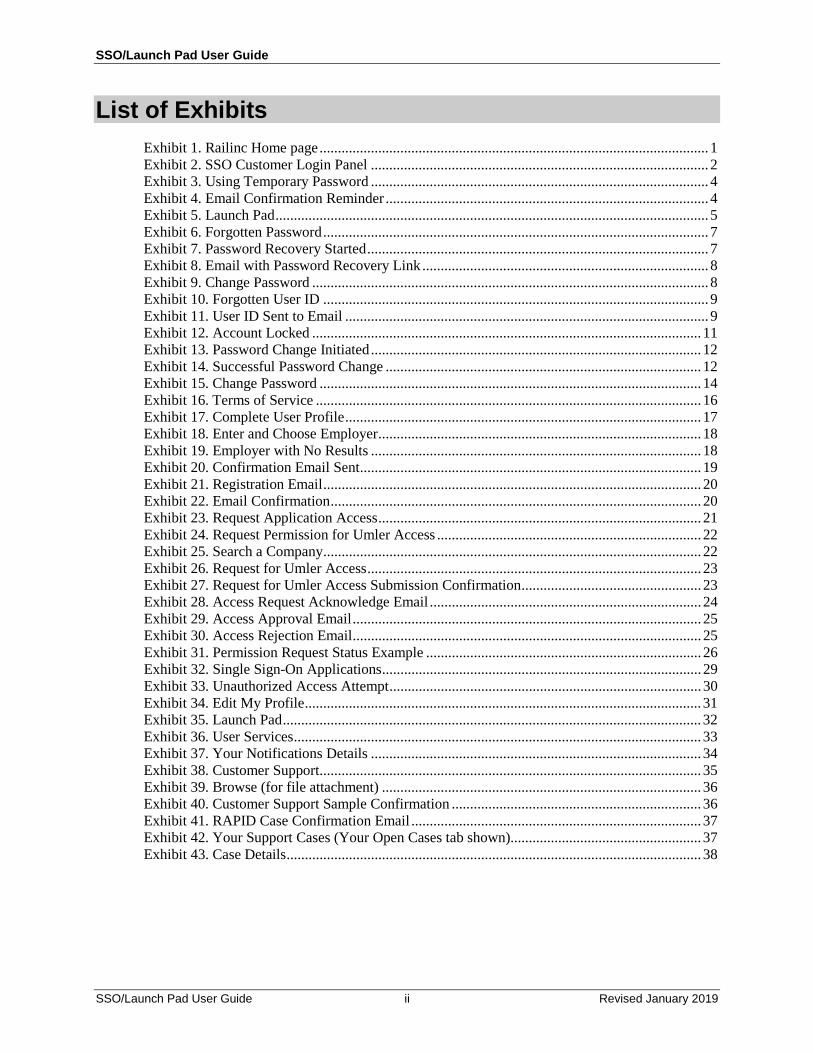
Welcome to Single Sign-On/Launch Pad The Single Sign-On (SSO) system provides a common user registration process and a central repository for customer information, authentication, and authorization solutions for most Railinc web applications. You use a single user ID and password to access most web applications.
For registered users, SSO opens on the Launch Pad. The Launch Pad is a dashboard-style interface that allows you to not only access your applications, but to see pertinent notifications about those applications. You can also make inquiries or report issues that automatically create “cases” in the Railinc internal customer support system (RAPID) and view those cases (both open and closed).
System Requirements For information about the system requirements of Railinc web applications and for information about downloading compatible web browsers and file viewers, refer to the Railinc UI Dictionary.
Accessing Single Sign-On To access Single Sign-On:
1. Open your internet browser.
2. Type the Railinc portal URL (www.railinc.com) in the address field.
3. Press Enter. The Railinc Home page is displayed (see Exhibit 1). Exhibit 1. Railinc Home page
Although the appearance of this page varies, the Customer Login area at the upper right of the Railinc Home page is reserved for SSO (see Exhibit 2).
SSO/Launch Pad User Guide
SSO/Launch Pad User Guide 2 Revised January 2019
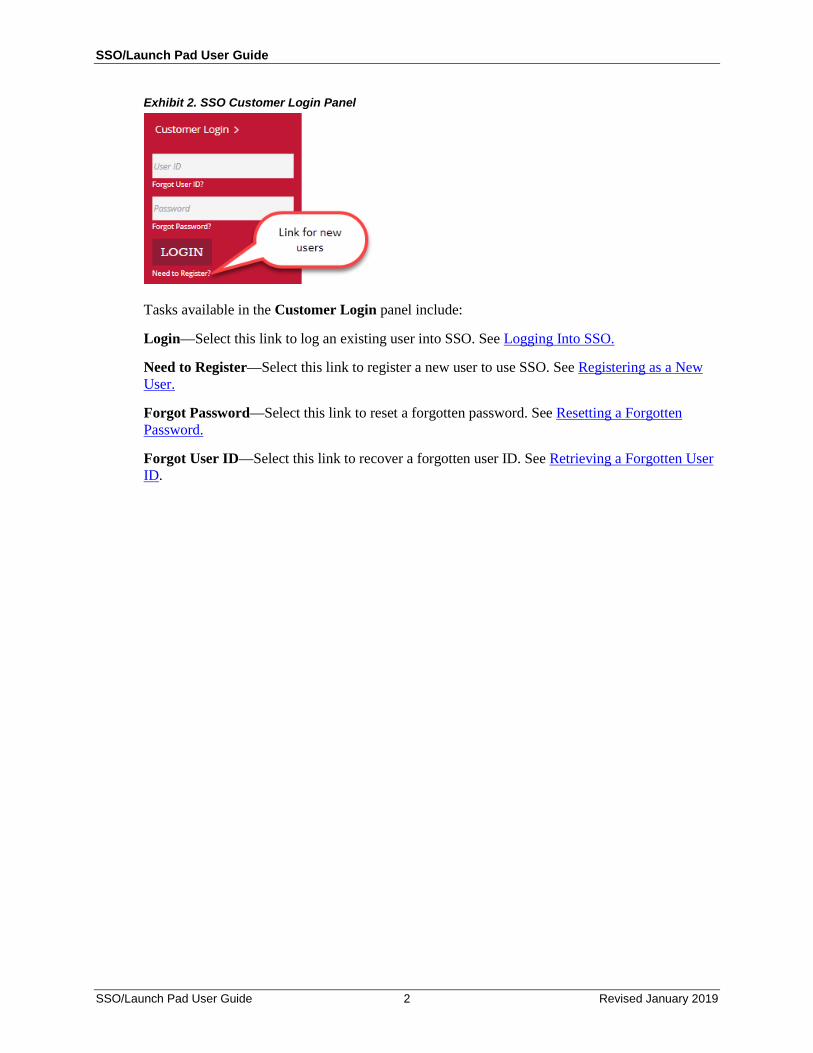
Exhibit 2. SSO Customer Login Panel
Tasks available in the Customer Login panel include:
Login—Select this link to log an existing user into SSO. See Logging Into SSO.
Need to Register—Select this link to register a new user to use SSO. See Registering as a New User.
Forgot Password—Select this link to reset a forgotten password. See Resetting a Forgotten Password.
Forgot User ID—Select this link to recover a forgotten user ID. See Retrieving a Forgotten User ID.

SSO/Launch Pad User Guide
SSO/Launch Pad User Guide 3 Revised January 2019
Logging Into SSO If you are an existing user and already have a Railinc SSO user ID, you can log in directly from the Railinc portal Customer Login panel (see Exhibit 2).
Note: If you are a new user and do not have a Railinc SSO user ID, you must register first. See Registering as a New User.
To access Single Sign-On:
1. Open your internet browser.
2. Enter the Railinc portal URL (www.railinc.com) in the address field.
3. Press Enter. The Railinc Home page is displayed (see Exhibit 1).
4. Enter your user ID in the User ID field.
5. Tab and enter your password in the Password field and press Enter. The result can be two-factor (see Two-Factor Authentication), unsuccessful (see Unsuccessful Logins) or successful (see Successful Logins).
Two-Factor Authentication Railinc’s two-factor authentication on the SSO portal enhances security to help keep freight rail industry data safe. This type of multi-factor authentication requires a combination of two factors before a user can access Railinc’s applications.
1. Railinc applications require a user ID and password – the password being one piece of evidence to prove identity.
2. Railinc’s two-factor authentication requires another piece of evidence to prove identity. As part of the SSO login process, you could occasionally be prompted to enter a code that Railinc will send to the email address associated with your account.
Note: If you are using a shared SSO ID, this security enhancement could adversely affect your ability to access Railinc applications.
Unsuccessful Logins a. If the login is not successful because the user ID and password do not match, retype
carefully and resubmit, or use the Forgot Password? or Forgot User ID? links to obtain guidance. See Handling a Forgotten Password or User ID.
Note: If you make nine unsuccessful login attempts, the account is locked and you’ll be prompted to validate your account and change your password.
b. If you have not used the account in more than 180 days (i.e., the account is inactive), revalidation is required. See Revalidating a Locked Account.
SSO/Launch Pad User Guide
SSO/Launch Pad User Guide 4 Revised January 2019
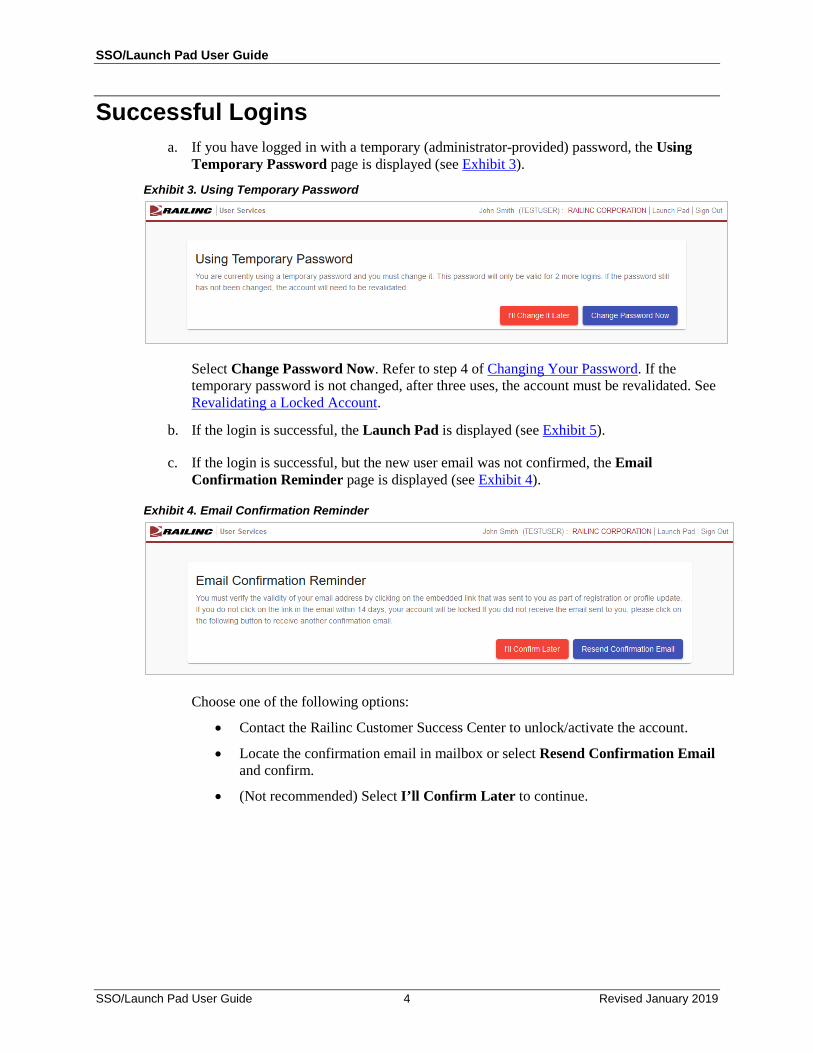
Successful Logins a. If you have logged in with a temporary (administrator-provided) password, the Using
Temporary Password page is displayed (see Exhibit 3).
Exhibit 3. Using Temporary Password
Select Change Password Now. Refer to step 4 of Changing Your Password. If the temporary password is not changed, after three uses, the account must be revalidated. See Revalidating a Locked Account.
b. If the login is successful, the Launch Pad is displayed (see Exhibit 5).
c. If the login is successful, but the new user email was not confirmed, the Email Confirmation Reminder page is displayed (see Exhibit 4).
Exhibit 4. Email Confirmation Reminder
Choose one of the following options:
• Contact the Railinc Customer Success Center to unlock/activate the account.
• Locate the confirmation email in mailbox or select Resend Confirmation Email and confirm.
• (Not recommended) Select I’ll Confirm Later to continue.
SSO/Launch Pad User Guide
SSO/Launch Pad User Guide 5 Revised January 2019
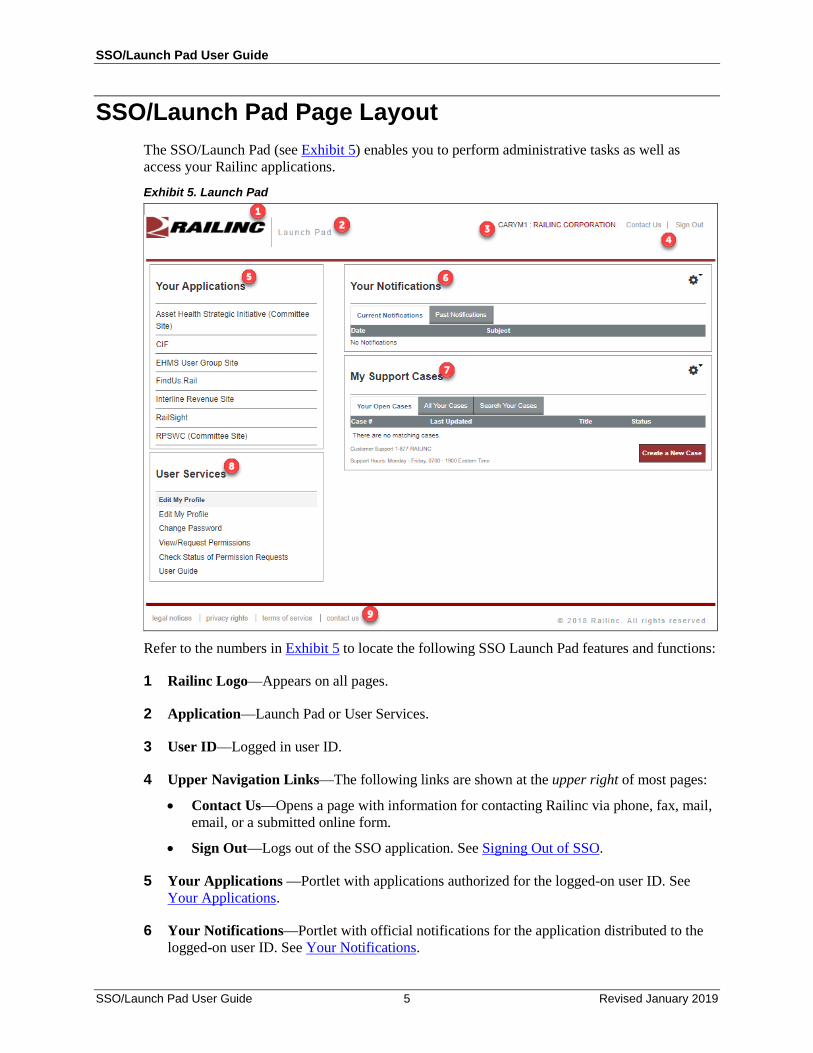
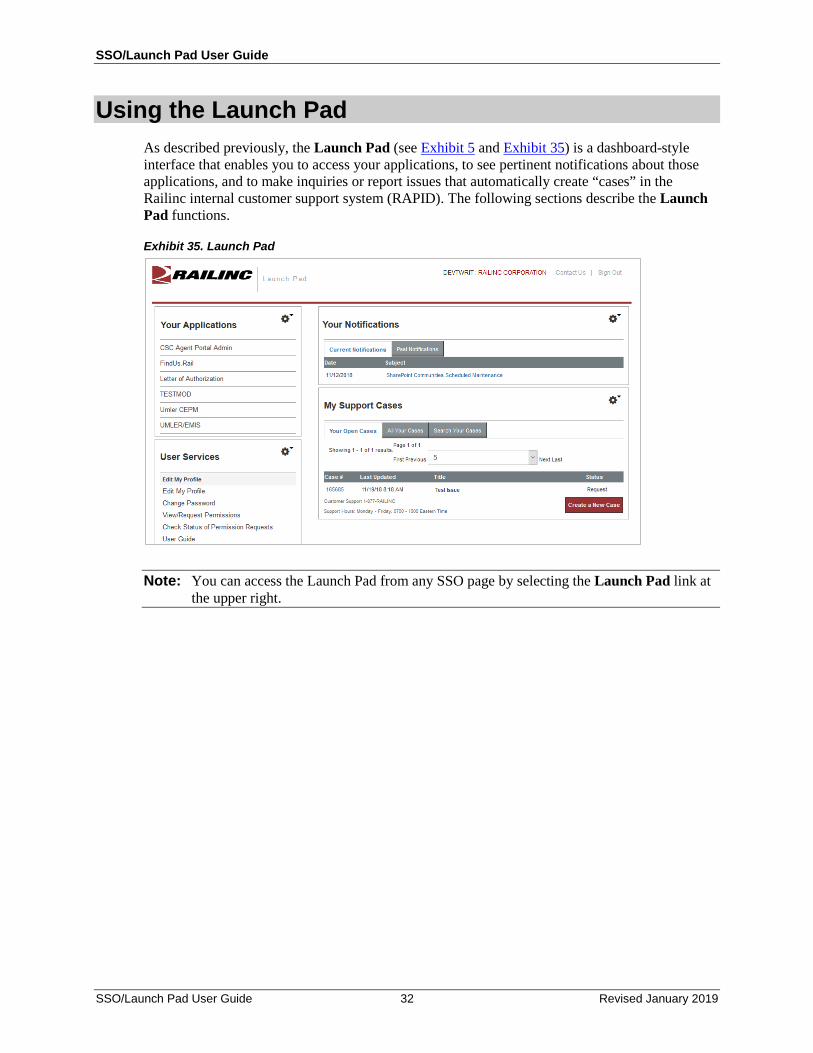
SSO/Launch Pad Page Layout The SSO/Launch Pad (see Exhibit 5) enables you to perform administrative tasks as well as access your Railinc applications.
Exhibit 5. Launch Pad
Refer to the numbers in Exhibit 5 to locate the following SSO Launch Pad features and functions:
1 Railinc Logo—Appears on all pages.
2 Application—Launch Pad or User Services.
3 User ID—Logged in user ID.
4 Upper Navigation Links—The following links are shown at the upper right of most pages:
• Contact Us—Opens a page with information for contacting Railinc via phone, fax, mail, email, or a submitted online form.
• Sign Out—Logs out of the SSO application. See Signing Out of SSO.
5 Your Applications —Portlet with applications authorized for the logged-on user ID. See Your Applications.
6 Your Notifications—Portlet with official notifications for the application distributed to the logged-on user ID. See Your Notifications.
SSO/Launch Pad User Guide
SSO/Launch Pad User Guide 6 Revised January 2019
7 My Support Cases—Portlet with inquiry or issues (cases) submitted by the user ID. See My Support Cases.
8 User Services—Portlet that provides quick access to the User Services management functions. See User Services.
Note: Content of this portlet varies based on the SSO responsibilities assigned to the user. General user tasks include:
a. Edit My Profile—Opens the Edit Profile <User ID> page (see Exhibit 38). See Editing Your User Profile.
b. Change Password—Opens the Change Password page (see Exhibit 15). See Changing Your Password.
c. View/Request Permissions—Opens the Request Application Access page (see Exhibit 23). See Requesting Application Access.
d. Check Status of Permission Requests—opens the Permission Request Status page (see Exhibit 31). See Checking the Status of Permission Requests.
e. User Guide—Opens the user guide for SSO and Launch Pad in a new tab or window.
9 Lower Links—The following links are shown at the bottom of most pages:
• Legal Notices—Opens a page with copyright information.
• Privacy Rights—Opens a page with information about what information will be obtained initially during registration and during SSO usage, how it will be used, and how long it will be retained.
• Terms of Service—Opens a page with links to the Railinc Terms of Service and the Products Terms of Use, and provides legal contacts for questions regarding access and usage.
• Contact Us—Opens a page with information for contacting Railinc by phone, fax, mail, email, or a submitted online form.
SSO/Launch Pad User Guide
SSO/Launch Pad User Guide 7 Revised January 2019
Handling a Forgotten Password or User ID If you cannot remember a password or a user ID, you can select the links in the Customer Login panel to obtain online assistance.
Resetting a Forgotten Password To reset a forgotten password:
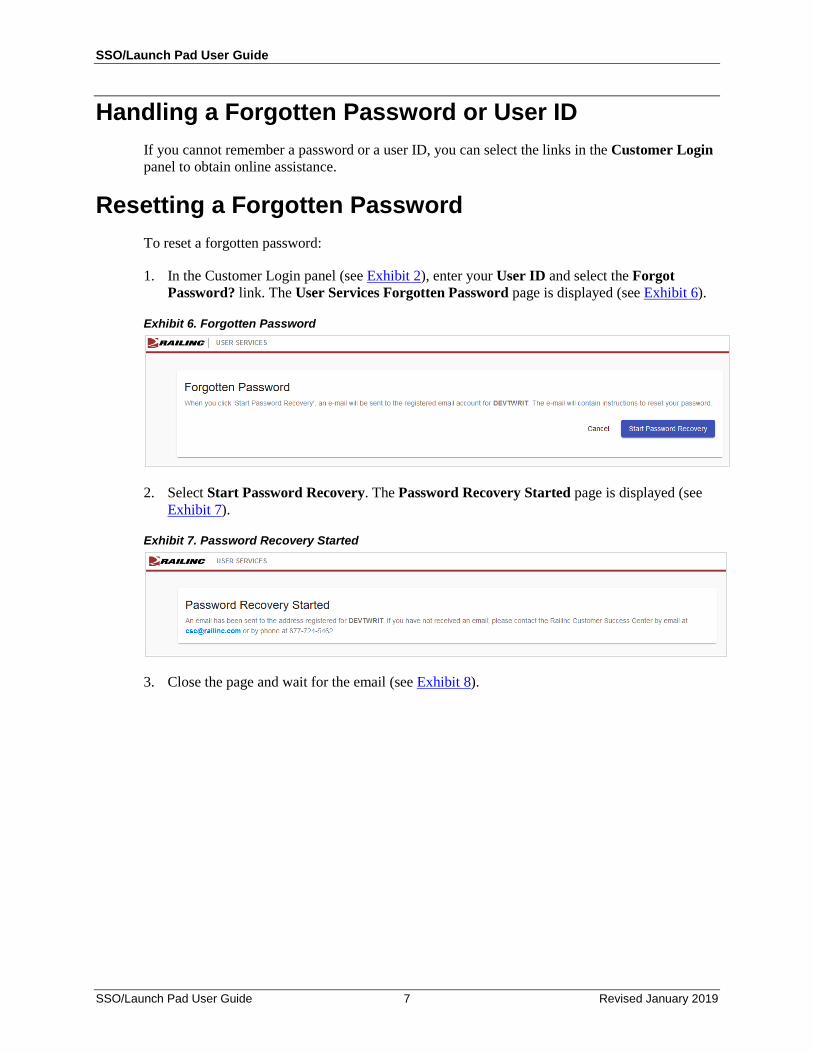
1. In the Customer Login panel (see Exhibit 2), enter your User ID and select the Forgot Password? link. The User Services Forgotten Password page is displayed (see Exhibit 6).
Exhibit 6. Forgotten Password
2. Select Start Password Recovery. The Password Recovery Started page is displayed (see Exhibit 7).
Exhibit 7. Password Recovery Started
3. Close the page and wait for the email (see Exhibit 8).
SSO/Launch Pad User Guide
SSO/Launch Pad User Guide 8 Revised January 2019
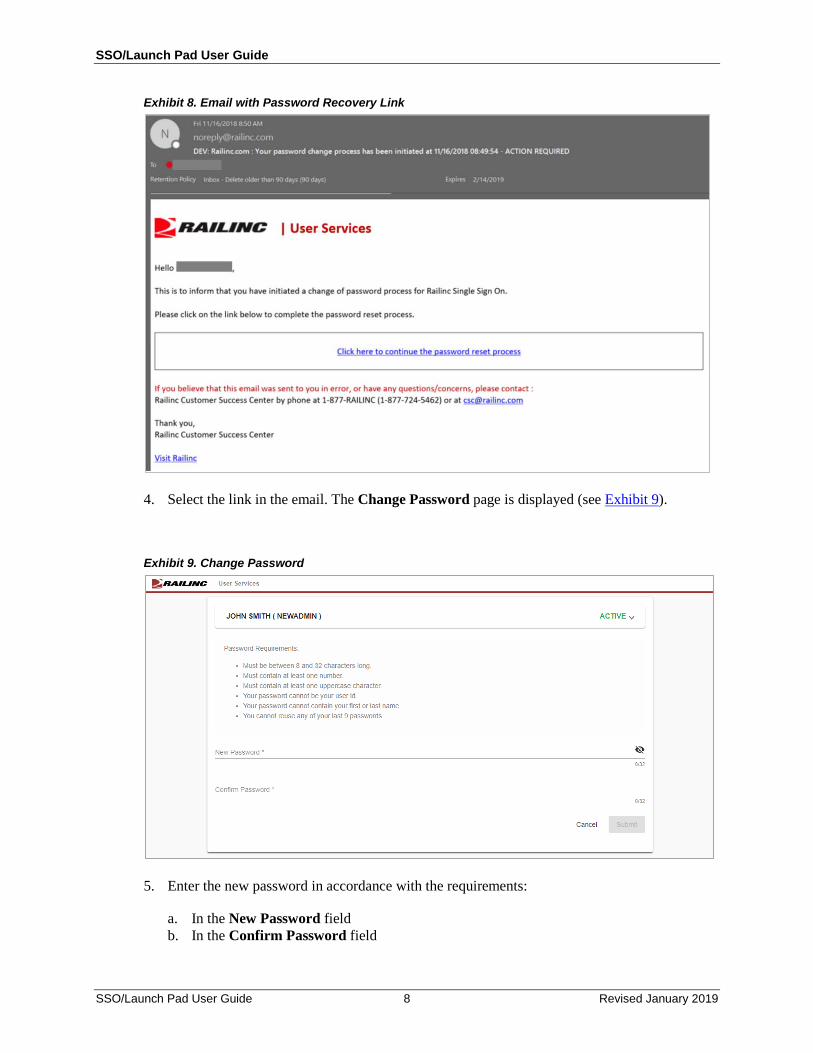
Exhibit 8. Email with Password Recovery Link
4. Select the link in the email. The Change Password page is displayed (see Exhibit 9).
Exhibit 9. Change Password
5. Enter the new password in accordance with the requirements:
a. In the New Password field b. In the Confirm Password field
SSO/Launch Pad User Guide
SSO/Launch Pad User Guide 9 Revised January 2019
Note: None of your previous nine passwords can be reused. Your entries in the New Password field and Confirm Password field must match.
6. Select Submit. If the new password meets SSO application standards, the Success page for
password change is displayed (not shown).
7. Select Continue to log in with your new password.
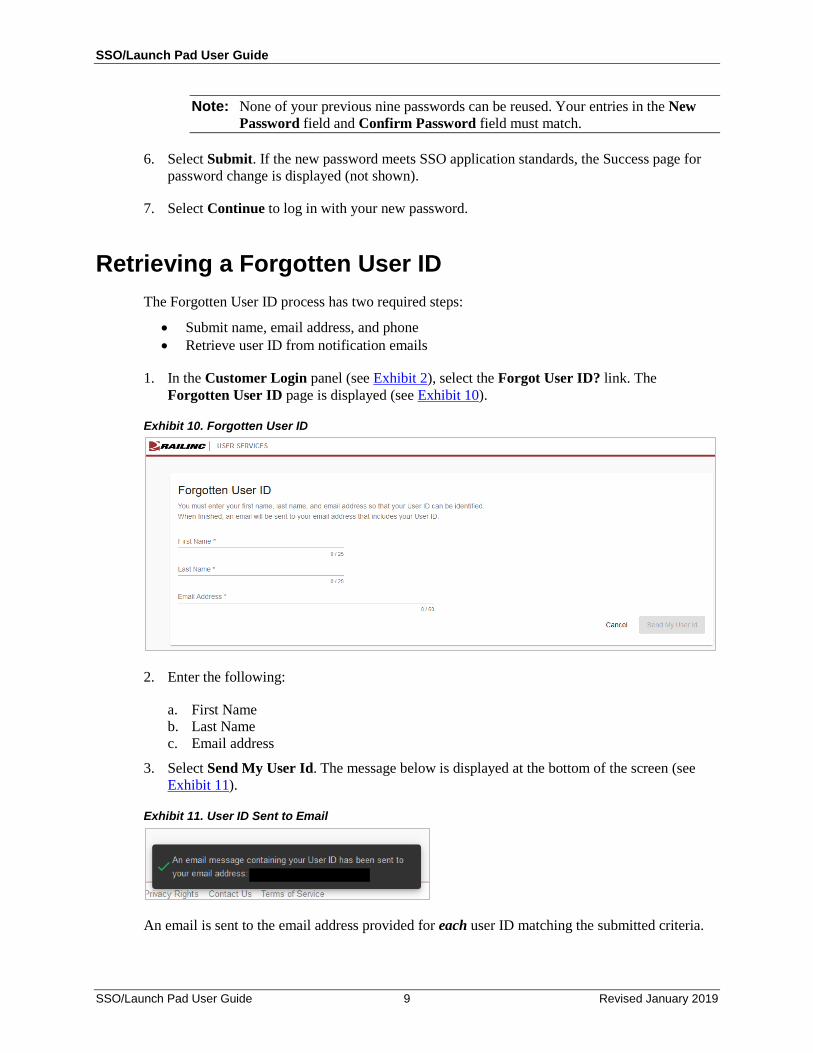
Retrieving a Forgotten User ID The Forgotten User ID process has two required steps:
• Submit name, email address, and phone • Retrieve user ID from notification emails
1. In the Customer Login panel (see Exhibit 2), select the Forgot User ID? link. The Forgotten User ID page is displayed (see Exhibit 10).
Exhibit 10. Forgotten User ID
2. Enter the following:
a. First Name b. Last Name c. Email address
3. Select Send My User Id. The message below is displayed at the bottom of the screen (see Exhibit 11).
Exhibit 11. User ID Sent to Email
An email is sent to the email address provided for each user ID matching the submitted criteria.
SSO/Launch Pad User Guide
SSO/Launch Pad User Guide 10 Revised January 2019
4. Select Continue. The SSO Login panel is redisplayed to do an immediate login (similar to Exhibit 2).
5. Open the email(s) received and locate the Your user ID entry. Optionally, copy the ID (Ctrl+C) to use for a login.
6. Toggle back to the SSO Login panel to use the retrieved ID.
SSO/Launch Pad User Guide
SSO/Launch Pad User Guide 11 Revised January 2019
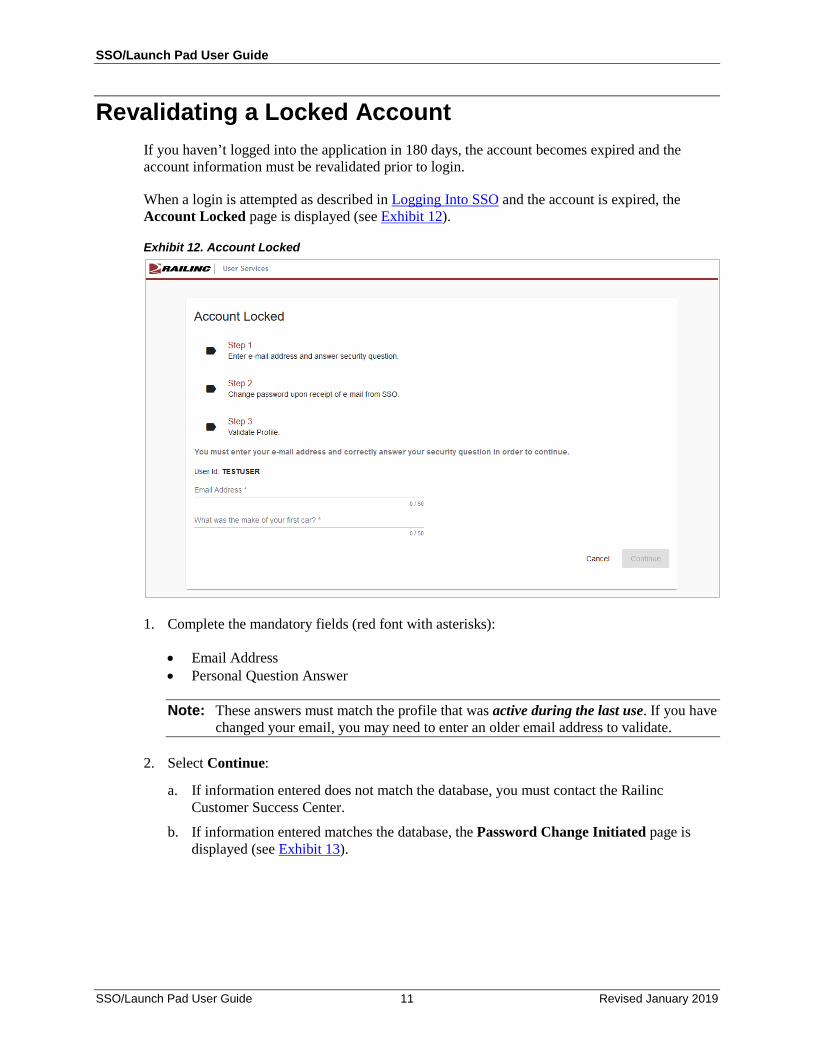
Revalidating a Locked Account If you haven’t logged into the application in 180 days, the account becomes expired and the account information must be revalidated prior to login.
When a login is attempted as described in Logging Into SSO and the account is expired, the Account Locked page is displayed (see Exhibit 12).
Exhibit 12. Account Locked
1. Complete the mandatory fields (red font with asterisks):
• Email Address • Personal Question Answer
Note: These answers must match the profile that was active during the last use. If you have changed your email, you may need to enter an older email address to validate.
2. Select Continue:
a. If information entered does not match the database, you must contact the Railinc Customer Success Center.
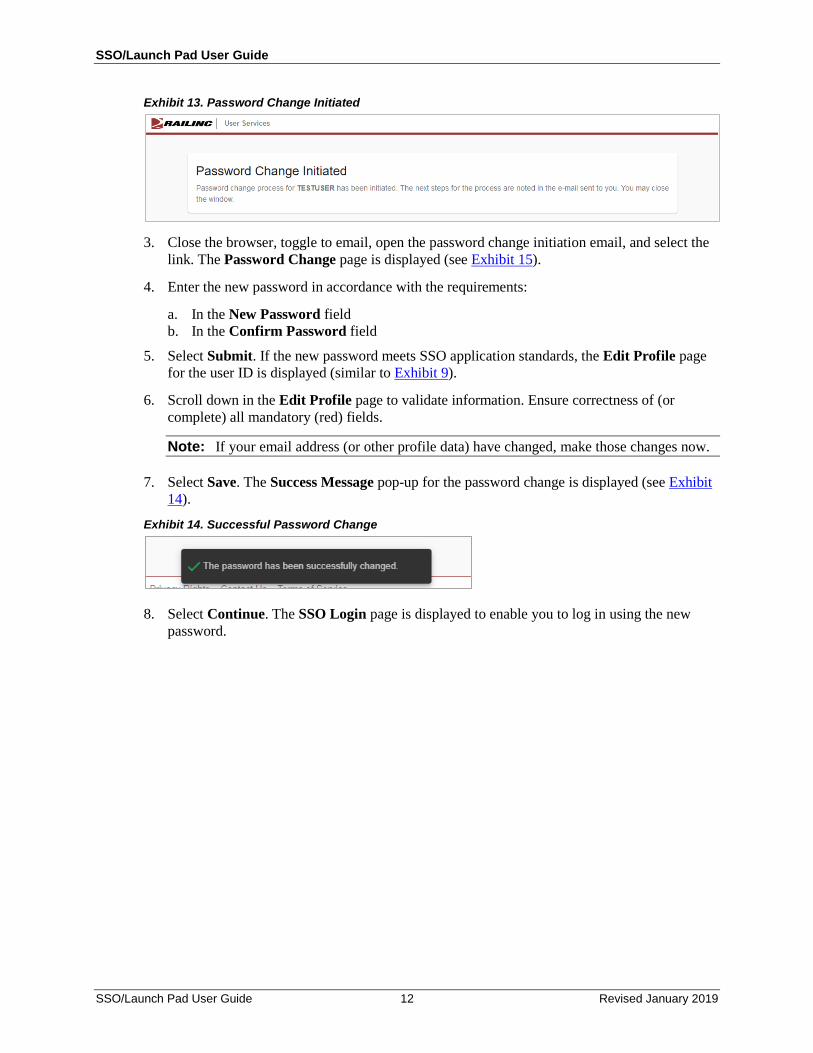
b. If information entered matches the database, the Password Change Initiated page is displayed (see Exhibit 13).
SSO/Launch Pad User Guide
SSO/Launch Pad User Guide 12 Revised January 2019
Exhibit 13. Password Change Initiated
3. Close the browser, toggle to email, open the password change initiation email, and select the
link. The Password Change page is displayed (see Exhibit 15).
4. Enter the new password in accordance with the requirements:
a. In the New Password field b. In the Confirm Password field
5. Select Submit. If the new password meets SSO application standards, the Edit Profile page for the user ID is displayed (similar to Exhibit 9).
6. Scroll down in the Edit Profile page to validate information. Ensure correctness of (or complete) all mandatory (red) fields.
Note: If your email address (or other profile data) have changed, make those changes now.
7. Select Save. The Success Message pop-up for the password change is displayed (see Exhibit 14).
Exhibit 14. Successful Password Change
8. Select Continue. The SSO Login page is displayed to enable you to log in using the new password.
SSO/Launch Pad User Guide
SSO/Launch Pad User Guide 13 Revised January 2019
Signing Out of SSO Important: Never “X” out of an SSO application without signing out first. This can “hang”
your user ID and prevent you from logging back in. One exception: when using multiple windows/applications (see Closing Multiple Applications).
To sign out (or log off) of SSO from an application or SSO page:
1. Select the Sign Out link at the top of the application page. The Railinc SSO Login page is displayed (similar to Exhibit 2).
2. As desired, close the browser window (click top right X, or File > Exit, or Alt+F4).
SSO/Launch Pad User Guide
SSO/Launch Pad User Guide 14 Revised January 2019
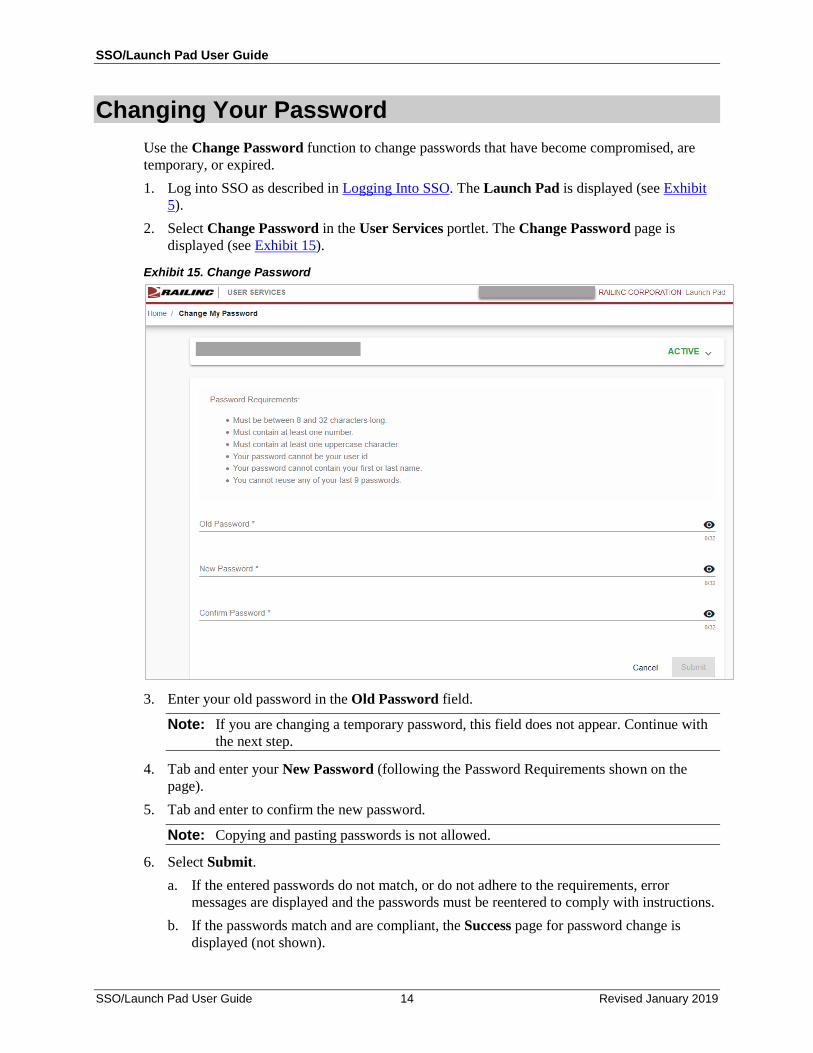
Changing Your Password Use the Change Password function to change passwords that have become compromised, are temporary, or expired. 1. Log into SSO as described in Logging Into SSO. The Launch Pad is displayed (see Exhibit
5). 2. Select Change Password in the User Services portlet. The Change Password page is
displayed (see Exhibit 15).
Exhibit 15. Change Password
3. Enter your old password in the Old Password field.
Note: If you are changing a temporary password, this field does not appear. Continue with the next step.
4. Tab and enter your New Password (following the Password Requirements shown on the page).
5. Tab and enter to confirm the new password.
Note: Copying and pasting passwords is not allowed.
6. Select Submit. a. If the entered passwords do not match, or do not adhere to the requirements, error
messages are displayed and the passwords must be reentered to comply with instructions. b. If the passwords match and are compliant, the Success page for password change is
displayed (not shown).
SSO/Launch Pad User Guide
SSO/Launch Pad User Guide 15 Revised January 2019
7. Select Continue. The User Services page is displayed (see Exhibit 40) and a confirming email is sent.
SSO/Launch Pad User Guide
SSO/Launch Pad User Guide 16 Revised January 2019
Registering as a New User Before you can access applications through SSO, you must be registered to use SSO.
Note: If you are already registered, select the Sign in link to return to the Single Sign-On login page (similar to Exhibit 1).
To register as a new user:
1. Open your internet browser.
2. Type the Railinc portal URL (http://www.railinc.com) in the address field and press Enter. The Railinc Home page is displayed (see Exhibit 1).
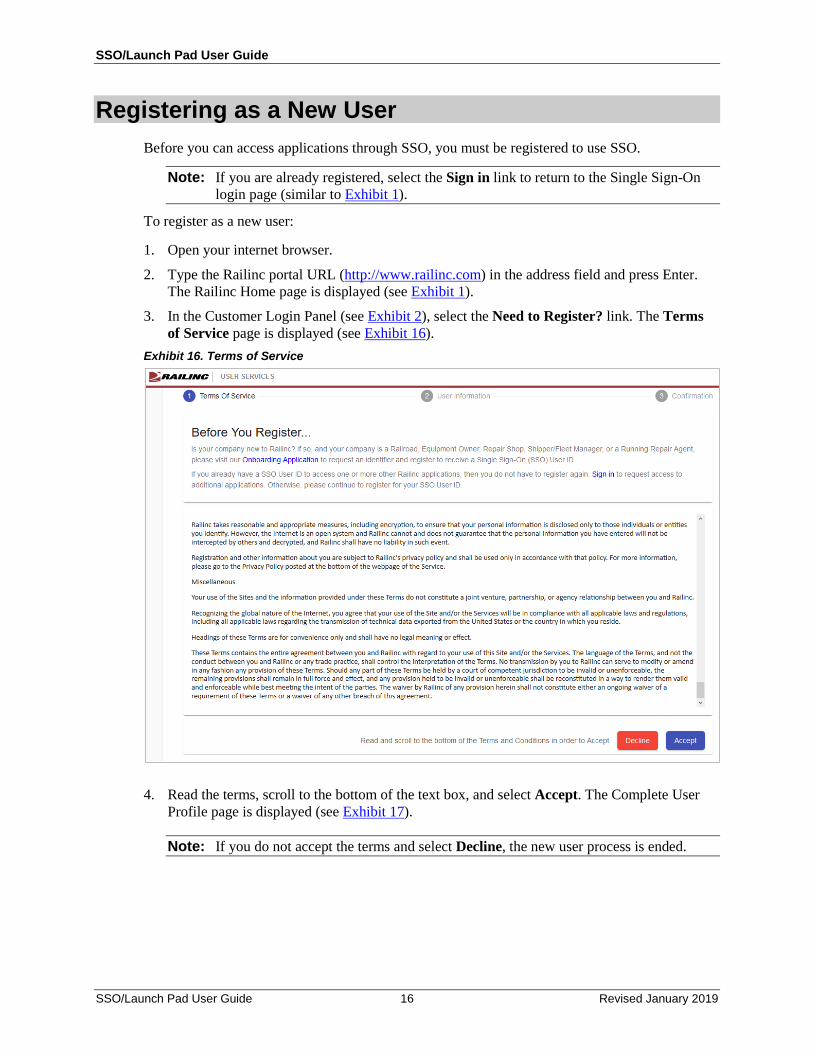
3. In the Customer Login Panel (see Exhibit 2), select the Need to Register? link. The Terms of Service page is displayed (see Exhibit 16).
Exhibit 16. Terms of Service
4. Read the terms, scroll to the bottom of the text box, and select Accept. The Complete User Profile page is displayed (see Exhibit 17).
Note: If you do not accept the terms and select Decline, the new user process is ended.
SSO/Launch Pad User Guide
SSO/Launch Pad User Guide 17 Revised January 2019
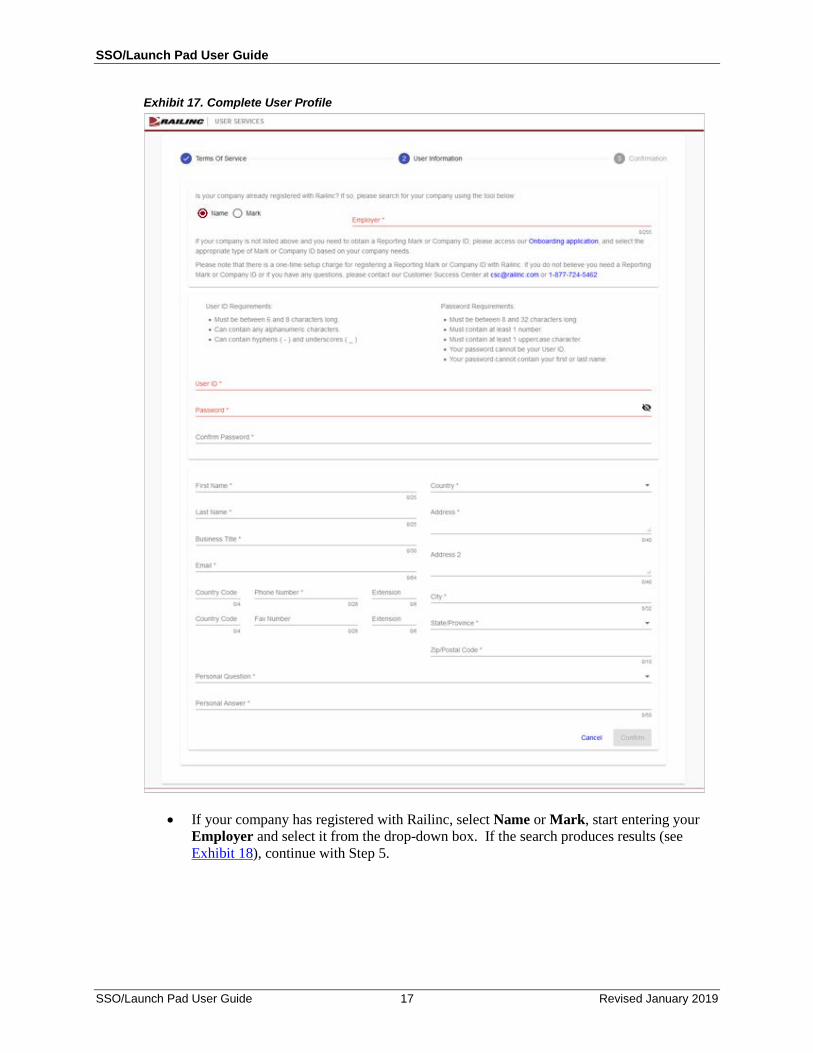
Exhibit 17. Complete User Profile
• If your company has registered with Railinc, select Name or Mark, start entering your Employer and select it from the drop-down box. If the search produces results (see Exhibit 18), continue with Step 5.
SSO/Launch Pad User Guide
SSO/Launch Pad User Guide 18 Revised January 2019
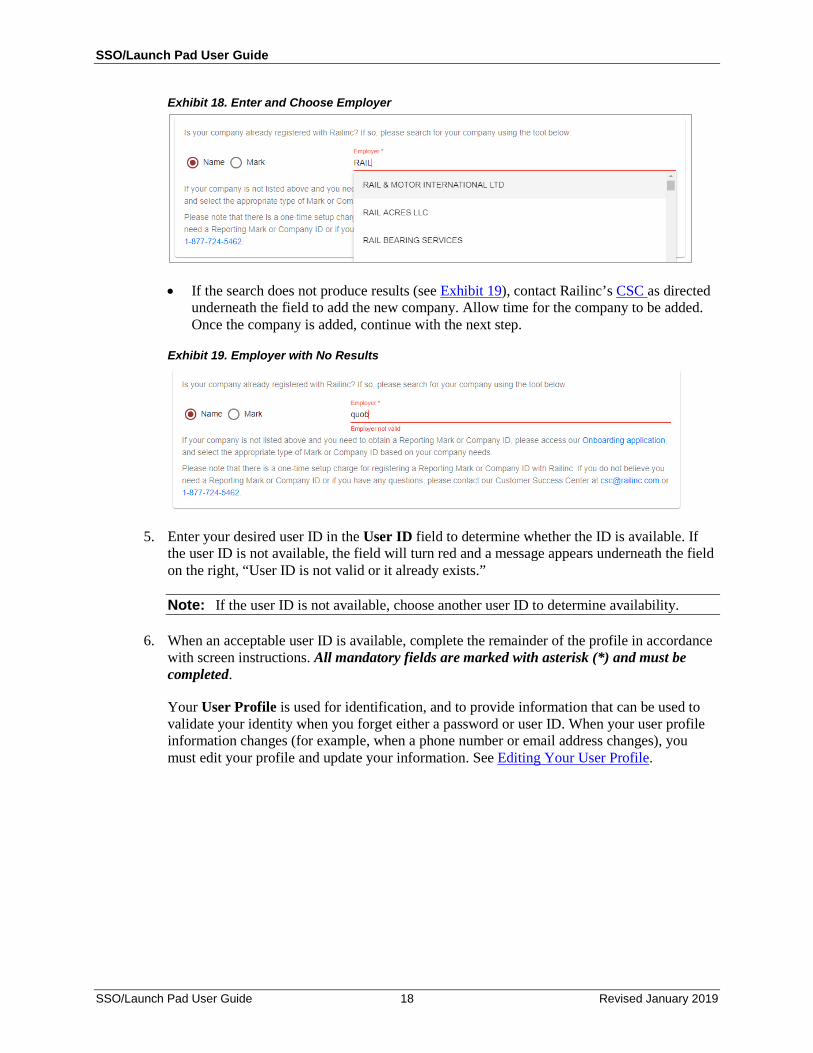
Exhibit 18. Enter and Choose Employer
• If the search does not produce results (see Exhibit 19), contact Railinc’s CSC as directed underneath the field to add the new company. Allow time for the company to be added. Once the company is added, continue with the next step.
Exhibit 19. Employer with No Results
5. Enter your desired user ID in the User ID field to determine whether the ID is available. If the user ID is not available, the field will turn red and a message appears underneath the field on the right, “User ID is not valid or it already exists.”
Note: If the user ID is not available, choose another user ID to determine availability.
6. When an acceptable user ID is available, complete the remainder of the profile in accordance with screen instructions. All mandatory fields are marked with asterisk (*) and must be completed.
Your User Profile is used for identification, and to provide information that can be used to validate your identity when you forget either a password or user ID. When your user profile information changes (for example, when a phone number or email address changes), you must edit your profile and update your information. See Editing Your User Profile.
SSO/Launch Pad User Guide
SSO/Launch Pad User Guide 19 Revised January 2019
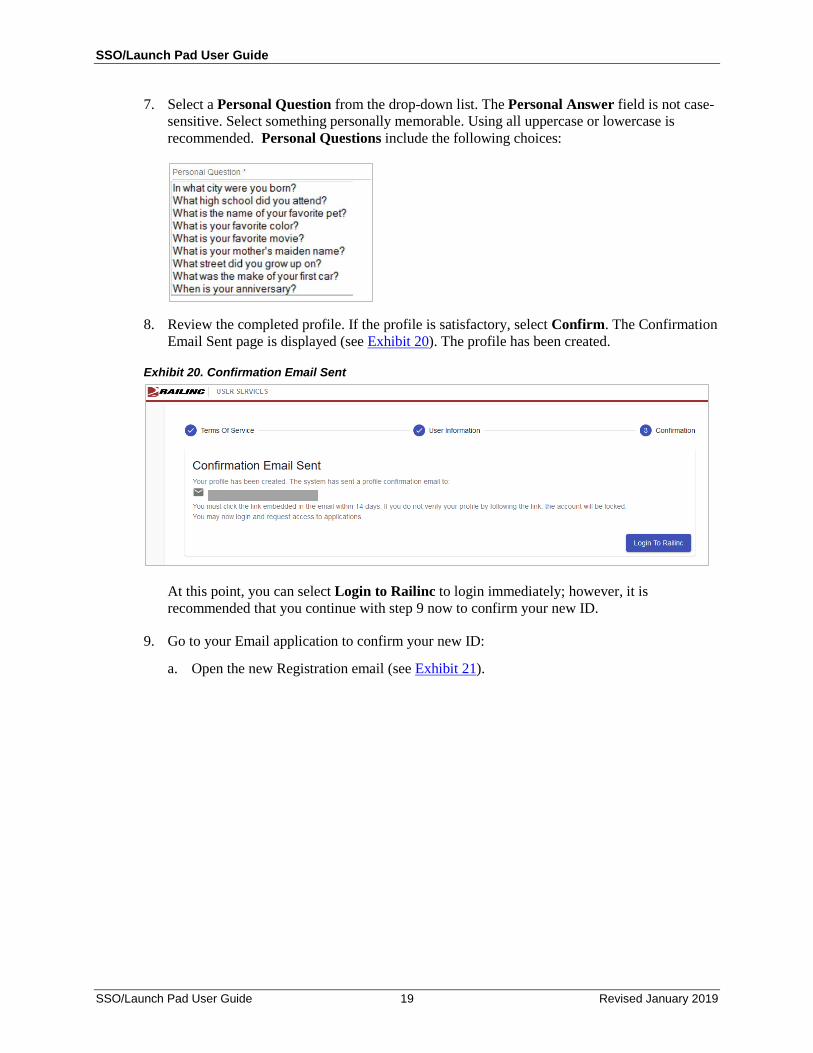
7. Select a Personal Question from the drop-down list. The Personal Answer field is not case-sensitive. Select something personally memorable. Using all uppercase or lowercase is recommended. Personal Questions include the following choices:
8. Review the completed profile. If the profile is satisfactory, select Confirm. The Confirmation Email Sent page is displayed (see Exhibit 20). The profile has been created.
Exhibit 20. Confirmation Email Sent
At this point, you can select Login to Railinc to login immediately; however, it is recommended that you continue with step 9 now to confirm your new ID.
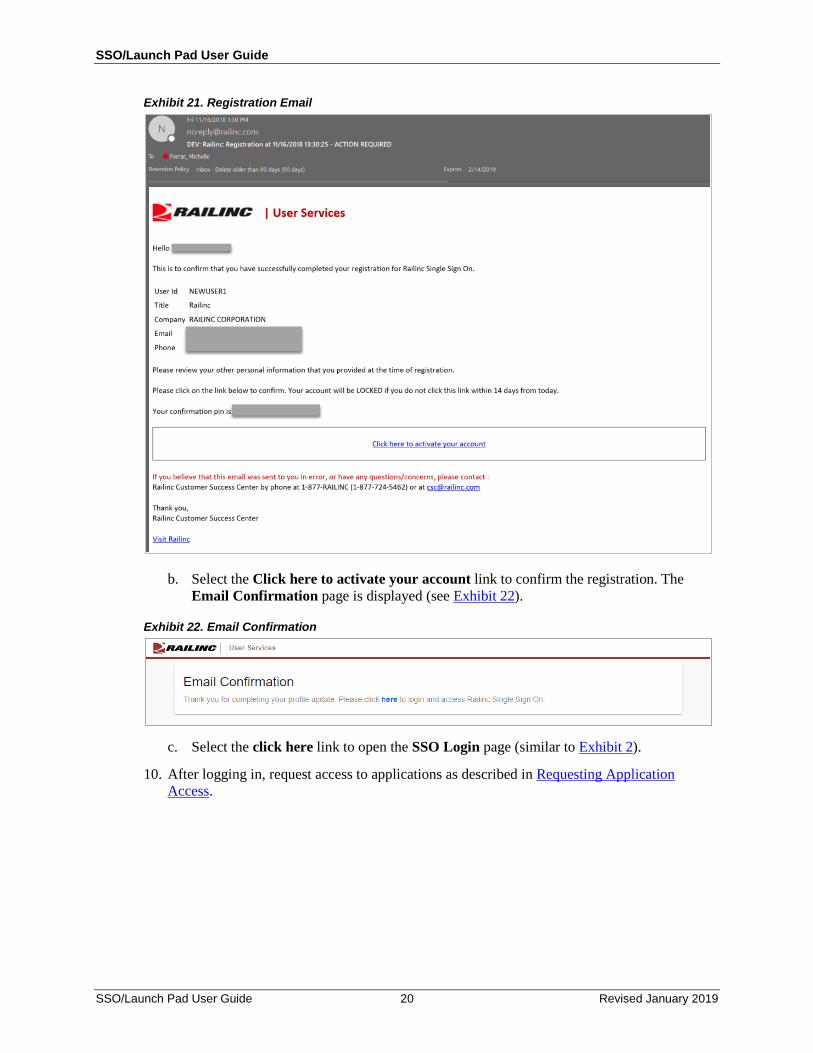
9. Go to your Email application to confirm your new ID:
a. Open the new Registration email (see Exhibit 21).
SSO/Launch Pad User Guide
SSO/Launch Pad User Guide 20 Revised January 2019
Exhibit 21. Registration Email
b. Select the Click here to activate your account link to confirm the registration. The Email Confirmation page is displayed (see Exhibit 22).
Exhibit 22. Email Confirmation
c. Select the click here link to open the SSO Login page (similar to Exhibit 2).
10. After logging in, request access to applications as described in Requesting Application Access.
SSO/Launch Pad User Guide
SSO/Launch Pad User Guide 21 Revised January 2019
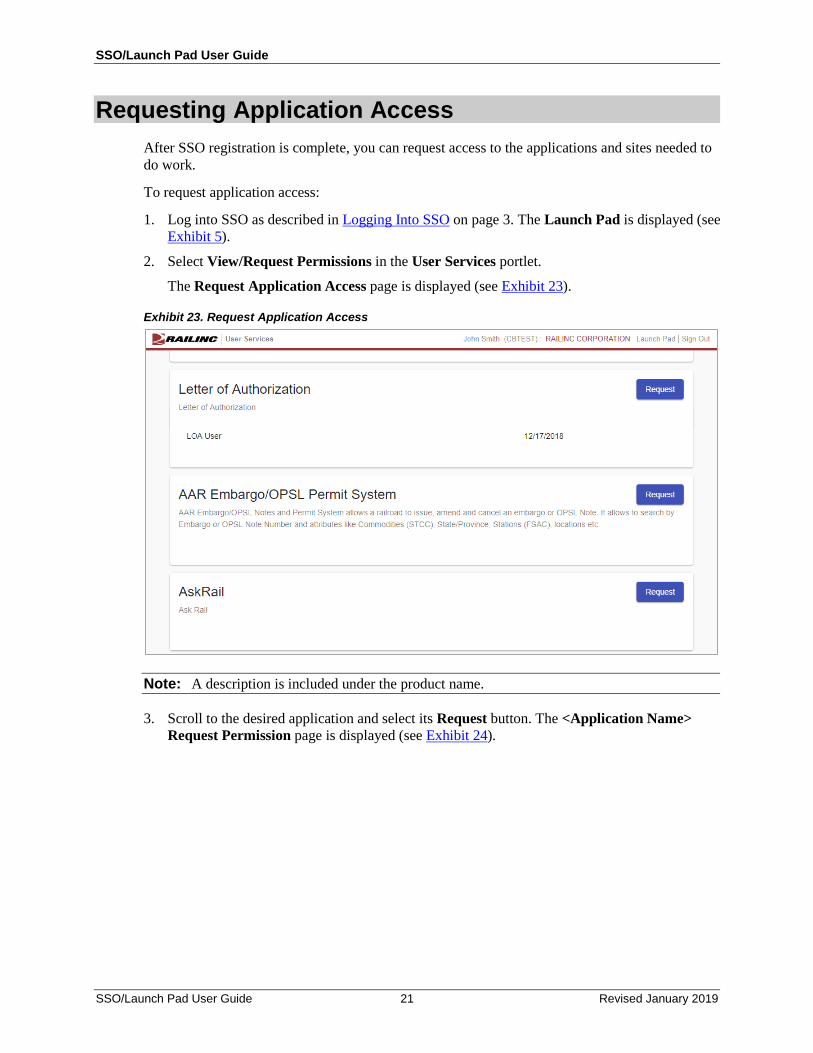
Requesting Application Access After SSO registration is complete, you can request access to the applications and sites needed to do work.
To request application access:
1. Log into SSO as described in Logging Into SSO on page 3. The Launch Pad is displayed (see Exhibit 5).
2. Select View/Request Permissions in the User Services portlet.
The Request Application Access page is displayed (see Exhibit 23).
Exhibit 23. Request Application Access
Note: A description is included under the product name.
3. Scroll to the desired application and select its Request button. The <Application Name> Request Permission page is displayed (see Exhibit 24).
SSO/Launch Pad User Guide
SSO/Launch Pad User Guide 22 Revised January 2019
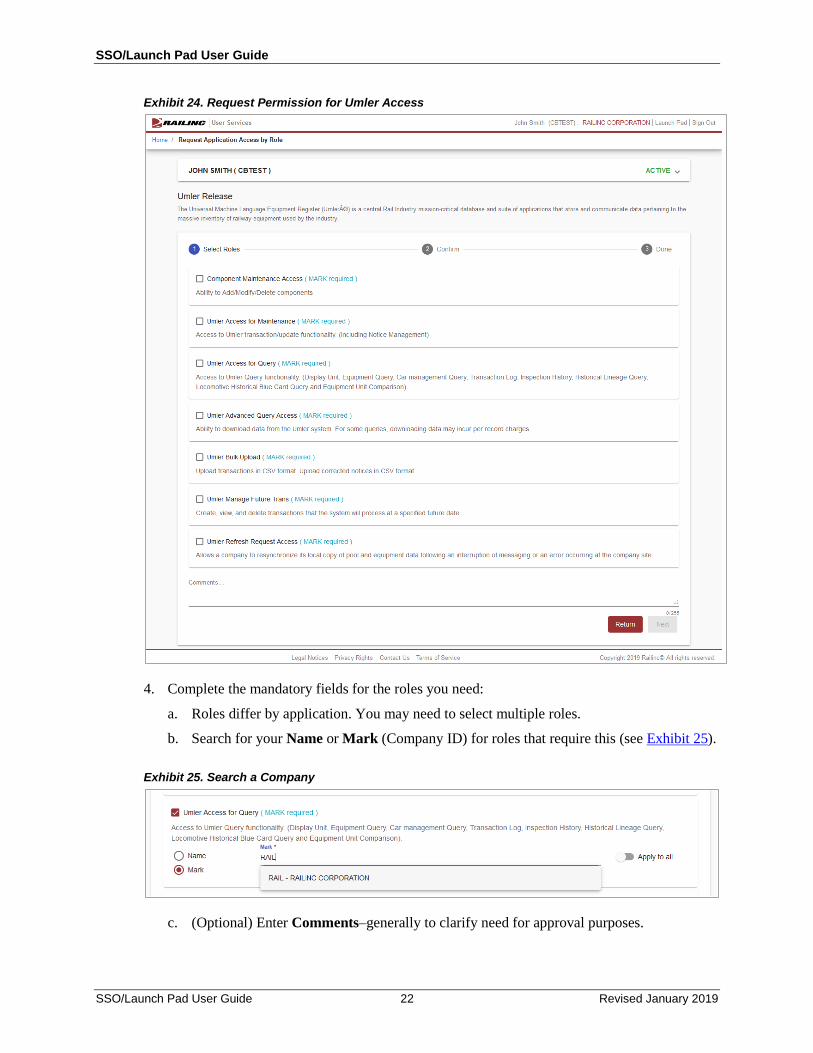
Exhibit 24. Request Permission for Umler Access
4. Complete the mandatory fields for the roles you need:
a. Roles differ by application. You may need to select multiple roles.
b. Search for your Name or Mark (Company ID) for roles that require this (see Exhibit 25).
Exhibit 25. Search a Company
c. (Optional) Enter Comments–generally to clarify need for approval purposes.
SSO/Launch Pad User Guide
SSO/Launch Pad User Guide 23 Revised January 2019
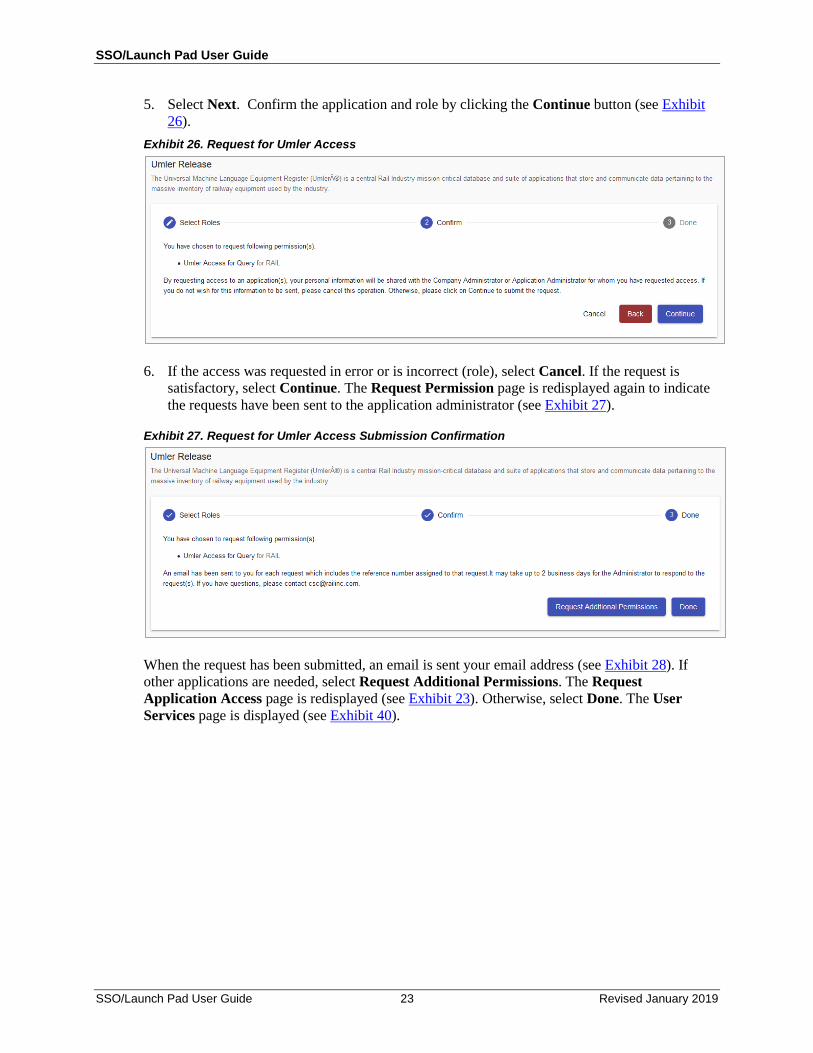
5. Select Next. Confirm the application and role by clicking the Continue button (see Exhibit 26).
Exhibit 26. Request for Umler Access
6. If the access was requested in error or is incorrect (role), select Cancel. If the request is satisfactory, select Continue. The Request Permission page is redisplayed again to indicate the requests have been sent to the application administrator (see Exhibit 27).
Exhibit 27. Request for Umler Access Submission Confirmation
When the request has been submitted, an email is sent your email address (see Exhibit 28). If other applications are needed, select Request Additional Permissions. The Request Application Access page is redisplayed (see Exhibit 23). Otherwise, select Done. The User Services page is displayed (see Exhibit 40).
SSO/Launch Pad User Guide
SSO/Launch Pad User Guide 24 Revised January 2019
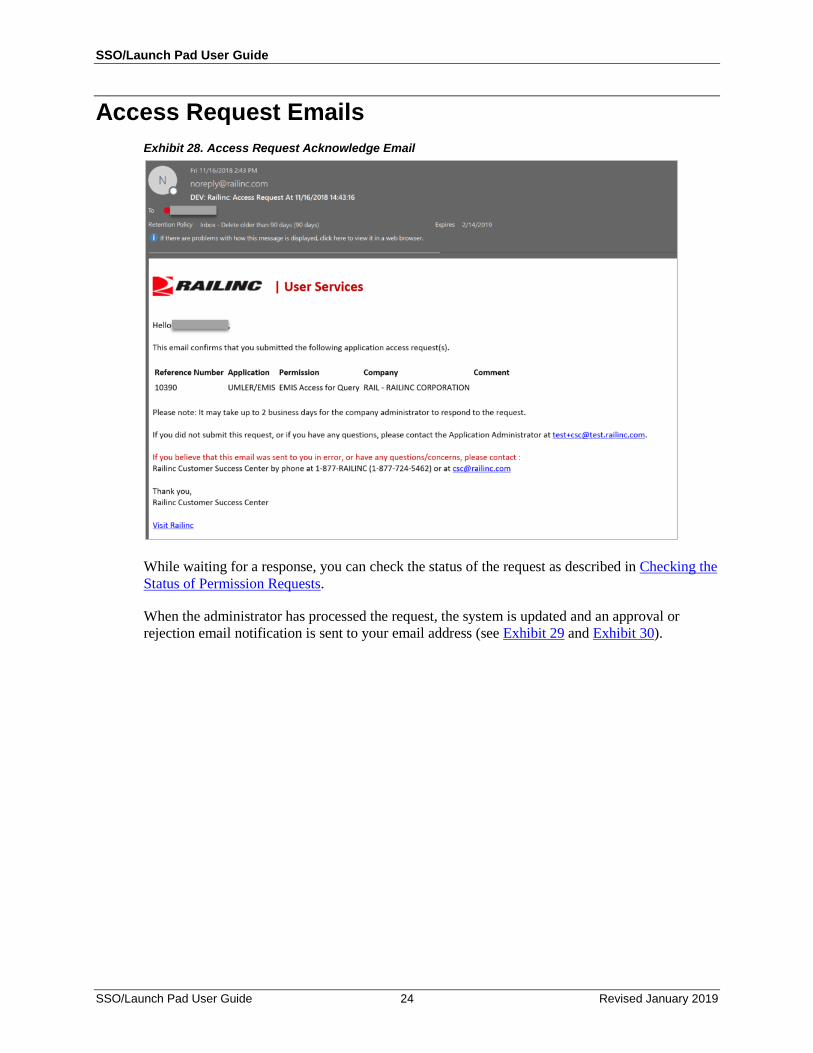
Access Request Emails Exhibit 28. Access Request Acknowledge Email
While waiting for a response, you can check the status of the request as described in Checking the Status of Permission Requests.
When the administrator has processed the request, the system is updated and an approval or rejection email notification is sent to your email address (see Exhibit 29 and Exhibit 30).
SSO/Launch Pad User Guide
SSO/Launch Pad User Guide 25 Revised January 2019
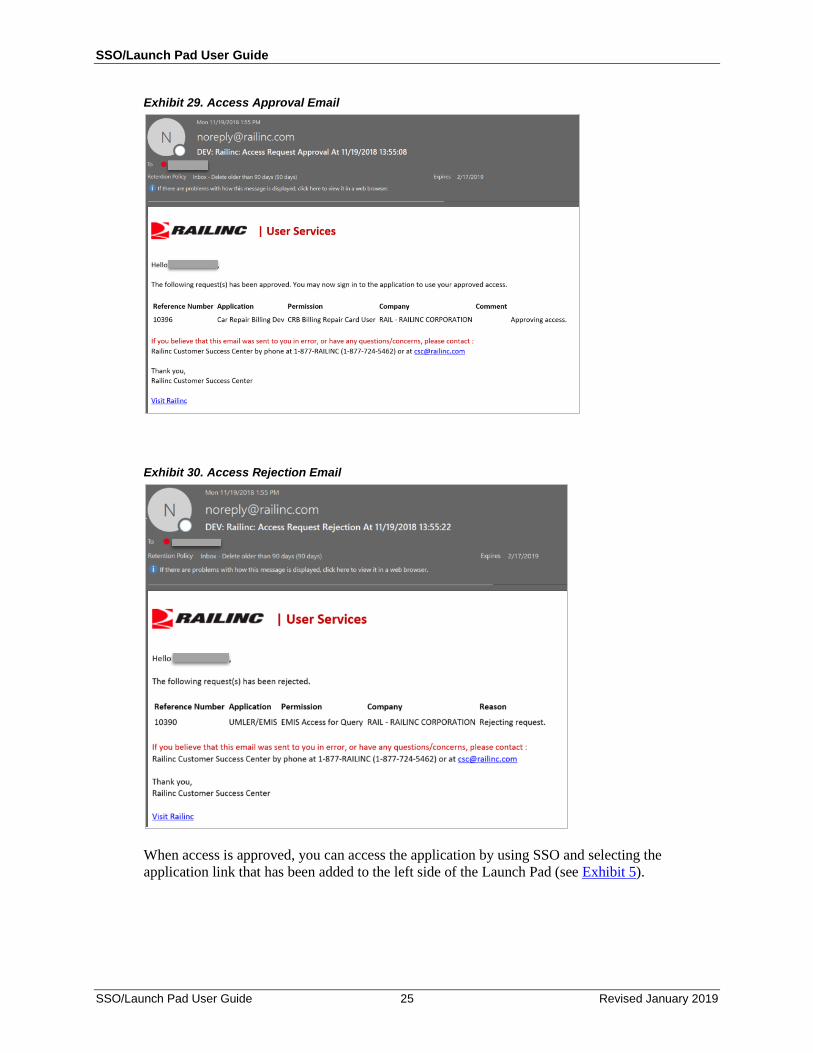
Exhibit 29. Access Approval Email
Exhibit 30. Access Rejection Email
When access is approved, you can access the application by using SSO and selecting the application link that has been added to the left side of the Launch Pad (see Exhibit 5).
SSO/Launch Pad User Guide
SSO/Launch Pad User Guide 26 Revised January 2019
Checking the Status of Permission Requests You can check the status of permission requests. Valid statuses include:
• Requested – the initial status of a request • Cancelled – requesters can cancel a request at any time • Approved – when a request has been approved by the administrator • Pending – when a request has been seen by the administrator, but more information is
needed, the status may be set to Pending. • Rejected – when a request has been rejected by the administrator
1. Log in to SSO as described in Logging Into SSO. The Launch Pad is displayed (see Exhibit 5).
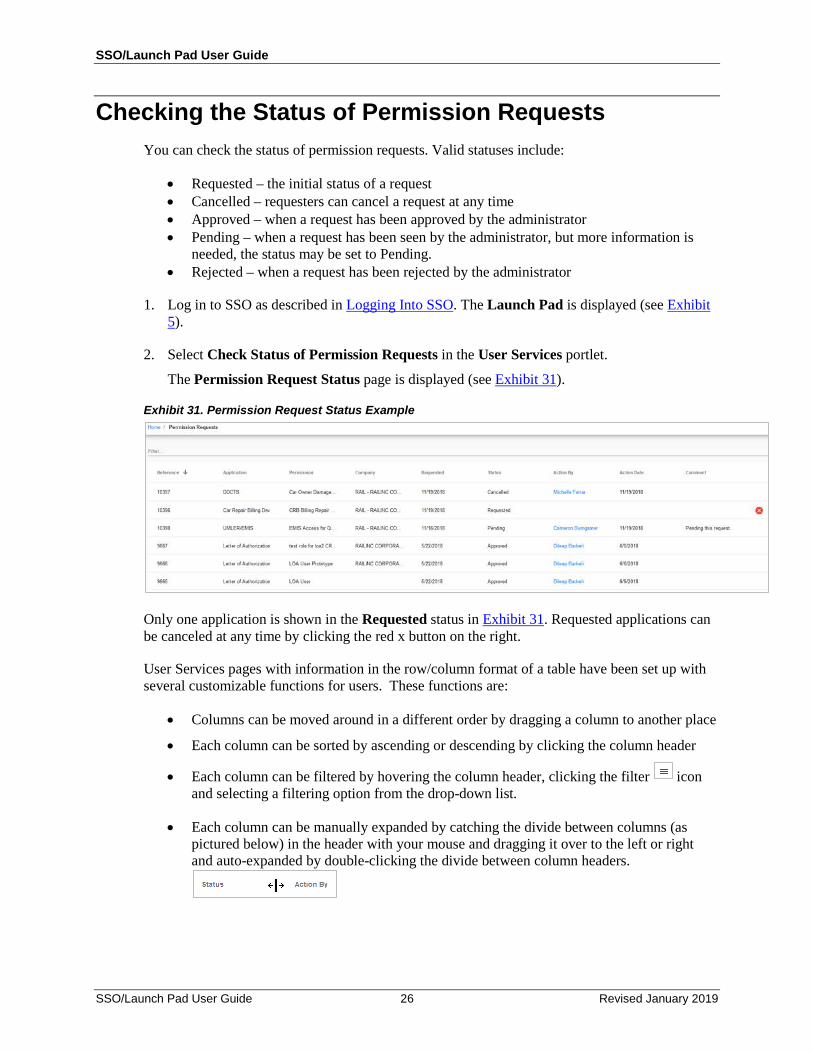
2. Select Check Status of Permission Requests in the User Services portlet.
The Permission Request Status page is displayed (see Exhibit 31).
Exhibit 31. Permission Request Status Example
Only one application is shown in the Requested status in Exhibit 31. Requested applications can be canceled at any time by clicking the red x button on the right.
User Services pages with information in the row/column format of a table have been set up with several customizable functions for users. These functions are:
• Columns can be moved around in a different order by dragging a column to another place
• Each column can be sorted by ascending or descending by clicking the column header
• Each column can be filtered by hovering the column header, clicking the filter icon and selecting a filtering option from the drop-down list.
• Each column can be manually expanded by catching the divide between columns (as pictured below) in the header with your mouse and dragging it over to the left or right and auto-expanded by double-clicking the divide between column headers.
SSO/Launch Pad User Guide
SSO/Launch Pad User Guide 27 Revised January 2019
Working with Applications
Launching a Single Application 1. Log into SSO as described in Logging Into SSO. The Launch Pad is displayed (see Exhibit
5).
2. Select the desired link in the Your Applications portlet on the left side. The application’s welcome/home page is displayed.
Note: It is beyond the scope of this document to describe tasks of specific applications. Each application has a user guide and/or help that can be accessed while in the application.
Closing a Single Application When you have finished working with an application, select the Launch Pad link to return to the Launch Pad (see Exhibit 5) without logging off. Select another application or log off as needed.
SSO/Launch Pad User Guide
SSO/Launch Pad User Guide 28 Revised January 2019
Working with Multiple Applications Opening an application from the Launch Pad opens the application Home/Welcome page. If you need to obtain input from a task in one application and use that information in another application, you can choose to open multiple applications.
Opening Multiple Applications 1. Log into SSO as described in Logging Into SSO. The Launch Pad is displayed (see Exhibit
5).
2. Right-click the desired application link in the Your Applications portlet on the left side and select Open link in new window. The application’s welcome/home page is displayed is displayed in a new browser window.
3. Go back to the original browser window (which still shows the Launch Pad) and select a second application from the Your Applications portlet. The second application’s Welcome/Home page is displayed.
Note: You can toggle between application browser windows using Alt+Tab.
Closing Multiple Applications Close All Applications To close all applications simultaneously, select the Sign Out link in one application. The SSO Login page is displayed. It also logs you out of Single Sign-On for all applications. Then close all windows (use the X or Alt+F4).
Important: Never “X” out of an SSO application without signing out first. This can “hang” your user ID and prevent you from logging back in. See below for the one exception to this.
Close One Application If you are finished with one application, but are still using another application, close the window of the unneeded application (use the X or Alt+F4). The unneeded window closes, and the other remains open with an active SSO login.
SSO/Launch Pad User Guide
SSO/Launch Pad User Guide 29 Revised January 2019
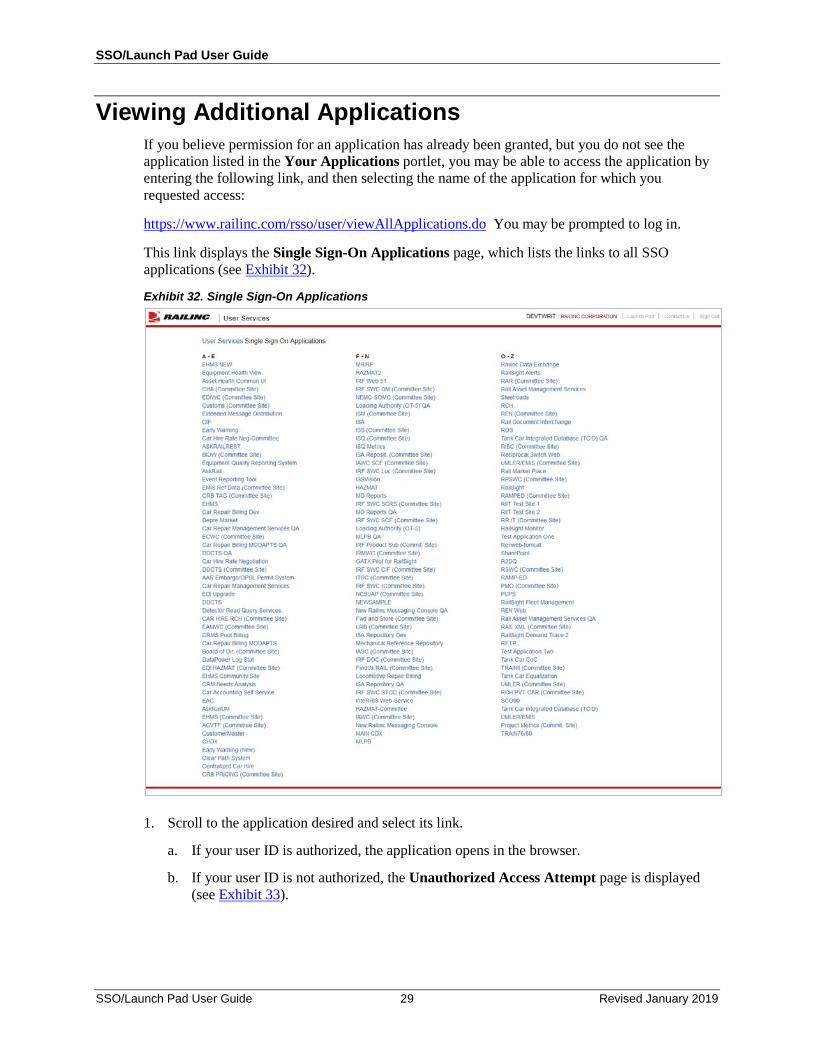
Viewing Additional Applications If you believe permission for an application has already been granted, but you do not see the application listed in the Your Applications portlet, you may be able to access the application by entering the following link, and then selecting the name of the application for which you requested access:
https://www.railinc.com/rsso/user/viewAllApplications.do You may be prompted to log in.
This link displays the Single Sign-On Applications page, which lists the links to all SSO applications (see Exhibit 32).
Exhibit 32. Single Sign-On Applications
1. Scroll to the application desired and select its link.
a. If your user ID is authorized, the application opens in the browser.
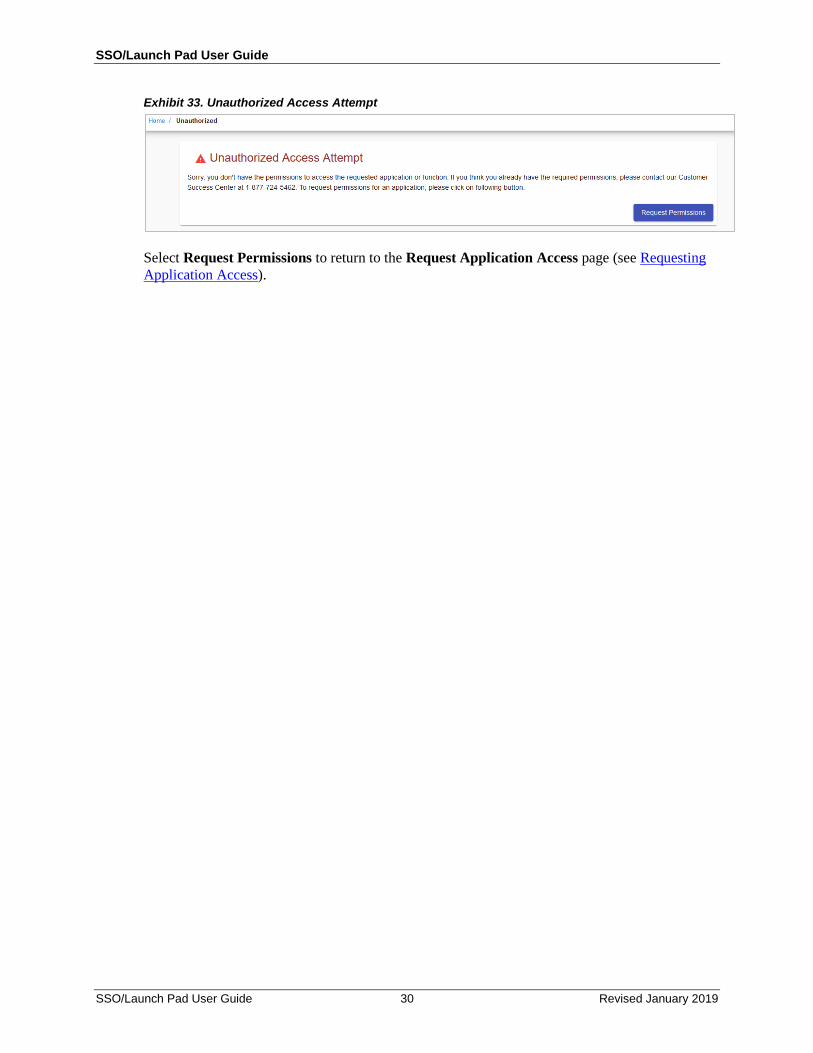
b. If your user ID is not authorized, the Unauthorized Access Attempt page is displayed (see Exhibit 33).
SSO/Launch Pad User Guide
SSO/Launch Pad User Guide 30 Revised January 2019
Exhibit 33. Unauthorized Access Attempt
Select Request Permissions to return to the Request Application Access page (see Requesting Application Access).
SSO/Launch Pad User Guide
SSO/Launch Pad User Guide 31 Revised January 2019
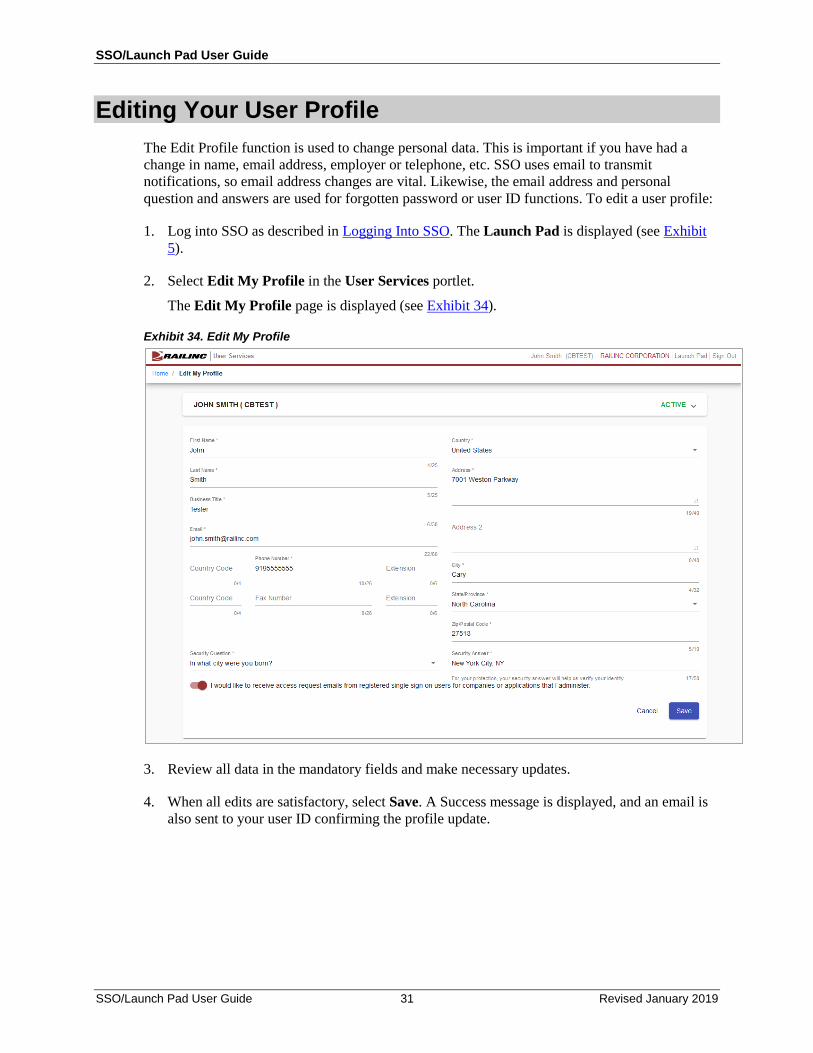
Editing Your User Profile The Edit Profile function is used to change personal data. This is important if you have had a change in name, email address, employer or telephone, etc. SSO uses email to transmit notifications, so email address changes are vital. Likewise, the email address and personal question and answers are used for forgotten password or user ID functions. To edit a user profile:
1. Log into SSO as described in Logging Into SSO. The Launch Pad is displayed (see Exhibit 5).
2. Select Edit My Profile in the User Services portlet.
The Edit My Profile page is displayed (see Exhibit 34).
Exhibit 34. Edit My Profile
3. Review all data in the mandatory fields and make necessary updates.
4. When all edits are satisfactory, select Save. A Success message is displayed, and an email is also sent to your user ID confirming the profile update.
SSO/Launch Pad User Guide
SSO/Launch Pad User Guide 32 Revised January 2019
Using the Launch Pad As described previously, the Launch Pad (see Exhibit 5 and Exhibit 35) is a dashboard-style interface that enables you to access your applications, to see pertinent notifications about those applications, and to make inquiries or report issues that automatically create “cases” in the Railinc internal customer support system (RAPID). The following sections describe the Launch Pad functions.
Exhibit 35. Launch Pad
Note: You can access the Launch Pad from any SSO page by selecting the Launch Pad link at the upper right.
SSO/Launch Pad User Guide
SSO/Launch Pad User Guide 33 Revised January 2019
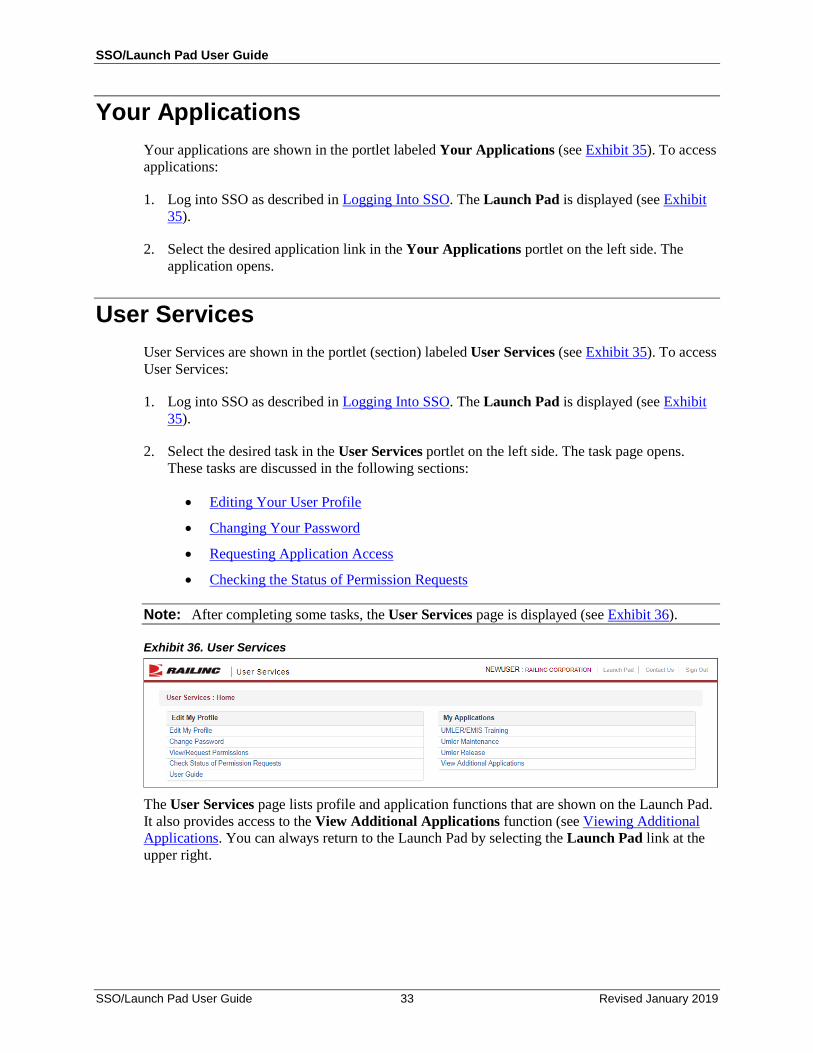
Your Applications Your applications are shown in the portlet labeled Your Applications (see Exhibit 35). To access applications:
1. Log into SSO as described in Logging Into SSO. The Launch Pad is displayed (see Exhibit 35).
2. Select the desired application link in the Your Applications portlet on the left side. The application opens.
User Services User Services are shown in the portlet (section) labeled User Services (see Exhibit 35). To access User Services:
1. Log into SSO as described in Logging Into SSO. The Launch Pad is displayed (see Exhibit 35).
2. Select the desired task in the User Services portlet on the left side. The task page opens. These tasks are discussed in the following sections:
• Editing Your User Profile
• Changing Your Password
• Requesting Application Access
• Checking the Status of Permission Requests
Note: After completing some tasks, the User Services page is displayed (see Exhibit 36).
Exhibit 36. User Services
The User Services page lists profile and application functions that are shown on the Launch Pad. It also provides access to the View Additional Applications function (see Viewing Additional Applications. You can always return to the Launch Pad by selecting the Launch Pad link at the upper right.
SSO/Launch Pad User Guide
SSO/Launch Pad User Guide 34 Revised January 2019
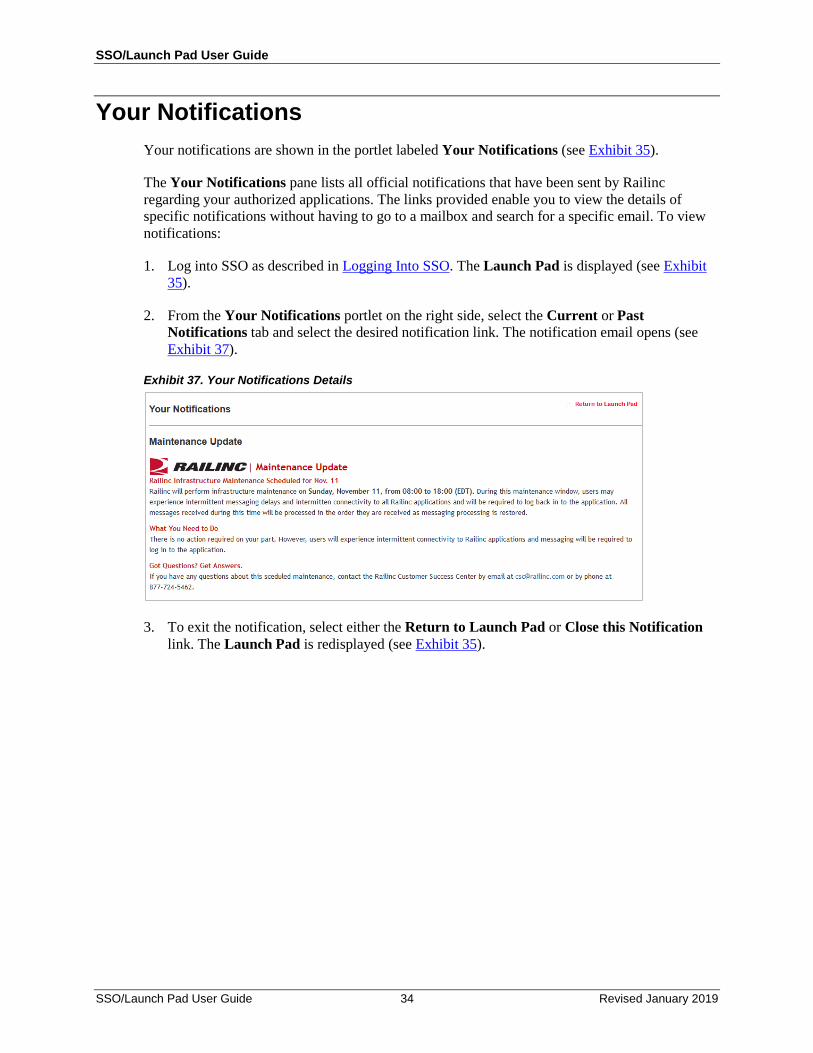
Your Notifications Your notifications are shown in the portlet labeled Your Notifications (see Exhibit 35).
The Your Notifications pane lists all official notifications that have been sent by Railinc regarding your authorized applications. The links provided enable you to view the details of specific notifications without having to go to a mailbox and search for a specific email. To view notifications:
1. Log into SSO as described in Logging Into SSO. The Launch Pad is displayed (see Exhibit 35).
2. From the Your Notifications portlet on the right side, select the Current or Past Notifications tab and select the desired notification link. The notification email opens (see Exhibit 37).
Exhibit 37. Your Notifications Details
3. To exit the notification, select either the Return to Launch Pad or Close this Notification link. The Launch Pad is redisplayed (see Exhibit 35).
SSO/Launch Pad User Guide
SSO/Launch Pad User Guide 35 Revised January 2019
My Support Cases Your support cases are shown in the portlet labeled My Support Cases in Exhibit 35.
The My Support Cases portlet enables you to make inquiries or report issues that automatically create “cases” in the Railinc internal customer support system (RAPID). Besides emails sent to the Railinc Customer Success Center, this is the only automated way to initiate a case in the RAPID system. You can upload documents or screen captures to help clarify the case. You can also view and update your cases.
Creating a Case If you would like to make an inquiry or report an issue about a Railinc application:
1. Log into SSO as described in Logging Into SSO. The Launch Pad is displayed (see Exhibit 35).
2. Select Create a New Case in the My Support Cases portlet on the right side. The Customer Support page is displayed (see Exhibit 38).
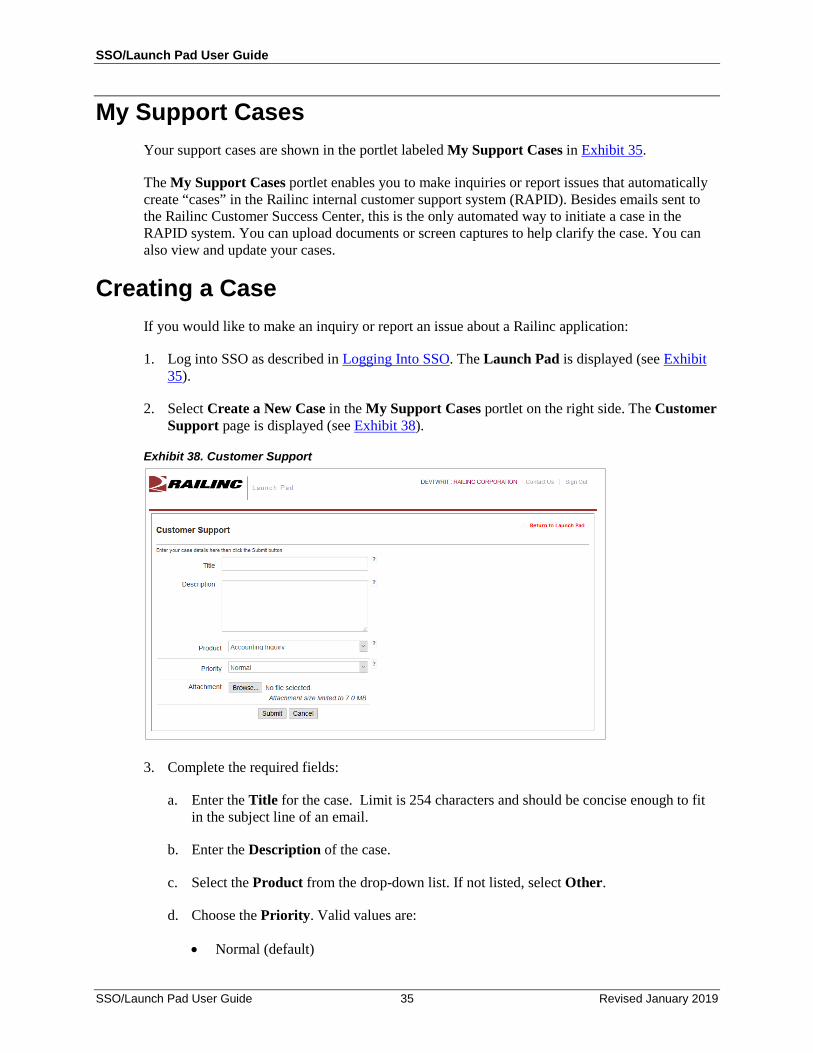
Exhibit 38. Customer Support
3. Complete the required fields:
a. Enter the Title for the case. Limit is 254 characters and should be concise enough to fit in the subject line of an email.
b. Enter the Description of the case.
c. Select the Product from the drop-down list. If not listed, select Other.
d. Choose the Priority. Valid values are:
• Normal (default)
SSO/Launch Pad User Guide
SSO/Launch Pad User Guide 36 Revised January 2019
• Medium • High
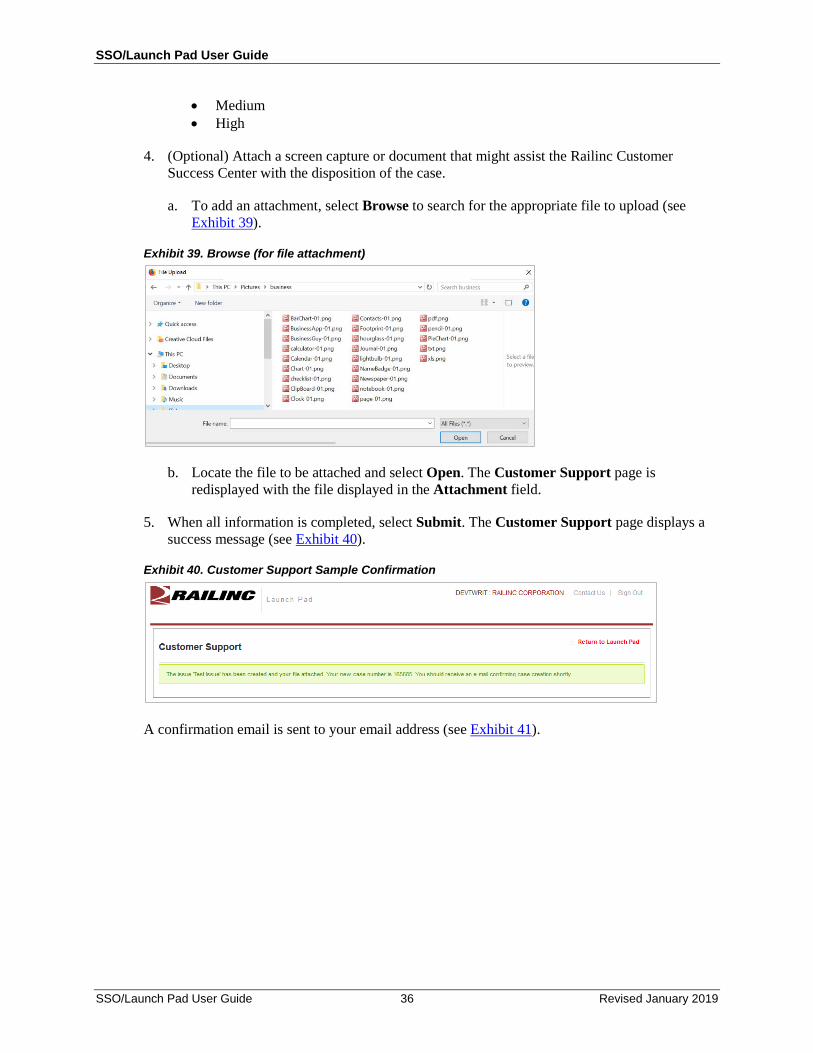
4. (Optional) Attach a screen capture or document that might assist the Railinc Customer Success Center with the disposition of the case.
a. To add an attachment, select Browse to search for the appropriate file to upload (see Exhibit 39).
Exhibit 39. Browse (for file attachment)
b. Locate the file to be attached and select Open. The Customer Support page is redisplayed with the file displayed in the Attachment field.
5. When all information is completed, select Submit. The Customer Support page displays a success message (see Exhibit 40).
Exhibit 40. Customer Support Sample Confirmation
A confirmation email is sent to your email address (see Exhibit 41).

SSO/Launch Pad User Guide
SSO/Launch Pad User Guide 37 Revised January 2019
Exhibit 41. RAPID Case Confirmation Email
Note: Responses to the email are copied directly into the internal RAPID case Description field, which can be seen when viewing case details. See Viewing/Updating a Case.
6. Select Return to Launch Pad to return to the Launch Pad. The new case is shown in the
My Support Cases pane (see Exhibit 42).
Exhibit 42. Your Support Cases (Your Open Cases tab shown)
Open cases appear in the Your Open Cases tab. All cases submitted (including those that have been closed) can be viewed by selecting the All Your Cases tab.
Viewing/Updating a Case To view (and optionally update) a case you submitted:
1. Log into SSO as described in Logging Into SSO on page 3. The Launch Pad is displayed (see Exhibit 35).
2. Select the Your Open Cases or All Your Cases tab in the My Support Cases pane on the right side. The Customer Support page is displayed (see Exhibit 42).
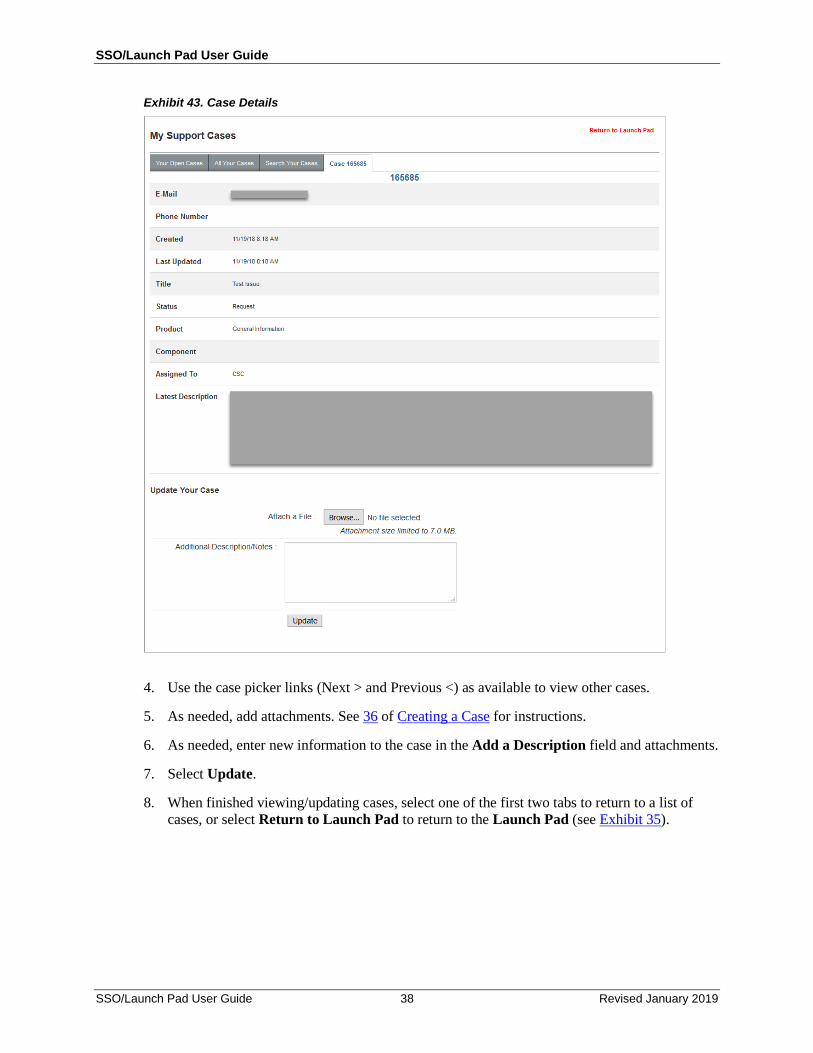
3. Select the Case # link. The Case Details page is displayed (see Exhibit 43).
SSO/Launch Pad User Guide
SSO/Launch Pad User Guide 38 Revised January 2019
Exhibit 43. Case Details
4. Use the case picker links (Next > and Previous <) as available to view other cases.
5. As needed, add attachments. See 36 of Creating a Case for instructions.
6. As needed, enter new information to the case in the Add a Description field and attachments.
7. Select Update.
8. When finished viewing/updating cases, select one of the first two tabs to return to a list of cases, or select Return to Launch Pad to return to the Launch Pad (see Exhibit 35).
SSO/Launch Pad User Guide
SSO/Launch Pad User Guide 39 Revised January 2019
Index
access request, 21 unauthorized, 29
access request e-mail acknowledge, 24 e-mail approval, 25
account revalidation, 11
Adobe Acrobat Viewer, 1 All Your Cases tab, 37 application
close single, 27 launch, 27 multiple, 28 open, 27 View All, 29
application access request, 21 status, 26
attachment add to case, 36
browser, 1 button
Send My User Id, 9 case
add attachment, 36 create, 35 description, 35 details, 37 priority, 35 product, 35 title, 35 update, 37 update Description, 38 view, 37
change password, 14 temporary password, 14 User Profile, 31
Change Password link, 6 Check Status of Permission Requests link, 6 close
application, 27 multiple applications, 28
company. See Employer, See Employer computer requirements, 1 confirm
user ID, 19 Contact Us link, 5, 6 description (case field), 35 edit
User Profile, 31 Edit My Profile link, 6 e-mail
access request, 24 access request approval, 25 case confirmation, 36 forgotten user ID, 10 password change confirmation, 9, 15 registration, 19, 23 registration confirmation, 19
Employer company found, 17 company not found, 18
User Profile, 17 forgotten
password, 7 user ID, 9
launch application, 27 Launch Pad
layout, 5 My Support Cases, 35 User Services, 33 Your Applications, 33 Your Notifications, 34
Legal Notices link, 6 link
Change Password, 6 Check Status of Permission Requests, 6 confirmation, 20 Contact Us, 5, 6 Edit My Profile, 6 Forgot User ID?, 9 Forgotten Password, 2 Forgotten User ID, 2 Legal Notices, 6 Privacy Rights, 6 Register Here, 2, 16 Sign Out, 5 Terms of Service, 6 View/Request Permissions, 6
login from Railinc portal, 3 successful, 4 unsuccessful, 3
Microsoft Excel Viewer, 1 multiple applications, 28
close all, 28 close one, 28
My Support Cases, 35 new user registration, 2 notifications
in Launch Pad, 34 view, 34
open application, 27
password change, 14 forgotten, 7 requirements, 14 reuse, 9 temporary, 4
PDF viewer, 1 permission request
status, 26 portal, Railinc, 1, 3, 16 priority (case field), 35 Privacy Rights link, 6 product (case field), 35 Railinc portal
access, 1, 3 address, 16 SSO Account Access, 2 URL, 1, 3 Welcome page, 1
register new user, 2
registration
SSO/Launch Pad User Guide
SSO/Launch Pad User Guide 40 Revised January 2019
e-mail, 19 user, 16
requirements, 1 revalidation (account), 11 Send My User Id button, 9 Sign Out link, 5 single sign on
access, 1, 3 computer requirements, 1 Login, 3 logoff, 13 overview, 1 system requirements, 1
SSO. See single sign on system requirements, 1 tab
All Your Cases, 37 Case NNNN, 37 Your Open Cases, 37
temporary password at login, 4
Terms of Service link, 6
title (case field), 35 User Guide
on User Services page, 6 user ID
availability, 18 confirmation, 19 forgotten, 9 uppercase, 18
user permission status, 26
User Profile edit, 31 Employer, 17
User Services, 33 portlet, 6
view notifications, 34
View/Request Permissions link, 6 web browser, 1 Your Applications, 33 Your Notifications, 34 Your Open Cases tab, 37