Embed Size (px)
Citation preview

1
350 EAST 60TH ST. N. • SIOUX FALLS, SD 57104800.658.5561 • 605.977.3300 WWW.DIAMONDMOWERS.COM
PARTS 888.960.0361WARRANTY + SERVICE 888.960.0364
OPERATOR’S MANUAL
SKID-STEERFORESTRY MULCHER
2
PRODUCT INFORMATION
Record the model and serial number of your unit here. When calling for warranty, service or parts, you may be asked to provide this information, in order to ensure fast, accurate service.
MODEL NUMBER: 60"(153cm) Forestry Mulcher
SERIAL NUMBER: ________________________________________________
©2017 Diamond Mowers.All rights reserved.
SKID-STEER FORESTRY MULCHER OPERATOR’S MANUAL
Any failure to read, understand and follow the instructions found in this operator’s manual could lead to serious injury. Operators who choose to operate this equipment without following instructions, or who choose to operate this equipment in a manner inconsistent with the recommendations set forth in this manual, do so at their own risk and assume the risk of injury. Diamond Mowers will not be liable for an owner or operator’s loss, damage, or injury due to the misuse of the equipment, failure to understand the inherent risks, or inability to properly operate the equipment.
Patents: D742,421 : D731,559 : 9,441,678Provisional Patents: 62/484,360

3
WELCOME!Thank you for choosing Diamond Mowers, and welcome to your skid-steer forestry mulcher. Before you begin, we encourage you to look through this manual to review the proper maintenance and operating techniques that will keep you, and your equipment, safe – while ensuring you the most productive forestry mulcher in the market.
We have nothing but respect and admiration for you. Our job at Diamond is to provide you with the toughest, most reliable and safest equipment that will allow you to do your job better. That also means being there when you need us.
CONTACT US:
Parts: 888.960.0361 | [email protected] Warranty / Service: 888.960.0364 | [email protected] Main Office: 800.658.5561 | 605.977.3300Website: www.diamondmowers.com | Email: [email protected]
Your time is important to us.We guarantee that Genuine Diamond Parts will ship within 72-hours of the order being placed, or the parts and shipping are free.
Your satisfaction is guaranteed.If you are not completely satisfied with your new Diamond in the first 30-days, we will buy it back. No questions asked.
Thanks again for choosing Diamond. If at any time your needs are not being met by our team, please feel free to call me direct.
Tim KubistaVP Sales & Marketing 651.955.6665
SKID-STEER FORESTRY MULCHER OPERATOR’S MANUAL

4
OWNER REGISTRATION
In your welcome packet you should have received a warranty registration form. Complete and return this form to our main office. It’s a self-mailer, so no postage is required. If you’d rather complete this info online, go to: http://info.diamondmowers.com/register-my-product
Returning your registration information to Diamond will help us process any warranty claims quickly and efficiently – so you can get back to work, fast.
TRANSFERRED OWNERSHIP
If you have acquired this forestry mulcher from a previous owner, we encourage you to register your equipment online. By registering your Diamond Mowers unit, you’ll stay informed on product advancements, offers and service alerts.
Register by going to: http://info.diamondmowers.com/register-my-product We honor our equipment’s warranty from the date it was put into service, no matter who’s in charge of running it.
For any questions, contact our Warranty / Service team at: 888.960.0364 or [email protected]
SKID-STEER FORESTRY MULCHER OPERATOR’S MANUAL

5
TABLE OF CONTENTS
INTENDED USE . . . . . . . . . . . . . . . . . . . . . . . . . . . . . . . . . . . . . . . . . . . . . . . . . . . . . . . . . 6
TAKE A LOOK AROUND . . . . . . . . . . . . . . . . . . . . . . . . . . . . . . . . . . . . . . . . . . . . . . . . 7
GETTING STARTED . . . . . . . . . . . . . . . . . . . . . . . . . . . . . . . . . . . . . . . . . . . . . . . . . . . . 9
OPERATING YOUR FORESTRY MULCHER . . . . . . . . . . . . . . . . . . . . . . . . 12
MAINTENANCE . . . . . . . . . . . . . . . . . . . . . . . . . . . . . . . . . . . . . . . . . . . . . . . . . . . . . . . 17
TROUBLESHOOTING . . . . . . . . . . . . . . . . . . . . . . . . . . . . . . . . . . . . . . . . . . . . . . . 26
PARTS BOOK . . . . . . . . . . . . . . . . . . . . . . . . . . . . . . . . . . . . . . . . . . . . . . . . . . . . . . . . 30
INDEX . . . . . . . . . . . . . . . . . . . . . . . . . . . . . . . . . . . . . . . . . . . . . . . . . . . . . . . . . . . . . . . . . 34

6
INTENDED USEThis attachment is designed to be used on a high flow 32-45 GPM (122-171 LPM) skid-steer or track loader for mowing and brush management applications.
This includes: • Cutting grass • Mulching brush • Cutting small trees up to 14" (35.5cm) to ground level
This attachment should only be used in an area free of obstructions and bystanders. Any use on non-vegetative material, or in an area that is not clear of persons and property, is strictly prohibited. Any use outside of the aforementioned application is considered contrary to its intended use. Any damage that may occur as a result of misuse will void warranty as statedin Diamond Mowers’ warranty policy.
WARNING
Do not operate this unit without first reading the safety precautions and operating instructions in this manual.
SKID-STEER FORESTRY MULCHER OPERATOR’S MANUAL

7
TEETH To provide the most efficient cut, we use hardened steel teeth that act like an axe to slice into material.
DISC
The disc acts like a flywheel and stores energy. The energy used to cut and mulch comes from stored energy, not hydraulic power alone. It will take approximately 60 seconds to come up to full speed.
PLANER KNIVESLocated in the center of the disc to eliminate any dead zone in the cutting area.
DEFLECTOR SHIELDFully adjustable, you can open the deflector shield wide to distribute debris quickly, or close it for more control in where your exhaust is distributed.
CONTINUED ON NEXT PAGE
TAKE A LOOK AROUNDLet’s get started by doing a quick walk around
of the skid-steer forestry mulcher.
7

8
INTAKE CHUTESYour forestry head comes standard with two intake chute options. Pick which one is best for your terrain:
NARROW INTAKE CHUTEDesigned for single stem, taller trees without many lower branches. This chute includes a hook to help feed trees, and a ramp to scoop material already on the ground into the head.
WIDE INTAKE CHUTE Designed with an open throat to feed larger, bushier trees more efficiently.
WARNING Your forestry mulcher comes with both intake chutes installed. You must remove one of the two chutes before operating. Running your machine with both intake chutes attached will cause damage to the deck.
PUSH BARGuides material away from the loader.
HOSESShipped with quick couplers and a case drain line with both male and female ends.
TAKE A LOOK AROUND(CONTINUED)
8

9
HIGH FLOW MACHINE Diamond’s skid-steer forestry attachment must be used on a high flow machine capable of 32-45 GPM (122-171 LPM) and have a case drain.
INSTALL SHATTER RESISTANT ENCLOSURESafety glass is mandatory. This product must not be used without a shatter resistant cab enclosure. Debris can fly back at the cab and cause injury.
HOOK UPThe forestry mulcher will mount onto the front of the skid loader’s quick detach arms in place of a bucket or other implements.
CONNECT QUICK COUPLERSThe case drain line must be properly connected or you will damage your hydraulic motor. The case drain line will come equipped with both male and female quick coupler connectors.
• Install the coupler that matches skid loader.
• Attachment is shipped with 1/2” flat face connectors, which are a common size for most skid loaders.
• To prevent contamination, clean connections before attaching.
• Make sure the hose length outside of the bracket is long enough for the head to make a full range of motion, but not so long that the hose can pinch. CONTINUED ON NEXT PAGE
GETTING STARTED

10
CONTINUED FROM PREVIOUS PAGE
• Start machine at low idle and verify that the disc is spinning in the correct direction. As you sit in the cab, it should spin left to right.
• If the pressure and return hoses are reversed, the disc will spin backwards resulting in damage.
• If this reversal occurs, either inverse the flow from your loader or switch the couplers on the pressure and return hose.
PICK YOUR INTAKE CHUTEYour forestry mulcher comes with both intake chutes installed. You must remove one of the two chutes before operating. Running your machine with both intake chutes attached will cause damage to the deck.
Narrow Intake Chute - Designed for taller trees without many lower branches. This chute includes a hook to help feed trees, and a ramp to scoop material already on the ground into the head.
Wide Intake Chute - Designed with an open throat to feed larger, bushier trees more efficiently.
SKID-STEER FORESTRY MULCHER OPERATOR’S MANUAL

11
ADJUST YOUR DEFLECTOR SHIELDThis adjustable shield helps control the direction of processed material.
Open – Allows material to be dispersed quickly and efficiently.This position may restrict visibility while in position. *Most common position
Middle – Allows material to be dispersed evenly.
Closed – Allows material to be dispersed into piles.This position is less efficient than the open position.
Removed – Allows material to be dispersed quickly and efficiently and maintain fully visibility.
WARNING
Do not use the deflector shield for pushing or
moving material while in the closed position.
Pushing material with the deflector shield will
bend the piece towards the disc and incur
damage to the shield.
Open
Middle
Closed

12
OPERATING YOUR FORESTRY MULCHERBefore you operate, note that the primary responsibility for safety on this equipment falls to the operator. Only trained individuals who have read and understood this manual should operate this unit. If any portion of this manual is not understood, contact Diamond Mowers’ Service/Warranty at 800.658.5561 or 605.977.3300.
SAFETY TIPS:Be sure to read all warnings carefully. They are included for your safety, and for the safety of others working with you.
This signal is used where serious injury or death will result if instructions are not followed properly.
This signal is used where serious injury or death could result if instructions are not followed properly.
This signal is used where minor injury could result if instructions are not followed properly.
Always wear proper safety glasses, goggles, or a face shield when operating.
Do not operate this unit without a shatter resistant cab enclosure installed on your skid loader.
This unit will cause flying debris.
Block off work area from bystanders, livestock, etc.
Bystanders must keep a distance of 300’/91.5m from the unit when it’s operating.
Teeth are always sharp and can cause injury, even when not in motion.
SKID-STEER FORESTRY MULCHER OPERATOR’S MANUAL
WARNING
CAUTION
DANGER
13
Do not use extremities to dislodge debris from teeth or disc.
Operate only from the operator’s station.
Hydraulic fluid is hot and will heat any exposed steel, hoses, motor, or spindle in its proximity.
Route hoses correctly to ensure a full range in motion.
Make certain hoses are out of the way of tires, tracks or the ground.
Be certain the disc has come to a complete stop before exiting the cab.
WARNING
Contact with the disc, teeth, and knives while the disc is in motion can cause serious injury or death. The disc does spin at a very high speed and can take several minutes to stop. Be sure all personnel is clear of the machine before engaging the mulcher.
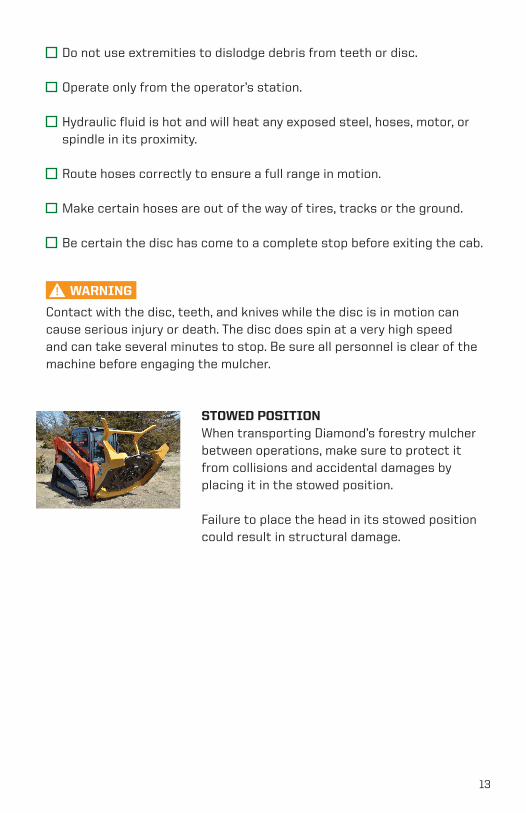
STOWED POSITIONWhen transporting Diamond’s forestry mulcher between operations, make sure to protect it from collisions and accidental damages by placing it in the stowed position.
Failure to place the head in its stowed position could result in structural damage.

14
OPERATING TECHNIQUESThe following techniques help get your work done quickly, safely and productively.
NOTE: When feeding and grinding material you’ll want
to use the right hand side of the disc.
When cutting only and pushing material away from the
machine you’ll want to use the left hand side of the disc.
CUT AND FEED – Trees 2"-6" (5cm-15.2cm) • Cut with the right hand side of the disc so that the disc will feed material into the head. • Cut the tree at the bottom and scoop up the tree (like scooping a load of dirt into a bucket) while allowing the tree to fall into the hook (if using the narrow chute) located at the top.
• This hook feature will hold the tree in the right position for processing.
• The tree must be at the same angle as the disc in order to pull the tree in to grind it.
BOTTOM GRIND – Trees 6"-10" (15.2cm-25.4cm)• To top the tree - reach as high as comfortably possible and cut the top of tree using the left hand side of the disc and push the top of the tree away from the cutter head to grind it later.
• Make certain to allow enough recovery time to rebuild momentum.
• To grind the tree – angle the head back 45 degrees and drop the head as fast as possible keeping the tree on the left side of the disc to throw material away from the machine.
SKID-STEER FORESTRY MULCHER OPERATOR’S MANUAL

15
GROUND PULL To pull in and grind debris laying on the ground.
• Use the right side and bottom of the disc by lifting the head slightly to suck branches or tree tops underneath the disc to grind it.
• Use the bottom of the disc to re-process material on the ground for a finer finish.
CUT WITHOUT GRIND• Set your disc level and use the left hand side to cut and push the tree away from skid-steer. • This will act like a saw to cut the tree without grinding it.
• For very large trees you will need to notch it (similar to using a chainsaw), then come to the other side to cut and drop the tree.
• Use your push bar to help direct the tree away from the machine.
WARNING
Be aware when mulching standing trees as there is potential for treetops to fall onto the operator’s cab.

16
STUMP CUTTo cut stumps at or below ground level.
• Keep the deck level and cut the stump low to the ground.
• Wait to rebuild speed before proceeding with a stump cut.
• Lift up and point the nose down to the ground to allow the head to use the bottom teeth for grinding.
NOTE: The more you use the stump cut application, the more
wear your teeth will incur.
CLEANING AND RE-PROCESSINGAfter mulching a tree for the first time, there will likely be branches and large debris around the work site. Re-processing the debris will provide a more groomed look.
• Raise lift arms about 6" (15.2cm) and drop front of head toward the ground with the disc leading edge touching the ground.
• Back over the remaining debris for a more finished look.
For more tips, visit us online at www.DiamondMowers.com
SKID-STEER FORESTRY MULCHER OPERATOR’S MANUAL

17
MAINTENANCE INTERVALSRegular maintenance will make certain your unit stays productive and retains a long, operating life. The following chart represents the minimum intervals recommended for inspection and maintenance.
When replacing parts, use Genuine Diamond Parts. Guaranteed to ship within 72-hours of your order, or the parts and shipping are free.
Call: 888.960.0361 or 605.977.3300 Email: [email protected] online: www.DiamondMowers.com
Deflector Shield
Disc
Ejection Chute
Hydraulic Hoses & Fittings
Intake Chute (Narrow/Wide)
Motor Bolts
Motor Shield
Planer Knives
Push Bars
Quick Couplers
Safety Glass
Skid Shoes
Spindle
Spindle Bolts
Teeth
Procedure
X
X
X
X
X
X
X
X
X
10
hours
X
X
50
hours
X
X
X
Annually or 500 Hours
As
necessary

18
DEFLECTOR SHIELD• Deflector shield should be inspected every 10 hours, or daily.
• Replace as necessary.
DISC• Disc should be inspected every 10 hours, or daily. • Raise and secure the deck to inspect the disc for any cracks or other damage.
• Disc should be replaced if damage is found. If disc bolts are loose: • Remove the bolts • Apply Loctite 262 (red) to the threads • Replace the bolts and torque to 212ft-lbs (287Nm)
EJECTION CHUTE• Ejection chute bolts and nuts should be inspected every 10 hours, or daily.
• Torque hardware to 110ft-lbs (149Nm).
• Replace as necessary.
SKID-STEER FORESTRY MULCHER OPERATOR’S MANUAL

19
HYDRAULIC HOSES & FITTINGS• Hydraulic hoses and fittings should be inspected every 10 hours, or daily. What to look for: • Abrasions or cuts on hoses • Replace damaged or worn hoses • Attach wear pads around critical points where hoses are likely pinched or rubbed • Hydraulic fitting clamps and threaded connections for any hydraulic fluid • If any leaks are observed, stop immediately to prevent damage to your loader CAUTION DO NOT check for hydraulic leaks with your hands or any part of your body. Use a heavy piece of paper or cardboard to check areas that are not readily visible. Pressurized hydraulic fluid can penetrate the skin and lead to serious health risks or death.
INTAKE CHUTE (NARROW or WIDE) • Chute bolts and nuts should be inspected every 10 hours, or daily.
• Torque hardware to 110ft-lbs (149Nm).
• Replace as necessary.
MOTOR BOLTS • Motor bolts should be inspected every 10 hours, or daily.
• Torque hardware to 110ft-lbs (149Nm).
• Verify that locking tabs are in place. • Assemble locking tabs to the u-shaped tab over the cab bolts with their hardware.

20
MOTOR SHIELD• Check for damage every 50 hours, or weekly.
• Torque hardware to 75ft-lbs (102Nm).
PLANER KNIVES• Planer knives should be inspected every 10 hours, depending on usage.
• Inspect the planer knives for any cracks or damage.
• No sharpening required.
• Replace as necessary.
If planer bolts are loose: • Remove the bolts • Apply Loctite 262 (red) to the threads • Replace the bolts and torque to 110ft/lbs (149Nm)
PUSH BAR • Check for cracks.
• Repair as necessary.
SHATTER RESISTANT ENCLOSURE• REQUIRED! Debris can be thrown unexpectedly in any direction. Do not attempt to use this forestry head without proper protection.
• Clean only with mild soap and water using a sponge or soft cloth.
• Replace as necessary.
SKID-STEER FORESTRY MULCHER OPERATOR’S MANUAL

21
SKID SHOES• Skid shoes should be inspected every 50 hours, or weekly.
• Replace as necessary.
SPINDLE • Inspect topside of cutting disc for oil. • If oil is present, the spindle’s lower bearing seal may be damaged and will require replacement. • The disc should rotate smoothly. • If excessive play is found, the spindle bearings are likely worn and will require replacement. • Drain and replace oil annually or every 500 hours with 32oz of 75w90 synthetic gear oil.
SPINDLE BOLTS• Spindle bolts and nuts should be inspected every 10 hours, or daily.
• If bolts come loose, remove, apply Loctite 262 (red) to threads and reinstall.
• Torque hardware to 220ft-lbs (298Nm).

22
TEETH• Teeth should be inspected every 10 hours, depending on usage. • Sharpen, rotate or replace as necessary.
• Inspect the teeth located on the disc for any cracks or damage.
• Teeth are also located on the top of the disc and inside of the deck. These teeth can be reached via the access panel located on the top, rear of the deck.
SKID-STEER FORESTRY MULCHER OPERATOR’S MANUAL

23
If teeth bolts are loose
Replacingteeth
Rotatingteeth
Sharpeningteeth
Use a torque wrench set to torque to 90ft-lbs (122Nm).
DO NOT over-torque as you could strip the threads and allow it to become loose.
Remove the bolts and flat washers.
Replace the tooth.
Using new hardware, hand-thread the bolts/washers or use an electric impact wrench set on low.
DO NOT use Loctite.
Use a torque wrench set to torque to 90ft-lbs (122Nm).
DO NOT use a pneumatic impact wrench.
DO NOT over-torque as you could strip the threads and allow it to become loose.
Make certain to replace the corresponding tooth located in the opposite position of the disc to maintain balance.
The majority of cutting will be done with the teeth’s two outside leading points. When these two points are worn down to roughly 60% from sharpening or wear, they can be rotated 180 degrees in their tooth holder to expose the fresh points.
Lightly sharpen the outside leading edge of the tooth with a 4” (115mm) angle grinder, equipped with a flap style-sanding disk.
DO NOT use a hard grinding disk. A hard grinding disk will produce excessive heat and ruin the tooth’s hardness.
If the tooth will no longer take an edge, you will need to replace it – along with the corresponding tooth located on the opposite position of the disc to maintain balance.

24
TOOTH HOLDERS (INNER)
• Tooth holders should be inspected every 10 hours, depending on usage.
• If a tooth holder is damaged, it can be replaced. • Cut off and grind the weld flat to the disc
• Bolt new holder to the disc using the locating bolt holes
• Weld the tooth holder to the disc with a similar sized weld as used on the original mounts NOTE: Weight differences can create balance
issues. Try to keep the weld consistent.
SKID-STEER FORESTRY MULCHER OPERATOR’S MANUAL

25
TOOTH HOLDERS (OUTER) • Tooth holders should be inspected every 10 hours, depending on usage.
• If a tooth holder is damaged, it can be replaced. • Cut off and grind the weld flat to the disc
• Position the new tooth holder in the notch in the disc
• Weld the tooth holder to the disc with a similar sized weld as used on the original mounts
NOTE: Weight differences can create balance
issues. Try to keep the weld consistent.
WARNING
Failure to inspect and replace hardware at recommended intervals may cause damage to the unit and skid loader.

26
SKID-STEER FORESTRY MULCHER OPERATOR’S MANUAL
TROUBLESHOOTING
Problem Potential Cause Solutions
Disc Will Not Spin
No hydraulic flow from skid loader
Verify hydraulic flow from power unit
Failed splined insert
• Remove motor and snap ring from spindle
• Thread a 3/4-16 by 5” bolt into the insert base, forcing it out of the shaft
• Replace spindle insert
• Replace snap ring, motor and hardware
• Torque motor bolt hardware to 110ft-lbs (149Nm)
Reversed flow from skid loader
After connecting the hoses to the machine, start machine at low idle and verify that the blades are spinning clockwise. As you sit in the cab it should spin left to right.
Hydraulic motor shaft failure
Will require replacement. Contact Diamond Parts at 888.960.0361 or 605.977.3300.
Material jammed
Dislodge material from disc by first disengaging the implement and backing up. This will typically clear the cutting head.
If the cutting head does not clear, shut down the implement and rest the head on the ground. After the disc has come to a complete stop, clear the head manually.
DO NOT use extremities to dislodge debris from teeth or disc.
27
Problem Potential Cause Solutions
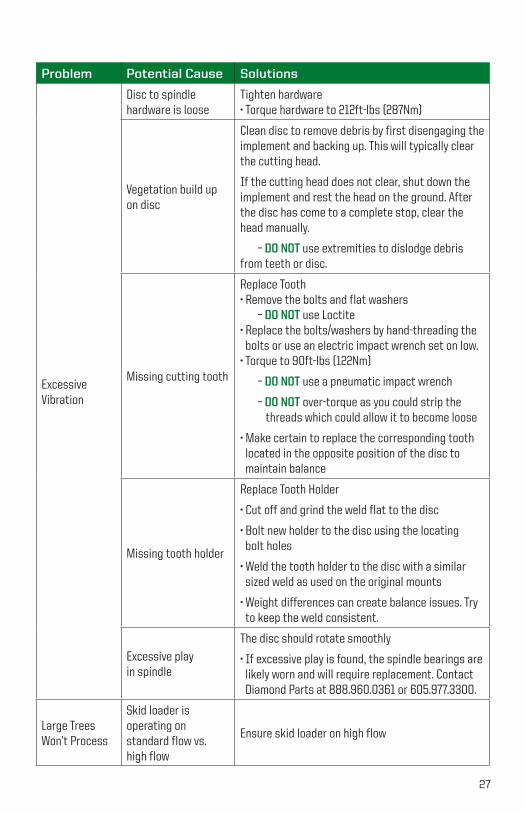
Excessive Vibration
Disc to spindle hardware is loose
Tighten hardware • Torque hardware to 212ft-lbs (287Nm)
Vegetation build up on disc
Clean disc to remove debris by first disengaging the implement and backing up. This will typically clear the cutting head.
If the cutting head does not clear, shut down the implement and rest the head on the ground. After the disc has come to a complete stop, clear the head manually.
– DO NOT use extremities to dislodge debris from teeth or disc.
Missing cutting tooth
Replace Tooth • Remove the bolts and flat washers – DO NOT use Loctite • Replace the bolts/washers by hand-threading the bolts or use an electric impact wrench set on low. • Torque to 90ft-lbs (122Nm)
– DO NOT use a pneumatic impact wrench
– DO NOT over-torque as you could strip the threads which could allow it to become loose
• Make certain to replace the corresponding tooth located in the opposite position of the disc to maintain balance
Missing tooth holder
Replace Tooth Holder
• Cut off and grind the weld flat to the disc
• Bolt new holder to the disc using the locating bolt holes
• Weld the tooth holder to the disc with a similar sized weld as used on the original mounts
• Weight differences can create balance issues. Try to keep the weld consistent.
Excessive play in spindle
The disc should rotate smoothly
• If excessive play is found, the spindle bearings are likely worn and will require replacement. Contact Diamond Parts at 888.960.0361 or 605.977.3300.
Large Trees Won’t Process
Skid loader is operating on standard flow vs. high flow
Ensure skid loader on high flow

28
Problem Potential Cause Solutions
Teeth Worn
Need to rotate teeth
The majority of cutting will be done with the teeth’s two outside leading points.
When these two points are worn down to roughly 60% from sharpening or wear, they can be rotated 180 degrees in their tooth holder to expose the fresh points.
Need to sharpen teeth
Lightly sharpen the outside leading edge of the tooth with a 4” (115 mm) angle grinder, equipped with a flap style-sanding disk.
– DO NOT use a hard grinding disk, as it will emit too much heat onto the tooth and ruin it’s hardness.
If the tooth will no longer take an edge, you will need to replace it – along with the corresponding tooth located on the opposite position of the disc to maintain balance.
Need to replace teeth
Remove the bolts and flat washers
– DO NOT use Loctite
Replace the tooth.
Using new hardware, hand-thread the bolts/washers or use an electric impact wrench set on low.
– DO NOT use a pneumatic impact wrench
Use a torque wrench set to torque to 90ft-lbs (122Nm).
– DO NOT cover-torque as you could strip the threads and allow it to become loose
Make certain to replace the corresponding tooth located in the opposite position of the disc to maintain balance.
For any questions, contact our Warranty / Service team at 888.960.0364 or 605.977.3300
SKID-STEER FORESTRY MULCHER OPERATOR’S MANUAL

29
THIS PAGE INTENTIONALLY LEFT BLANK

30
PARTS BOOK
REF# PARTS DESCRIPTION REQ PART #
23 SKID DECK 1 25-020424 UPPER ACCESS PORT COVER 1 31-053725 LOWER ACCESS PORT COVER 1 31-045526 SPINDLE ASSEMBLY 1 35-009327 NARROW CHUTE 1 41-130228 LEFT CHUTE 1 41-130329 DEBRIS DEFLECTOR 1 41-130530 WIDE CHUTE 1 41-130731 MOTOR GUARD 1 41-146132 LEFT SKID SHOE 1 42-004833 RIGHT SKID SHOE 1 42-004934 HOSE CLAMP 1 44-035135 TOOTH HOLDER, INSIDE 36 90-703536 TOOTH HOLDER, OUTSIDE 12 90-703637 5/8 LOCK WASHER GR 8 8 11-004338 TOOTH KIT
Kit 44-0342 includes 20 each of parts 3, 9, 18. 1Kit 44-0341 includes 50 each of parts 3, 9, 18. 1
39 COMPLETE TOOTH KITKit 44-0330 includes 47 each of parts 3, 9, 18, 16 each of part 11, and 2 each of part 19.
REF# PARTS DESCRIPTION REQ PART #
1 3/8 FLAT WASHER GR 5 CLEAR 18 11-00092 1/2 X 1-1/2 H.S.NF HEX CAP 16 11-07043 1/2 SAE FLAT WASHER GR 8 YELLOW 65 11-00424 3/8 X 1 NC HEX CAPSCREW 8 11-05325 1/2 X 1-1/4 NC HEX CAP 4 11-05706 7/16 X 1 NC HEX CAPSCREW 3 11-05847 1/2 X 1 NF HEX CAP GR 5 48 11-06398 3/8 X 1-1/2 PLOW BOLT 9 11-07959 1/2 X 3 NF SHCS 48 11-092910 1/2 X 1-3/4 NC CARRIAGE BOLT GR 8 13 11-096111 1/2 X 1-1/4 NC SHCS 6 11-096512 5/8 X 2 NC HEX CAPSCREW, GR 8 8 11-097013 5/8 X 2-1/2 NC HEX CAPSCREW, GR 8 12 11-097114 3/8 NC NYLOCK NUT GR 5 9 11-102415 1/2 NC NYLOCK NUT GR 8 13 11-107216 5/8 NC NYLOCK NUT GR 8 12 11-107317 ROLL PIN, 5/32 X 1 2 11-205418 *STEEL CUTTING TOOTH 48 22-001919 FBC, CENTER PLANER 2 24-019220 DEFLECTOR HINGE ROD 1 24-021321 60 FBS DISH, COMPLETE 1 24-022322 FBS, BOLT PROTECTOR 1 24-0224
Forestry Mulcher – 60"(153cm) Deck, Direct Drive

31
SKID-STEER FORESTRY MULCHER OPERATOR’S MANUAL
REF# PARTS DESCRIPTION REQ PART #
1 7/16 X 3 NC HEX CAPSCREW (included with #19 & 20) 8 11-05872 1/4 X 3/4 NC HEX CAP 4 11-05883 1/2 X 1-1/2 NC HEX CAP, GR 8 4 11-09724 1/4 NC NYLOCK NUT 4 11-10225 #20FLG X 1MJIC-90DEG ADAPTER 2 21-12676 CHECK VALVE 1 21-14747 3/4 MORB X 3/4 MJIC ADAPTER 1 21-14758 1/2 MALE QUICK COUPLER, FLAT FACE 1 21-15599 1/2 FEMALE QUICK COUPLER, FLAT FACE 1 21-156010 3/8 MALE QUICK COUPLER, FLAT FACE 1 21-156111 3/8 FEMALE QUICK COUPLER, FLAT FACE 1 21-156212 5/8 MALE QUICK COUPLER, FLAT FACE 1 21-157413 5/8 FEMALE QUICK COUPLER, FLAT FACE 1 21-157514 3/4 MALE QUICK COUPLER, FLAT FACE 1 21-157615 3/4 FEMALE QUICK COUPLER, FLAT FACE 1 21-157716 ADAPTER, 1/4MOR X 3/8MJIC 1 21-1597
REF# PARTS DESCRIPTION REQ PART #
17 ADAPTER, 1MJIC X 3/4MORB 2 21-160218 #20 FLANGE KIT (included with #19 & 20) 2 21-210519 CROSS OVER MANIFOLD KIT (includes #1, 18 & 25) 1 21-218020 TEE MANIFOLD KIT (includes #1, 18 & 25) 1 21-218121 HOSE 3/8 X 106 (3/8FJIC 90DEG X 1/2MP) 1 21-429022 RUN-AROUND TUBE 1 28-005123 MOTOR BOLT LOCK TAB 4 31-050324 MOTOR BOLT LOCK BASE 2 31-050425 O-RING (included with #18, 19 & 20) 4 33-001326 MOTOR
M365, 2-1/4" GEAR SET, 2-3/4" SECT, 32-45 GAL/MIN 1 30-052427 HOSE 1" (1FJIC X 1FJIC)
"STANDARD", PRESSURE & RETURN 103" 2 21-4345"OPTIONAL UPGRADE" 4000 psi, PRESSURE 103" 1 21-4346"OPTIONAL UPGRADE" 4000 psi, RETURN 90" 1 21-4365
Drive Assembly – 60"(153cm), 32-45 GPM (122-171 LPM)

32
REF# PARTS DESCRIPTION REQ PART #
1 SNAP RING 1 30-10092 OUTBOARD BEARING 1 30-10103 BUSHING 4 30-10114 THRUST PLATE 2 30-10125 SEAL RETAINER 1 30-10176 M365 SEAL KIT Avail 30-10217 2-1/4" M365 GEAR HOUSING 1 30-10268 SHAFT SEAL
150 PSI (included in M365 seal kit) 1 30-1210500 PSI 1 30-1156
9 SHAFT END COVER 1 30-108610 CHECK ASSEMBLY 2 30-108711 ALIGNMENT BUSHING 4 30-1090
REF# PARTS DESCRIPTION REQ PART #
12 PORT END COVER 1 30-109113 STUD 4 Call14 WASHER 4 30-1093
GEAR SET OPTION A:15 2-1/4" GEAR SET 1 30-1165
GEAR SET OPTION B:16 RETAINING RING 1 30-101917 WASHER 1 30-102018 2-1/4" GEAR SET 1 30-102519 CONTINENTAL SHAFT, SPLINED 1 30-114420 PLUG 1 30-1096* SEAL APPLICATOR TOOL (not shown) Avail 30-1048
SKID-STEER FORESTRY MULCHER OPERATOR’S MANUAL
30-0524 – Motor Assembly

33
REF# PARTS DESCRIPTION REQ PART #
1 BEARING-CONE (TOP) 1 10-00942 BEARING-CUP (TOP) 1 10-00953 BEARING-CONE (BOTTOM) 1 10-00964 BEARING-CUP (BOTTOM) 1 10-00975 BOLT-HEX HEAD 24 11-16116 WASHER-FLAT 24 11-16127 RING-RETAINING 1 11-16138 NUT-LOCK 1 11-16149 WASHER-LOCK 1 11-161510 SCREW-SKT HD CAP 6 11-161611 PIPE PLUG (TO COVER) (MAGNETIC) 1 21-160912 PIPE PLUG (TO COVER) (NON-MAGNETIC) 1 21-161013 PIPE PLUG (TO HUB) (MAGNETIC) 2 21-161114 WASHER-THRUST (TOP) 1 35-009615 COUPLING 1 35-009716 PLATE-KEEPER 1 35-009817 WASHER-THRUST (BOTTOM) 1 35-0099
**18 HUB 1 35-010019 SEAL-OIL 1 35-0101
*20 GUARD 1 35-0102**21 SHAFT-OUTPUT 1 35-0103
22 COVERC BASE (STANDARD) 1 35-0094D BASE (OPTIONAL) 1 35-0095
35-0093 – Direct Drive Spindle

34
Deflector Shield .......................................................................................................7, 11, 18Disc ..............................................................................................................................7, 18, 26Ejection Chute .................................................................................................................... 18Excessive Vibration .......................................................................................................... 27High Flow ........................................................................................................................... 6, 9Hoses ........................................................................................................................... 8, 9, 18Hydraulic Hoses & Fittings ............................................................................................ 18Intake Chute (Narrow) ........................................................................................ 8, 10, 19Intake Chute (Wide) ............................................................................................. 8, 10, 19Maintenance & Service Intervals ................................................................................ 17Motor Bolts ......................................................................................................................... 19Motor Shield .......................................................................................................................20Processing Trees ......................................................................................................... 14-16 Operating Techniques ............................................................................................... 14-16 Cut & Feed ........................................................................................................................14 Bottom Grind ...................................................................................................................14 Ground Pull .......................................................................................................................15 Cut without Grind ..........................................................................................................15 Stump Cut ....................................................................................................................... 16 Cleaning & Reprocessing .......................................................................................... 16Owner Registration .............................................................................................................4Planer Knives ..................................................................................................................7, 20Push Bar ..........................................................................................................................8, 20Quick Couplers ..................................................................................................................... 9Shatter Resistant Enclosure ............................................................................ 9, 12, 20Skid Shoes ............................................................................................................................21Spindle ...................................................................................................................................21Spindle Bolts ........................................................................................................................21Spinning Issues .................................................................................................................26Teeth ................................................................................................................... 7, 22, 23, 28 If Teeth Bolts Are Loose ............................................................................................23 Replacing Teeth .................................................................................................... 23, 28 Rotating Teeth ....................................................................................................... 23, 28 Sharpening Teeth ................................................................................................. 23, 28Tooth Holders .......................................................................................................24, 25, 27Transferred Ownership ......................................................................................................4Transport .............................................................................................................................. 13Warranty ........................................................................................................................3, 4, 6
INDEX

35

36 15-1065FBS-MANUAL