Embed Size (px)
Citation preview
1
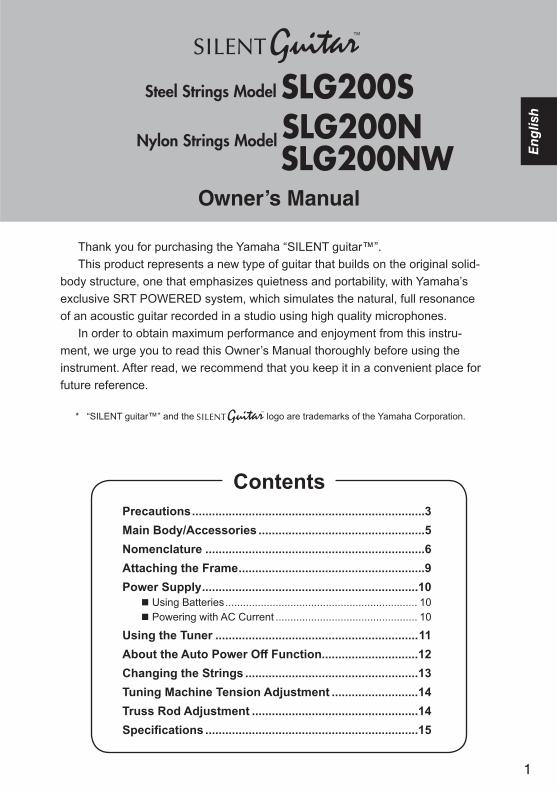
Steel Strings Model SLG200SNylon Strings Model SLG200N
SLG200NWOwner’s Manual
Thank you for purchasing the Yamaha “SILENT guitar™”. This product represents a new type of guitar that builds on the original solid-body structure, one that emphasizes quietness and portability, with Yamaha’s exclusive SRT POWERED system, which simulates the natural, full resonance of an acoustic guitar recorded in a studio using high quality microphones. In order to obtain maximum performance and enjoyment from this instru-ment, we urge you to read this Owner’s Manual thoroughly before using the instrument. After read, we recommend that you keep it in a convenient place for future reference.
* “SILENT guitar™” and the logo are trademarks of the Yamaha Corporation.
ContentsPrecautions ......................................................................3Main Body/Accessories ..................................................5Nomenclature ..................................................................6Attaching the Frame ........................................................9Power Supply .................................................................10n Using Batteries ................................................................. 10n Powering with AC Current ................................................ 10
Using the Tuner .............................................................11About the Auto Power Off Function.............................12Changing the Strings ....................................................13Tuning Machine Tension Adjustment ..........................14Truss Rod Adjustment ..................................................14Specifications ................................................................15
English
2
92-BP (others)
SPECIAL MESSAGE SECTIONThis product utilizes batteries or an external power supply (adaptor). DO NOT connect this product to any power supply or adaptor other than one described in the manual, on the name plate, or specifically recommended by Yamaha.This product should be used only with the components supplied or; a cart, rack, or stand that is recommended by Yamaha. If a cart, etc., is used, please observe all safety markings and instructions that accompany the accessory product.
SPECIFICATIONS SUBJECT TO CHANGE: The information contained in this manual is believed to be correct at the time of printing. How-ever, Yamaha reserves the right to change or modify any of the specifications without notice or obligation to update existing units.Do not attempt to service this product beyond that described in the user-maintenance instructions. All other servicing should be referred to qualified service personnel.This product, either alone or in combination with an amplifier and headphones or speaker/s, may be capable of producing sound levels that could cause permanent hearing loss. DO NOT operate for long periods of time at a high volume level or at a level that is uncomfortable. If you experience any hearing loss or ringing in the ears, you should consult an audiologist. IMPORTANT: The louder the sound, the shorter the time period before damage occurs.
NOTICE: Service charges incurred due to a lack of knowledge relating to how a function or effect works (when the unit is operating as designed) are not covered by the manufacturer’s warranty, and are therefore the owner’s responsibility. Please study this manual carefully and consult your dealer before requesting service.
ENVIRONMENTAL ISSUES: Yamaha strives to produce products that are both user safe and environmentally friendly. We sincerely believe that our products and the production methods used to produce them meet these goals. In keeping with both the letter and the spirit of the law, we want you to be aware of the following:
Battery Notice: This product MAY contain a small non-rechargeable battery which (if applicable) is soldered in place. The average life span of this type of battery is approximately five years. When replacement becomes nec-essary, contact a qualified service representative to perform the replacement.This product may also use “household” type batteries. Some of these may be rechargeable. Make sure that the battery being charged is a rechargeable type and that the charger is intended for the battery being charged.When installing batteries, do not mix old batteries with new, or with batteries of a different type. Batteries MUST be installed correctly. Mismatches or incorrect installation may result in overheating and battery case rupture.
Warning: Do not attempt to disassemble or incinerate any battery. Keep all batteries away from children. Dispose of used batteries promptly and as regulated by the laws in your area. Note: Check with any retailer of house-hold type batteries in your area for battery disposal information.
Disposal Notice: Should this product become damaged beyond repair, or for some reason its useful life is considered to be at an end, please observe all local, state, and federal regulations that relate to the disposal of products that contain lead, batter-ies, plastics, etc. If your dealer is unable to assist you, please contact Yamaha directly.NAMEPLATE LOCATION: The nameplate is located on the back of the product. The model number, serial number, power requirements, etc., are located on this plate. You should record the model number, serial number, and the date of purchase in the spaces provided below and retain this manual as a permanent record of your purchase.
Model Serial No.
Purchase Date
PLEASE KEEP THIS MANUAL
FCC INFORMATION (U.S.A.)electronic devices. Compliance with FCC regulations does not guarantee that interference will not occur in all installations. If this product is found to be the source of interference, which can be determined by turning the unit “OFF” and “ON”, please try to eliminate the problem by using one of the following measures:
Relocate either this product or the device that is being affected by the interference. Utilize power outlets that are on different branch (circuit breaker or fuse)
circuits or install AC line filter/s. In the case of radio or TV interference, relocate/reorient the antenna. If the
antenna lead-in is 300 ohm ribbon lead, change the lead-in to co-axial type cable. If these corrective measures do not produce satisfactory results, please contact
the local retailer authorized to distribute this type of product. If you cannot locate the appropriate retailer, please contact Yamaha Corporation of America, Electronic Service Division, 6600 Orangethorpe Ave, Buena Park, CA 90620
The above statements apply ONLY to those products distributed by Yamaha Corporation of America or its subsidiaries.
1. IMPORTANT NOTICE: DO NOT MODIFY THIS UNIT! This product, when installed as indicated in the instructions contained in this
manual, meets FCC requirements. Modifications not expressly approved by Yamaha may void your authority, granted by the FCC, to use the product.
2. IMPORTANT: When connecting this product to accessories and/or another product use only high-quality shielded cables. Cable/s supplied with this product MUST be used. Follow all installation instructions. Failure to follow instructions could void your FCC authorization to use this product in the USA.
3. NOTE: This product has been tested and found to comply with the require-ments listed in FCC Regulations, Part 15 for Class “B” digital devices. Compli-ance with these requirements provides a reasonable level of assurance that your use of this product in a residential environment will not result in harmful interference with other electronic devices. This equipment generates/uses radio frequencies and, if not installed and used according to the instructions found in the user’s manual, may cause interference harmful to the operation of other
CAN ICES-3 (B)/NMB-3(B) • This applies only to products distributed by Yamaha Canada Music Ltd. • Ceci ne s’applique qu’aux produits distribués par Yamaha Canada Musique Ltée. (can_b_01)
Information for users on collection and disposal of old equipment and used batteries:These symbols on the products, packaging, and/or accompanying documents mean that used electrical and electronic prod-ucts and batteries should not be mixed with general household waste.For proper treatment, recovery and recycling of old products and used batteries, please take them to applicable collection points, in accordance with your national legislation.By disposing of these products and batteries correctly, you will help to save valuable resources and prevent any potential negative effects on human health and the environment which could otherwise arise from inappropriate waste handling.For more information about collection and recycling of old products and batteries, please contact your local municipality, your waste disposal service or the point of sale where you purchased the items.
For business users in the European Union:If you wish to discard electrical and electronic equipment, please contact your dealer or supplier for further information.
Information on Disposal in other Countries outside the European Union:These symbols are only valid in the European Union. If you wish to discard these items, please contact your local authorities or dealer and ask for the correct method of disposal.
Note for the battery symbol (bottom two symbol examples):This symbol might be used in combination with a chemical symbol. In this case it complies with the requirement set by the EU Battery Directive for the chemical involved.
(weee_battery_eu_en_02)
3
PRECAUTIONSPLEASE READ CAREFULLY BEFORE PROCEEDING
Please keep this manual in a safe and handy place for future reference.
WARNINGAlways follow the basic precautions listed below to avoid the possibility of serious injury or even death from electrical shock, short-circuiting, damages, fire or other hazards. These precautions include, but are not limited to, the following:
Power supply/AC power adaptor
• Do not place the power cord near heat sources such as heaters or radiators. Also, do not exces-sively bend or otherwise damage the cord, or place heavy objects on it.
• Only use the voltage specified as correct for the instrument. The required voltage is printed on the name plate of the instrument.
• Use the specified adaptor (page 10) only. Using the wrong adaptor can result in damage to the instru-ment or overheating.
• Check the electric plug periodically and remove any dirt or dust which may have accumulated on it.
Do not open
• This instrument contains no user-serviceable parts. Do not open the instrument or attempt to disassem-ble or modify the internal components in any way. If it should appear to be malfunctioning, discontinue use immediately and have it inspected by qualified Yamaha service personnel.
Water warning
• Do not expose the instrument to rain, use it near water or in damp or wet conditions, place on it any containers (such as vases, bottles or glasses) con-taining liquids which might spill into any openings.
• Never insert or remove an electric plug with wet hands.
Battery
• Follow the precautions below. Failure to do so might result in explosion, fire, overheating or battery fluid leakage.- Do not tamper with or disassemble batteries.- Do not dispose of batteries in fire.- Do not attempt to recharge batteries that are not
designed to be charged.
- Keep the batteries separate from metallic objects such as necklaces, hairpins, coins, and keys.
- Use the specified battery type (page 10) only.- Use new batteries, all of which are the same
type, same model, and made by the same manu-facturer.
- Always make sure all batteries are inserted in conformity with the +/- polarity markings.
- When the batteries run out, or if the instrument is not to be used for a long time, remove the batter-ies from the instrument.
- When using Ni-MH batteries, follow the instruc-tions that came with the batteries. Use only the specified charger device when charging.
• Keep batteries away from small children who might accidentally swallow them.
• If the batteries do leak, avoid contact with the leaked fluid. If the battery fluid should come in contact with your eyes, mouth, or skin, wash imme-diately with water and consult a doctor. Battery fluid is corrosive and may possibly cause loss of sight or chemical burns.
If you notice any abnormality
• When one of the following problems occur, im-mediately turn off the power switch and disconnect the electric plug from the outlet. (If you are using batteries, remove all batteries from the instrument.) Then have the device inspected by Yamaha service personnel.- The power cord or plug becomes frayed or dam-
aged.- It emits unusual smells or smoke.- There is a sudden loss of sound during use of the
instrument.
4
Power supply/AC power adaptor• Do not connect the instrument to an electrical outlet
using a multiple-connector. Doing so can result in lower sound quality, or possibly cause overheating in the outlet.
• When removing the electric plug from the instru-ment or an outlet, always hold the plug itself and not the cord. Pulling by the cord can damage it.
• Do not use if the power adaptor plug or cord is damaged.• Remove the electric plug from the outlet when the
instrument is not to be used for extended periods of time, or during electrical storms.
• Do not cover or wrap the power adaptor with a cloth or blanket. Heat buildup during use can cause fire or deform the case. Use in a well ventilated area.
• Remove the batteries from the instrument when us-ing the power adaptor. When batteries are installed, the power source automatically switches to the AC power adaptor when connected. Leaving batteries in the instrument can cause leakage.
Assembly• Please refer to the “Attaching the Frame” section on
page 9 of this manual for instructions on attaching the frame. Not following the instructions may result in injury or damage.
• Make sure both frame fixing screws are fastened securely after attaching the frame. Loose screws can cause rattling resulting in noise while playing.
• Please take care not to pinch your fingers or hands in movable parts.
Location• Do not expose to direct sunlight (in a car during the
day), high temperatures such as near a stove, or extremely low temperatures, and do not expose to vibrations or dust to prevent damage to the internal components or panel disfiguration.
• Do not use close to electronics such as speakers, TV, and radio. The instrument’s electronic circuits may cause noise in the TV or radio.
CAUTIONAlways follow the basic precautions listed below to avoid the possibility of physical injury to you or others, or damage to the instrument or other property. These precautions include, but are not limited to, the following:
Yamaha cannot be held responsible for damage caused by improper use or modifications to the instrument.
Always turn the power off when the instrument is not in use.Make sure to discard used batteries according to local regulations.
• Do not place the instrument in an unstable position where it might accidentally fall over.
• Before moving the instrument, remove all con-nected cables, to prevent damage to the cables or injury to anyone who might trip over them.
Connections• Before connecting the instrument to other electronic
components, turn off the power for all components. Before turning the power on or off for all compo-nents, set all volume levels to minimum.
• Never return the signal from the outputs (PHONES/LINE OUT) directly or via an external device to the AUX IN jack. Doing so can cause a feedback loop that damage the instrument.
Handling caution• Never hold the instrument close to your face when
adjusting or replacing strings. A string may unex-pectedly break damaging your eyes.
• If you cut the strings when replacing, do so after sufficiently loosening the pegs. Sudden loss of string tension may damage the neck and the re-bounding strings may cause serious injury.
• Replace strings one by one to prevent the saddle and pickup sensor from moving. A sensor is in-stalled beneath the saddle to pickup string vibration. If the saddle falls out make sure the sensor position has not changed. Reattach the saddle positioning the lower end of the saddle beneath the first string.
• If cleaning is required, wipe with a soft cloth. Do not use thinners, solvents, cleaning fluids, or wipes soaked with chemicals. Also. Do not place vinyl or plastic products on the instrument. Doing so can cause discoloration/deterioration.
• Do not rest your weight on, or place heavy objects on the instrument, and do not use excessive force on the buttons, switches or connectors.
• Do not use the instrument or headphones/earphones for a long period of time at a high or uncomfort-able volume level, since this can cause permanent hearing loss. If you experience any hearing loss or ringing in the ears, consult a physician.
5
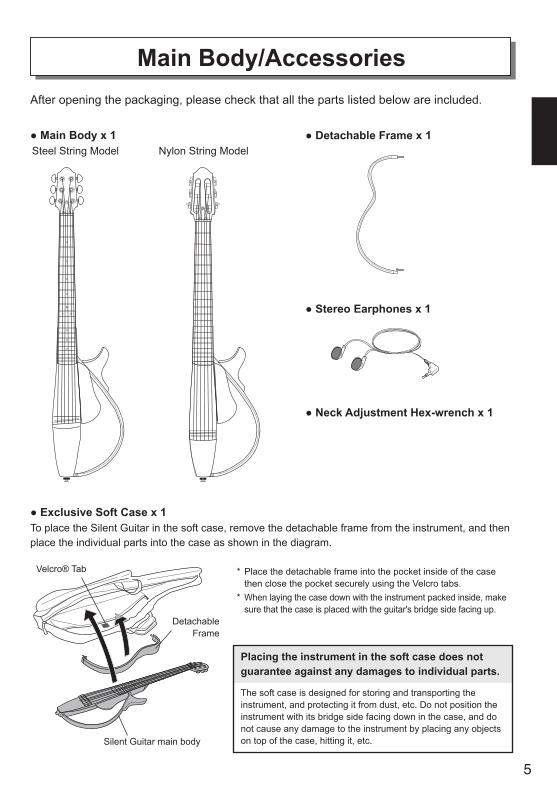
Main Body/Accessories
● Main Body x 1 Steel String Model Nylon String Model
● Detachable Frame x 1
● Neck Adjustment Hex-wrench x 1
● Stereo Earphones x 1
● Exclusive Soft Case x 1To place the Silent Guitar in the soft case, remove the detachable frame from the instrument, and then place the individual parts into the case as shown in the diagram.
After opening the packaging, please check that all the parts listed below are included.
* Place the detachable frame into the pocket inside of the case then close the pocket securely using the Velcro tabs.
* When laying the case down with the instrument packed inside, make sure that the case is placed with the guitar's bridge side facing up.
Placing the instrument in the soft case does not guarantee against any damages to individual parts.
The soft case is designed for storing and transporting the instrument, and protecting it from dust, etc. Do not position the instrument with its bridge side facing down in the case, and do not cause any damage to the instrument by placing any objects on top of the case, hitting it, etc.Silent Guitar main body
Detachable Frame
Velcro® Tab
6
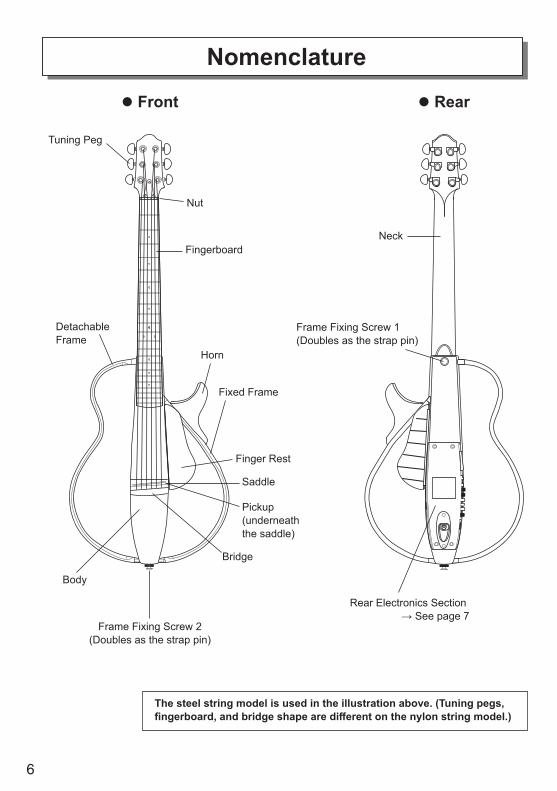
Nomenclaturel Front l Rear
Rear Electronics Section→ See page 7
Neck
Frame Fixing Screw 1(Doubles as the strap pin)
Fingerboard
Saddle
Tuning Peg
Nut
Body
Detachable Frame
Bridge
Fixed Frame
Horn
Frame Fixing Screw 2(Doubles as the strap pin)
Pickup(underneath the saddle)
Finger Rest
The steel string model is used in the illustration above. (Tuning pegs, fingerboard, and bridge shape are different on the nylon string model.)

7
l Rear Electronics Section
CD PlayerPortable Music Player
Metronome
To Power Outlet
Power Adaptor Jack
LINE OUT Jack (Monaural)
AUX IN Jack (Stereo Mini)
PHONES Jack (Stereo Mini)
Nomenclature
Control Panel
Battery Case
CAUTION• Before connecting the Silent Guitar to any external equipment, make sure the power is switched OFF
or the volume is fully lowered on all devices. Failure to do so can result in a loud sound that can dam-age equipment or your hearing.
• Never return the signal sent from Silent Guitar’s outputs directly, or via an external device to the AUX IN jack. Doing so can result in a feedback loop that may result in damaging the instrument’s electronics.
• Never play at high volume for any extended period of time when using the inner earphones or head-phones. Doing so can permanently damage your hearing.
When connecting the instrument to external audio equipment, check the jack size and make sure to use a plug size that corresponds to the jack being used, and properly con-nect the cable to the jack.
Guitar AmpPowered SpeakerRecording EquipmentMixer, etc.
Stereo Inner EarphonesStereo Headphones
* Do not connect anything other than a pair of headphones or inner earphones to the PHONES jack. Doing so can cause failure.
* Connecting/disconnecting a cable to the LINE OUT jack switches the power ON/OFF.• Insert plug → power ON• Disconnect plug → power OFF
Power Adaptor (sold separately)

8
l Control Section
Nomenclature
q Power SwitchThis switches the Silent Guitar’s power ON/OFF. Use a slightly long press (more than 0.5 sec.) to switch ON, and a longer press (more than 1 sec.) to switch OFF.* In addition to the power switch, the LINE OUT
jack also switches power ON/OFF. (Insert plug → power ON, disconnect plug → power OFF)
CAUTION• Before switching the power ON/OFF,
make sure that the power is switched OFF or the volume fully lowered on the guitar amp or powered speakers.
• Always remove the stereo inner ear-phones or headphones from your ears before switching the power ON/OFF.
w VOLUME ControlControls the volume level.* Turn the VOLUME control knob to the left to
lower the volume if the sound distorts when playing heavily.
e TREBLE ControlAdjusts the treble level.
r BASS ControlAdjusts the bass level.
Set the e and r knobs to their center positions as shown in the illustration then increase or decrease their levels as needed.
t TUNER SwitchSwitches the tuner function ON/OFF. With the power ON, press this switch to enter the tuner mode, then press again to leave the tuner mode and return to the play mode.* Sound output from the Silent Guitar and the AUX
IN jack are both muted while in the tuner mode.* Refer to page 11 for instructions on how to use
the tuner.
y DisplayDisplays information for power ON status, tuning, low battery warning, etc.Power ON → (the green round lamp in the center lights )Low battery warning → (triangles flash alter-nately n )
u BLEND ControlMixes the signal from the pickup and the signal of the simulated body resonance pro-duced by the SRT POWERED system.Turn fully to the left for 100% pickup signal, and fully to the right for 100% simulated resonance tone.
i EFFECT ControlSwitches between the three effects, two reverb and chorus, and adjusts the amount of each effect. Turn the knob fully to the left, as shown in the illustration, to turn the effects OFF. Turning the knob to the right gradually in-creases the depth of the effect until it reaches the point at which it switches to the next effect at its lowest depth level. Continue turning the knob to the right to increase effect depth.• REV 1: Produces a reverb effect similar to
what you experience when playing in a room.
• REV 2: Produces a reverb effect similar to what you experience when playing in an auditorium.
• CHO: Produces a chorus effect that sounds like two guitars or a 12-string guitar playing.
o AUX Control Adjusts the signal level of the AUX IN jack.

9
The Silent Guitar ships from the factory with its detachable frame removed. Please follow the instructions below to properly attach the detachable frame to the body.
1. Loosen Frame Fixing Screw 1 located at the heel of the neck and Frame Fixing Screw 2 located at the base of the instrument.
2. First, insert the Frame Pin (Lower) about half-way into the fixing hole on the guitar.
3. Next, insert the Frame Pin (Upper) into the fixing hole making sure that both the upper and lower pins on the detachable frame are inserted evenly and fully into the holes.* Do not mistake the upper and lower sections of the
frame when attaching.* When attaching or removing the frame, do not
apply pressure that may result in bending the pins. Doing so may damage the fixing pins.
4. After verifying that both upper and lower fixing pins are fully inserted, turn the fixing screws clockwise to secure the frame to the guitar body.
CAUTION When moving any movable parts, make sure that
your fingers or hand do not become pinched in the parts.
Attaching the Frame
n About the Strap PinsThe frame fixing screws also function as strap pins for attaching a guitar strap (sold separately) to the instrument.* Make sure that the guitar strap is securely attached to the instrument to prevent it from falling when playing.
Frame Fixing Screw 1
Frame Fixing Screw 2 4
2
4
3
Frame Pin (Upper)
Frame Pin (Lower)
Detachable Frame
This completes the frame attachment procedure.To remove the frame, loosen Frame Fixing Screws 1 and 2 then pull the upper and lower frame sec-tions away from the body slowly and evenly.* Make sure Frame Fixing Screws 1 and 2 are fastened securely after attaching the frame. Loose screws can result
in the frame rattling, which may cause noise while playing.* Always hold the instrument by its body or neck when moving the instrument. Holding the instrument by its frame
can damage the frame and/or its fasteners.
10
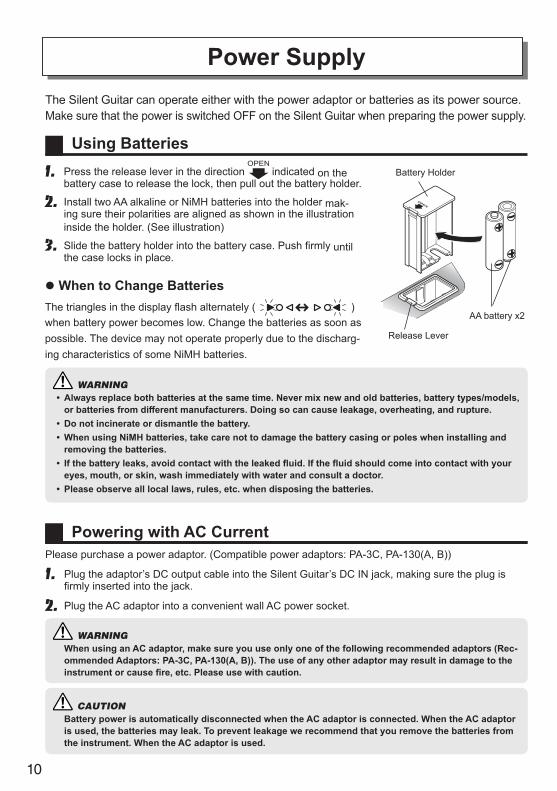
Power SupplyThe Silent Guitar can operate either with the power adaptor or batteries as its power source. Make sure that the power is switched OFF on the Silent Guitar when preparing the power supply.
Powering with AC CurrentPlease purchase a power adaptor. (Compatible power adaptors: PA-3C, PA-130(A, B))
1. Plug the adaptor’s DC output cable into the Silent Guitar’s DC IN jack, making sure the plug is firmly inserted into the jack.
2. Plug the AC adaptor into a convenient wall AC power socket.
WARNING When using an AC adaptor, make sure you use only one of the following recommended adaptors (Rec-
ommended Adaptors: PA-3C, PA-130(A, B)). The use of any other adaptor may result in damage to the instrument or cause fire, etc. Please use with caution.
CAUTION Battery power is automatically disconnected when the AC adaptor is connected. When the AC adaptor
is used, the batteries may leak. To prevent leakage we recommend that you remove the batteries from the instrument. When the AC adaptor is used.
WARNING• Always replace both batteries at the same time. Never mix new and old batteries, battery types/models,
or batteries from different manufacturers. Doing so can cause leakage, overheating, and rupture.• Do not incinerate or dismantle the battery.• When using NiMH batteries, take care not to damage the battery casing or poles when installing and
removing the batteries.• If the battery leaks, avoid contact with the leaked fluid. If the fluid should come into contact with your
eyes, mouth, or skin, wash immediately with water and consult a doctor.• Please observe all local laws, rules, etc. when disposing the batteries.
Using Batteries1. Press the release lever in the direction indicated on the
battery case to release the lock, then pull out the battery holder.
2. Install two AA alkaline or NiMH batteries into the holder mak-ing sure their polarities are aligned as shown in the illustration inside the holder. (See illustration)
3. Slide the battery holder into the battery case. Push firmly until the case locks in place.
l When to Change BatteriesThe triangles in the display flash alternately ( ) when battery power becomes low. Change the batteries as soon as possible. The device may not operate properly due to the discharg-ing characteristics of some NiMH batteries.
AA battery x2
Release Lever
Battery Holder
11
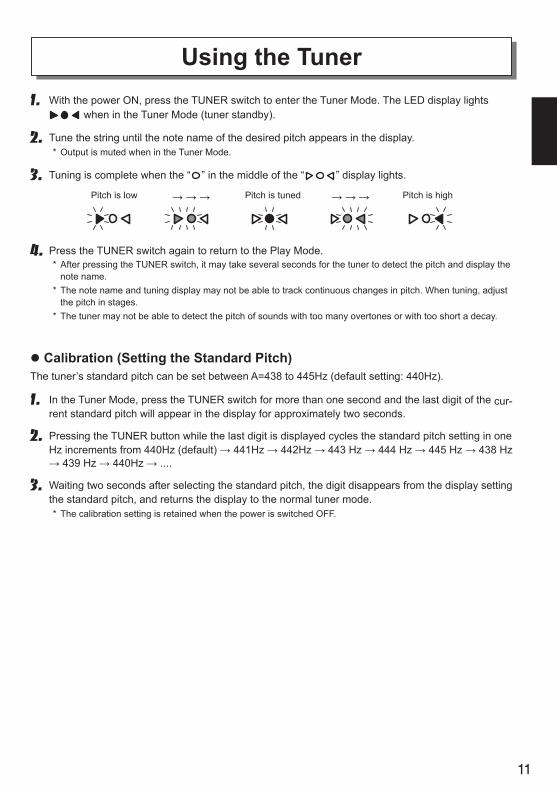
Using the Tuner1. With the power ON, press the TUNER switch to enter the Tuner Mode. The LED display lights
when in the Tuner Mode (tuner standby).
2. Tune the string until the note name of the desired pitch appears in the display.* Output is muted when in the Tuner Mode.
3. Tuning is complete when the “ ” in the middle of the “ ” display lights.
4. Press the TUNER switch again to return to the Play Mode.* After pressing the TUNER switch, it may take several seconds for the tuner to detect the pitch and display the
note name.* The note name and tuning display may not be able to track continuous changes in pitch. When tuning, adjust
the pitch in stages.* The tuner may not be able to detect the pitch of sounds with too many overtones or with too short a decay.
l Calibration (Setting the Standard Pitch)The tuner’s standard pitch can be set between A=438 to 445Hz (default setting: 440Hz).
1. In the Tuner Mode, press the TUNER switch for more than one second and the last digit of the cur-rent standard pitch will appear in the display for approximately two seconds.
2. Pressing the TUNER button while the last digit is displayed cycles the standard pitch setting in one Hz increments from 440Hz (default) → 441Hz → 442Hz → 443 Hz → 444 Hz → 445 Hz → 438 Hz → 439 Hz → 440Hz → ....
3. Waiting two seconds after selecting the standard pitch, the digit disappears from the display setting the standard pitch, and returns the display to the normal tuner mode.* The calibration setting is retained when the power is switched OFF.
Pitch is low → → → → → → Pitch is highPitch is tuned
12
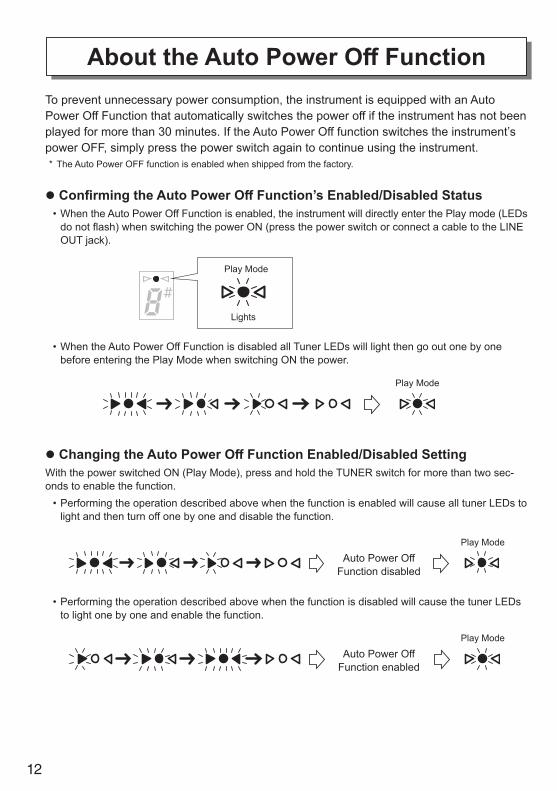
To prevent unnecessary power consumption, the instrument is equipped with an Auto Power Off Function that automatically switches the power off if the instrument has not been played for more than 30 minutes. If the Auto Power Off function switches the instrument’s power OFF, simply press the power switch again to continue using the instrument.* The Auto Power OFF function is enabled when shipped from the factory.
l Confirming the Auto Power Off Function’s Enabled/Disabled Status• When the Auto Power Off Function is enabled, the instrument will directly enter the Play mode (LEDs
do not flash) when switching the power ON (press the power switch or connect a cable to the LINE OUT jack).
• When the Auto Power Off Function is disabled all Tuner LEDs will light then go out one by one before entering the Play Mode when switching ON the power.
l Changing the Auto Power Off Function Enabled/Disabled SettingWith the power switched ON (Play Mode), press and hold the TUNER switch for more than two sec-onds to enable the function.
• Performing the operation described above when the function is enabled will cause all tuner LEDs to light and then turn off one by one and disable the function.
• Performing the operation described above when the function is disabled will cause the tuner LEDs to light one by one and enable the function.
About the Auto Power Off Function
Play Mode
Lights
Play Mode
Play Mode
Play Mode
Auto Power Off Function disabled
Auto Power Off Function enabled

13
n Caution When Changing Strings
CAUTION• When adjusting or replacing the strings, do not put your face close to the instrument. The strings may
unexpectedly break injuring your eyes. If you cut the strings when replacing, make sure you loosen the peg sufficiently before cutting. In addition to damaging the neck, the sudden loss of string tension will result in the strings rebounding causing serious injury.
• Sensors that pick up string vibrations are installed beneath the saddle. Replace strings one at a time to prevent sensor positions from shifting. If the saddle falls out make sure that the sensors have not changed position. Reattach the saddle making sure that the lower end of the saddle is positioned un-derneath the first string.
n Replacing the Strings (Nylon String Model)When attaching strings, please use the following procedure.
1. Tie the strings to the bridge.
Changing the Strings
bridge
neck side
* If the string slips (1st, 2nd, 3rd strings) tie one more knot.
Make sure the last knot is positioned over the edge of the bridge.
After wrapping once on the 2nd string side,
wrap towards the 1st string’s peg.
2. Next, tie and wind the strings onto the peg.* The following illustration shows how to attach the 1st string (the 2nd and 3rd strings are the same). To attach
the 4th, 5th and 6th strings tie and wind the strings in the opposite direction.* Adjust the position of the string on the peg to keep it from coming into contact with the wood of the head.
3. After stringing all six strings, tune the instrument using the built-in tuner, any commercially avail-able tuner, or a tuning fork, etc.
14
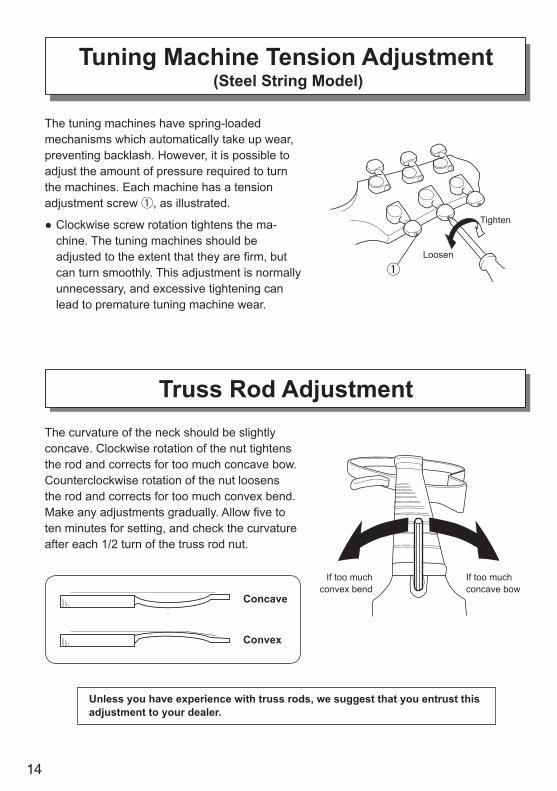
q
The tuning machines have spring-loaded mechanisms which automatically take up wear, preventing backlash. However, it is possible to adjust the amount of pressure required to turn the machines. Each machine has a tension adjustment screw q, as illustrated.
● Clockwise screw rotation tightens the ma-chine. The tuning machines should be adjusted to the extent that they are firm, but can turn smoothly. This adjustment is normally unnecessary, and excessive tightening can lead to premature tuning machine wear.
Tuning Machine Tension Adjustment (Steel String Model)
Truss Rod AdjustmentThe curvature of the neck should be slightly concave. Clockwise rotation of the nut tightens the rod and corrects for too much concave bow. Counterclockwise rotation of the nut loosens the rod and corrects for too much convex bend. Make any adjustments gradually. Allow five to ten minutes for setting, and check the curvature after each 1/2 turn of the truss rod nut.
Concave
Convex
Unless you have experience with truss rods, we suggest that you entrust this adjustment to your dealer.
If too muchconvex bend
If too muchconcave bow
Tighten
Loosen

15
Neck Mahogany
Body Mahogany
Fingerboard Rosewood (SLG200S SLG200N) Ebony (SLG200NW)
Bridge Rosewood
Frame Rosewood/Maple
Strings Steel string model: Folk guitar strings Nylon string model: Classic guitar nylon strings
Sensor Original piezo type bar sensor
Controls • Power Switch • TUNER Switch • VOLUME • TREBLE • BASS • BLEND (P.U. n MIC.) • EFFECT (REV1 n REV2 n CHO) • AUX
Input/Output Jacks • LINE OUT (Φ6.3 Standard Monaural, output impedance: 1 kΩ) • PHONES (Φ3.5 Stereo mini, output impedance: 10 Ω) • AUX IN (Φ3.5 Stereo mini, input impedance: 2.2 kΩ) • DC-IN
Power Batteries: AA Alkaline (LR6) or NiMH Battery x2 Power Adaptor (sold separately): Yamaha PA-3C (for use in Japan), PA-
130 (for use internationally), DC 12 V/700 mA
Power Consumption 2 W (with the PA-3C), 0.8 W (with the PA-130), 0.9 W (with the PA-130A, B)
Battery Life Alkaline Batteries: Approximately 22 hours (Continuous use)
String Length Steel string model: 634 mm (24-15/16”) Nylon string model: 650 mm (25-9/16”)
Dimensions Steel string model: 978 (L) x 356 (W) x 85 (H) mm (38-1/2” x 14” x 3-3/8”) Nylon string model: 970 (L) x 356 (W) x 87 (H) mm (38-3/16” x 14” x 3-7/16”) * with the detachable frame attached, and includes the frame fixing screws.
Weight Approximately 2.1 kg (4 lbs. 10 oz.)
Specifications
* The contents of this manual apply to the latest specifications as of the publishing date. To obtain the latest manual, access the Yamaha website then download the manual file.

Steel Strings Model
SLG200SNylon Strings Model
SLG200NSLG200NW
取扱説明書Owner’s Manual
BedienungsanleitungMode d’emploi
Manuale dell’utenteManual de instruccionesManual do Proprietário
Руководство пользователя使用说明书
사용설명서
Русский
Portug
uês
中文
한국어
English
Fran
çais
Deu
tsch
Italiano
Españ
ol
日本語
ZX36770 版次 : R1
SLG200S SLG
200N SLG
200NW
KOZHRUPTES
ITFRDEENJAManual Development Group
© Yamaha Corporation
Published 06/2018 改版 PO-B0