Embed Size (px)
Citation preview

Seed-to-TableSchool Food Program
Activity Guide:Plant Cultivation
ByGigia Kolouch
© December 2011
Slow Food Denver

page 2 • Slow Food Denver • Plant Cultivation © December 2011 Gigia Kolouch
For more information, contact:
Slow Food Denver4340 E. Kentucky Ave, Suite 311Denver, CO 80246(303) 321-3322info@slowfooddenver.orgwww.slowfooddenver.orgwww.sfdseedtotable.org© December 2011, Gigia Kolouch

© December 2011 Gigia Kolouch Slow Food Denver • Plant Cultivation • page 3
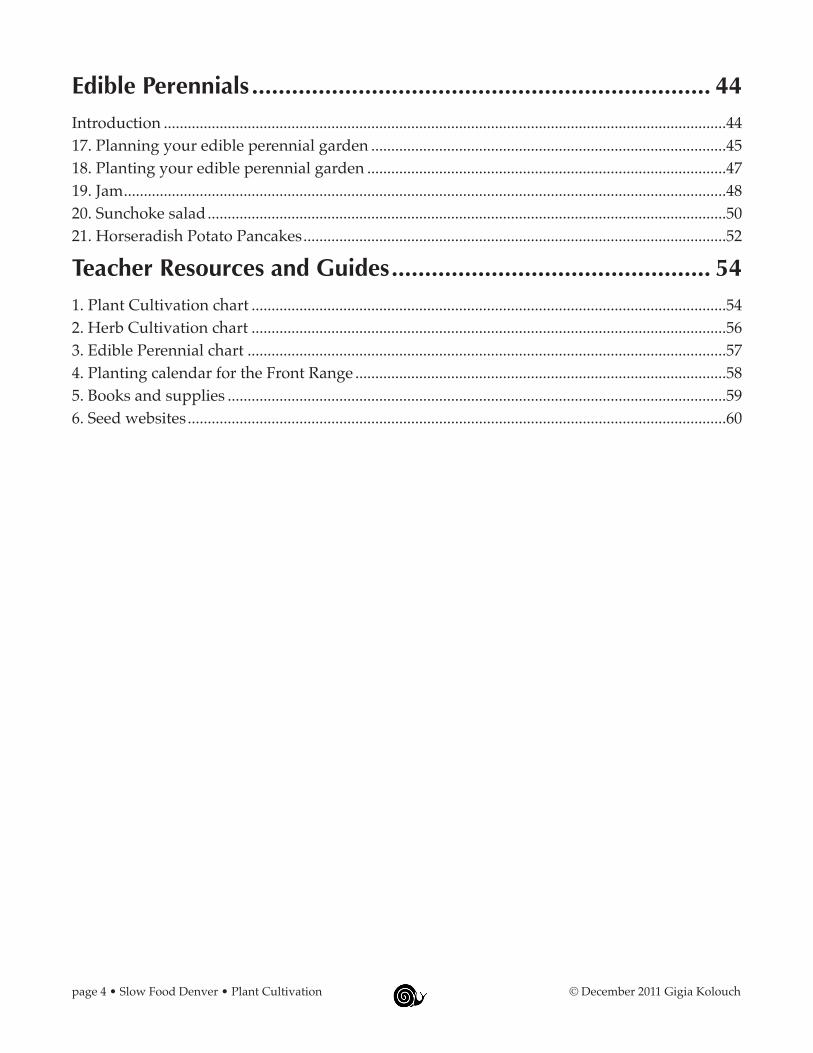
Section 1: Plant Cultivation SeriesOverview .................................................................................. 5
Gardening in the Colorado Front Range ...............................................................................................5Timing crops for school gardens .............................................................................................................6
Where Are We? ......................................................................... 71. Schoolyard mapping activity ..............................................................................................................72. Seasonal Eggs .........................................................................................................................................93. Fruit Sauce ............................................................................................................................................11
What’s in My Dirt ................................................................... 134. Exploring soil types ............................................................................................................................13
Seed Starting ........................................................................... 195. How do seeds grow? ..........................................................................................................................196. Seed windows ......................................................................................................................................217. Planting seeds ......................................................................................................................................23
Transplanting .......................................................................... 258. Transplanting and thinning ...............................................................................................................259. Plant part observation ........................................................................................................................27
Cold season planting ............................................................... 2910. Planting cold season crops outside.................................................................................................2911. Chinese Salad .....................................................................................................................................31
Warm season planting ............................................................. 3312. Planting warm season crops outside ..............................................................................................3313. Tomato, cucumber and pepper pasta salad...................................................................................35
Herbs ...................................................................................... 37Introduction .............................................................................................................................................3714. Planting an herb garden ...................................................................................................................3815. Herbal teas .........................................................................................................................................4016. Herb spreads ......................................................................................................................................42
page 4 • Slow Food Denver • Plant Cultivation © December 2011 Gigia Kolouch
Edible Perennials ..................................................................... 44Introduction .............................................................................................................................................4417. Planning your edible perennial garden .........................................................................................4518. Planting your edible perennial garden ..........................................................................................4719. Jam .......................................................................................................................................................4820. Sunchoke salad ..................................................................................................................................5021. Horseradish Potato Pancakes ..........................................................................................................52
Teacher Resources and Guides ................................................ 541. Plant Cultivation chart .......................................................................................................................542. Herb Cultivation chart .......................................................................................................................563. Edible Perennial chart ........................................................................................................................574. Planting calendar for the Front Range .............................................................................................585. Books and supplies .............................................................................................................................596. Seed websites .......................................................................................................................................60

© December 2011 Gigia Kolouch Slow Food Denver • Plant Cultivation • page 5
OverviewThe Plant Cultivation Series introduces students into their school garden with activities that can continue throughout the year. We begin with introducing students to their particular school environment, so that they will begin to understand where they are and what kinds of plants will grow in their garden. Then, you will find activities regarding seed starting, transplanting and planting. These lessons will take you through the spring. We finish with resources and activities concerning specialty gardens: herbs and perennials. We recommend food related activities to accompany gardening whenever feasible.
Most elementary schools start some plants in the classroom, but often these plants never end up being planted outside. Students should see the full cycle of seed to table by starting seeds inside, transplanting them outside, caring for them, harvesting them and then eating them.
The Plant Cultivation Series is meant to be supplemented by more comprehensive gardening advice. For more information, please see the Teacher Resources at the back of this section. Our primary goal is to give you a place to start, help you to incorporate food and eating with gardening, and to give you useful information relating to gardening in the arid intermountain west, specifically the Colorado Front Range.
Gardening in ColoradoIf you’ve grown up gardening in other places, or are new to the area, gardening in Colorado may be difficult for you. Here are some important things to remember:
Short growing season: Buy plants/seeds that have short growing seasons, preferably under 90 days. Our official growing season for frost sensitive crops is May 15 – September 15th (although you may be caught by an early snow).
Low levels of nitrogen: Colorado soils often are low in nitrogen and organic matter, which most vegetables need to thrive. Supplement your soil with compost and organic fertilizer or well composted manure.
Dry: Do everything you can to keep moisture in the soil. Protect plants by mulching or planting in afternoon shade, especially tender plants including those with large leaves (delicate lettuces, celery) or high humidity requirements (okra).
In other areas of the U.S., gardeners make furrows or mounds and plant on top.
Don’t do this!
Don’t do this!

page 6 • Slow Food Denver • Plant Cultivation © December 2011 Gigia Kolouch
Don’t do that in Colorado, unless the furrows are very wide (8”) and have a dip in the middle.
Instead, form deep bowls for large vegetables like squash. For smaller plants, form furrows that will hold water.
Do not plant on a flat plane. The water will run off and the plants will dry out. Of course, this advice applies to gardens that are hand watered. If you have a drip irrigation system, keep bowls or furrows shallow to facilitate the movement of water in your system.
Timing Crops for a School Garden
Use the Plant Cultivation chart at the end of the chapter to schedule your planting dates. However, you can also make some adjustments if you want most of your crops to be ready in the fall or late August when students return to school. For example, students may plant a smaller green bean area at the beginning of May for use in a summer program to be ready in July. However, the garden leader may wish to reseed a large plot in mid to late June to be ready in August.
Use the days to maturity printed on your seed package to make calculations on the best time to plant. Remember the days to maturity does not usually include the germination time, so you will have to add 7-10 days, depending on the variety.
Students will have a sense of where their school is located within the Denver area, where the natural water is and where the garden is located.
Gardens are intimately tied to the specific landscape in which they are located. Often students do not know anything about the local environment of their school yard. This activity will help them to figure out the best location for a garden in their school, as well as what is already growing.
Do this!Do this!

© December 2011 Gigia Kolouch Slow Food Denver • Plant Cultivation • page 7
For each group:Graph paperPencilClipboard
For everyone:Map of your city with waterways markedMap of your statePrintout of the schoolyard from Google maps.
1. Make a satellite map of your schoolyard by going on to http://www.maps.google.com and zooming in on your address as much as possible. Print out a copy to fill a page.
2. Divide the students into groups of 5-8. Assign a volunteer or teacher to each group.
3. Give each group a clipboard, graph paper and pencil.
1. Have each group explore one quadrant of the school grounds and make a sketch of what they find. Include permanent struc-tures like fences and garden beds, as well as interesting trees or shrubs.
2. Meet in the garden and look around you. See if the students can figure out where the four compass directions are located. Where is it the most sunny in your garden? The most shady?
3. Return to the classroom and have each group mark the plants and features on the Google map printout.
4. Use the map of your state and the map of your city waterways to lead the following discussion.
• Where is the school within Denver?• Where are the mountains?• Which way is north?• How does the sun hit the garden? When is it sunny or shady?• What season is it? What is growing outside? What is available to
eat?• Where is the soil wet? Where is it very dry?
Objective
Background
Materials
Preparation
Where Are We? G2-5 ❷ ✿❂❦d
Activity

page 8 • Slow Food Denver • Plant Cultivation © December 2011 Gigia Kolouch
• Where is it hot? Where is it cold or windy?
Vegetables like soft, rich soil that is sunny and gets lots of water. Gardens should also be close to the building and parking for bringing in supplies and carrying vegetables into the school.
• Which is the best place in your schoolyard for a vegetable garden?
• Is your garden located in the best spot?• If it is not in the best spot, what can you do to make it better for
plants to thrive?Serves 12-15 students
1 dozen eggs1/2 cup grated cheeseSalt and pepper to taste1/4 cup fresh herbs1 onion, leek, or shallot1 lb. seasonal vegetables*
1. If necessary, peel the vegetables first. Slice them into thin pieces.
Discussion
Further Exploration

© December 2011 Gigia Kolouch Slow Food Denver • Plant Cultivation • page 9
Background and Discussion
Another way to tie students to their particular location and season is to highlight a seasonal, local produce item.A simple frittata or scrambled egg dish shows off the vegetable, is quick to prepare and cook, and provides a substantial snack.
Materials1 large mixing bowl1 whiskInduction burner1 large frying panSpatulaCutting boardsKnivesMeasuring spoonsCheese graterPlates and forks
Preparation• Wash all of the vegetables.• Make sure everyone has washed
his/her hands.• Divide the class into 3 groups.• Demonstrate knife techniques and
safety.• Review the recipe so students know
what to do. Do not have students read the recipe while cooking.
Set-UpEach group will have a different task:#1: Beat the eggs and mix in the flavorings.#2: Cut up vegetables (can be two groups).#3: Grate cheese.
Eating and EvaluationWhile the students are waiting for the eggs to cook, you may do the following:
• Use the worksheet of the vegetable to color or discuss.
• Read a book from the suggested list appropriate to the season.
• Have the students draw or write down the process of making the eggs.
• Have the students draw something they have seen in the garden that day.
• Discuss what is happening outside right now.
Before eating:• Remind class to wait politely to be
served before eating. • Have 3 or 4 children volunteer to
help pass out the samples.
After eating:• What seasonal foods are they eating
at home?• Why are eggs good for you to eat?
Getting Organized: Seasonal Eggs

page 10 • Slow Food Denver • Plant Cultivation © December 2011 Gigia Kolouch
Break the eggs into a bowl and add 2 tablespoons of water and the salt and pepper. Stir in the grated cheese.
2. Heat a skillet on medium high, add the butter or oil and the cut up vegetables. Saute them for 5 minutes, or until tender.
3. Pour the eggs over the vegetables, turn the heat to medium low and cook for 10 minutes, until the eggs are cooked through. If you want to speed up the process, scramble the eggs gently.
*Suggestions for vegetables: Spring—Asparagus, Peas, Fava beans, Spinach, Arugula, greens. Summer—Zucchini, Green beans, Broccoli. Fall—Potatoes, Zucchini, Peppers, carrots.
Options: Some students enjoy eggs with hot sauce or salsa. You can also serve them with fresh flour or corn tortillas.
Serves 12-16 students
6 cups fruit, cut into large pieces1/2 cup water1/4 cup - 1/2 cup sugar1 qt. plain low fat yogurt1 cup granola
1. Rinse the fruit. If it has peels, like apples, peel first. Remove the seeds and cut it into large pieces. Place the fruit in a large pan
Seasonal Eggs
G2-5 ❺ ✿❂❦d
Ingredients
Method

© December 2011 Gigia Kolouch Slow Food Denver • Plant Cultivation • page 11
Background and Discussion
Make a quick, nutritious snack by cooking fresh fruit preseves and combining them with plain yogurt and granola. This snack has protein, dairy, whole grain carbohydrates and fruit. You can also add nuts or seeds for nutritious fats. Make sure to ask about potential allergies before including nuts.
Materials1 large mixing bowl for fruit1 medium bowl for yogurt1 bowl each for granola and toppingsServing spoonsLiquid measuring cupInduction burner1 5-qt pot with lidCutting boardsKnivesPotato masher
Preparation• Rinse the fruit and remove the
labels.• Make sure everyone has washed
his/her hands.• Divide the class into 2 groups.• Demonstrate knife techniques and
safety.• Review the recipe so students know
what to do. Do not have students read the recipe while cooking.
Set-Up
Place all of the fruit and cutting boards on one table. Place the yogurt and toppings on a second table. One group will cut the fruit and the other will set up the yogurt, toppings and plates.
Eating and EvaluationWhile the students are waiting for the fruit to cook, you may do the following:
• Use the worksheet of the fruit to color or discuss.
• Read a book from the suggested list appropriate to the season.
• Have the students draw or write down the process of making the fruit sauce.
• Have the students draw something they have seen in the garden that day.
• Discuss what is happening outside right now.
Before eating:• Remind class to wait politely to be
served before eating. • Have 3 or 4 children volunteer to
help pass out the samples.
After eating:• What seasonal foods are they eating
at home?• What food groups are in the snack?
Getting Organized: Fruit Sauce

page 12 • Slow Food Denver • Plant Cultivation © December 2011 Gigia Kolouch
Fruit Sauce
GK-5 ❺ ✿❂❦dalong with the water. Cover tightly and turn the heat to high. Let it cook for 5-10 minutes, until the fruit is soft.
2. Reduce the heat to medium low and add the sugar to taste. Smash the fruit puree with a potato masher and let it cook for another few minutes, until the sugar is dissolved. Let it cool.
3. Spoon a little yogurt into each cup. Cover with a few spoonfuls of sauce and sprinkle on a bit of granola. Great for a quick snack or breakfast.
Ingredients
Method

© December 2011 Gigia Kolouch Slow Food Denver • Plant Cultivation • page 13
To explore the attributes of different types of soil
Gardeners must know what kind of soil they have in order to know how to make it fertile enough for a vegetable garden. Usually clay soil needs more organic matter to add plenty of air for plant roots. Sandy soil does not hold nutrients well. It may need amendments such as fertilizer, as well as compost and mulch to keep in the moisture.
Collect 4 soil samples (about 5 cups of each soil) from diverse areas such as:• Soil from a well-established garden• Soil from a parking lot or other unimproved area (heavy clay)• Some compost, if available• Soil from your school garden
For each table:4 plates1 cup of each soilSoil observation sheet for each studentPencil for each student
Before the class, take 1 cup from each type of soil and put it in a mason jar. Fill the jar with water and shake it up vigorously. Place all of the jars in the classroom at least 2 days before the soil class to let them settle. You will use them at the end of class so that the students can see the different layers of soil.
Divide the class into 4 groups, with one volunteer per group.
What’s in My Dirt? GK-5 ❷ ✿❂❦dObjective
Background
Materials
Preparation

page 14 • Slow Food Denver • Plant Cultivation © December 2011 Gigia Kolouch
1. Talk about soil composition using the What’s in My Dirt? handout.
2. Each group should have 4 samples on their table, each numbered.
3. Each group should have a sheet to record their observations. They should note: the color, texture, smell, how sticky, etc.
Talk about differences between the samples. Tell the students which sample came from which places. What does the school garden soil look like? What are some ideas to improve the school garden soil.
Use the Soil Layer diagram to observe the jars. Which ones have the most clay? Which have the most humus.
1. Read the book Soil: Let’s Look at a Garden by Angela Royston or Soil (Geology Rocks) by Rebecca Faulkner.
2. Have the students bring in dirt from their home and discuss what kind of soil it is.
3. Plants need three major nutrients to grow well: nitrogen, phos-phorus and potassium. Typical Rocky Mountain soils have adequate amounts of phosphorus and potassium, but may be nitrogen deficient.Keep some of your garden soil and send it to the lab for lead and nutrient testing. Read the instructions for doing a soil test on the CSU website: http://www.soiltestinglab.colostate.edu/documents/soilsample_horticulture.pdf . Share the results with the students during the next class.
You need to send a ziplock sandwich sized bag of soil and $28.00 to: Soil, Water and Plant Testing Lab Colorado State University Room A319 NESB Fort Collins, Colorado 970-491-5061(office) (970) 491-2930(fax) http://www.soiltestinglab.colostate.edu/ 4. You can also use a quick home test to get an overall idea of your
garden’s soil fertility. Try the Rapitest Soil Test Kit.
Activity
Discussion
Further Exploration

© December 2011 Gigia Kolouch Slow Food Denver • Plant Cultivation • page 15
What’s in My Dirt?
Clay
Sticky, heavy. You can roll it into balls. Clay soil does not absorb water easily. But, when it is wet, it stays wet. Sometimes plants cannot get enough air and water in clay soils. But it does have more nutrients
Silt
Soft and silky. Very fine particles, but does not stick together. It does not absorb water well. The particles are very small and plants sometimes can’t get enough air. The water drains away very fast.
Sand
Granular. Does not stick together. Large particles have plenty of air and absorbs water easily. But, the water drains away very fast and dries out quickly. The nutrients also drain out more quickly.
Humus
Decomposed living material made up of leaves, plants, roots, etc. Humus also has living small animals and bacteria. Humus is necessary for healthy soil. It helps break up clay soil and holds nutrients for sandy soil. It is brown and crumbly. It is a little slippery and sticky.

page 16 • Slow Food Denver • Plant Cultivation © December 2011 Gigia Kolouch
Soil Sample #1 Soil Sample #2
Soil Sample #3 Soil Sample #4
Soil Observation Sheet

© December 2011 Gigia Kolouch Slow Food Denver • Plant Cultivation • page 17
Soil Layer Diagram
Organic matter (leaves, sticks, compost)
Water
Clay
Silt
Fine Sand
Thick Sand
Gravel

page 18 • Slow Food Denver • Plant Cultivation © December 2011 Gigia Kolouch

© December 2011 Gigia Kolouch Slow Food Denver • Plant Cultivation • page 19
Students will learn the parts of the seed and what roles they play in the growth of the new plant.
Starting seeds in the classroom provides many benefits for students as well as the garden. 1) Students will understand how a seed becomes a plant, 2) Get an early start on the season so you can maximize the short Colorado growing time; 3) Save some plants for a plant sale in late spring to help support the program.
This first activity introduces students to seeds and prepares them to do their first planting.
Garden JournalsPencilsSeed book from recommended list to read to the studentsPlastic tub of moistened potting soilLight table
1. Set up the light table and turn on the lights2. Add water to the potting soil until it is damp like a wrung out
sponge.3. Place the tub of potting soil with one planting container, a per-
manent marker and a plant tag at the front of the class.
1. What is the purpose of a seed?Seeds allow a plant to make more plants or offspring.Discussion Point: Ask class to give examples of seeds they have seen in nature or that they have planted at home.Seeds are a food source for some animals.Discussion Point: Ask class for examples of seeds that they have eaten before or that they have seen animals eat in nature.
Objective
Background
Materials
Preparation
Activity
How Do Seeds Grow? GK-5 ❷ ✿

page 20 • Slow Food Denver • Plant Cultivation © December 2011 Gigia Kolouch
2. What are the three parts of a seed?Read a book, such as The Tiny Seed by Eric Carle. For more recommendations, see page. Discuss the parts of a seed: • Seed coat-protects inside of seed• Cotyledon- food for new plant• Embryo- new plantHave students in their Plant Journal, draw a seed and label the parts.
3. How does a seed make a plant?Steps to germination:• Water moistens the seed coat• Given the right temperature, the embryo begins to grow into a
plant.• The cotyledon supplies the new plant with food.• The roots start to grow into the potting soil, supplying nutrients
to the new plant.Have students draw the stages of germination in their journals.
4. What does a seed need to grow?• Fine soil- usually potting soil which contains composted plant
material, vermiculite, nutrients• Water• Air• LightDiscussion Point: Show students the tub of potting soil. Discuss its texture: it is loose and contains different parts. Ask how this potting soil is different than the soil in the garden or in the schoolyard.Discussion Point: Show the students the light table and discuss the need for light. How can a plant get light inside?
—How to Seeds Grow by Andy Nowak
Activity

© December 2011 Gigia Kolouch Slow Food Denver • Plant Cultivation • page 21
Observe seed germination and root growth during the first stages of plant growth, comparing monocot and dicot plants.
This activity will allow students to see inside the seed during the first stages of plant growth. They can also observe the root and cotyledon emerging from the seed pod. Students will be able to clearly identify the two basic types of plants: monocots and dicots. Monocots only have one cotyledon (first leaf) and are often members of the grass family. In addition, they usually have fibrous root systems, without one main root. Dicots (most vegetable plants) have two cotyledons and usually have tap roots. Monocots take advantage of shallow surface water, while dicots prefer infrequent deep watering.
Note: These seedlings will not be useful for transplanting. Usually corn and beans are planted directly into the ground.1-2 packages of any kind of bean seeds1-2 package of any kind of corn seeds1 clear plastic cup per studentBlack construction paperPaper towels1 Spray bottle filled with water per table
1. Soak the seeds over night. Each student should have a cup, a strip of black construction paper, a damp paper towel and 4 seeds
2. Measure the height of the cups. Cut the construction paper into strips that are as wide as the height of the cups.
3. Pass out materials to the student so that each has a cup, paper towels, construction paper, 2 bean seeds and 2 corn seeds.
1. Place the strip of black paper inside the cup. Fill the middle with the damp paper towel.
2. Place the seeds between the outside of the cup and the paper, so you can clearly see them against the black background. Each cup should have 2 corn seeds and 2 bean seeds
3. Spray the paper towel with water so that it is wet, but there is no standing water in the cup.
Objective
Background
Materials
Preparation
Activity
Seed Windows GK-5 ❷ ✿

page 22 • Slow Food Denver • Plant Cultivation © December 2011 Gigia Kolouch
Further Exploration
4. Spray the paper towel each day as the seed germinates and grows
5. After the third day, remove one of the seeds from each cup. Split it open and observe the embryo. Have students identify the root and first leaves (cotyledon). Draw the embryo in their garden journal.
6. Wait until the root and leaves emerge from the seed. Split open the seed (if it is not already) and observe the seedlings. Which seedling is a monocot? Which is a dicot?
7. You may discard the cup after the first true leaves appear, or let the students bring them home and plant them in a pot or in the ground.
Use the Seed to Plant worksheet on page XX of the Workbook to go over vocabulary words and learn the parts of the germinated seed.Read Bean and Plant by B. Watts and compare the pictures to your seeds.

© December 2011 Gigia Kolouch Slow Food Denver • Plant Cultivation • page 23
Each student will also learn how to plant a seed and how to care for the developing young plants.
2 tubs of moistened potting soil.Light table1 4-pack plastic container (or other plant starting container) per student4 permanent markers1 short plastic plant tag per student2-3 plant trays—flats (no drainage holes)1 plastic dome for each trayWater bottle with squirt topExtra tub of water to wash off handsPackages of seeds
1. Make sure each tub of soil is wet so that the seeds will germi-nate better. It should not be soggy or drippy with water, but like a wrung out wet sponge.
2. Set up two stations: the first is for seeds that need a warming mat and the second for seeds that do not (see Plant Cultivation Chart on page 54).
3. Each station should have:• Tub of potting soil• Selection of 3-5 types of warm or cool seeds• 2 permanent markers• 4-pack plastic containers• 1-2 flats • Plant tags• 1-2 plastic dome covers
4. Set up a tub with water and paper towels so the students can rinse their hands and minimize dirt in the classroom sink.
5. Before starting, gather all of the students into one group and ex-plain the activity.
6. Divide the students into two groups. Have them line up 3-4 at a time at each station. Those that are not planting can do other class work or reading.
Objective
Materials
Preparation
Starting Seeds GK-5 ❶ ✿

page 24 • Slow Food Denver • Plant Cultivation © December 2011 Gigia Kolouch
1. Select a 4-cell seedling tray.2. Loosely pack potting soil into 4-cell tray, almost up to the top.3. Pour a few seeds into the students hand. Have him place one
seed into each cell.4. Cover seed loosely with more potting soil.5. Write the name of the student and classroom number on one
side of the marker, the plant variety on the other. Place the stick in the 4-pack
6. Place 4-pack container into large plant tray. Make sure that the seeds that need warming mats are all together.
7. If you have time, you can follow up with the Edible Seeds les-son in the Botany Activity Guide.
Show the students how to cover that trays with the dome. Discuss the water cycle, evaporation and condensation. What should the students observe in a couple of days?
Position each plant tray on light table shelf. Does this tray of plants require a heat pad or not? Talk about “cool” seeds and “warm” seeds.
Turn on the lights above the tray. The lights serve the role as the sun. When starting seedlings we can leave the lights on for 24 hours to give the seedlings lots of light energy.
Watering the trays: While the domes are on the trays tightly, there should be no need to water them. All the water stays trapped inside the dome. If the domes get knocked off and the water evaporates, go ahead and lightly sprinkle the potting soil with water and replace the domes.
Once seedlings appear, you can leave the dome on until the seedlings reach the inside of the dome. Remove the dome when the seedlings are tall as the dome. You will need to water daily or every other day at this point. Because the seedlings are fragile, an adult should do the initial watering, targeting the base of the plants.
As the seedlings grow stronger, students can help to water the plants with a simple watering can, or water bottle with a squirt top.
Activity
Discussion
Follow-up

© December 2011 Gigia Kolouch Slow Food Denver • Plant Cultivation • page 25
Students continue basic gardening skills by learning how to how to transplant and thin plants. They will also understand the difference between tender annuals and hardy annuals.
Six to eight weeks after your seeds have germinated, they will become crowded in the small 4-packs. In the ideal situation, the timing will be mid to late April. At this point, you will transplant the tender annuals to 4” pots. These will remain inside until mid May. The hardy annuals can be planted outside after having been hardened off for a week. Hardening off means that you gradually get them used to the outside world, first in the shade, exposing them to more sunlight each day. If there is a heavy frost forecasted, bring them inside at night.
While you are transplanting the plants, you should also thin them. Often students plant more that one seed in each cell. For the cold hardy plants, pull out but the strongest seedlings. For the tender plants, you can separate the seedlings and plant each one into its own 4” pot. Save the discarded seedlings for the plant observation activity.
We recommend using a potting soil that has some nutrient amendment either in the form of worm castings, manure or fish meal. The larger plants will need a balanced form of N-P-K in order to thrive.Garden book from recommended list to read to the studentsPlastic tub of moistened potting soilLight table30-40 4” pots4 permanent markers30-40 plant tags3-4 plant trays
1. Separate the cold hardy plants from the tender plants. Examples of cold hardy plants include broccoli, cabbage, kale, spinach, and lettuce. Any plant that can be either transplanted or seeded outside in April is cold hardy. These will not be transplanted, but can be hardened off.
Objective
Background
Preparation
Materials
Transplanting and Thinning G2-5 ❶ ✿

page 26 • Slow Food Denver • Plant Cultivation © December 2011 Gigia Kolouch
2. Tender annual vegetable plants include tomatoes, eggplant, peppers, and squash. Any plant that must be planted after mid May (last frost date for the Colorado Front Range) will die if exposed to freezing temperatures. Only transplant these into larger pots.
3. Set up planting stations that include empty 4” pots, flats to be transplanted, moistened potting soil, plant tags and markers.
1. Have a tub of moistened topsoil ready to go and four 4” pots.2. Fill 4” pots with potting soil about half way up and make a
small indentation in the soil.3. Transplant only the tender annuals. Take a 4-cell pack and loos-
en the dirt in one cell by pinching the outside of the cell. Gen-tly turn the cell over and place the stem between your fingers, cupping the roots in your hand.
4. If there is more than one seedling in a pot, save the strongest ones and discard the rest. Save the discarded seedlings for the Plant Part Observation activity on page 27.
5. Place seedling into new pot and cover roots with more potting soil. Press down gently on soil and make sure that the seedling is standing tall.
6. If the plant is a tomato plant, place it in the bottom of an empty pot and fill the pot with soil to the top. The top two sets of leaves should still be showing. Tomatoes will make new roots along the stems, strengthening the plant.
7. Make new name tag and place into pot.8. Place pot into plant tray and repeat with the rest of the cells.9. Look over the cold hardy plants. If there is more than one seed-
ling in a cell, remove the weakest and save them for the Plant Part Observation Activity. Top off the cells with fresh soil if need-ed.
10. While students are waiting for their turn to transplant, have them do the Plant Part Observation activity on page 27.
• If you would like each student to take a plant home, then have them transplant one of their plants from the 4-pack into a 4” pot. They can use their original tag to put in their pot to bring home. Make sure they know when they can plant it outside and how to care for it.
• Use a liquid fish/kelp or other organic fertilizer once a week to provide nutrients to the growing plants.
• If you are planning a plant sale, make sure all of the plants are labeled, thinned, filled with soil and are fertilized so that they can look their best for the sale.
Activity
Options

© December 2011 Gigia Kolouch Slow Food Denver • Plant Cultivation • page 27
Students observe the immature parts of the plant and learn simple botanical terms.
Using the discarded seedlings students can see how the small seedlings are growing. They will still be able to see the cotyledons (the first leaves), as well as the true leaves of the plant, the stem and immature root system. Most of the seedlings will be dicots (two first leaves) as opposed to monocots (one first leaf). If you would like a comparison, you can start some corn seedlings that they can add to this activity as well.
For each student:Plant journalsSeed to Plant worksheet1 or 2 seedlings to look atMagnifying glass or loop for closer observationPencils and or/colored pencils
1. Make sure the students are sitting down at their desks2. Go over the plant vocabulary and the instructions. Explain what
the different parts of the plant do.Roots- anchors plants in soil, provides nutrients to the plantStem- keeps plants upright, moves water and nutrients to leavesLeaves- Makes food through photosynthesisFlowers- pollination of fruitFruit- holds seeds, attracts animals to help spread seeds
1. Have each student label the plant parts of any single plant worksheet in the Workbook.
2. Students will observe the seedling in front of them. They will try to match the parts of their seedling to the worksheet.
3. Each student will draw her own seedling and label the parts in her journal.
4. If the student knows the name of her own plant, have her add that as well.
Objective
Background
Materials
Preparation
Plant Part Observation G2-5 ❷ ✿
Activity

page 28 • Slow Food Denver • Plant Cultivation © December 2011 Gigia Kolouch
Answer the following questions:• Are there one or two first leaves? If there are two , it is a dicot
(most plants, with a tap root), if there are one, it is a monocot (grass type plants with fibrous roots)
• Can you find all of the plant parts?• What does each part do?• Which parts are missing from the young seedling?• When do you think they will be on the plant?
Discussion

© December 2011 Gigia Kolouch Slow Food Denver • Plant Cultivation • page 29
Learn how to sow seeds outside and which vegetables can withstand cold weather.
Use the Plant Cultivation Guide on page 54 to help you decide what to plant. Use the individual worksheets for cultivation tips. Plant cold season crops between April 15 and May 15th. They germinat better if the weather is cool. Ideally plant after or just before rainy weather. Before going outside, review the seeds that you are going to plant in this session. If the students are older than 8, have them look at the seed packages to see how far apart the seeds should be planted. Or, read the cultivation tips on the worksheet for your plant from the Workbook. Go through each plant with them and show them how big they will be when grown. Write down a plan of what you are going to do when you are outside. Go over your garden safety rules.Choose which seeds to plant according to age group. Younger students do better with larger seeds that they can hold. Older children can manipulate smaller seeds better and are better at spacing.String to lay out squares or plotsStakesGarden journalsPencilsSeed packagesWatering cansTrowelsGarden signs-can be wooden stakes or premade signs1. If you have seedlings, make sure they are hardened off (gradu-
ally used to being outside) a week before planting. 2. Prepare the beds ahead of time if you are working with younger
children and/or are short on time. They dirt must be soft and easy to work with.
3. The two issues you may have when planting seeds are that the students may plant them too close together, or they may plant them too deep. Make sure to go over these issues with them be-fore planting.
Planting Cold Season Crops GK-5 ❶ ✿Objective
Background
Materials
Preparation

page 30 • Slow Food Denver • Plant Cultivation © December 2011 Gigia Kolouch
Planting options:1. Small plants like lettuce, beets, carrots, and greens can be plant-
ed in squares. For example, make one plot a greens plot and mark off 2 ft. squares with string and stakes. Place one package of greens on top of each square. Demonstrate how to broadcast seeds so they are not all in one clump. You can also make a plot of squares with root vegetables. This planting method is easier for children to do, especially if the seeds are small. Later, you can thin them or show the students how to thin them.
2. Larger plants must be spaced according to the package direc-tions. Before the class arrives, create furrow so that the students know where to plant the seeds. Make the plots no wider than 4’, so that students can line up on either side of the plot. Give each student a few seeds so they can plant the row in front of them.
3. If you are transplanting seedlings, have the students dig a hole that is twice as big as their plants. To help remove the seedling, have them hold out their palm flat and open a space between their index and middle fingers. Place the plant upside down in their hands, with the stem between the two fingers. Squeeze the pot gently and pull it off of the plant. Do not let the students pull the plant out by the stem as it might break.
If you have too many students to keep occupied at one time, have them work in their garden journals on the following questions:1. Instructions for planting a seed.2. Create a seed package including the spacing and planting time
of the seeds that you have planted today.3. Draw a picture of the kind of seed you planted.4. Draw a picture of how you think the garden will look later in
the summer.5. Draw your favorite vegetable that we have planted today.
Use the gardening books in the Books and Supplies appendix to get more advice about specific gardening practices or techniques.
Discussion
Further Exploration
Activity
© December 2011 Gigia Kolouch Slow Food Denver • Plant Cultivation • page 31
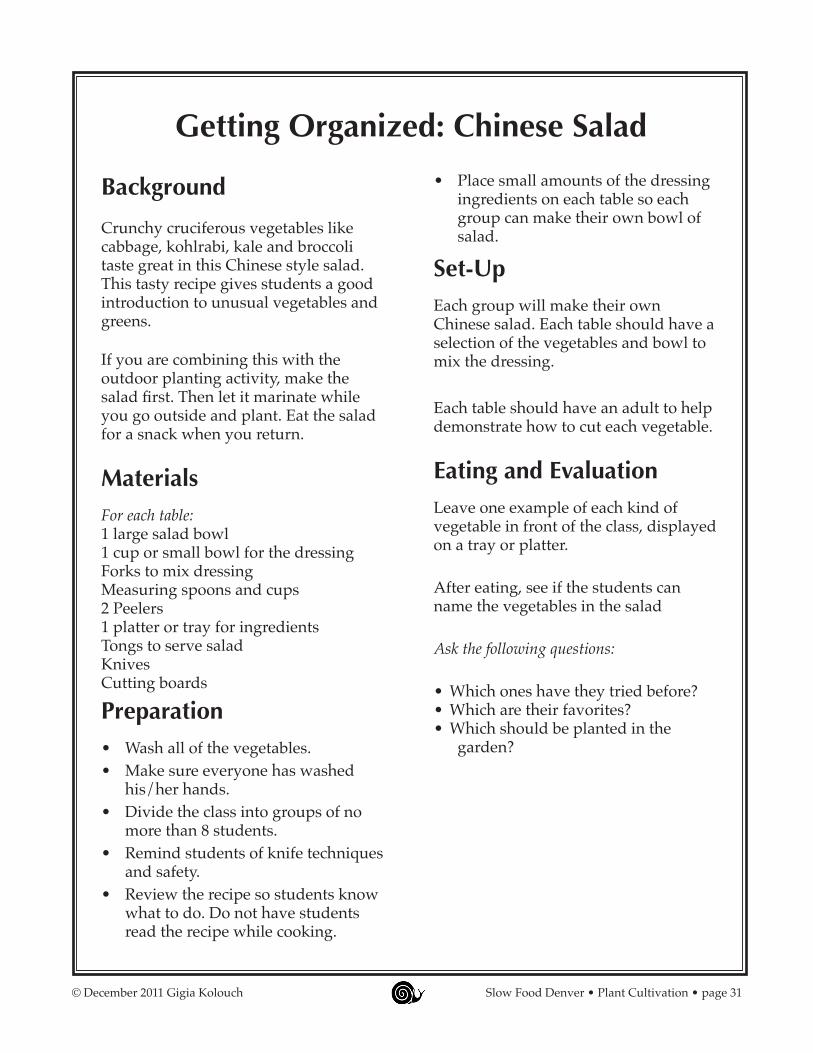
Background
Crunchy cruciferous vegetables like cabbage, kohlrabi, kale and broccoli taste great in this Chinese style salad. This tasty recipe gives students a good introduction to unusual vegetables and greens.
If you are combining this with the outdoor planting activity, make the salad first. Then let it marinate while you go outside and plant. Eat the salad for a snack when you return.
MaterialsFor each table:1 large salad bowl1 cup or small bowl for the dressingForks to mix dressingMeasuring spoons and cups2 Peelers1 platter or tray for ingredientsTongs to serve saladKnivesCutting boards
Preparation• Wash all of the vegetables.• Make sure everyone has washed
his/her hands.• Divide the class into groups of no
more than 8 students.• Remind students of knife techniques
and safety.• Review the recipe so students know
what to do. Do not have students read the recipe while cooking.
• Place small amounts of the dressing ingredients on each table so each group can make their own bowl of salad.
Set-UpEach group will make their own Chinese salad. Each table should have a selection of the vegetables and bowl to mix the dressing.
Each table should have an adult to help demonstrate how to cut each vegetable.
Eating and EvaluationLeave one example of each kind of vegetable in front of the class, displayed on a tray or platter.
After eating, see if the students can name the vegetables in the salad
Ask the following questions:
• Which ones have they tried before? • Which are their favorites?• Which should be planted in the
garden?
Getting Organized: Chinese Salad

page 32 • Slow Food Denver • Plant Cultivation © December 2011 Gigia Kolouch
Chinese Salad
G2-5 ❹ ✿❂❦
Serves 8-10
1/4 cabbage (regular, Napa or Savoy)4 stalks leafy greens (any type of kale, Swiss chard, or mustard)1/2 kohlrabi1 head broccoli or cauliflower1/2 cup sugar snap or snow peas1 carrot4 green onions1 pkg instant ramen-style noodles (discard flavor pack)
For the dressing:1 teaspoon salt2 tablespoons honey1 tablespoon soy sauce1 teaspoon toasted sesame oil3 tablespoons rice wine vinegar1/4 cup canola, peanut or safflower oil2 tablespoons sesame seeds or slivered almonds (optional)
1. Prepare the vegetables. All of them should be cut into very small pieces. Cut the cabbage and leafy greens (remove the ribs) into strips. Cut the kohlrabi into matchsticks. Break the broccoli or cauliflower into small florettes. Peel the stems of the broc-coli and cut them into matchsticks. Cut the peas diagonally into thin strips. Peel the carrot and then use the peeler to make thin strips. Cut the roots off of the green onions and slice them.
2. Break up the ramen noodles into clumps. Mix together the noo-dles and all of the vegetables.
3. Mix together the ingredients for the salad dressing. Taste it to see if the students want to adjust any of the flavors. Pour over the salad and let it sit for at least 5 minutes before serving.
Note: You can use more or less of any cold season vegetable. The amounts and types above are just suggestions. Check for food allergies before adding sesame seeds, sesame oil or nuts.
Ingredients
Method

© December 2011 Gigia Kolouch Slow Food Denver • Plant Cultivation • page 33
Learn how to sow seeds outside and which vegetables must be planted after last frost.
Use the Plant Cultivation Guide on page 54 to help you decide what to plant. Use the individual worksheets for cultivation tips. Plant warm season crops between mid May and mid June. They germinat better if the weather is cool. Ideally plant after or just before rainy weather. Before going outside, review the seeds that you are going to plant in this session. If the students are older than 8, have them look at the seed packages to see how far apart the seeds should be planted. Go through each plant with them and show them how big they will be when grown. Write down a plan of what you are going to do when you are outside. Go over your garden safety rules.Choose which seeds to plant according to age group. Younger students do better with larger seeds that they can hold. Older children can manipulate smaller seeds better and are better at spacing.String to lay out squares or plotsStakesGarden journalsPencilsSeed packagesWatering cansTrowelsGarden signs-can be wooden stakes or premade signs1. If you have seedlings, make sure they are hardened off (gradu-
ally used to being outside) a week before planting. 2. Prepare the beds ahead of time if you are working with younger
children and/or are short on time. They dirt must be soft and easy to work with.
3. The two issues you may have when planting seeds are that the students may plant them too close together, or they may plant them too deep. Make sure to go over these issues with them be-fore planting.
Planting Warm Season Crops GK-5 ❶ ✿Objective
Background
Materials
Preparation

page 34 • Slow Food Denver • Plant Cultivation © December 2011 Gigia Kolouch
Planting options:1. Large plants in the melon/squash family can be planted in
circles or mounds. Mounds must have a bowl-like depression on the top so that they trap water. Creat a mound that is 2-3 feet in diameter, with 5-6 seeds in each mound. Different types of squash can be planted in the same plot.
2. Larger plants must be spaced according to the package direc-tions. Before the class arrives, create furrow so that the students know where to plant the seeds. Make the plots no wider than 4’, so that students can line up on either side of the plot. Give each student a few seeds so they can plant the row in front of them.
3. If you are transplanting seedlings, have the students dig a hole that is twice as big as their plants. To help remove the seedling, have them hold out their palm flat and open a space between their index and middle fingers. Place the plant upside down in their hands, with the stem between the two fingers. Squeeze the pot gently and pull it off of the plant. Do not let the students pull the plant out by the stem as it might break.
4. Tomatoes will be stronger if they are buried, leaving 2-3 sets of leaves showing. The stem will become part of the root system and reduce sprawling plants.
If you have too many students to keep occupied at one time, have them work in their garden journals on the following questions:1. Instructions for planting a seed.2. Create a seed package including the spacing and planting time
of the seeds that you have planted today.3. Draw a picture of the kind of seed you planted.4. Draw a picture of how you think the garden will look later in
the summer.5. Draw your favorite vegetable that we have planted today.
Use the gardening books in the Books and Supplies appendix to get more advice about specific gardening practices or techniques.
Discussion
Further Exploration
Activity

© December 2011 Gigia Kolouch Slow Food Denver • Plant Cultivation • page 35
Background
Any type of warm season vegetable will work well with this Italian style pasta salad. The beans combine with the pasta to form a complete protein for this substantial snack.
If you are combining this with the outdoor planting activity, make the salad first. If you have an herb garden, harvest some to add to the salad dressing. Let the salad marinate while you go outside and plant. Eat the salad for a snack when you return.
You can make this recipe with grades K-1, if you focus on adding ingredients that do not need to be chopped: nuts, olives, cherry tomatoes, capers, corn etc.
MaterialsFor each table:1 large salad bowl1 cup or small bowl for the dressingForks to mix dressing2 PeelersServing spoons1 platter or tray for ingredientsKnivesCutting boards
Preparation• Wash all of the herbs and vegetables.• Make sure everyone has washed
his/her hands.• Divide the class into groups of no
more than 8 students.
• Remind students of knife techniques and safety.
• Review the recipe so students know what to do. Do not have students read the recipe while cooking.
• Place small amounts of the dressing ingredients on each table so each group can make their own bowl of salad.
Set-UpEach group will make their own bowl of pasta salad. Each table should have a selection of the vegetables and bowl to mix the dressing.
Each table should have an adult to help demonstrate how to cut each vegetable.
Eating and EvaluationLeave one example of each kind of vegetable in front of the class, displayed on a tray or platter.
After eating, see if the students can name the vegetables in the salad
Ask the following questions:
• Which ones have they tried before? • Which are their favorites?• Which should be planted in the
garden?
Getting Organized: Tomato Pasta Salad

page 36 • Slow Food Denver • Plant Cultivation © December 2011 Gigia Kolouch
Tomato Pasta Salad
G2-5 ❹ ✿❂❦
Serves 8-10
2 tomatoes1 cucumber1 bell pepper1 jalapeño pepper1 Anaheim or poblano pepper1 onion1 clove garlic1 can kidney or garbanzo beans1/2 lb cooked pasta (penne, fusili, or orcchiete)*
For the dressing:1/4 cup vinegar or lemon juice1/2 cup olive oil1/2 teaspoon salt1/4 cup fresh parsley, basil or mint (optional)
1. Prepare the vegetables. All of them should be in small pieces or dice. Peel the cucumber, cut in half lengthwise and scoop out the seeds for a better flavor. Make sure the garlic and jalapeño pepper are minced. You can remove the seeds from the jalapeño if you want it less spicy.
2. Toss the vegetables and pasta together in a large bowl.3. Mix together the ingredients for the salad dressing. Taste it to
see if the students want to adjust any of the flavors. Pour over the salad and let it sit for at least 5 minutes before serving.
*If you do not have a way to cook the pasta, use couscous or bulgur wheat instead and soak it for 30 minutes in warm water before class.
Note: You can use more or less of any warm season vegetable. The amounts and types above are just suggestions. Other options are adding corn kernels, olives, capers, or feta cheese.
Ingredients
Method

© December 2011 Gigia Kolouch Slow Food Denver • Plant Cultivation • page 37
Herbs
IntroductionSchool gardens should include a culinary herb garden to complete the school food program. Here are a few of the reasons to have an herb garden:
• Herbs add flavors to foods.• Herbs provide activities early or late in the season when other plants are dormant.• They make your garden beautiful even when the annual vegetables are gone.• Masses of flowers attract bees and other polinators to the garden.• Strongly scented essential oils discourage some pests.• Their leaves add wonderful aromas to your garden and food.• Most herbs are high in antioxidants, antifungal and antibacterial compounds.• Many herbs provide a wide variety of trace minerals.• Perennial herbs can live for years with little care.
Herbs can be either perennial (come back every year) or annual (grow only one season). In general, the perennials are less fussy about soil and water. Typical perennial herbs include lavender, thyme, and oregano. While rosemary is also a perennial, it is not reliably hardy in Colorado. Perennial herbs like to grow in well drained soil with a gravel mulch to prevent splashing dirt on their leaves.
Typical annual herbs include basil and cilantro. Usually annual herbs grow better mixed in with other annual vegetables as they need more water and a richer soil. Often annual herbs that enjoy full sun in other areas would rather have afternoon protection from the intense sunlight on the Rocky Mountain Front Range.
Plant hardy herbs from mid April to early June. Plant tender annuals after the last frost date, approximately May 15. Do not plant them in mid summer unless you have plenty of water or the weather is cool. If you have water throughout the winter, you can also plant the hardy perennials in the fall.
Most herbs are grown for their leaves. After blooming, perennial herbs should be trimmed to encourage new growth. Do not allow annual herbs to bloom, unless you plan to use or harvest seeds, as the leaves quickly loose their quality.
Please see the herb cultivation chart for suggestions about individual herbs for the Rocky Mountain region and their growing requirements. Use the following activities to explore the properties of herbs. For more resources and activities, as well as tips on growing herbs, see the Books and Supplies appendix on page 59.

page 38 • Slow Food Denver • Plant Cultivation © December 2011 Gigia Kolouch
Objective
Materials
Preparation
Activity
Planting an Herb Garden G2-5 ❶ ✿❦
Familiarize students with different herb plants, what they smell like and how they grow.
Herb PlantsStringWooden stakesScissors1 sheet Coroplast (plastic corrugated sheet)Metal landscape stakesPermanent markers10 small trowels1-2 bags pea gravelGarden journalsPencils
1. Before class, prepare the area you would like to use as your pe-rennial herb bed by digging up and loosening the soil, as well as removing all weeds. If you have particularly heavy clay, consid-er adding something like Clay Busters to help break up the soil.
2. Cut the sheet of Coroplast into rectangles (3” x 8”). Make sure that the tubes run vertically. Ease a metal stake in between the corrugations so that you have a sign.
3. Bring all of the supplies outside. Keep the trowels to one side.4. Place the herbs on the edge of the plot. If you want to make a
formal herb garden with a pattern, you should buy more than one plant of each type so that you can fill a section.
1. Bring the students outside and have them stand around the empty bed. Pass around each type of herb and have the students smell each one. Ask them if the scent reminds them of anything.
2. Mark out a design for your herb garden with the garden stakes and string. Common shapes are diamonds within a rectangle, triangles and circles. You can also just plant them randomly leaving the taller herbs in the middle.
3. Dig the holes where you want the plants. Make the holes a few inches deeper than the size of the pot, and about twice as wide.
4. Give the students trowels and show them how to remove plants from their pots: Hold your hand open flat and put the main herb stem between the index and middle finger. Then, squeeze the pot into the palm of the hand, upside down, and lift the pot

© December 2011 Gigia Kolouch Slow Food Denver • Plant Cultivation • page 39
off. Do not pull the plant out of the pot by its stem or it may break.
5. Gently pull the roots apart so that the roots will grow out and not in a circle.
6. Place the herb into the hole and pat the soil around it. It should be level with the ground, not sitting above it.
7. After all of the herbs have been planted, place a 2” layer of pea gravel or mulch around the plot. The gravel/mulch will keep the leaves from getting muddy when watering or in the rain.
8. Give each student a sign and a sharpie. Have them write the name of the herb on the sign and place it next to the plant.
9. Have the students draw their favorite herb in their journal.
Ideas for using herbs:• Tie them in bundles, place them in a pitcher of water and sell
them at your youth farmers’ market. Or give the bundles away to customers.
• Preserve them by tying them in bundles, hanging them upside down and drying them in a dark place like a basement.
• Preserve them by packing them in layers with salt. Works espe-cially well for sage and rosemary.
• Add them to sauces and starchy dishes like pasta and potatoes.• Add them to vinegars for flavor.• Grind them into pesto. See the pesto instructions in the Sensory
Education section, page 33.
Further Exploration

page 40 • Slow Food Denver • Plant Cultivation © December 2011 Gigia Kolouch
Background Use the background of a creamy spread to explore flavors of herbs. You can use the spread on vegetables, bread or crackers. Make it thicker or thinner according to your needs.
Materialsfor each group:1 medium sized bowl2 forksMeasuring spoons and cupsKnives for spreading dip
Preparation• Wash all of the herbs and vegetables• Make sure everyone has washed
his/her hands• Divide the class into groups of no
more than 8 students• Remind students of knife techniques
and safety• Review the recipe so students know
what to do. Do not have students read the recipe while cooking
• Bring cream cheese to room temperature.
Set-UpEach group will make their own herb spread. The tables should all have the same ingredients.
Eating and EvaluationPlace all of the herb spreads at the front of the classroom. Have the students try each one.
Ask the following questions:• Which is their favorite?• Which one is the most salty?• Which herb has the best smell?
Getting Organized: Herb Spread

© December 2011 Gigia Kolouch Slow Food Denver • Plant Cultivation • page 41
Low Fat Herb Spread
GK-5 ❹ ✿❂❦d
Makes 3 cups dip
1 lb. low fat cream cheese1 cup thick or greek nonfat yogurt1/3 cup chopped mixed herbs1 shallot, optional1/4 teaspoon garlic powderSalt and pepperBaguette, crackers or raw vegetables
1. Put the cream cheese in a bowl and smash it. Stir in the yogurt.
2. Meanwhile, chop the herbs and shallots (if using) into small pieces. Mix everything together with a fork until it is smooth. Add salt and pepper to taste, starting with 1/4 teaspoon. Add salt until the flavors come together. Serve on bread, crackers or with fresh raw vegetables.
Suggestions for herbs: chives, parsley, mint, thyme, dill, rosemary (small amount), basil.
Suggestions for vegetables: carrots, peppers, cherry tomatoes cut in half, celery, cucumbers.
Ingredients
Method
page 42 • Slow Food Denver • Plant Cultivation © December 2011 Gigia Kolouch
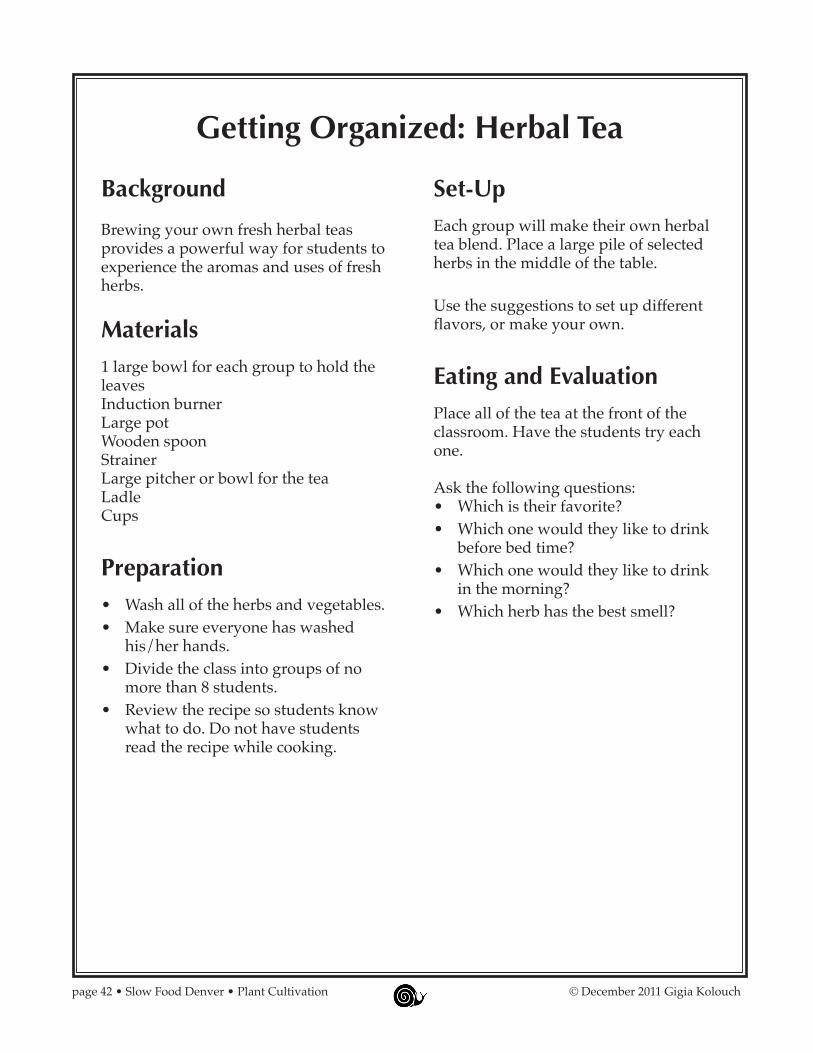
Background
Brewing your own fresh herbal teas provides a powerful way for students to experience the aromas and uses of fresh herbs.
Materials1 large bowl for each group to hold the leavesInduction burnerLarge potWooden spoonStrainerLarge pitcher or bowl for the teaLadleCups
Preparation• Wash all of the herbs and vegetables.• Make sure everyone has washed
his/her hands.• Divide the class into groups of no
more than 8 students.• Review the recipe so students know
what to do. Do not have students read the recipe while cooking.
Set-UpEach group will make their own herbal tea blend. Place a large pile of selected herbs in the middle of the table.
Use the suggestions to set up different flavors, or make your own.
Eating and EvaluationPlace all of the tea at the front of the classroom. Have the students try each one.
Ask the following questions:• Which is their favorite?• Which one would they like to drink
before bed time?• Which one would they like to drink
in the morning?• Which herb has the best smell?
Getting Organized: Herbal Tea

© December 2011 Gigia Kolouch Slow Food Denver • Plant Cultivation • page 43
Herbal Tea
GK-5 ❺ ✿❂❦d
Makes 8 cups tea
4 cups herb leaves9 cups water1/4 cup honey
1. Pick the leaves off of the stems and put them in a bowl.2. Cover the herbs with boiling water and let it steep for 10 min-
utes.3. Strain the tea into a pitcher.4. Stir in the honey. Let the tea cool and add ice if you would like.
Suggested Combinations:Calming Tea: Rose geranium, mint, fennelCold Tea: Sage, Rosemary, thymeRefreshing Tea: Spearming, peppermintIndian Tea: Coriander seeds, fennel seeds, basil seeds
Ingredients
Method

page 44 • Slow Food Denver • Plant Cultivation © December 2011 Gigia Kolouch
Edible Perennials
IntroductionMost people imagine traditional annual vegetable gardens when thinking about a school garden. However, perennials can be a valuable supplement or beginning garden. If you do not have the time to dedicate to a vegetable garden, but would like to add more edible activities to your school, consider planting edible perennials. They range from vegetables (asparagus, rhubarb), to condiments (horseradish), to fruit (trees, and berries). While most edible perennials produce less food per plant, they have several advantages over annual vegetable plants:
• Long-lived perennials add interest to existing landscapes.• Perennials can live for years with little care.• Many produce in early spring during a time when the traditional vegetable garden does
not offer much interest.• They typically require less care, less water and are not as fussy about soil requirements.• Some can tolerate partial shade and often form the undergrowth of a forest.• Many are native plants that can be incorporated into lessons about native peoples.• They can provide habitat and refuge for birds and wildlife.
One way to think about edible perennials is by soil type requirements. Those that are more domesticated such as raspberries, strawberries and asparagus often need richer soil and more water. Those that are natives or wild such as service berries, sand cherries and sunchokes will grow in most soils, and need watering once a week. Plan your gardens according to soil type and all of the plants will thrive.
There are many berries that thrive in the Rocky Mountain region, where fruit trees are problematic. Easy to grow berries include raspberries, currants, jostaberries and elderberries. These fruits are packed with nutrients and delicious. Unless you have a summer program, try to plant varieties that mature either early or late in the year. Everbearing strawberries are a good choice because you will get a second crop in the late summer. Try autumn bearing raspberries for an early fall harvest.
Please see the Edible Perennial Cultivation Chart for suggestions about individual herbs for the Rocky Mountain region and their growing requirements. Use the following activities to explore the properties of these plants. For more resources and actvities, as well as tips on growing herbs, see the Books and Supplies appendix on page 59.

© December 2011 Gigia Kolouch Slow Food Denver • Plant Cultivation • page 45
Students will understand the microclimates of their schoolyard and match them to cultivation requirements of perennials.Gardens are intimately tied to the specific landscape in which they are located. Often students do not know anything about the local environment of their school yard. This activity will help them to figure out the best location for a perennial garden in their school, as well as how to design a garden.
For each group:Graph paperPencilClipboard2-3 Garden site sheets
For the discussion:Map of the schoolgrounds, retrieved from Google Maps or a landscape master planpencil or marker
1. Divide the students into groups of 5-8. Assign a volunteer or teacher to each group.
2. Give each group 2 Garden Site checklists, pencil and clipboard.3. Explain the purpose of the activity. Each group will take one
portion of the schoolyard and look for a site that is best for a perennial edible garden that requires rich soil and one that re-quires average soil.
4. Before you start, have the students reorient themselves to the schoolyard. Where is north? Where does the morning sun come up? Which direction is the sunset?
5. Send the students out for 15 minutes to different sections of the schoolyard. Have each group pick 1 or 2 places that they think will make a good garden. Fill out the checklist for each site.
6. Gather together again for the discussion.7. Decide as a group which sites are the most favorable. Mark
them on a map of the schoolgrounds. Add anything that needs to be changed to make the site work for a garden.
8. Give the potential site list to the principal, facilities manager and school garden committee for approval. Include any items or
Objective
Background
Materials
Planning a Perennial Garden G2-5 ❷ ✿❂❦d
Activity

page 46 • Slow Food Denver • Plant Cultivation © December 2011 Gigia Kolouch
Garden Site ChecklistLook for a place you think would make a good garden. Check off the items that apply. The more boxes you have checked, the better the place will be for your garden. You are looking for two sites: one will have more water and richer soil, one will have better drainage and more sun. Use the Edible Perennial Cultivation chart on page 57 to figure out which plants would like each area.
General Questions
q Does it have sprinklers?q Is there a hose spigot near by?q If there are trees nearby, are they on the west (afternoon shade) or north (won’t shade the garden)?q Is the ground empty?q If there are already plants there, can they be removed?q What kind of soil does it have: sand, clay or loam?
For plants that like rich soil:
q Has the place been a garden before?q Is the ground easy to dig into?q Is the ground partially shaded from the afternoon sun?q Is it low lying, so that water will run into it?
What do you need to add to make this a good garden place for plants that like water
and rich soil? ________________________________________________________________
What plants would like this place? ______________________________________________
_____________________________________________________________________________
For native plants that are not particular about soil:
q Is the garden in full sun?q Does it have good drainage, or is it on top of a high spot?
What do you have to add to make this a good place for plants that like full sun and are
not fussy about their soil? _____________________________________________________
Which plants would like this place? _____________________________________________
© December 2011 Gigia Kolouch Slow Food Denver • Plant Cultivation • page 47
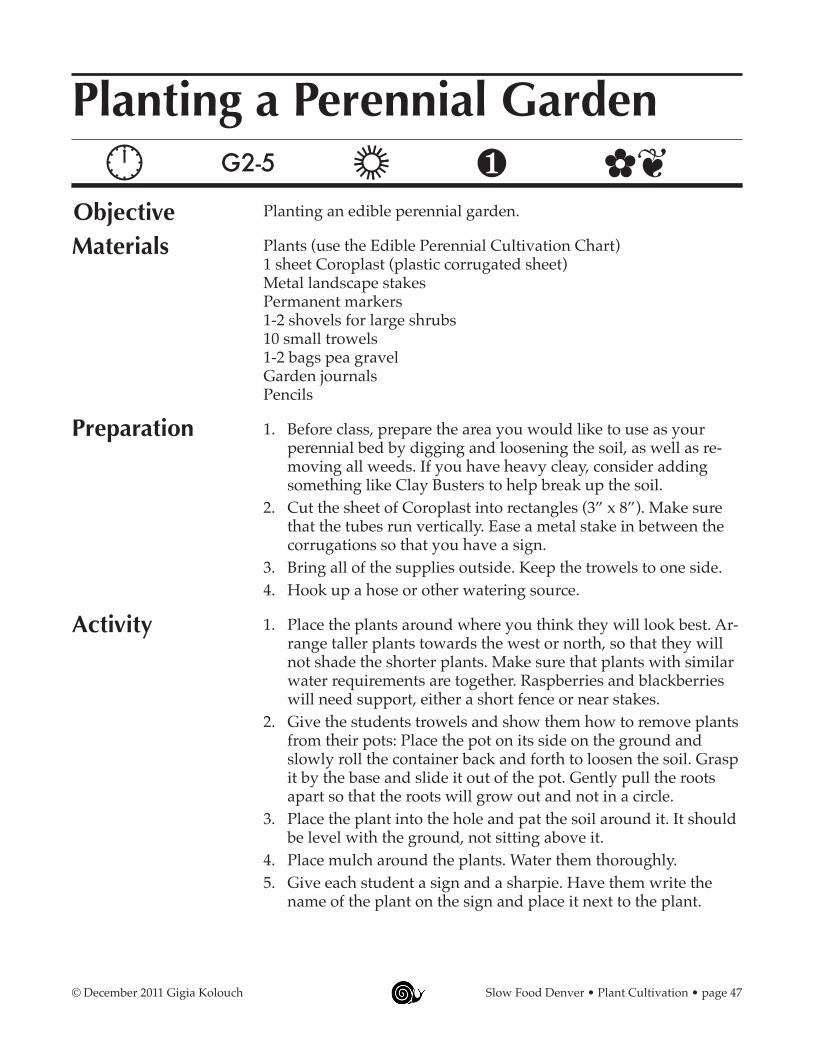
Planting an edible perennial garden.
Plants (use the Edible Perennial Cultivation Chart)1 sheet Coroplast (plastic corrugated sheet)Metal landscape stakesPermanent markers1-2 shovels for large shrubs10 small trowels1-2 bags pea gravelGarden journalsPencils
1. Before class, prepare the area you would like to use as your perennial bed by digging and loosening the soil, as well as re-moving all weeds. If you have heavy cleay, consider adding something like Clay Busters to help break up the soil.
2. Cut the sheet of Coroplast into rectangles (3” x 8”). Make sure that the tubes run vertically. Ease a metal stake in between the corrugations so that you have a sign.
3. Bring all of the supplies outside. Keep the trowels to one side.4. Hook up a hose or other watering source.
1. Place the plants around where you think they will look best. Ar-range taller plants towards the west or north, so that they will not shade the shorter plants. Make sure that plants with similar water requirements are together. Raspberries and blackberries will need support, either a short fence or near stakes.
2. Give the students trowels and show them how to remove plants from their pots: Place the pot on its side on the ground and slowly roll the container back and forth to loosen the soil. Grasp it by the base and slide it out of the pot. Gently pull the roots apart so that the roots will grow out and not in a circle.
3. Place the plant into the hole and pat the soil around it. It should be level with the ground, not sitting above it.
4. Place mulch around the plants. Water them thoroughly.5. Give each student a sign and a sharpie. Have them write the
name of the plant on the sign and place it next to the plant.
ObjectiveMaterials
Preparation
Activity
Planting a Perennial Garden G2-5 ❶ ✿❦
page 48 • Slow Food Denver • Plant Cultivation © December 2011 Gigia Kolouch
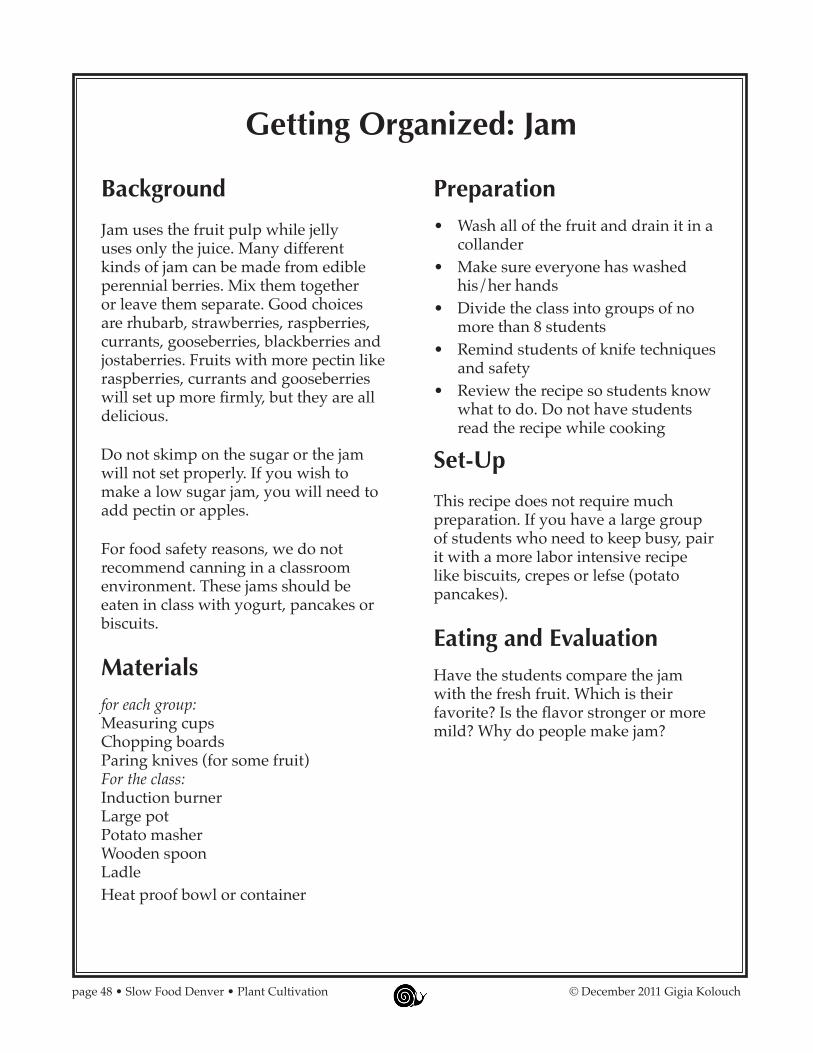
Background
Jam uses the fruit pulp while jelly uses only the juice. Many different kinds of jam can be made from edible perennial berries. Mix them together or leave them separate. Good choices are rhubarb, strawberries, raspberries, currants, gooseberries, blackberries and jostaberries. Fruits with more pectin like raspberries, currants and gooseberries will set up more firmly, but they are all delicious.
Do not skimp on the sugar or the jam will not set properly. If you wish to make a low sugar jam, you will need to add pectin or apples.
For food safety reasons, we do not recommend canning in a classroom environment. These jams should be eaten in class with yogurt, pancakes or biscuits.
Materialsfor each group:Measuring cupsChopping boardsParing knives (for some fruit)For the class:Induction burnerLarge potPotato masherWooden spoonLadleHeat proof bowl or container
Preparation• Wash all of the fruit and drain it in a
collander• Make sure everyone has washed
his/her hands• Divide the class into groups of no
more than 8 students• Remind students of knife techniques
and safety• Review the recipe so students know
what to do. Do not have students read the recipe while cooking
Set-Up
This recipe does not require much preparation. If you have a large group of students who need to keep busy, pair it with a more labor intensive recipe like biscuits, crepes or lefse (potato pancakes).
Eating and EvaluationHave the students compare the jam with the fresh fruit. Which is their favorite? Is the flavor stronger or more mild? Why do people make jam?
Getting Organized: Jam

© December 2011 Gigia Kolouch Slow Food Denver • Plant Cultivation • page 49
Jam
GK-5 ❺ ❂❦
Makes approximately 6 cups of jam
6 cups fruit4 cups sugar1/2 cup waterjuice of 1/2 lemon (or to taste)
1. If you are using rhubarb, strawberries, or other large fuit, cut it into 1/2” pieces. Otherwise, just rinse and drain the fresh fruit.
2. Put all of the fruit into a large pot and add just enough water to cover the bottom of the pan. Cover tightly and bring to a high heat. When the fruit is steaming, turn it down to low and let simmer for 5-10 minutes, or until the fruit is soft. Mash with a potato masher.
3. If you are using fruit with a lot of seeds like currants, put it through a food mill. Save the pulp and discard the seeds. It is not necessary fo strawberries, raspberries and blackberries are fine with the seeds.
4. Measure the cooked fruit pulp. For every 1 cup of pulp, you will need 3/4 cup of sugar.
5. Place the sugar and the pulp into a large pot. Bring to a boil and simmer for approximately 5-10 minutes. Add the lemon juice to taste. Do not let it boil over.
6. The jam should be thick when dripped from the wooden spoon. Taste and see if it needs more sugar. It will be cooked when the color deepens, and the consistency is like a thick syrup.
7. Let cool before serving. It is extremely hot.
Ingredients
Method

page 50 • Slow Food Denver • Plant Cultivation © December 2011 Gigia Kolouch
Background
Jerusalem artichoke, (Helianthus tuberosus), is the tuber of a variety of perennial flower in the aster family. The flowers look like small yellow sunflowers. Also marketed as sunchokes, these gnarly little tubers look a lot like ginger root. Perhaps the most important root cash crop to originate in North America, the tubers have a potato-like texture often recommended as a potato substitute for diabetics.
Sunchokes store their carbohydrates in a form of inulin, a starch that is not utilized by the body for energy, unlike sugar. They are recommended as a potato substitute for diabetics, since they are filling but not absorbed by the body, and because they also show indications of assisting in blood sugar control. High in iron, potassium and thiamine, low-fat sunchokes also feed the healthy bacteria (lactobacilli) in the intestinal tract. However, they can cause flatulence in some people and first tastings should be in small amounts. For this reason, they are always cooked before eating.
Harvest the roots in the fall, after the first frost. They quickly dry out, so harvest them as needed throughout the winter. Discard tops in the compost pile, after cutting into short lengths.
Materialsfor the sunchoke group:collanderPlastic bags (to store extra sunchokes)For the salad group:Measuring cupsChopping boardsParing knives (for some fruit)Large mixing bowl
For cooking:Induction burnerLarge potSlotted spoon
Preparation• Keep one table for sorting through
the roots and saving some to replant. Do not cook on this table.
• Wash and scrub all of the sunchokes that you are going to eat.
• Make sure everyone has washed his/her hands
Set-Up
If you have just harvested the sunchokes, make sure to trim them outside and remove as much dirt as possible. Split the class into two groups. Have one group sort through the roots, picking out the biggest, while the other group prepares the salad ingredients. Save some for replanting.
Eating and EvaluationWhat do the sunchokes (Jerusalem Artichokes) taste like? Can they think of other ways to eat them?
Getting Organized: Sunchoke Salad

© December 2011 Gigia Kolouch Slow Food Denver • Plant Cultivation • page 51
Sunchoke Salad
G2-5 ❺ ❦
Makes 8-10 tastings
1 lb sunchokes1/2 red pepper1/4 red onion1/4 cup parsley2 tablespoons fresh mint1 tablespoon cider vinegar2 tablespoons olive oilsalt and pepper
1. As soon as the sunchokes are clean, boil them for 20 minutes, until they are tender. Rinse in cold water and let cool. Remove the peels with a small knife or with your fingers.
2. Cut the pepper and onion into thin slices. Slice the sunchokes and toss them with the pepper strips, red onion, parsley, mint, vinegar, and oil.
3. Season with salt and pepper to taste.
Ingredients
Method

page 52 • Slow Food Denver • Plant Cultivation © December 2011 Gigia Kolouch
Background
Horseradish (Armoracia lapathifoliaand A. rusticana), is most likely from Russia or Hungary. It is related to the mustard family, hence its biting flavor and aroma. At one time, horseradish was referred to as “German mustard.”
Used for thousands of years, horseradish is one of the five symbolic bitter herbs celebrated in the Jewish Passover Seder.
Harvest roots in the spring or fall, making sure that the roots are crisp and well formed.
Materialsfor each group:PeelersMeasuring cupsMeasuring spoonsChopping boardsGratersLarge mixing bowlCollanderWooden spoon
For the class:Nonstick frying panInduction burnerSpatula
Preparation• Wash all of the ingredients and drain
in a collander• Make sure everyone has washed
his/her hands• Divide the class into groups of no
more than 8 students• Remind students of knife techniques
and safety• Review the recipe so students know
what to do.
Set-Up
Each table should have the ingredients in the middle of the table ready to go. Do not pass out the chopping boards until after the students have listened to the instructions.
Eating and EvaluationHow is the spiciness of the horseradish different from that of a hot pepper? Where do you feel it?
Getting Organized: Horseradish Pancakes

© December 2011 Gigia Kolouch Slow Food Denver • Plant Cultivation • page 53
Potato Horseradish Pancakes
G2-5 ❺ ✿❂❦d
Yields 10 latkes
4” piece of horseradish root4 baking potatoes, scrubbed clean1 medium onion, gratedJuice of 1/2 lemon2 tablespoons all-purpose flour or corn flour2 large eggs, lightly beaten1/2 teaspoon lemon zest1/4 cup chopped fresh chopped chives3/4 teaspoon kosher salt1/2 teaspoon freshly ground pepper2 tablespoons vegetable or olive oil1 tablespoons butter (optional)Salt to taste1 cup plain Greek yogurt for garnish
1. Peel and grate the horseradish. Peel and grate the potatoes. Grate or mince the onions.
2. Rinse the grated potatoes in cold water with the lemon juice. Drain the potatoes and squeeze dry with paper towels.
3. Toss grated potatoes, horseradish, onions, and flour in a large bowl to mix well. Stir in eggs, lemon zest, chives, salt, and pep-per until well-combined.
4. Heat olive oil and butter in a large, heavy non-stick skillet over medium-high heat until hot. Spoon about 2 tablespoons of mix-ture into the hot oil for each cake. Fry about 4 minutes on each side until nicely browned. Drain on paper towels. (You will need to fry the potato pancakes in batches.)
5. Mix together the yogurt and 1/2 teaspoon of salt. Season cakes with additional salt, if desired, and serve with a dollop of yo-gurt.
Ingredients
Method

page 54 • Slow Food Denver • Plant Cultivation © December 2011 Gigia Kolouch
Colorado Front Range Fruit and Vegetable Cultivation TableHow to use this chart• Planting decisions: This chart contains information to help you decide which plants to start
indoors, which to plant outside and when to do it. The “Succession” column indicates whether or not you can sow the crop more than once in a season. In the “Water” and “Fer-tilizer” columns, you should know that all vegetables require a fair amount of water, sun and fertilizer. “Heavy” refers to those plants that need more than the normal amount.
• Learning botany: Use the chart and the worksheets to make up botany games, teaching stu-dents the plant families or edible parts of a plant.
• Making signs: Use the chart to make garden signs organized by plant families or by plant parts. Make each plant family a different color. Draw a plant part on each sign to show which parts are edible.
Plant Families1. Legumes-Fabaceae2. Cabbage-Brassicaceae3. Nightshade-Solanaceae4. Sunflower-Compositae or Asteraceae5. Beets-Chenopodiaceae6. Cucumber-Cucurbitaceae
7. Lily-Liliacea8. Parsley-Apiaceae9. Grasses-Poaceae10. Buckwheat-Saxafrage11. Morning Glory-Convolvulaceae12. Rose-Rosaceae
Plant Parts1. Roots2. Stems3. Leaves
4. Flowers5. Fruit6. Seeds
Notes:*The edible portions of rhubarb and celery forms the petiole, the part of a leaf where it joins the stem. The true stem in the plants is in the middle, where it flowers.
**The edible portion of the kohlrabi is a swolen stem.

© December 2011 Gigia Kolouch Slow Food Denver • Plant Cultivation • page 55
Name Family Plant Part Sow Inside
Warming Mat?
Sow Outside
Trans-plant
Harvest Succes-sion
Water Fertil-izer
Artichoke Sunflower Flowers Jan No No May Sep No Med MedArugula Cabbage Leaves No — EarlyAp — June Yes Med MedAsparagus Lily Stems No — EarlyMay — 2 yr No Heavy HeavyBeet Beets Roots No — LateApril — Jul-Nov Yes Med MedBlack bean Legumes Seeds No — MidMay — Sep No Med MedBroccoli Cabbage Flowers Feb No LateApril May Jul-Oct August Heavy MedCabbage Cabbage Leaves Feb No LateApril May Sep August Heavy MedCantaloupe Cucumber Fruit Mar No No LateMay Sep No Med MedCardoon Sunflower Leaves Jan No No LateApril Sep No Heavy MedCarrot Parsley Roots No — EarlyMay — Yes Med MedCauliflower Cabbage Flowers Feb No LateApril May August Heavy HeavyCelery Parsley Leaves* Jan/Feb No No LateApril No Heavy HeavyCorn Grasses Seeds No — LateMay — Aug-Sep No Med HeavyCucumber Cucumber Fruit April Yes MidMay — Jul-Sep No Med HeavyEggplant Nightshade Fruit Feb Yes No MidMay Sep No Med MedFava bean Legumes Seeds No No EarlyAp — Sep July Med MedFennel Parsley Leaves Feb No Feb LateApril Sep No Heavy HeavyGarlic Lily Roots No — Oct-Nov — July No Med HeavyJer. Artichoke Sunflower Tuber No — April — Oct No Low LowKale Cabbage Leaves Feb No LateApril May Jul-Nov August Med MedKohlrabi Cabbage Stem Feb No LateApril May Jul-Sep August Med MedLeek Lily Roots Jan No No LateApril Sep-Oct No Heavy HeavyLettuce Sunflower Leaves No — April — LateMay Yes Heavy MedOnion Lily Roots Jan No No LateApril Sep-Oct No Heavy MedParsnip Parsley Roots No — EarlyMay — Aug-Sep No Med MedPeanut Legumes Seeds April Yes No LateMay Sep-Oct No Heavy MedPea Legumes Seeds No — EarlyAp — June August Med MedPepper Nightshade Fruit Feb Yes LateMay — Aug-Oct No Heavy MedPotato Nightshade Tuber No — April — Sep-Oct No Med HeavyRadish Cabbage Roots No — April — June Yes Med MedRaspberry Rose Fruit No — April — 2 yr No Med HeavyRhubarb Buckwheat Leaves* No — April — 2 yr No Light LightRutabaga Cabbage Roots No — April — Sep-Oct No Heavy HeavyShallot Lily Roots Jan No No April Sep-Oct No Heavy HeavySpinach Beets Leaves No — EarlyAp — July-Sep Yes Heavy HeavySquash -Winter Cucumber Fruit No — MidMay — Sep-Oct No Med MedStrawberry Rosacea Fruit No — April — 2 year No Heavy HeavyGreen beans Legumes Fruit No — MidMay — July-Sep Yes Med MedSweet Potato Morning Glory Tuber No — No LateMay Sep No Heavy HeavySwiss Chard Beets Leaves No — LateApril — July-Nov Yes Med MedTomatillo Nightshade Fruit Feb Yes No LateMay Sep-Oct No Med HeavyTomatoes Nightshade Fruit Feb Yes No LateMay Aug-Oct No Med HeavyTurnip Cabbage Roots No — LateApril July-Oct No Med MedZucchini Cucumber Fruit No — MidMay July-Sep No Med Med

page 56 • Slow Food Denver • Plant Cultivation © December 2011 Gigia Kolouch
Herb Cultivation Chart Name Latin Name Type Soil Sun/Shade Culinary Medicinal Edible Flowers
Basil Ocinum basilicum Annual Rich Sun/pt. shade Yes YesBay Laurus nobilis Tender perennial Any Sun YesBee Balm Monarda didyma Perennial Any Sun Yes Yes YesBorage Borago officinalis Annual Any Sun Yes YesCalendula Calendula officinalis Annual Rich Sun No Yes YesChervil Anthriscus cerefolium Annual Rich Pt shade YesChives Allium schoenoprasum Perennial Any Sun Yes YesCilantro Coriandrum sativum Annual Rich Sun/pt shade YesDill Anethum graveolens Annual Any Sun YesEnglish Lavender* Lavandula angustifolia Perennial Sandy Sun No Yes NoEpazote Chenopodium ambrosioides Annual Any Sun YesFennel Foeniculum vulgare Biannual Any Sun Yes Yes SeedsGarlic Chives Allium tuberosum Perennial Any Sun Yes YesGem Marigold Tagestes Tenqufolia Annual Rich Sun No YesHorseradish Armoracia rusticana Perennial Any Sun Yes YesJohnny jump-ups Viola tricolor Annual Rich Pt shade No YesLemon Balm Melissa officinalis Perennial Any Sun/pt shade YesLovage Levisticum officinalis Perennial Any Sun YesMarjoram Marjorana hortensis Tender perennial Any Sun YesMunstead Lavender Lavandula angustifolia Perennial Sandy Sun No YesMint, all varieties Mentha species Perennial Any Sun/pt shade YesNasturtium Tropaeolum majus Annual Rich Sun Yes YesOregano Origanum vulgare Perennial Any Sun Yes YesParsley Petraoselinum crispum Biannual Rich Sun YesPurslane Portulaca oleracea Annual Any Sun YesRosemary Rosmarinus officinalis Tender perennial Sandy Sun Yes YesRue Ruta graveolens Perennial Rich Sun/pt shade No YesSage Salvia officinalis Perennial Sandy Sun Yes YesSorrel Rumex Perennial Rich Pt shade YesSummer savory Satureia hortensis Annual Any Sun YesTarragon Artemisia dracunculus Perennial Any Sun YesThyme, all varieties Thymus vulgaris Perennial Any Sun Yes YesViolets Viola Perennial Rich Pt shade YesWinter savory Satureia montana Perennial Any Sun YesYarrow Achillea millefolium Perennial Any Sun No YesScented geraniums Pelargonium graveolens Tender perennial Rich Sun Yes YesSweet woodruff Gallium ordoratum Perennial Any Shade No Yes
Note: Tender perennials must be overwintered inside. They cannot survive freezing temperatures. Most herbs will grow in any well drained soil. Annual herbs with large leaves often require richer soil with more nitrogen.

© December 2011 Gigia Kolouch Slow Food Denver • Plant Cultivation • page 57
Edible Perennial Cultivation Chart Name Latin Name Wild/Domesticated Soil Sun/Shade Harvest Recommended Varieties
Apple Malus Domesticated Garden Sun Fall Delicious, Honeycrisp, Jonagold, HarlanAsparagus Asparagus officinalis Domesticated Rich Sun SpringBlackberry Rubus Domesticated Any Sun Summer Chester, Triple CrownCurrants, clove scented
Ribes ordoratum Wild Lean Sun/Pt shade Summer
Currants, golden Ribes aureum Wild Lean Sun/Pt shade SummerCurrants, red Ribes rubrum Domesticated Garden Sun SummerCurrants, white Ribes album Domesticated Garden Pt Shade Summer Red LakeElderberry Sambucus nigra Domesticated Any Sun Late SumGooseberry Ribes grossularia Domesticated Garden Sun/Pt shade Summer Thornless, Captivator, PixwellGrape Vitis vinifera Domesticated Gardy Sun Fall Himrod, Canadice, Lakemont, Suffolk RedJerusalem Artichoke Helianthus
turberosusDomesticated Any Sun Fall
Jostaberry Ribes nigrolaria Domesticated Garden Sun/Pt shade SummerKinnikinnick Arctostaphylos uva
ursiWild Lean Sun Fall
Peach Prunus persica Domesticated Garden Sun Late Sum Elberta, Haven, Reliance, PollyPlum Prunus cocomilia Domesticated Garden Sun Late SumRaspberry Rubus ideaeus Domesticated Garden Sun Sum/Fall Latham, Boyne, Heritage, GoldieRhubarb Rheum palmatum Domesticated Garden Sun SpringSand cherry Prunus pumila Wild Lean Sun SummerService berry Amelanchier Alnifolia Wild Any Sun/Pt shade SummerSour cherry Prunus cerasus Domesticated Garden Sun/Pt shade Early
SumMontmerency, North Star, Carmine Jewel
Strawberry Fragaria virginiana Domesticated Rich Sun Vaires EverbearingStrawberry, alpine Fragaria vesca WIld Garden Pt shade Varies
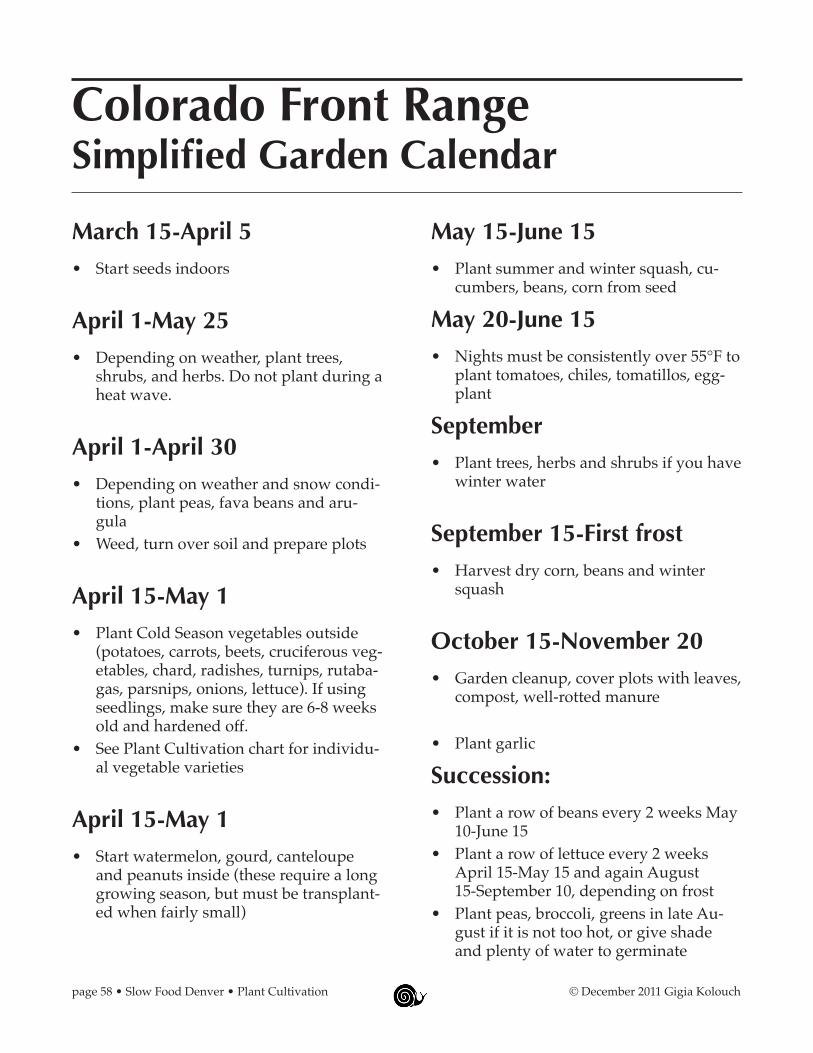
page 58 • Slow Food Denver • Plant Cultivation © December 2011 Gigia Kolouch
Colorado Front Range Simplified Garden Calendar
March 15-April 5• Start seeds indoors
April 1-May 25• Depending on weather, plant trees,
shrubs, and herbs. Do not plant during a heat wave.
April 1-April 30• Depending on weather and snow condi-
tions, plant peas, fava beans and aru-gula
• Weed, turn over soil and prepare plots
April 15-May 1• Plant Cold Season vegetables outside
(potatoes, carrots, beets, cruciferous veg-etables, chard, radishes, turnips, rutaba-gas, parsnips, onions, lettuce). If using seedlings, make sure they are 6-8 weeks old and hardened off.
• See Plant Cultivation chart for individu-al vegetable varieties
April 15-May 1• Start watermelon, gourd, canteloupe
and peanuts inside (these require a long growing season, but must be transplant-ed when fairly small)
May 15-June 15• Plant summer and winter squash, cu-
cumbers, beans, corn from seed
May 20-June 15• Nights must be consistently over 55°F to
plant tomatoes, chiles, tomatillos, egg-plant
September• Plant trees, herbs and shrubs if you have
winter water
September 15-First frost• Harvest dry corn, beans and winter
squash
October 15-November 20• Garden cleanup, cover plots with leaves,
compost, well-rotted manure
• Plant garlic
Succession:• Plant a row of beans every 2 weeks May
10-June 15• Plant a row of lettuce every 2 weeks
April 15-May 15 and again August 15-September 10, depending on frost
• Plant peas, broccoli, greens in late Au-gust if it is not too hot, or give shade and plenty of water to germinate

© December 2011 Gigia Kolouch Slow Food Denver • Plant Cultivation • page 59
Books and SuppliesBean and Plant by B. Watts
Botany for All Ages: Discovering Nature Through Activities for Children and Adults by Jorie Hunken
Botany for Gardeners by Brian Capon
The Family Kitchen Garden: How to Plant, Grow and Cook Together by Karen Liebreich
The Growing Classroom: Garden-based Science by Roberta Jaffe
Herbs and Spices: The Cooks Reference by Jill Norman
How to Grow a School Garden: A Complete Guide for Parents and Teachers by Arden Bucklin-Sporer and Rachel Pringle
I Am a Seed by Jean Marzolla
A Kid’s Herb Book: For Children of All Ages by Leslie Tierra
The Moosewood Restaurant Kitchen Garden: Creative Gardening for the Adventurous Cook by David Hirsch
Passover: Celebrating Now, Remembering Then by Harriet Ziefert
The Passover Seder by Emily Sper
Seeds by Ken Robbins
A Seed is Sleepy by Dianna Hutts Aston
Starting From Seed edited by Karan Davis Cutler
Soil: Lets Look at a Garden by Angela Royston
Soil (Geology Rocks!) by Rebecca Faulkner
The Tiny Seed by Eric Carle
The Vegetable Gardener’s Bible by Edward C. Smith

page 60 • Slow Food Denver • Plant Cultivation © December 2011 Gigia Kolouch
Seed Sourceswww.botanicalinterests.comThey are a local source of seeds from Longmont, Colorado with large variety of flowers and vegetables. They also offer fundraisers for schools.
www.cooksgarden.comCooks Garden is one of the first seed sources for market garden seeds, especially European and French varieties
www.growitalian.comGrow Italian imports seeds from Italy. Look for unusual Italian varieties of vegetables and greens. They have an excellent garden newsletter.
www.highmowingseeds.comThey offer 100% organic seeds since 1996, with over 600 heirloom, open-pollinated and hybrid varieties of vegetable, fruit, herb and flower seed.
www.johnnysseeds.comAn employee owned company that sells and develops a large variet of seeds and plants
www.reneeesgarden.comRenée’s Garden offers organic, gourmet and cottage garden seeds from around the world. Packages include good growing information.
www.nativeseeds.orgNative Seeds/SEARCH conserves and distributes the diverse varieties of agricultural seeds and their wild relatives from the American Southwest and Northwest Mexico.
www.rareseeds.comBaker Creek carries one of the largest selections of seeds from the 19th century, including many Asian and European varieties.
www.seedsavers.orgSeed Savers Exchange is a non-profit organization dedicated to saving and sharing heirloom seeds. They offer all types of heritage seeds and old varieties
http://www.southernexposure.com/Southern Exposure Seed Exchange offers more than 700 varieties of vegetable, flower, herb, grain and cover crop seeds. They emphasize seeds that grow well in the Southeast.
www.territorialseed.comTerritorial Seeds is a family owned business since 1979 producing seeds in the west.