Embed Size (px)
Citation preview

USER GUIDE
Introduction of the features and the use of
SmartExporter
The fast and easy way
to extract SAP® data
SmartExporter 2015 R1 User Guide

Copyright
Audicon GmbH
Documentation
Am Wallgraben 100
70565 Stuttgart
Audicon did its utmost to ensure the quality of the information supplied in this document. All the information is supplied without warranty of any kind. Audicon GmbH hereby disclaims all
warranties and conditions with regard to this information whether express, implied or statutory.
The document is protected by international copyright law. Translating, printing, copying images, tables or the publishing of the whole document or parts of it requires the
written permission of Audicon GmbH.
SAP, SAP DART, R/3, ABAP/4 and the SAP logo are registered trademarks of SAP SE, Walldorf, Germany.
Microsoft Excel and Microsoft Access are registered trademarks of Microsoft Corporation.
IDEA is a registered trademark of CaseWare International Inc.

This publication contains references to the products of SAP SE. SAP, R/3, SAP NetWeaver, Duet, PartnerEdge, ByDesign, Clear Enterprise, SAP BusinessObjects Explorer, and other SAP products and services mentioned herein as well as their respective logos are trademarks or registered trademarks of SAP SE in Germany and other countries.
Business Objects and the Business Objects logo, BusinessObjects, Crystal Reports, Crystal Decisions, Web Intelligence, Xcelsius, and other Business Objects products and services mentioned herein as well as their respective logos are trademarks or registered trademarks of SAP France in the United States and in other countries.
SAP SE is neither the author nor the publisher of this publication and is not responsible for its content. SAP Group shall not be liable for errors or omissions with respect to the materials. The only warranties for SAP Group products and services are those that are set forth in the express warranty statements accompanying such products and services, if any. Nothing herein should be construed as constituting an additional warranty.

SmartExporter User Guide 4
Contents
Introduction ........................................................................................................................... 6
Online and offline mode ..................................................................................................... 8
Online mode ................................................................................................................... 8
Offline Mode ................................................................................................................... 9
Data Request ....................................................................................................................10
Synchronous Data Request ...........................................................................................10
Asynchronous Data Request .........................................................................................10
Status of the Data Request ...........................................................................................11
Data Dictionary .................................................................................................................11
Application settings ...........................................................................................................11
Favorites ...........................................................................................................................12
SmartExporter Interface ....................................................................................................13
Home ............................................................................................................................14
The wizard screen .........................................................................................................15
Create and manage connections to an SAP® system ..........................................................16
Create a new connection ..................................................................................................16
Test a connection ..........................................................................................................19
Add a saplogon.ini file ...................................................................................................20
Create Data Request ............................................................................................................22
Create a Data Request and run it immediately ..................................................................22
Step: Introduction ..........................................................................................................22
Step: Select the SAP® connection ................................................................................23
Step: Select Tables .......................................................................................................24
Step: Quick-Filters .........................................................................................................26
Step: Fields and Filters ..................................................................................................27
Step: Define options for the Data Request ....................................................................32
Step: Finish ...................................................................................................................35
Define joins .......................................................................................................................37
Step: Joins ....................................................................................................................37
Create a Data Request and place it in a queue .................................................................46
Save a Data Request as offline Data Request ..................................................................48
Import or export a Data Request ..........................................................................................50
Export ...............................................................................................................................50
Import ...............................................................................................................................51

SmartExporter User Guide 5
Edit or modify a Data Request and monitor its status ...........................................................52
Edit a Data Request ..........................................................................................................52
Manage Data Requests activity ........................................................................................52
Using GDPdU file format ......................................................................................................58
Generate a Data Request in GDPdU format .....................................................................58
Create a GDPdU format file from SAP® AIS files ..............................................................60
Using IDEA file format ..........................................................................................................62
Running a Data Request on IDEA Server .........................................................................63
Appendix ..............................................................................................................................65
SmartExporter Editions .....................................................................................................65
SmartExporter Desktop Edition .....................................................................................65
SmartExporter Client Edition .........................................................................................65
SmartExporter Server Edition ........................................................................................66
SmartExporter Starter Edition ........................................................................................66
SmartExporter user interface of an edition with limited functionality ..............................67
Comparison of the functions ..........................................................................................68
Register and activate the license ......................................................................................71
Online Activation ...........................................................................................................73
Offline Activation ...........................................................................................................74
Transfer a SmartExporter license to another computer .................................................76
Limitations when using SAP® standard components ........................................................77
Limited functionality .......................................................................................................78
Limitations when extracting data ...................................................................................79
About joins in SmartExporter ............................................................................................82
Additional Data Sources ...................................................................................................83
Import and modify the Data Request template ...............................................................83
ODBC ...............................................................................................................................85
Creating an ODBC data source .....................................................................................85
Define ODBC settings ...................................................................................................85
IDEA version 9.x and SmartAnalyzer ................................................................................89

SmartExporter User Guide 6
Introduction
SmartExporter is the simple and fast solution if you want to extract and prepare data from SAP® systems. SmartExporter supports auditors or other persons interested in SAP® application data to get the data they require.
Using SmartExporter you do not have to be a trained SAP® user and you do not need to have thorough knowledge about SAP® table structures. SmartExporter enables you to extract exactly the data from SAP® you require for your analyses. At the same time SmartExporter prepares the data for the use in other auditing software like IDEA, AIS TaxAudit, SmartAnalyzer or Microsoft® Excel where they can be edited and analyzed immediately after extraction. If you are using SmartExporter in combination with AIS TaxAudit Professional or SmartAnalyzer, SmartExporter will automatically extract the data from SAP® required for the audit tests you have selected previously.
Once a Data Request is defined you can save it as a favorite. This favorite can be reused or modified whenever required. You only need to define an initial Data Request that might be useful for multiple data extractions.
SAP® administrators accept SmartExporter as the application is based on the SAP® authorization concept and allows just read only access for the SAP® system. However, the user has access to all transparent SAP® tables, Database Views, Pooled Tables, Cluster Tables and archived data as long as these were archived using the SAP ADK (Archive Development Kit). Besides SmartExporter provides ready to use Data Requests templates which enable you to extract data from Additional Data Sources such as Human Resource Cluster Tables or to create reports. For instance, use the additional data sources to get payroll data required for external wage tax audits while being compliant with all applicable privacy policies.
SmartExporter communicates with the SAP® system using LIBRFC with RFC modules. For details regarding the supported SAP® systems refer to the Readme file on the CD or select Start – Programs – Audicon – SmartExporter – Readme.
Additionally, SmartExporter is able to use existing SAP® standard components which are already installed on the SAP® system. SmartExporter will automatically switch to the SAP® standard components and allow a data extraction in online mode if SmartExporter discovers that the specific SAP® components are not implemented or SmartExporter has no access to these components. For detailed information on using SAP® standard components please refer to the appendix on page 77.
Even if you do not have a connection to an SAP® system, the SmartExporter offline mode provides the ideal alternative to create a Data Request and for instance send it by email to the administrator in charge who can then extract the required data for you.
Auditors and other persons who do not have direct access to an SAP® system can use the SmartExporter Client Edition to run an existing Data Request. An auditor can benefit from the Client Edition by simply sending the Data Request he created with his SmartExporter Desktop version to the company. The company can run the Data Request using the SmartExporter Client version which is connected to the Desktop license of the auditor and extract the required SAP® data which are provided for the auditor. For more information on the different SmartExporter editions see page 65.

SmartExporter User Guide 7
This guide will give you an overview of the first steps required to create a Data Request. Additionally, the guide is showing how you can use SmartExporter in combination with other products to improve your audits and make your work even more efficient.
Note:
If you are using a SmartExporter Desktop, Client or Server Edition, make sure to activate your license after you have installed SmartExporter. Refer to the “Readme.txt” on the CD for more information.
If you are using a SmartExporter Starter Edition, you have to register in order to receive the license key to benefit from the free of charge use of the application.

SmartExporter User Guide 8
Online and offline mode
There are several scenarios for the use of SmartExporter. If you have a connection to an SAP® system, simply collect the data you need to extract. SmartExporter provides a few different options to extract those data and run the Data Request you have defined. For users having no direct access to an SAP® system, the offline mode is the suitable way to request the desired data from SAP® for auditing purposes.
Online mode
If a connection to an SAP® system exists, you are able to export the data directly. To optimize the export of data you may extract the data from SAP® either synchronously or asynchronously. Using the synchronous method you are extracting the data immediately without placing your Data Request in a queue or scheduling the transfer. Using the asynchronous export, you are able to specify the exact time when the data transfer is to be done. This enables you to schedule the extraction of data to off-peak hours to reduce the workload of the system. Depending on your objectives and the data volume you can select the suitable method of data extraction.

SmartExporter User Guide 9
Offline Mode
The offline mode provides access to the data to be analyzed for those users who do not have a connection to an SAP® system.
Particularly auditors and other users interested in SAP® data can create a Data Request and send the generated binary file to their contact in the company. This person can import the Data Request using the SmartExporter version (e.g. Client Edition) installed on a machine in the company. Using SmartExporter with connection to the company’s SAP® system the data can be extracted and provided for the auditor or others.

SmartExporter User Guide 10
Data Request
An SAP® system can contain more than 50,000 tables which are difficult to identify and localize using SAP® tools. Besides the fact that the process of extracting data might be tricky and inconvenient, it also requires a thorough SAP® knowledge. Usually the returned data need to be edited or formatted before they can be analyzed.
The Data Request, which is generated by SmartExporter, is the simple way to avoid this inconvenient process. Comprehensive editing or conversion of data is not required anymore.
A Data Request is a list of tables and their fields which you need for your analyses. It contains a list of the data you want to extract from the SAP® system. Using a Data Dictionary, a kind of catalogue of the tables and fields contained in the SAP® system, you can easily specify the necessary data for your request. For this selection no specific knowledge of SAP® data is required. This “list“ of data can be customized to meet your individual requirements by filtering tables and their content to get exactly the data you need for your auditing purposes. For instance, you can filter data by selecting a specific period or company code. And you are able to define joins for the tables you have selected to combine the data you require for your auditing purposes beforehand. Additionally, you can select the file type of the Data Request and you can specify the format the data from the SAP® system will be transferred in.
The Data Requests created can then be passed on to the SAP® system to extract the data required. Or the Data Request will be saved and provided for a person in charge in the company who can then extract the data using e.g. the SmartExporter Client edition.
If you are working in online mode, there are several options to extract data from the SAP® system. Depending on the data volume you have to decide which method of extraction suits you best and how to schedule the data transfer accordingly. There are options to extract data using a synchronous or asynchronous method from the SAP® system.
Synchronous Data Request
This method of data transfer is primarily suitable for smaller data packages. You choose to run a synchronous data extraction when you select the option Run the Data Request in the final step of the Create Data Request Wizard. The Data Request will be passed on to the SAP® system immediately and gets a high priority label. The actual extraction of the data is started in a timely manner and your computer has to be connected to the SAP® system during the whole process.
Asynchronous Data Request
If you are dealing with large data volumes which shall be extracted from an SAP® system, it is recommended to use the asynchronous Data Request. This data transfer is placed as a background job in the queue of the connected SAP® system and the actual data extraction can be scheduled to off-peak hours (e.g. at night or on weekends). The user selects the option Schedule an unattended run and defines the time when the Data Request should be run to release the tension on the productive system.

SmartExporter User Guide 11
Status of the Data Request
You can monitor and manage the status of the Data Request you have placed in the SAP® queue. Use the option Manage Data Request activity to get a list of all Data Requests in the queue and check the current status of the processes running.
Data Dictionary
A Data Dictionary (DDIC) is a catalogue of metadata containing the definition and the format of data. There are different Data Dictionaries available for an SAP® system. SmartExporter provides some of these Data Dictionaries. The Data Dictionaries included will be sufficient for most of the Data Requests to be created. In case you need specific data which cannot be selected using the Data Dictionaries included, you are able to load additional Data Dictionaries and use them as a basis for your Data Request. Select the Download Data Dictionary option in the Tools category on the SmartExporter Home page to download your Data Dictionary.
The Data Dictionaries which come with SmartExporter will suit the needs of most users. However, if you require specific fields or you have updated to a new SAP® system, you are recommended to download your own current Data Dictionary. Particularly if updates of SAP® systems are available, the latest Data Dictionary of the new systems might be useful. Otherwise inconsistencies could occur between the tables or fields you require from the new system and the ones which might actually be contained in an older Data Dictionary.
This is also the case when you are dealing with customer specific tables. Please download the latest Data Dictionary of your SAP® system if you need to extract data from customer specific tables.
SmartExporter is not able to extract tables or fields which are not contained in the Data Dictionary you have selected when you define a Data Request. This is also important if you create a Data Request and pass it on to a third party to extract the data for you. Please make sure that both of you have the same version of the Data Dictionary when you are using SmartExporter to get the data.
To manage and specify your default Data Dictionary open the Change application options task. The selections you make here are automatically set as default by SmartExporter when you start to create a Data Request.
Application settings
You can define the basic and advanced settings for SmartExporter by selecting Change application options in the Options category of the Home page. If you always use the same settings when creating a Data Request, you can set them as default. For instance, when you decide to work in online or offline mode only or you need just one Data Dictionary to create your Data Requests or one file type as output then you can set your individual default values here. This might be useful when you are creating your Data Requests for a Data Carrier Cession (Z3) in compliance with the GDPdU Format (Default Data Structure). For delimited files you may also define the field separator and text encapsulator.
The Data Request section also includes options for performance settings. You can define the package size for the data transfer or the priority of your Data Request. In the Components tab the extraction method to be applied using either SmartExporter SAP® components or SAP® standard components can be set.
SmartExporter User Guide 12
Use the ODBC tab to specify the settings you want to apply when using ODBC data sources. For detailed information on the ODBC setting refer to page 85.
Additionally, you can select the language of the SmartExporter user interface and the language settings for your login to the SAP® system. If you are changing the language settings, a restart of SmartExporter is required to apply the new setting.
Refer to the About SmartExporter section to view details on the currently installed version of SmartExporter and to access the SmartExporter log file.
Favorites
Add the Data Requests you are going to use more than once to your favorites. You do not have to define Data Requests over and over again; just use existing ones by selecting them from the list of favorites. You can use a Data Request for recurring data extractions or edit an existing Data Request if you want to change one or more parameters like filters.
You can also import favorites or Data Requests defined by other users or you can provide Data Requests for users in your company simply by exporting the desired favorite. For more information on using favorites with SmartExporter Client, please refer to the appendix of this guide.
Use Run or manage Favorites on the Home page of SmartExporter and you have all existing favorites available you may want to modify, import or export. Select a favorite and click Start Data Request wizard to open and modify your favorite.
In case your audit objectives have changed and you want to modify the Quick-Filters the Data Request is based on, there is no need to define the Data Request from scratch. Save your time and simply copy an existing Data Request to apply the desired changes. Each favorite is flagged with a coloured bullet to make it easier to distinguish between the original favorite and its copy.

SmartExporter User Guide 13
SmartExporter Interface
SmartExporter is built like a wizard or like any common web browser and therefore offers optimal user guidance and an intuitive interface.
You can use the address bar as means of orientation and the functions are clearly arranged in categories to support a target-oriented workflow.
The following screen shows the opening or home page of SmartExporter with the terms used in the guide to identify certain areas:
Navigator
Category Task Mode/Connection
Address Bar
News Window

SmartExporter User Guide 14
Home
The opening or home page of SmartExporter provides access to all functionalities. Use the arrow button Back to jump to the previous page of the wizard.
Additionally, you can return to the Home page of SmartExporter from any page of the wizard.
Open the listed tasks which are collected in categories by clicking the corresponding link. The specific page of SmartExporter is opened and you can start working. Define the basic settings for SmartExporter like interface language or default output format of your Data Request in the Options category. Use the Connection and Favorites categories to manage, select or monitor already existing connections or Data Requests respectively.
At the bottom of the SmartExporter screen the currently selected mode or connection - if active - is displayed. Simply switch between offline and online mode or change the connection to the SAP® system by selecting the according Mode/Connection. Click the arrow and select the desired entry.
The News window at the bottom displays the latest information and Internet content regarding SmartExporter, auditing, events and workshops. If you are using SmartExporter Starter, the News window cannot be hidden. In the SmartExporter Desktop or Client Edition you are able to hide the News window by selecting the Turn off news window option in the News area of the Change application options category.

SmartExporter User Guide 15
The wizard screen
The Create Data Request wizard is providing a clearly arranged workspace to lead you through all steps.
Every step has a short explanation and if necessary further detailed instructions for specific and more complex entries. This makes SmartExporter an easy to use tool which you are able to handle and integrate into your daily work without having to attend time consuming trainings.

SmartExporter User Guide 16
Create and manage connections to an SAP® system
When you open SmartExporter for the first time a message is displayed asking you to create a connection to an SAP® system. It is not essential to create an SAP® connection at that stage. The following steps can be completed at any time in SmartExporter, e.g. by clicking the Manage connections task on the home page or by using the Connections step in the Create Data Request wizard.
Create a new connection
1. Click the Manage connections task on the SmartExporter home page.
2. Click the New button to create a new SAP® connection. The Edit connection tab is displayed.
3. Enter a connection name in the General area and select a connection type like custom application server or group/server selection. Note that the parameters in the System area are changing depending on the selected connection type.
4. If you have selected a custom application server, enter either the name of the server or the IP address in the Application server text box. If necessary, specify a system number. For Group/server selection you have to specify a message server, the group or server and the system ID (SID).
5. Define the client of the SAP® system you want to access and the user name and password required to connect to the SAP® system in the Log on area. Click Set password. Your existing password for this SAP® system will also be set for all further connections to this system when you click the Set password button. SmartExporter will save the password for this specific SAP® connection so that you do not need to enter it again when selecting a Data Request using the same connection. Note: If your company does not allow storing the password to an SAP® system outside of the SAP® system, see the description of the Advanced area below.

SmartExporter User Guide 17
6. Select the Language to use when connecting to the SAP® system. Note: The default setting of the language to use when connecting to an SAP® system is defined in the applications options. However, you can always define the settings for each Data Request individually.
7. You can also enter a SAProuter String. Note: SmartExporter automatically adds “/H/“ when concatenating the router and server information. Please enter your data as in the following example. Example: Application Server: SampleSAP SAProuter String: 80.250.155.19/S/2287 SmartExporter generates the connection information: “/H/80.250.155.19/S/2287/H/SampleSAP“
8. In the Advanced area you can set additional network settings to use your domain user account for authentication. By default the Don’t use secure network connection option is enabled. You can also specify a different setting from the drop-down list, e.g. Authentication. Depending on the secure network configuration you might have to specify a Library file name.
9. In case your SAP GUI supports Single Sign-On (the current logged in user credentials are used to logon to the SAP GUI) you may also enable the corresponding option in the Single Sign-On drop-down list. If the Use Single Sign-On option is selected, you have to enter an SNC Name.

SmartExporter User Guide 18
10. In the pass-through options you may have to define the message server port for the group/server connection if it is not provided by the system (e.g. MSSERV=xx).
11. Click the Go back to the connection list link to return to the Manage connections screen or switch to the Test connection tab.
12. Click the corresponding check box in the Show in menu column if you want the connection to appear in the SAP® connection menu in the status line of the SmartExporter screen.
You can remove entries from the menu when you disable the option Show in menu again. The currently selected SAP® connection cannot be removed from the menu.
Note:
Please refer to your SAP® administrator for more information on the different settings and find out which settings you may use to connect to the corresponding SAP® system.

SmartExporter User Guide 19
Test a connection
1. To check if your connections to an SAP® system are working, click the Test connection tab at the bottom. If you have just created a new connection, this one will be tested.
Alternatively, you can select a connection in the Manage connections overview screen and click the Test connection link.
2. Click the Connect now button. If your connection works, all available information concerning the current connection will be listed below.
3. In case your connection does not work or your name or password are incorrect an error message is shown. When you have not entered a user name or you did not use a Single Sign-On then an additional log in screen will be displayed. Enter the correct SAP® User and the corresponding Password here to log on.
4. Click the green arrow to log on to the SAP® system or click the red arrow to cancel the test.

SmartExporter User Guide 20
5. If the test has failed you can try to edit the connection settings again by switching to the Edit connection tab. There might also be other issues preventing the log on to your SAP® system. Make sure you have entered the correct log on data and settings and try again later. In case there are other issues you cannot fix, use the Copy to clipboard button to copy the connection information into an email to provide this information to your support or SAP® administrator.
Add a saplogon.ini file
In case you have an existing SAP-GUI installation, you can also create a new connection using the corresponding saplogon.ini file in the Manage connections screen.
1. Click the Add a saplogon.ini file option in the Manage connections screen.
2. In the File drop-down list a default folder is shown where usually saplogon.ini files are stored in. Note that the location of your saplogon.ini files depends on your operating system and the SAP® GUI version you are working with. Use the Browse button to locate the directory your saplogon.ini files are stored in.

SmartExporter User Guide 21
3. Click the Open button to load all available saplogon.ini files located in the selected folder.
4. Select the entry in the File connections area and click the Add button to add this connection to the SAP® connections available in SmartExporter. Optionally, you can also use the Add all button to add all available connections. To remove an entry from the SmartExporter connections list, select the connection you want to delete and click the Remove button.
5. Enable the Show in menu option if you want the connection to be shown in the status line menu of SmartExporter. Note that you can set this property also later on in the Manage connections screen.
6. Select the connection in the SmartExporter connections list and click the Import button. The connection is added to the connections list.

SmartExporter User Guide 22
Create Data Request
Apart from the final step the process of creating a Data Request is the same for offline and online mode.
Note:
Once you have started the Data Request wizard you cannot change the selected Data Dictionary or modify the ODBC settings you have previously defined in the application options. If you return to the Change application options page, all your entries will be lost.
Create a Data Request and run it immediately
Select the Create Data Request task on the SmartExporter home page. The Create Data Request wizard is started. In the Navigator pane all the steps are listed which are required to create a Data Request. The sample Data Request to be created will contain data for a journal entry test.
Step: Introduction
1. In the first step you have to define a new Data Request by entering its name, e.g. “JournalData“.

SmartExporter User Guide 23
2. Optionally, you can enter a description of the Data Request in the Notes area. This is recommended if you are planning to provide this Data Request also for other users. Use this area to enter information on the purpose or the analyses objective this Data Request was generated for.
3. In case you want to save the Data Request for later re-use or to edit and complete it at a later time, you have to make sure that the Add to favorites option is checked.
4. Continue with the next step by clicking Connection in the Navigator.
Step: Select the SAP® connection
5. Select the required SAP® connection in the Connections area. Alternatively, open the Mode/Connections drop-down menu and select one of the connections available in the menu.
If you have not previously tested whether the selected connection works, it will be indicated. Click the Connect now button to check if the selected connection works. If you have not created a connection yet, click the Manage connections link at the bottom of the screen to jump to the Manage connections screen (see page 16 for more information on how to create a new connection to an SAP® system).
6. Switch to Select Tables in the Navigator.

SmartExporter User Guide 24
Step: Select Tables
7. Select the tables which contain the data to be analyzed. Note: The tables listed here are taken from the Data Dictionary which you have selected as default in the application options. Please change your selection if you need to have other tables from a different Data Dictionary. Go to the Options category on the home page of SmartExporter to select the Change application options task and then switch to the Data Dictionaries area in the Navigator. For more information on Data Dictionaries refer to page 11. If you change the Data Dictionary before saving the Data Request you are currently working on, all your entries will be lost.
8. Choose the required tables by clicking the check box in front of the table. If you want to select all tables listed, use a right mouse click to open the context menu and click Select All.
9. Use the Search field to find a specific table. If you do not know the exact name of the table, enter a part of the name or a key word contained in the description of the table like “Company Code“. SmartExporter will show all tables containing “Company Code“ in their description. Or, if you know the table name, e.g. “BKPF”, enter it in the Search field. Click the Match case check box to specify the search criteria.

SmartExporter User Guide 25
In case the descriptions of the tables are not shown in the desired language, please check your application settings and select the correct Data Dictionary with the suitable language. The currently active Data Dictionary is shown underneath the list of tables. You can also extend your search to the fields contained in the tables listed. Click the Search fields button and SmartExporter will also look for the specified term in the field names and field descriptions. Note: The Search fields button appears when you enter text in the Search box. The results will be highlighted. Place the cursor over a table name marked with the
information icon to see which field in that particular table contains the search text.
Delete the search text to remove the highlighting.

SmartExporter User Guide 26
10. For a journal entry test select the following tables “BKPF“ (Accounting Document Header), “BSEG“ (Accounting Document Segment) and “T003T“ (Document Type Texts) by selecting the check box in front of the tables.
11. In the Navigator switch to the Quick-Filters step.
Step: Quick-Filters
12. In this step you are going to create general filters for all selected tables to extract exactly the data you require for your audit and to keep the data volume as small as possible. SmartExporter provides a pre-selection of some filters like Fiscal Year, Billing Date or Company Code which you can define. Refer to the Format column to see which formats you have to use when entering your filter conditions. Either a date mask or a value is displayed. For example, the company code requires the format “???? / 4“. This means that the company code can consist of 4 characters and the maximum number of characters allowed is shown behind the slash. For the selected tables enter the following values: Company Code “1000“, Fiscal Year “2009“ and select “EN – English (English)“ as language in the drop-down list.
13. When you have defined all filters required for the tables switch to Fields and Filters in the Navigator.

SmartExporter User Guide 27
Step: Fields and Filters
14. Use this step to choose the fields of the tables you have selected in the previous step. Additionally, you can specify more detailed filters to determine the content of the fields and define the exact range of data you require for your purposes. In the upper area select the table you want to specify the fields for. In the Fields tab all fields contained in the selected table are shown.
15. Select the following fields for the “BKPF” table by clicking the check box in front of the fields: BELNR, GJAHR, BLART, BUDAT, MONAT, CPUDT, USNAM, BKTXT and WAERS.
Enter the field name or a keyword of the field description in the Search area in order to identify the desired field. The fields matching your entries will be listed below. Click the Show selected fields option to reduce the list of fields and to view only the ones you have already selected.

SmartExporter User Guide 28
16. Select the fields for the other tables accordingly: For the “BSEG“ table select the fields: BUKRS, BELNR, UMSKZ, DMBTR, WRBTR, SGTXT, KOSTL, HKONT, KUNNR, LIFNR and PRCTR. And for table “T003T“ select the BLART and LTEXT fields.
17. Switch to the Filters tab to enter filter conditions for any of the chosen fields. Already defined Quick-Filters for the tables will also be displayed here. These particular Quick-Filters will be marked with an asterisk (*).
18. Define new filters for the selected fields or add specific conditions to already existing Quick-Filters. To add a new filter, click the corresponding instruction in the Field name and type column. A drop-down list opens containing the fields of the table. Select the desired field, e.g. BUDAT (Posting date in the document). The list shows the name and type of the field:

SmartExporter User Guide 29
19. Select the entry “Between“ in the Operator column. The following line will be shown:
If you need more than one operator, use the Click here to add an operator option to add another operator from the list.
20. Click “? and ?”, to define the desired date range. Enter the date values in the fields and click outside the area to confirm your entries and close it.
In case the value you have entered is invalid the corresponding value will be flagged.

SmartExporter User Guide 30
Additionally, an exclamation mark will flag invalid values. A tooltip will indicate which value has to be changed:
If you want to add more than one date range or depending on the selected filter add more than one value, select the Click here to add values option below the fields and another line will be displayed. You may also add values to an already existing Quick-Filter. Click the arrow in the Values column to enter the new values. In order to remove values for filters or the whole filter condition, please right click the value or the filter row you want to remove and select Delete filter(s) in the context menu. Note: You are not allowed to delete existing Quick-Filters here. If you want to remove Quick-Filters, you have to switch to the Quick-Filters step in the Navigator.
21. Define the filters you need for the other fields of the tables selected. You can add for instance a filter for the T003T table to get only the records where the document types start with an A. To do so, select the T003T table and enter the following filter for the BLART (document types) field. Select Like as operator and enter the value A%:
Note: If you want to use the Like operator in combination with a wildcard, please make sure to enter % as wildcard character. Use the specific value INITIAL if the fields of the type character, date or time are containing some records with empty values but you don’t want the records with the empty values to be extracted from the SAP® database. This might be the case for a field like BSTAT which contains the document status. Here the document status might be empty. To get all the records where the field BSTAT is not “empty” enter the value INITIAL (see below):

SmartExporter User Guide 31
Note: To delete a filter right click the filter row you want to remove and select Delete filter(s) in the context menu.
22. If you have completed your entries, check whether the selected tables and fields are available and let SmartExporter determine the data volume you are about to extract. Select the corresponding table in the list and click one of the icons below:
Use this option to check if the selected tables and fields are available in the SAP® system you are connected to. It also determines whether you have the appropriate authorization for these data.
Click this icon to determine the size of the tables and fields selected. (The filters you have defined will be considered.) The number of rows and the size (megabytes) are shown in the table underneath. Note that depending on the data volume you have selected this might take some time.
If you are using the SAP® standard components, the icon will be disabled as the size cannot be determined by the SAP® standard components.
Use this icon to get a preview of the selected tables and fields.
Please note that you need a connection to an SAP® system for these functionalities to work. If you are operating SmartExporter in offline mode, these features are not available.
23. If you want to define a join for your Data Request, you can now open the Join step in the Navigator. For a comprehensive instruction on how to define a join refer to the corresponding section on page 37.
24. Switch to Options in the Navigator.

SmartExporter User Guide 32
Step: Define options for the Data Request
25. Besides the general definition of application settings which you have set in the Options category on the SmartExporter home page, you can also define individual options for each Data Request. Note: Depending on your SmartExporter Edition the options you are able to modify and the available file formats might differ (see appendix on page 65 for more information). If you are in the process of creating a Data Request, you cannot change the selected Data Dictionary or modify the ODBC settings you have previously defined in the application options. Otherwise all your entries will be lost.
26. Determine the location which the SAP® data shall be extracted to when your Data Request is run. Click the Browse button to select the directory or folder. For the IDEA files see page 62.
27. Select the file type you want your Data Request to be created in. The data extracted from the SAP® system will have this format. Select one of the following: CSV with header, CSV – variable length, TXT – fixed length, AIS - SAP® AIS Format, IDEA, Microsoft Access, CSV – GDPdU Format, TXT – GDPdU Format and ODBC. Note: In case you want to create your Data Request in the ODBC Format, note that the settings on how to handle tables for ODBC are defined in the application options task on the Home page. You have to define these options before you start to create your Data Request. When you switch to the application settings now, make sure that you have saved your Data Request as an offline request or click the Finish button in the final step of the wizard to save it as a favorite. If you have selected AIS - SAP® AIS Format as file format for your Data Request, you might as well create a file in GDPdU Format at a later time. Use the Generate GDPdU Format task from the Tools category to generate a GDPdU Format. To generate IDEA (.imd or .idm) files as output format, you have to make sure that the integration of IDEA exists. Please refer to the “Readme.txt” file on the CD or select Start – Programs – Audicon – SmartExporter – Readme. For a detailed instruction on how to use IDEA files as output format see page 62.
28. For delimited file types you can specify the desired field separator. If applicable, select a text encapsulator from the drop-down list.

SmartExporter User Guide 33
29. Switch to the Advanced tab to select how you want the data to be extracted. Note that the available options depend on the SmartExporter Edition you have.
Database only The data to be extracted is kept in the productive system.
Archive only The data to be extracted is available as archived data only. Select this option if all the data you want to extract is kept in an archive.
Database before archive
Define the order of the extraction. Select this option if you want to extract the data from the productive system first.
Archive before database Define the order of the extraction. Select this option if you want to extract the data from the archive first.
30. Define the SmartExporter SAP® components performance settings. Change the package size by overwriting the value.
31. Set the desired priority for your Data Request by selecting High, Medium or Low from the drop-down list.

SmartExporter User Guide 34
Note: A high priority implies a larger stress on the SAP® system. For larger data volumes it is recommended to place the Data Request in the SAP® queue and to schedule the transfer to off-peak hours.
32. In the Components tab you can define the further settings for the use of the SmartExporter SAP® components and how to deal with issues occurring when using the SAP® standard components available in your SAP® system instead. Note: It is recommended to use the default settings. You need a detailed knowledge of the data to be able to change these settings.
33. In the Navigator switch to the Finish step.

SmartExporter User Guide 35
Step: Finish
34. This step provides several options on how to proceed with your Data Request. You can display a list of all defined tables and fields to check your selection again by clicking the View the summary option. Note: If you do not want to run your Data Request immediately, you can save it by clicking the Finish button. This way you can run or edit the requests at a later time. Please make sure that you have checked the option Add to favorites in the Introduction step.
35. In our current example the Data Request shall be run immediately. Click the Run the Data Request option to start the process. Note that your computer has to be connected to an SAP® system during the whole process. This option is called Run on IDEA Server if you have the SmartExporter Server Edition installed and you have selected to create an IDEA file format on IDEA Server.
36. The Data Request progress screen is displayed. It shows which tables have already been downloaded and which download is still in progress.
In the Task column the selected tables are listed and the Details column shows which action is currently performed. A green icon is displayed in front of the tables which have already been downloaded successfully. If a Data Request fails, the table will be flagged with a red icon and in the area below additional information regarding the process and the errors which occurred during the download will be listed. To get more details on the downloaded data click the Show log file button to view the log files which were generated while extracting the data. You can also copy the log files to the clipboard or save them as a CSV file.

SmartExporter User Guide 36
37. In case you want to stop a running Data Request, select the Cancel button.
38. If the Data Request was completed successfully, exit the dialog by clicking the Close button.

SmartExporter User Guide 37
Define joins
SmartExporter provides an additional step in the Create Data Request wizard to define joins for the tables selected. Thus the size of the data package required can be reduced to the minimum as a necessary join has already been defined by the Data Request and only the join result table is extracted. SmartExporter offers either an Inner Join or a Left Outer Join. Using SmartExporter you can also define joins for Pool and Cluster tables like the BSEG table.
Note that the joins in SmartExporter have the functionality of SQL joins. At least a basic knowledge in defining SQL joins is highly recommended in order to avoid extracting useless data.
Please refer to the section About joins in SmartExporter in the Appendix on page 82 for an overview of the different join types available.
Step: Joins
To provide a useful sample on how to define a join, a new Data Request will be created using Accounts Payable. Information on the vendor is kept in different master tables. These master tables will be joined. Please refer to the steps in the Create a Data Request section on page 22 and following for detailed instructions.
1. Click the Create Data Request task on the Home page of SmartExporter. Use the Introduction step to create a new Data Request named “AccountsPayable” and select the Add to favorites option.
2. Continue with the next step by clicking Connection in the Navigator and select the corresponding connection to your SAP® system.
3. Switch to the Select Tables step in the Navigator. Please select the tables LFA1 (Vendor Master (General Section)) and LFB1 (Vendor Master (Company Code)).

SmartExporter User Guide 38
4. There are no Quick-Filters to define. Please go to the Fields and Filters step.
5. In the Fields and Filters page open the Fields tab and select the following fields for the LFA1 table: LIFNR (Account Number of Vendor or Creditor), LAND1 (Country Key), NAME1 (Name 1), ORT01 (City), PSTLZ (Postal Code), STRAS (Home number and street), ERDAT (Date on which the Record Was Created), ERNAM (Name of Person who Created the Object), KUNNR (Customer Number), LNRZA (Account Number of the Alternative Payee), SPERR (Central posting block), SPERM (Centrally imposed purchasing block), SPRAS (Language Key) and SPERZ (Payment Block). To check if you have selected all required fields click the Show selected fields option.

SmartExporter User Guide 39
6. Select the following fields for the LFB1 table: LIFNR (Account Number of Vendor or Creditor), BUKRS (Company Code), AKONT (Reconciliation Account in General Ledger), ZTERM (Terms of Payment Key), ZSABE (Clerk at vendor)
7. Switch to the Filters tab and add a filter for the LFB1 table. Select the LFB1 table in the list of tables and use the Click here to add a filter option. Choose the BUKRS field in the Field name and type drop down list and select Equal to as operator. Enter 1000 as value.
8. Continue with the Joins step in the Navigator.

SmartExporter User Guide 40
9. Use the Click here to add a join option to create a new join. Enter a name for the join and some notes to describe what this join is about.
10. The Join Expression area is displayed. Use the Click here to add a join expression option to enter a join expression. You have to select the left or primary table for the join. All tables you have included in you current Data Request will be listed here.
11. Select the LFB1 table as left or primary table. The Join Expression area will display the table and all information available like fields selected for this table or filters defined.
The fields shown for the table are those you have chosen in the Fields and Filters step. The selected fields will be used for the table in the join. However, you may select or clear fields of the joined tables (see point 15 below).

SmartExporter User Guide 41
12. Use the Click here to add a join expression option again to select the join type and the right or secondary table.
Select Inner Join as Join Type and the LFA1 table as secondary or right table. Please refer to the section About joins in SmartExporter on page 82 for more information on the available join types.
13. The right table and the join type are shown in the Join Expression area. The question mark indicates that you still have to define a join condition.
Please click the arrow in the Join Condition column.
14. Use the Click here to add a join condition option to enter the join condition you need. Several columns will be shown which contain all information available, e.g. the fields selected for the tables and their data types. Select LIFNR as key field for the left table LFB1. As Operator specify Equal to and for the right table LFA1 please select the corresponding LIFNR field.

SmartExporter User Guide 42
To add additional join conditions simply use the Click here to add a join condition option.
Note: The sample above is quite simple. Defining a complex join with more tables and 1 to n relations requires an elaborate definition of join conditions and the corresponding key fields. As a rule of thumb it is recommended to define as many join conditions or different key fields and information as possible to get an exact join. Please have a look at the key fields in your SAP® system and select the ones suitable for your audit purposes. For instance, if you use a field containing a document number as key field you have to know that the document numbers are reset at the beginning of each fiscal year. Therefore it is essential to define the fiscal year as a filter to get a proper result. Additionally, a join condition for the fiscal year should be added to obtain the correct document numbers of the corresponding year from the second table.

SmartExporter User Guide 43
15. In the Join Expression area you can modify your selection of tables as well as the fields selected for a table or the filters defined by clicking the corresponding arrow in the columns of the Join Expression area. For example, if you would like to add fields for the LFA1 table, click the arrow in the corresponding Fields column.
To get an overview of the fields which are currently selected for this particular table, click the Show selected fields option. Default alias names of the field in the joined output created by SmartExporter are shown in the Alias column.
16. If you want to modify the default alias names for the fields in the joined output, click the row of the particular field you want to specify a different alias name for. In the Alias column simply overwrite the default name. Note: Characters like /, \, ?, %, *, :, |, “, <, > are not supported for alias names. Please consider that for an IDEA file output format the length of the field names may not exceed 40 characters.
17. The whole join expression is shown in the grid.
To add additional join expressions use the Click here to add a join expression option.

SmartExporter User Guide 44
Note: To delete a join condition right-click the join condition you want to delete in the Join Condition dialog and select the Delete join condition entry in the context menu. Please note that all subsequent conditions depending on the one you are going to delete have to be removed as well.
To delete a join expression right-click the join expression you want to delete and select the Delete join expression entry in the context menu. Please note that all subsequent expressions are removed as well.
If you want to select a different table for a join than you did in the first place, all subsequent join expressions, join conditions and selected fields and filters will also be removed.
18. Depending on your auditing objectives it might be necessary to have not just the joined data available but also some of the source tables. SmartExporter does not automatically include the tables a join is based on in order to avoid an overload of unnecessary data volume to be extracted. You have to deliberately select the tables you want to include in the Data Request.
Click the Select joined tables to download icon.

SmartExporter User Guide 45
19. If you have completed your entries, check whether the data for the join result table are available and let SmartExporter determine the data volume you are about to extract. Select the according table in the list and click one of the icons below.
Use this option to check if the data for the join result table are available in the SAP® system you are connected to. It also determines whether you have the appropriate authorization for these data.
Click this icon to determine the size of the tables and fields selected. (The filters you have defined will be considered.) The number of rows and the size (in megabytes) are shown in the table underneath. Note that depending on the data volume you have selected this might take some time.
If you are using the SAP® standard components, the icon will be disabled as the size cannot be determined by the SAP® standard components.
Use this icon to get a preview of the join result table.
Select the tables the join is based on to be downloaded in addition to the actual joined data.
20. Switch to the Options step in the Navigator. Define the output format, the performance options and the priority of your Data Request.
21. Proceed with the Finish step and select one of the options offered here to e.g. run your Data Request right away or schedule it etc. Note: If you have selected e.g. some of the source tables to be downloaded in addition to the joined data, please make sure that you have checked the size of the data volume to be extracted. You can use the Schedule an unattended run option to run your Data Request at off-peak hours.

SmartExporter User Guide 46
Create a Data Request and place it in a queue
Particularly if you are planning to extract large data volumes it is highly recommended to run your Data Request at off-peak hours. SmartExporter allows you to schedule the date and time your Data Request will be processed.
1. Please repeat the steps previously described in the Create Data Request section on page 22 and create a new Data Request. Or you can open and run a Data Request you have saved previously. Select the task Run or manage Favorites in the Favorites category. You can select the Data Request “JournalData“, for instance, and click the Start Data Request wizard.
2. In the Create Data Request wizard switch to the Finish step in the Navigator and select the Schedule an unattended run option.
3. The Schedule Data Request dialog will be displayed. Specify the date and the time for your Data Request to be processed.
4. Check the Place job in SAP® system at option and enter the desired start date using the date picker to open a calendar.
5. Then you can specify the time. Please enter the time value according to the regional settings of your computer (e.g. HH:MM:SS).

SmartExporter User Guide 47
6. If required, check the Jump to ‘Manage Data Request activity’ after placing job in queue option. The Manage Data Request activity page will be shown after this step is completed. Here you get an overview of all Data Requests you have placed in the queue (see page 52).
7. Click Place Data Request in Queue. Alternatively you can also exit this dialog and return to the Create Data Request Wizard by clicking Go Back to Wizard to modify your Data Request again.
Note:
If you are using the SAP® standard components in combination with SmartExporter, the Schedule an unattended run option is not available. The feature is disabled accordingly and a corresponding message is displayed.

SmartExporter User Guide 48
Save a Data Request as offline Data Request
If you do not have a connection to an SAP® system, SmartExporter offers the simple and easy alternative of creating a Data Request which you can pass on to your SAP® system administrator or your contact in the according company who will then provide the data for you.
Create and save your Data Request as an offline Data Request which you can send to other users who can import and run the Data Request accordingly.
1. Please repeat the steps previously described in the Create Data Request section on page 22 and create a Data Request. Or you can open and run a Data Request you have saved previously. Select the task Run or manage Favorites in the Favorites category. Select the Data Request “JournalData“ and click the Start Data Request wizard.
2. Select the Finish step in the Create Data Request wizard and click the Use the Data Request elsewhere option.
3. The SmartExporter - Save Files dialog appears. Enter a unique and speaking file name.

SmartExporter User Guide 49
4. Select the required File Type the offline Data Request will be saved in. If the file is saved in a Portable format, the file will have the file extension .xml. You can also generate a TXT file containing a summary which lists all tables and fields contained in your Data Request. You can use this file for documentation purposes and to check if your Data Request contains all required data. If the Binary format is selected, the file will have the file extension .set. To streamline the workflow for your SAP® administrator use the Authorization profile option in combination with the binary format or the portable format. Note that this file requires the SmartExporter authorization profiles to be active on the SAP® system in question. Your SAP® administrator can import the authorization profile file (.auth.xml) to quickly implement your SmartExporter profile and put you in the position to extract the data yourself. If necessary, the administrator can add more information to the profile and check the authorizations easily.
5. Specify the folder to store the files in by clicking the Browse button.
6. Click Save.

SmartExporter User Guide 50
Import or export a Data Request
Export
If you have saved a Data Request as an offline Data Request or added a Data Request to your favorites, you can provide these for other users which also have a SmartExporter version available. Simply export the Data Request and pass it on to the other users. Note:
Before you can export a Data Request, it has to be added to your favorites.
Depending on the SmartExporter edition you are using the export feature might not be available.
1. On the home page of SmartExporter select the Run or manage Favorites task in the Favorites category.
2. Select the Data Request you want to export from the list and click the Export option.
3. The SmartExporter – Save Files dialog opens.
4. Enter a name for the Data Request you want to export.
5. Select the file type the Data Request will be exported to (for the different file types see page 48).
6. Specify the folder to store the files in by clicking the Browse button.
7. Click the Save button to save your Data Request in the selected file format. You can now pass the files on to other users.

SmartExporter User Guide 51
Import
1. Select the Import Data Request task in the Data Request category on the home page of SmartExporter. Alternatively, you can select the Run or manage Favorites task in the Favorites category and click the Import option.
2. The Import Favorites dialog is displayed. Locate the directory where the Data Request file you want to import is stored.
3. Select the Data Request you want to import and click Open.
4. The Data Request will be displayed in the list of the Run or manage Favorites screen. Note that the Data Request will get the current date. In case you share Data Requests with users in a different date zone, the Data Request you have exported and the one your contact will import might show different date stamps in the Run or manage Favorites page. Note: Each favorite is flagged with a colored bullet to make it easier to distinguish between them. This colored flag will stay the same even if the favorite is exported and imported by other users into their SmartExporter applications. Thus Data Requests being exchanged can still be identified easily.
5. Information on the Data Request imported is shown below the list with the available Data Requests. You can now modify the name of the Data Request or the notes if necessary.
6. Click Start Data Request wizard to modify any other property of the Data Request or to run the Data Request.
Note:
The Import Favorites function is also available in SmartExporter Client Edition. You may only have ten favorites in SmartExporter Client. If ten favorites already exist, you will be notified. You have to delete one of the existing favorites before you can import another.

SmartExporter User Guide 52
Edit or modify a Data Request and monitor its status
In SmartExporter you can also edit any of your existing Data Requests providing you have added those to your favorites. In case you have placed several Data Requests in a queue you can also check their current status.
Edit a Data Request
1. To edit an existing Data Request, open the Run or manage Favorites task in the Favorites category.
2. Select the Data Request in the list.
3. Click Start Data Request wizard. The Create Data Request wizard will be started and you can modify all settings for the Data Request selected.
4. In the Finish step you can decide which of the options you want to use for the modified Data Request.
Manage Data Requests activity
The Manage Data Request activity feature provides a detailed overview of the Data Request status and offers the option to download the generated data at any time convenient. The activity list shows jobs which have been queued on an SAP® system or as an IDEA Server task.
1. If you want to check the status of a Data Request you have placed in an SAP® queue and to get a quick overview of the pending Data Requests, open the Manage Data Request activity task in the Data Request category on the SmartExporter home page. Please note that this feature is not available when you are using the SAP® standard components.
2. The Manage Data Request activity page will be displayed.
3. All the Data Requests you have placed in the queue are listed here. In the Last Status column a short comment indicates the last known status of this Data Request. Note that the Last Status does not necessarily show the actual status of the Data Request. The status might have changed in the meantime. The Last Update column shows when the status of this Data Request was checked or updated the last time.

SmartExporter User Guide 53
Name Name of the Data Request
Date Queued Local computer date and time when the SAP® job was queued or the IDEA Server task was initiated.
Last Status The last known status of the job (for more details on the entries see list below).
Last Update Date and time when the Data Request activity was updated the last time.
Server Indicates whether it is an SAP® server or an IDEA Server
Entries in the Last Status column:
Refresh Job is defined but not ready to be processed
Aborted Job has been cancelled by the user or by an error which occurred during the process
Active Job is running
Active (Not Running) Job is ready and is set to “Active“ but is not yet running
Enabled All prerequisites to run the job are met
Error Unknown error
Finished Job was completed successfully
Planned Job has been defined but is not ready to be executed even though all prerequisites are met
Ready Job is active and is waiting to be processed
4. Click the Details link to view the current status of the corresponding Data Request or select the Data Request in the list and open the context menu via right click and select the Show details and handle queued Data Request entry.
5. The status of the Data Request is shown including the name, connection, the Data Request ID, the date when the Data Request is planned to be run etc.

SmartExporter User Guide 54
6. If you have not updated the status of the corresponding Data Request, you will be notified that you should update the job status. You can check whether the correct connection to an SAP® system was specified by clicking the Initial connection info link showing an overview of the connection details.
If you want to change the connection, click the Choose a different connection link and select the desired connection from a list of the currently existing SAP® connections.
SmartExporter User Guide 55
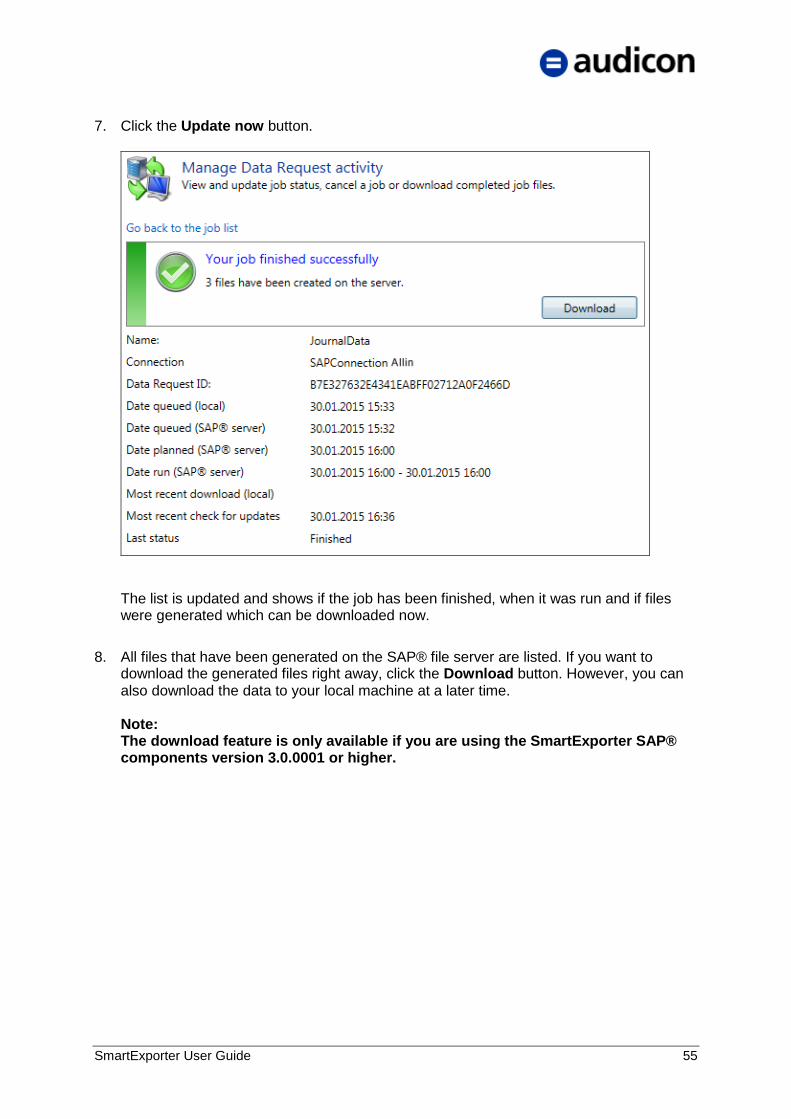
7. Click the Update now button.
The list is updated and shows if the job has been finished, when it was run and if files were generated which can be downloaded now.
8. All files that have been generated on the SAP® file server are listed. If you want to download the generated files right away, click the Download button. However, you can also download the data to your local machine at a later time. Note: The download feature is only available if you are using the SmartExporter SAP® components version 3.0.0001 or higher.

SmartExporter User Guide 56
9. Select the files you want to download by clicking the corresponding check box in front of the file name and specify the folder where you want to store the file or click the Browse button to navigate to the folder.
10. Click the Start download button to transfer the files to the specified folder. If you want to download the files at a later time, click Close to exit the dialog. The download details are shown in the list of files and a comment is displayed. To get more details on the downloaded data click the Show log file button to view the log files which were generated while extracting the data. You can also copy the log files to the clipboard or save them as a CSV file.
11. Additionally, you have the option to click the Delete files on server button, if you are sure that you do not need to download the files again. In case you might want to download these data again at a later time, just leave the dialog by clicking the Close button and the files will be kept on the server. Note that if you have downloaded the files, the Data Request activity list will also be updated and the values for Most recent download (local) will be shown.
12. Use the Go back to the job list link to check on other queued Data Requests.

SmartExporter User Guide 57
In case the Data Request you want to display the status for is in progress you will be notified accordingly.
You can either use the Update now button to update the status or the Cancel button to stop the job in progress.
Note:
If you have cancelled or deleted a job, you cannot update the job status anymore and you will be notified accordingly.
SmartExporter User Guide 58
Using GDPdU file format
In case you have to provide your data for an external auditor (German fiscal administration) a specific file format is required. This format is called GDPdU and it is based on the default data structure (Beschreibungsstandard). To provide the data you are extracting from an SAP® system in the suitable GDPdU compliant format, SmartExporter offers several options described below.
Generate a Data Request in GDPdU format
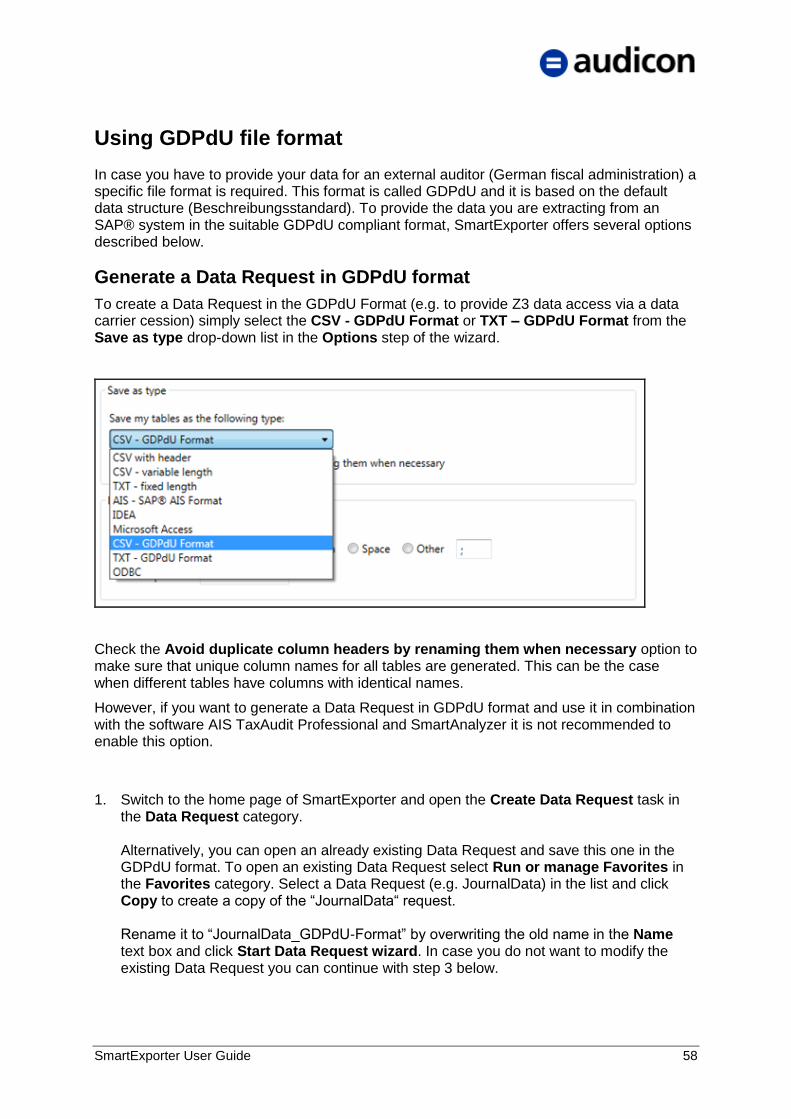
To create a Data Request in the GDPdU Format (e.g. to provide Z3 data access via a data carrier cession) simply select the CSV - GDPdU Format or TXT – GDPdU Format from the Save as type drop-down list in the Options step of the wizard.
Check the Avoid duplicate column headers by renaming them when necessary option to make sure that unique column names for all tables are generated. This can be the case when different tables have columns with identical names.
However, if you want to generate a Data Request in GDPdU format and use it in combination with the software AIS TaxAudit Professional and SmartAnalyzer it is not recommended to enable this option.
1. Switch to the home page of SmartExporter and open the Create Data Request task in the Data Request category. Alternatively, you can open an already existing Data Request and save this one in the GDPdU format. To open an existing Data Request select Run or manage Favorites in the Favorites category. Select a Data Request (e.g. JournalData) in the list and click Copy to create a copy of the “JournalData“ request. Rename it to “JournalData_GDPdU-Format” by overwriting the old name in the Name text box and click Start Data Request wizard. In case you do not want to modify the existing Data Request you can continue with step 3 below.

SmartExporter User Guide 59
2. If you are going to create a new Data Request or you are modifying an existing one, follow the steps in the “Create Data Request” section, page 22.
3. Switch to the Options step in the Navigator.
4. Select CSV – GDPdU Format or TXT – GDPdU Format as the file format from the Save as type drop-down list.
5. Depending on your purposes, you can enable the Avoid duplicate column headers by renaming them when necessary setting. Note: If you want to generate a Data Request in GDPdU format and use it in combination with AIS TaxAudit Professional or SmartAnalyzer, it is not recommended to enable the Avoid duplicate column headers by renaming them when necessary option.
6. Continue with step 27 (section “Create Data Request“ on page 22).
7. In the Finish step SmartExporter offers several options on how to save or process your Data Request. Select the one suitable for your purposes.
8. For instance you can run the Data Request immediately by selecting the Run the Data Request option.
You can now provide the extracted data in CSV file format and the corresponding XML file in combination with the DTD file necessary for the GDPdU format for your auditor.

SmartExporter User Guide 60
Create a GDPdU format file from SAP® AIS files
In case the data you have extracted from the SAP® system are SAP® AIS files and you require the data in a GDPdU compliant format for an auditor, SmartExporter provides an option to generate a corresponding format.
1. On the SmartExporter home page select the Generate GDPdU Format task in the Tools category.
2. The GDPdU Format for SAP® AIS files application is launched.
3. Locate the directory your SAP® AIS files are stored in by clicking the Browse button in the Source folder containing SAP® AIS files area.
4. Define whether you want to apply the same encoding for all files. You can select the encoding from the drop-down list. If the encoding is valid for all files listed, click the Apply button. You can also select a specific encoding for each file separately by selecting the corresponding encoding from the drop-down list in the Encoding column.
5. Click the check box in front of the files you want to generate a GDPdU format from.
6. Click Start generating GDPdU format.

SmartExporter User Guide 61
7. The Select index.xml destination folder dialog appears. Locate the directory for the index.xml. Click Save.
8. In the Report tab the process of generating the files is shown.
9. Exit the Report tab by clicking Close.
10. An index.xml file will be created corresponding to the existing SAP® AIS files and the file will be stored in the directory selected.
11. Close the application GDPdU Format for SAP® AIS files.

SmartExporter User Guide 62
Using IDEA file format
In case you want to use the IDEA file format as output format for the data you are extracting, some settings which are different from those for other output formats have to be considered.
Note: SmartExporter supports the IDEA default file format (.imd) as well as the IDEA Unicode format (.idm). You can also run SmartExporter in combination with IDEA Server (a specific license is required for the server component).
If you are using SmartExporter on a 64 bit operating system in combination with a 32 bit IDEA version, make sure to use the corresponding 32 bit version of SmartExporter.
1. Please consider that the actual files extracted are written to the currently selected IDEA project. Make sure that the current IDEA project is the directory you want the files to be written to. Open IDEA to check the current project and if necessary select a different one. Go to the Home tab and click the Select task to specify the desired project.
2. Switch to SmartExporter and in the Options step of the Create Data Request wizard to select the location where you want the intermediate files to be stored.
3. In the Save as type area select IDEA in the drop down list.
4. In the IDEA section choose where you want to save the files to. Select either In my current IDEA project or In my IDEA Server project from the drop-down list.

SmartExporter User Guide 63
The intermediate files will be saved in the folder you have specified in the Location area of the Options screen. This folder will be used to store the temporary files only. Note that the actual files extracted are written to the currently selected IDEA project folder. If you have selected IDEA Server, this option is not available.
5. Continue with the Finish step and if you have specified In my current IDEA project you can decide what you want to do with the Data Request, e.g. run the Data Request immediately. For running a Data Request on IDEA Server please refer to the following section.
Running a Data Request on IDEA Server
The following steps have to be completed before you can connect to an IDEA Server via SmartExporter:
1. An IDEA Server has to be selected. Open IDEA and in the Home tab, in the IDEA Server group, click Select Server.
2. Select an existing IDEA Server from the drop-down list. In case there are no servers listed, click the Servers… button.
3. The Add IDEA Server dialog is displayed. Click the Add button to add a new IDEA Server.
4. In the Add IDEA Server dialog enter the name of the IDEA Server you want to add and make sure the authentication port displayed is correct.
5. Click OK. The new server has been added to the IDEA Server list.
6. Exit the Add/Remove Servers dialog by clicking the Close button. You will return to the Select Server dialog.
7. If you have selected (or newly added) the IDEA Server you want to use, click OK. IDEA is now connecting to the server. Please make sure a corresponding project is selected.
8. Switch back to SmartExporter and select the Data Request you want to run on IDEA Server and complete the steps required for generating an IDEA file format described above.
9. Select In my IDEA Server project from the drop-down list in the IDEA area in the Options step of SmartExporter. Then switch to the Finish step. You will get the Run on IDEA Server option instead of Run the Data Request.
10. Click the Run on IDEA Server option.

SmartExporter User Guide 64
11. The SmartExporter – Connect to IDEA Server dialog is launched. By default the Connect to last server option is enabled.
In case you want to use a different server, uncheck the option and select the desired IDEA Server from the Server name drop-down list. Note that you have to enter your user name and password for the selected server.
12. Click the Connect button to connect to the selected server. All your IDEA Server projects are listed in the Select a project area. Select the project you want to transfer the extracted data to.
13. Optionally, you can check Jump to ‘Manage Data Request activity’ after initiating IDEA task if you want to view or manage the status of your Data Request.
14. Click OK to queue the IDEA task.

SmartExporter User Guide 65
Appendix
SmartExporter Editions
SmartExporter comes with a variety of editions and licensing models tailored to suit the needs of your company or auditing firm. Find below an overview of the different editions available.
SmartExporter Desktop Edition
The Desktop Edition is the full version of SmartExporter. Using the Desktop Edition you have access to all available features. You can for instance create and use Data Requests, you are able to import and export favorites, etc.
Note:
Some features or components like the import to IDEA Server or downloading archived data require a specific license.
SmartExporter Client Edition
The Client Edition was designed to provide a smooth and optimized workflow between auditor and client. The Client Edition offers the option to extract data from an SAP® system in a synchronous and asynchronous way. This guarantees a maximum of flexibility because the client is able to decide when and how the data requested by the auditor is extracted.
Note:
The licenses of the Desktop and the Client Edition are connected and the Client Edition can only import Data Requests or favorites created by the corresponding Desktop Edition. Both licenses (Desktop and Client) have to be activated before they can be run together.
Auditors and other persons who do not have direct access to an SAP® system can use the SmartExporter Client Edition to run an existing Data Request. An auditor can benefit from the Client Edition by simply sending the Data Request he created with his SmartExporter Desktop version to the company using a Client Edition. The company can run the Data Request using the SmartExporter Client version which is connected to the Desktop license of the auditor and extract the required SAP® data which are provided for the auditor.
SmartExporter Client limitations
Number of favorites and SAP® connections
SmartExporter Client cannot maintain and manage more than ten favorites at a time. You can only import ten favorites in SmartExporter Client. If ten favorites already exist, you will be notified and you have to delete an existing one before you can import the new one.
The SmartExporter Client edition is also limited to 3 SAP® connections.

SmartExporter User Guide 66
Default file format for Data Requests
The output file format of an imported Data Request cannot be modified in the Client Edition.
Note:
Every Data Request which you import into your SmartExporter Client can be run with the output file format defined in this Data Request.
This means that for instance an auditor can create a Data Request using his SmartExporter Desktop version and defining AIS - SAP® AIS Format as output file format. This Data Request which is passed on to the company can be imported into the SmartExporter Client version installed. The administrator of the SAP® system is then able to run this Data Request and he will get an output file in the SAP® AIS format.
Defining or editing joins
Using a SmartExporter Client Edition you are not able to define new joins. But you can delete joins existing in the Data Requests you have imported or you may select joined tables to download.
SmartExporter Server Edition
This is a SmartExporter Edition which can be integrated into other processes, e.g. in IDEA Server or CaseWare Monitor, and provides a high potential for automation.
SmartExporter Starter Edition
The SmartExporter Starter Edition is a free SmartExporter version with limited functionalities which can be used for testing purposes and as a means of evaluation for the features and functions of SmartExporter Desktop. The Starter Edition is available as a download on the SmartExporter website www.smartexporter.de/en.
Note:
SmartExporter Starter requires an Internet connection.
You require a license key to activate SmartExporter. This license key is provided in the email you receive after you have registered (please refer to section “Register and activate license” on page 71).
SmartExporter Starter limitations
SmartExporter Starter offers only a limited functionality. Some features are not available or only to a certain extent.
Number of connections to SAP® systems
Using SmartExporter Starter you may have one connection to an SAP® system only. In the SmartExporter Desktop Edition you can create and manage an unlimited number of connections to SAP® systems.

SmartExporter User Guide 67
Default file format for Data Requests
SmartExporter Starter provides the following default file formats: CSV files, CSV files with header and TXT files. The other formats available in the full version of SmartExporter like AIS SAP®, Microsoft Access etc. cannot be created with SmartExporter Starter.
SmartExporter user interface of an edition with limited functionality
SmartExporter Starter or Client edition have the same user interface as the Desktop version. However, some features are not available or their parameters or settings cannot be modified in the Starter or Client Edition.
For example, you cannot switch off the News window in the SmartExporter Starter Edition.
Features which are not available in SmartExporter Starter or Client are marked (see Generate GDPdU format).

SmartExporter User Guide 68
Comparison of the functions
SmartExporter Starter and SmartExporter Client have limited functionalities, e.g. the number of connections to an SAP® system. The following tables show the different editions and the features they support.
Function SmartExporter Desktop
SmartExporter Client
SmartExporter Starter
Create Data Request
Number of connections to SAP® systems
Unlimited 1 3 1
Selecting tables
Discarding tables
Edit Quick-Filters
Select fields for tables (in Fields and Filters)
Discard fields for tables (in Fields and Filters)
Add/delete filters (in Fields and Filters)
Preview of data with filters applied
Add joins
Delete joins
Select fields in joins
Discard fields in joins
Select joined tables to download
Copy favorites 2
Add Data Request to favorites 2
Download Data Dictionaries
Choose different Data Dictionaries
Turn off News window
1 subject to the licensing terms
2 a maximum number of 10 favorites is allowed

SmartExporter User Guide 69
Online Data Request SmartExporter Desktop
SmartExporter Client
SmartExporter Starter
Extract SAP® data online
Select data source (database or archive)
1 1
Modify performance settings
Place Data Request in queue
Methods of synchronous data transfer from SAP®
Filter calculation method using ordering the records
Filter calculation method without ordering the records regarding primary key fields
Buffer table method
1 access to archived data depends on license key
Offline Data Request SmartExporter Desktop
SmartExporter Client
SmartExporter Starter
Save an offline Data Request
Import a Data Request (favorite)
1
Export a Data Request
1 a maximum number of 10 favorites can be imported

SmartExporter User Guide 70
Default file format (output) SmartExporter Desktop
SmartExporter Client
SmartExporter Starter
CSV files 3
CSV files with header 3
TXT files 3
AIS SAP® 3
Microsoft® Access files 3
IMD / IDM files (IDEA ASCII or Unicode)
3 1
IMD / IDM files (IDEA Server ASCII or Unicode)
2
ODBC 3
GDPdU Format (according to default data structure)
3
Field separator and text encapsulator for delimited file types
3
Change the language settings
1 limited to 10,000 records per extracted file in the IDEA file output format
2 access to IDEA Server depends on license key
3 only file formats specified by the imported Data Request can be used
Integration in SmartExporter Desktop
SmartExporter Client
SmartExporter Starter
AIS TaxAudit
IDEA 1
SmartAnalyzer 2
1 limited to 10,000 records per extracted file in the IDEA file output format
2 only for special Data Requests referring to default sample apps

SmartExporter User Guide 71
Register and activate the license
You can use SmartExporter up to 10 days after installation.
If you are using a SmartExporter Starter Edition you have to register. Click the Register option in the License Status dialog.
If you are using a full version of SmartExporter please select the Enter your License Key option. The license key is provided in the delivery note you have received with your software package.
The License Status dialog is always displayed after launching SmartExporter if you have not activated your license or your current license is about to expire. In case your SmartExporter license is expiring you will be notified 30 days beforehand.
Please refer to the “Readme.txt” on the CD or via Start – Programs – Audicon – SmartExporter – Readme for a detailed description.
Note:
Even if your 10 days grace period has expired you are still able to activate your license.

SmartExporter User Guide 72
If you have received your license key, you can activate your SmartExporter license. Select the Activate License option in the Tools category on the SmartExporter Home page:
You can either activate your license online or offline for any edition of SmartExporter.

SmartExporter User Guide 73
The following options are available in the License Activation wizard:
Online Activation
1. Select the Online Activation option if there is an Internet connection available. You have received your license key either having registered your SmartExporter Starter edition or in the delivery note with your SmartExporter Desktop, Client or Server Edition.
2. Enter your license key and click the Activate button.
3. Exit the dialog by clicking Close.
You may return to the first page of the wizard at any time by clicking the icon.
Please note that each license key can only be activated once. If you would like to use SmartExporter on another machine, an additional license key is required.

SmartExporter User Guide 74
Using a proxy server
In case your firewall is blocking the online licensing you can also use a proxy server to do an online licensing.
1. Use the Online Activation option and enter your SmartExporter license key.
2. Expand the Proxy Settings entry. Check the Use proxy server option.
3. Please specify the IP address of the proxy server and the port which should be used.
4. Then you have to enter a user name and the corresponding password for a user account which has the necessary access rights for this particular server.
5. Click the Activate button.
Offline Activation
1. If there is no Internet connection available, please select the Request License option.
2. Click the button and locate the directory you want to store the activation request file (.c2v) in.
3. Enter a meaningful name like “MyCompany.c2v“.
4. Click the Save button.
5. Please send this file by email to [email protected]. Make sure that you also add your license key information which you have received with your software package.
6. You will then receive your update file (.v2c) by email. Save the file to e.g. a temporary folder or the desktop.
7. Launch the License Activation dialog by clicking the Enter your License Key option in the License Status dialog or by selecting Start – Programs – Audicon – SmartExporter – Activate license.
8. Please click the Apply Update option in the License Activation wizard.
9. Use the button to locate your update file and click Open.
10. Now click the Apply button. Your SmartExporter license will be activated. Note: Use only the computer you have created your Activation request file on to apply the update file. This update file is not valid for a different machine.
11. Exit the wizard by clicking the Close button.
You may return to the first page of the wizard any time by clicking the icon.
Please note that each license key can only be activated once. If you would like to use SmartExporter on another machine, an additional license key is required.

SmartExporter User Guide 75
As soon as you have activated your SmartExporter license the license information including expiry date will be displayed in the License Activation wizard:
Starting with SmartExporter 2013 R1 every activation is recorded in an activation history which you can display if you click the Show Activation History option. Here the date of the activation and the license key used are listed together with the type of the activation like license update and the status (whether the activation was successful or not).

SmartExporter User Guide 76
Transfer a SmartExporter license to another computer
In general a SmartExporter license is activated for one specific computer and it can be activated only once. However, it could be that you have got a new computer or you might have to switch to a different machine. In this case you have to transfer your license from one machine to another.
1. Write an email to [email protected] and request a cleaning license for your SmartExporter license key. Please provide your name, company and (if at hand) your currently activated SmartExporter license key.
2. A cleaning license will be returned to you. This cleaning license is a 19 digit key.
3. Please go to Start – All Programs – Audicon – SmartExporter and select the Activate license option or open the Activate license task on the Home page in the Tools category.
4. In the Activation Options dialog click the Online Activation option.
5. Enter the cleaning license key you have received in the License Key field.
6. Click the Activate button.
7. When the cleaning is completed successfully and is confirmed by the license server you will receive an email confirming that the deletion of the license was done. The email will also contain a new license key you can use for the other computer. Please activate this license on your other machine.

SmartExporter User Guide 77
Limitations when using SAP® standard components
SmartExporter is able to use existing SAP® standard components which are already installed on an SAP® system.
To use the SAP® standard components in combination with SmartExporter some configurations and authorizations have to be set and defined for the existing RFC modules in the SAP® system which are outlined in the "Configuring existing SAP® standard components for the use with SmartExporter.pdf" manual on the CD.
Note:
If you want to use the whole scope of functionalities SmartExporter offers and you are eager to avoid incorrect values in the data extracted or you do not accept the limited availability of data, it is highly recommended to use SmartExporter with the specific SmartExporter SAP® components.
As of SmartExporter 2015 R1 only SmartExporter specific SAP® components version 2.0.0003 and higher are supported. SAP® components version 2.0.0002 or older are not supported anymore.
SmartExporter will automatically switch to the SAP® standard components and allow a data extraction in online mode if SmartExporter discovers that the specific SmartExporter SAP® components are not implemented or SmartExporter has no access to these components. If a specific feature requires the use of the SmartExporter SAP® components, SmartExporter will display a message in the status bar, indicating that the default SAP® standard components are not sufficient to support this feature.
Note:
Some SmartExporter features are not available when you are using the SAP® standard components. You will be notified by specific icons in the SmartExporter user interface that certain features are not accessible. Besides, there are some limitations regarding the data to be extracted if you are using the SAP® standard components.

SmartExporter User Guide 78
Limited functionality
The following features are not available when SmartExporter is used in combination with the SAP® standard components:
o SAP® standard components can only be used to run synchronous Data Requests. You are not able to queue a Data Request in the SAP® system.
o Besides, you cannot view or check the Data Request activity.
o Using SAP® standard components it is not possible to check the size of a Data Request in the Fields and Filters step.
o Joins with more than one table are not supported when using SAP® standard components.
o To download a Data Dictionary while using SAP® standard components may take several hours. Note: You cannot pause the download once you have started it and you may not resume with the download at a later time.
The SmartExporter user interface uses special icons to mark the features which are not available.

SmartExporter User Guide 79
Limitations when extracting data
The use of existing SAP® standard components is subject to the following restrictions regarding the data to be extracted:
o You are limited to a total length for all fields of 512 bytes. Please make sure that the fields selected per table do not exceed this limit.
o Certain numeric data types like DEC (virtual or amount fields with decimal separators, thousands separators and signs) return false data for some values when the extraction is run. This may also be the case when large values of data type QUAN (Quantity) are extracted. Example: When you are using the SAP® standard components and you select the TNRO (Definition of Number Range Objects) table with the PERCENTAGE field which has the DEC data type, the data extraction will return the value *.0, whereas the correct value is actually 10.0. (The correct value is extracted if you are using the SmartExporter specific SAP® components). If SmartExporter detects incorrect data while exporting numeric data types, these bad data will be written to a separate file. This way you can quickly review and check whether the data extracted are correct. Corresponding to the example above the data of the TNRO table would be written to a file named “201104208022055_AUD_TNRO.csv“, whereas the bad or incorrect numeric data would be extracted by SmartExporter to an additional file called “201104208022055_AUD_TNRO_BadData.txt“. Please note that a corresponding message will be displayed in the Data Request progress dialog and you will be notified of the location of the file with the bad data. The following example shows a data extraction with the TNRO (Definition of Number Range Objects) table with the PERCENTAGE field selected, which has generated bad data:

SmartExporter User Guide 80
o Field values in the BSEG table exceeding a value of 9.999.999.999 will be marked with an asterisk * and will not be exported with the correct values.
o In SAP® 4.7 the extraction of Unicode strings is not working properly when using the SAP® standard component (RFC_READ_TABLE). Please refer to the SAP® note 758278 describing how to fix this behaviour. The note was set to “Internal use” or “In Progress” by SAP SE and is currently not available. Note: If you modify the SAP® module RFC_READ_TABLE to run it in combination with SmartExporter, please make sure that you implement your changes in the original function module as SmartExporter will only use the original one. Using the RFC_READ_TABLE module for the export of data is not officially supported by SAP®. Erroneous adjustment or customizing of the module might lead to an incorrect data extraction.
o If you are using SAP® version 4.7 or 5.0, incorrect values might occur when you are selecting fields of data type FLTP (Floating Point). In this case the RFC module generates an exception error. For more information refer to SAP® note 758278 describing how this behaviour can be fixed.

SmartExporter User Guide 81
o Due to the limitations of the RFC_READ_TABLE module Data Requests containing a
filter that exceeds the length of 72 characters cannot be run. The maximum length of the parameter SmartExporter is allowed to pass on to the RFC module is 72 characters. If the filter exceeds this length, no data will be transferred.
o The implementation of the RFC_READ_TABLE module by SAP® is not ideal. By
default the filter calculation method is not set when SmartExporter is forced to use SAP® standard components. However, when extracting large data volumes using SAP® standard components without the filter calculation method now and then time outs might occur. Therefore you can activate the Use SAP® standard components with filter calculation method option in the Components tab of the Data Requests page of the Change application options task or in the Options step of the wizard if you are using the SAP® standard components. This might improve the performance when SmartExporter is forced to use SAP® standard components. Note: The Use SAP® standard components with filter calculation method option requires that the database provides the records in a sorted order. Please refer to your SAP® administrator to get the necessary information. So far limitations regarding the performance using the SAP® standard components with filter calculation method have only been observed for the database systems DB2® and Oracle version 10, where not all records have been extracted. You can check the structure of your database by following the steps below:
o Create a Data Request in SmartExporter and select all key fields.
o Extract the data in a CSV or TXT file.
o Then check the file to see whether the data in the rows of the key fields are displayed in ascending order. If this is not the case, it is highly recommended to install and use the SmartExporter specific SAP® components.

SmartExporter User Guide 82
About joins in SmartExporter
Joins are used to combine fields from two or more tables. To join the tables common values or fields which exist in each table are required.
SmartExporter provides two join types: Inner Join and Left Outer Join.
Note that the joins in SmartExporter have the functionality of SQL joins. At least a basic knowledge in defining SQL joins is highly recommended in order to avoid extracting useless data.
Inner Join
The Inner Join processes every record in the left or primary table and checks based on the join condition if a match exists in the right or secondary table. If this is the case the record will be included in the join result table.
SmartExporter can create joins with a 1 to n relationship. This means that for each match in the right table a record is included in the result table.
If you are an IDEA user, you might be acquainted with the IDEA feature Join Databases. Using this IDEA feature you are also able to create an Inner Join when you are using the Matches only option in the IDEA Join Databases dialog. However, this IDEA join feature is limited to a 1 to 1 relationship. In IDEA only the first match from the secondary file will be extracted to the result file, while in SmartExporter the Inner Join feature has a 1 to n relationship and gets all matches in the right (or secondary) table comparable to the IDEA Visual Connector.
Note that for an Inner Join the following operators are available to define a join condition:
o Equal To
o Less Than or Equal To
o Greater Than or Equal To
o Greater Than
o Less Than
Left Outer Join
A Left Outer Join will extract all records from the left or primary table to the result table regardless of the join condition specified and whether or not a match is found in the right or secondary table. A Left Outer Join result will contain all records from the left table and the matches found in the right table. In case there is no match for a record of the left table to be found in the right table the column in this row will be empty. If there is more than one match in the right table for a single record of the left table, the record of the left table will be repeated with the corresponding matches of the right table in the join result table.
SmartExporter creates a Left Outer Join with a 1 to n relationship.
Note that for a Left Outer Join only one operator is available to define a join condition:
o Equal To

SmartExporter User Guide 83
Additional Data Sources
As of SmartExporter 2015 R1 you are able to use the so called Additional Data Sources to extract data from different sources. Additional Data Sources in an SAP® system such as reports or payroll data which are populated during run time by the SAP® business logic might be extracted using one of the pre-defined Data Request templates shipped by default with SmartExporter. Use the Data Requests for instance to get data from Human Capital Management or extract SAP® default report data. You can tailor the templates to meet your specific needs.
Note:
To use the Additional Data Source feature the specific SmartExporter SAP® components version 4.0.0000 or higher covering the Additional Data Sources functionality have to be implemented.
SmartExporter 2015 R1 comes by default with Data Dictionaries supporting the use of the pre-defined Data Requests.
For more information refer to the installation manual ‘SmartExporter_Additional_Data_Sources_Manual_EN.pdf’ in the Documentation folder on the SmartExporter SAP® components CD or the corresponding folder in your download package.
Import and modify the Data Request template
1. Go to the Run or manage Favorites task on the SmartExporter Home page.
2. Click the Import button.
3. Locate the folder where the Data Request file, e.g. ‘SmartExporter - Reports - Compact Document Journal – Field List.xml’, is stored (either on the SmartExporter SAP® components CD or in the corresponding folder in your download package). If necessary, select Portable format (*.xml) in the file type drop-down list.
4. Click the Open button.
5. The imported Data Request will be shown in the Run or manage Favorites list.
6. Read the description of the Data Request in the Notes area. It is an instruction on how to use the Data Request and which Quick-Filters have to be set before you can run the Data Request.
SmartExporter User Guide 84
7. Click the Start Data Request wizard button and modify it accordingly.
Note:
No matter what tables and fields are pre-defined for this Data Request template, SmartExporter will only show or extract the data of your SAP® system you have the corresponding SAP® authorizations for.

SmartExporter User Guide 85
ODBC
If you want to extract data from an SAP® system to an ODBC data source, note that only a synchronous extraction is supported.
Creating an ODBC data source
Please consider the following prerequisites when you create a data source:
o If you are using an already existing ODBC data source, make sure that you have the required log in information to connect to the ODBC data source.
o When you are connecting to a Microsoft SQL Server it is required that the property “Multiple Active Result Sets” (MARS) is set to “Yes”. Otherwise, SmartExporter will show the error “One or more errors occurred.” when you try to connect to the database. The property “Multiple Active Result Sets” (MARS) might also be set for an existing data source in the registry when you are using the ODBC data source definition for the SQL Server (Computer\HKEY_CURRENT_USER\Software\ODBC\ODBC.INI\Data Source Name). Additionally, you may also specify this property in the Connection string used to connect to the ODBC data source like in the example below: \SQLEXPRESS;Database=SmartExporterTest;Trusted_connection=Yes;
MARS_Connection=Yes;
o However, if you do not have the required authorization to modify registry keys, it is recommended that you create a specific ODBC data source for the use with SmartExporter.
Define ODBC settings
You have to define how the data in your ODBC data source is handled before you run a Data Request.
Note:
Once you have started the Data Request wizard you cannot change the selected Data Dictionary or modify the ODBC settings you have previously defined in the application options. If you return to the Change application options page, all your entries will be lost.
1. Go to the Change application options task on the SmartExporter Home page and select the Data Requests entry in the Navigator.
2. Switch to the ODBC tab.

SmartExporter User Guide 86
3. Define how the tables are handled by selecting the appropriate option in the drop-down list.
o Append to an existing table; create the table if it does not exist
The data will be attached to an existing table. Note that the second table has to have the same number of fields or fewer fields than the table it is attached to. And the fields must have the same name and the same data types as the ones in the first table.
o Always create a new table; replace it if it already exists
There will always be a newly created table. If a table with the same name already exists, it will be replaced by the new one.
o Try to create a new table; an error will occur if it already exists
o Truncate and then append to an existing table; an error will occur if it does not exist
All content of the existing table will be replaced by the new content.
o Append to an existing table; an error will occur if it does not exist
The data will be attached to an existing table. Note that the second table has to have the same number of fields or fewer fields than the table it is attached to. And the fields must have the same name and the same data types as the ones in the first table.

SmartExporter User Guide 87
4. In the Table name style drop-down list you can also specify the format of the table names.
o Select Leave unformatted in the drop-down list to keep the original table names.
o Use the option Format only conflicting names to modify the table name if it already exists. The specified table name format defined in the section below will be used to generate the table names.
o Select Format all names to use the specified table name format defined in the section below to generate the table names.
5. If you have decided to rename the tables, you must specify the Table name format.
Use the buttons below the Preview section to format the table name. Note that you have to set the counter manually. It does not increment automatically. In the Digits field specify how many digits the counter will have. Check the name you have defined in the Preview section above. You can also use a GUID for your table name.
6. If you have defined all required ODBC settings, you can either create a new Data Request or open an existing Data Request using the Run or manage Favorites task on the SmartExporter Home page. Please refer to the Create Data Request section on page 22 and follow the steps 1 to 24 described there.
7. Switch to the Options step in the Navigator.
8. Set the location where you want to save the extracted files.
9. In the Save as type drop-down list select ODBC.
10. Go to the Finish step in the Navigator and click Run the Data Request. Note: ODBC only supports synchronous extraction.

SmartExporter User Guide 88
11. The Connect to ODBC data source screen is shown.
12. Specify the data source by selecting the corresponding entry in the User or system data source name drop-down list. Note that the Connection string field is populated automatically corresponding to your entries.
13. Enter the Login information required for the selected data source or use the Advanced section to enter a Custom DSN.
14. Click OK to run the Data Request.
Note:
When you leave the Connect to ODBC data source screen all login information entered will be deleted.

SmartExporter User Guide 89
IDEA version 9.x and SmartAnalyzer
IDEA version 9.x provides the next integration step of the two applications SmartExporter and IDEA.
Note:
This section refers to IDEA 9 and the integrated SmartAnalyzer only. If you are using IDEA v 8.x the features described below are not available.
SmartExporter is included in IDEA, so you can launch SmartExporter from within the IDEA Import Assistant. You also have the opportunity here to download the SmartExporter Starter version in case you do not have a SmartExporter version installed. Note that IDEA version 9.x refers to Desktop projects and not Working Folders anymore. A Desktop project is stored locally and contains the data you have imported as well as the analysis results you have created using IDEA. If you have selected the IDEA files as output format for the data extracted by SmartExporter, the generated files will be stored in the project currently selected in your IDEA version.
Additionally, you will benefit from the SmartAnalyzer module available in IDEA. It is an easy to use application providing a comprehensive pool of pre-defined audit tests covering the main parts of analyses required. SmartAnalyzer comes with every IDEA version and includes by default 5 sample audit tests.
SmartAnalyzer offers numerous audit tests covering a wide scope of auditing areas. You can combine various audit tests to packages which are tailored to suit your specific audit objectives. Besides, SmartAnalyzer provides Standard Import Routines for ERP systems to simplify the import of data from complex systems by selecting the audit tests you want to perform and letting SmartAnalyzer do the work of getting exactly the data required for the audit tests chosen.
This is particularly useful when dealing with SAP® systems. Firstly, you select the audit tests in SmartAnalyzer which you want to run. Then you create an SAP® - SmartExporter Data Request and pass it on to SmartExporter immediately. SmartExporter extracts exactly the data required for the audit tests selected from the SAP® system and SmartAnalyzer imports it into IDEA. The data imported are ready to use. You are able to run the audit tests without taking any further steps or actions. Besides, there is also the option to create an SAP® - Data Request document and pass it on to third parties in case you do not have direct access to the SAP® system.
Note: To use the complete scope of functionality in combination with IDEA and SmartAnalyzer the SmartExporter Desktop version is recommended.
SmartAnalyzer comes with 5 sample audit tests including the so called Sample Payments app. However, to test this sample you do not require a SmartExporter Desktop version. The audit tests included in this sample can also be tested using SmartExporter Starter.