Embed Size (px)
Citation preview

Version1.0May2017
SmartPlantPi
Advanced Usage Manual
May 2017 Version 1.0
Version1.0May2017
TableofContentsCautionswhenbuildingandusingSmartPlantPi............................................................................................2
WhatisintheAdvancedUsageManual?.......................................................................................................2
WhatisSmartPlantPi?...................................................................................................................................6
BuildingYourInternetDashboard.................................................................................................................8
PubNubandFreeboard.................................................................................................................................9
IntroductiontoMQTT.................................................................................................................................10
JSONDataPayload......................................................................................................................................10
SettingupanAccountatPubNub................................................................................................................11
SettinguptheSmartPlantPiSoftware..........................................................................................................14
SettingupanAccountatFreeboard.............................................................................................................16
Support.......................................................................................................................................................20
Disclaimer...................................................................................................................................................21
CautionswhenbuildingandusingSmartPlantPi
• Keep all water away from the electronics and power supply at all times! • SmartPlantPi is designed for indoor use only and should be placed in a dry
environment where no water or rain can reach to avoid short circuiting the electronics,
• Insert the moisture sensor into the CENTER of the flower pot, and keep it near the center of the plant and away from the water coming out of the holes cut in the watering pipe.
• This is not a toy! Keep it out of reach of young children and pets. • SwitchDoc Labs assumes no liabilities in the use of this kit, beyond the refund of
the purchase price.
WhatisintheAdvancedUsageManual?
The Advanced Usage Manual for SmartPlantPi consists of instructions for setting up your own Internet Dashboard using MQTT (Pubnub) and the Freeboard.org Internet

Page6Version1.0May2017
Dashboard.
WhatisSmartPlantPi?
This is a perfect project kit for kids with some help from the adults and for adults trying to learn some new things. We have done this before with our successful OurWeather KickStarter so we know what we are talking about. People all over the world have built the OurWeather weather station with great success. This project has no soldering involved and uses Grove connectors to wire everything up! You can't reverse them and blow things up. Here is our tutorial on the Grove system. SmartPlantPi Features
• Measure your Temperature • Measure your Soil Moisture • Measure your Sunlight • Show your results on the Internet • Even connect your plant to the Amazon Echo/Alexa
Easy to build. Easy to learn about the IOT (Internet Of Things) and the Raspberry Pi. SwitchDoc Labs is building on the strength and reception of our last successful No Soldering Kickstarter Project - OurWeather.

Page7Version1.0May2017

Page8Version1.0May2017
BuildingYourInternetDashboard
SmartPlantPi has an OLED display that shows the status of the system and the plant under the control of the Raspberry Pi. The SmartPlantPi software comes preconfigured to display your Plant on the Internet (for all to see it in it's glory!) using an IOT dashboard. This is done by using Pubhub and Freeboard (both in Free mode!) to display all the information. We are publishing a very straight forward tutorial to make this work with your Smart Plant. Want to see the Live Link to our Smart Plant? Click here. It will take about 15 seconds to refresh.
Page9Version1.0May2017
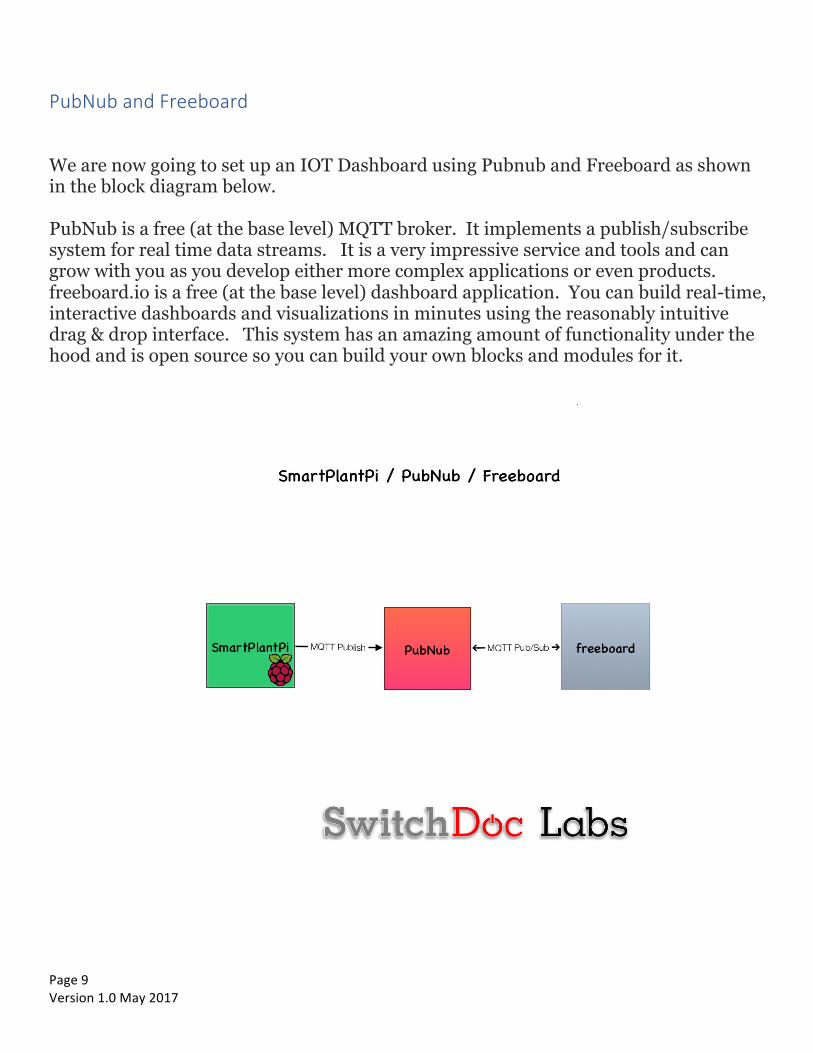
PubNubandFreeboard
We are now going to set up an IOT Dashboard using Pubnub and Freeboard as shown in the block diagram below. PubNub is a free (at the base level) MQTT broker. It implements a publish/subscribe system for real time data streams. It is a very impressive service and tools and can grow with you as you develop either more complex applications or even products. freeboard.io is a free (at the base level) dashboard application. You can build real-time, interactive dashboards and visualizations in minutes using the reasonably intuitive drag & drop interface. This system has an amazing amount of functionality under the hood and is open source so you can build your own blocks and modules for it.

Page10Version1.0May2017
IntroductiontoMQTT
MQTT is a publish-subscribe based "light weight" messaging protocol for use on top of the TCP/IP protocol, such as the WiFi packets that we are using in this project. It is designed for connections with remote locations where a "small code footprint" is required or the network bandwidth is limited. The publish-subscribe messaging pattern requires a message broker. The broker is responsible for distributing messages to interested clients based on the topic of a message.
Publish–subscribe is a pattern where senders of messages, called publishers (in this case our ESP8266 is the publisher), don't program the messages to be sent directly to subscribers, but instead characterize message payloads into classes without the specific knowledge of which subscribers the messages are sent to. Similarly, subscribers will only receive messages that are of interest without specific knowledge of which publishers there are. PubNub operates as the broker in this system and routes the published data to the appropriate subscribers. You can think of MQTT as writing stories for a newspaper where you don’t know who will be subscribing to the article.
JSONDataPayload
JSON is an open standard format that uses human-readable text to transmit data objects consisting of attribute–value pairs. It is the primary data format
used for asynchronous browser/server communication, largely replacing XML. XML is a "heavier" protocol that is also hierarchical in nature, but with a great deal more redundancy that JSON. Yes, there are class wars going on for people that advocate JSON over XML, but in todays world of higher speed communication, it rarely matters. You can make the argument that the higher data density of JSON is a better choice for IOT applications. Here is an example of the data packet we are using in the SmartPlantPi code in JSON

Page11Version1.0May2017
for the SmartPlantPi data payload:
{ 'SmartPlantPi_Humidity': '35.3', 'SmartPlantPi_MoistureHumidity': '83.1', 'SmartPlantPi_Water_Full_Text': 'Empty', 'SmartPlantPi_AirQuality_Sensor_Value': '454', 'SmartPlantPi_Water_Full_Direction': '180', 'SmartPlantPi_CurrentStatus': 'Sampling', 'SmartPlantPi_AirQuality_Sensor_Number': '0', 'SmartPlantPi_Temperature': '71.8 F', 'SmartPlantPi_UVIndex': '0.00', 'SmartPlantPi_Last_Event': 'Started at: 2017-05-15 15:25:05', 'SmartPlantPi_Moisture_Threshold': '65.0', 'SmartPlantPi_Visible': '113.11', 'SmartPlantPi_AirQuality_Sensor_Text': 'Fresh Air', 'SmartPlantPi_IR': '719.26', 'SmartPlantPi_Version': '012' } The foundation of PubNub is providing you the ability to integrate scalable, realtime data streams into your applications. Using the publish/subscribe paradigm, subscribers to a particular channel will receive any and all messages that are published to that channel. It doesn’t matter if there is one subscriber, 10 subscribers, 1000 subscribers or millions of subscribers, a published message will be delivered to all of those subscribers on that channel in less than ¼ second1.
SettingupanAccountatPubNub
Setup a free account at pubnub.com. Make sure you write down your password. Now let's setup the MQTT info to connect up SmartPlantPi. Step 1) Create a new App by clicking on "NEW APP +".. Type in SmartPlantPi in the

Page12Version1.0May2017
"enter a new app" filed and hit the "CREATE NEW APP +" button. You should see something similar to this (we have other projects on our PubNub account):
Step 2) Click on the SmartPlantPi App page. Then enter "SmartPlantPi" in the "Enter a New Keyset Name" field and hit the "CREATE NEW KEYSET +" button. That will get you a page that looks like this. Don't worry about the application add-ons for this page. Those are all for more advanced (and cool) usage. Note the keys below will not work (they are for our former SmartPlantPiTest App). They have all been disabled. You need to set up your own.

Page13Version1.0May2017
Next, let's set up the SmartPlantPi_PubHub Python Software.

Page14Version1.0May2017
SettinguptheSmartPlantPiSoftware
Make sure you have your complete SmartPlantPi software installed and working before proceeding. Open up the config.py file and edit the following lines # configuration Pubnub_Publish_Key = "pub-c-xxxxxx" Pubnub_Subscribe_Key = "sub-c-xxxxxx" Placing the Publish Key and Subscribe Key into the configuration strings above. It will then look something like this (user your own keys): # configuration Pubnub_Publish_Key = "pub-c-e77e14eb-2bb1-4f58-8ac7-cf4d75c46370" Pubnub_Subscribe_Key = "sub-c-10e3de76-a54c-11e6-8bfd-0619f8945a4f" If you want to subscribe to your own data from PubHub, open another terminal window on the Pi, configure listen.py with the same keys above and start listen.py sudo python listen.py You will see something like this: incoming message {u'SmartPlantPi_Temperature': u'71.8 F', u'SmartPlantPi_MoistureHumidity': u'83.0', u'SmartPlantPi_UVIndex': u'0.00', u'SmartPlantPi_AirQuality_Sensor_Value': u'453', u'SmartPlantPi_Water_Full_Direction': u'180',

Page15Version1.0May2017
u'SmartPlantPi_CurrentStatus': u'Sampling', u'SmartPlantPi_AirQuality_Sensor_Number': u'0', u'SmartPlantPi_Humidity': u'34.9', u'SmartPlantPi_Water_Full_Text': u'Empty', u'SmartPlantPi_Last_Event': u'Started at: 2017-05-15 15:34:07', u'SmartPlantPi_Moisture_Threshold': u'65.0', u'SmartPlantPi_Visible': u'108.61', u'SmartPlantPi_AirQuality_Sensor_Text': u'Fresh Air', u'SmartPlantPi_IR': u'665.98', u'SmartPlantPi_Version': u'012'} incoming message {u'SmartPlantPi_CurrentStatus': u'Monitor'} incoming message {u'SmartPlantPi_CurrentStatus': u'Sampling'} incoming message {u'SmartPlantPi_Temperature': u'71.8 F', u'SmartPlantPi_MoistureHumidity': u'82.3', u'SmartPlantPi_UVIndex': u'0.00', u'SmartPlantPi_AirQuality_Sensor_Value': u'439', u'SmartPlantPi_Water_Full_Direction': u'180', u'SmartPlantPi_CurrentStatus': u'Sampling', u'SmartPlantPi_AirQuality_Sensor_Number': u'0', u'SmartPlantPi_Humidity': u'34.9', u'SmartPlantPi_Water_Full_Text': u'Empty', u'SmartPlantPi_Last_Event': u'Started at: 2017-05-15 15:34:07', u'SmartPlantPi_Moisture_Threshold': u'65.0', u'SmartPlantPi_Visible': u'103.69', u'SmartPlantPi_AirQuality_Sensor_Text': u'Fresh Air', u'SmartPlantPi_IR': u'652.46', u'SmartPlantPi_Version': u'012'} incoming message {u'SmartPlantPi_CurrentStatus': u'Monitor'} incoming message {u'SmartPlantPi_CurrentStatus':

Page16Version1.0May2017
u'Sampling'} incoming message {u'SmartPlantPi_Temperature': u'71.8 F',
SettingupanAccountatFreeboard
Now we have all the data that we want being published to the PubNub MQTT broker, now it is time to set up an account at freeboard.io. Step 1) Set up your free account at freeboard.io Step 2) Go to My Freeboards and create a new Freeboard called SmartPlantPi Click on the name of SmartPlantPi to begin building your IOT Dashboard. The JSON for this dashboard is included below. It is included in the GitHub repository as dashboard006.json. Being able to import dashboards is critical to being able to distribute kits and repositories for projects like this. You will have to change your subscribe key. The one in the file won't work. Step 3) Edit dashboard006.json and change the subscribe key in the dashbaord006.json
"subscribe_key":"sub-c-xxxx" Step 4) Click on Import and locate the dashboard006.json Following is what one of these configuration files look like (from the SwitchDoc Labs Project, SunIOT). {"version":1,"allow_edit":true,"plugins":["/plugins/all"],"panes":[{"width":1,"row":{"3":1,"4":1,"5":1},"col":{"3":1,"4":2,"5":2},"col_width":1,"widgets":[{"type":"gauge_widget","settings":{"title":"Visible","value":"datasources[\"SunIOT\"][\"SunIOT_Visible\"]","min_value":0,"max_value":"1000"}}]},{"width":1,"row":{"3":1,"4":1,"5":1},

Page17Version1.0May2017
"col":{"3":2,"4":3,"5":3},"col_width":1,"widgets":[{"type":"gauge_widget","settings":{"title":"InfraRed","value":"datasources[\"SunIOT\"][\"SunIOT_IR\"]","min_value":0,"max_value":"6000"}}]},{"width":1,"row":{"3":1,"4":1,"5":1},"col":{"3":3,"4":4,"5":4},"col_width":1,"widgets":[{"type":"gauge_widget","settings":{"title":"UV Index","value":"datasources[\"SunIOT\"][\"SunIOT_UVIndex\"]","min_value":0,"max_value":"10"}}]},{"width":1,"row":{"3":9,"4":9,"5":9},"col":{"3":2,"4":3,"5":3},"col_width":1,"widgets":[{"type":"sparkline_widget","settings":{"value":["datasources[\"SunIOT\"][\"SunIOT_Visible\"]"]}}]},{"width":1,"row":{"4":1},"col":{"4":1},"col_width":1,"widgets":[]}],"datasources":[{"name":"SunIOT","type":"plugin5376758af1776c1c2e000326","settings":{"subscribe_key":"sub-c-34a701c0-a6a1-11e6-85a3-02ee2ddab7fe","channel":"SunIOT_Sunlight"}}],"columns":5} The file for SmartPlantPi (dashboard006.json) is much larger. Step 4) Add a Datasource. Click Add under DATASOURCES In this case, the Datasource is our PubHub MQTT broker. This is very important to get right. Fill out the form as below, using your subscribe key from PubNub. We have blocked out our subscribe key.

Page18Version1.0May2017
If you have SmartPlantPi running, you should see your screen populate with values, numbers and text in about 15-30 seconds. Congratulations! You now have your IOT device hooked up to an Internet Dashboard. You can share the link with anyone. If you want a private page, you need to get one of the inexpensive paid plans. Ack! What if it doesn’t work? Go back and check your publish and subscribe keys (you should be using your subscribe keys for the dashboard! The only place you use your publish key is in SmartPlantPi.py. Everywhere else you need to use the subscribe key. Following a screen shot of our SmartPlantPi system up on freeboard.io.

Page19Version1.0May2017

Page20Version1.0May2017
Support As with all SwitchDoc Labs products, technical support is given through the forums on www.switchdoc.com (support->forums). If you have issues that can be solved by our fabulous customer service department, please go to www.switchdoc.com and send your issues through our Contact page on the top menu.

Page21Version1.0May2017
Disclaimer SwitchDoc Labs, LLC takes no responsibility for any physical injuries and possession loss caused by those reasons which are not related to product quality, such as operating without following the operating manual and cautions, natural disasters or force majeure. SwitchDoc Labs, LLC has compiled and published this manual which covers the latest product description and specification. The contents of this manual are subject to change without notice.