Embed Size (px)
Citation preview
1
Table of Contents
1. Overview
2. Recommended Specifications
3. Glossary
4. Configuration Manager
5. Registration
6. Feature Settings
a. Import All Settings
b. Export All Settings
c. Create Support File
d. Reader Setup
e. OCR Setup
i. General Settings Tab
ii. Image Settings Tab
f. Hot Key
g. Pop Up Dialog
h. Activity Log
i. Customize Errors
j. Custom Cards
k. Decrypt Keys
l. Emulator Settings
i. DLL Location
ii. Session List
m. Output Leading Character
n. Keystroke Type
7. Profile Creation
a. New Profile
b. Functions
c. Custom Fields
d. Special Functions
e. Modifiers
f. Recognition Types
i. Title Bar Recognition
ii. Screen Scrape Recognition
iii. Image Capture Recognition
iv. Internet Explorer Recognition
v. Text Capture Recognition
vi. Windows Control Recognition
8. Appendices
a. Special Functions
2
Overview
SmartReg is automated enrollment software, designed to read data from any supported
Driver’s License, Passport, Military ID or standard Credit Card and automatically
populate your proprietary enrollment screen. Once setup properly, the system will
populate multiple screens with little to no user interaction. The operator simply gets to
the appropriate screen and scans or swipes the identification credential while SmartReg
does the rest.
This document will guide you through the process of setting up your SmartReg system
and also introduce you to the newest features available in SmartReg. Keep in mind,
this manual will not show examples of every capability of SmartReg. The developers of
SmartReg have equipped you with the tools to be flexible in most situations. Use your
imagination when thinking of scenarios to use SmartReg.
3
Recommended Specifications
Processor: 2.6 GHz Single-Core CPU or equivalent Multi-Core CPU
OS Version: Windows XP SP3, Vista SP2 or Windows 7
OS Edition: Professional, Business, Enterprise, or Ultimate
Memory: 1.5 GB of RAM.
Disk Space: 5 GB of free hard disk space
Other: Microsoft .NET Framework Version 4.0 or higher and
sufficient number of USB Ports to accommodate hardware
devices
4
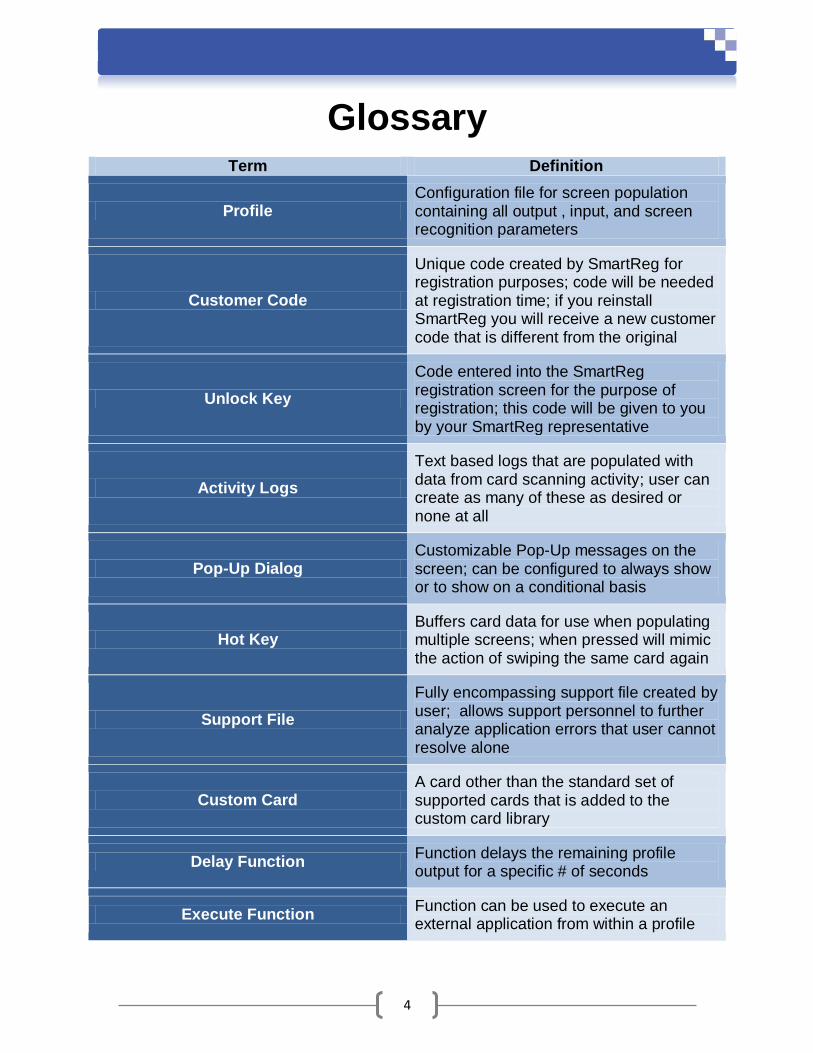
Glossary
Term Definition
Profile Configuration file for screen population containing all output , input, and screen recognition parameters
Customer Code
Unique code created by SmartReg for registration purposes; code will be needed at registration time; if you reinstall SmartReg you will receive a new customer code that is different from the original
Unlock Key
Code entered into the SmartReg registration screen for the purpose of registration; this code will be given to you by your SmartReg representative
Activity Logs
Text based logs that are populated with data from card scanning activity; user can create as many of these as desired or none at all
Pop-Up Dialog Customizable Pop-Up messages on the screen; can be configured to always show or to show on a conditional basis
Hot Key Buffers card data for use when populating multiple screens; when pressed will mimic the action of swiping the same card again
Support File
Fully encompassing support file created by user; allows support personnel to further analyze application errors that user cannot resolve alone
Custom Card A card other than the standard set of supported cards that is added to the custom card library
Delay Function Function delays the remaining profile output for a specific # of seconds
Execute Function Function can be used to execute an external application from within a profile

5
Title-Bar Recognition
Most common recognition type (how the profile recognizes if the appropriate screen is active); use this type of recognition first if at all possible
Internet Explorer Scraper
Another form of screen recognition (I.E. how the profile recognizes if the appropriate screen is active); matches the HTML of a web site displayed in an Internet Explorer browser of version 5.5 or later
Emulator Recognition (Screen Scrape)
Recognition type is specific to AS400 emulator’s; when title -bar recognition is not appropriate for your scenario and you are using an AS400 emulator, then this is the preferable way to do your recognition
Image Recognition Another type of recognition; Use only if title-bar and emulator recognition will not work
Special Functions Specific actions you can perform on a certain field (I.E. Remove, Replace, Capitalize First Character, Trim …)
Modifiers Specific keystroke combinations you can add to a character or field (I.E. Shift, Alt, Ctrl …)
6
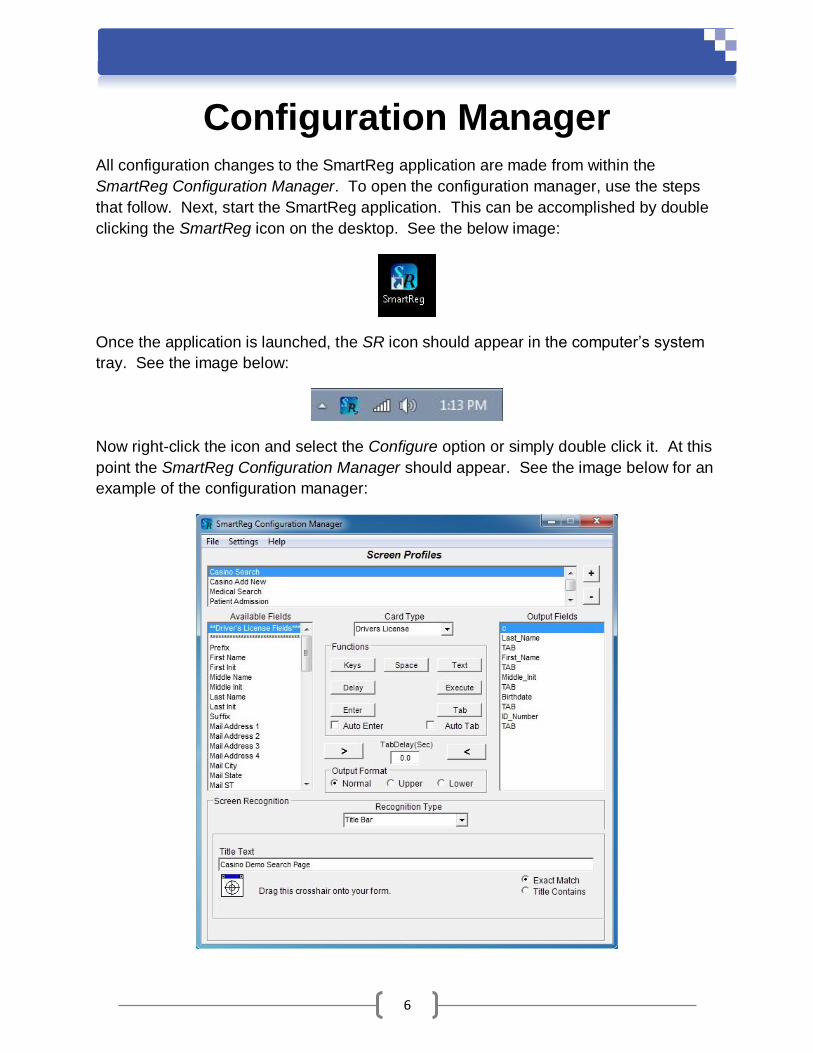
Configuration Manager
All configuration changes to the SmartReg application are made from within the
SmartReg Configuration Manager. To open the configuration manager, use the steps
that follow. Next, start the SmartReg application. This can be accomplished by double
clicking the SmartReg icon on the desktop. See the below image:
Once the application is launched, the SR icon should appear in the computer’s system
tray. See the image below:
Now right-click the icon and select the Configure option or simply double click it. At this
point the SmartReg Configuration Manager should appear. See the image below for an
example of the configuration manager:
7
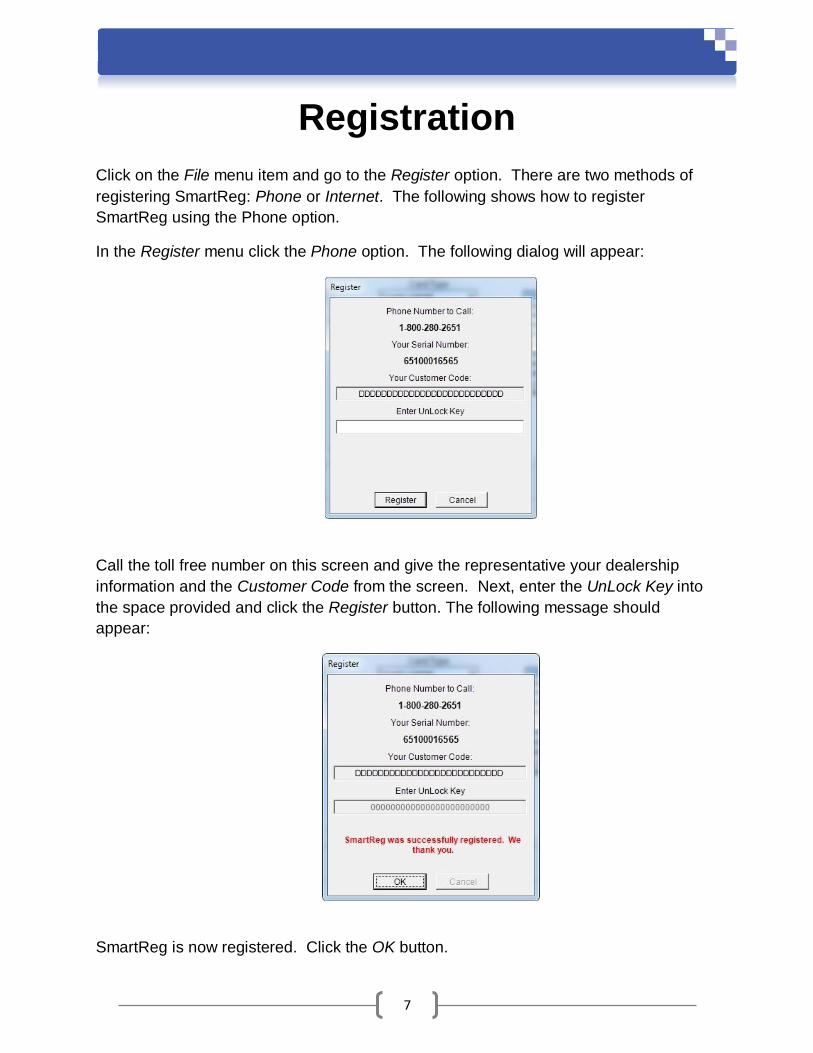
Registration
Click on the File menu item and go to the Register option. There are two methods of
registering SmartReg: Phone or Internet. The following shows how to register
SmartReg using the Phone option.
In the Register menu click the Phone option. The following dialog will appear:
Call the toll free number on this screen and give the representative your dealership
information and the Customer Code from the screen. Next, enter the UnLock Key into
the space provided and click the Register button. The following message should
appear:
SmartReg is now registered. Click the OK button.

8
If you would rather register over the Internet, click on the File menu item, Register and
click the Internet option. The following dialog will appear:
On this screen, enter a name into the Name of Person Registering Product text box and
a location into the Location of Product Installation text box. The location should be
descriptive such as “John’s Computer” or “Branch #2.” Next, click the Internet button.
This will instruct the application to contact our server and attempt to register the
product. If the process is successful and indication of Success is shown, then the
product is registered and registration is complete. However, if there was a problem with
registration, you may retry internet registration again or you may click the Phone option
from the Register menu and use the instructions above to register your product.
NOTE: Registration is NOT available for Trial versions of this software.
9
Feature Settings
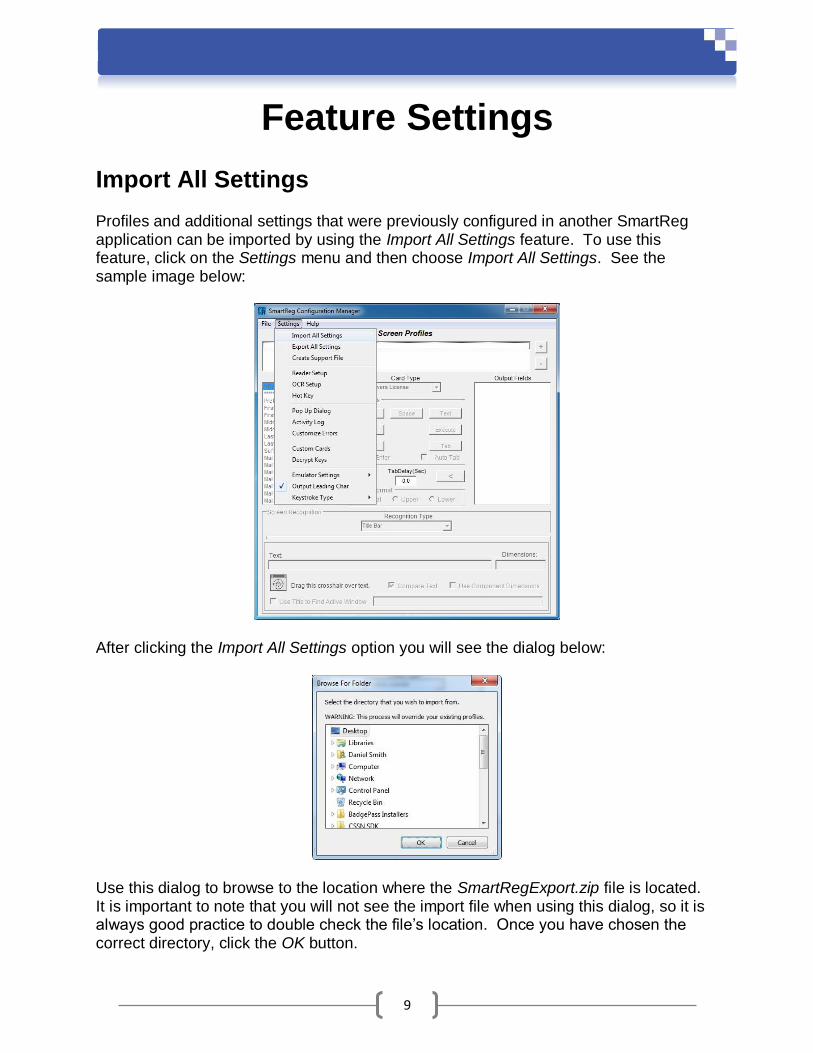
Import All Settings
Profiles and additional settings that were previously configured in another SmartReg application can be imported by using the Import All Settings feature. To use this feature, click on the Settings menu and then choose Import All Settings. See the sample image below:
After clicking the Import All Settings option you will see the dialog below:
Use this dialog to browse to the location where the SmartRegExport.zip file is located. It is important to note that you will not see the import file when using this dialog, so it is always good practice to double check the file’s location. Once you have chosen the correct directory, click the OK button.
10
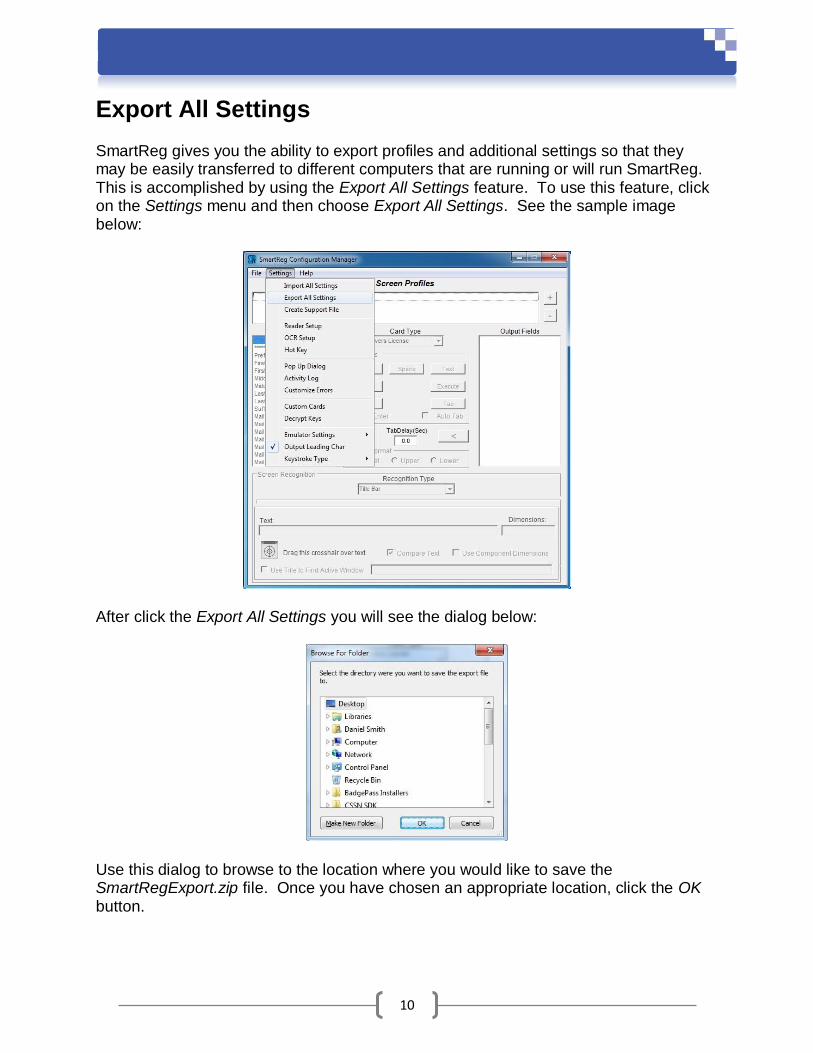
Export All Settings
SmartReg gives you the ability to export profiles and additional settings so that they may be easily transferred to different computers that are running or will run SmartReg. This is accomplished by using the Export All Settings feature. To use this feature, click on the Settings menu and then choose Export All Settings. See the sample image below:
After click the Export All Settings you will see the dialog below:
Use this dialog to browse to the location where you would like to save the SmartRegExport.zip file. Once you have chosen an appropriate location, click the OK button.
11
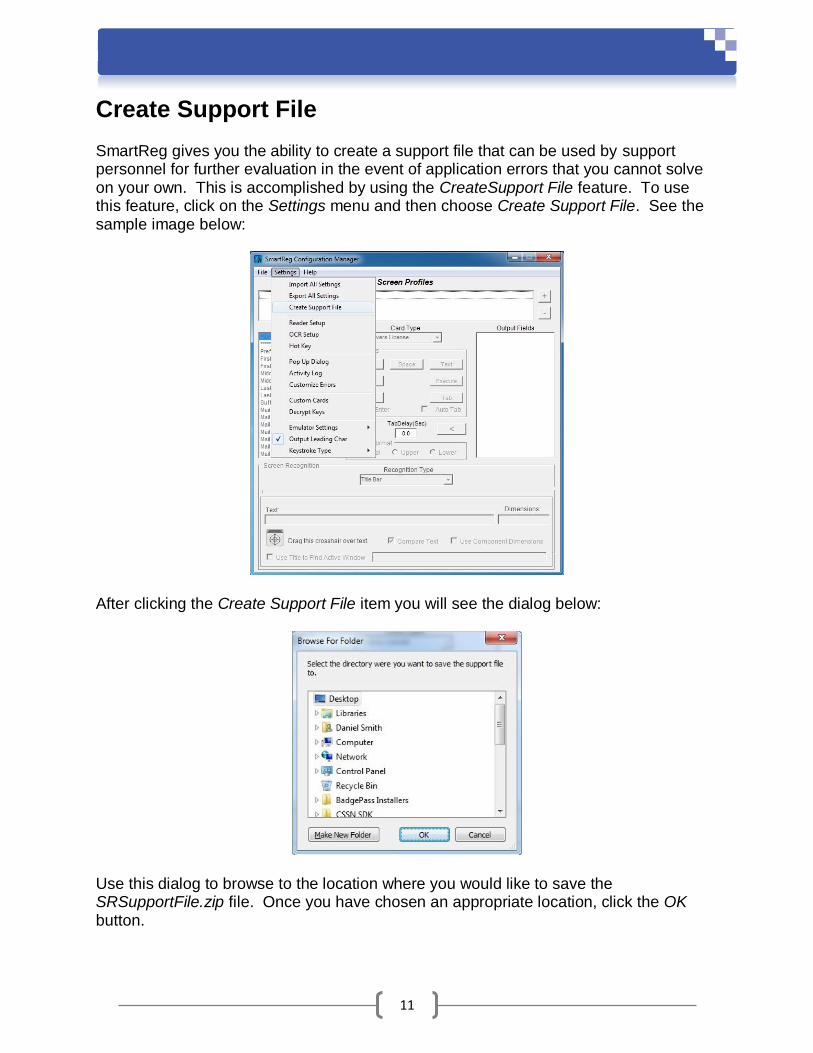
Create Support File
SmartReg gives you the ability to create a support file that can be used by support personnel for further evaluation in the event of application errors that you cannot solve on your own. This is accomplished by using the CreateSupport File feature. To use this feature, click on the Settings menu and then choose Create Support File. See the sample image below:
After clicking the Create Support File item you will see the dialog below:
Use this dialog to browse to the location where you would like to save the SRSupportFile.zip file. Once you have chosen an appropriate location, click the OK button.
12
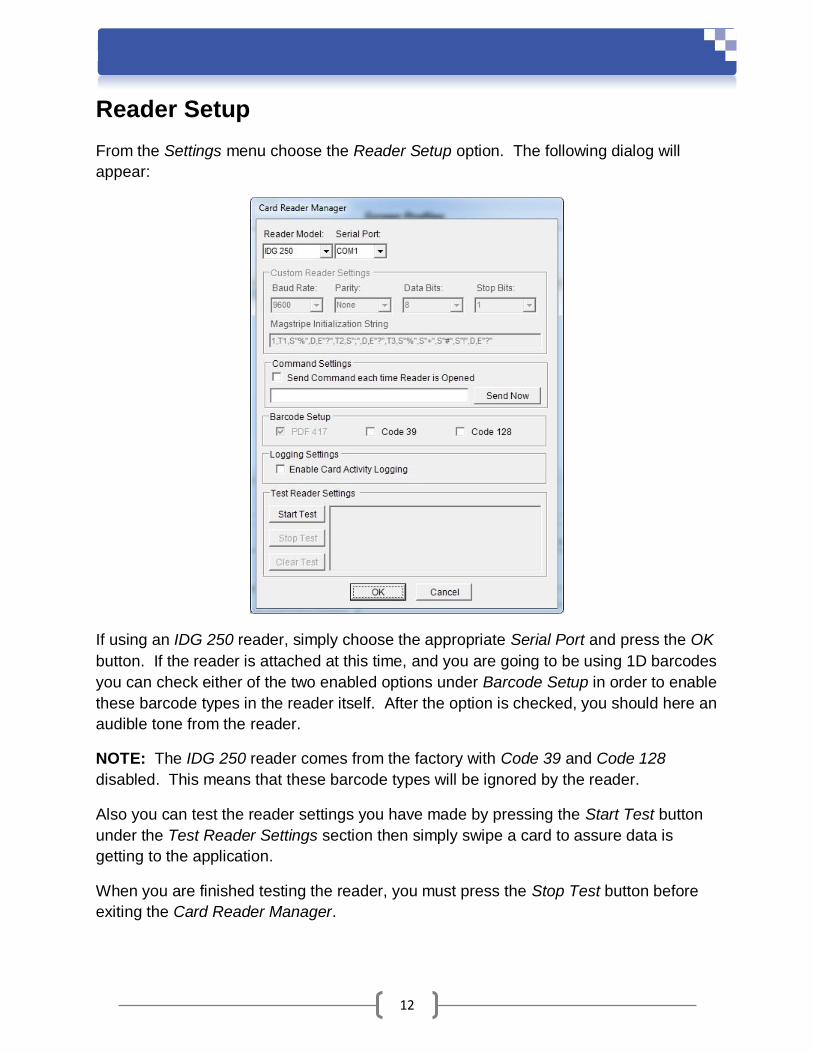
Reader Setup
From the Settings menu choose the Reader Setup option. The following dialog will
appear:
If using an IDG 250 reader, simply choose the appropriate Serial Port and press the OK
button. If the reader is attached at this time, and you are going to be using 1D barcodes
you can check either of the two enabled options under Barcode Setup in order to enable
these barcode types in the reader itself. After the option is checked, you should here an
audible tone from the reader.
NOTE: The IDG 250 reader comes from the factory with Code 39 and Code 128
disabled. This means that these barcode types will be ignored by the reader.
Also you can test the reader settings you have made by pressing the Start Test button
under the Test Reader Settings section then simply swipe a card to assure data is
getting to the application.
When you are finished testing the reader, you must press the Stop Test button before
exiting the Card Reader Manager.
13
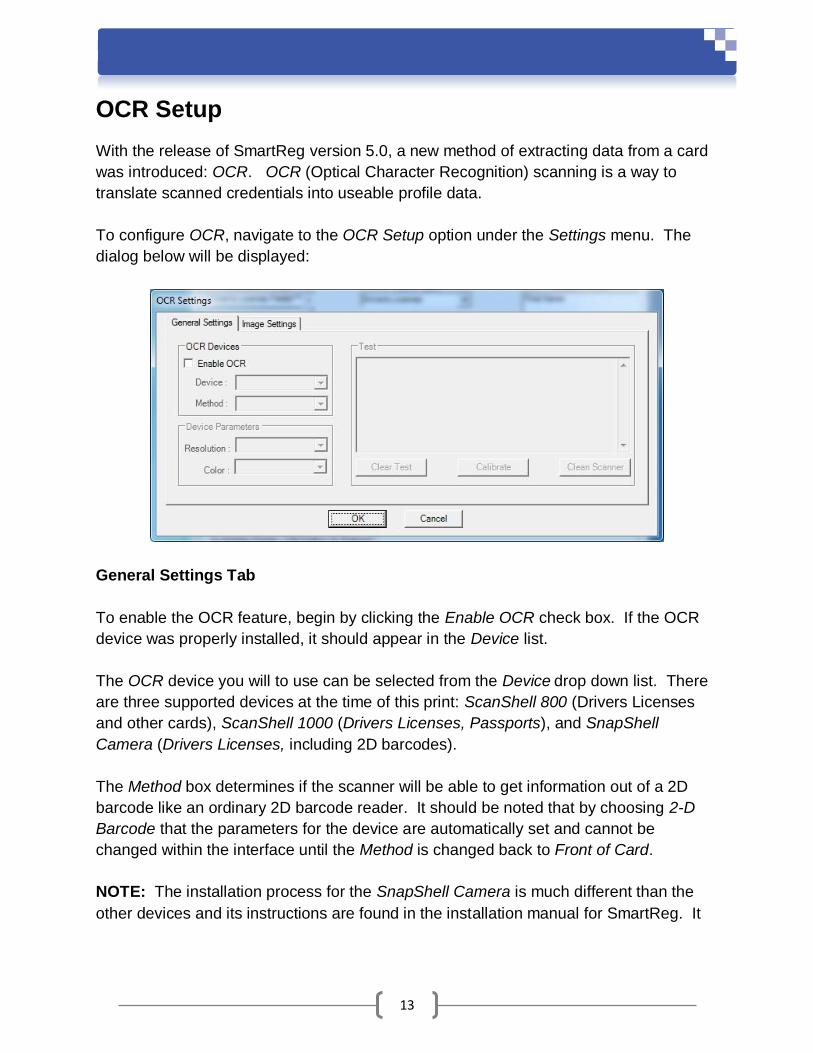
OCR Setup
With the release of SmartReg version 5.0, a new method of extracting data from a card
was introduced: OCR. OCR (Optical Character Recognition) scanning is a way to
translate scanned credentials into useable profile data.
To configure OCR, navigate to the OCR Setup option under the Settings menu. The
dialog below will be displayed:
General Settings Tab
To enable the OCR feature, begin by clicking the Enable OCR check box. If the OCR
device was properly installed, it should appear in the Device list.
The OCR device you will to use can be selected from the Device drop down list. There
are three supported devices at the time of this print: ScanShell 800 (Drivers Licenses
and other cards), ScanShell 1000 (Drivers Licenses, Passports), and SnapShell
Camera (Drivers Licenses, including 2D barcodes).
The Method box determines if the scanner will be able to get information out of a 2D
barcode like an ordinary 2D barcode reader. It should be noted that by choosing 2-D
Barcode that the parameters for the device are automatically set and cannot be
changed within the interface until the Method is changed back to Front of Card.
NOTE: The installation process for the SnapShell Camera is much different than the
other devices and its instructions are found in the installation manual for SmartReg. It
14
should also be noted that OCR is a less reliable way of gathering data when compared
to reading barcodes or magstripes with the IDG 250 reader.
Set the Resolution under the Device Parameters. The recommended resolution is 300.
Next, set the Color to either Gray Color or True Color, depending on your needs. True
Color almost always works better than Gray Color.
NOTE: You should always calibrate the scanner before use to ensure you get the best
possible scan. If the reader begins to produce inaccurate results you should try
cleaning the scanner. The SnapShell does NOT require calibrating.
To calibrate the scanner you will need the calibration sheet that comes with the
scanner. Simply click the Calibrate Scanner button under the Test section of the OCR
Settings screen and follow the directions.
To clean the scanner you will need the cleaning paper that comes with the scanner.
Simply click the Clean Scanner button under the Test section of the OCR Settings
screen and follow the directions.
When using the ScanShell 800 (Driver’s License), simply inserting the card into the
device will initiate the scanning process. The ScanShell 1000 (Driver’s License and
Passport) has three buttons to the right of the scan bed. The top button is for scanning
a Driver’s License, the middle button is for scanning Passport, and the bottom button is
non-functional. To use the SnapShell Camera, you must place the credential on the
ledge and press the button.
NOTE: It is important to remember that OCR devices are port specific devices. This
means that if you unplug the device from its current USB port and plug it into another, it
will not function properly. To resolve this issue, you must reinstall the device. Please
the SmartReg Install manual for instructions on how to reinstall the SnapShell Camera.
15
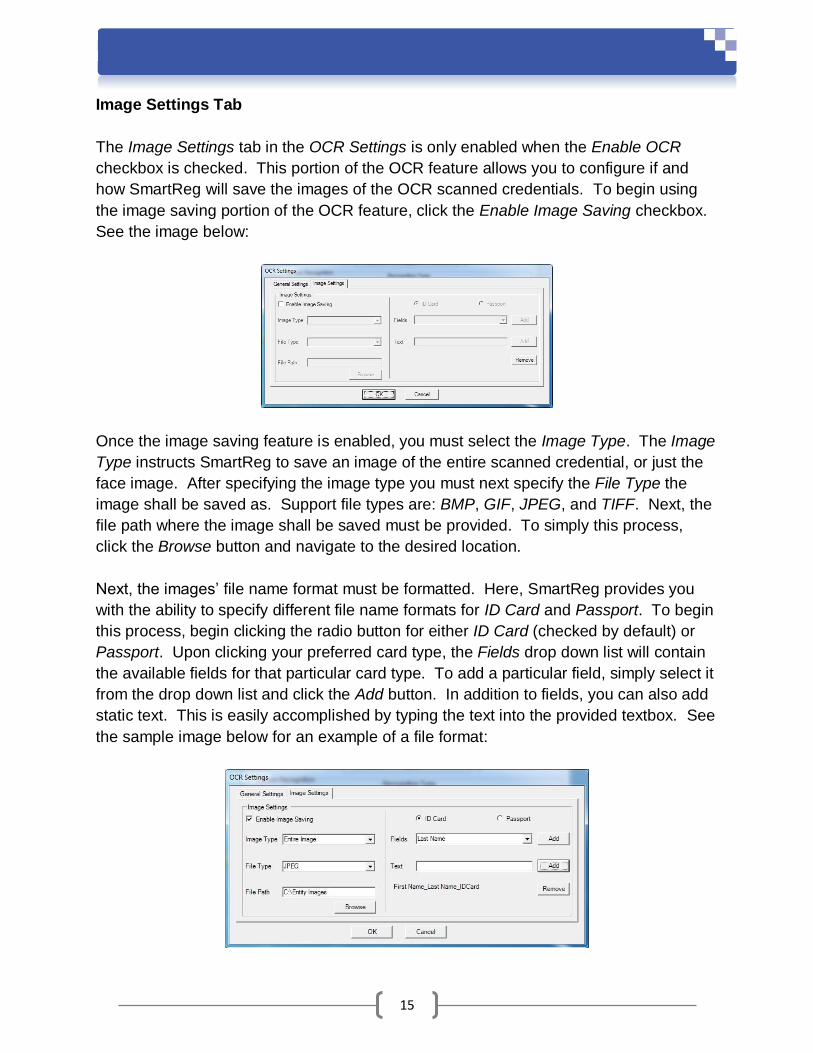
Image Settings Tab
The Image Settings tab in the OCR Settings is only enabled when the Enable OCR
checkbox is checked. This portion of the OCR feature allows you to configure if and
how SmartReg will save the images of the OCR scanned credentials. To begin using
the image saving portion of the OCR feature, click the Enable Image Saving checkbox.
See the image below:
Once the image saving feature is enabled, you must select the Image Type. The Image
Type instructs SmartReg to save an image of the entire scanned credential, or just the
face image. After specifying the image type you must next specify the File Type the
image shall be saved as. Support file types are: BMP, GIF, JPEG, and TIFF. Next, the
file path where the image shall be saved must be provided. To simply this process,
click the Browse button and navigate to the desired location.
Next, the images’ file name format must be formatted. Here, SmartReg provides you
with the ability to specify different file name formats for ID Card and Passport. To begin
this process, begin clicking the radio button for either ID Card (checked by default) or
Passport. Upon clicking your preferred card type, the Fields drop down list will contain
the available fields for that particular card type. To add a particular field, simply select it
from the drop down list and click the Add button. In addition to fields, you can also add
static text. This is easily accomplished by typing the text into the provided textbox. See
the sample image below for an example of a file format:
16
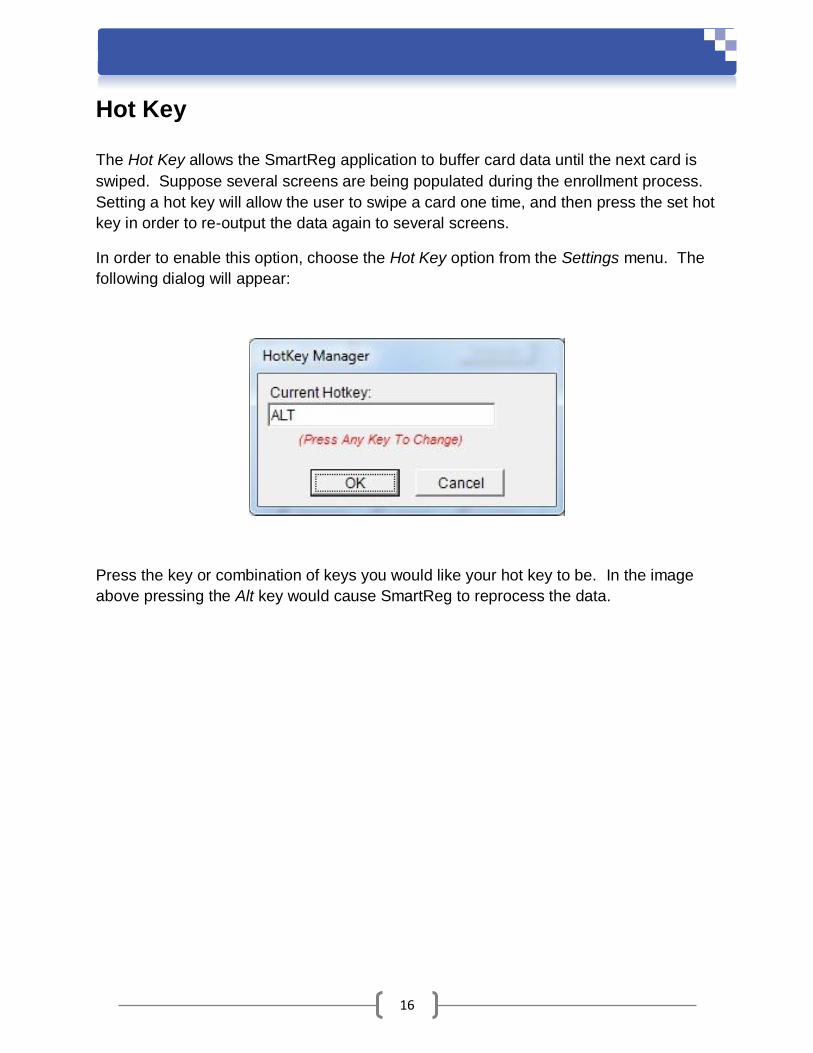
Hot Key
The Hot Key allows the SmartReg application to buffer card data until the next card is
swiped. Suppose several screens are being populated during the enrollment process.
Setting a hot key will allow the user to swipe a card one time, and then press the set hot
key in order to re-output the data again to several screens.
In order to enable this option, choose the Hot Key option from the Settings menu. The
following dialog will appear:
Press the key or combination of keys you would like your hot key to be. In the image
above pressing the Alt key would cause SmartReg to reprocess the data.
17
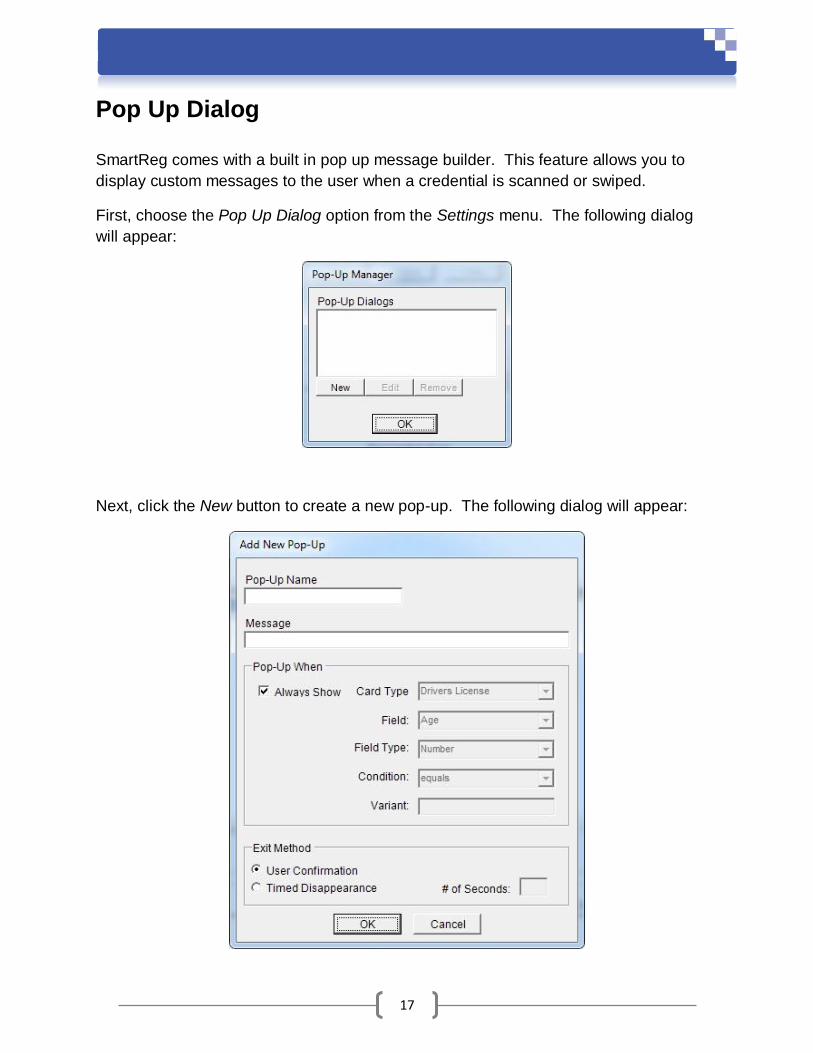
Pop Up Dialog
SmartReg comes with a built in pop up message builder. This feature allows you to
display custom messages to the user when a credential is scanned or swiped.
First, choose the Pop Up Dialog option from the Settings menu. The following dialog
will appear:
Next, click the New button to create a new pop-up. The following dialog will appear:
18
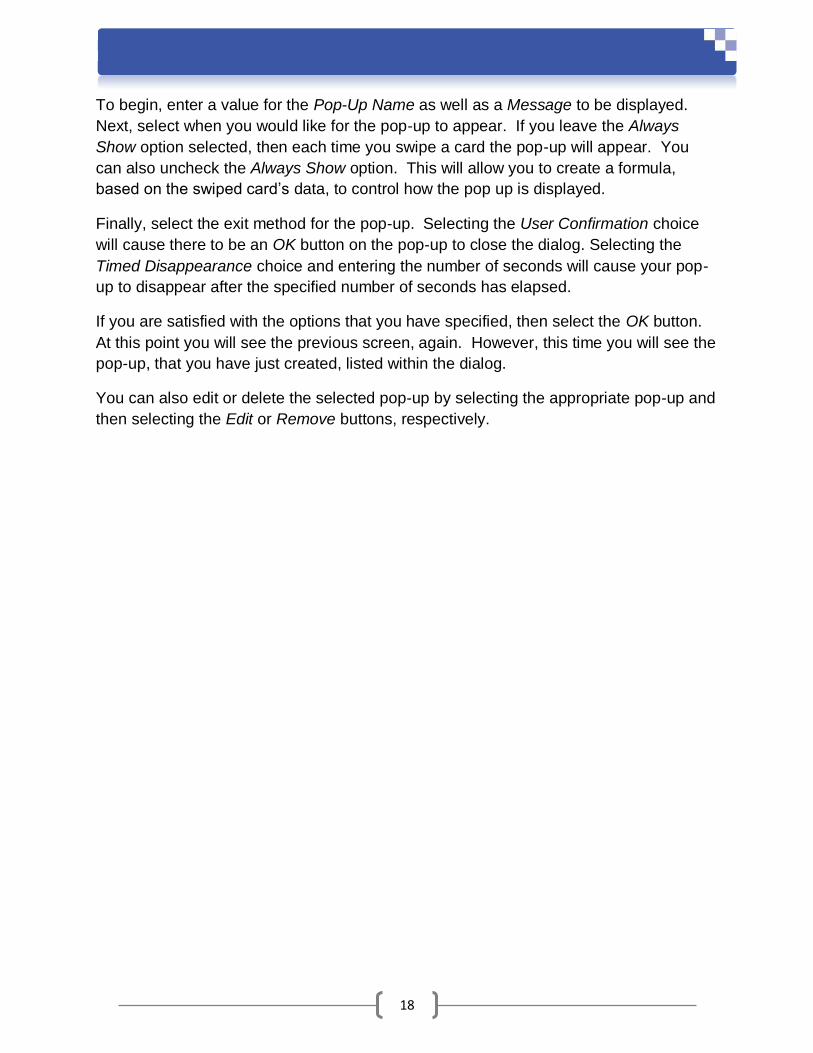
To begin, enter a value for the Pop-Up Name as well as a Message to be displayed.
Next, select when you would like for the pop-up to appear. If you leave the Always
Show option selected, then each time you swipe a card the pop-up will appear. You
can also uncheck the Always Show option. This will allow you to create a formula,
based on the swiped card’s data, to control how the pop up is displayed.
Finally, select the exit method for the pop-up. Selecting the User Confirmation choice
will cause there to be an OK button on the pop-up to close the dialog. Selecting the
Timed Disappearance choice and entering the number of seconds will cause your pop-
up to disappear after the specified number of seconds has elapsed.
If you are satisfied with the options that you have specified, then select the OK button.
At this point you will see the previous screen, again. However, this time you will see the
pop-up, that you have just created, listed within the dialog.
You can also edit or delete the selected pop-up by selecting the appropriate pop-up and
then selecting the Edit or Remove buttons, respectively.
19
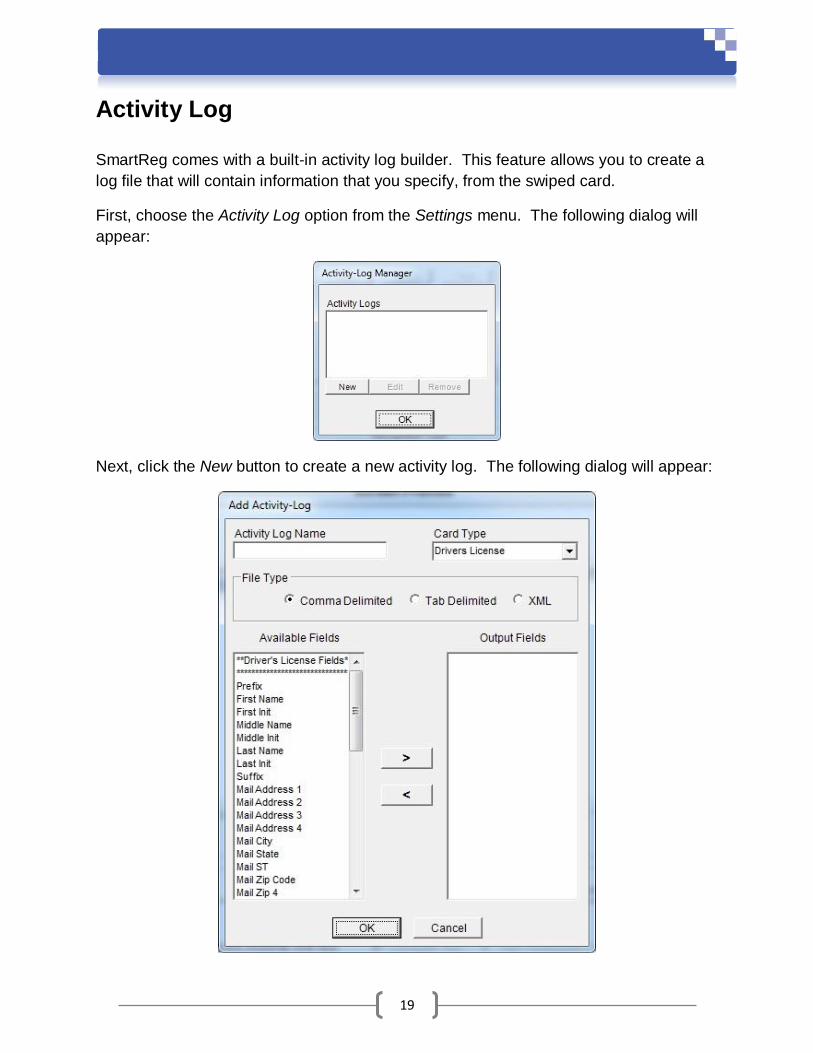
Activity Log
SmartReg comes with a built-in activity log builder. This feature allows you to create a
log file that will contain information that you specify, from the swiped card.
First, choose the Activity Log option from the Settings menu. The following dialog will
appear:
Next, click the New button to create a new activity log. The following dialog will appear:
20
Next, create a unique Activity Log Name and select the Card Type and the File Type.
The Card Type is the type of card for which you would like to make a log entry when
that particular card type is swiped. Depending on the chosen Card Type, the list of
Available Fields will change to reflect that choice.
The File Type determines the method of data delimitation associated with the activity
log and the file type for the saved activity log. SmartReg offers Comma Delimited (data
is separated by commas), Tab Delimited (data is separated by TABs) and XML (the
widely accepted format for universal data transportation).
The final step is to select the fields whose data you would like to store in the activity log.
To do this simply select a field from the Available Fields column and then either double
click it or click the > button. This will add the field to the Output Fields column. Repeat
this process for all of the fields that you desire to be logged. If you would like to remove
any fields from the Output Fields column simply select the field that you wish to remove
and click the < button.
If you are satisfied with your settings click the OK button. At this point you will return to
the previous screen. This time, however, the newly created activity log will be listed. To
edit or delete an activity log simply select it within the list and click the Edit or Remove
buttons, respectively.
21
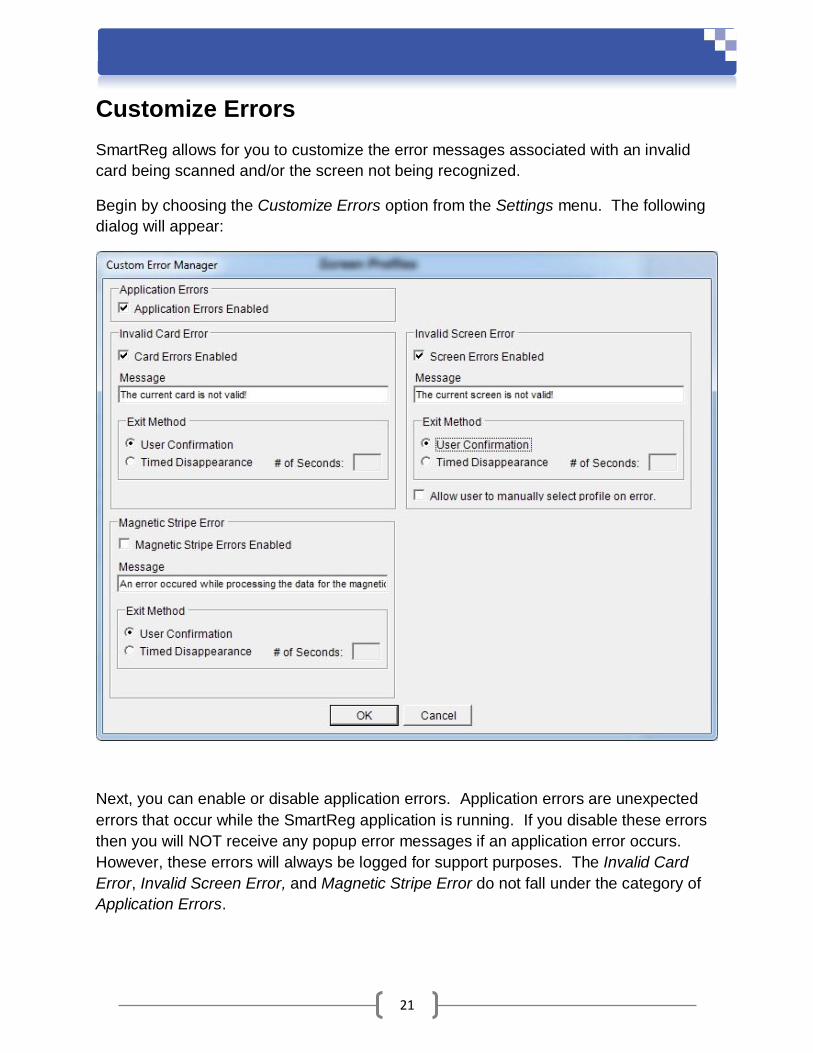
Customize Errors
SmartReg allows for you to customize the error messages associated with an invalid
card being scanned and/or the screen not being recognized.
Begin by choosing the Customize Errors option from the Settings menu. The following
dialog will appear:
Next, you can enable or disable application errors. Application errors are unexpected
errors that occur while the SmartReg application is running. If you disable these errors
then you will NOT receive any popup error messages if an application error occurs.
However, these errors will always be logged for support purposes. The Invalid Card
Error, Invalid Screen Error, and Magnetic Stripe Error do not fall under the category of
Application Errors.
22
Next, you have the option of adjusting the default settings for the Invalid Screen Error,
the Invalid Card Error, and the Magnetic Stripe Error.
To disable the Invalid Screen Error altogether, uncheck the Screen Errors Enabled
checkbox. If you choose to leave it enabled, then you will have the options of changing
the message, determining the Exit Method and allowing the user to manually select the
profile when an Invalid Screen error occurs. There are two choices for the Exit Method.
Selecting the User Confirmation choice will cause there to be an OK button on the error
dialog to close the dialog. Selecting the Timed Disappearance choice and entering the
number of seconds will cause your error dialog to disappear after the specified number
of seconds has elapsed. Selecting the Allow user to manually select profile on error
causes a dialog with your profiles listed on it, to appear when there is an Invalid Screen
Error. Select a profile from the list and select the OK button and your form will be filled
out using the profiles settings.
To disable the Invalid Card Error altogether, uncheck the Card Errors Enabled
checkbox. If you choose to leave it enabled, then you will have the options of changing
the message, determining the Exit Method and allowing the user to manually select the
profile when an Invalid Card error occurs. There are two choices for the Exit Method.
Selecting the User Confirmation choice will cause there to be an OK button on the error
dialog to close the dialog. Selecting the Timed Disappearance choice and entering the
number of seconds will cause your error dialog to disappear after the specified number
of seconds has elapsed.
To disable the Magnetic Stripe Error altogether, uncheck the Magnetic Stripe Errors
Enabled checkbox. If you choose to leave it enabled, then you will have the options of
changing the Message and determining the Exit Method. There are two choices for the
Exit Method. Selecting the User Confirmation choice will cause there to be an OK
button on the error dialog to close the dialog. Selecting the Timed Disappearance
choice and entering the number of seconds will cause your error to dialog to disappear
after the specified number of seconds has elapsed.
If you are satisfied with your modifications, then select the OK button.
23
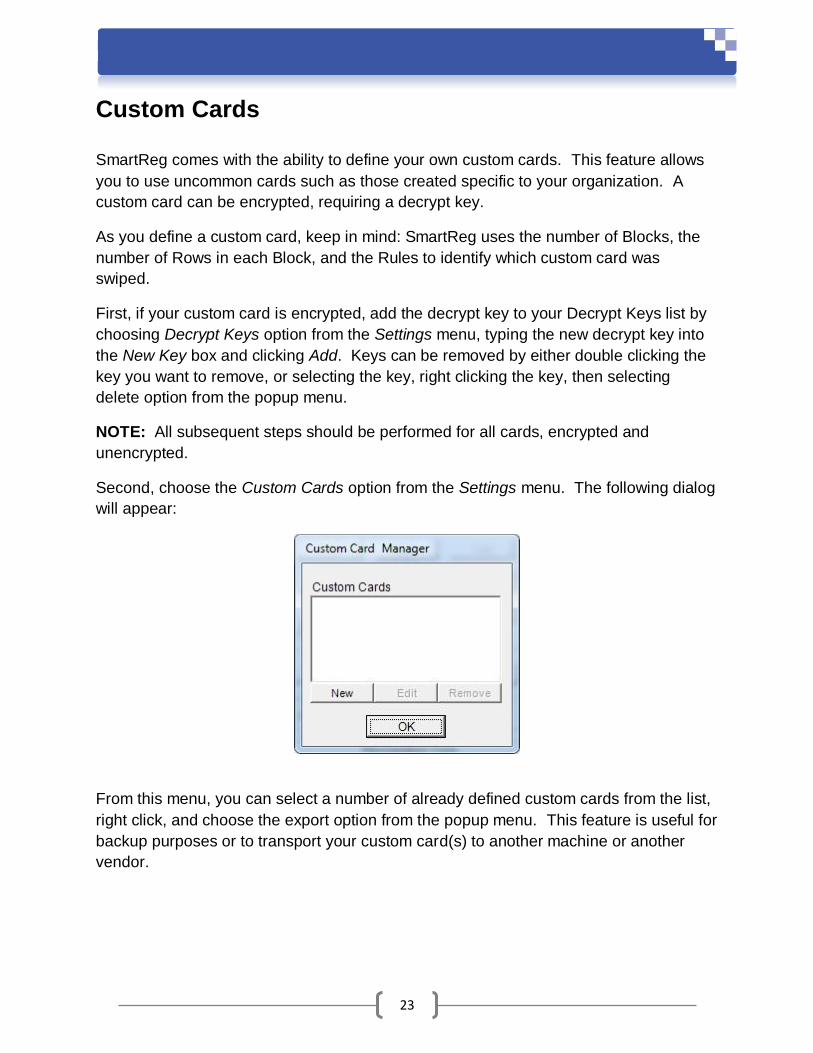
Custom Cards
SmartReg comes with the ability to define your own custom cards. This feature allows
you to use uncommon cards such as those created specific to your organization. A
custom card can be encrypted, requiring a decrypt key.
As you define a custom card, keep in mind: SmartReg uses the number of Blocks, the
number of Rows in each Block, and the Rules to identify which custom card was
swiped.
First, if your custom card is encrypted, add the decrypt key to your Decrypt Keys list by
choosing Decrypt Keys option from the Settings menu, typing the new decrypt key into
the New Key box and clicking Add. Keys can be removed by either double clicking the
key you want to remove, or selecting the key, right clicking the key, then selecting
delete option from the popup menu.
NOTE: All subsequent steps should be performed for all cards, encrypted and
unencrypted.
Second, choose the Custom Cards option from the Settings menu. The following dialog
will appear:
From this menu, you can select a number of already defined custom cards from the list,
right click, and choose the export option from the popup menu. This feature is useful for
backup purposes or to transport your custom card(s) to another machine or another
vendor.
24
You can import custom card(s) previously backed up or given to you by another vendor
by right clicking in this window pane and choosing the import option from the popup
menu. Imported custom cards will be added to you custom cards list. Import cards with
names equal to already existing custom cards will NOT be imported.
NOTE: It is advisable that, for back up purposed, you use the Export All Settings option
from the Settings menu. This option exports ALL configuration parameters including
custom cards.
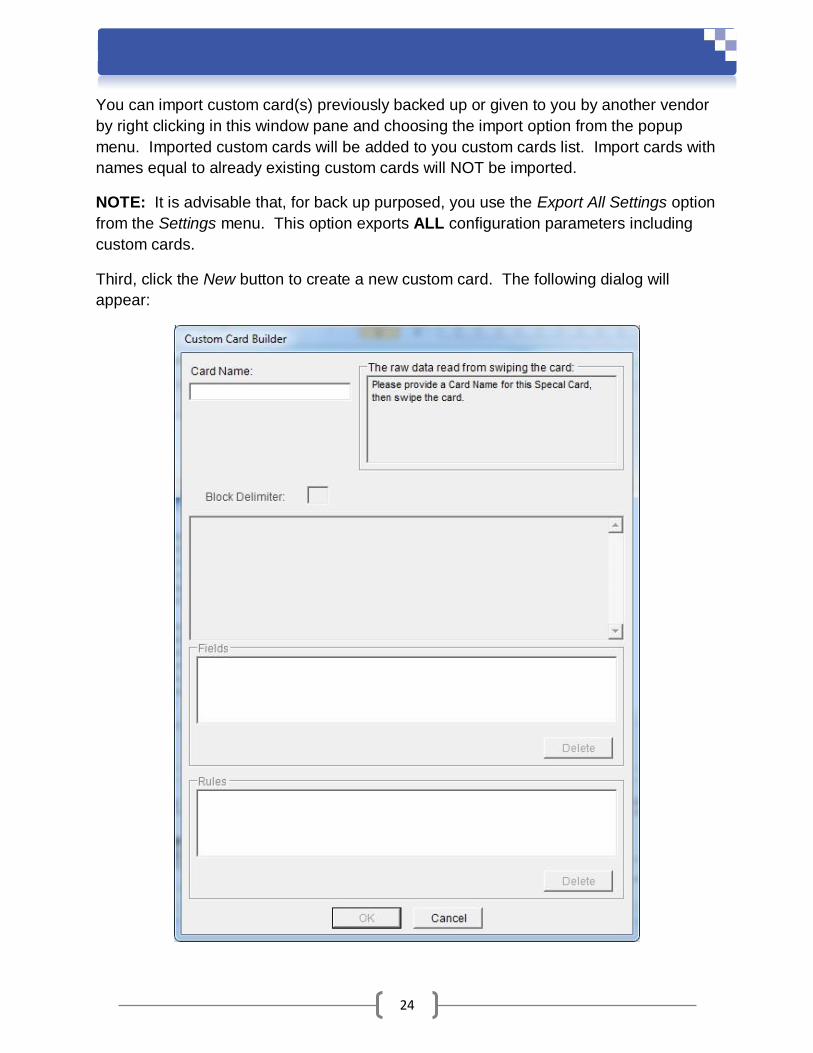
Third, click the New button to create a new custom card. The following dialog will
appear:

25
NOTE: This form has a hierarchy requiring you to work from the top down, outlined in
the subsequent steps.
Fourth, specify a Card Name and then swipe your card. The data read from the card is
placed in two sections. Within the The raw data read from swiping the card section an
overall view of the raw data on the card is displayed. This data cannot be edited. Also,
in the Block 1 -> Row 1 section all of the data read from the card is displayed.
However, this data can be reorganized in a more meaningful manner.
To reorganize the raw data into more meaningful chunks, provide a Block Delimiter to
break the data into separate blocks and a Row Delimiter to further break each block into
separate rows.
In the following diagram, a custom card with the name My Custom Card Name is
defined with a ? character as a Row Delimiter.
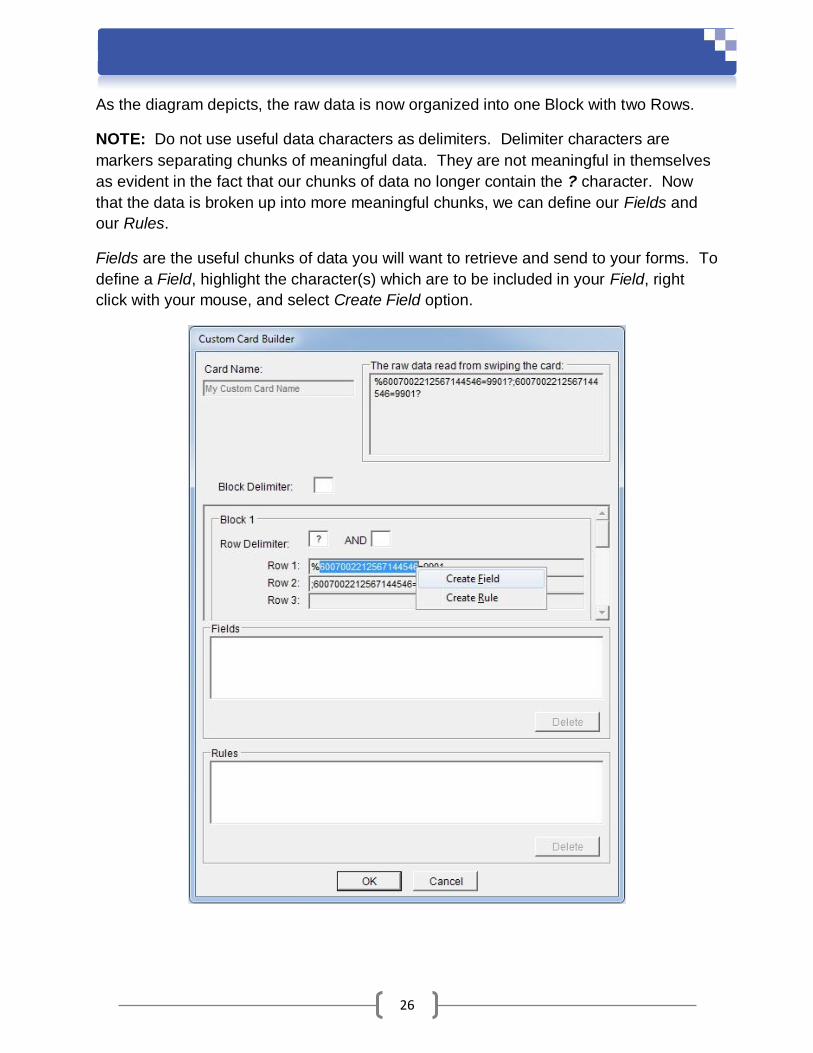
26
As the diagram depicts, the raw data is now organized into one Block with two Rows.
NOTE: Do not use useful data characters as delimiters. Delimiter characters are
markers separating chunks of meaningful data. They are not meaningful in themselves
as evident in the fact that our chunks of data no longer contain the ? character. Now
that the data is broken up into more meaningful chunks, we can define our Fields and
our Rules.
Fields are the useful chunks of data you will want to retrieve and send to your forms. To
define a Field, highlight the character(s) which are to be included in your Field, right
click with your mouse, and select Create Field option.
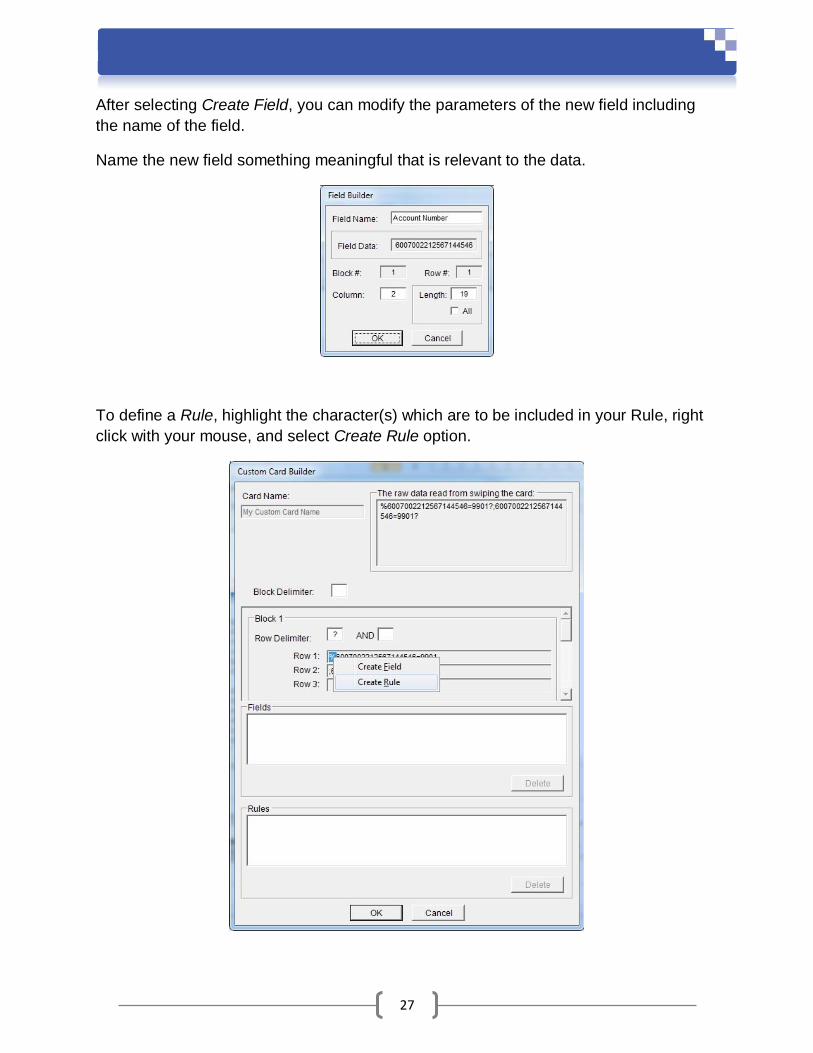
27
After selecting Create Field, you can modify the parameters of the new field including
the name of the field.
Name the new field something meaningful that is relevant to the data.
To define a Rule, highlight the character(s) which are to be included in your Rule, right
click with your mouse, and select Create Rule option.
28
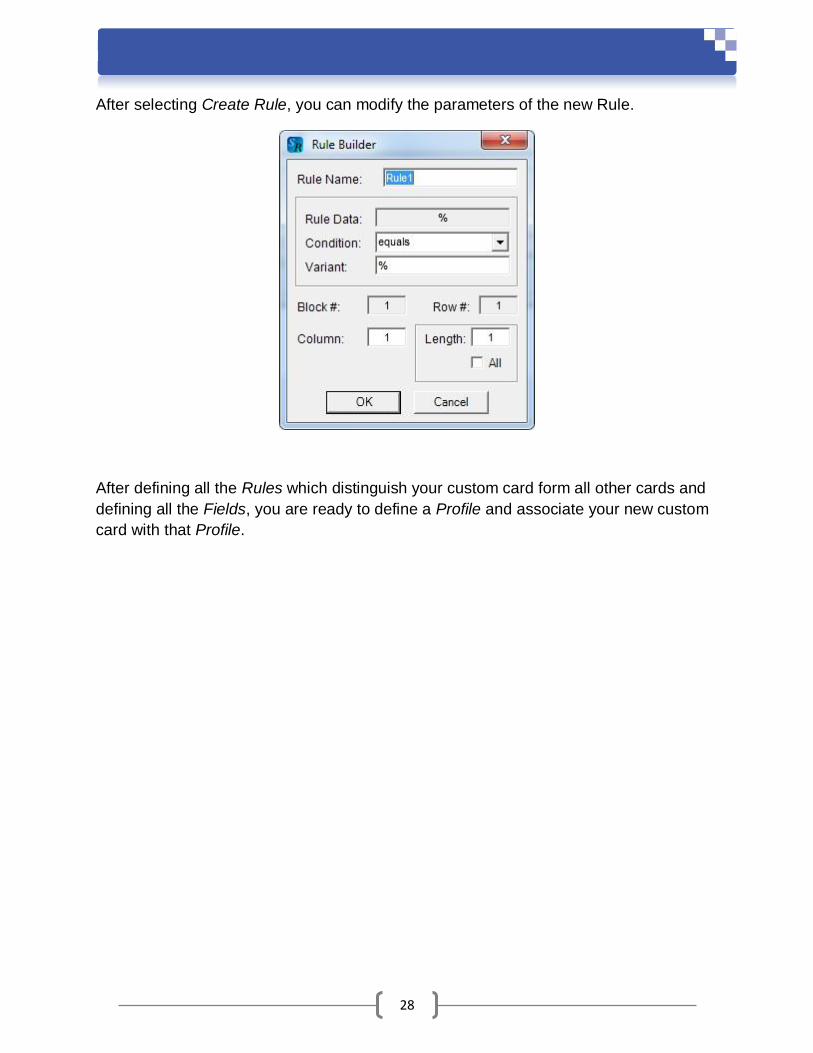
After selecting Create Rule, you can modify the parameters of the new Rule.
After defining all the Rules which distinguish your custom card form all other cards and
defining all the Fields, you are ready to define a Profile and associate your new custom
card with that Profile.
29
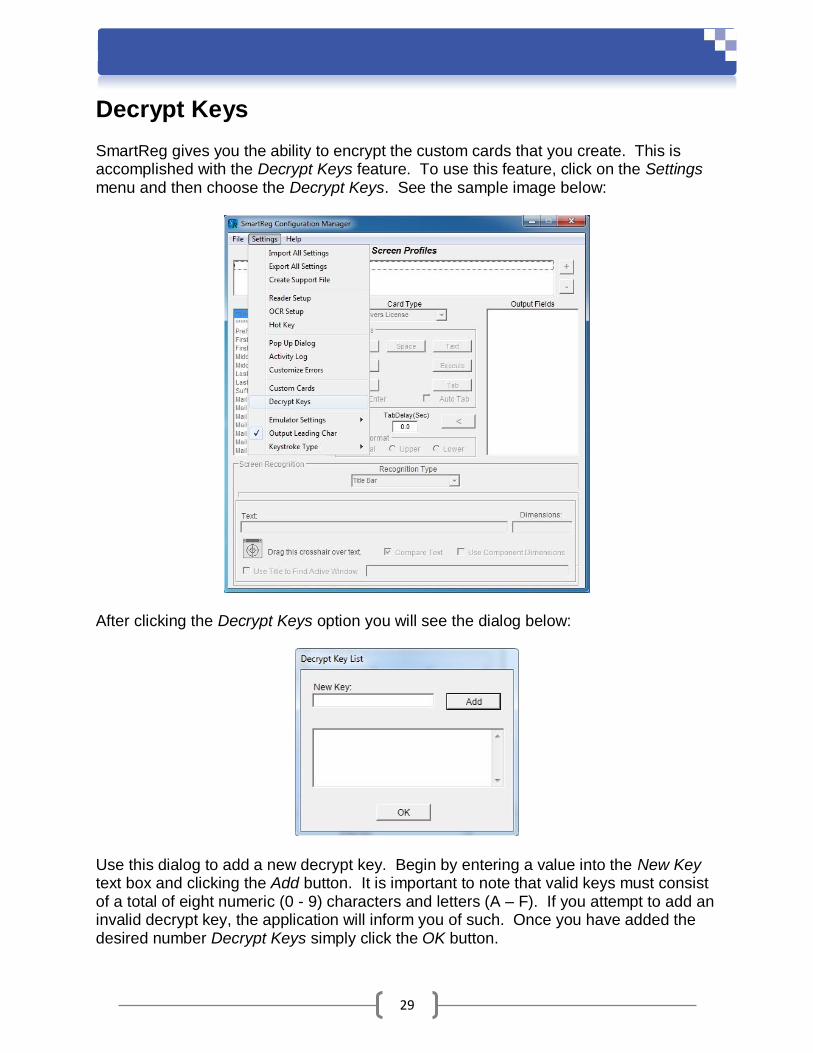
Decrypt Keys
SmartReg gives you the ability to encrypt the custom cards that you create. This is accomplished with the Decrypt Keys feature. To use this feature, click on the Settings menu and then choose the Decrypt Keys. See the sample image below:
After clicking the Decrypt Keys option you will see the dialog below:
Use this dialog to add a new decrypt key. Begin by entering a value into the New Key text box and clicking the Add button. It is important to note that valid keys must consist of a total of eight numeric (0 - 9) characters and letters (A – F). If you attempt to add an invalid decrypt key, the application will inform you of such. Once you have added the desired number Decrypt Keys simply click the OK button.
30
Emulator Settings
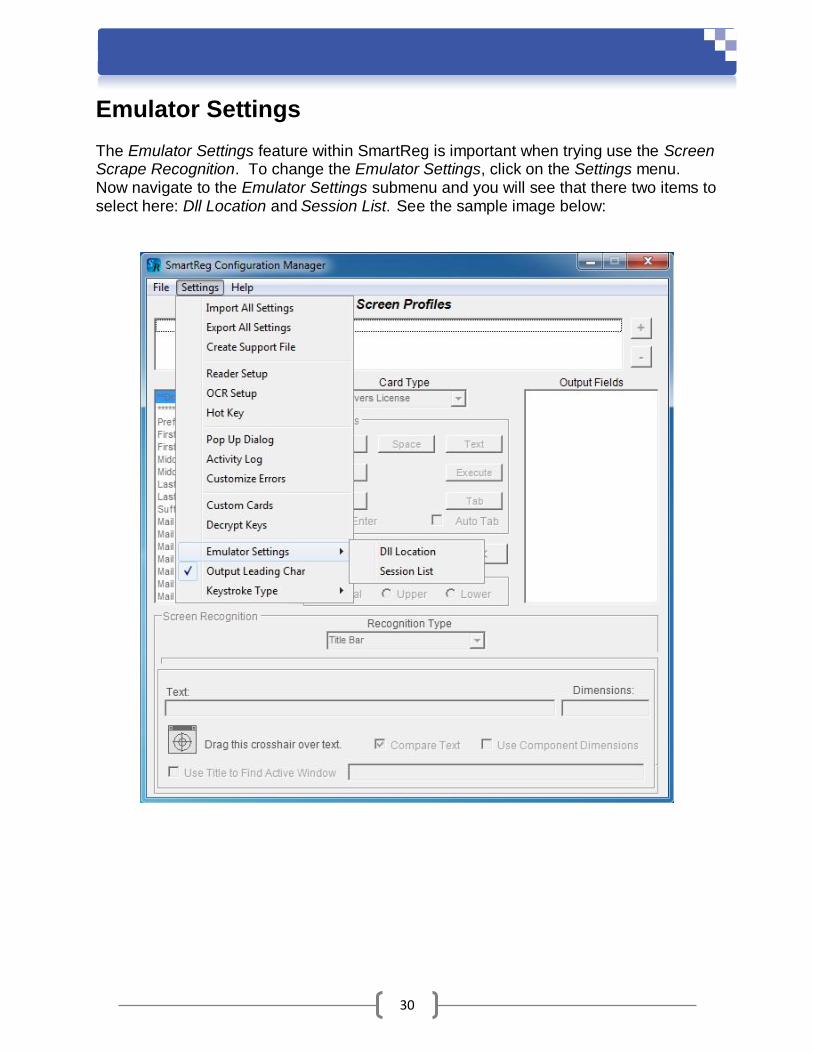
The Emulator Settings feature within SmartReg is important when trying use the Screen Scrape Recognition. To change the Emulator Settings, click on the Settings menu. Now navigate to the Emulator Settings submenu and you will see that there two items to select here: Dll Location and Session List. See the sample image below:
31
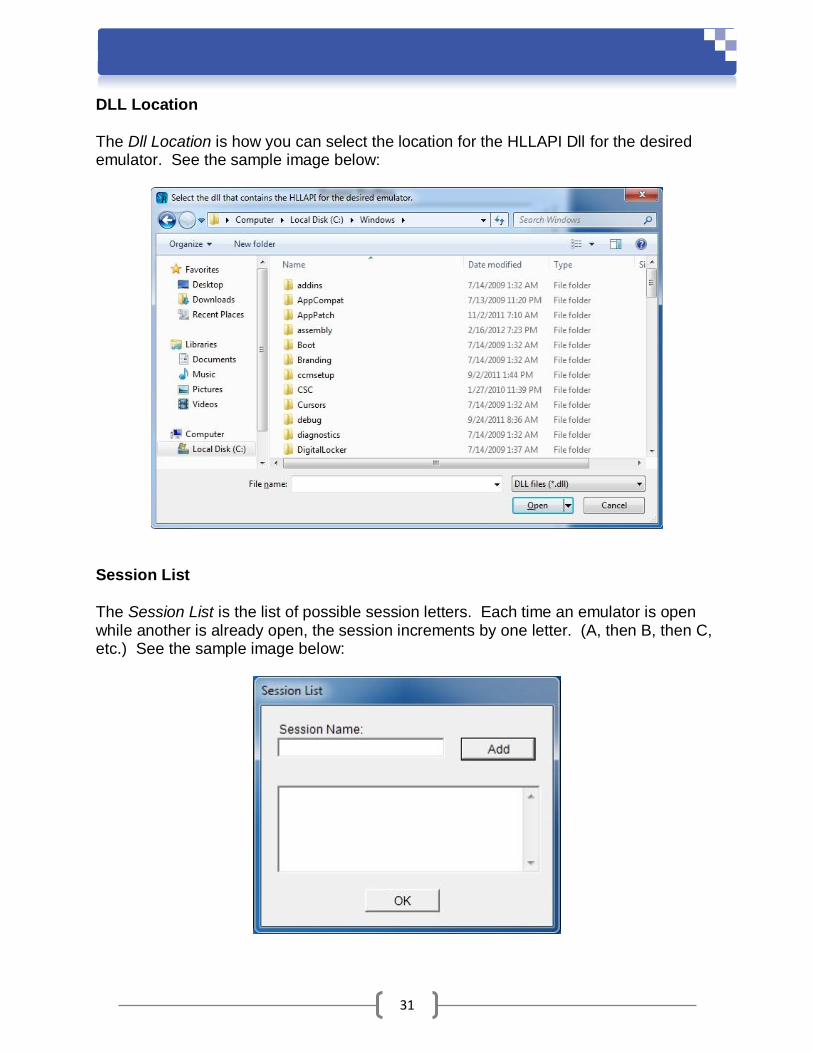
DLL Location
The Dll Location is how you can select the location for the HLLAPI Dll for the desired emulator. See the sample image below:
Session List
The Session List is the list of possible session letters. Each time an emulator is open while another is already open, the session increments by one letter. (A, then B, then C, etc.) See the sample image below:
32
Output Leading Character
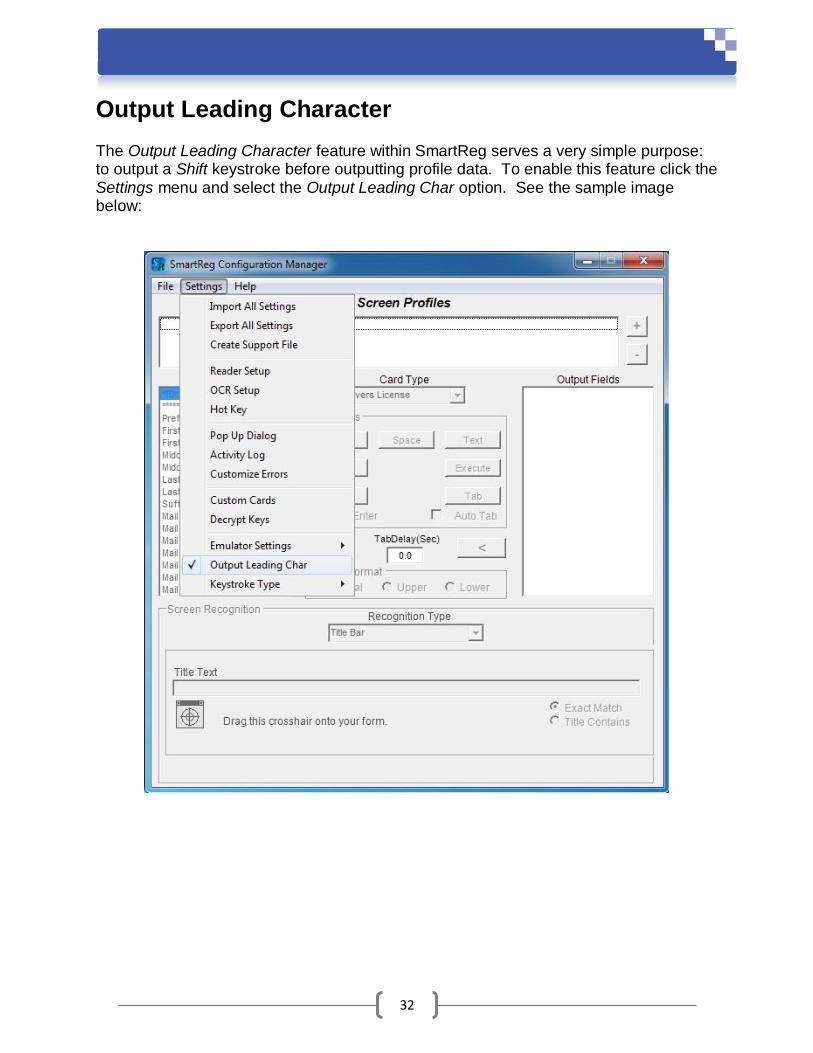
The Output Leading Character feature within SmartReg serves a very simple purpose: to output a Shift keystroke before outputting profile data. To enable this feature click the Settings menu and select the Output Leading Char option. See the sample image below:

33
Keystroke Type
The Keystroke Type feature within SmartReg gives you the ability to switch between .NET and API keystroke types. The .NET type is the recommended keystroke type and as such is enabled by default. Occasionally some forms can prove to be problematic to fill. In those instances it sometimes can prove helpful to change to the API keystroke type. Changing to API should definitely be a last resort though. To change this feature click the Settings menu, select Keystroke Type, and finally choose either .NET or API. See the sample image below:
34
Profile Creation
New Profile
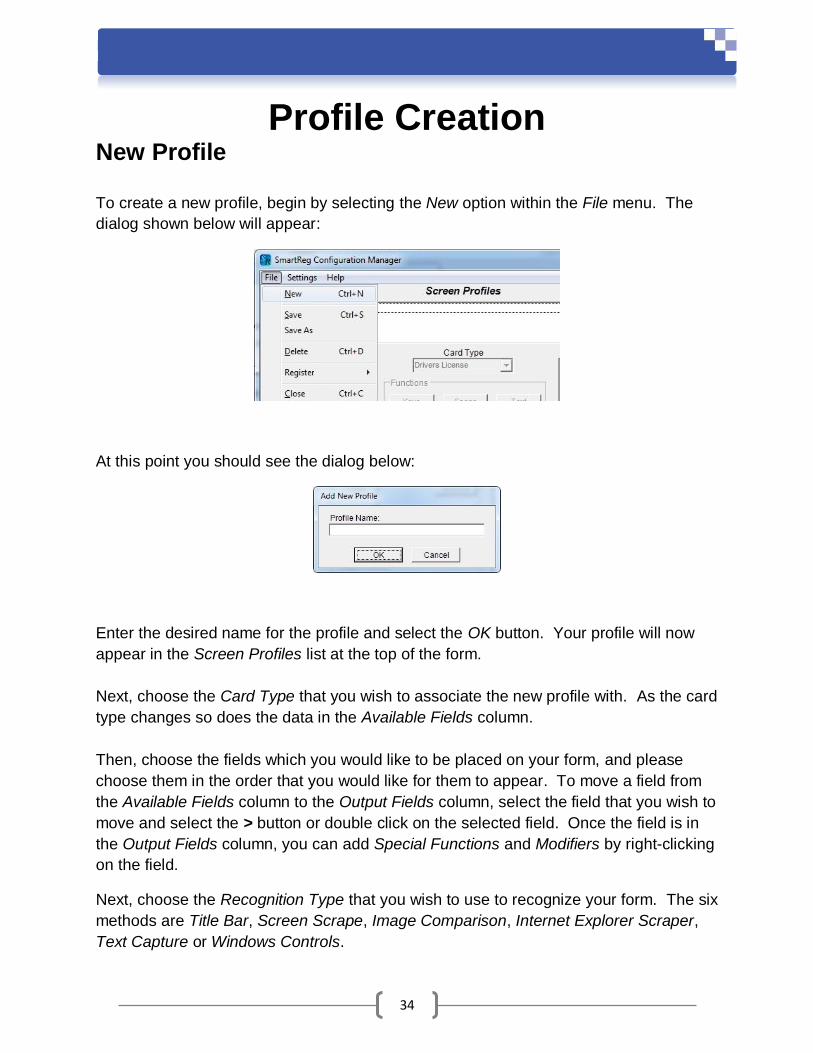
To create a new profile, begin by selecting the New option within the File menu. The
dialog shown below will appear:
At this point you should see the dialog below:
Enter the desired name for the profile and select the OK button. Your profile will now
appear in the Screen Profiles list at the top of the form.
Next, choose the Card Type that you wish to associate the new profile with. As the card
type changes so does the data in the Available Fields column.
Then, choose the fields which you would like to be placed on your form, and please
choose them in the order that you would like for them to appear. To move a field from
the Available Fields column to the Output Fields column, select the field that you wish to
move and select the > button or double click on the selected field. Once the field is in
the Output Fields column, you can add Special Functions and Modifiers by right-clicking
on the field.
Next, choose the Recognition Type that you wish to use to recognize your form. The six
methods are Title Bar, Screen Scrape, Image Comparison, Internet Explorer Scraper,
Text Capture or Windows Controls.
35
Functions
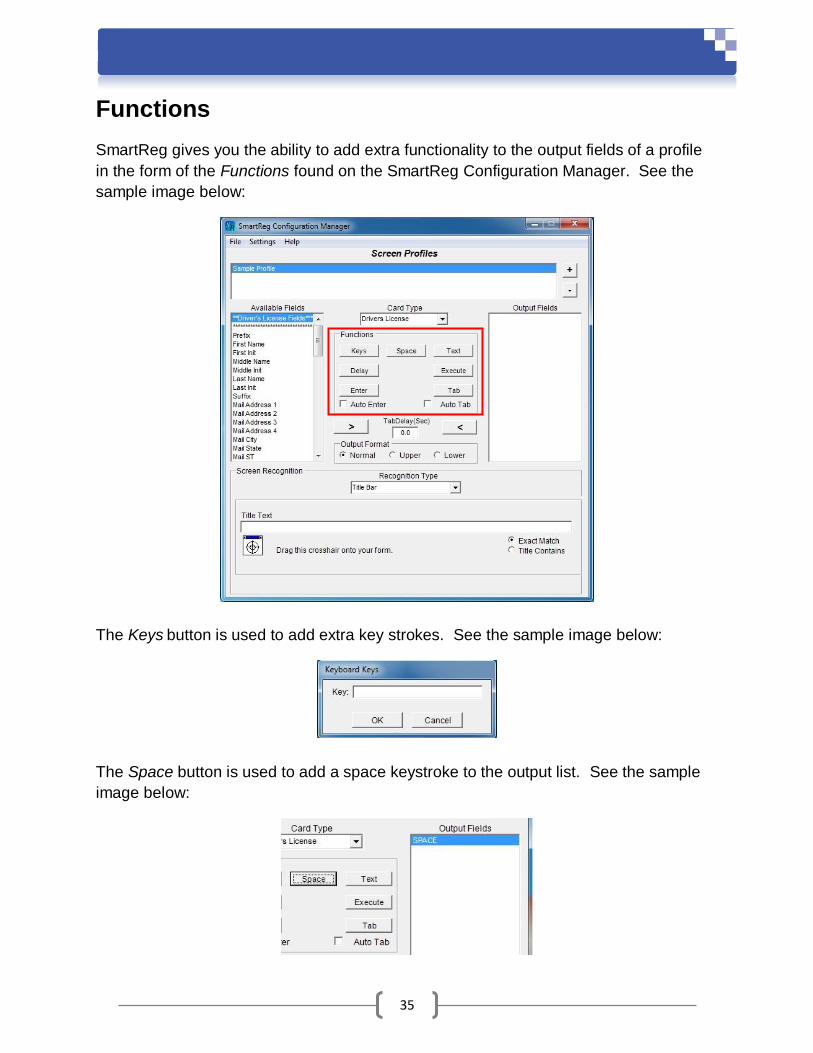
SmartReg gives you the ability to add extra functionality to the output fields of a profile
in the form of the Functions found on the SmartReg Configuration Manager. See the
sample image below:
The Keys button is used to add extra key strokes. See the sample image below:
The Space button is used to add a space keystroke to the output list. See the sample
image below:
36
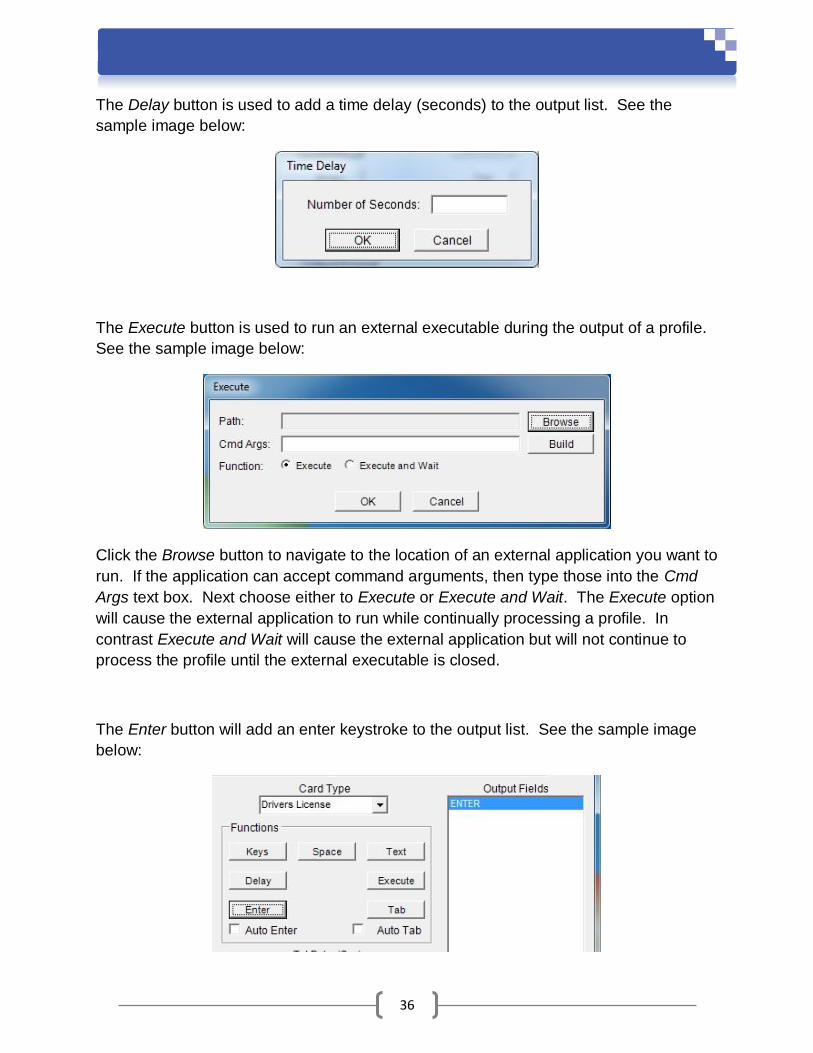
The Delay button is used to add a time delay (seconds) to the output list. See the
sample image below:
The Execute button is used to run an external executable during the output of a profile.
See the sample image below:
Click the Browse button to navigate to the location of an external application you want to
run. If the application can accept command arguments, then type those into the Cmd
Args text box. Next choose either to Execute or Execute and Wait. The Execute option
will cause the external application to run while continually processing a profile. In
contrast Execute and Wait will cause the external application but will not continue to
process the profile until the external executable is closed.
The Enter button will add an enter keystroke to the output list. See the sample image
below:
37
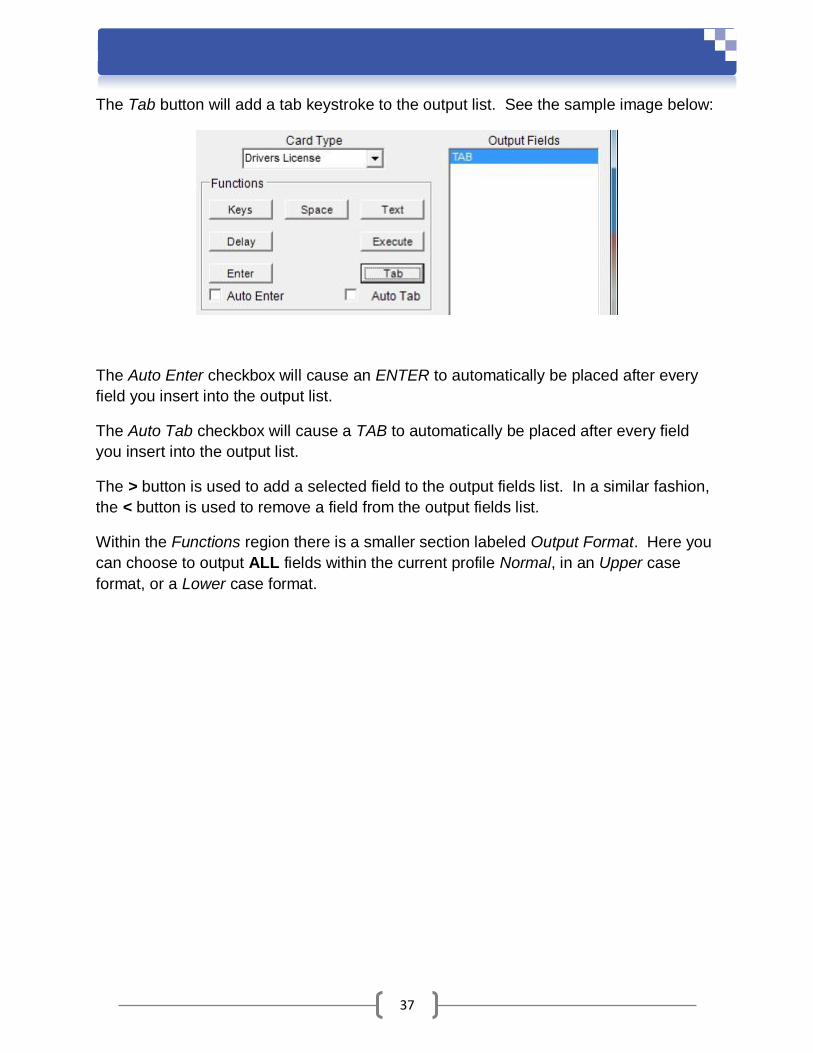
The Tab button will add a tab keystroke to the output list. See the sample image below:
The Auto Enter checkbox will cause an ENTER to automatically be placed after every
field you insert into the output list.
The Auto Tab checkbox will cause a TAB to automatically be placed after every field
you insert into the output list.
The > button is used to add a selected field to the output fields list. In a similar fashion,
the < button is used to remove a field from the output fields list.
Within the Functions region there is a smaller section labeled Output Format. Here you
can choose to output ALL fields within the current profile Normal, in an Upper case
format, or a Lower case format.
38
Custom Fields
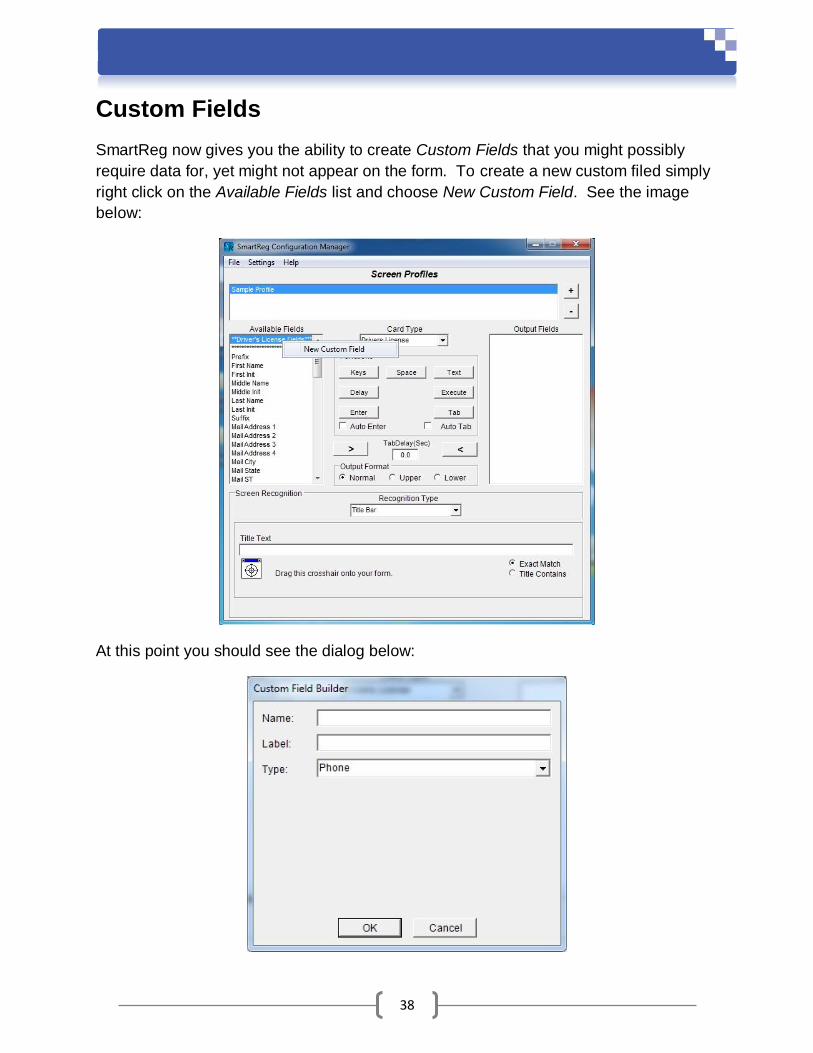
SmartReg now gives you the ability to create Custom Fields that you might possibly
require data for, yet might not appear on the form. To create a new custom filed simply
right click on the Available Fields list and choose New Custom Field. See the image
below:
At this point you should see the dialog below:
39
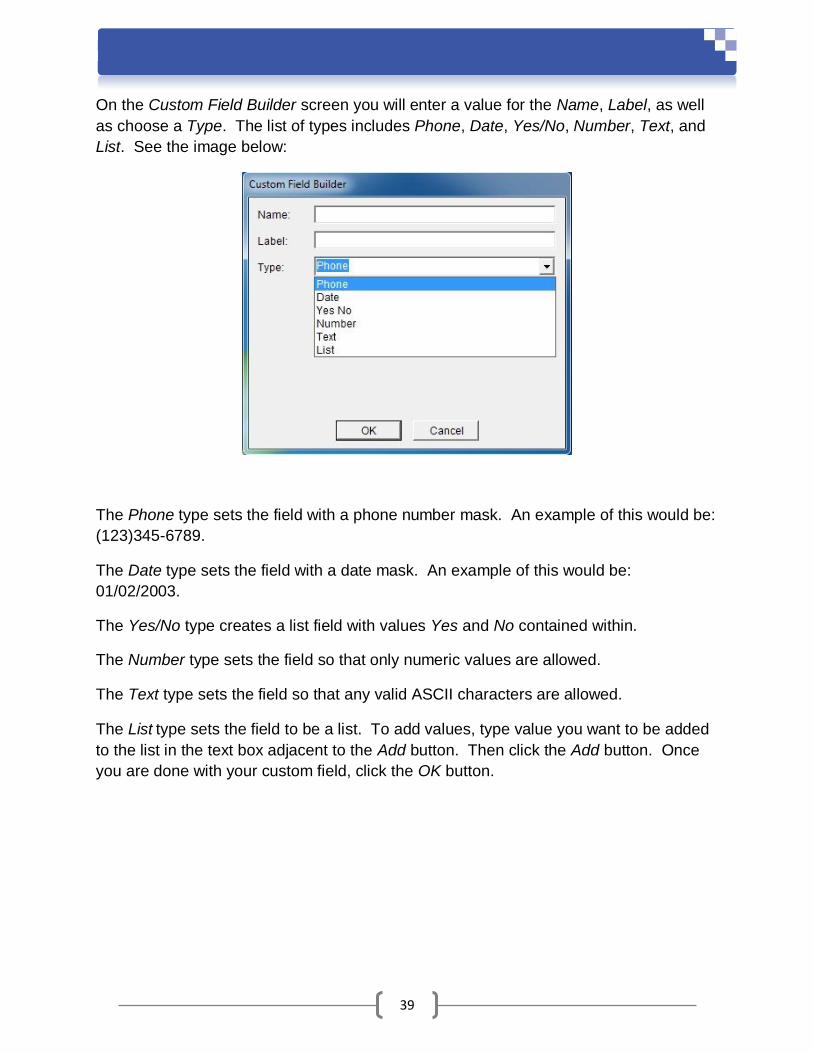
On the Custom Field Builder screen you will enter a value for the Name, Label, as well
as choose a Type. The list of types includes Phone, Date, Yes/No, Number, Text, and
List. See the image below:
The Phone type sets the field with a phone number mask. An example of this would be:
(123)345-6789.
The Date type sets the field with a date mask. An example of this would be:
01/02/2003.
The Yes/No type creates a list field with values Yes and No contained within.
The Number type sets the field so that only numeric values are allowed.
The Text type sets the field so that any valid ASCII characters are allowed.
The List type sets the field to be a list. To add values, type value you want to be added
to the list in the text box adjacent to the Add button. Then click the Add button. Once
you are done with your custom field, click the OK button.
40
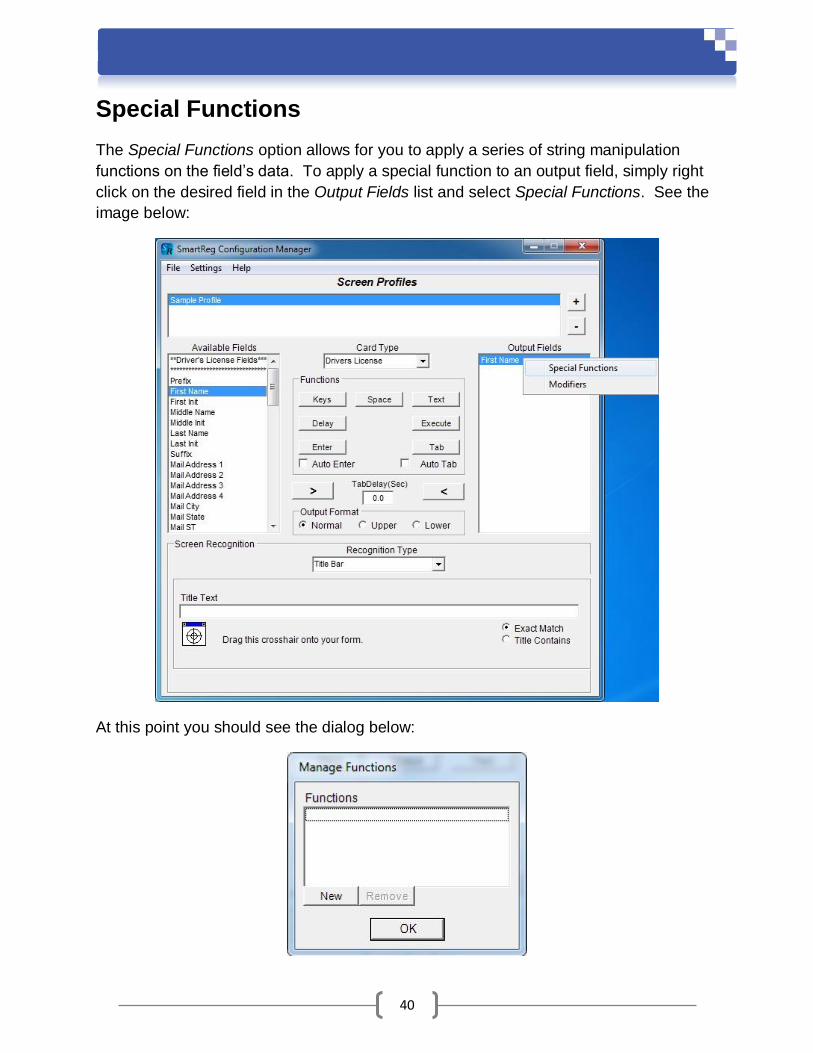
Special Functions
The Special Functions option allows for you to apply a series of string manipulation
functions on the field’s data. To apply a special function to an output field, simply right
click on the desired field in the Output Fields list and select Special Functions. See the
image below:
At this point you should see the dialog below:
41
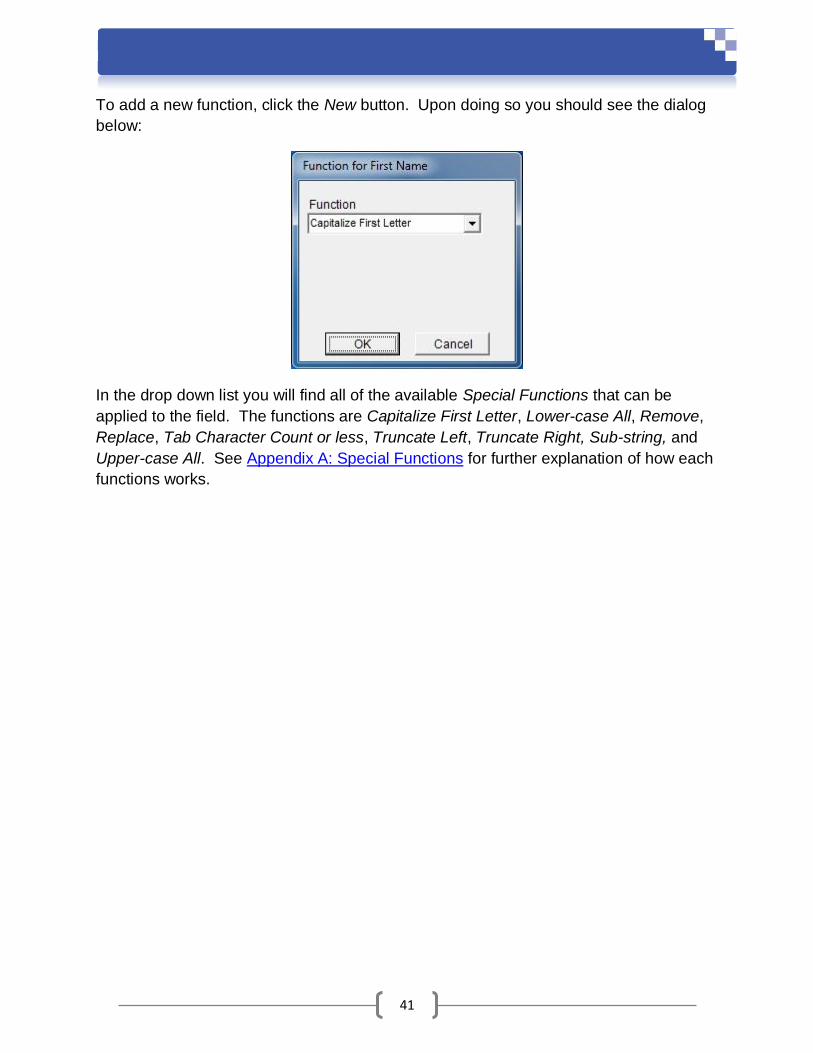
To add a new function, click the New button. Upon doing so you should see the dialog
below:
In the drop down list you will find all of the available Special Functions that can be
applied to the field. The functions are Capitalize First Letter, Lower-case All, Remove,
Replace, Tab Character Count or less, Truncate Left, Truncate Right, Sub-string, and
Upper-case All. See Appendix A: Special Functions for further explanation of how each
functions works.

42
Modifiers
The Modifiers function is mainly for use with single characters. To apply a modifier to
an output field, simply right click on the desired field in the Output Fields list and select
Modifiers. See the image below:
At this point you should the dialog below:
You can add keyboard modifiers, such as Ctrl and Alt, to the field. This allows for you to
simulate shortcuts, such as Ctrl + Alt + F12. To add a keystroke or combination of
keystrokes, simply press the key(s) you desire to use. See the sample image below:

43
Recognition Types
Title Bar Recognition
To use Title Bar Recognition, select Title Bar in the Recognition Type list. The section
should look like the image below:
Then, place the cursor over the crosshair in the bottom right corner of the section. Left
click the mouse and your normal cursor should be replaced with a crosshair. Move the
crosshair to form that you wish to recognize, and release the mouse button. The Title
Text textbox should then be filled with the title bar information.
Screen Scrape Recognition
To use Screen Scrape Recognition, select Screen Scrape from the Recognition Type
drop down list. The section should look like the image below:
You should first set the Dll Location and create the Session List. These two options are
located under the Settings menu and the Emulator Settings submenu. The Dll Location
is the Dll where the emulator’s HLLAPI is located. The Session List is the range of
session ids that might be used by the emulator. After these options are set, choose the
44
Screen Scrape option as your Recognition Type. The section should then look like the
image above. Next, choose the session id from the Session List that matches the
emulator session that you would like use and select the Get Data button. The black
area should then be populated with data from the presentation space of the emulator.
Next, highlight a word that is unique in its placement in the presentation space. Then,
right-click the highlighted area and click Add Rule. You should then see the rule in the
table below the black area. Repeat this process until you feel that this profile is
completely unique from any other profiles that you have or might have.
Image Capture Recognition
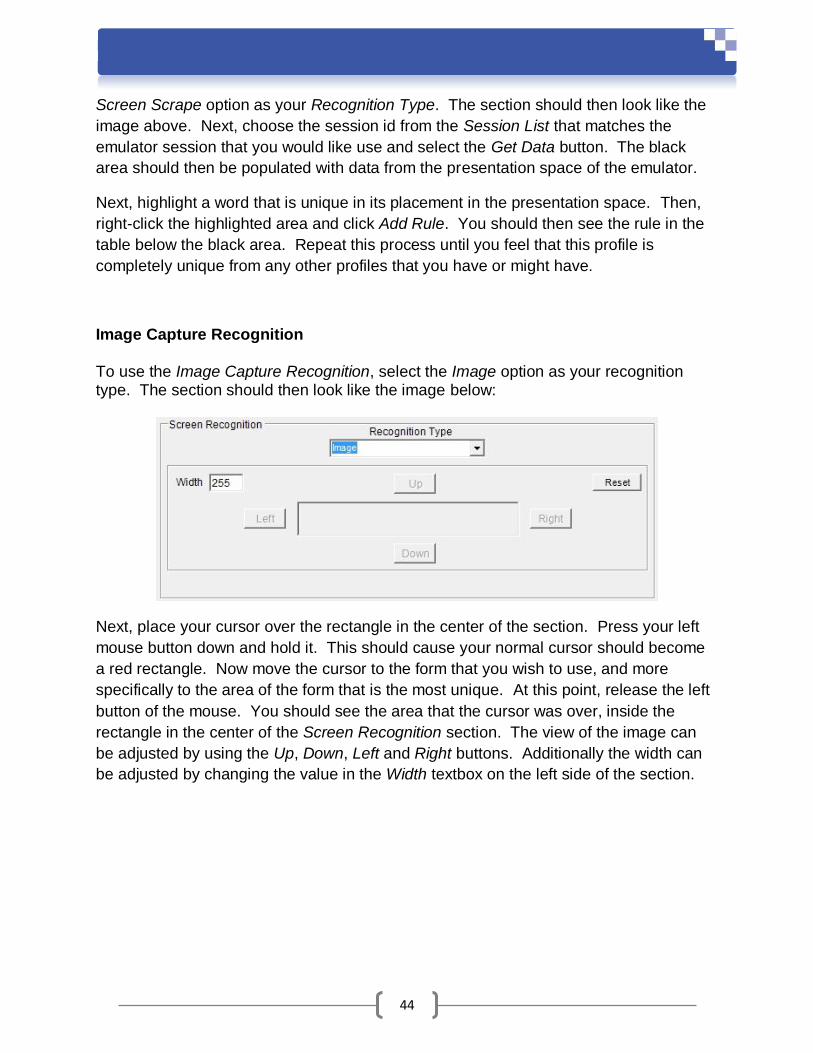
To use the Image Capture Recognition, select the Image option as your recognition type. The section should then look like the image below:
Next, place your cursor over the rectangle in the center of the section. Press your left
mouse button down and hold it. This should cause your normal cursor should become
a red rectangle. Now move the cursor to the form that you wish to use, and more
specifically to the area of the form that is the most unique. At this point, release the left
button of the mouse. You should see the area that the cursor was over, inside the
rectangle in the center of the Screen Recognition section. The view of the image can
be adjusted by using the Up, Down, Left and Right buttons. Additionally the width can
be adjusted by changing the value in the Width textbox on the left side of the section.
45
Internet Explorer Recognition
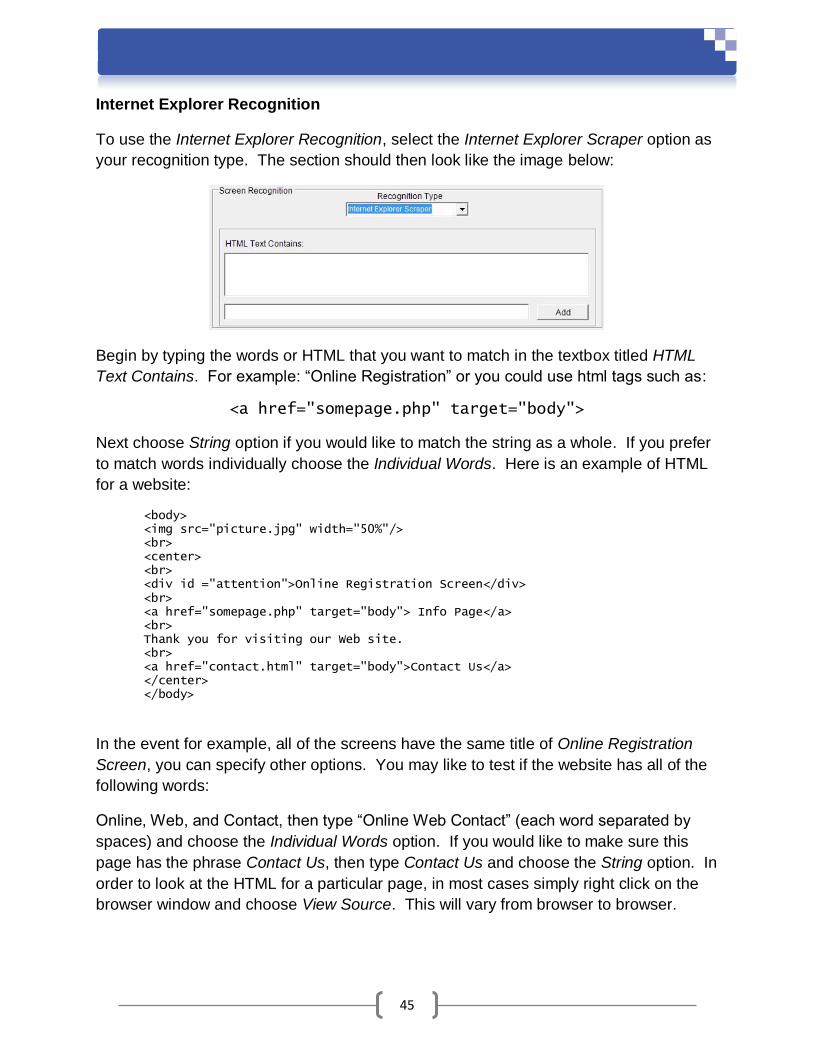
To use the Internet Explorer Recognition, select the Internet Explorer Scraper option as
your recognition type. The section should then look like the image below:
Begin by typing the words or HTML that you want to match in the textbox titled HTML
Text Contains. For example: “Online Registration” or you could use html tags such as:
<a href="somepage.php" target="body">
Next choose String option if you would like to match the string as a whole. If you prefer
to match words individually choose the Individual Words. Here is an example of HTML
for a website:
<body> <img src="picture.jpg" width="50%"/> <br> <center> <br> <div id ="attention">Online Registration Screen</div> <br> <a href="somepage.php" target="body"> Info Page</a> <br> Thank you for visiting our Web site. <br> <a href="contact.html" target="body">Contact Us</a> </center> </body>
In the event for example, all of the screens have the same title of Online Registration
Screen, you can specify other options. You may like to test if the website has all of the
following words:
Online, Web, and Contact, then type “Online Web Contact” (each word separated by
spaces) and choose the Individual Words option. If you would like to make sure this
page has the phrase Contact Us, then type Contact Us and choose the String option. In
order to look at the HTML for a particular page, in most cases simply right click on the
browser window and choose View Source. This will vary from browser to browser.
46
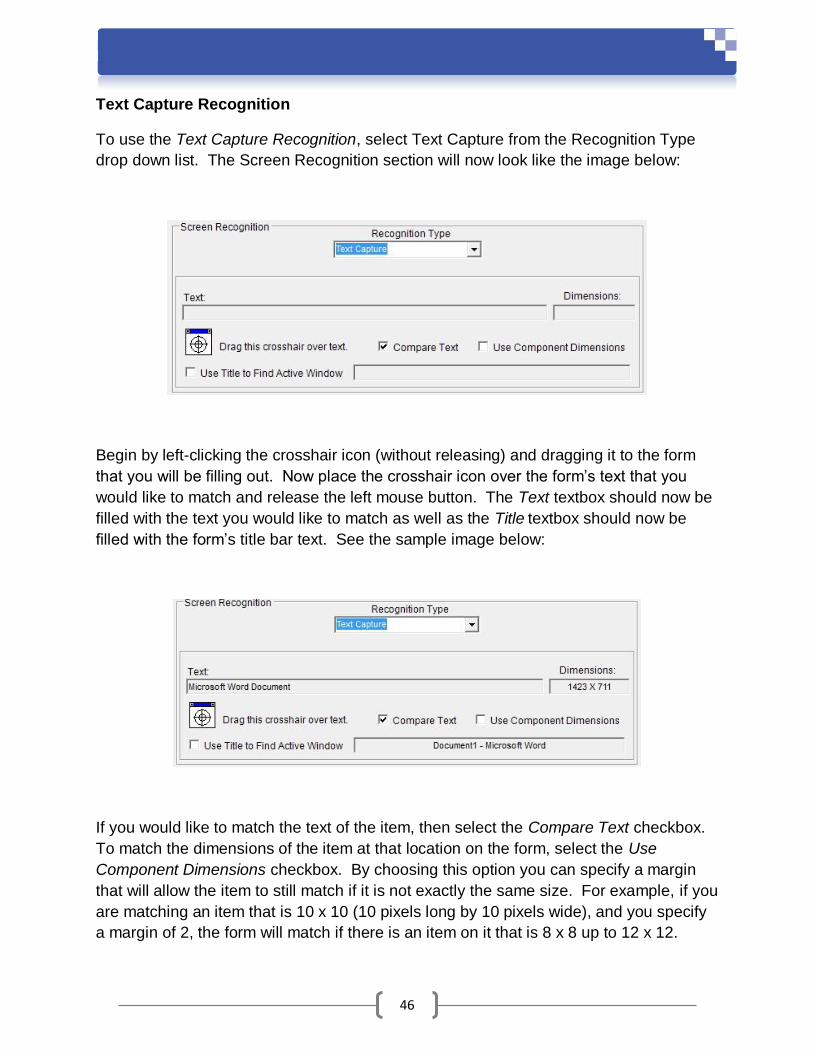
Text Capture Recognition
To use the Text Capture Recognition, select Text Capture from the Recognition Type
drop down list. The Screen Recognition section will now look like the image below:
Begin by left-clicking the crosshair icon (without releasing) and dragging it to the form
that you will be filling out. Now place the crosshair icon over the form’s text that you
would like to match and release the left mouse button. The Text textbox should now be
filled with the text you would like to match as well as the Title textbox should now be
filled with the form’s title bar text. See the sample image below:
If you would like to match the text of the item, then select the Compare Text checkbox.
To match the dimensions of the item at that location on the form, select the Use
Component Dimensions checkbox. By choosing this option you can specify a margin
that will allow the item to still match if it is not exactly the same size. For example, if you
are matching an item that is 10 x 10 (10 pixels long by 10 pixels wide), and you specify
a margin of 2, the form will match if there is an item on it that is 8 x 8 up to 12 x 12.
47
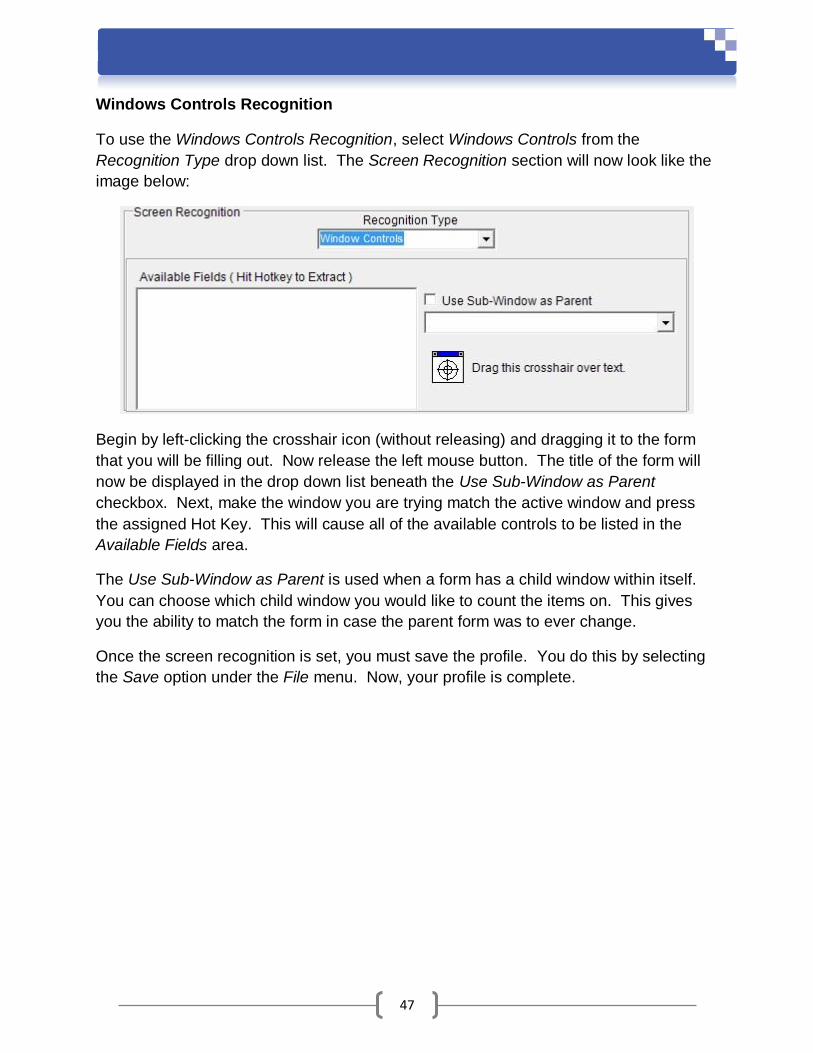
Windows Controls Recognition
To use the Windows Controls Recognition, select Windows Controls from the
Recognition Type drop down list. The Screen Recognition section will now look like the
image below:
Begin by left-clicking the crosshair icon (without releasing) and dragging it to the form
that you will be filling out. Now release the left mouse button. The title of the form will
now be displayed in the drop down list beneath the Use Sub-Window as Parent
checkbox. Next, make the window you are trying match the active window and press
the assigned Hot Key. This will cause all of the available controls to be listed in the
Available Fields area.
The Use Sub-Window as Parent is used when a form has a child window within itself.
You can choose which child window you would like to count the items on. This gives
you the ability to match the form in case the parent form was to ever change.
Once the screen recognition is set, you must save the profile. You do this by selecting
the Save option under the File menu. Now, your profile is complete.
48
Appendices
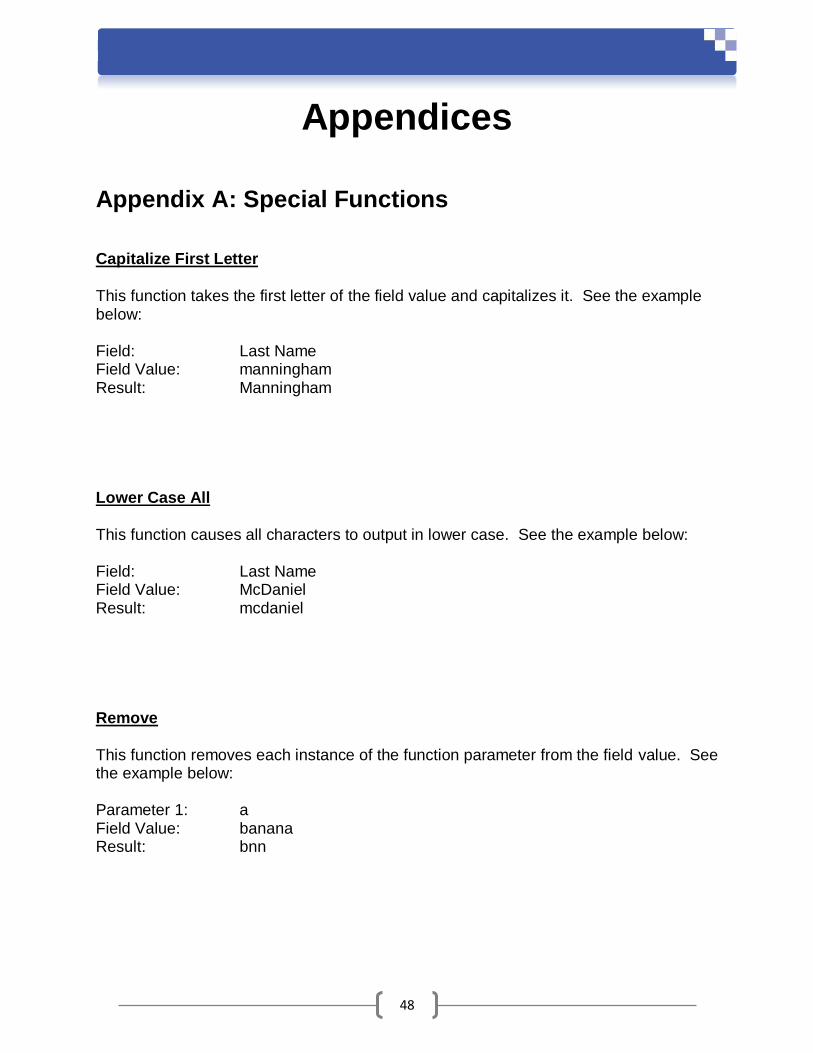
Appendix A: Special Functions Capitalize First Letter This function takes the first letter of the field value and capitalizes it. See the example below: Field: Last Name Field Value: manningham Result: Manningham Lower Case All
This function causes all characters to output in lower case. See the example below: Field: Last Name Field Value: McDaniel Result: mcdaniel Remove
This function removes each instance of the function parameter from the field value. See the example below: Parameter 1: a Field Value: banana Result: bnn

49
Replace
This function takes every instance of the first parameter and replaces it with second parameter. See the example below: Field: State Field Value: Mississippi Parameter 1: i Parameter 2: a Result: Massassappa Tab Character Count or Less This function outputs a TAB keystroke if the field value length is less than the first parameter value. See the example below: Field: Last Name Field Value: Bond Parameter 1: 3 Result: No TAB outputted Truncate Left This function removes the first P1 (Parameter 1) characters of the field value. See the example below: Parameter 1: 2 Field Value: apple Result: ple
50
Truncate Right
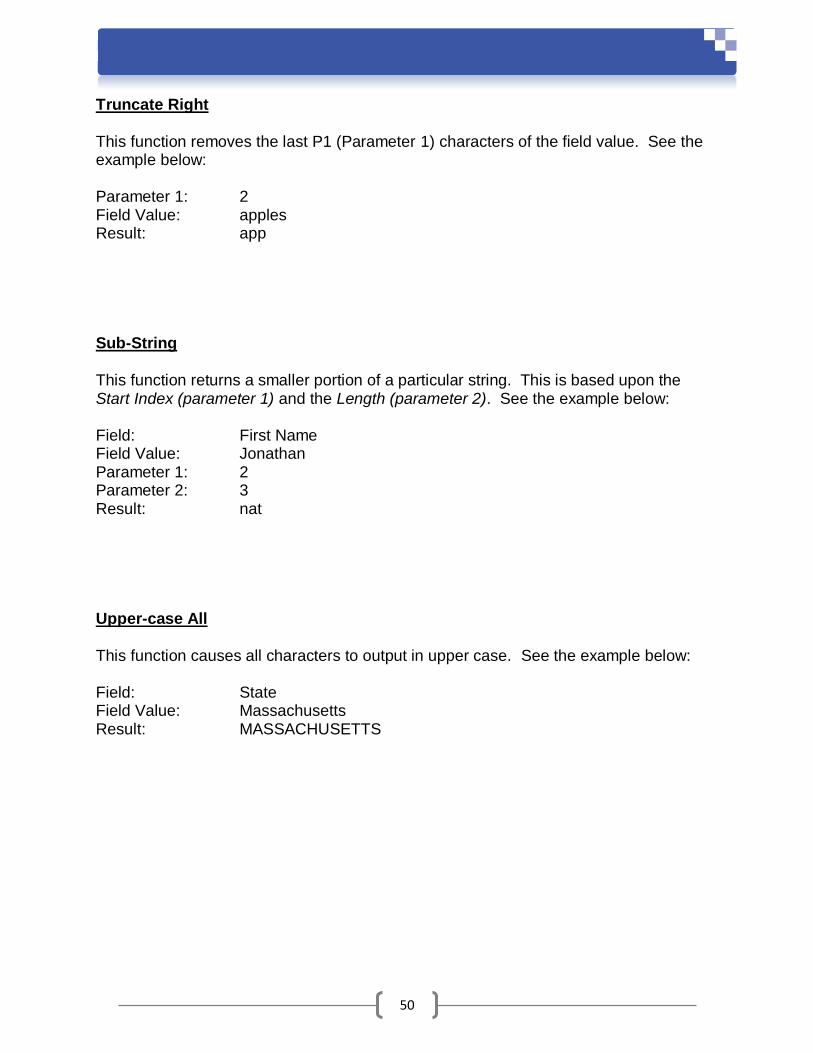
This function removes the last P1 (Parameter 1) characters of the field value. See the example below: Parameter 1: 2 Field Value: apples Result: app Sub-String
This function returns a smaller portion of a particular string. This is based upon the Start Index (parameter 1) and the Length (parameter 2). See the example below: Field: First Name Field Value: Jonathan Parameter 1: 2 Parameter 2: 3 Result: nat Upper-case All
This function causes all characters to output in upper case. See the example below: Field: State Field Value: Massachusetts Result: MASSACHUSETTS