Embed Size (px)
Citation preview
SnapManager® 6.0 for Microsoft® ExchangeInstallation and Administration Guide
NetApp, Inc495 East Java DriveSunnyvale, CA 94089 USATelephone: +1 (408) 822-6000Fax: +1 (408) 822-4501Support telephone: +1 (888) 4-NETAPPDocumentation comments: [email protected] Web: http://www.netapp.com
Part number: 215-04917_A0
January 2010

Contents
Copyright information ............................................................................... 15Trademark information ............................................................................. 17About this guide .......................................................................................... 19
Audience .................................................................................................................... 19
Keyboard and formatting conventions ...................................................................... 20
Special messages ....................................................................................................... 21
How to send your comments ..................................................................................... 21
SnapManager overview .............................................................................. 23SnapManager for Exchange limitations .................................................................... 24
Where you install and run SnapManager .................................................................. 24
How SnapManager works with other system components ........................................ 25
Snapshot technology in SnapManager ...................................................................... 25
How SnapManager and SnapDrive work together .................................................... 26
How SnapManager uses VSS .................................................................................... 26
Management of Snapshot copies created with VSS ...................................... 26
Data ONTAP VSS Hardware Provider requirement ..................................... 27
Comparison of methods for creating restorable backups .......................................... 27
SnapManager and conventional backup processes ........................................ 28
Types of external backup to use with SnapManager ..................................... 28
SnapManager snap-in ................................................................................................ 28
The SnapManager graphical user interface ............................................................... 29
The SnapManager command-line interface ............................................................... 29
Preparation for installing or upgrading SnapManager .......................... 31Where to install SnapManager .................................................................................. 32
SnapManager in a DAG environment ....................................................................... 32
Backing up system resources and data ...................................................................... 33
SnapManager licensing options ................................................................................. 33
Applying a SnapManager license to the Exchange server ............................. 34
Applying a Per Storage System license to the storage system ...................... 34
Exchange permission level required for SnapManager ............................................. 35
SnapManager for Exchange Service identity account requirements ............. 36
Account permissions for the report directory share ....................................... 36
Table of Contents | 3
Windows host system requirements .......................................................................... 37
If your storage system has multiple IP addresses ...................................................... 38
Storage system requirements ..................................................................................... 39
Remote administration server requirements .............................................................. 40
Remote verification server requirements ................................................................... 40
Exchange Server 2003 files to back up with a Windows backup utility ................... 41
Exchange Server 2007 files to back up with a Windows backup utility ................... 41
SnapManager installation and upgrade ................................................... 43Compatibility of SnapManager builds with Windows Server ................................... 44
Installation of SnapManager on a stand-alone Windows host system ...................... 44
Comparison of installation modes for a stand-alone Windows host
system ...................................................................................................... 44
Installing SnapManager in interactive mode ............................................................. 45
Installing SnapManager in unattended mode ............................................................ 47
Displaying the SnapManager software license agreement ............................ 49
Examples of unattended installation .............................................................. 49
SnapManager installation in a Windows cluster ....................................................... 50
Requirements for installing SnapManager in a Windows cluster ................. 50
Installing SnapManager after creating a new Windows cluster .................... 51
Installing SnapManager in an existing Windows cluster .............................. 52
Preparing to upgrade SnapManager .......................................................................... 53
Comparison of interactive and unattended upgrade modes ........................... 55
SnapManager upgrade paths .......................................................................... 55
Upgrade considerations for fractional space reserve monitoring .................. 55
Upgrading SnapManager in interactive mode ........................................................... 56
Upgrading SnapManager in unattended mode .......................................................... 56
Examples of unattended upgrade ................................................................... 58
Updating legacy scheduled jobs .................................................................... 58
Prerequisites for uninstalling SnapManager .............................................................. 59
Comparison of interactive versus unattended uninstallation ......................... 60
Moving Exchange data to a local disk ........................................................... 60
Uninstalling SnapManager in interactive mode ........................................................ 60
Uninstalling SnapManager in unattended mode ........................................................ 61
Examples of unattended uninstallation .......................................................... 63
SnapManager reinstallation with or without uninstallation ....................................... 64
Comparison of interactive and unattended reinstallation .............................. 64
4 | SnapManager® 6.0 for Microsoft® Exchange Installation and Administration Guide
Reinstalling SnapManager in interactive mode ......................................................... 65
Reinstalling SnapManager in unattended mode ........................................................ 66
Examples of unattended reinstallation ........................................................... 67
When you start SnapManager for the first time ...................................... 69What SnapManager verifies at startup ....................................................................... 69
Why you should administer SnapManager from the system console ........................ 70
Starting SnapManager and connecting to the default server ..................................... 70
Starting SnapManager and connecting to the CCR server ........................................ 71
SnapManager Dashboard view .................................................................................. 72
Scheduled jobs ........................................................................................................... 73
Database Availability Group ..................................................................................... 73
Database migration considerations ........................................................... 75Exchange configuration requirements ....................................................................... 75
Deletion of Storage Groups from clustered systems ..................................... 77
Rules for Exchange Server storage groups and databases enforced by the
Configuration wizard ........................................................................................... 77
Recommended Exchange Server storage groups and databases
configurations .......................................................................................... 78
Exchange Server storage groups and databases configurations to avoid ...... 79
Exchange message tracking in an MSCS configuration ................................ 79
NTFS volume mountpoints ....................................................................................... 80
Limitations of NTFS volume mountpoints .................................................... 80
SnapManager support for volume mountpoints ........................................................ 81
Drive letter limitations and individual database restoration .......................... 81
Mounted volume restrictions with SnapManager .......................................... 82
Mounted volume naming conventions with SnapManager ........................... 82
How mounted volumes are shown in SnapManager ..................................... 83
Transaction log archiving .......................................................................................... 84
NTFS hard links ............................................................................................. 84
Why SnapManager uses NTFS hard links for transaction log archiving ...... 85
Support for multiple SnapInfo directories ..................................................... 86
Example Exchange configurations supported with SnapManager ............................ 86
Example: single Storage Group and individual database restoration not
required .................................................................................................... 87
Example: single Storage Group and individual database restoration
required .................................................................................................... 87
Table of Contents | 5
Example: multiple Storage Groups and individual database restoration
required .................................................................................................... 88
Example: multiple Storage Groups and individual database restoration
not required .............................................................................................. 89
Creation of LUNs on qtrees ....................................................................................... 90
Storage system volume and LUN planning ............................................................... 90
Information needed for your SnapManager data configuration plan ......................... 91
Configuration and migration of Exchange data using SnapManager ... 93The SnapManager Configuration wizard .................................................................. 94
What the SnapManager Configuration wizard does ...................................... 94
When to use the SnapManager Configuration wizard ................................... 95
Settings configurable only with the SnapManager Configuration wizard . . . . 96
Placement of Exchange and SnapManager components ............................... 97
Viewing the placement of Exchange and SnapManager components ........... 98
Exchange Server storage groups and databases migration and configuration
considerations ...................................................................................................... 98
Migrating and configuring your Exchange Server storage groups and
databases using the SnapManager Configuration wizard ........................ 99
How to move transaction logs using the SnapManager Configuration
wizard ..................................................................................................... 105
Configuration using the SnapManager control file ................................................. 107
Configuration of SnapManager in a DAG using a control file .................... 107
Importing Exchange Server configuration information using the control
file .......................................................................................................... 108
Exporting Exchange Server configuration information using the control
file .......................................................................................................... 108
Migration of LCR-enabled databases ...................................................................... 109
Prerequisites for configuring an LCR-enabled Exchange server ................ 110
Comparison of moving production and LCR replica storage groups .......... 110
Database seeding in an LCR ........................................................................ 110
Migration of CCR-enabled databases ...................................................................... 111
Prerequisites for configuring a CCR-enabled Storage Group ..................... 111
Considerations for configuring SnapManager in a CCR-enabled Storage
Group ..................................................................................................... 112
Configuring SnapManager in a CCR-enabled Storage Group .................... 112
Migration of Exchange Server 2010 mailbox databases ......................................... 114
6 | SnapManager® 6.0 for Microsoft® Exchange Installation and Administration Guide
Prerequisites for migrating Exchange Server 2010 mailbox databases ....... 114
Available LUNs in a Database Availability Group ..................................... 115
Migrating Exchange Server 2010 mailbox databases .................................. 115
Guidelines for migrating to mountpoints for LUN mapping ................................... 116
Scenario: migrating an existing configuration from using drive letters to
using mountpoints for LUN mapping .................................................... 117
SnapManager Backup overview .............................................................. 119How SnapManager Backup works .......................................................................... 119
Types of backups SnapManager can perform ............................................. 120
The SnapInfo directory ................................................................................ 120
SnapManager backup sets ........................................................................... 121
Exchange Storage Group sets ...................................................................... 121
SnapManager minimum unit of backup ...................................................... 122
SnapManager naming-convention options .................................................. 122
Backup process in a Windows Server 2003 or Windows Server 2008
environment ........................................................................................... 122
Why a transaction log backup might contain two Snapshot copies ............ 123
SnapManager Snapshot copy naming conventions ................................................. 124
When to run a SnapManager backup ....................................................................... 125
How SnapManager checks database integrity in backup sets ................................. 126
LUN requirements for verifying databases in a backup set ......................... 127
Database verification load management ...................................................... 127
Backup verification status reporting ............................................................ 129
Where to run database and transaction log integrity verification ................ 129
When to verify the databases in a backup set .............................................. 130
Backup set retention ................................................................................................ 130
Maximum number of Snapshot copies per volume ..................................... 131
Ways to delete Snapshot copies ................................................................... 131
Automatic deletion of Snapshot copies ....................................................... 131
Transaction log management ................................................................................... 132
Option to back up transaction logs that Exchange will truncate ................. 132
Exchange System Manager in a SnapManager environment .................................. 133
Displaying the time of the last full backup .................................................. 133
Exchange page zeroing and deleted item retention ..................................... 134
Database backup using SnapManager .................................................... 135Exchange storage groups and databases display ..................................................... 135
Table of Contents | 7
Exchange databases display in a DAG ........................................................ 136
Decisions to make before performing a SnapManager backup ............................... 136
Backing up using the Backup wizard ...................................................................... 138
Backing up using the Backup and Verify window .................................................. 139
Using Database Filter to display the databases to back up in a Database
Availability Group ............................................................................................. 142
Activation Preference Number of a mailbox database in Exchange
Server 2010 ............................................................................................ 144
LCR-enabled database backups ............................................................................... 144
CCR-enabled database backups ............................................................................... 145
Considerations before backing up a CCR replica database and
production database ............................................................................... 145
Backing up and verifying a CCR replica database and production
database .................................................................................................. 146
Creating a secondary backup on a remote CCR node using the Backup
wizard ..................................................................................................... 148
Creating a secondary backup on a remote CCR node using the Backup
and Verify window ................................................................................ 149
How SnapManager creates a secondary backup on a remote CCR node .... 149
Reasons that a SnapManager backup might fail ...................................................... 149
Problem: cluster failover during backup ..................................................... 150
Problem: Snapshot copy limit reached ........................................................ 150
Problem: SnapInfo directory being accessed ............................................... 150
Problem: SnapInfo directory out of space ................................................... 150
Problem: data does not match ...................................................................... 151
Problem: busy Snapshot copy ...................................................................... 151
Problem: Snapshot copy already exists ....................................................... 151
Problem: out of disk space ........................................................................... 151
Problem: SnapManager server initialization failed ..................................... 151
Backup database verification ................................................................................... 151
Decisions to make before database verification .......................................... 152
Starting or scheduling database verification ................................................ 153
Backup management groups .................................................................................... 154
Backup management group assignments ..................................................... 155
Example using backup management groups ............................................... 155
Assigning a backup set to a different backup management group .............. 155
8 | SnapManager® 6.0 for Microsoft® Exchange Installation and Administration Guide
Frequent Recovery Point backup operation ............................................................. 156
How the Frequent Recovery Point feature works ........................................ 157
Frequent Recovery Point backup operations ............................................... 157
Frequent Recovery Point backup operation on clustered configurations .... 157
Frequent Recovery Point backup operation in a DAG ................................ 158
Verification of Frequent Recovery Point backup copies ............................. 158
Deletion of Frequent Recovery Point backup copies .................................. 158
Frequent Recovery Point backup reports ..................................................... 158
Performing a Frequent Recovery Point backup operation ........................... 158
Database restore operation using SnapManager ................................... 161When to choose SnapManager Restore to recover Exchange 2010 mailbox
databases ............................................................................................................ 162
How SnapManager Restore works .......................................................................... 162
How to choose the type of restore operation to perform ............................. 163
Types of SnapManager Restore operations ................................................. 163
Snapshot copies created during a restore process ........................................ 164
Methods that can decrease restore process time .......................................... 165
Transaction log sequence verification options ............................................ 165
LUN Clone Split Restore method ................................................................ 166
SnapManager Restore in a Windows cluster ............................................... 167
SnapManager Restore in a live Exchange virtual server cluster ................. 167
Guidelines for using SnapManager Restore ............................................................ 167
How to choose the type of restore operation to perform ............................. 167
Guidelines for restoring from a SnapManager backup copy ....................... 168
Restore from a SnapManager backup copy ............................................................. 169
Decisions to make before restoring from a SnapManager backup copy ..... 169
Restoring databases using the Restore wizard ............................................. 171
Restoring databases using the Restore window ........................................... 172
Restoring data to a specified Frequent Recovery Point ............................... 174
Restoring Exchange 2010 databases in a DAG ....................................................... 176
Backups available for restore in a DAG ...................................................... 176
Restoring a backup copy from one Exchange server to another in a DAG . 177
Reseeding after a restore operation in a DAG ............................................. 178
Restore from an LCR-enabled Storage Group ........................................................ 178
Restoring a backup copy from an LCR replica Storage Group ................... 178
What to do if corruption occurs in an LCR-enabled Storage Group ........... 180
Table of Contents | 9
Restore from a CCR-enabled Storage Group .............................................. 180
Recovery Storage Groups ........................................................................................ 183
Limitations of using a Recovery Storage Group ......................................... 184
Restoring a database to a recovery storage group in Exchange 2007 .......... 184
Restoring a database to a Recovery Storage Group in Exchange Server
2003 ........................................................................................................ 189
Restoring multiple databases to a Recovery Storage Group ....................... 192
Restoring an unverified backup copy to a Recovery Storage Group ........... 193
Restore of backups created at different Exchange server locations ........................ 193
Restoring backup copies that were created on other Exchange servers in
Exchange 2007 ................................................................................................... 194
Restoring backup sets from an archive .................................................................... 195
Up-to-the-minute restore from an archive backup ....................................... 196
Recovery Database .................................................................................................. 196
Limitations of using a Recovery Database .................................................. 197
Restoring a mailbox database to the Recovery Database in Exchange
Server 2010 ............................................................................................ 197
When to delete a Recovery Database .......................................................... 199
Mailbox restore using Single Mailbox Recovery ................................... 201Recovering mailbox data ......................................................................................... 201
Cleaning up after Single Mailbox Recovery ........................................................... 202
Deletion of Snapshot copies ...................................................................... 203Criteria for deleting backups ................................................................................... 203
Automatic deletion of Snapshot copies ................................................................... 205
Explicit deletion of Snapshot copies ....................................................................... 205
Option to retain up-to-the-minute restore ability ......................................... 206
Explicitly deleting individual backup copies ........................................................... 207
Explicitly deleting backup sets or SnapInfo Snapshot copies ................................. 208
Explicitly deleting Snapshot copies created by SnapManager Restore ................... 210
Problem deleting backups due to busy Snapshot copy error ................................... 211
How SnapManager uses SnapMirror ..................................................... 213Volume replication using SnapMirror ..................................................................... 213
Where to find more information about configuring and using SnapMirror ............ 214
Requirements for using SnapMirror with SnapManager ......................................... 214
How SnapManager uses SnapMirror and SnapDrive .............................................. 214
How SnapMirror replication works ............................................................. 215
10 | SnapManager® 6.0 for Microsoft® Exchange Installation and Administration Guide
Integrity verification on SnapMirror destination volumes ...................................... 215
Selecting the SnapMirror destination volumes for verification ................... 216
Requirements to run destination volume integrity verification ................... 217
Troubleshooting integrity verification failure on SnapMirror destination
volumes .................................................................................................. 217
Types of destination volume integrity verification .................................................. 218
Backup with verification ............................................................................. 218
Integrity verification for test restore operations .......................................... 219
Integrity verification for a restore process ................................................... 220
Remote destination volume integrity verification ....................................... 220
Deferred integrity verification ..................................................................... 220
Concurrent backup verification ............................................................................... 221
Managing integrity verification jobs ........................................................... 222
Disaster recovery with SnapManager ..................................................... 225Where to get information when disaster strikes ...................................................... 225
Preparations for disaster recovery ........................................................................... 226
Recommendations for disaster recovery preparation .................................. 226
Prerequisites for disaster recovery ............................................................... 226
Backing up your Windows environment ................................................................. 228
Replication of your Exchange server environment ................................................. 228
Methods of moving Exchange data offsite .............................................................. 230
Prerequisites for creating a Business Continuance plan .......................................... 230
System configuration for Business Continuance ......................................... 232
Setting permissions for business continuance on Microsoft Windows 2008R2 ..... 232
Impact of Active Directory replication lag on Business Continuance .................... 234
Creating a Business Continuance plan .................................................................... 234
Validating the Business Continuance plan .............................................................. 236
Prerequisites for failing over to the Business Continuance site .............................. 236
Executing the Business Continuance plan ............................................................... 237
Prerequisites for failing back from the Business Continuance site ......................... 240
Failing back to the production site .......................................................................... 241
Managing SnapMirror replication ........................................................................... 243
Troubleshooting disaster recovery ........................................................................... 244
SnapManager backup archiving ............................................................. 245Why organizations archive data .............................................................................. 245
Guidelines for archiving SnapManager backups ..................................................... 245
Table of Contents | 11
Methods of archiving SnapManager backups ......................................................... 246
Archives created with NDMP or the dump command ............................................ 247
Evaluation of the NDMP and dump command method of archiving .......... 248
Example: Using NDMP or dump command to archive SnapManager
backups .................................................................................................. 248
Archives created using a Windows backup utility .................................................. 250
Evaluation of the Windows backup utility method of archiving ................. 251
Example: Using a Windows backup utility to archive SnapManager
backups .................................................................................................. 251
Exchange backup archives created with Exchange Backup Agent ......................... 252
Evaluation of the Exchange Backup Agent method of archiving ............... 253
Example: Using Exchange Backup Agent to archive Exchange backup
copies ..................................................................................................... 254
If you use a centralized backup model .................................................................... 254
Automatic backup archiving using the Run Command After Operation feature .... 255
Command arguments supported by the Run Command After Operation
feature .................................................................................................... 255
Specifying the command to be run by the Run Command After
Operation feature ................................................................................... 256
Enabling the launch of SnapManager scripts from a UNC path ............................. 257
SnapManager reports and the report directory .................................... 259SnapManager reports in a Database Availability Group (DAG) ............................. 259
Reasons to change the report directory location ...................................................... 260
Changing the SnapManager report directory ........................................................... 260
Locating the report directory in a Windows cluster ................................................ 261
Viewing SnapManager reports ................................................................................ 261
Printing SnapManager reports ................................................................................. 261
Deleting SnapManager reports ................................................................................ 262
Dataset and SnapVault integration ......................................................... 263Dataset concepts ...................................................................................................... 263
Available functionalities of dataset and SnapVault integration with
SnapManager ..................................................................................................... 264
Dataset and SnapVault integration with SnapManager ............................... 264
Prerequisites for dataset and SnapVault integration with SnapManager ..... 265
Limitations of dataset and SnapVault integration with SnapManager ........ 266
Dataset configuration ............................................................................................... 266
12 | SnapManager® 6.0 for Microsoft® Exchange Installation and Administration Guide
Creating a dataset using SnapManager ........................................................ 268
Editing a dataset using Protection Manager ................................................ 269
SnapVault relationships ............................................................................... 269
Local backup protection using dataset and SnapVault integration .......................... 270
Information used to create remote backups ............................................................. 270
Remote backup retention ......................................................................................... 271
Deferred database integrity verification with SnapVault ........................................ 272
Restoring from a remote backup ............................................................................. 272
SnapManager application settings configuration .................................. 275Where to access SnapManager application settings ................................................ 275
Adding Exchange servers to be managed ................................................................ 277
Enabling database migration back to local disks ..................................................... 277
Disabling database migration back to local disks .................................................... 278
Considerations for selecting the database verification server .................................. 278
Configuring the verification server .............................................................. 279
Remote verification prerequisites ................................................................ 279
Selecting the Snapshot copy access method for database verification .................... 282
Database verification throttling ............................................................................... 282
How database verification throttling works ................................................. 283
Database verification throttling options ...................................................... 284
Calculating the verification throttling sleep interval ................................... 284
Configuring database verification throttling ................................................ 285
Throttling entries in the SnapManager backup and verification report ....... 286
Verification override entry in the SnapManager restore report ................... 286
Impact of database verification on performance ......................................... 286
Database verification override during restore operation ......................................... 287
Configuring the database verification override option ................................ 287
Verification override entry in the SnapManager restore report ................... 288
Configuring the backup naming convention ........................................................... 288
Configuring default settings for the Run Command After Operation option .......... 289
Fractional space reservation .................................................................................... 290
What can happen with a fractional-space-reserved volume ........................ 291
Fractional space reservation policies ........................................................... 291
Fractional space reservation policies to manage Exchange data ................. 295
Viewing current fractional space reservation data for a LUN ..................... 297
Event notification options ........................................................................................ 299
Table of Contents | 13

Configuring automatic event notification settings ....................................... 300
SnapManager control file XML schema ................................................. 303Storage layout settings XML schema ...................................................................... 303
Notification settings XML schema .......................................................................... 305
Verification settings XML schema .......................................................................... 306
Report directory settings XML schema ................................................................... 307
Backup settings XML schema ................................................................................. 308
SnapMirror relationship settings XML schema ....................................................... 308
SnapManager command-line reference .................................................. 311Guidelines for using the SnapManager for Exchange PowerShell command-line
tool ..................................................................................................................... 311
Launching SnapManager for Exchange PowerShell ............................................... 312
new-backup .............................................................................................................. 312
verify-backup ........................................................................................................... 321
delete-backup ........................................................................................................... 326
get-backup ............................................................................................................... 328
get-mirrors ............................................................................................................... 331
resync-mirrors .......................................................................................................... 333
release-mirrors ......................................................................................................... 334
break-mirrors ........................................................................................................... 336
restore-backup ......................................................................................................... 337
Get-JobStatus ........................................................................................................... 344
Change-JobPriority .................................................................................................. 345
Cancel-Job ............................................................................................................... 346
exec-bc ..................................................................................................................... 348
Export-config ........................................................................................................... 350
Import-config ........................................................................................................... 351
Index ........................................................................................................... 355
14 | SnapManager® 6.0 for Microsoft® Exchange Installation and Administration Guide

Copyright information
Copyright © 1994–2009 NetApp, Inc. All rights reserved. Printed in the U.S.A.
No part of this document covered by copyright may be reproduced in any form or by any means—graphic, electronic, or mechanical, including photocopying, recording, taping, or storage in anelectronic retrieval system—without prior written permission of the copyright owner.
Software derived from copyrighted NetApp material is subject to the following license anddisclaimer:
THIS SOFTWARE IS PROVIDED BY NETAPP "AS IS" AND WITHOUT ANY EXPRESS ORIMPLIED WARRANTIES, INCLUDING, BUT NOT LIMITED TO, THE IMPLIEDWARRANTIES OF MERCHANTABILITY AND FITNESS FOR A PARTICULAR PURPOSE,WHICH ARE HEREBY DISCLAIMED. IN NO EVENT SHALL NETAPP BE LIABLE FOR ANYDIRECT, INDIRECT, INCIDENTAL, SPECIAL, EXEMPLARY, OR CONSEQUENTIALDAMAGES (INCLUDING, BUT NOT LIMITED TO, PROCUREMENT OF SUBSTITUTEGOODS OR SERVICES; LOSS OF USE, DATA, OR PROFITS; OR BUSINESSINTERRUPTION) HOWEVER CAUSED AND ON ANY THEORY OF LIABILITY, WHETHERIN CONTRACT, STRICT LIABILITY, OR TORT (INCLUDING NEGLIGENCE OROTHERWISE) ARISING IN ANY WAY OUT OF THE USE OF THIS SOFTWARE, EVEN IFADVISED OF THE POSSIBILITY OF SUCH DAMAGE.
NetApp reserves the right to change any products described herein at any time, and without notice.NetApp assumes no responsibility or liability arising from the use of products described herein,except as expressly agreed to in writing by NetApp. The use or purchase of this product does notconvey a license under any patent rights, trademark rights, or any other intellectual property rights ofNetApp.
The product described in this manual may be protected by one or more U.S.A. patents, foreignpatents, or pending applications.
RESTRICTED RIGHTS LEGEND: Use, duplication, or disclosure by the government is subject torestrictions as set forth in subparagraph (c)(1)(ii) of the Rights in Technical Data and ComputerSoftware clause at DFARS 252.277-7103 (October 1988) and FAR 52-227-19 (June 1987).
Copyright information | 15

Trademark information
All applicable trademark attribution is listed here.
NetApp, the Network Appliance logo, the bolt design, NetApp-the Network Appliance Company,Cryptainer, Cryptoshred, DataFabric, DataFort, Data ONTAP, Decru, FAServer, FilerView,FlexClone, FlexVol, Manage ONTAP, MultiStore, NearStore, NetCache, NOW NetApp on the Web,SANscreen, SecureShare, SnapDrive, SnapLock, SnapManager, SnapMirror, SnapMover,SnapRestore, SnapValidator, SnapVault, Spinnaker Networks, SpinCluster, SpinFS, SpinHA,SpinMove, SpinServer, StoreVault, SyncMirror, Topio, VFM, and WAFL are registered trademarksof NetApp, Inc. in the U.S.A. and/or other countries. gFiler, Network Appliance, SnapCopy,Snapshot, and The evolution of storage are trademarks of NetApp, Inc. in the U.S.A. and/or othercountries and registered trademarks in some other countries. The NetApp arch logo; the StoreVaultlogo; ApplianceWatch; BareMetal; Camera-to-Viewer; ComplianceClock; ComplianceJournal;ContentDirector; ContentFabric; Data Motion; EdgeFiler; FlexShare; FPolicy; Go Further, Faster;HyperSAN; InfoFabric; Lifetime Key Management, LockVault; NOW; ONTAPI; OpenKey, RAID-DP; ReplicatorX; RoboCache; RoboFiler; SecureAdmin; SecureView; Serving Data by Design;Shadow Tape; SharedStorage; Simplicore; Simulate ONTAP; Smart SAN; SnapCache;SnapDirector; SnapFilter; SnapMigrator; SnapSuite; SohoFiler; SpinMirror; SpinRestore; SpinShot;SpinStor; vFiler; VFM Virtual File Manager; VPolicy; and Web Filer are trademarks of NetApp, Inc.in the U.S.A. and other countries. NetApp Availability Assurance and NetApp ProTech Expert areservice marks of NetApp, Inc. in the U.S.A.
IBM, the IBM logo, and ibm.com are trademarks or registered trademarks of International BusinessMachines Corporation in the United States, other countries, or both. A complete and current list ofother IBM trademarks is available on the Web at http://www.ibm.com/legal/copytrade.shtml.
Apple is a registered trademark and QuickTime is a trademark of Apple, Inc. in the U.S.A. and/orother countries. Microsoft is a registered trademark and Windows Media is a trademark of MicrosoftCorporation in the U.S.A. and/or other countries. RealAudio, RealNetworks, RealPlayer,RealSystem, RealText, and RealVideo are registered trademarks and RealMedia, RealProxy, andSureStream are trademarks of RealNetworks, Inc. in the U.S.A. and/or other countries.
All other brands or products are trademarks or registered trademarks of their respective holders andshould be treated as such.
NetApp, Inc. is a licensee of the CompactFlash and CF Logo trademarks.
NetCache is certified RealSystem compatible.
Trademark information | 17

About this guide
This guide helps you to use the product that it describes. You can do that more effectively when youunderstand the guide's terminology, format, conventions, and intended audience.
This guide describes how to install and configure SnapManager 6.0 for Microsoft Exchange softwareand use its online backup and restore features. It also describes how to use SnapMirror functionalitywith SnapManager. This guide does not explain how to install, configure, and use the SnapDrivefeatures that enable you to create and connect to LUNs, which you must do before you useSnapManager. For this information and details about how to configure NetApp storage systemvolumes and enable storage system access, see your SnapDrive documentation. This guide does notcover basic system or network administration topics, such as IP addressing, routing, and othernetwork topology.
Next topics
Audience on page 19
Keyboard and formatting conventions on page 20
Special messages on page 21
How to send your comments on page 21
AudienceThis guide is written with certain assumptions about your technical knowledge and experience.
This guide is for system and database administrators with a working knowledge of MicrosoftExchange. The discussion assumes familiarity with the following topics:
• Microsoft Exchange server administration• Network functions and operations• Basic concepts for moving data over a network• Your operating system, network, and NetApp storage system• CIFS protocols, as used for file sharing and file transfers• FC and iSCSI LUN access protocols
About this guide | 19
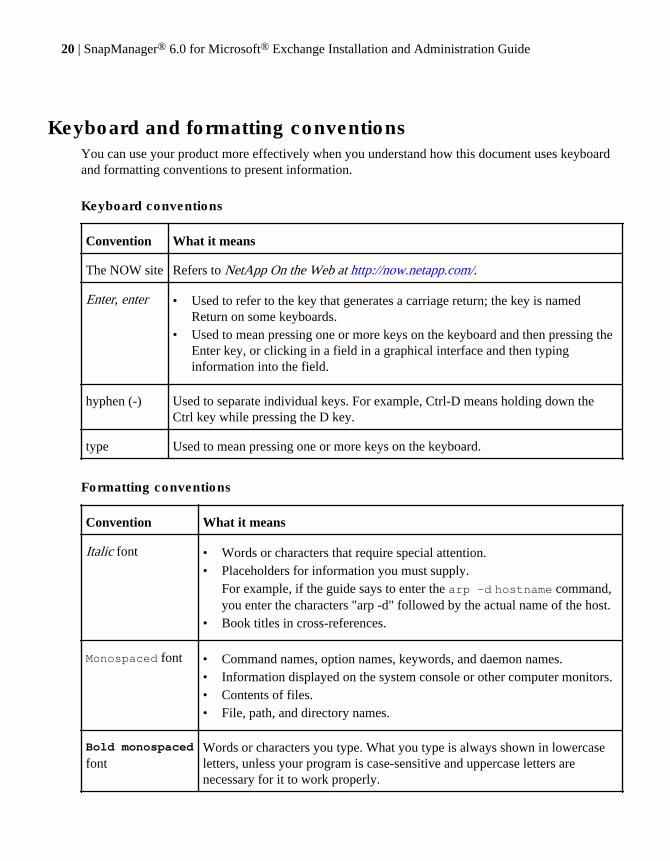
Keyboard and formatting conventionsYou can use your product more effectively when you understand how this document uses keyboardand formatting conventions to present information.
Keyboard conventions
Convention What it means
The NOW site Refers to NetApp On the Web at http://now.netapp.com/.
Enter, enter • Used to refer to the key that generates a carriage return; the key is namedReturn on some keyboards.
• Used to mean pressing one or more keys on the keyboard and then pressing theEnter key, or clicking in a field in a graphical interface and then typinginformation into the field.
hyphen (-) Used to separate individual keys. For example, Ctrl-D means holding down theCtrl key while pressing the D key.
type Used to mean pressing one or more keys on the keyboard.
Formatting conventions
Convention What it means
Italic font • Words or characters that require special attention.• Placeholders for information you must supply.
For example, if the guide says to enter the arp -d hostname command,you enter the characters "arp -d" followed by the actual name of the host.
• Book titles in cross-references.
Monospaced font • Command names, option names, keywords, and daemon names.• Information displayed on the system console or other computer monitors.• Contents of files.• File, path, and directory names.
Bold monospaced
fontWords or characters you type. What you type is always shown in lowercaseletters, unless your program is case-sensitive and uppercase letters arenecessary for it to work properly.
20 | SnapManager® 6.0 for Microsoft® Exchange Installation and Administration Guide
Special messagesThis document might contain the following types of messages to alert you to conditions that youneed to be aware of.
Note: A note contains important information that helps you install or operate the systemefficiently.
Attention: An attention notice contains instructions that you must follow to avoid a system crash,loss of data, or damage to the equipment.
How to send your commentsYou can help us to improve the quality of our documentation by sending us your feedback.
Your feedback is important in helping us to provide the most accurate and high-quality information.If you have suggestions for improving this document, send us your comments by e-mail to [email protected]. To help us direct your comments to the correct division, include in thesubject line the name of your product and the applicable operating system. For example, FAS6070—Data ONTAP 7.3, or Host Utilities—Solaris, or Operations Manager 3.8—Windows.
About this guide | 21

SnapManager overview
SnapManager provides you an integrated data management solution for Microsoft Exchange thatenhances the availability, scalability, and reliability of Exchange databases. SnapManager providesrapid online backup and restoration of databases, along with local or remote backup set mirroring fordisaster recovery.
SnapManager uses online Snapshot technology that is part of Data ONTAP and integrates Exchangebackup and restore APIs and Volume Shadow Copy Service (VSS). SnapManager uses SnapMirrorto support disaster recovery.
SnapManager provides the following data management capabilities:
• Migrating Exchange databases and transaction logs to LUNs on storage systems• Backing up Exchange databases and transaction logs from LUNs on storage systems• Verifying the backed-up Exchange databases and transaction logs• Managing backup sets• Archiving backup sets• Restoring Exchange databases and transaction logs from previously created backup sets
Next topics
SnapManager for Exchange limitations on page 24
Where you install and run SnapManager on page 24
How SnapManager works with other system components on page 25
Snapshot technology in SnapManager on page 25
How SnapManager and SnapDrive work together on page 26
How SnapManager uses VSS on page 26
Comparison of methods for creating restorable backups on page 27
SnapManager snap-in on page 28
The SnapManager graphical user interface on page 29
The SnapManager command-line interface on page 29
Related concepts
How SnapManager and SnapDrive work together on page 26
How SnapManager uses VSS on page 26
Comparison of methods for creating restorable backups on page 27
Preparation for installing or upgrading SnapManager on page 31
SnapManager installation and upgrade on page 43
When you start SnapManager for the first time on page 69
SnapManager backup archiving on page 245
SnapManager overview | 23
Disaster recovery with SnapManager on page 225
How SnapManager uses SnapMirror on page 213
Dataset and SnapVault integration on page 263
SnapManager for Exchange limitationsSnapManager for Exchange cannot be used with some software versions, features, databases, andserver editions.
• SnapDrive versions prior to 6.1• Microsoft Windows 2000• Restoration of individual mailboxes or public folders• Creation or restoration of backups of Exchange databases on third-party storage except for
databases on third-party storage arrays that provide storage for a V-Series system• Backup and restoration of Microsoft Exchange 5.5 and Exchange 2000 databases• Windows Server 2003 or the Windows Server 2008 IA-64 editions
Where you install and run SnapManagerYou can use SnapManager with configurations having multiple servers. You can perform localadministration, remote administration, and remote verification.
SnapManager provides the following capabilities:
• Local administrationYou install SnapManager on the same Windows host system as your Exchange server.
• Remote administrationIf you install SnapManager on a remote computer, you can run SnapManager remotely to performany task that you can perform on a locally installed SnapManager system.
• Remote verificationYou can also perform remote database verification from a remote administration server that isconfigured with SnapDrive and Exchange server. Remote verification offloads the CPU-intensivedatabase verification operations that can affect the performance of your production Exchangeserver.
Related references
Windows host system requirements on page 37
Remote administration server requirements on page 40
Remote verification server requirements on page 40
Database backup using SnapManager on page 135
24 | SnapManager® 6.0 for Microsoft® Exchange Installation and Administration Guide
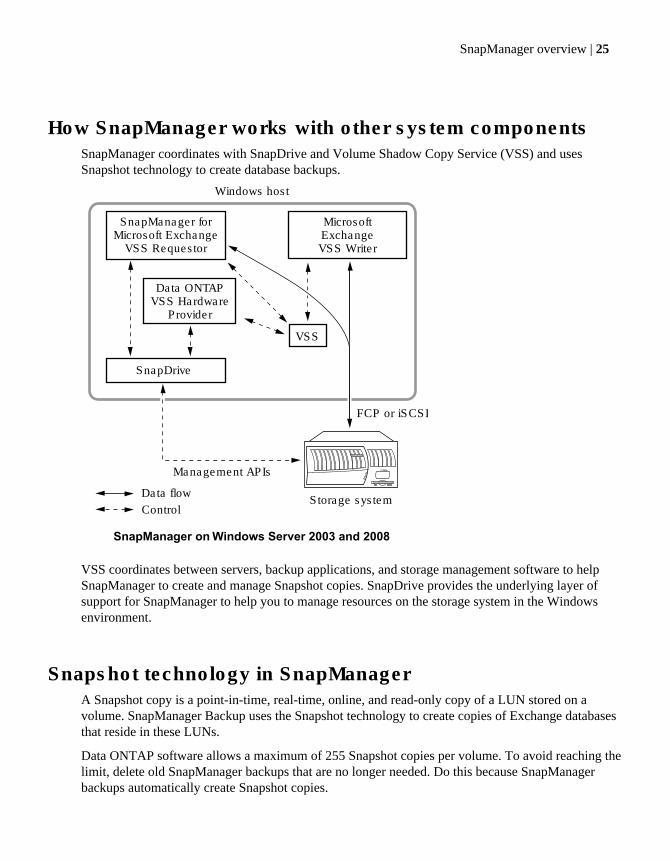
How SnapManager works with other system componentsSnapManager coordinates with SnapDrive and Volume Shadow Copy Service (VSS) and usesSnapshot technology to create database backups.
NetCache C760
Storage system
SnapManager forMicrosoft Exchange
VSS Requestor
SnapDrive
Data ONTAPVSS Hardware
Provider
Management APIs
FCP or iSCSI
Windows host
MicrosoftExchangeVSS Writer
VSS
SnapManager on Windows Server 2003 and 2008
Data flowControl
VSS coordinates between servers, backup applications, and storage management software to helpSnapManager to create and manage Snapshot copies. SnapDrive provides the underlying layer ofsupport for SnapManager to help you to manage resources on the storage system in the Windowsenvironment.
Snapshot technology in SnapManagerA Snapshot copy is a point-in-time, real-time, online, and read-only copy of a LUN stored on avolume. SnapManager Backup uses the Snapshot technology to create copies of Exchange databasesthat reside in these LUNs.
Data ONTAP software allows a maximum of 255 Snapshot copies per volume. To avoid reaching thelimit, delete old SnapManager backups that are no longer needed. Do this because SnapManagerbackups automatically create Snapshot copies.
SnapManager overview | 25
Note: The number of Snapshot copies on a volume can be greater than the number ofSnapManager backups being retained. For example, if a single volume contains both the SnapInfodirectory and the Exchange databases, each SnapManager backup generates two Snapshot copieson that volume. Therefore the number of Snapshot copies is double the number of backups on thesame volume.
For more information about Snapshot technology, see the Data ONTAP Storage Management Guide.
How SnapManager and SnapDrive work togetherSnapDrive provides the underlying layer of support for SnapManager by working with the NTFSWindows file system, Windows Volume Manager, and LUNs to help you to manage resources on thestorage system in the Windows environment.
Note: Use SnapManager for all backup-related operations. Use SnapDrive only to create andmanage the LUNs and storage system volumes that contain your Exchange data.
Related concepts
SnapManager overview on page 23
How SnapManager uses VSS on page 26
Comparison of methods for creating restorable backups on page 27
How SnapManager uses VSSSnapManager is a Microsoft Volume Shadow Copy Service (VSS) requestor, which means that ituses the VSS subsystem to initiate backups.
The Data ONTAP VSS Hardware Provider integrates the SnapDrive service and storage systemsrunning Data ONTAP into the VSS framework. For more information about VSS, see yourSnapDrive documentation.
Next topics
Management of Snapshot copies created with VSS on page 26
Data ONTAP VSS Hardware Provider requirement on page 27
Management of Snapshot copies created with VSSYou must manage the Snapshot copies that SnapManager creates using SnapManager or SnapDrive.Do not use the VSS administration tool vssadmin to manage Snapshot copies that are created bySnapManager using VSS.
26 | SnapManager® 6.0 for Microsoft® Exchange Installation and Administration Guide
Data ONTAP VSS Hardware Provider requirementYou must have the Data ONTAP VSS Hardware Provider installed for SnapManager to functionproperly. Data ONTAP VSS Hardware Provider integrates the SnapDrive service and storagesystems running Data ONTAP into the VSS framework.
The Data ONTAP VSS hardware provider is now included with SnapDrive 6.0 or later and does notneed to be installed separately.
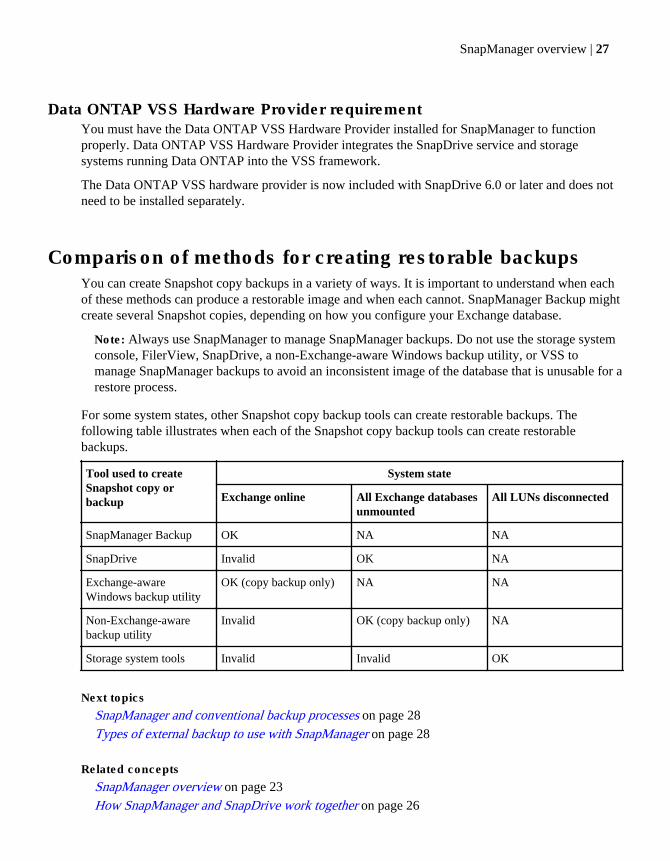
Comparison of methods for creating restorable backupsYou can create Snapshot copy backups in a variety of ways. It is important to understand when eachof these methods can produce a restorable image and when each cannot. SnapManager Backup mightcreate several Snapshot copies, depending on how you configure your Exchange database.
Note: Always use SnapManager to manage SnapManager backups. Do not use the storage systemconsole, FilerView, SnapDrive, a non-Exchange-aware Windows backup utility, or VSS tomanage SnapManager backups to avoid an inconsistent image of the database that is unusable for arestore process.
For some system states, other Snapshot copy backup tools can create restorable backups. Thefollowing table illustrates when each of the Snapshot copy backup tools can create restorablebackups.
Tool used to createSnapshot copy orbackup
System state
Exchange online All Exchange databasesunmounted
All LUNs disconnected
SnapManager Backup OK NA NA
SnapDrive Invalid OK NA
Exchange-awareWindows backup utility
OK (copy backup only) NA NA
Non-Exchange-awarebackup utility
Invalid OK (copy backup only) NA
Storage system tools Invalid Invalid OK
Next topics
SnapManager and conventional backup processes on page 28
Types of external backup to use with SnapManager on page 28
Related concepts
SnapManager overview on page 23
How SnapManager and SnapDrive work together on page 26
SnapManager overview | 27

How SnapManager uses VSS on page 26
SnapManager and conventional backup processesSnapManager complements conventional backup processes. However, some backup processesinterfere with SnapManager’s ability to back up and restore correctly. It is important that youunderstand which of your current backup tools and processes you need to modify or eliminate whenyou implement SnapManager.
SnapManager backups reside on disks. To archive SnapManager backups to another storage medium,such as tape, you can use the same tools and processes you currently employ.
Note: SnapManager backups cannot replace periodic disaster recovery measures, such as archivingto tape or other offline media.
Types of external backup to use with SnapManagerSnapManager backups replace the backups that are created by Exchange-aware backup tools (such asWindows NTBackup). If you need to create a backup using an Exchange-aware backup tool on asystem with SnapManager installed, you must use only copy or differential backup.
Attention: If you create a backup of a type other than copy or differential backup using anExchange-aware backup tool, your previous backups become unusable for up-to-the-minuterestore operations.
The following table describes the backup types.
Backup type Description Result
Copy Backs up all selected files; does not cleararchive bit
OK. SnapManager backups unaffected
Normal (full) Backs up all selected files and clears archive bit Do not use. Truncates transaction logs;disables SnapManager up-to-the- minuterestores
Differential Backs up all selected files with archive bit set OK. SnapManager backups unaffected
Incremental Backs up all selected files with archive bit setand clears archive bit
Do not use. Truncates transaction logs;disables SnapManager up-to-the- minuterestores
SnapManager snap-inThe SnapManager snap-in is based on Microsoft Management Console 3.0 (MMC). TheSnapManager snap-in allows you to manage the SnapManager application from MicrosoftManagement Console.
The following components of SnapManager snap-in help you to perform all operations:
28 | SnapManager® 6.0 for Microsoft® Exchange Installation and Administration Guide
• Scope paneThis is the left pane. It lists SnapManager for Exchange instances.
• Actions paneThis is the right pane. It displays all of the actions that you can perform, based on the instancethat you select in the Scope pane.
• Results paneThis is the center pane. It displays details of the type of instance that you select in the Scope pane.
The Dashboard view appears in the center pane when you select any server or server instance. TheDashboard view enables you to:
• View the Exchange server configuration• Add new Exchange servers
The SnapManager graphical user interfaceSnapManager 6.0 for Microsoft Exchange has a graphical user interface based on MicrosoftManagement Console (MMC). You can use it with other MMC snap-ins to create a single console formanaging Exchange and storage system components.
The new graphical interface enables you to do the following tasks:
• Manage and administer multiple instances of SnapManager for Exchange successfully.• Manage backup and restore operations of Exchange database files and transaction log files on
LUNs.• Schedule backups and verify the integrity of databases in SnapManager backup sets.• Administer SnapManager for Exchange on another Exchange server computer on the network.• Configure Exchange database, transaction logs, and Simple Mail Transfer Protocol (SMTP)
queue locations for SnapManager backup and restore operations.
The SnapManager command-line interfaceSnapManager Microsoft Exchange supports a SnapManager command-line functionality calledcmdlet, through SnapManager for Exchange PowerShell. Cmdlets enable you to perform almost allof the jobs that you can perform using the GUI.
Related references
SnapManager command-line reference on page 311
SnapManager overview | 29

Preparation for installing or upgradingSnapManager
Before you install SnapManager 6.0 for Microsoft Exchange or upgrade from a previous version, youmight need to configure Windows host systems, hardware, and software components; back up yourdatabases; and check licensing and account requirements.
For the most current list of system requirements, see the SnapManager 6.0 for Microsoft ExchangeDescription page on the NOW NetApp on the Web site.
For information about compatible versions of SnapManager, SnapDrive, and Data ONTAP, see theSnapManager and SnapDrive Compatibility Matrix.
You might need to install, upgrade, or configure any of the following components:
• Data ONTAP• iSCSI and FC protocols• SnapManager license• SnapRestore license• SnapMirror license• FlexClone license• Microsoft Windows operating system• Microsoft Windows hotfixes• Microsoft Exchange• SnapDrive• SnapDrive preferred IP address (if your storage system has multiple IP addresses)
Note: If you do not configure a SnapDrive preferred IP address for a storage system that hasmultiple IP addresses, SnapDrive times out when attempting to create Snapshot copiessimultaneously for more than one LUN on a storage system. For details, see the SnapDrive forWindows Installation and Administration Guide for your version of SnapDrive.
Installing or upgrading SnapManager involves performing the following tasks:
1. Backing up system resources and databases
2. Determining whether you want to use Per Server SnapManager licensing or Per Storage systemSnapManager licensing
3. Ensuring that the SnapManager COM server identity account on each Exchange server to be usedby SnapManager has Exchange Administrator permissions or greater
4. Configuring or upgrading your storage system according to the requirements for SnapManagerand SnapDrive
Preparation for installing or upgrading SnapManager | 31
5. If you upgrade SnapManager and underlying SnapDrive or Microsoft iSCSI initiator versions,removing the iSCSI dependency with respect to SnapManager
6. Noting whether your storage system has multiple IP addresses
7. Configuring or upgrading your Windows host systems to meet the requirements for SnapDriveand SnapManager
8. Ensuring that the TCP port 808 is open
Next topics
Where to install SnapManager on page 32
SnapManager in a DAG environment on page 32
Backing up system resources and data on page 33
SnapManager licensing options on page 33
Exchange permission level required for SnapManager on page 35
Windows host system requirements on page 37
If your storage system has multiple IP addresses on page 38
Storage system requirements on page 39
Remote administration server requirements on page 40
Remote verification server requirements on page 40
Exchange Server 2003 files to back up with a Windows backup utility on page 41
Exchange Server 2007 files to back up with a Windows backup utility on page 41
Related concepts
SnapManager overview on page 23
SnapManager installation and upgrade on page 43
Related information
NOW NetApp on the WebSnapManager and SnapDrive Compatibility Matrix
Where to install SnapManagerIn a basic configuration, SnapManager is installed on the same Windows host system as Exchange.You can also install SnapManager on one or more remote Windows hosts for remote administrationof the Exchange computer or for remote verification of the databases in backup sets.
SnapManager in a DAG environmentYou must install SnapManager and SnapDrive for Windows on all member servers of the DatabaseAvailability Group (DAG) to ensure proper working of SnapManager.
32 | SnapManager® 6.0 for Microsoft® Exchange Installation and Administration Guide
Backing up system resources and dataBefore you install SnapManager, back up your system resources and data using Windows NTBackupor another industry standard backup utility to prevent any data loss during configuration.
Steps
1. Back up the operating system installation on the Exchange server. This includes backing up all ofthe server system state which consists of the registry, the boot files, and the COM+ class registry.
2. Back up the data on the local drives on the Exchange server.
3. Back up the boot and system drives.
4. Use your backup utility to create and maintain a current emergency repair disk (ERD).
SnapManager licensing optionsSnapManager supports two licensing options: Per Server and Per Storage system licensing.
A Per Server SnapManager license is a 14-character license code for a specific Exchange server.When you use Per Server licensing, you do not require a SnapManager license on the storage system.Instead, you apply a SnapManager server-side license on every Exchange server. You can specify aserver-side license while you are installing SnapManager, or you can defer this activity until youhave completed SnapManager installation. After you install SnapManager, you can apply the licensefrom Help > About SnapManager.
If a SnapManager license is not enabled on the Exchange server, you must enable a 7-characterSnapManager Per Storage system license code directly on the storage system, using the licenseadd command. If no server license is detected, SnapManager checks the storage system for aSnapManager license whenever a SnapManager operation starts. If the SnapManager license is notenabled on the storage system either, the SnapManager operation fails and logs an error in theWindows event log.
Note: With storage system SnapManager licensing, if you use SnapMirror with SnapManager,both SnapMirror and SnapManager must be licensed on both the source and target storagesystems.
Next topics
Applying a SnapManager license to the Exchange server on page 34
Applying a Per Storage System license to the storage system on page 34
Preparation for installing or upgrading SnapManager | 33
Applying a SnapManager license to the Exchange serverYou can add a Per Server license to your Exchange server. When you use Per Server licensing, youdo not require a SnapManager license on the storage system. Instead, you apply a SnapManagerserver-side license on the Exchange server.
Before you begin
You must have a SnapManager Per Server license key.
Steps
1. Run the setup.exe file if you are using the CD-ROM, or the SME6.0.exe file if youdownloaded the software.
The SnapManager InstallShield wizard appears.
2. In the Welcome window, click Next.
The License Agreement window appears.
3. If you accept the terms of the agreement, select I accept the terms in the license agreement andthen click Next.
The Customer Information window appears.
4. In the Customer Information window, specify the user name and the name of your organization.
5. Under License Type, select Per Server.
6. In the License Key box, enter the license key for your server-side license.
7. If you do not have a license key, you can leave the License Key box empty for now and enteryour server-side license key later from the SnapManager interface. In the Actions pane, clickLicense settings.
8. In the Per Server License Key window, specify your license key.
9. Click OK.
Applying a Per Storage System license to the storage systemYou can add Per Storage System license to your storage system. If a SnapManager operation startsand no server license is detected, SnapManager checks the storage system for a SnapManagerlicense. If the SnapManager license is not enabled on the storage system either, the SnapManageroperation fails and logs an error in the Windows event log.
Before you begin
• You must have a SnapManager Per Storage System license key.
34 | SnapManager® 6.0 for Microsoft® Exchange Installation and Administration Guide
• If you use SnapMirror with SnapManager, both SnapMirror and SnapManager must be licensedon both the source and target storage systems.
Steps
1. Run the setup.exe file if you are using the CD-ROM or the SME6.0.exe file if youdownloaded the software.
2. In the Welcome window, click Next.
3. If you accept the terms of the agreement, select I accept the terms in the license agreement andthen click Next.
4. In the Customer Information window, specify your user name and the name of yourorganization.
5. Under License Type, select Per Storage System.
6. Continue with the instructions in the InstallShield wizard to apply the license.
Exchange permission level required for SnapManagerIf you need a granular control for the SnapManager for Exchange Service, you can apply Exchange-specific permissions to the object.
The minimum Exchange-specific permissions required for SnapManager are as follows:
• Read• Execute• Read Permissions• List Contents• Read Properties• Administer Information Store• View Information Store Status
To launch or access the SnapManager for Exchange Service from a different domain the useraccount, or the group that you are configuring must also be a member of the Exchange server’s localadministrators group.
The local administrator group permissions enable you to launch the SnapManager for ExchangeService account that needs to be part of the Exchange server administrator group.
Ensure that there are no firewall restrictions between the remote and local servers.
Next topics
SnapManager for Exchange Service identity account requirements on page 36
Account permissions for the report directory share on page 36
Preparation for installing or upgrading SnapManager | 35
SnapManager for Exchange Service identity account requirementsThe SnapManager for Exchange Service identity account must have proper Exchange permissionsfor SnapManager to function. SnapManager utilizes a Windows NT Service (SnapManagerService)that hosts a number of services such as SME Service, FSR Service, and SME Business ContinuanceService.
There are three predetermined permission levels for Exchange:
• Exchange View Only• Exchange Administrator• Exchange Full Administrator
The minimum level required for SnapManager is Exchange Administrator.
Use one of these methods to meet the requirement:
• Assign Exchange Administrator permissions to the organization object.• Create an Exchange administrative group and assign the correct permissions to that group.
In Exchange Server 2003, right-clicking an object in the Exchange System Manager and selectingDelegate Control opens the Exchange Administration Delegation wizard, which enables you tochange that object’s permissions.In Exchange Server 2007, select Organization node in the Exchange Management Console andthen click Add Exchange Administrator wizard in the Actions pane to change the object’spermissions.
Exchange Server 2010 uses the Role Based Access Control (RBAC) permissions model. You can addusers or members to a role group through the Exchange Management Console. From the Toolbox ofthe Exchange Management Console, open the Role Based Access Control (RBAC) User Editorand add users to management role groups.
Account permissions for the report directory shareThe first time SnapManager is launched, it creates a shared report directory, SMEReportFolder, toallow remote administration. It grants the logged-on user on the local computer, and theadministrators group on the local computer full control on the shared directory
If you recently upgraded SnapManager to SnapManager 6.0, other accounts might already havepermissions on the share. If only the group Everyone has permissions, SnapManager removes the fullcontrol permissions to the report directory for that group. If multiple accounts (including Everyone)have permissions, SnapManager does not modify those accounts.
36 | SnapManager® 6.0 for Microsoft® Exchange Installation and Administration Guide
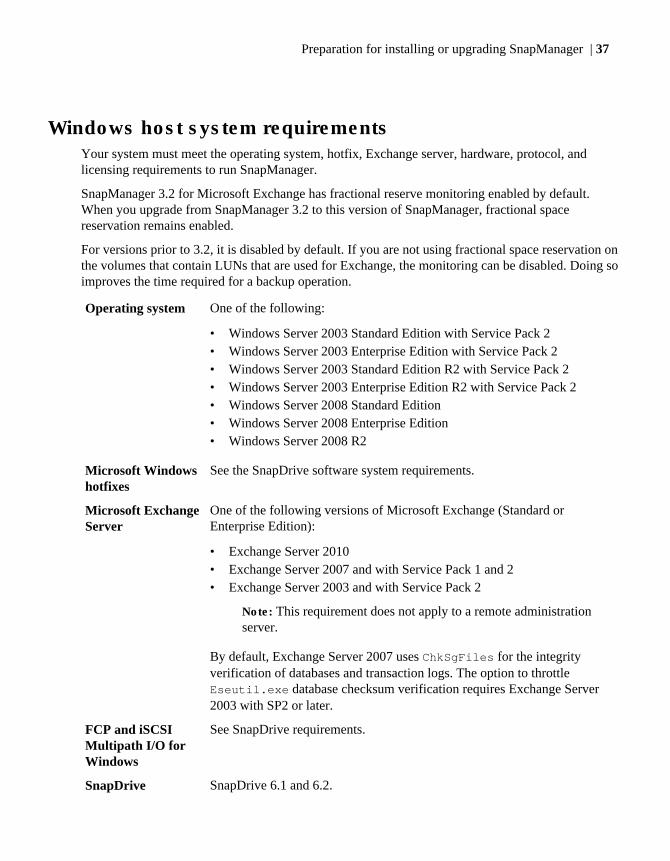
Windows host system requirementsYour system must meet the operating system, hotfix, Exchange server, hardware, protocol, andlicensing requirements to run SnapManager.
SnapManager 3.2 for Microsoft Exchange has fractional reserve monitoring enabled by default.When you upgrade from SnapManager 3.2 to this version of SnapManager, fractional spacereservation remains enabled.
For versions prior to 3.2, it is disabled by default. If you are not using fractional space reservation onthe volumes that contain LUNs that are used for Exchange, the monitoring can be disabled. Doing soimproves the time required for a backup operation.
Operating system One of the following:
• Windows Server 2003 Standard Edition with Service Pack 2• Windows Server 2003 Enterprise Edition with Service Pack 2• Windows Server 2003 Standard Edition R2 with Service Pack 2• Windows Server 2003 Enterprise Edition R2 with Service Pack 2• Windows Server 2008 Standard Edition• Windows Server 2008 Enterprise Edition• Windows Server 2008 R2
Microsoft Windowshotfixes
See the SnapDrive software system requirements.
Microsoft ExchangeServer
One of the following versions of Microsoft Exchange (Standard orEnterprise Edition):
• Exchange Server 2010• Exchange Server 2007 and with Service Pack 1 and 2• Exchange Server 2003 and with Service Pack 2
Note: This requirement does not apply to a remote administrationserver.
By default, Exchange Server 2007 uses ChkSgFiles for the integrityverification of databases and transaction logs. The option to throttleEseutil.exe database checksum verification requires Exchange Server2003 with SP2 or later.
FCP and iSCSIMultipath I/O forWindows
See SnapDrive requirements.
SnapDrive SnapDrive 6.1 and 6.2.
Preparation for installing or upgrading SnapManager | 37

If you need to install or upgrade SnapDrive, see the SnapDrive Installationand Administration Guide for detailed instructions.
For a remote administration server, SnapDrive is optional unless you intendto use the remote administration server to remotely administer SnapDrive.For a remote verification server, SnapDrive is required.
SnapDrivepreferred IPaddress
If your storage system has multiple IP addresses, configure the SnapDrivepreferred IP address. See the SnapDrive Installation and AdministrationGuide for your version of SnapDrive.
If you do not configure a SnapDrive preferred IP address for a storagesystem that has multiple IP addresses, SnapDrive times out when attemptingto create Snapshot copies simultaneously for more than one LUN on astorage system.
iSCSI protocol andFC protocol
The appropriate LUN access protocol software must be installed on theWindows host that runs the Exchange server. See your SnapDrivedocumentation for complete details about the system requirements.
Note: This requirement does not apply to a remote administration server.
SnapManagerlicense
If SnapManager is licensed per server, a SnapManager license is required onthe Windows host system.
Note: For Per Server SnapManager licensing, you can installSnapManager without specifying a server-side license; afterSnapManager has been installed, you can apply the license from theLicense Settings dialog box.
Microsoft .NET 3.5framework
SnapManager installation package installs Microsoft .NET framework if itis not present in the host system.
MicrosoftManagementConsole (MMC)
MMC 3.0 x64 Edition or MMC 3.0 x86 Edition (required for Exchange2007 and Exchange 2003) to launch the SnapManager snap-in console. Thisis a prerequisite before you start the SnapManager installation.
WindowsPowerShell
PowerShell 1.0 RTM x86 Edition or PowerShell 1.0 RTM x64 Edition(required for Exchange 2007 and Exchange 2003) or PowerShell 2.0(required for Exchange 2010). This is a prerequisite before you run theSnapManager installation.
Related conceptsDatabase verification throttling on page 282
If your storage system has multiple IP addressesIf your storage system has multiple IP addresses, you must configure a SnapDrive preferred IPaddress; otherwise, SnapDrive times out when attempting to create Snapshot copies simultaneously
38 | SnapManager® 6.0 for Microsoft® Exchange Installation and Administration Guide
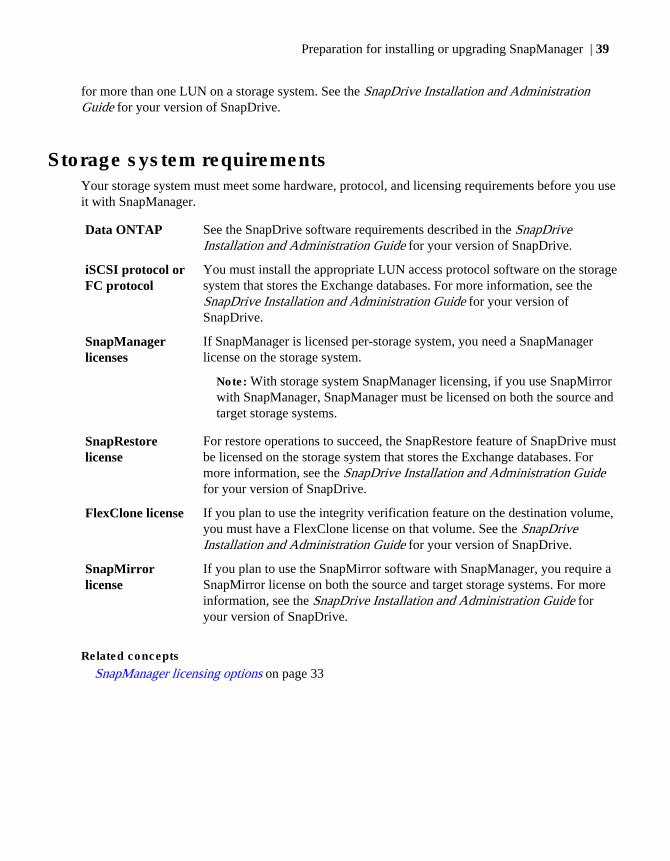
for more than one LUN on a storage system. See the SnapDrive Installation and AdministrationGuide for your version of SnapDrive.
Storage system requirementsYour storage system must meet some hardware, protocol, and licensing requirements before you useit with SnapManager.
Data ONTAP See the SnapDrive software requirements described in the SnapDriveInstallation and Administration Guide for your version of SnapDrive.
iSCSI protocol orFC protocol
You must install the appropriate LUN access protocol software on the storagesystem that stores the Exchange databases. For more information, see theSnapDrive Installation and Administration Guide for your version ofSnapDrive.
SnapManagerlicenses
If SnapManager is licensed per-storage system, you need a SnapManagerlicense on the storage system.
Note: With storage system SnapManager licensing, if you use SnapMirrorwith SnapManager, SnapManager must be licensed on both the source andtarget storage systems.
SnapRestorelicense
For restore operations to succeed, the SnapRestore feature of SnapDrive mustbe licensed on the storage system that stores the Exchange databases. Formore information, see the SnapDrive Installation and Administration Guidefor your version of SnapDrive.
FlexClone license If you plan to use the integrity verification feature on the destination volume,you must have a FlexClone license on that volume. See the SnapDriveInstallation and Administration Guide for your version of SnapDrive.
SnapMirrorlicense
If you plan to use the SnapMirror software with SnapManager, you require aSnapMirror license on both the source and target storage systems. For moreinformation, see the SnapDrive Installation and Administration Guide foryour version of SnapDrive.
Related concepts
SnapManager licensing options on page 33
Preparation for installing or upgrading SnapManager | 39
Remote administration server requirementsYou can remotely administer an Exchange server running SnapManager from another Windowssystem that is configured as a remote administration server. Your remote administration server mustmeet some installation requirements.
• You do not need to install an iSCSI driver or an HBA driver on this system.• If you want to use the remote administration server to remotely administer SnapDrive, you need
to install SnapDrive.• You must install SnapManager.
Remote verification server requirementsRemote verification is performed using the same mechanisms that are used for local verification,except that the verification is performed on a host that is different from the Exchange server thatinitiated the backup set. To run remote verification, your remote system must meet someconfiguration requirements.
• SnapDrive must be installed.
Note: Do not try to connect the Exchange server’s LUNs to the remote verification server.
• SnapManager must be installed, but it does not need to be configured.You must specify the user account that you use for the production Exchange server.
• The appropriate LUN driver (iSCSI or FC protocol) must be installed.• The remote Windows system must have connectivity (iSCSI or FC protocol) to the storage
system.
Note: If you are using iSCSI to connect to the storage system on the remote verification server,you must create an iSCSI connection.
• Exchange System Management Tools must be installed on the server (whether remote or local)for SnapManager to perform integrity verification.For more information about the installation of Exchange System Management Tools, seeMicrosoft documentation.
The connectivity required to perform remote verification is shown in the following illustration.
40 | SnapManager® 6.0 for Microsoft® Exchange Installation and Administration Guide
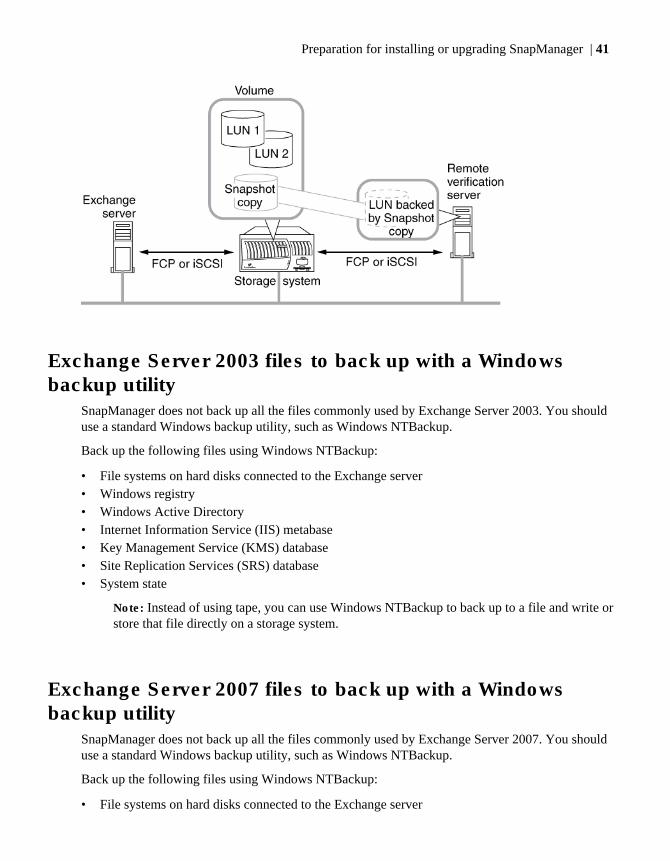
Exchange Server 2003 files to back up with a Windowsbackup utility
SnapManager does not back up all the files commonly used by Exchange Server 2003. You shoulduse a standard Windows backup utility, such as Windows NTBackup.
Back up the following files using Windows NTBackup:
• File systems on hard disks connected to the Exchange server• Windows registry• Windows Active Directory• Internet Information Service (IIS) metabase• Key Management Service (KMS) database• Site Replication Services (SRS) database• System state
Note: Instead of using tape, you can use Windows NTBackup to back up to a file and write orstore that file directly on a storage system.
Exchange Server 2007 files to back up with a Windowsbackup utility
SnapManager does not back up all the files commonly used by Exchange Server 2007. You shoulduse a standard Windows backup utility, such as Windows NTBackup.
Back up the following files using Windows NTBackup:
• File systems on hard disks connected to the Exchange server
Preparation for installing or upgrading SnapManager | 41

• Windows registry• Windows Active Directory• Internet Information Service (IIS) metabase• System state
Note: Instead of using tape, you can use Windows NTBackup to back up to a file and write orstore that file directly on a storage system.
• Mailbox server data−Offline Address Book that uses Web distribution• Hub Transport server data−message tracking and protocol logs• Edge Transport data−ADAM (Config Clone for backup and restore)• Content Filter ESE database (Config Clone for backup and restore)• Message tracking and protocol logs• Client Access server data• Microsoft Office Outlook Web Access web site, and Web.config file• IMAP4 and POP3 protocol settings• IIS metabase• Exchange ActiveSync• Outlook Web Access virtual directories• Unified Messaging server data• Custom audio prompts• Incoming calls
42 | SnapManager® 6.0 for Microsoft® Exchange Installation and Administration Guide
SnapManager installation and upgrade
You can install SnapManager for Exchange on a stand-alone Windows host system or a Windowscluster using either the interactive or the unattended modes of installation. SnapManager also enablesyou to upgrade an older version and reinstall SnapManager on your configuration.
Unless it is specified for a particular upgrade path or for a particular troubleshooting situation, you donot need to uninstall SnapManager before reinstalling it or upgrading to a newer version.
Note: If you plan to reinstall SnapManager later, ensure that you record the drive letter and path ofyour current SnapInfo directories. After you reinstall SnapManager, ensure that you reconfigureSnapManager to use those same SnapInfo directory locations. The reconfiguration preservesSnapManager’s records of backups created before you uninstalled and reinstalled SnapManager.
Next topics
Compatibility of SnapManager builds with Windows Server on page 44
Installation of SnapManager on a stand-alone Windows host system on page 44
Installing SnapManager in interactive mode on page 45
Installing SnapManager in unattended mode on page 47
SnapManager installation in a Windows cluster on page 50
Preparing to upgrade SnapManager on page 53
Upgrading SnapManager in interactive mode on page 56
Upgrading SnapManager in unattended mode on page 56
Prerequisites for uninstalling SnapManager on page 59
Uninstalling SnapManager in interactive mode on page 60
Uninstalling SnapManager in unattended mode on page 61
SnapManager reinstallation with or without uninstallation on page 64
Reinstalling SnapManager in interactive mode on page 65
Reinstalling SnapManager in unattended mode on page 66
Related concepts
SnapManager overview on page 23
Preparation for installing or upgrading SnapManager on page 31
When you start SnapManager for the first time on page 69
SnapManager installation and upgrade | 43
Compatibility of SnapManager builds with Windows ServerSnapManager 6.0 for Microsoft Exchange is available in x86 and x64 builds. The build that you usedepends on your system configuration.
Build Compatibility WOW64
x86 Windows Server 2003 or Windows Server 2008 x86edition
Not supported
x64 Windows Server 2003 or Windows Server 2008 x64edition
Supported
Your SnapManager media kit contains one CD-ROM for the SnapManager x86 build and another forthe SnapManager x64 build.
Note: Ensure that you install MMC 3.0 and Windows PowerShell 1.0 (x86 or x64) on theWindows system before installing SnapManager.
Installation of SnapManager on a stand-alone Windows hostsystem
You can install SnapManager on a stand-alone Windows host system that is used for a productionExchange server, a remote administration server, or a remote verification server.
Related concepts
SnapManager reinstallation with or without uninstallation on page 64
Related tasks
Installing SnapManager after creating a new Windows cluster on page 51
Installing SnapManager in an existing Windows cluster on page 52
Preparing to upgrade SnapManager on page 53
Comparison of installation modes for a stand-alone Windows host systemYou can run the software installation utility for SnapManager in either the interactive mode or theunattended mode. SnapManager guides you through the interactive mode; the unattended moderequires that you type certain commands and then installation takes place on its own.
The minimum required input for both modes is as follows:
• Acceptance of the terms of the license agreement• SnapManager server account
44 | SnapManager® 6.0 for Microsoft® Exchange Installation and Administration Guide
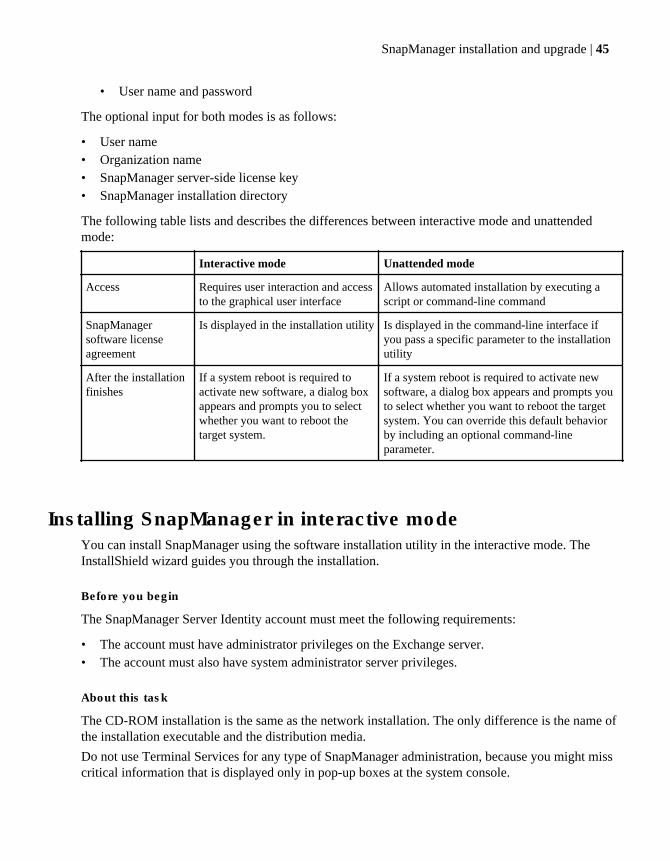
• User name and password
The optional input for both modes is as follows:
• User name• Organization name• SnapManager server-side license key• SnapManager installation directory
The following table lists and describes the differences between interactive mode and unattendedmode:
Interactive mode Unattended mode
Access Requires user interaction and accessto the graphical user interface
Allows automated installation by executing ascript or command-line command
SnapManagersoftware licenseagreement
Is displayed in the installation utility Is displayed in the command-line interface ifyou pass a specific parameter to the installationutility
After the installationfinishes
If a system reboot is required toactivate new software, a dialog boxappears and prompts you to selectwhether you want to reboot thetarget system.
If a system reboot is required to activate newsoftware, a dialog box appears and prompts youto select whether you want to reboot the targetsystem. You can override this default behaviorby including an optional command-lineparameter.
Installing SnapManager in interactive modeYou can install SnapManager using the software installation utility in the interactive mode. TheInstallShield wizard guides you through the installation.
Before you begin
The SnapManager Server Identity account must meet the following requirements:
• The account must have administrator privileges on the Exchange server.• The account must also have system administrator server privileges.
About this task
The CD-ROM installation is the same as the network installation. The only difference is the name ofthe installation executable and the distribution media.
Do not use Terminal Services for any type of SnapManager administration, because you might misscritical information that is displayed only in pop-up boxes at the system console.
SnapManager installation and upgrade | 45
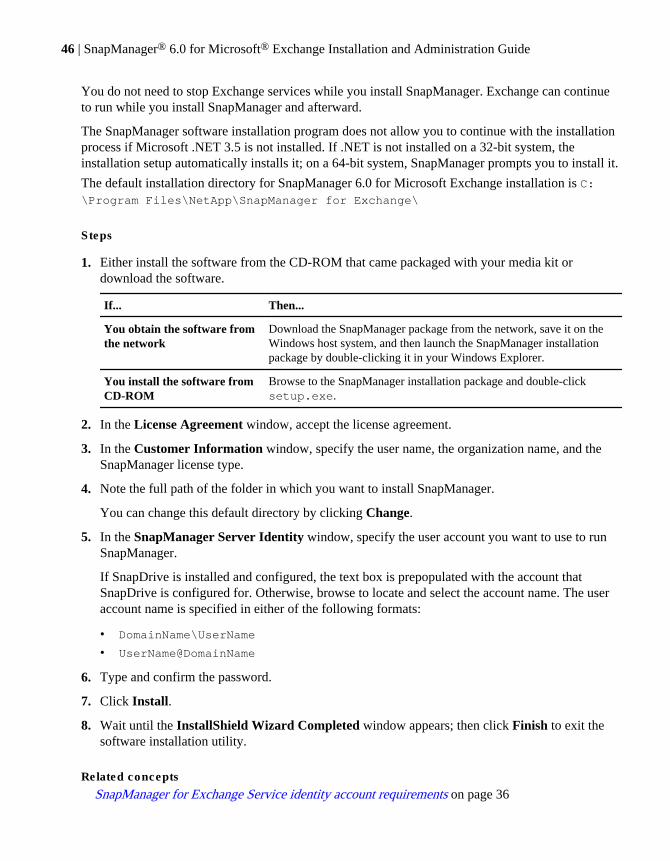
You do not need to stop Exchange services while you install SnapManager. Exchange can continueto run while you install SnapManager and afterward.
The SnapManager software installation program does not allow you to continue with the installationprocess if Microsoft .NET 3.5 is not installed. If .NET is not installed on a 32-bit system, theinstallation setup automatically installs it; on a 64-bit system, SnapManager prompts you to install it.
The default installation directory for SnapManager 6.0 for Microsoft Exchange installation is C:\Program Files\NetApp\SnapManager for Exchange\
Steps
1. Either install the software from the CD-ROM that came packaged with your media kit ordownload the software.
If... Then...
You obtain the software fromthe network
Download the SnapManager package from the network, save it on theWindows host system, and then launch the SnapManager installationpackage by double-clicking it in your Windows Explorer.
You install the software fromCD-ROM
Browse to the SnapManager installation package and double-clicksetup.exe.
2. In the License Agreement window, accept the license agreement.
3. In the Customer Information window, specify the user name, the organization name, and theSnapManager license type.
4. Note the full path of the folder in which you want to install SnapManager.
You can change this default directory by clicking Change.
5. In the SnapManager Server Identity window, specify the user account you want to use to runSnapManager.
If SnapDrive is installed and configured, the text box is prepopulated with the account thatSnapDrive is configured for. Otherwise, browse to locate and select the account name. The useraccount name is specified in either of the following formats:
• DomainName\UserName
• UserName@DomainName
6. Type and confirm the password.
7. Click Install.
8. Wait until the InstallShield Wizard Completed window appears; then click Finish to exit thesoftware installation utility.
Related concepts
SnapManager for Exchange Service identity account requirements on page 36
46 | SnapManager® 6.0 for Microsoft® Exchange Installation and Administration Guide
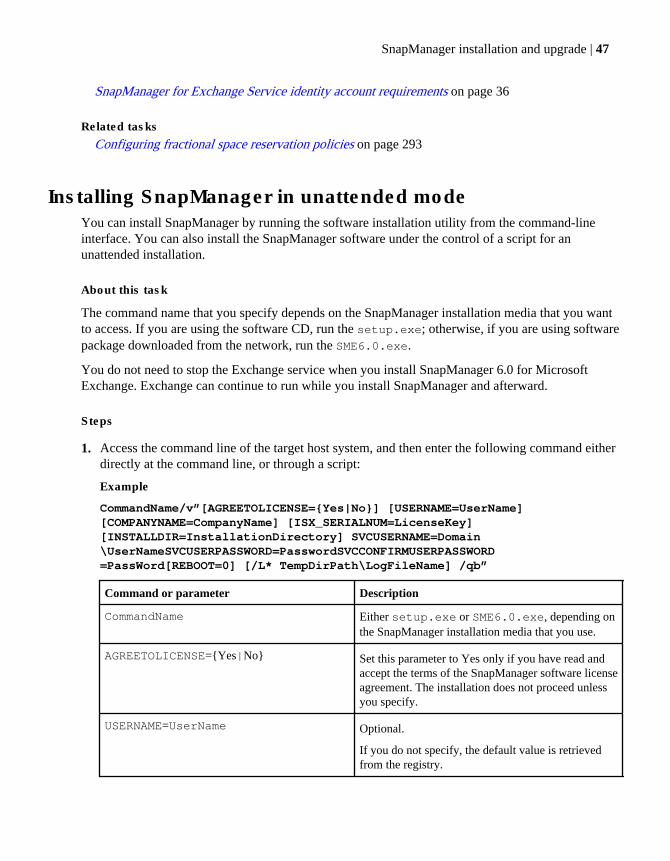
SnapManager for Exchange Service identity account requirements on page 36
Related tasks
Configuring fractional space reservation policies on page 293
Installing SnapManager in unattended modeYou can install SnapManager by running the software installation utility from the command-lineinterface. You can also install the SnapManager software under the control of a script for anunattended installation.
About this task
The command name that you specify depends on the SnapManager installation media that you wantto access. If you are using the software CD, run the setup.exe; otherwise, if you are using softwarepackage downloaded from the network, run the SME6.0.exe.
You do not need to stop the Exchange service when you install SnapManager 6.0 for MicrosoftExchange. Exchange can continue to run while you install SnapManager and afterward.
Steps
1. Access the command line of the target host system, and then enter the following command eitherdirectly at the command line, or through a script:
Example
CommandName/v”[AGREETOLICENSE={Yes|No}] [USERNAME=UserName][COMPANYNAME=CompanyName] [ISX_SERIALNUM=LicenseKey][INSTALLDIR=InstallationDirectory] SVCUSERNAME=Domain\UserNameSVCUSERPASSWORD=PasswordSVCCONFIRMUSERPASSWORD=PassWord[REBOOT=0] [/L* TempDirPath\LogFileName] /qb”
Command or parameter Description
CommandName Either setup.exe or SME6.0.exe, depending onthe SnapManager installation media that you use.
AGREETOLICENSE={Yes|No} Set this parameter to Yes only if you have read andaccept the terms of the SnapManager software licenseagreement. The installation does not proceed unlessyou specify.
USERNAME=UserName Optional.
If you do not specify, the default value is retrievedfrom the registry.
SnapManager installation and upgrade | 47
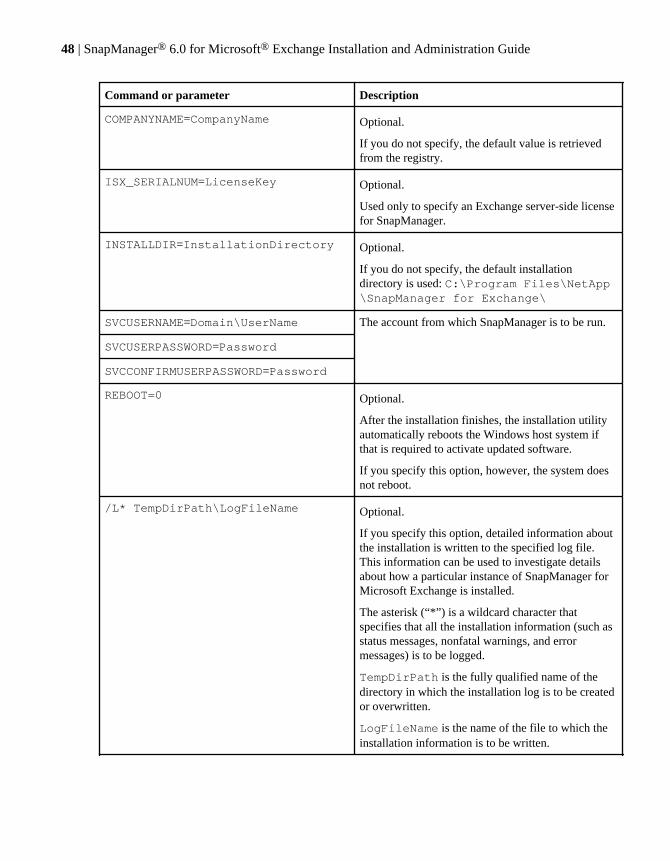
Command or parameter Description
COMPANYNAME=CompanyName Optional.
If you do not specify, the default value is retrievedfrom the registry.
ISX_SERIALNUM=LicenseKey Optional.
Used only to specify an Exchange server-side licensefor SnapManager.
INSTALLDIR=InstallationDirectory Optional.
If you do not specify, the default installationdirectory is used: C:\Program Files\NetApp\SnapManager for Exchange\
SVCUSERNAME=Domain\UserName The account from which SnapManager is to be run.
SVCUSERPASSWORD=Password
SVCCONFIRMUSERPASSWORD=Password
REBOOT=0 Optional.
After the installation finishes, the installation utilityautomatically reboots the Windows host system ifthat is required to activate updated software.
If you specify this option, however, the system doesnot reboot.
/L* TempDirPath\LogFileName Optional.
If you specify this option, detailed information aboutthe installation is written to the specified log file.This information can be used to investigate detailsabout how a particular instance of SnapManager forMicrosoft Exchange is installed.
The asterisk (“*”) is a wildcard character thatspecifies that all the installation information (such asstatus messages, nonfatal warnings, and errormessages) is to be logged.
TempDirPath is the fully qualified name of thedirectory in which the installation log is to be createdor overwritten.
LogFileName is the name of the file to which theinstallation information is to be written.
48 | SnapManager® 6.0 for Microsoft® Exchange Installation and Administration Guide
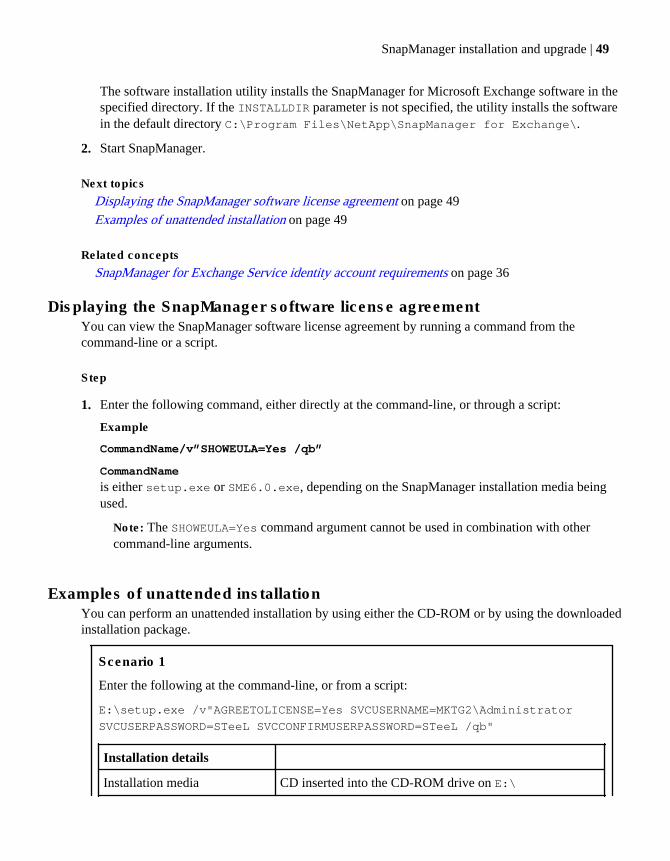
The software installation utility installs the SnapManager for Microsoft Exchange software in thespecified directory. If the INSTALLDIR parameter is not specified, the utility installs the softwarein the default directory C:\Program Files\NetApp\SnapManager for Exchange\.
2. Start SnapManager.
Next topics
Displaying the SnapManager software license agreement on page 49
Examples of unattended installation on page 49
Related concepts
SnapManager for Exchange Service identity account requirements on page 36
Displaying the SnapManager software license agreementYou can view the SnapManager software license agreement by running a command from thecommand-line or a script.
Step
1. Enter the following command, either directly at the command-line, or through a script:
Example
CommandName/v”SHOWEULA=Yes /qb”
CommandName
is either setup.exe or SME6.0.exe, depending on the SnapManager installation media beingused.
Note: The SHOWEULA=Yes command argument cannot be used in combination with othercommand-line arguments.
Examples of unattended installationYou can perform an unattended installation by using either the CD-ROM or by using the downloadedinstallation package.
Scenario 1
Enter the following at the command-line, or from a script:
E:\setup.exe /v"AGREETOLICENSE=Yes SVCUSERNAME=MKTG2\Administrator
SVCUSERPASSWORD=STeeL SVCCONFIRMUSERPASSWORD=STeeL /qb"
Installation details
Installation media CD inserted into the CD-ROM drive on E:\
SnapManager installation and upgrade | 49

Installation details
Server account Account user name: MKTG2\Administrator
Account password: STeeL
SnapManager license Storage system-side
Scenario 2
Enter the following at the command-line or from a script:
C:\NetApp\downloads\SME6.0.exe /v"AGREETOLICENSE=Yes
SVCUSERNAME=MKTG2\Administrator SVCUSERPASSWORD=STeeL
SVCCONFIRMUSERPASSWORD=STeeL ISX_SERIALNUM=ABCDEFGHIJKLMN /qb"
Installation details
Installation media Installation package downloaded to C:\NetApp\downloads\
Server account Account user name: MKTG2\Administrator
Account password: STeeL
SnapManager license Server-side (license key ABCDEFGHIJKLMN)
SnapManager installation in a Windows clusterYou can install and configure SnapManager for Microsoft Exchange either in an existing Windowscluster, or on a new Windows cluster.
Next topics
Requirements for installing SnapManager in a Windows cluster on page 50
Installing SnapManager after creating a new Windows cluster on page 51
Installing SnapManager in an existing Windows cluster on page 52
Requirements for installing SnapManager in a Windows clusterSnapManager is supported in Windows clusters with a maximum of eight nodes. Exchange Server2003 requires a Windows cluster that uses shared LUN resources. Exchange Server 2007 supportstwo types of Windows cluster configurations--SCC and CCR.
• The SCC, which uses LUN resources that are shared among all nodes in the cluster.• The CCR, which uses LUN resources that are dedicated to each of the two cluster nodes and are
not shared among the nodes
50 | SnapManager® 6.0 for Microsoft® Exchange Installation and Administration Guide
For more information, see Microsoft Exchange server documentation.
Installing SnapManager after creating a new Windows clusterYou can create a new cluster, and install and configure SnapManager for Microsoft Exchange, as partof the cluster.
Before you begin
When you install SnapManager for Microsoft Exchange in a new Windows cluster, consider thefollowing points:
• You have two to five systems that you are ready to configure into a Windows cluster.• Microsoft Exchange is not installed on either system.• You are using a LUN as the quorum disk.
Create Exchange System Attendant Resource in the cluster group from the node that owns the clustergroup containing the LUN physical disk resources.
Microsoft Management Console 3.0, and Windows PowerShell 1.0 (x86 or x64) must be installed. IfMicrosoft .NET 3.5 Framework is not already installed, SnapManager automatically installs it.
You do not have to use the default cluster group, but whatever group you use, must contain an IPaddress resource, a network name resource, and at least one physical disk cluster resource (LUN).
Steps
1. Create the cluster by following the procedure in your SnapDrive documentation for creating aWindows cluster with a virtual quorum disk.
2. Install and configure Exchange on one node.
Then install Exchange on the remaining nodes.
Note: Exchange virtual servers are not created during this step. See the Microsoftdocumentation for information about installing Exchange in a cluster.
3. Using Cluster Administrator, create an Exchange System Attendant resource in the clustergroup, on which the LUN physical disk resources are to reside.
That LUN should store the Exchange databases and transaction logs.
During the process you are prompted for an Exchange data directory. This directory is also wherethe Exchange system files are placed. You can accept the default location now; these system filescan be moved in a later step by using the Configuration wizard.
4. Specify the LUN physical disk resources and the Network Name resource as dependencies for theExchange System Attendant Resource.
SnapManager installation and upgrade | 51
5. If it is not online, bring the cluster group online, and verify that the Exchange cluster isfunctioning correctly by moving the cluster group containing the newly created Exchange virtualserver to the other node and back.
6. Install SnapManager on all nodes, starting with the node that currently owns the cluster resources.
You can install SnapManager either in interactive mode, or in unattended mode.
7. Start SnapManager.
Related concepts
Prerequisites for uninstalling SnapManager on page 59
SnapManager reinstallation with or without uninstallation on page 64
Related tasks
Installation of SnapManager on a stand-alone Windows host system on page 44
Installing SnapManager in an existing Windows cluster on page 52
Preparing to upgrade SnapManager on page 53
Installing SnapManager in an existing Windows clusterYou can install and configure SnapManager for Microsoft Exchange in an existing Windows cluster.
Before you begin
The shared LUNs must be physical disk resources in the cluster group that contains the Exchangevirtual server that uses them.
You need to install Microsoft Management Console 3.0, Windows PowerShell 1.0 (x64 or x86) andMicrosoft .NET 3.5 Framework (x64 or x86) on 64-bit and 32-bit operating system respectively, forSnapManager to work.
Prepare your SnapManager data configuration plan.
About this task
SnapManager adds the dependencies automatically for all the LUNs that Exchange uses, if theConfiguration wizard detects that it is being run on a cluster. There are no dependencies set on theLUN physical disk resource in a Continuous Cluster Replication (CCR) configuration.
Steps
1. Verify that the Exchange virtual servers and the cluster services are functioning, by moving theExchange virtual server from one cluster node to the other, and back.
If any errors occur, or if any of the cluster resources do not start correctly, resolve the issue beforecontinuing.
2. Install or upgrade SnapDrive as required.
52 | SnapManager® 6.0 for Microsoft® Exchange Installation and Administration Guide
For details, see the SnapDrive documentation.
3. Create the shared LUNs to hold the Exchange databases and transaction log files, according toyour SnapManager data configuration plan.
Create the shared LUNs from the node that owns the cluster group, which contains the Exchangevirtual server.
For details, see your SnapDrive documentation.
4. Verify that dependencies for the System Attendant Resource are set correctly.
The System Attendant Resource depends on all the LUN physical disk resources, and theNetwork Name resource in this cluster group, for Exchange Server 2003 clusters and ExchangeServer 2007 single copy cluster.
5. Verify that the Exchange virtual servers and the cluster services are functioning correctly bymoving the cluster group containing the newly created Exchange virtual server to the other nodeand back.
6. Install SnapManager on all nodes, starting with the node that currently owns the cluster resources.
Use either the interactive installation procedure or the unattended installation procedure for astand-alone Windows host system.
7. Start SnapManager.
Related concepts
SnapManager reinstallation with or without uninstallation on page 64
Related tasks
Installation of SnapManager on a stand-alone Windows host system on page 44
Installing SnapManager after creating a new Windows cluster on page 51
Preparing to upgrade SnapManager on page 53
Prerequisites for uninstalling SnapManager on page 59
Preparing to upgrade SnapManagerEnsure that you prepare the target system, the environment, and the existing SnapManagerapplication before you begin the upgrade process.
Before you begin
If you need to interrupt connectivity to the Exchange data when upgrading other components, such asstorage systems or connection protocols, take Exchange offline.
Close SnapManager before you begin upgrading to the new SnapManager version.
Uninstall SnapManager versions earlier than 3.2 before you install SnapManager 6.0.
SnapManager installation and upgrade | 53
About this task
When you upgrade SnapManager on a 32-bit system, set the SnapMgrService account to a Windowsdomain account that has the required rights to manage Exchange databases. Ensure that you use thesame account, as the one used by the SnapManager server. The SnapManager installation programprompts for this account during installation.
You do not need to stop Exchange services while you upgrade SnapManager. Exchange can continueto run while you upgrade SnapManager.
You do not need to stop Exchange services while you upgrade SnapManager; Exchange can continueto run while you upgrade.
Note: When you upgrade, all previous backup jobs will run correctly. The new functionality willnot be available for existing jobs.
Steps
1. Prepare your target system and environment.
2. If you have upgraded the underlying SnapDrive or Microsoft iSCSI initiator versions to prepareyour storage system for upgrading SnapManager, remove the iSCSI dependency with respect toSnapManager during the SnapManager upgrade process.
There are two ways to do this:
• Run the Configuration wizard and use the Add Microsoft iSCSI Service Dependency pageto remove this dependency.
• Stop the Microsoft Exchange System Attendant resource service.
After you finish upgrading the SnapManager application, you can restore the dependency.
3. Prepare the existing SnapManager application.
Next topics
Comparison of interactive and unattended upgrade modes on page 55
SnapManager upgrade paths on page 55
Upgrade considerations for fractional space reserve monitoring on page 55
Related concepts
SnapManager licensing options on page 33
SnapManager for Exchange Service identity account requirements on page 36
Prerequisites for uninstalling SnapManager on page 59
SnapManager reinstallation with or without uninstallation on page 64
Related tasks
Backing up system resources and data on page 33
54 | SnapManager® 6.0 for Microsoft® Exchange Installation and Administration Guide
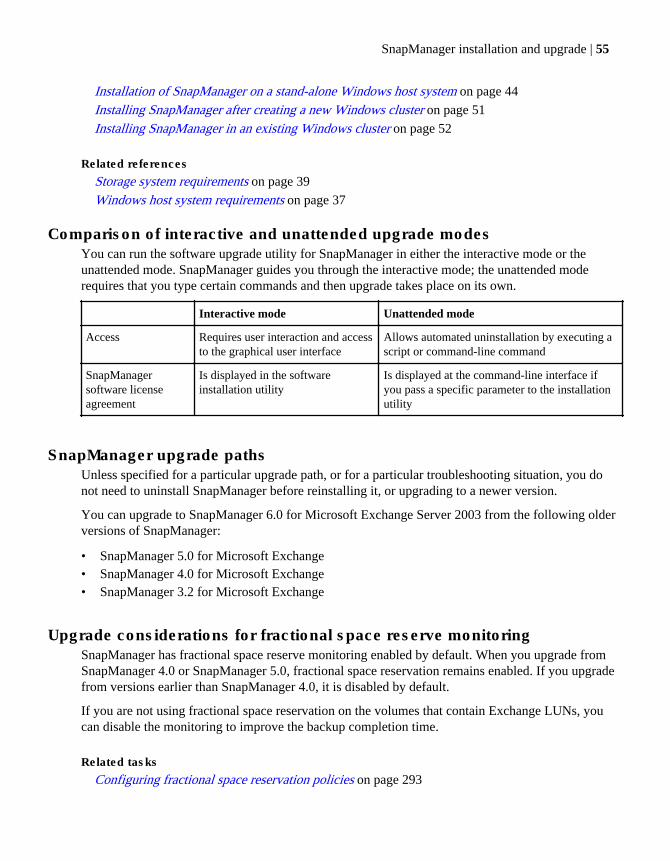
Installation of SnapManager on a stand-alone Windows host system on page 44
Installing SnapManager after creating a new Windows cluster on page 51
Installing SnapManager in an existing Windows cluster on page 52
Related references
Storage system requirements on page 39
Windows host system requirements on page 37
Comparison of interactive and unattended upgrade modesYou can run the software upgrade utility for SnapManager in either the interactive mode or theunattended mode. SnapManager guides you through the interactive mode; the unattended moderequires that you type certain commands and then upgrade takes place on its own.
Interactive mode Unattended mode
Access Requires user interaction and accessto the graphical user interface
Allows automated uninstallation by executing ascript or command-line command
SnapManagersoftware licenseagreement
Is displayed in the softwareinstallation utility
Is displayed at the command-line interface ifyou pass a specific parameter to the installationutility
SnapManager upgrade pathsUnless specified for a particular upgrade path, or for a particular troubleshooting situation, you donot need to uninstall SnapManager before reinstalling it, or upgrading to a newer version.
You can upgrade to SnapManager 6.0 for Microsoft Exchange Server 2003 from the following olderversions of SnapManager:
• SnapManager 5.0 for Microsoft Exchange• SnapManager 4.0 for Microsoft Exchange• SnapManager 3.2 for Microsoft Exchange
Upgrade considerations for fractional space reserve monitoringSnapManager has fractional space reserve monitoring enabled by default. When you upgrade fromSnapManager 4.0 or SnapManager 5.0, fractional space reservation remains enabled. If you upgradefrom versions earlier than SnapManager 4.0, it is disabled by default.
If you are not using fractional space reservation on the volumes that contain Exchange LUNs, youcan disable the monitoring to improve the backup completion time.
Related tasks
Configuring fractional space reservation policies on page 293
SnapManager installation and upgrade | 55
Upgrading SnapManager in interactive modeYou can reinstall SnapManager on a Windows host system to repair missing or corrupt files,shortcuts, and registry entries. SnapManager guides you through the interactive mode.
About this task
When you run the SnapManager installation utility as part of an upgrade, you are asked whether youwant to retain your current installation directory. Because changing your installation directory mightcause existing scripts that rely on the SnapManager installation directory path to fail, you shouldprobably keep what you have.
Steps
1. Upgrade to SnapManager 6.0 for Microsoft Exchange by installing the new product.
2. After upgrading to SnapManager by following one of the installation procedures, proceed to startSnapManager.
Note: Upgrading to SnapManager 6.0 removes all of the previously managed servers. Youneed to select the servers that you want to manage, using the Add Servers to be Manageddialog box.
Related tasks
Installation of SnapManager on a stand-alone Windows host system on page 44
Installing SnapManager after creating a new Windows cluster on page 51
Installing SnapManager in an existing Windows cluster on page 52
Upgrading SnapManager in unattended modeYou can upgrade the SnapManager software under the control of a script for an unattendedinstallation. You can also upgrade SnapManager by running the software installation utility from thecommand-line interface.
Before you begin
Exit SnapManager to stop any running SnapManager operations.
About this task
The command that you specify depends on the SnapManager installation media that you want toaccess. If you are using the software CD, run setup.exe; if you are using software packagedownloaded from the network, run SME6.0.exe.
56 | SnapManager® 6.0 for Microsoft® Exchange Installation and Administration Guide
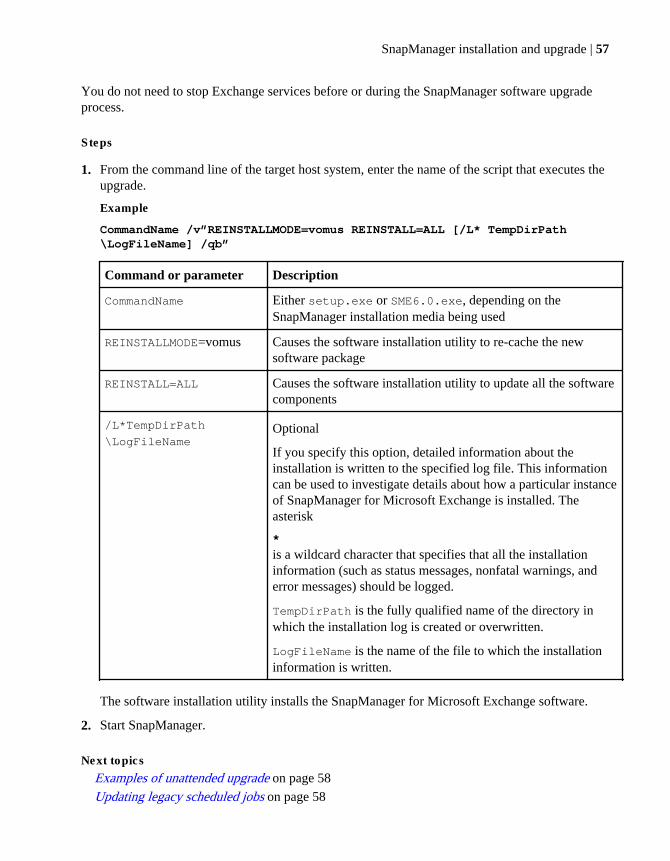
You do not need to stop Exchange services before or during the SnapManager software upgradeprocess.
Steps
1. From the command line of the target host system, enter the name of the script that executes theupgrade.
Example
CommandName /v”REINSTALLMODE=vomus REINSTALL=ALL [/L* TempDirPath\LogFileName] /qb”
Command or parameter Description
CommandName Either setup.exe or SME6.0.exe, depending on theSnapManager installation media being used
REINSTALLMODE=vomus Causes the software installation utility to re-cache the newsoftware package
REINSTALL=ALL Causes the software installation utility to update all the softwarecomponents
/L*TempDirPath
\LogFileNameOptional
If you specify this option, detailed information about theinstallation is written to the specified log file. This informationcan be used to investigate details about how a particular instanceof SnapManager for Microsoft Exchange is installed. Theasterisk
*
is a wildcard character that specifies that all the installationinformation (such as status messages, nonfatal warnings, anderror messages) should be logged.
TempDirPath is the fully qualified name of the directory inwhich the installation log is created or overwritten.
LogFileName is the name of the file to which the installationinformation is written.
The software installation utility installs the SnapManager for Microsoft Exchange software.
2. Start SnapManager.
Next topics
Examples of unattended upgrade on page 58
Updating legacy scheduled jobs on page 58
SnapManager installation and upgrade | 57
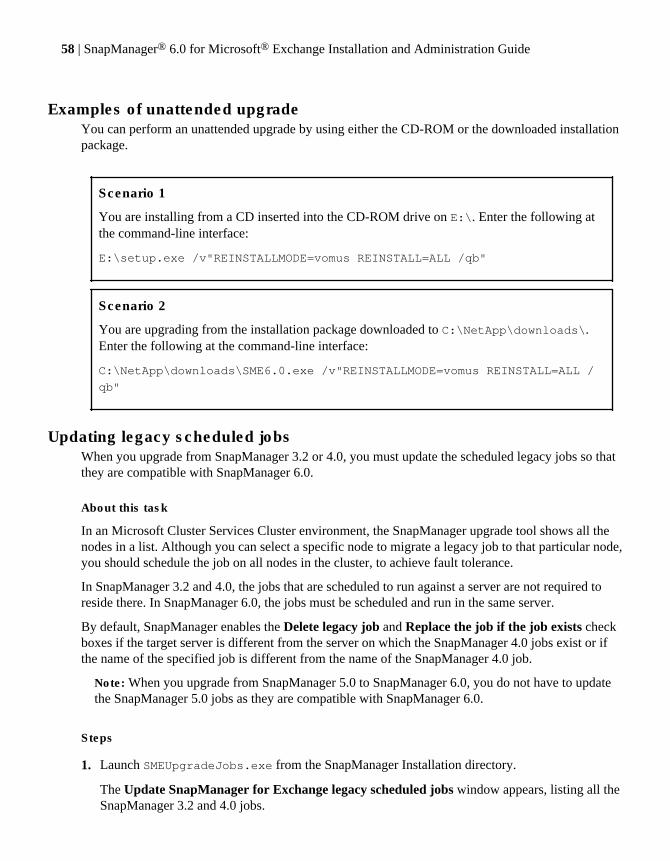
Examples of unattended upgradeYou can perform an unattended upgrade by using either the CD-ROM or the downloaded installationpackage.
Scenario 1
You are installing from a CD inserted into the CD-ROM drive on E:\. Enter the following atthe command-line interface:
E:\setup.exe /v"REINSTALLMODE=vomus REINSTALL=ALL /qb"
Scenario 2
You are upgrading from the installation package downloaded to C:\NetApp\downloads\.Enter the following at the command-line interface:
C:\NetApp\downloads\SME6.0.exe /v"REINSTALLMODE=vomus REINSTALL=ALL /
qb"
Updating legacy scheduled jobsWhen you upgrade from SnapManager 3.2 or 4.0, you must update the scheduled legacy jobs so thatthey are compatible with SnapManager 6.0.
About this task
In an Microsoft Cluster Services Cluster environment, the SnapManager upgrade tool shows all thenodes in a list. Although you can select a specific node to migrate a legacy job to that particular node,you should schedule the job on all nodes in the cluster, to achieve fault tolerance.
In SnapManager 3.2 and 4.0, the jobs that are scheduled to run against a server are not required toreside there. In SnapManager 6.0, the jobs must be scheduled and run in the same server.
By default, SnapManager enables the Delete legacy job and Replace the job if the job exists checkboxes if the target server is different from the server on which the SnapManager 4.0 jobs exist or ifthe name of the specified job is different from the name of the SnapManager 4.0 job.
Note: When you upgrade from SnapManager 5.0 to SnapManager 6.0, you do not have to updatethe SnapManager 5.0 jobs as they are compatible with SnapManager 6.0.
Steps
1. Launch SMEUpgradeJobs.exe from the SnapManager Installation directory.
The Update SnapManager for Exchange legacy scheduled jobs window appears, listing all theSnapManager 3.2 and 4.0 jobs.
58 | SnapManager® 6.0 for Microsoft® Exchange Installation and Administration Guide
2. To see the jobs in a different server, click Browse to select a different server and then clickRefresh.
SnapManager lists the 3.2 and 4.0 jobs for the selected server.
3. To update the SnapManager 3.2 and 4.0 jobs for SnapManager 6.0, click Update.
A Scheduling dialog box appears that you can use to migrate the 3.2 and 4.0 to 6.0 jobs.
4. If you do not want to use SnapManager 3.2 and 4.0 jobs for SnapManager 6.0, click Actions >Delete.
Prerequisites for uninstalling SnapManagerIf you have used SnapManager to manage your Exchange databases, and you plan to reinstallSnapManager later, ensure that you record the drive letter and the path of the SnapInfo directorylocations before proceeding.
If you have set up a single SnapInfo directory for all databases on your host, then record the driveletter and the path of the LUN that contains a single SnapInfo directory for all Exchange servers, andtheir associated databases.
If you have set up multiple SnapInfo directories, then record the drive letter and path of each LUNthat contains a SnapInfo directory.
SnapManager reports record the current SnapInfo directory locations in the most recent logscontained in the Backup folder and in the Config folder.
After you reinstall SnapManager, ensure that you reconfigure SnapManager with the same SnapInfodirectory locations that SnapManager had used earlier.
Attention: If you configure SnapManager with different SnapInfo directory locations than usedpreviously, then SnapManager no longer has records of any backups made before the reinstallationof SnapManager occurred. As a result, your prior backup sets could be invalidated or deleted thenext time you perform a backup.
Next topics
Comparison of interactive versus unattended uninstallation on page 60
Moving Exchange data to a local disk on page 60
Related concepts
SnapManager reinstallation with or without uninstallation on page 64
Related tasks
Installation of SnapManager on a stand-alone Windows host system on page 44
Installing SnapManager after creating a new Windows cluster on page 51
SnapManager installation and upgrade | 59
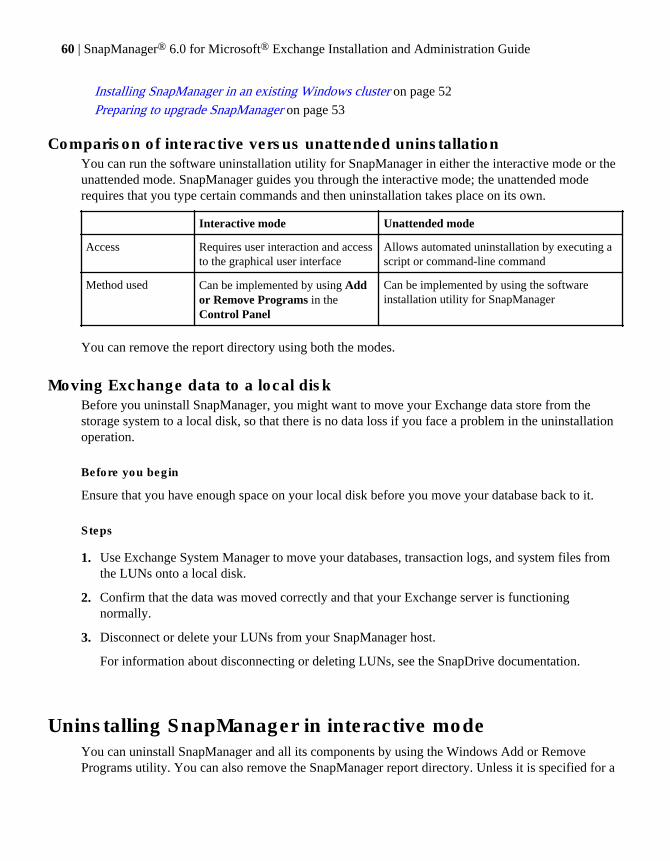
Installing SnapManager in an existing Windows cluster on page 52
Preparing to upgrade SnapManager on page 53
Comparison of interactive versus unattended uninstallationYou can run the software uninstallation utility for SnapManager in either the interactive mode or theunattended mode. SnapManager guides you through the interactive mode; the unattended moderequires that you type certain commands and then uninstallation takes place on its own.
Interactive mode Unattended mode
Access Requires user interaction and accessto the graphical user interface
Allows automated uninstallation by executing ascript or command-line command
Method used Can be implemented by using Addor Remove Programs in theControl Panel
Can be implemented by using the softwareinstallation utility for SnapManager
You can remove the report directory using both the modes.
Moving Exchange data to a local diskBefore you uninstall SnapManager, you might want to move your Exchange data store from thestorage system to a local disk, so that there is no data loss if you face a problem in the uninstallationoperation.
Before you begin
Ensure that you have enough space on your local disk before you move your database back to it.
Steps
1. Use Exchange System Manager to move your databases, transaction logs, and system files fromthe LUNs onto a local disk.
2. Confirm that the data was moved correctly and that your Exchange server is functioningnormally.
3. Disconnect or delete your LUNs from your SnapManager host.
For information about disconnecting or deleting LUNs, see the SnapDrive documentation.
Uninstalling SnapManager in interactive modeYou can uninstall SnapManager and all its components by using the Windows Add or RemovePrograms utility. You can also remove the SnapManager report directory. Unless it is specified for a
60 | SnapManager® 6.0 for Microsoft® Exchange Installation and Administration Guide
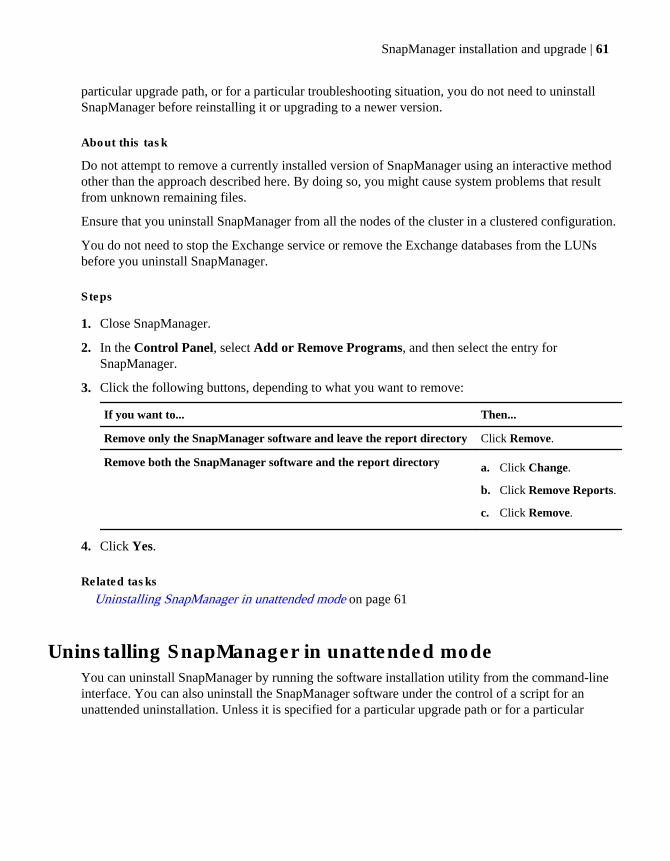
particular upgrade path, or for a particular troubleshooting situation, you do not need to uninstallSnapManager before reinstalling it or upgrading to a newer version.
About this task
Do not attempt to remove a currently installed version of SnapManager using an interactive methodother than the approach described here. By doing so, you might cause system problems that resultfrom unknown remaining files.
Ensure that you uninstall SnapManager from all the nodes of the cluster in a clustered configuration.
You do not need to stop the Exchange service or remove the Exchange databases from the LUNsbefore you uninstall SnapManager.
Steps
1. Close SnapManager.
2. In the Control Panel, select Add or Remove Programs, and then select the entry forSnapManager.
3. Click the following buttons, depending to what you want to remove:
If you want to... Then...
Remove only the SnapManager software and leave the report directory Click Remove.
Remove both the SnapManager software and the report directory a. Click Change.
b. Click Remove Reports.
c. Click Remove.
4. Click Yes.
Related tasks
Uninstalling SnapManager in unattended mode on page 61
Uninstalling SnapManager in unattended modeYou can uninstall SnapManager by running the software installation utility from the command-lineinterface. You can also uninstall the SnapManager software under the control of a script for anunattended uninstallation. Unless it is specified for a particular upgrade path or for a particular
SnapManager installation and upgrade | 61
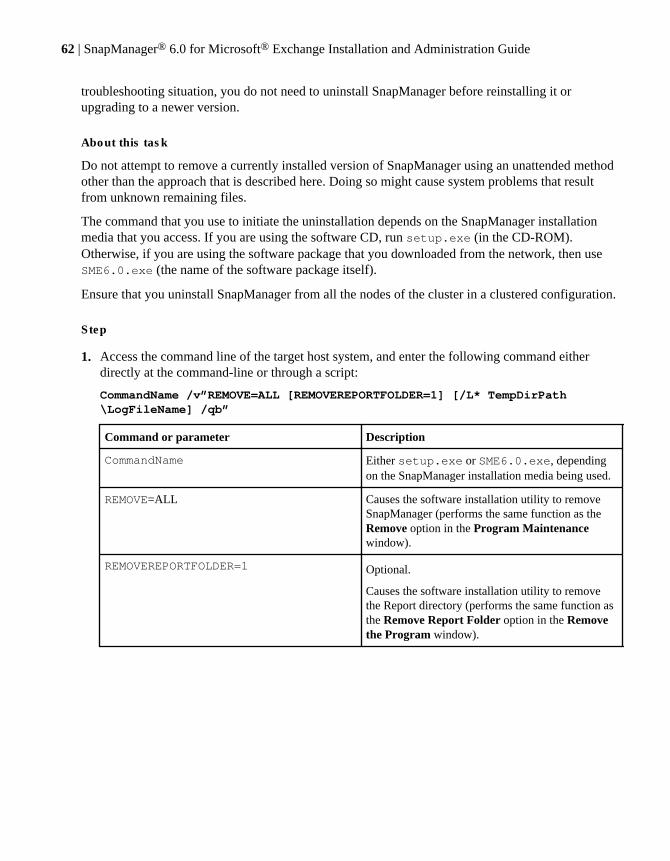
troubleshooting situation, you do not need to uninstall SnapManager before reinstalling it orupgrading to a newer version.
About this task
Do not attempt to remove a currently installed version of SnapManager using an unattended methodother than the approach that is described here. Doing so might cause system problems that resultfrom unknown remaining files.
The command that you use to initiate the uninstallation depends on the SnapManager installationmedia that you access. If you are using the software CD, run setup.exe (in the CD-ROM).Otherwise, if you are using the software package that you downloaded from the network, then useSME6.0.exe (the name of the software package itself).
Ensure that you uninstall SnapManager from all the nodes of the cluster in a clustered configuration.
Step
1. Access the command line of the target host system, and enter the following command eitherdirectly at the command-line or through a script:
CommandName /v”REMOVE=ALL [REMOVEREPORTFOLDER=1] [/L* TempDirPath\LogFileName] /qb”
Command or parameter Description
CommandName Either setup.exe or SME6.0.exe, dependingon the SnapManager installation media being used.
REMOVE=ALL Causes the software installation utility to removeSnapManager (performs the same function as theRemove option in the Program Maintenancewindow).
REMOVEREPORTFOLDER=1 Optional.
Causes the software installation utility to removethe Report directory (performs the same function asthe Remove Report Folder option in the Removethe Program window).
62 | SnapManager® 6.0 for Microsoft® Exchange Installation and Administration Guide
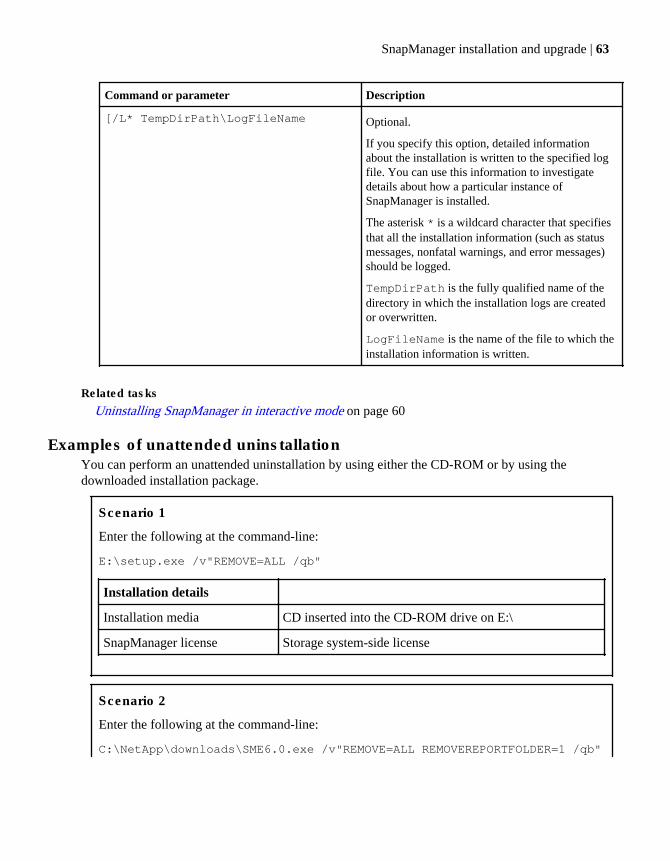
Command or parameter Description
[/L* TempDirPath\LogFileName Optional.
If you specify this option, detailed informationabout the installation is written to the specified logfile. You can use this information to investigatedetails about how a particular instance ofSnapManager is installed.
The asterisk * is a wildcard character that specifiesthat all the installation information (such as statusmessages, nonfatal warnings, and error messages)should be logged.
TempDirPath is the fully qualified name of thedirectory in which the installation logs are createdor overwritten.
LogFileName is the name of the file to which theinstallation information is written.
Related tasks
Uninstalling SnapManager in interactive mode on page 60
Examples of unattended uninstallationYou can perform an unattended uninstallation by using either the CD-ROM or by using thedownloaded installation package.
Scenario 1
Enter the following at the command-line:
E:\setup.exe /v"REMOVE=ALL /qb"
Installation details
Installation media CD inserted into the CD-ROM drive on E:\
SnapManager license Storage system-side license
Scenario 2
Enter the following at the command-line:
C:\NetApp\downloads\SME6.0.exe /v"REMOVE=ALL REMOVEREPORTFOLDER=1 /qb"
SnapManager installation and upgrade | 63
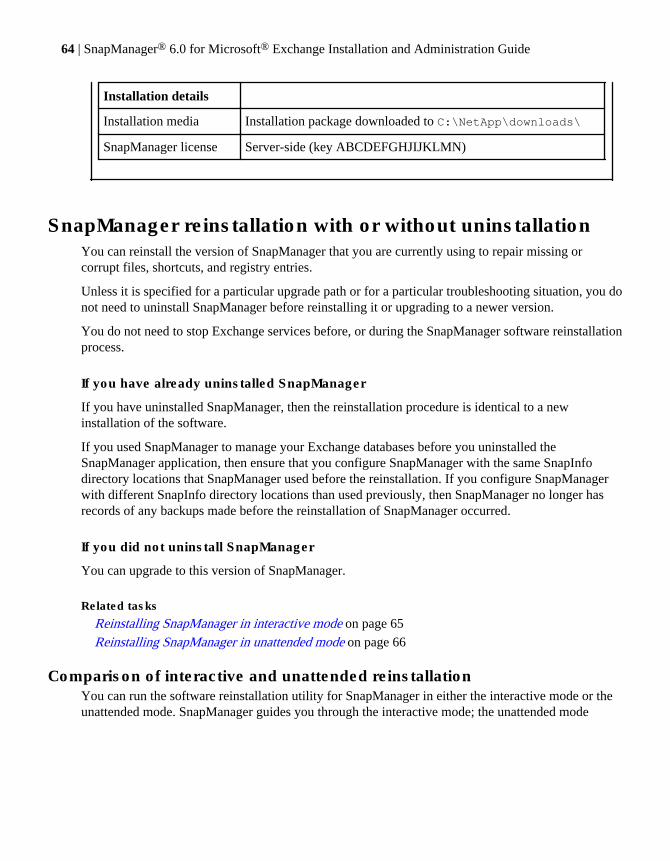
Installation details
Installation media Installation package downloaded to C:\NetApp\downloads\
SnapManager license Server-side (key ABCDEFGHJIJKLMN)
SnapManager reinstallation with or without uninstallationYou can reinstall the version of SnapManager that you are currently using to repair missing orcorrupt files, shortcuts, and registry entries.
Unless it is specified for a particular upgrade path or for a particular troubleshooting situation, you donot need to uninstall SnapManager before reinstalling it or upgrading to a newer version.
You do not need to stop Exchange services before, or during the SnapManager software reinstallationprocess.
If you have already uninstalled SnapManager
If you have uninstalled SnapManager, then the reinstallation procedure is identical to a newinstallation of the software.
If you used SnapManager to manage your Exchange databases before you uninstalled theSnapManager application, then ensure that you configure SnapManager with the same SnapInfodirectory locations that SnapManager used before the reinstallation. If you configure SnapManagerwith different SnapInfo directory locations than used previously, then SnapManager no longer hasrecords of any backups made before the reinstallation of SnapManager occurred.
If you did not uninstall SnapManager
You can upgrade to this version of SnapManager.
Related tasks
Reinstalling SnapManager in interactive mode on page 65
Reinstalling SnapManager in unattended mode on page 66
Comparison of interactive and unattended reinstallationYou can run the software reinstallation utility for SnapManager in either the interactive mode or theunattended mode. SnapManager guides you through the interactive mode; the unattended mode
64 | SnapManager® 6.0 for Microsoft® Exchange Installation and Administration Guide
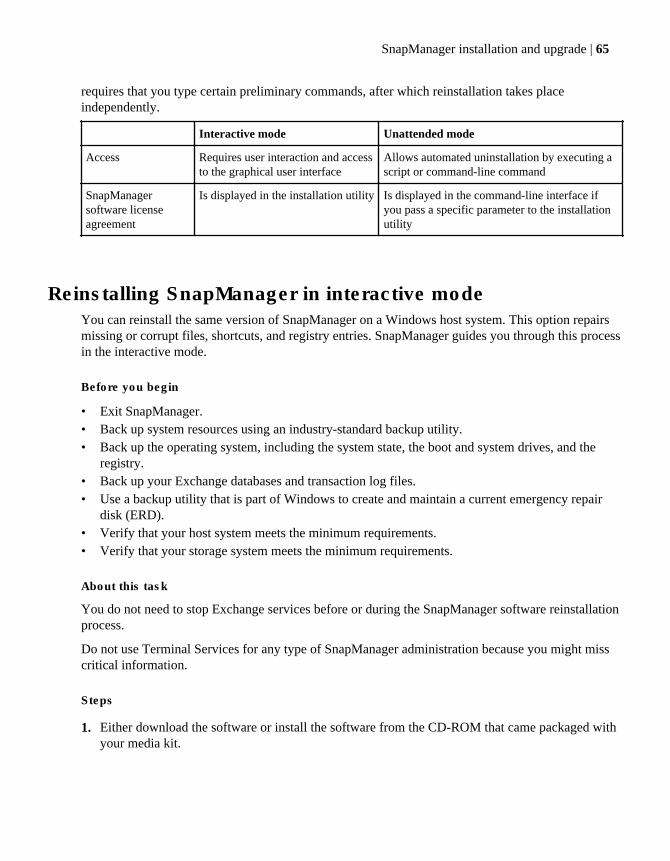
requires that you type certain preliminary commands, after which reinstallation takes placeindependently.
Interactive mode Unattended mode
Access Requires user interaction and accessto the graphical user interface
Allows automated uninstallation by executing ascript or command-line command
SnapManagersoftware licenseagreement
Is displayed in the installation utility Is displayed in the command-line interface ifyou pass a specific parameter to the installationutility
Reinstalling SnapManager in interactive modeYou can reinstall the same version of SnapManager on a Windows host system. This option repairsmissing or corrupt files, shortcuts, and registry entries. SnapManager guides you through this processin the interactive mode.
Before you begin
• Exit SnapManager.• Back up system resources using an industry-standard backup utility.• Back up the operating system, including the system state, the boot and system drives, and the
registry.• Back up your Exchange databases and transaction log files.• Use a backup utility that is part of Windows to create and maintain a current emergency repair
disk (ERD).• Verify that your host system meets the minimum requirements.• Verify that your storage system meets the minimum requirements.
About this task
You do not need to stop Exchange services before or during the SnapManager software reinstallationprocess.
Do not use Terminal Services for any type of SnapManager administration because you might misscritical information.
Steps
1. Either download the software or install the software from the CD-ROM that came packaged withyour media kit.
SnapManager installation and upgrade | 65
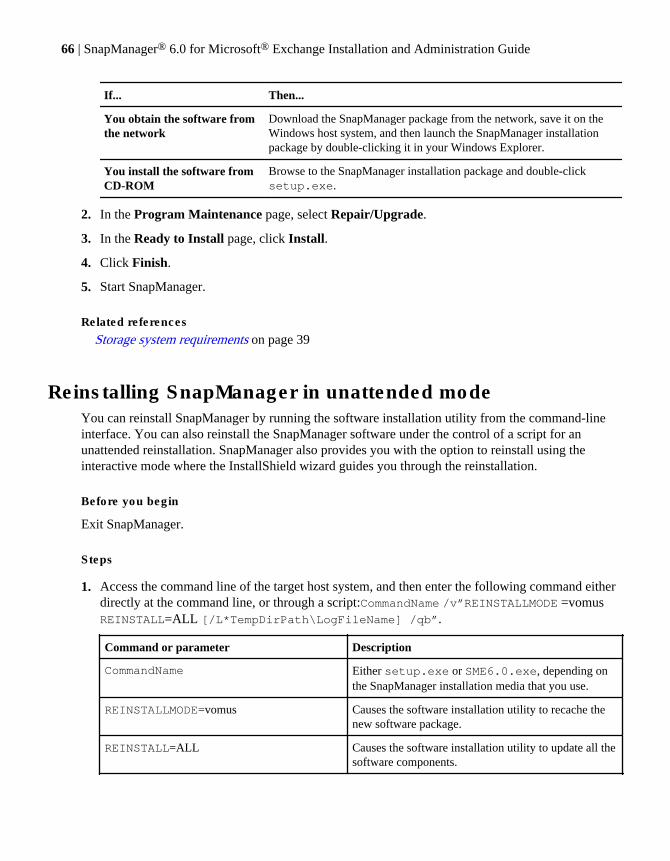
If... Then...
You obtain the software fromthe network
Download the SnapManager package from the network, save it on theWindows host system, and then launch the SnapManager installationpackage by double-clicking it in your Windows Explorer.
You install the software fromCD-ROM
Browse to the SnapManager installation package and double-clicksetup.exe.
2. In the Program Maintenance page, select Repair/Upgrade.
3. In the Ready to Install page, click Install.
4. Click Finish.
5. Start SnapManager.
Related references
Storage system requirements on page 39
Reinstalling SnapManager in unattended modeYou can reinstall SnapManager by running the software installation utility from the command-lineinterface. You can also reinstall the SnapManager software under the control of a script for anunattended reinstallation. SnapManager also provides you with the option to reinstall using theinteractive mode where the InstallShield wizard guides you through the reinstallation.
Before you begin
Exit SnapManager.
Steps
1. Access the command line of the target host system, and then enter the following command eitherdirectly at the command line, or through a script:CommandName /v”REINSTALLMODE =vomusREINSTALL=ALL [/L*TempDirPath\LogFileName] /qb”.
Command or parameter Description
CommandName Either setup.exe or SME6.0.exe, depending onthe SnapManager installation media that you use.
REINSTALLMODE=vomus Causes the software installation utility to recache thenew software package.
REINSTALL=ALL Causes the software installation utility to update all thesoftware components.
66 | SnapManager® 6.0 for Microsoft® Exchange Installation and Administration Guide
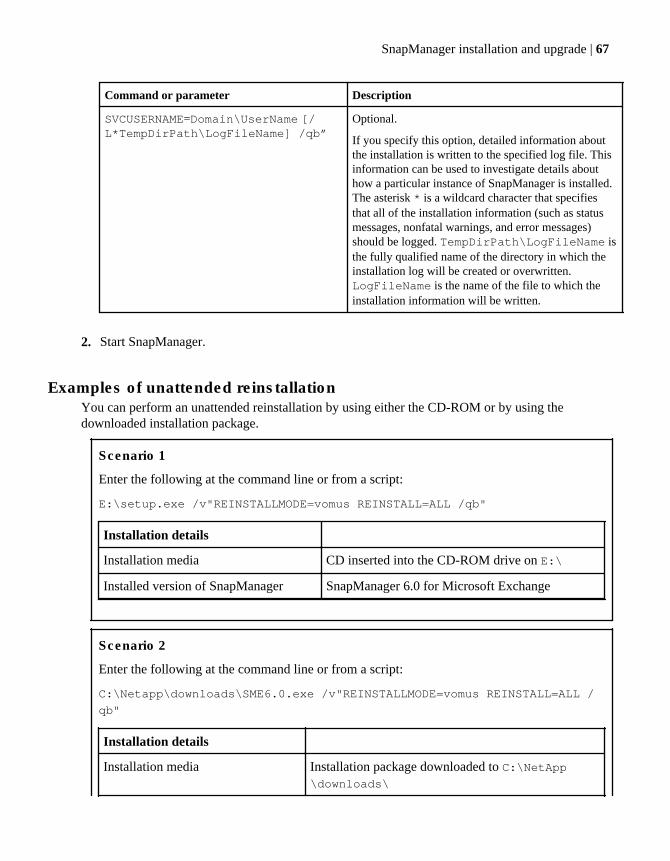
Command or parameter Description
SVCUSERNAME=Domain\UserName [/L*TempDirPath\LogFileName] /qb”
Optional.
If you specify this option, detailed information aboutthe installation is written to the specified log file. Thisinformation can be used to investigate details abouthow a particular instance of SnapManager is installed.The asterisk * is a wildcard character that specifiesthat all of the installation information (such as statusmessages, nonfatal warnings, and error messages)should be logged. TempDirPath\LogFileName isthe fully qualified name of the directory in which theinstallation log will be created or overwritten.LogFileName is the name of the file to which theinstallation information will be written.
2. Start SnapManager.
Examples of unattended reinstallationYou can perform an unattended reinstallation by using either the CD-ROM or by using thedownloaded installation package.
Scenario 1
Enter the following at the command line or from a script:
E:\setup.exe /v"REINSTALLMODE=vomus REINSTALL=ALL /qb"
Installation details
Installation media CD inserted into the CD-ROM drive on E:\
Installed version of SnapManager SnapManager 6.0 for Microsoft Exchange
Scenario 2
Enter the following at the command line or from a script:
C:\Netapp\downloads\SME6.0.exe /v"REINSTALLMODE=vomus REINSTALL=ALL /
qb"
Installation details
Installation media Installation package downloaded to C:\NetApp\downloads\
SnapManager installation and upgrade | 67

Installation details
Installed version of SnapManager SnapManager 6.0 for Microsoft Exchange
68 | SnapManager® 6.0 for Microsoft® Exchange Installation and Administration Guide
When you start SnapManager for the first time
After you install or upgrade SnapManager and start the application for the first time, SnapManagerverifies the Exchange server, SnapDrive version, and databases for compatibility. You must followcertain guidelines to start SnapManager for the first time.
Next topics
What SnapManager verifies at startup on page 69
Why you should administer SnapManager from the system console on page 70
Starting SnapManager and connecting to the default server on page 70
Starting SnapManager and connecting to the CCR server on page 71
SnapManager Dashboard view on page 72
Scheduled jobs on page 73
Database Availability Group on page 73
Related concepts
Database migration considerations on page 75
Storage system volume and LUN planning on page 90
Configuration and migration of Exchange data using SnapManager on page 93
What SnapManager verifies at startupWhen SnapManager starts for the first time, it verifies the Exchange server first, checks theSnapDrive version, and finally checks for database configuration, ensuring that the basicprerequisites to run the Configuration wizard have been met .
1. SnapManager checks the Microsoft Exchange version, and prompts you if the Exchange versionneeds upgrade.If SnapManager detects that the Microsoft Exchange Server 2007 or 2003 software does not havethe minimum Service Pack level required, an error message appears.If you have another available Exchange server that has the minimum Service Pack required bySnapManager, you can connect to that server instance instead. Otherwise, close the SnapManagerapplication, upgrade Microsoft Exchange as needed, and then restart SnapManager.
2. Next, SnapManager checks the SnapDrive version.If SnapManager detects that SnapDrive is installed, but that it is a version not supported with thisversion of SnapManager, a warning appears. Close the SnapManager application, upgradeSnapDrive as needed, and then restart SnapManager.
3. Finally, if SnapManager detects that no databases have been configured for use withSnapManager, a message appears, prompting you to run the Configuration wizard.
When you start SnapManager for the first time | 69
Why you should administer SnapManager from the systemconsole
Run SnapManager from the system console, not from a Terminal Services client. Do not useTerminal Services for any type of SnapManager administration, because you might miss criticalinformation that is displayed only in pop-up boxes at the system console.
Starting SnapManager and connecting to the default serverWhen you start SnapManager for the first time after either an installation or upgrade, you have toselect one or more Exchange servers that you want to manage.
Before you begin
You must know the name of the Exchange server that you want to manage, the computer that youwant to use for database integrity verification, and the default mountpoint path for integrityverification.
You can also decide if you want to enable verification throttling and to override the existing databaseverification.
Steps
1. To start SnapManager, go to the Start menu and select Program Files > NetApp >SnapManager for Exchange Management Console.
2. Click SnapManager for Exchange.
SnapManager prompts you to specify an Exchange server that you want to manage.
3. Click OK.
The Add Exchange Servers to be Managed window appears.
4. Select an Exchange server from the displayed list, or click Browse to select an Exchange serverfrom the network.
5. Click Add.
SnapManager prompts you to specify the computer that you want to use for database integrityverification.
6. Click OK.
The Database Verification Settings window appears.
7. Specify the verification server that you want to use for integrity verification.
70 | SnapManager® 6.0 for Microsoft® Exchange Installation and Administration Guide
SnapManager prompts you to specify the default mountpoint directory.
8. In the Access LUN in Snapshot window, specify the default mountpoint directory.
Note: You can also select Automatically assign available drive letter.
9. Click the Override Verification tab if you want to override the existing database verification,and then click Override database verification requirement for restore.
10. If you want to enable verification throttling, in the Verification Throttling tab, click Throttledatabase checksum verification.
11. Click OK.
After you finish
You can run the Configuration wizard to start SnapManager configuration.
Related references
Windows host system requirements on page 37
Starting SnapManager and connecting to the CCR serverAfter starting and connecting to the default server, you can connect to a CCR-enabled server by usingSnapManager for Exchange. You need to add the CCR-enabled server if you are using a clusteredconfiguration.
Before you begin
You must know the name of the Exchange server that you want to manage.
Steps
1. To start SnapManager, go to the Start menu and select Program Files > NetApp >SnapManager for Exchange Management Console.
The SnapManager 6.0 for Microsoft Exchange console appears.
2. Click Add Servers to be managed in the Actions pane.
3. Select a CCR-enabled Exchange server from the displayed list.
Note: You can use the Browse button to select a different CCR-enabled Exchange server fromthe network.
4. Click Add.
SnapManager connects to the CCR-enabled Exchange server.
When you start SnapManager for the first time | 71
After you finish
You can run the Configuration wizard to start SnapManager configuration.
SnapManager Dashboard viewYou can view the status of different SnapManager servers connected to the SnapManager forExchange network. This is a dynamic view that is refreshed frequently. You can view your Exchangeserver configuration and add new Exchange servers.
Exchange server configuration
You can select any Exchange server in the Scope pane to view the server configuration details. Thefollowing details are displayed in the Results pane:
• Name of the Exchange server• Name of the host
Note: In the case of clustered configurations, SnapManager displays the host name of the nodeto which SnapManager is connected.
• Exchange server version• SnapManager version• Exchange server configuration
This value can be any one of the following: Standalone, Single Copy Cluster, or ClusterContinuous Replication.
• Verification server• Next job that is scheduled• Last backup operation, including a timestamp and a hyperlink to the corresponding report• Last restore operation, including a timestamp and a hyperlink to the corresponding report• Last configuration operation, including a timestamp and a hyperlink to the corresponding report
Current Job Status viewThis view displays the jobs that are running and those in queue, for local as well as remoteverification. The following list describes the elements of the pane:
View Status Specifies a link to the SnapManager report associated with the running job.
Priority Specifies the queue position of the job.
Job ID Displays the Job ID of the job.
State Displays whether the job is running, cancelling, or in queue.
Job Type Displays whether the job is a backup job or backup with verification job. Thiselement can have any one of the following values:
• Full Backup
72 | SnapManager® 6.0 for Microsoft® Exchange Installation and Administration Guide
• Frequent Recovery Point Backup• Backup Verification• Restore• Test Restore
Backup Source Displays the name of the server that creates the backup.
Submission time Displays the time the job was submitted.
Start time Displays the time the backup job started.
Add new Exchange servers
You can add a new Exchange server from the Actions pane and manage it through SnapManager.
Related conceptsDatabase backup using SnapManager on page 135SnapManager reports and the report directory on page 259Fractional space reservation on page 290Integrity verification on SnapMirror destination volumes on page 215
Related tasksManaging integrity verification jobs on page 222Configuration and migration of Exchange data using SnapManager on page 93
Scheduled jobsWhen you select Scheduled Jobs in the Scope pane, the details of all scheduled jobs such as backupand integrity verification jobs are displayed in the Results pane. You can view, edit, and delete thesejobs.
When you select Scheduled Jobs in the Scope pane, the details of each scheduled job like job name,host name, last run time of the job, last return code, next run time of the job, and so on are displayedin the Results pane.
You can view and edit the settings for a job such as its schedule, password, and so on. You can alsodelete scheduled jobs.
Database Availability GroupThe Database Availability Group (DAG), a high availability feature of Exchange Server 2010,provides database-level recovery from failures and data corruption.
The DAG is a group of up to 16 servers in which some or all of the mailbox databases are replicatedto one or more servers within the DAG. Thus there can be up to 16 copies of a database in the DAG.
When you start SnapManager for the first time | 73
A database is not associated with any server. The current active database and its copies use the samepath on each server. All database names in a DAG have to be unique.
The DAG is for mailbox databases and not for public folder databases.
Related concepts
Migration of Exchange Server 2010 mailbox databases on page 114
Database backup using SnapManager on page 135
Recovery Database on page 196
Restoring Exchange 2010 databases in a DAG on page 176
74 | SnapManager® 6.0 for Microsoft® Exchange Installation and Administration Guide
Database migration considerations
You must migrate and store your database in correctly sized and appropriately configured LUNs. Usethe minimum possible number of LUNs for faster backup operations and faster restore operations.You must group your databases if you do not need to restore them individually.
Determine how many LUNs you need for your SnapManager configuration and what data thoseLUNs hold. Then create your data configuration plan by calculating the required sizes for each LUNand the volume that contains it.
Next topics
Exchange configuration requirements on page 75
Rules for Exchange Server storage groups and databases enforced by the Configurationwizard on page 77
NTFS volume mountpoints on page 80
SnapManager support for volume mountpoints on page 81
Transaction log archiving on page 84
Example Exchange configurations supported with SnapManager on page 86
Creation of LUNs on qtrees on page 90
Storage system volume and LUN planning on page 90
Information needed for your SnapManager data configuration plan on page 91
Related concepts
When you start SnapManager for the first time on page 69
Storage system volume and LUN planning on page 90
Configuration and migration of Exchange data using SnapManager on page 93
Exchange configuration requirementsMicrosoft Exchange Server 2010, Exchange Server 2007 and Exchange Server 2003 have dataconfiguration requirements with respect to the number of Storage Groups per server, the number ofdatabases per Storage Group, the number of databases per server, Recovery Storage Groups,Recovery Databases, and Storage Groups per virtual server.
Member servers in a Database Availability Group (DAG)
A DAG can have up to a maximum of 16 Exchange 2010 member servers.
Database migration considerations | 75
Storage Groups per server
If you use Exchange Server 2003, each server can have 1 to 4 Storage Groups per server. If you useExchange Server 2007, each server can have 1 to 50 Storage Groups per server. Storage Groups arenot present in Exchange Server 2010.
Databases per Storage Group
If you use Exchange Server 2003, each Storage Group can have 1 to 5 databases per Storage Group.If you use Exchange Server 2007, you can mix the Storage Group and database configuration basedon your requirements. For example, you can have either 25 databases each in two Storage Groups, orone database each in 50 Storage Groups.
Databases per Exchange Server 2010
The maximum number of databases that can be associated with each Exchange Server 2010 is 100.
Recovery Storage Group
A Recovery Storage Group enables you to mount a copy of a mailbox store on a production server,and recover the data within the restored mailbox store when the current mailbox store is still running.
If you are using Exchange Server 2003, you must use Exchange System Manager (ESM) to manuallycreate the Recovery Storage Group.
If you are using Exchange 2007, SnapManager creates a Recovery Storage Group automaticallywhen you restore a backup to a Recovery Storage Group. You can also create and manage RecoveryStorage Groups by using the Exchange Management Shell.
Recovery Database
A Recovery Database allows you to restore, recover, and mount your database to a differentExchange server. It is a feature available with Exchange Server 2010. Each Exchange Server 2010can have only one such Recovery Database mounted at any time.
Storage Groups per virtual server in Exchange Server 2003
An Exchange Server 2003 cluster has one or more Exchange virtual servers. In a two-node cluster,you can have a maximum of four Storage Groups on the complete cluster.
An active/passive Exchange Server cluster can have more than two cluster nodes. The maximumnumber of Exchange virtual servers in an active/passive cluster is one less than the number of nodesin the cluster. An active/passive Exchange cluster can have more than four Storage Groups becauseonly one Exchange virtual server runs on a cluster node at a time.
Maximum configurations supported by Exchange servers
The following table shows the maximum number of Storage Groups (including the Recovery StorageGroup) and databases that Exchange Server 2003 and Exchange Server 2007 support.
76 | SnapManager® 6.0 for Microsoft® Exchange Installation and Administration Guide
Exchange Server Configurations supported for StandardEdition
Configurations supported for EnterpriseEdition
Storage Groupsupport
Number ofdatabases perStorage Group
Storage Groupsupport
Number ofdatabases perStorage Group
Exchange Server2003
1 1 Mailbox store and1 public folder store
4 5
Exchange Server2007
5 5 50 50
The following table shows the maximum number of databases (including the Recovery Database)that Exchange Server 2010 supports.
Exchange Server 2010 Standard Edition Enterprise Edition
Maximum number of databases 5 100
Related concepts
Rules for Exchange Server storage groups and databases enforced by the Configurationwizard on page 77
NTFS volume mountpoints on page 80
SnapManager support for volume mountpoints on page 81
Deletion of Storage Groups from clustered systemsYou can delete a Storage Group from a clustered system by deleting it from the ExchangeManagement Console and the Cluster Administrator. If you do not delete the Storage Group from theExchange Management Console, the Configuration wizard and the Backup wizard detect the StorageGroup even after you delete it.
Rules for Exchange Server storage groups and databasesenforced by the Configuration wizard
When you configure your Exchange Server storage groups and databases for SnapManager, theConfiguration wizard creates some rules for databases, transaction logs, SnapInfo directories, forsharing of LUNs or occupation of a SAN boot LUN, and Storage Group system files.
• DatabasesDatabases from different Storage Groups cannot share a single LUN. Also, databases cannotshare a single LUN with transaction logs, even if both belong to the same Storage Group.
Note: SnapManager restores all databases on a LUN together. To restore an individualdatabase without restoring the rest of its Storage Group, move the database to a separate LUN.
Database migration considerations | 77
Note: In a Database Availability Group (DAG) configuration, it you have a drive or LUNexisting on all the nodes and this drive is used by a database only on some nodes, then otherdatabases cannot use this drive on other nodes of the DAG.
• Transaction logsTransaction logs from different Storage Groups can share a single LUN.
• SnapInfo directoryA SnapInfo directory can have its own LUN, or it can share a LUN with transaction logs if youuse NTFS hard links. The SnapInfo directory cannot share the LUN with databases.
• SAN boot LUNYou cannot place databases, transaction logs, or a SnapInfo directory on a SAN boot LUN (aLUN configured as a boot device for a SAN host).
• Storage Group system filesStorage Group system files must be on a LUN that contains the transaction logs for that StorageGroup. If you modify the database or move the transaction logs for a Storage Group, theConfiguration wizard automatically moves the Storage Group system files to the same LUN asthe transaction logs.
Next topics
Recommended Exchange Server storage groups and databases configurations on page 78
Exchange Server storage groups and databases configurations to avoid on page 79
Exchange message tracking in an MSCS configuration on page 79
Related concepts
Why SnapManager uses NTFS hard links for transaction log archiving on page 85
Recommended Exchange Server storage groups and databasesconfigurations
Ensure that you place your Exchange Server storage groups and databases on dedicated volumes,place your LUNs correctly, and use the minimum number of LUNs possible, for fast and successfulbackup and restore operations.
• Use dedicated volumes for your data.• You must always group your databases unless you need to perform an individual database restore
operation.
You should ensure that for a Continuous Cluster Replication (CCR) configuration, all Exchangeservers hosting a mailbox database and its copies have same storage level configuration layout. Forexample, if two LUNs share the same storage volume (vol1) on host A, the same two LUNs on hostB should share same storage volume (vol2).
78 | SnapManager® 6.0 for Microsoft® Exchange Installation and Administration Guide
Exchange Server storage groups and databases configurations to avoidBefore you migrate your Exchange database and transaction logs to LUNs during configuration,ensure that you do not manually store any files or directories on the LUNs that contain databases,SnapInfo directories, or host a mountpoint.
Note: After adding or moving Exchange Server storage groups and databases, always run theConfiguration wizard. If you add more databases or move databases to different LUNs withoutusing the Configuration wizard, you create an invalid configuration that causes backup or restoreoperations to fail.
Before you migrate your database and transaction logs to LUNs, ensure that you follow these points:
• Do not manually store any directories or files (including system paging files) on the LUNs thatare used by databases and transaction logs.
• Do not manually store any directories or files on the LUNs that are used by the SnapInfodirectory.
• Do not manually store databases on a LUN that hosts NTFS volume mountpoints.• Do not place LUNs containing data from different Exchange servers in the same volume, for the
following reasons:
• If you create backups for a different server on a volume that contains data from your currentserver, SnapManager uses all the Snapshot copies for the restore operation, but you canrestore only the backups of the other server and not the backups of your current server.
• Conflicting backup schedules between two Exchange servers can lead to busy Snapshotcopies.
• Do not place LUNs in the storage system’s root volume, which is reserved for use by DataONTAP.
Related concepts
SnapManager support for volume mountpoints on page 81
Exchange message tracking in an MSCS configurationWhen you use Exchange message tracking in an Microsoft Cluster Services (MSCS) configuration,place the message tracking directory on a shared LUN that does not store a database. If you specify ashared LUN with stored database, SnapManager restores an old copy of the message tracking logduring the restore operation.
To create an Exchange virtual server in an MSCS configuration, install the Exchange binaries onboth nodes and then create a new System Attendant cluster resource. As part of creating the SystemAttendant cluster resource, Exchange prompts you as follows:
Database migration considerations | 79
Enter [a] path to the data directory.
Exchange places the new databases and other related files (including the SMTP and MessageTransfer Agent (MTA) queues, message tracking logs, and Microsoft Search files, if configured) onthis path on a shared disk.
Suppose that the path that you specify for the data directory at the System Attendant cluster resourceis a shared LUN that is also specified for a database using the SnapManager Configuration wizardlater. In this case, the Exchange message tracking log and the Exchange database are on the sameLUN.
SnapManager does not prevent this configuration, nor does this configuration pose an immediateproblem. During a subsequent restore operation, SnapManager restores the entire LUN from theSnapshot copy, with the desired database and an old copy of the message tracking log.
If you already created a System Attendant cluster resource with the data directory on a shared LUNwith a stored database, you can move the message tracking location to a different location on ashared disk. For a description of how to move the message tracking location in Exchange Server2003, see Microsoft Knowledge Base article 841089.
NTFS volume mountpointsA volume mountpoint is a drive or volume in Windows that is mounted to a folder in the NTFS filesystem.
A mounted drive is assigned a drive path instead of a drive letter. Volume mountpoints enable you toexceed the limitation imposed by naming drives using one of the 26 letters of the alphabet.. By usingvolume mountpoints, you can mount a target partition into a folder on another physical disk. Formore information about volume mountpoints, see the Microsoft Web site.
Related concepts
SnapManager support for volume mountpoints on page 81
Related references
Exchange configuration requirements on page 75
Example Exchange configurations supported with SnapManager on page 86
Limitations of NTFS volume mountpointsVolume mountpoints in an NTFS environment, or on a server cluster have limitations with theircreation, the supported clustered configuration, and placement with respect to the Quorum disk.
The NTFS volume mountpoints feature imposes the following limitations:
• You can create volume mountpoints only on a dedicated disk or a shared cluster resource disk.• You cannot use volume mountpoints as storage locations for the Exchange Server 2003 binaries.• You cannot use volume mountpoints on a server cluster.
80 | SnapManager® 6.0 for Microsoft® Exchange Installation and Administration Guide

• You cannot place volume mountpoints between clustered and nonclustered disks.• You cannot create mountpoints that refer to the Quorum disk.
Using server cluster mountpoints includes the following limitations:
• The mounted volume must be of the same type as its root; that is, if the root volume is a sharedcluster resource, the mounted volume must also be shared, and if the root volume is dedicated, themounted volume must also be dedicated.
• You cannot create mountpoints to the Quorum disk.• If you have a mountpoint from one shared cluster resource disk to another, ensure that the disks
are in the same group and that the mounted disk resource is dependent on the root disk source.For more details, see the full text of Microsoft TechNet article 280297.
SnapManager support for volume mountpointsSnapManager supports volumes mounted on Data ONTAP LUNs in certain environments. You mustaccommodate particular drive letter limitations, restrictions, naming conventions, and procedures forusing volume mount points. Exchange Server 2003 supports only a stand-alone Windows Server2003 configuration.
Next topics
Drive letter limitations and individual database restoration on page 81
Mounted volume restrictions with SnapManager on page 82
Mounted volume naming conventions with SnapManager on page 82
How mounted volumes are shown in SnapManager on page 83
Related concepts
NTFS volume mountpoints on page 80
Related references
Exchange configuration requirements on page 75
Example Exchange configurations supported with SnapManager on page 86
Drive letter limitations and individual database restorationBy using NTFS volume mountpoint support, SnapManager can manage databases that are stored onmounted volumes, in addition to those stored on standard Windows volumes. With SnapManager,your configuration is not limited to the 26 letters of the alphabet to name drives in Windows.
SnapManager needs one LUN and one available drive letter to perform backup, verification, orrestore operations.
The following SnapManager operations require additional drive letters:
• Individually restored databases require their own LUN and drive letter.
Database migration considerations | 81
If you need to restore many databases individually, you likely need more than the total limit of 26drives.
• Performing a remote verification of more than one backup set requires a second LUN andtherefore another available drive letter or mountpoint.
Windows supports up to 26 drives, and you can allocate a maximum of 25 drive letters with releasesof SnapManager prior to 5.0. You can avoid running out of available drive letters by determiningwhich databases must be restored individually and which can be combined on a LUN with one or twoother databases and all restored together. With this approach, you must still reserve at least one freedrive letter for SnapManager.
Mounted volume restrictions with SnapManagerIn addition to the limitations inherent in the NTFS volume mountpoint feature of Windows,SnapManager does not allow you either to store files or to back up databases on an NTFS volumethat has mountpoints.
You cannot put databases on a mountpoint root volume. However, transaction logs can reside onsuch a volume. Consider the following points:
• The SnapManager Configuration wizard does not allow you to place Exchange databases on anNTFS volume that has mountpoints.
• SnapManager Backup does not allow you to back up a database on an NTFS volume that hasmountpoints.
Note: If databases reside on a LUN, do not add mountpoints to that LUN, even after you finish abackup operation. A subsequent LUN-level restore operation removes those volume mountpoints.This disrupts access to the data on the mounted volumes, to which the volume mountpoints refer.
Related concepts
NTFS volume mountpoints on page 80
Mounted volume naming conventions with SnapManagerYou can refer to a mounted volume by the path of a volume mountpoint that is created in an emptydirectory. The SnapManager user interface represents a mounted volume based on the path of avolume mountpoint that references that mounted volume, as follows: DriveLetter:\MountPointName.
Here DriveLetter represents the drive letter to which the mounted volume is assigned andMountPointName represents the mountpoint name assigned to the empty directory used to referencethe mounted volume.
An example of a path name is as follows:
F:\ My_Mount_Point
82 | SnapManager® 6.0 for Microsoft® Exchange Installation and Administration Guide
How mounted volumes are shown in SnapManagerA mounted volume is a volume that is mapped to a folder and referenced by a mountpoint that iscreated in an empty directory. You can access the mounted volumes in the SnapManager userinterface either from the Configuration wizard or from the Backup and Verification window.
The path-style representation of a mounted volume can appear in any part of the SnapManager userinterface that refers to LUNs accessed by SnapManager.
Path-style representation in the Configuration Wizard
The Configuration wizard displays disk list selection in the following different ways:
• Select a Storage Group/Database to move to a LUN.• Select a set of logs from one or more Storage Groups/Databases to move to a LUN.• Configure the SnapInfo directory to store the backup information.
The representation depends upon the following types of LUNs:
LUNs that arereferencedmore than once
If the storage system is configured with multiple references to the same LUN,each such LUN reference that has a label that includes any other references tothe same LUN. For example, suppose the drive letter H: and the mountpoint G:\DB\ reference the same LUN. In this case, the Disk List selection contains twoentries for the one LUN:
LUN H: <G:\DB\>
LUN G:\DB\ <H>
LUNs that havemountedvolumes
If SnapManager accesses a LUN with an NTFS volume that is referenced by amountpoint, that LUN has a label that indicates that it was accessed bySnapManager. For example, suppose the drive letter F: references a LUN thathosts a mountpoint. In this case, the Disk List selection shows that LUN asfollows:
LUN F: ( MPRoot)
The Configuration wizard does not allow you to store Exchange database files on LUNs that hostNTFS volume mountpoints.
Path-style representation in the Backup wizard and the Backup and Verify window
The left navigation pane of the Backup and Verify window and the Backup wizard lists the locationof the Storage Group/Database components as follows:
• SnapInfo directory• EDB path• Storage Group/Database log path
Database migration considerations | 83

Path-style representation in the Restore wizard and Restore window
The right display pane of the Restore window and the Restore wizard displays the location of theStorage Group components as follows:
• SnapInfo directory• EDB path• Storage Group/Database log path
Access to Snapshot copies during database integrity verificationTo specify the method to be used to access Snapshot copies during database integrity verification,use the Access LUN in Snapshot tab to assign either a drive letter or directory path to the Snapshotcopy as a mounted LUN.
You can access this setting from the following locations within the SnapManager user interface:
• Configuration wizard• Actions pane• Backup wizard• Restore wizard
Related tasks
Selecting the Snapshot copy access method for database verification on page 282
Transaction log archivingSnapManager archives transaction log files using NTFS hard links, which enables conservation ofdisk space in storage systems and improves the system performance.
During a backup operation, SnapManager archives transaction logs on the live file system to theSnapInfo directory. To optimize backup operations in which the Storage Group transaction logs andthe SnapInfo directory are on the same NTFS volume, SnapManager archives transaction logs to theSnapInfo directory by creating NTFS hard links instead of performing a file copy operation. Thisconserves the disk space of the storage system and improves system performance during thetransaction log archival phase of the backup operation.
Next topics
NTFS hard links on page 84
Why SnapManager uses NTFS hard links for transaction log archiving on page 85
Support for multiple SnapInfo directories on page 86
NTFS hard linksA hard link is a directory entry for a file, and it serves as a file system-level shortcut to the file.Unlike an application-level link, any updates to the file contents are seen by all applications that
84 | SnapManager® 6.0 for Microsoft® Exchange Installation and Administration Guide
access the file using a hard link. Unlike a symbolic link, a hard link created on one NTFS volumecannot point to a file in a different NTFS volume.
You can consider every file to have at least one hard link. Within a particular NTFS volume, a singlefile can have multiple hard links. Having multiple hard links enables a single file to appear inmultiple directories or to appear multiple times (under different names) within the same directory.Because all the links reference the same file, multiple applications can open any of the hard links andmodify the same file.
Note: The NTFS file system does not delete a file until all hard links to the file are deleted.
When you create a hard link for a file on an NTFS volume, NTFS adds hard link information and areference count to the file’s directory entry at the NTFS level. Creating the hard link does not create aduplicate original file or duplicate file-based reference (the application-level link).
While the physical file remains intact in its original location, you can access the same content by twoor more names. Because the file system is responsible for managing the various path names to asingle physical content, using a hard link can conserve system resources and storage system diskspace compared to performing a standard file copy operation.
Why SnapManager uses NTFS hard links for transaction log archivingBy creating NTFS hard links, SnapManager archives transaction log files without physically copyingthe log file. During a backup operation, SnapManager archives transaction log files on the live filesystem to the SnapInfo directory, from which the files later can be retrieved, during a restoreoperation.
When SnapManager uses a file copy operation to copy the transaction log files from the live filesystem to the SnapInfo directory, the following resources are consumed:
• Management of path names and the copy operation incurs file system overhead and storagesystem overhead, resulting in slower host and storage system performance.
• Each additional copy of a transaction log file not only consumes storage system disk space butalso increases the use of overwrite reserve for the LUN.
SnapManager 5.0 and later supports an optimization feature for cases in which the backup operationarchives transaction logs to a SnapInfo directory that resides on the same volume as the transactionlogs. To achieve this optimization, SnapManager archives transaction logs to the SnapInfo directoryby creating NTFS hard links to the live transaction log files, without physically copying the log file.
After the backup operation completes, Exchange truncates the transaction logs. However, thephysical log files on the original location are not deleted, because the NTFS file system detects thatother hard links to the files still exist. Instead, the original NTFS hard links to the live transaction logfiles are removed, and the links to the SnapInfo directory remain intact and available for accessduring SnapManager restore operations.
SnapManager automatically uses NTFS hard links to archive transaction logs if they reside on thesame LUN as the SnapInfo directory.
Database migration considerations | 85
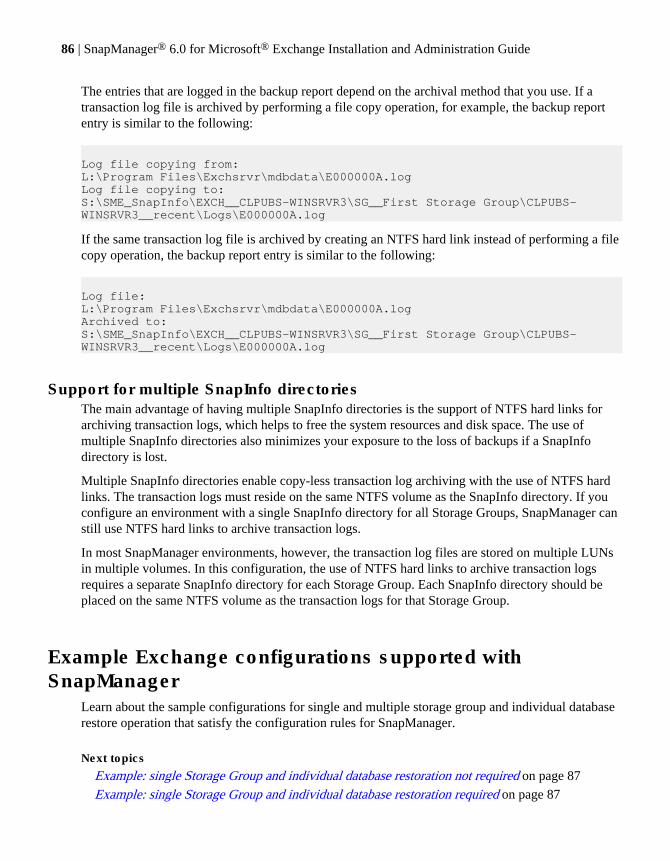
The entries that are logged in the backup report depend on the archival method that you use. If atransaction log file is archived by performing a file copy operation, for example, the backup reportentry is similar to the following:
Log file copying from:L:\Program Files\Exchsrvr\mdbdata\E000000A.logLog file copying to:S:\SME_SnapInfo\EXCH__CLPUBS-WINSRVR3\SG__First Storage Group\CLPUBS-WINSRVR3__recent\Logs\E000000A.log
If the same transaction log file is archived by creating an NTFS hard link instead of performing a filecopy operation, the backup report entry is similar to the following:
Log file:L:\Program Files\Exchsrvr\mdbdata\E000000A.logArchived to:S:\SME_SnapInfo\EXCH__CLPUBS-WINSRVR3\SG__First Storage Group\CLPUBS-WINSRVR3__recent\Logs\E000000A.log
Support for multiple SnapInfo directoriesThe main advantage of having multiple SnapInfo directories is the support of NTFS hard links forarchiving transaction logs, which helps to free the system resources and disk space. The use ofmultiple SnapInfo directories also minimizes your exposure to the loss of backups if a SnapInfodirectory is lost.
Multiple SnapInfo directories enable copy-less transaction log archiving with the use of NTFS hardlinks. The transaction logs must reside on the same NTFS volume as the SnapInfo directory. If youconfigure an environment with a single SnapInfo directory for all Storage Groups, SnapManager canstill use NTFS hard links to archive transaction logs.
In most SnapManager environments, however, the transaction log files are stored on multiple LUNsin multiple volumes. In this configuration, the use of NTFS hard links to archive transaction logsrequires a separate SnapInfo directory for each Storage Group. Each SnapInfo directory should beplaced on the same NTFS volume as the transaction logs for that Storage Group.
Example Exchange configurations supported withSnapManager
Learn about the sample configurations for single and multiple storage group and individual databaserestore operation that satisfy the configuration rules for SnapManager.
Next topics
Example: single Storage Group and individual database restoration not required on page 87
Example: single Storage Group and individual database restoration required on page 87
86 | SnapManager® 6.0 for Microsoft® Exchange Installation and Administration Guide
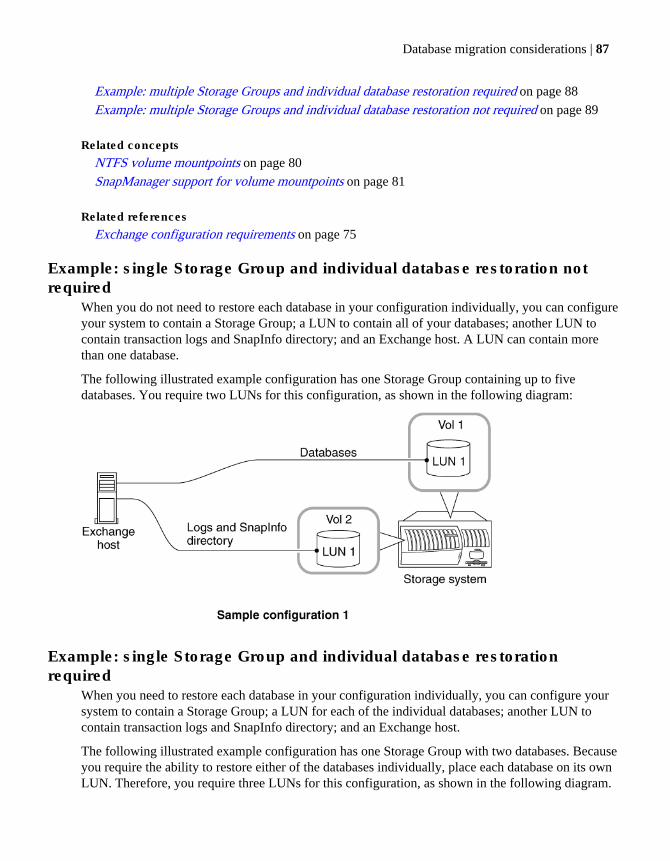
Example: multiple Storage Groups and individual database restoration required on page 88
Example: multiple Storage Groups and individual database restoration not required on page 89
Related concepts
NTFS volume mountpoints on page 80
SnapManager support for volume mountpoints on page 81
Related references
Exchange configuration requirements on page 75
Example: single Storage Group and individual database restoration notrequired
When you do not need to restore each database in your configuration individually, you can configureyour system to contain a Storage Group; a LUN to contain all of your databases; another LUN tocontain transaction logs and SnapInfo directory; and an Exchange host. A LUN can contain morethan one database.
The following illustrated example configuration has one Storage Group containing up to fivedatabases. You require two LUNs for this configuration, as shown in the following diagram:
Example: single Storage Group and individual database restorationrequired
When you need to restore each database in your configuration individually, you can configure yoursystem to contain a Storage Group; a LUN for each of the individual databases; another LUN tocontain transaction logs and SnapInfo directory; and an Exchange host.
The following illustrated example configuration has one Storage Group with two databases. Becauseyou require the ability to restore either of the databases individually, place each database on its ownLUN. Therefore, you require three LUNs for this configuration, as shown in the following diagram.
Database migration considerations | 87
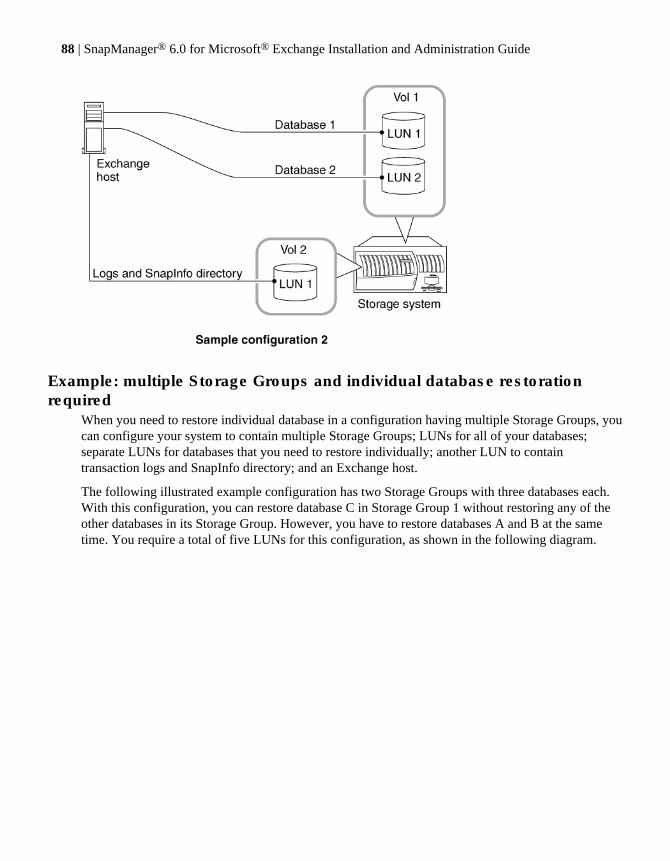
Example: multiple Storage Groups and individual database restorationrequired
When you need to restore individual database in a configuration having multiple Storage Groups, youcan configure your system to contain multiple Storage Groups; LUNs for all of your databases;separate LUNs for databases that you need to restore individually; another LUN to containtransaction logs and SnapInfo directory; and an Exchange host.
The following illustrated example configuration has two Storage Groups with three databases each.With this configuration, you can restore database C in Storage Group 1 without restoring any of theother databases in its Storage Group. However, you have to restore databases A and B at the sametime. You require a total of five LUNs for this configuration, as shown in the following diagram.
88 | SnapManager® 6.0 for Microsoft® Exchange Installation and Administration Guide
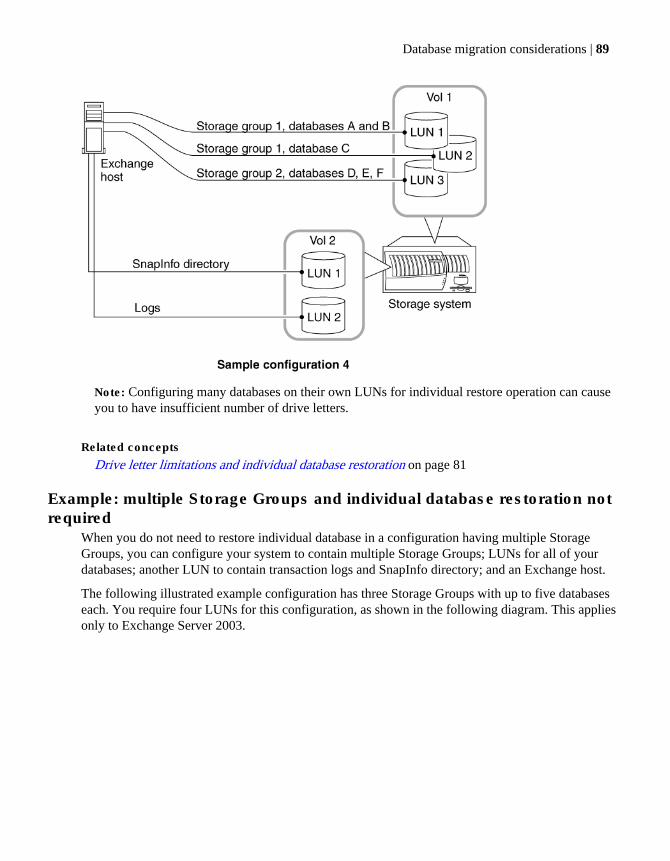
Note: Configuring many databases on their own LUNs for individual restore operation can causeyou to have insufficient number of drive letters.
Related concepts
Drive letter limitations and individual database restoration on page 81
Example: multiple Storage Groups and individual database restoration notrequired
When you do not need to restore individual database in a configuration having multiple StorageGroups, you can configure your system to contain multiple Storage Groups; LUNs for all of yourdatabases; another LUN to contain transaction logs and SnapInfo directory; and an Exchange host.
The following illustrated example configuration has three Storage Groups with up to five databaseseach. You require four LUNs for this configuration, as shown in the following diagram. This appliesonly to Exchange Server 2003.
Database migration considerations | 89
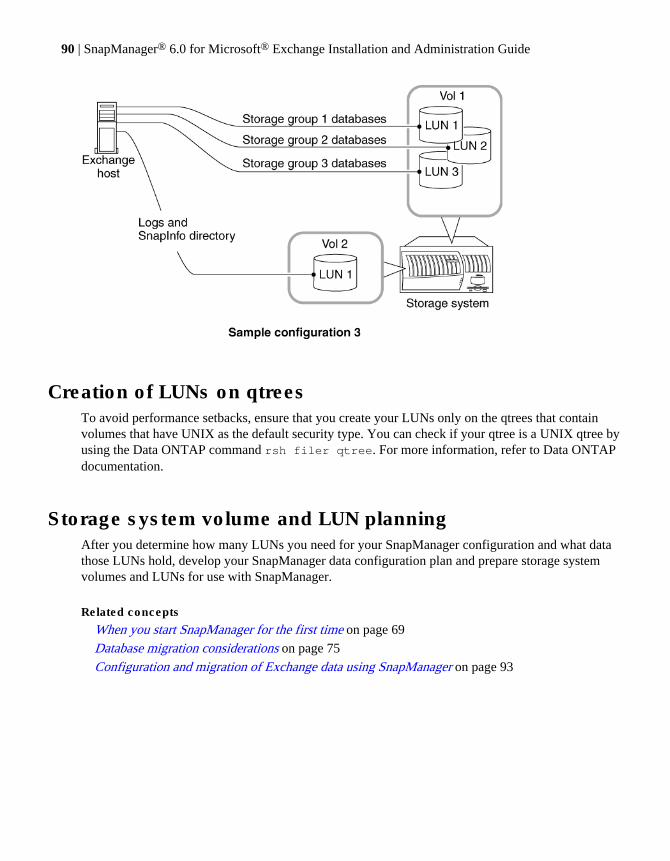
Creation of LUNs on qtreesTo avoid performance setbacks, ensure that you create your LUNs only on the qtrees that containvolumes that have UNIX as the default security type. You can check if your qtree is a UNIX qtree byusing the Data ONTAP command rsh filer qtree. For more information, refer to Data ONTAPdocumentation.
Storage system volume and LUN planningAfter you determine how many LUNs you need for your SnapManager configuration and what datathose LUNs hold, develop your SnapManager data configuration plan and prepare storage systemvolumes and LUNs for use with SnapManager.
Related concepts
When you start SnapManager for the first time on page 69
Database migration considerations on page 75
Configuration and migration of Exchange data using SnapManager on page 93
90 | SnapManager® 6.0 for Microsoft® Exchange Installation and Administration Guide
Information needed for your SnapManager dataconfiguration plan
You can use a data configuration plan to determine the LUN and volume sizes that you need for yourdatabase, and record this information in one place. This helps you to create and upgrade yourvolumes and LUNs without failure, as well as to diagnose and resolve any issues.
For each LUN you need, record the following information:
• Purpose Size• Volume• Qtree• Assigned drive letter or mountpoint
For each volume you need to store LUNs, record the following information:
• Location (storage system name)• Purpose• Type (traditional or flexible)• Fractional reserve (%)• Automatic Snapshot copy deletion setting (enabled or disabled)• LUNs contained• Volume autogrow (enabled or disabled)
Database migration considerations | 91

Configuration and migration of Exchange datausing SnapManager
The SnapManager Configuration feature enables you to select database verification servers, moveExchange databases and transaction logs to Data ONTAP LUNs, and configure automatic eventnotification.
You can perform the following configuration and migration tasks using SnapManager for Exchange:
• Implement the planned storage system layout• Configure Microsoft Exchange data• Migrate LCR-enabled Exchange data• Migrate CCR-enabled Exchange data• Migrate Exchange 2010 databases from local disks/non N series storage LUNs to N series storage
LUNs
Attention: You must run SnapManager from the system console, but not from a Terminal Servicesclient. Do not use Terminal Services for any type of SnapManager administration, because youmight miss critical information that appears only in pop-up boxes at the system console.
Next topics
The SnapManager Configuration wizard on page 94
Exchange Server storage groups and databases migration and configurationconsiderations on page 98
Configuration using the SnapManager control file on page 107
Migration of LCR-enabled databases on page 109
Migration of CCR-enabled databases on page 111
Migration of Exchange Server 2010 mailbox databases on page 114
Guidelines for migrating to mountpoints for LUN mapping on page 116
Related concepts
When you start SnapManager for the first time on page 69
Database migration considerations on page 75
Storage system volume and LUN planning on page 90
Configuration and migration of Exchange data using SnapManager | 93
The SnapManager Configuration wizardYou can use the Configuration wizard to migrate Exchange databases from your local disk to DataONTAP LUNs, so that you can make a backup copy and restore the databases by usingSnapManager.
Use the SnapManager Configuration wizard to move Exchange databases, transaction logs, or systemfiles for a Storage Group. SnapManager ensures that these files are placed in locations that meetSnapManager configuration requirements. Incorrectly located Exchange databases, transaction logs,or system files for a Storage Group impair SnapManager operation. If Exchange System Manager isused to move Exchange databases, transaction logs, or system files for a Storage Group, run theSnapManager Configuration wizard after the operation, to ensure that these files are in correctlocations.
Note: Protection Manager integration can be enabled without reinstalling SnapManager forExchange anytime by rerunning the Configuration wizard. You must first ensure that you haveconfigured SnapDrive for Protection Manager integration. If you have not already done so, youcan set up SnapDrive Protection Manager integration via the sdcli command, and then restart theSnapDrive service, or you can rerun the SnapDrive setup. (See the SnapDrive help for moreinformation on Protection Manager integration.)
Next topics
What the SnapManager Configuration wizard does on page 94
When to use the SnapManager Configuration wizard on page 95
Settings configurable only with the SnapManager Configuration wizard on page 96
Placement of Exchange and SnapManager components on page 97
Viewing the placement of Exchange and SnapManager components on page 98
What the SnapManager Configuration wizard doesThe Configuration wizard enables you to move your Exchange data in the following ways—fromlocal disk to LUN, from LUN to LUN, or from LUN to local disk.
From local disk to LUN
If you want to move Exchange databases, you can use the wizard to unmount the mailbox databasesor the Exchange databases in a Storage Group, move the Exchange databases and transaction logfiles to the selected LUN, and remount the databases.
Note: SnapManager takes Exchange databases offline during the transfer operation.
The wizard creates a SnapInfo directory that SnapManager uses to store information about thebackup sets and the backed up transaction logs.
94 | SnapManager® 6.0 for Microsoft® Exchange Installation and Administration Guide
The wizard disables circular logging for all mailbox databases and Storage Groups that are moved toa LUN, to enable up-to-the-minute restoring of those Storage Groups and mailbox databases.
The wizard also guides you through several application settings. These settings include enablingnotification of SnapManager events using e-mail, Syslog, or the AutoSupport feature.
From LUN to LUN
Resource management issues might require LUN-to-LUN transfer of Exchange data. An example ofa situation that requires a LUN-to-LUN transfer is when you want to consolidate the Exchange dataon another storage system.
From LUN to local disk
You need to move Exchange data from a LUN to a local disk if the data is no longer managed byusing SnapManager. However, Microsoft Cluster Services configurations do not support Exchangedata transfer from LUN to local disk.
Note: Protection Manager integration can be enabled without reinstalling SnapManager forExchange anytime by rerunning the Configuration wizard. You must first ensure that you haveconfigured SnapDrive for Protection Manager integration. If you have not already done so, youcan set up SnapDrive Protection Manager integration via the sdcli command, and then restart theSnapDrive service, or you can rerun the SnapDrive setup. (See the SnapDrive help for moreinformation on Protection Manager integration.)
Note: Ensure that all databases in a Storage Group are migrated to LUNs from a local disk.SnapManager does not support heterogeneous configuration. An example of a heterogeneousconfiguration is Storage Groups with some databases that reside on LUNs, and some on a localdisk. Exchange databases must reside on NetApp LUNs to enable SnapManager to back up.
When to use the SnapManager Configuration wizardYou can use the Configuration wizard to move the databases and transaction logs to the newlyconfigured LUN, to modify data configuration settings, or to validate the databases that you movedor added. You must re-run Configuration wizard if you change the Exchange configuration manually.
For initial configuration
Before using SnapManager to create a backup and to restore an Exchange database, you must use theSnapManager Configuration wizard to migrate the databases and transaction logs from yourExchange servers to the LUNs you configured on your storage system with SnapDrive.
To view or change the database configuration
After the initial configuration, you can re-run the Configuration wizard at any time to review or makechanges to your Exchange database configuration.
Configuration and migration of Exchange data using SnapManager | 95

To validate the database configuration
If you add databases, or move databases to different LUNs without using SnapManager, run theConfiguration wizard to ensure that the databases are stored in valid locations and to map thosedatabases to their respective SnapInfo subdirectories.
If you changed the Exchange configuration manually
Whenever you change the Exchange configuration manually using SnapDrive or the ExchangeSystem Manager, you need to re-run the Configuration wizard to inform SnapManager that theExchange configuration has been modified. For example, when you manually change theSnapManager configuration from using volume mountpoints to using drive letters, or from usingdrive letters to using volume mountpoints, you need to re-run the Configuration wizard before thechanges take effect. Another reason to re-run the Configuration wizard is when a new database isadded by using the Exchange System Manager.
Settings configurable only with the SnapManager Configuration wizardYou can configure certain settings of LUN mappings, SnapInfo directory, iSCSI service, andautomatic event notification by using only the Configuration wizard, and not other wizards orwindows.
SnapManager setting Configuration wizard page
Mapping your database toLUNs
Select a Storage Group/Database to move to a LUN
Mapping your transactionlog files to LUNs
Select a set of logs from one or more Storage Groups/Databases to move toa LUN
SMTP and MTA file-LUNmappings
Configure SMTP and MTA Services
Note: SMTP and MTA system files are applicable to Exchange Server 2003.The Hub Transport server role in Exchange Server 2007 and ExchangeServer 2010 uses the SMTP system file alone.
Note: This setting is skipped when you connect to Exchange Server 2010.
Specifying the SnapInfodirectory location
Configure the SnapInfo directory to store the backup information
Adding Microsoft iSCSIService as a dependency
Add Microsoft iSCSI Service Dependency
Configuring SnapManagerevent notification enablingfor SMTP e-mail, storagesystem Syslog, andAutoSupport
Configure Automatic Event Notification (Recommended)
96 | SnapManager® 6.0 for Microsoft® Exchange Installation and Administration Guide
Placement of Exchange and SnapManager componentsWhen you use the Configuration wizard, you have to specify the placement of several components ofExchange and SnapManager like databases, transaction logs, SnapInfo directories, SMTP, and MTAqueues.
Storage Groupsystem path
The path to the directory that contains the Exchange system files for the StorageGroup or database
This Storage Group system path is used only for Exchange system filespreceding Exchange 2010. SnapManager places system files for a StorageGroup on the same LUN that stores the transaction logs for that Storage Group.The system files for a Storage Group must remain where the Configurationwizard places them.
Storage Groupdatabases
The databases in a Storage Group or data store
Database The paths for the .edb file for the Exchange database
The .edb file stores message and attachment content that is generated byMicrosoft Messaging Application Program Interface (MAPI) clients, andmessage properties such as author, recipients, subject, and priority. The .stmfile holds native Internet content (for example, Multipurpose Internet MailExtensions (MIME)).
Note: The .stm file is supported only in Exchange Server 2003.
Transaction logfiles
The location of the Exchange transaction logs
The transaction logs contain changes made to the Exchange databases since thelast backup, enabling an up-to-the-minute restore operation.
SMTP queuepath
The directories that are used by the Simple Mail Transfer Protocol (SMTP)queue
MTA queue path The directories that are used by the Message Transfer Agent (MTA) queue
Note: The MTA queue path is applicable only to Exchange Server 2003.Exchange Server 2007 uses the SMTP queue path for its Hub Transportserver role. SnapManager copies the queue database, and updates thedatabase path in a configuration file, to move the queue databases.
SnapInfodirectory
Contains SnapManager Backup information, copies of transaction log files, andother data critical to the backup set
Configuration and migration of Exchange data using SnapManager | 97
Viewing the placement of Exchange and SnapManager componentsViewing the placement of Exchange and SnapManager components helps you in your configurationplanning.
About this task
You can also see database placement information from within the Configuration wizard if youhighlight a database displayed in a wizard page, and click Details.
Exchange Server 2003 supports both SMTP and MTA system files, whereas Exchange Server 2007and Exchange Server 2010 support only SMTP data files.
Steps
1. In the Scope pane, click Backup.
2. Select the component in the Results pane.
SnapManager displays the component properties in the Results pane.
Exchange Server storage groups and databases migrationand configuration considerations
Before you migrate your database using the Configuration wizard, consider how the differentrequirements for stand-alone systems and Windows clusters can impact where the SMTP and MTAqueues and the report directories should reside.
The SMTP and MTA queue location
The Simple Mail Transfer Protocol (SMTP) and Message Transfer Agent (MTA) queues are used byExchange. Ensure that these files do not reside on the same LUN as your Exchange databases.
For stand-alone systems, the SMTP and MTA system files can be placed on any disk, or on a LUNthat does not contain Exchange databases (the default location of the original local installation disk isacceptable).
For Windows clusters, the SMTP and MTA system files must be moved to a shared LUN that doesnot contain Exchange databases. This is the data directory that Exchange prompts you to specifywhen you create a new Exchange virtual server on a cluster. The data directory becomes the defaultsystem path. The Configuration wizard places the MTA and SMTP queues there by default.
Note: In Exchange Server 2007, the SMTP queue is valid only if the bridgehead, or the HubTransport server role is installed. The MTA queue is not applicable to Exchange Server 2007 andExchange Server 2010.
98 | SnapManager® 6.0 for Microsoft® Exchange Installation and Administration Guide
Report directories in a Windows cluster
In a Windows cluster you might want to have one set of report directories, no matter which nodeSnapManager runs on. Move your report directory to a shared disk resource that does not containExchange data or SnapManager data.
Next topics
Migrating and configuring your Exchange Server storage groups and databases using theSnapManager Configuration wizard on page 99
How to move transaction logs using the SnapManager Configuration wizard on page 105
Related tasks
Locating the report directory in a Windows cluster on page 261
Migrating and configuring your Exchange Server storage groups anddatabases using the SnapManager Configuration wizard
To manage your database using SnapManager, you need to migrate it from your local disk andconfigure it on the storage systems assigned for use by SnapManager.
Before you begin
If the computer that you want to use for database verification does not have Exchange installed, youmust configure the necessary files on it according to Windows host system requirements.
Ensure that you go through documentation on automatic e-mail notification settings before you startthe configuration.
About this task
For configuring archived database by using Protection Manager with SnapManager, SnapManagercurrently allows only the Backup and Remote backups only policies to be implemented. Back up isselected as the default option. You can change the policy by using the NetApp Management Console.
You can configure the following automatic e-mail notification settings using the Configurationwizard:
• Automatic SMTP e-mail notification for event notification• Enable Syslog (storage system event log) support• Enable AutoSupport for SnapManager• Limit event logging to failure events
After you complete the Configuration wizard, you can also view or change these settings by selectingNotification Settings from the Actions pane to access the Auto Notification Settings dialog box.You should enable all of the automatic event notification options; this ensures that if any problemswith your SnapManager backups occur, you are alerted and can take corrective action in a timelymanner.
Configuration and migration of Exchange data using SnapManager | 99
The list of available drives changes as you make choices that rule out other options.
Any time you use the Configuration wizard to move data from one drive to another, backupsperformed before the migration become invalid. After you migrate your databases to a new LUN,always perform an immediate backup.
Steps
1. In the Actions pane, click Configuration wizard.
2. If you want to use a control file for your configuration, click Use Control File, and then specifythe path to the control file that you want to use.
3. In the Database Verification Server page, specify the Exchange server to be used to performExchange database verification, or select the option Select a verification server later using theOptions menu.
If you select the option Select a verification server later using the Options menu,SnapManager for Exchange will use the existing verification server if you have already specifiedone.
4. In the Select a Storage Group/Database to move to a LUN page, associate your CCR-enabledExchange Storage Groups or databases with the correct LUNs, according to your SnapManagerdata configuration plan.
5. In the Select a set of logs from one or more Storage Groups/Databases to move to a LUNpage, associate your transaction logs with the correct LUNs, according to your SnapManager dataconfiguration plan.
6. In the Configure the SnapInfo directory to store the backup information page, select theSnapInfo files, and the LUN to which you want to move them and click <=>.
7. If you have datasets configured on your system, in the Configure Dataset for Backup Archivalpage, select the Storage Groups that you want to add to your dataset, and click Next.
8. Choose the default protection policy as Back up or Remote backups only as per yourrequirement.
9. In the Add Microsoft iSCSI Service Dependency window, select Yes, add the.. if you want toadd iSCSI service as a dependency for the MSExchangeSA service.
10. Use the Configure Automatic Event Notification (Recommended) page to configure theautomatic event notification options for SnapManager.
11. Review the configuration summary in the Completing the Configuration Wizard page, andclick Finish.
12. Click Start Now to migrate your databases and their transaction logs and SnapInfo files to theLUNs you specified.
Note: If you are moving the location of Exchange databases in this step, it could take sometime to complete.
100 | SnapManager® 6.0 for Microsoft® Exchange Installation and Administration Guide

13. Click OK.
After you finish
Create a SnapManager backup immediately.
Next topics
Moving a Storage Group to a LUN on page 101
Moving an individual database to a LUN on page 102
Changing the location of a Storage Group or database on page 103
Viewing the full path for database files on page 103
Dataset protection policy on page 104
Migration of transport database paths for Exchange Server 2010 on page 104
Related concepts
Considerations for selecting the database verification server on page 278
Why SnapManager uses NTFS hard links for transaction log archiving on page 85
Support for multiple SnapInfo directories on page 86
Database backup using SnapManager on page 135
Related tasks
Adding Exchange servers to be managed on page 277
Starting SnapManager and connecting to the default server on page 70
Moving transaction logs to a LUN on page 105
Configuring automatic event notification settings on page 300
Creating a dataset using SnapManager on page 268
Related references
Windows host system requirements on page 37
Moving a Storage Group to a LUN
The Configuration wizard enables you to select the LUNs in which you want to store your Exchangedatabases when you complete the wizard. You use the Select a Storage Group/Database to move toa LUN window to select the LUNs.
The list of available drives changes as you make choices that rule out other choices.
Steps
1. In the Actions pane, click Configuration wizard.
2. In the Select a Storage Group/Database to move to a LUN page, select the Storage Group ordatabase that you want to move.
Configuration and migration of Exchange data using SnapManager | 101

3. In the Disk list, select the drive letter for the LUN, or the local disk that you want to move theStorage Group or database to.
4. Click <=>.
The selected Storage Group or database and disk gets associated, and the Storage Group files ordatabase are then moved to that disk when the Configuration wizard moves your data.
5. Step through the wizard, and review the configuration summary in the Completing theConfiguration Wizard page, and click Finish.
6. Click Start Now.
Note: If you are moving the location of Exchange databases in this step, it could take sometime to complete.
7. Click OK.
Moving an individual database to a LUN
The Configuration wizard enables you to move an individual database to a LUN. You use the Selecta Storage Group/Database to move to a LUN page to move an individual database to a LUN.
The list of available drives changes as you make choices that rule out other choices.
Steps
1. In the Actions pane, click Configuration wizard.
2. In the Select a Storage Group/Database to move to a LUN page, select the database you wantto move or select the Storage Group containing the database you want to move then select thedatabase from the Storage Group/Database list.
3. In the Disk list, select the drive letter for the disk that you want to move the database to.
4. Click <=>.
The selected database and the disk gets associated, and the database files are then moved to thatdisk, when the Configuration wizard moves your data.
5. Step through the wizard, and review the configuration summary in the Completing theConfiguration Wizard page, and click Finish.
6. Click Start Now.
Note: If you are moving the location of Exchange databases in this step, it could take sometime to complete.
7. Click OK.
102 | SnapManager® 6.0 for Microsoft® Exchange Installation and Administration Guide

Changing the location of a Storage Group or database
The Configuration wizard enables you to change the location of a Storage Group or database that youhad associated with a LUN, or local disk, if you want to change your configuration plan.
The list of available drives changes as you make choices that rule out other choices.
If the Exchange system file path for a Storage Group is on the database LUN (placed for a previousversion of SnapManager), and then you use the Configuration wizard to reconfigure a database pathof the Storage Group or file path of the transaction log, then the Configuration wizard automaticallymoves the system file path to the same LUN as the file path of the transaction log.
Steps
1. In the Actions pane, click Configuration wizard.
2. Under Database Location Results, highlight the Storage Group or database you want to move,and click Reconfigure.
The selected Storage Group or database is returned to the list of unconfigured databases, and youcan re-associate it with any available disk.
3. Step through the wizard, and review the configuration summary in the Completing theConfiguration Wizard page, and click Finish.
4. Click Start Now.
Note: If you are moving the location of Exchange databases in this step, it could take sometime to complete.
5. Click OK.
Viewing the full path for database files
The Configuration wizard enables you to view the full path for your database, or Storage Group files.
Steps
1. In the Actions pane, click Configuration wizard.
2. In the Configuration wizard, highlight a Storage Group or a database under Database LocationResults, and click Details.
The Storage Group/Database Settings window appears for the selected Storage Group ordatabase.
3. To see the file path for the databases in the selected Storage Group, highlight the database andclick Details.
Configuration and migration of Exchange data using SnapManager | 103
The current path and file name for the selected database are displayed, along with the new pathand file name if the location of the selected database has changed.
4. Step through the wizard, and review the configuration summary in the Completing theConfiguration Wizard page, and click Finish.
5. Click Start Now.
Note: If you are moving the location of Exchange databases in this step, it could take sometime to complete.
6. Click OK.
Dataset protection policy
You have to specify the protection policy for your datasets using the Configuration wizard. Theprotection policy assigned to a dataset determines how replications are done. It also determines howlong backups are retained on the secondary storage SnapVault target.
You can assign any these protection policies to the dataset:
• Back up• Remote backups only• Any customized policy based on the above two policy templates
Both the Back up policy and the Remote backups only policy have scheduled SnapVault replicationthat happens in the background along with "on demand" SnapVault replication that happens whenyou do a backup or verify operation with SnapManager.
The "backup retention type determines the duration for which the archived backups are retained andwhich backups are verified during a "verification only" operation.
Migration of transport database paths for Exchange Server 2010
The Configuration wizard cannot be used to migrate transport database paths for Exchange Server2010. The Configuration wizard does not support migration of transport database paths of Exchange2010 transport server role.
When SnapManager runs on Exchange Server 2010, the option to Configure SMTP and MTAServices is skipped on the Configuration wizard. You cannot access this option when you connect tothe Exchange 2010 server.
To migrate transport database or temporary storage to NetApp LUNs, use the Exchange script move-transportdatabase.ps1 normally found under C:\Program Files\Microsoft\ExchangeServer\V14\Scripts .
The script can change the paths of the following:
• QueueDatabasePath <path>• QueueDatabaseLoggingPath <path>
104 | SnapManager® 6.0 for Microsoft® Exchange Installation and Administration Guide
• IPFilterDatabasePath <path>• IPFilterDatabaseLoggingPath <path>• TemporaryStoragePath <path>
How to move transaction logs using the SnapManager Configurationwizard
You can use the Configuration wizard to move transaction logs to a LUN, to change the location ofthe transaction logs, and to view their full path. You use the Where to Move Transaction Logswindow to perform the tasks.
Note: The list of available drives changes as you make choices that rule out other choices.
Next topics
Moving transaction logs to a LUN on page 105
Changing the location of transaction log files on page 106
Viewing the full path for transaction log files on page 106
Moving transaction logs to a LUN
You can move the transaction logs to a LUN by using the Configuration wizard.
Steps
1. In the Actions pane, click Configuration wizard.
2. From the Storage Group/Database list in the Configuration wizard, select the Storage Group ordatabase whose transaction logs you want to move.
3. From the Disk List, select the drive letter for the LUN or local disk you want to move thetransaction logs to.
4. Click <=>.
The transaction logs for the selected Storage Group or database and LUN gets associated, and thetransaction log files are then moved to that LUN when the Configuration wizard moves your data.
5. Step through the wizard, and review the configuration summary in the Completing theConfiguration Wizard page, and click Finish.
6. Click Start Now.
Note: If you are moving the location of Exchange databases in this step, it could take sometime to complete.
7. Click OK.
Configuration and migration of Exchange data using SnapManager | 105
Related tasks
Changing the location of transaction log files on page 106
Viewing the full path for transaction log files on page 106
Changing the location of transaction log files
You can reconfigure the location of the transaction log files by using the Configuration wizard .
Steps
1. In the Actions pane, click Configuration wizard.
2. In the Configuration wizard, go to Transaction Logs Location Results, and highlight theStorage Group or database for the transaction files that you want to move, and click Reconfigure.
The selected Storage Group or database is returned to the list of unconfigured transaction logs,and you can re-associate it with any available LUN or local disk.
3. Step through the wizard, and review the configuration summary in the Completing theConfiguration Wizard page, and click Finish.
4. Click Start Now.
Note: If you are moving the location of Exchange databases in this step, it could take sometime to complete.
5. Click OK.
Viewing the full path for transaction log files
You can view the full path of the transaction log files from the Configuration wizard.
Steps
1. In the Actions pane, click Configuration wizard.
2. In the Configuration wizard, highlight a Storage Group or database in Transaction LogsLocation Results, and then click Details.
The Transaction Logs Path window appears for the selected Storage Group or database. If thelocation of the transaction log files has changed, the current paths and file names for thetransaction logs, for the selected database are displayed, along with the new paths and file names.
3. Step through the wizard, and review the configuration summary in the Completing theConfiguration Wizard page, and click Finish.
4. Click Start Now.
Note: If you are moving the location of Exchange databases in this step, it could take sometime to complete.
106 | SnapManager® 6.0 for Microsoft® Exchange Installation and Administration Guide
5. Click OK.
Configuration using the SnapManager control fileSnapManager creates a control file that contains configuration information about the Exchangeserver. You can use the control file either to import or to export the Exchange server configuration.
The configuration data in the control file is represented in XML format. You can edit the filemanually using an XML editor.
The configuration data in the control file is grouped into the following sections, so that you canmanage it more easily:
• Storage layout settings• Notification settings• Verification settings• Report directory settings• Backup settings• Scheduled jobs• SnapMirror relationship settings
Instead of running the Configuration wizard every time you want to migrate databases andtransaction logs to LUNs, you should use the control file in the following scenarios:
• Large configurations• Business continuance or Disaster Recovery• Mass deployment
Next topics
Configuration of SnapManager in a DAG using a control file on page 107
Importing Exchange Server configuration information using the control file on page 108
Exporting Exchange Server configuration information using the control file on page 108
Configuration of SnapManager in a DAG using a control fileYou can use a control file instead of the configuration wizard to configure SnapManager. The controlfile support for Exchange Server 2010 mailbox databases is based at the Database Availability Group(DAG) level and not at a member server level.
You can export the configuration settings of a DAG to another DAG or import the configurationsettings from another DAG. This is possible by using either a SnapManager snap-in or aSnapManager for Exchange PowerShell cmdlet.
Because all database instances in all member servers of a DAG have to be migrated at the same timeto keep database replication operating properly, the control file support for Exchange Server 2010mailbox databases is DAG based, not member server based. It is not possible to export the
Configuration and migration of Exchange data using SnapManager | 107
configuration of a member server in a DAG to a control file and then import that control file toanother member server in the same DAG.
Importing Exchange Server configuration information using the control fileYou can configure an Exchange server by using a control file containing configuration settingsexported from another Exchange server. You can import configuration details and specific sectionsof the Exchange configuration from a control file.
Steps
1. In the Actions pane, click Configuration wizard.
2. Select Use Control File.
3. To import configuration details for the server, click Next.
The Import or Export Selection window appears.
4. Select Import.
5. You can review your configuration settings by selecting Review current settings in theConfiguration wizard.
6. In Use control file, either type the complete path of the control file or use the Browse feature tolocate and select the file path..
7. Click Advanced.
8. In the Configuration Import/Export Advanced Options window, specify the configurationsettings that need to be imported, or exported.
9. Select OK.
10. Click Next and then, to load the control file and validate the imported configuration and settings,click Apply.
If you do not want to apply the new configuration, click Cancel.
If you click Apply, SnapManager loads the control file, and validates the imported configurationand settings.
Exporting Exchange Server configuration information using the control fileYou can export specific settings of an Exchange server configuration to a control file that you canuse to configure other Exchange servers. You can export the current configuration details to a controlfile, and export a specific section of the current configuration to a control file.
Steps
1. In the Actions pane, click Configuration wizard.
108 | SnapManager® 6.0 for Microsoft® Exchange Installation and Administration Guide
2. Select Use Control File.
3. To export configuration details for the server, click Next.
The Import or Export Selection window appears.
4. Select Export.
5. In Use control file, either type the complete path of the control file or use the Browse feature tolocate and select the file path.
6. Click Advanced.
7. In the Configuration Import/Export Advanced Options window, specify the configurationsettings that need to be exported.
8. Select OK.
9. Click Next and then, to load the control file and validate the imported configuration and settings,click Apply.
If you do not want to apply the new configuration, click Cancel.
If you click Apply, SnapManager loads the control file, and validates the imported configurationand settings.
Migration of LCR-enabled databasesYou can move the databases, transaction logs, and system files with Local Continuous Replication(LCR) replicas to LUNs. You can follow the same procedure as you use for the production StorageGroup for migrating the databases, transaction logs, and system files.
In an LCR-enabled database, you can perform the following actions by using SnapManager:
• Move Storage Groups to a LUN• Move databases to a LUN• Change the location of a Storage Group or database• View the full path of the database files• Change the location of a transaction log file• View the full path of transaction log files• Seed the databases in an LCR copy
See your version of Microsoft Exchange Server 2007 Installation Guide.
Next topics
Prerequisites for configuring an LCR-enabled Exchange server on page 110
Comparison of moving production and LCR replica storage groups on page 110
Database seeding in an LCR on page 110
Configuration and migration of Exchange data using SnapManager | 109
Related concepts
LCR-enabled database backups on page 144
CCR-enabled database backups on page 145
Related tasks
Moving a Storage Group to a LUN on page 101
Moving an individual database to a LUN on page 102
Changing the location of a Storage Group or database on page 103
Viewing the full path for database files on page 103
Changing the location of transaction log files on page 106
Viewing the full path for transaction log files on page 106
Prerequisites for configuring an LCR-enabled Exchange serverBefore you use SnapManager to enable Local Continuous Replication (LCR) on Exchange, ensurethat the Exchange server is LCR-enabled, the databases in the Storage Group are seeded, and thatyou put the database, transaction logs and replica database on a different volume from the LCRenvironment.
Ensure that you meet the following criteria before you enable the LCR feature on an Exchangeserver:
• The Exchange server on which you want to perform SnapManager configuration is LCR enabled.Use the Microsoft Exchange cmdlet or the Exchange Management Console to enable LCR on aStorage Group. SnapManager does not automatically enable LCR on a Storage Group if it is notenabled already.
• The databases in the Storage Groups are seeded.If the replica database in an LCR is not seeded or broken, SnapManager seeds it during migration.
• In an LCR environment, you should put the database, transaction log files of the productiondatabase, and replica database on a different volume than that which contains the LCRrelationship.
Comparison of moving production and LCR replica storage groupsThe main difference between the production Storage Group and an Local Continuous Replication(LCR) replica Storage Group is the way that it is represented on the SnapManager user interface. AStorage Group with an LCR replica appears as "Storage Group (LCR)."
Database seeding in an LCRA database (either blank, or a copy of a production database) is added to the Storage Group copy byseeding. SnapManager performs database seeding in an LCR copy during a SnapManager migrationoperation, if a Storage Group is configured for LCR, and if a replica database is not seeded.
The added database becomes the baseline database for the copy. In Exchange Server 2007, after anLCR replica is enabled on the Storage Group, the LCR replica is automatically seeded.
110 | SnapManager® 6.0 for Microsoft® Exchange Installation and Administration Guide
When seeding is complete, the copy is given a status of good health. To reduce the I/O burden on theactive Storage Group volumes, seed the database during an off-peak time. The existing databaseneeds to be deleted before the seeding process.
SnapManager uses the Exchange cmdlet Update-StorageGroupCopy to seed the LCR replica. TheUpdate-StorageGroupCopy cmdlet initiates or re-synchronizes the copying for a specifiedExchange Server 2007 LCR.
Migration of CCR-enabled databasesYou can migrate Cluster Continuous Replication (CCR) databases and transaction logs to a specifiedlocation to enable SnapManager to manage it. The configuration is similar to that of the productionStorage Group; SnapManager internally migrates databases to the specified location on both thenodes.
CCR uses three computers or nodes combined in a single cluster. Two nodes host a clustered mailboxserver. CCR uses the third node, referred as "voter," to avoid an occurrence of network partitionwithin the cluster. A node that is currently running a clustered mailbox server is an active node, and anode that is not running a clustered mailbox server is a passive node.
You can connect to both the CCR active node and passive node at the same time. You can alsomigrate Storage Groups from either node.
When you connect to a CCR-enabled Exchange server, SnapManager connects to both the active andthe passive nodes by default.
Note: The Storage Groups must be in a healthy state before you can run the Configuration wizardto migrate the CCR-enabled database.
Next topics
Prerequisites for configuring a CCR-enabled Storage Group on page 111
Considerations for configuring SnapManager in a CCR-enabled Storage Group on page 112
Configuring SnapManager in a CCR-enabled Storage Group on page 112
Prerequisites for configuring a CCR-enabled Storage GroupEnsure that you enable the Continuous Cluster Replica (CCR) feature on the Exchange server, thecluster continuous replication Storage Group copy is seeded and is healthy, SnapManager is installedon both nodes of the CCR, and the CCR active and passive nodes have identical dedicated LUNsbefore configuring a CCR-enabled Storage Group.
Before you plan to configure and migrate the CCR enabled Storage Group, ensure that you meet thefollowing system requirements:
• The CCR feature is enabled on Exchange Server 2007.For more information about how to enable CCR on your version of Exchange Server 2007, seethe Microsoft documentation for Exchange Server 2007.
Configuration and migration of Exchange data using SnapManager | 111
• SnapManager is installed on both nodes of the CCR.• The cluster continuous replication Storage Group copy is seeded, and it is in a healthy state.
For more information about how to seed the databases in a CCR environment, see the Microsoftdocumentation for Exchange Server 2007.
• The CCR active and passive nodes have identical dedicated LUNs, with the same drive letter ormountpoint path.If a LUN exists only on one node, it cannot be used by CCR databases.
Note: Try to give the same LUN on each node the identical volume layout for the storage system.If LUNs E, F, and G on Node A are sharing a volume, LUNs E, F, and G on Node B also mustshare an identical volume.
Considerations for configuring SnapManager in a CCR-enabled StorageGroup
Before configuring SnapManager in a CCR-enabled Storage Group, ensure that database verificationserver is configured and enable all of the automatic event notification options.
If the computer used for database verification does not have Exchange installed, you must put thenecessary files on it.
You need to set up the database verification server on both active and passive nodes by performingthe Backup Verification Settings action from both Cluster Continuous Replication (CCR) nodes, orby rerunning the Configuration wizard on both the nodes. The Configuration wizard does not set upthe verification server on the remote CCR node.
Enable all of the automatic event notification options. Enabling automatic event notification ensuresthat if any problems occur with your SnapManager backups, you are alerted and can take immediatecorrective action.
Configuring SnapManager in a CCR-enabled Storage GroupYou can configure SnapManager in a Storage Group that has Cluster Continuous Replication (CCR)enabled.
Before you begin
Keep the name of the verification server ready.
About this task
SnapManager migrates a Storage Group or database from one location to another on both CCRnodes, because both nodes use the same database path.
SnapManager migrates transaction logs from one location to another on both CCR nodes. Thetransaction log path is same for both the active and the passive nodes.
The SnapInfo directory path is similar for both active and passive nodes.
112 | SnapManager® 6.0 for Microsoft® Exchange Installation and Administration Guide

You should configure your Microsoft iSCSI service as a dependency for the Microsoft ExchangeSystem Attendant so that Microsoft Exchange cannot start before the Microsoft iSCSI service isready to accept connections.
After you complete the Configuration wizard, you can also view or change the Notification settingsusing the Auto Notification Settings in the Actions pane. You should enable all of the automaticevent notification options. When you enable automatic event notification, if any problems occur withthe SnapManager backups, you are alerted and can take immediate corrective action.
If you are moving the location of Exchange databases, it could take some time to complete.
Steps
1. In the Scope pane, double-click SnapManager for Exchange.
2. Click the Exchange server that is CCR-enabled, and for which the database seeding is complete.
3. In the Actions pane, click Configuration Wizard.
4. In the Database Verification Server window, specify the Exchange server to be used to performExchange database verification.
a. If you want to specify the database verification server now, type the name of the Exchangeserver or browse to an Exchange server in the Verification Server window, or select Select averification server later.
5. In the Select a Storage Group/Database to move to a LUN window, associate your CCR-enabled Exchange Storage Groups or databases with the correct LUNs, according to yourSnapManager data configuration plan.
6. In the Select a set of logs from one or more Storage Groups/Databases to move to a LUNwindow, associate your transaction logs with the correct LUNs, according to your SnapManagerdata configuration plan.
7. In the Configure the SnapInfo directory to store the backup information window, select theSnapInfo files, and the LUN to which you want to move them and click <=>.
8. If you are installing SnapManager on a system that has the Microsoft iSCSI initiator installed,select whether you want to configure your Microsoft iSCSI service as a dependency for theMicrosoft Exchange System Attendant.
9. In the Configure Automatic Event Notification (Recommended) window, configure theautomatic Simple Mail Transfer Protocol (SMTP) e-mail notification for event notification,enable Syslog (storage system event log) support, enable AutoSupport for SnapManager, andlimit event logging to failure events.
10. Review the configuration summary in the Completing the Configuration Wizard window, andclick Finish.
11. To migrate your databases, and their transaction logs and SnapInfo files to the LUNs youspecified, click Start Now.
Configuration and migration of Exchange data using SnapManager | 113
12. Click OK.
After you finish
Create a SnapManager Backup immediately.
Related concepts
Considerations for selecting the database verification server on page 278
Why SnapManager uses NTFS hard links for transaction log archiving on page 85
Support for multiple SnapInfo directories on page 86
Database backup using SnapManager on page 135
Related tasks
Configuring automatic event notification settings on page 300
Related references
Windows host system requirements on page 37
Migration of Exchange Server 2010 mailbox databasesYou can migrate the Exchange Server 2010 mailbox databases and transaction logs to a specifiedlocation to enable SnapManager to manage them.
When the SnapManager MMC snap-in connects to a Database Availability Group (DAG), allmailbox databases in the DAG are available for migration. When the SnapManager MMC snap-inconnects to a DAG member server, only the mailbox databases in that server are available formigration.
Next topics
Prerequisites for migrating Exchange Server 2010 mailbox databases on page 114
Available LUNs in a Database Availability Group on page 115
Migrating Exchange Server 2010 mailbox databases on page 115
Prerequisites for migrating Exchange Server 2010 mailbox databasesBefore you migrate the Exchange Server 2010 mailbox databases, ensure that an active database andits copy databases use the same path in all servers. You have to install SnapManager on all memberservers of the Database Availability Group (DAG) before migrating the mailbox databases.
If SnapManager is not installed on a member server of the DAG, all databases hosted by that memberserver, including both the active and passive databases, will not be migrated by SnapManager, andSnapManager will not be able to back up databases on that server.
Ensure that the database replication status is healthy before the migration.
114 | SnapManager® 6.0 for Microsoft® Exchange Installation and Administration Guide
Available LUNs in a Database Availability GroupWhen the SnapManager MMC snap-in connects to the Database Availability Group (DAG), theavailable disks include all LUNs from all member servers of the DAG.
Migrating Exchange Server 2010 mailbox databasesTo manage your database using SnapManager, you need to migrate it from your local disk andconfigure it on the storage systems assigned for use by SnapManager. You can migrate ExchangeServer 2010 mailbox databases by using the SnapManager Configuration wizard.
About this task
SnapManager enables you to migrate the mailbox databases and transaction logs to LUNs, specifythe database verification server, and configure automatic event notification.
Steps
1. In the Scope pane, select the Database Availability Group (DAG) or a member server of theDAG.
2. In the Actions pane, click Configuration Wizard.
3. In the Database Verification Server window, either type or browse to the name of the Exchangeserver that you want to be the database verification server, or select Select a verification serverlater using the Options menu.
4. In the Select a Storage Group/Database to move to a LUN window, associate your databaseswith the correct LUNs, according to your SnapManager data configuration plan.
5. In the Select a set of logs from one or more Storage Groups/Databases to move to a LUNwindow, associate your transaction logs with the correct LUNs, according to your SnapManagerdata configuration plan.
6. In the Configure the SnapInfo directory to store the backup information window, select theSnapInfo files, and the LUN to which you want to move them and click <=>.
7. If you have datasets configured in your system, in the Configure Dataset for Backup Archivalwindow of the Configuration wizard, select the databases that you want to add to your dataset.
Note: Dataset configuration is not available when you connect to the DAG.
8. Choose the default protection policy as Back up or Remote backups only, according to yourSnapManager data configuration plan.
9. If you are installing SnapManager on a system that has the Microsoft iSCSI initiator installed,select whether you want to configure your Microsoft iSCSI service as a dependency for MicrosoftExchange System Attendant.
10. In the Configure Automatic Event Notification (Recommended) window, configure theautomatic Simple Mail Transfer Protocol (SMTP) e-mail notification for event notification,
Configuration and migration of Exchange data using SnapManager | 115
enable Syslog (storage system event log) support, enable AutoSupport for SnapManager, andlimit event logging to failure events.
11. Review the configuration summary in the Completing the Configuration Wizard window, andclick Finish.
Related conceptsDatabase backup using SnapManager on page 135
Related tasksChanging the location of a Storage Group or database on page 103Viewing the full path for database files on page 103Changing the location of transaction log files on page 106Viewing the full path for transaction log files on page 106Configuring automatic event notification settings on page 300
Related referencesWindows host system requirements on page 37
Guidelines for migrating to mountpoints for LUN mappingYou can migrate an existing configuration that uses drive letters to map to Data ONTAP LUNs to anew configuration that uses volume mountpoints instead. The migration process uses SnapDrive andSnapManager.
This method briefly takes the affected Storage Groups offline as their paths are changed. You do notneed to copy the databases themselves from one LUN to another. You save time, and Storage Groupsgo offline for less time.
Note: A drive letter is used for the mountpoint root volume and not all drive letters are eliminated.
The mountpoint root can be any of the following:
• The local C:\ drive• The LUN that stores the transaction log files• A separate dedicated LUN
The best practice is to use the LUN that stores the transaction log files. Using a separate LUN asthe mountpoint root adds an additional point of failure to the Exchange server.
Note: In clustered configurations, the mountpoint root must reside on a shared storage devicesuch as the transaction logs LUN.
For configurations using more than one Storage Group, use one LUN with a drive letter for thetransaction logs of each Storage Group.
Because the System Attendant cluster resources require dependencies on the physical disk clusterresources in clustered configurations, the entire Exchange virtual server is brought offline during a
116 | SnapManager® 6.0 for Microsoft® Exchange Installation and Administration Guide
migration even if only a single Storage Group is migrated. Taking the physical disk resource for thetransaction logs offline for one Storage Group takes the System Attendant resource offline and withall other Storage Groups.
Scenario: migrating an existing configuration from using drive letters tousing mountpoints for LUN mapping
You can migrate an existing configuration that uses drive letters to map to Data ONTAP LUNs, to anew configuration that uses volume mountpoints instead. In this scenario, the migration process isdescribed using a sample configuration.
About this task
The sample configuration contains the following components:
• A single Storage Group• A single database located on LUN I:\
This scenario assumes the following points:
• The Exchange transaction logs, MTA and SMTP system files, and the SnapManager SnapInfodirectory are collocated on LUN L:\.
• The mountpoint root LUN requires a drive letter, and the LUN containing the transaction logs isused as the mountpoint root.
• Double-clicking the mountpoint (directory) name takes you to the root of the mounted LUNrather than to an empty directory on the mountpoint root LUN.
• The original drive letter mapping, I:\, should not be removed until after you verify that theLUN mappings have been created successfully.
• For the Configuration wizard to function properly, SnapManager requires that the original driveletter mappings be in place along with the newly added mountpoints. Unneeded mappings areremoved later.
Steps
1. Launch Windows Explorer, and then browse to the root of the transaction logs, LUN L:\.
2. For example, create a directory named database under L:\.
Use a directory database.
3. Launch the SnapDrive MMC, right-click the database LUN I:\, and then select Change DriveLetter and Paths.
4. In Change Drive Letter and Paths, click Add.
5. When prompted, enter the path to the appropriate directory on your mountpoint root LUN, L:\database
Configuration and migration of Exchange data using SnapManager | 117
6. Verify that the additional LUN mappings are successfully created and reflected in the SnapDriveMMC.
In this example, the LUNs show drive letters of L:\ and L:\database\.
You can also browse to the root of the mountpoint root LUN, drive L:\. The icon for the folderdatabase changes from the standard Windows folder icon to the Windows icon representing amountpoint.
7. Launch SnapManager, and then run the Configuration wizard.
8. In the Welcome window, click Next.
9. In the Database Verification Server window, click Next.
Although changes can be made here if desired, doing so is not part of this example.
10. In the Exchange Server to Configure window, verify that you are about to configure the correctserver, and then click Next.
11. In the Select a Storage Group/Database to move to a LUN window, do the following: a. b. c.
a. Select a Storage Group listed in the Database Location Results field, and then clickReconfigure.
The Storage Group appears in the list of unconfigured databases, and you can reassociate itwith any available disk.
b. Select LUN L:\database\, and then click <=> to associate the database with the new path.
The Storage Group appears in the Database Location Results field again. The old drive letterLUN I appears under the From column. The new mountpoint path L:\database\:appearsunder the To column.
c. Click Next.
12. Keep clicking Next to proceed through the next few windows, making additional configurationchanges if desired. At the final window, click Finish.
The Configurator Status window appears.
13. Click Start Now.
The databases are taken offline, and the migration proceeds.
14. After the SnapManager Configuration wizard completes successfully, return to the SnapDriveMMC.
15. Using the SnapDrive MMC, right-click the database LUN I:\, and then select Change DriveLetter and Paths.
16. In Change Drive Letter and Paths, highlight the original drive letter for the database LUN (I:\)and click Remove.
The SnapDrive MMC displays the two LUNs L:\ and L:\database.
118 | SnapManager® 6.0 for Microsoft® Exchange Installation and Administration Guide

SnapManager Backup overview
SnapManager creates backups of your databases that are used to further restore and recover yourdatabases. Your database is stored as a backup set that also contains transaction logs and metadata foryour database. SnapManager also performs integrity verification of your database.
You can create or schedule a SnapManager backup by using the SnapManager Backup wizard or theBackup and Verify window. You can also manage the transaction logs and the number of backupsyou need to retain for your database.
Note: To ensure that your database is backed up by SnapManager for Exchange, you must placethe LUNs for your database, logs, and snapinfo in a qtree.
Next topics
How SnapManager Backup works on page 119
SnapManager Snapshot copy naming conventions on page 124
When to run a SnapManager backup on page 125
How SnapManager checks database integrity in backup sets on page 126
Backup set retention on page 130
Transaction log management on page 132
Exchange System Manager in a SnapManager environment on page 133
Related concepts
Database restore operation using SnapManager on page 161
Deletion of Snapshot copies on page 203
How SnapManager Backup worksSnapManager Backup uses the Snapshot technology to create online, read-only copies of databases.After you back up the selected Storage Groups, SnapManager deletes the transaction logs that arecommitted to the databases.
Next topics
Types of backups SnapManager can perform on page 120
The SnapInfo directory on page 120
SnapManager backup sets on page 121
Exchange Storage Group sets on page 121
SnapManager minimum unit of backup on page 122
SnapManager naming-convention options on page 122
Backup process in a Windows Server 2003 or Windows Server 2008 environment on page 122
SnapManager Backup overview | 119

Why a transaction log backup might contain two Snapshot copies on page 123
Types of backups SnapManager can performSnapManager gives you the options of volume-wide backup, multiple-volume backup, and partialbackup at the volume level.
Volume-widebackup
Use this option when a set of Storage Groups spans a single volume. When youmake a Snapshot copy of a LUN, SnapManager captures the entire volume in thatSnapshot copy. However, the Snapshot copy is valid only for your current server. Ifdata from other servers resides on the same volume, you cannot restore their data byusing the Snapshot copy of your current server.
Multiple-volumebackup
Use this option when a set of Storage Groups spans multiple volumes. All LUNsthat belong to a single server are backed up in simultaneously across all volumes.The resulting backup set contains multiple Snapshot copies, but you can restore itas a single entity.
Partialbackup
If any backup in a Storage Group set fails, you can restore other backups in the setthat are backed up successfully. Each database has its own backup and hence youcan restore it individually.
The SnapInfo directoryThe SnapInfo directory stores information about each Storage Group set that you create, copies oftransaction log files, and other data critical to the backup set. It also contains a SnapInfo subdirectoryfor every backup you create.
You can change the default name of the SnapInfo directory (SME_SnapInfo), as well as its defaultlocation using the Configuration wizard. If you rename the directory (or its Snapshot copies), youmust follow strict naming standards.
Specify the location of this directory is when you run the Configuration wizard. By default, thedirectory name is SME_SnapInfo. However, you can specify a different directory name.
By default, the SnapInfo directory is on the LUN that stores the transaction log files, but this is not arequirement. The SnapInfo directory cannot reside on the same LUN that stores the database files.
The SnapInfo directory name is EXCH__ followed by the Exchange server host name asEXCH__ExchServerName.
For example, you would name the subdirectory for databases that belong to the Exchange server onthe Windows host system CLPUBS-WINSRVR3 as EXCH__CLPUBS-WINSRVR3.
For SnapInfo directory backups, Snapshot copy names begin with the string eloginfo__.
120 | SnapManager® 6.0 for Microsoft® Exchange Installation and Administration Guide
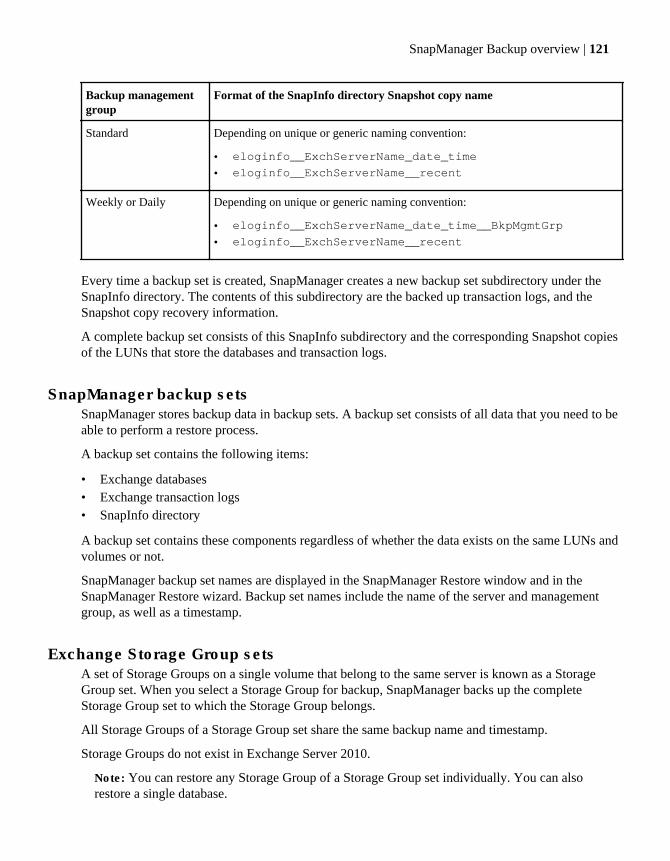
Backup managementgroup
Format of the SnapInfo directory Snapshot copy name
Standard Depending on unique or generic naming convention:
• eloginfo__ExchServerName_date_time
• eloginfo__ExchServerName__recent
Weekly or Daily Depending on unique or generic naming convention:
• eloginfo__ExchServerName_date_time__BkpMgmtGrp
• eloginfo__ExchServerName__recent
Every time a backup set is created, SnapManager creates a new backup set subdirectory under theSnapInfo directory. The contents of this subdirectory are the backed up transaction logs, and theSnapshot copy recovery information.
A complete backup set consists of this SnapInfo subdirectory and the corresponding Snapshot copiesof the LUNs that store the databases and transaction logs.
SnapManager backup setsSnapManager stores backup data in backup sets. A backup set consists of all data that you need to beable to perform a restore process.
A backup set contains the following items:
• Exchange databases• Exchange transaction logs• SnapInfo directory
A backup set contains these components regardless of whether the data exists on the same LUNs andvolumes or not.
SnapManager backup set names are displayed in the SnapManager Restore window and in theSnapManager Restore wizard. Backup set names include the name of the server and managementgroup, as well as a timestamp.
Exchange Storage Group setsA set of Storage Groups on a single volume that belong to the same server is known as a StorageGroup set. When you select a Storage Group for backup, SnapManager backs up the completeStorage Group set to which the Storage Group belongs.
All Storage Groups of a Storage Group set share the same backup name and timestamp.
Storage Groups do not exist in Exchange Server 2010.
Note: You can restore any Storage Group of a Storage Group set individually. You can alsorestore a single database.
SnapManager Backup overview | 121
SnapManager minimum unit of backupThe smallest object you can back up is a Storage Group. For better administration, back up all theStorage Groups in the same Exchange server at the same time.
SnapManager naming-convention optionsSnapManager offers both unique and generic naming conventions for naming Snapshot copies. Theunique naming convention contains the variable date_time in the name, and the generic namingconvention includes the string recent in the name of the most recent Snapshot copy.
When you use the unique naming convention, the most recent Snapshot copy is identified by themost recent date and time. SnapManager does not rename this Snapshot copy when the nextSnapshot copy is created.
When you use the generic backup naming convention, the most recent Snapshot copy is identified bythe Snapshot copy name that includes the string recent. This is the naming convention olderversions of SnapManager use and is the default setting to enable backward compatibility.
When you have datasets configured in your system and you choose the generic naming convention,no archives are created. To create archives, apply the unique naming convention with the archivalprocess enabled. If you archive the backups using PowerShell, SnapManager changes the genericnaming convention to the unique naming convention. In the GUI, you can select the backup namingconvention in the Backup Settings dialog box.
Note: Select the unique naming convention unless you have legacy scripts that need a Snapshotcopy with recent in its name.
Backup process in a Windows Server 2003 or Windows Server 2008environment
SnapManager performs backup individually for each volume you choose to back up, using thefollowing sequence. For example, if two separate volumes are involved, SnapManager performs thesequence of steps once for the first volume, then again for the second volume.
To create a backup, SnapManager performs the following sequence of steps:
1. Checks the SnapManager license
2. Renames the most recent SnapInfo directory, if required
3. Renames the most recent Snapshot copy, if you choose the generic naming convention
4. Creates a SnapInfo directory for the backup
5. Initiates a VSS backupWhen you back up data from an LCR or a CCR location, SnapManager uses VSS replicationwriter to back up the database.
6. Gathers Exchange metadata and activates the VSS Snapshot copy set
122 | SnapManager® 6.0 for Microsoft® Exchange Installation and Administration Guide
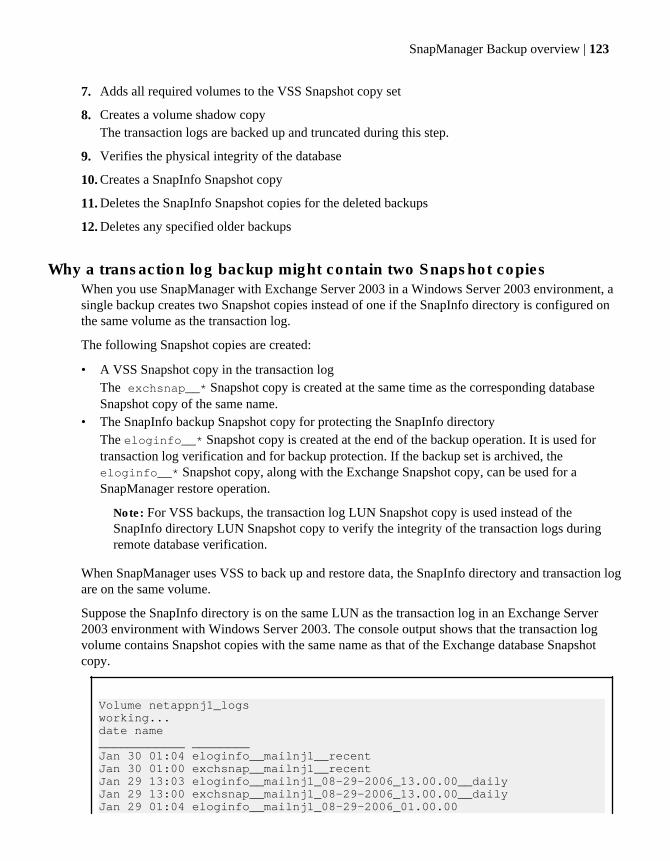
7. Adds all required volumes to the VSS Snapshot copy set
8. Creates a volume shadow copyThe transaction logs are backed up and truncated during this step.
9. Verifies the physical integrity of the database
10. Creates a SnapInfo Snapshot copy
11. Deletes the SnapInfo Snapshot copies for the deleted backups
12. Deletes any specified older backups
Why a transaction log backup might contain two Snapshot copiesWhen you use SnapManager with Exchange Server 2003 in a Windows Server 2003 environment, asingle backup creates two Snapshot copies instead of one if the SnapInfo directory is configured onthe same volume as the transaction log.
The following Snapshot copies are created:
• A VSS Snapshot copy in the transaction logThe exchsnap__* Snapshot copy is created at the same time as the corresponding databaseSnapshot copy of the same name.
• The SnapInfo backup Snapshot copy for protecting the SnapInfo directoryThe eloginfo__* Snapshot copy is created at the end of the backup operation. It is used fortransaction log verification and for backup protection. If the backup set is archived, theeloginfo__* Snapshot copy, along with the Exchange Snapshot copy, can be used for aSnapManager restore operation.
Note: For VSS backups, the transaction log LUN Snapshot copy is used instead of theSnapInfo directory LUN Snapshot copy to verify the integrity of the transaction logs duringremote database verification.
When SnapManager uses VSS to back up and restore data, the SnapInfo directory and transaction logare on the same volume.
Suppose the SnapInfo directory is on the same LUN as the transaction log in an Exchange Server2003 environment with Windows Server 2003. The console output shows that the transaction logvolume contains Snapshot copies with the same name as that of the Exchange database Snapshotcopy.
Volume netappnj1_logsworking...date name____________ ________Jan 30 01:04 eloginfo__mailnj1__recentJan 30 01:00 exchsnap__mailnj1__recentJan 29 13:03 eloginfo__mailnj1_08-29-2006_13.00.00__dailyJan 29 13:00 exchsnap__mailnj1_08-29-2006_13.00.00__dailyJan 29 01:04 eloginfo__mailnj1_08-29-2006_01.00.00
SnapManager Backup overview | 123
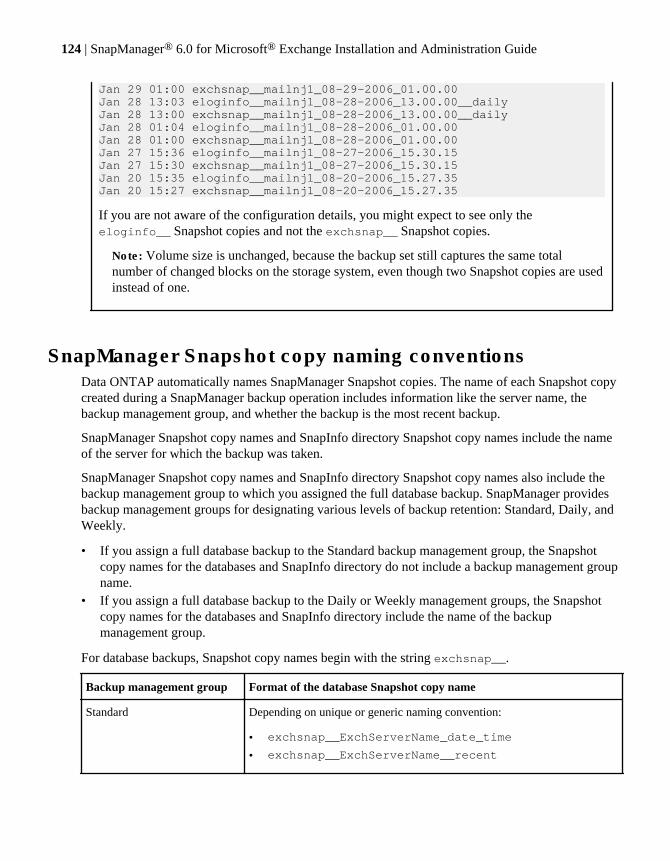
Jan 29 01:00 exchsnap__mailnj1_08-29-2006_01.00.00Jan 28 13:03 eloginfo__mailnj1_08-28-2006_13.00.00__dailyJan 28 13:00 exchsnap__mailnj1_08-28-2006_13.00.00__dailyJan 28 01:04 eloginfo__mailnj1_08-28-2006_01.00.00Jan 28 01:00 exchsnap__mailnj1_08-28-2006_01.00.00Jan 27 15:36 eloginfo__mailnj1_08-27-2006_15.30.15Jan 27 15:30 exchsnap__mailnj1_08-27-2006_15.30.15Jan 20 15:35 eloginfo__mailnj1_08-20-2006_15.27.35Jan 20 15:27 exchsnap__mailnj1_08-20-2006_15.27.35
If you are not aware of the configuration details, you might expect to see only theeloginfo__ Snapshot copies and not the exchsnap__ Snapshot copies.
Note: Volume size is unchanged, because the backup set still captures the same totalnumber of changed blocks on the storage system, even though two Snapshot copies are usedinstead of one.
SnapManager Snapshot copy naming conventionsData ONTAP automatically names SnapManager Snapshot copies. The name of each Snapshot copycreated during a SnapManager backup operation includes information like the server name, thebackup management group, and whether the backup is the most recent backup.
SnapManager Snapshot copy names and SnapInfo directory Snapshot copy names include the nameof the server for which the backup was taken.
SnapManager Snapshot copy names and SnapInfo directory Snapshot copy names also include thebackup management group to which you assigned the full database backup. SnapManager providesbackup management groups for designating various levels of backup retention: Standard, Daily, andWeekly.
• If you assign a full database backup to the Standard backup management group, the Snapshotcopy names for the databases and SnapInfo directory do not include a backup management groupname.
• If you assign a full database backup to the Daily or Weekly management groups, the Snapshotcopy names for the databases and SnapInfo directory include the name of the backupmanagement group.
For database backups, Snapshot copy names begin with the string exchsnap__.
Backup management group Format of the database Snapshot copy name
Standard Depending on unique or generic naming convention:
• exchsnap__ExchServerName_date_time
• exchsnap__ExchServerName__recent
124 | SnapManager® 6.0 for Microsoft® Exchange Installation and Administration Guide
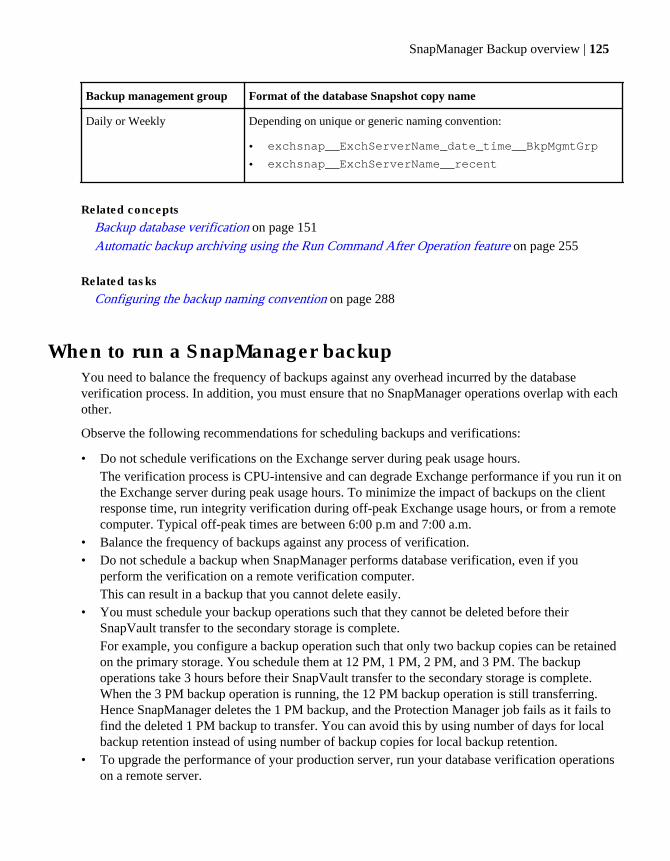
Backup management group Format of the database Snapshot copy name
Daily or Weekly Depending on unique or generic naming convention:
• exchsnap__ExchServerName_date_time__BkpMgmtGrp
• exchsnap__ExchServerName__recent
Related concepts
Backup database verification on page 151
Automatic backup archiving using the Run Command After Operation feature on page 255
Related tasks
Configuring the backup naming convention on page 288
When to run a SnapManager backupYou need to balance the frequency of backups against any overhead incurred by the databaseverification process. In addition, you must ensure that no SnapManager operations overlap with eachother.
Observe the following recommendations for scheduling backups and verifications:
• Do not schedule verifications on the Exchange server during peak usage hours.The verification process is CPU-intensive and can degrade Exchange performance if you run it onthe Exchange server during peak usage hours. To minimize the impact of backups on the clientresponse time, run integrity verification during off-peak Exchange usage hours, or from a remotecomputer. Typical off-peak times are between 6:00 p.m and 7:00 a.m.
• Balance the frequency of backups against any process of verification.• Do not schedule a backup when SnapManager performs database verification, even if you
perform the verification on a remote verification computer.This can result in a backup that you cannot delete easily.
• You must schedule your backup operations such that they cannot be deleted before theirSnapVault transfer to the secondary storage is complete.For example, you configure a backup operation such that only two backup copies can be retainedon the primary storage. You schedule them at 12 PM, 1 PM, 2 PM, and 3 PM. The backupoperations take 3 hours before their SnapVault transfer to the secondary storage is complete.When the 3 PM backup operation is running, the 12 PM backup operation is still transferring.Hence SnapManager deletes the 1 PM backup, and the Protection Manager job fails as it fails tofind the deleted 1 PM backup to transfer. You can avoid this by using number of days for localbackup retention instead of using number of backup copies for local backup retention.
• To upgrade the performance of your production server, run your database verification operationson a remote server.
SnapManager Backup overview | 125
• More backup operations cause fewer transaction logs to be played forward during a restoreoperation.Perform a minimum of one SnapManager full database backup every 24 hours.
• Do not schedule any operation to overlap any other operation.Only one SnapManager operation can be running on the same computer at the same time.
• Back up the databases at the end of a migration process.Any previous non-SnapManager backups are no longer valid after the migration process.
• If you schedule backups in a cluster, schedule them on only one node.If a virtual server fails over to another node, that performs the scheduled backup. If the entirenode fails, reschedule the backups.
• Be sure to reschedule the scheduled jobs that are affected by any changes you make in theconfiguration. Update the cmdlet parameters manually because they are hard coded in thescheduler.
How SnapManager checks database integrity in backup setsSnapManager uses ChkSgFiles.dll, an integrity verification library, to verify the Exchange Server2007 databases and transaction logs. SnapManager uses Eseutil, a Microsoft Exchange utility, toverify the Exchange Server 2003 database files. SnapManager uses either ChkSgFiles or Eseutil toverify the page-level integrity of the databases.
The Eseutil utility is installed automatically with binaries. SnapManager checks the database and thetransaction logs for physical-level corruption. For more information about physical-level corruption,see your Microsoft Exchange documentation.
The ChkSgFiles.dll library checks the databases and transaction log files for physical and logicalcorruption, by using checksum verification. You must install Exchange Server 2007 ManagementTools on the server that performs integrity verification.
Note: By default SnapManager Restore requires that you restore only from verified backups, butyou can override this requirement.
Next topics
LUN requirements for verifying databases in a backup set on page 127
Database verification load management on page 127
Backup verification status reporting on page 129
Where to run database and transaction log integrity verification on page 129
When to verify the databases in a backup set on page 130
Related tasks
Configuring the database verification override option on page 287
126 | SnapManager® 6.0 for Microsoft® Exchange Installation and Administration Guide

LUN requirements for verifying databases in a backup setSnapManager requires that all databases be mounted before verification. The SnapManagerverification server must have enough drive letters or mountpoints to mount the LUNs that store thebackup sets that you verify, depending on your verification scenario.
SnapManager mounts the LUNs that contain the backup sets that you select for verification withSnapDrive commands. Each mounted LUN requires one available drive letter or mountpoint.
To verify backups that are stored on a single LUN or across multiple LUNS, the verification servermust have at least one drive letter or mountpoint available.
If you are using a remote verification server, you need two unassigned drive letters or mountpoints toverify multiple backup sets in a single job.
In other situations, you need one unassigned drive letter or mountpoint.
The one unassigned drive letter or mountpoint is to mount the LUN in a Snapshot copy. TheSnapshot copy stores the transaction log directory for multiple Storage Groups for transaction logverification. When SnapManager verifies the transaction logs for the first backup set, it does notunmount the LUN or release the assigned drive letter. SnapManager reuses the same LUN for thetransaction log verification for the second backup set.
If a second drive letter or mountpoint is not available, schedule the backup or verification jobs toverify one backup set at a time.
Note: If you verify the destination volumes that contain more than one Storage Group sharing thesame LUN for the transaction logs, ensure that a second drive letter or mountpoint is available forthe Exchange server.
Database verification load managementIf you run database verification on a production server, it can place a significant load on both theserver and the storage systems. This degrades Exchange response, particularly during peak workhours. There are four methods to manage database verification load.
• Deferred database verification• Remote database verification• Verification throttling• Integrity verification on destination SnapMirror volume
Next topics
Deferred database verification on page 128
Remote database verification on page 128
Verification throttling on page 128
Integrity verification on the destination SnapMirror volume on page 128
SnapManager Backup overview | 127
Related conceptsDatabase backup using SnapManager on page 135Considerations for selecting the database verification server on page 278How SnapManager checks database integrity in backup sets on page 126
Related tasksConfiguring database verification throttling on page 285
Related referencesRemote verification server requirements on page 40
Deferred database verification
You can distribute your system workload by disabling automatic integrity verification, which takesplace immediate after your backup is created, and then performing a separate verification later.
Remote database verification
You can distribute your system workload by disabling automatic integrity verification, which takesplace immediate after your backup is created, and then run verification from another Exchangeserver.
Verification throttling
You can slow down the integrity verification to decrease the load on the Windows host and thestorage systems by using verification throttling if you are using Microsoft Exchange Server 2003SP2, or higher, or Microsoft Exchange Server 2007.
SnapManager can throttle integrity verification (the Microsoft Exchange consistency checker utility)in checksum verification mode to reduce the load on the host CPU, and on the storage subsystem.This .dll file checks the databases and transaction log files for integrity verification.
Integrity verification on the destination SnapMirror volume
SnapManager 5.0 and later supports integrity verification on the destination SnapMirror volume.SnapDrive uses FlexClone to access data in the Snapshot copy on destination SnapMirror volumes.
Integrity verification on the destination SnapMirror volume is available through the following:
• Backup and Verification window• Backup wizard• Deferred verification• Test Restore button and Restore wizard
Note: When you perform a restore operation from the Restore window, SnapManager promptsfor integrity verification on the source or destination volume, if there are any SnapMirrorvolume relationships associated with it.
The Choose SnapMirror Destination Volumes for Integrity Verification window displays eachSnapMirror volume as a tree showing the relationship among the volume, the LUN, and the
128 | SnapManager® 6.0 for Microsoft® Exchange Installation and Administration Guide
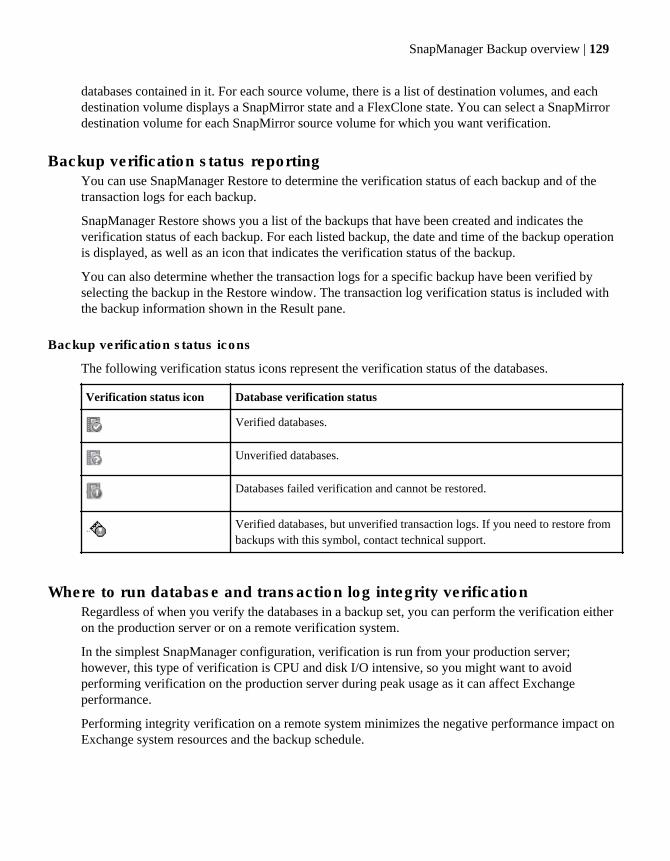
databases contained in it. For each source volume, there is a list of destination volumes, and eachdestination volume displays a SnapMirror state and a FlexClone state. You can select a SnapMirrordestination volume for each SnapMirror source volume for which you want verification.
Backup verification status reportingYou can use SnapManager Restore to determine the verification status of each backup and of thetransaction logs for each backup.
SnapManager Restore shows you a list of the backups that have been created and indicates theverification status of each backup. For each listed backup, the date and time of the backup operationis displayed, as well as an icon that indicates the verification status of the backup.
You can also determine whether the transaction logs for a specific backup have been verified byselecting the backup in the Restore window. The transaction log verification status is included withthe backup information shown in the Result pane.
Backup verification status icons
The following verification status icons represent the verification status of the databases.
Verification status icon Database verification status
Verified databases.
Unverified databases.
Databases failed verification and cannot be restored.
Verified databases, but unverified transaction logs. If you need to restore frombackups with this symbol, contact technical support.
Where to run database and transaction log integrity verificationRegardless of when you verify the databases in a backup set, you can perform the verification eitheron the production server or on a remote verification system.
In the simplest SnapManager configuration, verification is run from your production server;however, this type of verification is CPU and disk I/O intensive, so you might want to avoidperforming verification on the production server during peak usage as it can affect Exchangeperformance.
Performing integrity verification on a remote system minimizes the negative performance impact onExchange system resources and the backup schedule.
SnapManager Backup overview | 129
When to verify the databases in a backup setYou can verify the databases in your SnapManager backup sets immediately after creation, at ascheduled time later, or when you restore them.
By default, SnapManager automatically verifies full backup sets at the time the backup is created.This is simple and ensures that each database in the backup set is verified. However, this methodsignificantly increases the time required to complete the backup.
You can start an operation to verify the databases contained in one or more backup sets that havealready been created. You can start the verification immediately, or you can schedule the verificationto occur later, when it does not affect performance or delay later backups.
If you attempt to restore from a backup set on which a database consistency check has not been runsuccessfully, SnapManager prompts (but does not require) you to first verify the databases in thatbackup set.
Note: When you perform verification on a LUN clone, and you make a Snapshot copy of thevolume while a LUN clone exists, a “busy Snapshot copy” is created, which might cause problemswhen you attempt to delete Snapshot copies. To avoid this, do not schedule backups while averification is in progress, to enable the use of FlexClone for Snapshot copy access. If theFlexClone volume is licensed on the storage system, it is used without SnapMirror verification.
Related concepts
Database backup using SnapManager on page 135
Backup database verification on page 151
Backup set retentionWhen you plan your SnapManager backup schedules, you also need to manage the number ofSnapshot copy-based backup sets that are retained online.
You can do the following to manage the number of backup sets kept online:
• Regulate the number of Snapshot copies per volume.• Delete old and unnecessary backups.• Specify a backup deletion criteria that deletes the oldest backups for each Storage Group and
backup management group.• Explicitly delete any backups or Snapshot copies of LUNs created during a restore operation.
Next topics
Maximum number of Snapshot copies per volume on page 131
Ways to delete Snapshot copies on page 131
Automatic deletion of Snapshot copies on page 131
130 | SnapManager® 6.0 for Microsoft® Exchange Installation and Administration Guide
Maximum number of Snapshot copies per volumeThe Data ONTAP software used with SnapManager supports a maximum of 255 Snapshot copies pervolume, including copies not created by SnapManager. Because each SnapManager backup operationcreates Snapshot copies, a SnapManager backup operation fails if the volume that contains thedatabase LUN exceeds the 255 Snapshot copy capacity.
Note: The total number of Snapshot copies on a volume might exceed the number of retainedbackups. For example, if a single volume contains both the SnapInfo directory and the databases,each backup operation generates two Snapshot copies on the volume.
Ways to delete Snapshot copiesTo avoid reaching the limit of 255 Snapshot copies per volume, delete your old SnapManagerbackups when they are no longer needed.
SnapManager provides two ways to delete backups:
• Automatic deletion of older backups in the management group• Explicit deletion of backups or SnapInfo Snapshot copies only
Note: If a storage group is no longer available in the Exchange server, then backups associatedwith it can not be removed by the delete backup module .
Attention: Do not use SnapDrive or the storage system administration tools to delete Snapshotcopies created by SnapManager. Doing so will leave behind unwanted data that cannot beremoved.
Automatic deletion of Snapshot copiesYou can manage the number of Snapshot copies you store by configuring SnapManager to deletebackups automatically, based on how old the backups are or based on how many of them are stored.
Automatic deletion deletes a backup only if the backup has the following characteristics:
• The backup is in the same management group as the management group of the backups that youjust created.
• The backup is the oldest backup of the Storage Group• The number of backups exceeds the backup retention level that you specified in the “Delete
backups older than” option or the “Delete backups in excess of” option.
Note: If a storage group is no longer available in the Exchange server, then backups associatedwith it can not be removed by the delete backup module .
If you do not select automatic backup deletion, backups that are created after the current backup areretained. This would require manual removal of backups, or enough storage capacity for all backupsand transaction logs. You can delete the retained backups by selecting automatic backup deletion inthe next backup that you take.
SnapManager Backup overview | 131
Related concepts
Backup management groups on page 154
Option to retain up-to-the-minute restore ability on page 206
Transaction log managementSnapManager provides advanced options to manage the transaction logs that belong to a backupmanagement group.
You can choose not to back up transaction logs that Exchange truncates after the backup operationfinishes.
If deleting Snapshot copies of LUNs that contain transaction logs related to the selected backupmanagement group breaks the continuity of transaction logs between the previous backup and thepresent time, you can skip the deletion.
Related concepts
Option to back up transaction logs that Exchange will truncate on page 132
Option to retain up-to-the-minute restore ability on page 206
Related tasks
Explicitly deleting backup sets or SnapInfo Snapshot copies on page 208
Option to back up transaction logs that Exchange will truncateIf you do not need to retain up-to-the-minute restore ability from a backup that is not the most recent,you can reduce the amount of disk space required by omitting the backup of transaction logs thatExchange truncates after the SnapManager Backup operation finishes.
By default, SnapManager backs up database and the transaction logs. SnapManager creates adatabase Snapshot copy and a SnapInfo Snapshot copy, and truncates transaction logs by removingany entries already committed to the database.
Manage this feature using the Back up transaction logs that will be truncated by Exchange at theend of the backup option in the Advanced Options dialog box.
The option to back up all transaction logs (including those that Exchange truncates after the backupoperation finishes) is selected by default. When you clear the option to back up all transaction logs,the database and transaction log verification cannot be deferred, and the option to back up alltransaction logs is automatically enabled the next time you start SnapManager.
Related concepts
Backup management group assignments on page 155
132 | SnapManager® 6.0 for Microsoft® Exchange Installation and Administration Guide
Exchange System Manager in a SnapManager environmentExchange System Manager (ESM) is an Exchange Server 2003 component that includes a timestampthat tells you the last time that a full backup of a database took place.
The timestamp is displayed on the database Properties page. For an Exchange Server 2003 database,ESM 2003 displays a date and timestamp, and whether you made the backup with SnapManagerusing VSS Snapshot copy or with a streaming method such as Windows NTBackup.
Attention: Do not use the Exchange System Manager to move databases or transaction logs for asystem that you configure using SnapManager. Doing so prevents SnapManager from functioningcorrectly.
Next topics
Displaying the time of the last full backup on page 133
Exchange page zeroing and deleted item retention on page 134
Displaying the time of the last full backupTo display the time of the last full backup of a database, use the SnapManager Restore windowrather than Exchange System Manager.
About this task
To display the time of the last full backup of a given database, use the SnapManager Configurationwizard rather than Exchange System Manager.
Steps
1. In the SnapManager console, double-click Restore in the Scope pane.
SnapManager displays the backup sets in the Result pane.
2. In the Result pane, click the Storage Group name to get the available backup sets.
3. Double-click the name of the backup set whose properties you want to view.
Note the timestamp information included in the Result pane.
Name displays the backup set name. If you configure SnapManager to use unique backup naming(the default setting) as opposed to generic naming, the backup name includes the date andtimestamp. Backup Date and Time displays the date and time at which the backup was made.
Related concepts
Exchange System Manager in a SnapManager environment on page 133
SnapManager Backup overview | 133

Exchange page zeroing and deleted item retentionBecause SnapManager relies on the Snapshot technology to create a backup, SnapManager does notread every page of data. Hence, the page zeroing and deleted item retention features are not triggeredwhen you use only SnapManager to perform backups.
The page zeroing feature of Exchange increases your database security by enabling you to finddeleted database pages and is used by high-security installations. The deleted item retention settingsfeature enables you to mark items and mailboxes to delete after they are backed up.
Attention: SnapManager archives items before you select them for deletion. To ensure that deleteditems are archived into at least one backup set, select the Do not permanently delete mailboxesand items until the store has been backed up option. However, this option overrides the“Deleted item retention” intervals for items and mailboxes. Therefore, to recover deleted itemswithout restoring and extracting Exchange data from a tape, do not permanently delete mailboxesand items until you back up the store.
You can cause these Exchange features to be triggered by scheduling a periodic backup using astandard backup utility, such as NTBackup.
Ensure that the backup that you use for this purpose is a copy or differential backup. Performing anyother type of backup causes the existing SnapManager backups to become unusable for up-to-the-minute restore operations. Also ensure that you perform no extra backup operation at the same timeas a SnapManager backup.
134 | SnapManager® 6.0 for Microsoft® Exchange Installation and Administration Guide
Database backup using SnapManager
You can back up Exchange database storage sets using SnapManager. You can also back up LCR,CCR and DAG configurations using SnapManager.
Next topics
Exchange storage groups and databases display on page 135
Decisions to make before performing a SnapManager backup on page 136
Backing up using the Backup wizard on page 138
Backing up using the Backup and Verify window on page 139
Using Database Filter to display the databases to back up in a Database AvailabilityGroup on page 142
LCR-enabled database backups on page 144
CCR-enabled database backups on page 145
Reasons that a SnapManager backup might fail on page 149
Backup database verification on page 151
Backup management groups on page 154
Frequent Recovery Point backup operation on page 156
Related concepts
SnapManager Backup overview on page 119
Database restore operation using SnapManager on page 161
Deletion of Snapshot copies on page 203
How SnapManager uses SnapMirror on page 213
Related tasks
Configuring the backup naming convention on page 288
Exchange storage groups and databases displayThe Result pane in the SnapManager console lists the Exchange Server storage groups and databasesthat are managed from the current Exchange server.
• Storage groups or databases that reside on the same volume are shown with disk icons of thesame color.
• Storage groups or databases that span multiple volumes are shown with disk icons of three colors.• Storage groups or databases that cannot be backed up by SnapManager are shown with the label
Invalid next to the LUN drive letter or mountpoint.
Database backup using SnapManager | 135
For a CCR-enabled Exchange Server storage groups and databases, the server’s navigation tree in theScope pane lists the Backup, Restore, Scheduled jobs, and the Reports directories for both the activeand the passive nodes.
Exchange databases display in a DAGWhen the SnapManager MMC snap-in connects to a Database Availability Group (DAG), allmailbox databases in the DAG, including both the active and passive databases, are displayed. If theSnapManager MMC snap-in connects to a member server of the DAG, only the mailbox databaseson that server are displayed.
When you connect to the DAG in the Scope pane, you can view all the databases in the DAG that areavailable for backup. When you connect to a member server of the DAG, you can view and back upthe databases on that server only.
Decisions to make before performing a SnapManagerbackup
Before you perform a SnapManager backup, you need to gather the information required to completethe backup operation.
Feature used for backup
• Do you want to use the Backup and Verify window or the Backup wizard?You can create a backup more quickly using the Backup and Verify window on your own. TheSnapManager Backup wizard helps you create and schedule your backups using default settings.
Storage Group
• Which Storage Groups do you want to back up to?The types of Storage Groups you can back up to are:
• Production Storage Groups• LCR replica Storage Groups• Continuous Cluster Replica (CCR) replica Storage Groups
Databases in a Database Availability Group (DAG)
• Which databases do you want to back up?The types of databases you can back up are:
• Active databases• Passive or copy databases
136 | SnapManager® 6.0 for Microsoft® Exchange Installation and Administration Guide
Type of backup
• What type of backup do you want to perform?You can do a full backup or a copy backup.
Note: Copy backup is available only for CCR configuration created along with full backup onthe remote CCR node.
Backup management group
• Which backup management group you want to assign to this backup?You can assign your backup to a standard, daily, or weekly management group.
Integrity verification
• Do you want to verify databases and transaction logs on the SnapMirror destination volume?• Do you want to verify the backup databases and transaction logs after the backup is created for a
restore operation?Although it is possible to restore from an unverified backup, it is advisable to restore only fromverified backups.
Backup retention
• Do you want to automatically delete the oldest backups of this backup management group?If you do not select automatic backup deletion, backups that are created after the current backupare retained.
• Do you want to back up transaction logs that Exchange truncates at the end of the backup?If you do not need to retain up-to-the-minute restore ability from a backup that is not the mostrecent, you can reduce the amount of disk space required by omitting the backup of transactionlogs that Exchange truncates after the SnapManager Backup operation finishes.
Up-to-the-minute restore ability
• Do you want to retain up-to-the-minute restore ability for any backups from other backupmanagement groups that are older than backups you would delete?By default, automatic deletion of older backups within a backup management group is doneselectively, in such a way that it does not cause a break in the continuity of transaction logsbetween the previous backup and the present time.However, if you do not need to retain up-to-the-minute restore ability from a backup that is notthe most recent, you can allow the automatic deletion feature to delete all older backups withinthe backup management group. The storage system space consumption reduces.If you choose not to retain up-to-the-minute restore ability, it reduces the amount of disk spaceconsumed by transaction log backups that Exchange truncates after the backup finishes. If allbackups have the same backup management group designation, not retaining up-to-the-minuterestore ability has no effect.
Database backup using SnapManager | 137
Naming convention
• Do you want to use the unique naming convention or the generic naming convention?When you use the unique naming convention, the most recent Snapshot copy is identified by themost recent date and time. When you use the generic backup naming convention, the most recentSnapshot copy is identified by the Snapshot copy name that includes the string recent.
• Do you want to rename a Storage Group?When you rename a Storage Group, all the databases in that Storage Group need to beunmounted. After you unmount all the databases, you can remount the databases. At this pointExchange recognizes the new Storage Group name, and you can create new SnapManagerbackups of this Storage Group. Refresh the backup window before the backup operation.
Backup schedule
• Do you want to run the backup now or schedule it for later?If you want to schedule the backup to run later, you must have the job scheduling information.
• Do you want to run a command after the backup is complete?
SnapMirror
• Do you want to update the SnapMirror destination volume after the backup?
Related concepts
LCR-enabled database backups on page 144
CCR-enabled database backups on page 145
Backup management groups on page 154
Backup with verification on page 218
Criteria for deleting backups on page 203
Option to back up transaction logs that Exchange will truncate on page 132
Option to retain up-to-the-minute restore ability on page 206
How SnapMirror replication works on page 215
Automatic backup archiving using the Run Command After Operation feature on page 255
Backing up using the Backup wizardYou can back up databases by using the SnapManager Backup wizard. Creating a backup enablesyou to store and recover your database.
Steps
1. In the Scope pane, select the Exchange server node you want to back up.
2. Click Backup.
138 | SnapManager® 6.0 for Microsoft® Exchange Installation and Administration Guide
SnapManager displays the list of Storage Groups or Databases in the Backup view in the Resultpane and the corresponding actions that you can perform for SnapManager backup in the Actionspane.
Note: If the SnapManager MMC snap-in is connected to a Database Availability Group(DAG), you have to use the Database Filter to specify the criteria to display the Exchange 2010databases for backup.
3. Select the Storage Groups or Databases you want to back up.
The Result pane shows whether the Storage Group or Database is dataset enabled, the name ofthe enabled dataset, the SnapMirror status, the SnapVault status, and other details about theStorage Group or Database.
4. Click Backup Wizard in the Actions pane.
The Welcome window appears.
5. Follow the instructions in the Backup wizard to initiate a backup process.
6. At the Completing the Backup wizard dialog box, click Finish after you verify that all thesettings in the window are what you want.
The Backup Status window appears.
7. In the Backup Status window, click Start Now to start the backup.
The backup is performed and the Snapshot copy is written to the volume. SnapManager Backupcompletes each task and checks it off on the list shown in the Backup Task List view. You canalternate between the task check-off list and the progress report. If the backup is successful, theTask view shows the check-off list with the tasks completed.
Note: If you enable the Notification option, an e-mail message is sent and the event is posted tothe Windows event log.
Related concepts
LCR-enabled database backups on page 144
Decisions to make before performing a SnapManager backup on page 136
Backing up using the Backup and Verify windowUse the Backup and Verify window to create a backup more quickly than using the Backup wizard.
About this task
You can choose to archive your database to a secondary storage system and when to verify thearchived backup.
Database backup using SnapManager | 139

Steps
1. In the Actions pane, select Backup.
2. In the Backup and Verify window, select the Storage Groups or Databases that you want to backup.
Note: If you decide to back up a Storage Group with an invalid status, SnapManager does notallow you to proceed with the backup operation.
3. In the Backup Management Group list, select a management group for the backup you want tocreate.
4. If you have datasets configured in your system, select a backup archiving option under Backuparchiving options to archive the database at the secondary storage system.
5. If you have datasets configured in your system, select a backup retention group under Backuparchiving options to determine the retention time of the dataset on the archived secondarystorage system.
6. If you want to delete older backups of this backup management group automatically, select one ofthe Delete Backups options.
Note: Ensure to select one of the Delete Backups options to manage your Snapshot copies.
7. To view or change the setting to retain up-to-the-minute restore, click Advanced.
If you want to... Then do this...
Avoid creating a break in the continuity oftransaction logs (between the previousbackup and the present time)
Select the Retain up-to-the-minute restore ability forolder backups in other management groups option.
Snapshot copies of LUNs that contain transaction logsrelated to any management group that is not selected are notdeleted from the SnapInfo directory.
Reduce the space consumption of thestorage system by transaction logs (byallowing more transaction logs to bedeleted)
Clear the Retain up-to-the-minute restore ability forolder backups in other management groups option.
8. To view or change backup transaction logs settings, do the following.
If you want to... Then do this...
Retain up-to-the-minute restoreability from a backup that is not themost recent
Select Back up transaction logs that will be truncated byExchange at the end of the backup .
This option is automatically selected each time you launchSnapManager.
140 | SnapManager® 6.0 for Microsoft® Exchange Installation and Administration Guide
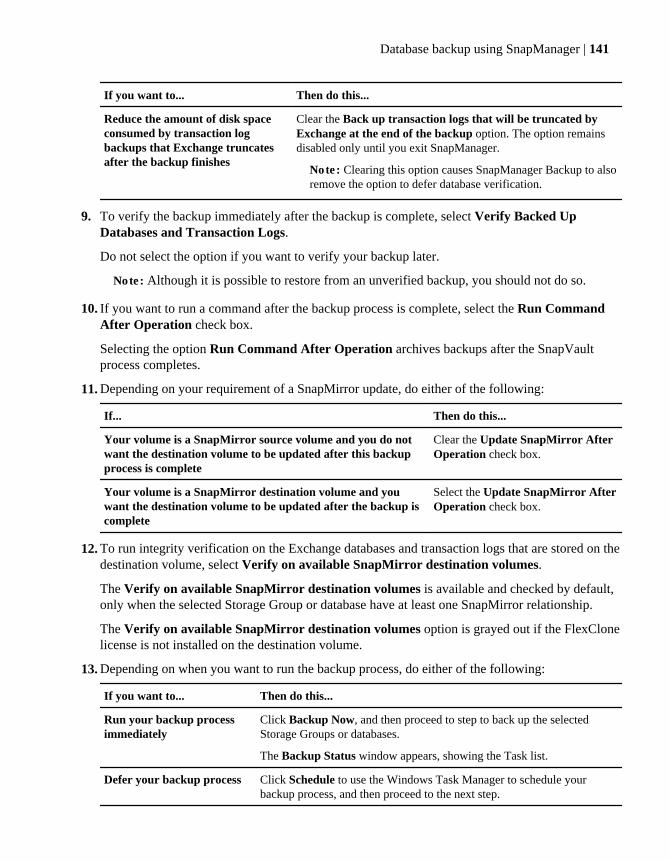
If you want to... Then do this...
Reduce the amount of disk spaceconsumed by transaction logbackups that Exchange truncatesafter the backup finishes
Clear the Back up transaction logs that will be truncated byExchange at the end of the backup option. The option remainsdisabled only until you exit SnapManager.
Note: Clearing this option causes SnapManager Backup to alsoremove the option to defer database verification.
9. To verify the backup immediately after the backup is complete, select Verify Backed UpDatabases and Transaction Logs.
Do not select the option if you want to verify your backup later.
Note: Although it is possible to restore from an unverified backup, you should not do so.
10. If you want to run a command after the backup process is complete, select the Run CommandAfter Operation check box.
Selecting the option Run Command After Operation archives backups after the SnapVaultprocess completes.
11. Depending on your requirement of a SnapMirror update, do either of the following:
If... Then do this...
Your volume is a SnapMirror source volume and you do notwant the destination volume to be updated after this backupprocess is complete
Clear the Update SnapMirror AfterOperation check box.
Your volume is a SnapMirror destination volume and youwant the destination volume to be updated after the backup iscomplete
Select the Update SnapMirror AfterOperation check box.
12. To run integrity verification on the Exchange databases and transaction logs that are stored on thedestination volume, select Verify on available SnapMirror destination volumes.
The Verify on available SnapMirror destination volumes is available and checked by default,only when the selected Storage Group or database have at least one SnapMirror relationship.
The Verify on available SnapMirror destination volumes option is grayed out if the FlexClonelicense is not installed on the destination volume.
13. Depending on when you want to run the backup process, do either of the following:
If you want to... Then do this...
Run your backup processimmediately
Click Backup Now, and then proceed to step to back up the selectedStorage Groups or databases.
The Backup Status window appears, showing the Task list.
Defer your backup process Click Schedule to use the Windows Task Manager to schedule yourbackup process, and then proceed to the next step.
Database backup using SnapManager | 141
14. In the Schedule Jobs window, name your backup job, provide the user ID and password for thejob, then click OK.
Note: If this name already exists as a Windows scheduled task and you want to replace it witha new job, select the Replace if it Exists check box, then click OK.
The Schedule jobs window appears.
15. In the Schedule Jobs window, use the Schedule tab to specify the following parameters of yourjob schedule—When the job is to run, and if you want the job to repeat, at what frequency
16. After you schedule your job, click OK.
You can use Control Panel to modify the schedule or cancel the scheduled job.
The backup job runs at the times you specified in the Schedule Task view.
17. In the Backup Status window, click Start Now to back up the selected Storage Groups orDatabases.
Clicking Start Now completes the backup operation and the Snapshot copy is written to thevolume. SnapManager Backup completes each task and checks it off on the list shown in theBackup Task List view.
You can alternate between the task check-off list and the progress report.
If the backup process is successful, the Task view shows the check off list with the taskscompleted.
Note: If you enable Notification, an e-mail message is sent and the event is posted to theWindows Application event log.
Related conceptsBackup management groups on page 154Criteria for deleting backups on page 203Explicit deletion of Snapshot copies on page 205Information used to create remote backups on page 270Option to retain up-to-the-minute restore ability on page 206Option to back up transaction logs that Exchange will truncate on page 132Deferred database verification on page 128Automatic backup archiving using the Run Command After Operation feature on page 255Integrity verification on SnapMirror destination volumes on page 215
Using Database Filter to display the databases to back up ina Database Availability Group
You can use the Database Filter to specify the criteria to display the Exchange Server 2010 databasesfor backup in a Database Availability Group (DAG). Databases that satisfy the filter criteria are
142 | SnapManager® 6.0 for Microsoft® Exchange Installation and Administration Guide
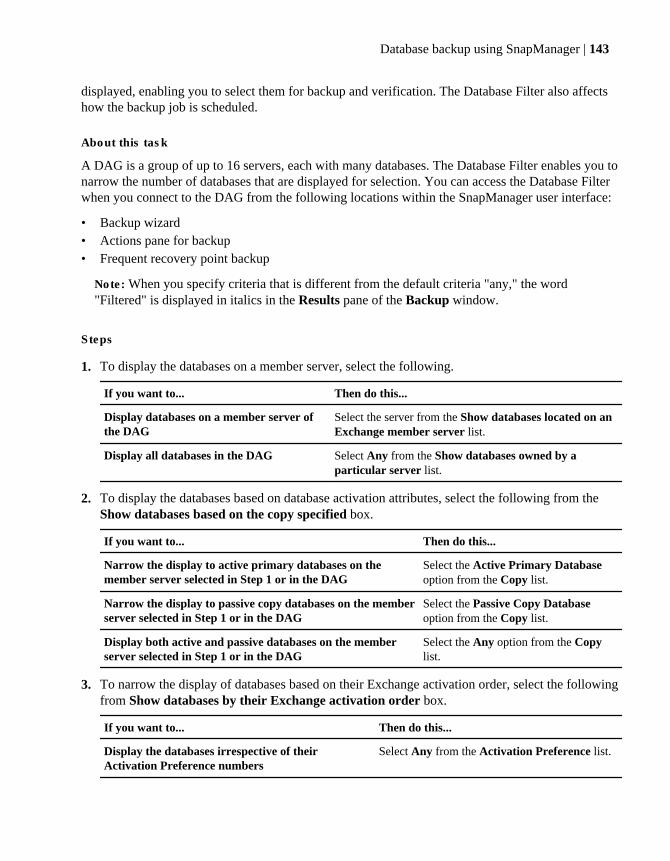
displayed, enabling you to select them for backup and verification. The Database Filter also affectshow the backup job is scheduled.
About this task
A DAG is a group of up to 16 servers, each with many databases. The Database Filter enables you tonarrow the number of databases that are displayed for selection. You can access the Database Filterwhen you connect to the DAG from the following locations within the SnapManager user interface:
• Backup wizard• Actions pane for backup• Frequent recovery point backup
Note: When you specify criteria that is different from the default criteria "any," the word"Filtered" is displayed in italics in the Results pane of the Backup window.
Steps
1. To display the databases on a member server, select the following.
If you want to... Then do this...
Display databases on a member server ofthe DAG
Select the server from the Show databases located on anExchange member server list.
Display all databases in the DAG Select Any from the Show databases owned by aparticular server list.
2. To display the databases based on database activation attributes, select the following from theShow databases based on the copy specified box.
If you want to... Then do this...
Narrow the display to active primary databases on themember server selected in Step 1 or in the DAG
Select the Active Primary Databaseoption from the Copy list.
Narrow the display to passive copy databases on the memberserver selected in Step 1 or in the DAG
Select the Passive Copy Databaseoption from the Copy list.
Display both active and passive databases on the memberserver selected in Step 1 or in the DAG
Select the Any option from the Copylist.
3. To narrow the display of databases based on their Exchange activation order, select the followingfrom Show databases by their Exchange activation order box.
If you want to... Then do this...
Display the databases irrespective of theirActivation Preference numbers
Select Any from the Activation Preference list.
Database backup using SnapManager | 143
If you want to... Then do this...
Display the databases based on their ActivationPreference number
Select the Activation Preference number from theActivation Preference list.
Related tasks
Backing up using the Backup wizard on page 138
Backing up using the Backup and Verify window on page 139
Activation Preference Number of a mailbox database in Exchange Server2010
The Activation Preference Number of a mailbox database in Exchange Server 2010 is a numberspecifying the preference value of that database copy. You can select the database that has to bebacked up by specifying its Activation Preference Number through the Database Filter.
The original database in a Database Availability Group (DAG) always has a Activation PreferenceNumber of 1. During database activation, when multiple database copies satisfy the criteria foractivating, the Activation Preference Number is used to decide which database copy is to beactivated.
LCR-enabled database backupsSnapManager allows you to back up and schedule a database from either its Local ContinuousReplication (LCR) copy location or its original location. Ensure that you do not create a backup onthe replica database and its production database at the same time.
Using either the SnapManager Backup and Verify window or the Backup wizard, you can view thereplica Storage Group simultaneously with its production Storage Group. The replica Storage Groupis represented as an LCR Storage Group on the SnapManager graphical user interface.
Note: You must use different volumes to store the database files, the transaction log files of thereplica Storage Group, and the production Storage Group.
When SnapManager creates a backup on the production database and its replica database at the sametime, SnapManager creates two successive sets of timestamps, one for each backup operation. Onlyone of the backups has the recent backup name, if you select the generic naming convention inBackup Settings. Two copies of the backup set are created that consume extra storage space in theLUN.
Note: SnapManager does not perform any special operation to delete the transaction log files on areplica database after making the backup on the production database. When you create a backupon an LCR-enabled database, Exchange Writer handles the truncation of the log filesautomatically, on both the production and the replica databases.
144 | SnapManager® 6.0 for Microsoft® Exchange Installation and Administration Guide
Related tasks
Backing up using the Backup wizard on page 138
Backing up using the Backup and Verify window on page 139
CCR-enabled database backupsYou can back up both the active and the passive nodes in a Continuous Cluster Replica (CCR)environment in Exchange Server 2007. Before starting the backup operation, ensure thatSnapManager is installed on both nodes of the CCR configuration.
Next topics
Considerations before backing up a CCR replica database and production database on page 145
Backing up and verifying a CCR replica database and production database on page 146
Creating a secondary backup on a remote CCR node using the Backup wizard on page 148
Creating a secondary backup on a remote CCR node using the Backup and Verifywindow on page 149
How SnapManager creates a secondary backup on a remote CCR node on page 149
Related concepts
How SnapManager creates a secondary backup on a remote CCR node on page 149
Considerations before backing up a CCR replica database and production database on page 145
Related tasks
Creating a secondary backup on a remote CCR node using the Backup wizard on page 148
Creating a secondary backup on a remote CCR node using the Backup and Verifywindow on page 149
Considerations before backing up a CCR replica database and productiondatabase
Before you back up a CCR replica database and production database, you need to make someconsiderations about the use of active and passive nodes in your CCR configuration.
• When you perform an operation such as adding, reconnecting, or removing a CCR-enabledExchange server, the operation applies to both the active and passive nodes together.
• You can back up your Storage Group from either the active node or the passive node.
• You cannot connect to the active nodes and passive nodes at the same time and performbackup operations on both the nodes simultaneously.
• If you do not select the option Create a copy database on another CCR node along withcurrent backup, then you only back up the CCR node that you are connected to, which iseither an active node or a passive node.
Database backup using SnapManager | 145
• When you rename a Storage Group, you must unmount all of the databases in that StorageGroup. After you unmount all of the databases, you can remount them.At this point Exchange recognizes the new Storage Group name, and you can create newSnapManager backups of this Storage Group.
• When you back up a CCR configuration, SnapManager creates full database backups either on aCCR active node, using Exchange Store Writer, or on a CCR passive node, using ExchangeReplication Writer.
Note: SnapManager does not perform any special operation to delete the log files on a replicadatabase after the production database backup in a CCR environment. When a backup is createdon a CCR replica database, Exchange Writer handles the truncation of the log files automatically,on both the production and the replica databases.
Backing up and verifying a CCR replica database and production databaseYou can back up and verify a CCR replica database and production database using SnapManagerBackup.
Steps
1. In the SnapManager console, select the Continuous Cluster Replica (CCR) node on which youwant to create the primary backup.
2. Click Backup either in the CCR Active node or passive node in the Scope pane.
3. Click Backup Wizard in the Actions pane.
4. Select the storage group that you want to back up or verify.
5. In the Backup or Verify Databases and Transaction Logs window, do either of the following:
If you want to... Then do this...
Back up databases and transaction logs in theselected Storage Group
Select Back up databases and transaction logs.
Verify the databases and transaction logs in anunverified backup
Select Verify databases and transaction logs inthe most unverified backups.
6. In the Backup Management Group window, select the management group for this backupoperation.
7. In the Select the naming convention for the newest backup window, select Use generic(“_recent”) or Use unique (“time stamp”) according to your requirement.
8. To delete older backups, enter the number of backups to be retained or the number of days toretain the backups in the Delete Older Backups window.
9. In the Retain Up-to-The-Minute Restore ability for Older backups window, do either of thefollowing:
146 | SnapManager® 6.0 for Microsoft® Exchange Installation and Administration Guide
If you want to... Then do this...
You do not want to delete the transaction logs that aresaved in the SnapInfo directory
Select Yes, the retain up-to-the-minuterestore capability for older backups.
You want to delete the transaction logs that are savedin the SnapInfo directory
Select No, allow older backups to becomepoint-in-time only.
10. To back up the truncated logs, select Yes, backup truncated transaction logs in the Truncatedlog backup window.
11. In the Verify the Databases and Transaction Logs in this Backup window, do either of thefollowing:
If you want to... Then do this...
Verify the physical integrity ofthe databases and transactionlogs
Select Yes, I want to verify the databases and transaction logsafter this backup is complete.
Note: Click Verification Settings button to launch theDatabases Verification Settings dialog box to select theSnapMirror relationship for the integrity verification.
Verify the physical integrity ofthe databases and transactionlogs later
Select No, I want to verify the databases and transaction logs inthis backup later.
12. In the Update SnapMirror After Operation window, do either of the following:
If you want to... Then do this...
You want to request a SnapMirror update Select Yes, request a SnapMirrorupdate after operation.
You do not want to request a SnapMirror update Select No at this time.
You want to run integrity verification on the Exchangedatabases and transaction logs that are stored on thedestination volume
Select Verify on availableSnapMirror destination volumes.
You do not want to run integrity verification on the Exchangedatabases and transaction logs that are stored on thedestination volume
Clear Verify on availableSnapMirror destination volumes.
13. To run a command after the backup is complete, select Yes, run a command after thisoperation in the Run Command After Operation window.
14. In the Complete the Backup wizard window, verify the backup settings and click Finish.
15. You can also schedule a backup process by selecting the Schedule button in the Complete theBackup wizard screen.
16. In the Backup Status window, click the Start Now button to initiate a backup process.
Database backup using SnapManager | 147
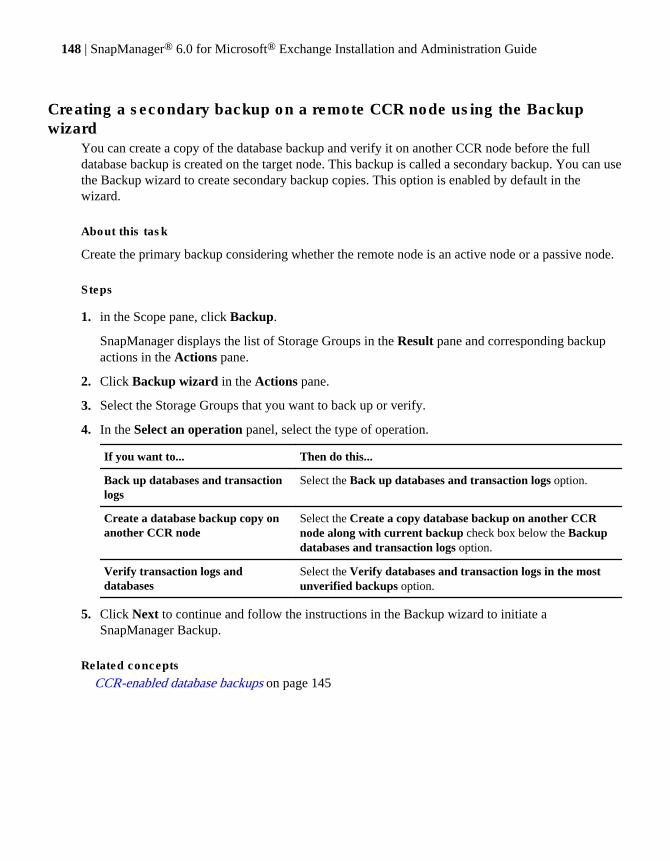
Creating a secondary backup on a remote CCR node using the Backupwizard
You can create a copy of the database backup and verify it on another CCR node before the fulldatabase backup is created on the target node. This backup is called a secondary backup. You can usethe Backup wizard to create secondary backup copies. This option is enabled by default in thewizard.
About this task
Create the primary backup considering whether the remote node is an active node or a passive node.
Steps
1. in the Scope pane, click Backup.
SnapManager displays the list of Storage Groups in the Result pane and corresponding backupactions in the Actions pane.
2. Click Backup wizard in the Actions pane.
3. Select the Storage Groups that you want to back up or verify.
4. In the Select an operation panel, select the type of operation.
If you want to... Then do this...
Back up databases and transactionlogs
Select the Back up databases and transaction logs option.
Create a database backup copy onanother CCR node
Select the Create a copy database backup on another CCRnode along with current backup check box below the Backupdatabases and transaction logs option.
Verify transaction logs anddatabases
Select the Verify databases and transaction logs in the mostunverified backups option.
5. Click Next to continue and follow the instructions in the Backup wizard to initiate aSnapManager Backup.
Related concepts
CCR-enabled database backups on page 145
148 | SnapManager® 6.0 for Microsoft® Exchange Installation and Administration Guide
Creating a secondary backup on a remote CCR node using the Backup andVerify window
You can use the Backup and Verify window to create secondary backup copies more quickly thanusing the Backup wizard.
Steps
1. In the SnapManager console, select the Continuous Cluster Replica (CCR) node on which youwant to create the backup.
2. Click Backup either in the CCR active node or passive node in the Scope pane.
3. Select the Storage Groups you want to back up and verify.
4. Click Backup and Verify.
5. Click Advanced Options.
6. Select Create a copy database backup on another CCR node along with current backup.
You have created a secondary backup on a remote CCR node.
How SnapManager creates a secondary backup on a remote CCR nodeWhen you create a copy of the secondary backup on a remote CCR node, SnapManager performs aparticular sequence of steps.
1. Connects to another CCR node to rename backups and updates the backup timestamp if there is amore recent backup.
2. Creates a copy of database backup on the remote CCR node and deletes the older backups.
Note: SnapManager does not regroup the backups on the remote CCR node based on the CCRnode volume that is used by the databases.
3. Creates a full database backup on the CCR node on which the full backup was initialized andperforms verification of the backup sets, if you select the Run Verification option.
4. Connects to the remote CCR node and copies the extra log files, which might be truncated fromthe primary node to the remote node.
Note: The secondary backup created on the remote is always standard. The secondary backupcreated on the remote node is not verified even if the primary backup is verified.
Reasons that a SnapManager backup might failIf your SnapManager backup fails, check the backup report to determine the cause of the failure.
Database backup using SnapManager | 149
Next topics
Problem: cluster failover during backup on page 150
Problem: Snapshot copy limit reached on page 150
Problem: SnapInfo directory being accessed on page 150
Problem: SnapInfo directory out of space on page 150
Problem: data does not match on page 151
Problem: busy Snapshot copy on page 151
Problem: Snapshot copy already exists on page 151
Problem: out of disk space on page 151
Problem: SnapManager server initialization failed on page 151
Problem: cluster failover during backupIf a cluster failover or a Windows cluster move group happens during a backup operation, the backupfails, and you need to restart the backup operation.
Problem: Snapshot copy limit reachedYou get an error message if you try to back up a LUN that contains more than 255 Snapshot copies.The backup operation fails irrespective of whether SnapManager created the Snapshot copies or not.
Note: Automatic backup deletion is performed only after a successful backup process is complete.Therefore, you must be able to create new Snapshot copies before you begin a new backupprocedure.
Problem: SnapInfo directory being accessedYou get an error message if you access the SnapInfo directory while performing a backup operation.
A SnapManager backup operation might include renaming a SnapInfo subdirectory, and Windowsdoes not allow you to change a directory name while it is being accessed. Accessing the SnapInfodirectory with Windows Explorer might cause the backup to fail. Ensure that you do not holdexclusive access to the SnapInfo directory on the Exchange host when a backup process isperformed.
Problem: SnapInfo directory out of spaceYou get an error message if your SnapInfo directory runs out of space. Expand the LUN that containsthe SnapInfo directory and ensure that enough space remains in the volume for Snapshot copycreation.
Related concepts
Maximum number of Snapshot copies per volume on page 131
150 | SnapManager® 6.0 for Microsoft® Exchange Installation and Administration Guide
Problem: data does not matchYou get an error message if you make changes to your Exchange Server storage groups anddatabases after SnapManager started and you did not refresh your view. You can refresh your viewby pressing F5, or you can restart SnapManager.
Problem: busy Snapshot copyYou get an error message if you back up a LUN when a Snapshot copy of the LUN already existsand then you try to delete a Snapshot copy of the LUN. Event 249 is logged by SnapDrive andSnapManager backups fail.
Problem: Snapshot copy already existsYou get an error message either if the system clock on the SnapManager host is not synchronizedwith the storage system clock or if SnapMirror replication is running when you try to start a backupoperation.
Synchronize the system clock on the SnapManager host and the storage system clock so thatSnapDrive functions properly. Also, ensure that any SnapMirror replications have enough time tocomplete before you initiate another SnapManager backup process.
Problem: out of disk spaceYou get an error message when the database or the transaction logs use all of the available disk spacein a volume. Resize the volume or expand the LUN.
Problem: SnapManager server initialization failedYou get an error message either if the SnapManager server account or the server account permissionshave changed; or if you exit SnapManager when the smesrvr.exe process is running.
Ensure that you use the correct server account and the correct server account permissions and thatyou terminate any orphaned SnapManager processes that run when you exit SnapManager.
Backup database verificationIf you back up a database without automatically verifying it, you can verify the database after thebackup.
Attention: You cannot verify a database when SnapManager is running from a Terminal Servicesclient.
Next topics
Decisions to make before database verification on page 152
Starting or scheduling database verification on page 153
Database backup using SnapManager | 151
Related conceptsBackup management groups on page 154Automatic backup archiving using the Run Command After Operation feature on page 255Considerations for selecting the database verification server on page 278Remote verification prerequisites on page 279
Related tasksSelecting the Snapshot copy access method for database verification on page 282Configuring database verification throttling on page 285Configuring the database verification override option on page 287
Related referencesProblem: busy Snapshot copy on page 151
Decisions to make before database verificationBefore you start or schedule verification, you need to gather the information required to complete theBackup Wizard or the Backup and Verify window.
Job-specific parameters
• Which are the databases for which you want to verify unverified Snapshot copies?• Which are the backup management groups within the databases that you selected?• What is the number of unverified backup Snapshot copies that you want to verify?
You can verify more unverified Snapshot copies than you specified earlier in your database andbackup management group selections.
• Do you want to run a command after the backup is complete?This is usually done to archive backups.
• Do you want to run the verification now or schedule it for later?If you want to schedule the verification to run later, you also need to know the job schedulinginformation.
Verification settings
• Which Exchange server do you want to use to perform database verification?Only Exchange Server 2010 can be used to verify Exchange Server 2010 mailbox databases. AnExchange Server 2010 mailbox database cannot be verified on Exchange Server 2003 orExchange Server 2007, while Exchange Server 2003 or Exchange Server 2007 mailbox databasescannot be verified on Exchange Server 2010.You can configure the server by using the Verification Server tab of the Database VerificationSettings dialog box. If you specify a remote verification server, ensure that you correctly set upthe server.
Note: Whether you perform a remote or local verification, SnapManager performs theverification on a LUN that is backed up by a Snapshot copy. If you make a Snapshot copy of
152 | SnapManager® 6.0 for Microsoft® Exchange Installation and Administration Guide
the same volume on which a LUN that is backed up by a Snapshot copy exists, you create a“busy Snapshot copy.” This might cause problems when you attempt to delete some Snapshotcopies. For this reason, you must be careful not to schedule backups while a verificationoperation is in progress.
• Which method do you want to use to access database Snapshot copies during database integrityverification?
• Do you want to configure throttling of the database checksum verification rate?Throttling is available only if SnapManager is installed with Exchange Server 2003 SP2, or later,or Exchange Server 2007.
• When you restore from an unverified backup, do you want to override the verificationrequirement for restoring databases from backups?
Starting or scheduling database verificationYou can run or schedule database verification from the production Exchange server. You cannot usethe remote verification server.
Steps
1. On the production Exchange server, click Backup and Verify in the Actions pane.
2. Select the Storage Group on which you want to run the verification.
3. Select Verify Databases and Transaction Logs in the Most Recent Unverified Backups.
4. Select the required, and most recent unverified backups you want to verify.
Note: Only unverified backups are eligible for verification. For example, if you select to verifythe two most recent unverified backups, but the most recent backup’s databases have alreadybeen verified, then the previous two unverified backups are verified.
5. In the Backup Management Group field, select the backup management group of the backupsthat you want to verify.
If you want to verify the most recent backups regardless of their backup management group,select All.
6. If you want to run a command after the verification is complete, select the Run Command AfterOperation check box.
The command that you enter in the Run Command After Operation option archives backups.
7. If your volume is a SnapMirror source volume and you do not want the destination volume to beupdated after this verification is complete, clear the Update SnapMirror After Operation checkbox.
8. If your volume is a SnapMirror destination volume and you want to run integrity verification onthe available destination volume, select the Verify databases and transaction logs on theSnapMirror destination check box.
Database backup using SnapManager | 153
9. Click Verify Now, and in the Backup Status window, click Start Now.
Note: To schedule the verification for later, click Schedule instead and follow the prompts inthe dialog boxes.
Verification is run on the databases in the backup that you selected.
After you finish
If any backup database fails in the verification operation, delete that backup and create anotherbackup.
Related concepts
Automatic backup archiving using the Run Command After Operation feature on page 255
Backup management groupsCreating backup management groups enables you to designate various levels of backup retention,which facilitates your database backup strategy. The backup management group neither depends onnor enforces how often backups are performed. Backup management groups are only a backuplabeling convention that you can assign to a backup set.
You can identify and group backups according to the operations to be performed on them: manualdeletion, automatic deletion, and database verification.
When you explicitly delete multiple backups, you can specify that only backups belonging to acertain backup management group be deleted.
When you run or schedule a backup, you can specify how many of the most recent backups in agroup you want to retain. Only backups of the specified backup management group are deleted.
When you run or schedule a database verification separate from the database backup operation, youcan limit the number of backups you want to verify by specifying a particular backup managementgroup.
The database Snapshot copy names and SnapInfo directory Snapshot copy names reflect themanagement group to which you assigned the backup.
Next topics
Backup management group assignments on page 155
Example using backup management groups on page 155
Assigning a backup set to a different backup management group on page 155
Related concepts
SnapManager Backup overview on page 119
Backup database verification on page 151
154 | SnapManager® 6.0 for Microsoft® Exchange Installation and Administration Guide
Related tasks
Explicitly deleting backup sets or SnapInfo Snapshot copies on page 208
Backup management group assignmentsYou can assign a backup to a Standard, Daily, or Weekly backup management groups. When youstart or schedule a database backup, the Backup wizard and the Backup and Verify window use theStandard management group by default.
The choice of backup management group and the backup Snapshot copy naming convention affectsthe name that is assigned to the Snapshot copy. The name of each Snapshot copy created during aSnapManager backup operation includes information that identifies the Snapshot copy contents.
Related references
SnapManager Snapshot copy naming conventions on page 124
Example using backup management groupsYou can use backup management groups to perform simultaneous backups, on a schedule that youcan customize. You can schedule backups on a Standard, Weekly, or Daily basis using the backupmanagement groups.
Suppose you want to make backups at regular intervals between 7:30 a.m. and 7:30 p.m. You want tokeep the last backup of the day and retain it for a few weeks, and you want to keep one backup perweek for several months for archiving.
To achieve this using backup management groups, you can use the Standard backup managementgroup for the backups during the day. Use a separate backup job to create one backup in the Dailymanagement group at the end of the day. Then, once a week, you can use another job to create abackup in the Weekly backup management group.
You can then decide how many backup copies to retain independently for each backup managementgroup. For example, you can keep ten standard backups, seven daily backup copies (one week’sworth), and four weekly backup copies (one month’s worth).
If your daily or weekly backup job fails for any reason, you can replace it with the most recentsuccessful standard backup by changing its backup management group.
Assigning a backup set to a different backup management groupYou can use the dialog box Change Backup Management Group to change the backupmanagement group to which a backup set belongs.
About this task
• The backup management group for all these backups is changed if you complete this operation.The change occurs because the backup management group share a common Snapshot copy.
• When you change a backup’s backup management group, you also change that backup’s name,because the name includes the backup management group.
Database backup using SnapManager | 155
• The report for the backup management group change is in the Miscellaneous report directory.
Steps
1. Click Restore in the Scope pane.
SnapManager displays the list of Storage Groups in the Result pane.
2. Expand the Storage Group that contains the backup set whose management group you want tochange in the Result pane.
3. Double-click the backup whose management group you want to change.
4. Click Change Management Group in the Actions pane.
Note: If you have datasets configured in your system, and archiving of the primary StorageGroup to the secondary Storage Group is in process, you can change the backup managementgroup only after the database transfer for archiving completes.
5. Review the backups listed in the "Backups sharing this Snapshot" list.
Note: The backup management group for all of these backups is changed if you complete thisoperation. The change occurs because the backup management group members share acommon Snapshot copy.
6. In the "New Management Group" list, select the backup management group to which you want tomove the backup set.
7. Click OK.
The backup management group for this backup and all backups listed in the "Backups sharing thisSnapshot" list is changed.
Frequent Recovery Point backup operationA Frequent Recovery Point backup copy operation backs up new transaction logs and is performedafter a full backup operation. You can restore data up to a recovery point that you select.SnapManager combines the restore operation of a full backup copy and the required transaction logsto restore to the selected recovery point.
Next topics
How the Frequent Recovery Point feature works on page 157
Frequent Recovery Point backup operations on page 157
Frequent Recovery Point backup operation on clustered configurations on page 157
Frequent Recovery Point backup operation in a DAG on page 158
Verification of Frequent Recovery Point backup copies on page 158
Deletion of Frequent Recovery Point backup copies on page 158
156 | SnapManager® 6.0 for Microsoft® Exchange Installation and Administration Guide
Frequent Recovery Point backup reports on page 158
Performing a Frequent Recovery Point backup operation on page 158
Related tasks
Restoring data to a specified Frequent Recovery Point on page 174
How the Frequent Recovery Point feature worksFrequent Recovery Point backs up transaction logs at a frequency that you determine to meet theRecovery Point Objective (RPO). Frequent Recovery Point backs up the most recent transaction logscreated after the last full backup copy or the previous Frequent Recovery Point backup copy.
The Frequent Recovery Point feature creates backup copies at a specific frequency and names themusing a unique naming convention. The lowest value for the interval between any two FrequentRecovery Point backup copies is 10 minutes. The default value is 15 minutes.
You can create a Frequent Recovery Point backup copy after you create a full backup copy. You cantrigger a SnapMirror update of the SnapInfo volume after the Frequent Recovery Point backup iscomplete.
A Frequent Recovery Point backup operation creates a Snapshot copy on the SnapInfo volume andnames it using the following convention:
efrpinfo__<exchserver name>_date_time
SnapManager retains only one Snapshot copy with this name.
You can use "Run command after operation" with the Frequent Recovery Point feature.
Frequent Recovery Point backup operationsThere are various operations that you can perform with Frequent Recovery Point backups.
• Create a Frequent Recovery Point backup• Schedule a new Frequent Recovery Point backup job with the name FRPBackup• Modify an existing scheduled Frequent Recovery Point backup job• Delete an existing Frequent Recovery Point backup job
Frequent Recovery Point backup operation on clustered configurationsThe Frequent Recovery Point backup operation that SnapManager performs on clusteredconfigurations depends on the type of clustered configuration you use.
Configuration Frequent Recovery Point operation
Exchange 2007 LCR If you select a database for Frequent recovery Point backup operation,SnapManager backs up the transaction logs of the replica database also.
Database backup using SnapManager | 157
Configuration Frequent Recovery Point operation
Exchange 2007 CCR If you select the copy-based backup option when performing a Frequent RecoveryPoint backup operation, SnapManager backs up the transaction logs on the remotenode also.
Exchange 2003 Cluster SnapManager backs up the transaction logs on the active node.
Frequent Recovery Point backup operation in a DAGYou can perform a Frequent Recovery Point (FRP) backup operation in a Database AvailabilityGroup (DAG) by connecting either to the DAG or to a member server.
When you connect to the DAG, the Frequent Recovery Point backup operation creates FRP backupson all member servers in the DAG. You can create FRP backup for either active or passive databases,or for all databases on a specified member server, or on all member servers in the DAG.
Each server has its own FRP backup, independent of other member servers in the DAG.
Verification of Frequent Recovery Point backup copiesSnapManager does not perform transaction log verification when it creates Frequent Recovery Pointbackup copies. When you verify a full backup copy, SnapManager verifies all its previous FrequentRecovery Point backup copies.
Deletion of Frequent Recovery Point backup copiesWhen you delete a full backup without enabling up-to-the-minute restore functionality, SnapManagerdeletes all the subsequent Frequent Recovery Point (FRP) backup copies up to the next full backup.You cannot delete FRP backup copies independent of full backups.
Frequent Recovery Point backup reportsSnapManager creates a separate folder in which to save Frequent Recovery Point backup reports andnames it using the naming convention "FRP Backup [server]". The naming convention for thefile names of reports does not change.
Performing a Frequent Recovery Point backup operationYou can either create a Frequent Recovery Point backup or schedule Frequent Recovery Pointbackups.
Steps
1. In the Scope pane, select an Exchange server.
2. In the Actions pane, click Frequent Recovery Point Backup.
158 | SnapManager® 6.0 for Microsoft® Exchange Installation and Administration Guide
If... Then...
You have not scheduled the backup jobof Frequent Recovery Point
SnapManager does not display any job details. You can usethe Create Job button to create a new job specification.
You have scheduled the backup job ofFrequent Recovery Point
SnapManager displays the job details.
Use Update Job to update the job specifications.
Note: You can disable the current job by selecting the Disable scheduled job check box.
3. Under "Selected for backup," click Select All to select all the Storage Groups or databases at onetime, or click Unselect All to clear all your selections.
4. Under "Backup Frequency", specify the maximum frequency at which the recovery point backupneeds to be made:
a. In the "Every" list, select a number of minutes or hours from the list box to specify theinterval between the Frequent Recovery Point backups.
b. In the "Start at" list, select the time to run the Frequent Recovery Point backup.
5. Under "Operation options", select Run command after operation if you want to run a commandor script of your choice after the backup operation completes.
6. Do one of the following:
If you want to... Then do this...
Create one Frequent Recovery Pointbackup
Click Create Recovery Point.
The Backup Status window is displayed with the list of tasks.
Run Frequent Recovery Pointbackups at a specific interval
Click Create Job.
A scheduled job named FRPBackup is created under WindowsScheduled Tasks.
7. When you click Create Recovery Point and the backup status is displayed, click Start Now tocreate one new recovery point backup.
8. In the Backup Status window, click Close when the backup operation completes.
SnapManager displays a message with the result of the Frequent Recovery Point backup.
Creating multiple FRP backup jobs for different Exchange instances
You can create multiple FRP backup jobs for different Exchange instances in a Microsoft Active/Active cluster configuration using SnapManager. Such a configuration can have two or more active
Database backup using SnapManager | 159

Exchange instances on a single node, so two or more FRP backup jobs are required, one for eachinstance of Exchange.
Steps
1. Connect to one of the Exchange instances on the cluster.
2. Create the FRP backup job.
Note: The FRP backup job created by SnapManager is always named FRPBackup.
3. Rename the FRP backup job on all nodes by using Windows Scheduled Tasks.
4. Connect to another Exchange instance and repeat Steps 2 and 3.
Related tasks
Performing a Frequent Recovery Point backup operation on page 158
160 | SnapManager® 6.0 for Microsoft® Exchange Installation and Administration Guide
Database restore operation using SnapManager
Using SnapManager, you can restore a Local Copy Replication (LCR) copy, a Cluster CopyReplication (CCR) copy, a Database Availability Group (DAG) copy, databases created on adifferent Exchange servers, or an archived backup set. You can also restore a database to a RecoveryStorage Group (RSG) or Recovery Database.
You can restore your databases either from a backup copy that you created previously, or from anarchive. You can then optionally restore the databases up to their current state by replaying thetransaction logs. Replaying the transaction logs is necessary if your Exchange data becomescorrupted or becomes unavailable. With SnapManager 5.0 and later, you can restore the productionbackup copies, LCR-enabled backup copies, and CCR-enabled backup copies to either of thefollowing locations:
• The same Storage Group• The Recovery Storage Group
In addition to the above, with SnapManager 6.0 and later, you can also restore database copies tomember servers in the DAG.
SnapManager supports restoring an entire Storage Group or an individual database.
Attention: You must run SnapManager from the system console, not from a Terminal Servicesclient. Do not use Terminal Services for any type of SnapManager administration, because youmight miss critical information that is displayed only in pop-up boxes at the system console.
Next topics
When to choose SnapManager Restore to recover Exchange 2010 mailbox databases on page 162
How SnapManager Restore works on page 162
Guidelines for using SnapManager Restore on page 167
Restore from a SnapManager backup copy on page 169
Restoring Exchange 2010 databases in a DAG on page 176
Restore from an LCR-enabled Storage Group on page 178
Recovery Storage Groups on page 183
Restore of backups created at different Exchange server locations on page 193
Restoring backup copies that were created on other Exchange servers in Exchange2007 on page 194
Restoring backup sets from an archive on page 195
Recovery Database on page 196
Related concepts
SnapManager Backup overview on page 119
Database restore operation using SnapManager | 161
Database backup using SnapManager on page 135
Deletion of Snapshot copies on page 203
When to choose SnapManager Restore to recover Exchange2010 mailbox databases
You should know when to use SnapManager to recover an Exchange 2010 mailbox from databasefailure or data corruption.
The database switchover to a different server in the Database Availability Group (DAG) can be doneusing the EMC or the Exchange management shell.
Use SnapManager in the following situations:
• When using Exchange Server 2010 and DAG cannot recover the failed database.• When using Exchange Server 2010 and DAG to recover database will cause data loss.• When using Exchange Server 2010 and DAG cannot recover the database to a particular point in
time: for example, when a virus has spread to all copies of databases.• When using Exchange Server 2010 and DAG is confusing to the administrator, and using
SnapManager Restore is simple, fast and reliable.
How SnapManager Restore worksSnapManager Restore performs a sequence of steps when it restores a backup copy. If you arerestoring in a Windows cluster, do not attempt to manage any cluster resources while the restoreoperation is running.
1. Checks that the backup copy is verified.If not, SnapManager checks if you have enabled the Database Verification Override option andcontinues.
Attention: You must restore only from verified backup copies to ensure a successful restoreoperation.
2. Creates a Snapshot copy of the volume to be restored, so that the state before the restore operationis preserved.
3. Restores the data from the Snapshot copy of the LUN to be restored.
4. Restores the transaction logs that you need to replay to restore the data.
5. Uses the Exchange recovery process to play these transaction logs to the restored databases.On Windows Server 2003, the soft recovery process is used, which is a transaction log replayprocess that occurs when a database is re-mounted after an unexpected stop, or when transactionlogs are replayed into an offline backup of a database.
162 | SnapManager® 6.0 for Microsoft® Exchange Installation and Administration Guide
Next topics
How to choose the type of restore operation to perform on page 163
Types of SnapManager Restore operations on page 163
Snapshot copies created during a restore process on page 164
Methods that can decrease restore process time on page 165
Transaction log sequence verification options on page 165
LUN Clone Split Restore method on page 166
SnapManager Restore in a Windows cluster on page 167
SnapManager Restore in a live Exchange virtual server cluster on page 167
How to choose the type of restore operation to performYou should consider your reasons for performing a restore operation so that you can decide whattype of restore operation to perform: point-in-time or up-to-the-minute restore operation.
When to use an up-to-the-minute restore operation
• You want to play forward all the transactions up to the most current time.• You want to restore individual databases.• You want to restore backup copies after a point-in-time restore operation of a backup copy that is
not the most recent.• You want to perform an up-to-the-minute restore operation from any backup copy, including the
most recent backup copy after a point-in-time restore operation of the most recent backupoperation.You might lose all transactions that occurred between the time when you created the last backupcopy and when you performed the point-in-time restore operation.
Note: For to an up-to-the-minute restore operation to succeed, a contiguous set of all requiredtransaction logs must be in the SnapInfo folder and the transaction log directory of the StorageGroup.
When to use a point-in-time restore operation
• You want to recover the databases as they were at a particular point in time: example, when themost recent backup copy was created.
• You want to restore databases to a Recovery Storage Group or to a Recovery Database.• You want to restore all existing backup copies after a point-in-time restoration of a backup that is
not the most recent one.
Types of SnapManager Restore operationsThere are two types of SnapManager Restore operations. In a point-in-time restore operation, thetransaction logs in the active file system not committed to the databases at the time of backup
Database restore operation using SnapManager | 163

operation are replayed. In an up-to-the-minute restore operation, all uncommitted transaction logs arereplayed and are applied to the databases. This option is selected by default.
Point-in-timerestoreoperation
In this case, only the uncommitted transaction logs that existed in the active filesystem at the time the backup copy was created are replayed. All the transactionlogs beyond the point-in-time (after the backup copy was created) that exist in thetransaction log directory and that belong to the restored Storage Group areremoved.
You can use this method to restore a database or Storage Group back to a timebefore a corruption occurred.
Up-to-the-minuterestoreoperation
There are some transaction logs that are not committed to the databases. In an up-to-the-minute restore operation, all uncommitted transaction logs, from the timethe backup set was created up to the most current time, are played forward andapplied to the databases. This includes transaction logs from the backup sets, inaddition to the transaction logs in the transaction log directory. A contiguous set oftransaction logs is required for an up-to-the-minute restore operation to succeed.
Example: Up-to-the-minute restore operation
Suppose you run SnapManager Backup every day at noon, and on Wednesday at 4 p.m. youdecide to restore from a previous backup set. For some reason, the backup set fromWednesday noon failed verification, so you decide to restore from the Tuesday noon backupset. After that backup set is restored, all the transaction logs are played forward and applied tothe restored databases. This starts with those that were not committed when you createdTuesday’s backup set and continues through the latest transaction log written on Wednesday at4 p.m.
Related concepts
How to choose the type of restore operation to perform on page 163
Snapshot copies created during a restore processEvery time you perform a restore process, a Snapshot copy is created on the volume that contains thetransaction logs.
The name of the Snapshot copy that is created during a restore operation contains the prefixrstrsnap__. After you verify that a restore process is completed successfully and you are satisfiedwith the results, you can delete the restored Snapshot copy using the Delete option in the Actionspane.
Related tasks
Explicitly deleting Snapshot copies created by SnapManager Restore on page 210
164 | SnapManager® 6.0 for Microsoft® Exchange Installation and Administration Guide
Methods that can decrease restore process timeYou can decrease the time that SnapManager requires to complete a restore operation by makingmore backup copies and ensuring that any LUN clone split operations in progress are complete.
The more backup operations you perform, the fewer Exchange transaction logs need to be playedforward at restore time. At a minimum, you should perform one SnapManager full database backupoperation every 24 hours.
Before proceeding with failback to the production site, ensure that any LUN clone split operationsthat are in progress are complete. The LUN clone split functionality, introduced with Data ONTAP7.1, supports significantly faster online Snapshot copy restore operation when using SnapManager orSnapDrive to restore databases. By default, this functionality is enabled.
Transaction log sequence verification optionsYou can make a restore operation faster by omitting the pre-restore transaction log sequence anddatabase metadata checks. However, if you omit these checks, and a problem exists with yourtransaction log sequencing or your database metadata, the restore operation fails.
To perform an exhaustive check of the metadata, select the Verify Transaction Log Sequence... andthe Exhaustive Verification check boxes in Restore > Advanced Options. For backwardcompatibility among SnapManager versions, the exhaustive check of metadata is selected by default.
To perform a quicker, less comprehensive check of the transaction logs, select Verify TransactionLog Sequence... and clear Exhaustive Verification in Restore > Advanced Options.
To omit metadata verification, clear the Verify Transaction Log Sequence... and the ExhaustiveVerification check boxes in Restore > Advanced Options.
You have the following pre-restore transaction log sequence options available:
• Exhaustive transaction log sequence checks• Non-exhaustive transaction log sequence checks
Next topics
Exhaustive transaction log sequence on page 165
Non-exhaustive transaction log sequence on page 166
Exhaustive transaction log sequence
The exhaustive transaction log sequence checks the transaction log headers and mounts the Snapshotcopies for further verification.
SnapManager follows this sequence of steps:
1. Analyzes the transaction log headers.
2. Verifies the following conditions:
Database restore operation using SnapManager | 165
• The transaction logs are all present and sequenced correctly.• The signatures of all the transaction logs match.• Each transaction log's create time matches the next log’s previous time.
3. Mounts a Snapshot copy of the databases in this backup copy and analyzes the database headers.
4. Checks if the database signature matches the log database signature.
Non-exhaustive transaction log sequence
The non-exhaustive transaction log sequence uses only the file names of the transaction log forverification. SnapManager verifies that the transaction log sequence is correct and that all log filesare present.
This option is enabled if you clear the Exhaustive Verification check box in Restore > AdvancedOptions.
LUN Clone Split Restore methodSnapDrive uses the LUN Clone Split Restore method for Data ONTAP 7.1 or later. This featureenables you to perform a restore operation quickly, because the only data blocks that are duplicatedduring the restore operation are those currently in use in the active file system.
Note: The restore destination must exist in the active file system.
SnapManager follows these steps to restore a LUN to its LUN clone that exists in the active filesystem:
1. SnapManager creates a LUN clone.The LUN clone is unavailable for data I/O. The LUN clone inherits the presentation of the LUNin the active file system.
2. SnapManager renames the LUN clone with the name of the original clone.
3. LUN Clone Split (LCS) starts in the background.The LUN becomes available for data I/O after LCS completes.
Verifying the LUN Clone Split status
You can determine the LUN Clone Split status of your LUNs during a restore operation using thestorage system console or SnapDrive.
Step
1. Use the Data ONTAP lun clone split status command on the storage system console.
Additionally, SnapDrive 6.0 and later displays the LUN Clone Split status in the OperationStatus column of the SnapDrive user interface. For more information, see the relevant SnapDriveand Data ONTAP documentation.
166 | SnapManager® 6.0 for Microsoft® Exchange Installation and Administration Guide
SnapManager Restore in a Windows clusterIn a Windows cluster, SnapManager does not take the entire Exchange virtual server offline; instead,it takes the online Storage Group that is to be restored offline before performing a restore operation.SnapManager takes the Storage Group that is to be restored offline before performing the restoreprocess, if that Storage Group is still online.
If a cluster move group operation occurs during the restore process, you must restart SnapManagerand the restore process.
SnapManager Restore in a live Exchange virtual server clusterSnapManager can restore databases in a clustered Exchange virtual server while keeping the clusterphysical disk resource or the Exchange virtual server online. Keeping the cluster physical diskresource or the Exchange virtual server online minimizes downtime during the restore operation fordatabases in Storage Groups that share a cluster group but are not being restored.
This feature applies to LUN restore operations that use the Single-File SnapRestore (SFSR) methodas well as to those that use the LUN Clone Split restore method supported with Data ONTAP 7.1.
Guidelines for using SnapManager RestoreYou must follow some guidelines for choosing if you want to use an up-to-the-minute restoreoperation or a point-in-time restore operation; about the restore destination, and the naming of theStorage Groups.
Next topics
How to choose the type of restore operation to perform on page 163
Guidelines for restoring from a SnapManager backup copy on page 168
How to choose the type of restore operation to performYou should consider your reasons for performing a restore operation so that you can decide whattype of restore operation to perform: point-in-time or up-to-the-minute restore operation.
When to use an up-to-the-minute restore operation
• You want to play forward all the transactions up to the most current time.• You want to restore individual databases.• You want to restore backup copies after a point-in-time restore operation of a backup copy that is
not the most recent.• You want to perform an up-to-the-minute restore operation from any backup copy, including the
most recent backup copy after a point-in-time restore operation of the most recent backupoperation.
Database restore operation using SnapManager | 167
You might lose all transactions that occurred between the time when you created the last backupcopy and when you performed the point-in-time restore operation.
Note: For to an up-to-the-minute restore operation to succeed, a contiguous set of all requiredtransaction logs must be in the SnapInfo folder and the transaction log directory of the StorageGroup.
When to use a point-in-time restore operation
• You want to recover the databases as they were at a particular point in time: example, when themost recent backup copy was created.
• You want to restore databases to a Recovery Storage Group or to a Recovery Database.• You want to restore all existing backup copies after a point-in-time restoration of a backup that is
not the most recent one.
Guidelines for restoring from a SnapManager backup copyYou must follow some guidelines about the type of restore operation, the restore destination, andnaming of the Storage Groups before you begin to restore from a backup.
• Use the most recent backup copy for an up-to-the-minute restore process; otherwise, moretransaction logs need to be replayed, and the restore process takes more time.The most recent backup copy's name contains recent if you did not use the unique namingconvention; otherwise, it uses the most recent timestamp.
• You can restore an entire Storage Group or, if you configured your Exchange Server storagegroups and databases appropriately, individual databases.If you need to restore more than one Storage Group, run SnapManager Restore more than once.
• If you rename a Storage Group after backing it up, you cannot recover it from that backup copy.If you must recover a Storage Group from a backup copy made before the Storage Group wasrenamed, return the Storage Group to its former name, then recover it from the backup copy bythe same name.
• If you rename a Storage Group, make sure that you back it up as soon as possible.
Note: When you rename a Storage Group, unmount all of the databases in that Storage Group.After they are all unmounted, you can remount the databases. At this point, Exchangerecognizes the new Storage Group name, and SnapManager can make new backup copies.
• If you restore the Storage Group to the Recovery Storage Group, you can perform only a point-in-time restore process.
• Store all databases that reside on the same LUN together.
Related concepts
Decisions to make before restoring from a SnapManager backup copy on page 169
168 | SnapManager® 6.0 for Microsoft® Exchange Installation and Administration Guide
Related tasks
Restoring databases using the Restore window on page 172
Restore from a SnapManager backup copyYou can access SnapManager Restore to restore databases or Storage Groups from a backup copy intwo ways.
• SnapManager Restore wizard• Restore window accessed from the Actions pane
Next topics
Decisions to make before restoring from a SnapManager backup copy on page 169
Restoring databases using the Restore wizard on page 171
Restoring databases using the Restore window on page 172
Restoring data to a specified Frequent Recovery Point on page 174
Decisions to make before restoring from a SnapManager backup copyWhen you perform a restore operation, SnapManager prompts you to provide some information likethe restore object and destination, type of restore operation, and verification options that you need tokeep ready with you before you make decisions during the operation.
Restore object and destination
• What items do you want to restore?You can select the production databases and LCR copies that you want to restore.
• Which database do you want to restore?• Which Storage Group do you want to restore, or which Storage Group contains the databases that
you want to restore?• To what location do you want to restore the backup sets?
You can restore the backup sets to either one of the following locations:
• To the same Storage Group or same server• To the Recovery Storage Group or Recovery Database
Type of restore operation
• Do you want to perform an up-to-the-minute restore operation (the default) or a point-in-timerestore operation?
• Do you want to perform an actual restore operation or only a test restore operation?A test restore operation gives you a preview of the actual restore process to help you decide if youwant to go ahead with your current settings.
Database restore operation using SnapManager | 169
• If you want to perform an actual restore operation, do you want to mount your databases after therestore operation is complete?
Verification options
• Do you want to verify the transaction log sequence and database metadata before the restoreoperation?For Exchange Server 2007, SnapManager recovers the databases if you select Recover andmount databases after restore. For Exchange Server 2003, SnapManager recovers and mountsthe databases if you select the Mount databases after restore option. If you clear this option,SnapManager recovers only the databases.
• If you want to perform a test up-to-the-minute restore operation, do you want to verify the currenttransaction logs?The option to verify the current transaction logs confirms that all the required transaction logs arepresent.
• If the backup copy is unverified, do you want to verify it before the restore operation?• Which verification settings do you want to apply for restoring backup sets?• Do you want to select SnapMirror destination volumes for integrity verification?
If yes, click the Verification Server tab in the Database Verification Settings dialog box toselect SnapMirror destination volumes.
Related concepts
Types of SnapManager Restore operations on page 163
How to choose the type of restore operation to perform on page 163
Remote destination volume integrity verification on page 220
Related tasks
Restoring a database to a Recovery Storage Group in Exchange Server 2003 on page 189
Restoring a database to a Recovery Storage Group in Exchange Server 2007 on page 184
Mount options
When you perform a restore operation, you can specify the mount options after restore. You canselect the option to enable SnapManager to mount the databases immediately after completing therestore operation or you can mount the databases manually at a later time.
When you are restoring backups that were created on other Exchange servers or restoring backup setsfrom an archive, you have the additional option to associate all mailboxes in the newly restoreddatabases to the currently connected Exchange server.
Related tasks
Restoring a backup copy from one Exchange server to another in a DAG on page 177
Restoring a backup copy from an LCR replica Storage Group on page 178
Restoring databases from a CCR location on page 181
170 | SnapManager® 6.0 for Microsoft® Exchange Installation and Administration Guide
Restoring backup copies that were created on other Exchange servers in Exchange2007 on page 194
Restoring backup sets from an archive on page 195
Restoring databases using the Restore wizardYou can restore a Storage Group from a backup set by using the SnapManager Restore wizard whichguides you through the restore process.
Before you begin
• Close all windows on the Exchange server that runs SnapManager.• Disable any SnapManager operations that are scheduled to run against the Exchange data that you
want to restore, including any jobs scheduled on the remote administration server or the remoteverification server.
About this task
You can restore only one database or only one Storage Group or any one of the databases in aStorage Group at a time.
You can optionally perform a SnapManager backup and verification operation after restoration toverify that your restored database is free of physical-level corruption.
Do not perform a restore operation while a backup operation is in progress. If you cancel a currentbackup operation in progress, SnapManager pauses all the active scheduled backup jobs on theExchange server, or on all nodes in the cluster environment, and cancels the current backup copybefore performing the restore operation. On completing the restore operation, SnapManagerreenables the paused scheduled backup jobs. All the other inactive jobs are not changed.
If you want to restore after the current backup operation completes, SnapManager pauses all theactive scheduled backup jobs on the current Exchange server ( on all nodes in the clusterenvironment) but waits for the completion of the current backup operation before performing therestore operation. On completing the restore operation, SnapManager reenables the paused scheduledbackup jobs. All the other inactive jobs are not changed.
If you select a backup that is or has any archived backups, the Results pane displays the followingdetails about them:
• EDB primary storage• EDB primary LUN path• EDB secondary storage• EDB secondary qtree path• EDB secondary Snapshot copy name
The EDB secondary storage, EDB secondary qtree path, and EDB secondary Snapshot copy nameare used to mount the Snapshot copies using the SnapDrive CLI. To recover a mailbox from thearchived backup, use the Single Mailbox Recovery tool.
Database restore operation using SnapManager | 171
Steps
1. Select the Exchange server node in the Scope pane, and then click Restore.
SnapManager displays the Exchange Server storage groups and databases and the StorageGroups. When the SnapManager connects to the Database Availability Group (DAG), all backupsin the DAG are displayed and when it connects to a member server of the DAG, only the backupson that server are displayed.
2. Double-click the Storage Group or Database that you want to restore.
3. In the Actions pane, click Restore wizard.
4. Follow the instructions in the Restore wizard and go to the Restore Status window.
5. After the restore process is complete, click OK.
Your Exchange server comes back online.
Related concepts
Decisions to make before restoring from a SnapManager backup copy on page 169
Restoring databases using the Restore windowUnlike using the Restore wizard to restore your databases, using the Restore window enables you toconfigure the restore process on your own.
Before you begin
• Close all windows on the Exchange server that runs SnapManager.• Disable any SnapManager operations that are scheduled to run against the Exchange data that you
want to restore, including any jobs scheduled on remote management or remote verificationservers.
About this task
Do not perform a restore operation while a backup operation is in progress. If you cancel a currentbackup operation in progress, SnapManager pauses all the active scheduled backup jobs on theExchange server, or on all nodes in the cluster environment, and cancels the current backup copybefore performing the restore operation. On completing the restore operation, SnapManagerreenables the paused scheduled backup jobs. All the other inactive jobs are not changed.
If you want to restore after the current backup operation completes, SnapManager pauses all theactive scheduled backup jobs on the current Exchange server (on all nodes in the clusterenvironment) but waits for the completion of the current backup operation before performing therestore operation. On completing the restore operation, SnapManager reenables the paused scheduledbackup jobs. All the other inactive jobs are not changed.
After an actual restore process, you can optionally perform a backup and verification operation toverify that your restored database is free of physical-level corruption.
172 | SnapManager® 6.0 for Microsoft® Exchange Installation and Administration Guide
Steps
1. In the Scope pane, click Restore.
2. Select the Storage Group or Database that you want to restore.
If you want to restore from an archived backup copy and have datasets configured in your system,select the SnapVault and SnapMirror-enabled storage systems from the listed archived backupcopies.
3. Double-click the backup copy under the Storage Group or Database that you want to restore.
4. In the Actions pane, select Restore.
5. In the Choose databases to restore pane, select the databases that you want to restore.
6. Under Type of Restore, select if you want an up-to-the-minute restore or a point-in-time restoreoperation.
7. If you do not want to perform exhaustive verification of the transaction log sequence anddatabase metadata before the restore process, click Advanced Options.
8. Under Operation Options, clear the Verify Transaction Log Sequence and DatabaseMetadata Before Restore and Exhaustive Verification check boxes.
9. Coordinate the backup and restore processes using the Job Control Options pane:
If you want to... Then do this...
Cancel the current backup operation inprogress
Select Cancel conflicting backup that is in progress.
Restore after the current backup operation iscomplete
Select Wait for running backup to complete.
End the restore operation Select Abort restore if conflicting operation isrunning.
10. If the restore server does not have access to the archived backup storage, click Advancedoptions, and then under Archived Backup Access, select Restore server does not have accessto the archived backup storage.
11. If you are performing a test restore operation, click Test Restore.
a. To check the current logs (for up-to-the-minute restore operations only) and run databaseverification, in the Select Test Restore Options window, select Check current Logs.
b. To verify databases and transaction logs on available destination volumes, select RunVerification on Computer.
SnapManager displays the Restore Status window, showing the tasks that are performed for therestore process.
12. Click Start Now.
Database restore operation using SnapManager | 173
Related concepts
Integrity verification for test restore operations on page 219
Restoring data to a specified Frequent Recovery PointYou can use the Restore window to restore a point-in-time Frequent Recovery Point backup copythat is created after a full backup operation using the Restore window. SnapManager combines therestore operation of a full backup copy and the required transaction logs to restore to the selectedrecovery point.
Before you begin
Determine the Frequent Recovery Points of the backup copies that you want to restore.
About this task
Do not perform a restore operation while a backup operation is in progress. If you cancel a currentbackup operation in progress, SnapManager pauses all the active scheduled backup jobs on theExchange server, or on all nodes in the cluster environment, and cancels the current backup copybefore performing the restore operation. On completing the restore operation, SnapManagerreenables the paused scheduled backup jobs. All the other inactive jobs are not changed.
If you want to restore after the current backup operation completes, SnapManager pauses all theactive scheduled backup jobs on the current Exchange server ( on all nodes in the clusterenvironment) but waits for the completion of the current backup operation before performing therestore operation. On completing the restore operation, SnapManager reenables the paused scheduledbackup jobs. All the other inactive jobs are not changed.
After an actual restore process, you can optionally perform a backup and verification operation toverify that your restored database is free of physical-level corruption.
Steps
1. In the Scope pane, click Restore.
2. Select the storage groups that you want to restore, and then double-click the backup sets that youwant to restore.
3. In the Actions pane, select Restore.
4. In the Choose databases to restore pane, select the databases that you want to restore.
5. Under Type of Restore, select Point in time.
6. Click Select Recovery Point.
7. In the Scope for Recovery Point Selection list, select the date, start time, and end time.
8. Click Refresh.
9. Select a recovery point from the Available Recovery Points list.
174 | SnapManager® 6.0 for Microsoft® Exchange Installation and Administration Guide
SnapManager restores the transaction logs up to the selected recovery point. These logs are laterplayed forward by Exchange during recovery.
10. Click OK.
11. To coordinate the backup and restore processes, click Advanced Options.
If you want to... Then do this...
Cancel the current backup operation inprogress
Select Cancel conflicting backup that is in progress.
Restore after the current backup operation iscomplete
Select Wait for running backup to complete.
End the restore operation Select Abort restore if conflicting operation isrunning.
12. In the Operation Options pane, select one of the following to configure exhaustive verificationand mount settings:
If you want... Then do this...
To perform exhaustive verification of the transactionlog sequence and database metadata before the restoreprocess
Select Verify Transaction Log Sequenceand Database Metadata Before Restore andExhaustive Verification.
SnapManager to automatically remount your restoreddatabases immediately after the restore operation
Select Recover and mount database afterrestore.
13. If you are performing a test restore operation, click Test Restore.
a. To check the current logs (for up-to-the-minute restore operations only) and run databaseverification, in the Select Test Restore Options window, select Check current Logs.
b. To verify databases and transaction logs on available destination volumes, select RunVerification on Computer.
SnapManager displays the Restore Status window, showing the tasks that are performed for therestore process.
14. Click Start Now.
Related concepts
Integrity verification for test restore operations on page 219
Recovery of a database to a Frequent Recovery Point (FRP)
When you restore a full backup, you can specify the recovery point from the subsequent FRPbackups. SnapManager will perform a point-in-time restore operation and recover the database up tothe specified recovery point.
Database restore operation using SnapManager | 175

Restoring Exchange 2010 databases in a DAGYou can restore Exchange Server 2010 databases in the Database Availability Group (DAG) usingSnapManager Restore operation.
You can restore a database in a DAG from the following restore sources:
• SnapManager backup copies created on the same Exchange server• Backup sets created on multiple Exchange servers in the DAG• Unmanaged media
You can restore data to a specified Frequent Recovery Point (FRP).
You can also restore a database to the Recovery Database.
Next topics
Backups available for restore in a DAG on page 176
Restoring a backup copy from one Exchange server to another in a DAG on page 177
Reseeding after a restore operation in a DAG on page 178
Related tasks
Restoring data to a specified Frequent Recovery Point on page 174
Restoring a mailbox database to the Recovery Database in Exchange Server 2010 on page 197
Restoring backup sets from an archive on page 195
Restoring databases using the Restore window on page 172
Backups available for restore in a DAGWhen the SnapManager MMC snap-in connects to a Database Availability Group (DAG), you get aconsolidated view of all backups in the DAG. You can then select a backup copy to restore.
Backups are created on the server where the database is located. When the SnapManager MMC snap-in connects to a member server of the DAG, you can view backups specific to that server. For eachdatabase that is backed up, its backups are grouped under two headings: Local Backups andArchived Backups. Because the backup name includes the name of the Exchange server, it indicateswhere the backup is located.
Note: The database restore takes place on the server where the backup is located.
176 | SnapManager® 6.0 for Microsoft® Exchange Installation and Administration Guide
Restoring a backup copy from one Exchange server to another in a DAGYou can use the SnapManager Restore wizard to restore to one server an Exchange 2010 mailboxdatabase from a backup created on a different server in the Database Availability Group (DAG).
Before you begin
If a Exchange Server 2010 (mailbox server) was down due to physical server crash, disconnect theLUNs, remap the LUNs to different Exchange Server 2010 in the DAG, then run the restoreoperation from Restore Wizard to recover the database.
Note: If a member server is removed from a DAG, all its backups will still be valid for restore,even it is added to another DAG.
About this task
If the backup set is not verified, SnapManager gives you the option to verify the backup set beforethe restore operation.
Note: The option Restore from archive is renamed to Restore from Unmanaged Media forSnapManager 5.0 and later.
After an actual restore process, you can optionally perform a backup and verification operation toverify that your restored database is free of physical-level corruption.
Steps
1. In the Scope pane, select an Exchange server node.
2. In the Actions pane, click Restore wizard .
3. In the Which Exchange Server Created the Backups window, select the Restore backupcreated on a different server option.
4. In the Exchange Server Where Backups were Created window, specify the Exchange serverwhere the databases were backed up and the SnapInfo Directory Path.
5. Select a backup set that you want to restore.
6. In the Where to restore panel, select a restore option.
7. Follow the instructions in the Restore wizard, and go to Mount Options page.
8. To recover and mount database after the restore process, select Recover and mount databaseafter restore.
9. To associate all mailboxes in the newly restored databases to the currently connected Exchangeserver, select Update user accounts associated with mailboxes in restored databases to pointto mailbox server with the new name.
Note: If you restore the backup created on a different server, and select the Update useraccounts associated with mailboxes in restored databases to point to mailbox server with
Database restore operation using SnapManager | 177
the new name check box, SnapManager uses the Exchange cmdlet Move-Mailbox -ConfigureOnly internally to connect all the mailboxes in the newly restored database to thecurrently connected Exchange server.
Reseeding after a restore operation in a DAGBecause restoring a database in a Database Availability Group (DAG) does not automatically reseedit, you might need to do so manually after a restore operation.
Restore from an LCR-enabled Storage GroupYou can restore Exchange databases from a backup set created from an LCR-enabled storage group.
Next topics
Restoring a backup copy from an LCR replica Storage Group on page 178
What to do if corruption occurs in an LCR-enabled Storage Group on page 180
Restore from a CCR-enabled Storage Group on page 180
Restoring a backup copy from an LCR replica Storage GroupYou can use the Restore wizard to restore Exchange databases from a backup set that was createdfrom either an LCR location or in its original location using the Restore wizard.
Before you begin
• Ensure that you close all Windows Explorer windows on the Exchange server runningSnapManager.
• Disable any SnapManager operations that are scheduled to run against the Exchange data you arerestoring, including any jobs scheduled on remote management or remote verification servers.
About this task
SnapManager uses a special naming convention to indicate the backup sets created in an LCRlocation. For example, the backup copy created from the LCR copy in Storage Group1 is representedas Storage Group1(LCR).
If you select a backup copy from Storage Group1(LCR), SnapManager uses the backup copycreated on the LCR replica. If the backup copy is not verified, SnapManager displays an option in themessage box to verify the backup copies before restore operation.
All databases that reside in the same LUN must be restored together.
A database restore operation from an LCR replica Storage Group replaces the database and log filepaths but retains the SnapInfo directory path of original Storage Group.
178 | SnapManager® 6.0 for Microsoft® Exchange Installation and Administration Guide

Steps
1. In the Scope pane, click Restore.
2. In the Actions pane, click Restore Wizard.
3. In the Which Exchange Server Created the Backups window, select Restore SnapManagerbackups that were created on the same Exchange Server.
4. In the Choose the backup that you want to restore window, select the Storage Group tree andthe Storage Group that you want to restore.
5. Double-click the backup set under the Storage Group that you want to restore.
6. In the Choose the target for back up restoration window, select the location to which you wantto restore the SnapManager backup copy.
7. In the Choose the items to be restored window, select the check boxes corresponding to theproduction databases and the LCR replica databases that you want to restore.
8. In the Type of Restore window, select the type of restore operation.
9. If you are performing a test restore operation, click Yes, this is a test restore.
If you choose to perform an actual restore operation, select No, this is an actual restore.
10. Configure the verification settings in the Verify options window:
a. To check the current logs (for up-to-the-minute restore operations only) and run databaseverification, in the Select Test Restore Options window, select Check current Logs.
b. If you do not want to perform exhaustive verification of the transaction log sequence anddatabase metadata before the restore process, clear the Exhaustive verification check box.
c. If the restore server does not have access to the archived backup storage, click Advancedoptions, and then under Archived Backup Access, select Restore server does not haveaccess to the archived backup storage.
d. To coordinate the backup and restore processes, do the following in the Job Control Optionspane:
If you want to... Then do this...
Cancel the current backup operation inprogress
Select Cancel conflicting backup that is in progress.
Restore after the current backup operation iscomplete
Select Wait for running backup to complete.
End the restore operation Select Abort restore if conflicting operation isrunning.
11. For an actual restore process, if you want SnapManager to automatically recover and remountyour restored databases immediately after the restore process, select Mount DatabaseAutomatically After Restore in the Mount Options window.
Database restore operation using SnapManager | 179
12. Verify the restore settings and then click Finish.
13. To start the restore process, click Start Now.
Related concepts
Recovery Storage Groups on page 183
Integrity verification for test restore operations on page 219
What to do if corruption occurs in an LCR-enabled Storage GroupWhen corruption occurs in an LCR enabled Storage Group, see Microsoft Exchange serverdocumentation and use a Microsoft recommended method to recover a Storage Group. If an LCRrecovery fails, use a backup set to restore the Storage Group.
SnapManager restores the database from a backup set that was created from another LCR location toits own LCR location. After the restore operation, SnapManager changes the location of theproduction database to the previous LCR location and disables the LCR process.
Restore from a CCR-enabled Storage GroupYou can restore Exchange databases from a backup set created from a CCR location.
Next topics
CCR backup set behavior on page 180
CCR restore rules for reseeding on page 181
Restoring databases from a CCR location on page 181
What to do if corruption occurs in a CCR-enabled Storage Group on page 183
CCR backup set behavior
A CCR backup set has a certain pattern of behavior regarding on which node it resides and the portsharing service when you restore it in a CCR configuration.
• A backup set always resides on the node on which it is created.• When you select the backup set from either an active or a passive node, SnapManager performs
the restore operation on the node on which backup set was created.• Before the restore operation, SnapManager moves the virtual server cluster resource group to the
node on which the backup set is located.• You need the Net.Tcp Port Sharing Service for remote server-to-server communication.
By default, it is enabled when you install SnapManager. Verify that the Net.Tcp Port SharingService is enabled before you create a CCR backup set.
180 | SnapManager® 6.0 for Microsoft® Exchange Installation and Administration Guide
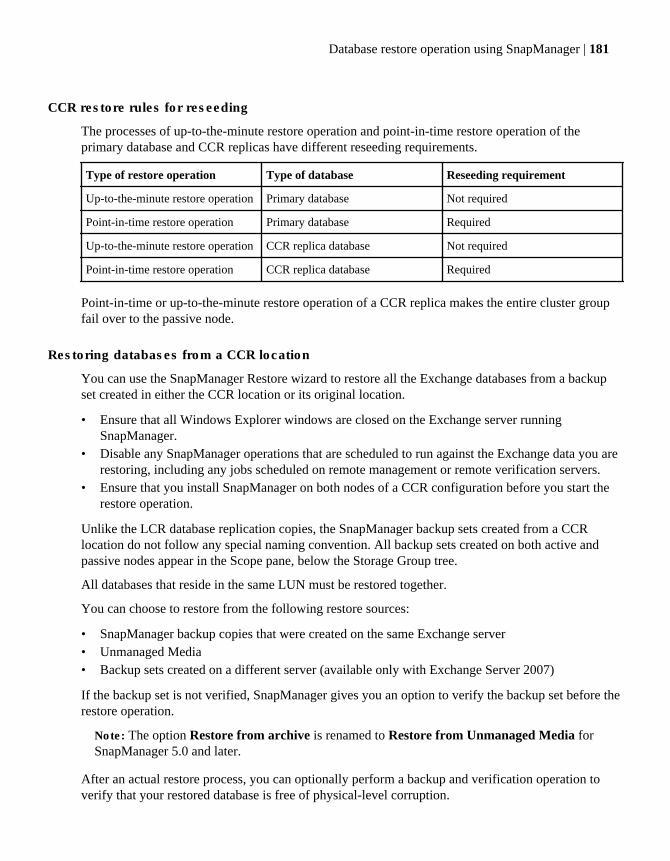
CCR restore rules for reseeding
The processes of up-to-the-minute restore operation and point-in-time restore operation of theprimary database and CCR replicas have different reseeding requirements.
Type of restore operation Type of database Reseeding requirement
Up-to-the-minute restore operation Primary database Not required
Point-in-time restore operation Primary database Required
Up-to-the-minute restore operation CCR replica database Not required
Point-in-time restore operation CCR replica database Required
Point-in-time or up-to-the-minute restore operation of a CCR replica makes the entire cluster groupfail over to the passive node.
Restoring databases from a CCR location
You can use the SnapManager Restore wizard to restore all the Exchange databases from a backupset created in either the CCR location or its original location.
• Ensure that all Windows Explorer windows are closed on the Exchange server runningSnapManager.
• Disable any SnapManager operations that are scheduled to run against the Exchange data you arerestoring, including any jobs scheduled on remote management or remote verification servers.
• Ensure that you install SnapManager on both nodes of a CCR configuration before you start therestore operation.
Unlike the LCR database replication copies, the SnapManager backup sets created from a CCRlocation do not follow any special naming convention. All backup sets created on both active andpassive nodes appear in the Scope pane, below the Storage Group tree.
All databases that reside in the same LUN must be restored together.
You can choose to restore from the following restore sources:
• SnapManager backup copies that were created on the same Exchange server• Unmanaged Media• Backup sets created on a different server (available only with Exchange Server 2007)
If the backup set is not verified, SnapManager gives you an option to verify the backup set before therestore operation.
Note: The option Restore from archive is renamed to Restore from Unmanaged Media forSnapManager 5.0 and later.
After an actual restore process, you can optionally perform a backup and verification operation toverify that your restored database is free of physical-level corruption.
Database restore operation using SnapManager | 181

Steps
1. Select an Exchange server node in the Scope pane.
2. In the Actions pane, click Restore wizard .
3. In the Which Exchange Server Created the Backup window, select the restore source.
4. In the Choose the backup that you want to restore window, double-click the backup set presentin a Storage Group.
5. In the Choose the target for backup restoration window, select Restore back to the sameStorage Group/Database.
6. In the Choose the items to be restored window, select the check boxes corresponding to theproduction databases and the replica databases that you want to restore.
7. In the Type of Restore window, select the type of restore operation.
8. If you are performing a test restore operation, click Yes, this is a test restore.
If you choose to perform an actual restore operation, select No, this is an actual restore.
9. Configure the verification settings in the Verify options window:
a. To check the current logs (for up-to-the-minute restore operations only) and run databaseverification, in the Select Test Restore Options window, select Check current Logs.
b. If you do not want to perform exhaustive verification of the transaction log sequence anddatabase metadata before the restore process, clear the Exhaustive verification check box.
c. If the restore server does not have access to the archived backup storage, click Advancedoptions, and then under Archived Backup Access, select Restore server does not haveaccess to the archived backup storage.
d. To coordinate the backup and restore processes, do the following in the Job Control Optionspane:
If you want to... Then do this...
Cancel the current backup operation inprogress
Select Cancel conflicting backup that is in progress.
Restore after the current backup operation iscomplete
Select Wait for running backup to complete.
End the restore operation Select Abort restore if conflicting operation isrunning.
10. For an actual restore process, if you want SnapManager to automatically recover and remountyour restored databases immediately after the restore process, select Mount DatabaseAutomatically After Restore in the Mount Options window.
11. Verify the restore settings and then click Finish.
182 | SnapManager® 6.0 for Microsoft® Exchange Installation and Administration Guide
12. To start the restore process, click Start Now.
Related concepts
Integrity verification for test restore operations on page 219
Related tasks
Restoring backup copies that were created on other Exchange servers in Exchange2007 on page 194
What to do if corruption occurs in a CCR-enabled Storage Group
When corruption occurs in a Storage Group that is CCR-enabled, see Microsoft Exchange Serverdocumentation and use a Microsoft recommended method to recover a Storage Group. Use a backupset located on CCR active node or passive node to restore the Storage Group.
If you use the backup set located on a CCR active node, the normal recovery procedure is applicable.
If you use the backup set located on a CCR passive node, SnapManager performs the followingtasks:
1. Manually fails over to the CCR passive node on which the backup set is locatedThe Exchange store writer becomes available on the previous passive node. SnapManager runsthe Restore-StorageGroupCopy cmdlet to make an extra copy of the log file on the previouspassive node before restore.
2. Performs a normal restore operationWhen the server comes online, the previous active node becomes a CCR passive node. Theprevious production database becomes the CCR copy location. To replicate, Reseeding thedatabases (which were the primary databases before the restore operation) again can enablereplication of the data.
Recovery Storage GroupsA Recovery Storage Group allows you to restore databases, to extract mailbox data, and to mergethat data to the original Storage Group on the production server. You can mount a second copy of anExchange mailbox store on a production Exchange server when the original store is still running.
A Recovery Storage Group is useful in the disaster recovery process. SnapManager 5.0 and later forExchange automates the mailbox store recovery process. In a normal recovery process, you need tomanually create the Recovery Storage Group. Then you add the Exchange mailbox store throughExchange System Manager (ESM) on Exchange Server 2003 and management shell cmdlets onExchange Server 2007. You can then restore the mailbox from the backup copies created and storedin the Recovery Storage Group.
You can restore databases to a Recovery Storage Group by using the restorebackup cmdlet withthe appropriate parameter in the SnapManager command-line interface.
Database restore operation using SnapManager | 183

Next topicsLimitations of using a Recovery Storage Group on page 184Restoring a database to a Recovery Storage Group in Exchange Server 2007 on page 184Restoring a database to a Recovery Storage Group in Exchange Server 2003 on page 189Restoring multiple databases to a Recovery Storage Group on page 192Restoring an unverified backup copy to a Recovery Storage Group on page 193
Limitations of using a Recovery Storage GroupAlthough you can benefit from using Recovery Storage Groups in SnapManager, there are somelimitations with the restore source, the type of restore operation, configuration of the restoreoperation, and the creation of a Recovery Storage Group.
• You cannot restore a public folder store to the Recovery Storage Group.• You cannot perform up-to-the-minute database recovery to a Recovery Storage Group.• You cannot restore databases to a Recovery Storage Group from the backups that are created by
other backup utilities.• You cannot change the configuration settings of a Recovery Storage Group, such as renaming it
and changing the database paths.• You cannot use SnapManager to create and destroy a Recovery Storage Group on Exchange
Server 2003.You need to manually create and destroy a Recovery Storage Group.
• You cannot use SnapManager to add, mount, and unmount databases in a Recovery StorageGroup on Exchange Server 2003.You need to add, mount, and unmount databases manually.
Restoring a database to a Recovery Storage Group in Exchange Server2007
You can use the Restore wizard to restore databases to the Recovery Storage Group. You create aRecovery Storage Group using the Exchange Server Disaster Recovery Analyzer Tool (ExDRA) inExchange Server 2007. SnapManager performs only a point-in-time restore process to the RecoveryStorage Group during a restore operation.
About this task
By default, the Delete the existing Storage Group check box is selected during the restore process,resulting in the deletion of the group as part of the restore operation. SnapManager does not allowyou to restore to an existing Recovery Storage Group.
To restore a backup set to a Recovery Storage Group in an Exchange cluster, connect the mountedLUNs that store the restored databases, transaction logs, and Storage Group system files only to thenode that owns the Exchange virtual server.
Add these mounted LUNs to the Exchange cluster group as physical disk resources and keep themonline at the end of restore process. These physical disk resources do not have the Affect the groupcheck box enabled because these LUNs are mapped to only one of the cluster nodes. If you move the
184 | SnapManager® 6.0 for Microsoft® Exchange Installation and Administration Guide
Exchange cluster group to another node, these physical disk resources fail, because they are notconnected to the other nodes. After you return the Exchange cluster group to the node on which theseresources are connected, you can bring them online.
SnapManager does not display the public folder database in the Restore wizard. You cannot restorepublic folder databases to the Recovery Storage Group.
As part of the restore to the Recovery Storage Group operation, SnapManager performs the followingoperations:
1. Destroys the existing Recovery Storage Group
2. Creates a new Recovery Storage Group
3. Adds databases to the new Recovery Storage Group
4. Mounts databases on the new Recovery Storage Group
If the backup set is not verified, SnapManager gives you an option to verify the backup set before therestore operation.
You can restore from the following restore sources:
• Backup sets that were created on the same Exchange server• Unmanaged Media• Backup sets created on a different server
After an actual restore process, you can optionally perform a backup and verification operation toverify that your restored database is free of physical-level corruption.
Steps
1. Select an Exchange server node in the Scope pane.
2. In the Actions pane, click Restore Wizard.
3. In the Which Exchange Server Created the Backups window, select the restore source.
4. In the Choose the backup that you want to restore window, double-click the backup set presentin a Storage Group.
5. In the Select the target for backup restoration window, select Restore to Recovery StorageGroup/Database.
6. In the Choose the items to be restored window, select the check boxes corresponding to theproduction databases and LCR replica databases that you want to restore.
7. In the Choose Recovery Storage Group/Database window, select the destination Exchangeserver to which you want to restore the backup set.
8. Specify the name of the new Recovery Storage Group to which you want to restore the selectedbackup sets.
9. In the Type of Restore window, select a Recovery point for your database.
Database restore operation using SnapManager | 185
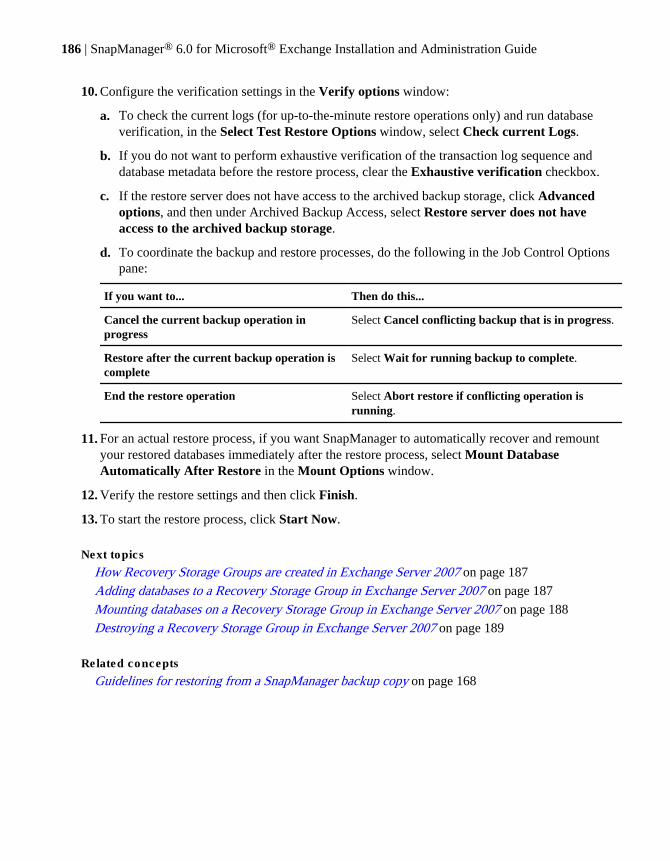
10. Configure the verification settings in the Verify options window:
a. To check the current logs (for up-to-the-minute restore operations only) and run databaseverification, in the Select Test Restore Options window, select Check current Logs.
b. If you do not want to perform exhaustive verification of the transaction log sequence anddatabase metadata before the restore process, clear the Exhaustive verification checkbox.
c. If the restore server does not have access to the archived backup storage, click Advancedoptions, and then under Archived Backup Access, select Restore server does not haveaccess to the archived backup storage.
d. To coordinate the backup and restore processes, do the following in the Job Control Optionspane:
If you want to... Then do this...
Cancel the current backup operation inprogress
Select Cancel conflicting backup that is in progress.
Restore after the current backup operation iscomplete
Select Wait for running backup to complete.
End the restore operation Select Abort restore if conflicting operation isrunning.
11. For an actual restore process, if you want SnapManager to automatically recover and remountyour restored databases immediately after the restore process, select Mount DatabaseAutomatically After Restore in the Mount Options window.
12. Verify the restore settings and then click Finish.
13. To start the restore process, click Start Now.
Next topics
How Recovery Storage Groups are created in Exchange Server 2007 on page 187
Adding databases to a Recovery Storage Group in Exchange Server 2007 on page 187
Mounting databases on a Recovery Storage Group in Exchange Server 2007 on page 188
Destroying a Recovery Storage Group in Exchange Server 2007 on page 189
Related concepts
Guidelines for restoring from a SnapManager backup copy on page 168
186 | SnapManager® 6.0 for Microsoft® Exchange Installation and Administration Guide
How Recovery Storage Groups are created in Exchange Server 2007
A Recovery Storage Group is created as part of the SnapManager restore operation. By default,SnapManager provides this group with a default Recovery Storage Group name that has the samename as the original Storage Group name, with -RSG appended to it.
For example, if the original Storage Group name is SG2, the Recovery Storage Group name is SG2-RSG. You can change the default Recovery Storage Group name either in the user interface or byspecifying the name in the command-line interface.
Adding databases to a Recovery Storage Group in Exchange Server 2007
You can add Exchange 2007 databases to the Recovery Storage Group by using the Restore wizardto add databases to the Recovery Storage Group during the SnapManager restore operation.
Steps
1. Select an Exchange server node in the Scope pane.
2. In the Actions pane, click Restore wizard.
3. In the Which Exchange Server Created the Backup window, select any of the followingoptions:
• Restore SnapManager backups that were created on the same Exchange server• Restore from Unmanaged Media• Restore backup created on a different server
4. In the Choose the backup that you want to restore window, double-click the backup set presentin a Storage Group.
If the backup is not verified, SnapManager gives you an option to verify the backup set before therestore operation.
5. In the Select the target for backup restoration window, select Restore to Recovery StorageGroup.
6. In the Choose the items to be restored window, select the check boxes corresponding to theproduction databases and LCR replica databases that you want to restore.
7. Proceed with the steps as directed by the Restore wizard.
Database restore operation using SnapManager | 187
Mounting databases on a Recovery Storage Group in Exchange Server 2007
When the Exchange Information Store service restarts, the databases in the Recovery Storage Groupare not mounted automatically. Use the Restore wizard to mount databases on a Recovery StorageGroup.
Steps
1. Select an Exchange server node in the Scope pane.
2. In the Actions pane, click Restore wizard.
3. In the Which Exchange Server Created the Backup window, select any of the followingoptions:
• Restore SnapManager backups that were created on the same Exchange server• Restore from Unmanaged Media• Restore backup created on a different server
4. In the Choose the backup that you want to restore window, double-click the backup set presentin a Storage Group.
If the backup set is not verified, SnapManager gives you an option to verify the backup set beforethe restore operation.
5. In the Select the target for backup restoration window, select Restore to Recovery StorageGroup.
6. In the Choose the items to be restored window, select the check boxes corresponding to theproduction databases and LCR replica databases that you want to restore.
7. In the Choose Recovery Storage Group window, select the destination Exchange server towhich you want to restore the backup set.
8. Specify the name of the new Recovery Storage Group to which you want to restore the selectedbackup sets.
9. In the Type of Restore window, select a Recovery point for your database.
10. Configure the verification settings in the Verify options window:
a. To check the current logs (for up-to-the-minute restore operations only) and run databaseverification, in the Select Test Restore Options window, select Check current Logs.
b. If you do not want to perform exhaustive verification of the transaction log sequence anddatabase metadata before the restore process, clear the Exhaustive verification check box.
c. If the restore server does not have access to the archived backup storage, click Advancedoptions, and then under Archived Backup Access, select Restore server does not haveaccess to the archived backup storage.
188 | SnapManager® 6.0 for Microsoft® Exchange Installation and Administration Guide
d. To coordinate the backup and restore processes, do the following in the Job Control Optionspane:
If you want to... Then do this...
Cancel the current backup operation inprogress
Select Cancel conflicting backup that is in progress.
Restore after the current backup operation iscomplete
Select Wait for running backup to complete.
End the restore operation Select Abort restore if conflicting operation isrunning.
11. For an actual restore process, if you want SnapManager to automatically recover and remountyour restored databases immediately after the restore process, select Mount DatabaseAutomatically After Restore in the Mount Options window.
12. Proceed with the steps as directed by the Restore wizard.
Destroying a Recovery Storage Group in Exchange Server 2007
With SnapManager 5.0 and later, you can destroy the Recovery Storage Group, since you cannotrestore to an existing Recovery Storage Group.
SnapManager performs the following actions when you destroy the Recovery Storage Group.
1. Unmounts the Recovery Storage Group from Exchange Server 2007
2. Disconnects all of the database LUNs in the Snapshot copy
3. Deletes the Recovery Storage Group from the target Exchange Server 2007
4. If your configuration is an MSCS cluster, removes the physical disk resource from the Exchangecluster group
Steps
1. In the Scope pane, click Backup.
2. In the Backup window, select the Recovery Storage Group that you want to delete.
3. In the Actions pane, select Delete Storage Group.
Restoring a database to a Recovery Storage Group in Exchange Server2003
You can mount a copy of a mailbox store onto a production server and recover data within therestored mailbox store while the current store is running using Recovery Storage Groups. You need
Database restore operation using SnapManager | 189
to manually create the Recovery Storage Group and add a mailbox store by using Exchange SystemManager (ESM).
About this task
When you run the SnapManager restore operation, SnapManager does the following:
1. SnapManager mounts the databases and transaction log LUNs onto the Snapshot copy that iscreated by the selected backup.Do not move the Exchange group. If you move the Exchange group to another node, the newlyadded physical disk resources will enter the failed state.
2. SnapManager performs a soft recovery process on the databases during the restore operation.SnapManager tracks the LUN information for unmounting. If your configuration is a clusterconfiguration, SnapManager adds mounted LUNs in a Snapshot copy to the Exchange clustergroup as a physical disk resource.After the soft recovery is complete, the databases are in a Clean Shutdown state.
Steps
1. Start Exchange System Manager (ESM).
2. Choose the option to create a recovery storage group.
3. Enter the transaction log location path by clicking the Browse button to locate and select the LUNthat SnapManager connected to during the restore operation.
4. Copy the transaction log location path to the System path location field.
5. Click OK to save your changes.
6. Select the database you want to recover then click OK.
7. Click the Database tab.
8. Enter the path to the database located on the LUN that SnapManager connected to during therestore operation.
9. Add a unique database file name to the path.
The database file name can be any name except the existing database file name. The Exchangedatabase file name must end in .edb. For example, SG2-DB1-RSG.edb.
10. Copy the Exchange database path and file name to the Exchange streaming database field andreplace the .edb suffix if the database file name with .stm.
11. Click OK.
12. Start Windows Explorer and navigate to the location of the database LUN that SnapManagerconnected to during the restore.
13. Rename the existing database files to the unique database file names you just created.
190 | SnapManager® 6.0 for Microsoft® Exchange Installation and Administration Guide
14. Mount the databases to the Recovery Storage Group.
15. To restore more than one database to the same Storage Group, repeat steps 1 through 15.
16. To restore the database from a different Storage Group, delete all of the databases in theRecovery Storage Group and remove the Recovery Storage Group through ESM.
Next topics
Creating a Recovery Storage Group in Exchange Server 2003 on page 191
Adding databases to a Recovery Storage Group in Exchange Server 2003 on page 191
Disconnecting LUNs of a Recovery Storage Group in Exchange Server 2003 on page 192
Related tasks
Creating a Recovery Storage Group in Exchange Server 2003 on page 191
Adding databases to a Recovery Storage Group in Exchange Server 2003 on page 191
Creating a Recovery Storage Group in Exchange Server 2003
You can restore databases to the Recovery Storage Group using the Exchange System Manager inExchange Server 2003. Before that, you must manually create the Recovery Storage Group.
Delete the existing Recovery Storage Group and disconnect all the database and log LUNs of theexisting Recovery Storage Group before you restore a backup set to a new Recovery Storage Group.Run the Restore to Recovery Storage Group option in the SnapManager Configuration wizardbefore adding the databases to the Recovery Storage Group.
Steps
1. In Exchange System Manager, right-click the server on which you intend to place the RecoveryStorage Group, click New, and then click Recovery Storage Group.
2. Name the Recovery Storage Group.
3. Specify the transaction log location and the system path location.
4. Click OK.
Adding databases to a Recovery Storage Group in Exchange Server 2003
You can use the Restore wizard to add database to a Recovery Storage Group to restore the database.Exchange automatically determines which databases can be added to the recovery storage group andpresents you with a list from which to choose.If the Recovery Storage Group already contains a database, Exchange limits the list of databases tothose in the same Storage Group as the database that you already added to the Recovery StorageGroup.
Database restore operation using SnapManager | 191
Steps
1. In Exchange System Manager, find the server on which you created the Recovery Storage Group,right-click the Recovery Storage Group, and then click Add Database to Recover.
2. In the Select database to recover dialog box, click the database that you want to recover andthen click OK.
3. Type the path to the database located at the LUN mounted on the Snapshot copy created by theselected backup set.
The database file name can be any name (for example, SG2-DB1-RSG.edb) except the databasefile name (for example, SG2-DB1.edb) that exists on that location.
4. Name the database, and define the paths for the database and streaming database files.
5. Click OK.
6. Rename the existing database to the specified name (for example, SG2-DB1-RSG.edb).
Disconnecting LUNs of a Recovery Storage Group in Exchange Server 2003
You can temporarily disconnect the Recovery Storage Group LUNs using SnapManager. InExchange Server 2003, SnapManager can only disconnect the LUNs; you need to use the ExchangeSystem Manager (ESM) to delete the Recovery Storage Group.
Steps
1. In the Scope pane, click Backup.
2. Select the Recovery Storage Group LUN that you want to disconnect.
3. In the Actions pane, select Disconnect LUNs.
SnapManager disconnects all the LUNs in the Snapshot copy that belong to that RecoveryStorage Group.
Restoring multiple databases to a Recovery Storage GroupYou can use SnapManager to restore multiple databases to a Recovery Storage Group. This optionsaves you from performing repeated restore operations.
About this task
You cannot add more than one database from the same Storage Group to the existing RecoveryStorage Group. If you attempt to perform this operation in an Exchange Server 2007 environment,after you select all of the databases that you want to recover, SnapManager deletes the existingRecovery Storage Group and creates a new Recovery Storage Group, into which it then adds all thedatabases that you chose to recover. In an Exchange Server 2003 environment, SnapManager does
192 | SnapManager® 6.0 for Microsoft® Exchange Installation and Administration Guide
not allow you to proceed if the Recovery Storage Group exists. You need to manually remove theRecovery Storage Group through ESM.
Steps
1. In the Actions pane, click Restore wizard.
2. In the Choose the target for back up restoration window, select the Restore to the RecoveryStorage Group option.
3. In the Choose the items to be restored, select the check boxes corresponding to the productiondatabases and the LCR replica databases that you want to restore.
4. Follow the instructions in the Restore wizard to complete the restoration of multiple databases toa Recovery Storage Group.
Restoring an unverified backup copy to a Recovery Storage GroupAs a part of a normal restore process, SnapManager verifies the backup Snapshot copies before theactual restore operation. If you need to perform a quick restore operation of a backup copy, you canoverride the database verification requirement. In such cases, SnapManager restores the unverifiedbackup copy directly to the Recovery Storage Group.
About this task
You should restore only from verified backup copies to ensure a successful restore operation.
Steps
1. In the Actions pane, select Backup Verification Settings.
2. In the Database Verification Settings dialog box, click the Override Verification tab.
3. Select the Override database verification requirement for restore check box.
4. Click OK.
Restore of backups created at different Exchange serverlocations
The SnapManager Restore wizard enables you to select the Exchange 2007 locations on which thedatabases were backed up, and then restore the databases to the current Exchange server. You canrestore those backups to either the same Storage Group or to a Recovery Storage Group. To restorebackups that were created on different servers, specify the details in the Exchange Servers wherebackups were created window during the restore operation.
Database restore operation using SnapManager | 193
Restoring backup copies that were created on otherExchange servers in Exchange 2007
You can restore SnapManager backup copies that were created on other Exchange servers to eitherthe same Storage Group or the Recovery Storage Group. By default, SnapManager restores thebackup sets to the Exchange server on which the restore operation is initiated.
Before you begin
To restore the backup copies from a different Exchange server to the Exchange server where therestore operation is initiated, you must first remap the source LUNs to the Exchange server by usingeither the same drive letters, or volume mountpoints (both drive letters and volume mountpoints) thatwere assigned for the original Exchange server.
To use the restored backup set created on another Exchange server for a particular Storage Group, alldatabase LUNs, transaction log LUNs, and SnapInfo LUNs must be remapped to the destination.
Steps
1. In the Scope pane, click Restore.
2. In the Actions pane, click Restore wizard.
3. Go through wizard to the Which Exchange Server Created the Backups page and select theRestore backup created on a different server option.
4. From the Exchange Server where the databases were backed up list, select the Exchangeserver to which the databases were backed up.
5. Under Enter the SnapInfo directory path of the backups, type the SnapInfo directory path.
6. Select a backup set that you want to restore.
7. In the Where to restore panel, select a restore option.
8. Follow the instructions in the Restore wizard, and go to Mount Options page.
9. To recover and mount database after the restore process, select Recover and mount databaseafter restore.
10. To associate all mailboxes in the newly restored databases to the currently connected Exchangeserver, Select Update user accounts associated with mailboxes in restored databases to pointto mailbox server with the new name.
Note: If you restore the backup created on a different server, and select the Update useraccounts associated with mailboxes in restored databases to point to mailbox server withthe new name check box, SnapManager uses the Exchange cmdlet Move-Mailbox -
194 | SnapManager® 6.0 for Microsoft® Exchange Installation and Administration Guide
ConfigureOnly internally to connect all the mailboxes in the newly restored database to thecurrently connected Exchange server.
Restoring backup sets from an archiveYou can restore backup sets from an archive created by third-party software to the same StorageGroup or server or to the Recovery Storage Group or Recovery Database. Using the RecoveryStorage Group or Recovery Database enables you to mount a mailbox store copy on a productionserver and recover data within the restored mailbox while the current mailbox store is still running.
Before you begin
While performing a restore operation from an archive, restore the archived SnapInfo directory to atemporary location. This SnapInfo directory must be part of the same backup set as the restored LUNthat contains the Exchange databases. The restored SnapInfo directory must have the SnapInfo fileand the .xml files.
Ensure that you have ready the SnapInfo directory path for the backup set that you want to restore.
Steps
1. In the Scope pane, click Restore.
2. In the Actions pane, click Restore wizard.
3. Go to the Which Exchange Server Created the backups window.
4. Select Restore from Unmanaged Media.
5. From the Backup Exchange Server list, select the Exchange server on which the archive backupwas originally created.
6. In the SnapInfo Directory Path field, type the path of the SnapInfo directory.
7. Select a backup set that you want to restore.
8. In the Where to restore panel, select a restore option.
9. Select the option to restore either the Mailbox Database or the Public folder, or both, asrequired.
10. Select the specified option to perform an up-to-the-minute restore operation or a point-in-timerestore operation, as required.
11. Specify if the restore operation is a test restore operation.
12. Under Operation Options, select Verify transaction log sequence and database metadatabefore restore to verify transaction log sequence and database metadata before the restoreoperation.
Database restore operation using SnapManager | 195
13. Under Operation Options, select Exhaustive verification to verify all signatures and metadatabefore the restore operation.
14. Select the appropriate job control option under Job Control Options to determine the order ofpriority, if any conflicting backup operations are running.
15. If the restore server does not have access to the remote archived storage, select Restore serverdoes not have access to archived backup storage.
16. Follow the instructions in the wizard, and go to the Mount Options page.
17. To recover and mount the database after the restore process, select Recover and mount databaseafter restore.
18. To associate all mailboxes in the newly restored databases to the currently connected Exchangeserver, select Update user accounts associated with mailboxes in restored databases to pointto mailbox server with the new name.
Note: If you restore the backup created on a different server, and select the Update useraccounts associated with mailboxes in restored databases to point to mailbox server withthe new name check box, SnapManager uses the Exchange cmdlet Move-Mailbox -ConfigureOnly internally to connect all the mailboxes in the newly restored database to thecurrently connected Exchange server.
19. Click Finish.
Up-to-the-minute restore from an archive backupAs newer backups are made, older backups and logs for older backups get deleted. Because an up-to-the-minute restore operation is possible only if the logs are present, you can perform an up-to-the-minute restore operation from archive backup only if local log backup exists. Therefore, restoringfrom an archive backup is usually a point-in-time restore operation, and not an up-to-the-minuterestore operation.
Related tasks
Restoring backup sets from an archive on page 195
Recovery DatabaseA Recovery Database is a special type of mailbox database that allows you to restore, recover, andmount your database to an Exchange server, while the original database is still serving the user. It is afeature available with Exchange Server 2010. It is not bound to any server or database and eachExchange Server 2010 can have only one such Recovery Database.
A Recovery Database is useful in the disaster recovery process. SnapManager automates the mailboxstore recovery process. You can add the Exchange mailbox store through management shell cmdlets
196 | SnapManager® 6.0 for Microsoft® Exchange Installation and Administration Guide

on Exchange Server 2010, then you can restore the mailbox from the backup copy created and storedin the Recovery Database.
You can restore a database to a Recovery Database by using the restore-backup cmdlet with theappropriate parameter in the SnapManager command-line interface.
Next topics
Limitations of using a Recovery Database on page 197
Restoring a mailbox database to the Recovery Database in Exchange Server 2010 on page 197
When to delete a Recovery Database on page 199
Limitations of using a Recovery DatabaseAlthough a Recovery Database allows you to restore, recover, and mount your database to anExchange server to retrieve mail while the original database is still serving the user, it has somelimitations in terms of the number of databases that you can restore, the type of restore operation thatyou can perform, and the configuration of the restore operation.
• You can use the Recovery Database for Exchange 2010 mailbox databases only.• You can use the Recovery Database as a target for restore operations but not for backup
operations.• You can mount only one Recovery Database at any time on an Exchange Server 2010.• You cannot use the Recovery Database to recover mailbox databases of Exchange Server 2003 or
Exchange Server 2007.• You cannot restore public folder data to the Recovery Database.
Restoring a mailbox database to the Recovery Database in ExchangeServer 2010
You can use the Restore wizard to restore an Exchange 2010 database to the Recovery Database.
About this task
SnapManager does not display the public folder database in the Restore wizard. You cannot restorepublic folder database to a Recovery Database.
If the backup set is not verified, SnapManager gives you the option to verify the backup set beforethe restore operation.
You can restore from the following restore sources:
• Backup that was created on the same Exchange server• Unmanaged media• Backup that was created on a different Exchange server
After an actual restore process, you can optionally perform a verification operation to verify that yourrestored database is free of physical-level corruption.
Database restore operation using SnapManager | 197
Steps
1. Either select an Exchange server node in the Scope pane or connect to the DAG.
2. In the Actions pane, click Restore Wizard.
3. In the Which Exchange Server Created the Backups window, select the restore source.
4. In the Choose the backup that you want to restore window, double-click the backup set listedunder the database.
5. In the Select the target for backup restoration window, select Restore to the RecoveryStorage Group/Database.
6. In the Choose the items to be restored window, select the check boxes corresponding to theproduction databases that you want to restore.
7. In the Choose Recovery Storage Group/Database window, select the destination Exchangeserver to which you want to restore the backup set.
Note: You cannot specify a Database Availability Group (DAG) name as a destinationExchange server.
8. Specify the name of the new Recovery Database to which you want to restore the selected backupset.
9. In the Type of Restore window, select a recovery point for your database.
10. Configure the verification settings in the Verify options window:
a. To check the current logs (for up-to-the-minute restore operations only) and run databaseverification, in the Select Test Restore Options window, select Check current Logs.
b. If you do not want to perform exhaustive verification of the transaction log sequence anddatabase metadata before the restore process, clear the Exhaustive verification check box.
c. If the restore server does not have access to the archived backup storage, click Advancedoptions, and then under Archived Backup Access, select Restore server does not haveaccess to the archived backup storage.
d. To coordinate the backup and restore processes, make the following selections in the JobControl Options pane:
If you want to... Then do this...
Cancel the current backup operation inprogress
Select Cancel conflicting backup that is in progress.
Restore after the current backup operation iscomplete
Select Wait for running backup to complete.
End the restore operation Select Abort restore if conflicting operation isrunning.
198 | SnapManager® 6.0 for Microsoft® Exchange Installation and Administration Guide

11. For an actual restore process, if you want SnapManager to automatically recover and remountyour restored databases immediately after the restore process, select Mount DatabaseAutomatically After Restore in the Mount Options window.
12. Verify the restore settings and then click Finish.
13. To start the restore process, click Start Now.
When to delete a Recovery DatabaseBecause each Exchange Server 2010 can have only one Recovery Database mounted at any giventime, after you recover the mailbox from the Recovery Database, you must delete the RecoveryDatabase. You can then recover other mailbox databases.
You can delete the Recovery Database using the SnapManager MMC.
Database restore operation using SnapManager | 199

Mailbox restore using Single Mailbox Recovery
You can use SnapManager for Microsoft Exchange to launch the Single Mailbox Recovery (SMBR)application to restore your mailbox data.
Single Mailbox Recovery works in conjunction with SnapManager for Microsoft Exchange. You canuse SnapManager for Exchange to perform online backups of Exchange databases. When you need torestore previously deleted, individual Exchange mailbox items, you can launch Single MailboxRecovery through SnapManager for Exchange to locate and then restore items at any level ofgranularity, directly to an existing mailbox on your Exchange server. For more information, seeSingle Mailbox Recovery User Guide.
Next topics
Recovering mailbox data on page 201
Cleaning up after Single Mailbox Recovery on page 202
Related tasks
Recovering mailbox data on page 201
Cleaning up after Single Mailbox Recovery on page 202
Recovering mailbox dataWhen you need to restore mailbox items to your Exchange server, you can launch the Single MailboxRecovery application via SnapManager for Microsoft Exchange to locate and restore these items.
Before you begin
Ensure that Single Mailbox Recovery version 5.0 or later is installed on the server that is running theSnapManager for Microsoft Exchange user interface, MMC Snap-in. Also, if you are usingProtection Manager, ensure that both the source and destination Single Mailbox Recovery servers areconfigured for Protection Manager access. See the sdcli dfm_config command for help on howto configure SnapDrive to access a Protection Manager server.
Steps
1. Select the Exchange server node in the Scope pane, and then click Restore.
SnapManager for Microsoft Exchange displays the Exchange server storage groups anddatabases.
2. Click the name of the backup that you want to restore.
You can select both local backups and archive backups.
Mailbox restore using Single Mailbox Recovery | 201
3. In the Actions pane, click Run SMBR.
SnapManager for Microsoft Exchange displays a the Start SMBR dialog box.
4. Provide the information required by the Single Mailbox Recovery software, such as the databasename and optionally usage of the transaction logs.
For more information about using Single Mailbox Recovery software, see the Single MailboxRecovery User Guide.
5. Click Start SMBR to launch the SMBR software and start the mailbox recovery.
After you finish
After the Single Mailbox Recovery application restores your mailbox items, you must unmount thesnapshots you restored.
Related tasks
Cleaning up after Single Mailbox Recovery on page 202
Cleaning up after Single Mailbox RecoveryIn order to recover mailbox data, Single Mailbox Recovery needed to mount the mailbox backupcopy that contained the appropriate data. After your mailbox data is recovered, you need to unmountthe backup copy. Mounted backup copies use resources and cannot be deleted.
About this task
For Microsoft Windows 2007, unmounting the backup copies actually renames the backup copy ofthe resource group by appending the back up copy name with a timestamp.
Steps
1. Select the Exchange server node in the Scope pane, and then click Restore.
SnapManager displays the Exchange server data store and the Storage Groups.
2. In the Actions pane, click SMBR Cleanup.
3. Select the LUNs that you want to unmount, and then click Dismount.
To select all of the LUNs that were mounted during the restore process, click Select All.
4. Close the window when the progress bar indicates that the cleanup process is complete.
202 | SnapManager® 6.0 for Microsoft® Exchange Installation and Administration Guide
Deletion of Snapshot copies
You can use the Delete Backup dialog box to explicitly delete multiple Snapshot copies from one ormore Storage Groups or databases. You can delete either entire backup sets, or only the SnapInfoSnapshot copies related to the selected backup sets, and you can delete Snapshot copies createdduring previous restore operations.
You can use the Delete Backup dialog box to delete backups when the SnapManager MMC snap-inconnects to a member server of the Database Availability Group (DAG), but this box is not availablewhen it connects to the DAG.
Do not use SnapDrive or storage system administration tools to delete Snapshot copies created bySnapManager. Doing so will leave behind unwanted data that cannot be removed.
You must run SnapManager from the system console, not from a Terminal Services client. Do notuse Terminal Services for any type of SnapManager administration, because you might miss criticalinformation that is displayed only in pop-up boxes at the system console.
Next topics
Criteria for deleting backups on page 203
Automatic deletion of Snapshot copies on page 131
Explicit deletion of Snapshot copies on page 205
Explicitly deleting individual backup copies on page 207
Explicitly deleting backup sets or SnapInfo Snapshot copies on page 208
Explicitly deleting Snapshot copies created by SnapManager Restore on page 210
Problem deleting backups due to busy Snapshot copy error on page 211
Related concepts
SnapManager Backup overview on page 119
Database backup using SnapManager on page 135
Database restore operation using SnapManager on page 161
Criteria for deleting backupsTo avoid reaching the limit of 255 Snapshot copies per volume, you should delete the backups thatyou no longer need. You can delete backups by using either the age-based criteria or the quantity-based criteria.
Age-basedSnapshot copydeletion
You can delete backups that are assigned to a particular backup managementgroup and that are older than a specified number of days. You can specify thedeletion criteria by selecting the “Delete backups older than” option. Enter the
Deletion of Snapshot copies | 203
number of days for which you want to keep the most recent backups for thebackup management group.
Quantity-basedSnapshot copydeletion
You can delete backups that are assigned to a particular backup managementgroup so that only a specified number of backups remain for that backupmanagement group. Specify the deletion criteria by selecting the “Delete (oldest)backups in excess of” option. Enter the number of the most recent backups thatyou want to keep for the backup management group.
Note: Automatic deletion of older backups in a management group is the recommended methodfor managing the number of Snapshot copies stored on your system.
When SnapManager counts the number of stored backups, it also counts the backups that are sharedby multiple Storage Groups. Therefore, more backups than you specify in the “Delete backups olderthan” or “Delete backups in excess of” box are retained.
For example, assume that you back up Storage Groups A and B. Both reside on the samevolume and contain the following backup sets.
Backup set Description
Storage Group A
exchsnap__orbit3_01-23-2006_16.
21.07Old backup—good
exchsnap__orbit3__recent Recent backup—good
Storage Group B
exchsnap__orbit3_01-23-2006_16.
21.07Old backup—good
exchsnap__orbit3__recent Recent backup—inconsistent
You set the “Delete backups in excess of” box to 2 to preserve the most recent two backupsets.
To preserve two good backups for Storage Group B, SnapManager does not delete theSnapshot copy exchsnap__orbit3_01-23-2006_16.21.07, which is old and good.Therefore, because both Storage Groups reside on the same volume, three backups for StorageGroup A remain instead of two.
Related concepts
Database backup using SnapManager on page 135
Deletion of Snapshot copies on page 203
204 | SnapManager® 6.0 for Microsoft® Exchange Installation and Administration Guide
Automatic deletion of Snapshot copiesYou can manage the number of Snapshot copies you store by configuring SnapManager to deletebackups automatically, based on how old the backups are or based on how many of them are stored.
Automatic deletion deletes a backup only if the backup has the following characteristics:
• The backup is in the same management group as the management group of the backups that youjust created.
• The backup is the oldest backup of the Storage Group• The number of backups exceeds the backup retention level that you specified in the “Delete
backups older than” option or the “Delete backups in excess of” option.
Note: If a storage group is no longer available in the Exchange server, then backups associatedwith it can not be removed by the delete backup module .
If you do not select automatic backup deletion, backups that are created after the current backup areretained. This would require manual removal of backups, or enough storage capacity for all backupsand transaction logs. You can delete the retained backups by selecting automatic backup deletion inthe next backup that you take.
Related concepts
Backup management groups on page 154
Option to retain up-to-the-minute restore ability on page 206
Explicit deletion of Snapshot copiesYou can explicitly delete any backups or Snapshot copies of LUNs created during a restore operationby selecting them. You can delete either an individual backup or multiple backups.
When you explicitly delete backups, you can also ensure that the deletion is limited so as not tocreate a break in the continuity of the transaction logs between the previous backup and the presenttime. Doing so allows you to retain up-to-the-minute restore ability for older backups from othermanagement groups.
Attention: Do not use SnapDrive or the storage system administration tools to delete Snapshotcopies created by SnapManager. Doing so leaves behind unwanted data that you cannot remove.
You can delete individual selected Snapshot copies for either full database backups or transactionlogs. You can also select a database to be deleted, the types of backup set components to be deleted(full database backups or SnapInfo directory backups), and the type of backup management group tobe deleted for multiple backups.
Deletion of Snapshot copies | 205
When you explicitly delete backup sets (or related SnapInfo Snapshot copies) that contain selectedStorage Groups, you can expand the scope of the deletion to include backups that contain only someof the selected Storage Groups (in addition to backups that contain all the selected Storage Groups).
Related concepts
Option to retain up-to-the-minute restore ability on page 206
Database restore operation using SnapManager on page 161
Related tasks
Explicitly deleting individual backup copies on page 207
Explicitly deleting Snapshot copies created by SnapManager Restore on page 210
Option to retain up-to-the-minute restore abilityIf you delete backups and transaction logs that are not the oldest backups in your backup list, theoldest backups are no longer available for up-to-the-minute restore. Ensure that you do not break thecontinuity of transaction logs between the previous backup and the present time.
When you delete backups of a particular backup management group, limiting the backup deletionallows you retain the ability to use the older backups in an up-to-the-minute restore operation.
To limit the backup deletion, use the "Retain up-to-the-minute restore ability for older backups inother backup management groups" option in the Advanced Options dialog box. Selecting this optionconsumes more space on your storage system for the transaction logs that are not deleted, and it isselected by default.
If all backups have the same management group designation, there is no effect if you clear the option.SnapManager deletes the SnapInfo directory transaction logs according to the Delete backups setting,and ignores the Retain up-to-the-minute restore ability option.
By default, SnapManager backs up selected database files and all associated transaction logs, so thatup-to-the-minute restores are possible from all backups. If you do not need to perform an up-to-the-minute restore operation from the older backups, delete the transaction logs to free space on thestorage system that contains the backups. The "Retain up-to-the-minute restore ability for olderbackups in other backup management groups" option is automatically selected the next time you startSnapManager.
As an example, assume that you have the following backups stored:
• exchsnap_WINSRV3_01_05_2004_19.05.37_Daily (Oldest)• exchsnap_WINSRV3_01_06_2004_08.23.14• exchsnap_WINSRV3_01_06_2004_10.22.19• exchsnap_WINSRV3_01_06_2004_12.18.58• exchsnap_WINSRV3_01_06_2004_14.28.03 (Newest)
206 | SnapManager® 6.0 for Microsoft® Exchange Installation and Administration Guide
If you perform a Standard backup, and specify that you want to retain only the four mostrecent Standard backups the oldest Standard backup is deleted, and the daily backup becomespoint-in-time only:
• exchsnap_WINSRV3_01_05_2004_19.05.37_Daily (Oldest) (Daily backup becomespoint-in-time only)
• exchsnap_WINSRV3_01_06_2004_08.23.14 (Oldest Standard backup deleted)• exchsnap_WINSRV3_01_06_2004_10.22.19• exchsnap_WINSRV3_01_06_2004_12.18.58• exchsnap_WINSRV3_01_06_2004_14.28.03• exchsnap_WINSRV3_01_06_2004_16.23.48 (Newest) (New Standard backup created)
To avoid breaking the continuity of transaction logs, you can enable the "Retain up-to-the-minute restore ability for older backups in other backup management groups" option.
Explicitly deleting individual backup copiesYou can delete an individual backup copies.
About this task
If you select the Retain up-to-the-minute restore ability for older backups in other backupmanagement groups option, transaction logs are deleted only from this backup management group;transaction logs are not deleted from other backup management groups. If you clear this option,transaction logs are deleted from other backup management groups as well.
Steps
1. In the Scope pane, Select Restore.
2. Select the Storage Group in which the backup copy resides.
3. Click Delete in the Actions pane.
4. In the Delete Single Backup window, select the backup copies that you want to delete.
5. Review the list of backup copies that share the Snapshot copy you want to delete, because all ofthese backup copies are deleted simultaneously.
6. If you want to retain up-to-the-minute restore ability for older backups in other backupmanagement groups, select Retain up-to-the-minute restore ability for older backups in otherbackup management groups.
7. Click OK.
Related concepts
Option to retain up-to-the-minute restore ability on page 206
Deletion of Snapshot copies | 207
Explicitly deleting backup sets or SnapInfo Snapshot copiesYou can delete backup sets (or only the SnapInfo Snapshot copies related to those backup sets) thatcontain one or more selected Storage Groups or databases. If you need to free some space or reduceyour Snapshot copy count without deleting a SnapManager Backup, you can delete the SnapInfoSnapshot copies without affecting the associated backup.
About this task
The Backup Component selection is set to Backup Data Sets by default, so that you delete the entirebackup set, including related transaction logs and SnapInfo directories. You can narrow this selectionfurther by selecting SnapInfo Snapshot copies Only.
The Management Group selection further narrows the scope of the deletion by specifying the backupmanagement group of the backups that you want to delete.
For easiest backup administration, it is best if you always back up an entire Storage Group set.
If you select the Retain up-to-the-minute restore ability for older backups in other backupmanagement groups option, transaction logs are deleted only from the specified backupmanagement group; transaction logs are not deleted from other backup management groups. On theother hand, if you clear this option, transaction logs are deleted from other backup managementgroups as well.
Steps
1. In the Actions pane, click Delete Backup.
Note: You can access Delete Backup when you connect to a member server, but not when youconnect through the Database Availability Group (DAG).
2. If you want to display a list of the backup components on your SnapManager system, selectBackup Component.
Note: You cannot select an individual backup component for deletion by using this list.
3. Select one or more Storage Group sets or databases whose backups are to be deleted.
4. To delete backups that contain some of the selected Storage Groups (in addition to the backupsthat contain all the selected Storage Groups), click Advanced > Delete backups that containdatabases belonging to one or more storage groups.
Note: This option is useful only if you created backups that did not contain all Storage Groupsin a Storage Group set.
For this backup deletion operation only, multiple backup deletions delete backups that containany one or more of the selected databases.
208 | SnapManager® 6.0 for Microsoft® Exchange Installation and Administration Guide

5. Select the Backup Component.
6. Select the Management Group.
It is set to Standard by default. You can change Management Group to Daily, Weekly, or All.
7. If you want to retain up-to-the-minute restore ability for older backups in other backupmanagement groups, click Advanced > Retain up-to-the-minute restore ability for olderbackups in other backup management groups.
Note: If you selected All for the backup management group, this option has no effect and isdisabled.
8. In the specified Storage Group and backup management groups, specify those that you want todelete.
If you want to delete... Then...
The oldest backups In the Delete oldest backups in excess of box, specify howmany of the newest backups in the specified backupmanagement group you want to preserve.
All the backups in the specifiedbackup management group
Select the Delete all backups in the specified managementgroup option.
Only the backups that are older thana specified number of days
In the Delete backups older than box, specify the number ofdays for which you want to keep the most recent backups.
9. To see what backup components would be deleted with the parameters you have entered, withoutdeleting them, click Delete Preview.
The Delete Backup Data Set Preview window is displayed. After a moment, a count and list ofthe backup components identified for deletion are displayed.
10. If, after previewing the deletion, you want to delete the backup components listed in the preview,click Delete in the Delete Backup Data Set Preview window.
The backup components listed in the preview window are deleted.
11. If you chose not to preview and delete the backup components, as described in Steps 9 and 10,click Delete now to delete them.
When the deletion is complete, a status popup is displayed.
Related concepts
Option to retain up-to-the-minute restore ability on page 206
Deletion of Snapshot copies | 209
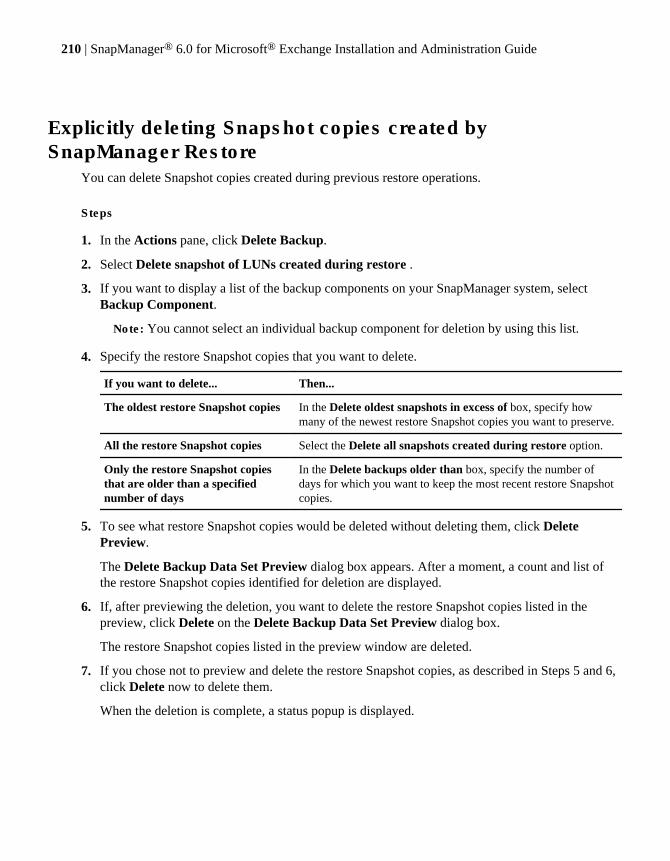
Explicitly deleting Snapshot copies created bySnapManager Restore
You can delete Snapshot copies created during previous restore operations.
Steps
1. In the Actions pane, click Delete Backup.
2. Select Delete snapshot of LUNs created during restore .
3. If you want to display a list of the backup components on your SnapManager system, selectBackup Component.
Note: You cannot select an individual backup component for deletion by using this list.
4. Specify the restore Snapshot copies that you want to delete.
If you want to delete... Then...
The oldest restore Snapshot copies In the Delete oldest snapshots in excess of box, specify howmany of the newest restore Snapshot copies you want to preserve.
All the restore Snapshot copies Select the Delete all snapshots created during restore option.
Only the restore Snapshot copiesthat are older than a specifiednumber of days
In the Delete backups older than box, specify the number ofdays for which you want to keep the most recent restore Snapshotcopies.
5. To see what restore Snapshot copies would be deleted without deleting them, click DeletePreview.
The Delete Backup Data Set Preview dialog box appears. After a moment, a count and list ofthe restore Snapshot copies identified for deletion are displayed.
6. If, after previewing the deletion, you want to delete the restore Snapshot copies listed in thepreview, click Delete on the Delete Backup Data Set Preview dialog box.
The restore Snapshot copies listed in the preview window are deleted.
7. If you chose not to preview and delete the restore Snapshot copies, as described in Steps 5 and 6,click Delete now to delete them.
When the deletion is complete, a status popup is displayed.
210 | SnapManager® 6.0 for Microsoft® Exchange Installation and Administration Guide
Problem deleting backups due to busy Snapshot copy errorIf you delete a backup copy of a LUN that was already backed up by another Snapshot copy, you getan error message saying that the Snapshot copy is busy and cannot be deleted. In this case, you needto delete the most recent backup copy before the older backup can be deleted.
To see if you have busy Snapshot copies, you can view your Snapshot copies in FilerView or use thestorage system snap list command. For more information about deleting busy Snapshot copies,see Data ONTAP Block Access Management Guide for iSCSI and FC for your version of DataONTAP.
Note: To avoid this situation, ensure that you do not make backup copies of LUNs that are alreadybacked up by Snapshot copies (for example, during a verification or while archiving from a LUNbacked by a Snapshot copy).
Related concepts
When to run a SnapManager backup on page 125
Deletion of Snapshot copies | 211


How SnapManager uses SnapMirror
SnapManager 5.0 and later enables you to verify databases that are stored on the LUNs of thedestination SnapMirror volumes.
Next topics
Volume replication using SnapMirror on page 213
Where to find more information about configuring and using SnapMirror on page 214
Requirements for using SnapMirror with SnapManager on page 214
How SnapManager uses SnapMirror and SnapDrive on page 214
Integrity verification on SnapMirror destination volumes on page 215
Types of destination volume integrity verification on page 218
Concurrent backup verification on page 221
Volume replication using SnapMirrorSnapMirror creates replicas of volumes. SnapMirror mirrors a Snapshot copy of data on a sourcevolume to one or more destination volumes. SnapMirror automatically reflects incremental changesof the source volume on the destination volume.
SnapMirror can replicate a source volume to a destination volume on the same storage system or on adifferent storage system. The destination storage system can be in a different geographical location.This ability to duplicate data in different locations is a key component of a sound disaster recoveryplan.
Data stored in a destination volume can be accessed through SnapDrive. Because the duplication isvolume wide, Snapshot copies of other datasets on the source volume are also mirrored. And becauseSnapMirror updates the destination volumes to reflect incremental changes on the source volume, theresult is an online, read-only destination volume that contains the same data as the source at the timeof the most recent update.
Attention: SnapManager uses SnapMirror in asynchronous mode. Any disk writes on the sourcevolume after the most recent SnapMirror replication update are not available if a catastrophicfailure occurs before the next SnapMirror update.
Related concepts
Requirements for using SnapMirror with SnapManager on page 214
How SnapManager uses SnapMirror | 213
Where to find more information about configuring and usingSnapMirror
You can obtain more information about configuring and using SnapMirror in Data ONTAP andSnapDrive documentation.
• See the Data ONTAP Data Protection Online Backup and Recovery Guide for your version ofData ONTAP for the following SnapMirror information:
• What SnapMirror volumes are• How SnapMirror volumes work• When to use or access data stored on a SnapMirror destination volume• How to set up and configure SnapMirror on a storage system
• See your SnapDrive documentation for the following information:
• How SnapMirror is used with SnapDrive to create a destination volume for replicating LUNs• What SnapMirror replication is and how it works• Reasons and benefits of using SnapMirror replication• How to connect to a LUN in a SnapMirror destination volume
Requirements for using SnapMirror with SnapManagerTo use SnapMirror with SnapManager, you should ensure that your configuration satisfies somerequirements regarding the source and destination volumes, licenses, and configuration, as well asthe replication schedule.
• Ensure that there is at least one or more SnapMirror source volume.• Ensure that there is at least one or more SnapMirror destination volume for each source volume.• Ensure that the size of the destination volumes is equal to or greater than the size of source
volumes.• Configure SnapMirror first on the source volume and then its destination volume.
See the relevant SnapDrive documentation for more information.• Enable SnapMirror licenses on both the source and destination storage systems.• Manually configure and initialize SnapMirror replication between source and destination
volumes.• Configure SnapMirror replication to be asynchronous.• Disable the SnapMirror replication schedule on your storage system.
How SnapManager uses SnapMirror and SnapDriveSnapManager uses SnapMirror to enable you to replicate backups to mirrored volumes. You can alsoperform concurrent backup verification. SnapManager coordinates with SnapDrive to perform
214 | SnapManager® 6.0 for Microsoft® Exchange Installation and Administration Guide

asynchronous replication using SnapMirror. The changes reflected in a restore operation dependupon your backup schedule.
If a backup resides in a volume that is configured as a SnapMirror source volume, SnapDriverequests a SnapMirror update for that volume. SnapMirror replication is asynchronous, andSnapManager does not support SnapMirror qtree replication.
The schedule you define for backups sets the schedule for mirror replication. The changes madebetween consecutive backups are not reflected in the SnapMirror destination volume. Any restoreoperation from the destination volume restores the databases to their state at the time of the lastbackup. You can use SnapDrive to minimize the time between two SnapMirror replications.
How SnapMirror replication worksYou can configure a SnapMirror relationship and request a mirror update. SnapMirror thencoordinates with SnapDrive to reflect the incremental changes of the source volume on thedestination volume.
With SnapManager 3.0 for Microsoft Exchange and later, after the SnapManager backup is complete,the mirror update request is delayed until SnapManager explicitly requests it. If you do not want toupdate the SnapMirror destination volume after a backup, you can override the update by using theBackup wizard or the Backup and Verify window.
The following process describes SnapMirror destination replication:
1. You configure a SnapMirror relationship between source volumes and destination volumes.Create a Custom schedule with schedule parameters (“- - - - -“). Initialize the mirror to performinitial transfer of contents from a source volume to a destination volume.
2. You select the “Update SnapMirror after operation” option for the operation.
3. If any volume whose data is captured in the backup is a SnapMirror source volume, SnapDriverequests information about all SnapMirror destination volumes for the source volume.
4. SnapDrive sends a SnapMirror destination update request to all the related destination volumes.
5. SnapMirror updates the destination volumes to reflect incremental changes on the source volume.
Related concepts
Integrity verification on SnapMirror destination volumes on page 215
Integrity verification on SnapMirror destination volumesSnapManager 5.0 and later enables you to verify the Exchange databases that are stored on the LUNsof the destination SnapMirror volumes.
When you verify the integrity of a destination volume, SnapManager automatically detects theSnapMirror relationships with the appropriate source volume in the volumes and selects the availableSnapMirror relationship for the selected destination volume.
How SnapManager uses SnapMirror | 215
If you have changed the volume SnapMirror relationship by mirroring data to a new destination filer,you can set the new path as the volume SnapMirror destination for verification purposes. To changethe volume SnapMirror destination, perform the following steps:
• Click the SnapManager for Exchange Backup verification settings.• Click the Verification Server tab.• Click the Verification on destination volumes button.
Next topics
Selecting the SnapMirror destination volumes for verification on page 216
Requirements to run destination volume integrity verification on page 217
Troubleshooting integrity verification failure on SnapMirror destination volumes on page 217
Selecting the SnapMirror destination volumes for verificationYou must select a destination volume when you establish a SnapMirror relationship. SnapManagerautomatically detects and selects the available SnapMirror relationships between the SnapMirrorsource and SnapMirror destination volumes.
Steps
1. Click Backup Verification Settings in the Actions pane.
2. Click Verification Server.
3. In the Verification Server tab, click Verification on destination volumes.
Note: If the SnapMirrored volume is not available, SnapManager displays an appropriate errormessage.
You cannot configure SnapMirror for deferred verification through the Database AvailabilityGroup (DAG). You can configure SnapMirror for deferred verification only when you connectto a member server of the DAG.
SnapManager displays the Choose SnapMirror Destination Volumes for Integrity Verificationwindow.
4. Select the destination volume for each SnapMirrored volume.
Note: By default, SnapManager displays the Number of Relationships field. You cannot editthis value. If the destination volume is not in the SnapMirrored state or does not haveFlexClone license installed, SnapManager displays an error message when you click Apply,and the integrity verification fails for that volume.
5. Click Apply.
6. Click OK.
216 | SnapManager® 6.0 for Microsoft® Exchange Installation and Administration Guide

Requirements to run destination volume integrity verificationEnsure that your system meets the system requirements for the SnapMirror and FlexClone licensesand CIFS shares configuration before you start integrity verification.
A SnapMirror license is enabled on the source volume and a FlexClone license is enabled on thedestination volume. SnapManager uses SnapDrive to verify that the required licenses are enabled onthe source and destination storage system.
If SnapDrive is using RPC to communicate with the destination filer, the destination filer must haveCIFS service started and configured correctly, to be accessible by SnapDrive. SnapDrive providesaccess to the Exchange databases that are stored on the destination volume, and SnapManagerperforms the integrity verification on the backups of those databases.
Troubleshooting integrity verification failure on SnapMirror destinationvolumes
If you have changed the volume SnapMirror relationship by mirroring data to a new destination filer,SnapManager will not be able to find the destination filer and will provide an error. You can set thenew path as the volume SnapMirror destination for verification purposes.
About this task
SnapManager for Exchange integrity verification on volume SnapMirror destination fails when thedestination filer is no longer available or it has changed. If the volume SnapMirror destination filer isno longer available, SnapManager for Exchange will provide the following error:
The destination volume filer2:vol1 of the source Logical Disk e does not have valid FlexClone stateor SnapMirrored state. FlexClone State is Unknown and SnapMirror State is Unknown. Please checkthe SnapMirror relationship filer1:vol1 filer2:vol1_dest. Unable to mount snapshot, abortverification.
If you have changed the volume SnapMirror relationship by mirroring data to a new destination filer(for example filer3), SnapManager for Exchange might still try to contact filer2 which may notnecessarily exist. This is very likely to happen when you perform a filer hardware upgrade andreplace an old filer head with a new one. When you run the SnapMirror update command on newdestination filer it will work, but SnapManager for Exchange may not be up to date with the newdestination filer.
To resolve this problem, ensure that the following requirements are met.
• SnapMirror status on both the volume SnapMirror source and the volume SnapMirror destinationfiler is updated with the new destination and that you have run at least one successful manualupdate (from filer console) after the volume SnapMirror destination has changed.
• For releases of SnapManager for Exchange prior to 4.0, the (new) destination filer is reachablevia RSH. Grant RSH access to the SnapManager user by editing the destination filer's \etc\hosts.equiv file or by editing the option rsh.access.
How SnapManager uses SnapMirror | 217
• The new destination filer holds the SnapManager for Exchange user in its built in Administratorsgroup.
Complete the following steps to set the new path as a volume SnapMirror destination for verificationpurposes.
Steps
1. Click SnapManager for Exchange Backup verification settings.
2. Click the Verification server tab.
3. Click the Verification on destination volumes button.
Types of destination volume integrity verificationYou can run different types of SnapMirror destination volume integrity verifications for differentSnapManager operations.
• Backup with verification• Deferred integrity verification• Test restore operation• Restore operation• Remote verification
Next topics
Backup with verification on page 218
Integrity verification for test restore operations on page 219
Integrity verification for a restore process on page 220
Remote destination volume integrity verification on page 220
Deferred integrity verification on page 220
Related concepts
Database backup using SnapManager on page 135
Database restore operation using SnapManager on page 161
Backup with verificationWhen you run integrity verification on the SnapMirror destination volume, SnapManager requestsSnapMirror updates using SnapDrive, verifies the backup, and monitors the SnapMirror updateactivity through SnapDrive.
When you run integrity verification on the SnapMirror destination volume, SnapManager performsthe following operations:
218 | SnapManager® 6.0 for Microsoft® Exchange Installation and Administration Guide
1. Backs up the databases
2. Requests a SnapMirror update through SnapDrive to replicate the data across destination volumes
3. Verifies the integrity of databases and transaction logs from LUNs that are located in the selecteddestination volumes
4. Updates verification results to the SnapInfo directory
5. Updates the SnapMirror instance after the operation, to replicate verification results to theSnapInfo volume
6. When the SnapMirror update replicates the backup to the selected destination, SnapManagercontinuously monitors the SnapMirror update activity through SnapDrive, as follows:
• SnapDrive provides the SnapMirror update progress information continuously toSnapManager during the update.
• SnapManager logs the SnapMirror update activity to the Windows Application event log andto the backup report at every defined interval.
Note: If you have passthrough LUNs on a hyperV client, you must either run the verificationoperation on a separate host that has direct connection to the destination filer, or you mustcreate a direct connection on the local machine for verification.
Note: If the SnapMirror update operation does not have any progress within a defined interval,SnapManager aborts monitoring it and leaves the backup unverified.
Integrity verification for test restore operationsWhen you run an integrity verification for the test restore operation, SnapManager performs integrityverification and updates the verification results to the source SnapInfo volumes.
SnapManager performs the following tasks for integrity verification for a test restore operation:
1. Runs the metadata verification and integrity verification on the backups that are stored on thedestination volumes
2. Verifies the transaction log signature and sequence in the source SnapInfo directory
3. Verifies the database metadata
4. Updates the verification results to the source SnapInfo volumes
Note: SnapManager does not verify the backup on the source volume, if an unverifiedSnapManager backup is not available on the destination volume. If you try to run integrityverification in such a case, SnapManager displays an error message.
How SnapManager uses SnapMirror | 219
Integrity verification for a restore processWhen you run an integrity verification for a restore process, SnapManager performs integrityverification, updates source SnapInfo volumes, and logs additional steps to event logs and restorereports.
1. SnapManager performs integrity verification on the destination SnapMirror volumes, if a backupis available on the destination volume.
2. SnapManager displays an appropriate error message, if a backup is not available on thedestination volume.
3. SnapManager updates the verification results to the source SnapInfo volumes.
4. SnapManager logs the additional steps to the Windows Application event log and to theSnapManager restore report.
Remote destination volume integrity verificationWhen you run integrity verification on a remote destination volume, SnapManager performs integrityverification and updates source SnapInfo volumes.
SnapManager performs the following actions:
1. Runs database metadata verification on the backups that are stored on the source volumes
2. Verifies the transaction log signature and sequence in the source SnapInfo directory
3. Runs integrity verification on the backups that are stored on the destination volumes
4. Updates the verification results to the source SnapInfo volumes
Deferred integrity verificationIn deferred integrity verification, SnapManager checks if a backup copy exists and then updatesSnapMirror if you select to update SnapMirror after the backup operation. If a backup Snapshot copydoes not exist, SnapManager displays an appropriate error message.
If you do not select the “SnapMirror update after operation” option, SnapManager updates theverification results only on the source SnapInfo volumes.
If you select the SnapMirror update after operation option, the following actions occur:
1. SnapManager verifies the backup copy on the selected destination.
2. SnapManager updates the verification results on the source SnapInfo volumes.
3. SnapMirror replicates the verification results on the source SnapInfo volumes and sends them toall the destination SnapInfo volumes.
220 | SnapManager® 6.0 for Microsoft® Exchange Installation and Administration Guide
If you select the SnapMirror update after operation option but the backup Snapshot copy is notavailable on the destination volume, the mount operation fails for integrity verification and leaves thebackup copy unverified. In this case, SnapManager does not request for the SnapMirror update.
Concurrent backup verificationYou can run multiple backup verification jobs concurrently on the verification server, whenverification requests originate on a different server than the server where the backup is created.
Note: SnapManager executes multiple verification requests from the same host serially.
SnapManager workflow for concurrent backup verification
The workflow for concurrent backup verification is as follows:
1. After you create a new backup copy at the source backup server, SnapManager immediatelysends it for verification to the remote verification server.The remote server uses the same Job ID as the source server.
2. The backup job sent to the remote server is displayed as running on the source server.The remote server shows the active job as running or queued, depending on its position in thequeue.
3. After SnapManager verifies the first backup set at the remote server, the job runs until all thebackup sets are created and verified.
Note: There is a maximum of four backup jobs from different servers that SnapManager canverify simultaneously. SnapManager places the subsequent jobs in the queue.
The job can be a full backup job that includes backup verification, a deferred backup verificationjob, or a backup verification job that is initiated as part of a restore job.
You can create a new full backup when the deferred integrity verification job is running if allproduction volumes are FlexClone enabled.
Concurrent backup verification during a restore operation
You can restore a backup when the verification job is running. When you submit a restore job withverification, SnapManager performs one of the following tasks based on the scenario:
1. Aborts the restore job if any backup or deferred integrity verification jobs are running
2. Cancels all the running jobs and then starts the restore operation
Note: The status of the Storage Group of all the canceled verification jobs remains unverified.
3. Waits for all the currently running jobs to finish and then starts the restore operation
When you select to have the restore operation cancel all the currently running jobs, the restoreoperation performs the following tasks:
How SnapManager uses SnapMirror | 221
1. Stops processing new jobs that are in the queue
2. Disables all SnapManager scheduled tasks in the Windows scheduler
3. If SnapManager is creating a full backup, cancels the full backup operation
4. If SnapManager is running a Frequent Recovery Point operation, cancels the Frequent RecoveryPoint operation
5. If one or more verification jobs are running, cancels all running jobs
6. Waits for the full backup operation to stop
7. Runs the restore operation
Concurrent backup verification and Frequent Recovery Point backup
Concurrent backup verification involves Frequent Recovery Point backup running in parallel withfull backup.
• If SnapManager is waiting for VSS Snapshot copy to start, then Frequent Recovery Point backupis running.
• If SnapManager is Running backup verification for the new VSS Snapshot copy backup, thenFrequent Recovery Point backup starts.
• If SnapManager is Creating a new VSS Snapshot copy backup, then Frequent Recovery Pointbackup fails to start.
You can select restore options for such backup from Job Control Options in the Restore window.
Managing integrity verification jobsYou can view, move, and cancel queued and running integrity verification jobs. You can perform allthe tasks from the Current Job Status pane. By default, job management is enabled inSnapManager.
Steps
1. In the Scope pane, select an Exchange server.
SnapManager displays the queued and running jobs for that server in the Current Job Statuspane.
2. Select the job you want to manage.
3. Position your mouse over the job.
A floating menu appears.
4. Manage the jobs as described in the following table.
222 | SnapManager® 6.0 for Microsoft® Exchange Installation and Administration Guide

If you want to... Then do this...
Retrieve job information Select the job.
SnapManager displays the job information in the Results pane.
Move a job up within a queue Select Move Up in the floating menu.
Move a job down within a queue Select Move Down in the floating menu.
Cancel a queued or running job Select Cancel Job in the floating menu.
How SnapManager uses SnapMirror | 223

Disaster recovery with SnapManager
You can use SnapManager to prepare for disasters, to perform failover and failback operations, andto restore Exchange databases that have been destroyed or compromised. SnapManager provides anexclusive Business Management Console to define a Business Continuance plan and execute thatplan to recover Exchange data.
You can use a Business Continuance plan for routine maintenance purposes. When your productionsite is down, the SnapManager Business Management Console enables you to move the applicationServer and its data to the Business Continuance site automatically.
Next topics
Where to get information when disaster strikes on page 225
Preparations for disaster recovery on page 226
Backing up your Windows environment on page 228
Replication of your Exchange server environment on page 228
Methods of moving Exchange data offsite on page 230
Prerequisites for creating a Business Continuance plan on page 230
Setting permissions for business continuance on Microsoft Windows 2008R2 on page 232
Impact of Active Directory replication lag on Business Continuance on page 234
Creating a Business Continuance plan on page 234
Validating the Business Continuance plan on page 236
Prerequisites for failing over to the Business Continuance site on page 236
Executing the Business Continuance plan on page 237
Prerequisites for failing back from the Business Continuance site on page 240
Failing back to the production site on page 241
Managing SnapMirror replication on page 243
Troubleshooting disaster recovery on page 244
Where to get information when disaster strikesAs part of your disaster-recovery preparation, ensure that you have access to reference material abouthow to use LUNs, about how to administer Data ONTAP, data replication by using SnapMirror,about disaster preparedness and recovery for Microsoft Exchange server, and so on.
You should have the following guides available for reference during disaster recovery:
• For information about how to connect to and use the LUNs stored in a mirrored destinationvolume, see SnapDrive documentation.
Disaster recovery with SnapManager | 225
• For information about administering Data ONTAP, see the Data ONTAP Administration Guidefor your version of Data ONTAP.
• For information about data replication by using SnapMirror, see the Data ONTAP DataProtection Tape Backup and Recovery Guide for your version of Data ONTAP.
• For detailed information about disaster preparedness and recovery for Microsoft Exchange server,see the following documents published by Microsoft Corporation:
• For Exchange Server 2003, see Exchange Server 2003 Disaster Recovery Operations Guide.This TechNet guide is available on the Microsoft Web site.
• For Exchange Server 2007, the Help published in the TechNet Web site is useful. The sectionthat discusses disaster recovery is available in the in the TechNet Library.
• For more information about disaster recovery in a Microsoft environment, see MicrosoftWindows and Microsoft Exchange documentation sets.
Preparations for disaster recoveryTo prepare for a catastrophic failure, keep the storage system that stores the destination SnapMirrorvolumes in a different physical location than your primary production system. Keep the archivingmedia offsite.
Next topicsRecommendations for disaster recovery preparation on page 226Prerequisites for disaster recovery on page 226
Recommendations for disaster recovery preparationEvery environment and site is unique, and every company has different requirements, depending onthe amount of time recovery can take, archiving resources, and other factors. You must considerthese differences before you start with disaster recovery.
• Ensure that your storage system is at a different location from the production system.• Keep the archiving media offsite.• If you are using SnapMirror to mirror your data, keep the storage system safe by storing the
destination SnapMirror volumes in a different physical location than your primary productionsystem.
• If you are using archiving the archive media should be located offsite.• Ensure that more than one person knows how to restore the system.• Record your Exchange data configuration, and keep detailed records and logs of changes you
make to your Windows and Exchange environments.• Keep hard copy duplicates of your records offsite.
Prerequisites for disaster recoveryPrerequisites for disaster recovery include checking the installation path for Microsoft Exchangebinaries in the Business Continuance host and the permissions configured for the machine account
226 | SnapManager® 6.0 for Microsoft® Exchange Installation and Administration Guide
for the Business Continuance Cluster. There are also prerequisites specific to Windows Server 2008and SAN Boot configuration.
• The installation path for Exchange binaries in the Business Continuance host should be the sameas the Exchange installation path in the production host.For a clustered configuration, this convention applies to all the cluster nodes.
• Ensure that the machine account for the Business Continuance Cluster is configured with fullpermissions on the Exchange computer object.Use the Active Directory Users and Computers snap-in.
• Do not place any Exchange database, log files, system files, SMTP, Message Transfer Agent, orSnapInfo components in the SAN boot LUN.
• Do not place any LUN that contains Exchange database, log files, system files, SMTP, MessageTransfer Agent, or SnapInfo components in a volume that contains the SAN boot LUN.
The following prerequisites are applicable only to Windows Server 2008:
• In failover clusters, the resource network name has a new property, HostNameTTL private, whichis set to 20 minutes by default. Microsoft recommends having the HostNameTTL private propertyset five minutes for Clustered MailBox Servers, especially if they are configured for site failover.For more information, see Microsoft Developer Network documentation.
• Ensure that the Windows Management Instrumentation (WMI) traffic is enabled in the firewall.It is enabled by default. Some security policy templates can block WMI at the firewall level. TheWMI namespace security should allow access for local administrators in all the nodes in thecluster configuration. Some security policy templates can disable this access also.
Components required to restore your environment
After a failure you must be able to recover the Windows environment, Exchange server, andExchange data.
Windowsenvironment
You can either back up or copy your Windows environment
Exchange server You can either back up your Exchange server or reconstruct it by using theExchange recovery mode
To reconstruct your Exchange server you must restore or copy the exact copyof your Windows environment.
Exchange data Use SnapManager to create backups of your Exchange data, then move thatdata offsite, either by archiving those backups or by using SnapMirror tomirror them to another storage system, at a remote site.
Related concepts
Replication of your Exchange server environment on page 228
Disaster recovery with SnapManager | 227
Related tasks
Backing up your Windows environment on page 228
Backing up your Windows environmentSnapManager, Exchange server, and storage systems are dependent on the Windows environment.Before you can use any of the SnapManager processes, it is important that you back up yourWindows environment so that you can restore the same state as part of the recovery process.
Steps
1. Back up your Exchange server, including your Windows operating system and any applicationsrunning concurrently with the Exchange server.
2. Use your backup utility to create and maintain a current Emergency Repair Disk (ERD).
Replication of your Exchange server environmentA typical Exchange site replication copies the Windows environment (Active Directory, DomainController and so on) through the Wide Area Network (WAN) to another site. The Exchange Data onthe storage system is copied to the other site using SnapMirror.
To recover from a total site outage in a minimum amount of time, you can replicate your ExchangeServer environment to a remote site. Then, if the primary site is destroyed, you can re-create yourExchange environment on the site you copied.
The following diagram shows a typical Exchange site replication:
228 | SnapManager® 6.0 for Microsoft® Exchange Installation and Administration Guide
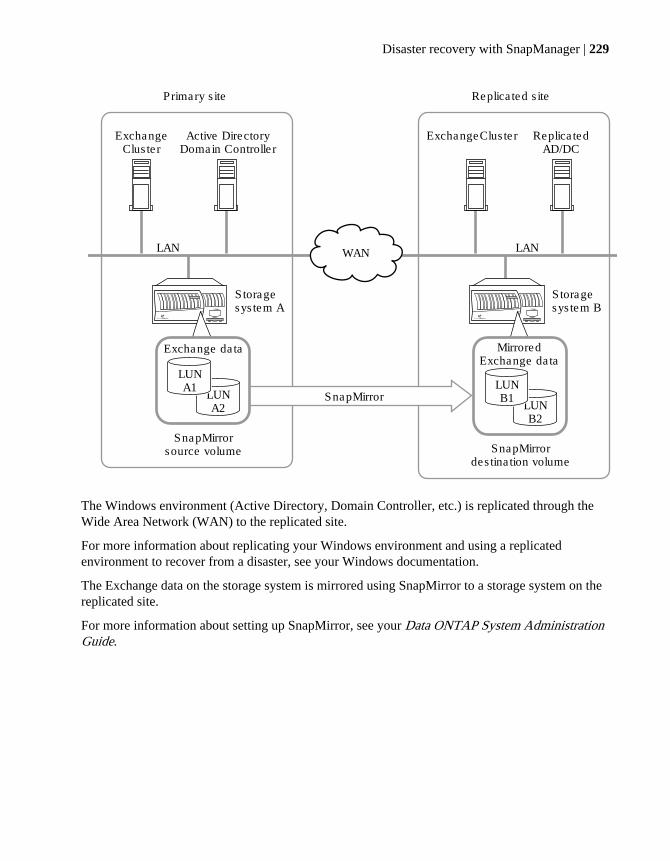
NetCache C760
Exchange data
SnapMirrorsource volume
Storagesystem A
SnapMirror
LANLAN
Primary site Replicated site
LUNA2
LUNA1
ExchangeCluster
Active DirectoryDomain Controller
WAN
NetCache C760
MirroredExchange data
SnapMirrordestination volume
Storagesystem B
LUNB2
LUNB1
ReplicatedAD/DC
ExchangeCluster
The Windows environment (Active Directory, Domain Controller, etc.) is replicated through theWide Area Network (WAN) to the replicated site.
For more information about replicating your Windows environment and using a replicatedenvironment to recover from a disaster, see your Windows documentation.
The Exchange data on the storage system is mirrored using SnapMirror to a storage system on thereplicated site.
For more information about setting up SnapMirror, see your Data ONTAP System AdministrationGuide.
Disaster recovery with SnapManager | 229
Methods of moving Exchange data offsiteYou need to move your data offsite for disaster recovery. You can use SnapMirror to mirror yourstorage system data to a storage system in another location. You can also archive the data to physicalmedia such as tapes and store that media off-site.
Method to get Exchangedata offsite
Advantages Disadvantages
Using SnapMirror Faster than restoring from tape.
You can update the destination morefrequently than tape, resulting in morecurrent archives.
Another storage system is required inthe remote location.
WAN connectivity to the remotelocation is required.
Archiving SnapManagerBackups
The required equipment might alreadybe available and in use.
Slower than restoring from a storagesystem.
Tapes must be stored and managed.
Note: If NearStore is used, thenyou need to install another storagesystem in a remote location.
Related concepts
How SnapManager uses SnapMirror on page 213
SnapManager backup archiving on page 245
Prerequisites for creating a Business Continuance planBefore you create a Business Continuance plan for your clustered configuration, or on a stand-aloneserver, ensure that you have necessary software installed, drive letters or mountpoints available, andcorrect cluster configuration on the production and the Business Continuance site.
Note: If you created a Business Continuance plan in SnapManager for Exchange 5.0 for failoverfrom CCR to SCC, you must recreate the Business Continuance plan in SnapManager forExchange 6.0 in order to failback from SCC to CCR.
• Exchange, SnapDrive, and SnapManager must be installed.• The SnapManager service account must have full access privileges.
See Setting permissions for business continuance on Microsoft Windows 2008R2 for informationon how to set permissions for your SnapManager service account.
• Ensure that Business Continuance is supported by your system configuration.• The drive letters or mountpoints used by Exchange databases, transaction logs, SMTP, MTA, and
the Exchange data directory must be available to use in the Business Continuance host.
230 | SnapManager® 6.0 for Microsoft® Exchange Installation and Administration Guide
In the case of Exchange Server 2003, the Exchange data directory specified during the creation ofthe Exchange Virtual Server must be in a LUN along with either SMTP or MTA components, orLogs, or SnapManager SnapInfo components.
• You must have created and initialized all SnapMirror relationships between the source volumesand the destination volumes.
• Before creating a Business Continuance plan, ensure that the mailbox database cluster resourcesare dependent on the disk resources as recommended by Microsoft.This step is necessary because the installation of Exchange 2007 does not create a dependencybetween database resources and disk resources. This can result in some databases not comingonline after a Business Continuance failover.
• Before creating a Business Continuance plan, ensure that the mailbox database cluster resourcesare dependent on the appropriate disk resources as recommended by Microsoft.This step is necessary because the installation of Exchange 2007 does not create a dependencybetween database resources and disk resources. This can result in some databases not comingonline after a Business Continuance failover. Also, after a Business Continuance failover, youmust recreate the dependencies appropriately between database resources and disk resources.
• If you have a primary Domain Name System (DNS) on the production site, and a secondary orslave DNS running on the Business Continuance site, you must convert the secondary or slaveDNS running on the Business Continuance site into a primary DNS.This converts the secondary DNS from a read-only server to a write-enabled server, hencepreventing the failure of DNS changes during the execution of your Business Continuance plan.
• In a remote recovery scenario, create two separate Windows server clusters, one at the productionsite and one at the Business Continuance site.
• Ensure that the operating systems installed on both the servers is the same.• In Microsoft Window 2008 failover clusters, the network name resource has a new private
property, HostRecordTTL, which is set to 20 minutes by default. Set the private propertyHostRecordTTL to 5 minutes as recommended by Microsoft.
• Prior to creating the Business Continuance plan, ensure that the Microsoft Exchange CMSversion matches the version of the Exchange binaries in all of the production and DR clusternodes. This should be ensured when you upgrade your version of Microsoft Exchange.
• If you are using Windows 2008, ensure that the Windows Management Instrumentation traffic isenabled in the firewall.
• If you are using Windows 2008, the Windows Management Instrumentation namespace securitymust allow SnapManager to access all nodes in the cluster.
• If you are using Windows 2008, the network name specified when you create the BusinessContinuance plan must match the cluster network name.For Windows 2003, the network name must match the network connection name.
• If you are using Microsoft Windows 2008, rename the network name in the Failover ClusterManagement to be the same as the network name in the Control Panel, prior to creating theBusiness Continuance policy.The Windows 2008 system uses different Network Names in the Control Panel and FailoverCluster Management module. During the Business Continuance policy creation, the network
Disaster recovery with SnapManager | 231
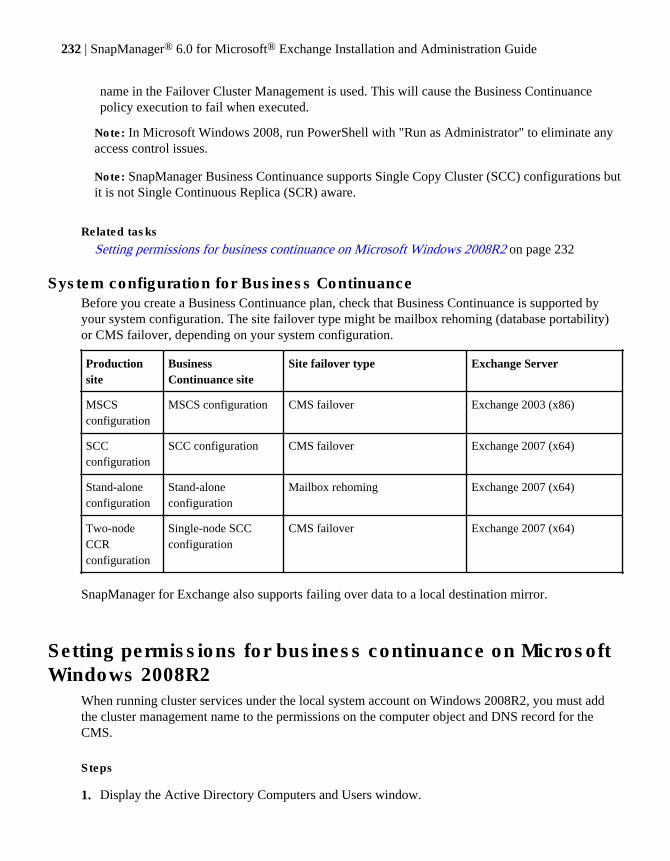
name in the Failover Cluster Management is used. This will cause the Business Continuancepolicy execution to fail when executed.
Note: In Microsoft Windows 2008, run PowerShell with "Run as Administrator" to eliminate anyaccess control issues.
Note: SnapManager Business Continuance supports Single Copy Cluster (SCC) configurations butit is not Single Continuous Replica (SCR) aware.
Related tasks
Setting permissions for business continuance on Microsoft Windows 2008R2 on page 232
System configuration for Business ContinuanceBefore you create a Business Continuance plan, check that Business Continuance is supported byyour system configuration. The site failover type might be mailbox rehoming (database portability)or CMS failover, depending on your system configuration.
Productionsite
BusinessContinuance site
Site failover type Exchange Server
MSCSconfiguration
MSCS configuration CMS failover Exchange 2003 (x86)
SCCconfiguration
SCC configuration CMS failover Exchange 2007 (x64)
Stand-aloneconfiguration
Stand-aloneconfiguration
Mailbox rehoming Exchange 2007 (x64)
Two-nodeCCRconfiguration
Single-node SCCconfiguration
CMS failover Exchange 2007 (x64)
SnapManager for Exchange also supports failing over data to a local destination mirror.
Setting permissions for business continuance on MicrosoftWindows 2008R2
When running cluster services under the local system account on Windows 2008R2, you must addthe cluster management name to the permissions on the computer object and DNS record for theCMS.
Steps
1. Display the Active Directory Computers and Users window.
232 | SnapManager® 6.0 for Microsoft® Exchange Installation and Administration Guide

2. From the View menu, choose Advanced Features.
3. Navigate to the computer's container, and select the computer account for the CMS name.
4. Right click the account name, then select Properties.
5. Click the Security tab.
6. Make sure you have selected the computer's object type, then click Add.
7. Click OK to save your changes.
The system displays the Select Users, Computers, or Groups dialog box.
8. Enter the cluster management name of the disaster recovery cluster and click Check Names.
The system displays the Properties window again with your cluster management namehighlighted.
9. Click all of the Allow checkboxes in the Permissions pane to give full control permissions to thecluster management name.
10. Click OK to save your changes.
11. Open the DNS record.
12. Select the forward lookup zone for the domain, then select the record for the CMS.
13. Right click the record and select Properties.
14. Click the Security tab.
15. Make sure you have selected the computer's object type, then click Add.
16. Click OK to save your changes.
The system displays the Select Users, Computers, or Groups dialog box.
17. Enter the cluster management name of the disaster recovery cluster and then click Check Names.
The system displays the Properties window again with your cluster management namehighlighted.
18. Click all of the Allow checkboxes in the Permissions pane to give full control permissions to thecluster management name.
19. Click OK to save your changes.
Disaster recovery with SnapManager | 233
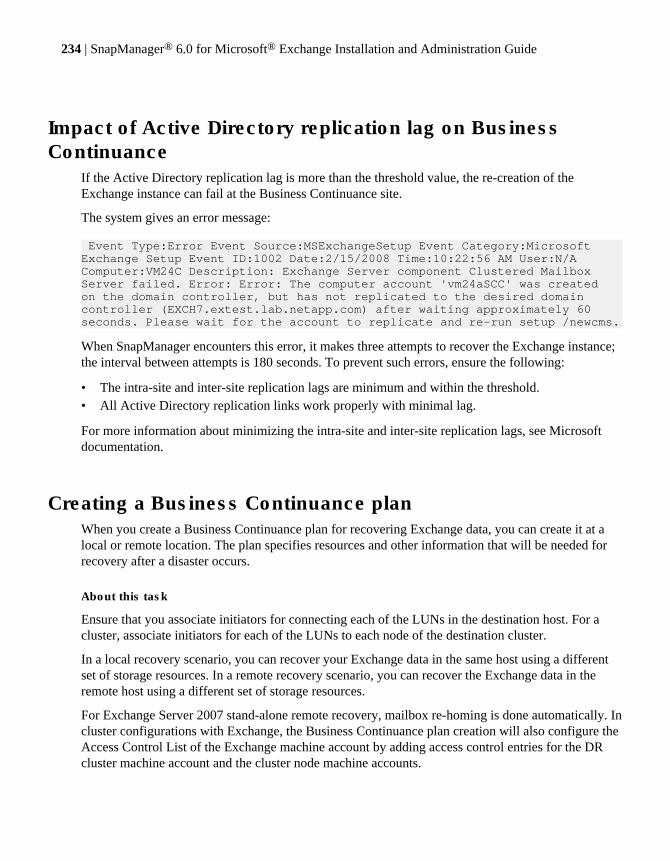
Impact of Active Directory replication lag on BusinessContinuance
If the Active Directory replication lag is more than the threshold value, the re-creation of theExchange instance can fail at the Business Continuance site.
The system gives an error message:
Event Type:Error Event Source:MSExchangeSetup Event Category:Microsoft Exchange Setup Event ID:1002 Date:2/15/2008 Time:10:22:56 AM User:N/A Computer:VM24C Description: Exchange Server component Clustered Mailbox Server failed. Error: Error: The computer account 'vm24aSCC' was created on the domain controller, but has not replicated to the desired domain controller (EXCH7.extest.lab.netapp.com) after waiting approximately 60 seconds. Please wait for the account to replicate and re-run setup /newcms.
When SnapManager encounters this error, it makes three attempts to recover the Exchange instance;the interval between attempts is 180 seconds. To prevent such errors, ensure the following:
• The intra-site and inter-site replication lags are minimum and within the threshold.• All Active Directory replication links work properly with minimal lag.
For more information about minimizing the intra-site and inter-site replication lags, see Microsoftdocumentation.
Creating a Business Continuance planWhen you create a Business Continuance plan for recovering Exchange data, you can create it at alocal or remote location. The plan specifies resources and other information that will be needed forrecovery after a disaster occurs.
About this task
Ensure that you associate initiators for connecting each of the LUNs in the destination host. For acluster, associate initiators for each of the LUNs to each node of the destination cluster.
In a local recovery scenario, you can recover your Exchange data in the same host using a differentset of storage resources. In a remote recovery scenario, you can recover the Exchange data in theremote host using a different set of storage resources.
For Exchange Server 2007 stand-alone remote recovery, mailbox re-homing is done automatically. Incluster configurations with Exchange, the Business Continuance plan creation will also configure theAccess Control List of the Exchange machine account by adding access control entries for the DRcluster machine account and the cluster node machine accounts.
234 | SnapManager® 6.0 for Microsoft® Exchange Installation and Administration Guide
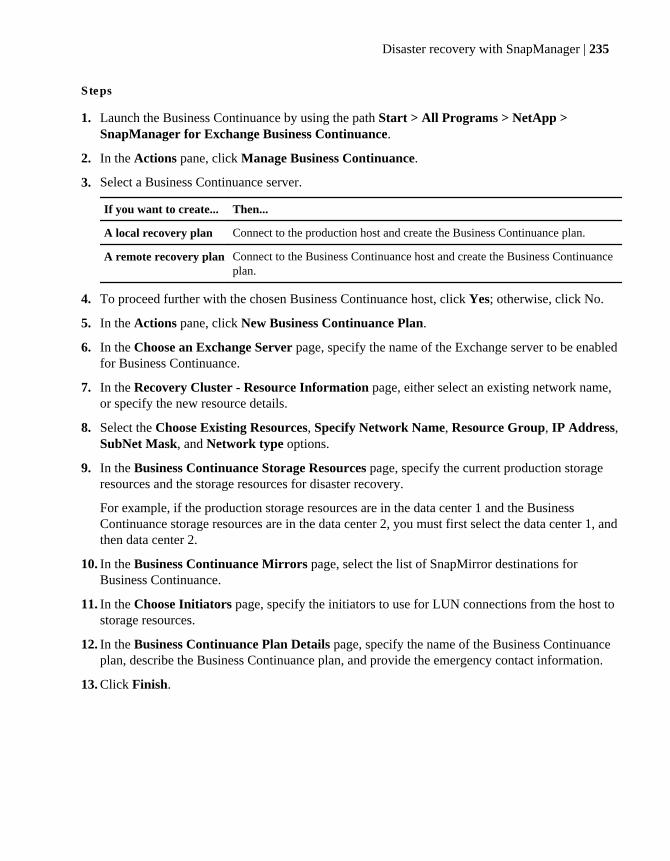
Steps
1. Launch the Business Continuance by using the path Start > All Programs > NetApp >SnapManager for Exchange Business Continuance.
2. In the Actions pane, click Manage Business Continuance.
3. Select a Business Continuance server.
If you want to create... Then...
A local recovery plan Connect to the production host and create the Business Continuance plan.
A remote recovery plan Connect to the Business Continuance host and create the Business Continuanceplan.
4. To proceed further with the chosen Business Continuance host, click Yes; otherwise, click No.
5. In the Actions pane, click New Business Continuance Plan.
6. In the Choose an Exchange Server page, specify the name of the Exchange server to be enabledfor Business Continuance.
7. In the Recovery Cluster - Resource Information page, either select an existing network name,or specify the new resource details.
8. Select the Choose Existing Resources, Specify Network Name, Resource Group, IP Address,SubNet Mask, and Network type options.
9. In the Business Continuance Storage Resources page, specify the current production storageresources and the storage resources for disaster recovery.
For example, if the production storage resources are in the data center 1 and the BusinessContinuance storage resources are in the data center 2, you must first select the data center 1, andthen data center 2.
10. In the Business Continuance Mirrors page, select the list of SnapMirror destinations forBusiness Continuance.
11. In the Choose Initiators page, specify the initiators to use for LUN connections from the host tostorage resources.
12. In the Business Continuance Plan Details page, specify the name of the Business Continuanceplan, describe the Business Continuance plan, and provide the emergency contact information.
13. Click Finish.
Disaster recovery with SnapManager | 235
Validating the Business Continuance planYou can validate the Business Continuance plan at any time; however, you should validate it at fixedintervals, especially before starting the failover process. This ensures that correct resources andserver configuration get involved in the recovery operation.
About this task
If the mountpoint root LUNs required for recovery are not a part of the BC plan and do not exist onthe BC host, the BC plan validation and execution fails. To avoid such failures, ensure either thatsuch LUNs have Exchange or SnapManager SnapInfo directory components in them or that themountpoint root LUNs are connected to the BC host prior to running the validation.
Steps
1. Launch the Business Continuance by using the path Start > All Programs > NetApp >SnapManager for Exchange Business Continuance.
2. In the Scope pane, connect to the disaster recovery server to which you want to fail over.
3. In the Actions pane, click Validate.
4. Click Next to confirm the recovery server and the storage resources that you selected forBusiness Continuance.
5. Select the Business Continuance activities that need to be performed during execution.
6. Click Finish.
7. In the Status window, click Validate.
8. Click OK.
9. Click Close.
Prerequisites for failing over to the Business Continuancesite
For a planned failover to a Business Continuance server, ensure that you have a valid disasterrecovery plan, perform backup of all Storage Groups, and ensure that the Exchange server is offlineat the production site.
For a planned failover, you must first meet the following conditions:
• Create a valid disaster recovery plan.
236 | SnapManager® 6.0 for Microsoft® Exchange Installation and Administration Guide
• Perform a complete backup of all Storage Groups, using Update SnapMirror after backupoption so that you do not lose any data.
• Ensure that the Exchange server is offline at the production site after you complete the backupoperation.
• Convert the DNS running on the disaster recovery site to primary and ensure that it is write-enabled to execute the Business Continuance plan successfully.
• Ensure that there are no non-Exchange LUNs in the Exchange volumes.If you configure non-Exchange LUNs in Exchange volumes, the Business Continuance recoveryoperation recovers only Exchange and SnapManager SnapInfo LUNs.
• For standalone Exchange configurations involving "storage only failover", you must manuallydismount the storage groups in the Business Continuance plan, prior to executing the plannedfailover of the Business Continuance Plan.
• If necessary, reinstall the passive mailbox server role to a site that was the failover destination ofan earlier operation. If you get an error trying to fail over to that site again:Clustered Mailbox Server Performing Microsoft Exchange ServerPrerequisite Check Configuring Microsoft Exchange Server ... FAILEDSetup previously failed while performing the action "Install". Youcannot resume setup by performing the action "DisasterRecovery". TheExchange Server Setup operation did not complete. For more information,visit http://support.microsoft.com and enter the Error ID. ExchangeServer setup encountered an error. Setup.com completed with Return code:[1]
1. Remove all of the registry keys except for ConfiguredVersion and UnpackedVersion from thefollowing registry path (in which <ServerRole> is the Exchange role installed on yourserver):HKLM\Software\Microsoft\Exchange\v8.0\<ServerRole>
2. Perform this operation for all roles on your server.
3. Reinstall the passive mailbox server role on that site.
Executing the Business Continuance planYou can perform the following tasks as part of the Business Continuance plan—BusinessContinuance server validation, cleanup of Business Continuance destination, take Exchangeinstances offline, quiesce and break SnapMirror relationships, reconnect Exchange LUNs, Exchangeinstance re-creation, and restore backups.
Before you begin
If it is a planned failover, be sure to make a complete backup with the Run Command after Backupoption selected, so that the Exchange instances are taken offline.
Make sure the databases and storage groups do not exist at the destination site for stand-alone-to-stand-alone fail over.
Disaster recovery with SnapManager | 237
If the Exchange instance is alive (running), SnapManager displays a message to take the Exchangeresources offline as part of failover, or it provides an option to exit the wizard.
Ensure that the mount points or drive letters are available (not in use) at the destination site. Forexample, if the following are the mount point paths for the source,c:\sg1 and c:\logs1,ensure thatthere is only c:\ at the destination site. The paths will be created by Business Continuance when itmounts the LUNs. If you are using drive letters F: and T:,they should not be used at the destination aswell .
When the Exchange server has LUNs that contain mountpoints, but do not have any exchange relateddata on the mount point root LUN, then these LUNs must be created manually prior to the failover tothe Business Continuance site. For example if LUN "N" has mountpoint N:\mp on it, then LUN Nmust be created manually in the Business Continuance exchange server prior to failover.
About this task
As a part of the Business Continuance plan execution, SnapManager does not restart the ExchangeTransport service. Mailflow might not resume until you restart the Exchange Transport service.
You can use the SnapManager Replication Management Console page to fix a SnapMirrorrelationship error.
Steps
1. Launch the Business Continuance by using the path Start > All Programs > NetApp >SnapManager for Exchange- Business Continuance.
2. In the Scope pane, select the Business Continuance plan.
3. Connect to the Business Continuance host, in which the Exchange data needs to be recovered.
4. In the Actions pane, click Execute.
5. To revalidate the Business Continuance plan before executing it, click Yes.
6. In the SnapManager - Business Continuance page, click Next.
7. This step is applicable only for a clustered configuration. In the Business Continuance PlanDetails page, select the If the Exchange Instance is alive check box to verify whether theExchange instance is running.
8. In the Business Continuance Plan Details page, click Next.
9. If your Exchange instance is running, take the Exchange resources offline, and then relaunch theBusiness Continuance wizard.
10. Click Next> to confirm the recovery server and the Storage Group that are selected for BusinessContinuance.
11. In the Choose Business Continuance Activities for Execution page, select the BusinessContinuance activities that need to be performed during execution.
238 | SnapManager® 6.0 for Microsoft® Exchange Installation and Administration Guide

If you want to... Then...
Ensure that the Business Continuanceplan is consistent and valid with respectto the current state of Exchange
Select Business Continuance Server Validation.
Ensure that the old production cluster isclean, and that there are any not faileddisk resources
Select Cleanup of Business Continuance Destination.
The Business Continuance cleanup process will not removethe mount point roots and, in case of Exchange 2007clusters, it might rename the old resource group when thereare left over mount point roots.
Ensure that all of the Exchange StorageGroup instances are offline
Select Offline Exchange Instances.
Validate the SnapMirror relationshipsthat are a part of the BusinessContinuance plan
Select quiesce and Break SnapMirrors. Any unbrokenmirror relationships are broken at this time.
Connect all the LUNs on the SnapMirrordestination volume by using the samedrive letters
Select Reconnect Exchange LUNs.
Create Exchange cluster resources Select Exchange Instance Recreation. This step isapplicable only for Exchange 2007 and Exchange 2003cluster-cluster configurations. However, the step is skippedautomatically for Exchange 2007 stand-alone-to-stand-aloneconfigurations.
Execute an up-to-the-minute restoreoperation or mail box rehoming
Select Restore backups.
If your configuration is Exchange 2007 and 2003, Cluster-Cluster, SnapManager performs an up-to-the-minute restoreoperation.
If your configuration is Exchange 2007, stand-alone-stand-alone, SnapManager performs an restore operation with themail box rehoming.
If there is an error during the process, SnapManager logs the details into reports and WindowsEvents logs.
12. Click Finish.
13. In the Status page, click Execute to start the operation.
14. Click OK.
15. In the Status page, click Close.
After you finish
If the common base Snapshot copy between the production and Business Continuance site does notexist after a failover process, then re-initialize the SnapMirror relationships in the reverse direction.
Disaster recovery with SnapManager | 239
Reset the advanced properties of the Exchange resource on the target server (that you initially set onthe production server) after a failover or a failback operation.
Prerequisites for failing back from the BusinessContinuance site
Before you start a planned failback operation from the Business Continuance site, execute theBusiness Continuance plan cleanup task, start reverse resynchronization from the destination to thesource storage system, and flush the local DNS cache.
• If you have a clustered configuration and already have a production site where you performedBusiness Continuance, execute the Business Continuance plan cleanup task to remove theremaining Exchange resources and to disconnect the old LUNs.Perform this cleanup before you resynchronize the mirrors in the reverse direction.
• From the Replication Management Console, initiate reverse resynchronization from thedestination storage system to the source storage system.
• Verify that the SnapMirror relationship is in a state from which a transfer can take place.• Flush out the local DNS cache and delete the stale entries after the failover process.
Note: After failover\failback from the Business Continuance site, you might need to update thenew IP in reverse lookup zone of DNS.
The local DNS cache in the Business Continuance site (all of the nodes of the BusinessContinuance cluster for a clustered configuration) are flushed automatically as a part of therecovery operation. If the IP address is different in the disaster recovery site, the automatic flushenables the connection to SnapManager from the Business Continuance server after a recoveryoperation without a manual removal of the local DNS cache.
• Make sure that each SnapMirror alias is unique in its system and that there is not any otherinvalid, stale, or old destination volume relationship for the same destination volume.
• To remove any prior history, run setup.com /clearlocalcms /cmsname:<> on thedestination cluster.
Note: The cleanup task also performs clearlocalcms automatically.
• Ensure that any LUN clone split operation that is in progress is complete.To check that any LUN clone split operations are complete, use the storage system’s lun clonesplit status command, or view the Operation Status column in the SnapDrive MicrosoftManagement Console (MMC).For detailed information about this command, see the Data ONTAP Block Access ManagementGuide for iSCSI and FC.The LUN clone split functionality, introduced in Data ONTAP 7.1, supports significantly fasteronline Snapshot copy restore times when using SnapManager or SnapDrive to restore database.By default, this functionality is enabled.
240 | SnapManager® 6.0 for Microsoft® Exchange Installation and Administration Guide

Attention: If you attempt a failback procedure immediately after a failover, that uses a LUNclone split (such as a test of a failover and failback), the LUN clone split operation mightinterfere with SnapMirror during resynchronization with the data back to the production site.
Failing back to the production siteYou can perform a failback using a disaster recovery plan only if the destination volumes areresynchronized in the reverse direction to the original production storage resources. You can alsocreate a new disaster recovery plan to fail over the Exchange storage resources to the production site.
Before you begin
Ensure you meet all the prerequisites mentioned in the document before you start the failbackprocess.
About this task
By resynchronizing the destination volumes in the reverse direction, all the data is transferred fromthe original SnapMirror destination volume at the disaster recovery site, to the original SnapMirrorsource volume at the production site. SnapManager then initializes the destination volumes.
Steps
1. Launch the Replication Management Console.
2. Click Business Continuance (DR : PROD).
3. Select the destination volumes.
If there are no SnapMirror relationships, create new destination volumes through storage systemcommands, and initialize it.
4. Click Sync to resynchronize the destination volumes in the reverse direction, if they are broken.
5. Create a final backup of all the Storage Groups at the Business Continuance site with adestination volume update of all LUNs.
6. Connect to the production host.
7. Select the disaster recovery plan.
8. In the Actions pane, click Execute.
9. In the dialog box that appears, either click Yes to validate the Business Continuance plan beforeexecuting it, or continue without validation.
10. In the SnapManager - Business Continuance window, click Next.
11. This step is applicable only for Exchange Server 2003 or Exchange Server 2007 clusteredconfiguration, to ensure that the Clustered Mailbox Server, or Exchange Virtual Server is not
Disaster recovery with SnapManager | 241
running. In the Business Continuance Plan Details window that appears, ensure that theExchange Instance check box is selected, to verify that the Exchange instance is running.
12. In the Business Continuance Plan Details window, click Next.
If the Exchange instance is not running, SnapManager displays a message that the network nameis not alive, along with the complete error details. If the Exchange instance is running,SnapManager displays two options, one to take the Exchange resources offline as part of failover,and the other to exit the wizard, to take the Exchange resources offline, and then relaunch thewizard.
13. In the Choose Business Continuance Recovery Server page, click Next to confirm the recoveryserver, and the Storage Group that are selected for Business Continuance.
14. In the Choose Business Continuance Activities for Execution page, select the BusinessContinuance activities that need to be performed during execution.
If you want to... Then...
Ensure that the Business Continuance plan isconsistent and valid with respect to thecurrent state of Exchange
Select Business Continuance Server Validation.
Ensure that the old production cluster isclean, and that there are any not failed diskresources
Select Cleanup of Business Continuance Destination.
Ensure that all of the Exchange StorageGroup instances are offline
Select Offline Exchange Instances.
Validate the SnapMirror relationships thatare a part of the Business Continuance plan
Select quisce and Break SnapMirrors. Any unbrokenmirror relationships are broken at this time.
Connect all the LUNs on the SnapMirrordestination volume by using the same driveletters
Select Reconnect Exchange LUNs.
Create Exchange cluster resources Select Exchange Instance Recreation. This step isapplicable only for Exchange 2007 and Exchange 2003cluster-cluster configurations. However, the step isskipped automatically for Exchange 2007 stand-alone-to-stand-alone configurations.
Execute an up-to-the-minute restoreoperation or mail box rehoming
Select Restore backups.
If your configuration is Exchange 2007 and 2003,Cluster-Cluster, SnapManager performs an up-to-the-minute restore operation.
If your configuration is Exchange 2007, stand-alone-stand-alone, SnapManager performs an restoreoperation with the mail box rehoming.
242 | SnapManager® 6.0 for Microsoft® Exchange Installation and Administration Guide
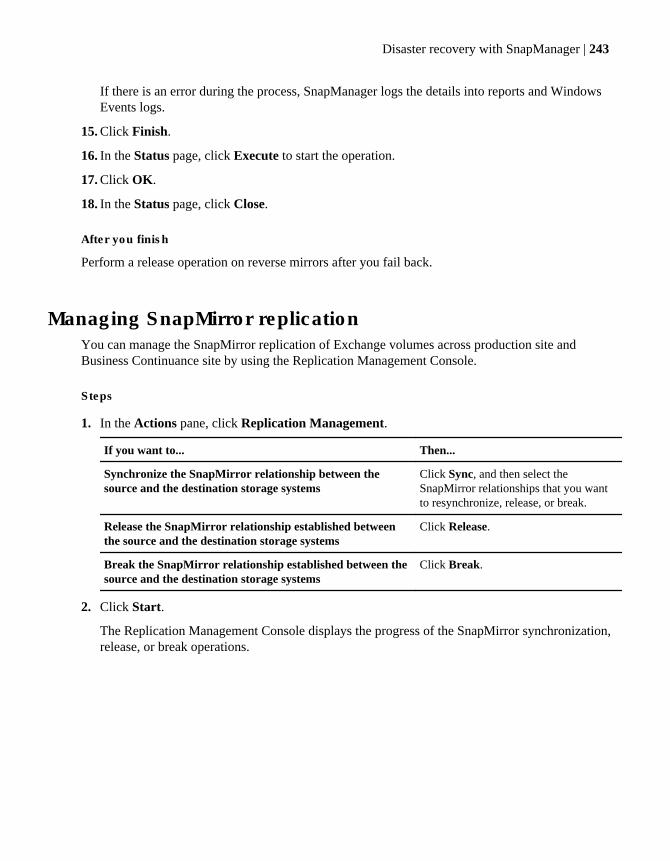
If there is an error during the process, SnapManager logs the details into reports and WindowsEvents logs.
15. Click Finish.
16. In the Status page, click Execute to start the operation.
17. Click OK.
18. In the Status page, click Close.
After you finish
Perform a release operation on reverse mirrors after you fail back.
Managing SnapMirror replicationYou can manage the SnapMirror replication of Exchange volumes across production site andBusiness Continuance site by using the Replication Management Console.
Steps
1. In the Actions pane, click Replication Management.
If you want to... Then...
Synchronize the SnapMirror relationship between thesource and the destination storage systems
Click Sync, and then select theSnapMirror relationships that you wantto resynchronize, release, or break.
Release the SnapMirror relationship established betweenthe source and the destination storage systems
Click Release.
Break the SnapMirror relationship established between thesource and the destination storage systems
Click Break.
2. Click Start.
The Replication Management Console displays the progress of the SnapMirror synchronization,release, or break operations.
Disaster recovery with SnapManager | 243
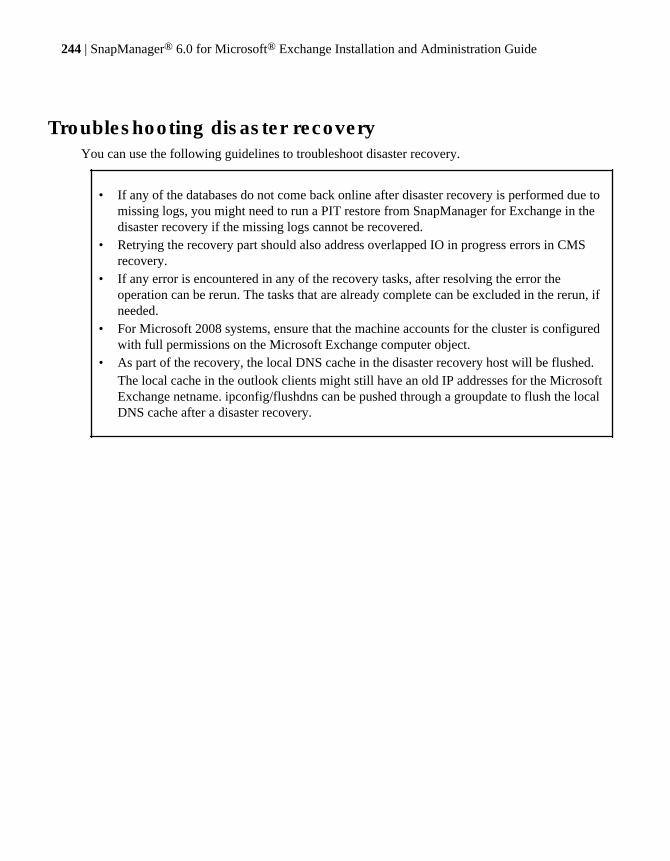
Troubleshooting disaster recoveryYou can use the following guidelines to troubleshoot disaster recovery.
• If any of the databases do not come back online after disaster recovery is performed due tomissing logs, you might need to run a PIT restore from SnapManager for Exchange in thedisaster recovery if the missing logs cannot be recovered.
• Retrying the recovery part should also address overlapped IO in progress errors in CMSrecovery.
• If any error is encountered in any of the recovery tasks, after resolving the error theoperation can be rerun. The tasks that are already complete can be excluded in the rerun, ifneeded.
• For Microsoft 2008 systems, ensure that the machine accounts for the cluster is configuredwith full permissions on the Microsoft Exchange computer object.
• As part of the recovery, the local DNS cache in the disaster recovery host will be flushed.The local cache in the outlook clients might still have an old IP addresses for the MicrosoftExchange netname. ipconfig/flushdns can be pushed through a groupdate to flush the localDNS cache after a disaster recovery.
244 | SnapManager® 6.0 for Microsoft® Exchange Installation and Administration Guide
SnapManager backup archiving
You can use SnapManager to create offline archives of Snapshot copies containing SnapManagerbackup sets. Archiving data enables you to create a complete, self-consistent replica of your data,should you have to recover it. You can use several methods to archive your data.
Next topics
Why organizations archive data on page 245
Guidelines for archiving SnapManager backups on page 245
Methods of archiving SnapManager backups on page 246
Archives created with NDMP or the dump command on page 247
Archives created using a Windows backup utility on page 250
Exchange backup archives created with Exchange Backup Agent on page 252
If you use a centralized backup model on page 254
Automatic backup archiving using the Run Command After Operation feature on page 255
Enabling the launch of SnapManager scripts from a UNC path on page 257
Why organizations archive dataThe main reason for archiving data is disaster recovery. Archiving helps you to recover datadamaged or accidentally deleted due to human error, due to accidental deletion, hardware failure, ornatural calamity. Space constraints, historical analysis, and litigation often require the older data tobe archived.
Guidelines for archiving SnapManager backupsBefore you start archiving your data, consider the guidelines for choosing the type of data to bearchived, naming, and using the appropriate protocols.
• Archive only verified backups.If you are not sure whether a backup copy is verified, use the SnapManager Restore window tocheck.
• Archive a complete backup set.• Archive the most recent backup copy.• Archive all Storage Groups together.
Do not archive individual Storage Groups or databases unless you know which Snapshot copiescontain the appropriate Storage Groups and transaction logs for a specific time.
• Keep in mind that single backup version is used during backup archiving when multiple storagegroups or databases are selected to create a backup. This means that a backup version in
SnapManager backup archiving | 245
Protection Manager includes backups from multiple storage groups or databases. When deleting aremote backup, all backups in that backup version will be deleted.
• If you use the unique naming convention, look for the Snapshot copy with the most recent dateand time.
• If you did not use the unique name option when you created the backup, look for the most recentSnapshot copy in the storage system’s LUN drive volume named/exchsnap_servername_recent
or/exchsnap_servername_recent_backupmgmtgroup.This is for backward compatibility with earlier versions of SnapManager, which did not includethe Run Command After Operation feature.
• Do not use the CIFS or NFS protocols to archive LUNs.Use the storage system’s dump command or an NDMP backup application to archive LUNs.
Note: If the system is busy, the network is slow, or the load is primarily on the DataFabricManager server or the storage system, there is a time lag between the creation of a backup andthe appearance of the archive in the Restore view.
• Consider the following factors:
• The archive method you use• Service Level Agreements for disaster recovery• The number of SnapManager backups performed per day• Exchange client activity schedules• Backup verification time
Methods of archiving SnapManager backupsYou can use different methods for selecting the components of your backup to archive.
• Use NDMP or the storage system’s dump command to archive LUNs directly from the storagesystem to the archive medium.
• Mount the LUNs in a SnapManager backup Snapshot copy and share it, then use NTBackup oranother Windows backup utility to copy the LUNs’ contents to the archive medium.
• Create an Exchange copy-type backup directly on the archive medium using an Exchange-awarebackup application.
246 | SnapManager® 6.0 for Microsoft® Exchange Installation and Administration Guide
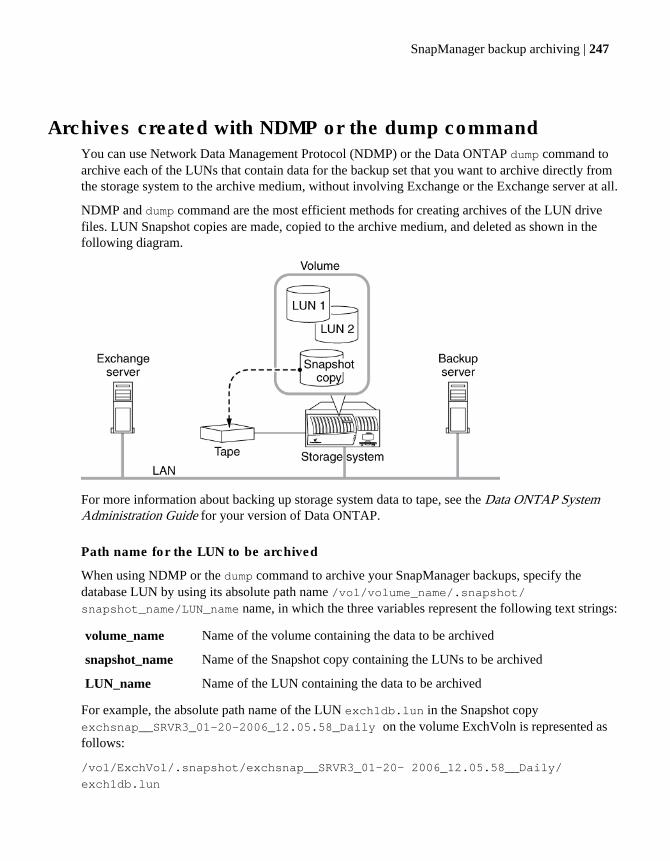
Archives created with NDMP or the dump commandYou can use Network Data Management Protocol (NDMP) or the Data ONTAP dump command toarchive each of the LUNs that contain data for the backup set that you want to archive directly fromthe storage system to the archive medium, without involving Exchange or the Exchange server at all.
NDMP and dump command are the most efficient methods for creating archives of the LUN drivefiles. LUN Snapshot copies are made, copied to the archive medium, and deleted as shown in thefollowing diagram.
For more information about backing up storage system data to tape, see the Data ONTAP SystemAdministration Guide for your version of Data ONTAP.
Path name for the LUN to be archived
When using NDMP or the dump command to archive your SnapManager backups, specify thedatabase LUN by using its absolute path name /vol/volume_name/.snapshot/snapshot_name/LUN_name name, in which the three variables represent the following text strings:
volume_name Name of the volume containing the data to be archived
snapshot_name Name of the Snapshot copy containing the LUNs to be archived
LUN_name Name of the LUN containing the data to be archived
For example, the absolute path name of the LUN exch1db.lun in the Snapshot copyexchsnap__SRVR3_01-20-2006_12.05.58_Daily on the volume ExchVoln is represented asfollows:
/vol/ExchVol/.snapshot/exchsnap__SRVR3_01-20- 2006_12.05.58__Daily/
exch1db.lun
SnapManager backup archiving | 247
Next topics
Evaluation of the NDMP and dump command method of archiving on page 248
Example: Using NDMP or dump command to archive SnapManager backups on page 248
Related concepts
Archives created with NDMP or the dump command on page 247
Related references
Example: Using a Windows backup utility to archive SnapManager backups on page 251
Example: Using Exchange Backup Agent to archive Exchange backup copies on page 254
Evaluation of the NDMP and dump command method of archivingThe NDMP and the dump command are the most efficient methods of creating archives of the LUNdrive files, you archive more data than you need.
Advantages
• Because the NDMP and the dump command methods do not rely on mounting a Snapshot copy,you do not risk creating of busy Snapshot copies.
• Because the NDMP and the dump command methods archive the entire raw LUN, restoringinvolves replacing the LUNs.
• If your archive procedure does not send the data over the network, the NDMP and the dumpcommand methods can be significantly faster than other methods.
Disadvantages
• Because you are archiving raw LUNs, the entire LUN containing the Exchange data is archived,so you archive more data than you need.If archiving extra data is undesirable, you can use NTBackup or another Windows backup utilityto back up the corresponding SnapInfo directory. Coordinate this so that the two pieces of thearchive are kept together for later retrieval.
• If you archive the SnapInfo directory separately, you must ensure that you get the SnapInfodirectory backed up directly from the Exchange server and the Exchange data extracted from theLUN backed by Snapshot copy from different locations into the same archive.
Example: Using NDMP or dump command to archive SnapManagerbackups
You can run a script to archive your SnapManager backups to tape either by using the Run CommandAfter Operation feature or by hardcoding the Snapshot copy names into the script.
Assume you want to run a script in the following environment:
• The script is run on the computer running Exchange and SnapManager.
248 | SnapManager® 6.0 for Microsoft® Exchange Installation and Administration Guide
• The name of the storage system is storagesystem1.• The name of the LUN containing the Exchange databases is exch1db.lun.• The name of the LUN containing the Exchange transaction logs and the SnapInfo directory is
exch1logs.lun.• The name of the volume that contains the Exchange databases is Exchvol.
To run a script using the SnapManager Run Command After Operation feature, use the followingcommand:
C:\SnapManager Scripts\scriptname.txt $ExchSnapshot $InfoSnapshot
The command-line parameters %1 and %2 might provide values similar to the following,respectively:
exchsnap__SRVR3_01-20-2006_12.05.58__Daily
eloginfo__SRVR3_01-20-2006_12.05.58__Daily
If you do not use the Run Command After Operation feature and you do not use the unique namingconvention for your backups, you can hard code the Snapshot copy names into the script.
For example, the dump command for the database might look like this, for an Exchange server namedSRVR3:
rsh storagesystem1 dump 0f nrst0a
/vol/Exch/.snapshot/exchsnap__SRVR3__recent__Daily/exch1db.lun
The following script uses the storage system dump command to dump the database,transaction logs, and SnapInfo LUNs to the tape. This script relies on rsh functioning on theExchange server using the SnapManager user account.
REM Back up the LUN containing the Exchange database.REM For this example, a level 0 backup is performedREM to the tape device named nrst0a.rsh storagesystem1 dump 0f nrst0a/vol/ExchVol/.snapshot/%1/exch1db.lunREM Before appending the next backup to the tape,REM reposition to the end of the tape so the nextREM write will not overwrite the existing data.rsh storagesystem1 mt -f nrst0a eomREM Back up the LUN containing the ExchangeREM transaction log files and the SnapManager SnapInfoREM directory.rsh storagesystem1 dump 0f nrst0a/vol/ExchVol/.snapshot/%2/exch1logs.lun
Related concepts
Automatic backup archiving using the Run Command After Operation feature on page 255
SnapManager backup archiving | 249
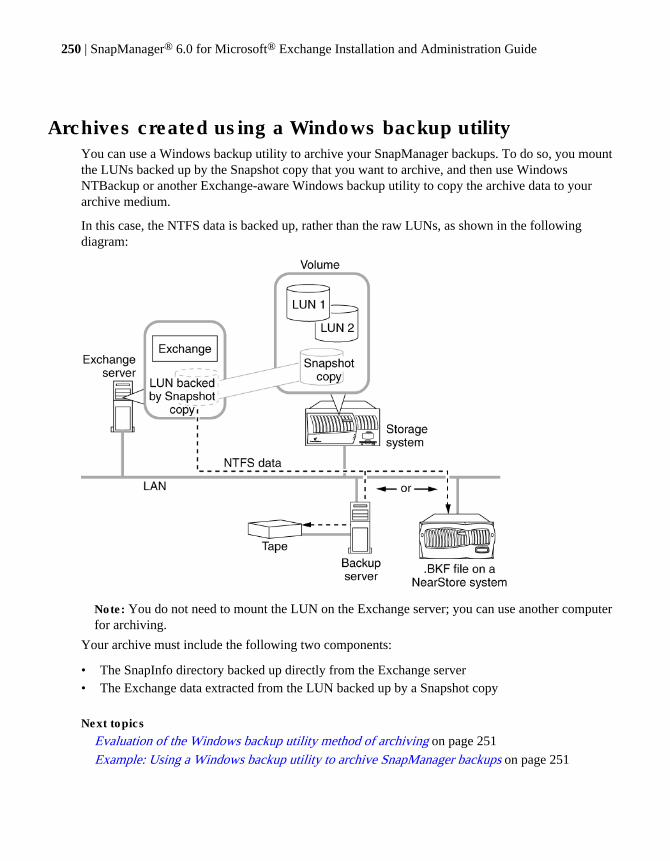
Archives created using a Windows backup utilityYou can use a Windows backup utility to archive your SnapManager backups. To do so, you mountthe LUNs backed up by the Snapshot copy that you want to archive, and then use WindowsNTBackup or another Exchange-aware Windows backup utility to copy the archive data to yourarchive medium.
In this case, the NTFS data is backed up, rather than the raw LUNs, as shown in the followingdiagram:
Note: You do not need to mount the LUN on the Exchange server; you can use another computerfor archiving.
Your archive must include the following two components:
• The SnapInfo directory backed up directly from the Exchange server• The Exchange data extracted from the LUN backed up by a Snapshot copy
Next topics
Evaluation of the Windows backup utility method of archiving on page 251
Example: Using a Windows backup utility to archive SnapManager backups on page 251
250 | SnapManager® 6.0 for Microsoft® Exchange Installation and Administration Guide
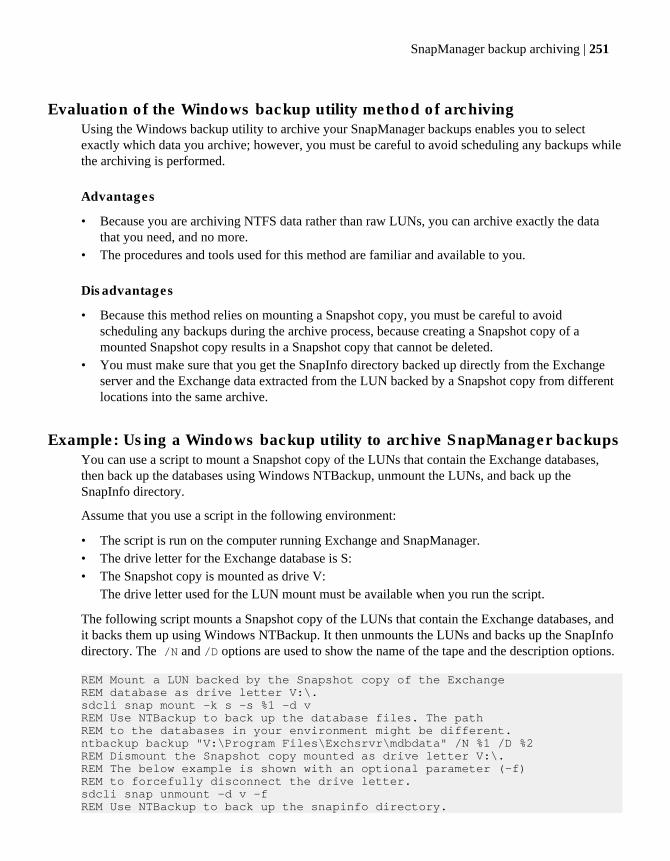
Evaluation of the Windows backup utility method of archivingUsing the Windows backup utility to archive your SnapManager backups enables you to selectexactly which data you archive; however, you must be careful to avoid scheduling any backups whilethe archiving is performed.
Advantages
• Because you are archiving NTFS data rather than raw LUNs, you can archive exactly the datathat you need, and no more.
• The procedures and tools used for this method are familiar and available to you.
Disadvantages
• Because this method relies on mounting a Snapshot copy, you must be careful to avoidscheduling any backups during the archive process, because creating a Snapshot copy of amounted Snapshot copy results in a Snapshot copy that cannot be deleted.
• You must make sure that you get the SnapInfo directory backed up directly from the Exchangeserver and the Exchange data extracted from the LUN backed by a Snapshot copy from differentlocations into the same archive.
Example: Using a Windows backup utility to archive SnapManager backupsYou can use a script to mount a Snapshot copy of the LUNs that contain the Exchange databases,then back up the databases using Windows NTBackup, unmount the LUNs, and back up theSnapInfo directory.
Assume that you use a script in the following environment:
• The script is run on the computer running Exchange and SnapManager.• The drive letter for the Exchange database is S:• The Snapshot copy is mounted as drive V:
The drive letter used for the LUN mount must be available when you run the script.
The following script mounts a Snapshot copy of the LUNs that contain the Exchange databases, andit backs them up using Windows NTBackup. It then unmounts the LUNs and backs up the SnapInfodirectory. The /N and /D options are used to show the name of the tape and the description options.
REM Mount a LUN backed by the Snapshot copy of the ExchangeREM database as drive letter V:\.sdcli snap mount -k s -s %1 -d vREM Use NTBackup to back up the database files. The pathREM to the databases in your environment might be different.ntbackup backup "V:\Program Files\Exchsrvr\mdbdata" /N %1 /D %2REM Dismount the Snapshot copy mounted as drive letter V:\.REM The below example is shown with an optional parameter (-f)REM to forcefully disconnect the drive letter.sdcli snap unmount -d v -fREM Use NTBackup to back up the snapinfo directory.
SnapManager backup archiving | 251
REM This backup appends the media so as not toREM overwrite the database backup. The path to theREM snapinfo directory is passed as the thirdREM parameter on the command line used to launchREM this script.ntbackup backup %3 /T%1 /A
To run this script using the SnapManager Run Command After Operation feature, use the followingcommand:
C:\SnapManager Scripts\scriptname.txt $ExchSnapshot $InfoSnapshot
The command-line parameters %1 and %2 might provide values similar to the following,respectively:
• exchsnap__SRVR3_01-20-2006_12.05.58__Daily
• eloginfo__SRVR3_01-20-2006_12.05.58__Daily
If you prefer not to use the Run Command After Operation feature and you are not using the uniquenaming convention for your backups, you can hard code the Snapshot copy names into the script.
For example, the dump command for the database might look like this, for an Exchange server namedSRVR3:
rsh storagesystem1 dump 0f nrst0a
/vol/Exch/.snapshot/exchsnap__SRVR3__recent__Daily/exch1db.lun
Related concepts
Problem deleting backups due to busy Snapshot copy error on page 211
Automatic backup archiving using the Run Command After Operation feature on page 255
Exchange backup archives created with Exchange BackupAgent
You can use Exchange backup copies to archive your SnapManager backup copies. You useNTBackup (which, in turn, uses the Exchange Backup Agent) to create a backup copies of yourExchange databases. In this case, the Exchange data itself is captured and archived.
Because you do not use SnapManager to create the backup copy, you also do not use SnapManagerto perform the restore process, so the SnapInfo directory does not need to be archived.
The following diagram represents this archiving method:
252 | SnapManager® 6.0 for Microsoft® Exchange Installation and Administration Guide
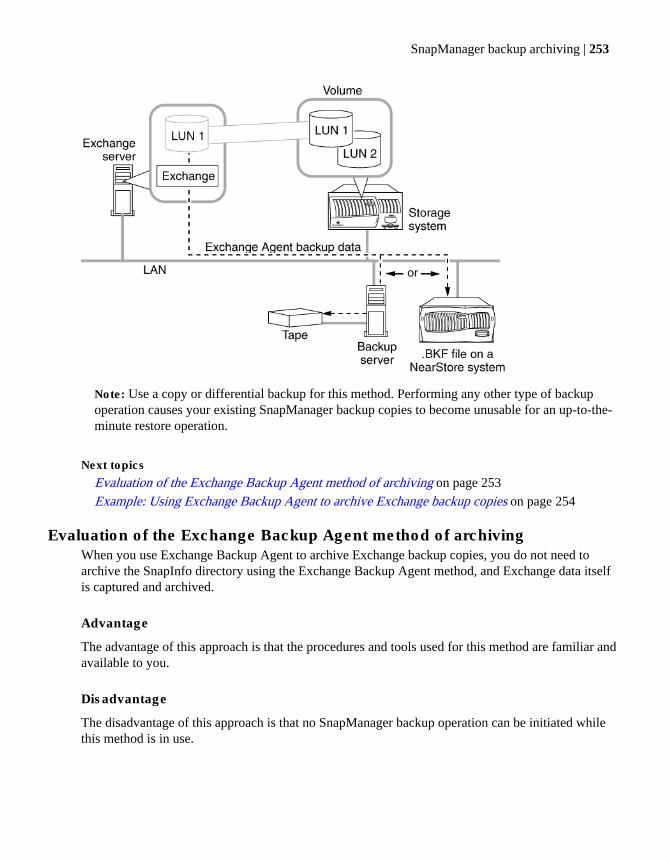
Note: Use a copy or differential backup for this method. Performing any other type of backupoperation causes your existing SnapManager backup copies to become unusable for an up-to-the-minute restore operation.
Next topics
Evaluation of the Exchange Backup Agent method of archiving on page 253
Example: Using Exchange Backup Agent to archive Exchange backup copies on page 254
Evaluation of the Exchange Backup Agent method of archivingWhen you use Exchange Backup Agent to archive Exchange backup copies, you do not need toarchive the SnapInfo directory using the Exchange Backup Agent method, and Exchange data itselfis captured and archived.
Advantage
The advantage of this approach is that the procedures and tools used for this method are familiar andavailable to you.
Disadvantage
The disadvantage of this approach is that no SnapManager backup operation can be initiated whilethis method is in use.
SnapManager backup archiving | 253
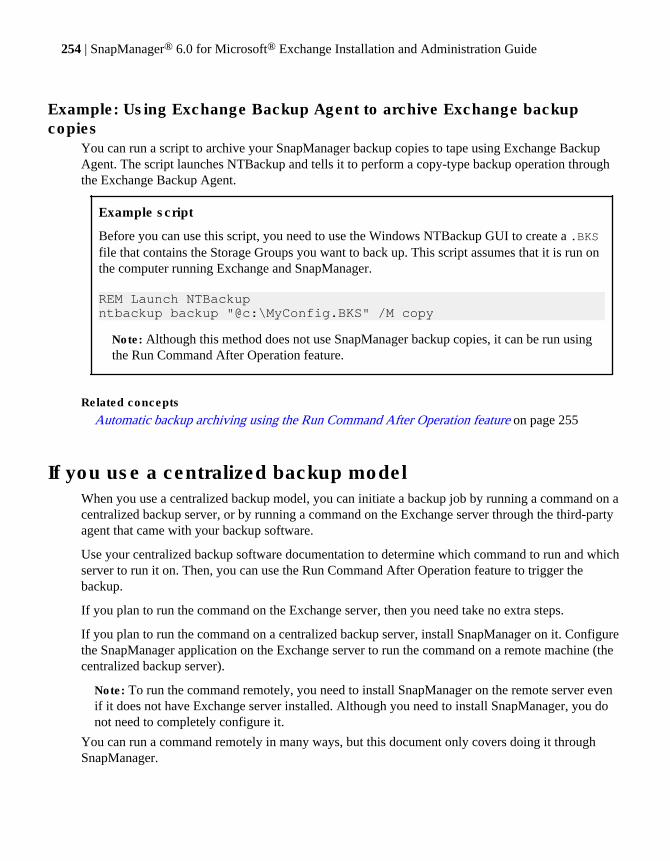
Example: Using Exchange Backup Agent to archive Exchange backupcopies
You can run a script to archive your SnapManager backup copies to tape using Exchange BackupAgent. The script launches NTBackup and tells it to perform a copy-type backup operation throughthe Exchange Backup Agent.
Example script
Before you can use this script, you need to use the Windows NTBackup GUI to create a .BKSfile that contains the Storage Groups you want to back up. This script assumes that it is run onthe computer running Exchange and SnapManager.
REM Launch NTBackupntbackup backup "@c:\MyConfig.BKS" /M copy
Note: Although this method does not use SnapManager backup copies, it can be run usingthe Run Command After Operation feature.
Related concepts
Automatic backup archiving using the Run Command After Operation feature on page 255
If you use a centralized backup modelWhen you use a centralized backup model, you can initiate a backup job by running a command on acentralized backup server, or by running a command on the Exchange server through the third-partyagent that came with your backup software.
Use your centralized backup software documentation to determine which command to run and whichserver to run it on. Then, you can use the Run Command After Operation feature to trigger thebackup.
If you plan to run the command on the Exchange server, then you need take no extra steps.
If you plan to run the command on a centralized backup server, install SnapManager on it. Configurethe SnapManager application on the Exchange server to run the command on a remote machine (thecentralized backup server).
Note: To run the command remotely, you need to install SnapManager on the remote server evenif it does not have Exchange server installed. Although you need to install SnapManager, you donot need to completely configure it.
You can run a command remotely in many ways, but this document only covers doing it throughSnapManager.
254 | SnapManager® 6.0 for Microsoft® Exchange Installation and Administration Guide
Related concepts
Automatic backup archiving using the Run Command After Operation feature on page 255
Automatic backup archiving using the Run Command AfterOperation feature
SnapManager allows you to automatically run your own program or script after a backup or databaseverification operation, but only after the operation finishes successfully. This feature, called RunCommand After Operation, is typically used to automatically archive a backup copy.
Make sure that you archive all components of a backup set together. If any one of the Storage Groupsis offline and you a initiate a backup process using the Run Command After Operation, the backupoperation fails for that particular job.
Next topics
Command arguments supported by the Run Command After Operation feature on page 255
Specifying the command to be run by the Run Command After Operation feature on page 256
Command arguments supported by the Run Command After Operationfeature
The Run Command After Operation feature supports some pre-defined variables that can passoperation-specific information to your program or script.
$ExchSnapshot Expands to the name of an Exchange database Snapshot copy, as shown in thefollowing examples:
exchsnap__winsrvr3__01-31-2006_15.03.09
exchsnap__winsrvr3__recent
The number of database Snapshot copies in a SnapManager backup set dependson the number of volumes used to store the Storage Groups included in thebackup operation.
$InfoSnapshot Expands to the name of a SnapInfo directory Snapshot copy, as shown in thefollowing examples:
eloginfo__winsrvr2__01-31-2006_15.03.09
eloginfo__winsrvr2__recent
$SnapInfoName Expands to the name of the SnapInfo directory, as shown in the followingexamples:
WINSRVR3__01-23-2006_16.21.07__Daily
WINSRVR3__recent
If you use this variable, you must also provide the correct path to the directory.
SnapManager backup archiving | 255
$SnapInfoPath Expands to the name of the SnapInfo subdirectory, as shown in the followingexamples:
I:\SME_SnapInfo\EXCH__WINSRVR3\SG__First Storage Group
\WINSRVR5_01-06-2006_11.52.36
The $SnapInfoPath variable is automatically enclosed within double quotes sothat the actual path name can contain spaces without affecting the scriptinvocation on the Windows command line.
If you do not want the double quotes to appear in your command line, removethem from the Command Arguments field in the Run Command AfterOperation dialog box.
Specifying the command to be run by the Run Command After Operationfeature
While specifying a backup or verification operation, you can use Run Command After Operation tospecify the details of the command that you want to run after the operation finishes. Using defaultvalues for the command arguments frees you from entering the command information each time youinitiate a backup or verification operation.
Before you begin
• You must install SnapManager on a computer that you specify, but you do not need to configureit.
• If your script is stored on a network share, use the UNC path rather than the network drive letterto specify the script’s location.Add the network location to Internet Explorer's list of trusted sites; otherwise, your commandmight fail.
About this task
If more than one Snapshot copy of the same type exists for your command, include that Snapshotcopy’s variable name once for every Snapshot copy. If you do not, you cannot create a completearchive. For example, if you enter myscript $exchSnap $exchSnap, the command that isgenerated is myscript snap1 snap2 .
Steps
1. Use the Backup wizard or the Backup and Verify window to specify a full database backup, atransaction log only backup, or a database verification.
2. Select Yes, Run a command after this operation in the Backup wizard or Run CommandAfter Operation in the Backup and Verify window.
3. Under Specify a computer where..., select the host on which your program or script resides.
256 | SnapManager® 6.0 for Microsoft® Exchange Installation and Administration Guide
4. Under Specify the full path..., select your program or script.
5. Type the command input string in Command Arguments.
You can directly enter text or select the variable you want to enter from the SnapManagerVariables list.
6. Repeat Steps 4 and 5 as needed until the Command Arguments box contains all of the argumentsthat you want to pass to your program or script.
7. Click OK and return to the backup or verification setup process.
After the backup or verification finishes successfully, the command that you specified, with theSnapshot copy and SnapInfo information for this backup operation inserted, runs automatically.
Example: script and the required parameters
Suppose that you want to run the following script:
C:\SnapManager Scripts\scriptname.bat
You need the following parameters:
• Name of the database Snapshot copy• Name of the specific SnapInfo directory• NTFS path to the SnapInfo directory
Related conceptsAutomatic backup archiving using the Run Command After Operation feature on page 255Archives created with NDMP or the dump command on page 247
Related referencesExample: Using a Windows backup utility to archive SnapManager backups on page 251Command arguments supported by the Run Command After Operation feature on page 255Example: Using a Windows backup utility to archive SnapManager backups on page 251
Enabling the launch of SnapManager scripts from a UNCpath
If SnapManager is installed on a Windows Server system and you want to launch a script from aUNC (Uniform Naming Convention) path, you need to add the host where the script is located to theInternet Explorer list of trusted sites.
About this task
• If SnapManager is installed on a Windows Server system, and you attempt to launch a script froma UNC (Uniform Naming Convention) path, SnapManager might hang. When this happens, the
SnapManager backup archiving | 257
log file shows no indication of the failure and the last line of the log text “The specified commandhas been launched successfully.” does not appear.
• Windows Server 2003 or Windows Server 2008 ships with Internet Explorer's Enhanced InternetExplorer Security Configuration enabled. This setting is restrictive and prevents batch fileslocated on a network share from running. The network location needs to be added to InternetExplorer's list of trusted sites.
• The system you log on to can be the same system that is running SnapManager, or it can be adifferent server. Log on using the same user account that SnapManager is configured to use.
• The security settings are specific to each user account on each machine. You need to repeat thisprocedure for on all machines that are used to run scripts and for all users who might launch thescript on each machine. You will also need to repeat these steps if you start using a different useraccount to run SnapManager.
Steps
1. Log in to the Windows Server 2003 or Windows Server 2008 system that will be running thescript.
2. Launch Internet Explorer.
3. In the menu bar, select Tools > Internet Options.
4. In the Internet Options dialog box, select Security > Local intranet > Sites.
5. In “Add this Web site to the zone,” enter the host name of the machine from which the script willbe launched and click Add.
6. Click OK.
7. To verify your changes, browse to the network on which the script resides and launch the script.
The script should now run normally without security prompts. The script might fail to completeproperly because the SnapManager variables are not passed to the script in this test.
Related concepts
SnapManager for Exchange Service identity account requirements on page 36
258 | SnapManager® 6.0 for Microsoft® Exchange Installation and Administration Guide
SnapManager reports and the report directory
SnapManager reports list step-by-step details of every SnapManager operation that you perform,their final statuses, and any error messages that you encounter during the operation.
The SnapManager Report Directory provides folders that group the reports for each of theseoperation types:
• Backup• Config• Debug• Frequent Recovery Point• Delete Snapshot• Restore• Miscellaneous
Note: There might be other folders in the directory if you are running SnapManager in a Windowscluster or you have a previous version of SnapManager.
Next topicsSnapManager reports in a Database Availability Group (DAG) on page 259Reasons to change the report directory location on page 260Changing the SnapManager report directory on page 260Locating the report directory in a Windows cluster on page 261Viewing SnapManager reports on page 261Printing SnapManager reports on page 261Deleting SnapManager reports on page 262
Related conceptsPrerequisites for uninstalling SnapManager on page 59
Related tasksChanging the SnapManager report directory on page 260
SnapManager reports in a Database Availability Group(DAG)
When the SnapManager MMC snap-in is connecting to the Database Availability Group (DAG), youcan view all the reports from all the member servers of the DAG.
The report folders reside on each member server of the DAG. The report folders for the DAG resideon the "owner node" of the DAG. Whenever configuration, backup, or restore operations are
SnapManager reports and the report directory | 259
performed, the reports generated for the DAG are stored in the report folders of the server which isthe owner node of the DAG at the time these operations were performed.
Reasons to change the report directory locationYou might need to change the report directory location, either because of limited space or becauseyou want to share the directory between SnapManager and the Exchange server running in anMicrosoft Cluster Services (MSCS) cluster.
If you find you have limited space in the current report directory, you can move it to a differentlocation that has more available disk space.
If you are running Exchange and SnapManager in an MSCS cluster, storing the SnapManager reportsin the default location (in a directory named Report under the SnapManager installation directory)does not allow the report directory to be shared between the nodes in the cluster. Furthermore, youwould not see the same reports from different nodes. To avoid these problems, you can move thereport directory to a disk that belongs to the same group as your Exchange virtual server.
Changing the SnapManager report directoryIf you have limited space in your original report directory, you can change the report directory tostore your reports.
About this task
If you change the directory, you can no longer see the reports that were created before you changedthe path. To view them, change the report directory path back to the original path and refresh theview.
Steps
1. In the Actions pane, click Report Directory Settings.
2. Enter or browse to the path name for your new Report Directory.
3. In the Actions pane, click Refresh.
260 | SnapManager® 6.0 for Microsoft® Exchange Installation and Administration Guide
Locating the report directory in a Windows clusterBy default, the SnapManager Report Directory is on the disk on which SnapManager is installed. In aWindows cluster, the report directory is not shared among the nodes in the cluster, and you cannotsee the same reports from different nodes.
About this task
• Change the directory from every SnapManager node.• Use a disk that does not contain Exchange or SnapManager data for the report directory.
The report directory is restored from its Snapshot copy when you perform a restore operation.
Steps
1. In the Actions pane, click Report Directory Settings.
2. Enter or browse to the new report directory path to a disk that belongs to the same group as yourExchange virtual server.
3. In the Actions pane, click Refresh.
Viewing SnapManager reportsYou can view SnapManager reports from the SnapManager GUI.
Steps
1. In the Scope pane, click Reports.
SnapManager displays the report folders in the Results pane.
2. In the report folders, select the database for which you want to view a report.
SnapManager displays the report in the Results pane.
Printing SnapManager reportsYou can print SnapManager reports either from within the displayed report, or you can open thereport in Notepad and print it.
Steps
1. In the Scope pane, click Reports.
SnapManager reports and the report directory | 261
2. Click the directory that contains the report you want to print.
If you want to... Then...
Print the displayed reportdirectly
a. Select the report that you want to print.
b. Right-click anywhere within the displayed report in the Result pane, andselect Print.
Print from Notepad a. Right-click the report name in the Result pane and select Open withNotepad.
b. From Notepad, select Print in the File menu.
Deleting SnapManager reportsYou can delete reports from the Report Directory to increase the space available in the directory.
Steps
1. Click the reports in the Scope pane.
2. Select the report you want in the SnapManager Report Directory.
3. Right-click the report directory or the individual report that you want to delete and select DeleteAll or Delete.
4. Click Yes in the dialog box that appears.
The report is deleted.
262 | SnapManager® 6.0 for Microsoft® Exchange Installation and Administration Guide
Dataset and SnapVault integration
Dataset and SnapVault integration with SnapManager provides an integrated, rapid way to create,restore, and manage remote backup sets and archives. SnapManager coordinates with ProtectionManager for the integration.
The functionality for dataset and SnapVault integration is available only if you are using DataONTAP 7.3 or later, along with Protection Manager 3.7 or later. SnapManager uses Data ONTAPSnapshot technology to create and restore local backup copies.
Note: Protection Manager integration can be enabled without reinstalling SnapManager forExchange anytime by rerunning the Configuration wizard. You must first ensure that you haveconfigured SnapDrive for Protection Manager integration. If you have not already done so, youcan set up SnapDrive Protection Manager integration via the sdcli command, and then restart theSnapDrive service, or you can rerun the SnapDrive setup. (See the SnapDrive help for moreinformation on Protection Manager integration.)
Next topics
Dataset concepts on page 263
Available functionalities of dataset and SnapVault integration with SnapManager on page 264
Dataset configuration on page 266
Local backup protection using dataset and SnapVault integration on page 270
Information used to create remote backups on page 270
Remote backup retention on page 271
Deferred database integrity verification with SnapVault on page 272
Restoring from a remote backup on page 272
Dataset conceptsAssociating a data protection, disaster recovery, or provisioning policy with a dataset lets storageadministrators automate tasks, such as assigning consistent policies to primary data, propagatingpolicy changes, and provisioning new volumes, qtrees, or LUNS on primary and secondary datasetnodes. The licenses that you have installed determine which policies are available.
Configuring a dataset combines the following objects:
Dataset For protection purposes, a dataset is a collection of physical resources on a primarynode, such as volumes, flexible volumes, and qtrees, and the physical resources forcopies of backed-up data on secondary and tertiary nodes.
For provisioning purposes, a dataset is a collection of physical resources, such asvolumes, flexible volumes, qtrees, and LUNs, that are assigned to a dataset node. If
Dataset and SnapVault integration | 263
the protection license is installed and the protection policy establishes a primary andone or more nonprimary nodes, each node of the dataset is a collection of physicalresources that might or might not be provisioned from the same resource pool.
Resourcepool
A collection of physical resources from which secondary storage is provisioned.Resource pools can be used to group storage systems and aggregates by attributes,such as performance, cost, physical location, or availability.
Dataprotectionpolicy
A data protection policy defines how to protect the primary, secondary, and tertiarystorage, as well as when to create copies of data and how many copies to keep.
Available functionalities of dataset and SnapVaultintegration with SnapManager
By using dataset and SnapVault integration with SnapManager, you can create, manage, verify andrestore remote backup copies. You can select dataset policies, manage remote backup copies,perform temporary restore operations and remote backup integrity verification operations.
The following functionalities of dataset and SnapVault integration with SnapManager are available:
• You can create and restore remote backup copies.• You can select policies related to the dataset created by Protection Manager.• You can protect created datasets, by doing the following:
• Creating remote backup copy on the SnapVault secondary.• Using topologies supported by SnapManager and Protection Manager.
• You can delete individual remote backup copies based on the backup version.• You can display remote backup copies that are available for restore.• You can perform a restore operation to a Recovery Storage Group using SnapVault remote
backup technology.• You can perform remote backup integrity verification.
Next topicsDataset and SnapVault integration with SnapManager on page 264Prerequisites for dataset and SnapVault integration with SnapManager on page 265Limitations of dataset and SnapVault integration with SnapManager on page 266
Dataset and SnapVault integration with SnapManagerA dataset is a collection of storage sets. SnapManager integrates with datasets and SnapVault toarchive these storage sets to secondary storage. By replicating Snapshot copies of the storage sets tosecondary storage, SnapVault provides you with a centralized disk-based backup solution.
The dataset being a data management concept introduced in Protection Manager includes the backupcopies and replica of the primary data and configuration information, along with data protection
264 | SnapManager® 6.0 for Microsoft® Exchange Installation and Administration Guide
policies that determine how the data is protected. Datasets enable you to keep backup online forfaster restore.
The following capabilities of Protection Manager make it a good option for integration withSnapManager:
• Automatic setting up of SnapVault relationships and complex replication topologies withresource pools
• Monitoring of data transfer• Management of remote backup retentions
If Protection Manager is available and SnapDrive is configured for DataFabric Manager,SnapManager automatically becomes aware of the dataset. If Protection Manager is not available,SnapDrive informs SnapManager of its unavailability. SnapManager continues in normal mode, anddoes not support remote backup operations.
Protection Manager integration can be enabled without reinstalling SnapManager for Exchangeanytime by rerunning the SnapManager Configuration wizard. However, you must first ensure thatyou have configured Snapdrive for Protection Manager integration. If you have not already done so,you can set up Snapdrive Protection Manager integration with the sdcli command, and then restartthe SnapDrive service, or by rerunning the SnapDrive setup. ( Refer to the SnapDrive Help for moreinformation on Protection Manager integration.)
Dataset policiesDataset policies control the protection of data in datasets. A policy defines characteristics such as thereplication topology, backup retention, replication lag, and throttle.
Remote backup retention policies control the backup copies that are created at the remote site. Theremote backup retention policies are controlled by Protection Manager, not SnapManager.
Datasets associate the LUNs that are used by an Exchange server to the related set of protectionpolicies. The LUN association with the policies enables the administrator to protect the data throughremote backup copy and to relate to the corresponding resource pool.
Prerequisites for dataset and SnapVault integration with SnapManagerBefore you integrate datasets and SnapVault with SnapManager, ensure that you have all requiredsoftware installed. Also ensure that you meet the storage system, license, SnapMirror, and LUNplacement requirements.
Ensure that you have the following softwares installed:
• Protection Manager 3.7 or later• NetApp Management Console 3.7 or later• SnapDrive for Windows 6.0 or later• Data ONTAP 7.3 or later
Dataset and SnapVault integration | 265
Note: You can upgrade SnapManager from an earlier version that did not support datasets to alater version that supports datasets. You can also revert to the older version without any adverseeffects on the system.
Ensure that you have the following configuration requirements met:
• Two storage systemsThe primary storage system is the archiving source; the secondary storage system is the archivingdestination. Both should have Data ONTAP 7.3 or later installed. One system should have theSnapVault primary license, and the other should have the SnapVault secondary license.
• All LUNS on qtrees• Each LUN on its own qtree and should contain only a single LUN• Protection Manager and NetApp Management Console software installed on a dedicated server
other than the Exchange server that you are working with SnapDrive for Windows installed• If you set up SnapMirror relationships using Protection Manager, the snapmirror.conf
and .allow files have been updated manually, so that Business Continuance works.
Limitations of dataset and SnapVault integration with SnapManagerWhen you integrate SnapManager with datasets and SnapVault, some limitations exist with datasetconfiguration, retention policies, Business Continuance, and verification.
• You cannot perform remote backup and archiving operations without dataset configuration.• You cannot control the archived backup retention policy by using SnapManager.
Archived backup retention policies are controlled by Protection Manager.• You cannot use SnapManager to create and manage datasets for disaster recovery or business
continuance.• SnapManager does not support LUNs residing on one qtree.• SnapManager does not support LUNs that do not reside on a qtree.• SnapManager does not support verification of an archived backup copy on secondary storage
after a backup operation is complete.• After you apply a dataset policy, you cannot change it using SnapManager.
If you want to change a dataset policy, then change it using Protection Manager, whichautomatically updates the policy in SnapManager as well.
Dataset configurationA storage set grouped with its configuration information makes a data set. Data sets associate theLUNs used by an Exchange server to the related set of protection policies. This enables the
266 | SnapManager® 6.0 for Microsoft® Exchange Installation and Administration Guide
administrator to protect the data through remote backup and relate to the corresponding resourcepool. One data set is created for each Exchange server on the server host.
You can create and configure datasets when you run the SnapManager Configuration wizard for thefirst time on a system with Protection Manager installed. If you upgrade SnapManager from anearlier version, re-run the Configuration wizard to configure a dataset.
You cannot configure datasets through the Database Availability Group (DAG). You can configuredatasets on all member servers of the DAG. You must enable the dataset option on a member serverduring SnapDrive for Windows installation to create a dataset on that server.
You cannot change the names of the datasets. The following is the example for the namingconvention for a dataset:
SnapMgr_Exchange_exchange1
For a server running on Microsoft Clustered Server, a virtual server is used to name the dataset. Inthe case of Continuous Cluster Replica (CCR) configuration, the Exchange server name is used alongwith the name of the node.
Dataset member information is a list of drive letters and mountpoints related to SnapManager. Theinformation is stored and tracked by Protection Manager, and its information is retained even afterSnapDrive is uninstalled. The member information is retained on all cluster nodes.
If you are using Microsoft Exchange 2003 or 2007, you can view the current dataset status for yourserver by selecting the server and then selecting Backup in the Scope pane. SnapManager gives youthe dataset description and status, the protection policy description, the protection status, theconformance status, and lists the dataset members in the Results pane.
You can also view the dataset status from the Microsoft Management Console. When you clickSnapManager for Exchange, you can see a list of servers. If datasets are configured for a server,MMC displays the dataset status. If datasets are not configured, the messageDataset not configured
is displayed.
Note: If you are using Microsoft Exchange 2010, the dataset status will not be accurate.
Next topics
Creating a dataset using SnapManager on page 268
Editing a dataset using Protection Manager on page 269
SnapVault relationships on page 269
Dataset and SnapVault integration | 267
Creating a dataset using SnapManagerWhen you run the Configuration wizard for the first time with Protection Manager configured,SnapManager creates a dataset for each server internally that you configure with SnapManager usingthe Configuration wizard.
Before you begin
Ensure that you are assigned an administrator role that enables you to create a dataset.
Ensure that you go through documentation on automatic e-mail notification settings before you startthe configuration.
About this task
For configuring archived database by using Protection Manager with SnapManager, SnapManagercurrently allows only the Backup and Remote backups only policies to be implemented. Back up isselected as the default option. You can change the policy by using the NetApp Management Console.
For a CCR configuration you can create two datasets, one for each CCR node.
Steps
1. If you have datasets configured in your system, in the Configure Dataset for Backup Archivalpage of the Configuration wizard, select the Storage Groups that you want to add to your dataset.
2. Choose the default protection policy as Back up or Remote backups only as per yourrequirement.
3. In the Add Microsoft iSCSI Service Dependency window, select Yes, add the.. if you want toadd iSCSI service as a dependency for the MSExchangeSA service.
4. Use the Configure Automatic Event Notification page to configure the automatic eventnotification options for SnapManager.
5. Review the configuration summary in the Completing the Configuration Wizard page, andclick Finish.
6. Click Start Now to migrate your databases and their transaction logs and SnapInfo files to theLUNs you specified.
Note: If you are moving the location of Exchange databases in this step, it could take sometime to complete.
7. Click OK.
After you finish
Edit the dataset that you have created.
268 | SnapManager® 6.0 for Microsoft® Exchange Installation and Administration Guide
Related concepts
Exchange Server storage groups and databases migration and configurationconsiderations on page 98
Editing a dataset using Protection ManagerIt is mandatory that you use Protection Manager to add individual physical resources to the dataset(that you created with Protection Manager) after you run the SnapManager Configuration wizard.Only after adding resources you can start archiving the database. SnapManager cannot associate aresource pool to the dataset.
Before you begin
After the dataset is created, use Protection Manager to check the Protection status and theConformance status of the dataset.
Steps
1. In the Scope pane, click Dataset.
2. Select the dataset.
3. In the Dataset window, click Edit.
4. In the Edit Dataset window, click Physical Resources under Backup.
5. From the list of available resources, add the resources you want in the dataset.
6. Click Next.
7. Click Finish.
8. In the Edit Dataset window, click Provisioning/Resource Pools under Backup.
9. From the list of available resource pools, assign the resource pools for the archive backup.
10. Click Next.
11. Click Finish.
SnapVault relationshipsAfter you create the dataset, determine its policies, and add secondary resource pools to the dataset,Protection Manager creates SnapVault relationships for archiving. You cannot restore a remotebackup if you change or modify the SnapVault relationship.
If you upgrade from earlier versions of SnapManager to SnapManager 5.0 and later, and archive thebackup database by using SnapVault, import the SnapVault relationships that exist to the dataset. Ifyou do not import the SnapVault relationship, a new one is created. For more information, see therelevant Protection Manager documentation.
Dataset and SnapVault integration | 269
Related information
Using SnapVault to Archive SnapManager for Exchange Backups Sets
Local backup protection using dataset and SnapVaultintegration
SnapManager uses datasets to create remote backup copies of local data residing in the primaryStorage Group. You must schedule your backup operations such that their transfer to SnapVaultsecondary storage does not get affected.
Ensure that you meet the following conditions before SnapManager starts creating remote backupcopies:
1. A dataset exists.
2. The Archive local backup using SnapVault option is enabled.
3. The dataset protection status is Protected and conformance status as Conformant.If the configuration contains non-Exchange LUNs, the qtrees containing the non-Exchangedatabase are not updated during archiving. This changes the dataset protection status to LagWarning or Lag Error.
For more information, see the relevant Protection Manager documentation.
Scheduling backup operations according to SnapVault transfers
You must schedule your backup operations so that they cannot be deleted before theirSnapVault transfer to the secondary storage is complete.
You configure a backup operation so that only two backup copies can be retained on theprimary storage. You schedule the backup operations at 12 PM, 1 PM, 2 PM, and 3 PM. Thebackup operations take three hours before their SnapVault transfer to the secondary storage iscomplete. When the 3 PM backup operation is running, the 12 PM backup operation is stilltransferring. Hence SnapManager deletes the 1 PM backup, and the Protection Manager jobfails as it fails to find the deleted 1 PM backup to transfer. You can avoid this by using numberof days for local backup retention instead of using number of backup copies for local backupretention.
Information used to create remote backupsWhen configured for archiving, SnapManager creates remote backups after it creates local backups.SnapManager sends certain information like the local backup version, the local backup managementgroup, and the list of backup LUNs to SnapDrive before the remote backup operation can take place.
• The version number of the backup
270 | SnapManager® 6.0 for Microsoft® Exchange Installation and Administration Guide
The version number acts as both the timestamp and locator for the backup copy during a restoreoperation.
• The type of backup management group
• Local management groupThe local management groups can be standard, daily, and weekly.
• Remote management groupThe remote management groups can be hourly, daily, weekly, monthly, and unlimited. Thedefault management group is daily.If you select the hourly management group for remote backup, SnapManager shows amessage that conveys that hourly archived backups are deleted the next time the ProtectionManager monitoring service runs.
• A list of LUNs with their corresponding Snapshot names
You can defer remote backup to a time after the local backup is created.
SnapManager uses the unique backup naming convention for archives created on secondary storage.In the Backup wizard, if you configure a dataset and the archival process starts, SnapManager doesnot change the generic backup naming convention to the unique backup naming convention. If youselect to keep generic naming, no archives are created.
If the backup naming convention is generic and you archive the backup, SnapManager providesoptions to either continue to archive to secondary storage with the unique naming convention, or todisable archiving and continue the local backup operations with generic naming convention.
Related concepts
The SnapInfo directory on page 120
Related tasks
Backing up using the Backup and Verify window on page 139
Remote backup retentionRemote backup retention refers to the duration of time that the remote backups that are retained at asecondary Storage Group. SnapManager and Protection Manager work together to retain or deleteyour backups, based on the protection policy that you select for a dataset.
You can specify the number of local backups to retain by using the backup management groups.Protection Manager controls remote backup retention. When SnapManager deletes a backup, itdeletes the metadata only, after confirming with Protection Manager that the archive backup has alsobeen deleted.
New backups are continuously created. If the number of backups or the duration of retention exceedsthe management group setup, the policy deletes the oldest backup on the secondary storage.
Dataset and SnapVault integration | 271
Deferred database integrity verification with SnapVaultYou can defer integrity verification of either the local or remote backup copies.
Deferred integrity verification runs on the management group that you selected when you created thebackup. You cannot change the remote backup management group after you create the remotebackup copy. You can perform deferred verification on the SnapVault secondary Storage Group fromeither the local application server and the remote verification server.
Note: For deferred verification of the remote backup copies, verification is based only on theRemote retention type. The number of backups that you select with the specified retention type areverified.
Restoring from a remote backupThe process for restoring from a remote backup copy is almost the same as that for restoring a localbackup copy, except that the remote backup copy needs to be restored from the archived backup.
Before you begin
Prior to restoring from a remote backup copy, you must enter the following information on theremote filer:
options snapvault.access <filername>
For more information on the options snapvault.access command, see the Data ONTAPdocumentation.
Steps
1. Select the Exchange server from the Scope pane.
2. If you don't have direct access to the SnapVault secondary, you must cancel the backupverification so that the remote backup will not mount on your local machine before the restore.To cancel the backup verification, complete the following steps:
a. Click Restore.
b. Click the Advanced options tab.
c. Uncheck the Verify log sequence and database metadata before restore checkbox, thenclick Okay.
d. Navigate to the Backup Verification Setting tab.
e. Uncheck the Override database verification requirements for restore checkbox, then clickOkay.
272 | SnapManager® 6.0 for Microsoft® Exchange Installation and Administration Guide
3. In the Actions pane, select Restore wizard.
4. In the Which Exchange Server Created the Backups page, select Restore from unmanagedmedia.
5. Continue with the instructions provided in the Restore wizard.
6. Click Finish.
Related tasks
Restoring databases using the Restore window on page 172
Dataset and SnapVault integration | 273

SnapManager application settings configuration
You can configure or change SnapManager application settings at any time after you installSnapManager. Run SnapManager from the system console, not from a Terminal Services client.
Do not use Terminal Services for any type of SnapManager administration, because you might misscritical information that is displayed only in pop-up boxes at the system console.
Next topics
Where to access SnapManager application settings on page 275
Adding Exchange servers to be managed on page 277
Enabling database migration back to local disks on page 277
Disabling database migration back to local disks on page 278
Considerations for selecting the database verification server on page 278
Selecting the Snapshot copy access method for database verification on page 282
Database verification throttling on page 282
Database verification override during restore operation on page 287
Configuring the backup naming convention on page 288
Configuring default settings for the Run Command After Operation option on page 289
Fractional space reservation on page 290
Event notification options on page 299
Related concepts
Database backup using SnapManager on page 135
Database restore operation using SnapManager on page 161
Related tasks
Viewing the placement of Exchange and SnapManager components on page 98
Where to access SnapManager application settingsUsing the SnapManager user interface, you can easily configure and change SnapManagerapplication settings at any time after you install SnapManager. There are multiple ways with whichyou can access your application settings.
From the Configuration wizard, you can access settings for only the verification server. To accessother verification settings (Override Verification, Throttling, and Access LUN in Snapshot copy),you must open the Verification Settings dialog box.
When you open the Run Command After Operation dialog box from the Actions pane, you canview or configure only the default settings. However, from within the context of a specific operation,
SnapManager application settings configuration | 275
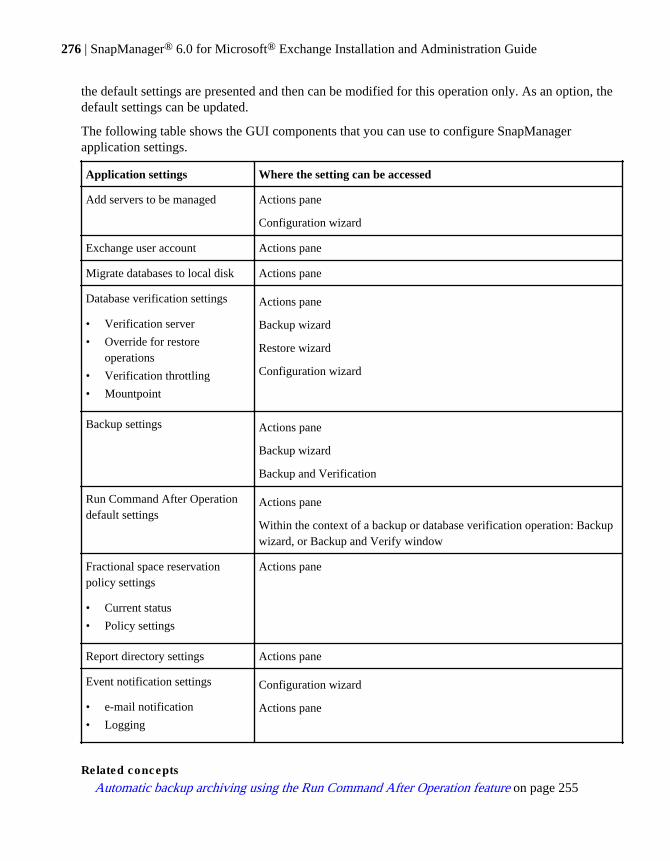
the default settings are presented and then can be modified for this operation only. As an option, thedefault settings can be updated.
The following table shows the GUI components that you can use to configure SnapManagerapplication settings.
Application settings Where the setting can be accessed
Add servers to be managed Actions pane
Configuration wizard
Exchange user account Actions pane
Migrate databases to local disk Actions pane
Database verification settings
• Verification server
• Override for restoreoperations
• Verification throttling
• Mountpoint
Actions pane
Backup wizard
Restore wizard
Configuration wizard
Backup settings Actions pane
Backup wizard
Backup and Verification
Run Command After Operationdefault settings
Actions pane
Within the context of a backup or database verification operation: Backupwizard, or Backup and Verify window
Fractional space reservationpolicy settings
• Current status
• Policy settings
Actions pane
Report directory settings Actions pane
Event notification settings
• e-mail notification
• Logging
Configuration wizard
Actions pane
Related concepts
Automatic backup archiving using the Run Command After Operation feature on page 255
276 | SnapManager® 6.0 for Microsoft® Exchange Installation and Administration Guide
Adding Exchange servers to be managedYou can manage one Exchange server or multiple Exchange servers with SnapManager using theAdd Servers to be Managed option. You cannot run SnapManager until you successfully add anExchange server. You can also manage multiple servers.
Steps
1. In the Actions pane, select Add Servers to be Managed.
2. Type the name of or browse to the Exchange server that you want to manage.
This setting remains in effect, specifying the default Exchange server, until, or unless you changeit.
Result
Whenever the SnapManager program starts, SnapManager automatically connects to the defaultExchange server by using the default security authentication method.
Note: If you want to manage a different Exchange server later, use the Add Servers to beManaged option to connect and manage an Exchange server.
Enabling database migration back to local disksOnce you have migrated your database for SnapManager configuration, you can enable migrationback to local disks.
About this task
If you enable the Enable databases and transaction logs to be migrated back to local disk option,SnapManager disables it the next time you start SnapManager.
Steps
1. In the Actions pane, click Configuration Wizard.
2. Select the Enable databases and transaction logs to be migrated back to local disk option toenable the migrate-back-to-local-disk feature.
3. Click OK.
SnapManager application settings configuration | 277
Disabling database migration back to local disksYou can disable the migration of your database back to local disks after you have configuredSnapManager.
Steps
1. In the Actions pane, click Configuration Wizard.
2. Select the Enable databases and transaction logs to be migrated back to local disk option todisable the migrate-back-to-local-disk feature.
3. Click OK.
Considerations for selecting the database verification serverYou can manage verification your backup sets on either your production Exchange server or on aremote verification server, and you can use any of deferred verification, remote verification, andverification throttling to do so.
Verification of databases in a backup set can be done on the production Exchange server (theWindows host system running the Exchange server used to service the users) or on a remoteverification system (a different Exchange server with Exchange management tools installed).Running database verification on a production Exchange server is CPU-intensive for the Windowshost and also involves a substantial amount of activity on the storage system.
Note: When you change the database verification server, this change does not affect any databasebackup (with verification) or database verification-only jobs that are already scheduled. You mustre-create the scheduled backup jobs for the change to apply.
SnapManager offers three methods for managing database verification load that you can useseparately or in any combination:
• Deferred verification• Remote verification• Verification throttling
Both the deferred verification and remote verification manage database verification load byseparating database verification from the backup operation. Verification throttling manages databaseverification load by slowing down the verification throughput rate.
Next topics
Configuring the verification server on page 279
Remote verification prerequisites on page 279
278 | SnapManager® 6.0 for Microsoft® Exchange Installation and Administration Guide
Related concepts
Database verification load management on page 127
How SnapManager checks database integrity in backup sets on page 126
Verification override entry in the SnapManager restore report on page 286
Related tasks
Selecting the Snapshot copy access method for database verification on page 282
Configuring database verification throttling on page 285
Configuring the verification serverAfter you have configured SnapManager, you can configure your verification server to be the sameas your host server or a remote server. Configuring a remote server as the verification server reducesthe load on the host server. You can optionally configure the verification server after you havecompleted SnapManager configuration.
Before you begin
You must have SnapDrive, SnapManager, and Exchange installed on your verification server. If youconfigure a remote server as your verification server, the versions of SnapManager and SnapDrivemust be the same on both the host and the remote server.
You can also use the following path to configure the verification server:Actions > BackupVerification Settings > Verification Server.
About this task
You can omit the configuration of the verification server during configuration by selecting the Selectthe verification server later... check box in the Configuration wizard.
If Exchange is not installed on the computer that you select, specify the eseutil.exe filepath andcopy the necessary files to the computer before proceeding.
Steps
1. In the Actions pane, click Configuration wizard.
2. In the Database Verification Server window, enter or browse to the name of the server that youwant to use as the verification server.
Remote verification prerequisitesBefore you use a remote verification server, ensure that you establish the Windows hostrequirements, LUN requirements, and verification server designation.
Remote verification uses the same mechanisms as local verification, except that the verificationoccurs on a different host than the one that initiated the backup operation. This is why you need
SnapManager application settings configuration | 279

SnapDrive and SnapManager installed on your remote verification server, in addition to FC or iSCSIconnectivity to the storage system.
If you use a remote verification server to verify the databases in multiple databases in a single job,you need an additional LUN.
You can designate your verification server from the production Exchange server.
Next topics
How remote verification works on page 280
Viewing or changing the verification server on page 281
Related concepts
How SnapManager checks database integrity in backup sets on page 126
Related tasks
Viewing or changing the verification server on page 281
Related references
Remote verification server requirements on page 40
How remote verification works
SnapManager initiates a backup operation at the primary host, which then contacts the remoteverification server. The remote verification server then uses SnapDrive for verification and sends theresults back to the primary host.
The basic steps of this process are as follows:
1. The SnapManager backup with verification (or verification only) is initiated on the primarySnapManager host, which is configured to run verifications on the remote verification server.
2. The primary SnapManager host contacts the remote verification server and initiates theverification job.
3. The remote verification server uses SnapDrive to connect to a LUN backed by a Snapshot copycontaining the databases to be verified.
4. The remote verification server performs the database verification on the LUN backed bySnapshot copy.
5. When the remote verification server completes the verification, it sends the results back to theprimary SnapManager host.
Note: You must be careful not to schedule backup operations while a verification operation is inprogress. Verification is always performed on a LUN that is backed by a Snapshot copy. If youmake a Snapshot copy of the same volume while a LUN backed by Snapshot copy exists, you
280 | SnapManager® 6.0 for Microsoft® Exchange Installation and Administration Guide

create a “busy Snapshot copy,” which might cause problems when you attempt to delete someSnapshot copies.
Viewing or changing the verification server
You can view or change your verification server for verification load management.
You need to connect to the production Exchange server to view or to change the verification server.
Until you specify verification settings, database verification is run from the Exchange server youselected. Verification does not necessarily run on the system from which you opened the DatabaseVerification Settings dialog box. A change in the verification server does not affect any databaseverification jobs that are already scheduled.
Steps
1. Click Backup Verification Settings in the Actions pane.
You can also use these paths:
• Backup wizard > Verification Settings• Restore wizard > Verification Settings
The Verification Server tab is active by default and displays the host name of the currentverification server.
2. In the Verification Server box, type or browse to the Exchange server you want to use as thedatabase verification server.
Note: If you plan to specify a remote verification server, ensure that the server is set upcorrectly.
3. To make the database verification server verify backups from both Windows Exchange Server2003 and Windows Exchange Server 2007, select the Verification server will verify bothExchange Server 2003 and 2007 backups check box.
4. Click OK.
Related references
Remote verification server requirements on page 40
SnapManager application settings configuration | 281
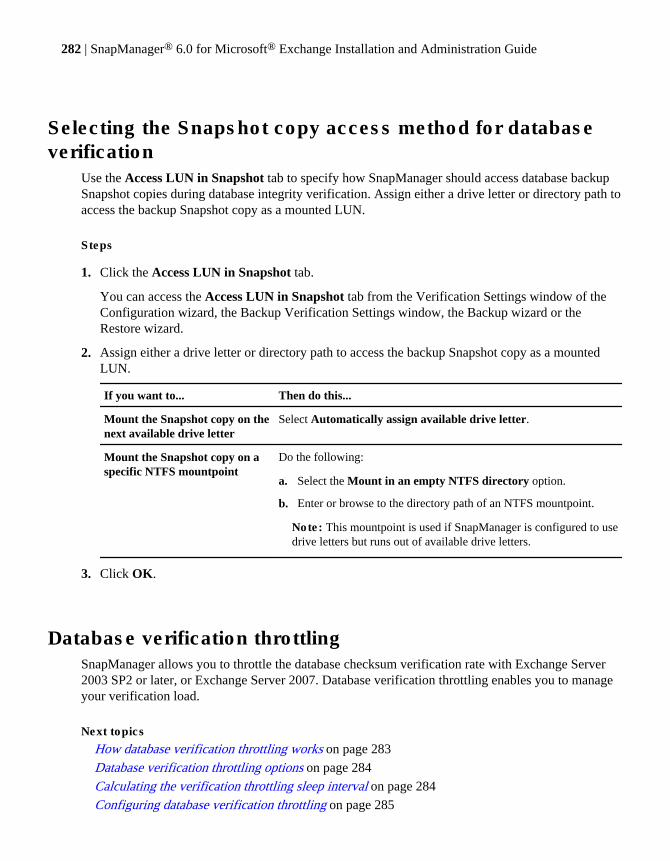
Selecting the Snapshot copy access method for databaseverification
Use the Access LUN in Snapshot tab to specify how SnapManager should access database backupSnapshot copies during database integrity verification. Assign either a drive letter or directory path toaccess the backup Snapshot copy as a mounted LUN.
Steps
1. Click the Access LUN in Snapshot tab.
You can access the Access LUN in Snapshot tab from the Verification Settings window of theConfiguration wizard, the Backup Verification Settings window, the Backup wizard or theRestore wizard.
2. Assign either a drive letter or directory path to access the backup Snapshot copy as a mountedLUN.
If you want to... Then do this...
Mount the Snapshot copy on thenext available drive letter
Select Automatically assign available drive letter.
Mount the Snapshot copy on aspecific NTFS mountpoint
Do the following:
a. Select the Mount in an empty NTFS directory option.
b. Enter or browse to the directory path of an NTFS mountpoint.
Note: This mountpoint is used if SnapManager is configured to usedrive letters but runs out of available drive letters.
3. Click OK.
Database verification throttlingSnapManager allows you to throttle the database checksum verification rate with Exchange Server2003 SP2 or later, or Exchange Server 2007. Database verification throttling enables you to manageyour verification load.
Next topics
How database verification throttling works on page 283
Database verification throttling options on page 284
Calculating the verification throttling sleep interval on page 284
Configuring database verification throttling on page 285
282 | SnapManager® 6.0 for Microsoft® Exchange Installation and Administration Guide
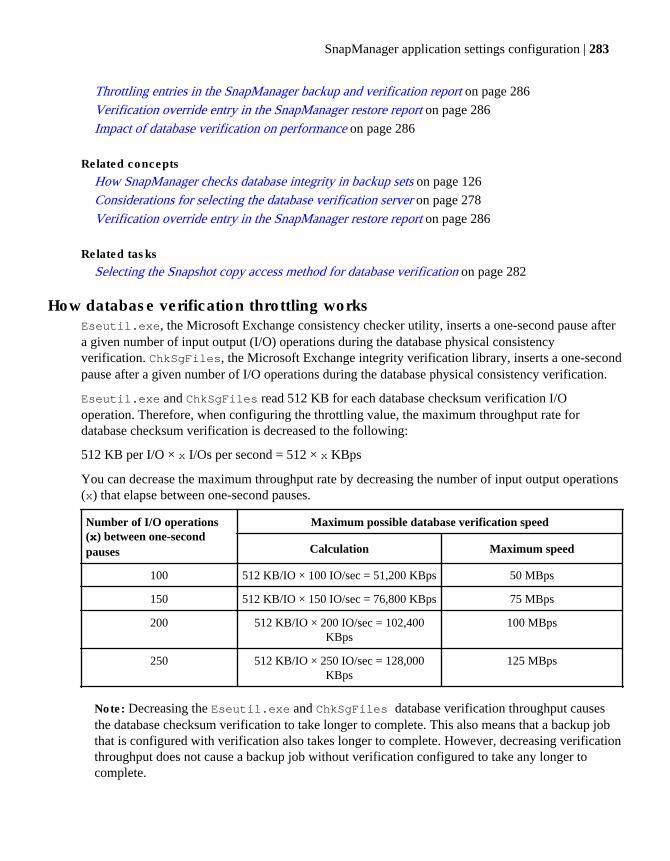
Throttling entries in the SnapManager backup and verification report on page 286
Verification override entry in the SnapManager restore report on page 286
Impact of database verification on performance on page 286
Related concepts
How SnapManager checks database integrity in backup sets on page 126
Considerations for selecting the database verification server on page 278
Verification override entry in the SnapManager restore report on page 286
Related tasks
Selecting the Snapshot copy access method for database verification on page 282
How database verification throttling worksEseutil.exe, the Microsoft Exchange consistency checker utility, inserts a one-second pause aftera given number of input output (I/O) operations during the database physical consistencyverification. ChkSgFiles, the Microsoft Exchange integrity verification library, inserts a one-secondpause after a given number of I/O operations during the database physical consistency verification.
Eseutil.exe and ChkSgFiles read 512 KB for each database checksum verification I/Ooperation. Therefore, when configuring the throttling value, the maximum throughput rate fordatabase checksum verification is decreased to the following:
512 KB per I/O × x I/Os per second = 512 × x KBps
You can decrease the maximum throughput rate by decreasing the number of input output operations(x) that elapse between one-second pauses.
Number of I/O operations(x) between one-secondpauses
Maximum possible database verification speed
Calculation Maximum speed
100 512 KB/IO × 100 IO/sec = 51,200 KBps 50 MBps
150 512 KB/IO × 150 IO/sec = 76,800 KBps 75 MBps
200 512 KB/IO × 200 IO/sec = 102,400KBps
100 MBps
250 512 KB/IO × 250 IO/sec = 128,000KBps
125 MBps
Note: Decreasing the Eseutil.exe and ChkSgFiles database verification throughput causesthe database checksum verification to take longer to complete. This also means that a backup jobthat is configured with verification also takes longer to complete. However, decreasing verificationthroughput does not cause a backup job without verification configured to take any longer tocomplete.
SnapManager application settings configuration | 283
Database verification throttling optionsSnapManager 5.0 and later for Microsoft Exchange supports two throttling options: Eseutil withMicrosoft Exchange Server 2003, and ChkSgFiles with Microsoft Exchange Server 2007.
Attention: Attempting to use the Eseutil throttling feature with earlier versions of SnapManager3.2 or Exchange has no effect.
Related concepts
Impact of database verification on performance on page 286
Calculating the verification throttling sleep intervalYou must calculate the appropriate sleep interval value to use for each server. Monitor the read andwrite performance of the LUNs on which the databases reside, and then calculate the verificationthrottle setting so that the average and peak physical disk performance is below the maximum valuesdetermined by Microsoft.
About this task
• To monitor the SnapManager progress, watch the Backup Status window that is displayedduring a manually launched backup job.
• Monitor the counters during the busiest time of day that a verification or backup with verificationjob might occur.
Steps
1. Launch the Windows Performance Monitor utility (also known as “Perfmon”) on the machinethat is the Exchange server.
2. Add the Perfmon counters PhysicalDisk\Average Disk sec/Read, and PhysicalDisk\Average Disksec/Write for each LUN that contains a database.
3. Monitor the pairs of values, Physical Disk\Average Disk sec/Read and PhysicalDisk\AverageDisk sec/Write, while a SnapManager verification job or a backup job with verification is inprogress.
If monitoring a backup with verification job, be sure to monitor the counters during theverification portion of the job. Multiple databases on the same Exchange server are verifiedsequentially, so be sure to monitor the counters for all of the database verifications.
4. The throttle setting is global, so select the reading from the database that exhibits the worstperformance (highest readings).
5. Compare the measured values to the maximum read and write values recommended by Microsoft.
Physical Disk\Average Disk sec/Read: Average read time should be below 20 ms, Maximumpeak read time should be below 50 ms.
284 | SnapManager® 6.0 for Microsoft® Exchange Installation and Administration Guide
Physical Disk\Average Disk sec/Write: The maximum physical disk performance timesdetermined by Microsoft are as follows: Average write time should be below 20 ms, Maximumpeak write time should be below 50 ms.
Compare the measured values to the maximum read and write values recommended by Microsoft:less than 20 ms. average time and less than 50 ms. peak time.
6. If the measured values exceed the maximum values recommended by Microsoft, adjust thethrottle setting to decrease the verification throughput rate.
Configuring database verification throttlingYou have to configure database verification throttling on all of the Windows host systems that are toperform database verification and is running Exchange Server.
Before you begin
Throttling is accessible only if the verification server is installed with Microsoft Exchange Server2003 SP2 or later, or Microsoft Exchange Server 2007.
Steps
1. From the SnapManager console, click Backup Verification Settings in the Actions pane.
You can also use these paths:
• Backup Wizard > Backup or Verify Databases and Transaction Logs > Verify databasesand transaction Logs > Backup management group > Database Verification Server >Verification Settings
• Restore wizard > Mount options > Verification Settings
2. Click the Verification Throttling tab.
3. Select or clear the Throttle database checksum verification check box to enable or disable thethrottling feature.
4. If you enabled the throttling feature, enter a positive integer value in the Pause for 1 second afterx I/O operations box.
The default value is 150. Enter the number Input Output (I/O) operations to complete beforepausing for one second during checking of the database physical consistency.
Using a value in the range of 100 to 250 suits most environments.
5. Click OK.
SnapManager application settings configuration | 285
Throttling entries in the SnapManager backup and verification reportIf you enable either Eseutil throttling or ChkSgFiles throttling, the SnapManager Backup andverification report logs messages indicating that the throttling feature is enabled before each databaseverification operation.
If you use Eseutil throttling, before each database verification, the SnapManager backup andverification report includes the following entry:
ESEUTIL throttling feature is enabled.
If you use ChkSgFiles throttling, before each database verification, the SnapManager and verificationreport includes the following entry:
Running Integrity Verification using ChkSgFiles API Throttle (Pause): 1000ms per X I/O's
Verification override entry in the SnapManager restore reportYou must restore only from verified database to ensure a successful restore operation. Before eachdatabase verification, the SnapManager restore report indicates if verification override is enabled. Ifthe feature is enabled, the report includes the warning "Database verification before restore wasoverridden."
Related conceptsConsiderations for selecting the database verification server on page 278
Related tasksSelecting the Snapshot copy access method for database verification on page 282Configuring database verification throttling on page 285
Impact of database verification on performanceDatabase verification can impact the performance of both the Exchange server and the storagesystem. To overcome the performance impact, you can separate the database verification process anddatabase backup operations.
Verification can degrade Exchange Server response, particularly during peak work hours. WithSnapManager 3.1 and earlier releases, there are two options for distributing this load by separatingdatabase verification and database backup operations: deferred database verification and remotedatabase verification.
SnapManager 3.2 introduced database verification throttling, which you can combine with either orboth of the existing options to reduce the load even further. When installed with Microsoft ExchangeServer 2003 SP2 or later, SnapManager 3.2 and later supports the ability to throttle Eseutil (theMicrosoft Exchange consistency checker utility) in database checksum verification mode.
SnapManager 5.0 and later for Microsoft Exchange supports a new option for managing databaseverification that uses the same database checksum algorithm as Eseutil throttling. When installedwith Microsoft Exchange Server 2007, SnapManager 5.0 and later supports the ability to throttle
286 | SnapManager® 6.0 for Microsoft® Exchange Installation and Administration Guide
ChkSgFiles (the Microsoft Exchange integrity verification library) in database checksum verificationmode. In Exchange Server 2003, ChkSgFiles is installed only if the Exchange 2007 management toolis installed.
Database verification override during restore operationYou must not select an unverified backup copy as the source of the restore operation. If a verifiedbackup copy is not available when you need to restore and you cannot wait for a verification tocomplete before restoring, you can override verification and restore from an unverified backup copy.
Next topics
Configuring the database verification override option on page 287
Verification override entry in the SnapManager restore report on page 286
Configuring the database verification override optionYou can configure SnapManager to override the verification requirement and restore directly from anunverified backup copy.
Steps
1. In the Actions pane, click Backup Verification Settings > Verification Settings.
Other ways to open Verification Settings are as follows:
• From the Backup Wizard, go to the Verify the Databases and Transaction Logs in thisBackup window and click Verification Settings.
• From the Restore Wizard, go to the Verify the Database Integrity in this Backup window(displayed only if you select to restore from an unverified backup copy) and clickVerification Settings.
2. Select the Override Verification tab.
3. Configure the Override Database Verification Requirement for Restore option.
Note: If you enable this option, it is reset the next time you start the SnapManager application.
4. A message appears that says "An unverified backup may contain an image of an Exchangedatabase that is physically corrupt. If the backup copy contains physical database corruption, thiscorruption will persist in the restored database." If you want to enable the Override DatabaseVerification Requirement for Restore option, click OK; otherwise, click No.
5. Click OK to close the dialog box and apply your change.
Note: If you are using the Restore wizard, by selecting the Override Database VerificationRequirement for Restore option causes the Verify the database integrity of this backup prior torestoring it option to become accessible so that you can disable it.
SnapManager application settings configuration | 287
If... Then...
The override option is disabled(the default and recommendedsetting)
You cannot select an unverified backup copy as the source of therestore operation.
The override option is enabled(not recommended)
If you select an unverified backup copy as the source of the restoreoperation, you are asked to proceed with the restore operation.
Note: This option is reset when you exit SnapManager.
Verification override entry in the SnapManager restore reportYou must restore only from verified database to ensure a successful restore operation. Before eachdatabase verification, the SnapManager restore report indicates if verification override is enabled. Ifthe feature is enabled, the report includes the warning "Database verification before restore wasoverridden."
Related concepts
Considerations for selecting the database verification server on page 278
Related tasks
Selecting the Snapshot copy access method for database verification on page 282
Configuring database verification throttling on page 285
Configuring the backup naming conventionYou should configure the names for database backup Snapshot copies and SnapInfo directorySnapshot copies to include either the string recent for the most recent Snapshot copy, or the dateand time at which the Snapshot copy is created.
Steps
1. In the Actions pane, click Backup Settings.
Another way to access the backup naming convention option is Backup Wizard > Select thenaming convention for the newest backup.
2. Select either naming convention for the database backup Snapshot copy and SnapInfo directorySnapshot copy:
• If you want to identify the most recent backup copy by the Snapshot copy name that includesthe string recent, select Use Generic.
• If you want all Snapshot copy names, even for the most recent backup copy, to contain thedate and time at which the Snapshot copy is created, select Use Unique. This option is
288 | SnapManager® 6.0 for Microsoft® Exchange Installation and Administration Guide
selected by default. This is the Snapshot copy naming convention used by SnapManager forMicrosoft Exchange releases prior to release 3.0.
3. Click OK.
SnapManager applies the selected naming convention to all subsequent backup operations.
Related references
SnapManager Snapshot copy naming conventions on page 124
Configuring default settings for the Run Command AfterOperation option
You can configure default values to populate the Run Command After Operation dialog box whenyou open it from the Actions pane, or the Backup and Verify window, or the Backup wizard, to run acommand or a script after a backup or verification operation.
Steps
1. In the Actions pane, click Run Command After Operation.
2. In the Specify a computer where... box, enter or browse to the name of the host on which yourprogram or script resides.
3. In the Specify the full path... box, browse to your program or script.
4. Enter the command input string in the Command Arguments box.
You can do this using any combination of the following methods:
• To enter text directly into the Command Arguments box, click the box and type the desiredtext.
• To enter a SnapManager variable into the Command Arguments box, do the following:
a. Click the Command Arguments box to position the cursor.
b. In the SnapManager Variables list, select the variable you want to enter.
c. Click Select.
Note: The $SnapInfoPath variable is enclosed within double quotes so that the path namecan contain spaces without affecting the script invocation on the Windows command line. Ifyou do not want the double quotes to appear in your command line, remove them from theCommand Arguments box.
5. Repeat steps 1 to 4 as required, until the Command Arguments box contains the arguments youwant to pass to your program or script.
6. Click OK.
SnapManager application settings configuration | 289
Note: SnapManager verifies that the specified program exists on your system. SnapManagerdoes not run the command until the backup or verification operation is complete.
Whenever the Run Command After Operation dialog box is opened from either the Backupand Verify window or the Backup wizard, the boxes are populated with the values you specifiedas default settings.
Related concepts
Automatic backup archiving using the Run Command After Operation feature on page 255
Related references
Example: Using a Windows backup utility to archive SnapManager backups on page 251
Command arguments supported by the Run Command After Operation feature on page 255
Fractional space reservationWhen you create a LUN, Data ONTAP reserves space in the volume containing that LUN so thatwrite operations to that LUN do not fail due to lack of disk space. With fractional reserve, this spaceis set to less than 100 percent of the total size of the LUNs.
SnapDrive creates and manages LUNs with space reservation enabled. Operations such as creating aSnapshot copy or creating new LUNs can occur only if there is enough available unreserved space.These operations are restricted from using reserved space.
While space reservation is enabled at the LUN level, fractional overwrite reserve amounts areconfigured at the volume level; that is, fractional space reservation does not control how the totalamount of space reserved for overwrites in a volume is applied to individual LUNs in that volume.
The volume has the guarantee option set to volume rather than file. Fractional reserve is supportedby Data ONTAP 7.1 or later. For more detailed information, see the Data ONTAP Block AccessManagement Guide for iSCSI and FC for Data ONTAP 7.1 or later.
Additional space that is not space-reservation-enabled on the volume is automatically reserved foroverwriting blocks that belong to a LUN. By default this additional space is equal to 100 percent ofthe total size of all space-reserved LUNs in the volume. If space reservation is disabled, writeoperations to a LUN might fail due to insufficient disk space in the volume and the host applicationmight terminate, report I/O errors, or experience unexpected behavior.
With fractional reserve, the space reserved for overwrites is set to less than 100 percent and the spacethat is preallocated for space reservation is reduced to that percentage. Fractional reserve is generallyused for volumes with LUNs that store data with a low rate of change.
Next topics
What can happen with a fractional-space-reserved volume on page 291
Fractional space reservation policies on page 291
Fractional space reservation policies to manage Exchange data on page 295
290 | SnapManager® 6.0 for Microsoft® Exchange Installation and Administration Guide

Viewing current fractional space reservation data for a LUN on page 297
What can happen with a fractional-space-reserved volumeIf a fractional-space-reserved volume runs out of overwrite reserve space, write operations to a LUNfail and the host application might terminate, report I/O errors, or exhibit unexpected behavior. DataONTAP uses automatic expansion of flexible volumes and automatic deletion of Snapshot copiesfrom flexible volumes to avoid this situation.
When a LUN is fully space reserved, write operations cannot fail due to an out-of-space condition.When the overwrite reserve for a volume is set to less than 100 percent, write operations to the LUNson that volume might fail when the volume runs low in free disk space.
The automatic expansion of flexible volumes and the automatic deletion of Snapshot copies fromflexible volumes monitor the reserved space and take action if the free space becomes scarce. Formore detailed information, see the Data ONTAP Block Access Management Guide for iSCSI and FCfor Data ONTAP 7.1 or later.
Automatic expansion of flexible volumes
Data ONTAP automatically expands a nearly full volume into the space preallocated for it in theaggregate. The volume must be a flexible volume with the guarantee option set to Volume. You canenable automatic deletion of Snapshot copies and FlexVol expansion features separately or together,with one policy to be applied before the other. When fractional-space-reserved volumes hold LUNsthat store Exchange database files, however, you can only use only the automatic FlexVol expansionfeature.
Automatic deletion of Snapshot copies from flexible volumes
Data ONTAP automatically deletes one or more Snapshot copies on a nearly full volume, when youenable the Snapshot copy automatic deletion policy. If the trigger condition is detected, the oldest ornewest Snapshot copies are deleted until a configured percentage of the volume is free space. If youdo not want to automatically delete Snapshot copies on the volume, you can set the overwrite reserveto 100 percent, by setting the fractional space reserve to 100 percent on the storage system.
This Data ONTAP feature is not designed specifically to support backup and restore operations onExchange databases. The options for selecting Snapshot copies to be deleted do not have visibility tothe automatic backup Snapshot copy deletion criteria configured in SnapManager. You must alwaysretain at least one online backup copy for each database.
Fractional space reservation policiesFractional space reservation policies include specific thresholds that determine when SnapManagermust delete Exchange backup sets or unmount Exchange databases (or both), because the overwritereserve utilization for the volume is running low.
If overwrite reserve space runs low for a fractional space-reserved volume, SnapManager preventsthe overwrite reserve from becoming fully depleted.
SnapManager application settings configuration | 291
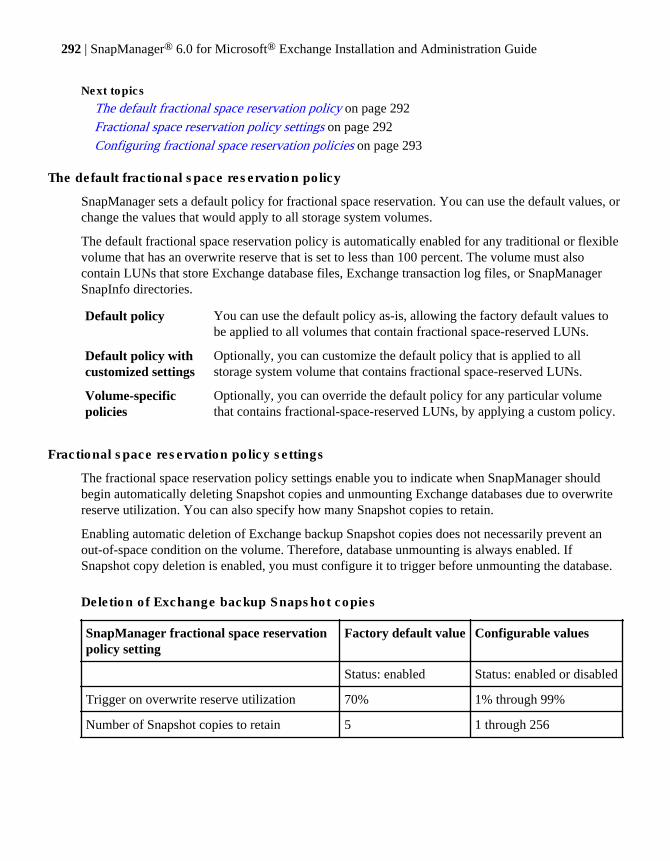
Next topics
The default fractional space reservation policy on page 292
Fractional space reservation policy settings on page 292
Configuring fractional space reservation policies on page 293
The default fractional space reservation policy
SnapManager sets a default policy for fractional space reservation. You can use the default values, orchange the values that would apply to all storage system volumes.
The default fractional space reservation policy is automatically enabled for any traditional or flexiblevolume that has an overwrite reserve that is set to less than 100 percent. The volume must alsocontain LUNs that store Exchange database files, Exchange transaction log files, or SnapManagerSnapInfo directories.
Default policy You can use the default policy as-is, allowing the factory default values tobe applied to all volumes that contain fractional space-reserved LUNs.
Default policy withcustomized settings
Optionally, you can customize the default policy that is applied to allstorage system volume that contains fractional space-reserved LUNs.
Volume-specificpolicies
Optionally, you can override the default policy for any particular volumethat contains fractional-space-reserved LUNs, by applying a custom policy.
Fractional space reservation policy settings
The fractional space reservation policy settings enable you to indicate when SnapManager shouldbegin automatically deleting Snapshot copies and unmounting Exchange databases due to overwritereserve utilization. You can also specify how many Snapshot copies to retain.
Enabling automatic deletion of Exchange backup Snapshot copies does not necessarily prevent anout-of-space condition on the volume. Therefore, database unmounting is always enabled. IfSnapshot copy deletion is enabled, you must configure it to trigger before unmounting the database.
Deletion of Exchange backup Snapshot copies
SnapManager fractional space reservationpolicy setting
Factory default value Configurable values
Status: enabled Status: enabled or disabled
Trigger on overwrite reserve utilization 70% 1% through 99%
Number of Snapshot copies to retain 5 1 through 256
292 | SnapManager® 6.0 for Microsoft® Exchange Installation and Administration Guide
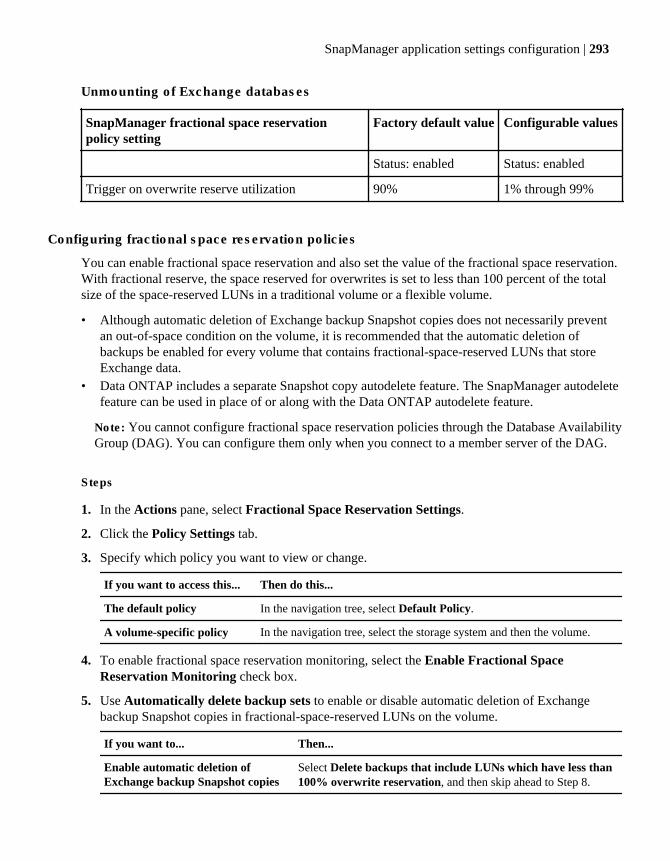
Unmounting of Exchange databases
SnapManager fractional space reservationpolicy setting
Factory default value Configurable values
Status: enabled Status: enabled
Trigger on overwrite reserve utilization 90% 1% through 99%
Configuring fractional space reservation policies
You can enable fractional space reservation and also set the value of the fractional space reservation.With fractional reserve, the space reserved for overwrites is set to less than 100 percent of the totalsize of the space-reserved LUNs in a traditional volume or a flexible volume.
• Although automatic deletion of Exchange backup Snapshot copies does not necessarily preventan out-of-space condition on the volume, it is recommended that the automatic deletion ofbackups be enabled for every volume that contains fractional-space-reserved LUNs that storeExchange data.
• Data ONTAP includes a separate Snapshot copy autodelete feature. The SnapManager autodeletefeature can be used in place of or along with the Data ONTAP autodelete feature.
Note: You cannot configure fractional space reservation policies through the Database AvailabilityGroup (DAG). You can configure them only when you connect to a member server of the DAG.
Steps
1. In the Actions pane, select Fractional Space Reservation Settings.
2. Click the Policy Settings tab.
3. Specify which policy you want to view or change.
If you want to access this... Then do this...
The default policy In the navigation tree, select Default Policy.
A volume-specific policy In the navigation tree, select the storage system and then the volume.
4. To enable fractional space reservation monitoring, select the Enable Fractional SpaceReservation Monitoring check box.
5. Use Automatically delete backup sets to enable or disable automatic deletion of Exchangebackup Snapshot copies in fractional-space-reserved LUNs on the volume.
If you want to... Then...
Enable automatic deletion ofExchange backup Snapshot copies
Select Delete backups that include LUNs which have less than100% overwrite reservation, and then skip ahead to Step 8.
SnapManager application settings configuration | 293
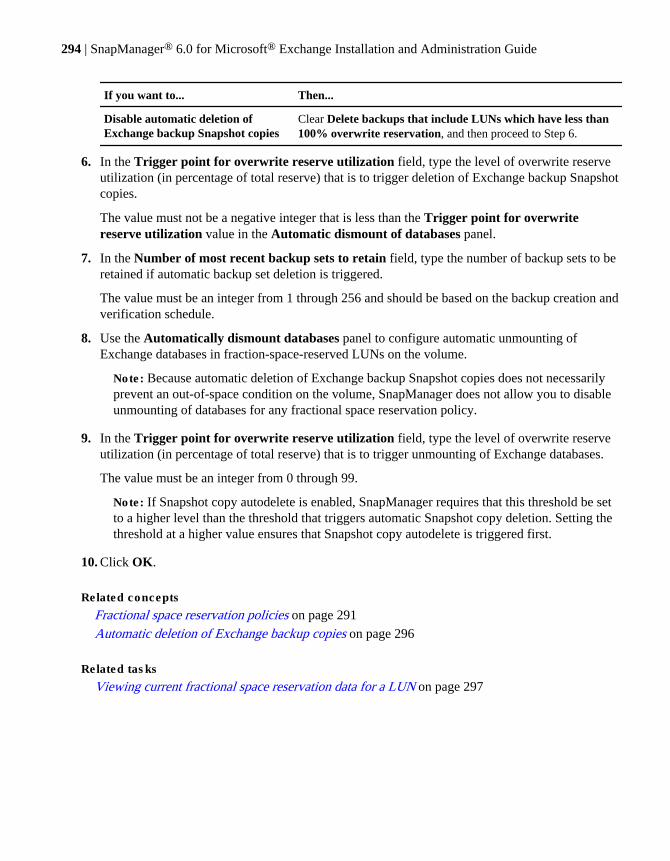
If you want to... Then...
Disable automatic deletion ofExchange backup Snapshot copies
Clear Delete backups that include LUNs which have less than100% overwrite reservation, and then proceed to Step 6.
6. In the Trigger point for overwrite reserve utilization field, type the level of overwrite reserveutilization (in percentage of total reserve) that is to trigger deletion of Exchange backup Snapshotcopies.
The value must not be a negative integer that is less than the Trigger point for overwritereserve utilization value in the Automatic dismount of databases panel.
7. In the Number of most recent backup sets to retain field, type the number of backup sets to beretained if automatic backup set deletion is triggered.
The value must be an integer from 1 through 256 and should be based on the backup creation andverification schedule.
8. Use the Automatically dismount databases panel to configure automatic unmounting ofExchange databases in fraction-space-reserved LUNs on the volume.
Note: Because automatic deletion of Exchange backup Snapshot copies does not necessarilyprevent an out-of-space condition on the volume, SnapManager does not allow you to disableunmounting of databases for any fractional space reservation policy.
9. In the Trigger point for overwrite reserve utilization field, type the level of overwrite reserveutilization (in percentage of total reserve) that is to trigger unmounting of Exchange databases.
The value must be an integer from 0 through 99.
Note: If Snapshot copy autodelete is enabled, SnapManager requires that this threshold be setto a higher level than the threshold that triggers automatic Snapshot copy deletion. Setting thethreshold at a higher value ensures that Snapshot copy autodelete is triggered first.
10. Click OK.
Related concepts
Fractional space reservation policies on page 291
Automatic deletion of Exchange backup copies on page 296
Related tasks
Viewing current fractional space reservation data for a LUN on page 297
294 | SnapManager® 6.0 for Microsoft® Exchange Installation and Administration Guide

Fractional space reservation policies to manage Exchange dataFractional space reservation policies enable you to monitor overwrite reserve utilization on fractionalspace-reserved volumes that contain your Exchange data.
If you store Exchange data on LUNs in a fractional space-reserved volume in a SnapManagerenvironment, you need to avoid an out-of-space condition on the volume such that you have explicitor implicit Exchange-aware control over the deletion of Exchange backup set components.
To address this need, SnapManager provides its own space management tool for monitoringoverwrite reserve utilization on the volumes. If overwrite reserve space runs low for a fractionalspace-reserved volume, SnapManager can take action to prevent the overwrite reserve frombecoming fully depleted.
Fractional space reservation policies include specific thresholds that act as trigger points.SnapManager can delete Exchange backup sets or unmount Exchange databases (or both) when theoverwrite reserve utilization for the volume reaches the trigger point.
Note: If you enable SnapManager e-mail notification, SnapManager sends SMTP e-mail messageafter an event of SnapManager fractional space reservation policy is complete.
Next topics
Automatic unmounting of Exchange databases on page 295
Automatic deletion of Exchange backup copies on page 296
Automatic unmounting of Exchange databases
Automatic unmounting is triggered if overwrite reserve utilization on the volume reaches thethreshold specified by the fractional space reservation policy. SnapManager automatically unmountsthe databases and stops the write operations to LUNs in that volume.
The threshold for overwrite reserve is specified by the policy for fractional space reservation.Another component of the fractional space reservation policy is the last-resort action that preventsfurther consumption of overwrite reserve; hence, automatic unmounting is always enabled.
SnapManager first uses backup set deletion to free some overwrite reserve. If this is not enough,unmounting the affected database prevents further consumption of overwrite reserve. This happenswhen both components of a fractional space reservation policy are enabled; and the unmounting ofdatabases is triggered at a later level of overwrite reserve utilization than the level that is used totrigger the deletion of Exchange backup Snapshot copies.
Attention: If another host or client continues to write data to the affected volume, the overwritereserve space might still run out and the volume goes offline. For this reason, you must usededicated volumes for Exchange data.
SnapManager application settings configuration | 295
Automatic deletion of Exchange backup copies
You can enable automatic deletion of LUN backup copies that store Exchange data. SnapManagerchecks for the level of overwrite utilization on the volume and triggers automatic deletion of backupsif the level of overwrite utilization reaches the threshold.
Automatic deletion of LUN backup copies serves as the Exchange-aware replacement for or adjunctto the feature of Data ONTAP Snapshot copy deletion. SnapManager follows the following sequenceof steps:
1. Deletes the oldest Snapshot copies.
2. Retains the specified number of total Snapshot copies on the volume.
3. Retains the most recent backup of any database (if it resides on the volume).
4. Retains any backup copies of databases no longer in existence.
You must select the backup retention level based on your backup copy creation and verificationschedule. It is important that at least one verified backup copy remains on the volume if Snapshotcopy deletion is triggered. Due to its Exchange-aware features, the automatic deletion of Snapshotcopies does not necessarily prevent an out-of-space condition on the volume.
You must set the same number of backup sets to be deleted on database LUNs and transaction logLUNs. If there is a mismatch in this number, SnapManager attempts to delete backup sets based onthe fractional reserve policy settings.
Example: automatic deletion of backup sets that span multiple volumes
If you have a backup copy that spans multiple volumes, with a different automatic deletionthreshold configured on each volume, then for a specific volume, SnapManager deletesSnapshot copies based on the policy for that volume.
In this example, the automatic deletion settings for each volume are configured to take thefollowing actions:
• Volume 1: Delete all but 2 Snapshot copies if 20 percent overwrite reserve utilization isexceeded.
• Volume 2: Delete all but 5 Snapshot copies if 20 percent overwrite reserve utilization isexceeded.
• Volume 3: Delete all but 10 Snapshot copies if 20 percent overwrite reserve utilization isexceeded.
If the 20 percent overwrite reserve utilization threshold for Volume 1 is exceeded,SnapManager deletes all but two Snapshot copies, regardless of the policies for Volumes 2 and3. If the 20 percent overwrite reserve utilization threshold for Volume 2 is exceeded,SnapManager deletes all but five Snapshot copies, regardless of the policies for Volumes 1and 3.
296 | SnapManager® 6.0 for Microsoft® Exchange Installation and Administration Guide
Viewing current fractional space reservation data for a LUNYou can view current fractional space reservation settings to ensure that the policy in force for eachLUN is configured appropriately.
About this task
Only the Drive Letter or Mount Point column displays LUN-specific information. All othercolumns in the Current Settings tab display information that applies across the volume that containsthe LUN.
The SnapManager fractional space reservation policy includes a separate, Exchange-aware automaticdeletion feature. The SnapManager automatic deletion feature can be used in place of or along withthe Data ONTAP automatic deletion feature; you can also select to disable the SnapManagerautomatic deletion feature.
Steps
1. In the Actions pane, click Fractional Space Reservation Settings.
2. In the Current Settings tab, note the space consumption status for each LUN that stores databaseor SnapInfo directories.
The information displayed in this tab automatically refreshes every 60 seconds.
3. If the Snapshot Autodelete column is enabled, investigate the cause of it being enabled and takeone of the following preventive actions:
• Disable the Data ONTAP Automatic deletion of Snapshot copies feature.• Ensure that the Data ONTAP Automatic deletion of Snapshot copies feature is configured in
such a way that it does not delete Exchange backup set components.
For details about the snap automatic delete storage system command, see the DataONTAP Block Access Management Guide for iSCSI and FC for Data ONTAP 7.1 or later.
4. To close the dialog box, click OK.
Related conceptsAutomatic deletion of Exchange backup copies on page 296
Related tasksConfiguring fractional space reservation policies on page 293
Fractional space reservation status data
You can view data about your current space-reservation status in the Current Settings tab of theFractional Space Reservation Settings dialog box
If the Storage Snapshot Autodelete option is enabled, the LUN is contained in a FlexVol volume thathas overwrite reserve set to less than 100 percent and that also has the Data ONTAP automatic
SnapManager application settings configuration | 297
Snapshot copy deletion feature enabled and configured to trigger when the overwrite reserve isnearly full. If Exchange data or SnapManager SnapInfo directories are stored on LUNs contained in avolume with these characteristics, the Data ONTAP Snapshot copy automatic deletion policy mightdelete Exchange backup set components.
The following columns display SnapManager configuration information:
Drive Letter orMountpoint
A SnapManager configuration setting. The drive letter or NTFSmountpoint on which the LUN is mounted.
Backup AutodeleteTrigger (percentage)
A SnapManager fractional space reservation policy setting. Thepercentage of overwrite reserve utilization that triggers automatic deletionof Exchange backup sets for the volume that contains the LUN.
Disable DatabaseTrigger (percentage)
A SnapManager fractional space reservation policy setting. Thepercentage of overwrite reserve utilization that triggers automaticdisabling of Exchange databases for the volume that contains the LUN.
The following columns display the fractional overwrite reserve settings and status:
FractionalReserve(percentage)
The amount of space reserved for overwrites on the volume that contains thisLUN, expressed as a percentage of the total size of all space-reserved LUNs inthe volume
Used Reserve(percentage)
For the volume that contains this LUN, the amount of overwrite reserve in use,expressed in two ways: as a percentage of the total size of all space-reservedLUNs in the volume, and in megabytes
AvailableReserve (MB)
For the volume that contains this LUN, the amount of overwrite reserveavailable
SnapshotAutodelete
For the volume that contains this LUN, the state of the Data ONTAP Snapshotcopy automatic deletion feature: enabled or disabled
If this LUN stores Exchange data files and is contained in a volume for whichthe Data ONTAP Snapshot copy automatic deletion feature is enabled, disablethis feature on that volume or ensure that it is configured so that it does notdelete SnapManager backup set components.
Note: The SnapManager fractional space reservation policy triggers are not applicable to fullyspace-reserved LUNs. If Fractional Overwrite Reserve (percentage) is 100, the LUN is containedin a fully space-reserved volume rather than a fractionally space-reserved volume.
298 | SnapManager® 6.0 for Microsoft® Exchange Installation and Administration Guide
Event notification optionsYou can use either the Configuration wizard or the Auto Notification Settings dialog box toconfigure e-mail notifications, syslog event logging, and AutoSupport notifications.
Operations with e-mail notification support
SnapManager can notify you through e-mail messages (using SMTP) about the success or failure ofthe following types of events:
• SnapManager backup operation• Database integrity verification• SnapManager restore operation• SnapManager configuration• SnapManager fractional space reservation policy event execution
You can select one of these body messages to include in the body of the e-mail: Send operationresults summary, or Send verbose operation results.
You must enable the e-mail notifications option, which is disabled by default.
SnapManager syslog event logging
SnapManager events are posted to the storage system syslog by default. You can disable this optionto reduce the load on the network or when you are troubleshooting your system.
AutoSupport notification
If AutoSupport is enabled on both the storage system and SnapManager, technical support receivesautomatic e-mail notification about any SnapManager events or storage system problems that mightoccur. This option is enabled by default. You can disable this option to reduce the load on thenetwork or when you are troubleshooting your system.
The AutoSupport daemon monitors the storage system’s operations and sends automatic messages totechnical support to alert them to potential storage system problems. If necessary, technical supportcontacts you by e-mail to help resolve a potential system problem. The AutoSupport daemon isallowed by default on the storage system. For more information, see the Data ONTAP SystemAdministration Guide.
Limitation of AutoSupport notification to failure events only
If AutoSupport is enabled, you can limit the SnapManager events that are posted to the storagesystem syslog and AutoSupport (if allowed for SnapManager) to failure events only. The option isenabled by default.
SnapManager application settings configuration | 299
Configuring automatic event notification settingsYou can configure automatic event notification settings for SnapManager. You can enable andconfigure e-mail notification, advanced event notification settings, advanced e-mail notificationsettings, storage system syslog settings, and AutoSupport notification settings.
Before you begin
You must have the following ready before you configure automatic event notification settings:
• IP address of the SMTP e-mail server or gateway• E-mail address of each recipient to whom the notification is to be sent.• E-mail address of the sender of the notification that you want to use
By default, SMEAutoSender is the name of the notification sender. To specify a sender other thanthe default, use one of the following formats:
• SenderAlias<SenderName@SenderDomain>
• SenderAlias
• SenderName@SenderDomain
• The text to be appended to the standard subject line, which is included in all notificationmessages:Backup status at mm_dd_yyyy-hh.mm.ss from MachineName
By default, the stringSnapManager for Exchange
is appended.
If you select to send the operational results in summary format rather than in verbose format, you canalso select the Include SnapManager Operation Report as an Attachment option.
About this task
By default, the automatic e-mail notification feature is disabled.
SnapManager relies on and requires an external e-mail host at your site to send e-mail. The e-mailhost is a host that runs a mail server that listens on the SMTP port (25).
You can configure the SMTP mail notification settings by selecting either or both of the followingtwo options:
Only send notification whenoperation fails
Specifies that you want e-mail notification sent only when abackup process or a verification process fails (cleared by default).
Include SnapManageroperation report asattachment
Specifies that you want the status report to be attached to the e-mail notification (cleared by default).
300 | SnapManager® 6.0 for Microsoft® Exchange Installation and Administration Guide

Steps
1. In the Actions pane (or the Configure Automatic Event Notification screen of theConfiguration wizard), select Notification Settings.
The Auto Notification Settings dialog box opens.
2. To enable e-mail notification, select the Send Email Notification option.
3. In the relevant text boxes, type the following information.
a. In the SMTP Server text box, type the host name or the IP address of the SMTP e-mail serveror gateway to be used.
b. In the From text box, type the e-mail address of the sender of the notification.
c. In the To text box, type the e-mail address of each recipient.
To send to more than one recipient, use a semicolon (;) to separate the addresses.
d. In the Subject text box, type the text to be appended to the standard subject line.
4. Click Advanced.
The Advanced Event Notification Settings dialog box opens.
5. In the E-mail Message Content pane, select the types of body messages to include in the e-mail.
6. If you choose the summary format rather than the verbose format, you can also select the IncludeSnapManager Operation Report as an Attachment option.
7. Click Apply to commit your settings.
8. To configure the SMTP mail notification settings, select either or both of the following twooptions:
• Only send notification when operation fails check box• Include SnapManager operation report as attachment check box
9. Click OK to apply your settings and close the Advanced E-mail Notifications Settings dialogbox.
10. Click Send a Test Email.
SnapManager sends a test e-mail notification that uses the settings you specified and displayswhat that e-mail message looks like.
11. If you want to post SnapManager events to the storage system syslog, select Log SnapManagerEvents to Storage System Syslog.
12. If you want to enable automatic notification of syslog entries to technical support, and ifSnapManager is configured to log events to the storage system syslog, select Send AutoSupportNotification.
13. If you want to limit SnapManager event logging to failure events, select On failure only.
SnapManager application settings configuration | 301

14. Click OK (or Next, if you are using the Configuration wizard).
302 | SnapManager® 6.0 for Microsoft® Exchange Installation and Administration Guide
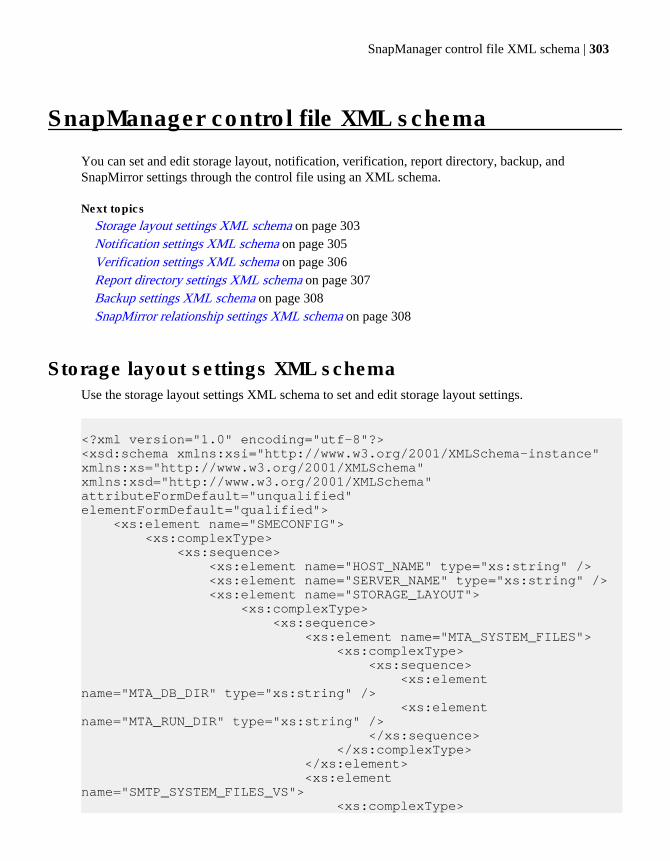
SnapManager control file XML schema
You can set and edit storage layout, notification, verification, report directory, backup, andSnapMirror settings through the control file using an XML schema.
Next topicsStorage layout settings XML schema on page 303Notification settings XML schema on page 305Verification settings XML schema on page 306Report directory settings XML schema on page 307Backup settings XML schema on page 308SnapMirror relationship settings XML schema on page 308
Storage layout settings XML schemaUse the storage layout settings XML schema to set and edit storage layout settings.
<?xml version="1.0" encoding="utf-8"?><xsd:schema xmlns:xsi="http://www.w3.org/2001/XMLSchema-instance"xmlns:xs="http://www.w3.org/2001/XMLSchema"xmlns:xsd="http://www.w3.org/2001/XMLSchema" attributeFormDefault="unqualified"elementFormDefault="qualified"> <xs:element name="SMECONFIG"> <xs:complexType> <xs:sequence> <xs:element name="HOST_NAME" type="xs:string" /> <xs:element name="SERVER_NAME" type="xs:string" /> <xs:element name="STORAGE_LAYOUT"> <xs:complexType> <xs:sequence> <xs:element name="MTA_SYSTEM_FILES"> <xs:complexType> <xs:sequence> <xs:element name="MTA_DB_DIR" type="xs:string" /> <xs:element name="MTA_RUN_DIR" type="xs:string" /> </xs:sequence> </xs:complexType> </xs:element> <xs:element name="SMTP_SYSTEM_FILES_VS"> <xs:complexType>
SnapManager control file XML schema | 303
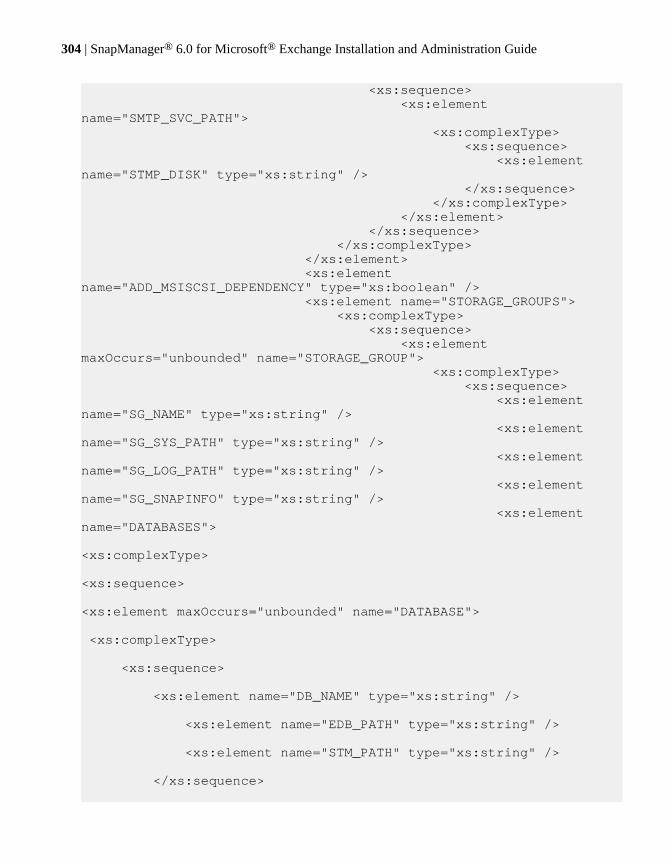
<xs:sequence> <xs:element name="SMTP_SVC_PATH"> <xs:complexType> <xs:sequence> <xs:element name="STMP_DISK" type="xs:string" /> </xs:sequence> </xs:complexType> </xs:element> </xs:sequence> </xs:complexType> </xs:element> <xs:element name="ADD_MSISCSI_DEPENDENCY" type="xs:boolean" /> <xs:element name="STORAGE_GROUPS"> <xs:complexType> <xs:sequence> <xs:element maxOccurs="unbounded" name="STORAGE_GROUP"> <xs:complexType> <xs:sequence> <xs:element name="SG_NAME" type="xs:string" /> <xs:element name="SG_SYS_PATH" type="xs:string" /> <xs:element name="SG_LOG_PATH" type="xs:string" /> <xs:element name="SG_SNAPINFO" type="xs:string" /> <xs:element name="DATABASES"> <xs:complexType> <xs:sequence> <xs:element maxOccurs="unbounded" name="DATABASE"> <xs:complexType> <xs:sequence> <xs:element name="DB_NAME" type="xs:string" /> <xs:element name="EDB_PATH" type="xs:string" /> <xs:element name="STM_PATH" type="xs:string" /> </xs:sequence>
304 | SnapManager® 6.0 for Microsoft® Exchange Installation and Administration Guide
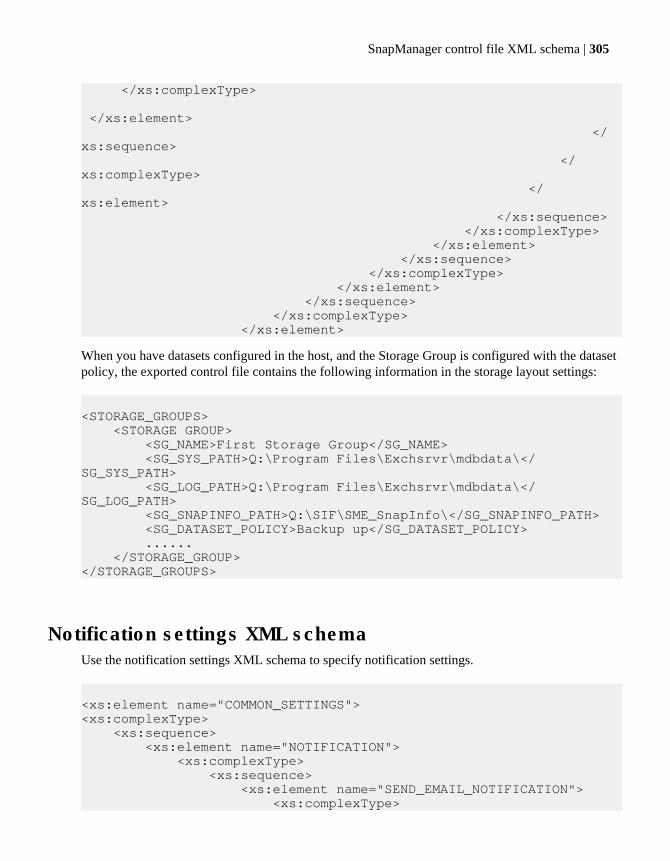
</xs:complexType> </xs:element> </xs:sequence> </xs:complexType> </xs:element> </xs:sequence> </xs:complexType> </xs:element> </xs:sequence> </xs:complexType> </xs:element> </xs:sequence> </xs:complexType> </xs:element>
When you have datasets configured in the host, and the Storage Group is configured with the datasetpolicy, the exported control file contains the following information in the storage layout settings:
<STORAGE_GROUPS> <STORAGE GROUP> <SG_NAME>First Storage Group</SG_NAME> <SG_SYS_PATH>Q:\Program Files\Exchsrvr\mdbdata\</SG_SYS_PATH> <SG_LOG_PATH>Q:\Program Files\Exchsrvr\mdbdata\</SG_LOG_PATH> <SG_SNAPINFO_PATH>Q:\SIF\SME_SnapInfo\</SG_SNAPINFO_PATH> <SG_DATASET_POLICY>Backup up</SG_DATASET_POLICY> ...... </STORAGE_GROUP></STORAGE_GROUPS>
Notification settings XML schemaUse the notification settings XML schema to specify notification settings.
<xs:element name="COMMON_SETTINGS"><xs:complexType> <xs:sequence> <xs:element name="NOTIFICATION"> <xs:complexType> <xs:sequence> <xs:element name="SEND_EMAIL_NOTIFICATION"> <xs:complexType>
SnapManager control file XML schema | 305
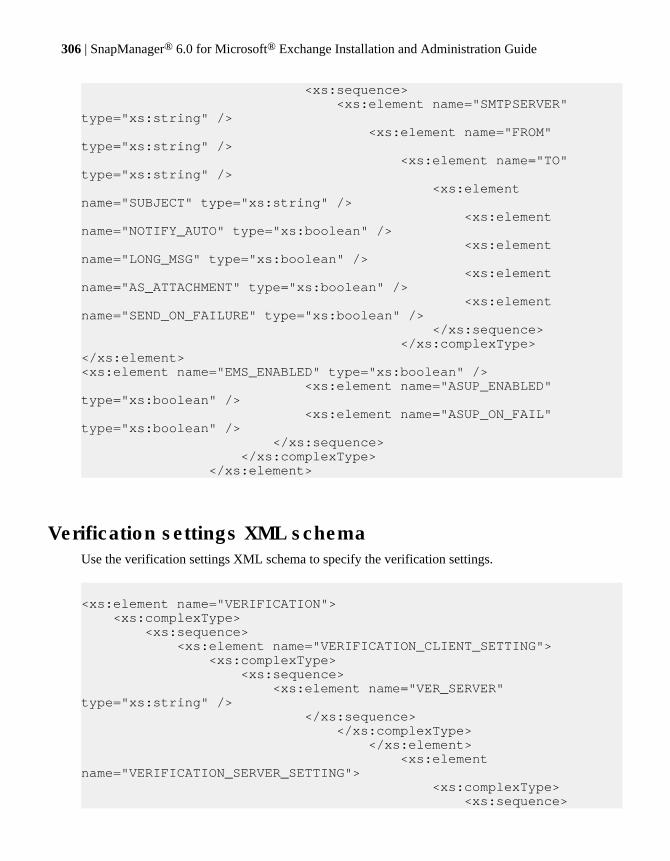
<xs:sequence> <xs:element name="SMTPSERVER" type="xs:string" /> <xs:element name="FROM" type="xs:string" /> <xs:element name="TO" type="xs:string" /> <xs:element name="SUBJECT" type="xs:string" /> <xs:element name="NOTIFY_AUTO" type="xs:boolean" /> <xs:element name="LONG_MSG" type="xs:boolean" /> <xs:element name="AS_ATTACHMENT" type="xs:boolean" /> <xs:element name="SEND_ON_FAILURE" type="xs:boolean" /> </xs:sequence> </xs:complexType></xs:element><xs:element name="EMS_ENABLED" type="xs:boolean" /> <xs:element name="ASUP_ENABLED" type="xs:boolean" /> <xs:element name="ASUP_ON_FAIL" type="xs:boolean" /> </xs:sequence> </xs:complexType> </xs:element>
Verification settings XML schemaUse the verification settings XML schema to specify the verification settings.
<xs:element name="VERIFICATION"> <xs:complexType> <xs:sequence> <xs:element name="VERIFICATION_CLIENT_SETTING"> <xs:complexType> <xs:sequence> <xs:element name="VER_SERVER" type="xs:string" /> </xs:sequence> </xs:complexType> </xs:element> <xs:element name="VERIFICATION_SERVER_SETTING"> <xs:complexType> <xs:sequence>
306 | SnapManager® 6.0 for Microsoft® Exchange Installation and Administration Guide
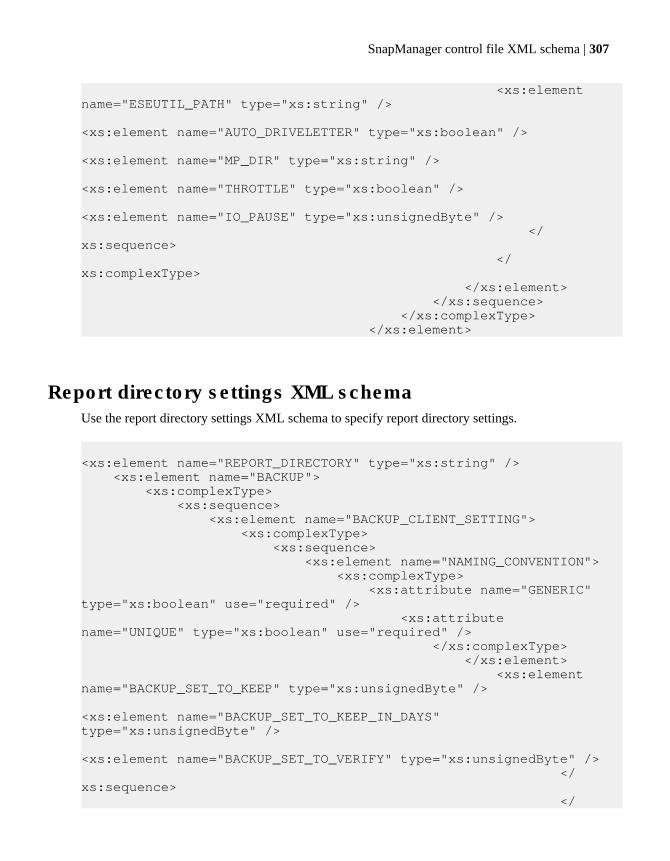
<xs:element name="ESEUTIL_PATH" type="xs:string" /> <xs:element name="AUTO_DRIVELETTER" type="xs:boolean" /> <xs:element name="MP_DIR" type="xs:string" /> <xs:element name="THROTTLE" type="xs:boolean" /> <xs:element name="IO_PAUSE" type="xs:unsignedByte" /> </xs:sequence> </xs:complexType> </xs:element> </xs:sequence> </xs:complexType> </xs:element>
Report directory settings XML schemaUse the report directory settings XML schema to specify report directory settings.
<xs:element name="REPORT_DIRECTORY" type="xs:string" /> <xs:element name="BACKUP"> <xs:complexType> <xs:sequence> <xs:element name="BACKUP_CLIENT_SETTING"> <xs:complexType> <xs:sequence> <xs:element name="NAMING_CONVENTION"> <xs:complexType> <xs:attribute name="GENERIC" type="xs:boolean" use="required" /> <xs:attribute name="UNIQUE" type="xs:boolean" use="required" /> </xs:complexType> </xs:element> <xs:element name="BACKUP_SET_TO_KEEP" type="xs:unsignedByte" /> <xs:element name="BACKUP_SET_TO_KEEP_IN_DAYS" type="xs:unsignedByte" /> <xs:element name="BACKUP_SET_TO_VERIFY" type="xs:unsignedByte" /> </xs:sequence> </
SnapManager control file XML schema | 307
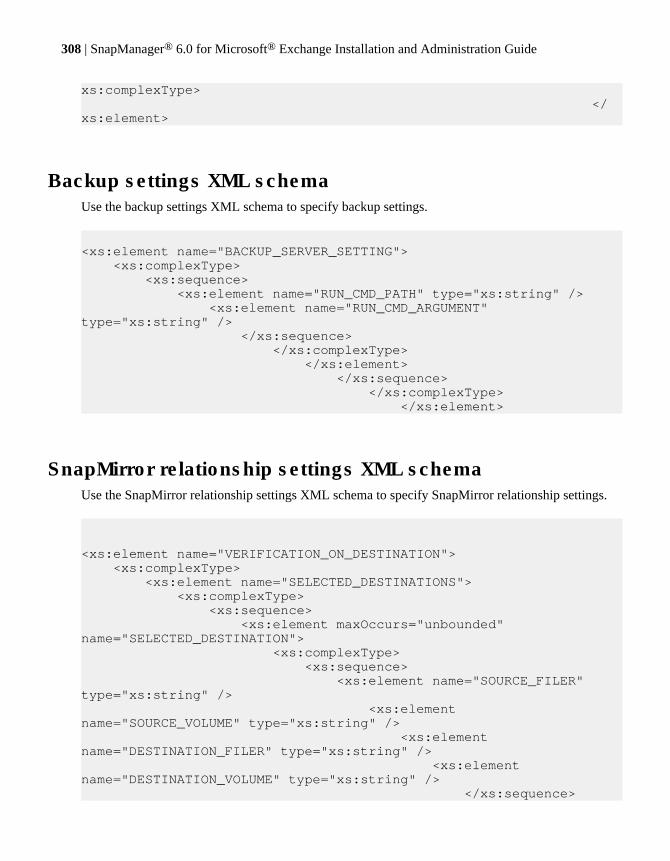
xs:complexType> </xs:element>
Backup settings XML schemaUse the backup settings XML schema to specify backup settings.
<xs:element name="BACKUP_SERVER_SETTING"> <xs:complexType> <xs:sequence> <xs:element name="RUN_CMD_PATH" type="xs:string" /> <xs:element name="RUN_CMD_ARGUMENT" type="xs:string" /> </xs:sequence> </xs:complexType> </xs:element> </xs:sequence> </xs:complexType> </xs:element>
SnapMirror relationship settings XML schemaUse the SnapMirror relationship settings XML schema to specify SnapMirror relationship settings.
<xs:element name="VERIFICATION_ON_DESTINATION"> <xs:complexType> <xs:element name="SELECTED_DESTINATIONS"> <xs:complexType> <xs:sequence> <xs:element maxOccurs="unbounded" name="SELECTED_DESTINATION"> <xs:complexType> <xs:sequence> <xs:element name="SOURCE_FILER" type="xs:string" /> <xs:element name="SOURCE_VOLUME" type="xs:string" /> <xs:element name="DESTINATION_FILER" type="xs:string" /> <xs:element name="DESTINATION_VOLUME" type="xs:string" /> </xs:sequence>
308 | SnapManager® 6.0 for Microsoft® Exchange Installation and Administration Guide
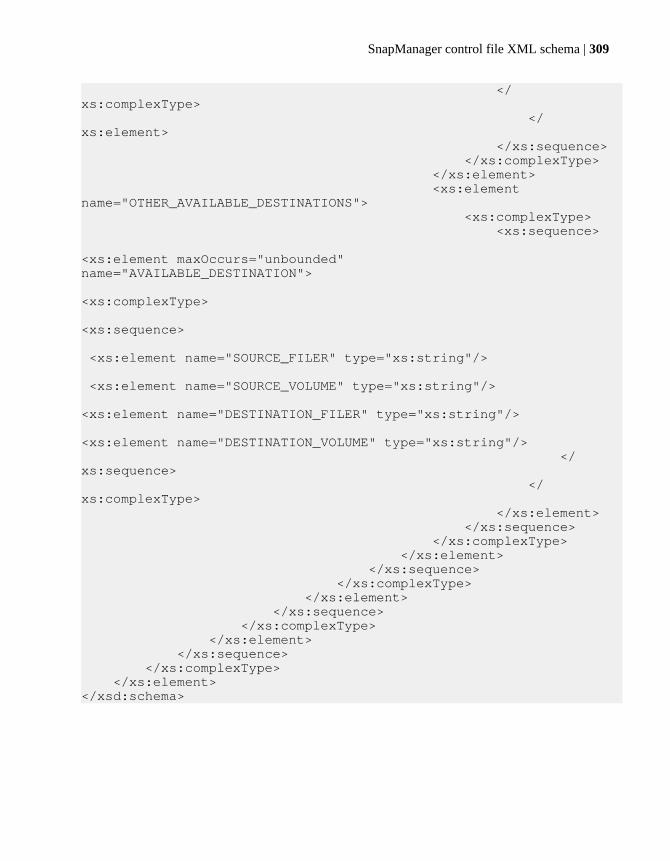
</xs:complexType> </xs:element> </xs:sequence> </xs:complexType> </xs:element> <xs:element name="OTHER_AVAILABLE_DESTINATIONS"> <xs:complexType> <xs:sequence> <xs:element maxOccurs="unbounded"name="AVAILABLE_DESTINATION"> <xs:complexType> <xs:sequence> <xs:element name="SOURCE_FILER" type="xs:string"/> <xs:element name="SOURCE_VOLUME" type="xs:string"/> <xs:element name="DESTINATION_FILER" type="xs:string"/> <xs:element name="DESTINATION_VOLUME" type="xs:string"/> </xs:sequence> </xs:complexType> </xs:element> </xs:sequence> </xs:complexType> </xs:element> </xs:sequence> </xs:complexType> </xs:element> </xs:sequence> </xs:complexType> </xs:element> </xs:sequence> </xs:complexType> </xs:element></xsd:schema>
SnapManager control file XML schema | 309


SnapManager command-line reference
SnapManager 6.0 for Microsoft Exchange provides SnapManager command-line functionality,allowing you to create scripts to run SnapManager without using the graphical user interface (GUI).
Next topics
Guidelines for using the SnapManager for Exchange PowerShell command-line tool on page 311
Launching SnapManager for Exchange PowerShell on page 312
new-backup on page 312
verify-backup on page 321
delete-backup on page 326
get-backup on page 328
get-mirrors on page 331
resync-mirrors on page 333
release-mirrors on page 334
break-mirrors on page 336
restore-backup on page 337
Get-JobStatus on page 344
Change-JobPriority on page 345
Cancel-Job on page 346
exec-bc on page 348
Export-config on page 350
Import-config on page 351
Guidelines for using the SnapManager for ExchangePowerShell command-line tool
You need to keep in mind some points before you start using the PowerShell command-line tool.
To run the Microsoft Exchange cmdlets, use Microsoft Exchange Management Shell.
Observe the following guidelines when using the SnapManager command-line tool:
• All parameters and options are case-insensitive. So using the option “-Daily” gives the sameresults as using “-daily”.
• Some of the options must be invoked in a particular order. For best results, use the order given inthe syntax for all options.
• When a parameter value string contains spaces, ensure to enclose it in single quote. For example,use “First Storage Group” rather than First Storage Group.
SnapManager command-line reference | 311
Launching SnapManager for Exchange PowerShellYou can launch the SnapManager for Exchange PowerShell from the Windows Start menu to use thecommand-line interface to perform various SnapManager operations.
Step
1. Go to Start > Programs > NetApp > SnapManager for Exchange PowerShell.
The SnapManager for Exchange PowerShell command-line interface is displayed.
After you finish
On a Windows Server 2008 system with User Access Control enabled, use the menu option Run AsAdministrator to prevent any access errors related to the Windows Registry, or any other Windowsserver resources.
new-backupThe new-backup command enables you to back up the Exchange databases.
new-backup-Clusteraware <True|False>-lcr <True|False>-VerifyOnDestVolumes <src_storage_system_list:src_vol:dest_storage_system:dest_vol>-Verify <True|False>-Server <server_name>-StorageGroup <storage_grp1, storage_grp2, ...>-Database <database1, database2, ...>-ManagementGroup <Standard|Weekly|Daily>-ActiveDatabaseOnly <True|False>-PassiveDatabaseOnly <True|False>-BackupTargetServer <server name>-ActivationPreference <ActivationPreferenceNum>-UpdateMirror <True|False>-VerDestVolume <True|False>-NoUTMRestore <True|False>-NoTruncateLogs <False>-Throttle <throttle_val>-VerificationServer <server_name>-UseMountPoint <True|False>-CCRActiveNode Boolean <True|False>-MountPointDir <mountpoint_dir>-RetainBackups <no_of_days_to_retain_backup>-RetainDays <no_of_days_delete_backup>-Command <True|False>-RunCommand <win_path_and_script_name>-GenericNaming <True|False>-BackupCopyRemoteCCRNode Boolean <True|False>-RecoveryPoint <win_path_and_script_name>-ReportProgress <True|False>-ArchiveBackup <True|False>-ArchiveBackupCopyRemoteCCRNode <True|False>-ArchivedBackupRetention <Hourly|Monthly|Daily|Weekly|Unlimited> common parameters
Description
The new-backup command enables you to initiate a backup or verification job, with all of theoptions available through the SnapManager GUI.
This command also supports the following common parameters:
• -Debug (-db)
312 | SnapManager® 6.0 for Microsoft® Exchange Installation and Administration Guide
• -ErrorAction (-ea)• -ErrorVariable (-ev)• -OutBuffer (-ob)• -OutVariable (-ov)• -Verbose (-vb)• -Confirm
To learn more about common parameters, see help about_ubiquitous_parameters.
Parameters-Clusteraware <True|False>
Short name: cl
Assumes significance only when scheduling jobs in cluster configurations, byfacilitating scheduling the same job in multiple cluster nodes to improve faulttolerance.
In the case of Single Copy Cluster (SCC), if a job is scheduled with -Clusteraware, the job runs only if the host in which it is scheduled is the activenode of the cluster.
In the case of Cluster Continuous Replica (CCR), the processing of -Clusteraware depends on whether the host in which it is scheduled is an activeor passive node and the value of -CCRActiveNode. The job runs if the host is aCCR active node and the job targets it with -CCRActiveNode as true. If the host isa CCR passive node, the job runs if the job targets the host with -CCRActiveNodeas false.
In the case of DAG, if a job is scheduled with -Clusteraware, the job runs only ifthe host in which it is scheduled is the active node of the DAG.
-lcr <True|False>
Processed only if the Storage Groups are not specified explicitly using -StorageGroup. In Exchange Server 2007, -lcr is false by default and in suchcases only the production Storage Groups are backed up. Note the following points:
• In Exchange Server 2007, set -lcr as true, if you want to back up only thereplica Storage Groups.
• If you specify the list of Storage Groups explicitly, the -lcr Storage Group isignored.
Note: In Exchange Server 2003, -lcr is not supported.
-VerifyOnDestVolumes <src_storage_system_list:src_vol:dest_storage_system:dest_vol>
Short name: vermirror
Overrides the existing SnapMirror relationships.
SnapManager command-line reference | 313
-Verify <True|False>
Short name: ver
Verifies the backed up SnapManager databases and transaction logs.
-Server <server_name>
Short name: svr
Specifies the target Exchange server name. You can also specify the DatabaseAvailability Group (DAG) name.
In a cluster configuration, you need to specify -Server explicitly in all of thecmdlets to perform all operations. If -Server is not specified explicitly in a stand-alone server, SnapManager uses the local machine as the default to run thefollowing cmdlets: new-backup, verify-backup, restore-backup, get-backup, and delete-backup.
-StorageGroup <storage_grp1, storage_grp2, ...>
Short name: sg
Specifies the list of Storage Groups to be verified during the backup operation.
If invalid Storage Groups are specified in new-backup during backup operation,PowerShell cancels the new-backup operation. SnapManager displays anappropriate error message and does not selectively back up valid Storage Groups.Scheduled jobs and backup scripts also fail when there is an invalid Storage Groupconfiguration.
-Database <database1, database2, ...>
Short name: dbs
Lists the databases in the following format:
-Database "DatabaseName1", "DatabaseName2"
If you do not specify Database, the cmdlet backs up all the databases on the serverspecified with the -server parameter.
You can back up all mailbox databases in the DAG without specifying eachmember server of the DAG in the following way:
new-backup -server DAG1
If a database, for example, MB1, is replicated on three member servers in the DAG,you can back up this database in the following way:
new-backup -server DAG1 -database MB1. This will back up all threecopies of the database on all three member servers.
Note: If the server name specified is a DAG name, and if theActiveDatabaseOnly or the PassiveDatabaseOnly option is not specified,to select a database for backup you have to specify both the database and the
314 | SnapManager® 6.0 for Microsoft® Exchange Installation and Administration Guide
server on which the database resides. For example, specify the databases in thefollowing way:
-Database "db1\server1", "db1\server2"
-ActiveDatabaseOnly <True|False>
Short name: activedb
Backs up the active databases. This is a switch parameter.
Note: If neither the ActiveDatabaseOnly nor the PassiveDatabaseOnlyoption is specified, all passive and active databases in the DAG are included inthe backup.
-PassiveDatabaseOnly <True|False>
Short name: passivedb
Backs up the passive databases. This is a switch parameter.
Note: If neither the ActiveDatabaseOnly nor the PassiveDatabaseOnlyoption is specified, all passive and active databases in the DAG are included inthe backup.
-BackupTargetServer <server name>
Short name: bkupsvr
Backs up the databases on the specified server. If you do not specifyBackupTargetServer, mailbox databases on all member servers in the DAG arebacked up . For example, the command new-backup -server DAG1 will backup all databases on all member servers in the DAG.
-ActivationPreference <ActivationPreferenceNum >
Short name: actpref
Back up the databases with the specified ActivationPreference number.
Note: You can use the following cmdlet from the Microsoft Exchange 2010PowerShell to get the list of ActivationPreference numbers on the memberservers for a database: Get-MailboxDatabase -Identity databasename| fl
-ManagementGroup <Standard|Weekly|Daily>
Short name: mgmt
Specifies the frequency of a backup or verify operation that is scheduled to beperformed on a daily, weekly, or standard basis.
-UpdateMirror <True|False>
Short name: updmir
Starts a SnapMirror synchronization after the backup operation.
SnapManager command-line reference | 315
SnapMirror updates the specified volume to reflect incremental updates to a sourcevolume. If a SnapManager volume is enabled for SnapMirror use, the SnapMirrordestination is updated from the source volume.
-VerDestVolume <True|False>
Short name: verdest
Verifies the SnapMirror destination volume.
-NoUTMRestore <True|False>
Short name: noutm
Denies the retention of up-to-the-minute restore ability.
The logs are also deleted for any backup copies that you delete as part of thisbackup operation. This does not retain the up-to-the-minute restore ability for olderbackup copies that remain after the delete phase of a backup operation.
-NoTruncateLogs <False>
Short name: notrunc
Denies the backup of truncated transaction logs. This option can be used toconserve space on the LUN containing the backed up Exchange transaction logs.
-Throttle <throttle_val>
Short name: throt
throttle_var is an integer value; defines the throttling value to be used duringthe verification operation.
-VerificationServer <server_name>
Short name: versvr
Overrides the preconfigured SnapManager verification settings. It denotes the hostto be used as the verification server for the verification phase of a backupoperation. This is a switch parameter.
-UseMountPoint <True|False>
Short name: mp
Mounts the Snapshot copy to a NTFS directory. During a SnapManagerverification operation the Snapshot copies are mounted in a default NTFS directoryfor database verification. This option is effective when there are no drives availableto mount the Snapshot copies during database verification. The value of thisparameter overrides the preconfigured SnapManager verification settings.
-CCRActiveNode <Boolean True|False>
Short name: ccrnode
Specifies whether the connection is to an active or a passive node, respectively.This is a Boolean parameter.
316 | SnapManager® 6.0 for Microsoft® Exchange Installation and Administration Guide

-MountPointDir <mountpoint_dir>
Short name: mpdir
Specifies which mountpoint directory a Snapshot copy is to be mounted to, duringdatabase verification.
-RetainBackups <no_of_days_to_retain_backup>
Short name: rtbackups
Specifies the number of backup copies to retain after the delete phase of aSnapManager backup operation.
-RetainDays <no_of_days_to_delete_backup>
Short name: rtdays
Specifies the number of days after which a backup copy is to be deleted. Specifiesthat the deletion of backup copies is to be based on an "older than number of days"policy. Use this option in conjunction with RetainBackups. Absence of thisoption denotes a deletion policy based on retained backup count.
-Command <True|False>
Short name: cmd
Indicates that RunCommand is to be used after the current operation. This is aswitch parameter.
-RunCommand<win_path_and_script_name>
Short name: runcmd
Specifies the complete path name of and runs the specified command after theSnapManager backup or verification operation is complete.
Note: You need to specify this command explicitly, the preconfigured commanddoes not run after the backup or verification operation.
-GenericNaming <True|False>
Short name: gen
Specifies the generic naming convention to be used for the SnapManager backupsets.
-BackupCopyRemoteCCRNode Boolean <True|False>
Creates a secondary backup on a remote node. This is a Boolean parameter.
-RecoveryPoint <win_path_and_script_name>
Indicates a Frequent Recovery Point backup.
Note: If you specify this parameter new-backup, all the other parameters except-Server, -StorageGroup, -UpdateMirror, -Clusteraware, -lcr, -BackupCopyRemoteCCRNode are ignored.
SnapManager command-line reference | 317
-ReportProgress <True|False>
Short name: repprog
Displays the operation status and progress information in the PowerShell output. Ifyou do not use this switch parameter, the progress information is logged only to thereport file, and not to the PowerShell output.
Note: Avoid using this switch for scheduled backup and verification jobs.
-ArchiveBackup <True|False>
Short name: arch
Creates an archive of the backup copy created on the primary node. Primary node isthe node where backup operation is initiated. Include this parameter if you havedatasets configured on your primary node and want to archive the backup copy tothe SnapVault secondary storage system.
-ArchiveBackupCopyRemoteCCRNode <True|False>
Short name: arch
Creates an archive of the copy backup created on the secondary node. Secondarynode is the remote node of the primary node. Include this parameter if you havedatasets configured on the secondary node and want to archive the copy backup tothe SnapVault secondary storage system.
-ArchivedBackupRetention <Hourly|Monthly|Daily|Weekly|Unlimited>
Short name: archret
Determines the retention time for the archives that were created using theArchiveBackup parameter. The retention can be hourly, monthly, daily, weekly,or unlimited.
Note: Do not use ArchivedBackupRetention without using the parameterArchiveBackup. If you use the parameter ArchiveBackup only, the dailyretention type is used by default.
ArchiveBackupCopyRemoteCCRNode <True|False>
Short name: archbkupcopy
Archives the backup copies at the remote node specifically for a CCRconfiguration, as the remote node could be an active node if you run the backupcopy from passive node.
Example: Creating a new backup copy of two Storage Groups in Standardbackup management group, and deleting older backup copies
This command creates a new backup copy of two Storage Groups on EXCHSRVR in theStandard backup management group (the default), using the unique naming convention (the
318 | SnapManager® 6.0 for Microsoft® Exchange Installation and Administration Guide
backup copy is named using the date-time stamp). Run Command After Operation isperformed, and all older backup copies are deleted except for the eight most recent ones.
new-backup -Server 'EXCHSRVR' -ManagementGroup 'Standard' -
NoTruncateLogs $False -RetainBackups 8 -Command - RunCommand 'C:
\WINDOWS\system32\svript1.bat'-CommandServer 'SNAPMGR-48' -
StorageGroup 'alaska','3' -Verify -VerificationServer 'Snapmgr-48' -
Throttle 150 -UseMountPoint -MountPointDir 'C:\ProgramFiles\NetApp
\SnapManager for Exchange\SnapMgrMountPoint'
Example: Creating a new backup of two Storage Groups in Standard backupmanagement group, and retaining older backup copies
This command creates a new backup of two Storage Groups on EXCHSRVR3 in the Standardbackup management group (the default), using the unique naming convention (the backup arenamed using the date-time stamp). No verification or other command is performed after thisoperation, and no older backup copies are deleted.
new-backup -Server 'EXCHSRVR3' -StorageGroup SG1, SG2
Example: Creating a new backup in Daily backup management group, verifyingbackup copies, and deleting older backup copies
This command creates a new backup in the Daily backup management group. The backup isverified on SRVR7, and all older Daily backup copies are deleted except for the three mostrecent ones. No SnapMirror replication is initiated after the backup, even if the volume is aSnapMirror source volume.
new-backup -Server 'EXCHSRVR3' -StorageGroup SG1, SG2 -
VerificationServer -SRVR7 -retainbackups 3 -ManagementGroup daily
Example: Creating a new backup and verifying destination volume
This command creates a backup and performs verification on the destination volumes.
new-backup -Server SNAPMGR-55 -ManagementGroup Standard -
NoTruncateLogs $False -StorageGroup 'First Storage Group' -Verify -
VerificationServer SNAPMGR-55 -VerDestVolume -UpdateMirror -
BackupCopyRemoteCCRNode $False
Example: Creating backup of LCR database
This command creates a backup of the LCR database.
new-backup -Server SNAPMGR-55 -ManagementGroup Standard -
NoTruncateLogs $False -StorageGroup First Storage Group\LCR -
BackupCopyRemoteCCRNode $False
SnapManager command-line reference | 319
Example: Creating a frequent recovery backup
This command creates a frequent recovery backup from the specified Storage Group in"SNAPMGR-50".
new-backup -Server SNAPMGR-50 -StorageGroup FirstStorageGroup, SG2,
SG3 -UpdateMirror -RecoveryPoint
Example: Creating archive of primary backup at the secondary Storage Group
This command creates an archive of the primary backup at the secondary Storage Grouplocation.
new-backup -Server exchange1 -CCRActiveNode $False -GenericNaming -
ManagementGroup Standard -NoTruncateLogs $False -RetainBackups 8 -
StorageGroup sg1,sg2 -Verify -VerificationServer exchange2-Throttle
200 -UseMountPoint - MountPointDir 'C:\Program Files\NetApp
\SnapManager for Exchange\SnapMgrMountPoint'-BackupCopyRemoteCCRNode
$False -ArchiveBackup -ArchivedBackupRetention Monthly
Example: Creating a backup of the specified databases
This command creates a backup of the specified databases on the server "SNAPMGR-DAG1".
new-backup -Server SNAPMGR-DAG1 -Database "Mailbox Database
1248233294\SNAPMGR-06-VM2", "Mailbox Database 1333555666\SNAPMGR-06",
"Mailbox Database 1456789\SNAPMGR-06-VM2"
Example: Backing up databases on the specified server in the DAG
This command creates a backup of the specified databases on the server "SNAPMGR06".
new-backup -Server 'SNAPMGR06-DAG1' -ClusterAware -ManagementGroup
'Standard' -NoTruncateLogs $False -RetainBackups 3 -dbs 'Mailbox
Database 0294565900','Mailbox Database 0793619176','DB1' -Verify -
UseMountPoint -BackupTargetServer snapmgr-06
Example: Backing up the databases with the specified ActivationPreferencenumber on the specified server in the DAG.
This command creates a backup of the databases with the ActivationPreference number 2 onthe server "SNAPMGR06".
new-backup -Server 'SNAPMGR06-DAG1' -ClusterAware -ManagementGroup
'Standard' -NoTruncateLogs $False -RetainBackups 3 -Verify -
UseMountPoint -ActivationPreference 2 -BackupTargetServer snapmgr-06
320 | SnapManager® 6.0 for Microsoft® Exchange Installation and Administration Guide
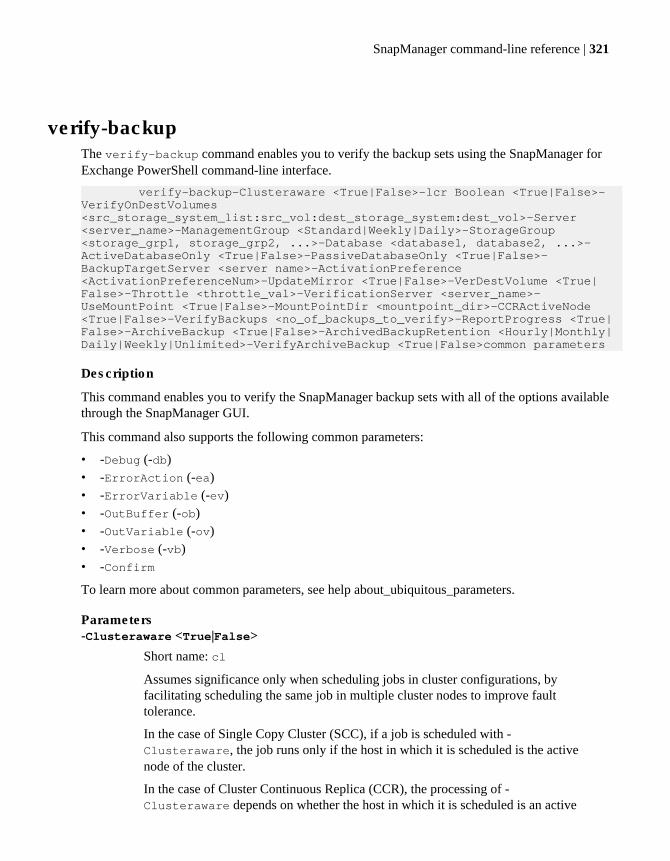
verify-backupThe verify-backup command enables you to verify the backup sets using the SnapManager forExchange PowerShell command-line interface.
verify-backup-Clusteraware <True|False>-lcr Boolean <True|False>-VerifyOnDestVolumes <src_storage_system_list:src_vol:dest_storage_system:dest_vol>-Server <server_name>-ManagementGroup <Standard|Weekly|Daily>-StorageGroup <storage_grp1, storage_grp2, ...>-Database <database1, database2, ...>-ActiveDatabaseOnly <True|False>-PassiveDatabaseOnly <True|False>-BackupTargetServer <server name>-ActivationPreference <ActivationPreferenceNum>-UpdateMirror <True|False>-VerDestVolume <True|False>-Throttle <throttle_val>-VerificationServer <server_name>-UseMountPoint <True|False>-MountPointDir <mountpoint_dir>-CCRActiveNode <True|False>-VerifyBackups <no_of_backups_to_verify>-ReportProgress <True|False>-ArchiveBackup <True|False>-ArchivedBackupRetention <Hourly|Monthly|Daily|Weekly|Unlimited>-VerifyArchiveBackup <True|False>common parameters
Description
This command enables you to verify the SnapManager backup sets with all of the options availablethrough the SnapManager GUI.
This command also supports the following common parameters:
• -Debug (-db)• -ErrorAction (-ea)• -ErrorVariable (-ev)• -OutBuffer (-ob)• -OutVariable (-ov)• -Verbose (-vb)• -Confirm
To learn more about common parameters, see help about_ubiquitous_parameters.
Parameters-Clusteraware <True|False>
Short name: cl
Assumes significance only when scheduling jobs in cluster configurations, byfacilitating scheduling the same job in multiple cluster nodes to improve faulttolerance.
In the case of Single Copy Cluster (SCC), if a job is scheduled with -Clusteraware, the job runs only if the host in which it is scheduled is the activenode of the cluster.
In the case of Cluster Continuous Replica (CCR), the processing of -Clusteraware depends on whether the host in which it is scheduled is an active
SnapManager command-line reference | 321
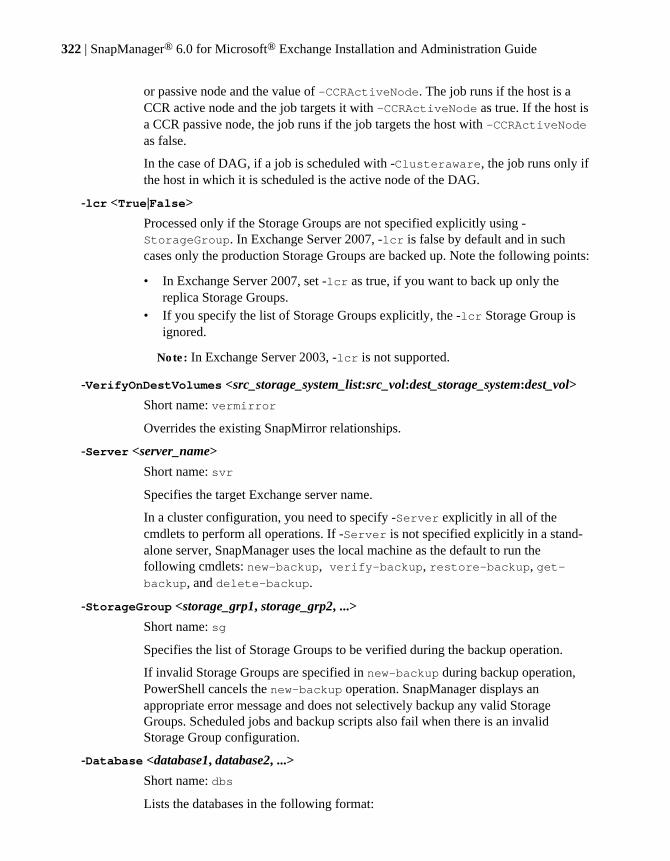
or passive node and the value of -CCRActiveNode. The job runs if the host is aCCR active node and the job targets it with -CCRActiveNode as true. If the host isa CCR passive node, the job runs if the job targets the host with -CCRActiveNodeas false.
In the case of DAG, if a job is scheduled with -Clusteraware, the job runs only ifthe host in which it is scheduled is the active node of the DAG.
-lcr <True|False>
Processed only if the Storage Groups are not specified explicitly using -StorageGroup. In Exchange Server 2007, -lcr is false by default and in suchcases only the production Storage Groups are backed up. Note the following points:
• In Exchange Server 2007, set -lcr as true, if you want to back up only thereplica Storage Groups.
• If you specify the list of Storage Groups explicitly, the -lcr Storage Group isignored.
Note: In Exchange Server 2003, -lcr is not supported.
-VerifyOnDestVolumes <src_storage_system_list:src_vol:dest_storage_system:dest_vol>
Short name: vermirror
Overrides the existing SnapMirror relationships.
-Server <server_name>
Short name: svr
Specifies the target Exchange server name.
In a cluster configuration, you need to specify -Server explicitly in all of thecmdlets to perform all operations. If -Server is not specified explicitly in a stand-alone server, SnapManager uses the local machine as the default to run thefollowing cmdlets: new-backup, verify-backup, restore-backup, get-backup, and delete-backup.
-StorageGroup <storage_grp1, storage_grp2, ...>
Short name: sg
Specifies the list of Storage Groups to be verified during the backup operation.
If invalid Storage Groups are specified in new-backup during backup operation,PowerShell cancels the new-backup operation. SnapManager displays anappropriate error message and does not selectively backup any valid StorageGroups. Scheduled jobs and backup scripts also fail when there is an invalidStorage Group configuration.
-Database <database1, database2, ...>
Short name: dbs
Lists the databases in the following format:
322 | SnapManager® 6.0 for Microsoft® Exchange Installation and Administration Guide
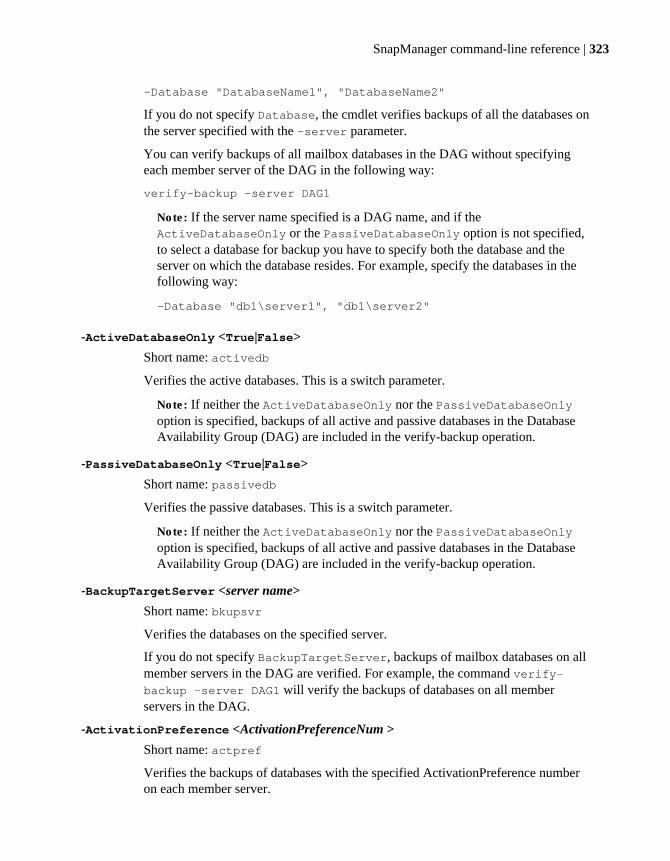
-Database "DatabaseName1", "DatabaseName2"
If you do not specify Database, the cmdlet verifies backups of all the databases onthe server specified with the -server parameter.
You can verify backups of all mailbox databases in the DAG without specifyingeach member server of the DAG in the following way:
verify-backup -server DAG1
Note: If the server name specified is a DAG name, and if theActiveDatabaseOnly or the PassiveDatabaseOnly option is not specified,to select a database for backup you have to specify both the database and theserver on which the database resides. For example, specify the databases in thefollowing way:
-Database "db1\server1", "db1\server2"
-ActiveDatabaseOnly <True|False>
Short name: activedb
Verifies the active databases. This is a switch parameter.
Note: If neither the ActiveDatabaseOnly nor the PassiveDatabaseOnlyoption is specified, backups of all active and passive databases in the DatabaseAvailability Group (DAG) are included in the verify-backup operation.
-PassiveDatabaseOnly <True|False>
Short name: passivedb
Verifies the passive databases. This is a switch parameter.
Note: If neither the ActiveDatabaseOnly nor the PassiveDatabaseOnlyoption is specified, backups of all active and passive databases in the DatabaseAvailability Group (DAG) are included in the verify-backup operation.
-BackupTargetServer <server name>
Short name: bkupsvr
Verifies the databases on the specified server.
If you do not specify BackupTargetServer, backups of mailbox databases on allmember servers in the DAG are verified. For example, the command verify-backup -server DAG1 will verify the backups of databases on all memberservers in the DAG.
-ActivationPreference <ActivationPreferenceNum >
Short name: actpref
Verifies the backups of databases with the specified ActivationPreference numberon each member server.
SnapManager command-line reference | 323
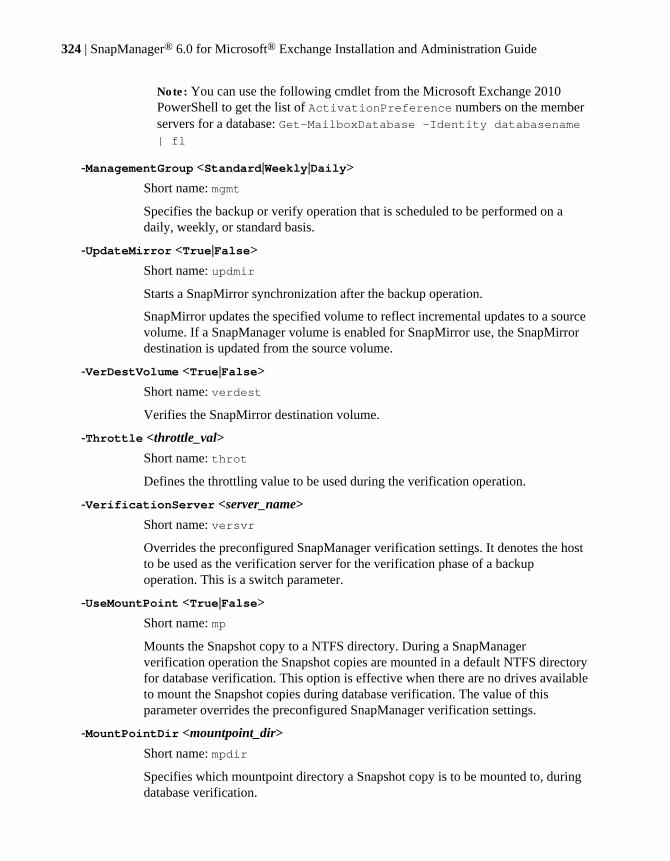
Note: You can use the following cmdlet from the Microsoft Exchange 2010PowerShell to get the list of ActivationPreference numbers on the memberservers for a database: Get-MailboxDatabase -Identity databasename| fl
-ManagementGroup <Standard|Weekly|Daily>
Short name: mgmt
Specifies the backup or verify operation that is scheduled to be performed on adaily, weekly, or standard basis.
-UpdateMirror <True|False>
Short name: updmir
Starts a SnapMirror synchronization after the backup operation.
SnapMirror updates the specified volume to reflect incremental updates to a sourcevolume. If a SnapManager volume is enabled for SnapMirror use, the SnapMirrordestination is updated from the source volume.
-VerDestVolume <True|False>
Short name: verdest
Verifies the SnapMirror destination volume.
-Throttle <throttle_val>
Short name: throt
Defines the throttling value to be used during the verification operation.
-VerificationServer <server_name>
Short name: versvr
Overrides the preconfigured SnapManager verification settings. It denotes the hostto be used as the verification server for the verification phase of a backupoperation. This is a switch parameter.
-UseMountPoint <True|False>
Short name: mp
Mounts the Snapshot copy to a NTFS directory. During a SnapManagerverification operation the Snapshot copies are mounted in a default NTFS directoryfor database verification. This option is effective when there are no drives availableto mount the Snapshot copies during database verification. The value of thisparameter overrides the preconfigured SnapManager verification settings.
-MountPointDir <mountpoint_dir>
Short name: mpdir
Specifies which mountpoint directory a Snapshot copy is to be mounted to, duringdatabase verification.
324 | SnapManager® 6.0 for Microsoft® Exchange Installation and Administration Guide

-CCRActiveNode Boolean <True|False>
Short name: ccrnode
Specifies whether the connection is to an active or a passive node, respectively.This is a Boolean parameter.
-VerifyBackups <no_of_backups_to_verify>
Short form: verbkups
Verifies the unverified SnapManager backup sets. The default value is one, but youcan specify the number of backup copies that you want to verify.
-ReportProgress <True|False>
Short form: reppro
Gets the operation status and progress information in the PowerShell output. If thisswitch is not used, the progress information is logged on only to the report file andnot to the PowerShell output.
Note: It is recommended that you do not use this switch for scheduled backupand verification jobs.
-ArchiveBackup <True|False>
Short name: arch
Creates an archive of the backup copy created on the primary node. Primary node isthe node where backup operation is initiated. Include this parameter if you havedatasets configured on your primary node and want to archive the backup copy tothe SnapVault secondary storage system.
-ArchivedBackupRetention <Hourly|Monthly|Daily|Weekly|Unlimited>
Short name: archret
Determines the retention time for the archives that were created using theArchiveBackup parameter. The retention can be hourly, monthly, daily, weekly,or unlimited.
Note: Do not use ArchivedBackupRetention without usingArchiveBackup. If you use the parameter ArchiveBackup only, the dailyretention type is used by default.
-VerifyArchiveBackup <True|False>
Short name: verarch
Specifies that the backup copy that has to be verified is an archived backup copy. Ifyou do not specify VerifyArchiveBackup, and one local and one archivedbackup copy exist with the same name, SnapManager verifies the local backupcopy.
SnapManager command-line reference | 325
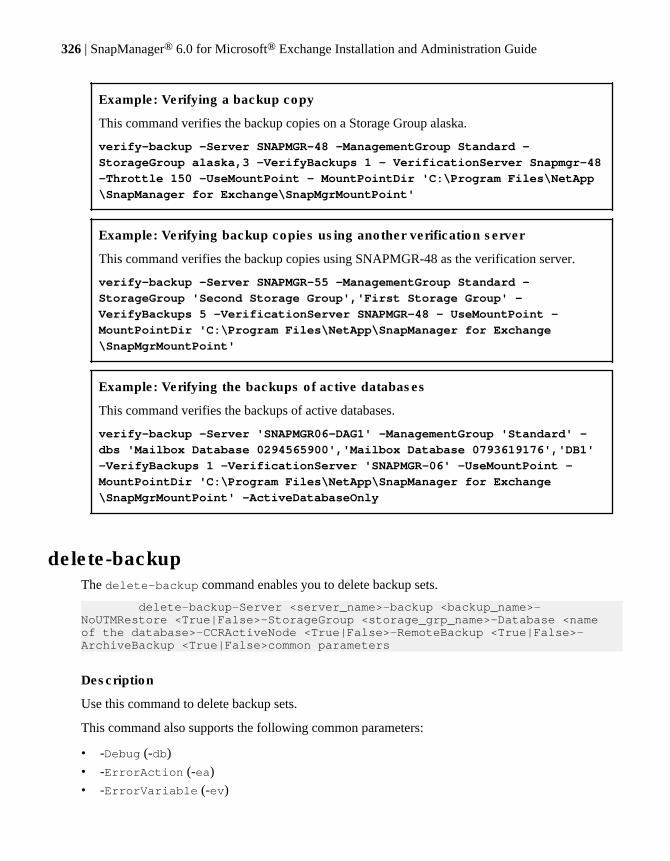
Example: Verifying a backup copy
This command verifies the backup copies on a Storage Group alaska.
verify-backup -Server SNAPMGR-48 -ManagementGroup Standard -
StorageGroup alaska,3 -VerifyBackups 1 - VerificationServer Snapmgr-48
-Throttle 150 -UseMountPoint - MountPointDir 'C:\Program Files\NetApp
\SnapManager for Exchange\SnapMgrMountPoint'
Example: Verifying backup copies using another verification server
This command verifies the backup copies using SNAPMGR-48 as the verification server.
verify-backup -Server SNAPMGR-55 -ManagementGroup Standard -
StorageGroup 'Second Storage Group','First Storage Group' -
VerifyBackups 5 -VerificationServer SNAPMGR-48 - UseMountPoint -
MountPointDir 'C:\Program Files\NetApp\SnapManager for Exchange
\SnapMgrMountPoint'
Example: Verifying the backups of active databases
This command verifies the backups of active databases.
verify-backup -Server 'SNAPMGR06-DAG1' -ManagementGroup 'Standard' -
dbs 'Mailbox Database 0294565900','Mailbox Database 0793619176','DB1'
-VerifyBackups 1 -VerificationServer 'SNAPMGR-06' -UseMountPoint -
MountPointDir 'C:\Program Files\NetApp\SnapManager for Exchange
\SnapMgrMountPoint' -ActiveDatabaseOnly
delete-backupThe delete-backup command enables you to delete backup sets.
delete-backup-Server <server_name>-backup <backup_name>-NoUTMRestore <True|False>-StorageGroup <storage_grp_name>-Database <name of the database>-CCRActiveNode <True|False>-RemoteBackup <True|False>-ArchiveBackup <True|False>common parameters
Description
Use this command to delete backup sets.
This command also supports the following common parameters:
• -Debug (-db)• -ErrorAction (-ea)• -ErrorVariable (-ev)
326 | SnapManager® 6.0 for Microsoft® Exchange Installation and Administration Guide
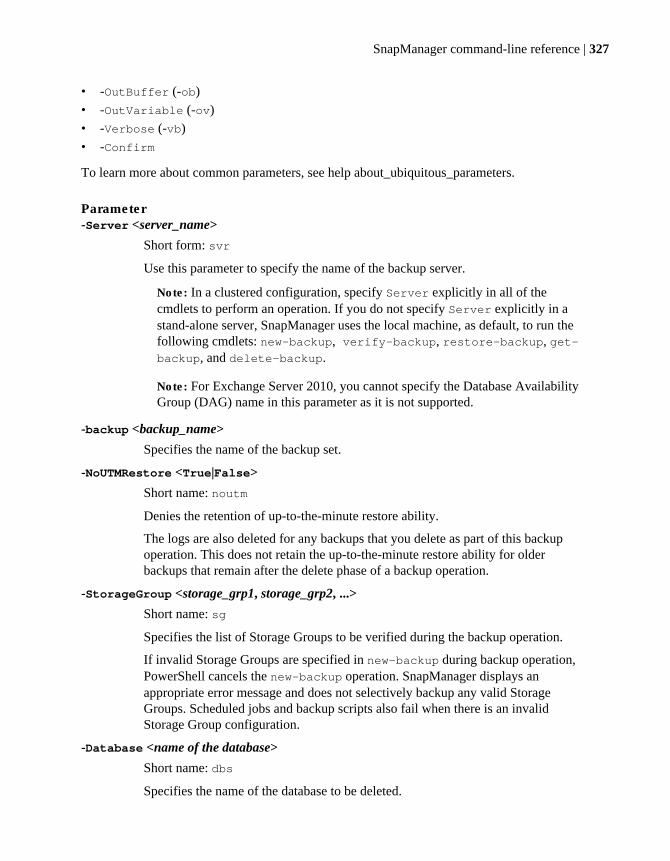
• -OutBuffer (-ob)• -OutVariable (-ov)• -Verbose (-vb)• -Confirm
To learn more about common parameters, see help about_ubiquitous_parameters.
Parameter-Server <server_name>
Short form: svr
Use this parameter to specify the name of the backup server.
Note: In a clustered configuration, specify Server explicitly in all of thecmdlets to perform an operation. If you do not specify Server explicitly in astand-alone server, SnapManager uses the local machine, as default, to run thefollowing cmdlets: new-backup, verify-backup, restore-backup, get-backup, and delete-backup.
Note: For Exchange Server 2010, you cannot specify the Database AvailabilityGroup (DAG) name in this parameter as it is not supported.
-backup <backup_name>
Specifies the name of the backup set.
-NoUTMRestore <True|False>
Short name: noutm
Denies the retention of up-to-the-minute restore ability.
The logs are also deleted for any backups that you delete as part of this backupoperation. This does not retain the up-to-the-minute restore ability for olderbackups that remain after the delete phase of a backup operation.
-StorageGroup <storage_grp1, storage_grp2, ...>
Short name: sg
Specifies the list of Storage Groups to be verified during the backup operation.
If invalid Storage Groups are specified in new-backup during backup operation,PowerShell cancels the new-backup operation. SnapManager displays anappropriate error message and does not selectively backup any valid StorageGroups. Scheduled jobs and backup scripts also fail when there is an invalidStorage Group configuration.
-Database <name of the database>
Short name: dbs
Specifies the name of the database to be deleted.
SnapManager command-line reference | 327
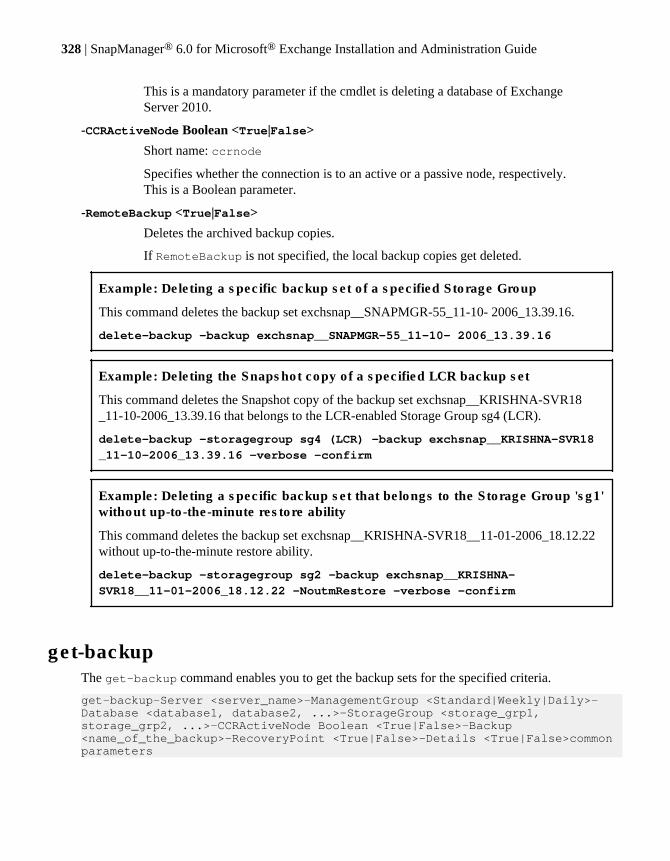
This is a mandatory parameter if the cmdlet is deleting a database of ExchangeServer 2010.
-CCRActiveNode Boolean <True|False>
Short name: ccrnode
Specifies whether the connection is to an active or a passive node, respectively.This is a Boolean parameter.
-RemoteBackup <True|False>
Deletes the archived backup copies.
If RemoteBackup is not specified, the local backup copies get deleted.
Example: Deleting a specific backup set of a specified Storage Group
This command deletes the backup set exchsnap__SNAPMGR-55_11-10- 2006_13.39.16.
delete-backup -backup exchsnap__SNAPMGR-55_11-10- 2006_13.39.16
Example: Deleting the Snapshot copy of a specified LCR backup set
This command deletes the Snapshot copy of the backup set exchsnap__KRISHNA-SVR18_11-10-2006_13.39.16 that belongs to the LCR-enabled Storage Group sg4 (LCR).
delete-backup -storagegroup sg4 (LCR) -backup exchsnap__KRISHNA-SVR18
_11-10-2006_13.39.16 -verbose -confirm
Example: Deleting a specific backup set that belongs to the Storage Group 'sg1'without up-to-the-minute restore ability
This command deletes the backup set exchsnap__KRISHNA-SVR18__11-01-2006_18.12.22without up-to-the-minute restore ability.
delete-backup -storagegroup sg2 -backup exchsnap__KRISHNA-
SVR18__11-01-2006_18.12.22 -NoutmRestore -verbose -confirm
get-backupThe get-backup command enables you to get the backup sets for the specified criteria.
get-backup-Server <server_name>-ManagementGroup <Standard|Weekly|Daily>-Database <database1, database2, ...>-StorageGroup <storage_grp1, storage_grp2, ...>-CCRActiveNode Boolean <True|False>-Backup <name_of_the_backup>-RecoveryPoint <True|False>-Details <True|False>common parameters
328 | SnapManager® 6.0 for Microsoft® Exchange Installation and Administration Guide
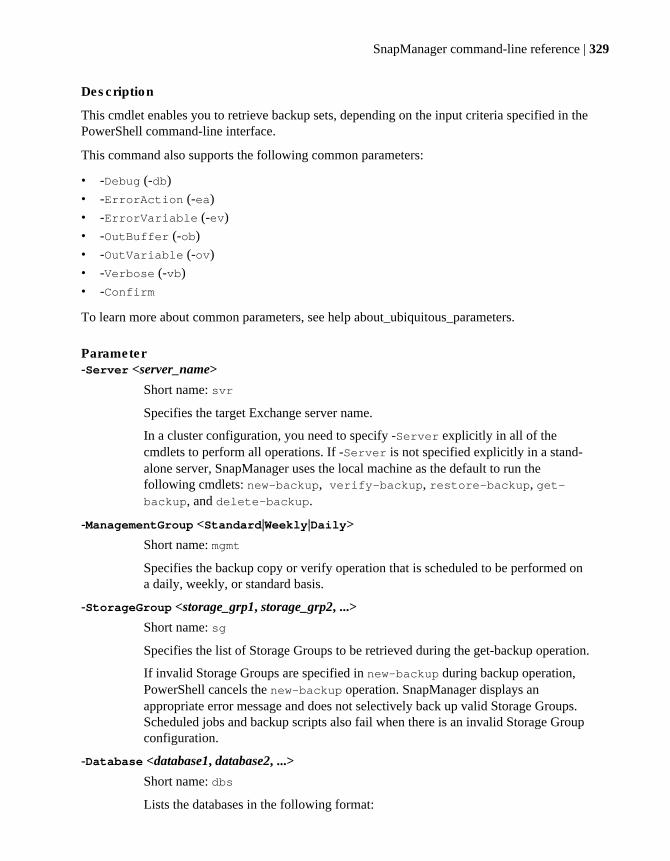
Description
This cmdlet enables you to retrieve backup sets, depending on the input criteria specified in thePowerShell command-line interface.
This command also supports the following common parameters:
• -Debug (-db)• -ErrorAction (-ea)• -ErrorVariable (-ev)• -OutBuffer (-ob)• -OutVariable (-ov)• -Verbose (-vb)• -Confirm
To learn more about common parameters, see help about_ubiquitous_parameters.
Parameter-Server <server_name>
Short name: svr
Specifies the target Exchange server name.
In a cluster configuration, you need to specify -Server explicitly in all of thecmdlets to perform all operations. If -Server is not specified explicitly in a stand-alone server, SnapManager uses the local machine as the default to run thefollowing cmdlets: new-backup, verify-backup, restore-backup, get-backup, and delete-backup.
-ManagementGroup <Standard|Weekly|Daily>
Short name: mgmt
Specifies the backup copy or verify operation that is scheduled to be performed ona daily, weekly, or standard basis.
-StorageGroup <storage_grp1, storage_grp2, ...>
Short name: sg
Specifies the list of Storage Groups to be retrieved during the get-backup operation.
If invalid Storage Groups are specified in new-backup during backup operation,PowerShell cancels the new-backup operation. SnapManager displays anappropriate error message and does not selectively back up valid Storage Groups.Scheduled jobs and backup scripts also fail when there is an invalid Storage Groupconfiguration.
-Database <database1, database2, ...>
Short name: dbs
Lists the databases in the following format:
SnapManager command-line reference | 329
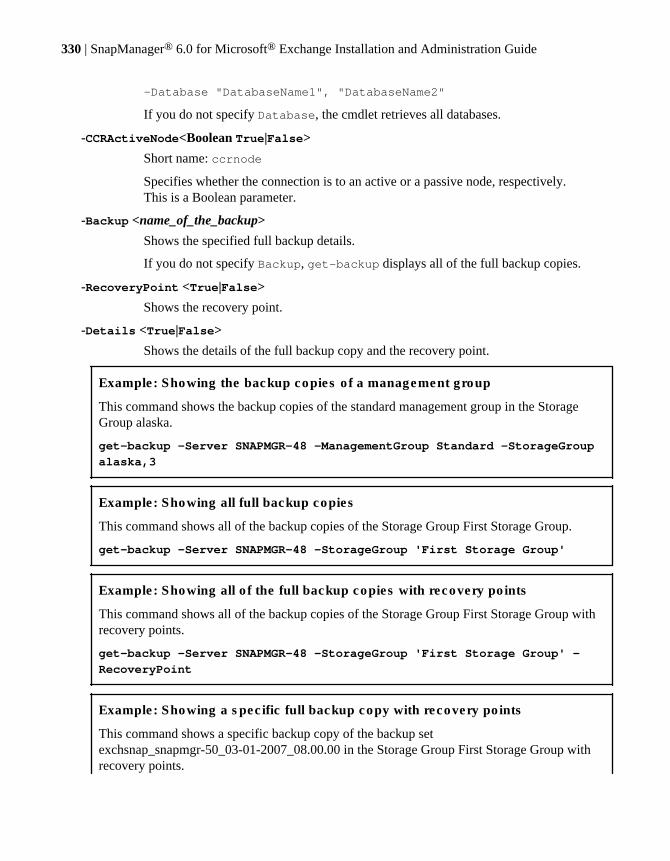
-Database "DatabaseName1", "DatabaseName2"
If you do not specify Database, the cmdlet retrieves all databases.
-CCRActiveNode<Boolean True|False>
Short name: ccrnode
Specifies whether the connection is to an active or a passive node, respectively.This is a Boolean parameter.
-Backup <name_of_the_backup>
Shows the specified full backup details.
If you do not specify Backup, get-backup displays all of the full backup copies.
-RecoveryPoint <True|False>
Shows the recovery point.
-Details <True|False>
Shows the details of the full backup copy and the recovery point.
Example: Showing the backup copies of a management group
This command shows the backup copies of the standard management group in the StorageGroup alaska.
get-backup -Server SNAPMGR-48 -ManagementGroup Standard -StorageGroup
alaska,3
Example: Showing all full backup copies
This command shows all of the backup copies of the Storage Group First Storage Group.
get-backup -Server SNAPMGR-48 -StorageGroup 'First Storage Group'
Example: Showing all of the full backup copies with recovery points
This command shows all of the backup copies of the Storage Group First Storage Group withrecovery points.
get-backup -Server SNAPMGR-48 -StorageGroup 'First Storage Group' -
RecoveryPoint
Example: Showing a specific full backup copy with recovery points
This command shows a specific backup copy of the backup setexchsnap_snapmgr-50_03-01-2007_08.00.00 in the Storage Group First Storage Group withrecovery points.
330 | SnapManager® 6.0 for Microsoft® Exchange Installation and Administration Guide

get-backup -Server SNAPMGR-48 -StorageGroup 'First Storage Group' -
Backup exchsnap_snapmgr-50_03-01-2007_08.00.00 -RecoveryPoint
Example: Showing a specific full backup copy with complete details
This command shows the backup set exchsnap_snapmgr-50_03-01-2007_08.00.00 withcomplete details.
get-backup -Server SNAPMGR-48 -StorageGroup 'First Storage Group' -
Backup exchsnap_snapmgr-50_03-01-2007_08.00.00 - Details
Example: Showing both full backup copy and recovery points in detail
This command shows the backup set exchsnap_snapmgr-50_03-01-2007_08.00.00 with therecovery points in detail.
get-backup -Server SNAPMGR-48 -StorageGroup 'First Storage Group' -
Backup exchsnap_snapmgr-50_03-01-2007_08.00.00 - RecoveryPoint -
Details
get-mirrorsThe get-mirrors command enables you to retrieve the SnapMirror status for the set of volumesthat you configure as mirrors. You can also retrieve all SnapMirror relationships in the specifiedBusiness Continuance plan.
get-mirrors-ExchServer <server_name>-BcServer <bc_server_name>-BcPlan <bc_plan_name>-FailoverTo <bc_failover_destination>-Mirrors <[storage system1:mirror1:storage system2:mirror1], [storage system1:mirror2:storage system2:mirror2], ...>common parameters
Description
The get-mirrors command enables you to retrieve the SnapMirror status for the set of volumes,with all of the options available through the SnapManager GUI. This command also supports thefollowing common parameters:
• -Debug (-db)• -ErrorAction (-ea)• -ErrorVariable (-ev)• -OutBuffer (-ob)• -OutVariable (-ov)• -Verbose (-vb)• -Confirm
SnapManager command-line reference | 331
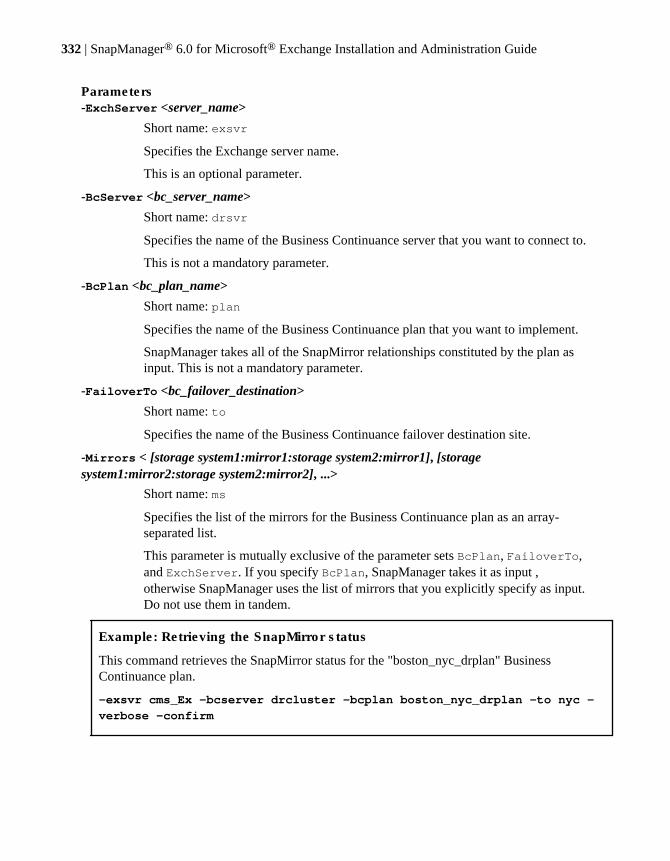
Parameters-ExchServer <server_name>
Short name: exsvr
Specifies the Exchange server name.
This is an optional parameter.
-BcServer <bc_server_name>
Short name: drsvr
Specifies the name of the Business Continuance server that you want to connect to.
This is not a mandatory parameter.
-BcPlan <bc_plan_name>
Short name: plan
Specifies the name of the Business Continuance plan that you want to implement.
SnapManager takes all of the SnapMirror relationships constituted by the plan asinput. This is not a mandatory parameter.
-FailoverTo <bc_failover_destination>
Short name: to
Specifies the name of the Business Continuance failover destination site.
-Mirrors < [storage system1:mirror1:storage system2:mirror1], [storagesystem1:mirror2:storage system2:mirror2], ...>
Short name: ms
Specifies the list of the mirrors for the Business Continuance plan as an array-separated list.
This parameter is mutually exclusive of the parameter sets BcPlan, FailoverTo,and ExchServer. If you specify BcPlan, SnapManager takes it as input ,otherwise SnapManager uses the list of mirrors that you explicitly specify as input.Do not use them in tandem.
Example: Retrieving the SnapMirror status
This command retrieves the SnapMirror status for the "boston_nyc_drplan" BusinessContinuance plan.
-exsvr cms_Ex -bcserver drcluster -bcplan boston_nyc_drplan -to nyc -
verbose -confirm
332 | SnapManager® 6.0 for Microsoft® Exchange Installation and Administration Guide
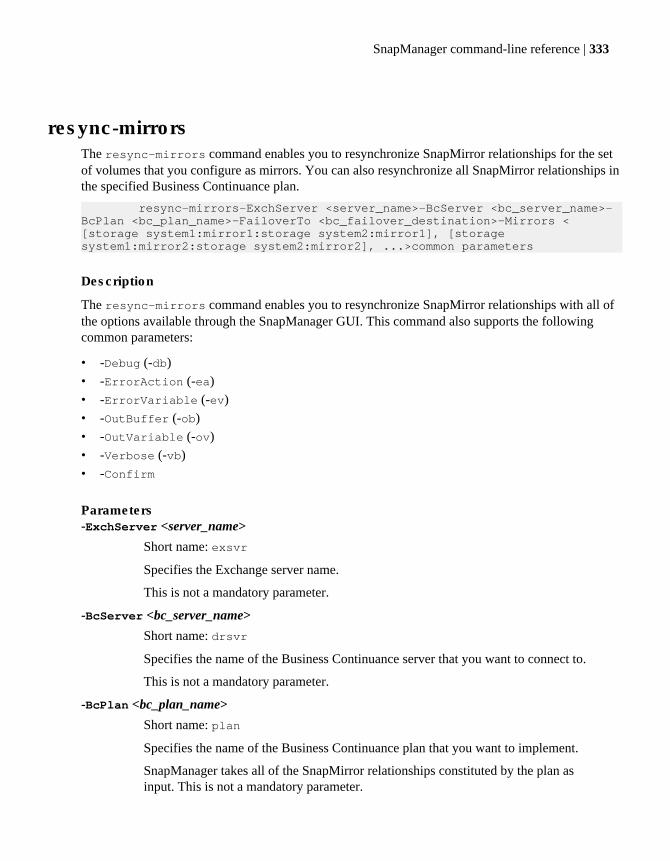
resync-mirrorsThe resync-mirrors command enables you to resynchronize SnapMirror relationships for the setof volumes that you configure as mirrors. You can also resynchronize all SnapMirror relationships inthe specified Business Continuance plan.
resync-mirrors-ExchServer <server_name>-BcServer <bc_server_name>-BcPlan <bc_plan_name>-FailoverTo <bc_failover_destination>-Mirrors < [storage system1:mirror1:storage system2:mirror1], [storage system1:mirror2:storage system2:mirror2], ...>common parameters
Description
The resync-mirrors command enables you to resynchronize SnapMirror relationships with all ofthe options available through the SnapManager GUI. This command also supports the followingcommon parameters:
• -Debug (-db)• -ErrorAction (-ea)• -ErrorVariable (-ev)• -OutBuffer (-ob)• -OutVariable (-ov)• -Verbose (-vb)• -Confirm
Parameters-ExchServer <server_name>
Short name: exsvr
Specifies the Exchange server name.
This is not a mandatory parameter.
-BcServer <bc_server_name>
Short name: drsvr
Specifies the name of the Business Continuance server that you want to connect to.
This is not a mandatory parameter.
-BcPlan <bc_plan_name>
Short name: plan
Specifies the name of the Business Continuance plan that you want to implement.
SnapManager takes all of the SnapMirror relationships constituted by the plan asinput. This is not a mandatory parameter.
SnapManager command-line reference | 333
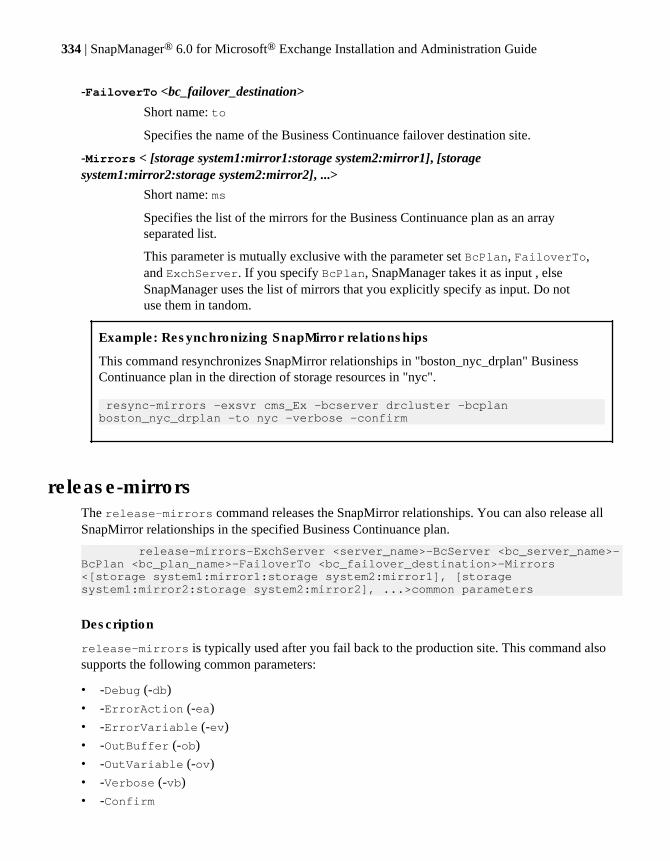
-FailoverTo <bc_failover_destination>
Short name: to
Specifies the name of the Business Continuance failover destination site.
-Mirrors < [storage system1:mirror1:storage system2:mirror1], [storagesystem1:mirror2:storage system2:mirror2], ...>
Short name: ms
Specifies the list of the mirrors for the Business Continuance plan as an arrayseparated list.
This parameter is mutually exclusive with the parameter set BcPlan, FailoverTo,and ExchServer. If you specify BcPlan, SnapManager takes it as input , elseSnapManager uses the list of mirrors that you explicitly specify as input. Do notuse them in tandom.
Example: Resynchronizing SnapMirror relationships
This command resynchronizes SnapMirror relationships in "boston_nyc_drplan" BusinessContinuance plan in the direction of storage resources in "nyc".
resync-mirrors -exsvr cms_Ex -bcserver drcluster -bcplan boston_nyc_drplan -to nyc -verbose -confirm
release-mirrorsThe release-mirrors command releases the SnapMirror relationships. You can also release allSnapMirror relationships in the specified Business Continuance plan.
release-mirrors-ExchServer <server_name>-BcServer <bc_server_name>-BcPlan <bc_plan_name>-FailoverTo <bc_failover_destination>-Mirrors <[storage system1:mirror1:storage system2:mirror1], [storage system1:mirror2:storage system2:mirror2], ...>common parameters
Description
release-mirrors is typically used after you fail back to the production site. This command alsosupports the following common parameters:
• -Debug (-db)• -ErrorAction (-ea)• -ErrorVariable (-ev)• -OutBuffer (-ob)• -OutVariable (-ov)• -Verbose (-vb)• -Confirm
334 | SnapManager® 6.0 for Microsoft® Exchange Installation and Administration Guide
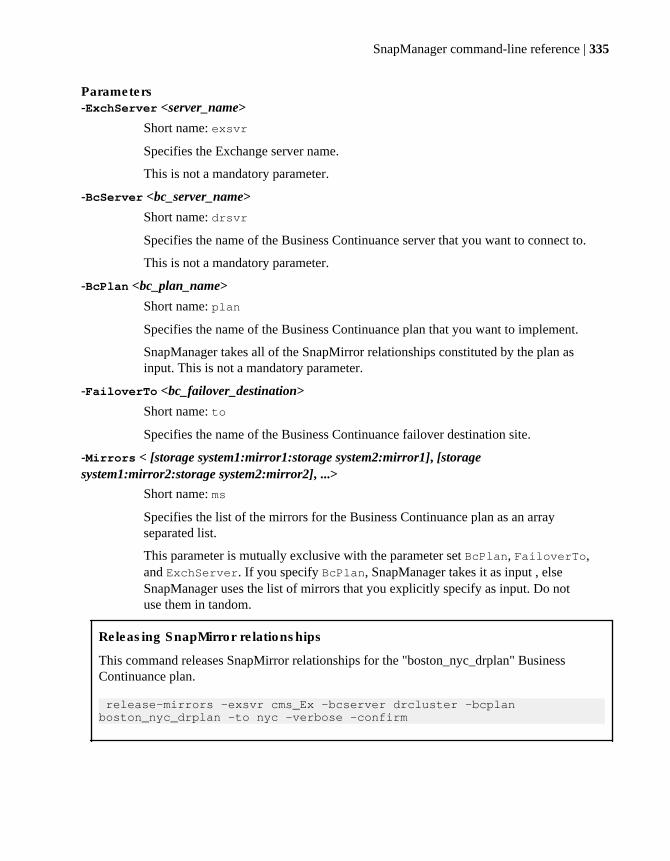
Parameters-ExchServer <server_name>
Short name: exsvr
Specifies the Exchange server name.
This is not a mandatory parameter.
-BcServer <bc_server_name>
Short name: drsvr
Specifies the name of the Business Continuance server that you want to connect to.
This is not a mandatory parameter.
-BcPlan <bc_plan_name>
Short name: plan
Specifies the name of the Business Continuance plan that you want to implement.
SnapManager takes all of the SnapMirror relationships constituted by the plan asinput. This is not a mandatory parameter.
-FailoverTo <bc_failover_destination>
Short name: to
Specifies the name of the Business Continuance failover destination site.
-Mirrors < [storage system1:mirror1:storage system2:mirror1], [storagesystem1:mirror2:storage system2:mirror2], ...>
Short name: ms
Specifies the list of the mirrors for the Business Continuance plan as an arrayseparated list.
This parameter is mutually exclusive with the parameter set BcPlan, FailoverTo,and ExchServer. If you specify BcPlan, SnapManager takes it as input , elseSnapManager uses the list of mirrors that you explicitly specify as input. Do notuse them in tandom.
Releasing SnapMirror relationships
This command releases SnapMirror relationships for the "boston_nyc_drplan" BusinessContinuance plan.
release-mirrors -exsvr cms_Ex -bcserver drcluster -bcplan boston_nyc_drplan -to nyc -verbose -confirm
SnapManager command-line reference | 335
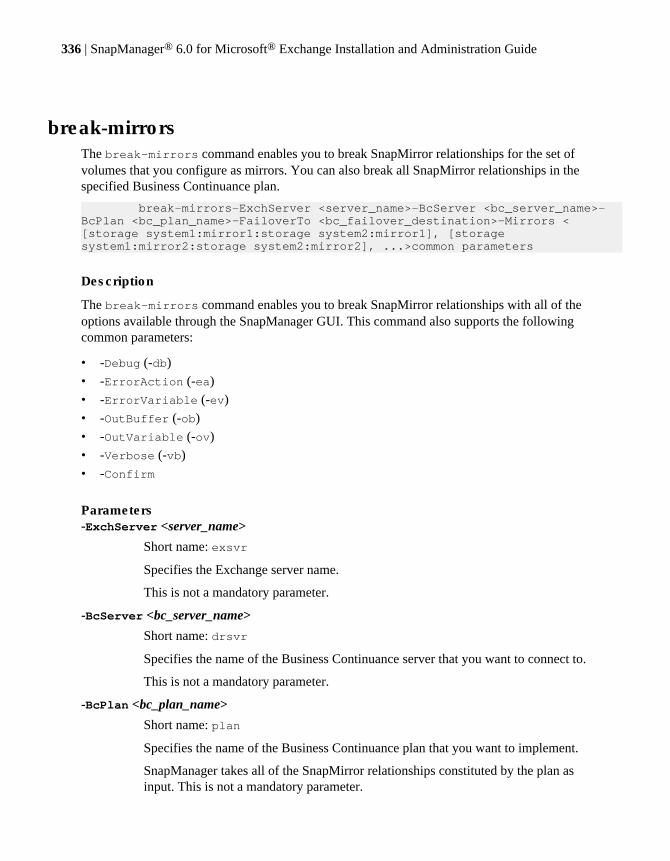
break-mirrorsThe break-mirrors command enables you to break SnapMirror relationships for the set ofvolumes that you configure as mirrors. You can also break all SnapMirror relationships in thespecified Business Continuance plan.
break-mirrors-ExchServer <server_name>-BcServer <bc_server_name>-BcPlan <bc_plan_name>-FailoverTo <bc_failover_destination>-Mirrors < [storage system1:mirror1:storage system2:mirror1], [storage system1:mirror2:storage system2:mirror2], ...>common parameters
Description
The break-mirrors command enables you to break SnapMirror relationships with all of theoptions available through the SnapManager GUI. This command also supports the followingcommon parameters:
• -Debug (-db)• -ErrorAction (-ea)• -ErrorVariable (-ev)• -OutBuffer (-ob)• -OutVariable (-ov)• -Verbose (-vb)• -Confirm
Parameters-ExchServer <server_name>
Short name: exsvr
Specifies the Exchange server name.
This is not a mandatory parameter.
-BcServer <bc_server_name>
Short name: drsvr
Specifies the name of the Business Continuance server that you want to connect to.
This is not a mandatory parameter.
-BcPlan <bc_plan_name>
Short name: plan
Specifies the name of the Business Continuance plan that you want to implement.
SnapManager takes all of the SnapMirror relationships constituted by the plan asinput. This is not a mandatory parameter.
336 | SnapManager® 6.0 for Microsoft® Exchange Installation and Administration Guide
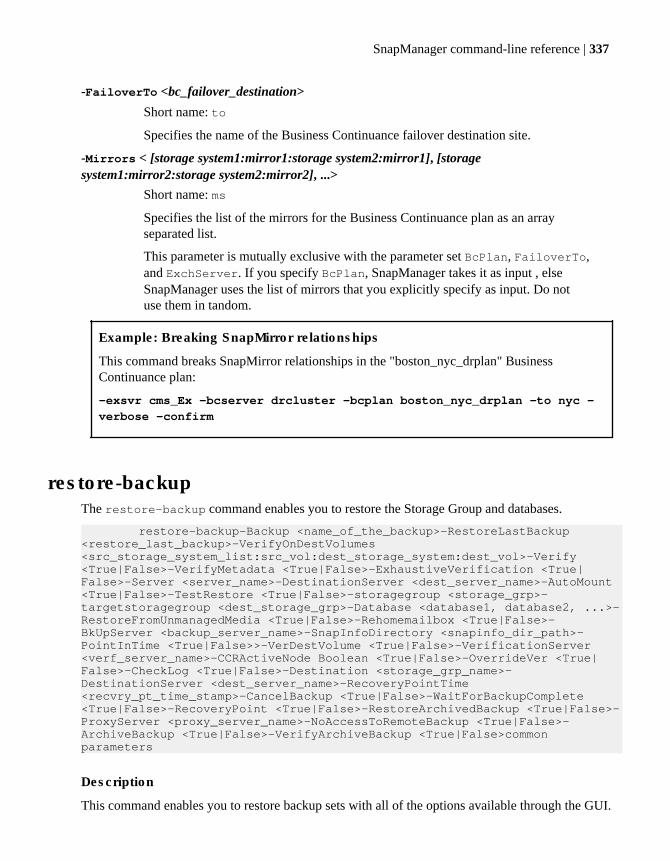
-FailoverTo <bc_failover_destination>
Short name: to
Specifies the name of the Business Continuance failover destination site.
-Mirrors < [storage system1:mirror1:storage system2:mirror1], [storagesystem1:mirror2:storage system2:mirror2], ...>
Short name: ms
Specifies the list of the mirrors for the Business Continuance plan as an arrayseparated list.
This parameter is mutually exclusive with the parameter set BcPlan, FailoverTo,and ExchServer. If you specify BcPlan, SnapManager takes it as input , elseSnapManager uses the list of mirrors that you explicitly specify as input. Do notuse them in tandom.
Example: Breaking SnapMirror relationships
This command breaks SnapMirror relationships in the "boston_nyc_drplan" BusinessContinuance plan:
-exsvr cms_Ex -bcserver drcluster -bcplan boston_nyc_drplan -to nyc -
verbose -confirm
restore-backupThe restore-backup command enables you to restore the Storage Group and databases.
restore-backup-Backup <name_of_the_backup>-RestoreLastBackup <restore_last_backup>-VerifyOnDestVolumes <src_storage_system_list:src_vol:dest_storage_system:dest_vol>-Verify <True|False>-VerifyMetadata <True|False>-ExhaustiveVerification <True|False>-Server <server_name>-DestinationServer <dest_server_name>-AutoMount <True|False>-TestRestore <True|False>-storagegroup <storage_grp>-targetstoragegroup <dest_storage_grp>-Database <database1, database2, ...>-RestoreFromUnmanagedMedia <True|False>-Rehomemailbox <True|False>-BkUpServer <backup_server_name>-SnapInfoDirectory <snapinfo_dir_path>-PointInTime <True|False>>-VerDestVolume <True|False>-VerificationServer <verf_server_name>-CCRActiveNode Boolean <True|False>-OverrideVer <True|False>-CheckLog <True|False>-Destination <storage_grp_name>-DestinationServer <dest_server_name>-RecoveryPointTime <recvry_pt_time_stamp>-CancelBackup <True|False>-WaitForBackupComplete <True|False>-RecoveryPoint <True|False>-RestoreArchivedBackup <True|False>-ProxyServer <proxy_server_name>-NoAccessToRemoteBackup <True|False>-ArchiveBackup <True|False>-VerifyArchiveBackup <True|False>common parameters
Description
This command enables you to restore backup sets with all of the options available through the GUI.
SnapManager command-line reference | 337

This command also supports the following common parameters:
• -Debug (-db)• -ErrorAction (-ea)• -ErrorVariable (-ev)• -OutBuffer (-ob)• -OutVariable (-ov)• -Verbose (-vb)• -Confirm
To learn more about common parameters, see help about_ubiquitous_parameters.
Parameters-Backup <name_of_the_backup>
Short form: bkup
The name of the backup set that you want to restore.
-RestoreLastBackup <restore_last_backup>
Short form: rstlast
Restores backup copies without specifying the name.
If you try to use Backup and RestoreLastBackup together, SnapManagerignores RestoreLastBackup and uses Backup during the restore operation.
A typical usage example of the RestoreLastBackup parameter is as follows:
restore-backup -restorelastbackup = 1 -backup = “backup name”
If the value of RestoreLastBackup is 1, SnapManager ignores this parameterand uses the Backup during the restore operation.
Note: The default value of this parameter is 0, which means that SnapManagerrestores the latest backup. If the value is 1, SnapManager restores the second-to-latest backup.
-VerifyOnDestVolumes <src_storage_system_list:src_vol:dest_storage_system:dest_vol>
Short form: vermirror
Overrides the existing SnapMirror relationships.
-Verify <True|False>
Short name: ver
Verifies the backed up SnapManager databases and transaction logs. -Verify is aswitch parameter.
-VerifyMetadata <True|False>
Short form: vermetadata
338 | SnapManager® 6.0 for Microsoft® Exchange Installation and Administration Guide
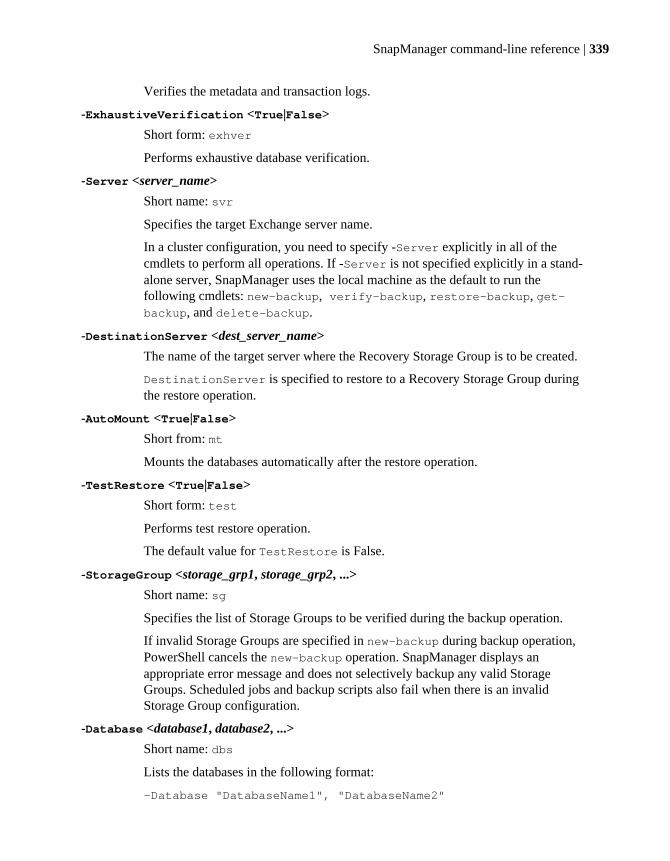
Verifies the metadata and transaction logs.
-ExhaustiveVerification <True|False>
Short form: exhver
Performs exhaustive database verification.
-Server <server_name>
Short name: svr
Specifies the target Exchange server name.
In a cluster configuration, you need to specify -Server explicitly in all of thecmdlets to perform all operations. If -Server is not specified explicitly in a stand-alone server, SnapManager uses the local machine as the default to run thefollowing cmdlets: new-backup, verify-backup, restore-backup, get-backup, and delete-backup.
-DestinationServer <dest_server_name>
The name of the target server where the Recovery Storage Group is to be created.
DestinationServer is specified to restore to a Recovery Storage Group duringthe restore operation.
-AutoMount <True|False>
Short from: mt
Mounts the databases automatically after the restore operation.
-TestRestore <True|False>
Short form: test
Performs test restore operation.
The default value for TestRestore is False.
-StorageGroup <storage_grp1, storage_grp2, ...>
Short name: sg
Specifies the list of Storage Groups to be verified during the backup operation.
If invalid Storage Groups are specified in new-backup during backup operation,PowerShell cancels the new-backup operation. SnapManager displays anappropriate error message and does not selectively backup any valid StorageGroups. Scheduled jobs and backup scripts also fail when there is an invalidStorage Group configuration.
-Database <database1, database2, ...>
Short name: dbs
Lists the databases in the following format:
-Database "DatabaseName1", "DatabaseName2"
SnapManager command-line reference | 339
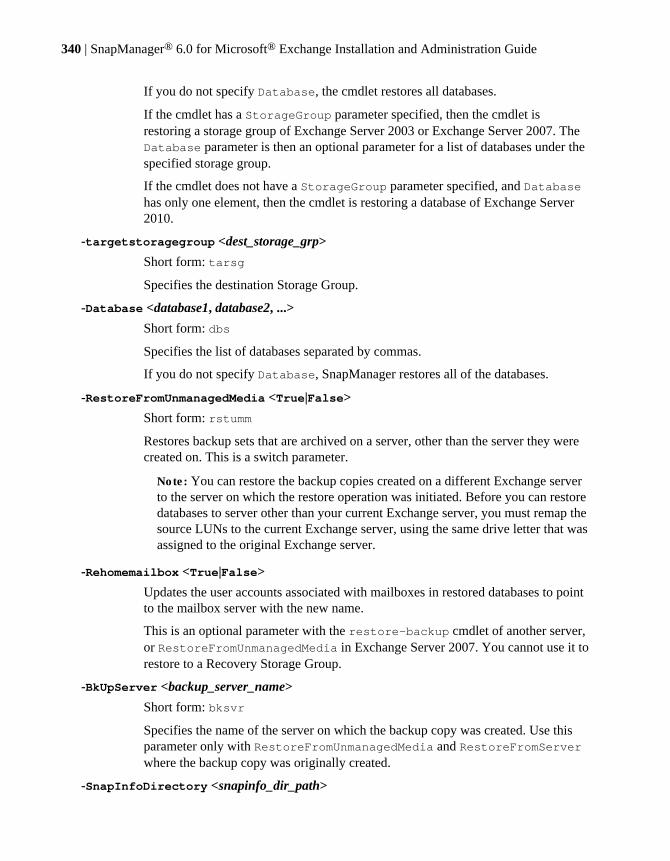
If you do not specify Database, the cmdlet restores all databases.
If the cmdlet has a StorageGroup parameter specified, then the cmdlet isrestoring a storage group of Exchange Server 2003 or Exchange Server 2007. TheDatabase parameter is then an optional parameter for a list of databases under thespecified storage group.
If the cmdlet does not have a StorageGroup parameter specified, and Databasehas only one element, then the cmdlet is restoring a database of Exchange Server2010.
-targetstoragegroup <dest_storage_grp>
Short form: tarsg
Specifies the destination Storage Group.
-Database <database1, database2, ...>
Short form: dbs
Specifies the list of databases separated by commas.
If you do not specify Database, SnapManager restores all of the databases.
-RestoreFromUnmanagedMedia <True|False>
Short form: rstumm
Restores backup sets that are archived on a server, other than the server they werecreated on. This is a switch parameter.
Note: You can restore the backup copies created on a different Exchange serverto the server on which the restore operation was initiated. Before you can restoredatabases to server other than your current Exchange server, you must remap thesource LUNs to the current Exchange server, using the same drive letter that wasassigned to the original Exchange server.
-Rehomemailbox <True|False>
Updates the user accounts associated with mailboxes in restored databases to pointto the mailbox server with the new name.
This is an optional parameter with the restore-backup cmdlet of another server,or RestoreFromUnmanagedMedia in Exchange Server 2007. You cannot use it torestore to a Recovery Storage Group.
-BkUpServer <backup_server_name>
Short form: bksvr
Specifies the name of the server on which the backup copy was created. Use thisparameter only with RestoreFromUnmanagedMedia and RestoreFromServerwhere the backup copy was originally created.
-SnapInfoDirectory <snapinfo_dir_path>
340 | SnapManager® 6.0 for Microsoft® Exchange Installation and Administration Guide
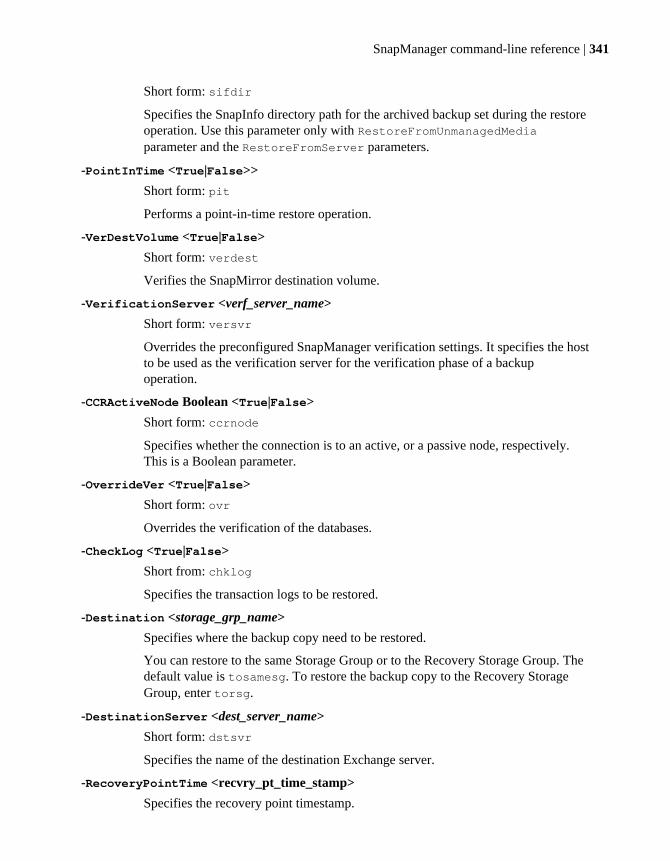
Short form: sifdir
Specifies the SnapInfo directory path for the archived backup set during the restoreoperation. Use this parameter only with RestoreFromUnmanagedMediaparameter and the RestoreFromServer parameters.
-PointInTime <True|False>>
Short form: pit
Performs a point-in-time restore operation.
-VerDestVolume <True|False>
Short form: verdest
Verifies the SnapMirror destination volume.
-VerificationServer <verf_server_name>
Short form: versvr
Overrides the preconfigured SnapManager verification settings. It specifies the hostto be used as the verification server for the verification phase of a backupoperation.
-CCRActiveNode Boolean <True|False>
Short form: ccrnode
Specifies whether the connection is to an active, or a passive node, respectively.This is a Boolean parameter.
-OverrideVer <True|False>
Short form: ovr
Overrides the verification of the databases.
-CheckLog <True|False>
Short from: chklog
Specifies the transaction logs to be restored.
-Destination <storage_grp_name>
Specifies where the backup copy need to be restored.
You can restore to the same Storage Group or to the Recovery Storage Group. Thedefault value is tosamesg. To restore the backup copy to the Recovery StorageGroup, enter torsg.
-DestinationServer <dest_server_name>
Short form: dstsvr
Specifies the name of the destination Exchange server.
-RecoveryPointTime <recvry_pt_time_stamp>
Specifies the recovery point timestamp.
SnapManager command-line reference | 341
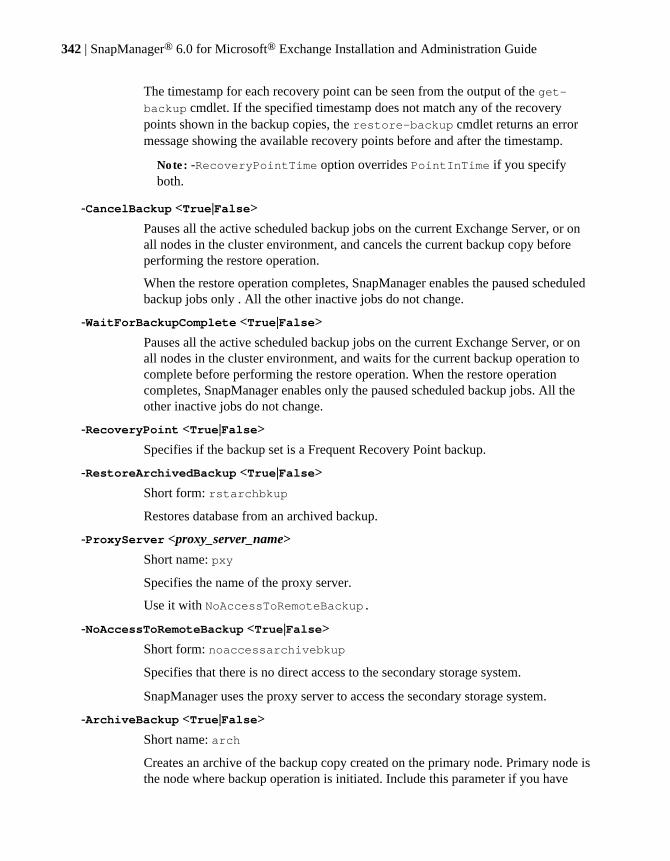
The timestamp for each recovery point can be seen from the output of the get-backup cmdlet. If the specified timestamp does not match any of the recoverypoints shown in the backup copies, the restore-backup cmdlet returns an errormessage showing the available recovery points before and after the timestamp.
Note: -RecoveryPointTime option overrides PointInTime if you specifyboth.
-CancelBackup <True|False>
Pauses all the active scheduled backup jobs on the current Exchange Server, or onall nodes in the cluster environment, and cancels the current backup copy beforeperforming the restore operation.
When the restore operation completes, SnapManager enables the paused scheduledbackup jobs only . All the other inactive jobs do not change.
-WaitForBackupComplete <True|False>
Pauses all the active scheduled backup jobs on the current Exchange Server, or onall nodes in the cluster environment, and waits for the current backup operation tocomplete before performing the restore operation. When the restore operationcompletes, SnapManager enables only the paused scheduled backup jobs. All theother inactive jobs do not change.
-RecoveryPoint <True|False>
Specifies if the backup set is a Frequent Recovery Point backup.
-RestoreArchivedBackup <True|False>
Short form: rstarchbkup
Restores database from an archived backup.
-ProxyServer <proxy_server_name>
Short name: pxy
Specifies the name of the proxy server.
Use it with NoAccessToRemoteBackup.
-NoAccessToRemoteBackup <True|False>
Short form: noaccessarchivebkup
Specifies that there is no direct access to the secondary storage system.
SnapManager uses the proxy server to access the secondary storage system.
-ArchiveBackup <True|False>
Short name: arch
Creates an archive of the backup copy created on the primary node. Primary node isthe node where backup operation is initiated. Include this parameter if you have
342 | SnapManager® 6.0 for Microsoft® Exchange Installation and Administration Guide
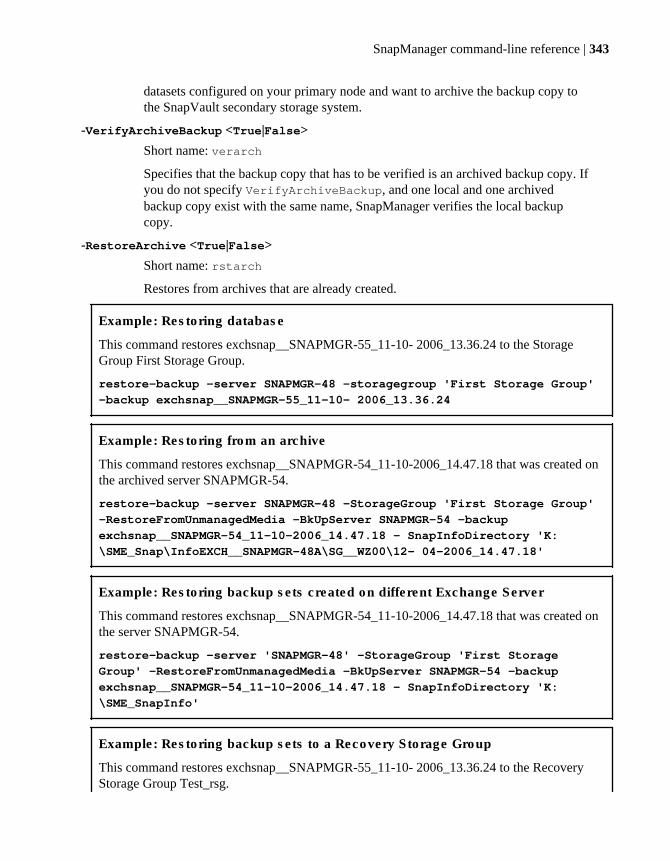
datasets configured on your primary node and want to archive the backup copy tothe SnapVault secondary storage system.
-VerifyArchiveBackup <True|False>
Short name: verarch
Specifies that the backup copy that has to be verified is an archived backup copy. Ifyou do not specify VerifyArchiveBackup, and one local and one archivedbackup copy exist with the same name, SnapManager verifies the local backupcopy.
-RestoreArchive <True|False>
Short name: rstarch
Restores from archives that are already created.
Example: Restoring database
This command restores exchsnap__SNAPMGR-55_11-10- 2006_13.36.24 to the StorageGroup First Storage Group.
restore-backup -server SNAPMGR-48 -storagegroup 'First Storage Group'
-backup exchsnap__SNAPMGR-55_11-10- 2006_13.36.24
Example: Restoring from an archive
This command restores exchsnap__SNAPMGR-54_11-10-2006_14.47.18 that was created onthe archived server SNAPMGR-54.
restore-backup -server SNAPMGR-48 -StorageGroup 'First Storage Group'
-RestoreFromUnmanagedMedia -BkUpServer SNAPMGR-54 -backup
exchsnap__SNAPMGR-54_11-10-2006_14.47.18 - SnapInfoDirectory 'K:
\SME_Snap\InfoEXCH__SNAPMGR-48A\SG__WZ00\12- 04-2006_14.47.18'
Example: Restoring backup sets created on different Exchange Server
This command restores exchsnap__SNAPMGR-54_11-10-2006_14.47.18 that was created onthe server SNAPMGR-54.
restore-backup -server 'SNAPMGR-48' -StorageGroup 'First Storage
Group' -RestoreFromUnmanagedMedia -BkUpServer SNAPMGR-54 -backup
exchsnap__SNAPMGR-54_11-10-2006_14.47.18 - SnapInfoDirectory 'K:
\SME_SnapInfo'
Example: Restoring backup sets to a Recovery Storage Group
This command restores exchsnap__SNAPMGR-55_11-10- 2006_13.36.24 to the RecoveryStorage Group Test_rsg.
SnapManager command-line reference | 343
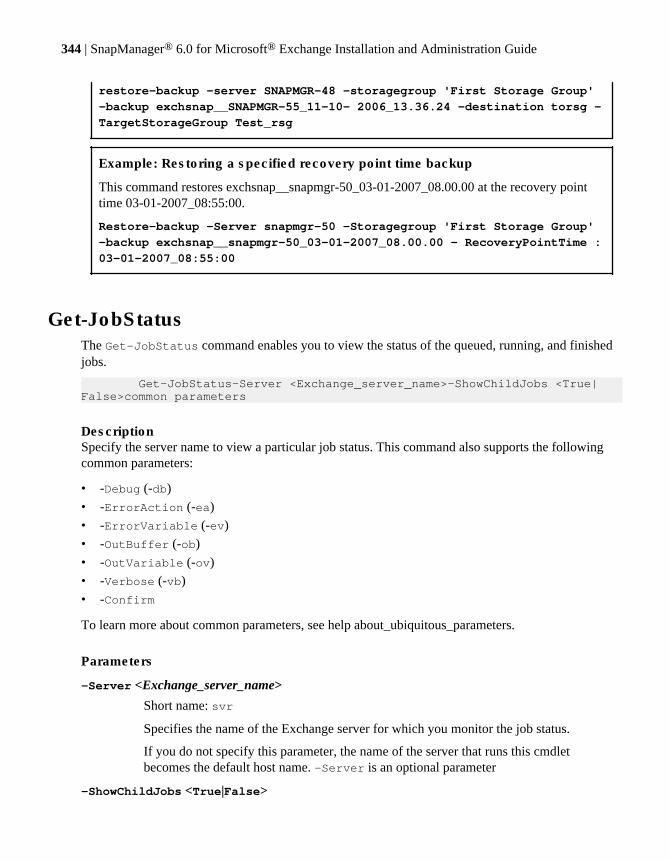
restore-backup -server SNAPMGR-48 -storagegroup 'First Storage Group'
-backup exchsnap__SNAPMGR-55_11-10- 2006_13.36.24 -destination torsg -
TargetStorageGroup Test_rsg
Example: Restoring a specified recovery point time backup
This command restores exchsnap__snapmgr-50_03-01-2007_08.00.00 at the recovery pointtime 03-01-2007_08:55:00.
Restore-backup -Server snapmgr-50 -Storagegroup 'First Storage Group'
-backup exchsnap__snapmgr-50_03-01-2007_08.00.00 - RecoveryPointTime :
03-01-2007_08:55:00
Get-JobStatusThe Get-JobStatus command enables you to view the status of the queued, running, and finishedjobs.
Get-JobStatus-Server <Exchange_server_name>-ShowChildJobs <True|False>common parameters
DescriptionSpecify the server name to view a particular job status. This command also supports the followingcommon parameters:
• -Debug (-db)• -ErrorAction (-ea)• -ErrorVariable (-ev)• -OutBuffer (-ob)• -OutVariable (-ov)• -Verbose (-vb)• -Confirm
To learn more about common parameters, see help about_ubiquitous_parameters.
Parameters
-Server <Exchange_server_name>
Short name: svr
Specifies the name of the Exchange server for which you monitor the job status.
If you do not specify this parameter, the name of the server that runs this cmdletbecomes the default host name. -Server is an optional parameter
-ShowChildJobs <True|False>
344 | SnapManager® 6.0 for Microsoft® Exchange Installation and Administration Guide
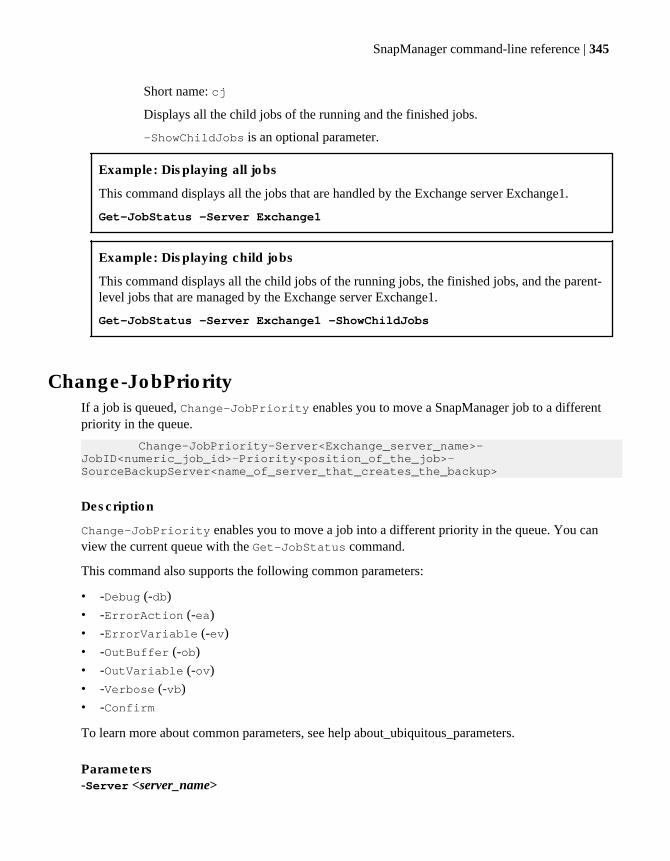
Short name: cj
Displays all the child jobs of the running and the finished jobs.
-ShowChildJobs is an optional parameter.
Example: Displaying all jobs
This command displays all the jobs that are handled by the Exchange server Exchange1.
Get-JobStatus -Server Exchange1
Example: Displaying child jobs
This command displays all the child jobs of the running jobs, the finished jobs, and the parent-level jobs that are managed by the Exchange server Exchange1.
Get-JobStatus -Server Exchange1 -ShowChildJobs
Change-JobPriorityIf a job is queued, Change-JobPriority enables you to move a SnapManager job to a differentpriority in the queue.
Change-JobPriority-Server<Exchange_server_name>-JobID<numeric_job_id>-Priority<position_of_the_job>-SourceBackupServer<name_of_server_that_creates_the_backup>
Description
Change-JobPriority enables you to move a job into a different priority in the queue. You canview the current queue with the Get-JobStatus command.
This command also supports the following common parameters:
• -Debug (-db)• -ErrorAction (-ea)• -ErrorVariable (-ev)• -OutBuffer (-ob)• -OutVariable (-ov)• -Verbose (-vb)• -Confirm
To learn more about common parameters, see help about_ubiquitous_parameters.
Parameters-Server <server_name>
SnapManager command-line reference | 345
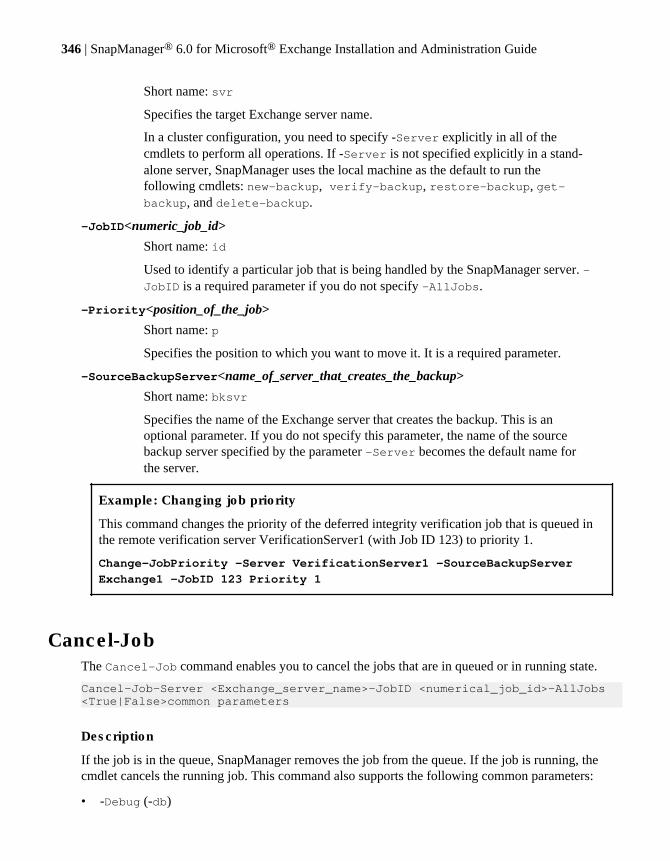
Short name: svr
Specifies the target Exchange server name.
In a cluster configuration, you need to specify -Server explicitly in all of thecmdlets to perform all operations. If -Server is not specified explicitly in a stand-alone server, SnapManager uses the local machine as the default to run thefollowing cmdlets: new-backup, verify-backup, restore-backup, get-backup, and delete-backup.
-JobID<numeric_job_id>
Short name: id
Used to identify a particular job that is being handled by the SnapManager server. -JobID is a required parameter if you do not specify -AllJobs.
-Priority<position_of_the_job>
Short name: p
Specifies the position to which you want to move it. It is a required parameter.
-SourceBackupServer<name_of_server_that_creates_the_backup>
Short name: bksvr
Specifies the name of the Exchange server that creates the backup. This is anoptional parameter. If you do not specify this parameter, the name of the sourcebackup server specified by the parameter -Server becomes the default name forthe server.
Example: Changing job priority
This command changes the priority of the deferred integrity verification job that is queued inthe remote verification server VerificationServer1 (with Job ID 123) to priority 1.
Change-JobPriority -Server VerificationServer1 -SourceBackupServer
Exchange1 -JobID 123 Priority 1
Cancel-JobThe Cancel-Job command enables you to cancel the jobs that are in queued or in running state.
Cancel-Job-Server <Exchange_server_name>-JobID <numerical_job_id>-AllJobs <True|False>common parameters
Description
If the job is in the queue, SnapManager removes the job from the queue. If the job is running, thecmdlet cancels the running job. This command also supports the following common parameters:
• -Debug (-db)
346 | SnapManager® 6.0 for Microsoft® Exchange Installation and Administration Guide
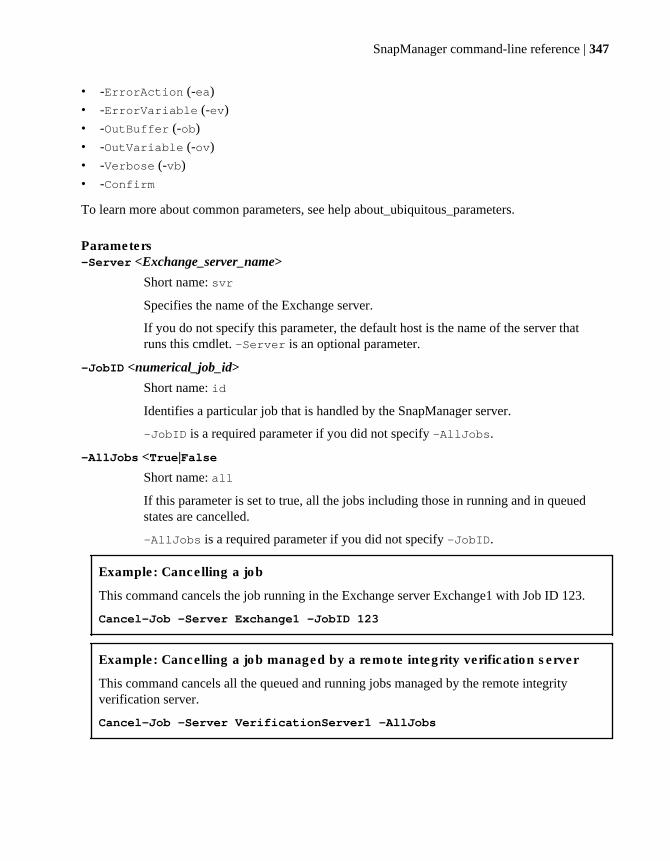
• -ErrorAction (-ea)• -ErrorVariable (-ev)• -OutBuffer (-ob)• -OutVariable (-ov)• -Verbose (-vb)• -Confirm
To learn more about common parameters, see help about_ubiquitous_parameters.
Parameters-Server <Exchange_server_name>
Short name: svr
Specifies the name of the Exchange server.
If you do not specify this parameter, the default host is the name of the server thatruns this cmdlet. -Server is an optional parameter.
-JobID <numerical_job_id>
Short name: id
Identifies a particular job that is handled by the SnapManager server.
-JobID is a required parameter if you did not specify -AllJobs.
-AllJobs <True|False
Short name: all
If this parameter is set to true, all the jobs including those in running and in queuedstates are cancelled.
-AllJobs is a required parameter if you did not specify -JobID.
Example: Cancelling a job
This command cancels the job running in the Exchange server Exchange1 with Job ID 123.
Cancel-Job -Server Exchange1 -JobID 123
Example: Cancelling a job managed by a remote integrity verification server
This command cancels all the queued and running jobs managed by the remote integrityverification server.
Cancel-Job -Server VerificationServer1 -AllJobs
SnapManager command-line reference | 347
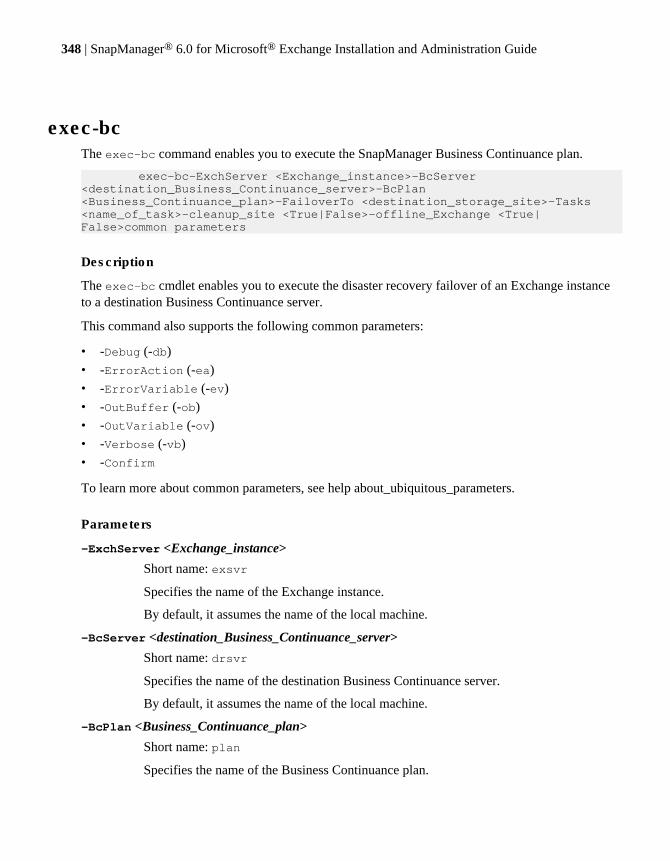
exec-bcThe exec-bc command enables you to execute the SnapManager Business Continuance plan.
exec-bc-ExchServer <Exchange_instance>-BcServer <destination_Business_Continuance_server>-BcPlan <Business_Continuance_plan>-FailoverTo <destination_storage_site>-Tasks <name_of_task>-cleanup_site <True|False>-offline_Exchange <True|False>common parameters
Description
The exec-bc cmdlet enables you to execute the disaster recovery failover of an Exchange instanceto a destination Business Continuance server.
This command also supports the following common parameters:
• -Debug (-db)• -ErrorAction (-ea)• -ErrorVariable (-ev)• -OutBuffer (-ob)• -OutVariable (-ov)• -Verbose (-vb)• -Confirm
To learn more about common parameters, see help about_ubiquitous_parameters.
Parameters
-ExchServer <Exchange_instance>
Short name: exsvr
Specifies the name of the Exchange instance.
By default, it assumes the name of the local machine.
-BcServer <destination_Business_Continuance_server>
Short name: drsvr
Specifies the name of the destination Business Continuance server.
By default, it assumes the name of the local machine.
-BcPlan <Business_Continuance_plan>
Short name: plan
Specifies the name of the Business Continuance plan.
348 | SnapManager® 6.0 for Microsoft® Exchange Installation and Administration Guide
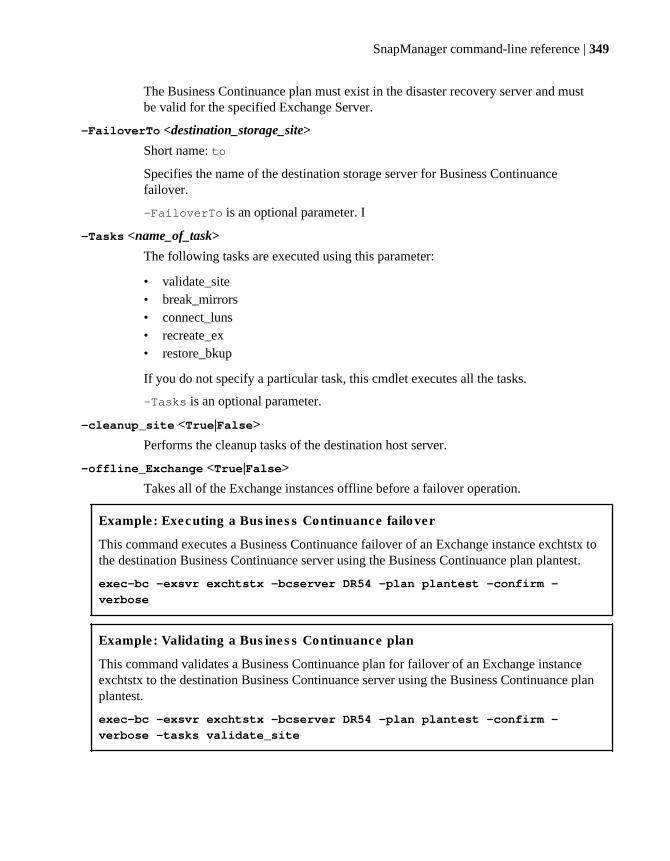
The Business Continuance plan must exist in the disaster recovery server and mustbe valid for the specified Exchange Server.
-FailoverTo <destination_storage_site>
Short name: to
Specifies the name of the destination storage server for Business Continuancefailover.
-FailoverTo is an optional parameter. I
-Tasks <name_of_task>
The following tasks are executed using this parameter:
• validate_site• break_mirrors• connect_luns• recreate_ex• restore_bkup
If you do not specify a particular task, this cmdlet executes all the tasks.
-Tasks is an optional parameter.
-cleanup_site <True|False>
Performs the cleanup tasks of the destination host server.
-offline_Exchange <True|False>
Takes all of the Exchange instances offline before a failover operation.
Example: Executing a Business Continuance failover
This command executes a Business Continuance failover of an Exchange instance exchtstx tothe destination Business Continuance server using the Business Continuance plan plantest.
exec-bc -exsvr exchtstx -bcserver DR54 -plan plantest -confirm -
verbose
Example: Validating a Business Continuance plan
This command validates a Business Continuance plan for failover of an Exchange instanceexchtstx to the destination Business Continuance server using the Business Continuance planplantest.
exec-bc -exsvr exchtstx -bcserver DR54 -plan plantest -confirm -
verbose -tasks validate_site
SnapManager command-line reference | 349
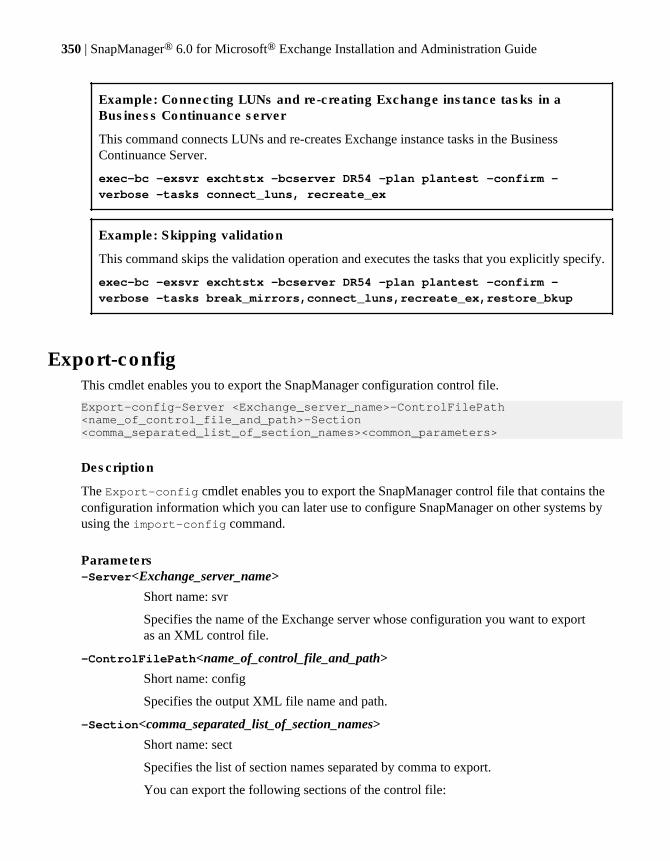
Example: Connecting LUNs and re-creating Exchange instance tasks in aBusiness Continuance server
This command connects LUNs and re-creates Exchange instance tasks in the BusinessContinuance Server.
exec-bc -exsvr exchtstx -bcserver DR54 -plan plantest -confirm -
verbose -tasks connect_luns, recreate_ex
Example: Skipping validation
This command skips the validation operation and executes the tasks that you explicitly specify.
exec-bc -exsvr exchtstx -bcserver DR54 -plan plantest -confirm -
verbose -tasks break_mirrors,connect_luns,recreate_ex,restore_bkup
Export-configThis cmdlet enables you to export the SnapManager configuration control file.
Export-config-Server <Exchange_server_name>-ControlFilePath <name_of_control_file_and_path>-Section <comma_separated_list_of_section_names><common_parameters>
Description
The Export-config cmdlet enables you to export the SnapManager control file that contains theconfiguration information which you can later use to configure SnapManager on other systems byusing the import-config command.
Parameters-Server<Exchange_server_name>
Short name: svr
Specifies the name of the Exchange server whose configuration you want to exportas an XML control file.
-ControlFilePath<name_of_control_file_and_path>
Short name: config
Specifies the output XML file name and path.
-Section<comma_separated_list_of_section_names>
Short name: sect
Specifies the list of section names separated by comma to export.
You can export the following sections of the control file:
350 | SnapManager® 6.0 for Microsoft® Exchange Installation and Administration Guide
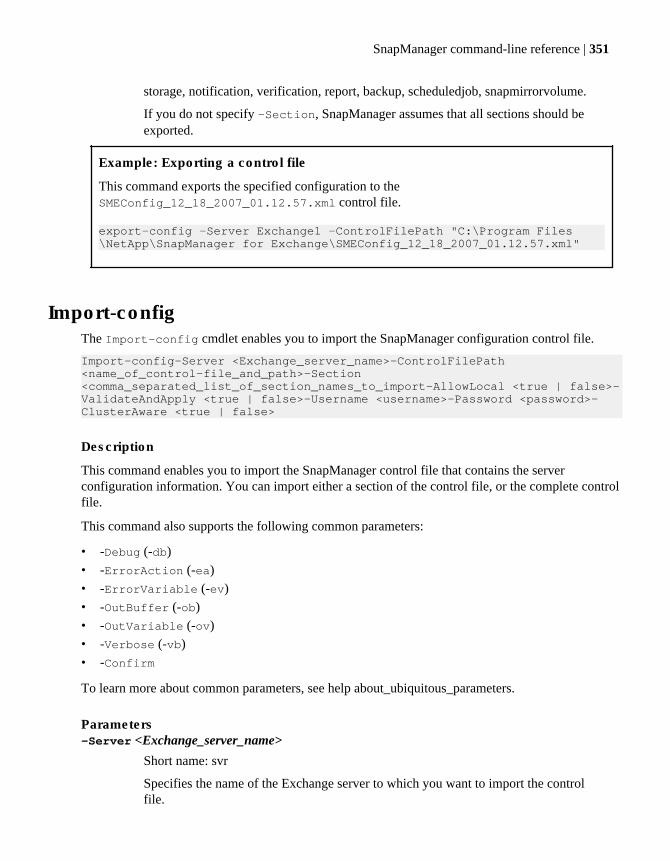
storage, notification, verification, report, backup, scheduledjob, snapmirrorvolume.
If you do not specify -Section, SnapManager assumes that all sections should beexported.
Example: Exporting a control file
This command exports the specified configuration to theSMEConfig_12_18_2007_01.12.57.xml control file.
export-config -Server Exchange1 -ControlFilePath "C:\Program Files\NetApp\SnapManager for Exchange\SMEConfig_12_18_2007_01.12.57.xml"
Import-configThe Import-config cmdlet enables you to import the SnapManager configuration control file.
Import-config-Server <Exchange_server_name>-ControlFilePath <name_of_control-file_and_path>-Section <comma_separated_list_of_section_names_to_import-AllowLocal <true | false>-ValidateAndApply <true | false>-Username <username>-Password <password>-ClusterAware <true | false>
Description
This command enables you to import the SnapManager control file that contains the serverconfiguration information. You can import either a section of the control file, or the complete controlfile.
This command also supports the following common parameters:
• -Debug (-db)• -ErrorAction (-ea)• -ErrorVariable (-ev)• -OutBuffer (-ob)• -OutVariable (-ov)• -Verbose (-vb)• -Confirm
To learn more about common parameters, see help about_ubiquitous_parameters.
Parameters-Server <Exchange_server_name>
Short name: svr
Specifies the name of the Exchange server to which you want to import the controlfile.
SnapManager command-line reference | 351
-ControlFilePath <name_of_control-file_and_path>
Short name: config
Specifies the location of the control file to import.
Specify -ControlFilePath with the control file name. If the control file is not inthe current directory, the full file name path must be given.
-Section <comma_separated_list_of_section_names_to_import>
Short name: sect
Specifies the comma-separated list of names of sections to import.
You can import the following sections from the control file:
storage, notification, verification, report, backup, scheduledjob, snapmirrorvolume.
If you do not specify particular sections, SnapManager imports all sections in thecontrol file.
-AllowLocal <true | false>
Short name: tolocal
Migrates the databases to the local disk.
-ValidateAndApply <true | false>
Short name: apply
This is an optional parameter. By default, the value is false, that indicates toperform only validation. If the value is set to true, it indicates to perform validationand apply it if the validation is successful.
-Username <username>
Short name: usr
Verifies the user name before creating a scheduled job.
-Password<password>
Short name: pwd
Verifies the user credentials before creating a scheduled job.
-Clusteraware <True|False>
Short form: cl
Assumes significance only when scheduling jobs in cluster configurations, byfacilitating scheduling the same job in multiple cluster nodes to improve faulttolerance.
In the case of Single Copy Cluster (SCC), if a job is scheduled with -Clusteraware, the job runs only if the host in which it is scheduled is the activenode of the cluster.
352 | SnapManager® 6.0 for Microsoft® Exchange Installation and Administration Guide
In the case of Cluster Continuous Replica (CCR), the processing of -Clusteraware depends on whether the host in which it is scheduled is an activeor passive node and the value of -CCRActiveNode. The job runs if the host is aCCR active node and the job targets it with -CCRActiveNode as true. If the host isa CCR passive node, the job runs if the job targets the host with -CCRActiveNodefalse.
Example: Importing sections of the control file
This command imports the specified sections from the control file sme_config.xml toExchange server Exchange1.
import-config -Server Exchange1 -ControlFilePath "C:\Program Files\NetApp\SnapManager for Exchange\sme_config.xml" -Section "storage,notification,verification,report,backup,scheduledjob,snapmirrorvolume" -ValidateAndApply
SnapManager command-line reference | 353

IndexA
Actions pane 28Activation Preference Number 144Active databases 142age-based Snapshot copy deletion 203application
settings 275application datasets
defined 263application settings
accessing 275archives 270archiving
Exchange Backup Agent 253, 254automatic 255Exchange Backup Agent
example 254guidelines 245methods 246NDMP and dump
evaluation 248Windows backup utility
evaluation 251example 251
automatic deletion of backups 131, 205automatic event notification
configuring 300AutoSupport
configuring 300
B
back upWindows environment 228
backup copiesrestoring from different servers 193
backup copyunmounting 202
backup management groupchanging 155
backup modelcentralized 254
backup naming conventionconfiguring 288
backup sets
names 121backup settings
XML schema 308backup tasks 122break-mirrors 336Business Continuance
failover prerequisites 236executing the plan 237failback prerequisites 240impact of active directory replication lag 234plan creation
prerequisites 230SnapManager control file
importing or exporting 107System configuration 232validating the plan 236
busy Snapshot copy 130, 211
C
Cancel-Job command 346, 347CCR
restoring 181CCR backup set
behavior 180CCR replica database 145CCR server
connecting 71CCR-enabled databases backups 145CCR-enabled Storage Group
corruption 183centralized backup model 254Change-JobPriority command 345checksum verification 126ChkSgFiles integrity verification library 286ChkSgFiles.dll 126cleaning up after
mailbox data 202cluster continuous replication databases
migration of 111command
specifying 256concurrent verification 221, 222configuration
migrating 116, 117Configuration wizard
Index | 355
migrating Exchange datalocal disk to LUN 94, 95LUN to local disk 94, 95LUN to LUN 94, 95
migrating Exchange databases 94settings 96when to use 95, 96
Configuration Wizard 77conformance status 270Continuous Cluster Replica (CCR) 50control file
exporting 107XML schema 303
conventional backup processes 28
D
dashboardview 72, 73
Dashboard view 28data configuration plan 91data store configurations 78, 79data store rules 77database
automatic unmounting 295changing location 103migration 277migration of 99restore 161restoring
Restore window 172Restore Wizard 171
restoring Frequent Recovery Point 174restoring LCR replica Storage Group 178verification
server 278throttling 282
Database Availability Group (DAG) 32, 73, 104, 107,114, 115, 136, 142, 158, 176–178, 197, 216
Database Filter 142database migration 75database path
viewing 103database seeding
LCR (Local Continuous Replication ) 110Local Continuous Replication (LCR) 110
database verificationconcurrent 221, 222deferred 127load management 127
scheduling 153settings 152
databasesrestoring multiple 192
datasetconfiguring 266creating 268functionality 264limitations 266naming 268
dataset and SnapVault integrationprerequisites 265
dataset integration with SnapVault 263dataset protection policy 104datasets
editing 269general concepts 263
datasets concepts 264, 265default server
connecting 70deferred database integrity verification 272Deferred database verification 128delete-backup command 326, 327deleted item retention 134disaster recovery
preparationrecommendations 226
preparations 226prerequisites 226required guides 225
Disaster RecoverySnapManager control file
importing or exporting 107drive letter 116Drive letter limitations 81drive letters 127dump command 247
E
e-mail notificationconfiguring 300
Eseutil consistency checker 286events
configuring notification 300Exchange
adding servers 70permission level 35Service identity account 36
Exchange 2010 114
356 | SnapManager® 6.0 for Microsoft® Exchange Installation and Administration Guide
Exchange and SnapManager componentsplacement of 97viewing placement of 98
Exchange Backup Agent 252Exchange backups
automatic deletion 296Exchange configuration requirements 75, 76Exchange configurations 86Exchange data
configuration 93, 98, 99migration 93, 98, 99moving back to local disk 60moving offsite 230
Exchange database migrationUsing the Configuration wizard to perform 94
Exchange page zeroing 134Exchange server
configuring the control file 108default server 277LCR (Local Continuous Replication)
configuration prerequisites 110Local Continuous Replication (LCR)
configuration prerequisites 110recovering 228
Exchange server 2010 104Exchange Server 2010 107Exchange Service
identity account 36permissions 35
Exchange System Manager 95, 96, 133Exchange virtual server 167Exchange Writer 144Exchanger Server 2010 115exec-bc command 348Exhaustive transaction log sequence checks 165explicit deletion 205external backups 28
F
failing backBusiness Continuance 241
flexible volumesautomatic expansion 291
FlexVol volumesautomatic expansion 291
fractional space reservationconfiguring policy 292, 293monitoring 297policies
configuring 293status data 297viewing current data 297
fractional space reservation policiesmanaging Exchange data 295
fractional space reservation policydefault 292settings 292, 293
Fractional space reservation policy settings 292, 293fractional space reserve 291Frequent Recovery Point
backup 158clustered configurations 157operations 157reports 158restoration 158verification 158working 157
G
get-backup command 328, 329Get-JobStatus command 344get-mirrors 331, 332
I
individual databasemove to LUN 102
individual database restoration 81, 88, 89installation
interactive 44unattended 44
installing SnapManagerin unattended mode 47Windows cluster 50
integrity verificationdestination SnapMirror volume 127, 128remote 220requirements 217troubleshooting 217
IP addressesmultiple for storage system 38
J
job-specific parameters 152JobID parameter 345
Index | 357
LLCR (Local Continuous Replication) enabled database
migration 109LCR replicas
restore operation 178LCR-enabled database backups 144LCR-enabled Storage Group
corruption 180legacy scheduled jobs 58licenses
applying 34requirements 34
licensingPer Server 33Per Storage system 33
limitationsRecovery Storage Group 184
local backup protection 270local continuous replication
database seeding 110Local Continuous Replication (LCR) enabled database
migration 109log database signature 165LUN Clone Split Restore method 166LUN clone split status
verifying 166LUNs
disconnecting 192migrating to mountpoints 117write operations stopped 291
Mmailbox data
cleaning up after 202restoring 201
mailbox database 115mailbox databases 114mailboxes
restoring from archive 171MCSC clusters
restore restriction 260message tracking 79migrating 114migration 115Migration 114mount options 170mounted volume 82–84Mounted volume restrictions 82mountpoint 116
mountpointsmigrating LUNs 117
move group operation 167MSCS 79MSCS clusters
report directory location 260multiple FRPs 159multiple SnapInfo directories 86multiple-volume backup 120
N
NDMP and dump commandexample 248
NDMP method 247Net.Tcp port sharing service 180new-backup command 312, 313Non-exhaustive transaction log sequence checks 166notification
XML schema 305NTFS hard links 84, 85NTFS volume mount points 80NTFS volume mountpoints 80
P
page zeroing 134partial backup 120Passive database copies 142Per Storage System license 34planning backups 125point-in-time restore 163policies
fractional space reservation 291Priority parameter 345problem launching scripts 257production database 145production Exchange server 129production site
maintenance 225Protection Manager 264, 265, 268protection policies
overview 263provisioning policies
overview 263
Q
quantity-based Snapshot copy deletion 203
358 | SnapManager® 6.0 for Microsoft® Exchange Installation and Administration Guide
queue locationSMTP and MTA 98, 99
R
Recover Storage Groupdisconnecting LUNs
Exchange Server 2003 192recovering
mailbox data 201Recovery Database
delete 199Recovery Storage Group
adding databaseExchange Server 2003 191
adding databasesExchange Server 2007 187
creatingExchange Server 2003 191
destroyingExchange Server 2007 189
Exchange Server 2003 189Exchange Server 2007 187limitations 184mounting databases
Exchange Server 2007 188overview 183restore 189restoring
Exchange 2007 184multiple databases 192unverified backup copy 193
reinstallationinteractive 64unattended 64
reinstalling SnapManagerin unattended mode 66
remote administrationserver requirements 40
remote backuprestoring 272
remote backup retention 271remote backups 270remote database verification 127, 128remote verification
prerequisites 279server requirements 40working 280
remote verification server 129report directories
Windows cluster 98, 99report directory
changing 260clustered configuration 261sharing
account permissions 36XML schema 307
reportsDAG 259deleting 262printing 261viewing 261
requirementsremote administration server 40remote verification server 40
reseeding 178restore
backup copiesdifferent server 194
backup sets from unmanaged media 195decisions 168–170destination 169, 170live Exchange virtual server cluster 167mailbox data 201point-in-time 163Snapshot copies 164type 169, 170up-to-the-minute 163verification options 169, 170Windows cluster 167working 162
restore from different server 177restore operation
Frequent Recovery Point 174guidelines 168LCR replicas 178multiple databases 192required components 227Restore window method 172Restore wizard method 171unverified copies 193
restore processCCR replicas
reseeding requirements 181primary database
reseeding requirements 181restore Snapshot copies
explicit deletion 210restore time
decreasing 165
Index | 359

restore-backup command 337, 338restoring 201Results pane 28rstrsnap__ files
deleting 164Run Command After Operation option
command arguments 255configuring 289
S
scheduled jobs 73Scope pane 28scripts
launching from UNC paths 257server cluster mountpoints 80Server parameter 345settings
application 275SFSR (Single-File SnapRestore) method 167single copy cluster 50Single Mailbox Recovery (SMBR) 201, 202Single-File SnapRestore (SFSR) method 167SMTP and MTA
queue location 98, 99SnapDrive
version verification 69SnapDrive for Windows 32SnapInfo directory 123SnapInfo directory Snapshot copy names
location 120name 120subdirectory 120
SnapInfo filesmigration of 99
SnapInfo Snapshot copiesexplicit deletion 208SnapInfo Snapshot copies 208
SnapManageradministering 70builds 44command-line reference 311configuration and version check 69coordination with Protection Manager 268installation 43starting 69–71upgrade 43
SnapManager Backup 119SnapManager control file
import or export
Business continuance 107Disaster Recovery 107
SnapManager for Exchange PowerShelllaunching 312
SnapManager installationinteractive 45
SnapManager reinstallationconsiderations 64interactive 65
SnapManager snap-in 28, 107, 259SnapManager software license agreement 49SnapManager uninstallation
interactive 60prerequisites 59unattended 61
SnapManager upgradefractional space reserve monitoring 55interactive mode 56preparation 53unattended mode 56
SnapManager upgrade path 55SnapMirror
destination volumes 216documentation 214
SnapMirror relationshipXML schema 308
SnapMirror replicationsmanaging 243
Snapshot copiesautomatic deletion 291
Snapshot copies per volume 131Snapshot copy
access method 282Snapshot copy busy 211Snapshot copy naming conventions 122, 124SnapVault 264, 265SnapVault integration 263SnapVault relationships 269SourceBackupServer parameter 345Storage Group
CCR (Continuous Cluster Replica)configuration prerequisites 111
changing location 103cluster continuous replication
configure 112considerations 112
Continuous Cluster Replica (CCR)configuration prerequisites 111
move to LUN 101Storage Group sets 121
360 | SnapManager® 6.0 for Microsoft® Exchange Installation and Administration Guide

Storage Groupsrenaming limitation 168restore operation guidelines 168
storage layoutXML schema 303
storage systemmultiple IP addresses 38requirements 39
syslog event loggingconfiguring 300
System configurationBusiness Continuance 232
system resourcesback up 33
T
test restore 219throttling report
entries 286transaction log archiving 84Transaction log sequence verification 165transaction logs
change configuration 105changing location 106deleting 132migration of 99moving to LUN 105truncated 132viewing full path 106
transport database 104troubleshooting
integrity verification 217type of restore
guidelines 163, 167, 168types of backups 120
U
unattended installationexamples 49, 67
unattended uninstallationexamples 63
unattended upgradeexamples 58
UNC path 257uninstallation
interactive 60unattended 60
unmounting
back up copy 202up-to-the-minute restore 163Up-to-the-minute restore 196up-to-the-minute restore ability 206upgrade
interactive 55unattended 55
upgrading SnapManager 31
V
verificationaccessing Snapshot copies 282deferred 220override 287performance
impact 286selecting the server 281sleep interval
calculating 284throttling
configuring 285options 284working 283
XML schema 306verification override
report entry 286, 288verification server
configuring 279verification status reporting 129verification throttling 127Verification throttling 128verify-backup command 321verifying multiple backup sets 127volume mountpoints 81volume-wide backup 120volumes
fractional reserve 290VSS Snapshot copy 123
W
Windowshost system requirements 37
Windows backup utility 250Windows cluster
impact on SnapManager reports 261report directories 98, 99restore operation 167
Index | 361