Embed Size (px)
Citation preview
Page 1 of 7 ©2016 Singer Sourcing Limited LLC, PFAFF and IDT are exclusive trademarks of Singer Sourcing Limited LLC. All rights reserved.
Snowflake Placemats By Patti Buhler
It’s easier than it looks! Don’t worry about trying to cut ⅞, just round up and trim your pieces to size after sewing. Use a layer cake to make multiple snowflakes, all a little different. The IDT™ on the PFAFF sewing machines makes piecing a “piece of cake”! Sewing Supplies: • PFAFF® sewing machine with IDT™ System
• ¼ piecing foot of choice – my favorite is the Perfect ¼” Foot with guide for IDT™ System 821063096
• Narrow Edge Foot for IDT™ System 820609096
• Seam Guide Foot for IDT™ System 820772096
• Or – Adjustable Guide Foot for IDT™ System 820677096
• 1 layer cake with at least (2) 10” squares of each color; (4) 10” squares will make 1 snowflake – I used sparkle fabrics
• or ¼ yard light and ¼ yard dark for each 2 snowflakes
• ½ yard white fabric for background, borders and binding for each 2 placemats

Page 2 of 7 ©2016 Singer Sourcing Limited LLC, PFAFF and IDT are exclusive trademarks of Singer Sourcing Limited LLC. All rights reserved.
• ½ yard backing fabric for each 2 placemats
• 19” x 21” piece of batting for each placemat
• White cotton thread for piecing
• White thread for quilting
• Thread that matches your background fabric for quilting
Cut: Lights and Darks From the first 10” x 10” piece cut (2) squares 3” x 3” (I light, C dark) (1) square 2 ½” x 2 ½” (H) (4) pieces 1 ½ x 7 (E light, F dark) From the second 10” x 10” piece cut 4 pieces 7 ½” x 2” (A light, B dark) From the white cut: (4) squares 4” (4) squares 2” (2) pieces 3 ¼” x 12 ½” (2) pieces 2” x 18” Save the rest of the fabric for binding. Take all of the squares and cut them in half diagonally making 2 triangles out of each square. Take the four light 1 ½” x 7” pieces and cut them like this:
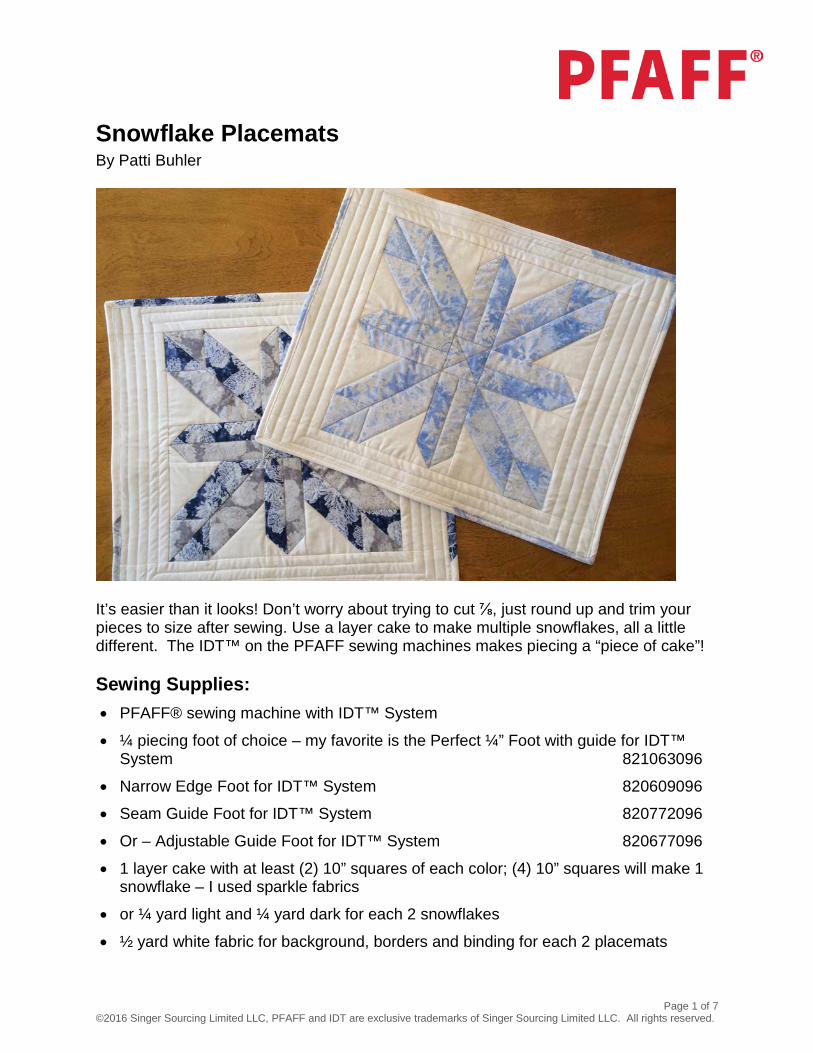
To do this lay your piece of fabric on your cutting mat, lining the side of the piece with a grid line. Lay the 45 degree line on you ruler on the side of piece E. Line it up so that the end of the line intersects the 6” line on the mat and cut the 45 degree angle at the end.
Page 3 of 7 ©2016 Singer Sourcing Limited LLC, PFAFF and IDT are exclusive trademarks of Singer Sourcing Limited LLC. All rights reserved.
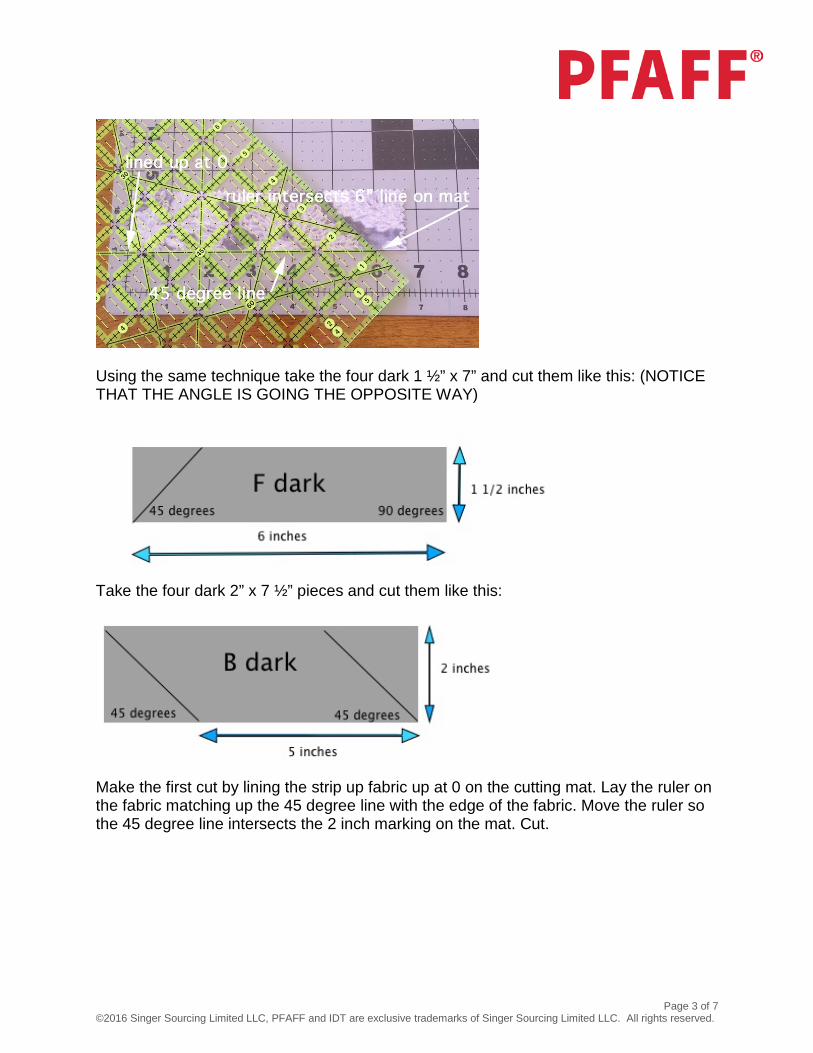
Using the same technique take the four dark 1 ½” x 7” and cut them like this: (NOTICE THAT THE ANGLE IS GOING THE OPPOSITE WAY)
Take the four dark 2” x 7 ½” pieces and cut them like this:
Make the first cut by lining the strip up fabric up at 0 on the cutting mat. Lay the ruler on the fabric matching up the 45 degree line with the edge of the fabric. Move the ruler so the 45 degree line intersects the 2 inch marking on the mat. Cut.

Page 4 of 7 ©2016 Singer Sourcing Limited LLC, PFAFF and IDT are exclusive trademarks of Singer Sourcing Limited LLC. All rights reserved.
Now slide the ruler down until the 45 degree line intersects the 7” line on the mat. This will make the side of the piece measure 5”. Cut.
Using the same technique take the four light 2” x 7 ½” pieces and cut them like this: (NOTICE THAT THE ANGLES ON THE LIGHT PIECES ARE DIFFERENT THAN THE DARK PIECES.

Page 5 of 7 ©2016 Singer Sourcing Limited LLC, PFAFF and IDT are exclusive trademarks of Singer Sourcing Limited LLC. All rights reserved.
Cut the backing 21” x 19” Block Diagram:
Sew 1. Always press to the dark unless otherwise instructed 2. Sew all four B pieces to the I pieces 3. Sew all four A pieces to the C pieces 4. Sew the eight D pieces to the BI and AC combinations 5. Sew the BID combinations to the ACD combinations, matching seams. If seams
were both pressed to the dark, the seam allowances should “nest” together. The machine will push one toward the other as you sew so that the seams match.
6. Trim the combined pieces to 5 ½” square 7. Sew E to F along the long side. Press and trim the dog ear. 8. Sew one G to the dark side of the EF combinations. Press to the white. 9. Sew the other G to the light side of the EF combinations. Press to the white.

Page 6 of 7 ©2016 Singer Sourcing Limited LLC, PFAFF and IDT are exclusive trademarks of Singer Sourcing Limited LLC. All rights reserved.
10. Trim so that the white top edge is ¼” past the point and each side is 1¼” from the center seam. Trim the length to 5½”
11. Lay out the dark and the light H pieces. Sew the lights to the darks and then sew them to each other.
12. Trim to a 2½” square 13. Sew one of the EFG combinations to one end of the H square. 14. Sew another of the EFG combinations to the opposite end of the H square. 15. Sew one of the 5½” squares (ABCDI) to either side of one of the remaining EFG
combinations. Do the same for the other EFG pieces. Press seams to the EFG pieces.
16. Sew one of the combinations you just made to either side of the strip made in step 13 and 14. Press seams away from the center strip.
17. Square up the block to 12½” x 12½”. 18. Sew the 3¼” border to one side of the block. 19. Sew the other 3¼” border to the opposite side of the block. 20. Sew the 2” x 18” border to the top of the block. 21. Sew the other 2” x 18” border to the bottom of the block.
Quilting the Placemat • Layer the backing, batting and top to make a quilt sandwich
• Pin the layers together
• Using the Narrow Edge Foot for IDT™ System, stitch in the ditch around the snowflake pieces.
• Using the Seam Guide Foot for IDT™ System or the Adjustable Guide Foot for IDT™ System Sew around the snowflake block ½” away from the block. Continue to sew ½” away from the previous stitching all the way around. When you’ve sewn off the top and bottom continue to sew ½” away from the stitching on the sides.
• Square up the placemat
• Bind Binding: I like using different fabric in my binding. From your scraps cut pieces of the light and dark fabrics. If you used 10” squares there should be one 2” x 10” piece left over of each color. Cut one of the other squares into 2” x 10” pieces. Make the binding by combining 2” x 15” pieces of white with the 2” x 10” pieces until you have approximately

Page 7 of 7 ©2016 Singer Sourcing Limited LLC, PFAFF and IDT are exclusive trademarks of Singer Sourcing Limited LLC. All rights reserved.
75” of binding. This is for ¼” binding. I attach the binding to the back and then fold to the front. I stitched the binding to the front using the Narrow Edge Foot for IDT™, adjusting the needle position so it topstitched the binding down. Since my backing was dark I decided to put the white thread in the machine and I put black thread in the bobbin. It worked great and hid the stitching on the back.