Embed Size (px)
Citation preview
Load Test Creation Tutorial
Copyright Notice
COPYRIGHT© 2015 SOASTA Inc. This document is unpublished and the foregoing notice is affixed to protect SOASTA Inc. in the event of inadvertent publication. All rights reserved. No part of this document may be reproduced in any form, including photocopying or transmission electronically to any computer, without prior written consent of SOASTA Inc. The information contained in this document is confidential and proprietary to SOASTA Inc. and may not be used or disclosed except as expressly authorized in writing by SOASTA Inc. Copyright protection includes material generated rom our software programs displayed on the screen, such as icons, screen displays, and he like. ft Trademarks
Technologies described herein are either covered by existing patents or patent applications are in progress. All brand and product names are trademarks or registered rademarks of their respective holders and are hereby acknowledged. t Confidentiality
The information in this document is subject to change without notice. This document contains information that is confidential and proprietary to SOASTA Inc. and may not be copied, published, or disclosed to others, or used for any purposes other than review, without written authorization of an officer of SOASTA Inc. Submission of this document oes not represent a commitment to implement any portion of this specification in the roducts of the submitters. dp Content Warranty
The information in this document is subject to change without notice. THIS DOCUMENT IS PROVIDED "AS IS" AND SOASTA MAKES NO WARRANTY, EXPRESS, IMPLIED, OR STATUTORY, INCLUDING BUT NOT LIMITED TO ALL WARRANTIES OF MERCHANTABILITY OR FITNESS FOR A PARTICULAR PURPOSE. SOASTA Inc. shall not be liable for errors contained herein or for incidental or consequential damages in connection with the furnishing, performance or use of this material. V
1
er
5 sion
Find and Replace ...................................................................................................................................................................78 Creating User‐Defined Validations ............................................................................................................................80
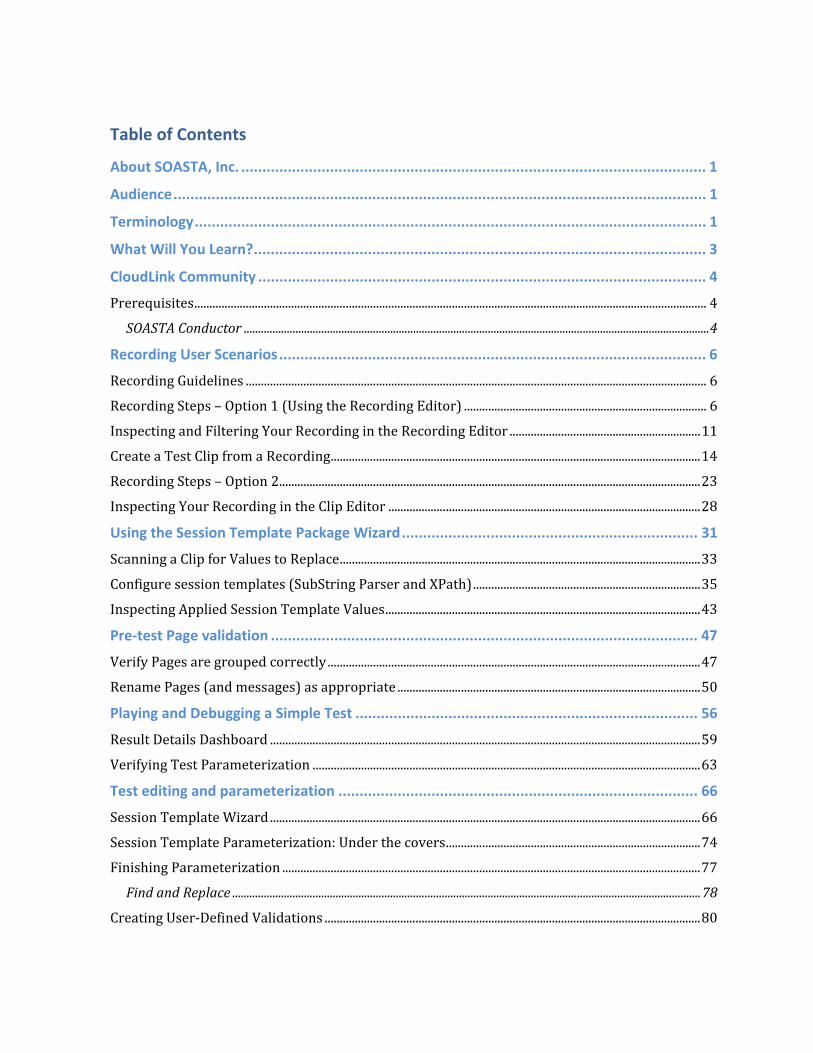
Table of Contents
About SOASTA, Inc. .............................................................................................................. 1
Audience.............................................................................................................................. 1
Terminology......................................................................................................................... 1
What Will You Learn?........................................................................................................... 3
CloudLink Community .......................................................................................................... 4 Prerequisites......................................................................................................................................................................... 4 SOASTA Conductor ..................................................................................................................................................................4
Recording User Scenarios..................................................................................................... 6 Recording Guidelines ........................................................................................................................................................ 6 Recording Steps – Option 1 (Using the Recording Editor) ................................................................................ 6 Inspecting and Filtering Your Recording in the Recording Editor ...............................................................11 Create a Test Clip from a Recording..........................................................................................................................14 Recording Steps – Option 2...........................................................................................................................................23 Inspecting Your Recording in the Clip Editor .......................................................................................................28 Using the Session Template Package Wizard...................................................................... 31 Scanning a Clip for Values to Replace.......................................................................................................................33 Configure session templates (SubString Parser and XPath)...........................................................................35 Inspecting Applied Session Template Values........................................................................................................43 Pre‐test Page validation ..................................................................................................... 47 Verify Pages are grouped correctly ...........................................................................................................................47 Rename Pages (and messages) as appropriate ....................................................................................................50 Playing and Debugging a Simple Test ................................................................................. 56 Result Details Dashboard ..............................................................................................................................................59 Verifying Test Parameterization ................................................................................................................................63 Test editing and parameterization ..................................................................................... 66 Session Template Wizard ..............................................................................................................................................66 Session Template Parameterization: Under the covers....................................................................................74 Finishing Parameterization ..........................................................................................................................................77
Using Scripts .......................................................................................................................................................................84 Using Transactions...........................................................................................................................................................91 Using Seed Data to Parameterize data .....................................................................................................................94 Test Execution.................................................................................................................. 100 Setting Play Mode for Load Testing........................................................................................................................ 100 Adding System Dashboards to tests....................................................................................................................... 101 Advanced exercise......................................................................................................................................................... 103 Next Steps… ..................................................................................................................... 103 Pages versus Transactions......................................................................................................................................... 103 Building Dashboards .................................................................................................................................................... 104 Dynamic Pages ................................................................................................................................................................ 104 If‐Then‐Else and Switch .............................................................................................................................................. 104 Monitoring ........................................................................................................................................................................ 105
1
ence the test itself as a Script. In CloudTest, a script is a JavaScript snippet of code that gets included inside a Test Clip.
Page – Pages are groups of HTTP requests that enable CloudTest to simulate the order and timing of browser traffic. Pages can be either “static” or “dynamic”. Static pages
About SOASTA, Inc. SOASTA’s mission is to ensure that today’s Web applications and services perform in a high quality, scalable, and predictable manner. The company’s product, SOASTA CloudTest™, is available as an on‐demand service in the Cloud or as an appliance (virtual and hardware), and enables developers and testers to test and monitor their Web applications and services at an affordable price. SOASTA CloudTest supports Load/Performance, Functional, and Web UI/Ajax testing. SOASTA is privately held and headquartered in Mountain View, California. SOASTA also offers two additional products currently; TouchTest and mPulse For more information about SOASTA,. please visit www.soasta.com.
Audience This tutorial is designed to be an introduction to SOASTA CloudTest for individuals familiar with other proprietary or open source tools for developing and executing load/performance tests. In addition to some experience in load/performance testing, experience with web‐based applications based on the underlying HTTP request/response message structure will be beneficial. The tutorial target application site (SOASTAStore.com) has been selected to demonstrate fundamental features found in many public‐facing applications. Subsequent exercises demonstrate the need to address more complex application development techniques.
Terminology
Message – Messages are the HTTP requests or XML sent to a web application or web service. Messages are represented visually in SOASTA CloudTest as boxes in the icon view and URL values in the list view.
Script ‐ SOASTA CloudTest Scripts are written in JavaScript and allow you to add custom logic to a Test Clip. For example, a script that modifies the input data for a message based upon a set of status codes from the previous message response extracts data or validates responses. For people who have used other products, those products refer
2
use the same requests captured during the recording process while dynamic pages parse the HTML response to identify resources associated with that page.
Transaction – A transaction is a larger unit of work in a test than a single page or single chain. A transaction is often associated with a portion of a business flow and may include, for example, hitting a page, logging in, and performing some action. A transaction can include chains, pages, messages, and think times (delays).
Test Clip ‐ The building block of testing in SOASTA CloudTest is the Test Clip. A Test Clip is a visual script that is composed of a series of sequenced events (an event can be, for example, an HTTP request or a SOAP message). Once built and debugged, these Test Clips can be reused for any type of testing: functional testing, load testing, performance testing and Web UI testing where appropriate.
Composition ‐ A Test Composition is a multi‐track interface where test clips can be placed at different times and tracks to create complex testing scenarios. This interface is similar to music and movie digital creation tools. CloudTest provides a number of methods to create Test Compositions including by using the "Open in Test Composition" command from within the Clip Editor (the method used in the tutorial steps below). Test Compositions can also be created manually by creating a new Test Composition and then dragging and dropping Test Clips into a sequence based on when they should execute.
Target ‐ A Target points to the application, service, or web site that you want to test, including its location (hostname) and any authentication information necessary to successfully con
or site. nect to the target. A Target also contains a specification of the
information needed to properly format and send messages to the given service Monitor Server ‐ A Monitor Server defines which hardware resources will be monitored. Typical Monitor Servers are Linux/Windows/Mac, database, and application servers. SNMP devices are also Monitor Servers. A Monitor Server does not define the metrics to be captured; just ‘how’ they will be captured (IP Addresses, ports, authentication, etc.).
Monitor ‐ A Monitor defines the resources for which you will capture data to be used in analytics. This data typically includes statistics on resource usage, processes and activity. Monitored data appears in the Dashboard on the same timeline as test metrics such as response times and error rates. Reference: SOASTA Monitoring FAQ in CloudLink.
Dashboard ‐ A Dashboard is where you view and analyze your test results in real‐time. SOASTA CloudTest provides a wide variety of analytic widgets to fill your Dashboards. You can use ults for one or more widgets to track your test in real time and capture respost‐test analysis.
Conductor ‐ SOASTA Conductor is an agent that runs on a client machine (for HTTP/HTTPs recording) or servers (for monitoring server metrics like CPU usage, for example). The Conductor runs on Windows, Linux, and Mac OS X machines.
Session Template – A session template is essentially a parameterization rule that defines how to extract a name/value pair from a response, put it into a clip property, so that it can substitute the data dynamically at runtime. The task of replacing dynamic values in CloudTest can be done manually or by creating a session template that can be
3
orial general process is as follow:
• Create an HTTP/HTTPs recording of the web application test scenario, either in the Clip Editor or Recording Editor (both methods are documented)
applied and re‐applied to like test clips. Session Template Package ‐ A Session Template Package contains a set of session templates that were originally created using a selected test clip. A package can be reused across multiple test c o lips and eliminates the need to repeatedly define how textract a particular dynamic name/value pair.
Session Template Wizard – This wizard is started within the Test Clip editor and allows the parameterization of one name/value pair at a time. At the completion of the wizard, the dynamic values are replaced (by custom properties) and a reusable session template is created.
Session Template Package Wizard – This wizard is started from either SOASTA Central or within the Test Clip Editor and parameterizes multiple name/value pairs at the same time. It also creates a Session Template Package as its output.
Virtual Users ‐ Software programs or services that, when executed iteratively, generate traffic from their location to target servers or services, as would real users of these same servers or services. These are concurrent users.
Load Testing ‐ (also known as Performance Testing) is the use of a coordinated community of virtual users to place “load” on servers or services simulating some future workload for evaluation. Many different categories or terms for performance testing with virtual users are in current use such as benchmarks, endurance, stress tests, failover Testing” will b
tests, etc. In the context of this tutorial, “Load Testing” and “Performancee used interchangeably.
Think Times – A think time is used in a test to simulate the natural pauses that a user has while accessing a web application. A user doesn’t just blast through a bunch of URLs. For example, it might take a user 10‐15 seconds to enter their credentials when a login page is loaded in the browser. That 10‐15 second period is a think time. Think times are critical to a test as it makes the test more real world by simulating what a real user would do.
What Will You Learn? In this tutorial, the goal is simple: Create and run a test to demonstrate the fundamental features of SOASTA CloudTest and develop understanding of using these features to be successful. At the end of this tutorial is a list of next steps to
A CloudTest. continue your education on SOASTThe tut
4
• Inspect the recorded clip
• correlation process Use the Session Template Package Wizard to start the
• and Page contents, as necessary Verify/rename Pages
• Debug test playback
• on using the Session Template Wizard Additional parameterizati
• n Manual parameterizatio
• Using Find and Replace
• defined validations Creating user‐
• Using Scripts
• Using Transactions
• Including Seed Data in a test
• Run a load test using Load Play Mode
CloudLink Community SOASTA has created a community site, CloudLink, which is a primary source of technical information about how to use CloudTest. The site contains a KnowledgeBase, training materials, documentation, and a forum to ask questions. Both SOASTA employees and community members contribute to the content on the site. Throughout this Tutorial, CloudLink is referenced as a source of additional information on a variety of topics. Please use CloudLink to expand your knowledge of CloudTest and as a way to interact directly ith SOASTA employees and other CloudTest users. w
Prerequisites
The following items are prerequisites for the successful completion of this tutorial.
SOASTA Conductor
HTTP(s) Message recording requires that the SOASTA Conductor agent be installed on a client machine on which you want to do recording. This machine can be running any of the common operating systems: Windows, Linux, or Mac OS X. To download the Conductor, log into CloudTest with the URL and account credentials provided by your CloudTest administrator.
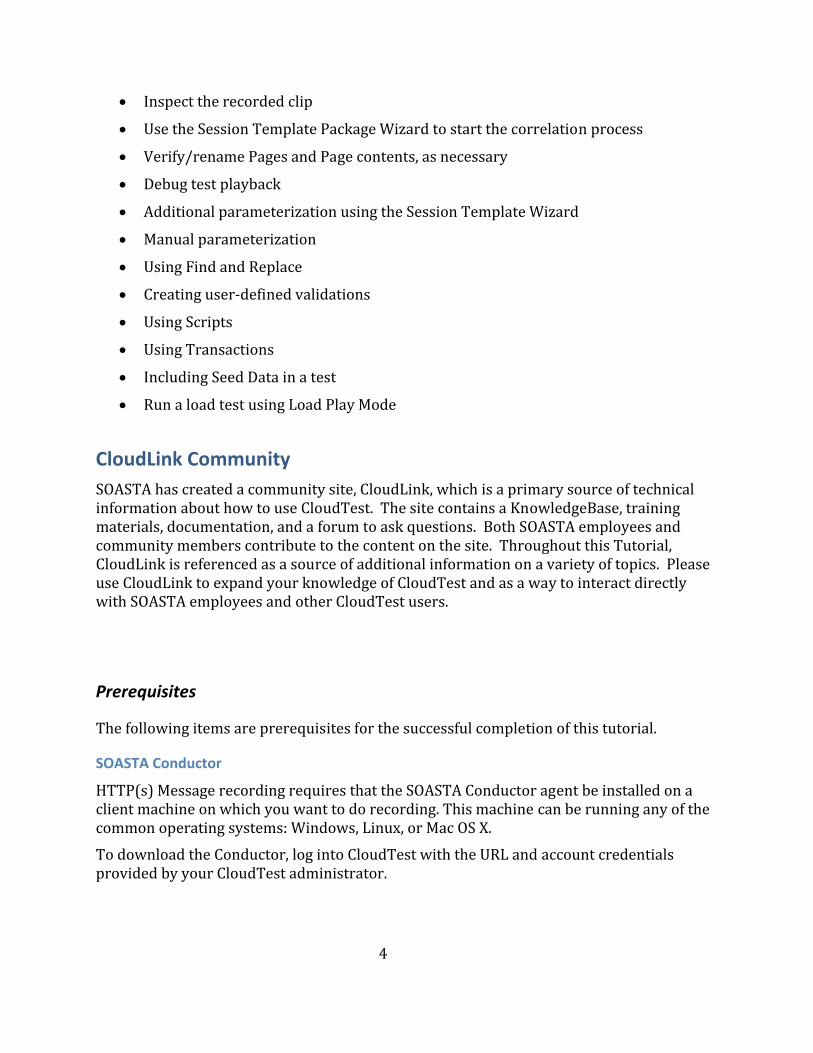
If you haven’t yet installed the Conductor, you can do so from the SOASTA CloudTest > Resources page, download section. The appropriate Conductor installation file should be listed.
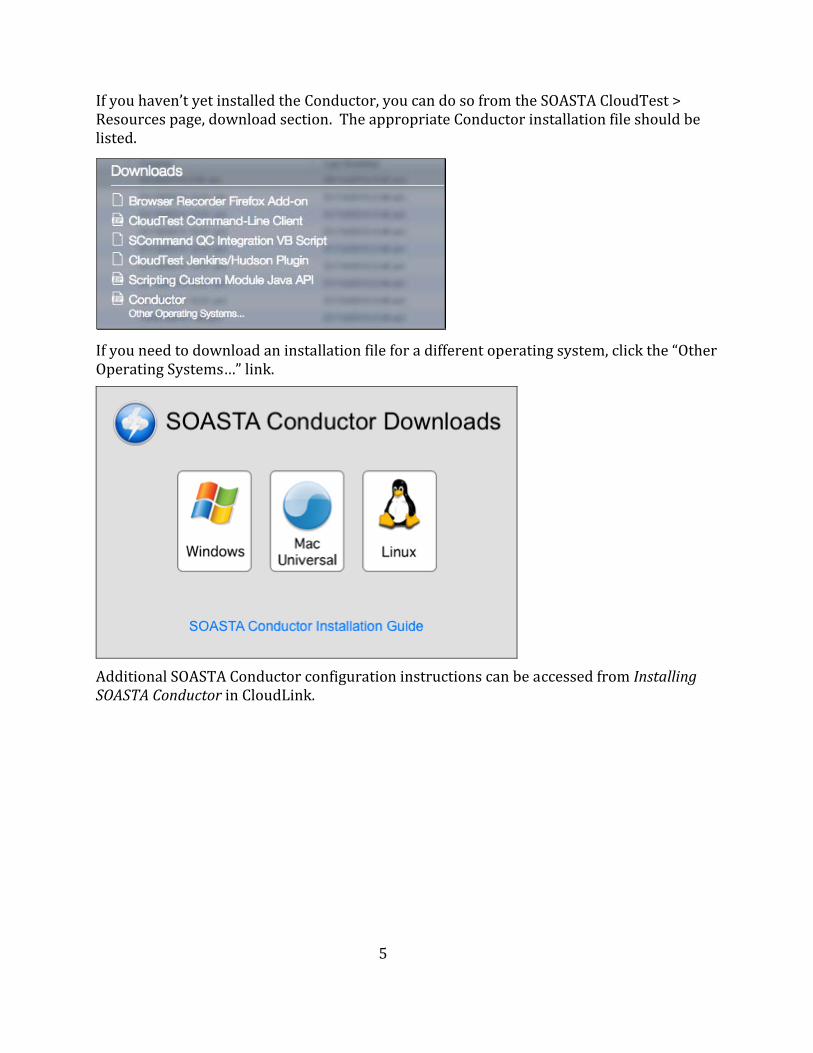
If you need to download an installation file for a different operating system, click the “Other Operating Systems…” link.
Additional SOASTA Conductor configuration instructions can be accessed from Installing OASTA Conductor in CloudLink. S
5
6
Recording User Scenarios SOASTA CloudTest’s HTTP(s) recording feature provides a read‐only view of a given user scenario as captured from the browser’s HTTP(s) traffic. CloudTest offers two HTTP(S) recording modes—the first is performed using the Recording Editor, while the second mode records directly into the Clip Editor. The steps to record using both modes are presented in the Option 1 and Option 2 steps below
Recording Guidelines
To record a user scenario, use one browser for CloudTest (recommended: Firefox or Chrome) and a separate browser (recommended: Internet Explorer, Chrome, or Safari) to perform user actions. Before recording, it is recommended you do the following things:
• Clear the browser’s cache and cookies before recording user scenarios.
• Close any additional programs that use the network (e.g. mail, calendar, and all social media applications), and any other applications that access the Internet to eliminate unnecessary HTTP traffic in the recording.
• wser For a cleaner recording, make the default home page for the second broabout:blank.
The example scenario in this tutorial uses a demonstration site, SOASTA Store (www.soastastore.com). This site has been created to demonstrate some of the most common topics for training purposes.
Recording Steps – Option 1 (Using the Recording Editor)
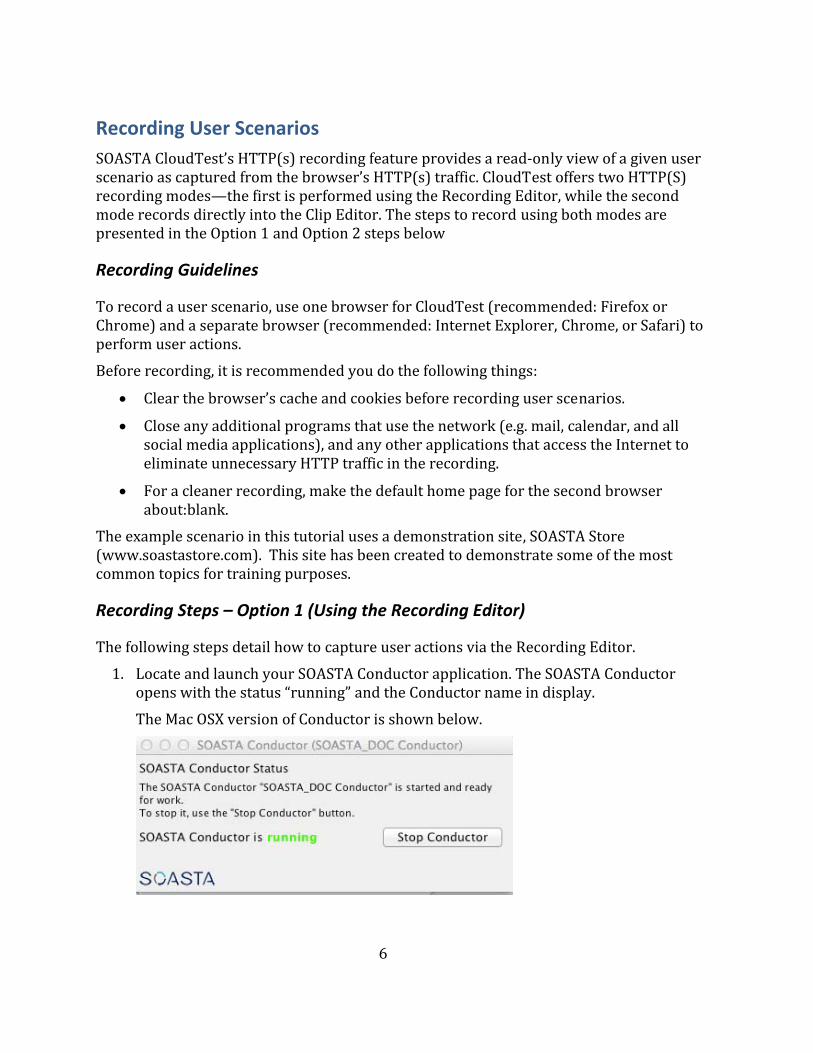
Th foe llowing steps detail how to capture user actions via the Recording Editor. 1. Locate and launch your SOASTA Conductor application. The SOASTA Conductor
ame in display. opens with the status “running” and the Conductor nThe Mac OSX version of Conductor is shown below.
7
In Windows, the Conductor will appear in the System Tray. Make sure the icon has a gold color. Otherwise, the Conductor is not connected to the CloudTest server.
2. Login to CloudTest using Firefox or Chrome. For this tutorial, it is recommend that
you use Firefox.
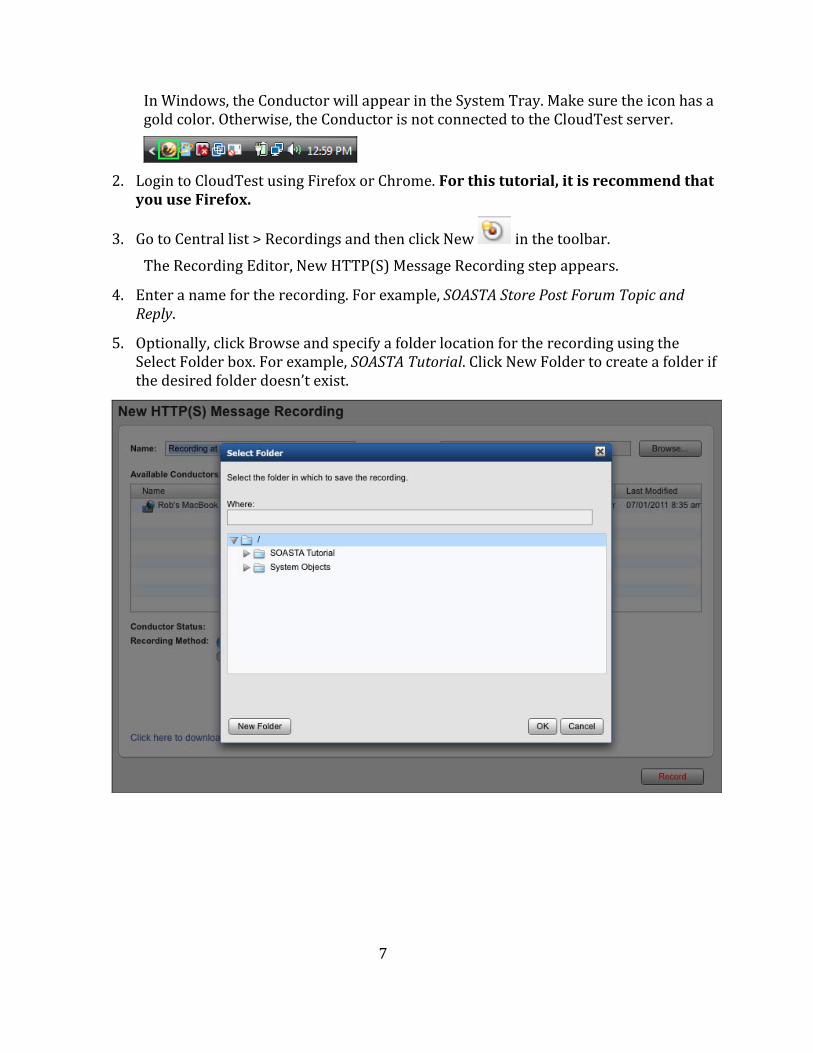
3. Go to Central list > Recordings and then click New in the toolbar. e Recording step appears. The Recording Editor, New HTTP(S) Messag
4. Enter a name for the recording. For example, SOASTA Store Post Forum Topic and Reply.
5. Optionally, click Browse and specify a folder location for the recording using the Select Folder box. For example, SOASTA Tutorial. Click New Folder to create a folder if the desired folder doesn’t exist.
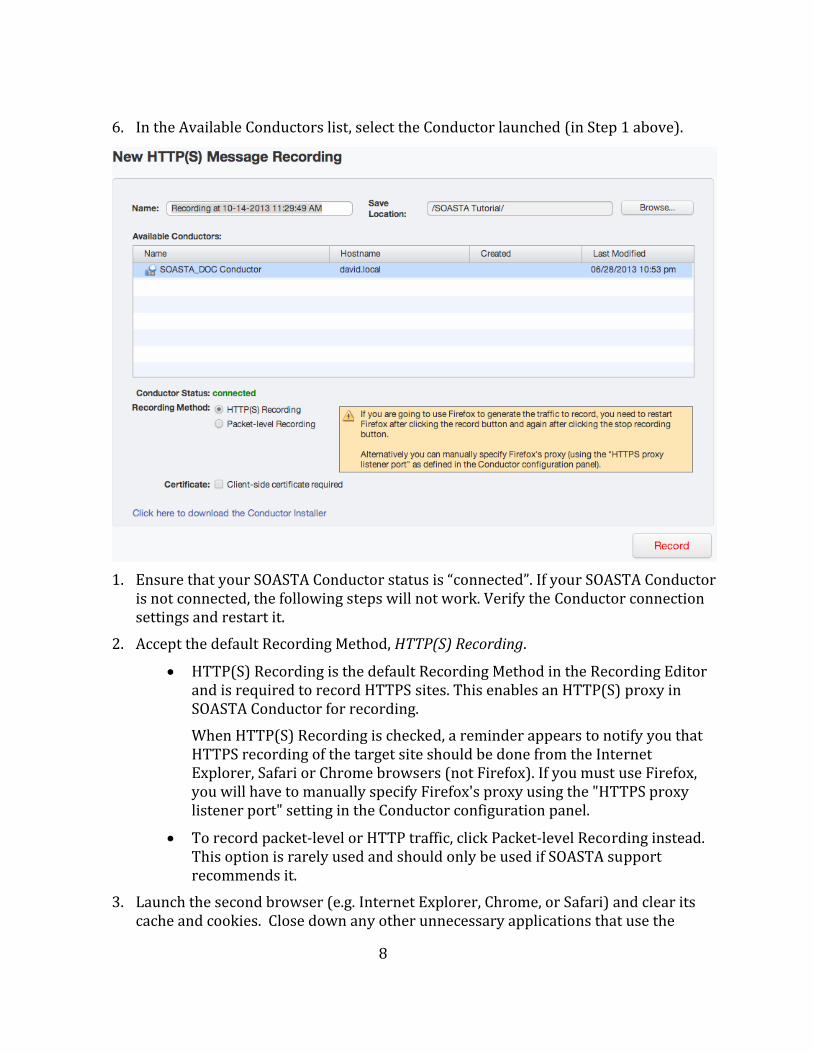
6. In the Available Conductors list, select the Conductor launched (in Step 1 above).
1. Ensure that your SOASTA Conductor status is “connected”. If your SOASTA Conductor
ill not work. Verify the Conductor connection is not connected, the following steps wsettings and restart it.
2. Accept the default Recording Method, HTTP(S) Recording.
• HTTP(S) Recording is the default Recording Method in the Recording Editor and is required to record HTTPS sites. This enables an HTTP(S) proxy in SOASTA Conductor for recording. When HTTP(S) Recording is checked, a reminder appears to notify you that HTTPS recording of the target site should be done from the Internet Explorer, Safari or Chrome browsers (not Firefox). If you must use Firefox, you will have to manually specify Firefox's proxy using the "HTTPS proxy listener port" setting in the Conductor configuration panel.
• To record packet‐level or HTTP traffic, click Packet‐level Recording instead.
8
This option is rarely used and should only be used if SOASTA support recommends it.
3. Launch the second browser (e.g. Internet Explorer, Chrome, or Safari) and clear its cache and cookies. Close down any other unnecessary applications that use the
9
network. Set the second browser URL to “about:blank”. For this tutorial, it is recommended that you use Chrome or Safari as the second browser. In the following example, a user will post a forum topic to the SOASTA Store site and reply to it. This tutorial will walk you through the process of creating this test.
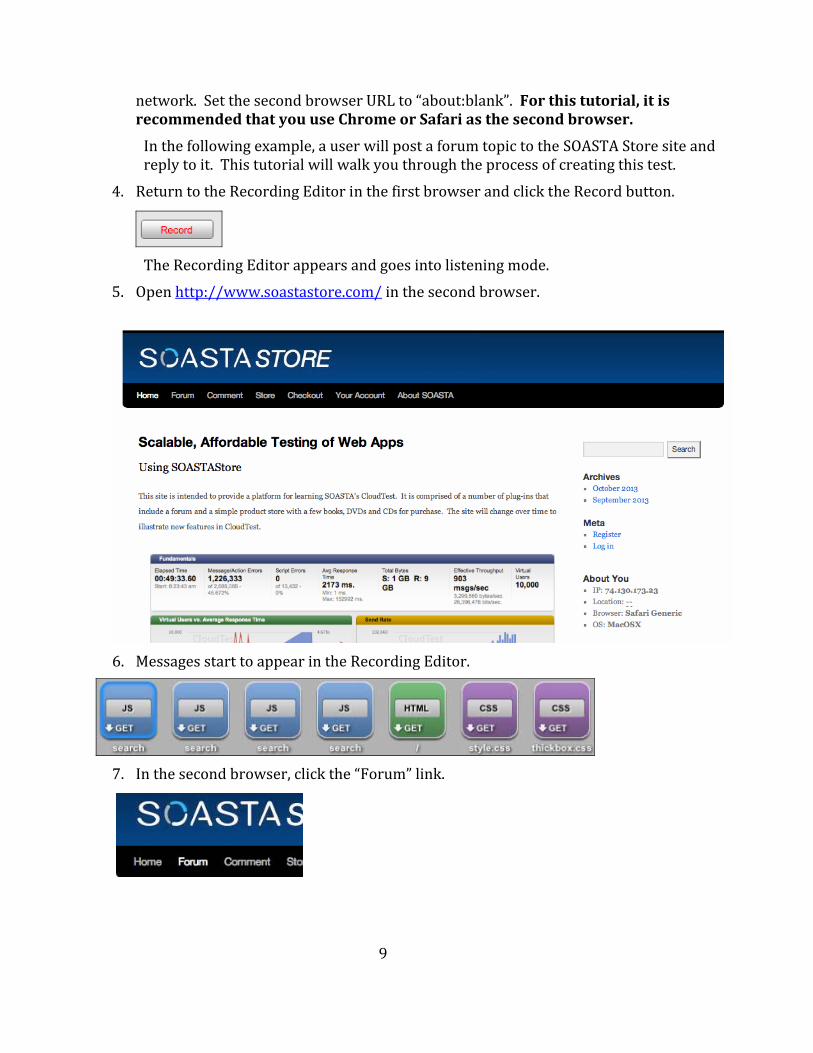
4. Return to the Recording Editor in the first browser and click the Record button.
. The Recording Editor appears and goes into listening mode
. Open 5 http://www.soastastore.com/ in the second browser.
6. Messages start to appear in the Recording Editor.
7. In the second browser, click the “Forum” link.
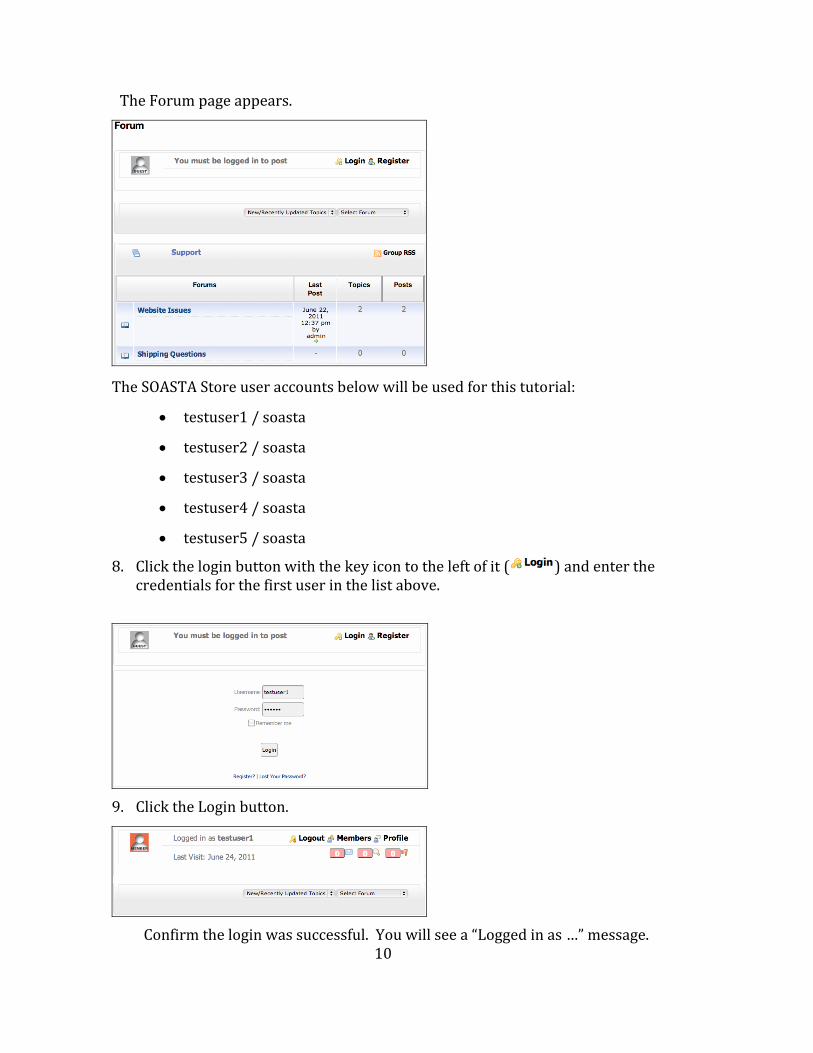
The Forum page appears.
The SOASTA Store user accounts below will be used for this tutorial:
• testuser1 / soasta
• testuser2 / soasta
• testuser3 / soasta
• testuser4 / soasta
• testuser5 / soasta
8. Click the login button with the key icon to the left of it ( ) and enter the credentials for the first user in the list above.
9. Click the Login button.
10
Confirm the login was successful. You will see a “Logged in as …” message.
11
in the “Pre‐Sales” Forum Group. 10. Click the “Product Questions” link 11. Click the “Add a New Topic” link. 12. Enter “Post 1” as the Topic Name. .” as the content for this post. 13. Enter “This is sample text for Post 1 tton. 14. Click the “Post New Topic” bu 15. Click the “Reply to Post” link. As the content for this post. 16. Enter “This is reply text for Post 1.” 17. Click the “Post New Reply” button. 18. Click the “Logout” link at the top of the page.
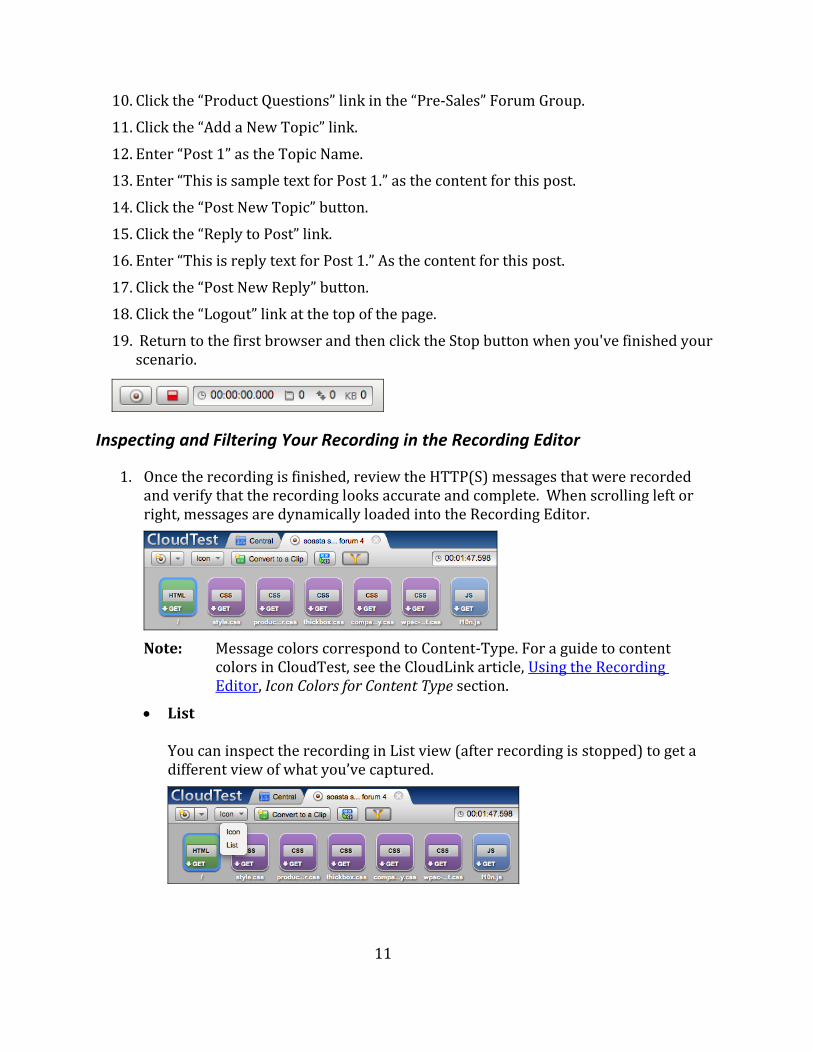
19. Return to the first browser and then click the Stop button when you've finished your scenario.
Insp ce ting and Filtering Your Recording in the Recording Editor
1. Once the recording is finished, review the HTTP(S) messages that were recorded and verify that the recording looks accurate and complete. When scrolling left or right, messages are dynamically loaded into the Recording Editor.
Note: Message colors correspond to Content‐Type. For a guide to content
colors in CloudTest, see the CloudLink article, Using the Recording Editor, Icon Colors for Content Type section.
• List You can inspect the recording in List view (after recording is stopped) to get a different view of what you’ve captured.
12
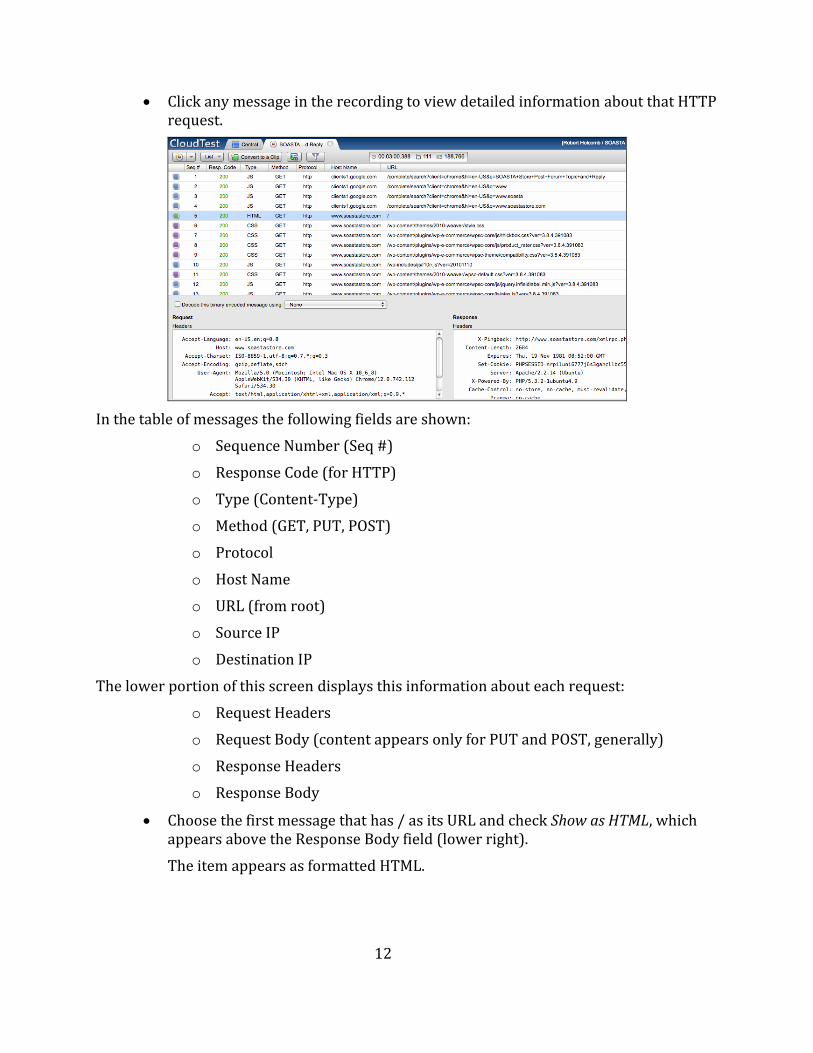
• Click any message in the recording to view detailed information about that HTTP request.
In the table of me re shown: ssages the following fields a
o Sequence Number (Seq #) o TTP) Response Code (for Ho Type (Content‐Type) o ET, PUT, POST) Method (Go Protocol o Host Name o root) URL (fromo Source IP o Destination IP
The lower portion plays this information about each request: of this screen diso Request Headers o ent appears only for PUT and POST, generally) Request Body (conto rs Response Headeo Response Body
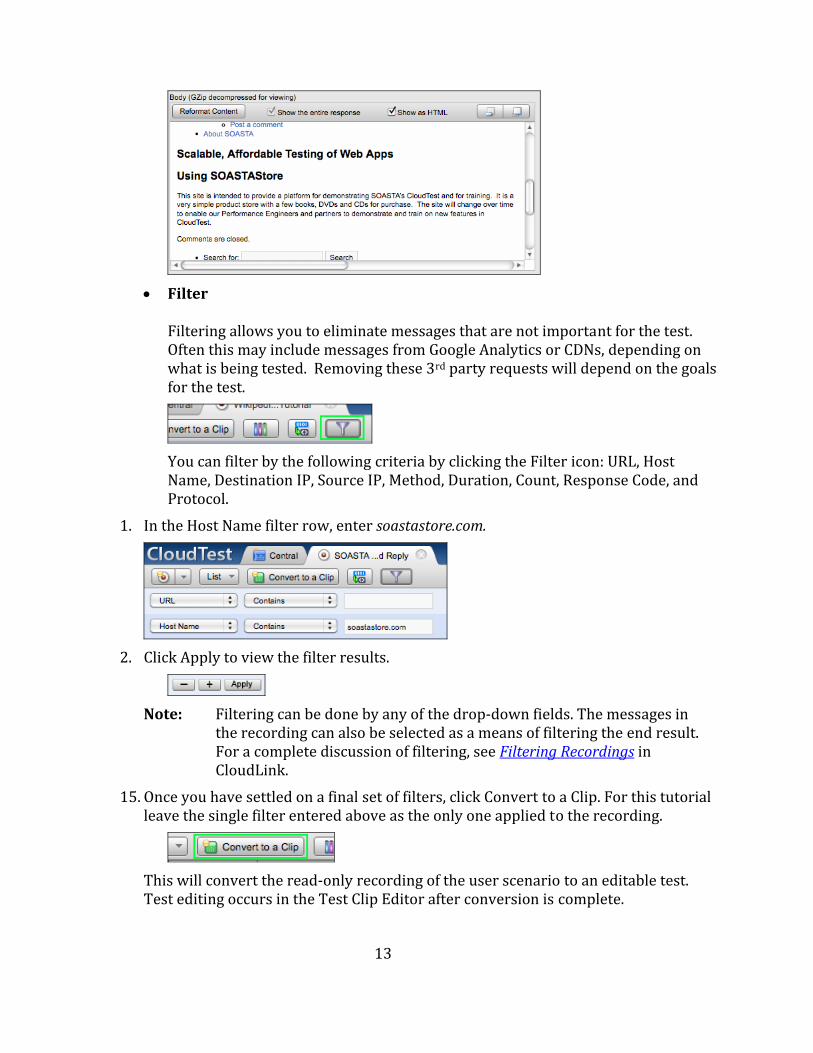
• ts URL and check Show as HTML, which (lower right).
Choose the first message that has / as iappears above the Response Body fieldThe item appears as formatted HTML.
13
• Filter
Filtering allows you to eliminate messages that are not important for the test. Often this may include messages from Google Analytics or CDNs, depending on what is being tested. Removing these 3rd party requests will depend on the goals for the test.
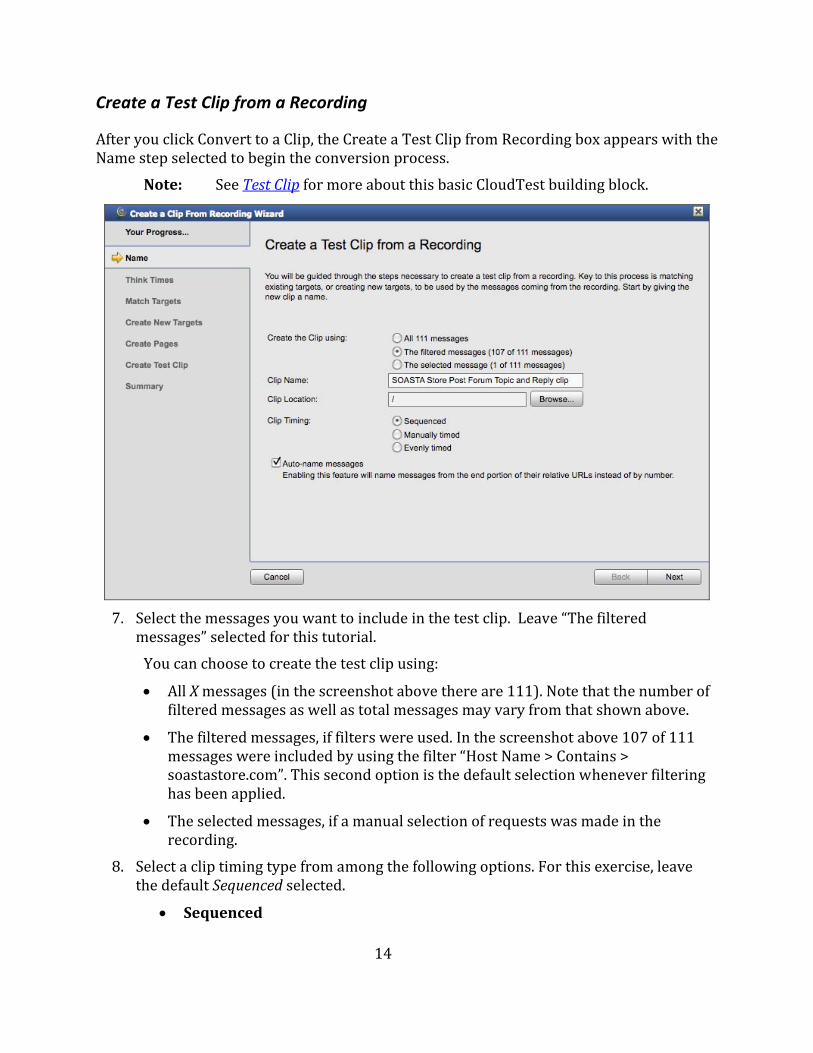
You can filter by the following criteria by clicking the Filter icon: URL, Host
, Method, Duration, Count, Response Code, and Name, Destination IP, Source IPProtocol.
1. In the Host Name filter row, enter soastastore.com.
2. Click Apply to view the filter results.
Note: Filtering can be done by any of the drop‐down fields. The messages in
the recording can also be selected as a means of filtering the end result. Filtering RecordingsFor a complete discussion of filtering, see in
CloudLink. 15. Once you have settled on a final set of filters, click Convert to a Clip. For this tutorial
leave the single filter entere above as the only one applied to the recording. d
This will convert the read‐only recording of the user scenario to an editable test. Test editing occurs in the Test Clip Editor after conversion is complete.
14
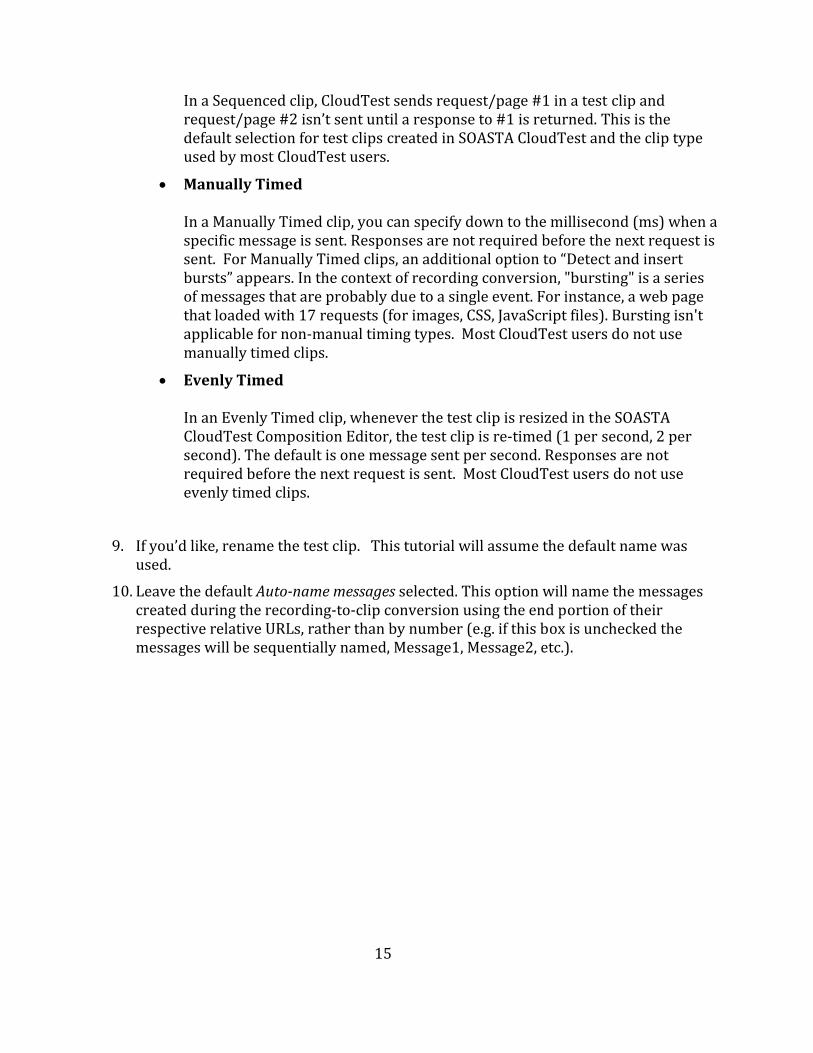
Create a Test Clip from a Recording
After you click Convert to a Clip, the Create a Test Clip from Recording box appears with the Name step se ectel d to begin the conversion process.
Note: See Test Clip for more about this basic CloudTest building block.
7. Select the messages you want to include in the test clip. Leave “The filtered
messages” selected for this tutorial. You can choose to create the test clip using:
• All X messages (in the screenshot above there are 111). Note that the number of filtered messages as well as total messages may vary from that shown above.
• The filtered messages, if filters were used. In the screenshot above 107 of 111 messages were included by using the filter “Host Name > Contains > soastastore.com”. This second option is the default selection whenever filtering has been applied.
• The selected messages, if a manual selection of requests was made in the recording.
8. Select a clip timing type from among the following options. For this exercise, leave the default Sequenced selected.
• Sequenced
15
In a Sequenced clip, CloudTest sends request/page #1 in a test clip and request/page #2 isn’t sent until a response to #1 is returned. This is the default selection for test clips created in SOASTA CloudTest and the clip type used by most CloudTest users.
• Manually Timed In a Manually Timed clip, you can specify down to the millisecond (ms) when a specific message is sent. Responses are not required before the next request is sent. For Manually Timed clips, an additional option to “Detect and insert bursts” appears. In the context of recording conversion, "bursting" is a series of messages that are probably due to a single event. For instance, a web page that loaded with 17 requests (for images, CSS, JavaScript files). Bursting isn't applicable for non‐manual timing types. Most CloudTest users do not use manually timed clips.
• Evenly Timed In an Evenly Timed clip, whenever the test clip is resized in the SOASTA CloudTest Composition Editor, the test clip is re‐timed (1 per second, 2 per second). The default is one message sent per second. Responses are not required before the next request is sent. Most CloudTest users do not use evenly timed clips.
9. If you’d like, rename the test clip. This tutorial will assume the default name was
used. 10. Leave the default Autoname messages selected. This option will name the messages
created during the recording‐to‐clip conversion using the end portion of their respective relative URLs, rather than by number (e.g. if this box is unchecked the messages will be sequentially named, Message1, Message2, etc.).
16
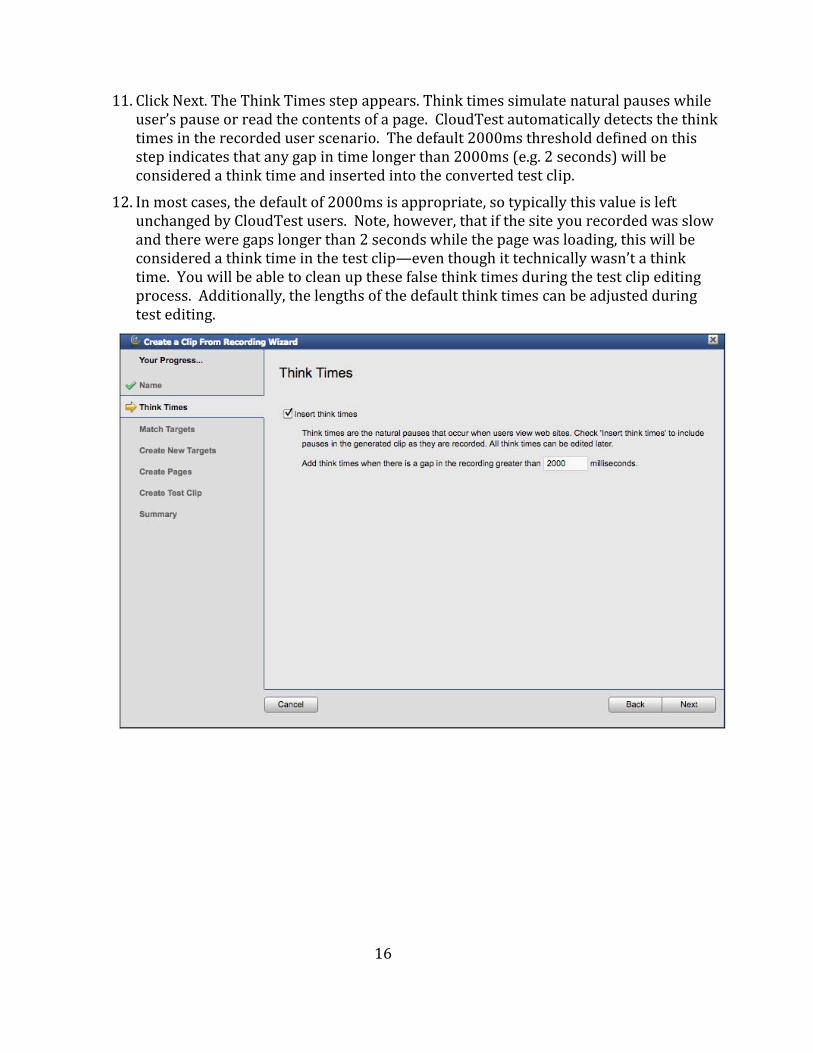
11. Click Next. The Think Times step appears. Think times simulate natural pauses while
user’s pause or read the contents of a page. CloudTest automatically detects the think times in the recorded user scenario. The default 2000ms threshold defined on this step indicates that any gap in time longer than 2000ms (e.g. 2 seconds) will be considered a think time and inserted into the converted test clip.
12. In most cases, the default of 2000ms is appropriate, so typically this value is left unchanged by CloudTest users. Note, however, that if the site you recorded was slow and there were gaps longer than 2 seconds while the page was loading, this will be considered a think time in the test clip—even though it technically wasn’t a think time. You will be able to clean up these false think times during the test clip editing process. Additionally, the lengths of the default think times can be adjusted during test editing.
17
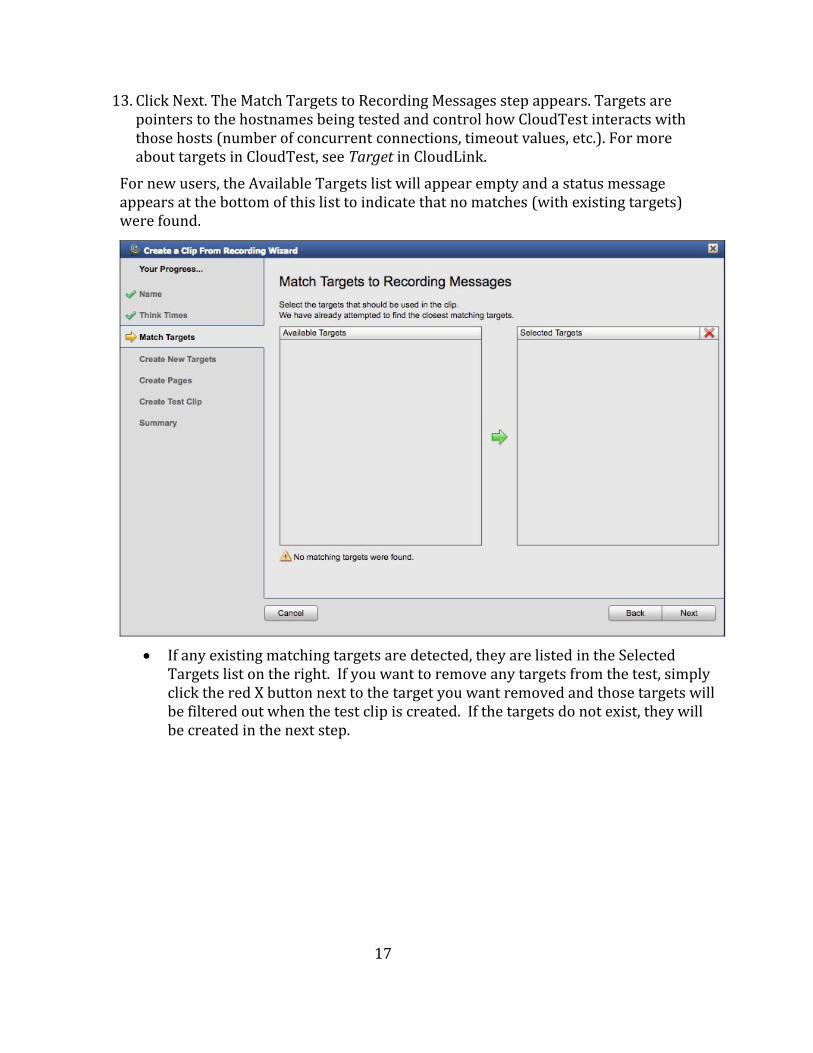
13. Click Next. The Match Targets to Recording Messages step appears. Targets are
pointers to the hostnames being tested and control how CloudTest interacts with those hosts (number of concurrent connections, timeout values, etc.). For more about targets in CloudTest, see Target in CloudLink.
For new users, the Available Targets list will appear empty and a status message appears at the bottom of this list to indicate that no matches (with existing targets) were found.
• If any existing matching targets are detected, they are listed in the Selected
Targets list on the right. If you want to remove any targets from the test, simply click the red X button next to the target you want removed and those targets will be filtered out when the test clip is created. If the targets do not exist, they will be created in the next step.
18
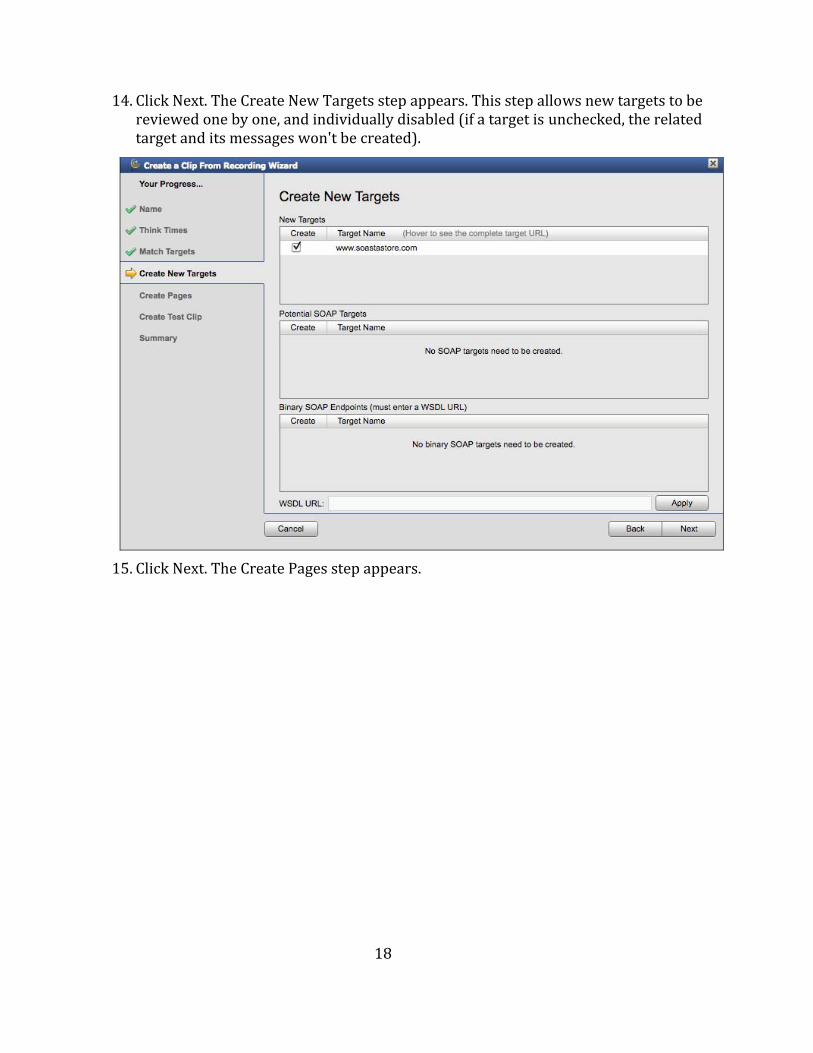
14. Click Next. The Create New Targets step appears. This step allows new targets to be
reviewed one by one, and individually disabled (if a target is unchecked, the related target and its messages won't be created).
15. Click Next. The Create Pages step appears.

19
16. Pages are groups of HTTP requests that enable CloudTest to simulate the order and
timing of browser traffic. Pages can be either “static” or “dynamic”. Static pages use the same exact requests that were captured during the recording. Static pages are typically easier to get started with, as all the resources are listed and available for modification and/or deletion. Static pages are good to use on sites that are stable and not changing or if the tests clips have a limited life. Dynamic pages make a request for the HTML page, parse the page, and dynamically extract the resources referenced in the page (e.g. CSS, images, JavaScript, etc.). Dynamic pages typically take more time to setup because additional filters need to be applied to each page to remove any 3rd party resource requests that aren’t supposed to be played during the test (e.g. Google Analytics). Dynamic pages are good to use on sites that change frequently or when sites dynamically generate unique URLs each time the site is accessed (e.g. Drupal). Dynamic Pages are beyond the scope of this tutorial. Please reference CloudLink for more information. For this tutorial, we will use static pages. Leave Automatically create groups of Page requests box checked. Click Next.
The Create Test Clip step appears with summary information about the new test clip selections.
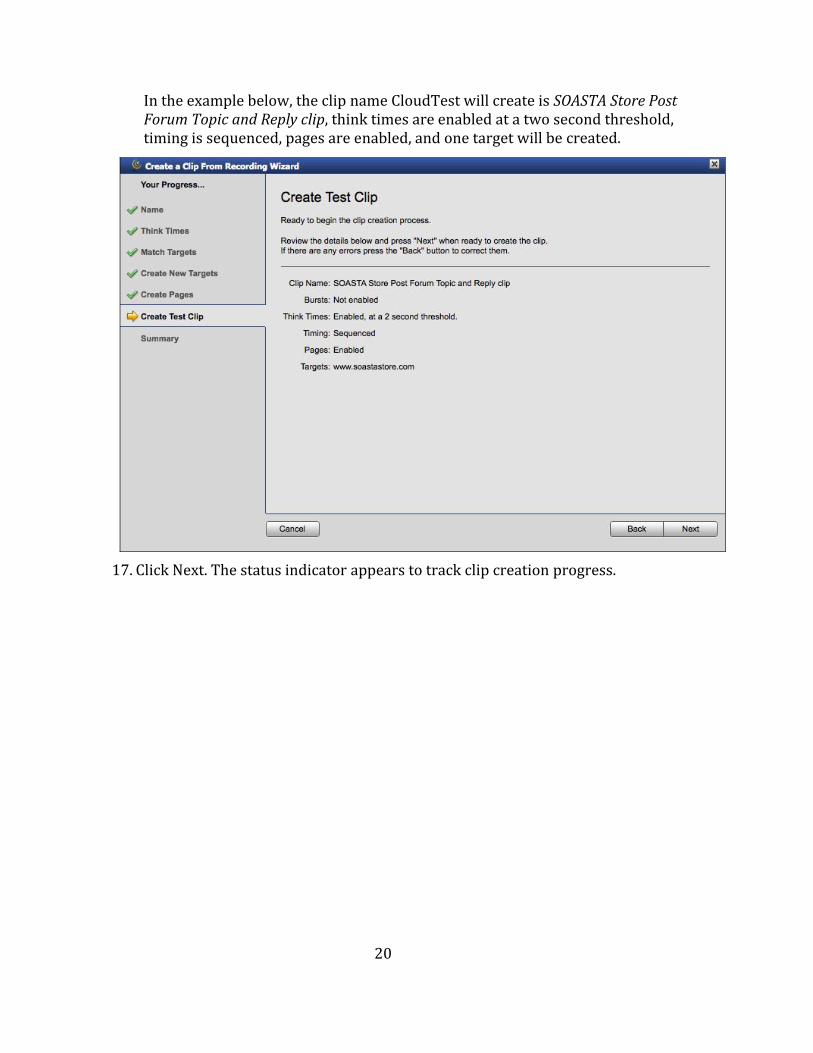
20
In the example below, the clip name CloudTest will create is SOASTA Store Post Forum Topic and Reply clip, think times are enabled at a two second threshold, timing is sequenced, pages are enabled, and one target will be created.
17. Click Next. The status indicator appears to track clip creation progress.
21
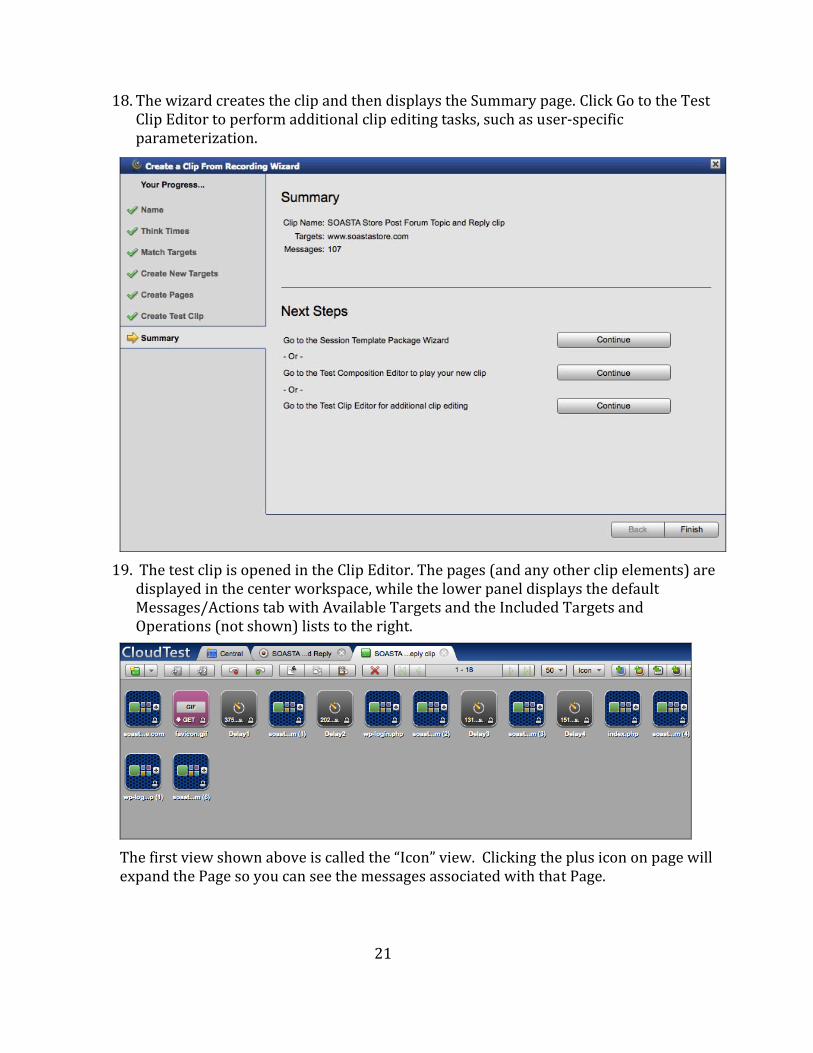
18. The wizard creates the clip and then displays the Summary page. Click Go to the Test
Clip Editor to perform additional clip editing tasks, such as user‐specific parameterization.
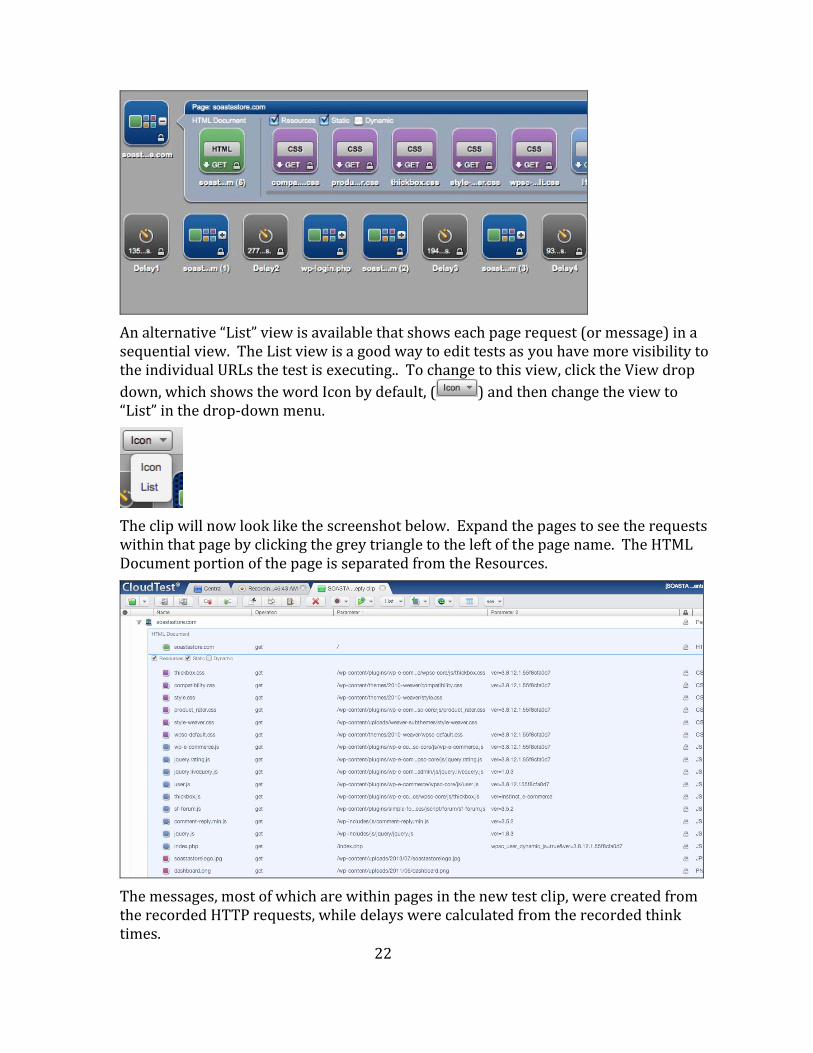
19. The test clip is opened in the Clip Editor. The pages (and any other clip elements) are
displayed in the center workspace, while the lower panel displays the default Messages/Actions tab with Available Targets and the Included Targets and Operations (not shown) lists to the right.
The first view shown above is called the “Icon” view. Clicking the plus icon on page will xpand the Page so you can see the messages associated with that Page. e
22
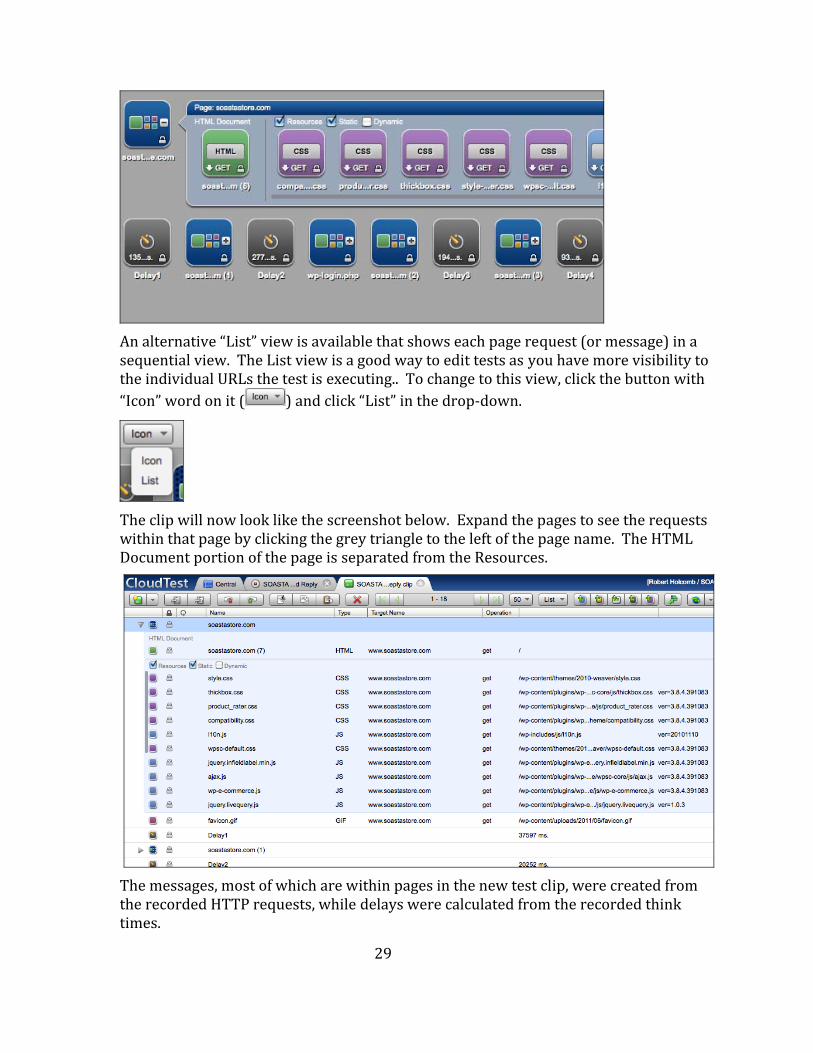
An alternative “List” view is available that shows each page request (or message) in a sequential view. The List view is a good way to edit tests as you have more visibility to the individual URLs the test is executing.. To change to this view, click the View drop down, which shows the word Icon by default, ( ) and then change the view to “List” in the drop‐down menu.
The clip will now look like the screenshot below. Expand the pages to see the requests within that page by clicking the grey triangle to the left of the page name. The HTML Document portion of the page is separated from the Resources.
The messages, most of which are within pages in the new test clip, were created from the recorded HTTP requests, while delays were calculated from the recorded think times.
23
Recording Steps – Option 2
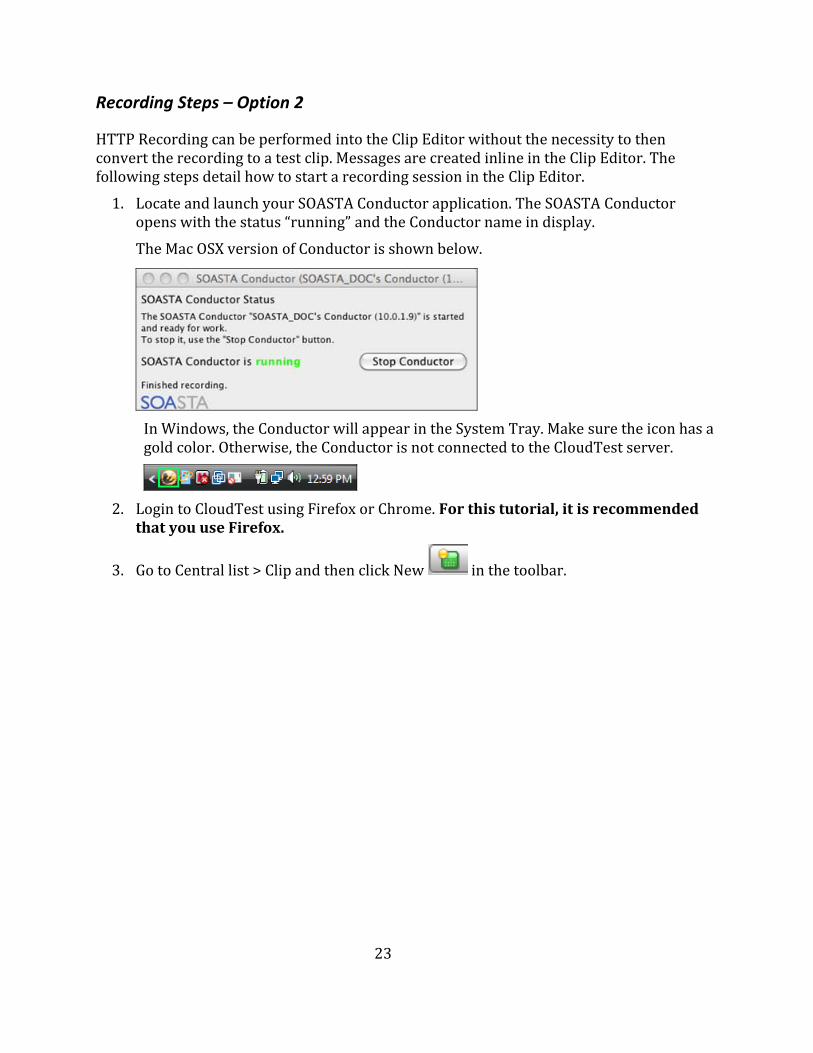
HTTP Recording can be performed into the Clip Editor without the necessity to then convert the recording to a test clip. Messages are created inline in the Clip Editor. The fol wlo ing steps detail how to start a recording session in the Clip Editor. 1. ion. The SOASTA Conductor
ame in display. Locate and launch your SOASTA Conductor applicatopens with the status “running” and the Conductor nThe Mac OSX version of Conductor is shown below.
In Windows, the Conductor will appear in the System Tray. Make sure the icon has a gold color. Otherwise, the Conductor is not connected to the CloudTest server.
2. Login to CloudTest using Firefox or Chrome. For this tutorial, it is recommended
that you use Firefox.
3. Go to Central list > Clip and then click New in the toolbar.
24
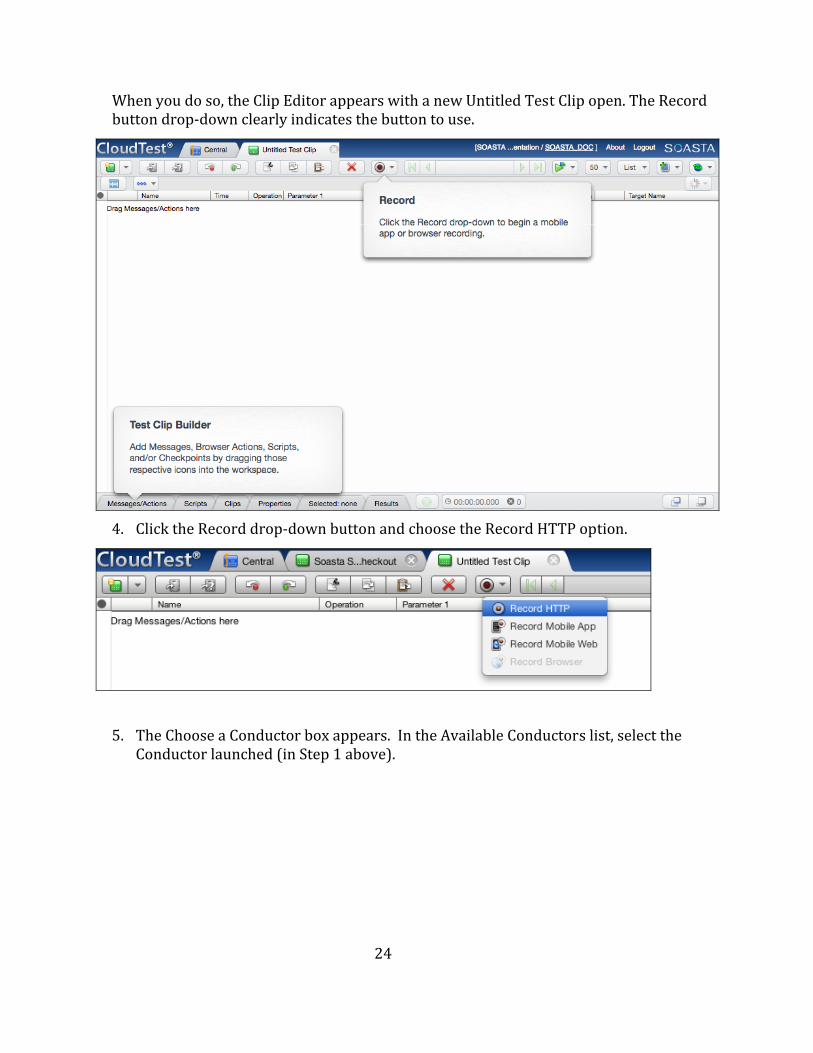
When you do so, the Clip Editor appears with a new Untitled Test Clip open. The Record button drop‐down clearly indicates the button to use.
4. Click the Record drop‐down button and choose the Record HTTP option.
5. The Choose a Conductor box appears. In the Available Conductors list, select the Conductor launched (in Step 1 above).
25
6. Ensure that your SOASTA Conductor status is “connected”. If your SOASTA
Conductor is not connected, the following steps will not work. Verify the Conductor connection settings and restart it.
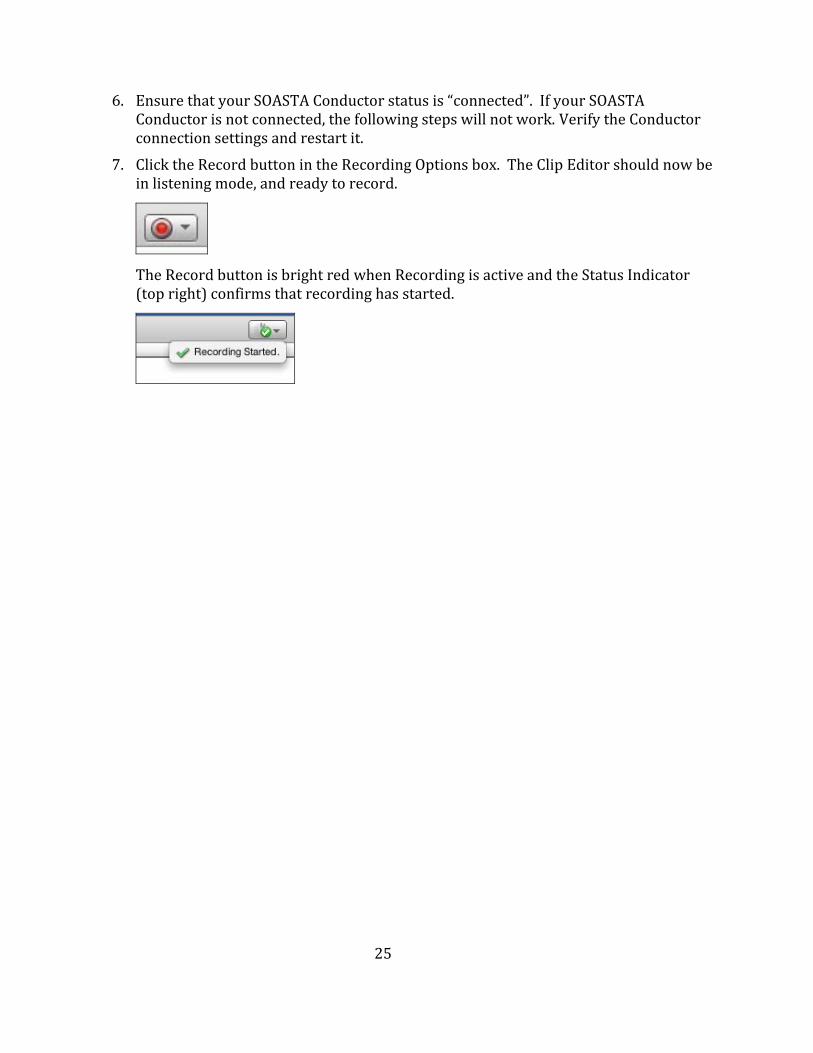
7. Click the Record button in the Recording Options box. The Clip Editor should now be in listening mode, and ready to record.
The Record button is bright red when Recording is active and the Status Indicator (top right) confirms that recording has started.
26
Note: When using this feature note that the clip is created as if it were recorded in the Recording Editor and then converted using the wizard conversion DEFAULTS. The underlying recording is still created and will be located in the Central > Recordings list.
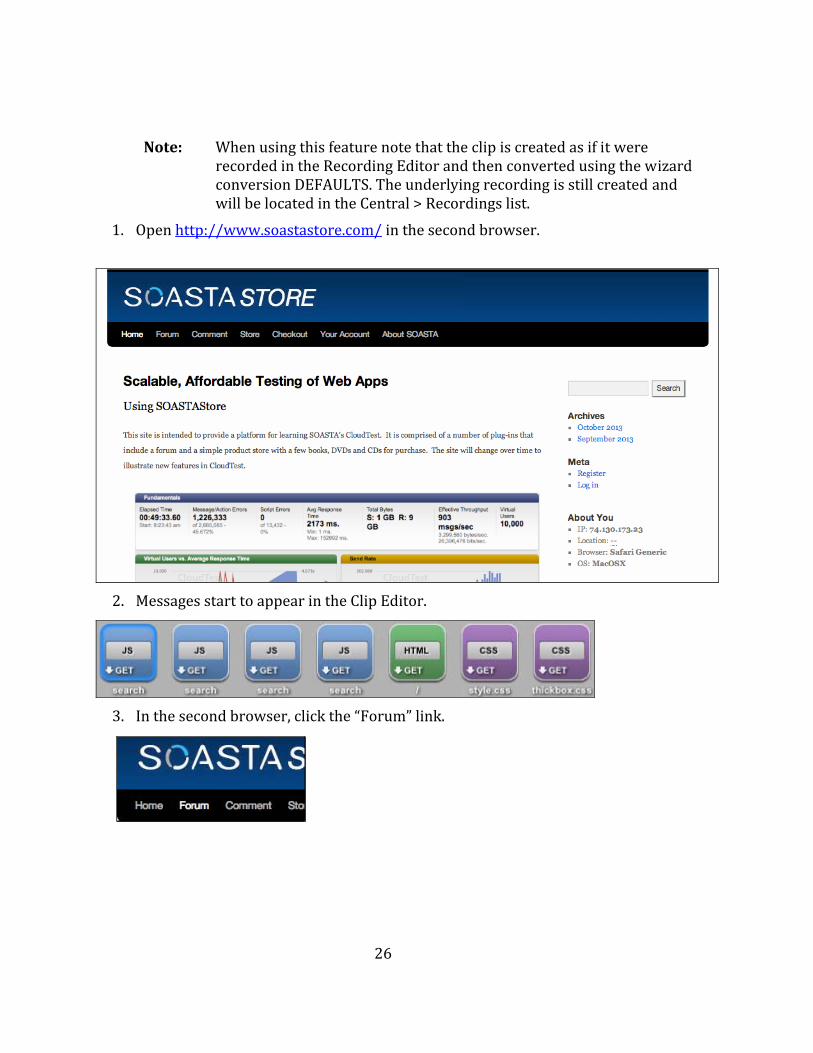
1. Open http://www.soastastore.com/ in the second browser.
2. Messages start to appear in the Clip Editor.
3. In the second browser, click the “Forum” link.
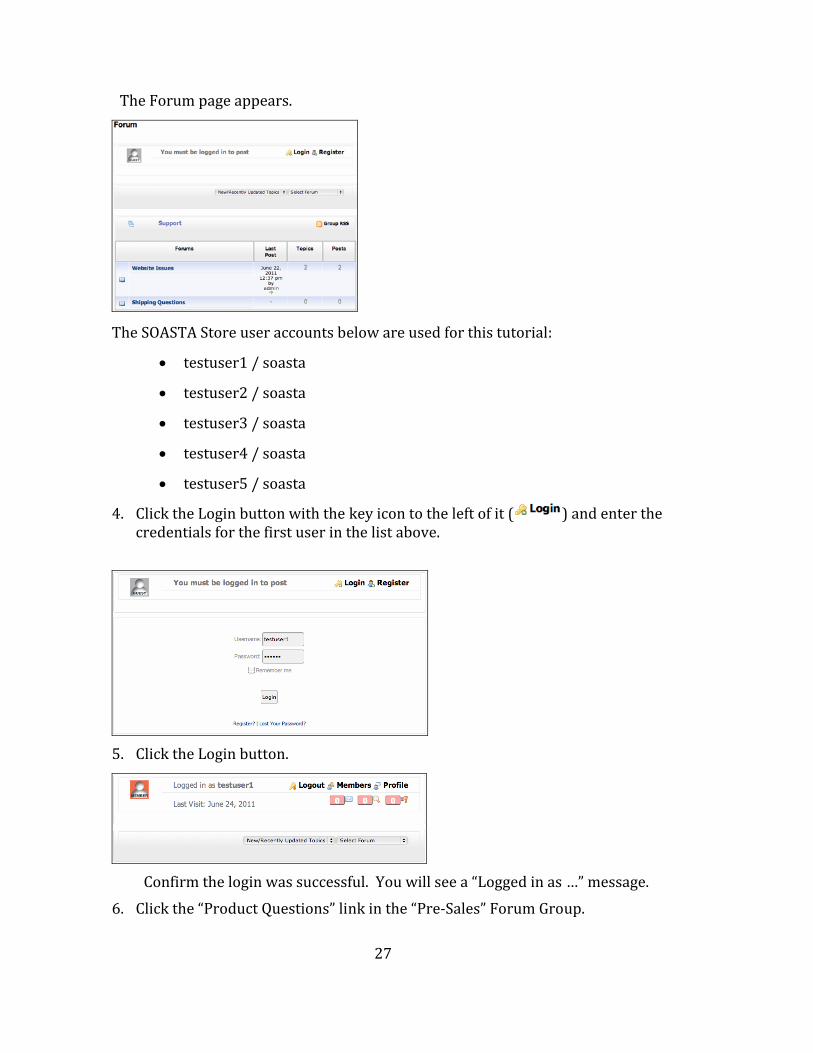
The Forum page appears.
The SOASTA Store user accounts below are used for this tutorial:
• testuser1 / soasta
• testuser2 / soasta
• testuser3 / soasta
• testuser4 / soasta
• testuser5 / soasta
4. Click the Login button with the key icon to the left of it ( ) and enter the credentials for the first user in the list above.
5. Click the Login button.
27
essage. Confirm the login was successful. You will see a “Logged in as …” m
6. Click the “Product Questions” link in the “Pre‐Sales” Forum Group.
28
7. Click the “Add a New Topic” link.
8. Enter “Post 1” as the Topic Name. .” as the content for this post. 9. Enter “This is sample text for Post 1
tton. 10. Click the “Post New Topic” bu 11. Click the “Reply to Post” link. As the content for this post. 12. Enter “This is reply text for Post 1.” 13. Click the “Post New Reply” button. 14. Click the “Logout” link at the top of the page.
15. Return to the first browser, with the Clip Editor open, and click the Record button
when you've finished your scenario. The Record button should no longer be lit.
Insp ce ting Your Recording in the Clip Editor
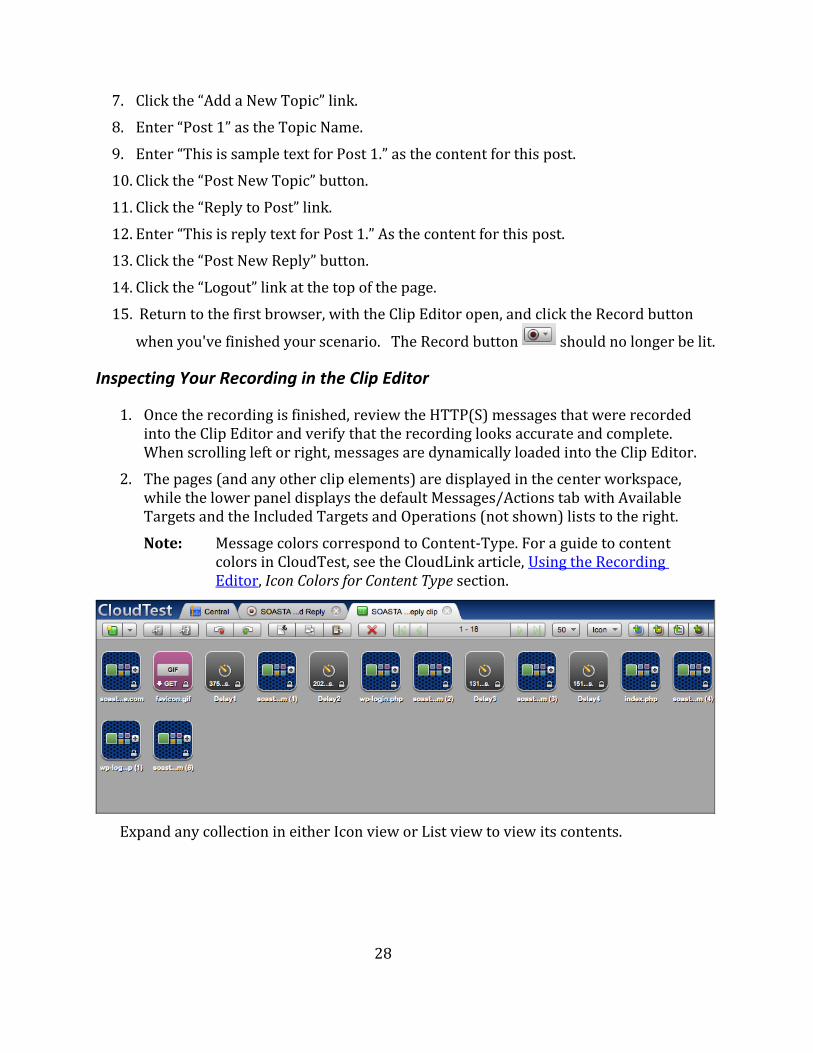
1. Once the recording is finished, review the HTTP(S) messages that were recorded
r. into the Clip Editor and verify that the recording looks accurate and complete. When scrolling left or right, messages are dynamically loaded into the Clip Edito
2. The pages (and any other clip elements) are displayed in the center workspace, while the lower panel displays the default Messages/Actions tab with Available Targets an . d the Included Targets and Operations (not shown) lists to the rightNote: Message colors correspond to Content‐Type. For a guide to content
colors in CloudTest, see the CloudLink article, Using the Recording Editor, Icon Colors for Content Type section.
Expand any collection in either Icon view or List view to view its contents.
29
An alternative “List” view is available that shows each page request (or message) in a sequential view. The List view is a good way to edit tests as you have more visibility to the individual URLs the test is executing.. To change to this view, click the button with “Icon” word on it ( ) and click “List” in the drop‐down.
The clip will now look like the screenshot below. Expand the pages to see the requests within that page by clicking the grey triangle to the left of the page name. The HTML Document portion of the page is separated from the Resources.
The messages, most of which are within pages in the new test clip, were created from the recorded HTTP requests, while delays were calculated from the recorded think times.
30
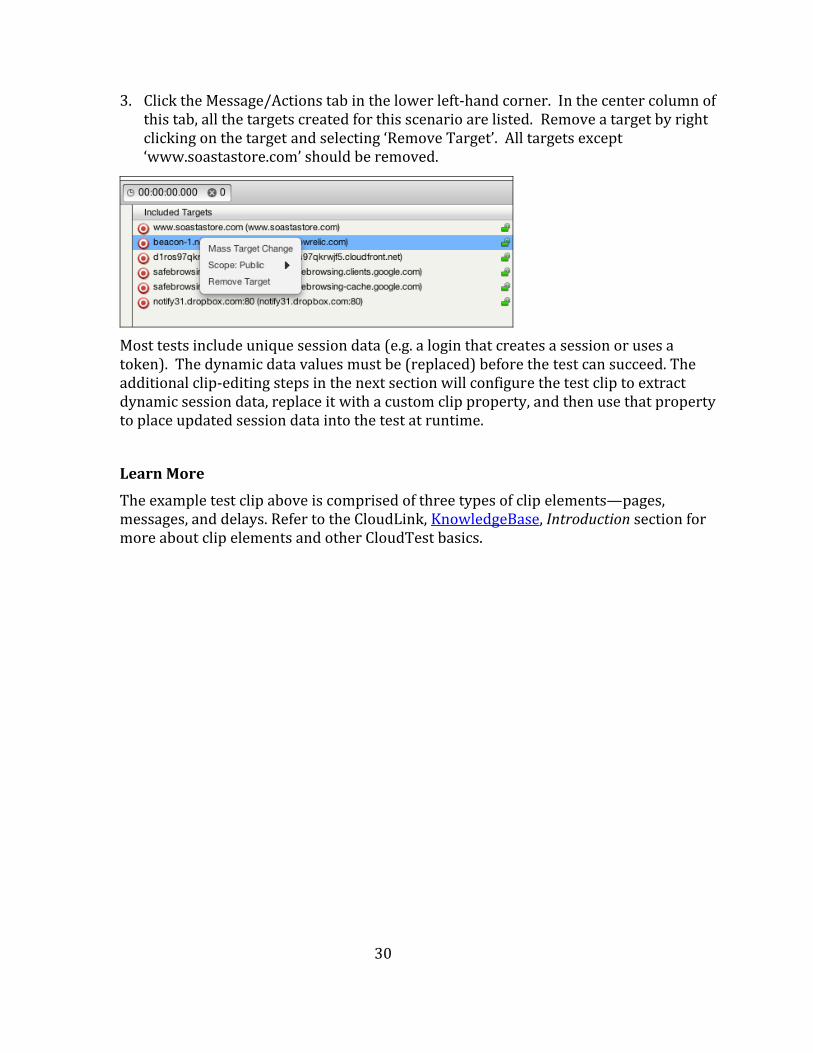
3. Click the Message/Actions tab in the lower left‐hand corner. In the center column of
this tab, all the targets created for this scenario are listed. Remove a target by right clicking on the target and selecting ‘Remove Target’. All targets except ‘www.soastastore.com’ should be removed.
Most tests include unique session data (e.g. a login that creates a session or uses a token). The dynamic data values must be (replaced) before the test can succeed. The additional clip‐editing steps in the next section will configure the test clip to extract dynamic session data, replace it with a custom clip property, and then use that property to place updated session data into the test at runtime.
Learn More
The example test clip above is comprised of three types of clip elements—pages, messages, and delays. Refer to the CloudLink, KnowledgeBase, Introduction section for more about clip elements and other CloudTest basics.
31
Using the Session Template Package Wizard Now that a test clip has been created from the recording, the next step is to identify and substitute dynamic properties for those messages that require unique session data (e.g. parameters). In this section we will utilize the Session Template Package Wizard, which creates a re‐usable “Package” that can be applied to other tests that use the same name/value pairs. The Session Template Package Wizard uses a clip scanning method to search for potential name/value pairs that might be dynamic in the test. When the scan is complete, it provides a list of possible values to replace. Data can be extracted in the wizard using SubString parsing, XPath, by creating a new inline script, or by using an existing script. The Session Template Package Wizard can be started from within the clip itself (as described below), or you can right‐click on a clip in the clip list in SOASTA Central and cho ethe ip
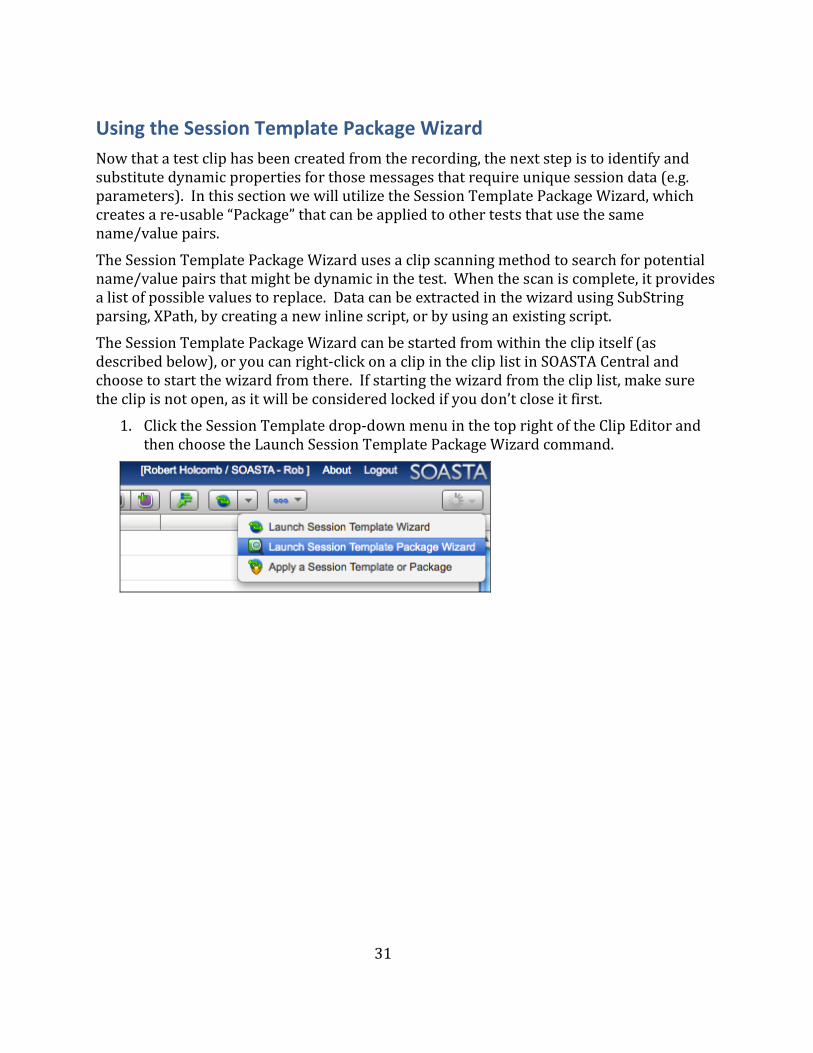
os to start the wizard from there. If starting the wizard from the clip list, make sure cl is not open, as it will be considered locked if you don’t close it first. 1. Click the Session Template drop‐down menu in the top right of the Clip Editor and
then choose the Launch Session Template Package Wizard command.
32
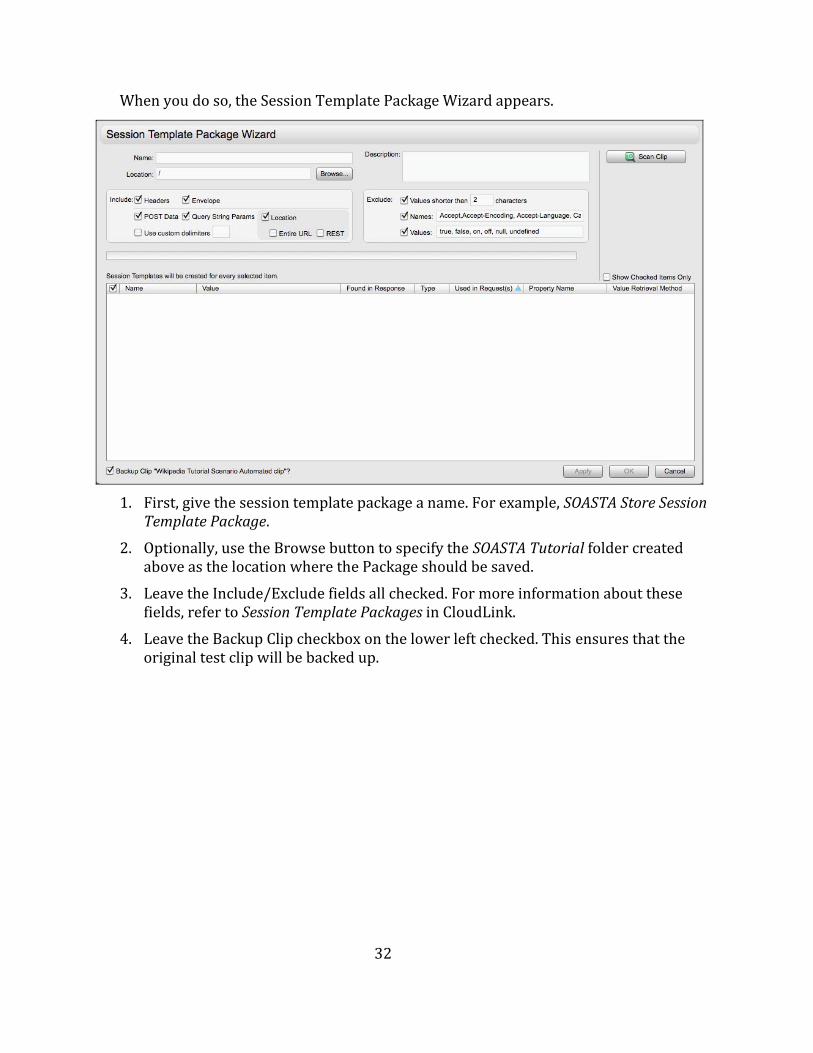
When you do so, the Session Template Package Wizard appears.
1. First, give the session template package a name. F
Template Package. SOASTA Tutorial
or example, SOASTA Store Session
2. Optionally, use the Browse button to specify the folder created above as the location where the Package should be saved.
3. Leave the Include/Exclude fields all checked. For more information about these fields, refer to Session Template Packages in CloudLink.
4. Leave the Backup Clip checkbox on the lower left checked. This ensures that the original test clip will be backed up.
33
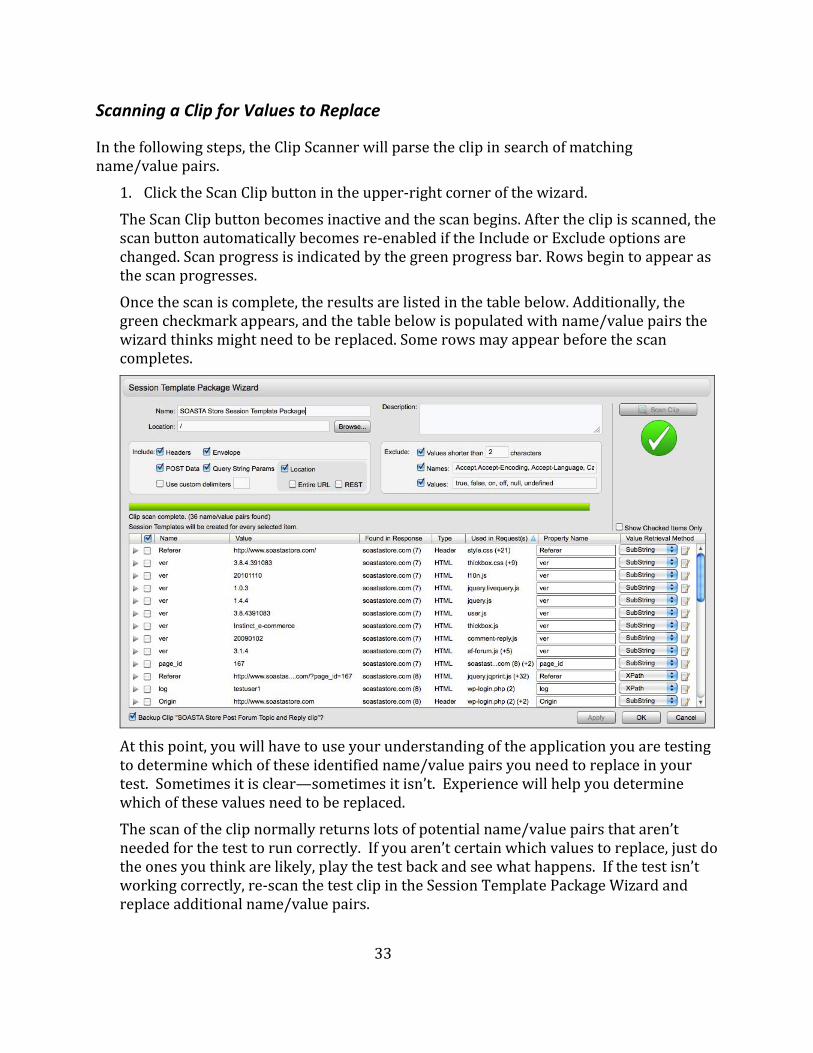
Scanning a Clip for Values to Replace
In the following steps, the Clip Scanner will parse the clip in search of matching nam /ve alue pairs.
1. Click the Scan Clip button in the upper‐right corner of the wizard. The Scan Clip button becomes inactive and the scan begins. After the clip is scanned, the scan button automatically becomes re‐enabled if the Include or Exclude options are
as changed. Scan progress is indicated by the green progress bar. Rows begin to appearthe scan progresses. Once the scan is complete, the results are listed in the table below. Additionally, the green checkmark appears, and the table below is populated with name/value pairs the wizard thinks might need to be replaced. Some rows may appear before the scan completes.
At this point, you will have to use your understanding of the application you are testing to determine which of these identified name/value pairs you need to replace in your test. Sometimes it is clear—sometimes it isn’t. Experience will help you determine which of these values need to be replaced. The scan of the clip normally returns lots of potential name/value pairs that aren’t needed for the test to run correctly. If you aren’t certain which values to replace, just do the ones you think are likely, play the test back and see what happens. If the test isn’t working correctly, re‐scan the test clip in the Session Template Package Wizard and replace additional name/value pairs.

34
The wizard allows you to configure multiple session templates at the same time. Just check the box to the left of the identified name/value pair and start the process for each session template. Let’s walk through a couple examples that utilize the SubString arser and XPath to extract the dynamic values. p
35
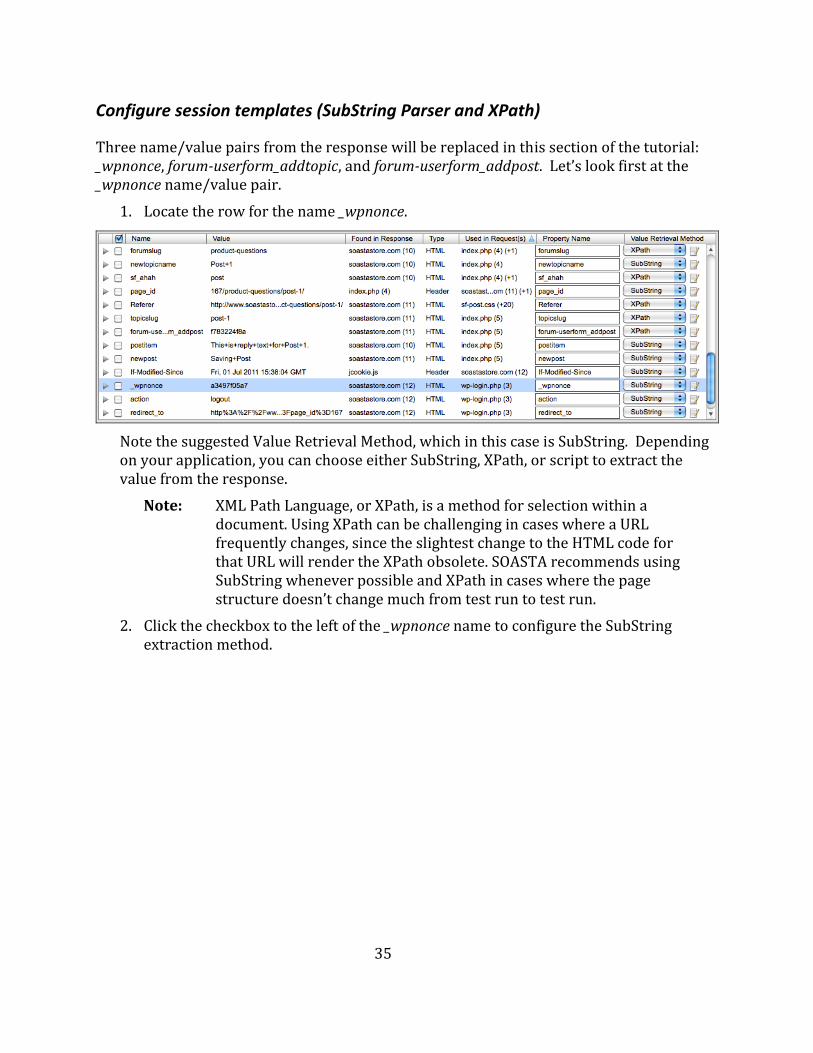
Configure session templates (SubString Parser and XPath)
Three name/value pairs from the response will be replaced in this section of the tutorial: _wpnonce, forumuserform_addtopic, and forumuserform_addpost. Let’s look first at the _wp nno ce name/value pair.
1. Locate the row for the name _wpnonce.
Note the suggested Value Retrieval Method, which in this case is SubString. Depending on your a plic t the value from the
p ation, you can choose either SubString, XPath, or script to extrac response.
Note: XML Path Language, or XPath, is a method for selection within a document. Using XPath can be challenging in cases where a URL frequently changes, since the slightest change to the HTML code for that URL will render the XPath obsolete. SOASTA recommends using SubString whenever possible and XPath in cases where the page
much frostructure doesn’t change m test run to test run. 2. Click the checkbox to the left of the _wpnonce name to configure the SubString
extraction method.
36
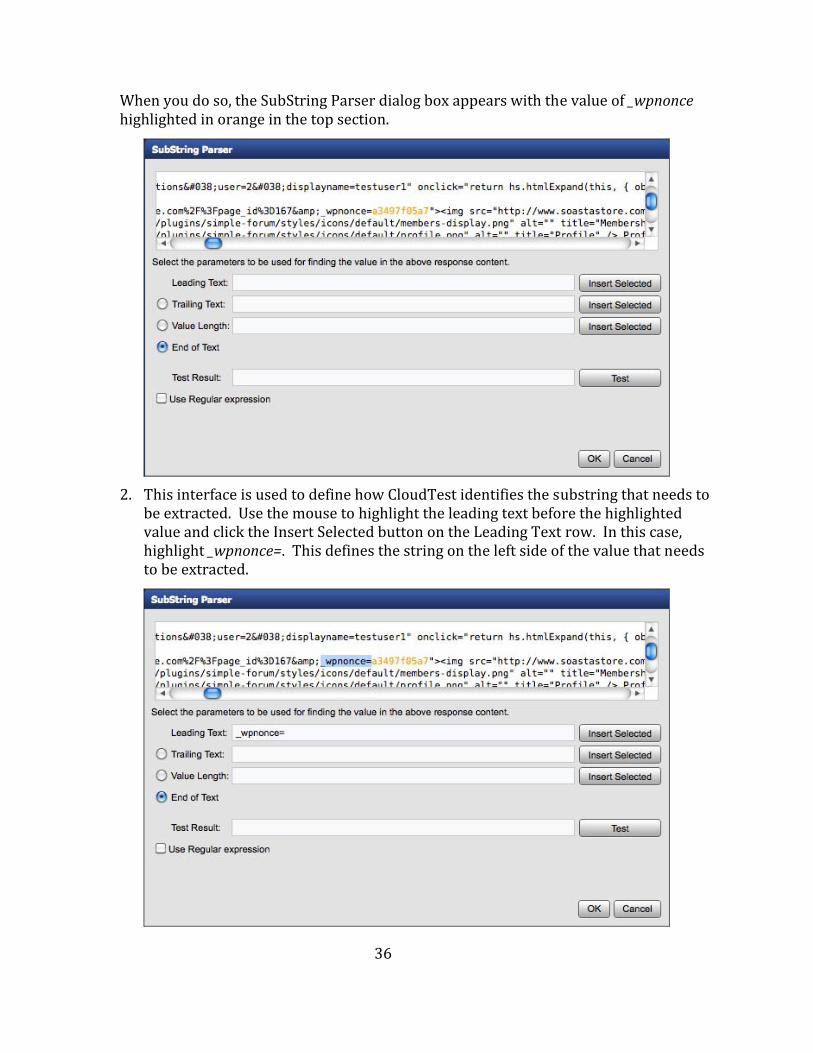
When you do so, the SubString Parser dialog box appears with the value of _wpnonce highlighted in orange in the top section.
2. This interface is used to define how CloudTest identifies the substring that needs to
be extracted. Use the mouse to highlight the leading text before the highlighted value and click the Insert Selected button on the Leading Text row. In this case, highlight _wpnonce=. This defines the string on the left side of the value that needs to be extracted.
37
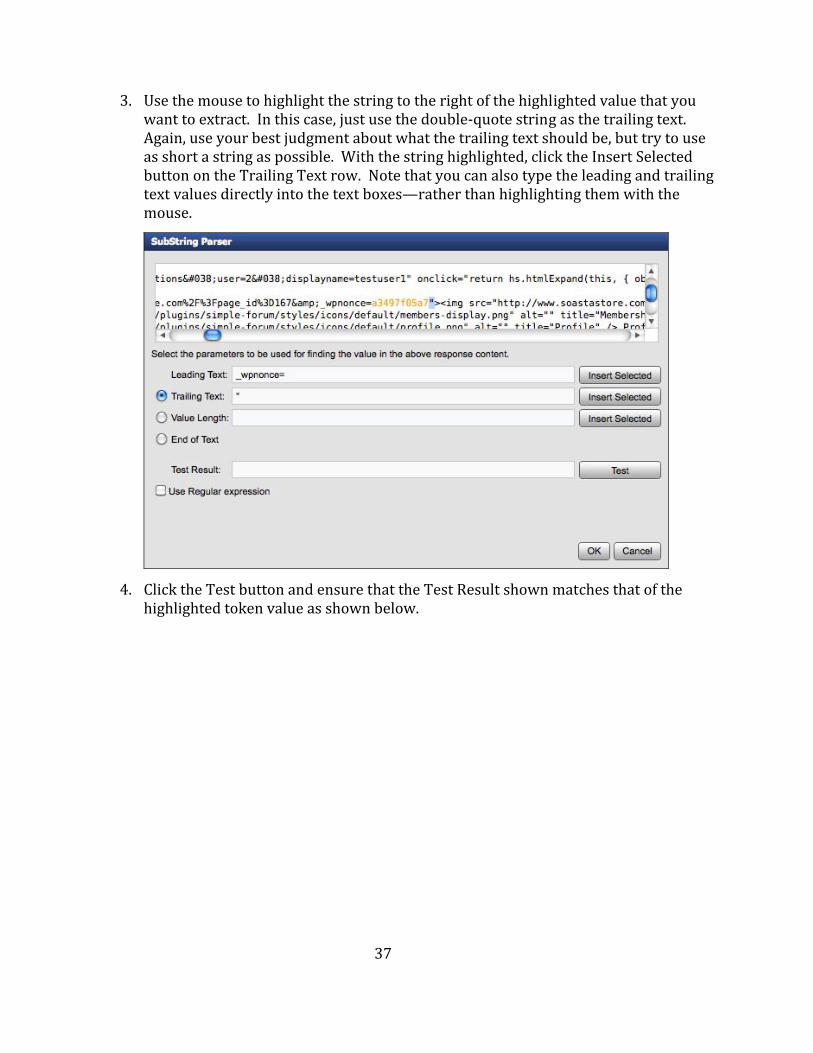
3. Use the mouse to highlight the string to the right of the highlighted value that you
want to extract. In this case, just use the double‐quote string as the trailing text. Again, use your best judgment about what the trailing text should be, but try to use as short a string as possible. With the string highlighted, click the Insert Selected button on the Trailing Text row. Note that you can also type the leading and trailing text values directly into the text boxes—rather than highlighting them with the mouse.
4. Click the Test button and ensure that the Test Result shown matches that of the
highlighted token value as shown below.

38
5. Click OK to exit the SubString Parser. Note that the _wpnonce row is now checked
and that the specified value retrieval method is SubString Parser. The _wpnonce ration is now complete. session template configu
6. Next, let’s configure the forumuserform_addtopic session template. In this case, CloudTest has determined that this value can be extracted via XPath (as shown in the suggested Value Retrieval Method column).
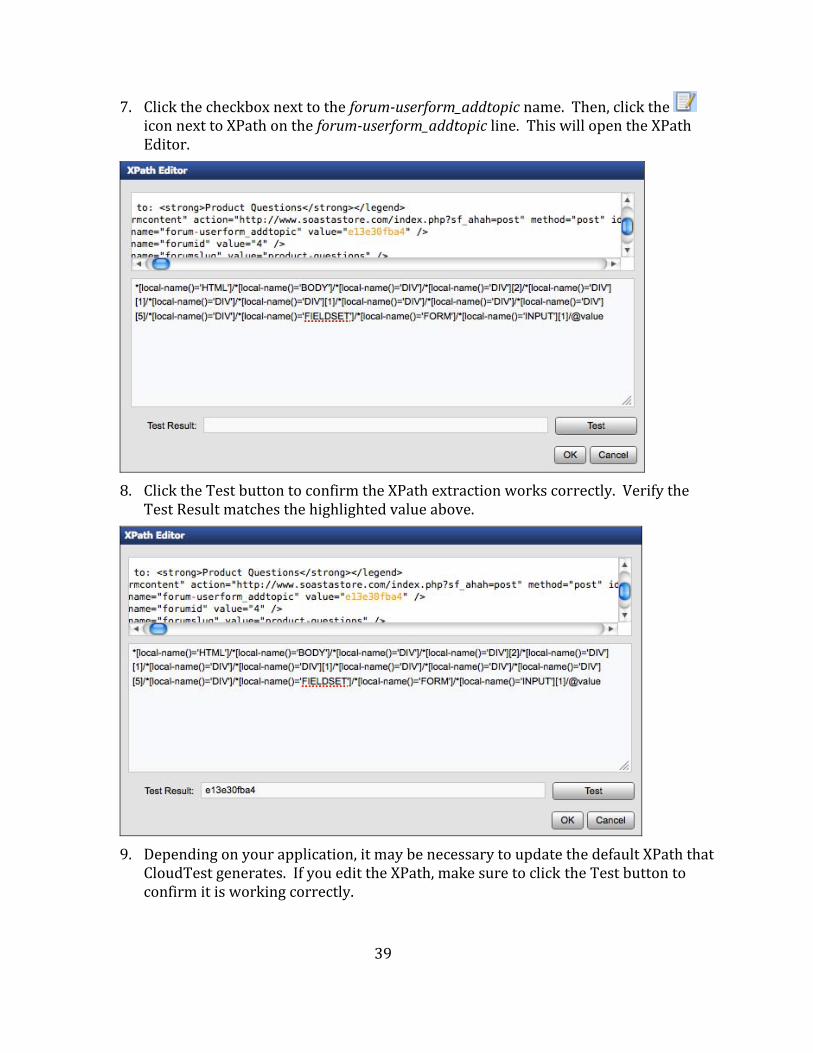
39
7. Click the checkbox next to the forumuserform_addtopic name. Then, click the icon next to XPath on the forumuserform_addtopic line. This will open the XPath Editor.
8. Click the Test button to confirm the XPath extraction works correctly. Verify the
Test Result matches the highlighted value above.
9. Depending on your application, it may be necessary to update the default XPath that
CloudTest generates. If you edit the XPath, make sure to click the Test button to confirm it is working correctly.
40
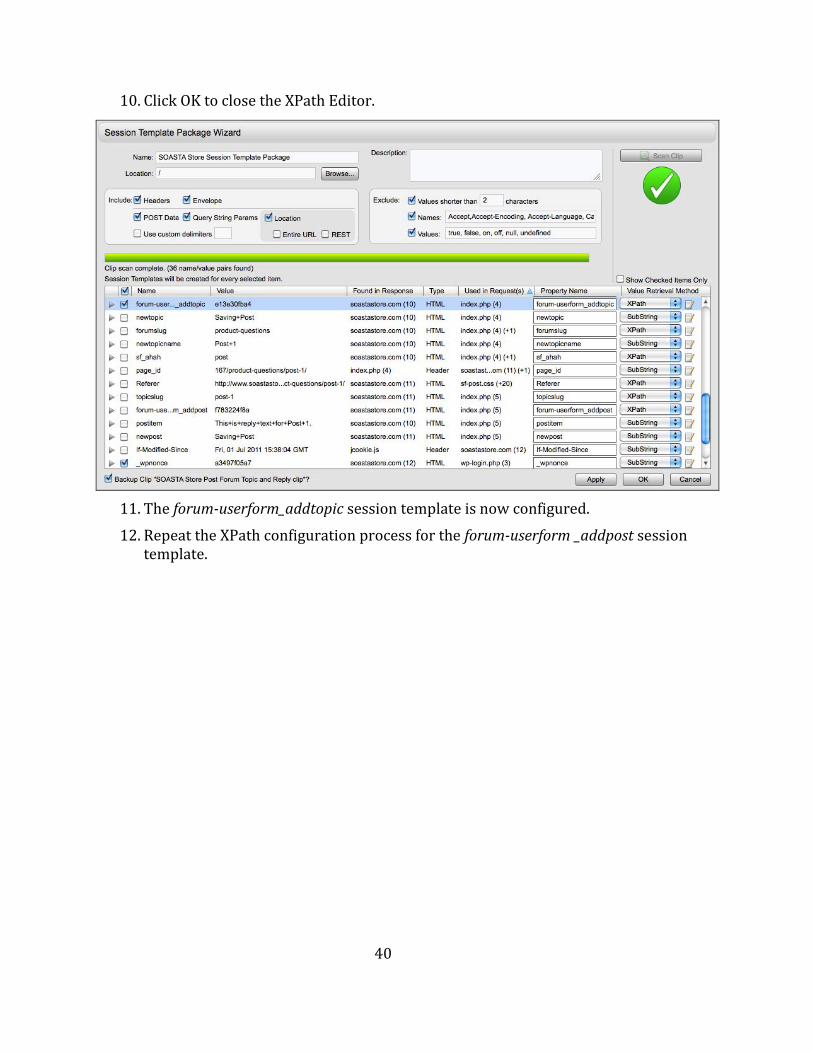
10. Click OK to close the XPath Editor.
11. The forumuserform_addtopic session template 12. Repeat the XPath configuration process for the forumuserform _addpost session
template.
is now configured.
41
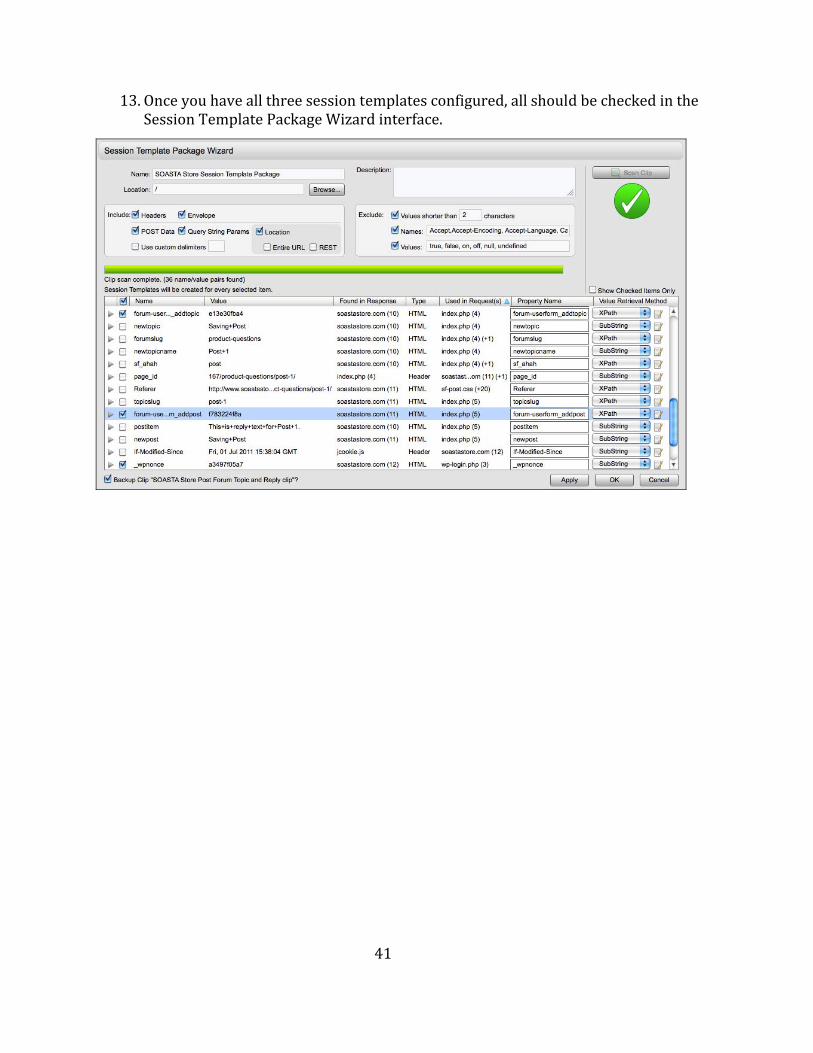
13. Once you have all three session templates configured, all should be checked in the
Session Template Package Wizard interface.
42
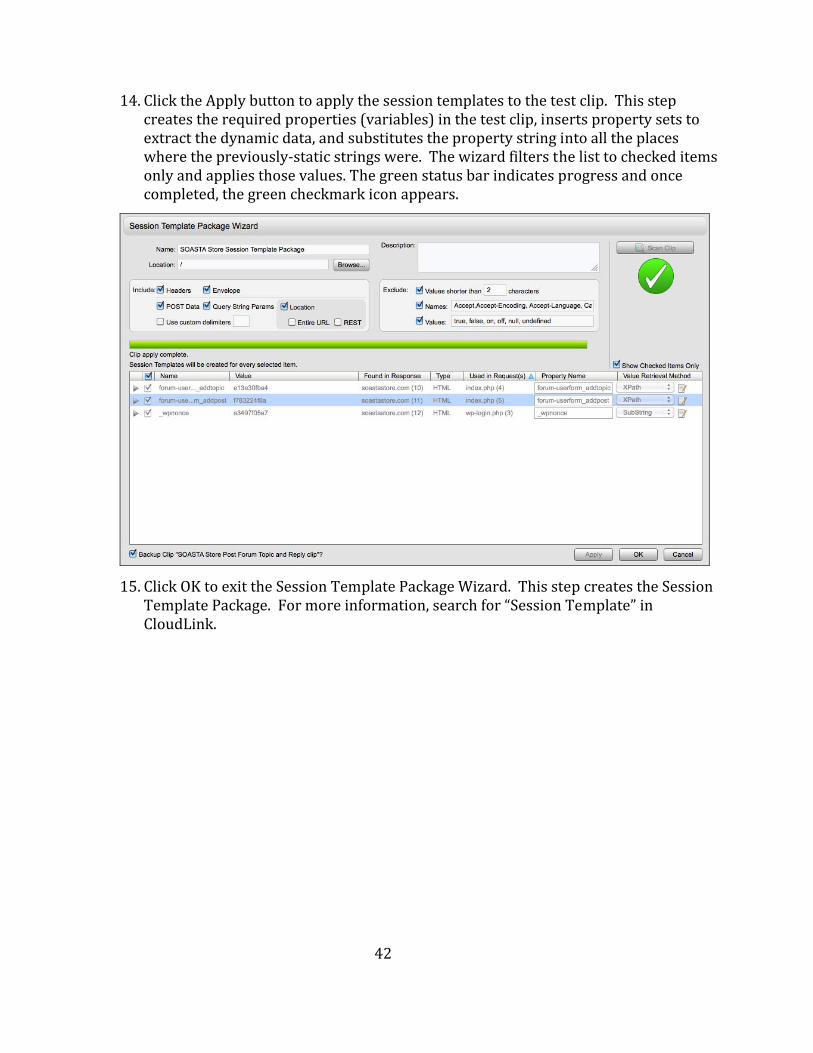
14. Click the Apply button to apply the session templates to the test clip. This step
creates the required properties (variables) in the test clip, inserts property sets to extract the dynamic data, and substitutes the property string into all the places where the previously‐static strings were. The wizard filters the list to checked items only and applies those values. The green status bar indicates progress and once completed, the green checkmark icon appears.
15. Click OK to exit the Session Template Package Wizard. This step creates the Session
Template Package. For more information, search for “Session Template” in CloudLink.

43
Inspecting Applied Session Template Values
Now that the test clip has had the session templates applied, let’s review the changes that wer m te value. e ade to the clip by the wizard and inspect the applied templa
1. Click the Properties tab in the lower panel of the Clip Editor
The custom properties have assumed the names extracted from the SOASTA Store site, whi wch as identified in the Session Template Package Wizard above.
2. Click the Applied Session Templates & Packages node in the Property Type list.
3. The SOASTA Store Session Template Package appears in the Name list on the right.
Click its arrow to expand the session templates within the package.
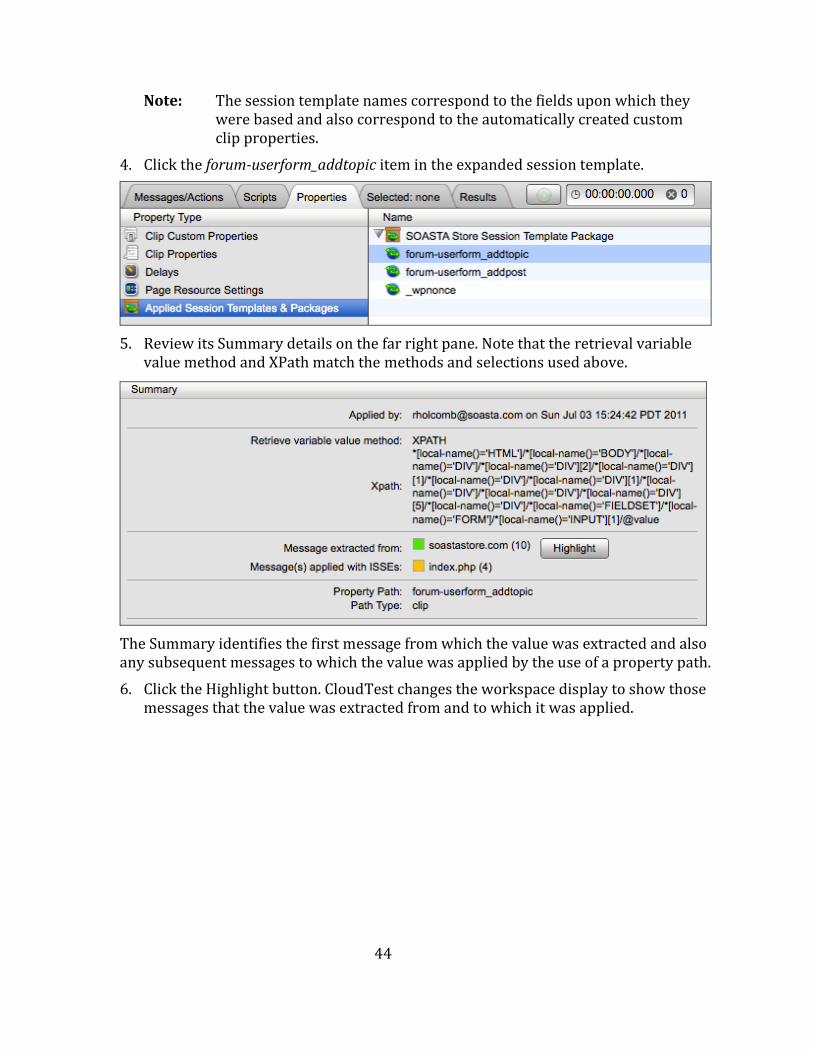
44
Note: The session template names correspond to the fields upon which they
were based and also correspond to the automatically created custom clip properties.
4. Click the forumuserform_addtopic item in the expanded session template.
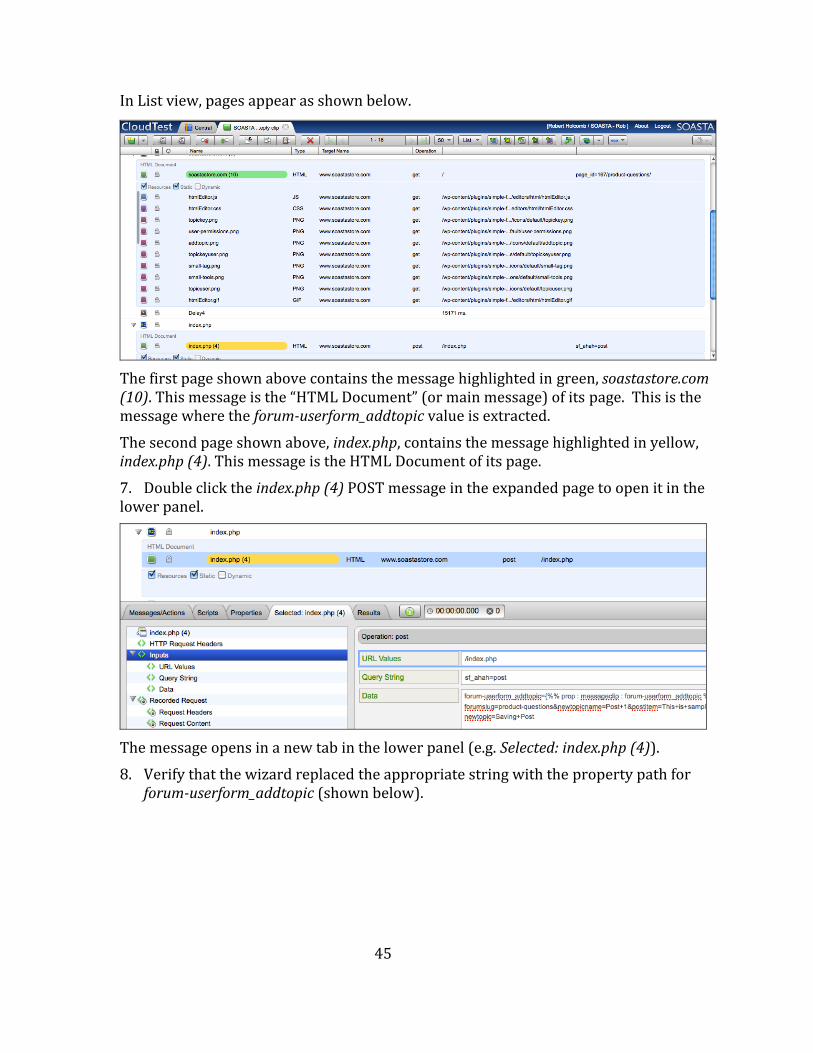
5. Review its Summary details on the far right pane. Note that the retrieval variable
value method and XPath match the methods and selections used above.
The Summary identifies the first message from which the value was extracted and also any subsequent messages to which the value was applied by the use of a property path.6. Click the Highlight button. CloudTest changes the workspace display to show those
messages that the value was extracted from and to which it was applied.
45
In List view, pages appear as shown below.
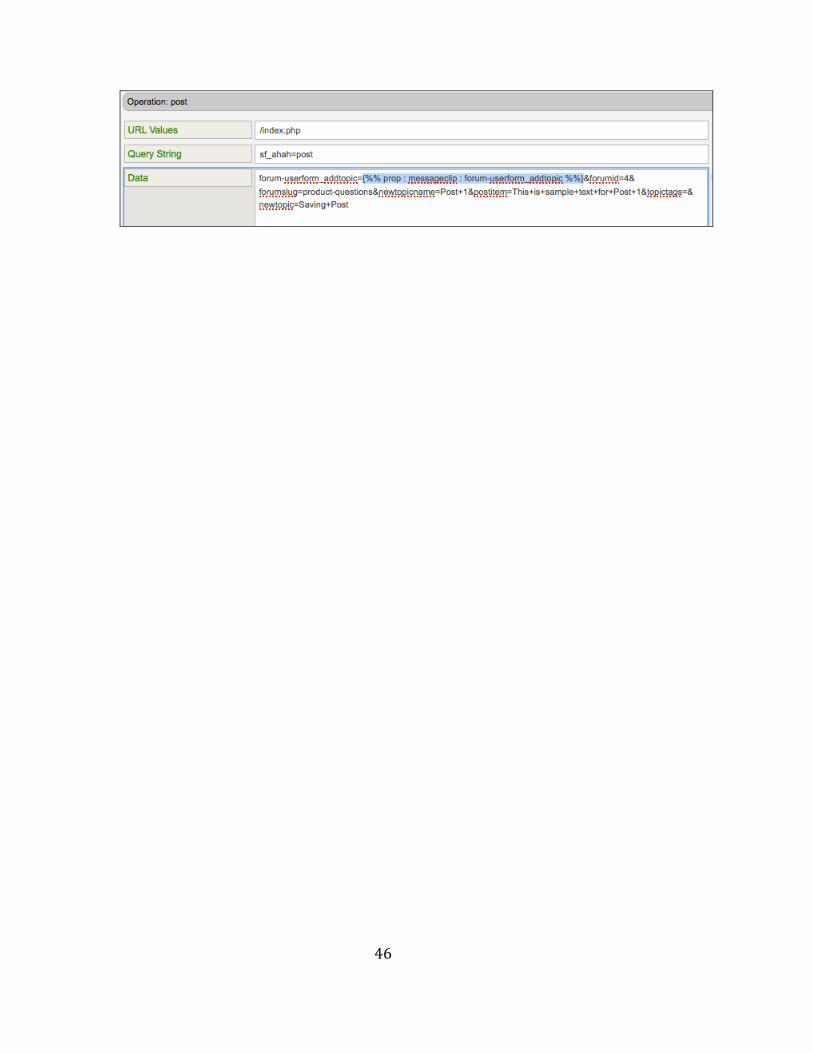
The first page shown above contains the message highlighted in green, soastastore.com (10). This message is the “HTML Document” (or main message) of its page. This is the message where the forumuserform_addtopic value is extracted. The second page shown above, index.php, contains the message highlighted in yellow, index.php (4). This message is the HTML Document of its page. 7. Double click the index.php (4) POST message in the expanded page to open it in the lower panel.
The message opens in a new tab in the lower panel (e.g. Selected: index.php (4)). 8. Verify that the wizard replaced the appropriate string with the property path for
forumuserform_addtopic (shown below).
46
47
Pre‐test Page validation
Verify Pages are grouped correctly
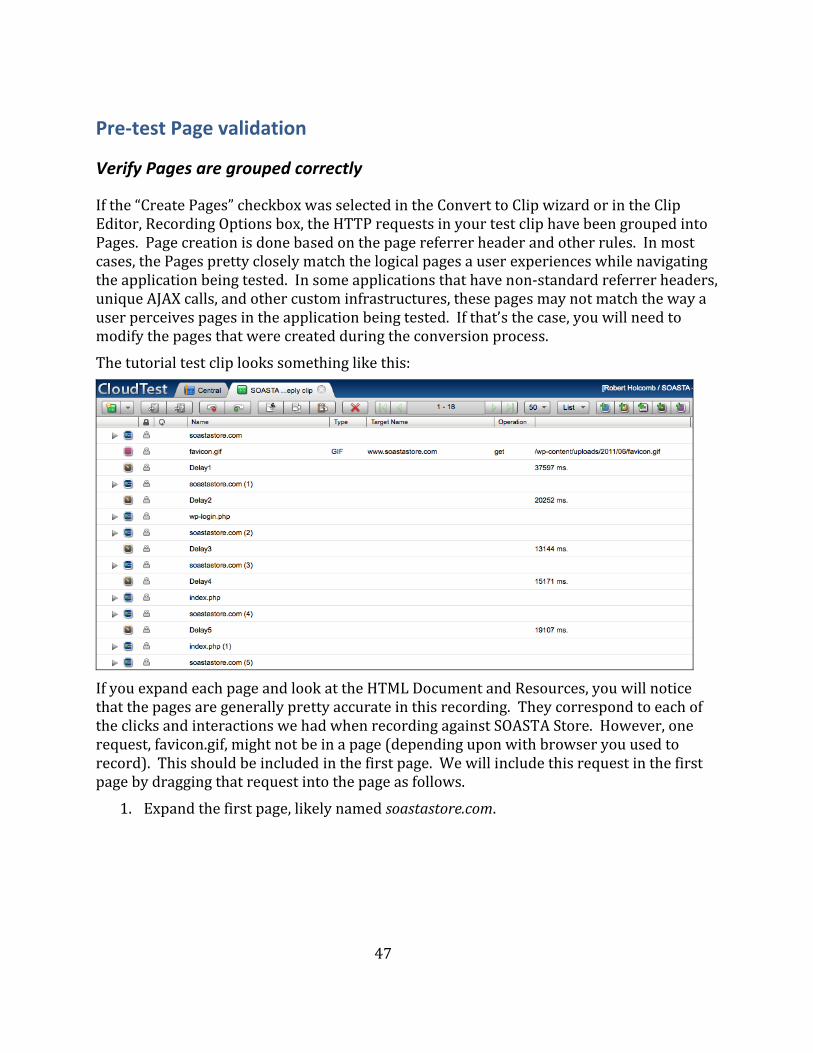
If the “Create Pages” checkbox was selected in the Convert to Clip wizard or in the Clip Editor, Recording Options box, the HTTP requests in your test clip have been grouped into Pages. Page creation is done based on the page referrer header and other rules. In most cases, the Pages pretty closely match the logical pages a user experiences while navigating the application being tested. In some applications that have non‐standard referrer headers, unique AJAX calls, and other custom infrastructures, these pages may not match the way a user perceives pages in the application being tested. If that’s the case, you will need to
onversion process. modify the pages that were created during the cThe tutorial test clip looks something like this:
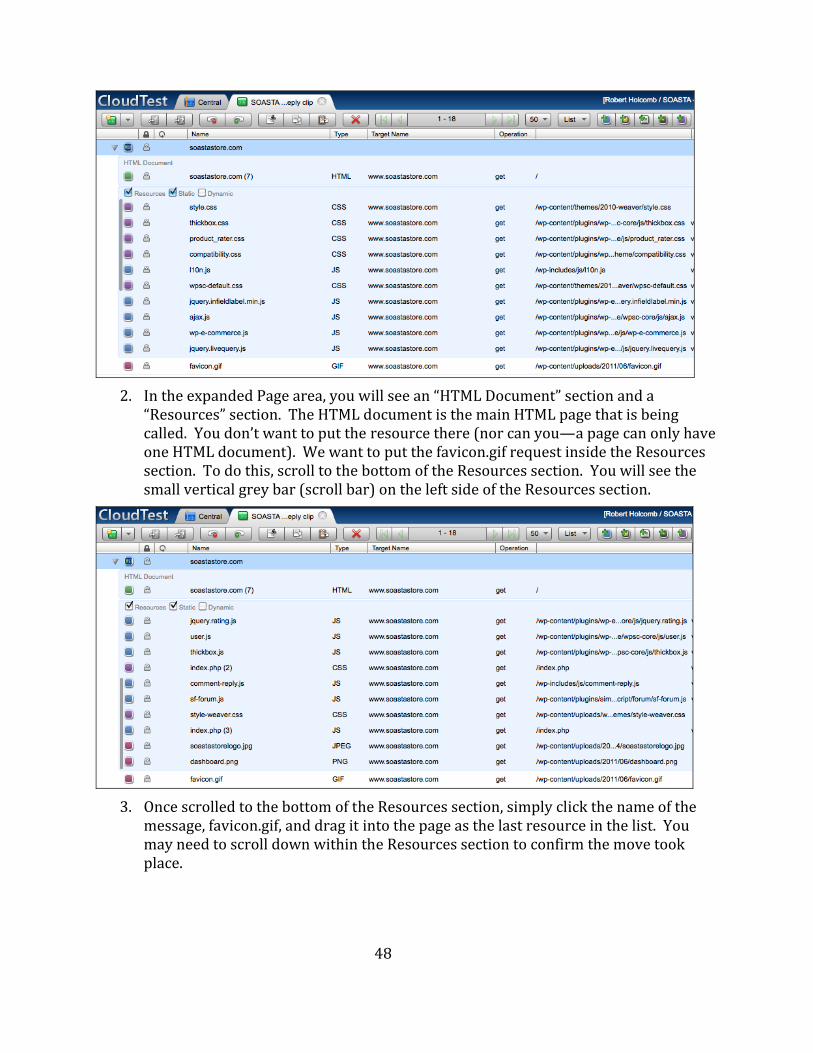
If you expand each page and look at the HTML Document and Resources, you will notice that the pages are generally pretty accurate in this recording. They correspond to each of the clicks and interactions we had when recording against SOASTA Store. However, one request, favicon.gif, might not be in a page (depending upon with browser you used to record). This should be included in the first page. We will include this request in the first pag y as follows. e b dragging that request into the page
1. Expand the first page, likely named soastastore.com.
48
2. In the expanded Page area, you will see an “HTML Document” section and a
“Resources” section. The HTML document is the main HTML page that is being called. You don’t want to put the resource there (nor can you—a page can only have one HTML document). We want to put the favicon.gif request inside the Resources section. To do this, scroll to the bottom of the Resources section. You will see the small vertical grey bar (scroll bar) on the left side of the Resources section.
3. Once scrolled to the bottom of the Resources section, simply click the name of the
message, favicon.gif, and drag it into the page as the last resource in the list. You may need to scroll down within the Resources section to confirm the move took place.

49
4. Click the Save icon on the toolbar to save the Test Clip. 5. If you collapse the first page by clicking the triangle icon, you will see that the
favicon.gif request is now incorporated into the Page and no longer gets requested on its own.
6. Depending on the factors listed above, you may need to do this zero or more times
for each test clip.
Rename Pages (and messages) as appropriate
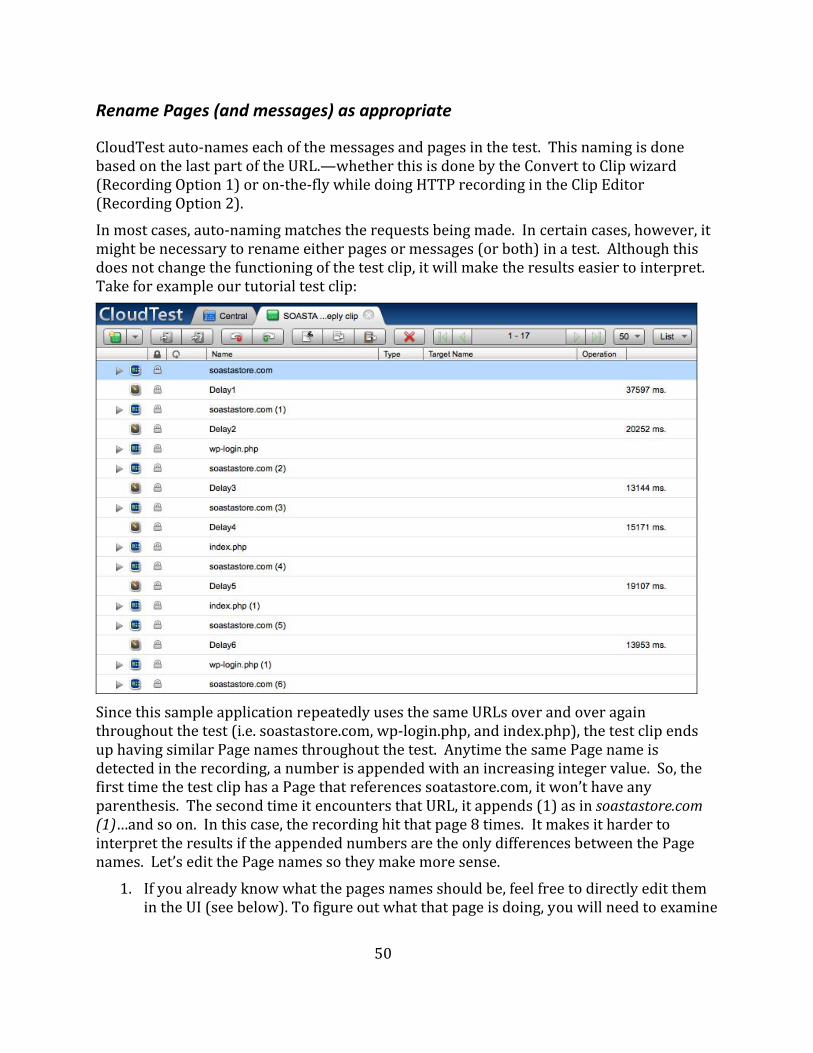
CloudTest auto‐names each of the messages and pages in the test. This naming is done based on the last part of the URL.—whether this is done by the Convert to Clip wizard (Recording Option 1) or on‐the‐fly while doing HTTP recording in the Clip Editor (Recording Option 2). In most cases, auto‐naming matches the requests being made. In certain cases, however, it might be necessary to rename either pages or messages (or both) in a test. Although this does not change the functioning of the test clip, it will make the results easier to interpret. Take for example our tutorial test clip:
Since this sample application repeatedly uses the same URLs over and over again throughout the test (i.e. soastastore.com, wp‐login.php, and index.php), the test clip ends up having similar Page names throughout the test. Anytime the same Page name is detected in the recording, a number is appended with an increasing integer value. So, the first time the test clip has a Page that references soatastore.com, it won’t have any parenthesis. The second time it encounters that URL, it appends (1) as in soastastore.com (1)…and so on. In this case, the recording hit that page 8 times. It makes it harder to inte rnam s.
50
rp et the results if the appended numbers are the only differences between the Page e Let’s edit the Page names so they make more sense. 1. If you already know what the pages names should be, feel free to directly edit them
in the UI (see below). To figure out what that page is doing, you will need to examine
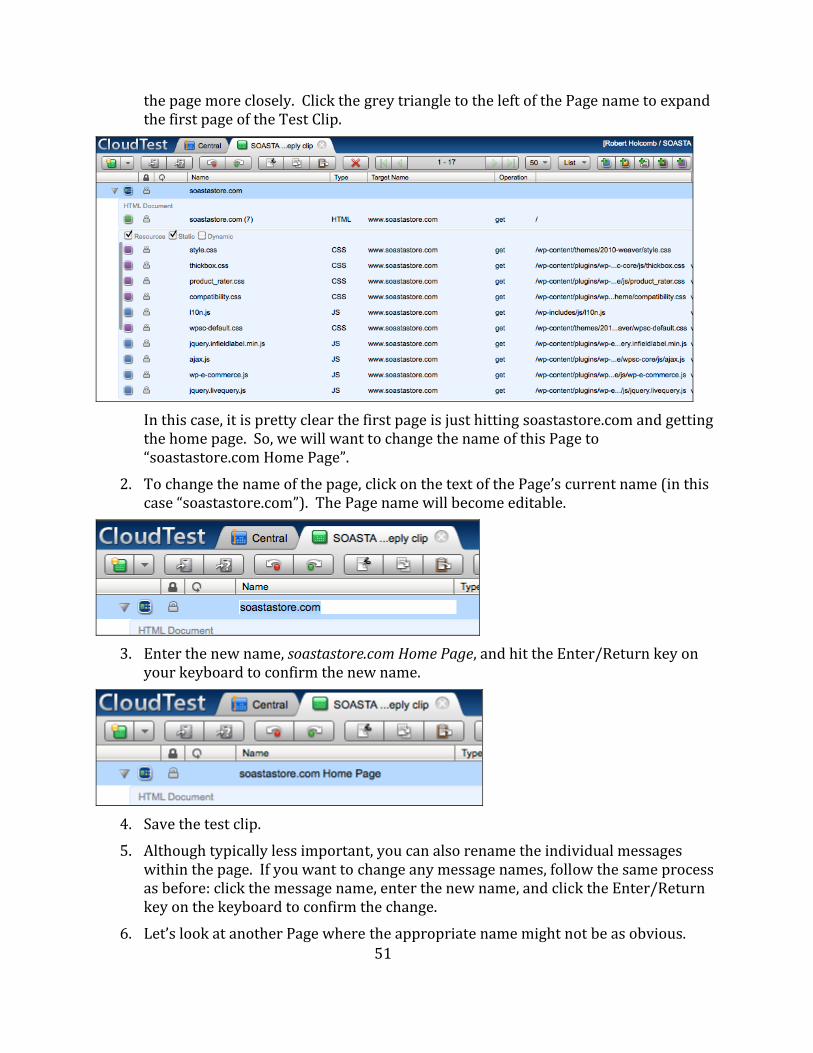
the page more closely. Click the grey triangle to the left of the Page name to expand the first page of the Test Clip.
In this case, it is pretty clear the first page is just hitting soastastore.com and getting the home page. So, we will want to change the name of this Page to “soastastore.com Home Page”.
2. To change the name of the page, click on the text of the Page’s current name (in this case “soastastore.com”). The Page name will become editable.
3. Enter the new name, soastastore.com Home Page, and hit the Enter/Return key on
your keyboard to confirm the new name.
51
4. Save the test clip. 5. Although typically less important, you can also rename the individual messages
within the page. If you want to change any message names, follow the same process as before: click the message name, enter the new name, and click the Enter/Return
key on the keyboard to confirm the change. 6. Let’s look at another Page where the appropriate name might not be as obvious.
52
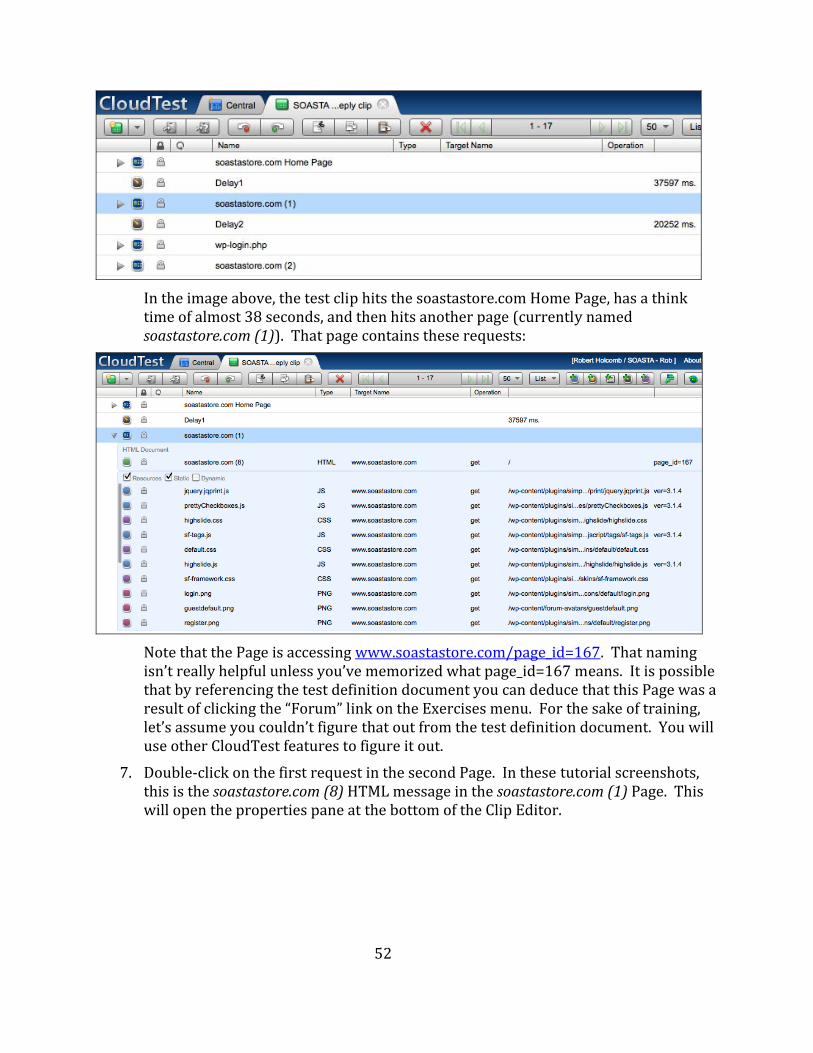
In the image above, the test clip hits the soastastore.com Home Page, has a think time of almost 38 seconds, and then hits another page (currently named soastastore.com (1)). That page contains these requests:
Note that the Page is accessing www.soastastore.com/page_id=167. That naming isn’t really helpful unless you’ve memorized what page_id=167 means. It is possible that by referencing the test definition document you can deduce that this Page was a result of clicking the “Forum” link on the Exercises menu. For the sake of training, let’s assume you couldn’t figure that out from the test definition document. You will use other CloudTest features to figure it out.
7. Double‐click on the first request in the second Page. In these tutorial screenshots, this is the soastastore.com (8) HTML message in the soastastore.com (1) Page. This will open the properties pane at the bottom of the Clip Editor.

53
8. Once you’ve double‐clicked on a message, you have the ability to see the recorded
request and response for that message. This is the request/response that occurred at the time of your recording. This is always available as a reference while you are building tests. Having this information available as part of the test clip is frequently used to compare the test you are editing to a “known good” execution of the test. That way you can compare headers, content, etc. to help troubleshoot any issues you might experience with a particular message. Click the ‘Response Headers’ item on the left.
9. Many times this data is useful to determine if an HTTP 302 redirect occurred in the
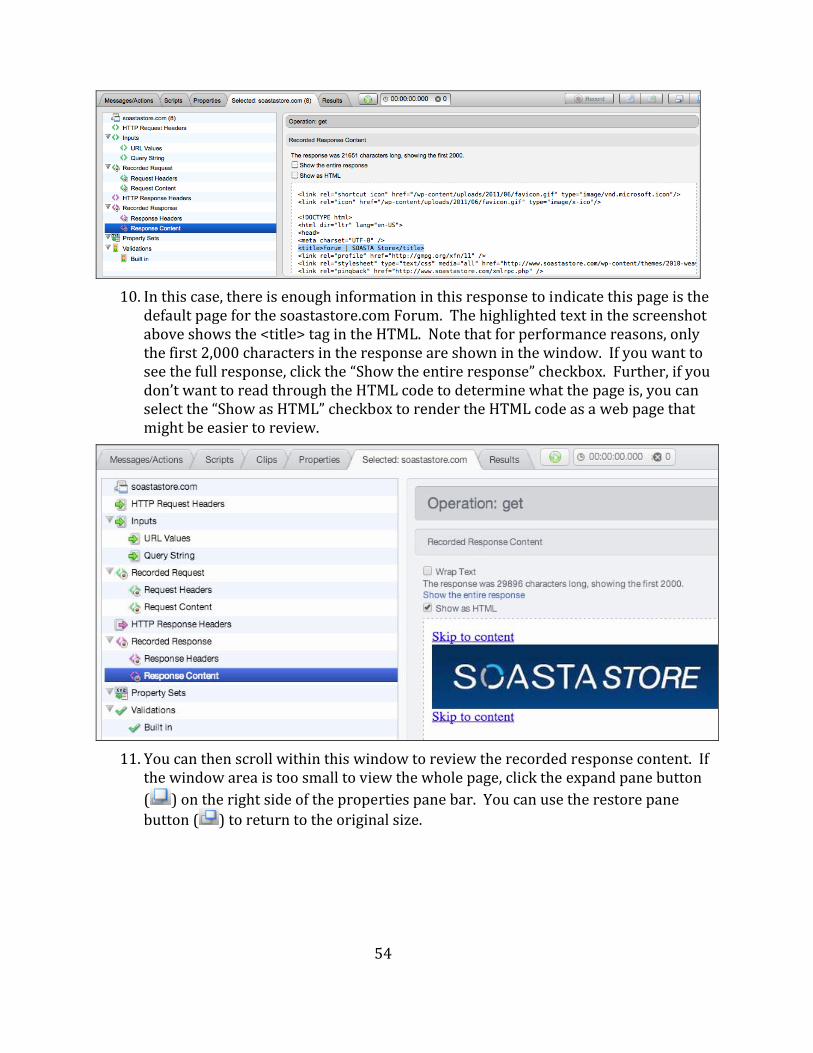
test—and what the redirect URL (location) might have been. This data is also useful when trying to determine if cookies were sent as part of this request and what their values might have been. In this case, the recorded response headers don’t provide much information about what this Page is actually doing. So, click ‘Response Content’ to see the response content.
54
10. In this case, there is enough information in this response to indicate this page is the
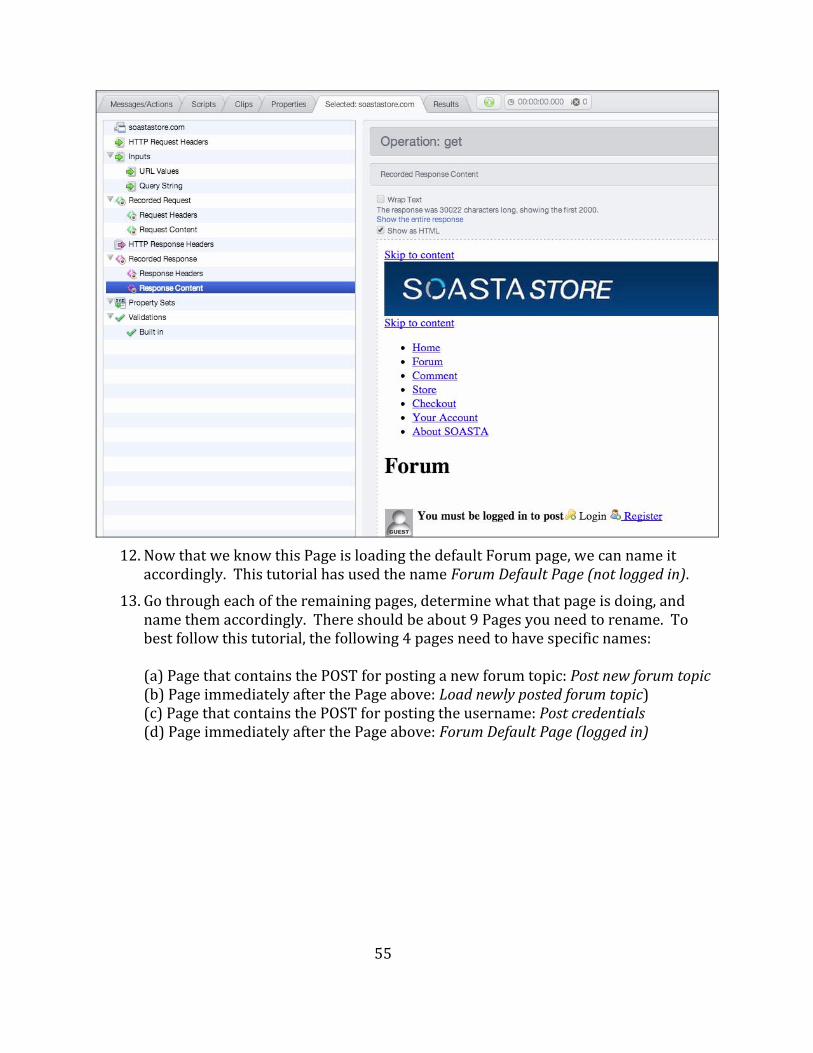
default page for the soastastore.com Forum. The highlighted text in the screenshot above shows the <title> tag in the HTML. Note that for performance reasons, only the first 2,000 characters in the response are shown in the window. If you want to see the full response, click the “Show the entire response” checkbox. Further, if you don’t want to read through the HTML code to determine what the page is, you can select the “Show as HTML” checkbox to render the HTML code as a web page that might be easier to review.
11. You can then scroll within this window to review the recorded response content. If
the window area is too small to view the whole page, click the expand pane button ( ) on the right side of the properties pane bar. You can use the restore pane button ( ) to return to the original size.
55
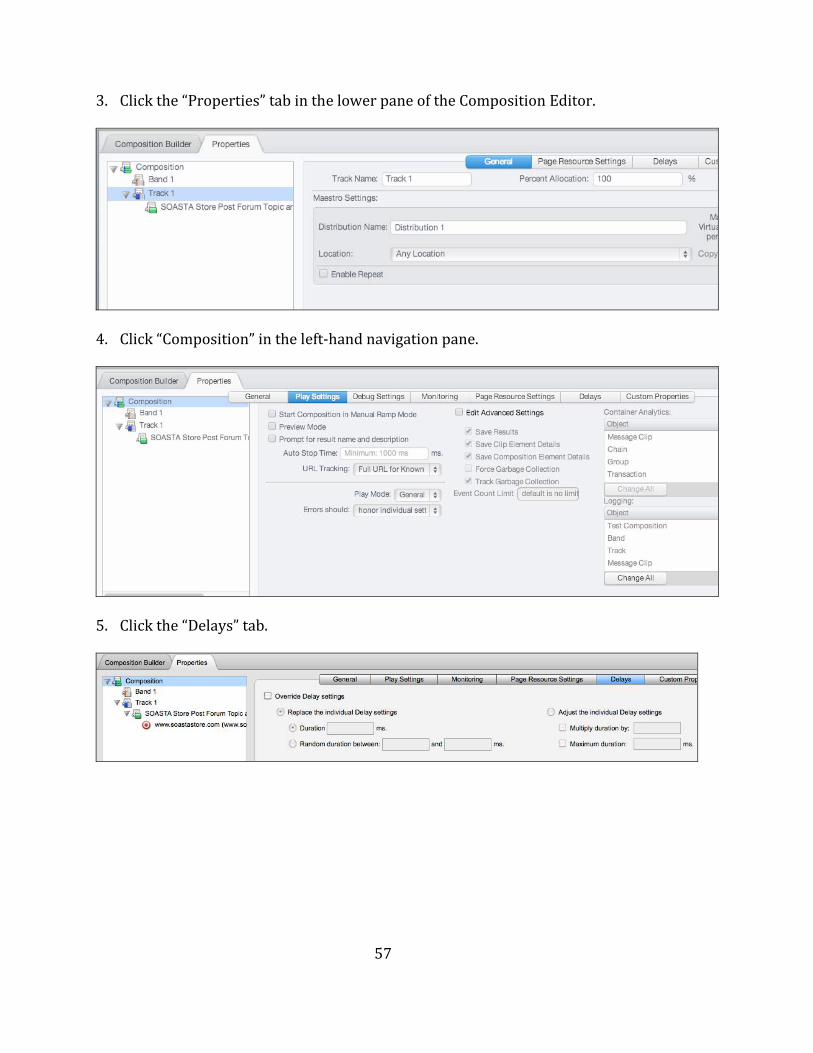
12. Now that we know this Page is loading the default Forum page, we can name it
accordingly. This tutorial has used the name Forum Default Page (not logged in).13. Go through each of the remaining pages, determine what that page is doing, and
name them accordingly. There should be about 9 Pages you need to rename. To best follow this tutorial, the following 4 pages need to have specific names: (a) Page that contains the POST for posting a new forum topic: Post new forum topic (b) Page immediately after the Page above: Load newly posted forum topic) (c) Page that contains the POST for posting the username: Post credentials (d) Page immediately after the Page above: Forum Default Page (logged in)

56
Playing and Debugging a Simple Test As a general guideline, it is best to play and debug a test as changes are made to the Test Clip. This simplifies debugging tasks. Debugging a test is an iterative process and this tutorial walks you through a common test creation/debugging process. 1. Click the Open in Test Composition icon on the Clip Editor toolbar. For more
information, see Test Composition in CloudLink.
The test is added to Track 1 of a composition with the name Composition for SOASTA Store Post Forum Topic and Reply clip, which opens in the Composition Editor (in a new tab).
Click Save on the Composition Editor toolbar. The Save Composition box appears. Assign the composition a new name. For example, SOASTA Store Forum Tutorial Composition.
2. This tutorial test clip, like most tests, has think times and those think times can sometimes be quite long. A test might playback in a couple of seconds without think times, but might take many minutes with think times included. Think times are critical during load tests to ensure the HTTP traffic closely simulates real user traffic. However, think times are not necessary (in most cases) during the test debugging process. Many users override the think times in the clip with “0ms” think times. Note, however, there are a small number of applications that need think times to operate correctly. In those cases, users will typically override the think times with “1000ms”. If you want to be conservative, simply override all think times with 1000ms—it covers your bases and still plays the test back for debugging purposes much more quickly. Now, let’s set a composition‐level think time override.
3. Click the “Properties” tab in the lower pane of the Composition Editor.
57
4. Click “Composition” in the left‐hand navigation pane.
5. Click the “Delays” tab.
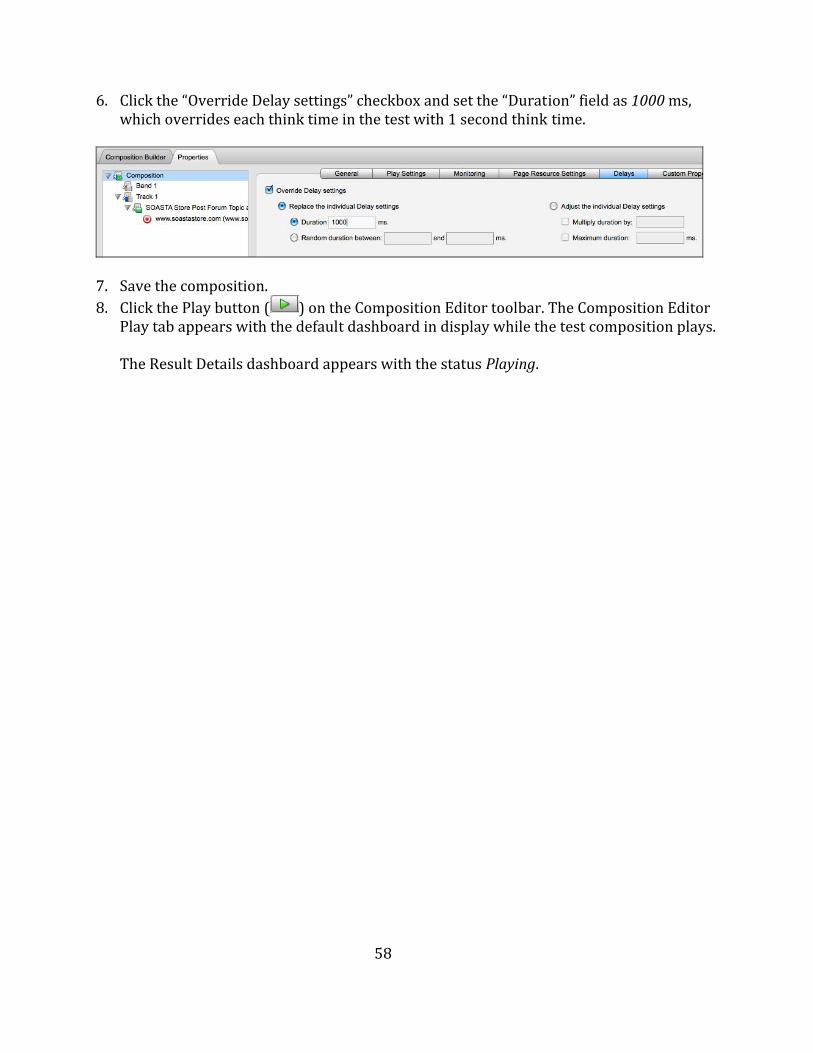
6. Click the “Override Delay settings” checkbox and set the “Duration” field as 1000 ms,
which overrides each think time in the test with 1 second think time.
7. Save the composition. 8. Click the Play button ( ) on the Composition Editor toolbar. The Composition Editor
e test composition plays. Play tab appears with the default dashboard in display while th
The Result Details dashboard appears with the status Playing.
58

59
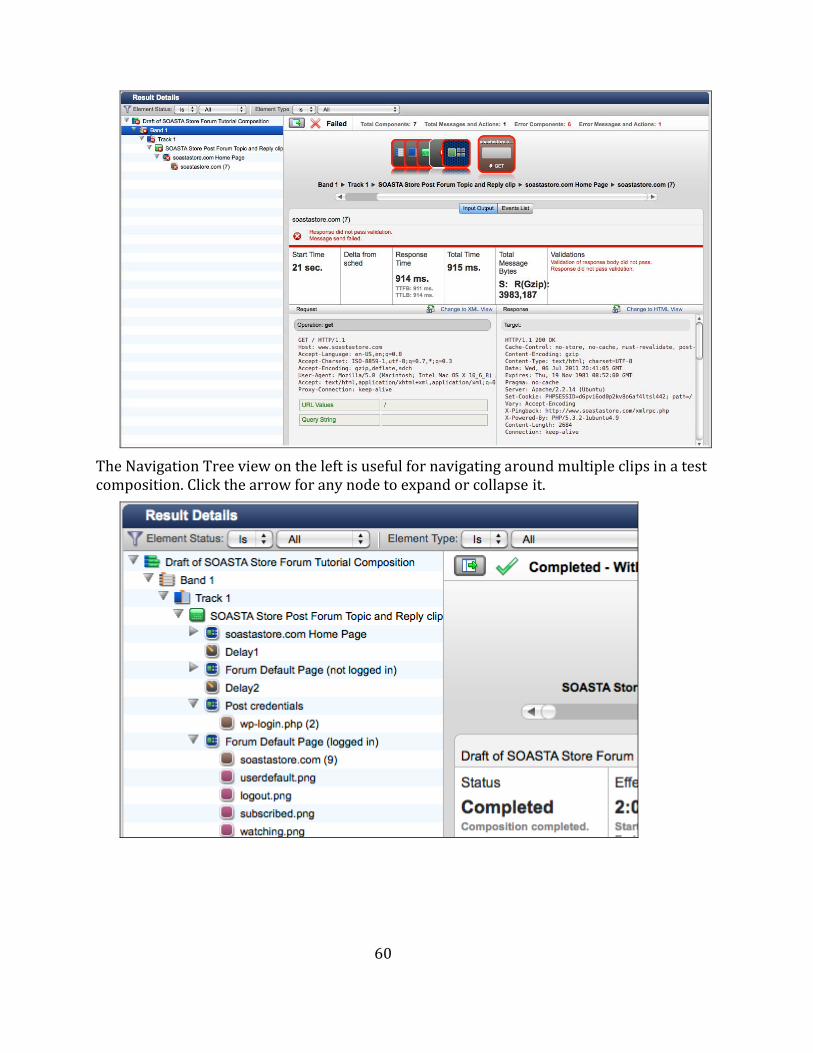
Result Details Dashboard
The Result Details dashboard helps you determine the cause of errors in your test and has several methods for navigating through the test results. Start by clicking the arrows next to the Track and Clip names to expand each Page in the test. You can further expand individual Pages in the tree to drill down to individual message requests.
Although errors didn’t occur in this test playback, when errors do occur, the Result Details widget helps to easily identify both where and what errors occurred. A message will indicate that errors occurred during the test, how many errors there were, and any errors will be highlighted in red. Here are some sample screenshots of error conditions:
60
The Navigation Tree view on the left is useful for navigating around multiple clips in a test composition. Click the arrow for any node to expand or collapse it.
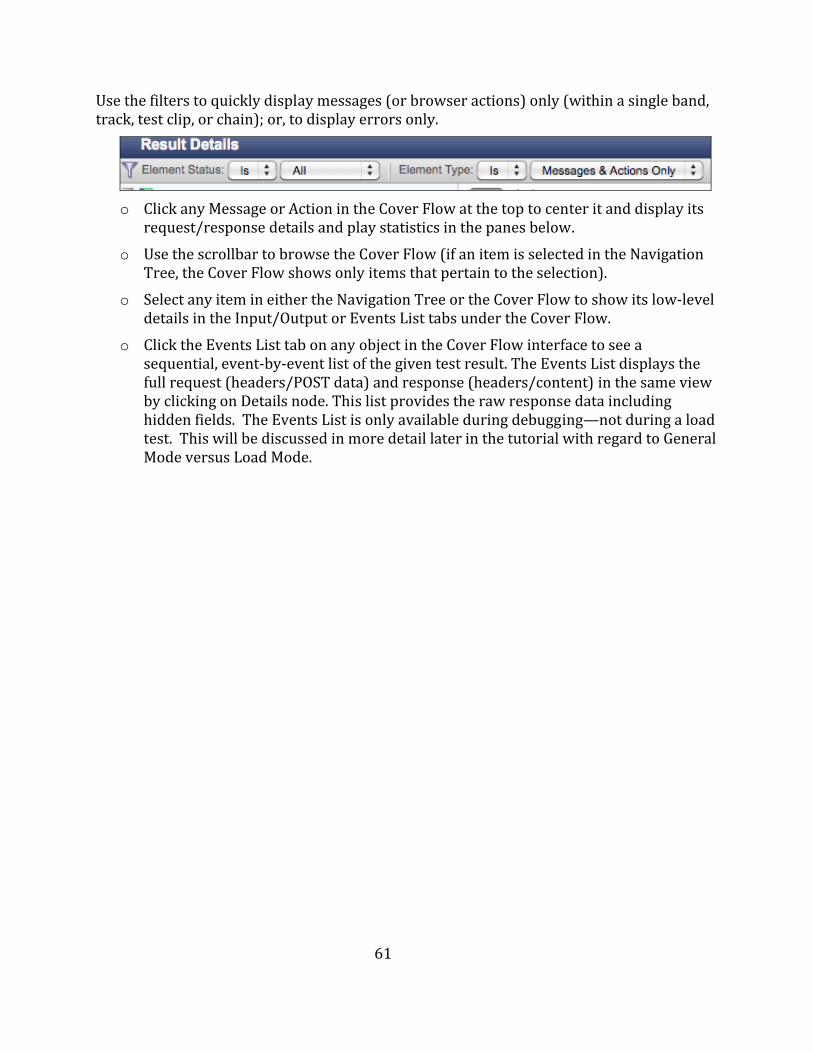
Use the filters to quickly display messages (or browser actions) only (within a single band, track, test clip, or chain); or, to display errors only.
o Click any Message or Action in the Cover Flow at the top to center it and display its
request/response details and play statistics in the panes below. o Use the scrollbar to browse the Cover Flow (if an item is selected in the Navigation
Tree, the Cover Flow shows only items that pertain to the selection). o Select any item in either the Navigation Tree or the Cover Flow to show its low‐level
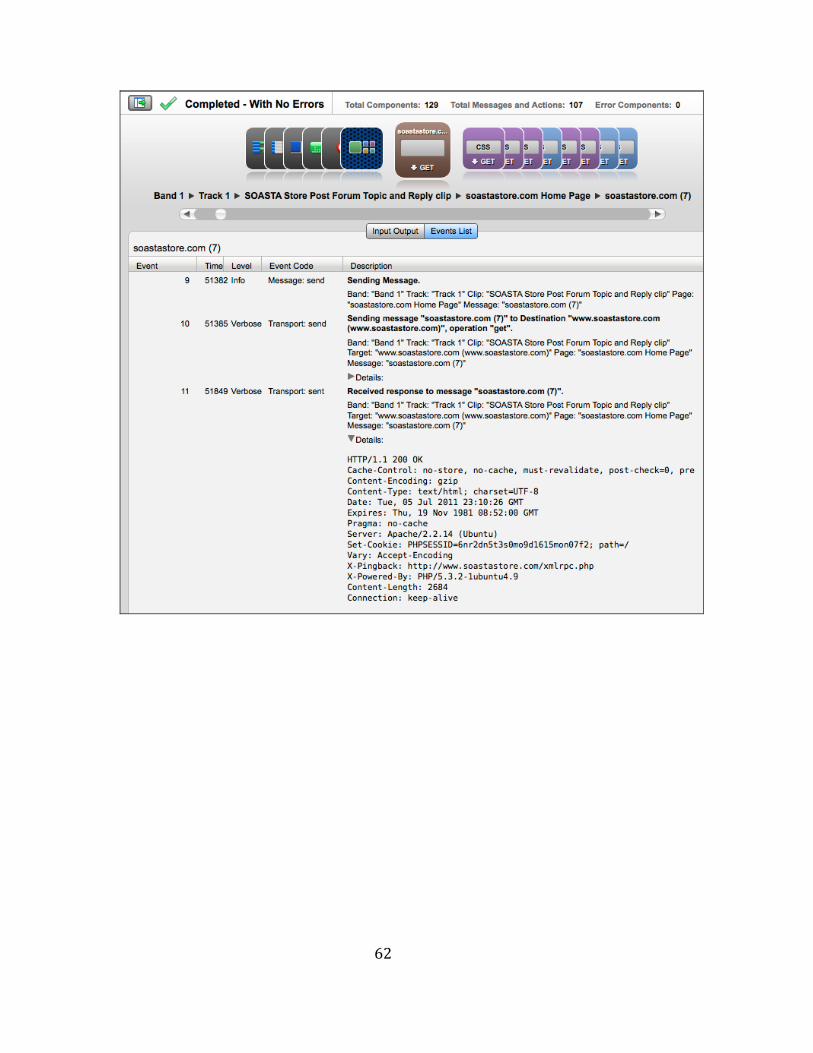
details in the Input/Output or Events List tabs under the Cover Flow. o Click the Events List tab on any object in the Cover Flow interface to see a
sequential, event‐by‐event list of the given test result. The Events List displays the full request (headers/POST data) and response (headers/content) in the same view by clicking on Details node. This list provides the raw response data including hidden fields. The Events List is only available during debugging—not during a load test. This will be discussed in more detail later in the tutorial with regard to General Mode versus Load Mode.
61
62
63
Verifying Test Parameterization
You will note that this test “Completed – With No Errors”. An important point to note is that just because the test completed without errors does not necessarily mean the test was successful. CloudTest automatically checks the HTTP Status Code for all HTTP requests in a test. If the response is an HTTP 2xx or 3xx response code, it is considered a success. If the response is an HTTP 4xx or 5xx response code, it is considered an error. Many applications, however, will not use these status codes to indicate if a request is successful or not. For example, many applications will return a valid response (i.e. HTTP 200 status code), but actually contain an error message on it—or return an error page with an HTTP 200 status code. (A later section in this tutorial will walk you through the setup of custom validations to ensure pages and messages are coming back correctly.) Until validations are setup in the test, the only way to ensure the test is working correctly is by reviewing each page request.
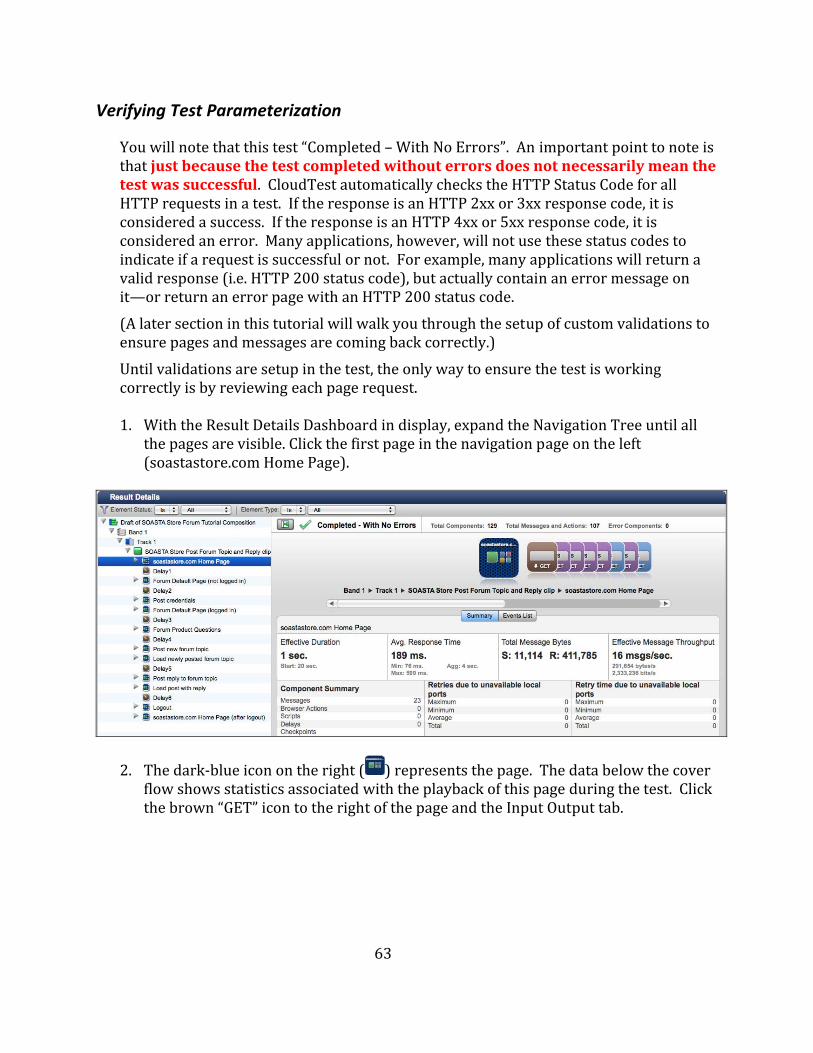
1. With the Result Details Dashboard in display, expand the Navigation Tree until all the pages are visible. Click the first page in the navigation page on the left (soastastore.com Home Page).
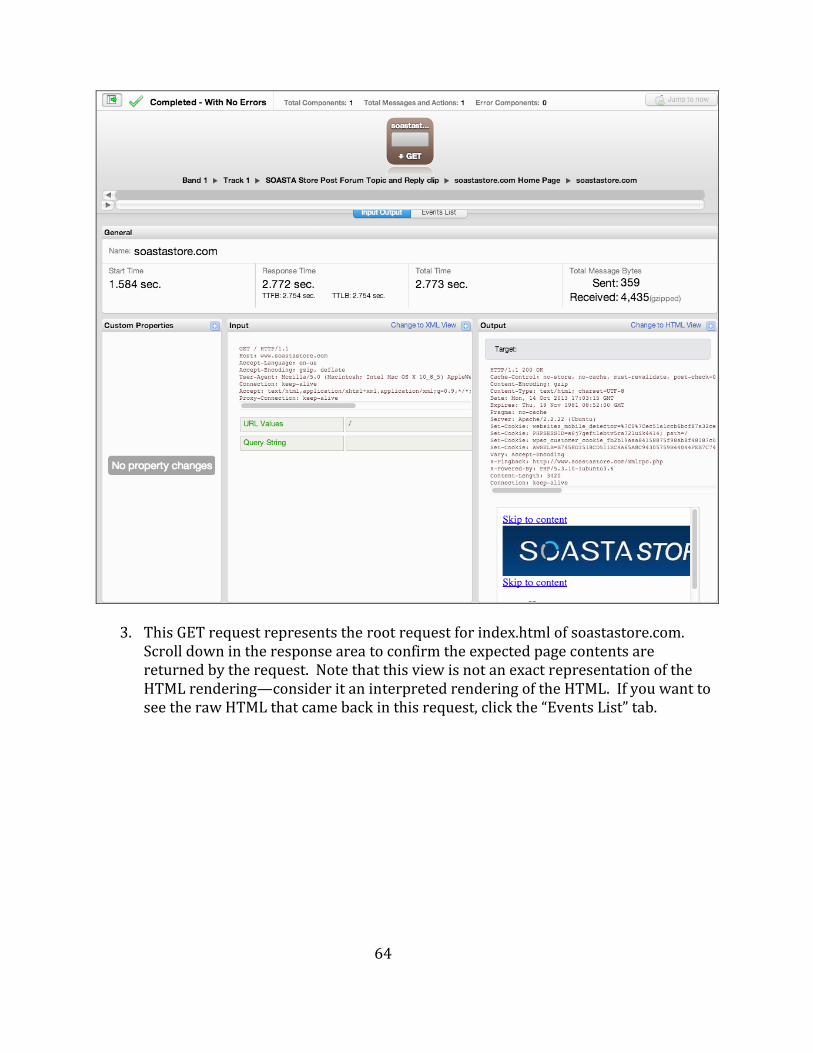
2. The dark‐blue icon on the right ( ) represents the page. The data below the cover flow shows statistics associated with the playback of this page during the test. Click the brown “GET” icon to the right of the page and the Input Output tab.
64
3. This GET request represents the root request for index.html of soastastore.com. Scroll down in the response area to confirm the expected page contents are returned by the request. Note that this view is not an exact representation of the HTML rendering—consider it an interpreted rendering of the HTML. If you want to see the raw HTML that came back in this request, click the “Events List” tab.
65
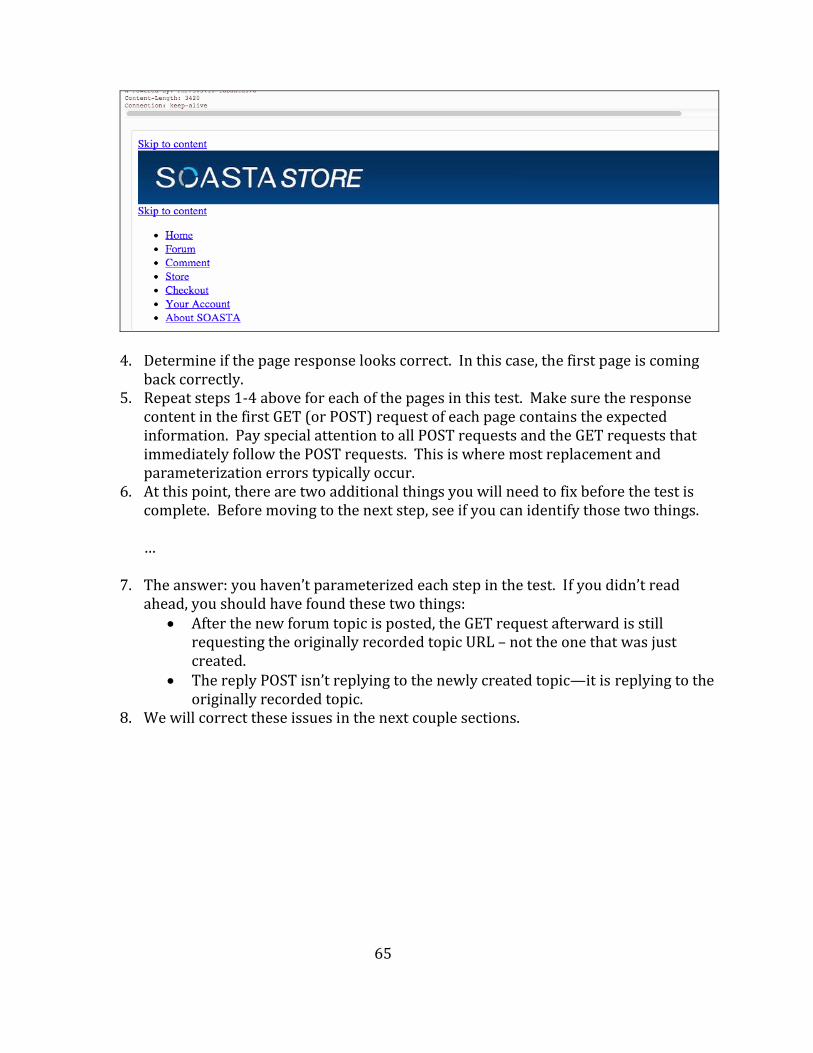
4. Determine if the page response looks correct. In this case, the first page is comingback correctly.
5. Repeat steps 1‐4 above for each of the pages in this test. Make sure the response content in the first GET (or POST) request of each page contains the expected information. Pay special attention to all POST requests and the GET requests that
immediately follow the POST requests. This is where most replacement and parameterization errors typically occur.
6. At this point, there are two additional things you will need to fix before the test is complete. Before moving to the next step, see if you can identify those two things. …
7. The ans d ahead,
wer: you haven’t parameterized each step in the test. If you didn’t reayou should have found these two things:
• After the new forum topic is posted, the GET request afterward is still requesting the originally recorded topic URL – not the one that was just created.
d topic—it is replying to the • The reply POST isn’t replying to the newly createoriginally recorded topic.
8. We will correct these issues in the next couple sections.
66
Test editing and parameterization
Session Template Wizard
As you discovered in the previous section, although this test plays back with “No Errors” it isn’t working correctly. A couple of POSTs and related GET requests aren’t working 100% correctly. Let’s fix these errors. There are a few ways these issues can be fixed: (a) Re‐run the Session Template Package Wizard. There are other variables that need
to be parameterized. This is typically the recommended approach, although it isn’t always the best solution for each situation.
(b) Parameterize the dynamic values as they are discovered in the Clip Editor. This process is slower because each variable is done one at a time versus in batches. However, the Session Template Wizard makes this process very easy.
(c) Manually parameterize the dynamic values by identifying the value to extract, manually creating extraction rules (or “property sets”), creating properties, and using the created properties in subsequent requests.
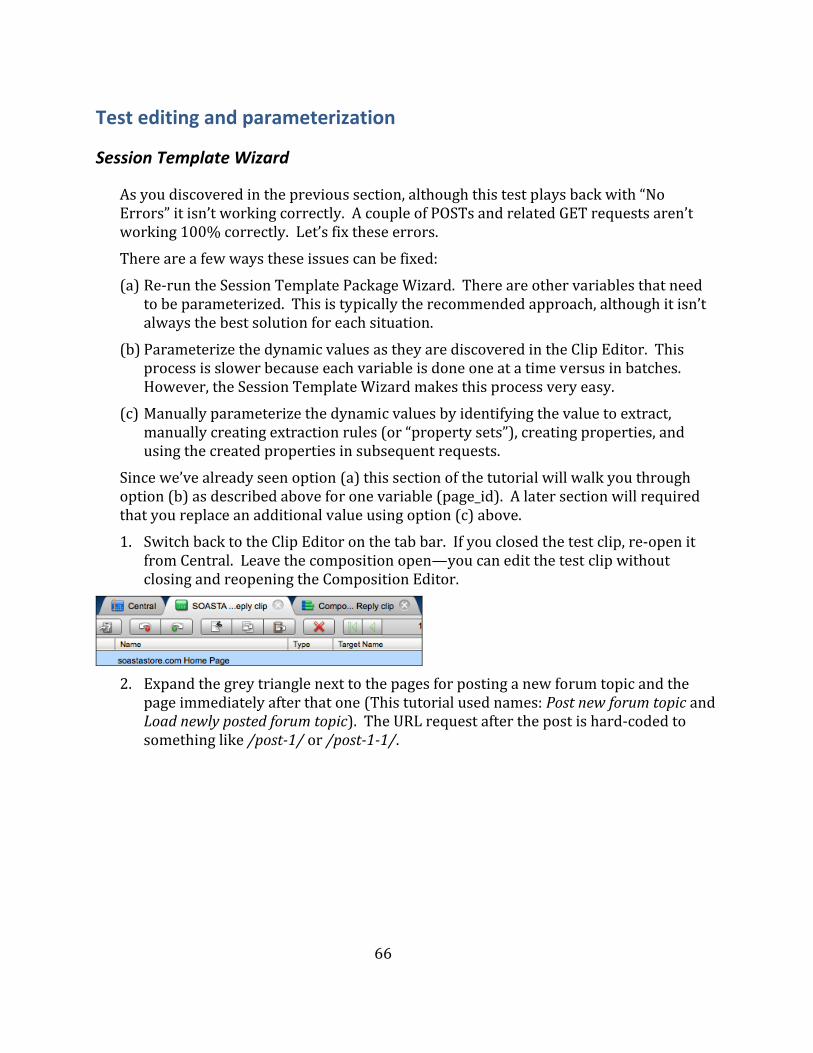
Since we’ve already seen option (a) this section of the tutorial will walk you through option (b) as described above for one variable (page_id). A later section will required that you replace an additional value using option (c) above. 1. Switch back to the Clip Editor on the tab bar. If you closed the test clip, re‐open it
from Central. Leave the composition open—you can edit the test clip without closing and reopening the Composition Editor.
2. Expand the grey triangle next to the pages for posting a new forum topic and the
page immediately after that one (This tutorial used names: Post new forum topic and Load newly posted forum topic). The URL request after the post is hard‐coded to something like /post1/ or /post11/.
67
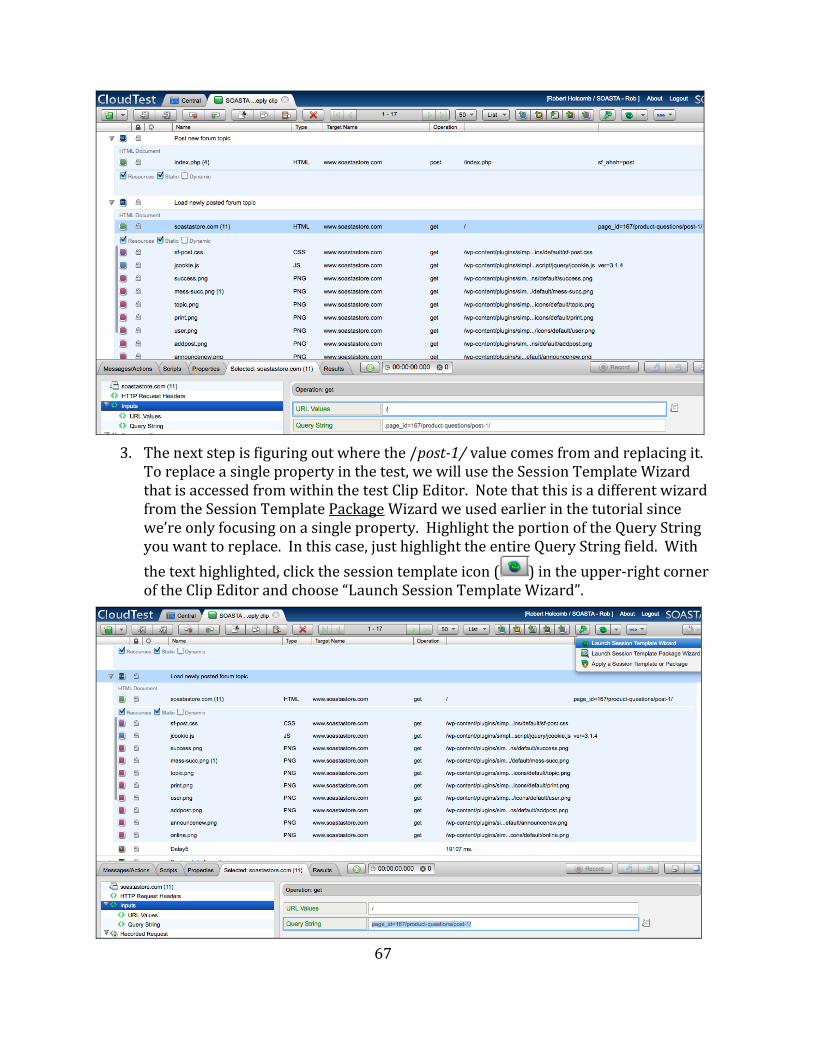
3. The next step is figuring out where the /post1/ value comes from and replacing it.
To replace a single property in the test, we will use the Session Template Wizard that is accessed from within the test Clip Editor. Note that this is a different wizard from the Session Template Package Wizard we used earlier in the tutorial since we’re only focusing on a single property. Highlight the portion of the Query String you want to replace. In this case, just highlight the entire Query String field. With the text highlighted, click the session template icon ( ) in the upper‐right corner of the Clip Editor and choose “Launch Session Template Wizard”.
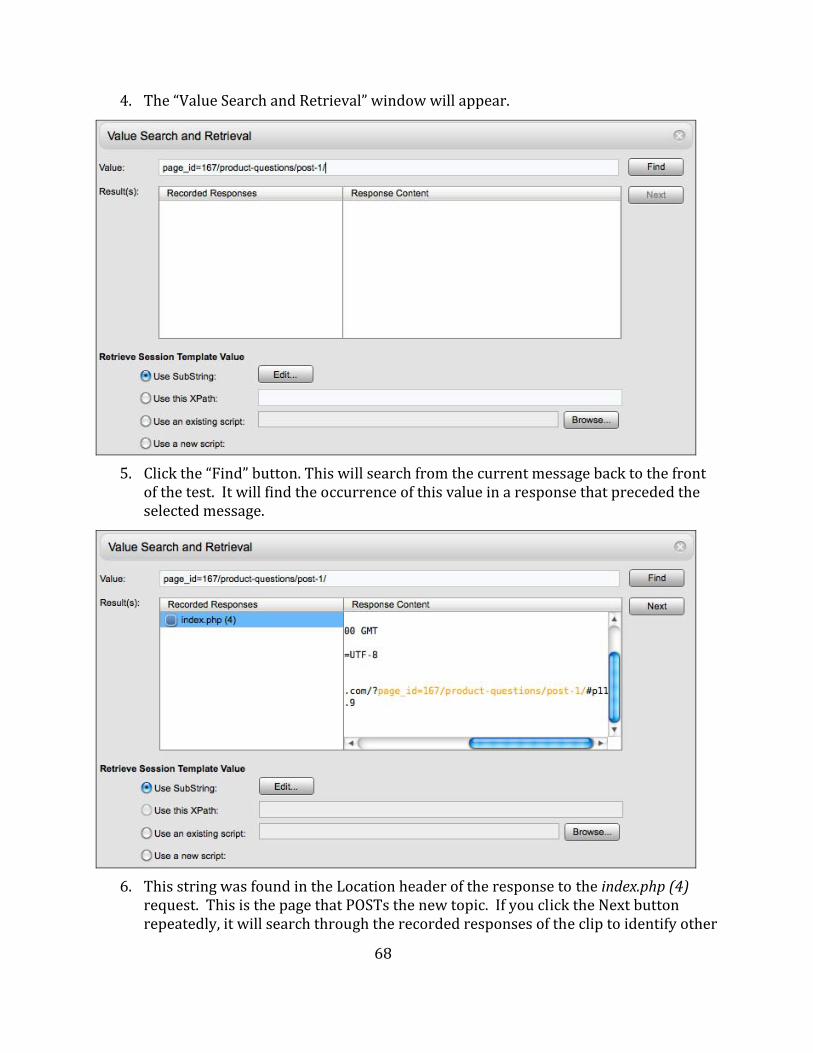
4. The “Value Search and Retrieval” window will appear.
5. Click the “Find” button. This will search from the current message back to the front
of the test. It will find the occurrence of this value in a response that preceded the selected message.
68
6. This string was found in the Location header of the response to the index.php (4) request. This is the page that POSTs the new topic. If you click the Next button repeatedly, it will search through the recorded responses of the clip to identify other
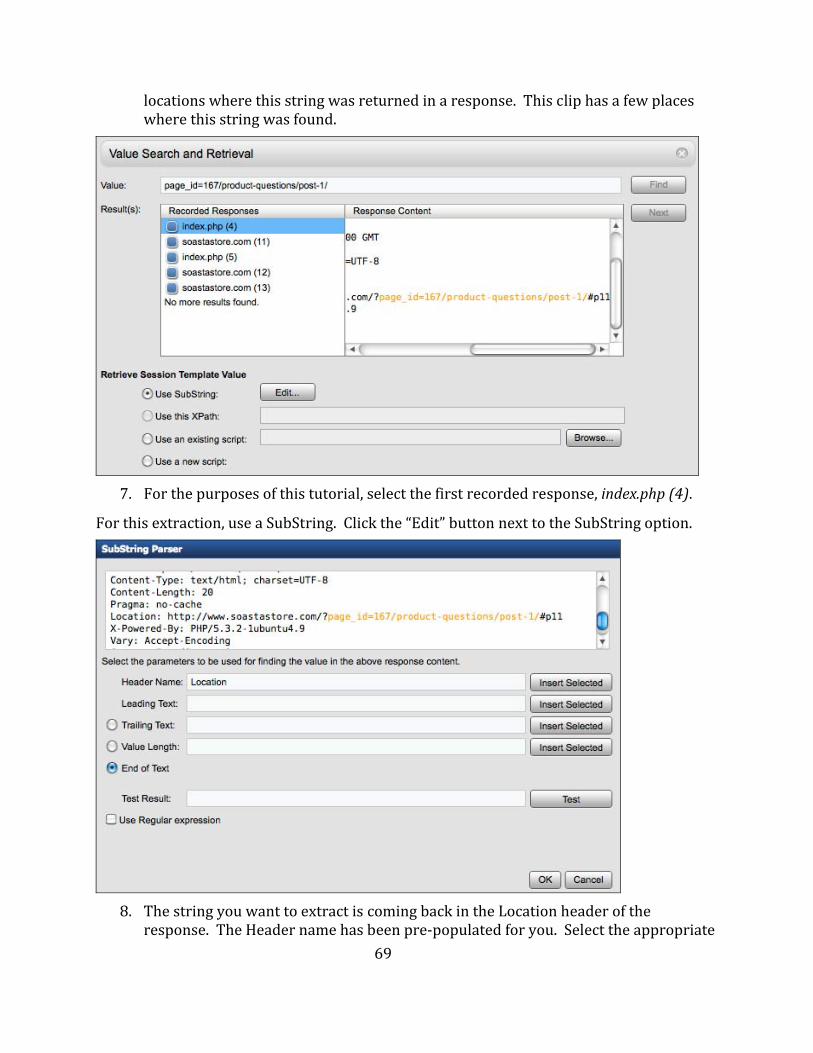
locations where this string was returned in a response. This clip has a few places where this string was found.
7. For the purposes of this tutorial, select the first recorded response, index.php (4).
For this extraction, use a SubString. Click the “Edit” button next to the SubString option.
69
8. The string you want to extract is coming back in the Location header of the
response. The Header name has been pre‐populated for you. Select the appropriate
70
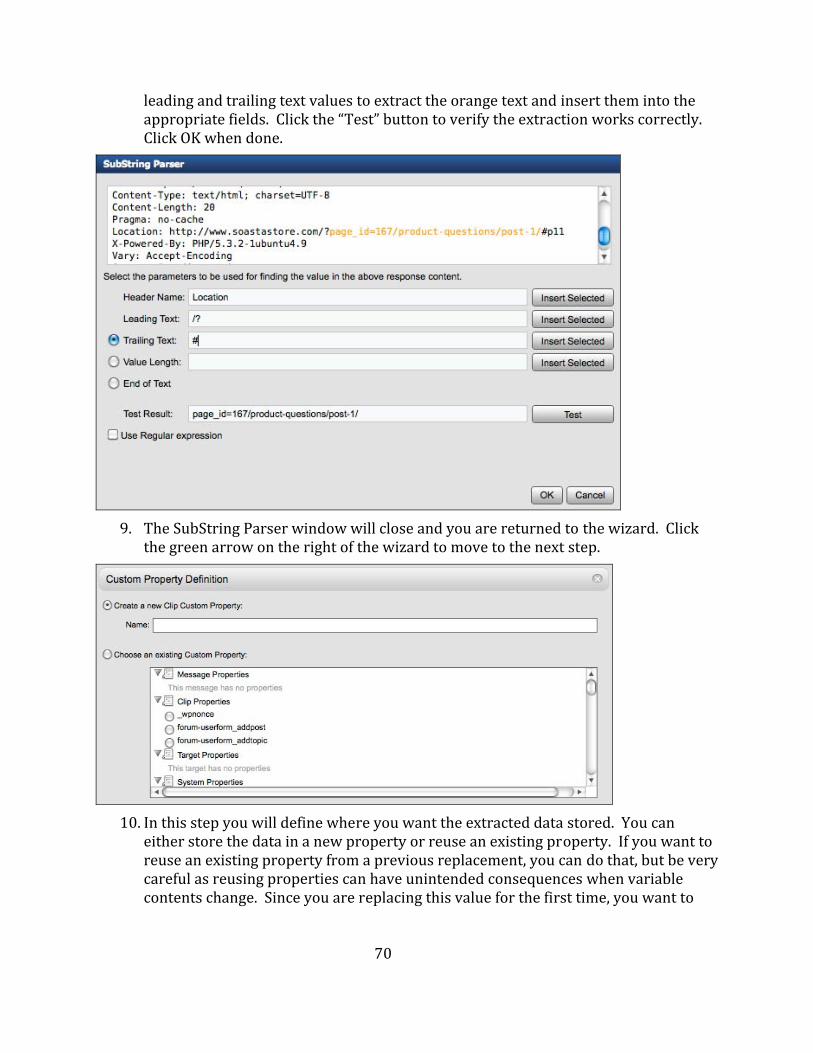
leading and trailing text values to extract the orange text and insert them into the appropriate fields. Click the “Test” button to verify the extraction works correctly. Click OK when done.
9. The SubString Parser window will close and you are returned to the wizard. Click
the green arrow on the right of the wizard to move to the next step.
10. In this step you will define where you want the extracted data stored. You can
either store the data in a new property or reuse an existing property. If you want to reuse an existing property from a previous replacement, you can do that, but be very careful as reusing properties can have unintended consequences when variable contents change. Since you are replacing this value for the first time, you want to
71
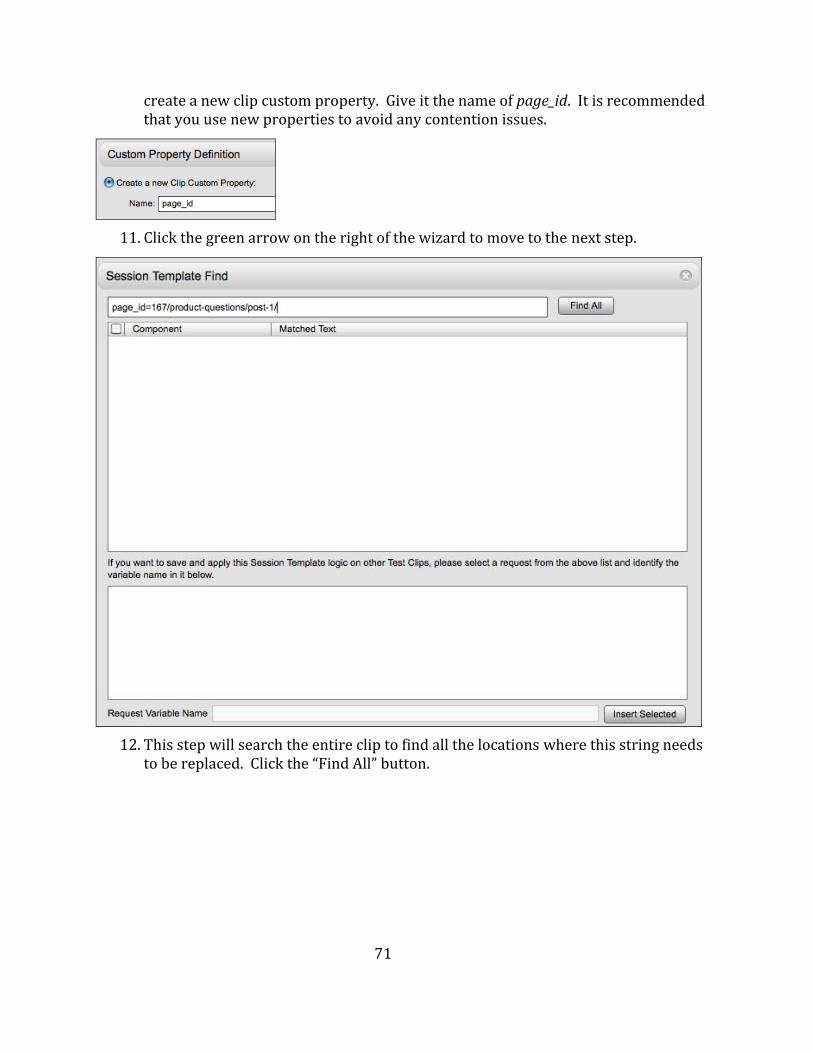
create a new clip custom property. Give it the name of page_id. It is recommended that you use new properties to avoid any contention issues.
11. Click the green arrow on the right of the wizard to move to the next step.
12. This step will search the entire clip to find all the locations where this string needs
to be replaced. Click the “Find All” button.
72
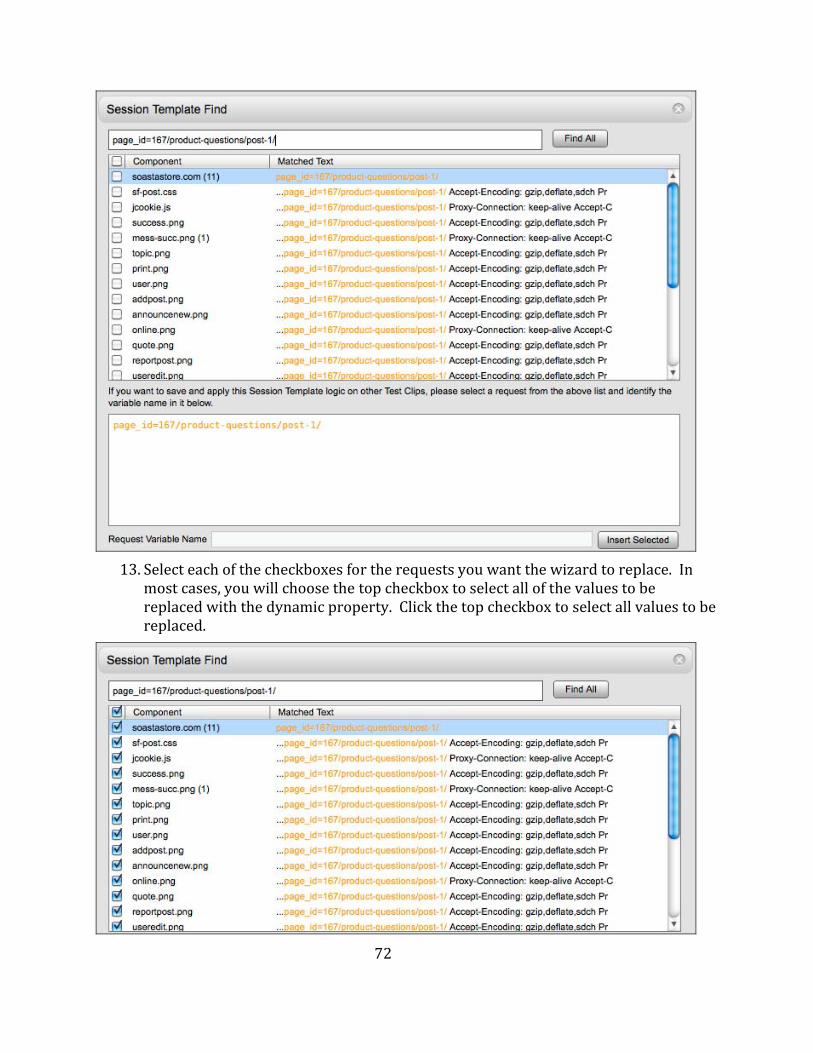
13. Select each of the checkboxes for the requests you want the wizard to replace. In
most cases, you will choose the top checkbox to select all of the values to be replaced with the dynamic property. Click the top checkbox to select all values to be replaced.
73
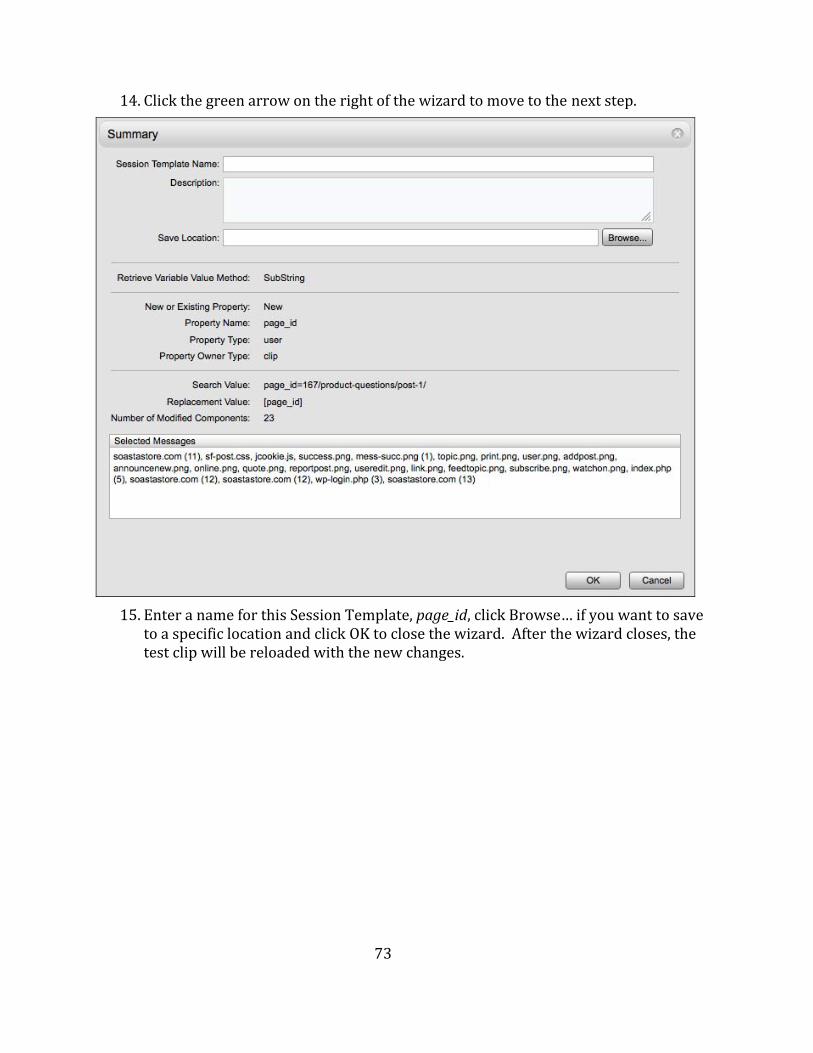
14. Click the green arrow on the right of the wizard to move to the next step.
15. Enter a name for this Session Template, page_id, click Browse… if you want to save
to a specific location and click OK to close the wizard. After the wizard closes, the test clip will be reloaded with the new changes.
74
Session Template Parameterization: Under the covers
When you clicked OK to the complete the Session Template Wizard in the last section, several things happened:
• ed (e.g. property set) An extraction rule was defin
• A clip property was created
• The static string that needed to be replaced was replaced with a dynamic property
• A “session template” was created for re‐use in other test clips (reusable session templates is a topic beyond the scope of this tutorial, please see CloudLink for more information)
Let’s examine each of the places where the wizard altered the test in the test Clip Editor. Pay tt ou will ll
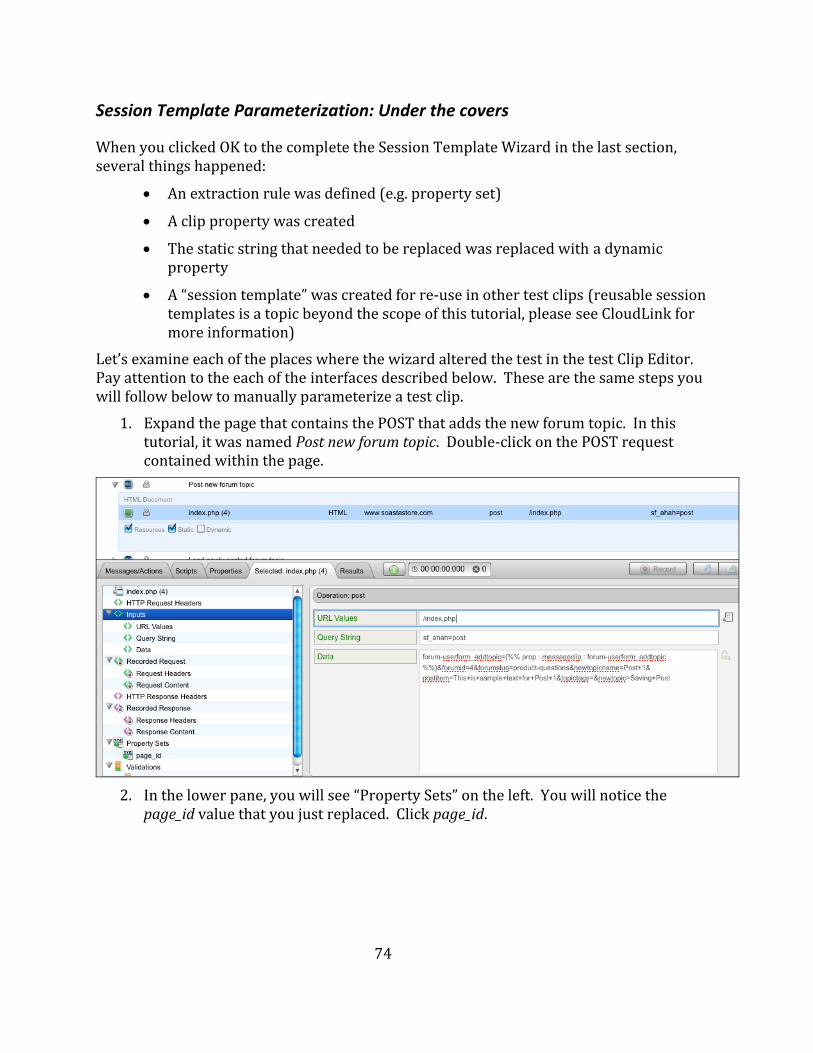
a ention to the each of the interfaces described below. These are the same steps y fo ow below to manually parameterize a test clip. 1. Expand the page that contains the POST that adds the new forum topic. In this
tutorial, it was named Post new forum topic. Double‐click on the POST request contained within the page.
2. In the lower pane, you will see “Property Sets” on the left. You will notice the
page_id value that you just replaced. Click page_id.
75
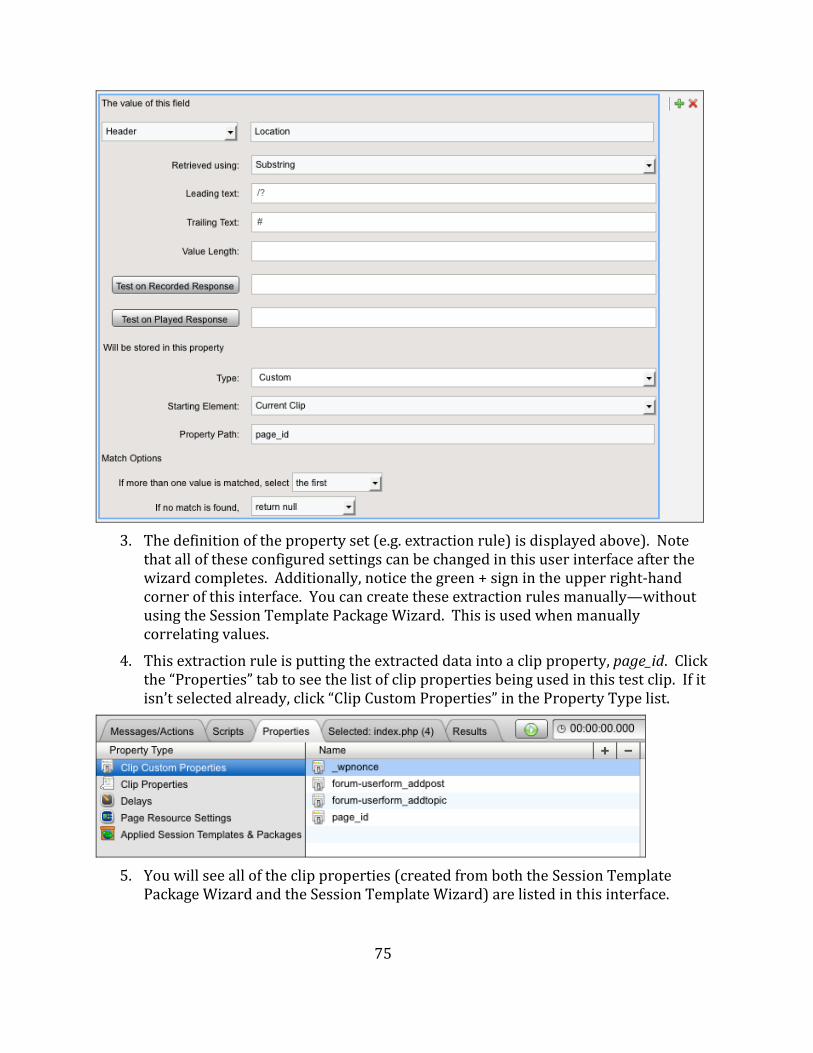
3. The definition of the property set (e.g. extraction rule) is displayed above). Note
that all of these configured settings can be changed in this user interface after the wizard completes. Additionally, notice the green + sign in the upper right‐hand corner of this interface. You can create these extraction rules manually—without using the Session Template Package Wizard. This is used when manually correlating values.
4. This extraction rule is putting the extracted data into a clip property, page_id. Click the “Properties” tab to see the list of clip properties being used in this test clip. If it isn’t selected already, click “Clip Custom Properties” in the Property Type list.
5. You will see all of the clip properties (created from both the Session Template
Package Wizard and the Session Template Wizard) are listed in this interface.
76
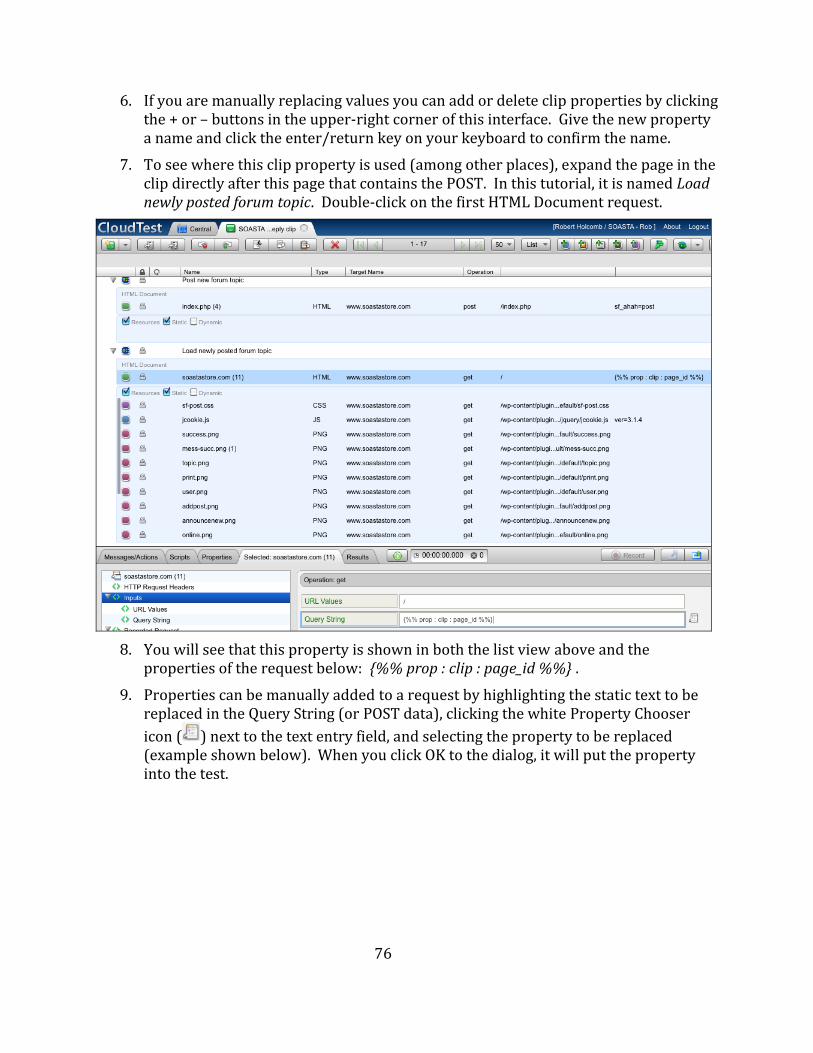
6. If you are manually replacing values you can add or delete clip properties by clicking
the + or – buttons in the upper‐right corner of this interface. Give the new property a name and click the enter/return key on your keyboard to confirm the name.
7. To see where this clip property is used (among other places), expand the page in the clip directly after this page that contains the POST. In this tutorial, it is named Load newly posted forum topic. Double‐click on the first HTML Document request.
8. You will see that this property is shown in both the list view above and the
properties of the request below: {%% prop : clip : page_id %%} . 9. Properties can be manually added to a request by highlighting the static text to be
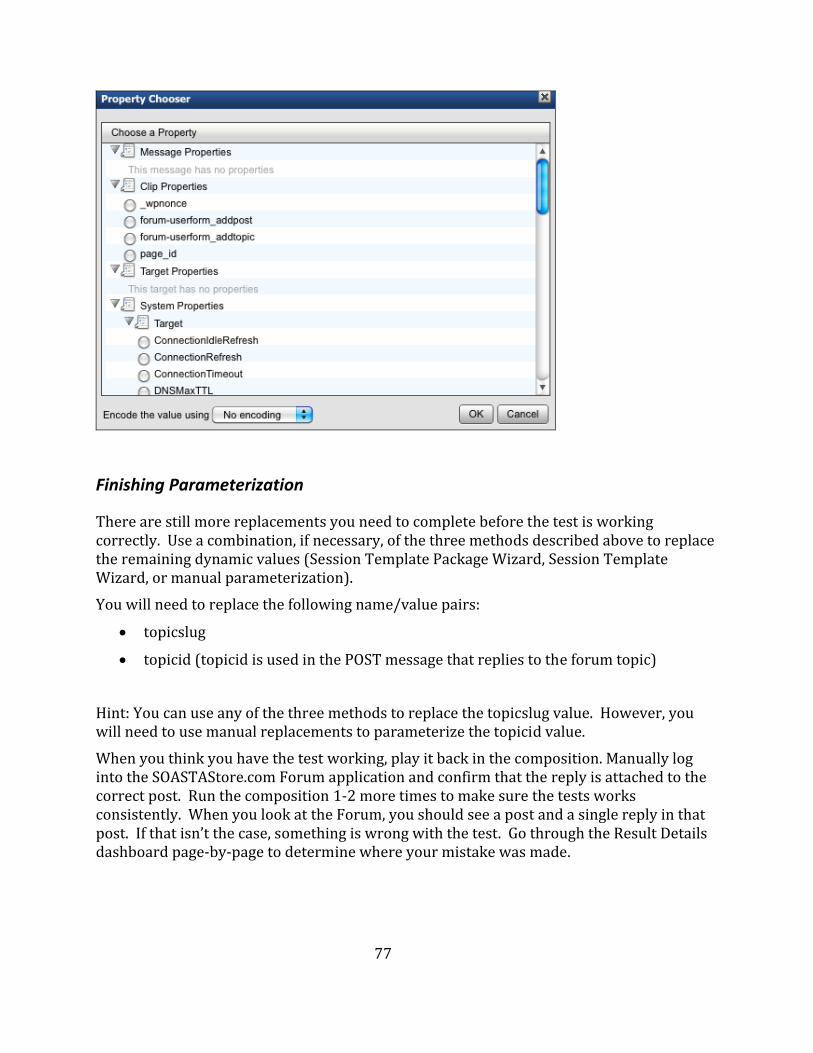
replaced in the Query String (or POST data), clicking the white Property Chooser icon ( ) next to the text entry field, and selecting the property to be replaced (example shown below). When you click OK to the dialog, it will put the property into the test.
77
Finishing Parameterization
There are still more replacements you need to complete before the test is working correctly. Use a combination, if necessary, of the three methods described above to replace the remaining dynamic values (Session Template Package Wizard, Session Template Wizard, or manual parameterization). You will need to replace the following name/value pairs:
• topicslug
• topicid (topicid is used in the POST message that replies to the forum topic) Hint: You can use any of the three methods to replace the topicslug value. However, you will need to use manual replacements to parameterize the topicid value. When you think you have the test working, play it back in the composition. Manually log into the SOASTAStore.com Forum application and confirm that the reply is attached to the correct post. Run the composition 1‐2 more times to make sure the tests works consistently. When you look at the Forum, you should see a post and a single reply in that post. If that isn’t the case, something is wrong with the test. Go through the Result Details ashboard page‐by‐page to determine where your mistake was made. d
78
Find and Replace
HINT: You may find it useful to use the Find/Replace feature to determine which response the pto icid value is coming back in.
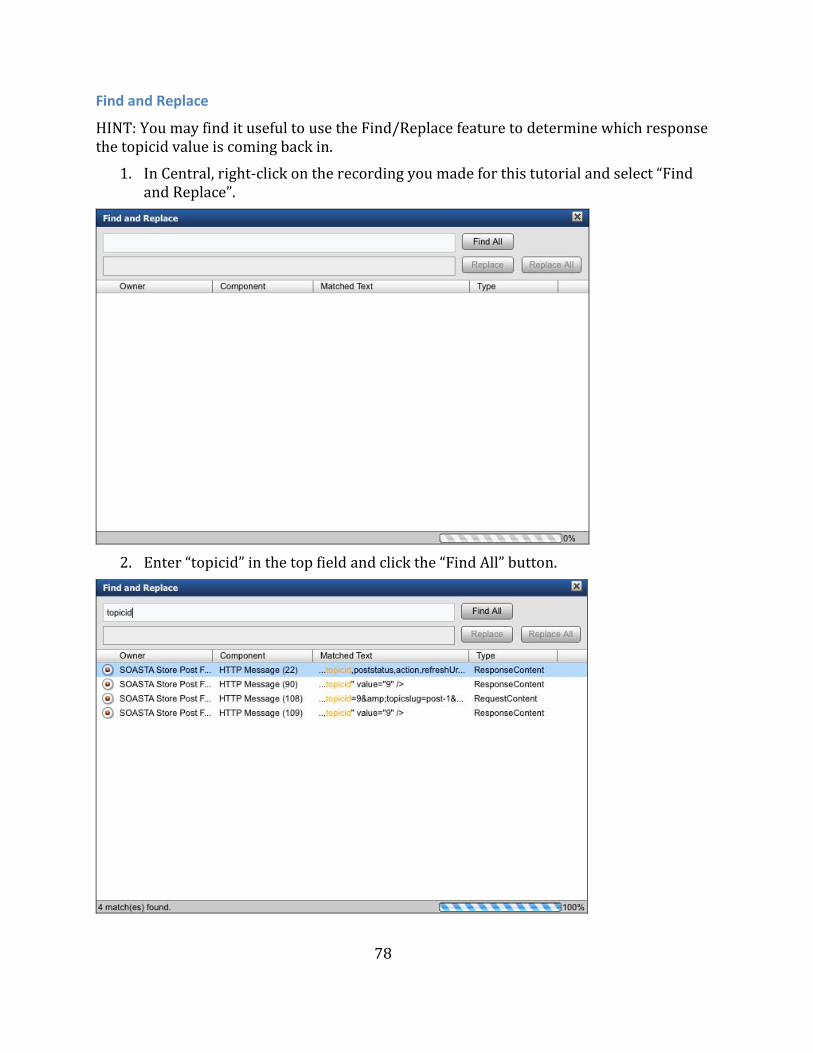
1. In Central, right‐click on the recording you made for this tutorial and select “Find and Replace”.
2. Enter “topicid” in the top field and click the “Find All” button.
79
1. This shows you each message where this string was found in the recording. You
want to find the request where the topicid value first came back in a response. That is where you will create an extraction rule. Note the message number your response came back in. In this example, it is HTTP Message (90) that has the topicid value = 9.
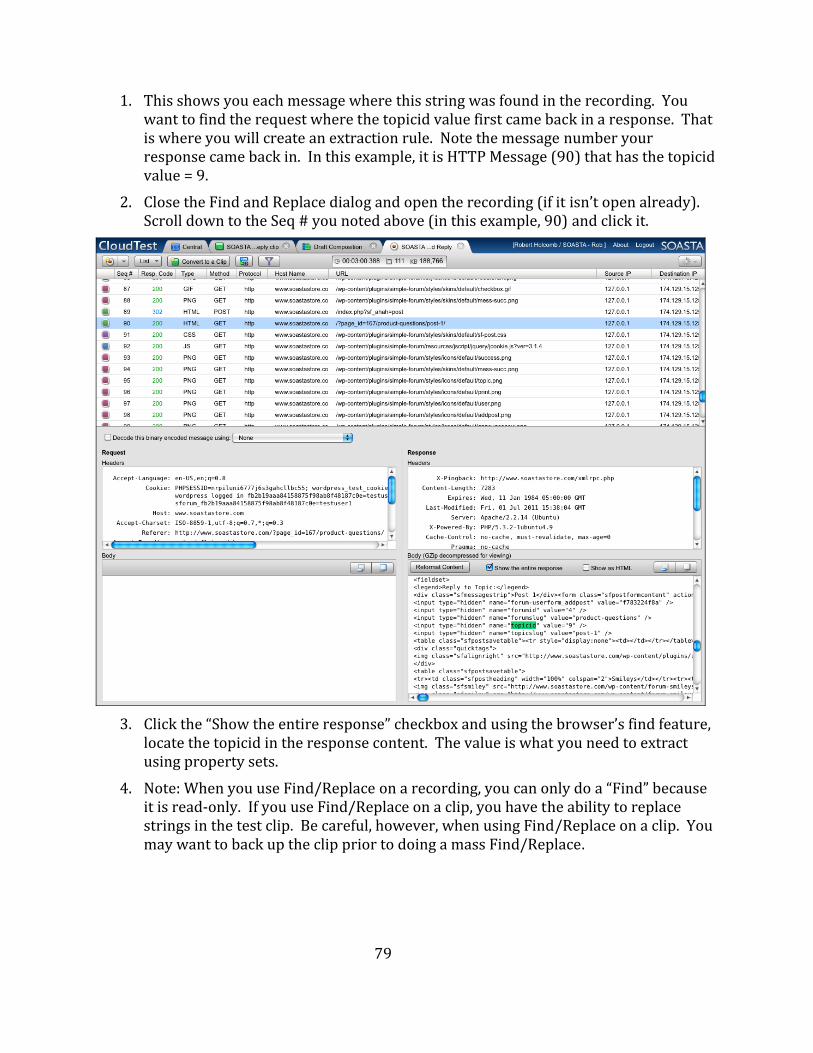
2. Close the Find and Replace dialog and open the recording (if it isn’t open already). Scroll down to the Seq # you noted above (in this example, 90) and click it.
3. Click the “Show the entire response” checkbox and using the browser’s find feature,
locate the topicid in the response content. The value is what you need to extract using property sets.
4. Note: When you use Find/Replace on a recording, you can only do a “Find” because it is read‐only. If you use Find/Replace on a clip, you have the ability to replace strings in the test clip. Be careful, however, when using Find/Replace on a clip. You may want to back up the clip prior to doing a mass Find/Replace.
80
Creating User‐Defined Validations
CloudTest provides the ability to create user‐defined custom validations. Use the following step tos define a custom validation that will validate login success in the test clip.
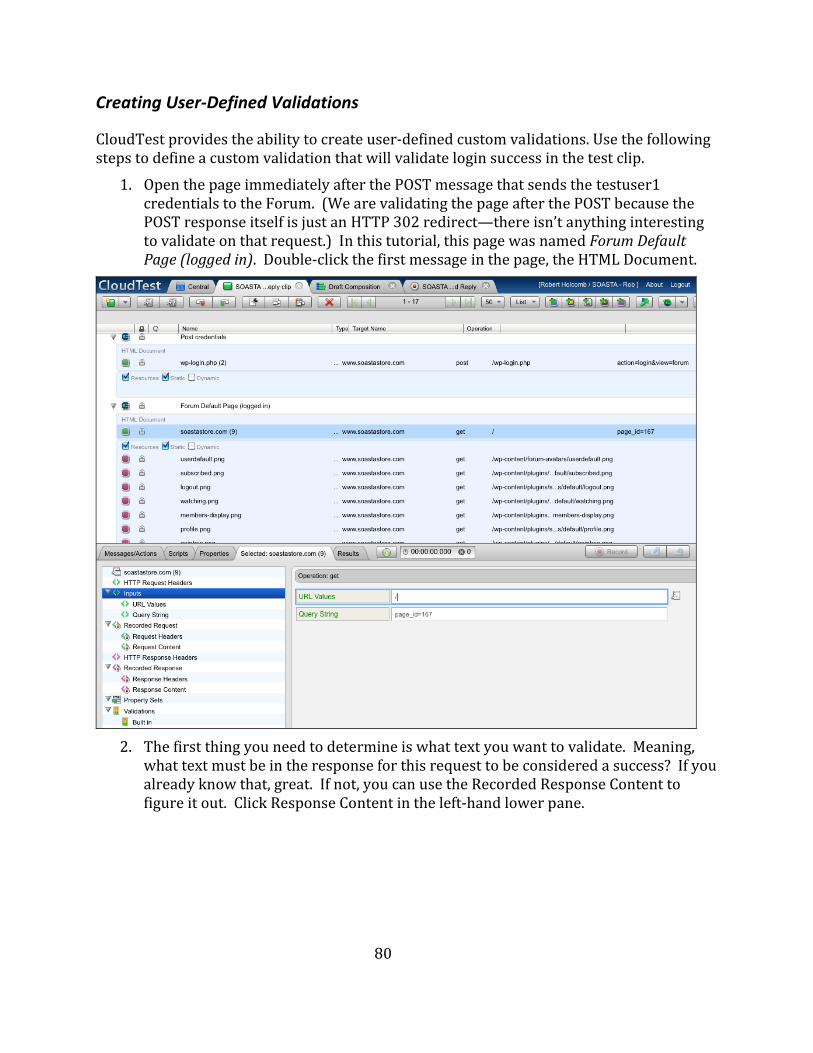
1. Open the page immediately after the POST message that sends the testuser1 credentials to the Forum. (We are validating the page after the POST because the POST response itself is just an HTTP 302 redirect—there isn’t anything interesting to validate on that request.) In this tutorial, this page was named Forum Default Page (logged in). Double‐click the first message in the page, the HTML Document.
2. The first thing you need to determine is what text you want to validate. Meaning,
what text must be in the response for this request to be considered a success? If you already know that, great. If not, you can use the Recorded Response Content to figure it out. Click Response Content in the left‐hand lower pane.
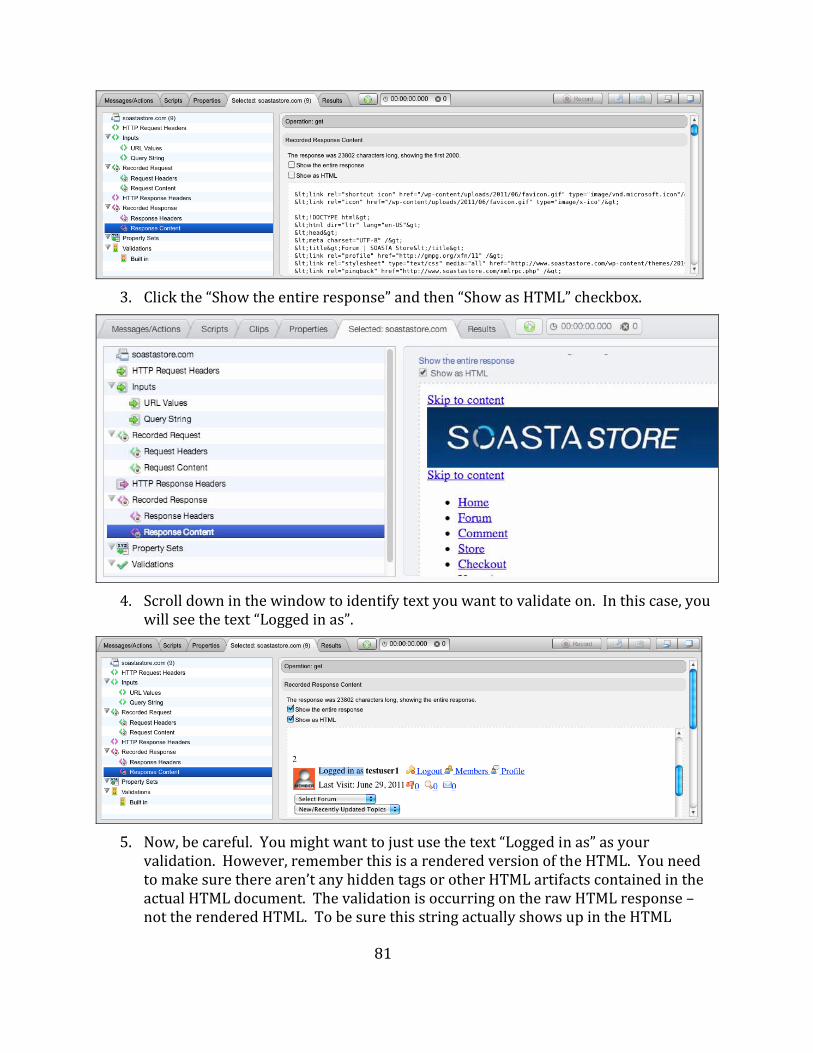
3. Click the “Show the entire response” and then “Show as HTML” checkbox.
4. Scroll down in the window to identify text you want to validate on. In this case, you
will see the text “Logged in as”.
81
5. Now, be careful. You might want to just use the text “Logged in as” as your
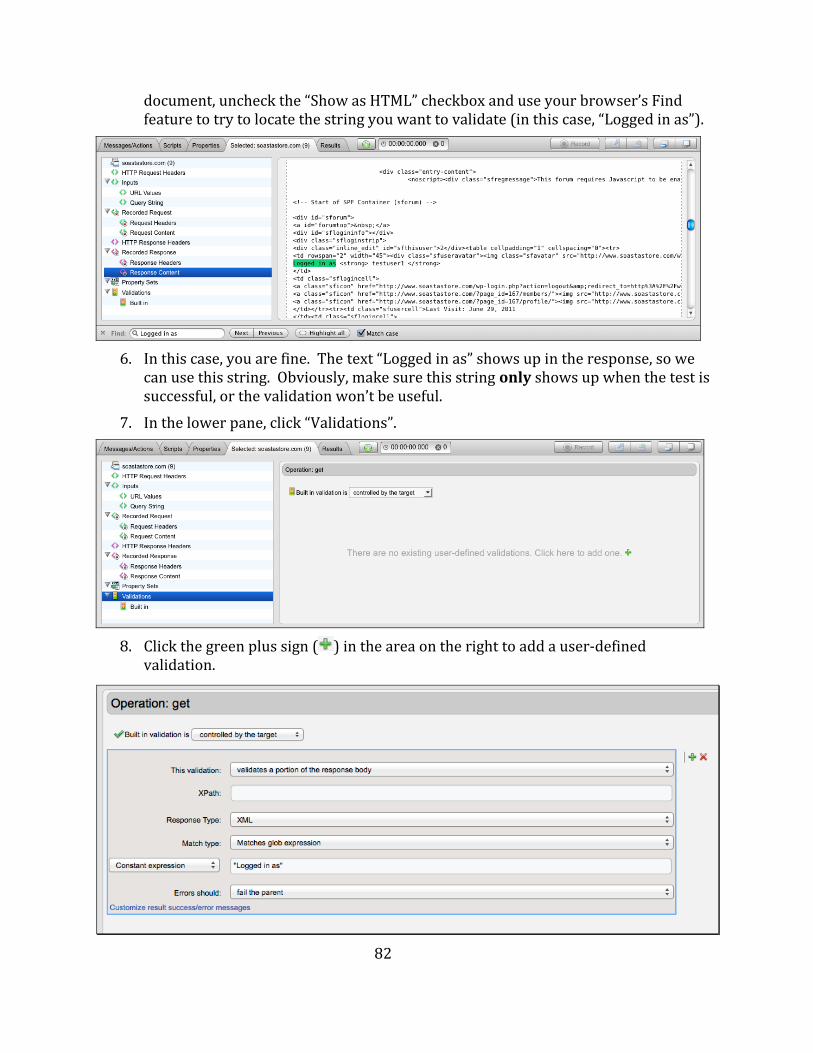
validation. However, remember this is a rendered version of the HTML. You need to make sure there aren’t any hidden tags or other HTML artifacts contained in the actual HTML document. The validation is occurring on the raw HTML response – not the rendered HTML. To be sure this string actually shows up in the HTML
82
document, uncheck the “Show as HTML” checkbox and use your browser’s Find feature to try to locate the string you want to validate (in this case, “Logged in as”).
6. In this case, you are fine. The text “Logged in as” shows up in the response, so we
can use this string. Obviously, make sure this string only shows up when the test is seful. successful, or the validation won’t be u
7. In the lower pane, click “Validations”.
8. Click the green plus sign ( ) in the area on the right to add a user‐defined
validation.
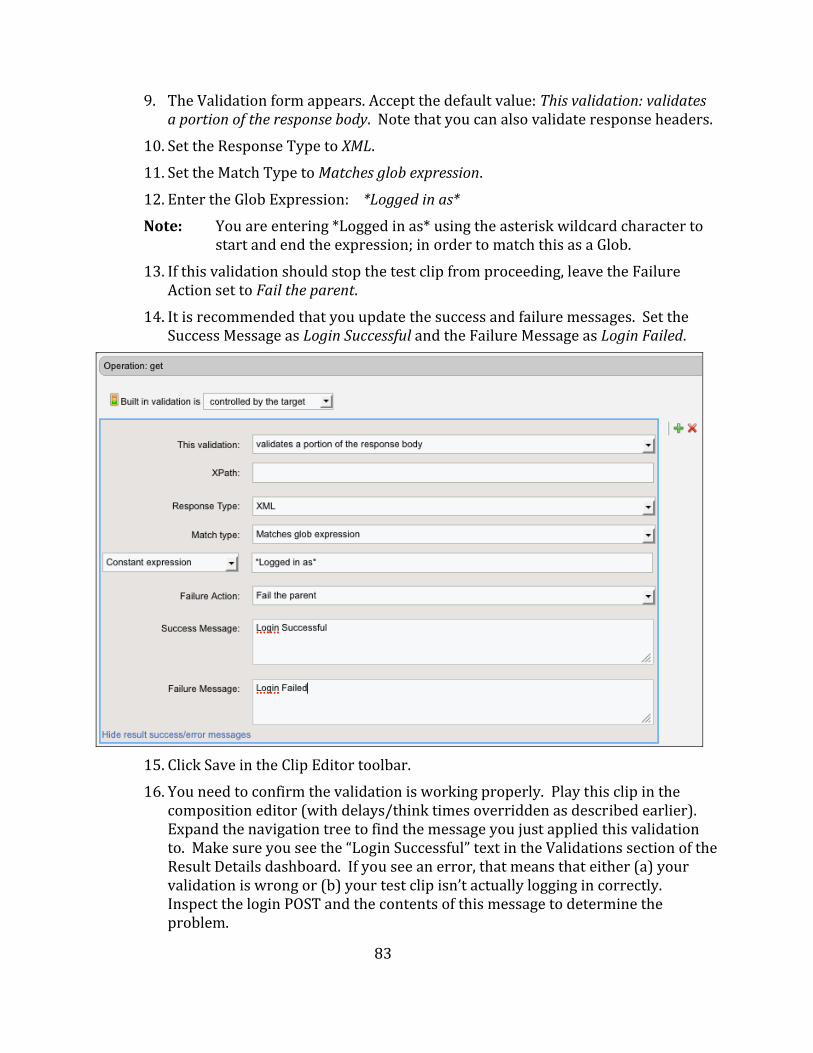
83
9. The Validation form appears. Accept the default value: This validation: validates
ody. Note that you can also validate response headers. a portion of the response b
to XML. 10. Set the Response Type s glob expressi n. 11. Set the Match Type to Matche o
12. En er tt he Glob Expression: *Logged in as* Note: to You are entering *Logged in as* using the asterisk wildcard character
start and end the expression; in order to match this as a Glob. 13. If this validation should stop the test clip from proceeding, leave the Failure Action set to Fail the parent.
14. It is recommended that you update the success and failure messages. Set the Success Message as Login Successful and the Failure Message as Login Failed.
15. Click Save in the Clip Editor toolbar. 16. You need to confirm the validation is working properly. Play this clip in the
composition editor (with delays/think times overridden as described earlier). Expand the navigation tree to find the message you just applied this validation to. Make sure you see the “Login Successful” text in the Validations section of the Result Details dashboard. If you see an error, that means that either (a) your validation is wrong or (b) your test clip isn’t actually logging in correctly. Inspect the login POST and the contents of this message to determine the problem.
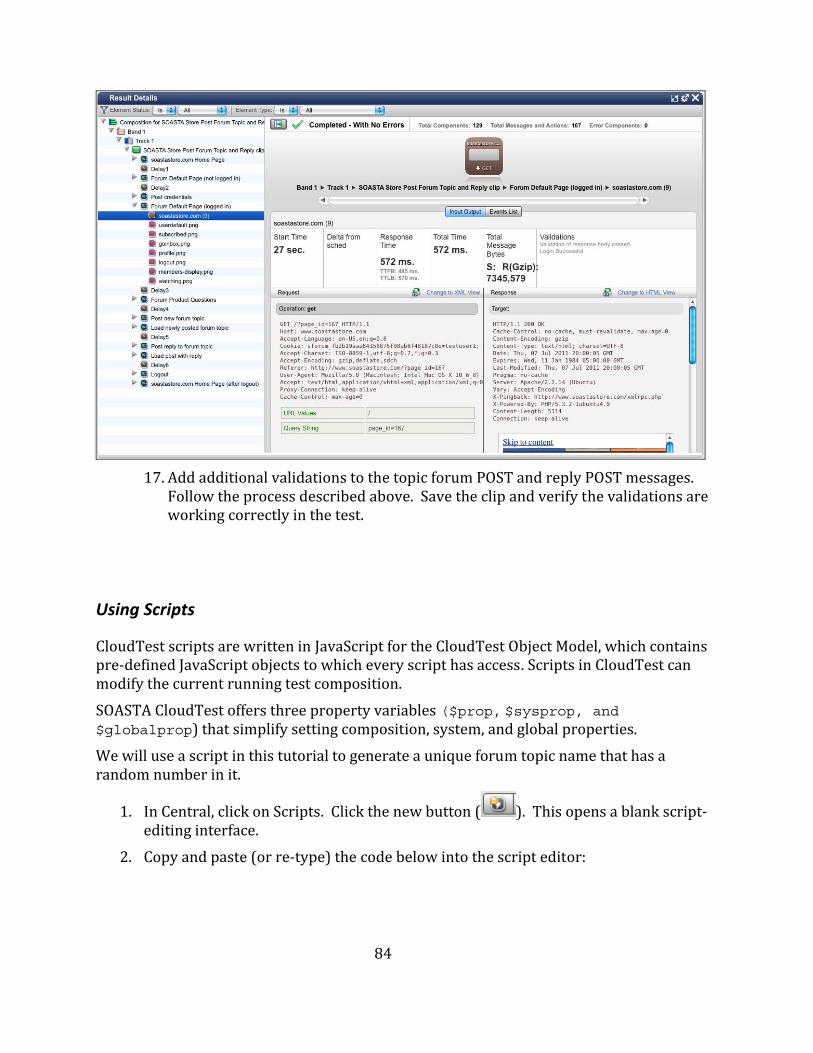
84
17. Add additional validations to the topic forum POST and reply POST messages.
Follow the process described above. Save the clip and verify the validations are working correctly in the test.
Using Scripts
CloudTest scripts are written in JavaScript for the CloudTest Object Model, which contains t has access. Scripts in CloudTest can pre‐defined JavaScript objects to which every scrip
modify the current running test composition. SOASTA CloudTest offers three property variables ($prop, $sysprop, and $globalprop) that simplify setting composition, system, and global properties. We will use a script in this tutorial to generate a unique forum topic name that has a ran mdo number in it.
1. In Central, click on Scripts. Click the new button ( ). This opens a blank script‐editing interface.
2. Copy and paste (or re‐type) the code below into the script editor:
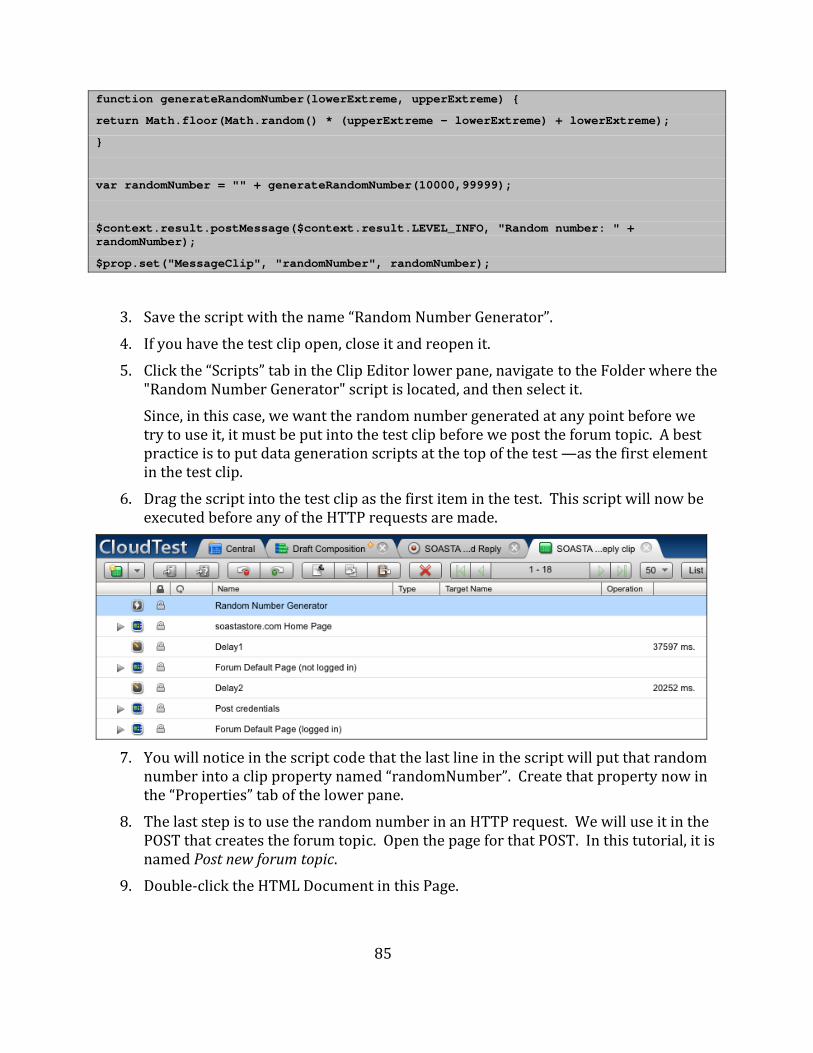
85
function generateRandomNumber(lowerExtreme, upperExtreme) {
return Math.floor(Math.random() * (upperExtreme - lowerExtreme) + lowerExtreme);
}
var randomNumber = "" + generateRandomNumber(10000,99999);
$context.result.postMessage($context.result.LEVEL_INFO, "Random number: " + randomNumber);
$prop.set("MessageClip", "randomNumber", randomNumber);
3. Save the script with the name “Random Number Gen
erator”. 4. If you have the test clip open, close it and reopen it. 5. Click the “Scripts” tab in the Clip Editor lower pane, navigate to the Folder where the
"Random Number Generator" script is located, and then select it. Since, in this case, we want the random number generated at any point before we try to use it, it must be put into the test clip before we post the forum topic. A best
practice is to put data generation scripts at the top of the test —as the first elementin the test clip.
6. Drag the script into the test clip as the first item in the test. This script will now be executed before any of the HTTP requests are made.
7. You will notice in the script code that the last line in the script will put that random
number into a clip property named “randomNumber”. Create that property now in the “Properties” tab of the lower pane.
8. The last step is to use the random number in an HTTP request. We will use it in the ge for that POST. In this tutorial, it is POST that creates the forum topic. Open the pa
named Post new forum topic. 9. Double‐click the HTML Document in this Page.
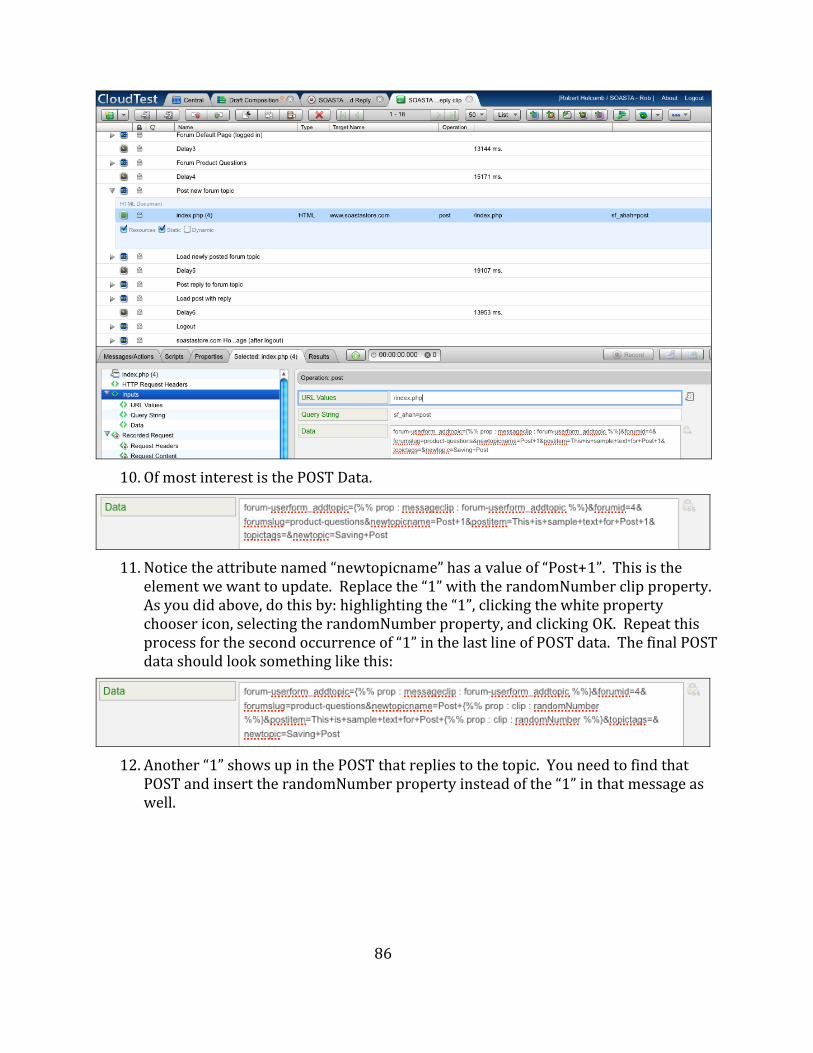
86
10. Of most interest is the POST Data.
11. Notice the attribute named “newtopicname” has a value of “Post+1”. This is the
element we want to update. Replace the “1” with the randomNumber clip property. As you did above, do this by: highlighting the “1”, clicking the white property chooser icon, selecting the randomNumber property, and clicking OK. Repeat this process for the second occurrence of “1” in the last line of POST data. The final POST data should look something like this:
12. Another “1” shows up in the POST that replies to the topic. You need to find that
POST and insert the randomNumber property instead of the “1” in that message as well.
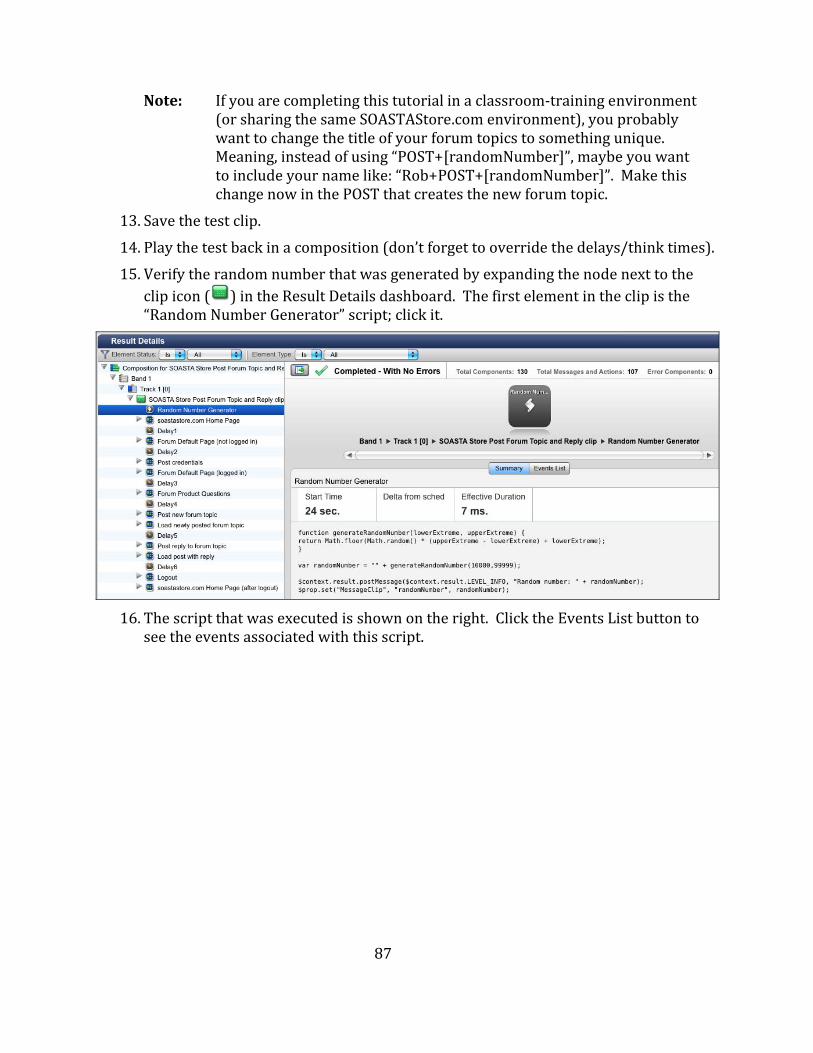
87
Note: If you are completing this tutorial in a classroom‐training environment
(or sharing the same SOASTAStore.com environment), you probably want to change the title of your forum topics to something unique. Meaning, instead of using “POST+[randomNumber]”, maybe you want
de your name like: “Rob+POST+[randomNumber]”. Make this now in the POST that creates the new forum topic.
to incluchange
13. Save the test clip. s). 14. Play the test back in a composition (don’t forget to override the delays/think time
15. Verify the random number that was generated by expanding the node next to the clip icon ( ) in the Result Details dashboard. The first element in the clip is the “Random Number Generator” script; click it.
16. The script that was executed is shown on the right. Click the Events List button to
see the events associated with this script.
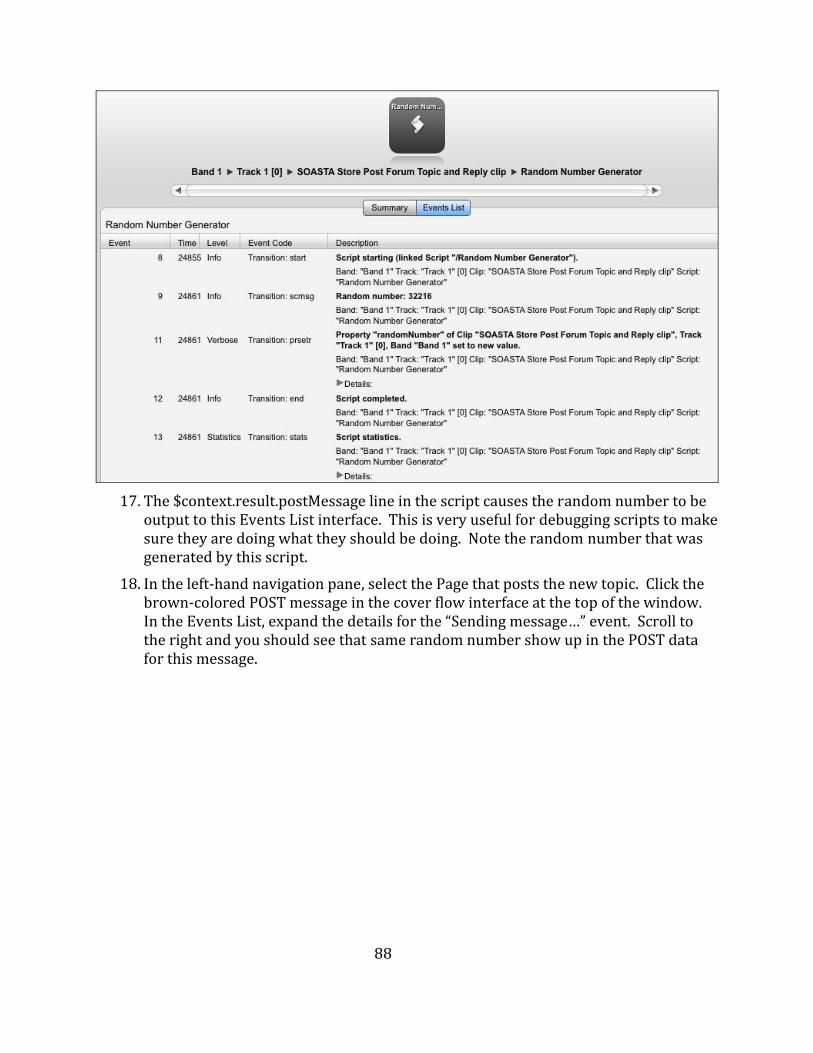
88
17. The $context.result.postMessage line in the script causes the random number to be
output to this Events List interface. This is very useful for debugging scripts to make sure they are doing what they should be doing. Note the random number that was generated by this script.
18. In the left‐hand navigation pane, select the Page that posts the new topic. Click the brown‐colored POST message in the cover flow interface at the top of the window. In the Events List, expand the details for the “Sending message…” event. Scroll to the right and you should see that same random number show up in the POST data for this message.
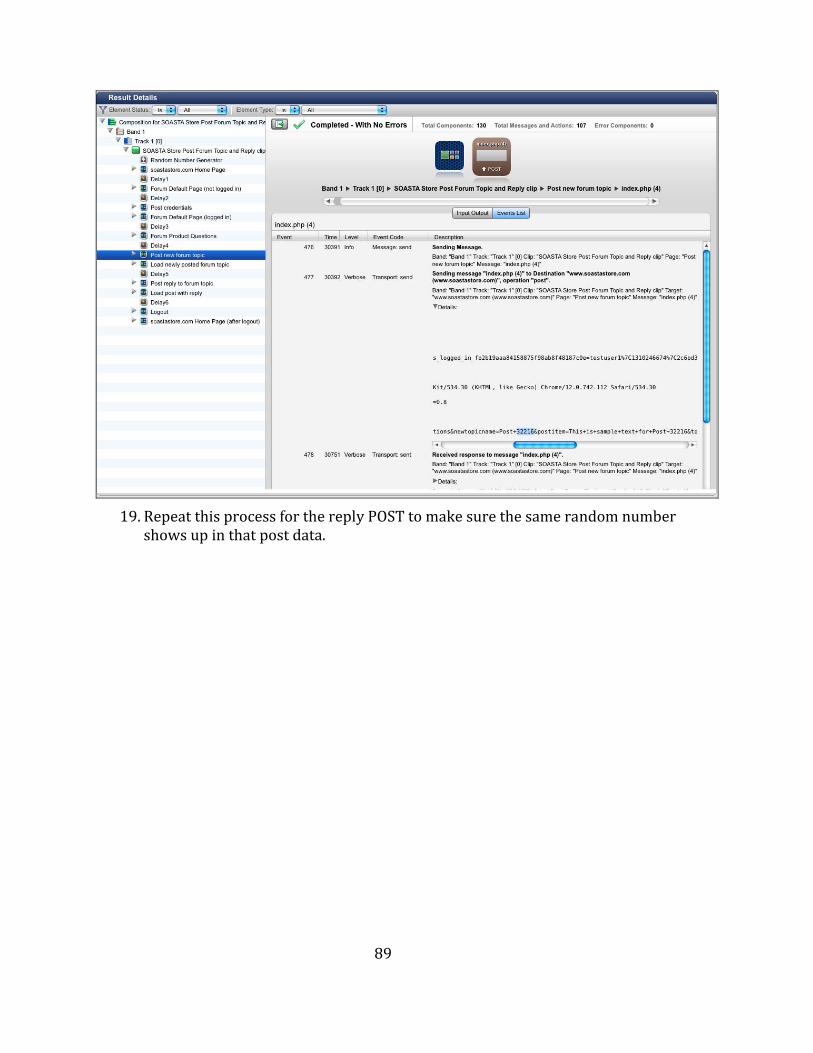
89
19. Repeat this process for the reply POST to make sure the same random number
shows up in that post data.

90
20. Once you’ve verified the test appears to be working from the CloudTest perspective,
do a last verification by looking at the SOASTAStore.com Forum site. You should see your new post (look at the timestamp to confirm) with the same random number you saw in the CloudTest messages. Click on that topic and you should see the same random number in the topic text and reply text.
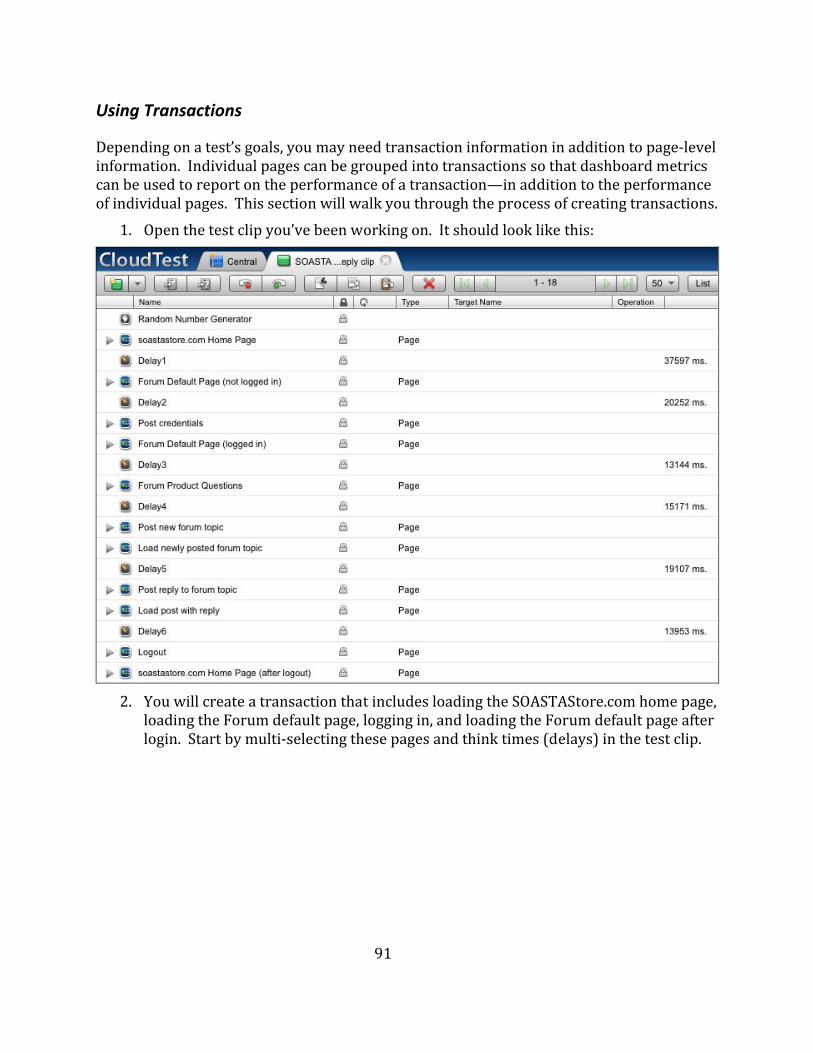
91
Using Transactions
Depending on a test’s goals, you may need transaction information in addition to page‐level information. Individual pages can be grouped into transactions so that dashboard metrics can be used to report on the performance of a transaction—in addition to the performance of in iv ting transactions. d idual pages. This section will walk you through the process of crea
1. Open the test clip you’ve been working on. It should look like this:
2. You will create a transaction that includes loading the SOASTAStore.com home page,
loading the Forum default page, logging in, and loading the Forum default page after login. Start by multi‐selecting these pages and think times (delays) in the test clip.
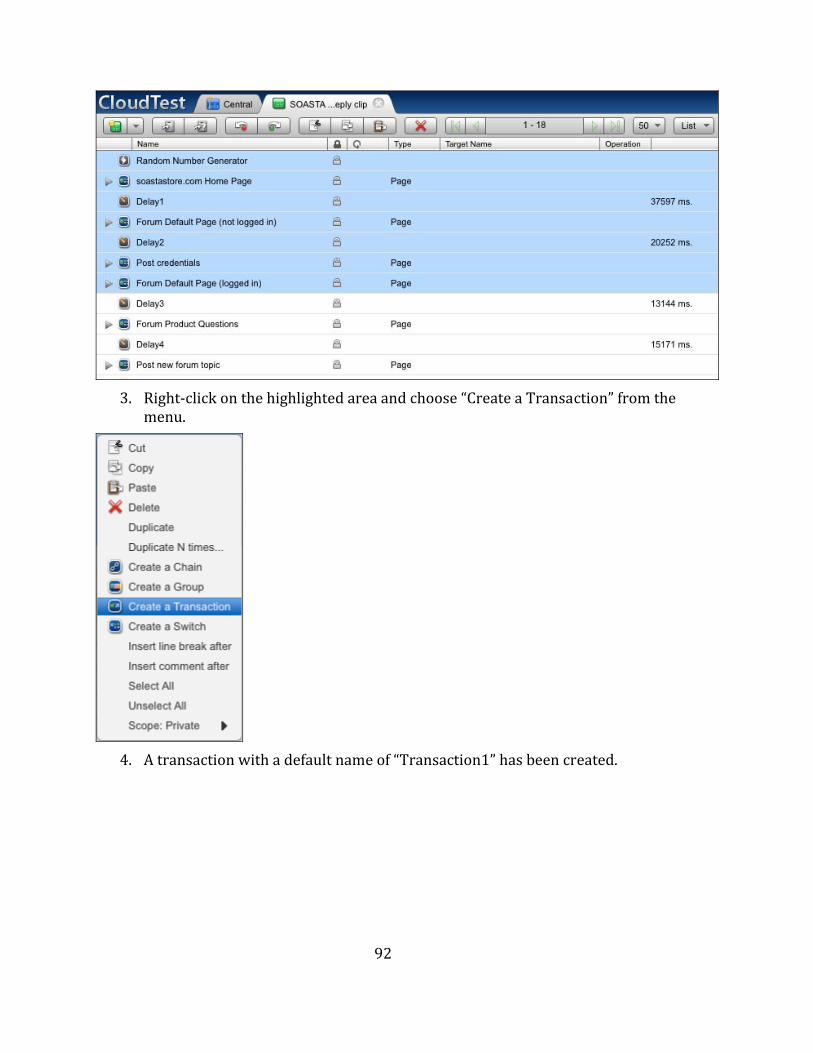
92
3. Right‐click on the highlighted area and choose “Create a Transaction” from the
menu.
4. A transaction with a default name of “Transaction1” has been created.
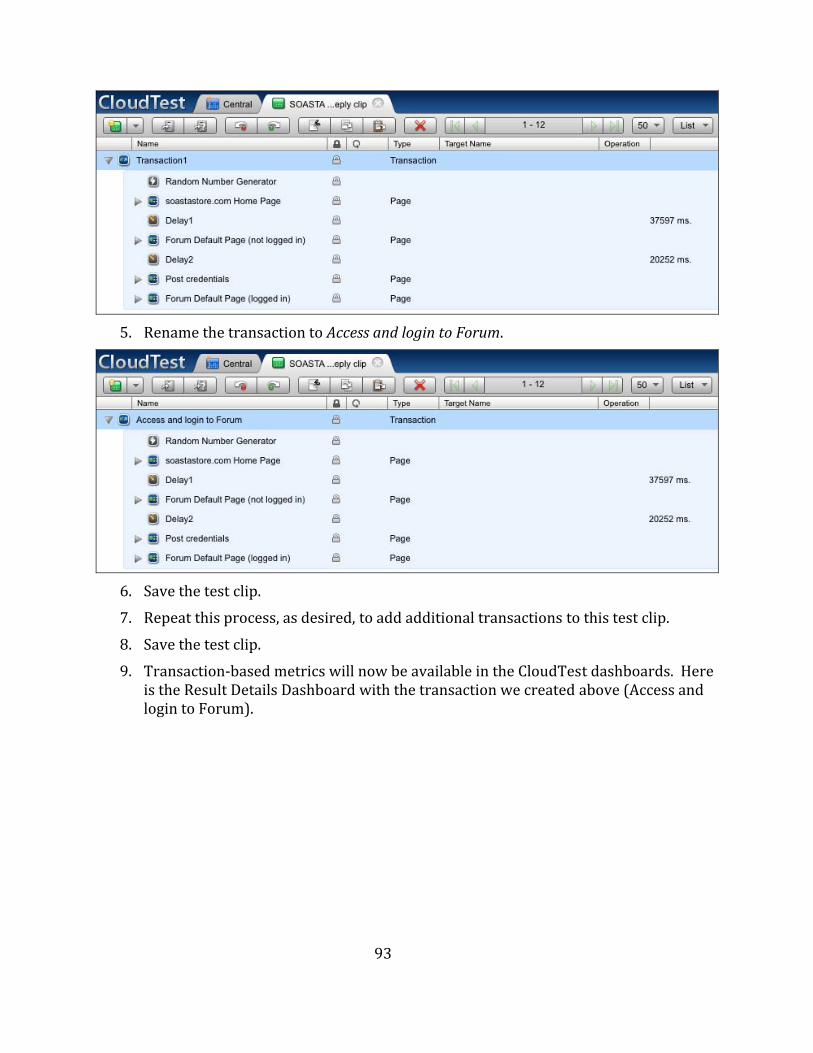
93
5. Rename the transaction to Access and login to Forum.
6. Save the test clip.
s, as desired, to add additional transactions to this test clip.
7. Repeat this proces 8. Save the test clip.
9. Transaction‐based metrics will now be available in the CloudTest dashboards. Here is the Result Details Dashboard with the transaction we created above (Access and login to Forum).
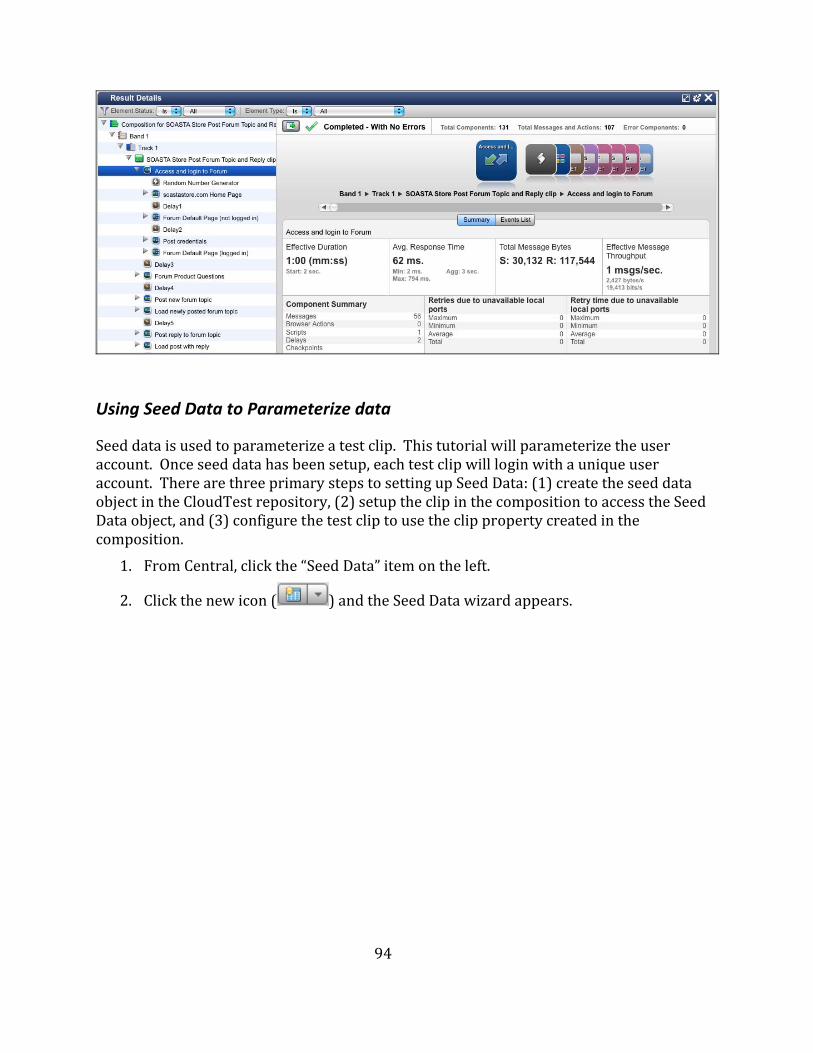
94
Using Seed Data to Parameterize data
Seed data is used to parameterize a test clip. This tutorial will parameterize the user account. Once seed data has been setup, each test clip will login with a unique user account. There are three primary steps to setting up Seed Data: (1) create the seed data object in the CloudTest repository, (2) setup the clip in the composition to access the Seed Data object, and (3) configure the test clip to use the clip property created in the com osp ition.
1. From Central, click the “Seed Data” item on the left.
2. Click the new icon ( ) and the Seed Data wizard appears.
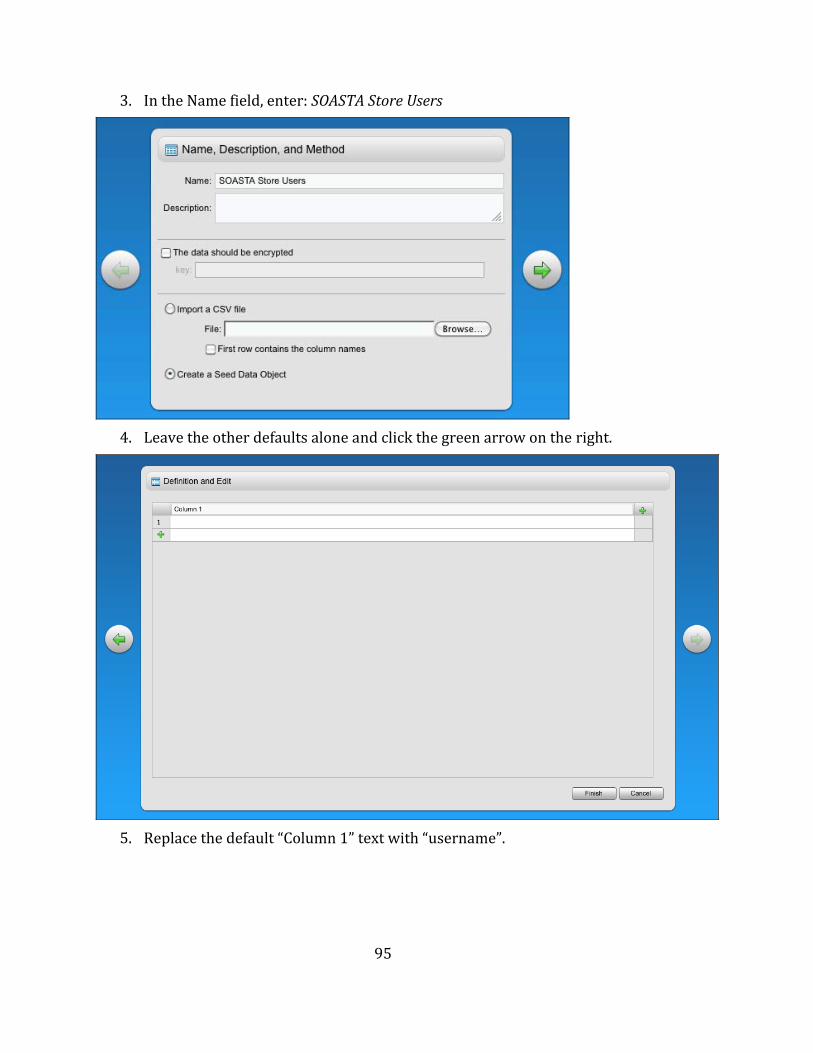
95
3. In the Name field, enter: SOASTA Store Users
4. Leave the other defaults alone and click the green arrow on the right.
5. Replace the default “Column 1” text with “username”.
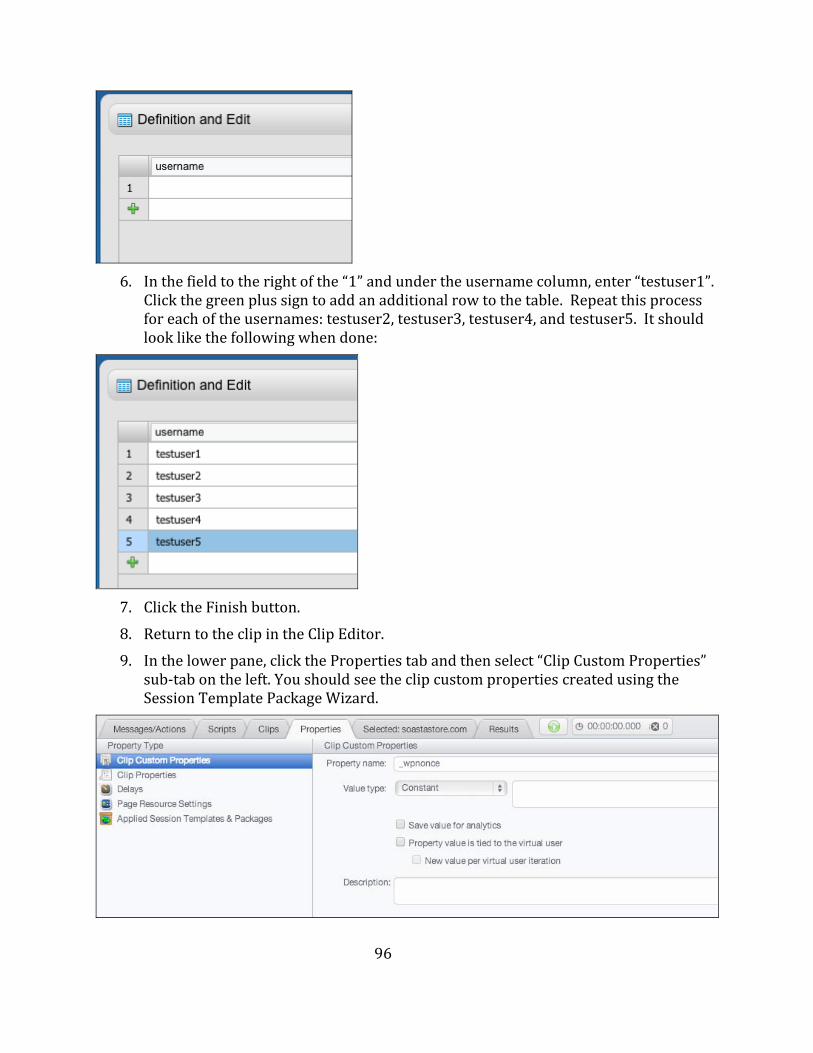
96
6. In the field to the right of the “1” and under the username column, enter “testuser1”.
Click the green plus sign to add an additional row to the table. Repeat this process for each of the usernames: testuser2, testuser3, testuser4, and testuser5. It should look like the following when done:
7. Click the Finish button.
8. Return to the clip in the Clip Editor. 9. In the lower pane, click the Properties tab and then select “Clip Custom Properties”
sub‐tab on the left. You should see the clip custom properties created using the Session Template Package Wizard.
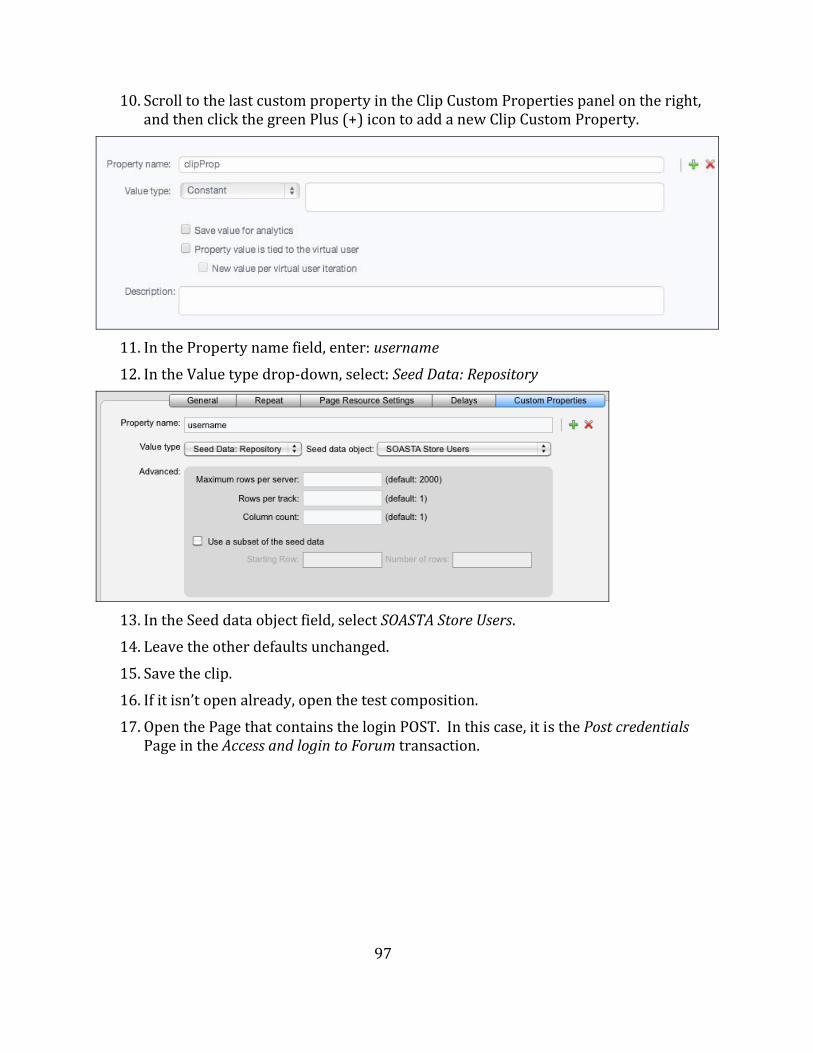
97
10. Scroll to the last custom property in the Clip Custom Properties panel on the right,
and then click the green Plus (+) icon to add a new Clip Custom Property.
11. In the Property name field, enter: use12. In the Value type drop‐down, select: Seed Data: Repository
rname
13. In the Seed data object field, select SO
r defaults unchanged. ASTA Store Users.
14. Leave the othe 15. Save the clip. 16. If it isn’t open already, open the test composition.
17. Open the Page that contains the login POST. In this case, it is the Post credentials Page in the Access and login to Forum transaction.
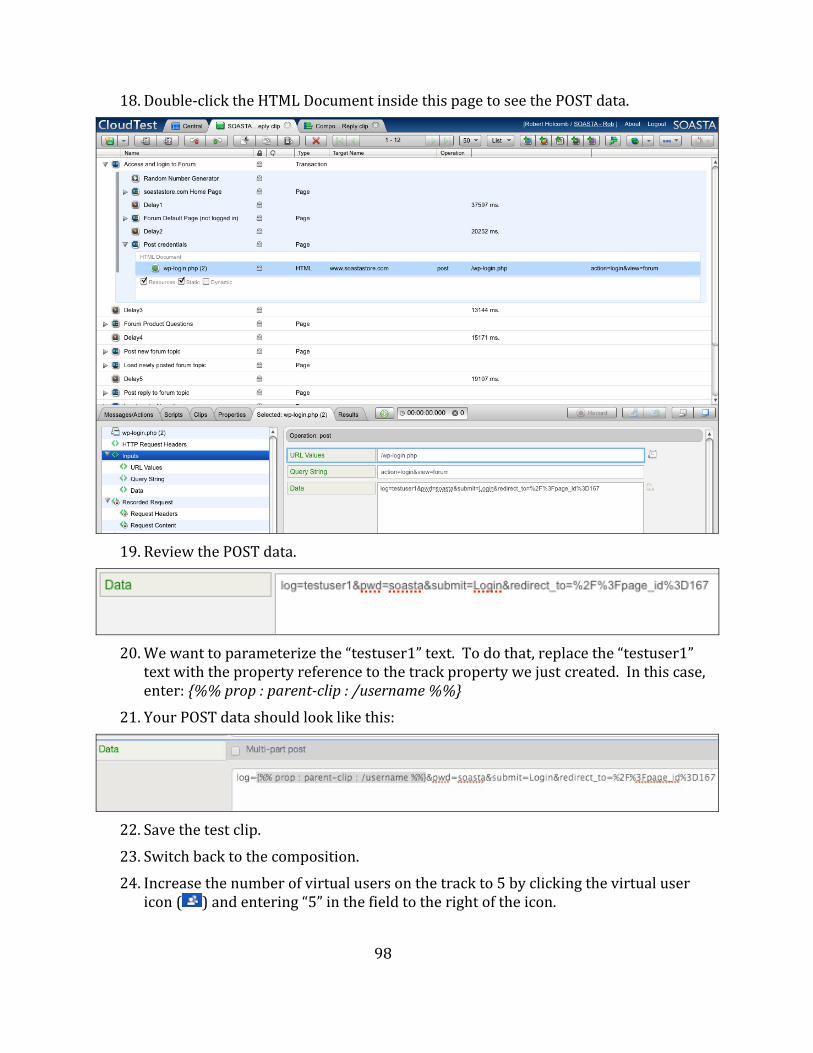
98
18. Double‐click the HTML Document inside this page to see the POST data.
19. Review the POST data.
20. We want to parameterize the “testuser1” text. To do that, replace the “testuser1”
text with the property reference to the track property we just created. In this case, me %%} enter: {%% prop : parentclip : /userna
21. Your POST data should look like this:
22. Save the test clip.
23. Switch back to the composition. 24. Increase the number of virtual users on the track to 5 by clicking the virtual user
icon ( ) and entering “5” in the field to the right of the icon.
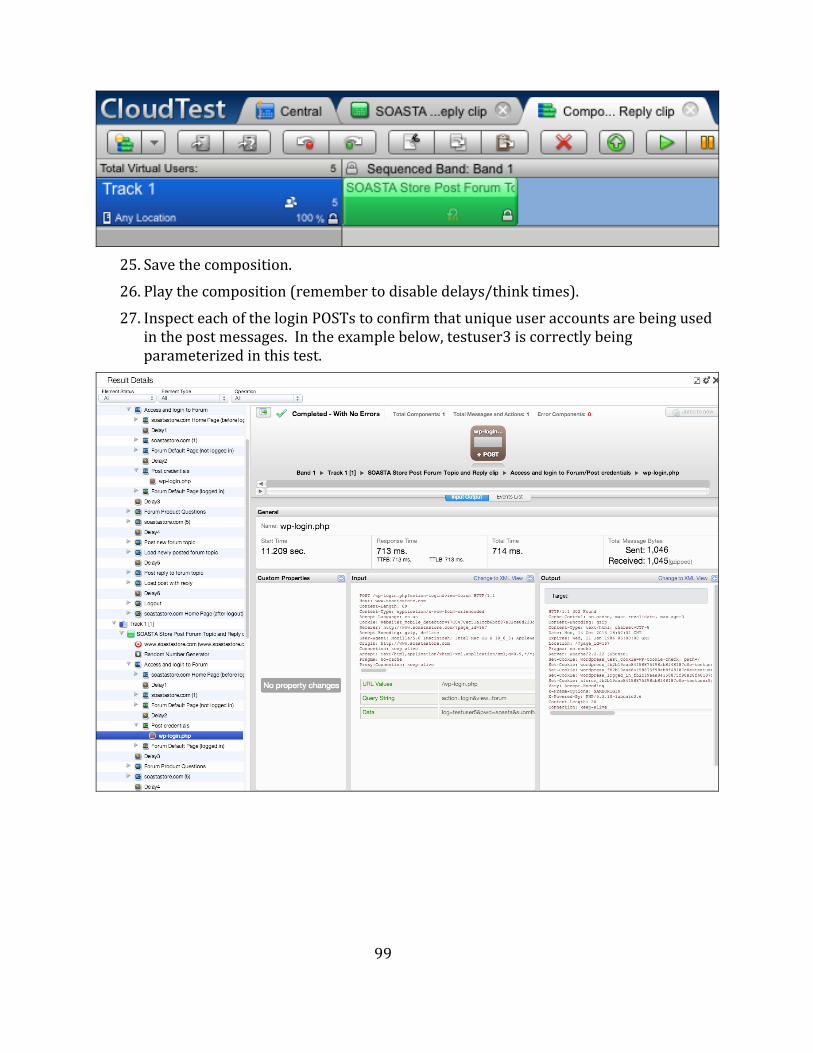
99
25. Save the composition.
26. Play the composition (remember to disable delays/think times). 27. Inspect each of the login POSTs to confirm that unique user accounts are being used
in the post messages. In the example below, testuser3 is correctly being parameterized in this test.
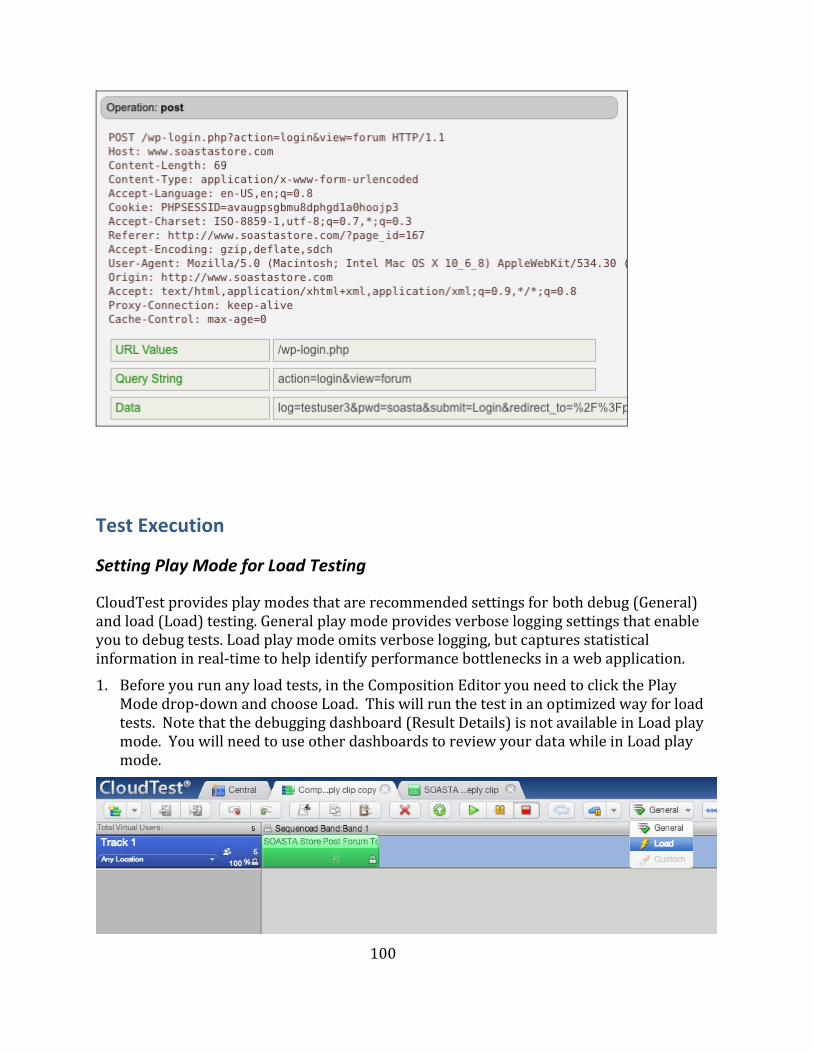
100
Test Execution
Setting Play Mode for Load Testing
CloudTest provides play modes that are recommended settings for both debug (General) and load (Load) testing. General play mode provides verbose logging settings that enable you to debug tests. Load play mode omits verbose logging, but captures statistical information in real‐time to help identify performance bottlenecks in a web application. 1. Before you run any load tests, in the Composition Editor you need to click the Play
Mode drop‐down and choose Load. This will run the test in an optimized way for load tests. Note that the debugging dashboard (Result Details) is not available in Load play mode. You will need to use other dashboards to review your data while in Load play mode.
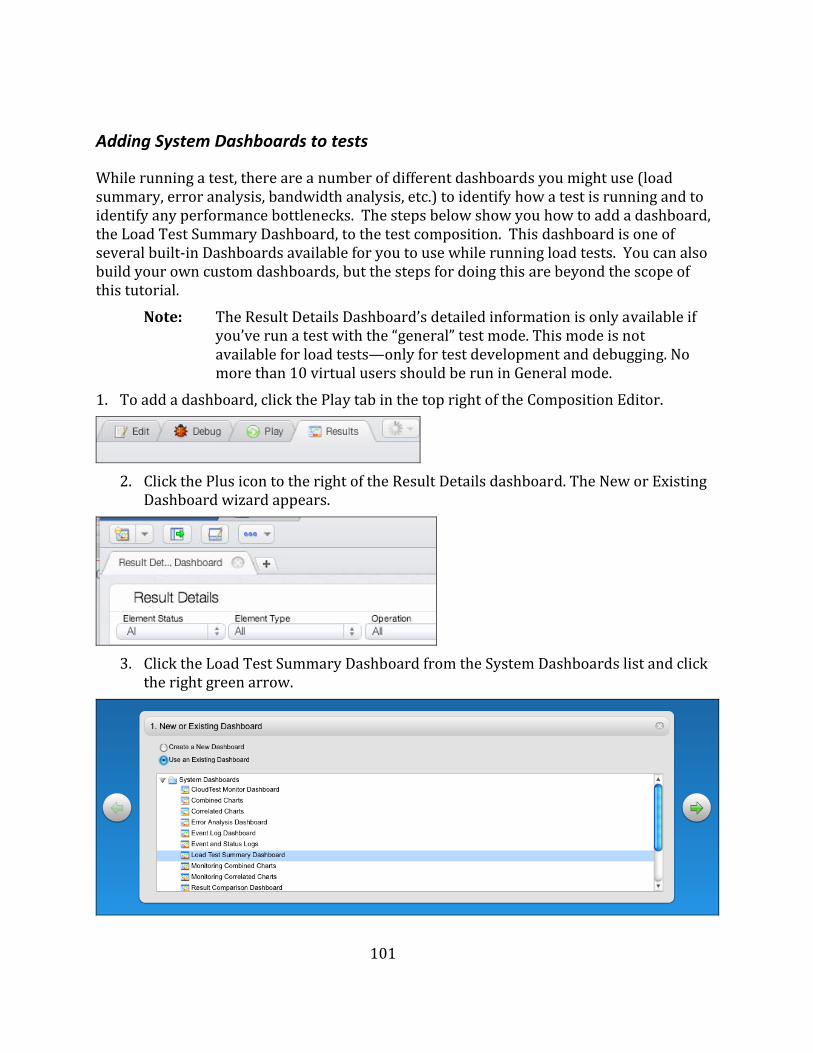
101
Adding System Dashboards to tests
While running a test, there are a number of different dashboards you might use (load summary, error analysis, bandwidth analysis, etc.) to identify how a test is running and to identify any performance bottlenecks. The steps below show you how to add a dashboard, the Load Test Summary Dashboard, to the test composition. This dashboard is one of several built‐in Dashboards available for you to use while running load tests. You can also build your own cuthis tutorial.
stom dashboards, but the steps for doing this are beyond the scope of
Note: The Result Details Dashboard’s detailed information is only available if you’ve run a test with the “general” test mode. This mode is not available for load tests—only for test development and debugging. No more than 10 virtual users should be run in General mode.
1. To add a dashboard, click the Play tab in the top right of the Composition Editor.
2. Click the Plus icon to the right of the Result Details dashboard. The New or Existing
Dashboard wizard appears.
3. Click the Load Test Summary Dashboard from the System Dashboards list and click
the right green arrow.
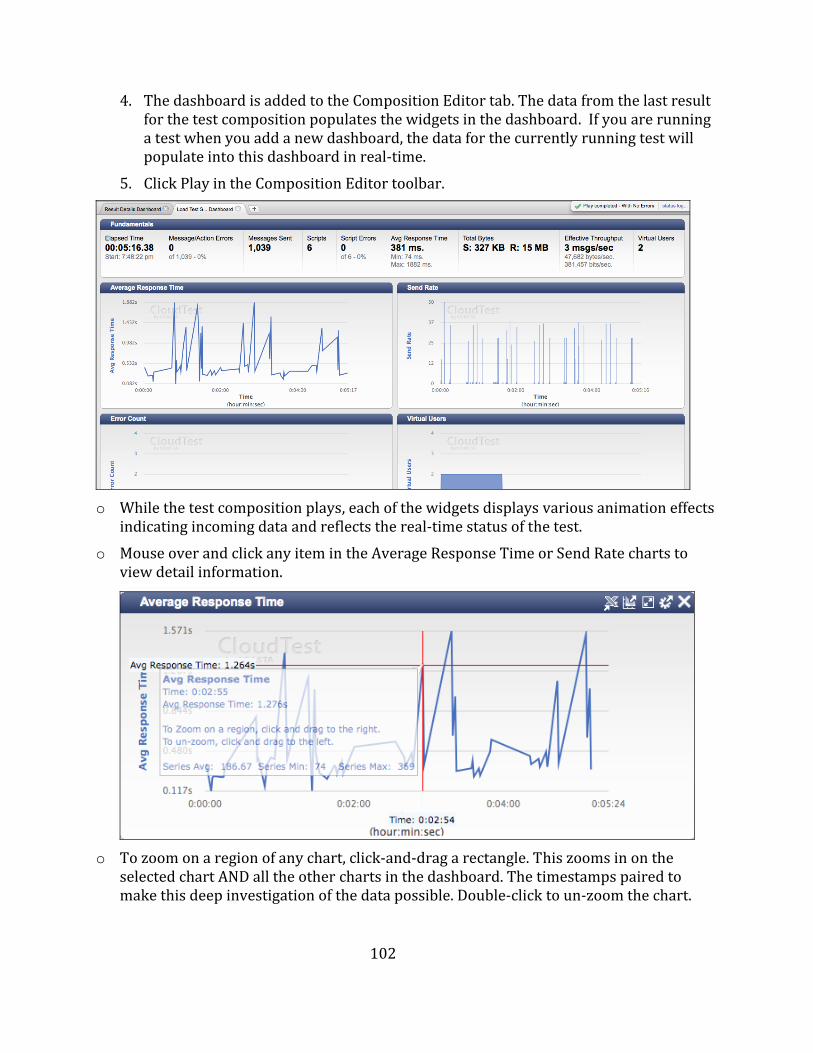
102
4. The dashboard is added to the Composition Editor tab. The data from the last result
for the test composition populates the widgets in the dashboard. If you are running a test when you add a new dashboard, the data for the currently running test will populate into this dashboard in real‐time.
5. Click Play in the Composition Editor toolbar.
o While the test composition plays, each of the widgets displays various animation effects
indicating incoming data and reflects the real‐time status of the test. o Mouse over and click any item in the Average Response Time or Send Rate charts to
view detail information.
o To zoom on a region of any chart, click‐and‐drag a rectangle. This zooms in on the selected chart AND all the other charts in the dashboard. The timestamps paired to make this deep investigation of the data possible. Double‐click to un‐zoom the chart.
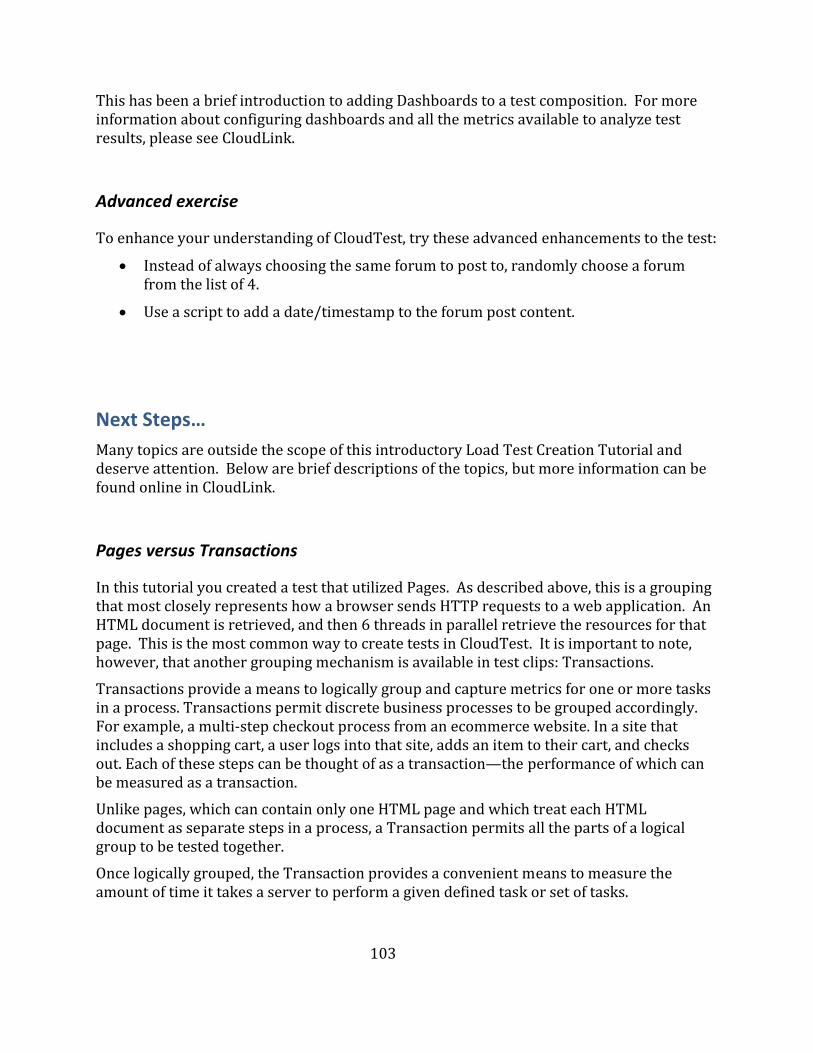
This has been a brief introduction to adding Dashboards to a test composition. For more information about configuring dashboards and all the metrics available to analyze test esults, please see CloudLink.
a
103
r
Advanced exercise
To enh est: ance your understanding of CloudTest, try these advanced enhancements to the t
• Instead of always choosing the same forum to post to, randomly choose a forum from the list of 4.
• Use a script to add a date/timestamp to the forum post content.
Next Steps… Many topics are outside the scope of this introductory Load Test Creation Tutorial and deserve attention. Below are brief descriptions of the topics, but more information can be ound online in CloudLink. f
Pages versus Transactions
In this tutorial you created a test that utilized Pages. As described above, this is a grouping that most closely represents how a browser sends HTTP requests to a web application. An HTML document is retrieved, and then 6 threads in parallel retrieve the resources for that page. This is the most common way to create tests in CloudTest. It is important to note, however, that another grouping mechanism is available in test clips: Transactions. Transactions provide a means to logically group and capture metrics for one or more tasks in a process. Transactions permit discrete business processes to be grouped accordingly. For example, a multi‐step checkout process from an ecommerce website. In a site that includes a shopping cart, a user logs into that site, adds an item to their cart, and checks out. Each of these steps can be thought of as a transaction—the performance of which can be measured as a transaction. Unlike pages, which can contain only one HTML page and which treat each HTML document as separate steps in a process, a Transaction permits all the parts of a logical group to be tested together. Once logically grouped, the Transaction provides a convenient means to measure the mount of time it takes a server to perform a given defined task or set of tasks.
Note that it isn’t an either/or situation with Pages versus Transactions. Many tests utilize a combination of both Pages and Transactions. For example, the Transaction shown above (in Icon view) contains multiple CloudTest pages that equates to a complete tasks in a web application. By constructing the test as a Transaction, metrics about the specific “transaction” (e.g. submitting a form) can be captured. Among the metrics captured is the server response time it takes to submit all or part of a Transaction. An individual Transaction can be measured again at various increments of load. The resulting etrics are useful in identifying potential bottlenecks as an outcome of testing discrete usiness processes. The Transaction above is shown in List view below..
104
If‐Then‐Else and Switch
The Clip Editor supports a visual mechanism for doing if‐then‐else and switch statements within a test. If you plan to include conditional logic in a test, these are important topics to review. These mechanisms provide the ability to create very complex test cases, but spend the time to make sure you understand how to use the features correctly.
mb
Building Dashboards
Real‐time analytics are the cornerstone of the CloudTest solution. The goal of any test is to understand how an application performs under differing conditions. The only way to determine how an application is performing during a test is by using real‐time dashboards. Everyone looks for different things in a dashboard, so CloudTest provides an intuitive and flexibly way for every user to create and edit their own dashboards. All metrics are available in real‐time and can be exported when tests are complete. As a CloudTest user who will be running tests, it is critical you understand which metrics (both test‐related and monitoring‐related) are available within CloudTest. This will make you more efficient while running a test and help you identify performance bottlenecks uicker. Take time to review each of the metrics available in CloudTest and understand hat that data means and how to interpret it during a test.
qw
Dynamic Pages
This tutorial used static pages in the test clip. It is a good idea to spend some time working with Dynamic Pages. As described above, these are very different as they dynamically parse out the Resources (CSS, JS, images, etc.) in an HTML document. It takes some time to become familiar with correctly filtering Dynamic Pages to make sure they are making the HTTP requests the test goals require (and more importantly, not making the requests for esources the test goals explicitly exclude). r
105
Monitoring
Monitoring is a key part of any test. Monitoring data provides back‐end metrics detailing the impact a test is having on the application or application infrastructure and helps the tester identify possible performance bottlenecks. CloudTest provides its own monitoring tools, in addition to integrating with 3rd‐party tools like CA’s Wily Introscope product. pend some time installing a couple monitors and reviewing the Monitoring FAQ document o become familiar with the capabilities of CloudTest monitoring features. St

Mountain View, CA 94041 866.344.8766
http://www.soasta.com
SOASTA, Inc. 44 Ca Floor 4 stro Street, 4th