Embed Size (px)
Citation preview

TouchTest™ for Quality Center Tutorial

SOASTA TouchTest™ for Quality Center Tutorial ©2013, SOASTA, Inc. All rights reserved.The names of actual companies and products mentioned herein may be the trademarks of their respective companies.This document is for informational purposes only. SOASTA makes no warranties, express or implied, as to the information contained within this document.

Table of Contents.....................................................................................................................Prerequisites 1
..........................................................................................CloudTest/TouchTest Prerequisites 1.......................................................................................Creating a New Test in the Test Plan 2
..................................................................................Adding the Integration Script to the Test 4...........................................................................Adding Test Instance User Fields to the Test 5
.................................................................................................Adding Parameters to the Test 8............................................................................................Defining and Running a Test Set 13
.................................................................................Adding Columns to the Execution Grid 13..........................................................................Selecting Tests to Run in an Execution Grid 16
i

1
PrerequisitesThis tutorial guides the user through the process of integrating SOASTA TouchTest (or CloudTest) with the HP Quality Center by using the SOASTA scommandIntegration.vbs script in tandem with preconfigured TouchTest compositions. The Quality Center is presumed to be operational, according to Hewlett-Packard instructions.
TIP: If your organization is not already using Quality Center—refer to the HP Quality Center Software page to get started.
This tutorial provides guidance for two audiences:• Users who would like to integrate CloudTest/TouchTest with a pre-existing Quality
Center setup• Users who are mobile developers starting out with TouchTest who would also like
to add TouchTest to a Quality Center setupCloudTest/TouchTest Prerequisites
• From the Welcome page of your CloudTest instance, download the scommandIntegration.vbs. You will need to note the location as we will paste its content into a Test Script entry field as part of test definition.
• CloudTest provides wide browser support; however, Quality Center runs in Windows Internet Explorer 7 through 9. CloudTest no longer supports Internet Explorer 7, while Internet Explorer 9 is supported in Italia builds only. If you intend to view CloudTest from your Windows installation while using Quality Center, please note the CloudTest Supported Browsers.
Test Composition PrerequisitesThe test compositions you will integrate with Quality Center should already exist on the CloudTest instance that you specify; in addition to the composition name take note of the SOASTA repository path (use "/" if appropriate) to invoke them.
TIP: The composition in use below happens to be a mobile app example, however, any CloudTest or TouchTest composition can be used with Quality Center, whether that composition tests a mobile native/hybrid app, a web UI, SOAP/WSDL, or HTTP(S) target(s).
• For iOS developers or testers, refer to the SOASTA TouchTest for iOS Tutorial. • For Android developers or testers, refer to the SOASTA TouchTest for Android
Tutorial. • For general information, refer to the SOASTA CloudLink Knowledge Base and join
the CloudLink Forum for community support and interaction.

2
Creating a New Test in the Test PlanIn this section we will add a test to an existing Quality Center Test Plan. Use the following steps to create the new test in your existing Quality Center Test Plan.
1. In Quality Center, open the Test Plan to which the test will be added.2. Create the new Test by clicking Tests > New Test. The Test Details box appears.
3. In the New Test dialog box, assign the test a name and optional description. Keep in mind a description can help identify the test components at a later time.
4. Click OK. THE HP VAPI-XP Wizard box appears.

3
5. Check the Create a HP LoadRunner Vuser box. Note that without this checked box TouchTest integration will not work.
Leave the Test Details box open for the next steps.
4
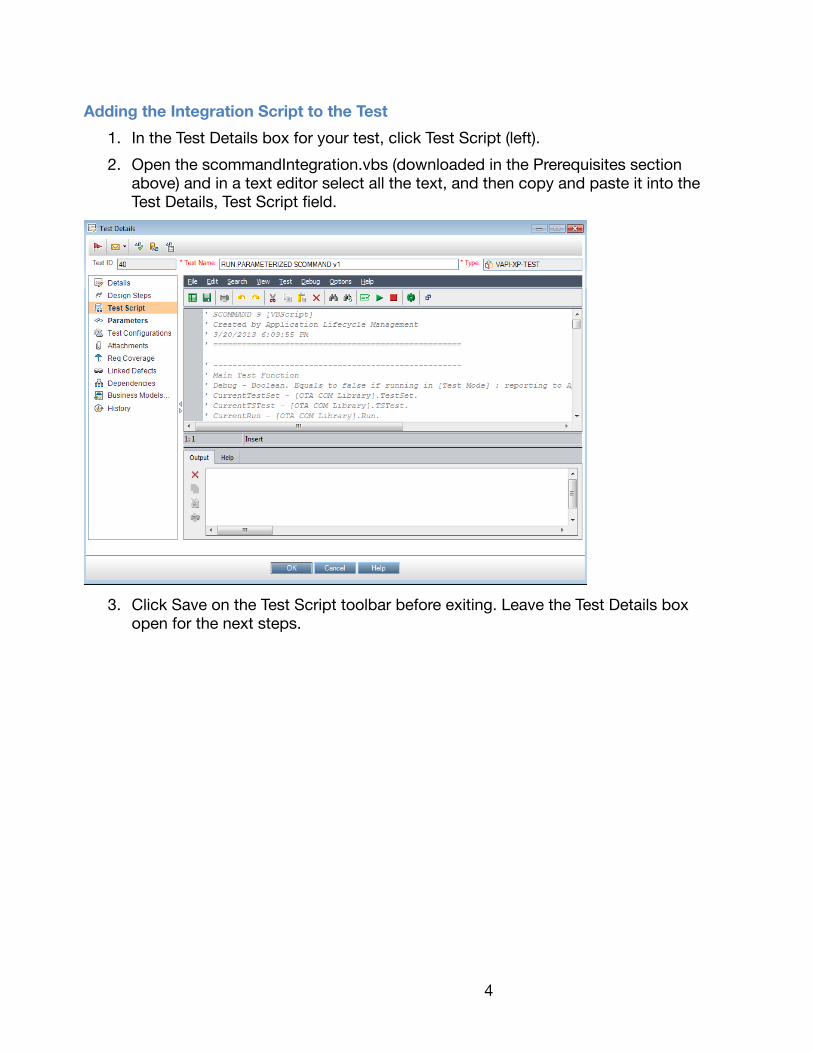
Adding the Integration Script to the Test1. In the Test Details box for your test, click Test Script (left). 2. Open the scommandIntegration.vbs (downloaded in the Prerequisites section
above) and in a text editor select all the text, and then copy and paste it into the Test Details, Test Script field.
3. Click Save on the Test Script toolbar before exiting. Leave the Test Details box open for the next steps.

5
Adding Test Instance User Fields to the Test1. With the Test Plan saved, go to the upper blue menu bar and choose Tools >
Customize… When you do so, the Project Customization page appears.
2. In the Project Customization tree, select Project Entities (leftmost) > Test Instance (middle pane) > User Fields.
3. Click the New Field button.4. For each of the below, create a new field. For example, for “Name: TC_USER_01”,
enter “SOASTA Results URL” in the Label field.

6
Add a new field for all of the following:• SOASTA Results URL – TC_USER_01
Note: SOASTA Results URL’s Field Name is “TC_USER_01”. We will use this identifier: “TC_USER_01”, later to associate the field with the test script parameter colResultsURL. Please keep track of all the additional Field Names added. These values will be input as the Default Value for the corresponding parameters starting with “col” in the test script.
• Last Composition Completed – TC_USER_02. In the next section, TC_USER_02 will also be the default value for colLastComposition.

7
• SOASTA Failure Message – TC_USER_03. In the next section, TC_USER_03 will also be the default value for colCompositionFailures.
• Composition to Run – TC_USER_04. In the next section, TC_USER_04 will also be the default value for colCompositionToRun.
• Test Folder Path – TC_USER_05. In the next section, TC_USER_05 will also be the default value for colTestsFolderPath.
5. At this point, Quality Center may force the user to log out and back in to show these changes.

8
Adding Parameters to the Test1. After saving the test, click Return (top right of the Project Customization page) to
go back to the prior Quality Center screen.2. Click the Parameters tab (next to the Test Script tab in Test Plan).
3. Click New Parameter.
The Test Parameter Details box appears.

9
4. Enter the parameter name, CompositionName. 5. In the Default Value tab, type the composition name. For example, Composition
for Fools Mate Clip (shown above). The Default Value should be the test composition to use. Note: Parameter names are case sensitive and must match the values
below or the test will fail. To make this easier, a list of all necessary parameters has been provided at the top of the scommandIntegration.vbs script in the Parameters to add to run this script: comment. Feel free to switch between the Test Script and Parameters tabs while copying and pasting the necessary parameters the script uses.

10
6. Click New Parameter, and enter a parameter name and default value until you have defined a parameter for each of the below:
Parameter Name Default Value DescriptionCompositionName Composition for Fools Mate The default
composition to run.URL http://10.0.1.55:8080/concerto CloudTest URL for
your instance.Username SOASTA_DOC CloudTest
username to use for this instance. For example, SOASTA_DOC.
Password secret CloudTest Password to use for this username. For example, secret.
TestsFolderPath /SOASTA Tutorial/Advanced CloudTest repository folder where this composition is located. For example, /SOASTA Tutorial/Advanced
SCommandWaitTime 120 The amount of time (in seconds) to wait for scommand to finish running this test before terminating. This should begin with a reasonable estimate of the time your test composition will take to run and should be reset to a larger number if the test fails on a timeout. For our example test, we entered 120.

11
colResultsURL TC_USER_01 This value should match the value found in Tools > Customize… > Project Entities > Test Instance > User Fields > SOASTA Results URL. For example, TC_USER_01.
colLastComposition TC_USER_02 This value should match the value found in Tools > Customize… > Project Entities > Test Instance > User Fields > Last Composition Complete. For example, TC_USER_02.
colCompositionFailures TC_USER_03 This value should match the value found in Tools > Customize… > Project Entities > Test Instance > User Fields > SOASTA Failure Message. For example, TC_USER_03.
colCompositionToRun TC_USER_04 This value should match the value found in Tools > Customize… > Project Entities > Test Instance > User Fields > Composition to Run. For example, TC_USER_04.

12
colTestsFolderPath This value should match the value found in Tools > Customize… > Project Entities > Test Instance > User Fields > Test Folder Path. For example, TC_USER_05.
The fully parameterized test parameter list is shown below.
Note: The default values (for example, TC_USER_01) can be different according to the defaults in use on your Quality Center instance. For all parameter names starting with col, their default values are based on the QC-generated User Field Names. They must match what was done in “Adding Test Instance User Fields to the Test” and the QC Names associated with the fields added.

13
Defining and Running a Test SetOnce the scommandIntegration.vbs script is included in a defined test with the necessary fields mapped, we will create a corresponding Execution Grid that displays all the column values defined above (as well as columns for Time, Status, and so forth, which are relevant to a test run). Once we have an Execution Grid that displays the TouchTest-relevant fields, we will Select Tests to add to that grid. We can add one or more tests (for our example we have defined only one test's Default Values; however, we can override those values if we have additional tests we'd like to run in this grid. Adding Columns to the Execution Grid Once the new test is configured using all the steps above, proceed to the Test Lab to add columns that will be used to select the outputs.
1. Click Test Lab on the Application Lifestyle Management page. 2. Click Test Sets > New Test Set (or, click the New Test Set icon).

14
3. In the New Test Set box, enter a name and click OK. For example, QC Integration Test Set.
4. With the new test set still selected in the Test Sets list (left), click the Columns icon.
5. The Select Columns box appears. Select all the User Fields created above to add to the test plan's Execution Grid. Also, include Name, Status, Exec Date, and Time (these fields will provide info about the test run).

15
6. Click OK. The Execution Grid shows the table with columns aligned from left to right as indicated in the Select Columns box.
The Execution Grid for the new test set appears on top.

16
TIP: Quality Center users can set values other than the default values provided here. To do so, double-click the test and then go to the Test Instance Details box. However, since default values can be easily overridden during execution grid setup, we recommend this be done there.
Selecting Tests to Run in an Execution GridOnce we have an Execution Grid that displays the TouchTest-relevant fields, we will Select Tests to add to that grid. We can add one or more tests (for our example we have defined only one test's Default Values; however, we can override those values if we have additional tests we'd like to run in this grid.
1. With the Test Set open, click the Select Tests command (top left).
2. Expand the Test Plan Tree until you locate the test created above. For example, QC Integration Test.

17
3. Double-click the item to add it to the Execution Grid and then close the right panel by clicking the Close [X] icon.
4. Optionally, add the same test a second time. You might wish to do so if you have more than one test composition to run and wish to use an override to achieve this. For example, as in the SOASTA TouchTest Tutorials cited above, two test clips are in use (the second is called Composition for King Gambit Clip and it resides in the same repository folder as the default value /SOASTA Tutorial/Advanced).
At this point, if you are going to run only one test using its default values, you can click Run on the Execution Grid toolbar in order to run it. Do so only if the configured Default Values are suitable. However, you can also use the Execution Grid to create overrides.

18
Overrides work like this: user entered Execution Grid settings > Actual Values > Default Values. Skipping the execution grid setup will cause the test plan to follow the usual: Actual Values > Default Values.
5. If you added more than one test instance, select the instance to override and then double-click it to open the Test Instance Details box and select fields to override. For example, [2] QC Integration Test.TIP: You can also enter override values in the row. You can enter overrides by entering them in the Details node or by clicking Execution Settings and entering an Actual Value.Once ready, click OK to exit the Test Instance Details box.
6. With the necessary tests added, and overrides entered (if any), click Run Test Set.

19
7. In the Automatic Runner box, click Run All.
The test queue begins to run.

20
At the appropriate point in the run, the scommandIntegration.vbs is invoked and a corresponding window appears.
8. After the test run is complete, examine the test results in the Last Run Report lower panel. For example, an error has occurred at the end of the test run shown below.

21
For more about test result analysis, refer to either of the following OS-specific tutorials:
• SOASTA TouchTest for iOS Tutorial
• SOASTA TouchTest for Android Tutorial
For a wider discussion of the extensive TouchTest Tutorial set, refer to Introduction to TouchTest Tutorials

22
SOASTA, Inc.444 Castro St.
Mountain View, CA 94041866.344.8766
http://www.soasta.com