Embed Size (px)
Citation preview
Software-driven Pneumatic Beating Heart Simulator andECG Display
Vanderbilt University, School of Engineering
BME 272-273, Group #9
Submitted on April 27, 2011
Group Members:
Jacob Bauer (BME)
Nicole Rice (EE)
Ashley Whiteside (BME)
Advisors:
Dr. Jonathan Nesbitt
Dr. Paul King

2
Table of Contents
Abstract 3
I. Introduction 41.1 Literature Review 41.2 Current System 51.3 Design Goals 5
II. Methodology 52.1 Hardware Specifications 62.2 Software Design 92.3 ECG 12
III. Results 153.1 Graphs and Images 153.2 Safety Considerations 173.3 Economic Analysis 18
IV. Conclusions 20
V. Recommendations 20
References 22
Appendix 23
3
Abstract
The main goal of our project was to design a prototype for a software-driven beating
heart simulator for use in the cardiothoracic surgery training program at Vanderbilt University’s
Medical School. Current models lack cohesive integration of simulation software and
mechanical palpitation of the heartbeat and do not accurately immerse the trainees in a realistic
training environment. We intended to address these issues by creating a mechanical simulator
that was fully integrated with a user-friendly software program and allows for dynamic alteration
of variables.
The physical heartbeat was accomplished through controlling the flow of compressed air
into intraventricular balloons positioned within the right and left ventricles of the heart. This
airflow was controlled electronically by means of a solenoid pneumatic valve which is triggered
in correlation with the user-provided heart rate. The pneumatic pressure is supplied by way of
in-wall compressed air and vacuum sources located in the simulation laboratory.
We created a user-friendly software program that allows the instructors controlling the
simulation to dynamically alter each variable, permitting real-time changes in the surgical
environment. Our software consists of a graphical user interface as well as a separate ECG
display. The graphical user interface permits the user to enter the heart rate and desired
arrhythmia. The ECG is plotted in a separate window permitting it to be displayed on a different
monitor to allow the trainees to observe the ECG throughout the surgery. Our software
interfaces with an Arduino Uno microcontroller which produces a voltage signal to control the
pneumatic valve. Ultimately, our system effectively replicates the motion of a beating human
heart and produces a corresponding ECG to contribute to the realism of the training environment.
4
I. Introduction
1.1 Literature Review
A new cutting edge technology that is currently being explored is the development of
cardiac simulators that will be used to train surgical residents. Experiments have been conducted
on the efficiency and helpfulness of a cardiac simulation setup. One of these was a
cardiopulmonary bypass simulation at a boot camp. The objective of this boot camp was to
“evaluate a modular approach to skills mastery related to cardiopulmonary bypass and crisis
scenarios” (Hicks et al.). In this study, 32 first-year cardiothoracic surgery residents performed
operations using the cardiopulmonary bypass simulator. Upon completion, each participant gave
a score on how helpful they found the simulator to be for training purposes. The overall average
of the scores indicated that the participants found the simulator to be very helpful (Hicks et al.).
While a beating heart simulator is an excellent way to introduce surgical residents to
heart surgeries, it can also be used to gain experience with more advanced techniques and
methods without learning on a real patient. An example of this was an experiment conducted
with eight surgical residents to practice anastomoses, a more advanced cardiac surgical
procedure. The data obtained from this study indicated that the residents shortened the necessary
time for the anastomoses procedure after only one week of practice. After completing the study,
“100% of the residents agreed that the beating-heart model is a good method of training” (Fann
et al.)
Currently, cardiac surgical residents primarily train on unrealistic models or cadavers.
These do not accurately simulate an operating environment or adequately prepare a student for
working on live patients. The beating heart simulator provides an essential bridge in training
between cadavers and participating in live surgery for surgical residents. The simulator can be
5
used by a surgeon at any level of experience to practice a procedure before performing it on a
patient. This could be very helpful in situations where a doctor must perform an unfamiliar
procedure or one that he or she does not do on a regular basis.
1.2 Current System
The system that our project sponsor, Dr. Nesbitt, is currently using utilizes a windshield
wiper motor to cyclically pump a plastic bellows. The bellows forces air through surgical tubing
connected to party balloons placed in right and left ventricles of a porcine heart. Unfortunately,
this does not allow for variable BPM or real time control. Furthermore, it does not produce a
simulated ECG display or displace enough air to accurately represent the magnitude of a
contraction in a healthy heart.
1.3 Project Goals
The goals for this project were to address the lack of dynamic alterations and to display
an ECG for a beating heart simulator. In order to effectively accomplish these goals, we
identified several engineering requirements that needed to be met to successfully complete the
project. For ease of use the simulator must be controlled by a computer software package. This
software needs to drive a physical heartbeat in a porcine heart based on the user provided heart
rate data. Additionally, the software had to produce an ECG display that corresponds to the user
provided data. An integral component of our system was that the simulated heartbeat must be
dynamically alterable. Lastly, the most important task to accomplish was to make the physical
palpitation produced in the porcine heart accurately mimic real-life motion.
II. Methodology
The construction of the heart beat simulator was approached in three distinct steps. One
member immediately began programming the computer software that would direct the solenoid
6
valve and the ECG display. The team as a whole focused on design and construction of the
physical system and later, the implementation of the ECG display.
2.1 Hardware Specifications
During our first meeting with Dr. Nesbitt we had the opportunity to observe how his
current system functions. This system acted as a jumping-off point for our design process. We
agreed that creating the beating motion by pumping balloons was a good concept as this caused
the heart to expand in a natural fashion. Balloons expand uniformly when inflated, but are
flexible, allowing them to conform to the natural shape of the ventricles in which they are
inserted. They also give under pressure, meaning that when the surgeons are operating on the
porcine heart it will feel more natural than if a mechanical driver were being used. Having
decided to use balloons to deliver the pressure needed to expand the heart we consulted with Dr.
Barnett, an associate professor of mechanical engineering here at Vanderbilt, regarding methods
of delivering pressure to the balloons. Dr. Barnett suggested that we should consider both
hydraulic and pneumatic means of driving our pump and explained the key differences between
the two. He informed us that hydraulics are more versatile but that pneumatics respond more
rapidly. We ultimately decided upon using pneumatics because a high response rate was
essential when creating pulses of over 100 beats per minute and also because a leak in hydraulic
fluid would be considerably more disruptive to the simulation than a pneumatic leak would
be. Having decided to employ pneumatic force to achieve the mechanical movement that we
desired we looked into the devices that Dr. Barnett suggested to us: air cylinders, a motor driven
pump, and pneumatic solenoid valves. We discovered that air cylinders were generally not
driven electronically, but rather by controlling the pneumatic inputs to the device; this was
undesirable as we needed to control the device via computer software. We also considered using

7
a servo motor to drive a pump which would have acted essentially like a syringe. In this case the
servo motor would drive a piston within an airtight tube, as diagrammed in Figure 1 below.
Figure 1: Servo Motor Driven Pump Concept
As the motor rotated the piston would oscillate, alternately forcing air into and out of the
balloon. This system took care of our concern regarding the need for suction to vacuum the air
from the balloons; however, we felt that this system would have too many points of failure. Dr.
Nesbitt’s current system operates in a similar manner and we knew that it did not produce
enough air pressure to accurately imitate a beating heart, so if we were to implement the system
this way we would have to generate much more force. We were concerned that in order to
achieve the desired movement the mechanical components would have to be incredibly durable
and powerful, which would significantly stress the delivery apparatus. Alternatively, the method
that we ultimately chose, the pneumatic solenoid valve, was significantly more simple and
streamlined and was comparatively less expensive. Additionally, using a solenoid valve was
more convenient, we could supply it with a compressed air and vacuum source from the in-wall
spigots located in the simulation lab and we could control it using a simple square wave voltage
signal. We ultimately ended up using our initial design as shown below in Figure 2.

8
Figure 2: Pneumatic Solenoid Valve Setup
We purchased a three-way pneumatic solenoid valve that was capable of operating with
the 20 psi compressed air supply from the sources available in the lab. Unfortunately, this valve
required a 12 VDC impulse in order to switch and our Arduino was only capable of producing a
5 VDC signal. We decided that the simplest way to solve this problem was to construct a simple
transistor circuit that would act as a switch between the valve and an external 12 V power
supply. We determined that a logic-level NMOS transistor would be ideal as they are simple to
integrate with the relatively small voltage signals supplied by the Arduino. We designed the
switching circuit as shown below in Figure 3 and did a few simple calculations in order to spec
and purchase the model of transistor that would be necessary.
Figure 3: NMOS Switching Circuit
9
Upon receiving our transistors we purchased a 12VDC-1A wall wart from a hardware
store and tested our circuit. Once it was observed that the solenoid was triggered by the signal
from the Arduino we connected the valve to the compressed air source using surgical tubing
available for our use in the laboratory. We found that our system leaked air where it connected
to the surgical tubing so we purchased zip-ties and used pneumatic tape to seal these
connections. Following those few modifications our system worked rather successfully.
Additionally, Dr. Nesbitt requested that we add a beeping function to correspond with the
ECG output. This would assist the surgeons in audibly monitoring the ECG while visually
focusing on their surgical task. We decided that this could most simply be accomplished by
interfacing a simple piezoelectric speaker with the Arduino. We modified the Arduino’s code as
shown in the Appendix to include the additional pin to connect the speaker. When the Arduino
signaled for the heart to expand the Arduino’s ‘tone’ function was used to play a note
corresponding to the peaks of the ECG.
2.2 Software Design
The computer software was written in the Qt Creator integrated development
environment (IDE) (Qt-Cross-platform Application and UI Framework) (Qt Online Reference
Documentation). Qt Creator is an open-source software project and was selected over other
popular IDEs, such as Visual Studio, for its powerful, integrated and intuitive graphical user
interface (GUI) design suite. The Qt development software is also noted for cross platform
compatibility. Should future development ever require the beating heart simulation software to
function in an Apple or Unix environment, only the system specific functions for creating
threads, starting processes and obtaining current directory location would have to be altered. The
software was implemented using the C++ programming language augmented with system
10
specific functions from the MSDN library, Windows development documentation
(Cplusplus.com - The C Resources Network) (MSDN Library). The Qwt library was also
included in addition to standard C++ libraries (Qwt User's Guide: Qt Widgets for Technical
Applications). Qwt is an open-source library intended to function in conjunction with the Qt
IDE. It provides GUI components and other utility classes that function as extension of Qt GUI
widgets. The heart beat simulator software utilized the Qwt dynamic plotting tools to produce a
simulated ECG display within a Qt GUI window.
Serial port setup was handled using the MSDN “CreateFile” function (CreateFile
Function (Windows)). A specific COM (serial) port address, obtained from the user at run-time,
was used as the file name parameter, of the “CreateFile” function, to initialize an I/O device.
The I/O device was then set to a static HANDLE for later use. Serial port communication was
implemented using the MSDN function “WriteFile” (WriteFile Function (Windows)). Using the
HANDLE initialized by the “CreatFile” function as the file name parameter, the “WriteFile”
function can pass data directly to the user specified serial port.
Thread creation was handled with the MSDN “_beginthreadex” function (_beginthread,
_beginthreadex (CRT)). A local function, containing the signal timing and port communication
functionality, was called in a newly created thread, parallel to the primary thread handling user
input. This enabled uninterrupted communication with the physical portion of the heart beat
simulator while allowing the user to specify new heart rate or rhythm parameters.
Due to constraints imposed by the Qt GUI suite it was not possible to create additional
GUI windows within threads of control separate from the primary thread of control in which the
Qt GUI application was begun. Therefore to allow the ECG display to function simultaneously
with the user input and heart beat driver threads of control it was necessary to implement the

11
ECG display as a separate process. Process creation was handled with the MSDN
“CreateProcess” function (CreateProcess Function (Windows)). Since the executable file for the
ECG display process is located in a subdirectory of the primary heart beat simulator program file
the MSDN “GetCommandLine” function was utilized to ensure proper initialization of the ECG
display regardless of parent directory location (GetCommandLine Function (Windows)). The
“CreateProcess” function was called from the primary heart beat simulator process using the
known address of the ECG display subdirectory and executable, appended onto the file address
returned from the “GetCommandLine” function. This same approach was used to ensure proper
access to waveform data files from the ECG display process by the standard C++ “readFile”
function (Cplusplus.com - The C Resources Network).
The scrolling ECG display was achieved through the use of the “QwtPlot” widget
included in the Qwt library (Qwt User's Guide: Qt Widgets for Technical Applications). This
widget functions as a standard Qt GUI widget and contains multiple subclasses and functions
useful for displaying and describing graphical information. The plot object itself was initialized
as an instance of the “QwtPlot” class (Qwt User's Guide: QwtPlot Class Reference). The curve
within the plot was initialized as an instance of the “QwtPlotCurve” class (Qwt User's Guide:
QwtPlotCurve Class Reference). The “setSamples” function was utilized referencing two arrays;
one containing x axis data and one containing y axis data, to attachplot data to the
“QwtPlotCurve” item. Aesthetic features of the plot were set using various member functions of
the “QwtPlot” class. The aesthetic features of the ECG trace were set using member functions of
the “QPen” class, a “QwtPlot” derived class. Animation of the plot and ECG display was
achieved by calling the “replot” function every 10 milliseconds after updating and reattaching
the data represented “QwtPlotCure” item.
12
2.3 ECG
An ECG that corresponds to the user-provided heart rate is also generated by our
software. The ECG output and beating heart prototype operate simultaneously but completely
independently of one another. Our project sponsor, Dr. Nesbitt, expressed that he would like the
ECG output to be capable of displaying a normal sinus rhythm and three common arrhythmias at
various heart rates. Using a drop-down menu the user is able to select the desired ECG
waveform from the following: Normal sinus rhythm with a rate range of 50-130, Atrial
Fibrillation with a rate range of 100-150, Ventricular tachycardia with a rate range of 80-130,
and Ventricular fibrillation, no rate range.
We began our approach toward creating the ECG display by looking into ways to
simulate the normal sinus rhythm plot, as this was the most essential for simulation purposes.
We were very fortunate to find a MATLAB program which generated approximations of ECG
waveforms based on desired specifications. The program was developed by Raviprakash
Karthik and uses Fourier series to model each of the characteristic peaks of the ECG waveform.
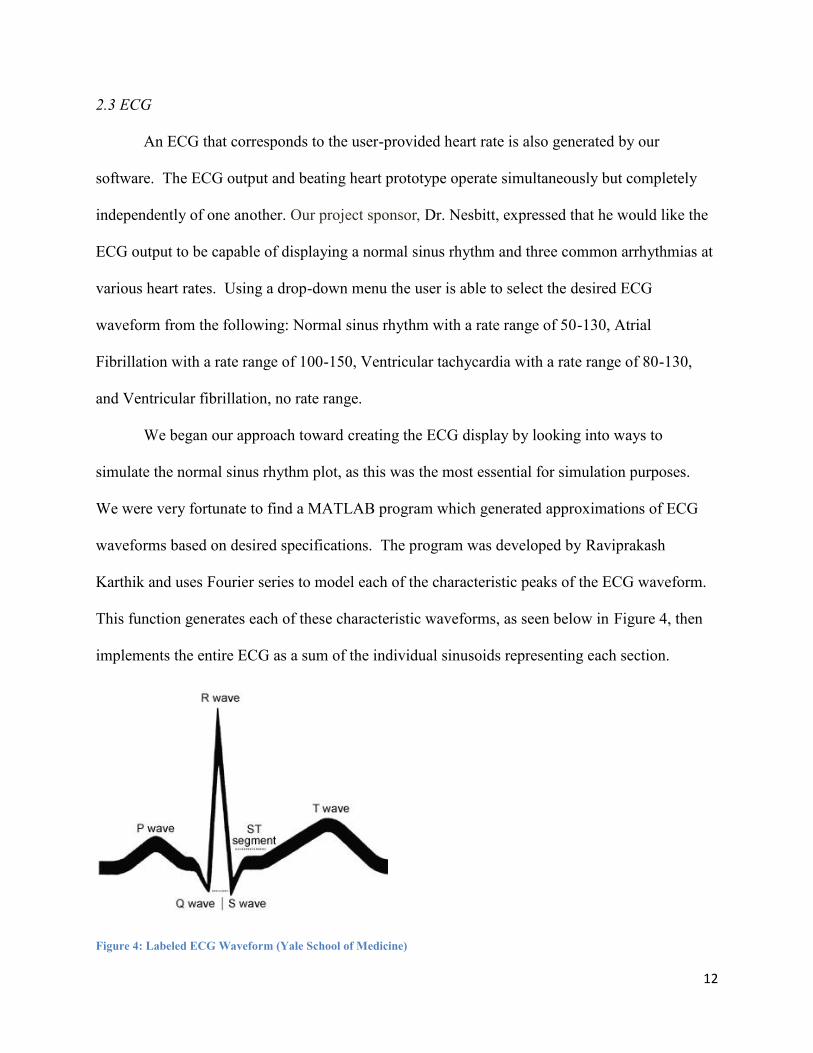
This function generates each of these characteristic waveforms, as seen below in Figure 4, then
implements the entire ECG as a sum of the individual sinusoids representing each section.
Figure 4: Labeled ECG Waveform (Yale School of Medicine)
13
This program provided a convenient way for us to generate normal sinus rhythm ECGs
for any heart rate. In order to obtain waveforms for each rate within our desired range we
individually generated the waveform for each heart rate using this program. We then exported
the resulting data from MATLAB to a .txt file which could be accessed by our software and read
in as an array to plot the waveform.
Once our system could plot the normal sinus rhythm ECGs for each heart rate within the
desired range we concerned ourselves with generating ECGs for the three basic arrhythmias that
Dr. Nesbitt had desired. Our research into atrial fibrillation revealed that ECGs displaying this
arrhythmia were characterized by the absence of the p-wave section of the ECG waveform
(Valderrama, Dunbar and Mensah). We realized that this phenomenon could be replicated by
modifying the MATLAB code to produce an ECG waveform with a p-wave whose amplitude
was zero. Having made this modification we generated ECG data for each heart rate within the
desired range in a manner similar to that for the normal sinus rhythm.
Simulating an ECG displaying a ventricular tachycardia required us to develop our own
function that approximated the ECG waveform characterized by this arrhythmia. We researched
the characteristics of ventricular tachycardia and examined numerous actual ECG plots in order
to understand the identifying features that our plot needed to depict. Upon observation we noted
that the ECG resembled a simple sinusoid and we hypothesized that we could write an equation
to approximate the vtach ECG signal if we could calculate the frequency of the sinusoid as a
function of the heart rate to be displayed. The mathematical derivation of this function was as
follows:
= , =
14
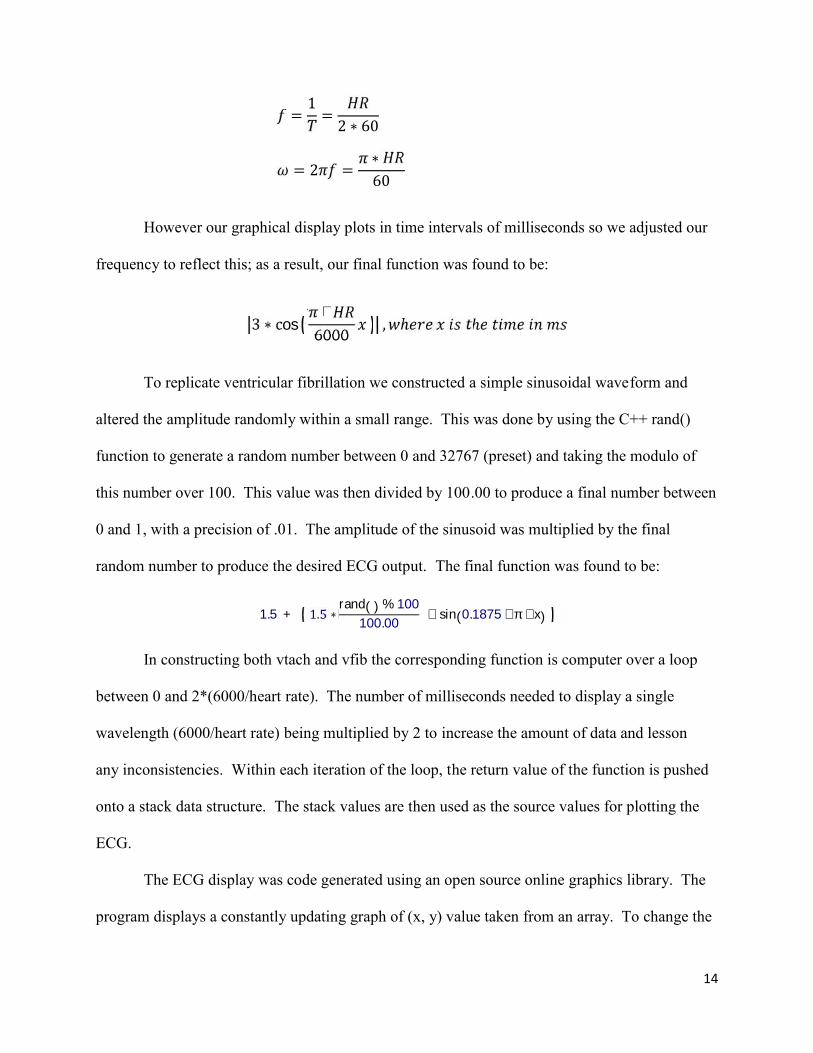
= 1 = 2 ∗ 60= 2 = ∗60However our graphical display plots in time intervals of milliseconds so we adjusted our
frequency to reflect this; as a result, our final function was found to be:
3 ∗ cos ∗6000 , ℎ ℎTo replicate ventricular fibrillation we constructed a simple sinusoidal waveform and
altered the amplitude randomly within a small range. This was done by using the C++ rand()
function to generate a random number between 0 and 32767 (preset) and taking the modulo of
this number over 100. This value was then divided by 100.00 to produce a final number between
0 and 1, with a precision of .01. The amplitude of the sinusoid was multiplied by the final
random number to produce the desired ECG output. The final function was found to be:
1.5 + 1.5 ∗ rand( ) % 100100.00 ∗ sin(0.1875 ∗ π ∗ x)In constructing both vtach and vfib the corresponding function is computer over a loop
between 0 and 2*(6000/heart rate). The number of milliseconds needed to display a single
wavelength (6000/heart rate) being multiplied by 2 to increase the amount of data and lesson
any inconsistencies. Within each iteration of the loop, the return value of the function is pushed
onto a stack data structure. The stack values are then used as the source values for plotting the
ECG.
The ECG display was code generated using an open source online graphics library. The
program displays a constantly updating graph of (x, y) value taken from an array. To change the

15
signal the array was updated one value at time from a stored graph of sample ECG data. In this
fashion the signal can be altered dynamically while maintaining the 4-5 second scrolling display
common to ECG machines. Heart rate is conveyed altering the basic frequency of the sample
ECG waveform.
III. Results
3.1 Graphs and Images
As our project focused primarily on the creation of a usable and realistic prototype rather
than research our results consist of the final capabilities of our design. An image of our final
prototype is shown below in Figure 5.
Figure 5: Final Prototype
Figure 5 depicts each hardware component we used to drive the physical palpitation of the heart.
Following our presentation at senior design day we will complete the permanent install of this
hardware into the lab. This will include storing the solenoid valve, Arduino, and breadboard in a
plastic enclosure sealed with silicone to protect the electronic components. Once this permanent
install is completed those running a simulation will simply need to open and run our software on

16
the lab’s computer. This will open the Graphical User Interface (GUI) through which the
simulation may be controlled. An image of the GUI may be seen below in Figure 6.
Figure 6: Graphical User Interface for the Program
Figure 6 provides some insight into how our program will be used. In order to produce the
desired ECG and physical heartbeat the user need simply enter the desired heart rate and click
the OK button then select the desired arrhythmia from the drop down menu directly underneath.
This process results in an immediate change both in the ECG display and in the physical
heartbeat. An example of the ECG display produced by our program is shown below in Figure
7.
Figure 7: ECG Display for Normal Sinus Rhythm at 100 bpm

17
In practice the ECG Display window will be dragged onto another monitor, as a part of a multi-
monitor desktop, that will be located nearer to the operating table. This will allow the trainees to
observe the ECG throughout the simulation. The following figures demonstrate the ECG
waveforms of the additional arrhythmias that our system simulates.
Figure 8: ECG Display for Atrial Fibrillation at 100 bpm
Figure 9: ECG Display for Ventricular Tachycardia at 100 bpm
Figure 10: ECG Display for Ventricular Fibrillation
3.2 Safety Considerations
As our system will be used exclusively for simulation purposes the risks it poses to safety
are relatively minimal. There are really only two areas of concern regarding safety precautions.

18
The first concern is that our project does deal with electricity and could potentially shock one of
the users. Fortunately our system utilizes relatively low voltage and current sources so in the
event that someone were to be shocked by our project this would likely not cause major injury.
The wall-wart that our system uses to power the solenoid valve does produce a moderately large
current of 1 A. If this current were to be applied directly across the heart it could result in death.
In order to ensure that no user will be shocked by our electrical hardware we have taken
care to install our electronic devices inside a plastic, watertight enclosure. This not only prevents
our electronics from water damage, but also ensures that the user will not have access to any of
the wiring. We have also been careful to double check our circuitry and use only appropriately
specified electronics. Additionally, we have checked the connectivity and insulation of each of
our electronic connections. These precautions should prevent any users from being shocked by
the electronic components.
An additional safety concern is that our project involves moving parts and the trainees
using our equipment will be operating with sharp needles and scalpels. This combination creates
the possibility that a surgeon may cut himself or others during the simulation. As with the
surgeries our system simulates, precautions must be taken to minimize the risk of injury when
working with sharp tools on a moving object.
3.3 Economic Analysis
Our system will be used to train at least six cardiothoracic surgery residents and three
perfusion students per year here at Vanderbilt in addition to multiple residents studying
anesthesia and general surgery. It is our belief that our simulator could easily impact similar
numbers of students at any teaching hospital with a cardiothoracic surgery department.
19
The most significant impedance towards making our system commercially available
involves our use of open-source code to develop our software. This is particularly of concern
regarding the ECG values we generated using R. Karthik’s MATLAB program. If we were to
try and commercially produce our simulator we would have to independently generate our own
functions for plotting the ECGs for normal sinus rhythm and atrial fibrillation.
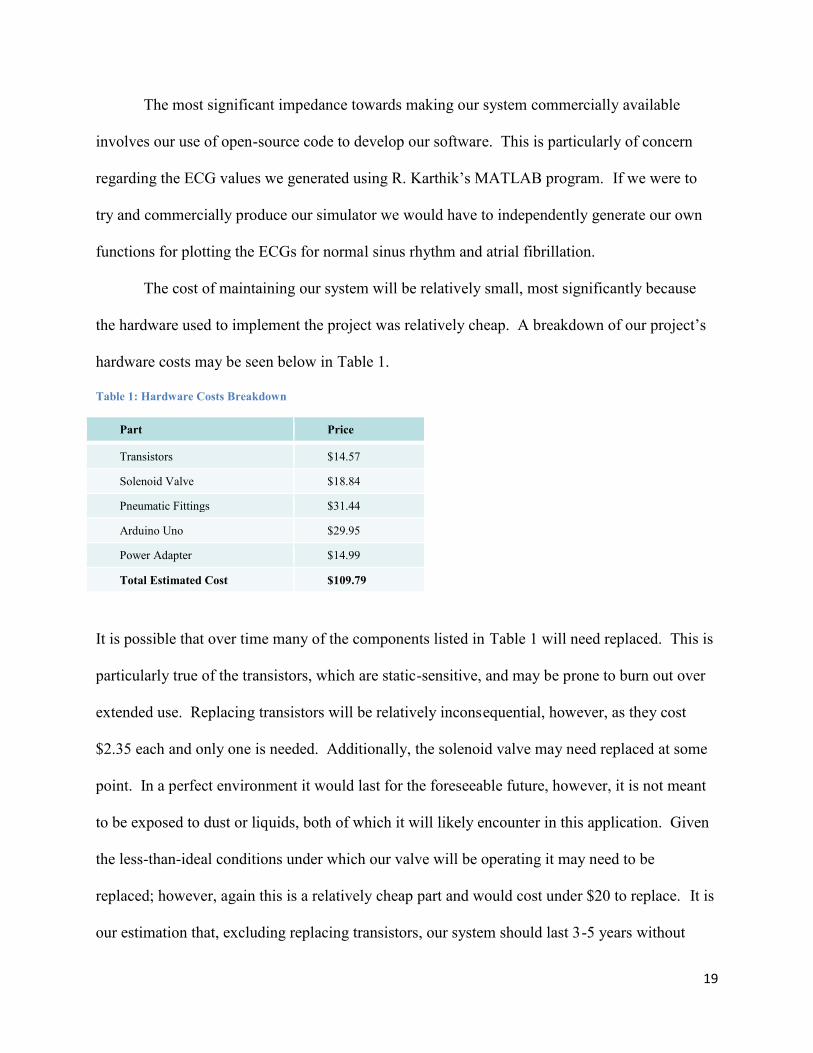
The cost of maintaining our system will be relatively small, most significantly because
the hardware used to implement the project was relatively cheap. A breakdown of our project’s
hardware costs may be seen below in Table 1.
Table 1: Hardware Costs Breakdown
Part Price
Transistors $14.57
Solenoid Valve $18.84
Pneumatic Fittings $31.44
Arduino Uno $29.95
Power Adapter $14.99
Total Estimated Cost $109.79
It is possible that over time many of the components listed in Table 1 will need replaced. This is
particularly true of the transistors, which are static-sensitive, and may be prone to burn out over
extended use. Replacing transistors will be relatively inconsequential, however, as they cost
$2.35 each and only one is needed. Additionally, the solenoid valve may need replaced at some
point. In a perfect environment it would last for the foreseeable future, however, it is not meant
to be exposed to dust or liquids, both of which it will likely encounter in this application. Given
the less-than-ideal conditions under which our valve will be operating it may need to be
replaced; however, again this is a relatively cheap part and would cost under $20 to replace. It is
our estimation that, excluding replacing transistors, our system should last 3-5 years without
20
requiring any significant modification. We have kept detailed records of each part we have used
so that replacement parts may be ordered if and when components fail. It is likely that the
biggest maintenance concern will deal with maintaining software compatibility as the operating
system of the lab’s computer is updated over time.
The overhead costs of our project are relatively insignificant. These are mostly
attributable to the energy consumption of the system which is relatively minimal. The solenoid
valve consumes approximately 2.5 watts of power when in use which will not significantly
impact the hospital’s energy consumption. Additionally there are likely some relatively
insignificant costs attributable to the use of the in-wall compressed air and vacuum sources, but,
again it is not likely that these will significantly impact the hospital’s energy resources.
IV. Conclusions:
The Heart Beat Simulator software can effectively take in dynamic user input and alter a
physical output and a scrolling ECG display. It is built in an easily extensible manner and can
easily be expanded to include new arrhythmias or even new user inputs. The solenoid valve
combined with in-wall compressed air and vacuum sources effectively fills and empties balloons
at the entire range of accepted heart rates. The system as a whole accurately replicates a realistic
heartbeat.
V. Recommendations:
We are proud to have met, and surpassed, our basic engineering requirements; however,
there are several capabilities we would like to have endowed our system with had we time to
continue working on it. The most significant flaw in our design is that it requires us to run wires
from the computer and Arduino to our pneumatic control system at the other side of the
laboratory. This is clearly not an optimal design and we had desired to address this issue by
21
controlling the solenoid remotely; however, we did not have sufficient time to implement the
radio-frequency control that we had envisioned. Additionally, we would have liked to simulate
even more scenarios that surgeons would deal with in an actual surgery. We would like to
program more arrhythmias into our software to further expand the trainees’ familiarity with these
conditions. We would also have liked to simulate the effects of anesthesia on the hearts
movement and corresponding ECG. We also feel that it would be conducive to the realism of the
simulation environment to include a plot of arterial pressure alongside the ECG plot. Ultimately,
we believe that we have developed a solid design that will provide a good analog to a beating
human heart for medical students to practice on; however, we would love for our design to be
built upon in the coming years to further improve the educational experience of the
simulation. With this hope in mind we have prepared a comprehensive instruction manual that
explains our design in detail so that others will be able to easily pick up where we left off.
As our system will be used solely for simulation and training purposes there are relatively
few ethical and societal implications of our project. The sole ethical implication that we feel
should be considered is that our system will be responsible for preparing surgeons and
perfusionists for real-life surgeries. If, for some reason our system improperly prepares these
students the lives of their future patients could be at risk. Despite the possible negative
implications of our simulation system, we believe that it will ultimately prove beneficial to these
students because while it may not provide an entirely realistic and perfect training environment it
does improve upon the models currently being used and therefore will hopefully benefit their
education.
22
Works Cited
_beginthread, _beginthreadex (CRT). <http://msdn.microsoft.com/en-us/library/kdzttdcb(v=vs.80).aspx>.
Cplusplus.com - The C Resources Network. <http://www.cplusplus.com/reference/>.
CreateFile Function (Windows). 2011 <htpp://msdn.microsoft.com/en-us/library/aa363858(v=vs.85).aspx>.
CreateProcess Function (Windows). 2011 <http://msdn.microsoft.com/en-us/library/ms682425(v=vs.85).aspx>.
Fann, James, et al. "Improvement in coronary anastomoses with cardiac surgery simulation." 2008.SciVerse. 2011 <http://www.sciencedirect.com/science?_ob=ArticleURL&_udi=B6WMF-4TRR92B-3&_user=86629&_coverDate=12%2F31%2F2008&_rdoc=1&_fmt=high&_orig=gateway&_origin=gateway&_sort=d&_docanchor=&view=c&_acct=C000006878&_version=1&_urlVersion=0&_userid=86629&md5=9e008b8c9>.
GetCommandLine Function (Windows). 2011 <http://msdn.microsoft.com/en-us/library/ms683156(v=vs.85).aspx>.
Hicks, GL Jr., et al. "Cardopulmonary bypass simulation at the Boot Camp." May 2010. PubMed.gov. April2011 <http://www.ncbi.nlm.nih.gov/pubmed/20451929>.
MSDN Library. <http://msdn.microsoft.com/library/default.aspx>.
Qt Online Reference Documentation. 2011 <http://doc.qt.nokia.com/>.
Qt-Cross-platform Application and UI Framework. 2011 <http://qt.nokia.com/products/developer-tools/>.
Qwt User's Guide: Qt Widgets for Technical Applications. 2011 <http://qwt.sourceforge.net/>.
Qwt User's Guide: QwtPlot Class Reference. 2011 <http://qwt.sourceforge.net/class_qwt_plot.html>.
Qwt User's Guide: QwtPlotCurve Class Reference. 2011<http://qwt.sourceforge.net/class_qwt_plot_curve.html>.
Valderrama, Amy L, Sandra B Dunbar and George A Mensah. "Atrial Fibrillation: Public HealthImplications." American Journal of Preventative Medicine (2005): 75-80.
WriteFile Function (Windows). <http://msdn.microsoft.com/en-us/library/aa365747(v=vs.85).aspx>.
Yale School of Medicine. Yale Medical Group: EKG/ECG. 2011. 25 April 2011<http://www.yalemedicalgroup.org/stw/Page.asp?PageID=STW026195>.
23
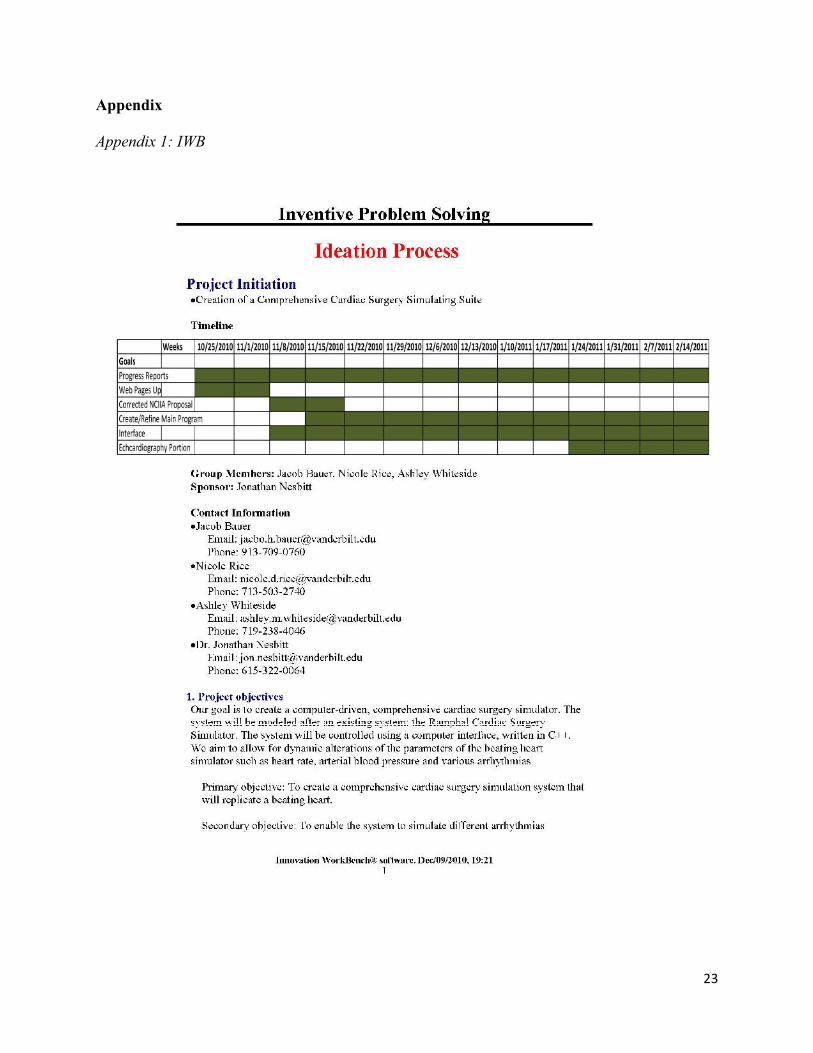
Appendix
Appendix 1: IWB
Weeks 10/25/2010 11/1/2010 11/8/2010 11/15/2010 11/22/2010 11/29/2010 12/6/2010 12/13/2010 1/10/2011 1/17/2011 1/24/2011 1/31/2011 2/7/2011 2/14/2011GoalsProgress ReportsWeb Pages UpCorrected NCIIA ProposalCreate/Refine Main ProgramInterfaceEchcardiography Portion
24
25
26
27

28
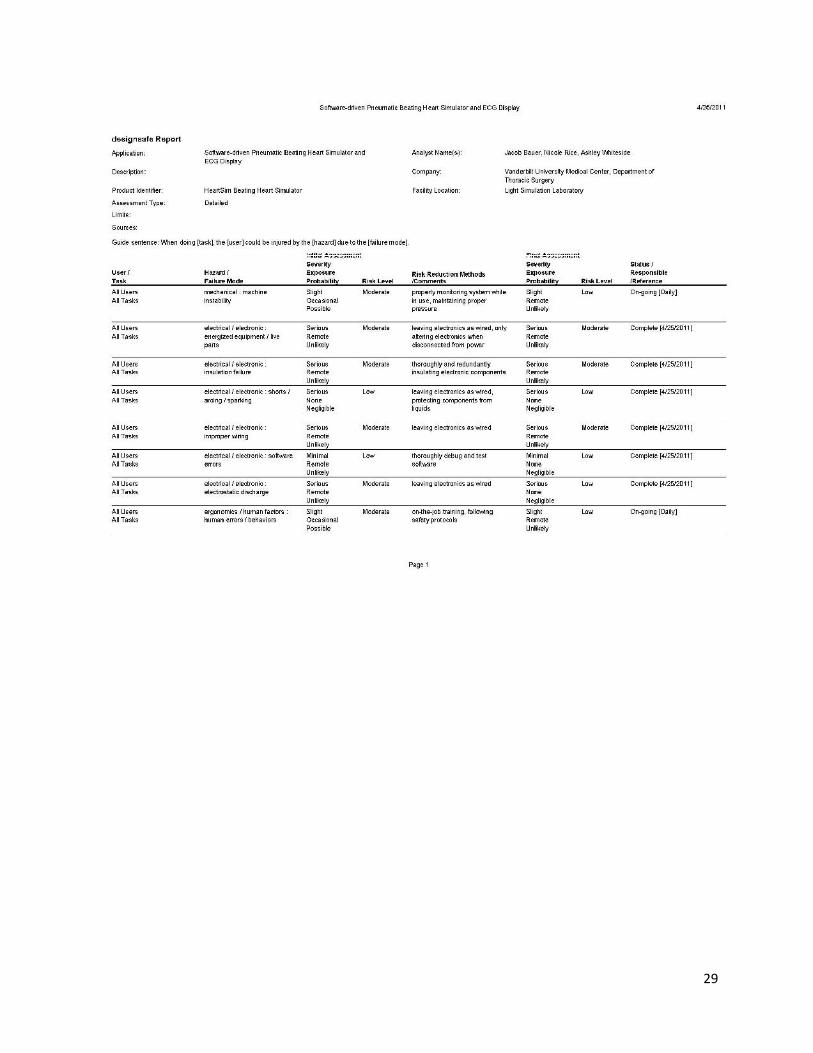
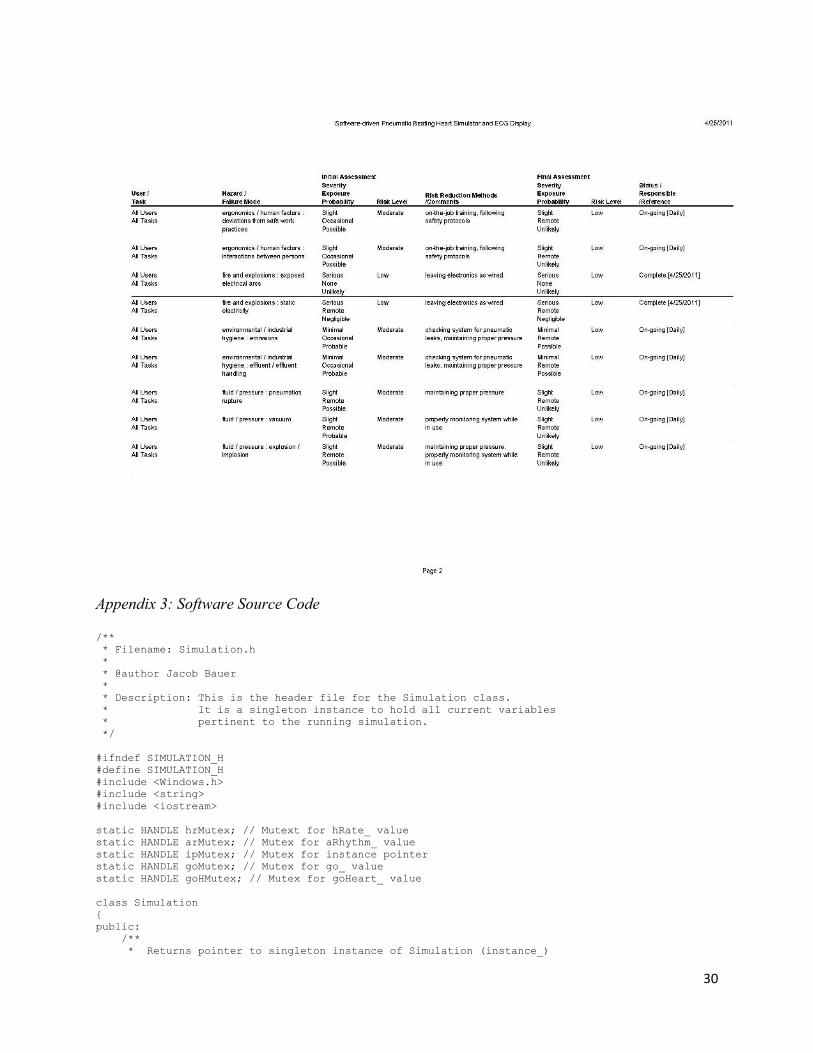
Appendix 2: Design Safe
29
30
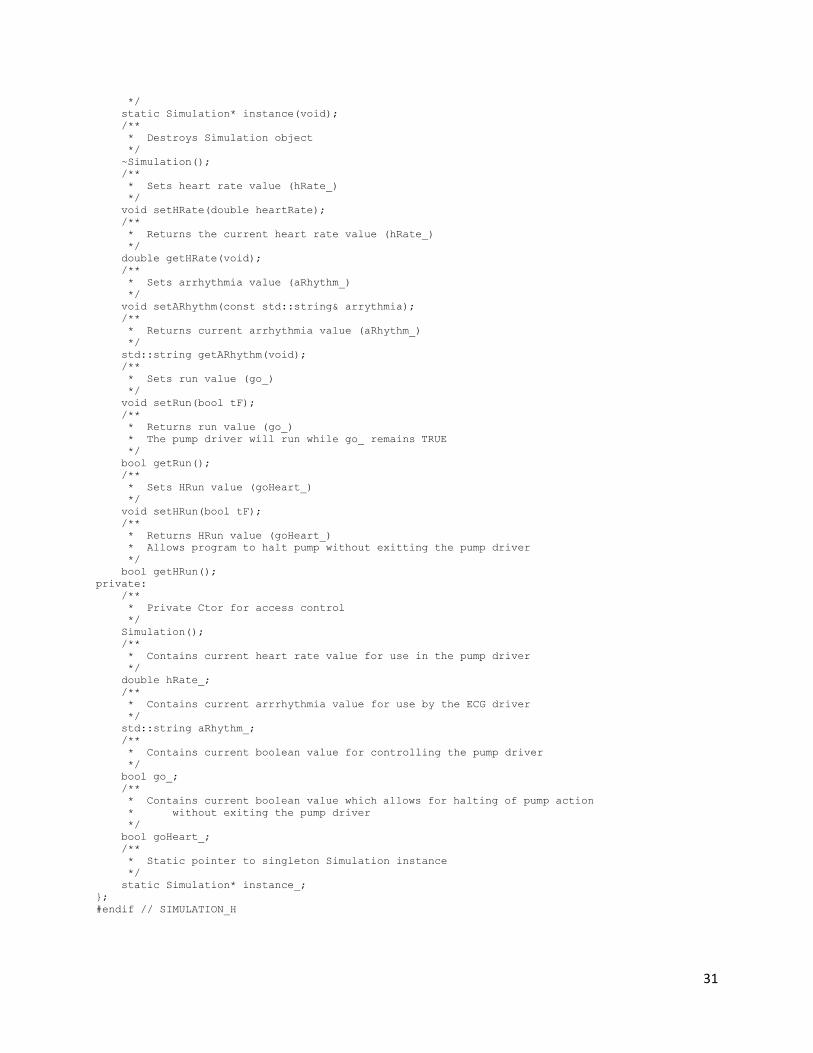
Appendix 3: Software Source Code
/*** Filename: Simulation.h** @author Jacob Bauer** Description: This is the header file for the Simulation class.* It is a singleton instance to hold all current variables* pertinent to the running simulation.*/
#ifndef SIMULATION_H#define SIMULATION_H#include <Windows.h>#include <string>#include <iostream>
static HANDLE hrMutex; // Mutext for hRate_ valuestatic HANDLE arMutex; // Mutex for aRhythm_ valuestatic HANDLE ipMutex; // Mutex for instance pointerstatic HANDLE goMutex; // Mutex for go_ valuestatic HANDLE goHMutex; // Mutex for goHeart_ value
class Simulation{public:
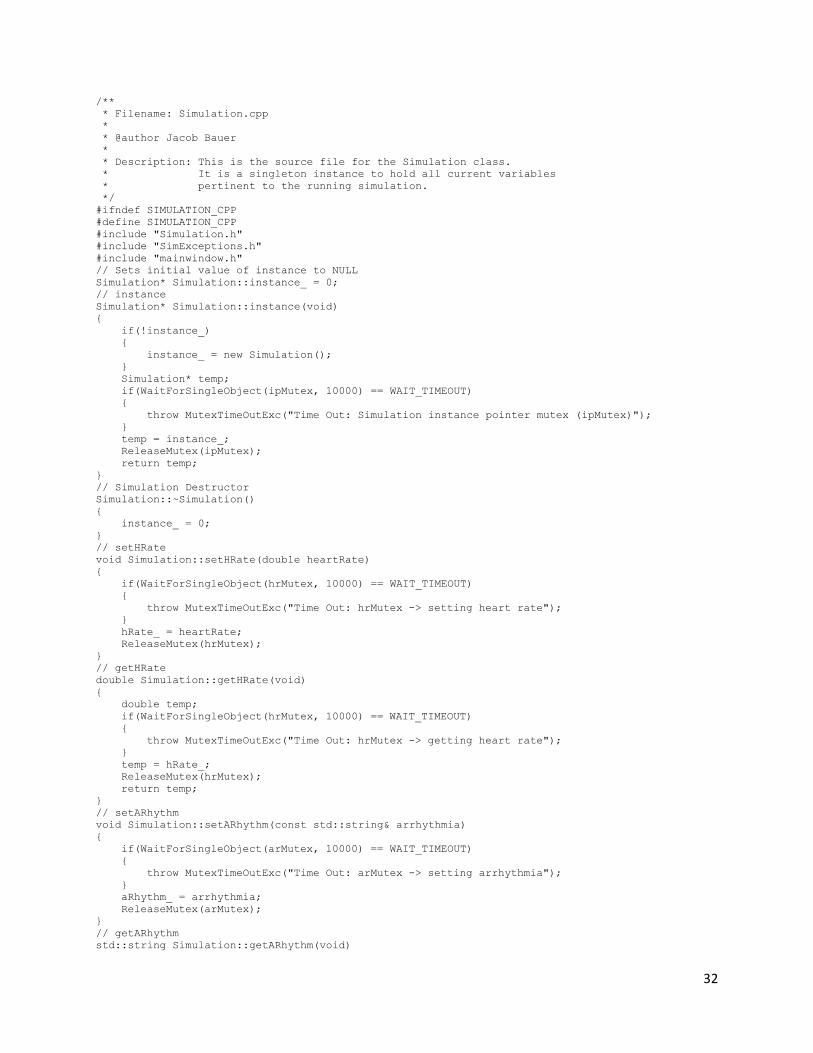
/*** Returns pointer to singleton instance of Simulation (instance_)
31
*/static Simulation* instance(void);/*** Destroys Simulation object*/~Simulation();/*** Sets heart rate value (hRate_)*/void setHRate(double heartRate);/*** Returns the current heart rate value (hRate_)*/double getHRate(void);/*** Sets arrhythmia value (aRhythm_)*/void setARhythm(const std::string& arrythmia);/*** Returns current arrhythmia value (aRhythm_)*/std::string getARhythm(void);/*** Sets run value (go_)*/void setRun(bool tF);/*** Returns run value (go_)* The pump driver will run while go_ remains TRUE*/bool getRun();/*** Sets HRun value (goHeart_)*/void setHRun(bool tF);/*** Returns HRun value (goHeart_)* Allows program to halt pump without exitting the pump driver*/bool getHRun();
private:/*** Private Ctor for access control*/Simulation();/*** Contains current heart rate value for use in the pump driver*/double hRate_;/*** Contains current arrrhythmia value for use by the ECG driver*/std::string aRhythm_;/*** Contains current boolean value for controlling the pump driver*/bool go_;/*** Contains current boolean value which allows for halting of pump action* without exiting the pump driver*/bool goHeart_;/*** Static pointer to singleton Simulation instance*/static Simulation* instance_;
};#endif // SIMULATION_H
32
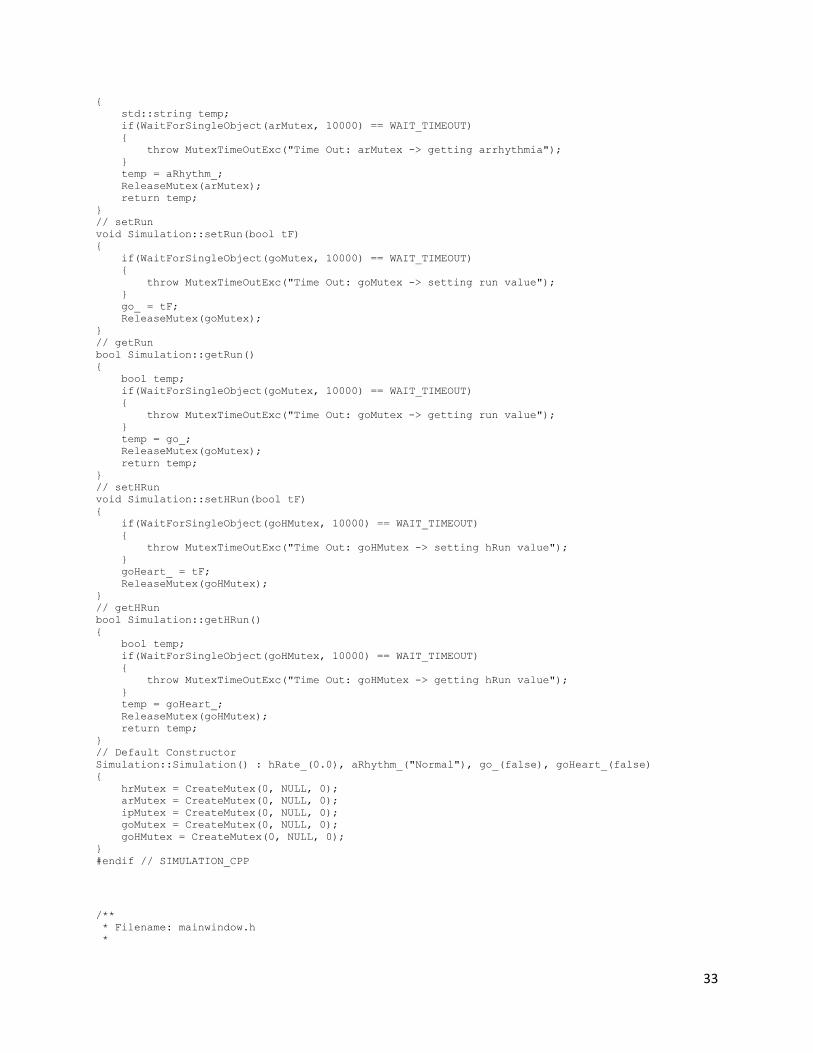
/*** Filename: Simulation.cpp** @author Jacob Bauer** Description: This is the source file for the Simulation class.* It is a singleton instance to hold all current variables* pertinent to the running simulation.*/#ifndef SIMULATION_CPP#define SIMULATION_CPP#include "Simulation.h"#include "SimExceptions.h"#include "mainwindow.h"// Sets initial value of instance to NULLSimulation* Simulation::instance_ = 0;// instanceSimulation* Simulation::instance(void){
if(!instance_){
instance_ = new Simulation();}Simulation* temp;if(WaitForSingleObject(ipMutex, 10000) == WAIT_TIMEOUT){
throw MutexTimeOutExc("Time Out: Simulation instance pointer mutex (ipMutex)");}temp = instance_;ReleaseMutex(ipMutex);return temp;
}// Simulation DestructorSimulation::~Simulation(){
instance_ = 0;}// setHRatevoid Simulation::setHRate(double heartRate){
if(WaitForSingleObject(hrMutex, 10000) == WAIT_TIMEOUT){
throw MutexTimeOutExc("Time Out: hrMutex -> setting heart rate");}hRate_ = heartRate;ReleaseMutex(hrMutex);
}// getHRatedouble Simulation::getHRate(void){
double temp;if(WaitForSingleObject(hrMutex, 10000) == WAIT_TIMEOUT){
throw MutexTimeOutExc("Time Out: hrMutex -> getting heart rate");}temp = hRate_;ReleaseMutex(hrMutex);return temp;
}// setARhythmvoid Simulation::setARhythm(const std::string& arrhythmia){
if(WaitForSingleObject(arMutex, 10000) == WAIT_TIMEOUT){
throw MutexTimeOutExc("Time Out: arMutex -> setting arrhythmia");}aRhythm_ = arrhythmia;ReleaseMutex(arMutex);
}// getARhythmstd::string Simulation::getARhythm(void)
33
{std::string temp;if(WaitForSingleObject(arMutex, 10000) == WAIT_TIMEOUT){
throw MutexTimeOutExc("Time Out: arMutex -> getting arrhythmia");}temp = aRhythm_;ReleaseMutex(arMutex);return temp;
}// setRunvoid Simulation::setRun(bool tF){
if(WaitForSingleObject(goMutex, 10000) == WAIT_TIMEOUT){
throw MutexTimeOutExc("Time Out: goMutex -> setting run value");}go_ = tF;ReleaseMutex(goMutex);
}// getRunbool Simulation::getRun(){
bool temp;if(WaitForSingleObject(goMutex, 10000) == WAIT_TIMEOUT){
throw MutexTimeOutExc("Time Out: goMutex -> getting run value");}temp = go_;ReleaseMutex(goMutex);return temp;
}// setHRunvoid Simulation::setHRun(bool tF){
if(WaitForSingleObject(goHMutex, 10000) == WAIT_TIMEOUT){
throw MutexTimeOutExc("Time Out: goHMutex -> setting hRun value");}goHeart_ = tF;ReleaseMutex(goHMutex);
}// getHRunbool Simulation::getHRun(){
bool temp;if(WaitForSingleObject(goHMutex, 10000) == WAIT_TIMEOUT){
throw MutexTimeOutExc("Time Out: goHMutex -> getting hRun value");}temp = goHeart_;ReleaseMutex(goHMutex);return temp;
}// Default ConstructorSimulation::Simulation() : hRate_(0.0), aRhythm_("Normal"), go_(false), goHeart_(false){
hrMutex = CreateMutex(0, NULL, 0);arMutex = CreateMutex(0, NULL, 0);ipMutex = CreateMutex(0, NULL, 0);goMutex = CreateMutex(0, NULL, 0);goHMutex = CreateMutex(0, NULL, 0);
}#endif // SIMULATION_CPP
/*** Filename: mainwindow.h*
34
* @author Jacob Bauer** Description: This is the header file for the mainwindow class.*/#ifndef MAINWINDOW_H#define MAINWINDOW_H#include <QMainWindow>#include <windows.h>namespace Ui {
class MainWindow;}class MainWindow : public QMainWindow{
Q_OBJECTpublic:
explicit MainWindow(QWidget *parent = 0);~MainWindow();
public slots:/*** Handles user input of new heart rate*/void hrPushButtonHandler();/*** Handles IPC of new heart rate*/void hrChangeHandler(double hRate);/*** Handles user input of new heart rhythm*/void rhythmChangeHandler(QString rhythm);/*** Updates current heart rate display*/void hrDisplay(double hRate);/*** Checks to see if passed in double is an acceptable heartrate value for* the currently selected rhythm.*/bool isAccHRate(std::string curRhythm, double hRate);
private:Ui::MainWindow *ui;
};#endif // MAINWINDOW_H
/*** Filename: mainwindow.cpp** @author Jacob Bauer** Description: This is the source code file for the mainwindow class.*/#include "mainwindow.h"#include "ui_mainwindow.h"#include "Simulation.h"#include <tchar.h>#include <iostream>#include <sstream>MainWindow::MainWindow(QWidget *parent) :
QMainWindow(parent),ui(new Ui::MainWindow)
{ui->setupUi(this);
}MainWindow::~MainWindow(){
delete ui;}// hrPushButtonHandler
35
void MainWindow::hrPushButtonHandler(){
Simulation* instance = Simulation::instance();double curHRate = (ui->lineEdit->text()).toDouble();// Ensures that any changes to heart rate values or heart rate values// sent to ECG_display are compatible with the currently selected rhythm.// Ensures that no changes to heart rate are made while heart is in "vFib".if(isAccHRate(instance->getARhythm(), curHRate)
&& instance->getARhythm() != "Ventricular Fibrillation"){
instance->setHRate(curHRate);hrChangeHandler(instance->getHRate());// Restarts pump driver loop if it was previously turned offif(instance->getHRun() == false){
instance->setHRun(true);// Sends currently selected rhythm to ECG to replace "zero"// Requires sleep function so that ECG_display has time to read// updated heart rate value before updated rhythm is sentSleep(11);rhythmChangeHandler(ui->comboBox->currentText());
}ui->lineEdit->clear();
}// Handles instance when heart rate is changed to zero. Sets Simulator// heart rate value to zero and sends "zero" to ECG_display.else if(curHRate <= 0){
instance->setHRun(false);instance->setHRate(0);rhythmChangeHandler("zero");ui->lineEdit->clear();
}// Clears lineEdit box if invalid heart rate is enteredelse{
ui->lineEdit->clear();}hrDisplay(instance->getHRate());
}// hrChangeHandlervoid MainWindow::hrChangeHandler(double hRate){
std::cout<<"In hrChangeHandler"<<std::endl;// Implicitly converts heart rate to integer valueint iHRate = hRate;std::string sHRate;std::stringstream ss;ss<<iHRate;ss>>sHRate;HGLOBAL gHandleH;char * buffer;gHandleH = GlobalAlloc(GMEM_MOVEABLE, 10);buffer = (char *)GlobalLock(gHandleH);strcpy(buffer, sHRate.c_str());while(OpenClipboard(0) == 0) {std::cout<<"Open Clipboard failed"<<std::endl;}EmptyClipboard();GlobalUnlock(gHandleH);SetClipboardData(CF_TEXT, gHandleH);CloseClipboard();std::cout<<"Out of hrChangeHandler"<<std::endl;
}// rhythmChangeHandlervoid MainWindow::rhythmChangeHandler(QString rhythm){
std::cout<<"In rhythmChange Handler"<<std::endl;Simulation* instance = Simulation::instance();// Ensures that any changes set to the rhythm are viable in relation to// currently selected heart rate. Fails to change rhythm if heart is// currently in ventricular fibrillation, "vFib" is handled later.if(isAccHRate(rhythm.toStdString(), instance->getHRate())
36
&& instance->getARhythm() != "Ventricular Fibrillation"){
HGLOBAL gHandle;char * buffer;gHandle = GlobalAlloc(GMEM_MOVEABLE, 10);buffer = (char *)GlobalLock(gHandle);if(rhythm == "Normal"){
strcpy(buffer,"Normal");instance->setARhythm("Normal");
}else if (rhythm == "Atrial Fibrillation"){
strcpy(buffer,"aFib");instance->setARhythm("Atrial Fibrillation");
}else if (rhythm == "Ventricular Tachycardia"){
strcpy(buffer,"vTac");instance->setARhythm("Ventricular Tachycardia");
}else if (rhythm == "Ventricular Fibrillation"){
strcpy(buffer,"vFib");//Sets heart rate extremely high to mimic "twitching" seen in vFibinstance->setHRate(200);instance->setARhythm("Ventricular Fibrillation");hrDisplay(200);
}else if (rhythm == "zero"){
// Does not set Simulator rhythm value to "zero", the user must// first raise the heart rate back to an acceptable level to// change rhythmstrcpy(buffer,"zero");
}else{
std::cout<<"Set Rhythm IPC failed"<<std::endl;}while(OpenClipboard(0) == 0) {std::cout<<"Open Clipboard failed"<<std::endl;}EmptyClipboard();GlobalUnlock(gHandle);SetClipboardData(CF_TEXT, gHandle);CloseClipboard();
}// Ensures that only changing selected rhythm will remove "vFib" condition.// When changed from vFib a standard heart rate of 100 is set. Requires// Sleep function to ensure ECG_display has enough time to read new// heart rate value before new rhythm value is place on clipboard.else if (instance->getARhythm() == "Ventricular Fibrillation"){
instance->setHRate(100);hrChangeHandler(100);instance->setARhythm(rhythm.toStdString());Sleep(11);rhythmChangeHandler(rhythm);hrDisplay(100);
}// Resets comboBox if user attempts to switch to a rhythm that is not// Compatible with the current heart rateelse{
QString qRhythm = QString::fromStdString(instance->getARhythm());ui->comboBox->setCurrentIndex(ui->comboBox->findText(qRhythm));
}std::cout<<"Out of rhythm change handler"<<std::endl;
}// hrDisplayvoid MainWindow::hrDisplay(double hRate){
37
ui->lcdNumber->display(hRate);}// isAccHRatebool MainWindow::isAccHRate(std::string curRhythm, double hRate){
if(curRhythm == "Normal"){
return (hRate >= 50 && hRate <= 150);}else if (curRhythm == "Atrial Fibrillation"){
return (hRate >= 100 && hRate <= 150);}else if (curRhythm == "Ventricular Tachycardia"){
return (hRate >= 80 && hRate <= 130);}else if (curRhythm == "Ventricular Fibrillation"){
return hRate > 0;}else if (curRhythm == "zero"){
return hRate == 0;}else{
return false;}
}
/*** Filename: SimExceptions.h** @author Jacob Bauer** Description: This is the header file containing all the custom excetion* classes for the Simulator program*/#ifndef SIMEXCEPTIONS_H#define SIMEXCEPTIONS_H#include <stdexcept>#include <string>class MutexTimeOutExc : public std::runtime_error{public:
MutexTimeOutExc(std::string myBad) : std::runtime_error(myBad){}
};class SerialPortSetupExc : public std::runtime_error{public:
SerialPortSetupExc(std::string myBad) : std::runtime_error(myBad){}
};class ECGDisplaySetupExc : public std::runtime_error{public:
ECGDisplaySetupExc(std::string myBad) : std::runtime_error(myBad){}
};#endif // SIMEXCEPTIONS_H
/*** Filename: main.cpp*

38
* @author Jacob Bauer** Description: This is the source code file for main.*/#include <QtGui/QApplication>#include "mainwindow.h"#include "Simulation.h"#include "SimExceptions.h"#include <windows.h>#include <process.h>#include <tchar.h>#include <stdio.h>#include <string>#include <iostream>#include <cstdlib>unsigned hrDriverTID;static HANDLE hrDriverThread;static HANDLE arduinoSerial;/*** Standard code for setting up serial port in Windows, altered to interface* correctly with Arduino device.*/void portSetUp(){
std::wstring comPrefix = L"COM";std::wstring userIn;std::wcout<<"Please input desired COM (USB) port (1-9, enter d for default): "<<std::endl;std::wcin>>userIn;if(userIn == L"d"){
userIn = L"COM3";}else{
userIn = comPrefix.append(userIn);}arduinoSerial = CreateFile(userIn.c_str(), GENERIC_READ | GENERIC_WRITE, 0, 0, OPEN_EXISTING,
FILE_ATTRIBUTE_NORMAL, 0);/*if(arduinoSerial==INVALID_HANDLE_VALUE){
if(GetLastError()==ERROR_FILE_NOT_FOUND){
throw SerialPortSetupExc("Specified serial port does not exist");}throw SerialPortSetupExc("Unknown error: Serial port setup");
}*/// Setting serial port settingsDCB dcbSerialParams = {0};dcbSerialParams.DCBlength=sizeof(dcbSerialParams);if (!GetCommState(arduinoSerial, &dcbSerialParams)){
//throw SerialPortSetupExc("Exception occured while getting serial port state");}dcbSerialParams.BaudRate=CBR_9600;dcbSerialParams.ByteSize=8;dcbSerialParams.StopBits=ONESTOPBIT;dcbSerialParams.Parity=NOPARITY;if(!SetCommState(arduinoSerial, &dcbSerialParams)){
//throw SerialPortSetupExc("Exception occured while setting serial port state");}
}/*** A helper function which initializes the ECG_display process and* reports errors that occur during CreateProcess().*/void startECGDisplay(){
// Clears clipboard, set initial value to "unset"
39
HGLOBAL gHandleI;char * buffer;gHandleI = GlobalAlloc(GMEM_MOVEABLE, 10);buffer = (char *)GlobalLock(gHandleI);strcpy(buffer,"unset");while(OpenClipboard(NULL) == 0) {std::cout<<"Open Clipboard failed"<<std::endl;}EmptyClipboard();GlobalUnlock(gHandleI);SetClipboardData(CF_TEXT, gHandleI);CloseClipboard();// Initialize ECG_display processSTARTUPINFO si;PROCESS_INFORMATION pi;ZeroMemory( &si, sizeof(si) );si.cb = sizeof(si);ZeroMemory( &pi, sizeof(pi) );// Building file path based on current directory of programstd::wstring wFilePath(GetCommandLine());wFilePath = wFilePath.assign(wFilePath.begin()+1, wFilePath.end()-16);wFilePath += L"\\ECG_display\\ECG_display.exe";std::wcout<<"cur filePath: "<<wFilePath<<std::endl;// wchar_t wFilePath[] = L"C:\\Users\\Jacob Bauer\\Desktop\\QT Simulator\\ECG_display-build-
desktop\\debug\\ECG_display.exe";// Starts ECG_display processif(!CreateProcess(NULL,
const_cast<LPTSTR>(wFilePath.c_str()),NULL,NULL,FALSE,CREATE_NEW_CONSOLE,NULL,NULL,&si,&pi))
{// Throws error message with GetLastError() includedchar sysError[16];std::string errorMessage = "CreateProcess() for ECG_display.exe failed with System Error:
";itoa(GetLastError(),sysError,16);errorMessage.append(sysError);throw ECGDisplaySetupExc(errorMessage);
}CloseHandle(pi.hProcess);CloseHandle(pi.hThread);
}/*** The pump driver:* A helper function which runs within the hrDriver thread*/unsigned __stdcall hrDriver(void * param){
Simulation* instance = Simulation::instance();DWORD dwBytesRead = 0;char one[] = "1";char zero[] = "0";// Sets initial run value to TRUEinstance->setRun(true);// Main pump driver loopwhile(instance->getRun()){
// Subloop allows for halting of pump without exitting main pump driver// loopwhile(instance->getHRun()){
Sleep(((60 / instance->getHRate()) * 1000) * 0.5);WriteFile(arduinoSerial, one, 2, &dwBytesRead, NULL);Sleep(((60 / instance->getHRate()) * 1000) * 0.5);WriteFile(arduinoSerial, zero, 2, &dwBytesRead, NULL);
}}
40
CloseHandle(arduinoSerial);return 0;
}/*** main function:* Initializes GUI and Simulation instance* Begins pump driver and ecg driver threads of control*/int main(int argc, char *argv[]){
QApplication a(argc, argv);MainWindow w;Simulation sim();try{
// Sets up serial port communicatino with Arduino deviceportSetUp();// Starts ECGDisplaystartECGDisplay();// Shows main windoww.show();// Starts main pump driverhrDriverThread = (HANDLE) _beginthreadex(NULL, 0, hrDriver, (void *) 0, 0, (unsigned *)
&hrDriverTID);}catch (MutexTimeOutExc e) {
std::cout << e.what() << std::endl;}catch (SerialPortSetupExc e) {
std::cout << e.what() << std::endl;}catch (ECGDisplaySetupExc e) {
std::cout << e.what() << std::endl;}return a.exec();
}
Code for Simulator GUI
<?xml version="1.0" encoding="UTF-8"?><ui version="4.0"><class>MainWindow</class><widget class="QMainWindow" name="MainWindow"><property name="geometry"><rect><x>0</x><y>0</y><width>553</width><height>379</height></rect></property><property name="windowTitle"><string>MainWindow</string></property><widget class="QWidget" name="centralWidget"><widget class="QLabel" name="label"><property name="geometry"><rect><x>30</x><y>30</y><width>61</width><height>16</height></rect></property><property name="text"><string>Heart Rate</string></property></widget>
41
<widget class="QLineEdit" name="lineEdit"><property name="geometry"><rect><x>100</x><y>30</y><width>113</width><height>20</height></rect></property></widget><widget class="QPushButton" name="pushButton"><property name="geometry"><rect><x>220</x><y>30</y><width>51</width><height>23</height></rect></property><property name="text"><string>OK</string></property></widget><widget class="QComboBox" name="comboBox"><property name="geometry"><rect><x>100</x><y>60</y><width>171</width><height>22</height></rect></property><item><property name="text"><string>Normal</string></property></item><item><property name="text"><string>Atrial Fibrillation</string></property></item><item><property name="text"><string>Ventricular Tachycardia</string></property></item><item><property name="text"><string>Ventricular Fibrillation</string></property></item></widget><widget class="QLabel" name="label_2"><property name="geometry"><rect><x>30</x><y>60</y><width>46</width><height>13</height></rect></property><property name="text"><string>Rhythm</string></property></widget><widget class="QLCDNumber" name="lcdNumber"><property name="geometry"><rect><x>450</x><y>22</y>
42
<width>64</width><height>31</height></rect></property></widget><widget class="QLabel" name="label_3"><property name="geometry"><rect><x>350</x><y>30</y><width>101</width><height>16</height></rect></property><property name="text"><string>Current Heart Rate</string></property></widget><widget class="QTextBrowser" name="textBrowser"><property name="geometry"><rect><x>100</x><y>120</y><width>291</width><height>192</height></rect></property><property name="html"><string><!DOCTYPE HTML PUBLIC "-//W3C//DTD HTML 4.0//EN"
"http://www.w3.org/TR/REC-html40/strict.dtd"><html><head><meta name="qrichtext" content="1" /><styletype="text/css">p, li { white-space: pre-wrap; }</style></head><body style=" font-family:'MS Shell Dlg 2'; font-size:8.25pt;font-weight:400; font-style:normal;"><p style=" margin-top:0px; margin-bottom:0px; margin-left:0px; margin-right:0px; -qt-block-indent:0; text-indent:0px;"><span style=" font-size:8pt; text-decoration:underline;">Rhythm</span><span style=" font-size:8pt;">
</span><span style=" font-size:8pt; text-decoration:underline;">Accepted Heart Rates</span></p><p style="-qt-paragraph-type:empty; margin-top:0px; margin-bottom:0px; margin-left:0px;margin-right:0px; -qt-block-indent:0; text-indent:0px; font-size:8pt;"></p><p style=" margin-top:0px; margin-bottom:0px; margin-left:0px; margin-right:0px; -qt-block-indent:0; text-indent:0px;"><span style=" font-size:8pt;">Normal 50 - 150 bpm</span></p><p style=" margin-top:0px; margin-bottom:0px; margin-left:0px; margin-right:0px; -qt-block-indent:0; text-indent:0px;"><span style=" font-size:8pt;">AtrialFibrillation 100 - 150 bpm</span></p><p style=" margin-top:0px; margin-bottom:0px; margin-left:0px; margin-right:0px; -qt-block-indent:0; text-indent:0px;"><span style=" font-size:8pt;">Ventricular Tachycardia 80 - 130 bpm</span></p><p style=" margin-top:0px; margin-bottom:0px; margin-left:0px; margin-right:0px; -qt-block-indent:0; text-indent:0px;"><span style=" font-size:8pt;">Ventricular Fibrillation norange</span></p></body></html></string>
</property></widget><widget class="QLabel" name="label_4"><property name="geometry"><rect><x>100</x><y>100</y><width>71</width><height>16</height></rect></property><property name="text"><string>Specifications</string></property></widget></widget><widget class="QMenuBar" name="menuBar">
43
<property name="geometry"><rect><x>0</x><y>0</y><width>553</width><height>21</height></rect></property><widget class="QMenu" name="menuHeart_Beat_Simulator"><property name="title"><string>Heart Beat Simulator</string></property></widget><addaction name="menuHeart_Beat_Simulator"/></widget><widget class="QToolBar" name="mainToolBar"><attribute name="toolBarArea"><enum>TopToolBarArea</enum></attribute><attribute name="toolBarBreak"><bool>false</bool></attribute></widget><widget class="QStatusBar" name="statusBar"/></widget><layoutdefault spacing="6" margin="11"/><resources/><connections><connection><sender>pushButton</sender><signal>clicked()</signal><receiver>MainWindow</receiver><slot>hrPushButtonHandler()</slot><hints><hint type="sourcelabel"><x>267</x><y>77</y></hint><hint type="destinationlabel"><x>268</x><y>146</y></hint></hints></connection><connection><sender>lineEdit</sender><signal>returnPressed()</signal><receiver>MainWindow</receiver><slot>hrPushButtonHandler()</slot><hints><hint type="sourcelabel"><x>137</x><y>73</y></hint><hint type="destinationlabel"><x>141</x><y>141</y></hint></hints></connection><connection><sender>comboBox</sender><signal>currentIndexChanged(QString)</signal><receiver>MainWindow</receiver><slot>rhythmChangeHandler(QString)</slot><hints><hint type="sourcelabel"><x>106</x><y>104</y></hint><hint type="destinationlabel">
44
<x>106</x><y>181</y></hint></hints></connection></connections><slots><slot>hrPushButtonHandler()</slot><slot>rhythmChangeHandler(QString)</slot><slot>hrDisplay()</slot></slots></ui>
/*** Filename: ECG.h** @author Jacob Bauer** Description: This is the header file for the ECG class.*/#ifndef ECG_H#define ECG_H#include <QtGui/QApplication>#include <QCoreApplication>#include <QPainter>#include "ECGExceptions.h"#include "mainwindow.h"#include "qwt_plot.h"#include "qwt_plot_curve.h"#include <vector>#include <string>#include <iostream>#include <fstream>#include <sstream>#include <windows.h>#include <stdio.h>#include <stdlib.h>#include <time.h>#include <math.h>const size_t DSIZE = 500;static HANDLE sourceValMutex;static double PI = 3.14159;class ECG{public:
/*** Default constructor, initializes ECG class with passed in QtGUI widget*/ECG(MainWindow* widget);/*** Destructor*/~ECG();/*** Updates plot data, counting variables, timing variables and replots graph* for animation. Calls setSource. Ensures a replot occurs every 1/100 of* second.*/void run();/*** Checks clipboard for IPC data and calls setSource if new data is found*/void checkIPC();/*** Builds correct file path to ECG data calls openFile() with that path*/void setSource();/**
45
* Calls checkIPC() and setSource() sequentially*/void checkAndSet();/*** Opens file with passed in string, manages transfer of file contents into* sourceVals_.*/void openFile(std::string fileName);/*** Uses preset formula to load ventricular tachycardia data into sourceVals_*/void loadVTac();/*** Uses preset formula to load ventricular fibrillation data into sourceVals_*/void loadVFib();/*** Sets sourceVals_ to zeros*/void loadZero();/*** Checks to see if passed in string is a recognized arrhythmia type*/bool isAR(std::string aR);
private:// GUI objectsMainWindow* mainWindow_;QwtPlot* ecgDisplay_;QwtPlotCurve* ecgTrace_;// Variables to indicate current state of simulationbool go_;std::string curAR_;int curHRate_;// Data storage variablesdouble xAxis_[DSIZE]; // xdouble displayVals_[DSIZE]; // display ystd::vector<double> sourceVals_; // source y
};#endif // ECG_H
/*** Filename: ECG.cpp** @author Jacob Bauer** Description: This is the source file for the ECG class.*/#include "ECG.h"// Default ctorECG::ECG(MainWindow* mainW) : mainWindow_(mainW),
ecgDisplay_(new QwtPlot(mainWindow_)), ecgTrace_(new QwtPlotCurve()),go_(true), curAR_("unset"), curHRate_(-1)
{// Initializes displayVals_ array with zerosfor(size_t i = 0; i < DSIZE; ++i){
xAxis_[i] = i;displayVals_[i] = 0.0;
}// Sets sourceVals_ to all zerosloadZero();// Colors & labelecgDisplay_->setCanvasBackground(QColor(Qt::black));ecgDisplay_->setTitle("ECG Display");ecgDisplay_->setAxisTitle(QwtPlot::xBottom, "Time(s)");ecgDisplay_->enableAxis(QwtPlot::yLeft, false);ecgTrace_->setPen(QPen(QColor(Qt::green)));// Sets QwtPlot "ecgDisplay_" as central widget
46
mainWindow_->setCentralWidget(ecgDisplay_);// Attaches QwtPlotCurve "ecgTrace_" to QwtPlot "ecgDisplay_"ecgTrace_->attach(ecgDisplay_);// Shows main windowmainWindow_->show();ecgTrace_->setSamples(xAxis_, displayVals_, DSIZE);
}// DtorECG::~ECG(){
delete ecgDisplay_;delete ecgTrace_;
}// run()void ECG::run(){
// Counting and timing variablessize_t i = 0;size_t j = 0;clock_t start;clock_t starttest; // FOR TESTING// Will not attempt to run display until both variables are set and// a file is loaded. Replot() allows window to be moved and resized// before the ECG animation "starts".while(curAR_ == "unset" || curHRate_ == -1){
ecgDisplay_->replot();QCoreApplication::processEvents();checkIPC();
}starttest = clock();// Main loop which "animates" the ECGwhile(go_){
start = clock();for(size_t temp = 0; temp < 4; temp++){
// Resets counting variables when either reaches the end of their// countainerif(i >= DSIZE){
i = 0;// Tests to see if whole display is running in 5 secstd::cout<<"time: "<<(clock()-starttest)/1000<<std::endl; // FOR TESTINGstarttest = clock(); // FOR TESTING
}if(j >= sourceVals_.size()){
j = 0;}// Mutex protected sourceVals_ access//if(WaitForSingleObject(sourceValMutex, 10000) == WAIT_TIMEOUT)//{// throw MutexTimeOutExc("Time Out: ECG source values mutex (sourceValMutex)");//}displayVals_[i] = sourceVals_.at(j);//ReleaseMutex(sourceValMutex);// Updating counter variables++i;++j;
}// Updating plot dataecgTrace_->setSamples(xAxis_, displayVals_, DSIZE);ecgDisplay_->replot();// Waits for all events to finishsQCoreApplication::processEvents();// Checks for new arrhythmia/heart ratecheckIPC();// Determines correct sleep time so that each update is 1/100 of a secif((clock()-start) < 40){
47
while(40 > (clock()-start)) {}}
}}// checkIPCvoid ECG::checkIPC(){
std::string IPCin;int intIPCin;// Getting IPC data from clipboardwhile(OpenClipboard(NULL) == 0) {std::cout<<"Open Clipboard failed"<<std::endl;}HANDLE hData = GetClipboardData(CF_TEXT);char * buffer = (char*)GlobalLock( hData );GlobalUnlock( hData );CloseClipboard();// Sets IPC variablesIPCin = buffer;intIPCin = atoi(IPCin.c_str());// Checks if IPC variable was a valid heart rate and if the value has// changed. Will not call set source until both values have been set.if(intIPCin >= 50 && intIPCin <= 150 && intIPCin != curHRate_){
curHRate_ = intIPCin;std::cout<<"current hRate: "<<curHRate_<<std::endl;if(curAR_ != "unset")
setSource();}// Checks if IPC variable was a valid rhythm and if the value has changed.// Will not call set source until both values have been set.if(isAR(IPCin) && IPCin != curAR_){
curAR_ = IPCin;std::cout<<"current rhythm: "<<curAR_<<std::endl;if(curHRate_ != -1)
setSource();}
}// setSourcevoid ECG::setSource(){
// The file path is built using "GetComandLine()", curAR_ and curHRate_.// If curAR_ or curHRate_ have not yet been set, there is no attempt to// load a file.std::wstring wfilePath(GetCommandLine());std::string filePath;std::string filePathEnd;std::stringstream ss;// Converts returned command line to string and cuts off unneeded// sections. Builds the begining of the file path and the end of// the file path.filePath.assign(wfilePath.begin()+1, wfilePath.end()-16);filePath += "ECG_waveforms\\";ss<<curHRate_;ss>>filePathEnd;filePathEnd = "_" + (filePathEnd += ".txt");// Calls openFile with correct fileName or correct load function to update// sourceVals_, based on curAR_ and curHRate_if(curAR_ == "Normal"){
filePath += curAR_ + filePathEnd;openFile(filePath);
}else if(curAR_ == "aFib"){
filePath += curAR_ + filePathEnd;openFile(filePath);
}else if(curAR_ == "vTac"){
loadVTac();}
48
else if(curAR_ == "vFib"){
loadVFib();}else{
// else statement calls loadZero because setSource should not be called// unless curAR_ is of a recognized typeloadZero();
}}// openFilevoid ECG::openFile(std::string fileName){
double fileVar;char * fName;std::ifstream readFile;// Opens filefName = &fileName[0];readFile.open(fName);// Copies file contents into sourceVals_if(readFile.is_open()){
// Mutex protected sourceVals_ accessif(WaitForSingleObject(sourceValMutex, 10000) == WAIT_TIMEOUT){
throw MutexTimeOutExc("Time Out: ECG source values mutex (sourceValMutex)");}sourceVals_.clear();while(!readFile.eof()){
readFile >> fileVar;sourceVals_.push_back(fileVar);
}readFile.close();ReleaseMutex(sourceValMutex);
}else{
std::cout<<"file failed to open"<<std::endl;}
}// loadVTacvoid ECG::loadVTac(){
sourceVals_.clear();for(int i = 0; i < 2*(6000/curHRate_); i++){
sourceVals_.push_back(sqrt(pow(3*cos((PI * curHRate_ * i)/6000), 2.0)));}
}// load VFibvoid ECG::loadVFib(){
sourceVals_.clear();for(int i = 0; i < 2*(6000/curHRate_); i++){
// Sets sourceVals(i) to a random number between 0 and 1 and alters// multiplied by a sin wave. This effectively replicates a standard// ventricular fibrillation.sourceVals_.push_back(1.5 + (1.5*(((rand()%100)/100.00) * sin(0.1875*PI*i))) );
}}// loadZerovoid ECG::loadZero(){
sourceVals_.clear();for(int i = 0; i < (6000/curHRate_); i++){
sourceVals_.push_back(0);}
49
}// isARbool ECG::isAR(std::string aR){
return (aR == "Normal" || aR == "aFib" || aR == "vTac" || aR == "vFib"|| aR == "zero");
}
#ifndef MAINWINDOW_H#define MAINWINDOW_H#include <QMainWindow>namespace Ui {
class MainWindow;}class MainWindow : public QMainWindow{
Q_OBJECTpublic:
explicit MainWindow(QWidget *parent = 0);~MainWindow();
private:Ui::MainWindow *ui;
};#endif // MAINWINDOW_H
#include "mainwindow.h"#include "ui_mainwindow.h"MainWindow::MainWindow(QWidget *parent) :
QMainWindow(parent),ui(new Ui::MainWindow)
{ui->setupUi(this);
}MainWindow::~MainWindow(){
delete ui;}
/*** Filename: ECGExceptions.h** @author Jacob Bauer** Description: This is the header file containing all the custom excetion* classes for the ECG_display program*/#ifndef ECGEXCEPTIONS_H#define ECGEXCEPTIONS_H#include <stdexcept>#include <string>class MutexTimeOutExc : public std::runtime_error{public:
MutexTimeOutExc(std::string myBad) : std::runtime_error(myBad){}
};class ArrhythmiaTypeExc : public std::runtime_error{public:
ArrhythmiaTypeExc(std::string myBad) : std::runtime_error(myBad){}
};#endif // ECGEXCEPTIONS_H
50
#include <QtGui/QApplication>#include <QDesktopWidget>#include <iostream>#include "mainwindow.h"#include "ECG.h"#include "qwt_plot.h"#include "qwt_series_data.h"#include "qwt_plot_curve.h"int main(int argc, char *argv[]){
std::cout<<"ECG_display Start"<<std::endl;QApplication a(argc, argv);MainWindow w;// Resizes window to fit destopint width = a.desktop()->width();int height = a.desktop()->height();w.resize(width - (width/20), height/3);// Creates instance of ECGECG sim(&w);try{
sim.run();}catch (MutexTimeOutExc e) {
std::cout << e.what() << std::endl;}return a.exec();
}
Code for ECG GUI
<?xml version="1.0" encoding="UTF-8"?><ui version="4.0"><class>MainWindow</class><widget class="QMainWindow" name="MainWindow"><property name="geometry"><rect><x>0</x><y>0</y><width>400</width><height>300</height></rect></property><property name="windowTitle"><string>MainWindow</string></property><widget class="QWidget" name="centralWidget"><widget class="QLCDNumber" name="lcdNumber"><property name="geometry"><rect><x>283</x><y>0</y><width>111</width><height>51</height></rect></property></widget><widget class="QLabel" name="label"><property name="geometry"><rect><x>230</x><y>0</y><width>51</width><height>51</height></rect></property>
51
<property name="text"><string>Heart Rate</string></property></widget></widget><widget class="QMenuBar" name="menuBar"><property name="geometry"><rect><x>0</x><y>0</y><width>400</width><height>21</height></rect></property></widget><widget class="QToolBar" name="mainToolBar"><attribute name="toolBarArea"><enum>TopToolBarArea</enum></attribute><attribute name="toolBarBreak"><bool>false</bool></attribute></widget><widget class="QStatusBar" name="statusBar"/></widget><layoutdefault spacing="6" margin="11"/><resources/><connections/></ui>
Appendix 4: MATLAB ECG Program
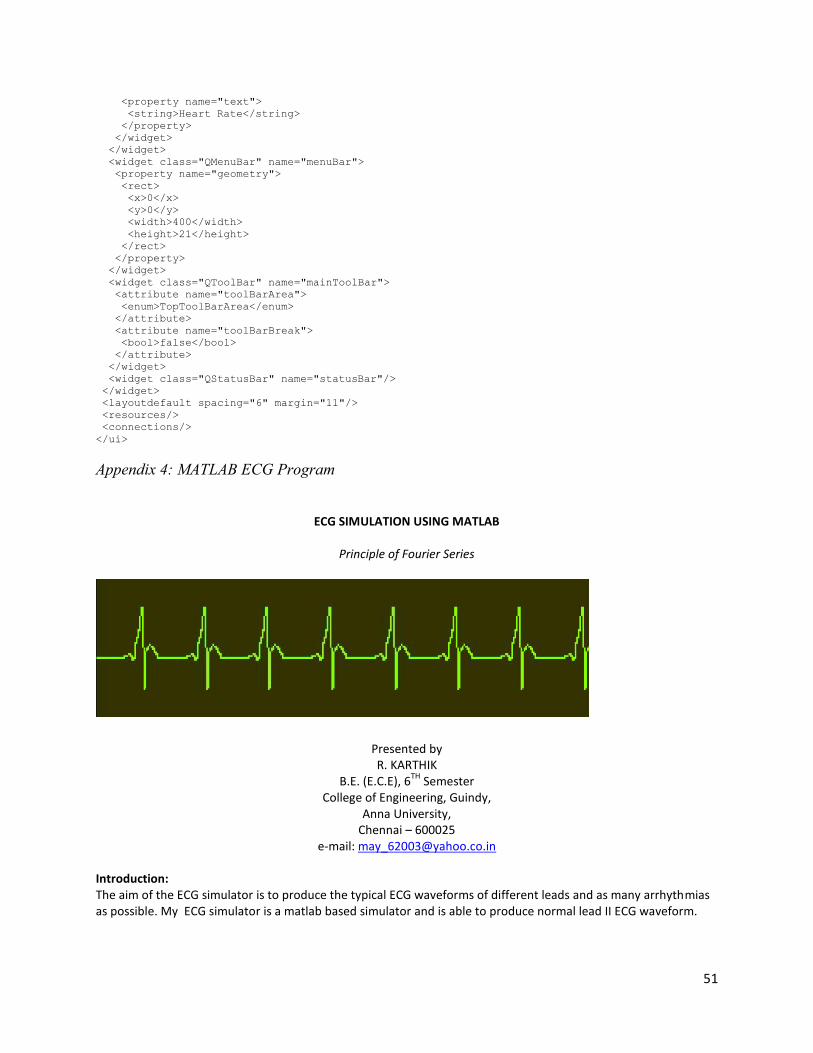
ECG SIMULATION USING MATLAB
Principle of Fourier Series
Presented byR. KARTHIK
B.E. (E.C.E), 6TH SemesterCollege of Engineering, Guindy,
Anna University,Chennai – 600025
e-mail: [email protected]
Introduction:The aim of the ECG simulator is to produce the typical ECG waveforms of different leads and as many arrhythmiasas possible. My ECG simulator is a matlab based simulator and is able to produce normal lead II ECG waveform.

52
The use of a simulator has many advantages in the simulation of ECG waveforms. First one is saving of time andanother one is removing the difficulties of taking real ECG signals with invasive and noninvasive methods. The ECGsimulator enables us to analyze and study normal and abnormal ECG waveforms without actually using the ECGmachine. One can simulate any given ECG waveform using the ECG simulator.
Significant features of ECG waveform:A typical scalar electrocardiographic lead is shown in Fig. 1, where the significant features of the waveform are theP, Q, R, S, and T waves, the duration of each wave, and certain time intervals such as the P-R, S-T, and Q-Tintervals.
fig 1.Typical ECG signal
Main features of this simulator: Any value of heart beat can be set Any value of intervals between the peaks (ex-PR interval) can be set Any value of amplitude can be set for each of the peaks Fibrillation can be simulated Noise due to the electrodes can be simulated Heart pulse of the particular ECG wave form can be represented in a separate graph
Principle:Fourier series
Any periodic functions which satisfy dirichlet’s condition can be expressed as a series of scaled magnitudes of sinand cos terms of frequencies which occur as a multiple of fundamental frequency.
∞ ∞f (x) = (ao/2) + Σ an cos (nπx / l) + Σ bn sin (nπx / l),
n=1 n=1
ao = (1/ l ) ∫ f (x) dx , T = 2l -- (1)T
an = (1/ l ) ∫ f (x) cos (nπx / l) dx , n = 1,2,3…. -- (2)T
bn = (1/ l ) ∫ f (x) sin (nπx / l) dx , n = 1,2,3…. -- (3)T
53
ECG signal is periodic with fundamental frequency determined by the heart beat. It also satisfies the dirichlet’sconditions: Single valued and finite in the given interval Absolutely integrable Finite number of maxima and minima between finite intervals It has finite number of discontinuitiesHence fourier series can be used for representing ECG signal.
Calculations:If we observe figure1, we may notice that a single period of a ECG signal is a mixture of triangular and sinusoidalwave forms. Each significant feature of ECG signal can be represented by shifted and scaled versions one of thesewaveforms as shown below. QRS, Q and S portions of ECG signal can be represented by triangular waveforms P, T and U portions can be represented by triangular waveforms
Once we generate each of these portions, they can be added finally to get the ECG signal.Lets take QRS waveform as the centre one and all shiftings takes place with respect to this part of the signal.
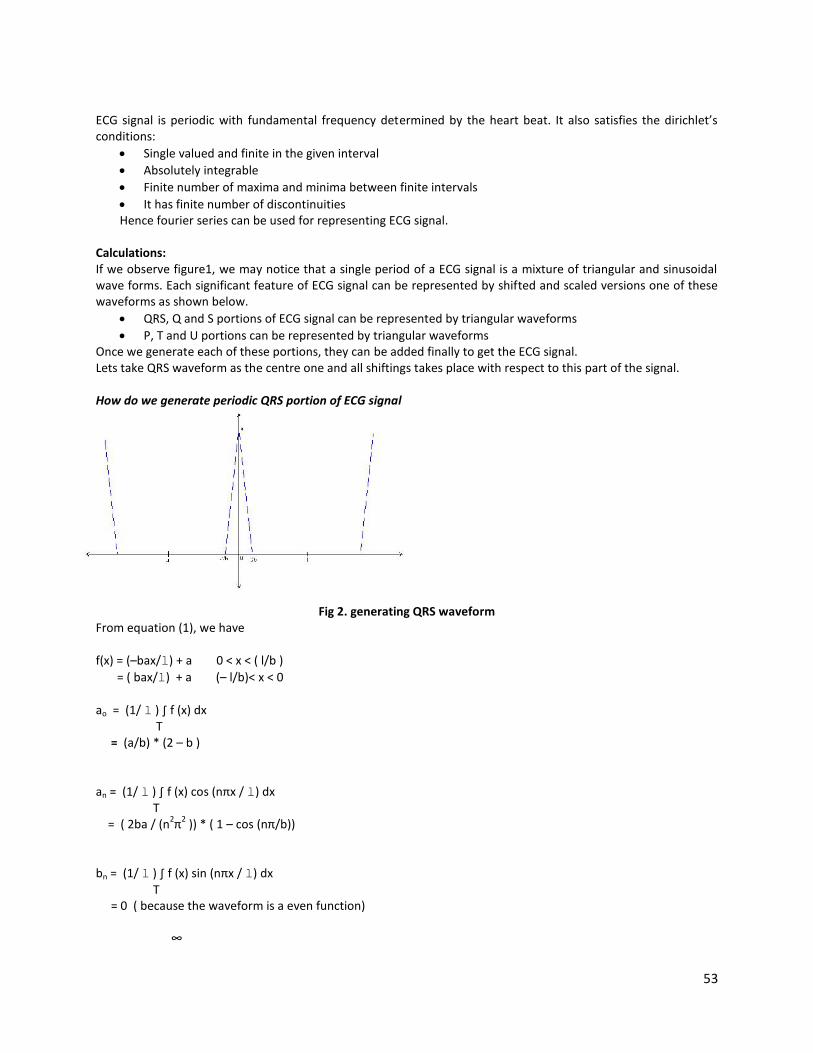
How do we generate periodic QRS portion of ECG signal
Fig 2. generating QRS waveformFrom equation (1), we have
f(x) = (–bax/l) + a 0 < x < ( l/b )= ( bax/l) + a (– l/b)< x < 0
ao = (1/ l ) ∫ f (x) dxT
= (a/b) * (2 – b )
an = (1/ l ) ∫ f (x) cos (nπx / l) dxT
= ( 2ba / (n2π2 )) * ( 1 – cos (nπ/b))
bn = (1/ l ) ∫ f (x) sin (nπx / l) dxT
= 0 ( because the waveform is a even function)
∞

54
f (x) = (ao/2) + Σ an cos (nπx / l)n=1
How do we generate periodic p-wave portion of ECG signal
Fig 3. generation of p-wavef(x) = cos ((πbx) /(2l)) (–l/b)< x < (l/b)
ao = (1/ l ) ∫ cos ((πbx) / (2l)) dxT
= (a/(2b))(2-b)
an = (1/ l ) ∫ cos ((πbx) / (2l)) cos (nπx / l) dxT
= (((2ba)/(i2π2)) (1-cos((nπ)/b))) cos((nπx)/l)
bn = (1/ l ) ∫ cos ((πbx) / (2l)) sin (nπx / l) dxT
= 0 ( because the waveform is a even function)
∞f (x) = (ao/2) + Σ an cos (nπx / l)
n=1
Implementation in MATLAB:Code:
55
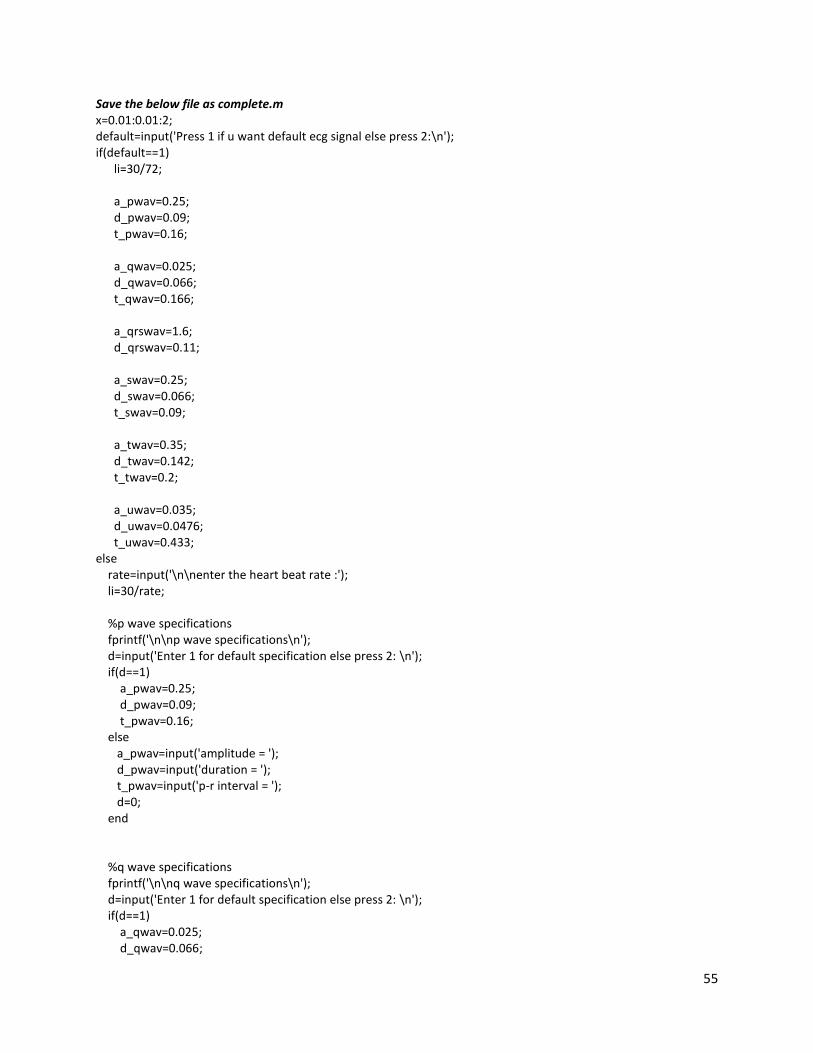
Save the below file as complete.mx=0.01:0.01:2;default=input('Press 1 if u want default ecg signal else press 2:\n');if(default==1)
li=30/72;
a_pwav=0.25;d_pwav=0.09;t_pwav=0.16;
a_qwav=0.025;d_qwav=0.066;t_qwav=0.166;
a_qrswav=1.6;d_qrswav=0.11;
a_swav=0.25;d_swav=0.066;t_swav=0.09;
a_twav=0.35;d_twav=0.142;t_twav=0.2;
a_uwav=0.035;d_uwav=0.0476;t_uwav=0.433;
elserate=input('\n\nenter the heart beat rate :');li=30/rate;
%p wave specificationsfprintf('\n\np wave specifications\n');d=input('Enter 1 for default specification else press 2: \n');if(d==1)
a_pwav=0.25;d_pwav=0.09;t_pwav=0.16;
elsea_pwav=input('amplitude = ');d_pwav=input('duration = ');t_pwav=input('p-r interval = ');d=0;
end
%q wave specificationsfprintf('\n\nq wave specifications\n');d=input('Enter 1 for default specification else press 2: \n');if(d==1)
a_qwav=0.025;d_qwav=0.066;

56
t_qwav=0.166;else
a_qwav=input('amplitude = ');d_qwav=input('duration = ');t_qwav=0.1;d=0;
end
%qrs wave specificationsfprintf('\n\nqrs wave specifications\n');d=input('Enter 1 for default specification else press 2: \n');if(d==1)
a_qrswav=1.6;d_qrswav=0.11;
elsea_qrswav=input('amplitude = ');d_qrswav=input('duration = ');d=0;
end
%s wave specificationsfprintf('\n\ns wave specifications\n');d=input('Enter 1 for default specification else press 2: \n');if(d==1)
a_swav=0.25;d_swav=0.066;t_swav=0.125;
elsea_swav=input('amplitude = ');d_swav=input('duration = ');t_swav=0.125;d=0;
end
%t wave specificationsfprintf('\n\nt wave specifications\n');d=input('Enter 1 for default specification else press 2: \n');if(d==1)
a_twav=0.35;d_twav=0.142;t_twav=0.18;
elsea_twav=input('amplitude = ');d_twav=input('duration = ');t_twav=input('s-t interval = ');d=0;
end%u wave specificationsfprintf('\n\nu wave specifications\n');d=input('Enter 1 for default specification else press 2: \n');if(d==1)
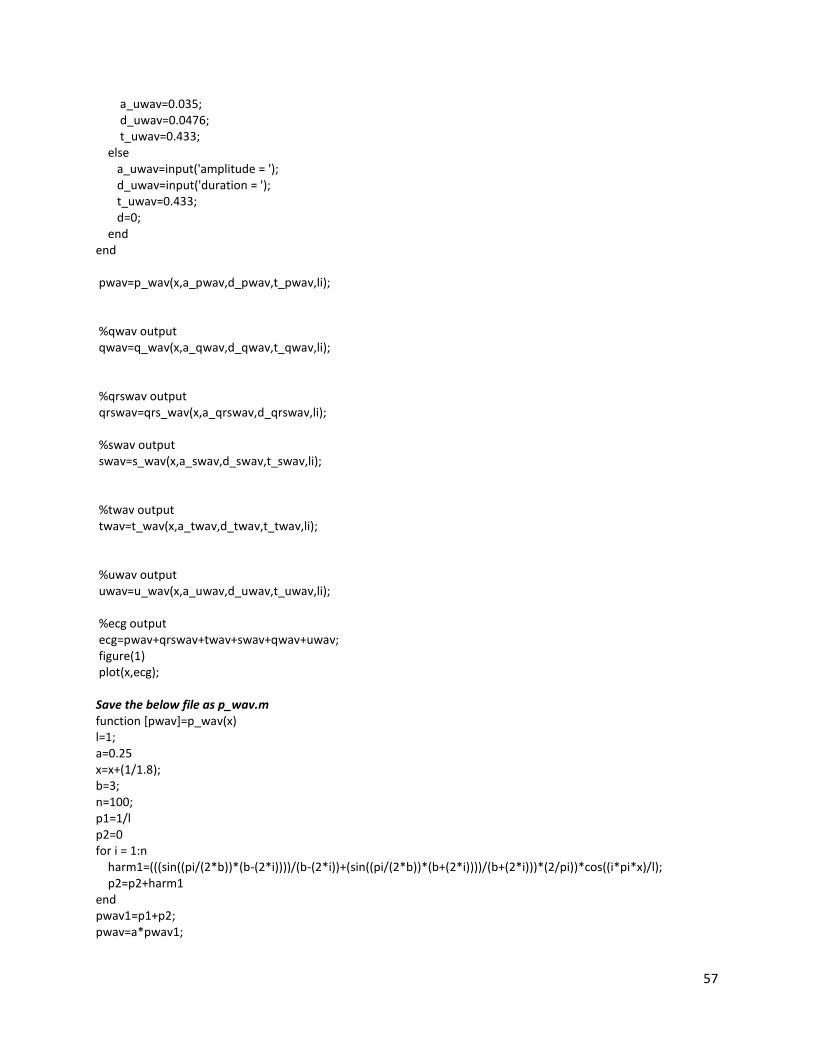
57
a_uwav=0.035;d_uwav=0.0476;t_uwav=0.433;
elsea_uwav=input('amplitude = ');d_uwav=input('duration = ');t_uwav=0.433;d=0;
endend
pwav=p_wav(x,a_pwav,d_pwav,t_pwav,li);
%qwav outputqwav=q_wav(x,a_qwav,d_qwav,t_qwav,li);
%qrswav outputqrswav=qrs_wav(x,a_qrswav,d_qrswav,li);
%swav outputswav=s_wav(x,a_swav,d_swav,t_swav,li);
%twav outputtwav=t_wav(x,a_twav,d_twav,t_twav,li);
%uwav outputuwav=u_wav(x,a_uwav,d_uwav,t_uwav,li);
%ecg outputecg=pwav+qrswav+twav+swav+qwav+uwav;figure(1)plot(x,ecg);
Save the below file as p_wav.mfunction [pwav]=p_wav(x)l=1;a=0.25x=x+(1/1.8);b=3;n=100;p1=1/lp2=0for i = 1:n
harm1=(((sin((pi/(2*b))*(b-(2*i))))/(b-(2*i))+(sin((pi/(2*b))*(b+(2*i))))/(b+(2*i)))*(2/pi))*cos((i*pi*x)/l);p2=p2+harm1
endpwav1=p1+p2;pwav=a*pwav1;
58
Save the below file as q_wav.mfunction [qwav]=q_wav(x)l=1;x=x+l/6a=0.025;b=15;n=100;q1=(a/(2*b))*(2-b);q2=0for i = 1:n
harm5=(((2*b*a)/(i*i*pi*pi))*(1-cos((i*pi)/b)))*cos((i*pi*x)/l);q2=q2+harm5;
endqwav=-1*(q1+q2);
Save the below file as qrs_wav.mfunction [qrswav]=qrs_wav(x)l=1;a=1;b=5;n=100;qrs1=(a/(2*b))*(2-b);qrs2=0for i = 1:n
harm=(((2*b*a)/(i*i*pi*pi))*(1-cos((i*pi)/b)))*cos((i*pi*x)/l);qrs2=qrs2+harm;
endqrswav=qrs1+qrs2;
Save the below file as s_wav.mfunction [swav]=s_wav(x)l=1;x=x-l/6a=0.25;b=15;n=100;s1=(a/(2*b))*(2-b);s2=0for i = 1:n
harm3=(((2*b*a)/(i*i*pi*pi))*(1-cos((i*pi)/b)))*cos((i*pi*x)/l);s2=s2+harm3;
endswav=-1*(s1+s2);
Save the below file as t_wav.mfunction [twav]=t_wav(x)l=1;a=0.35x=x-(1/1.8);
59
b=7;n=20;t1=1/lt2=0for i = 1:n
harm2=(((sin((pi/(2*b))*(b-(2*i))))/(b-(2*i))+(sin((pi/(2*b))*(b+(2*i))))/(b+(2*i)))*(2/pi))*cos((i*pi*x)/l);t2=t2+harm2
endtwav1=t1+t2;twav=a*twav1;
Save the below file as u_wav.mfunction [uwav]=u_wav(x)l=1;a=0.03;x=x-(1/1.1);b=21;n=100;u1=1/l;u2=0;for i = 1:n
harm4=(((sin((pi/(2*b))*(b-(2*i))))/(b-(2*i))+(sin((pi/(2*b))*(b+(2*i))))/(b+(2*i)))*(2/pi))*cos((i*pi*x)/l);u2=u2+harm4;
enduwav1=u1+u2;uwav=a*uwav1;
precautions:
All the files have to be saved in the same folder Save the files in the names mentioned above the code While entering the specification, give the amplitude in mV and duration in seconds
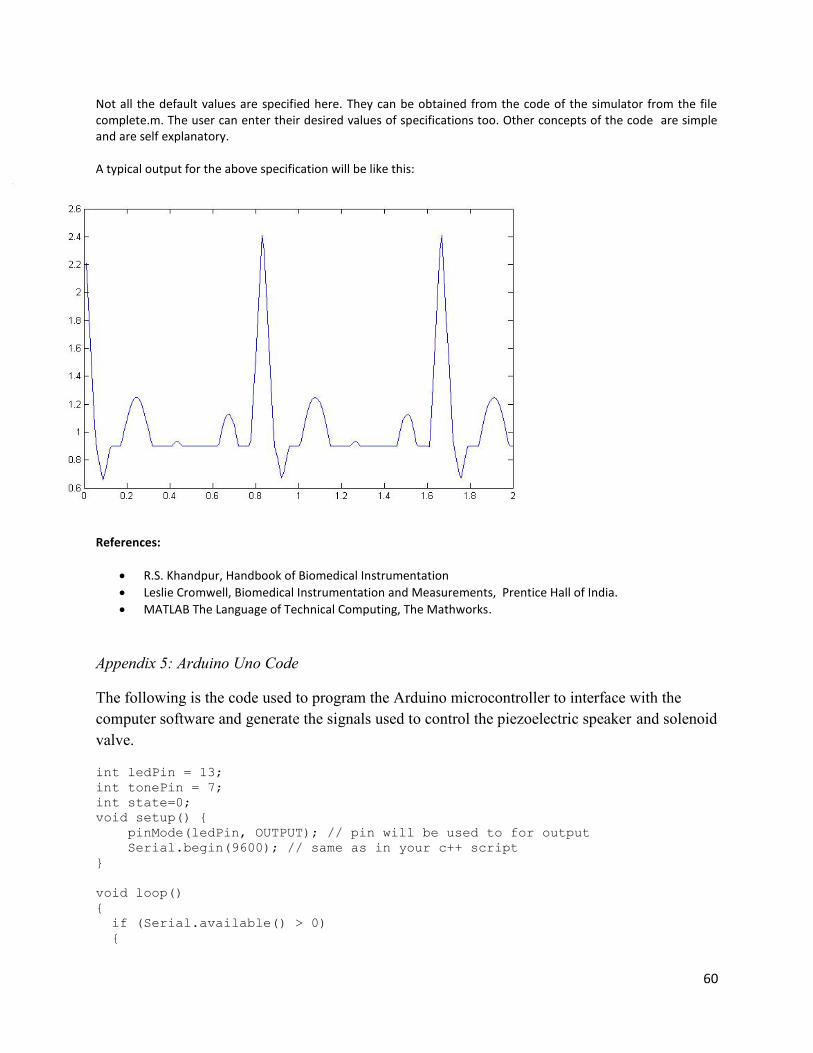
Output waveform:
Default Specification
Heart beat :72 Amplitude:
P wave 25mVR wave 1.60mVQ wave 0.025mVT wave 0.35mV
Duration:P-R interval 0.16sS-T interval 0.18sP interval 0.09sQRS interval 0.11s
60
Not all the default values are specified here. They can be obtained from the code of the simulator from the filecomplete.m. The user can enter their desired values of specifications too. Other concepts of the code are simpleand are self explanatory.
A typical output for the above specification will be like this:
References:
R.S. Khandpur, Handbook of Biomedical Instrumentation Leslie Cromwell, Biomedical Instrumentation and Measurements, Prentice Hall of India. MATLAB The Language of Technical Computing, The Mathworks.
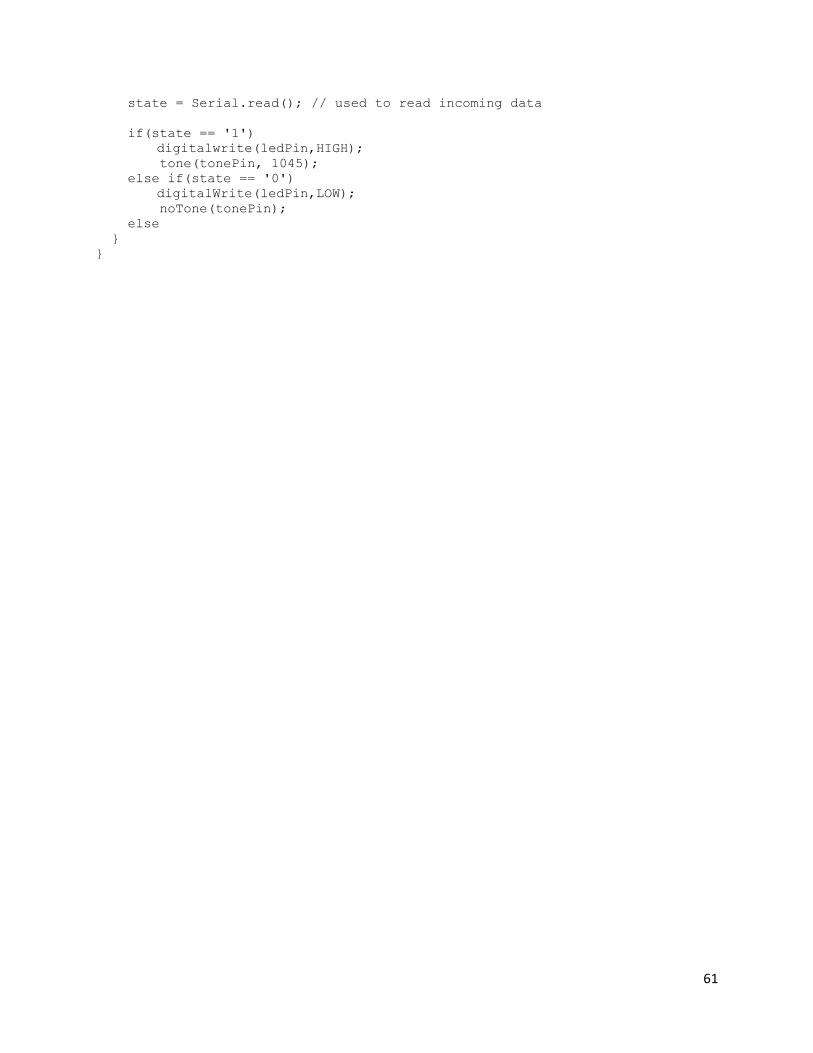
Appendix 5: Arduino Uno Code
The following is the code used to program the Arduino microcontroller to interface with thecomputer software and generate the signals used to control the piezoelectric speaker and solenoidvalve.
int ledPin = 13;int tonePin = 7;int state=0;void setup() {
pinMode(ledPin, OUTPUT); // pin will be used to for outputSerial.begin(9600); // same as in your c++ script
}
void loop(){
if (Serial.available() > 0){
61
state = Serial.read(); // used to read incoming data
if(state == '1')digitalwrite(ledPin,HIGH);tone(tonePin, 1045);
else if(state == '0')digitalWrite(ledPin,LOW);noTone(tonePin);
else}
}