Embed Size (px)
Citation preview

Software Installation Guide
i
PPiiccooDDiiggiittiizzeerr112255
22nndd GGeenneerraattiioonn
SSooffttwwaarree TToooollss
IInnssttaallllaattiioonn GGuuiiddee

ii
Revision history
Revision Date Comments
1.0 February 2017 First release of the PicoDigitizer125 2nd Generation Software package

Software Installation Guide
iii
Table of Contents
1 Installation on Windows 7 ............................................................................................... 1 1.1 Requirements for PicoDigitizer125 2
nd Generation Software Tools for Windows ....................................... 1
1.1.1 System Requirements ........................................................................................................................ 1 1.1.2 Software Requirements ..................................................................................................................... 1
1.2 Installing/Modifying/Removing PicoDigitizer125 2nd
Generation Software Tools ........................................ 2 1.2.1 Software Updates .............................................................................................................................. 2 1.2.2 Firmware Updates ............................................................................................................................. 2 1.2.3 USB dongle......................................................................................................................................... 2 1.2.4 MBDK Software Lock ......................................................................................................................... 2 1.2.5 Performing the Installation ................................................................................................................ 2 1.2.6 Removing PicoDigitizer125 2
nd Generation Software Tools for Windows ......................................... 9
1.2.7 Updating to a new version of PicoDigitizer125 2nd
Generation Software Tools or activating a new software component ....................................................................................................................... 10
1.2.8 Restoring your PicoDigitizer125 2nd
Generation Software Tools installation to its default state ... 10 1.3 PicoDigitizer125 2
nd Generation Software Tools - Utilities ......................................................................... 11
1.3.1 Updating MATLAB Paths .................................................................................................................. 11 1.3.2 Accessing the PicoDigitizer125 2
nd Generation Software Tools Documentation ............................ 11
1.4 Support on installation ............................................................................................................................... 11 1.5 Acquiring new software packages or getting a license renewal ................................................................. 12 1.6 Applying license updates to your USB dongle ............................................................................................ 13
2 Installation on Linux Ubuntu 12.04.5 LTS........................................................................ 14 2.1 Requirements for PicoDigitizer125 2
nd Generation Software Tools for Linux ............................................ 14
2.1.1 Host Computer ................................................................................................................................ 14 2.1.2 µTCA Chassis Host............................................................................................................................ 14
2.2 Installing PicoDigitizer125 2nd
Generation Software Tools for Linux .......................................................... 15 2.2.1 Preparing the system ....................................................................................................................... 15 2.2.2 Performing the Installation .............................................................................................................. 15 2.2.3 Configuring the Environment .......................................................................................................... 15
2.3 Removing PicoDigitizer125 2nd
Generation Software Tools for Linux......................................................... 15


Software Installation Guide
1
1 Installation on Windows 7
This section describes how to install, configure, and update Nutaq’s PicoDigitizer125 2nd
Generation Software Tools on a computer running the Windows 7 operating system. A system properly set up to work with the Nutaq development tools allows FPGA and host development for the Perseus platform.
For operating details, please refer to the documentation library accompanying the product.
1.1 Requirements for PicoDigitizer125 2nd Generation Software Tools for Windows
This section presents the requirements that must be met by the system in order to use the PicoDigitizer125 2nd
Generation software tools.
1.1.1 System Requirements
Hardware
A PC with the following characteristics:
Processor of 64 bits (×64), 1 GHz or faster
10 GB of RAM or more
Free HDD space — 50 GB or more
Operating System
Windows 7, 64 bits
1.1.2 Software Requirements
Only the software versions presented below are supported.
Essential BSDK Development Software
Xilinx ISE Design Suite 14.7 Embedded Edition or System Edition (essential for FPGA development)
Essential MBDK Development Software
MATLAB R2013B (64-bit installation)
o Signal Processing Toolbox
o MATLAB Simulink
Xilinx ISE Design Suite 14.7 System Edition (essential for FPGA development)
o Xilinx System Generator 14.7
Adobe Acrobat Reader DC
TFTP software
Note: Model-based design software is only essential to those who purchase the Nutaq model-based design kit (MBDK).
Before installing Nutaq software, you must install all non-Nutaq software. Refer to the documentation relative to each third-party installation for details.
Important: If you are using MBDK, install MATLAB before Xilinx ISE Design Suite 14.7 System Edition.
WARNING Nutaq software cannot function when MATLAB is installed in a folder containing the space character, for example,
“Program Files”. We suggest that you install MATLAB in the “C:\MATLAB\R2013b“ directory.

2
1.2 Installing/Modifying/Removing PicoDigitizer125 2nd Generation Software Tools
1.2.1 Software Updates
Periodically visit the Nutaq product page at http://www.nutaq.com/support/latest-utca-edition to verify whether there are updates for your Nutaq software.
Note:
If you are unsure of the software version you are using, check the release notes of the installation on your computer or the documentation on the USB license dongle that came with the product.
1.2.2 Firmware Updates
Every time an installation of a new version of the Nutaq PicoDigitizer125 2nd
Generation Software Tools is performed, and before proceeding with anything involving the PicoDigitizer125 hardware, we recommend verifying that the Linux firmware contained in the flash memory of the Perseus is compatible and to update it if needed. Please refer to the Perseus Firmware Update document for details about the firmware update operation.
1.2.3 USB dongle
The USB dongle provided with your PicoDigitizer125 2nd
Generation Software Tools purchase contains the license information for the product options you selected. It is also a flash drive that contains the latest PicoDigitizer125 2
nd Generation Software Tools version at the moment of the purchase and some documentation. You must leave
the dongle connected to your computer when installing PicoDigitizer125 2nd
Generation Software Tools and compiling a bitstream with the MBDK toolset. PicoDigitizer125 2
nd Generation Software Tools can be installed on
as many computers as you require, as long as they meet the minimum system requirements.
1.2.4 MBDK Software Lock
The model-based part of Nutaq PicoDigitizer125 2nd
Generation Software Tools is protected by a locking mechanism. Since the compilation of a bitstream with MBDK requires a valid USB dongle to be connected to the system, you will only be able to perform this operation on one system at a time.
1.2.5 Performing the Installation
1. Connect the provided USB dongle to your computer. Let the driver installation finish, if applicable.
2. Navigate to the base directory of the USB dongle and double-click on the application file (PicoDigitizer125_2ndGen_Software_Tools_1_1_0.exe) to launch the installer.
Note: If using an installation application downloaded from Nutaq’s Web site to perform the installation, double-click the application file (PicoDigitizer125_2ndGen_Software_Tools_1_1_0.exe) that was saved on the computer.
3. The installer will prompt you to close all other applications. Once this is done, click OK.
4. Click Next.

Software Installation Guide
3
5. In the License agreement (Nutaq Software) dialog box, carefully read the Nutaq license agreement, select the I accept the terms of the license agreement option to continue, and click Next.

4
6. In the License agreement (GPL) dialog box, carefully read the GPL agreement, select the I accept the terms of the license agreement option to continue, and click Next.
7. In the Customer Information dialog box, type your name, type the name of your organization, and click Next.

Software Installation Guide
5
8. In the Installation folder dialog box, select the installation folder for PicoDigitizer125 2nd
Generation Software tools on your system and click Next. You must select a path without the space character in it. C:\Nutaq\ is used as default.
9. Select the packages you would like to install.
6
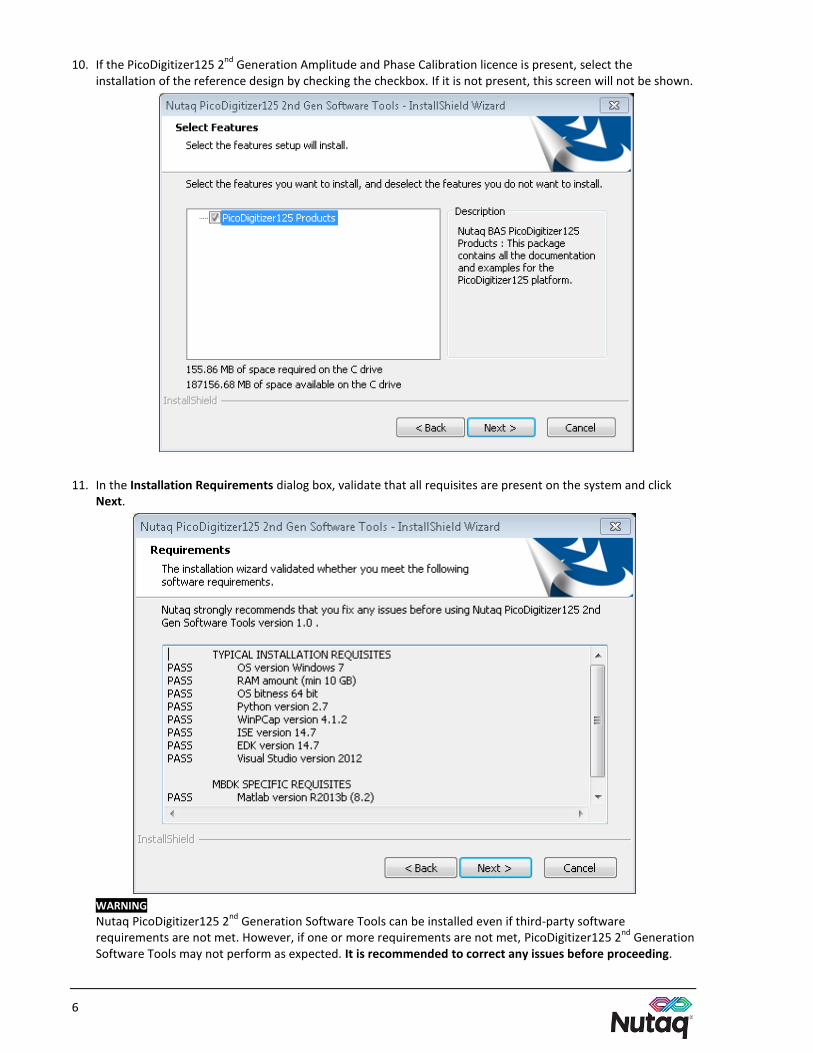
10. If the PicoDigitizer125 2nd
Generation Amplitude and Phase Calibration licence is present, select the installation of the reference design by checking the checkbox. If it is not present, this screen will not be shown.
11. In the Installation Requirements dialog box, validate that all requisites are present on the system and click Next.
WARNING
Nutaq PicoDigitizer125 2nd
Generation Software Tools can be installed even if third-party software requirements are not met. However, if one or more requirements are not met, PicoDigitizer125 2
nd Generation
Software Tools may not perform as expected. It is recommended to correct any issues before proceeding.

Software Installation Guide
7
12. Click Install.
13. Wait while the installer transfers files on your system.
14. You will be asked if you want the installer to manage the automatic configuration of Matlab for use with the PicoDigitizer125 2
nd Generation Software Tools. Click Yes.
The installer will launch MATLAB and its setup script.
15. When the installation is complete, click Finish. If prompted to restart the computer, please do so.
The installation of PicoDigitizer125 2nd
Generation Software Tools is now complete.

8

Software Installation Guide
9
1.2.6 Removing PicoDigitizer125 2nd Generation Software Tools for Windows
To remove the PicoDigitizer125 2nd
Generation Software Tools, perform the following steps:
1. In Control Panel> Programs and Features, select Nutaq PicoDigitizer125 2nd
Generation and click Uninstall.
OR
In Start Menu>All Programs>Nutaq>Uninstall click Uninstall Application.
2. In the dialog that opens, click Yes.
.
3. The installer will inform you that it is modifying the contents of the program folder. Backup any important work in another directory. Click Yes.
.
4. While removing files from the system, the installer will indicate that it is launching Matlab to remove the PicoDigitizer125 2
nd Generation Software Tools configuration. Do not try to abort the installer at this step.
5. When the uninstall is complete, click Finish. If you are prompted to restart your computer, please do so.

10
1.2.7 Updating to a new version of PicoDigitizer125 2nd Generation Software Tools or activating a new software component
To update to a new version of PicoDigitizer125 2nd
Generation Software Tools or add a new software component:
1. Download the latest PicoDigitizer125 2nd
Generation Software Tools version from the product page on the Nutaq Web site at http://www.nutaq.com/support/latest-utca-edition.
2. If necessary, transfer the application file that you have downloaded to the system where you want PicoDigitizer125 2
nd Generation installed.
3. Double-click on the application file.
4. Select Modify.
5. Proceed to step 3 of the “Performing the Installation” section. Select packages and features as needed.
1.2.8 Restoring your PicoDigitizer125 2nd Generation Software Tools installation to its default state
1. In Control Panel> Programs and Features, select Nutaq PicoDigitizer125 Software 2nd
Generation Tools and click Change.
2. Select Repair.
3. The install will inform you that it is modifying the contents of the program folder. Backup any important work in another directory. Click Yes.
4. When the repair is complete, click Finish. If you are prompted to restart your computer, please do so.

Software Installation Guide
11
1.3 PicoDigitizer125 2nd Generation Software Tools - Utilities
1.3.1 Updating MATLAB Paths
1. Close all MATLAB applications.
2. To start the MATLAB update script, on the Windows Start menu, point to All Programs> Nutaq and click Setup MATLAB.
This automatically starts MATLAB and adds paths and plug-ins necessary to PicoDigitizer125 2nd
Generation Software Tools.
1.3.2 Accessing the PicoDigitizer125 2nd Generation Software Tools Documentation
PicoDigitizer125 2nd
Generation Software Tools come with a library of documents that is installed on the hard disk of the computer when you install Nutaq software.
All the documents are in PDF format. Adobe Reader must be installed on the computer to view them. You can download the latest Adobe Reader from the Adobe Systems Web site (www.adobe.com).
To access the documentation:
On the Windows Start menu, point to All Programs> Nutaq and click Documentation.
Windows Explorer then opens the folder containing the documentation.
1.4 Support on installation
If you are experiencing problems installing PicoDigitizer125 2nd
Generation Software Tools on your computer, please contact Nutaq’s support personnel at [email protected].
Please provide the archive MM-DD-YYYY_HH-MM-SS_NutaqBASInstall_Log.txt.zip attached to your message. It is located in the root directory of your installation folder (C:\Nutaq\PicoDigitizer125 by default).

12
1.5 Acquiring new software packages or getting a license renewal
1. Connect the USB dongle to your computer.
2. On the Windows Start menu, point to All Programs> Nutaq and click USB dongle utility.
1. In the USB dongle utility software, select Tools>Generate diagnostics.
2. In the dialog box, select create e-mail with diagnostics as attachment. Click OK.
3. Send the message to [email protected].

Software Installation Guide
13
1.6 Applying license updates to your USB dongle
1. Connect the USB dongle to your computer.
2. On the Windows Start menu, point to All Programs> Nutaq and click USB dongle utility.
3. In the USB dongle utility software, open the update code file (.ducf file extension) with File -> Open Update Code file. The update code file is provided by Nutaq support on the purchase of newer software packages or a license renewal.
4. Click Make changes to dongle.
5. Refer to sections 1.2.7 and 1.2.8 of this document to perform software updates.

14
2 Installation on Linux Ubuntu 12.04.5 LTS
This section describes how to install Nutaq’s PicoDigitizer125 2nd
Generation Software Tools on a PC running the Ubuntu 12.04.5 operating system.
The Linux installation contains the tools and drivers necessary for Linux-based host development.
2.1 Requirements for PicoDigitizer125 2nd Generation Software Tools for Linux
This section presents the requirements that must be met by the system on which the PicoDigitizer125 2nd
Generation Software Tools are installed.
2.1.1 Host Computer
Hardware
x86_x64 architecture
1GB RAM
Operating System
Ubuntu 12.04.5
2.1.2 µTCA Chassis Host
Hardware
16GB USB stick
Analog display
USB hub equipped with four ports or more
USB keyboard
USB mouse
USB optical disc drive
Operating System
Ubuntu 12.04.5

Software Installation Guide
15
2.2 Installing PicoDigitizer125 2nd Generation Software Tools for Linux
2.2.1 Preparing the system
1. Make sure the user account used has administrator rights and can use the command sudo.
2. Update the system prior to the installation using the user interface tools or through a terminal with the command:
sudo apt-get upgrade
3. Install the standard development packages on the system using the user interface tools or through terminal with the commands:
sudo apt-get install build-essential
sudo apt-get install libpcap-dev
sudo apt-get install libtool
2.2.2 Performing the Installation
Use the following commands to install the package:
sudo dpkg -i nutaq-picosdr-2ndgen-sdk-1.1.0-1_amd64.deb
2.2.3 Configuring the Environment
1. Modify the installation folder owner with:
sudo chown -R {username} //opt/Nutaq
2. Modify the installation folder group with:
sudo chgrp -R {username} //opt/Nutaq
3. Modify the installation folder permissions with:
sudo chmod -R +x //opt/Nutaq
4. Modify the cache folder permissions with:
sudo chown -R {username} //var/cache
2.3 Removing PicoDigitizer125 2nd Generation Software Tools for Linux
To uninstall PicoDigitizer125 2nd
Generation Software tools simply run the command:
sudo dpkg --purge nutaq-picosdr-2ndgen-sdk