Embed Size (px)
Citation preview
Software
Installation Manual
Rev. 2.1
‘unified, multi-model driver and configuration suite’
Contents
1. Software Overview ................................................................................................... 1
1.1 Windows Printer Driver .................................................................................................................1
1.2 Printer Utility ...................................................................................................................................2
1.2.1 Starting the Printer Utility ...................................................................................................................................2
1.2.2 Printer Utility Functions .......................................................................................................................................3
2. Operating Environment ............................................................................................... 6
2.1 Operating System ...........................................................................................................................6
2.2 Supported Functions (Interface / Emulation) ...........................................................................6
3. Installation ...............................................................................................................10
4. Uninstallation ..........................................................................................................15
5. Revision History ......................................................................................................17
Appendix 1. FVP10 Sample Sounds ............................................................................18
Appendix 2. Pairing with Bluetooth in Windows .......................................................19
Appendix 3.
How to Allow a program to communicate through Windows Firewall .............28
Installation Manual
− 1 −
Windows
Application
Windows
Printer Driver
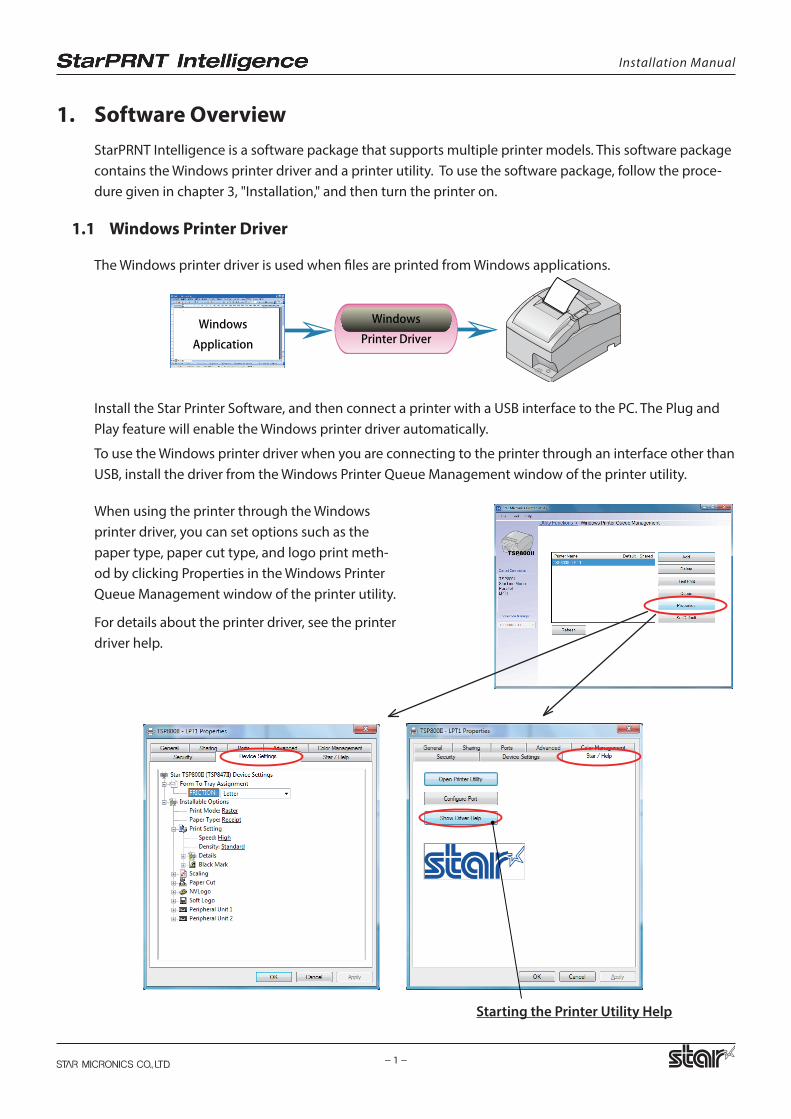
1. Software OverviewStarPRNT Intelligence is a software package that supports multiple printer models. This software package contains the Windows printer driver and a printer utility. To use the software package, follow the proce-dure given in chapter 3, "Installation," and then turn the printer on.
1.1 Windows Printer Driver
The Windows printer driver is used when files are printed from Windows applications.
Install the Star Printer Software, and then connect a printer with a USB interface to the PC. The Plug and Play feature will enable the Windows printer driver automatically.
To use the Windows printer driver when you are connecting to the printer through an interface other than USB, install the driver from the Windows Printer Queue Management window of the printer utility.
When using the printer through the Windows printer driver, you can set options such as the paper type, paper cut type, and logo print meth-od by clicking Properties in the Windows Printer Queue Management window of the printer utility.
For details about the printer driver, see the printer driver help.
Starting the Printer Utility Help
Installation Manual
− 2 −
1.2 Printer Utility
The printer utility is used to connect to the printer and to set various options.
It can be used in conjunction with the Windows printer driver, OPOS driver, and in numerous other envi-ronments.
The printer utility is used over a specific “Connection” (each “Connection” has specific properties such as the printer model and connection method). Depending on the specifications of the connection, the util-ity functions that are displayed vary (see section 2.2, "Supported Functions").
For details on how to configure connections and on the utility functions, see the printer utility help.
1.2.1 Starting the Printer Utility
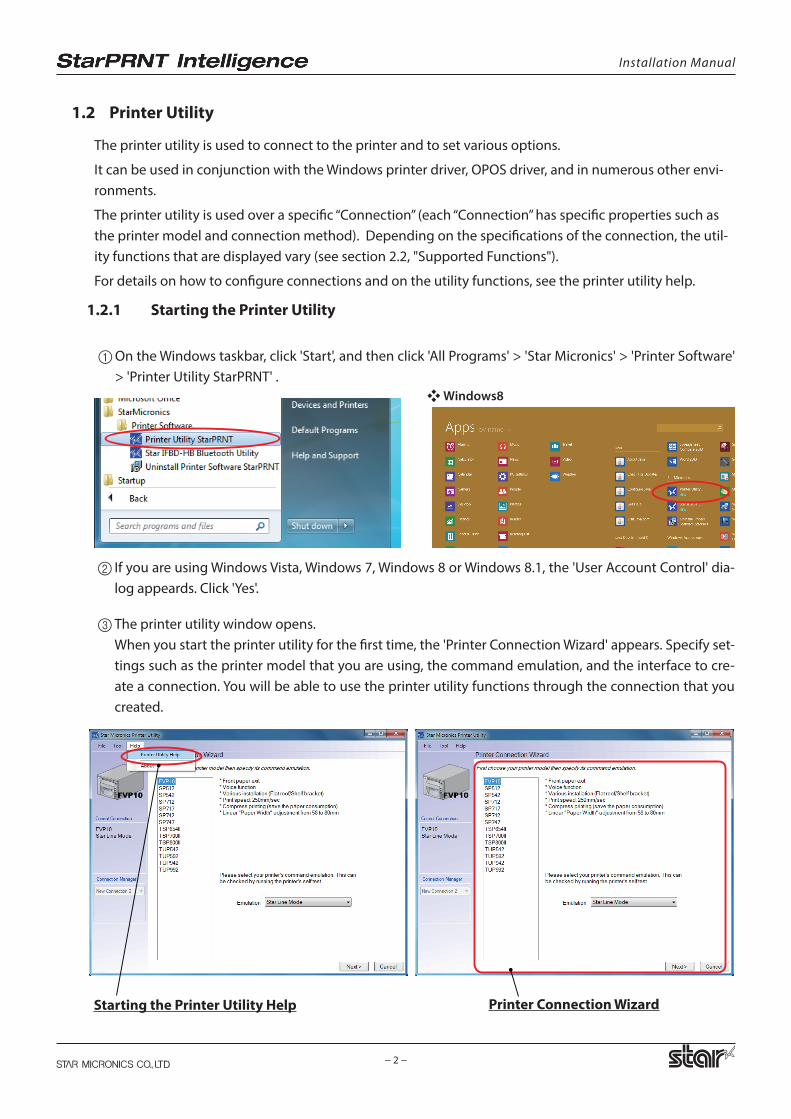
1 On the Windows taskbar, click 'Start', and then click 'All Programs' > 'Star Micronics' > 'Printer Software' > 'Printer Utility StarPRNT' .
2 If you are using Windows Vista, Windows 7, Windows 8 or Windows 8.1, the 'User Account Control' dia-log appeards. Click 'Yes'.
3 The printer utility window opens. When you start the printer utility for the first time, the 'Printer Connection Wizard' appears. Specify set-
tings such as the printer model that you are using, the command emulation, and the interface to cre-ate a connection. You will be able to use the printer utility functions through the connection that you created.
Starting the Printer Utility Help Printer Connection Wizard
❖ Windows8
Installation Manual
− 3 −
1.2.2 Printer Utility Functions
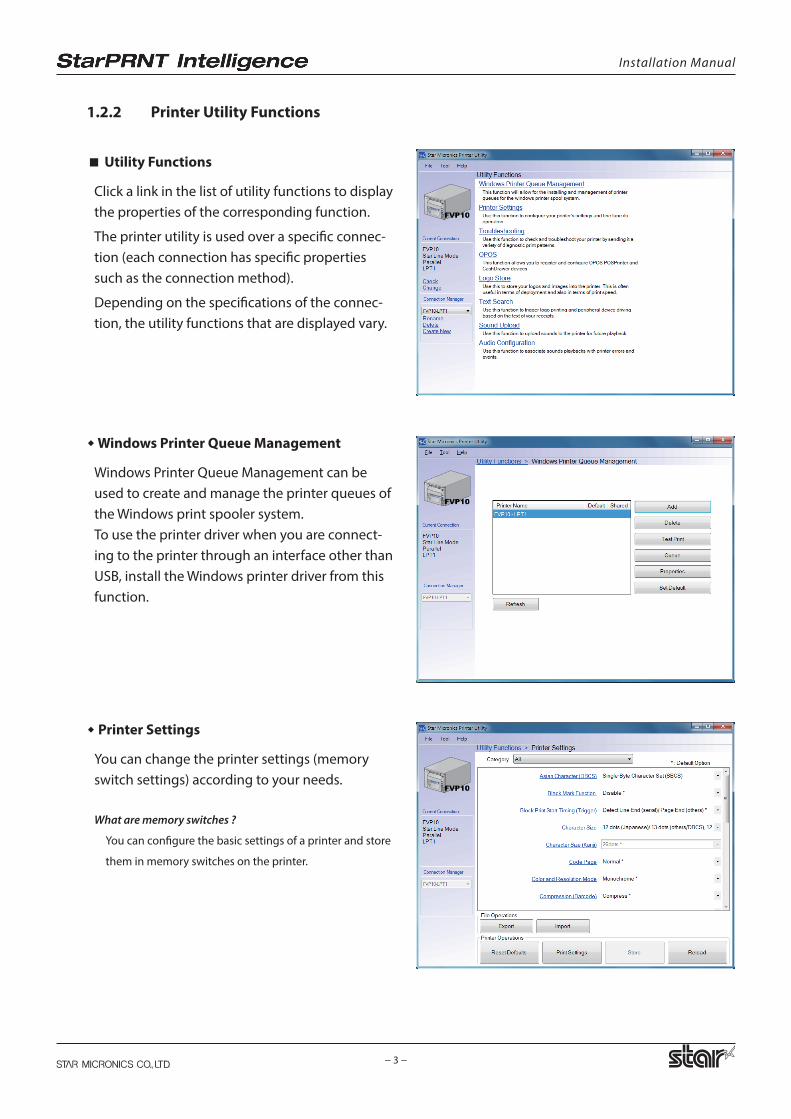
Utility Functions
Click a link in the list of utility functions to display the properties of the corresponding function.
The printer utility is used over a specific connec-tion (each connection has specific properties such as the connection method).
Depending on the specifications of the connec-tion, the utility functions that are displayed vary.
Windows Printer Queue Management
Windows Printer Queue Management can be used to create and manage the printer queues of the Windows print spooler system.To use the printer driver when you are connect-ing to the printer through an interface other than USB, install the Windows printer driver from this function.
Printer Settings
You can change the printer settings (memory switch settings) according to your needs.
What are memory switches ?
You can configure the basic settings of a printer and store
them in memory switches on the printer.
Installation Manual
− 4 −
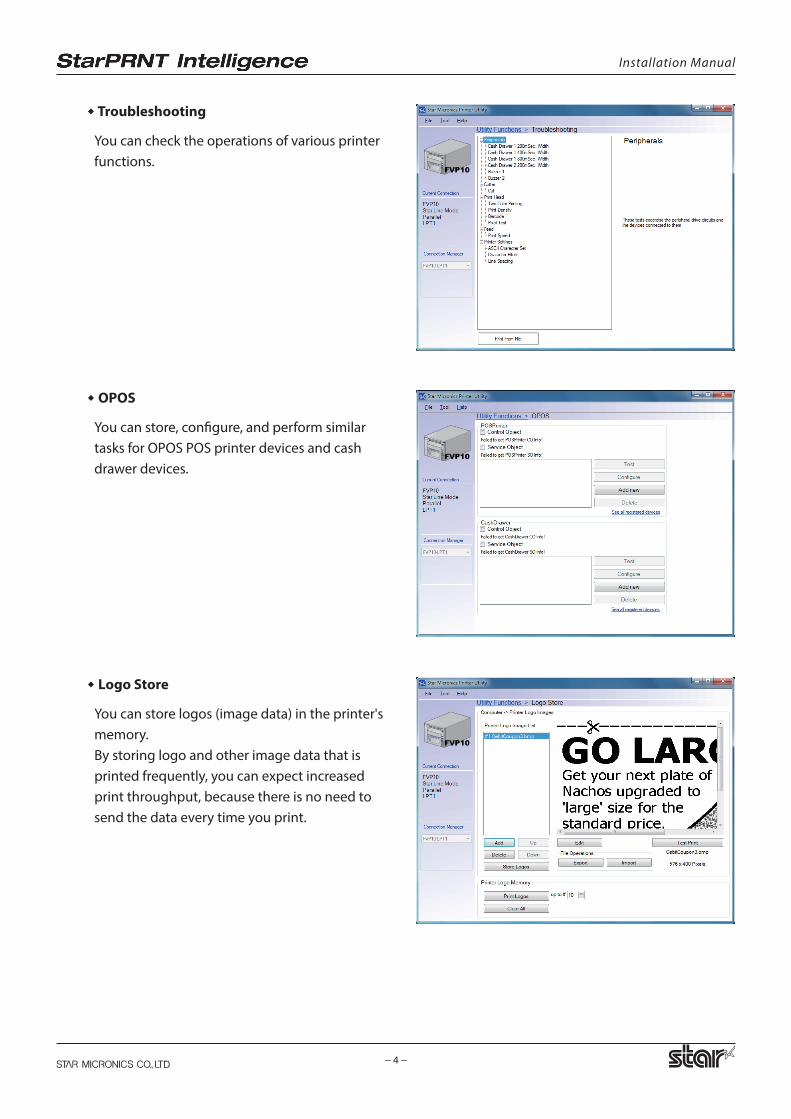
Troubleshooting
You can check the operations of various printer functions.
OPOS
You can store, configure, and perform similar tasks for OPOS POS printer devices and cash drawer devices.
Logo Store
You can store logos (image data) in the printer's memory.By storing logo and other image data that is printed frequently, you can expect increased print throughput, because there is no need to send the data every time you print.
Installation Manual
− 5 −
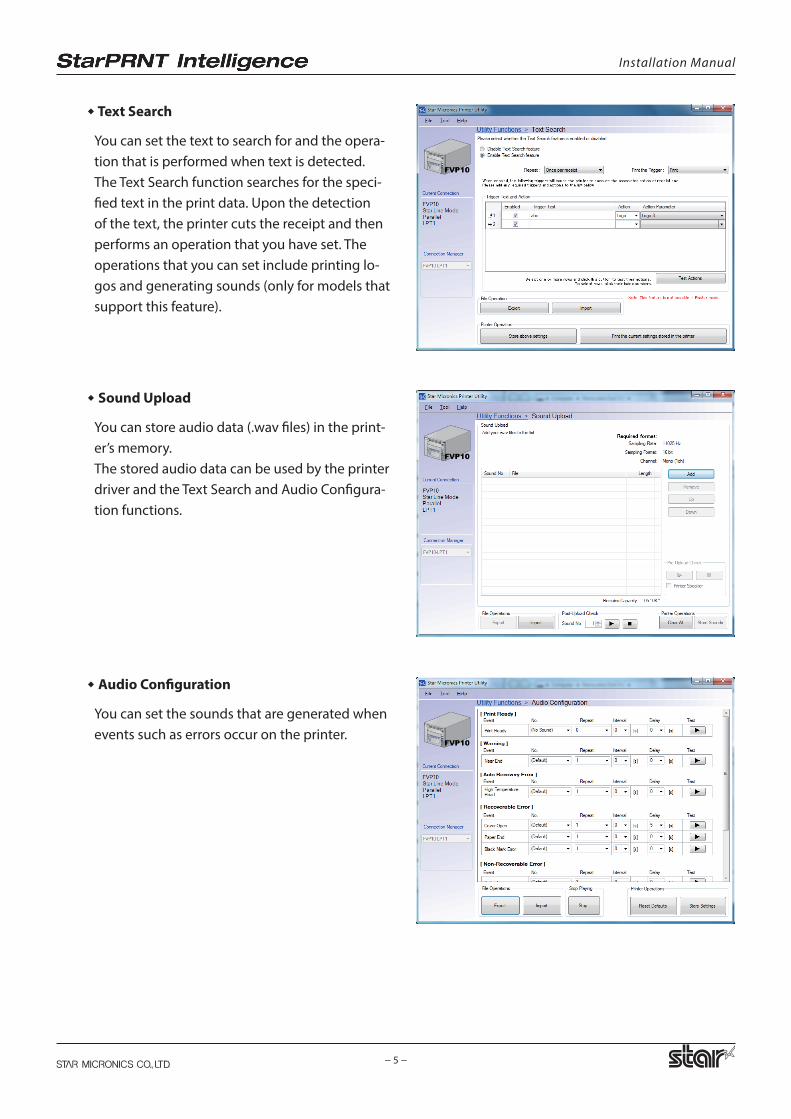
Text Search
You can set the text to search for and the opera-tion that is performed when text is detected.The Text Search function searches for the speci-fied text in the print data. Upon the detection of the text, the printer cuts the receipt and then performs an operation that you have set. The operations that you can set include printing lo-gos and generating sounds (only for models that support this feature).
Sound Upload
You can store audio data (.wav files) in the print-er’s memory.The stored audio data can be used by the printer driver and the Text Search and Audio Configura-tion functions.
Audio Configuration
You can set the sounds that are generated when events such as errors occur on the printer.
Installation Manual
− 6 −
2. Operating Environment
2.1 Operating System
This software supports the following operating systems.
Microsoft Windows 8.1* 32bit/64bit ( except Windows RT )
Microsoft Windows 8* 32bit/64bit ( except Windows RT )
Microsoft Windows 7 32bit/64bit
Microsoft WIndows Vista 32bit/64bit
Microsoft Windows XP (SP3 or later)
*Limitation for Windows 8 / 8.1∙ Star original Printer Driver Function (e.g. Logo Setting) can not be changed from “Modern UI”.
However, once the setting of its function is changed from “Desktop UI”,these function can be used on “Modern UI” as well.
∙ USB Printer will not be appeared in [Device and Printer] if its power is off.∙ Error status (e.g. Paper empty during printing) will not be shown in “Modern UI”.
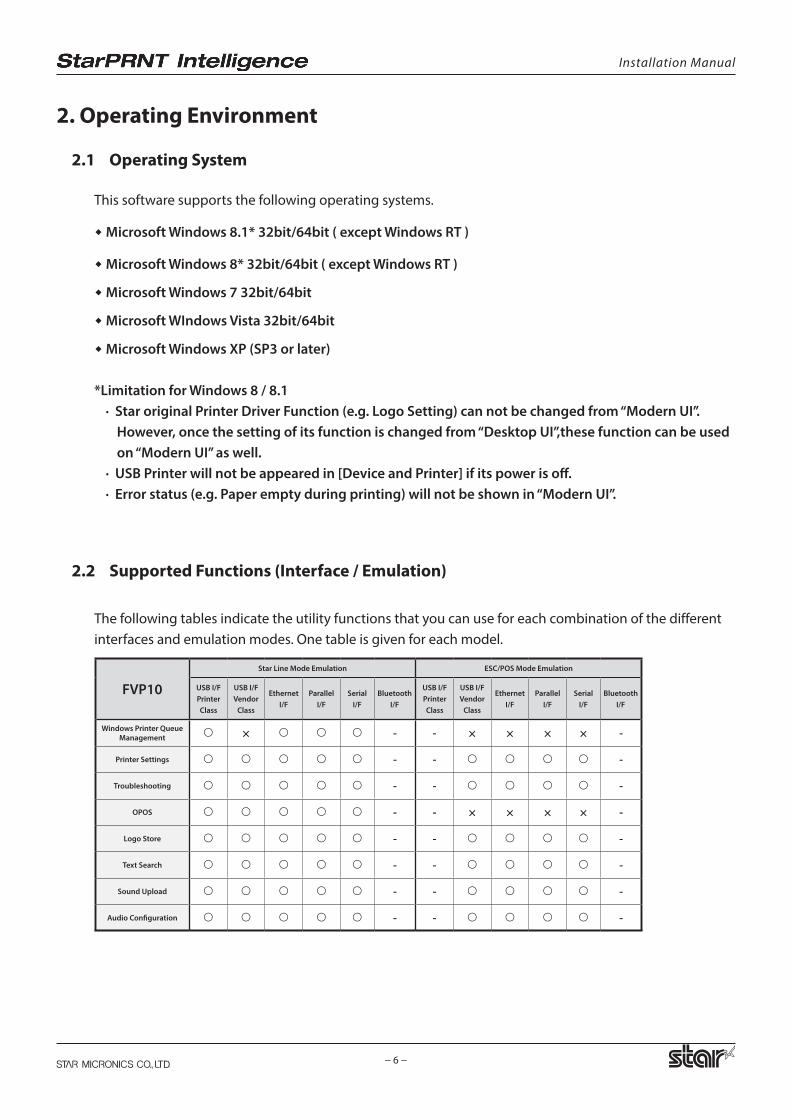
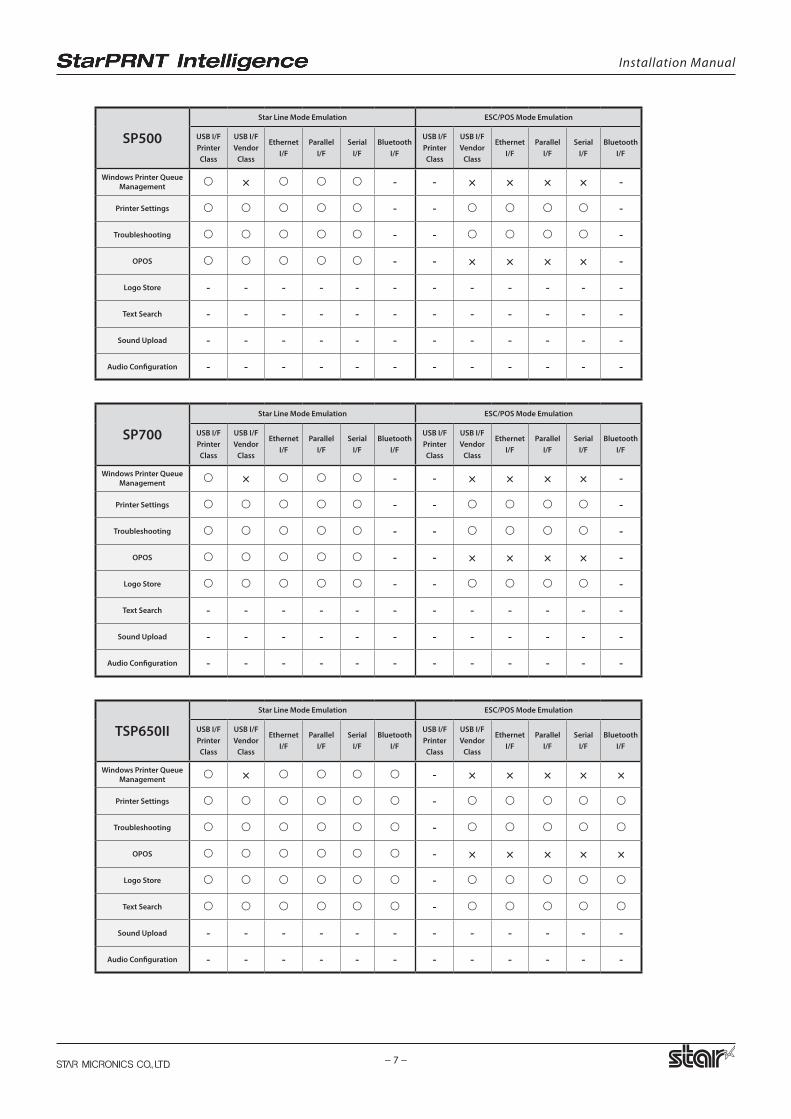
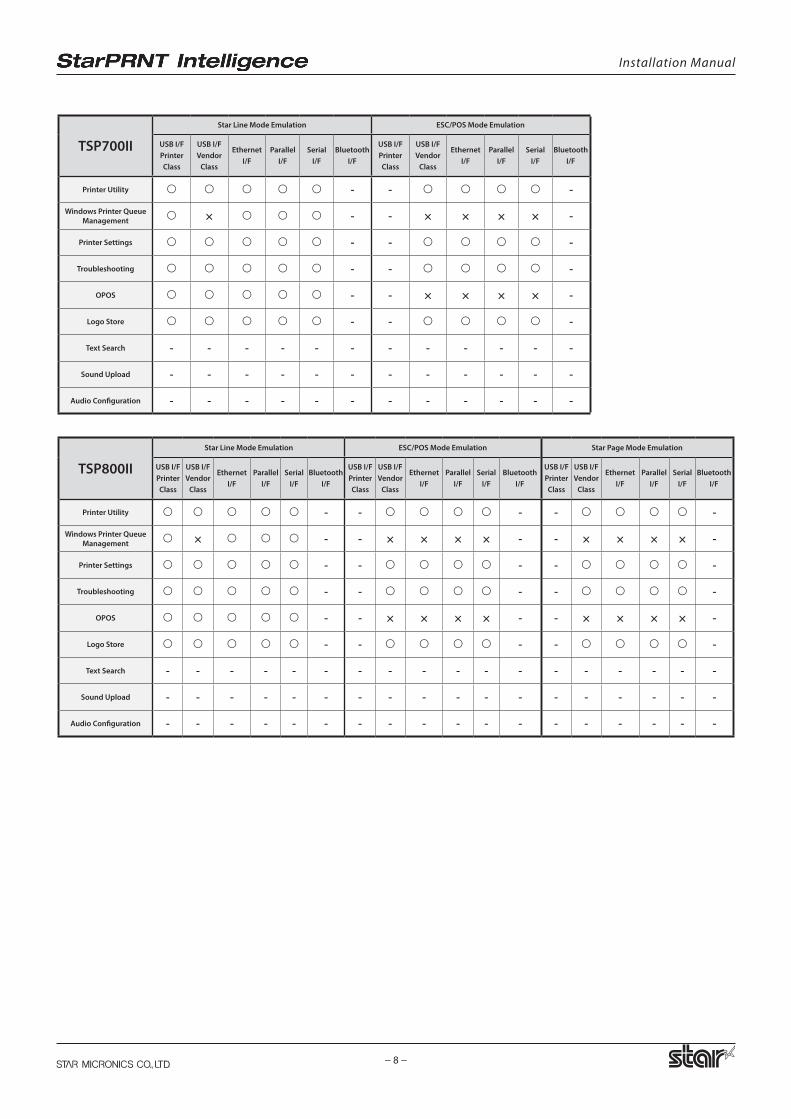
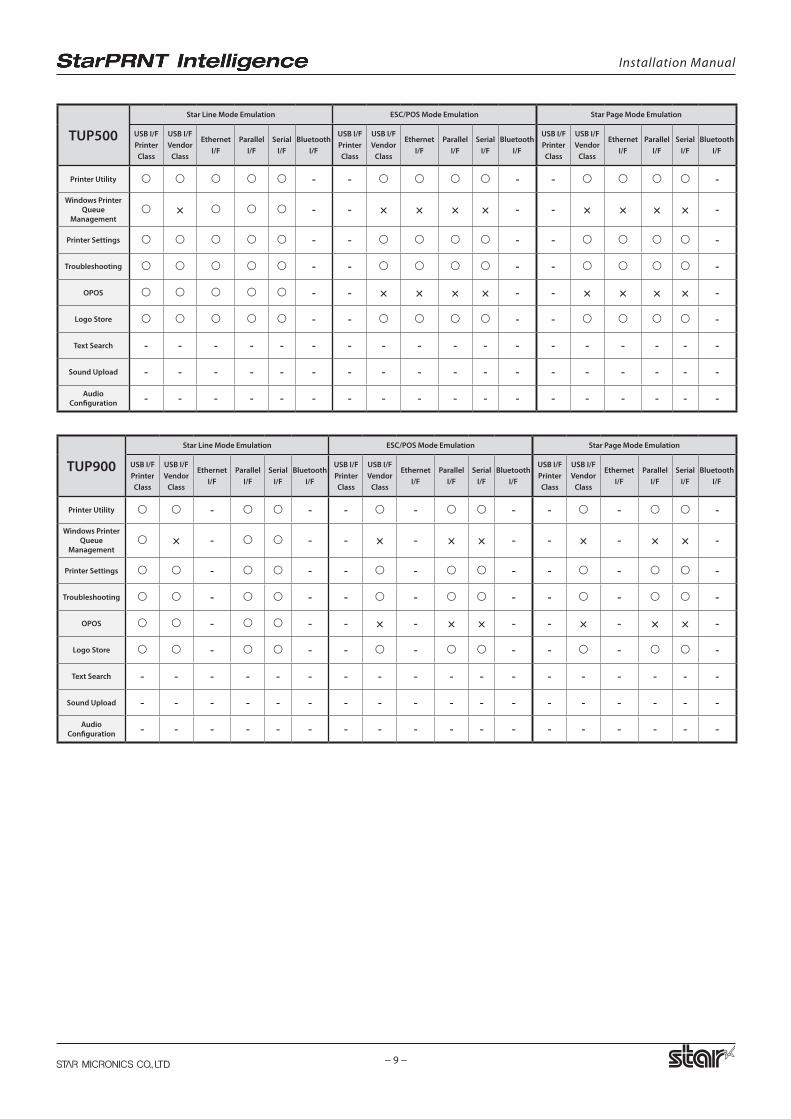
2.2 Supported Functions (Interface / Emulation)
The following tables indicate the utility functions that you can use for each combination of the different interfaces and emulation modes. One table is given for each model.
FVP10
Star Line Mode Emulation ESC/POS Mode Emulation
USB I/FPrinterClass
USB I/FVendor
Class
EthernetI/F
ParallelI/F
SerialI/F
BluetoothI/F
USB I/FPrinterClass
USB I/FVendor
Class
EthernetI/F
ParallelI/F
SerialI/F
BluetoothI/F
Windows Printer QueueManagement × - - × × × × -
Printer Settings - - -
Troubleshooting - - -
OPOS - - × × × × -
Logo Store - - -
Text Search - - -
Sound Upload - - -
Audio Configuration - - -
Installation Manual
− 7 −
SP500
Star Line Mode Emulation ESC/POS Mode Emulation
USB I/FPrinterClass
USB I/FVendor
Class
EthernetI/F
ParallelI/F
SerialI/F
BluetoothI/F
USB I/FPrinterClass
USB I/FVendor
Class
EthernetI/F
ParallelI/F
SerialI/F
BluetoothI/F
Windows Printer QueueManagement × - - × × × × -
Printer Settings - - -
Troubleshooting - - -
OPOS - - × × × × -
Logo Store - - - - - - - - - - - -
Text Search - - - - - - - - - - - -
Sound Upload - - - - - - - - - - - -
Audio Configuration - - - - - - - - - - - -
SP700
Star Line Mode Emulation ESC/POS Mode Emulation
USB I/FPrinterClass
USB I/FVendor
Class
EthernetI/F
ParallelI/F
SerialI/F
BluetoothI/F
USB I/FPrinterClass
USB I/FVendor
Class
EthernetI/F
ParallelI/F
SerialI/F
BluetoothI/F
Windows Printer QueueManagement × - - × × × × -
Printer Settings - - -
Troubleshooting - - -
OPOS - - × × × × -
Logo Store - - -
Text Search - - - - - - - - - - - -
Sound Upload - - - - - - - - - - - -
Audio Configuration - - - - - - - - - - - -
TSP650II
Star Line Mode Emulation ESC/POS Mode Emulation
USB I/FPrinterClass
USB I/FVendor
Class
EthernetI/F
ParallelI/F
SerialI/F
BluetoothI/F
USB I/FPrinterClass
USB I/FVendor
Class
EthernetI/F
ParallelI/F
SerialI/F
BluetoothI/F
Windows Printer QueueManagement × - × × × × ×
Printer Settings -
Troubleshooting -
OPOS - × × × × ×
Logo Store -
Text Search -
Sound Upload - - - - - - - - - - - -
Audio Configuration - - - - - - - - - - - -
Installation Manual
− 8 −
TSP700II
Star Line Mode Emulation ESC/POS Mode Emulation
USB I/FPrinterClass
USB I/FVendor
Class
EthernetI/F
ParallelI/F
SerialI/F
BluetoothI/F
USB I/FPrinterClass
USB I/FVendor
Class
EthernetI/F
ParallelI/F
SerialI/F
BluetoothI/F
Printer Utility - - -
Windows Printer QueueManagement × - - × × × × -
Printer Settings - - -
Troubleshooting - - -
OPOS - - × × × × -
Logo Store - - -
Text Search - - - - - - - - - - - -
Sound Upload - - - - - - - - - - - -
Audio Configuration - - - - - - - - - - - -
TSP800II
Star Line Mode Emulation ESC/POS Mode Emulation Star Page Mode Emulation
USB I/FPrinterClass
USB I/FVendor
Class
EthernetI/F
ParallelI/F
SerialI/F
BluetoothI/F
USB I/FPrinterClass
USB I/FVendor
Class
EthernetI/F
ParallelI/F
SerialI/F
BluetoothI/F
USB I/FPrinterClass
USB I/FVendor
Class
EthernetI/F
ParallelI/F
SerialI/F
BluetoothI/F
Printer Utility - - - - -
Windows Printer QueueManagement × - - × × × × - - × × × × -
Printer Settings - - - - -
Troubleshooting - - - - -
OPOS - - × × × × - - × × × × -
Logo Store - - - - -
Text Search - - - - - - - - - - - - - - - - - -
Sound Upload - - - - - - - - - - - - - - - - - -
Audio Configuration - - - - - - - - - - - - - - - - - -
Installation Manual
− 9 −
TUP500
Star Line Mode Emulation ESC/POS Mode Emulation Star Page Mode Emulation
USB I/FPrinterClass
USB I/FVendor
Class
EthernetI/F
ParallelI/F
SerialI/F
BluetoothI/F
USB I/FPrinterClass
USB I/FVendor
Class
EthernetI/F
ParallelI/F
SerialI/F
BluetoothI/F
USB I/FPrinterClass
USB I/FVendor
Class
EthernetI/F
ParallelI/F
SerialI/F
BluetoothI/F
Printer Utility - - - - -
Windows Printer Queue
Management × - - × × × × - - × × × × -
Printer Settings - - - - -
Troubleshooting - - - - -
OPOS - - × × × × - - × × × × -
Logo Store - - - - -
Text Search - - - - - - - - - - - - - - - - - -
Sound Upload - - - - - - - - - - - - - - - - - -
Audio Configuration - - - - - - - - - - - - - - - - - -
TUP900
Star Line Mode Emulation ESC/POS Mode Emulation Star Page Mode Emulation
USB I/FPrinterClass
USB I/FVendor
Class
EthernetI/F
ParallelI/F
SerialI/F
BluetoothI/F
USB I/FPrinterClass
USB I/FVendor
Class
EthernetI/F
ParallelI/F
SerialI/F
BluetoothI/F
USB I/FPrinterClass
USB I/FVendor
Class
EthernetI/F
ParallelI/F
SerialI/F
BluetoothI/F
Printer Utility - - - - - - - -
Windows Printer Queue
Management × - - - × - × × - - × - × × -
Printer Settings - - - - - - - -
Troubleshooting - - - - - - - -
OPOS - - - × - × × - - × - × × -
Logo Store - - - - - - - -
Text Search - - - - - - - - - - - - - - - - - -
Sound Upload - - - - - - - - - - - - - - - - - -
Audio Configuration - - - - - - - - - - - - - - - - - -
Installation Manual
− 10 −
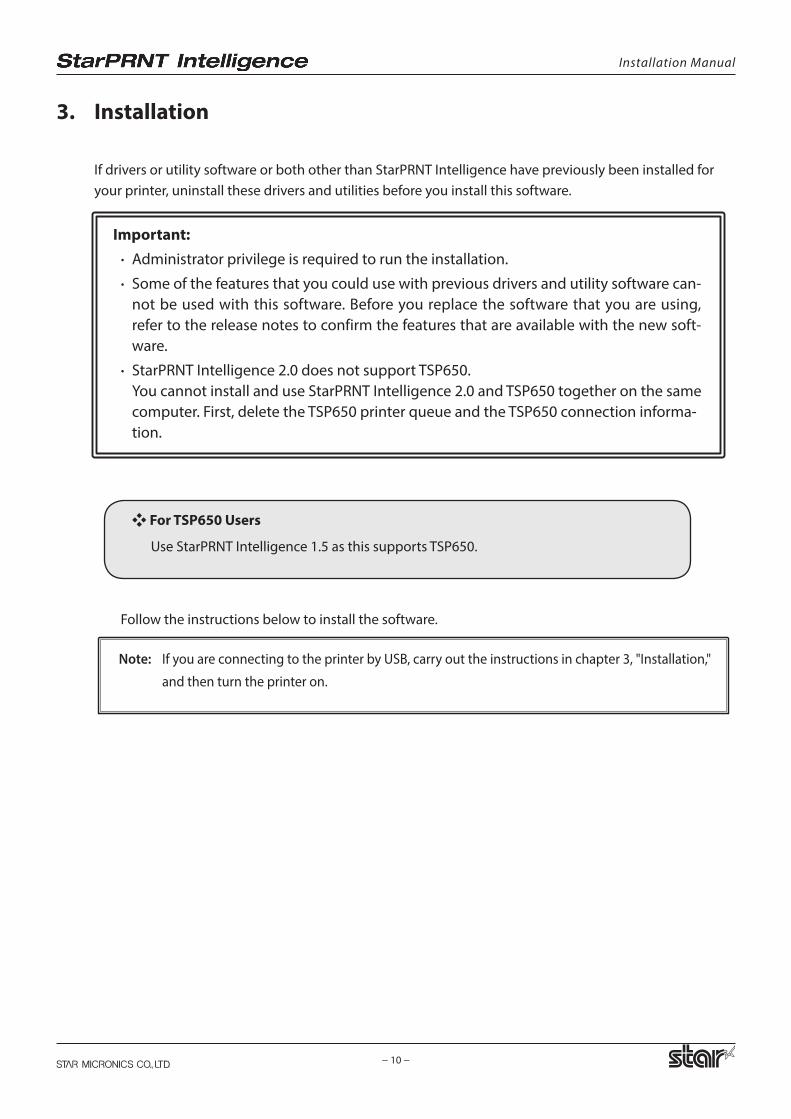
3. Installation
If drivers or utility software or both other than StarPRNT Intelligence have previously been installed for your printer, uninstall these drivers and utilities before you install this software.
Important: ∙ Administrator privilege is required to run the installation.
∙ Some of the features that you could use with previous drivers and utility software can-not be used with this software. Before you replace the software that you are using, refer to the release notes to confirm the features that are available with the new soft-ware.
∙ StarPRNT Intelligence 2.0 does not support TSP650. You cannot install and use StarPRNT Intelligence 2.0 and TSP650 together on the same computer. First, delete the TSP650 printer queue and the TSP650 connection informa-tion.
Follow the instructions below to install the software.
Note: If you are connecting to the printer by USB, carry out the instructions in chapter 3, "Installation,"
and then turn the printer on.
❖ For TSP650 Users
Use StarPRNT Intelligence 1.5 as this supports TSP650.
Installation Manual
− 11 −
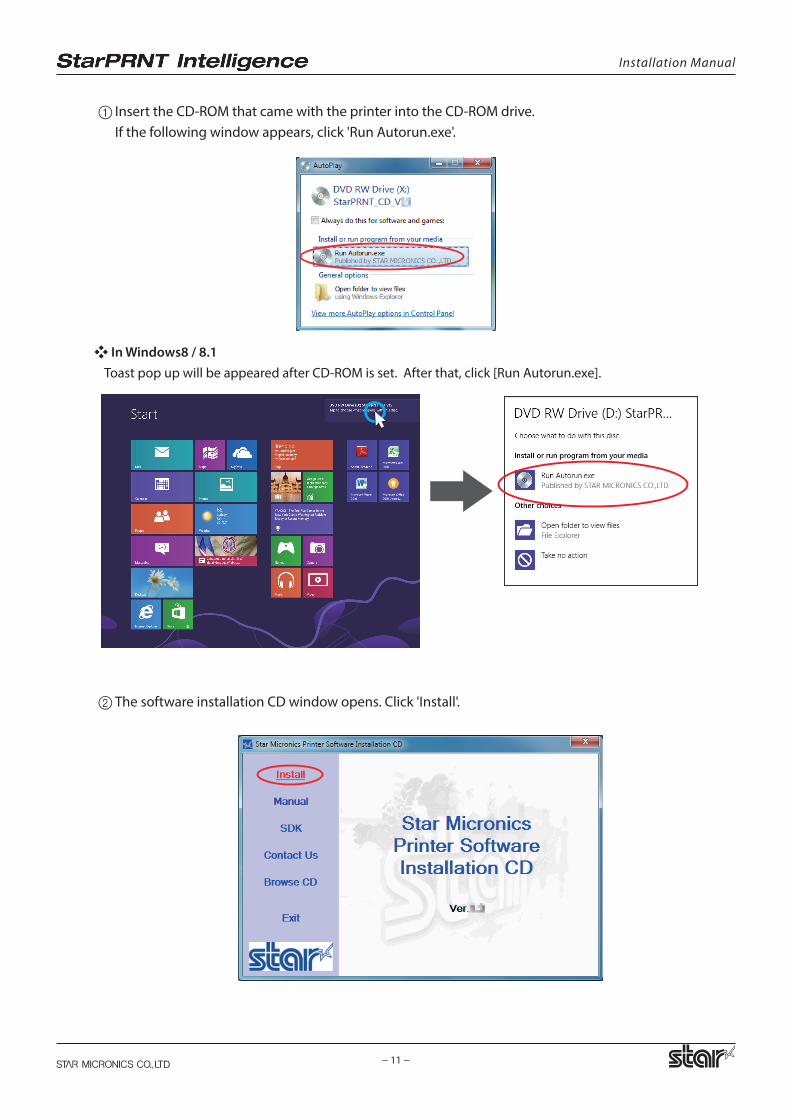
1 Insert the CD-ROM that came with the printer into the CD-ROM drive. If the following window appears, click 'Run Autorun.exe'.
2 The software installation CD window opens. Click 'Install'.
❖ In Windows8 / 8.1 Toast pop up will be appeared after CD-ROM is set. After that, click [Run Autorun.exe].
Installation Manual
− 12 −
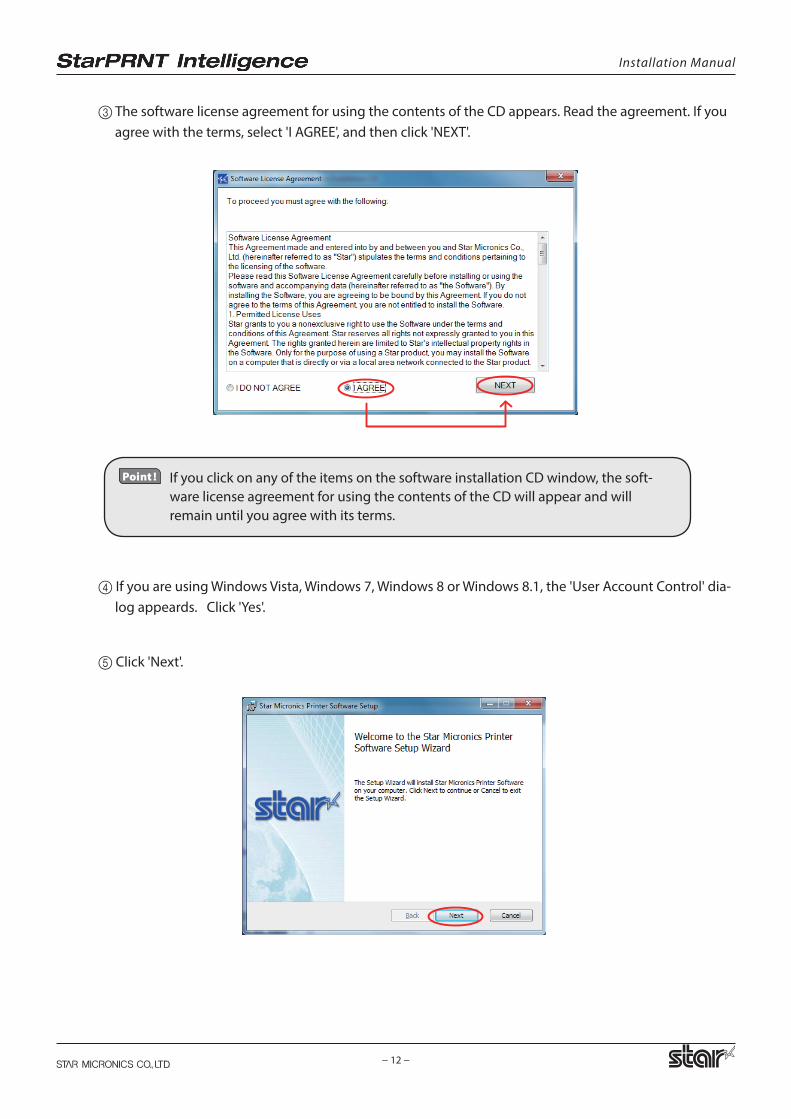
4 If you are using Windows Vista, Windows 7, Windows 8 or Windows 8.1, the 'User Account Control' dia-log appeards. Click 'Yes'.
5 Click 'Next'.
3 The software license agreement for using the contents of the CD appears. Read the agreement. If you agree with the terms, select 'I AGREE', and then click 'NEXT'.
If you click on any of the items on the software installation CD window, the soft-ware license agreement for using the contents of the CD will appear and will remain until you agree with its terms.
Installation Manual
− 13 −
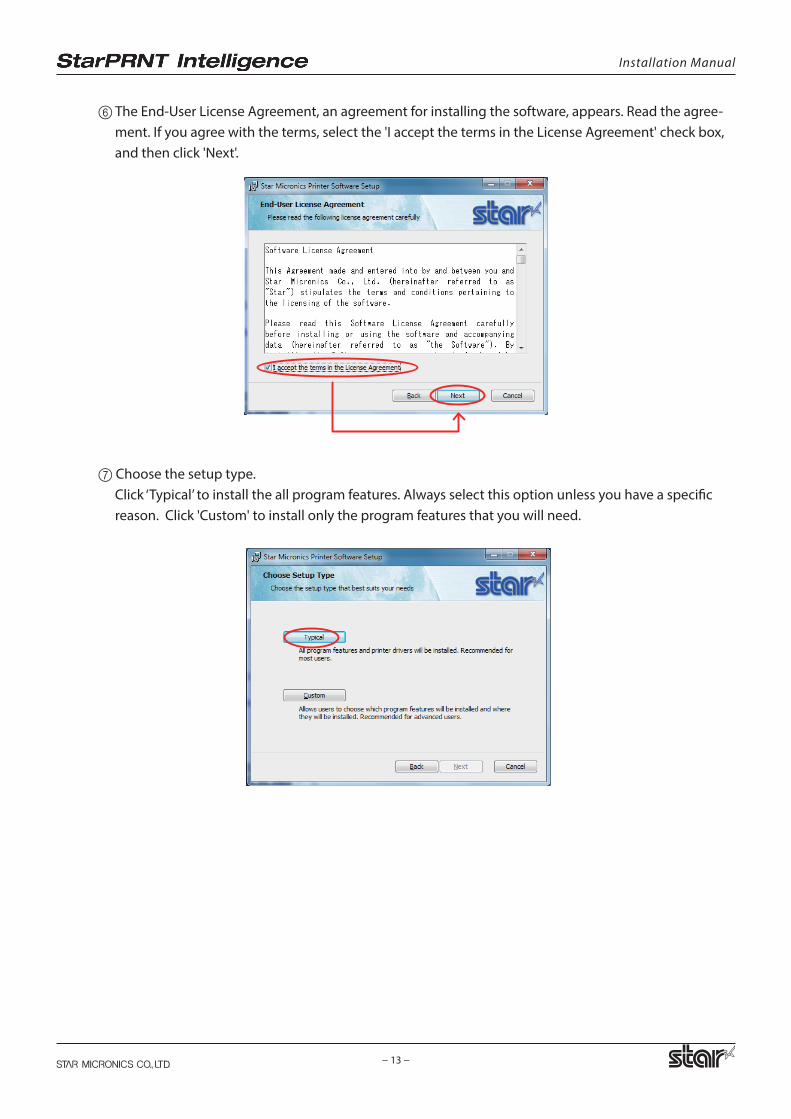
6 The End-User License Agreement, an agreement for installing the software, appears. Read the agree-ment. If you agree with the terms, select the 'I accept the terms in the License Agreement' check box, and then click 'Next'.
7 Choose the setup type. Click ‘Typical’ to install the all program features. Always select this option unless you have a specific reason. Click 'Custom' to install only the program features that you will need.
Installation Manual
− 14 −
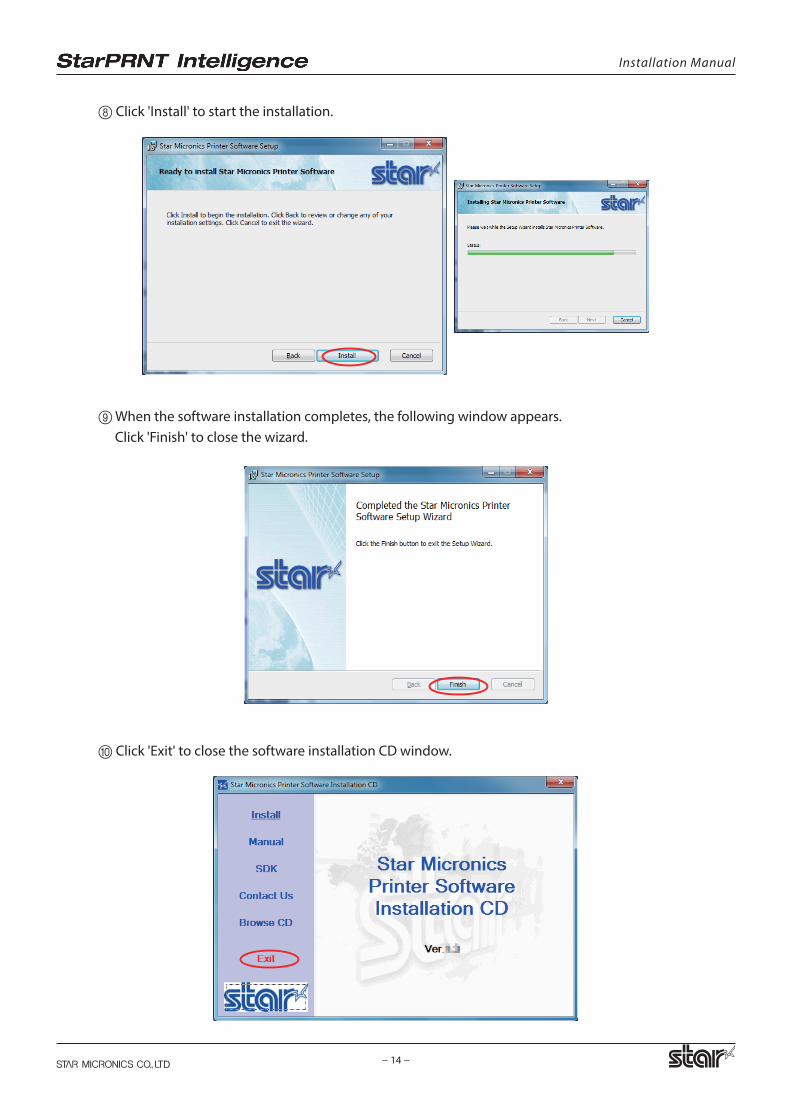
8 Click 'Install' to start the installation.
9 When the software installation completes, the following window appears. Click 'Finish' to close the wizard.
0 Click 'Exit' to close the software installation CD window.
Installation Manual
− 15 −
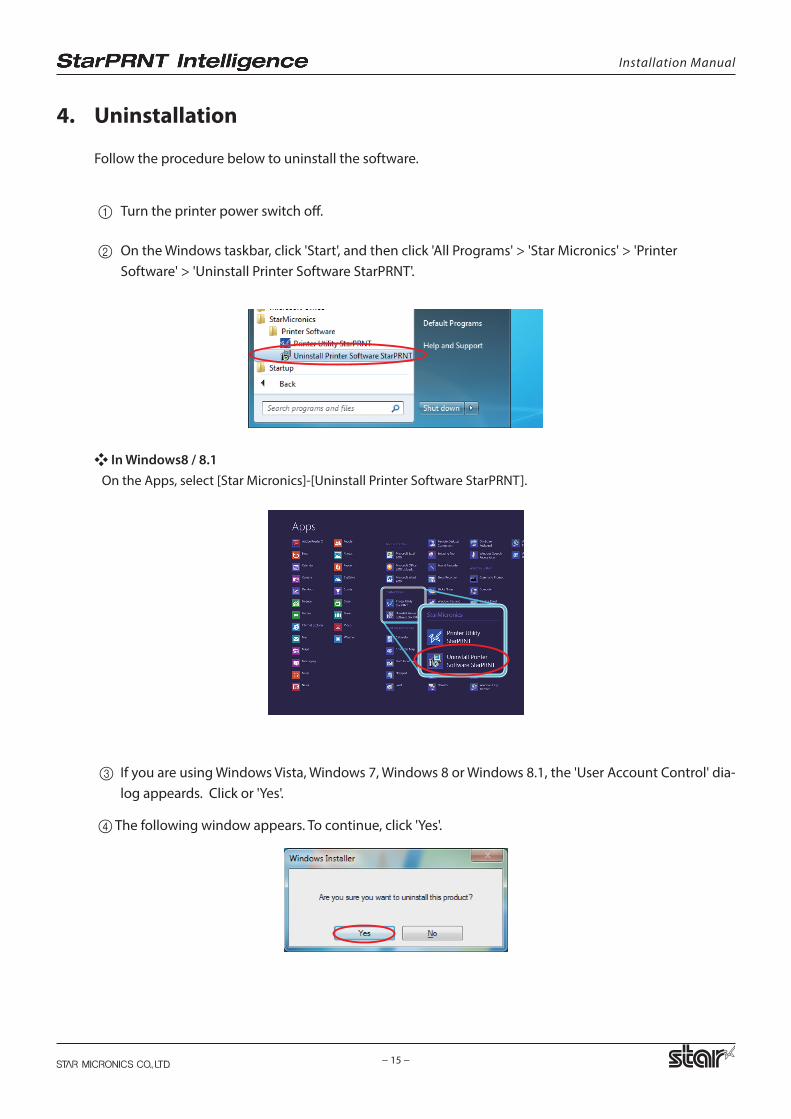
3 If you are using Windows Vista, Windows 7, Windows 8 or Windows 8.1, the 'User Account Control' dia-log appeards. Click or 'Yes'.
4 The following window appears. To continue, click 'Yes'.
4. Uninstallation
Follow the procedure below to uninstall the software.
1Turn the printer power switch off.
2On the Windows taskbar, click 'Start', and then click 'All Programs' > 'Star Micronics' > 'Printer Software' > 'Uninstall Printer Software StarPRNT'.
❖ In Windows8 / 8.1On the Apps, select [Star Micronics]-[Uninstall Printer Software StarPRNT].
Installation Manual
− 16 −
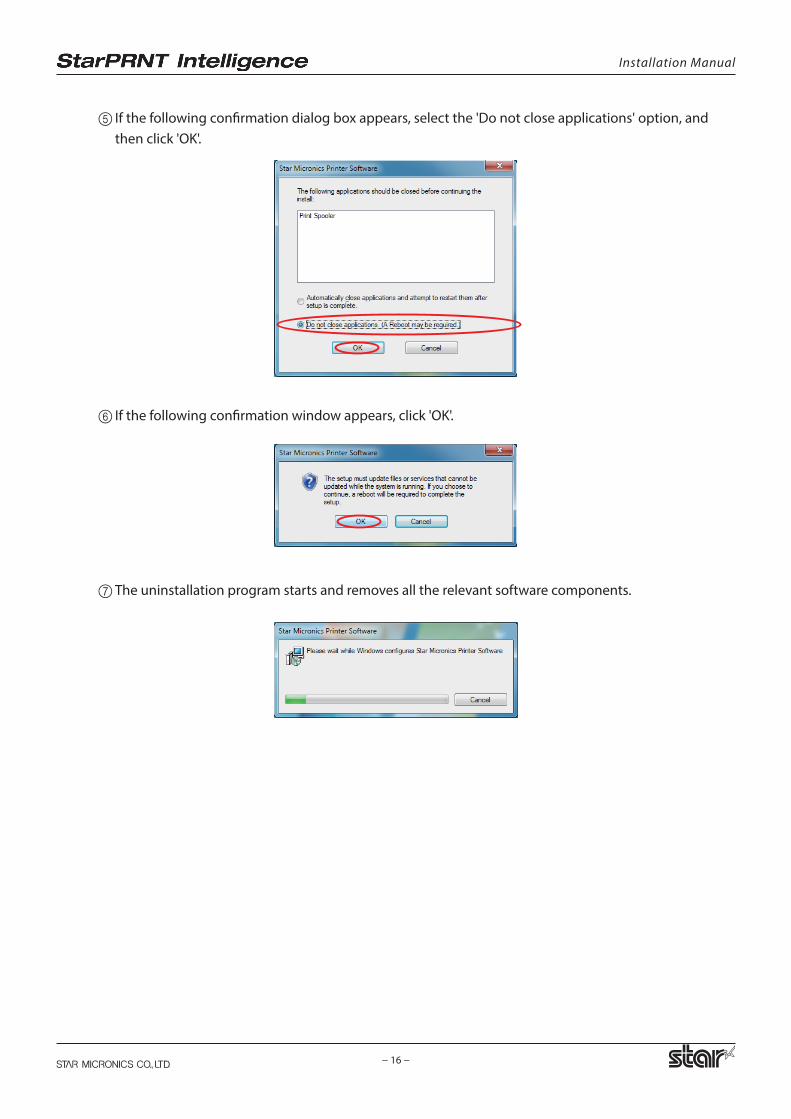
5 If the following confirmation dialog box appears, select the 'Do not close applications' option, and then click 'OK'.
6 If the following confirmation window appears, click 'OK'.
7 The uninstallation program starts and removes all the relevant software components.
Installation Manual
− 17 −
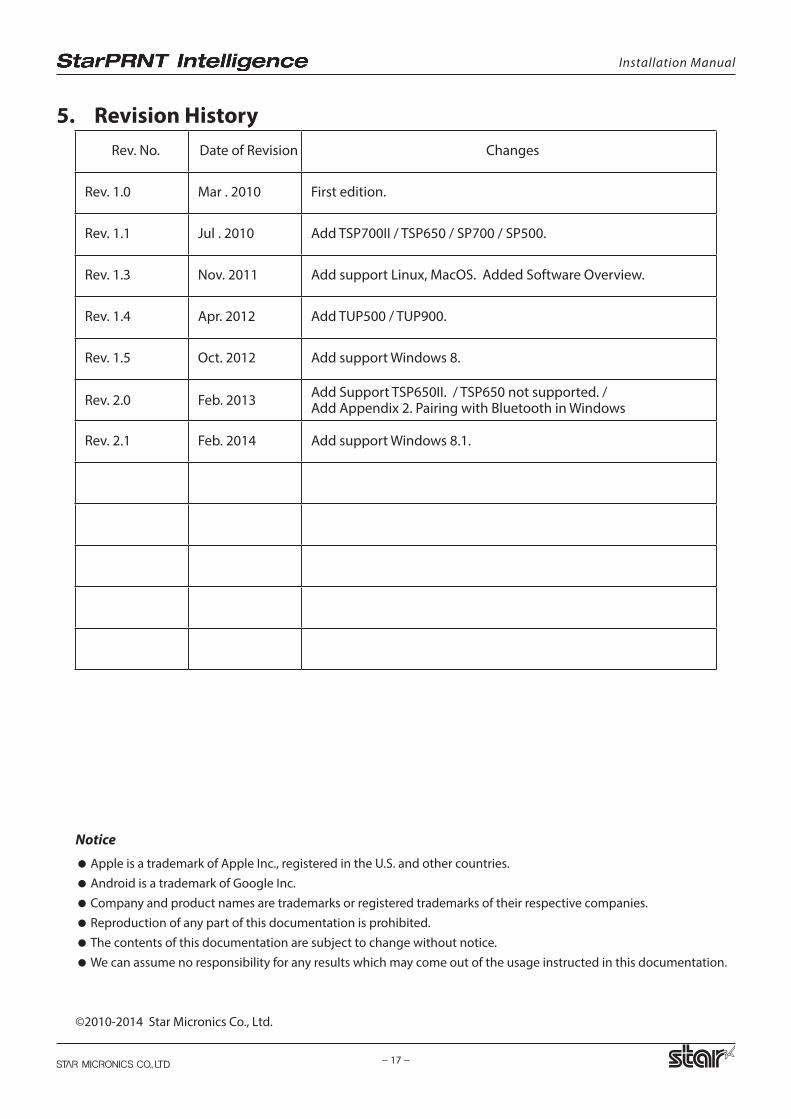
5. Revision HistoryRev. No. Date of Revision Changes
Rev. 1.0 Mar . 2010 First edition.
Rev. 1.1 Jul . 2010 Add TSP700II / TSP650 / SP700 / SP500.
Rev. 1.3 Nov. 2011 Add support Linux, MacOS. Added Software Overview.
Rev. 1.4 Apr. 2012 Add TUP500 / TUP900.
Rev. 1.5 Oct. 2012 Add support Windows 8.
Rev. 2.0 Feb. 2013 Add Support TSP650II. / TSP650 not supported. / Add Appendix 2. Pairing with Bluetooth in Windows
Rev. 2.1 Feb. 2014 Add support Windows 8.1.
Notice
Apple is a trademark of Apple Inc., registered in the U.S. and other countries. Android is a trademark of Google Inc. Company and product names are trademarks or registered trademarks of their respective companies. Reproduction of any part of this documentation is prohibited. The contents of this documentation are subject to change without notice. We can assume no responsibility for any results which may come out of the usage instructed in this documentation.
©2010-2014 Star Micronics Co., Ltd.
Installation Manual
− 18 −
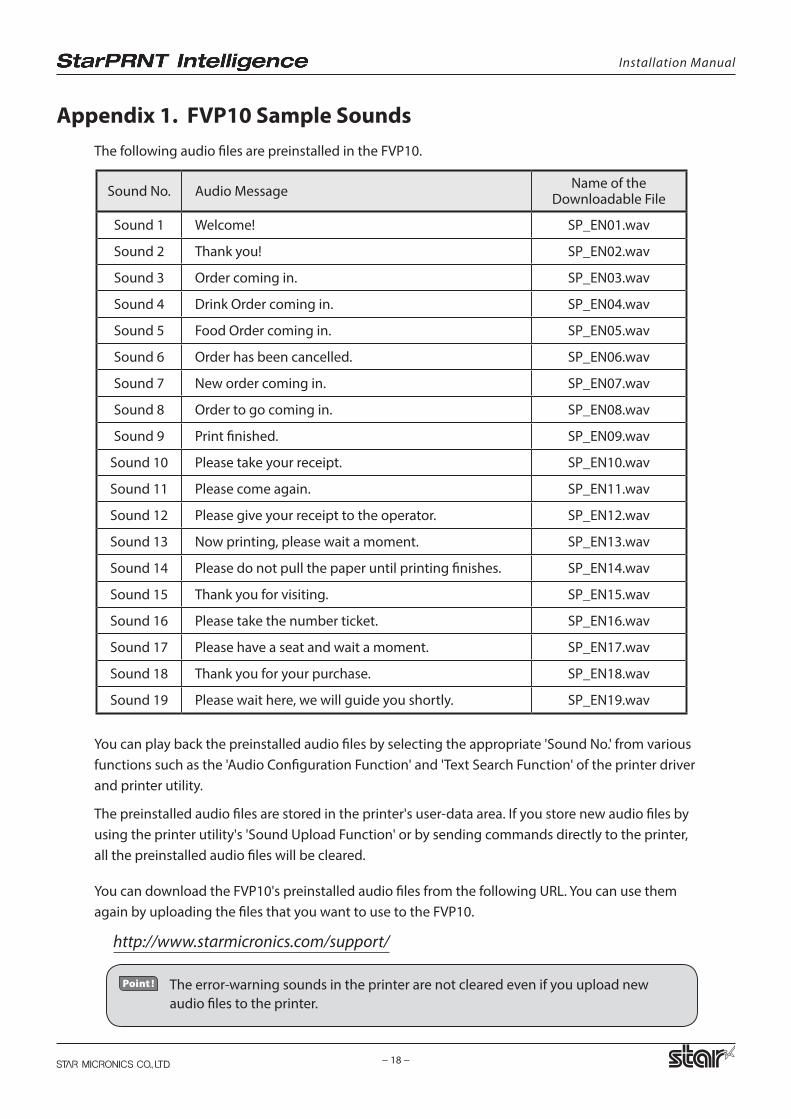
Appendix 1. FVP10 Sample SoundsThe following audio files are preinstalled in the FVP10.
Sound No. Audio Message Name of the Downloadable File
Sound 1 Welcome! SP_EN01.wav
Sound 2 Thank you! SP_EN02.wav
Sound 3 Order coming in. SP_EN03.wav
Sound 4 Drink Order coming in. SP_EN04.wav
Sound 5 Food Order coming in. SP_EN05.wav
Sound 6 Order has been cancelled. SP_EN06.wav
Sound 7 New order coming in. SP_EN07.wav
Sound 8 Order to go coming in. SP_EN08.wav
Sound 9 Print finished. SP_EN09.wav
Sound 10 Please take your receipt. SP_EN10.wav
Sound 11 Please come again. SP_EN11.wav
Sound 12 Please give your receipt to the operator. SP_EN12.wav
Sound 13 Now printing, please wait a moment. SP_EN13.wav
Sound 14 Please do not pull the paper until printing finishes. SP_EN14.wav
Sound 15 Thank you for visiting. SP_EN15.wav
Sound 16 Please take the number ticket. SP_EN16.wav
Sound 17 Please have a seat and wait a moment. SP_EN17.wav
Sound 18 Thank you for your purchase. SP_EN18.wav
Sound 19 Please wait here, we will guide you shortly. SP_EN19.wav
You can play back the preinstalled audio files by selecting the appropriate 'Sound No.' from various functions such as the 'Audio Configuration Function' and 'Text Search Function' of the printer driver and printer utility.
The preinstalled audio files are stored in the printer's user-data area. If you store new audio files by using the printer utility's 'Sound Upload Function' or by sending commands directly to the printer, all the preinstalled audio files will be cleared.
You can download the FVP10's preinstalled audio files from the following URL. You can use them again by uploading the files that you want to use to the FVP10.
http://www.starmicronics.com/support/
The error-warning sounds in the printer are not cleared even if you upload new audio files to the printer.
Installation Manual
− 19 −
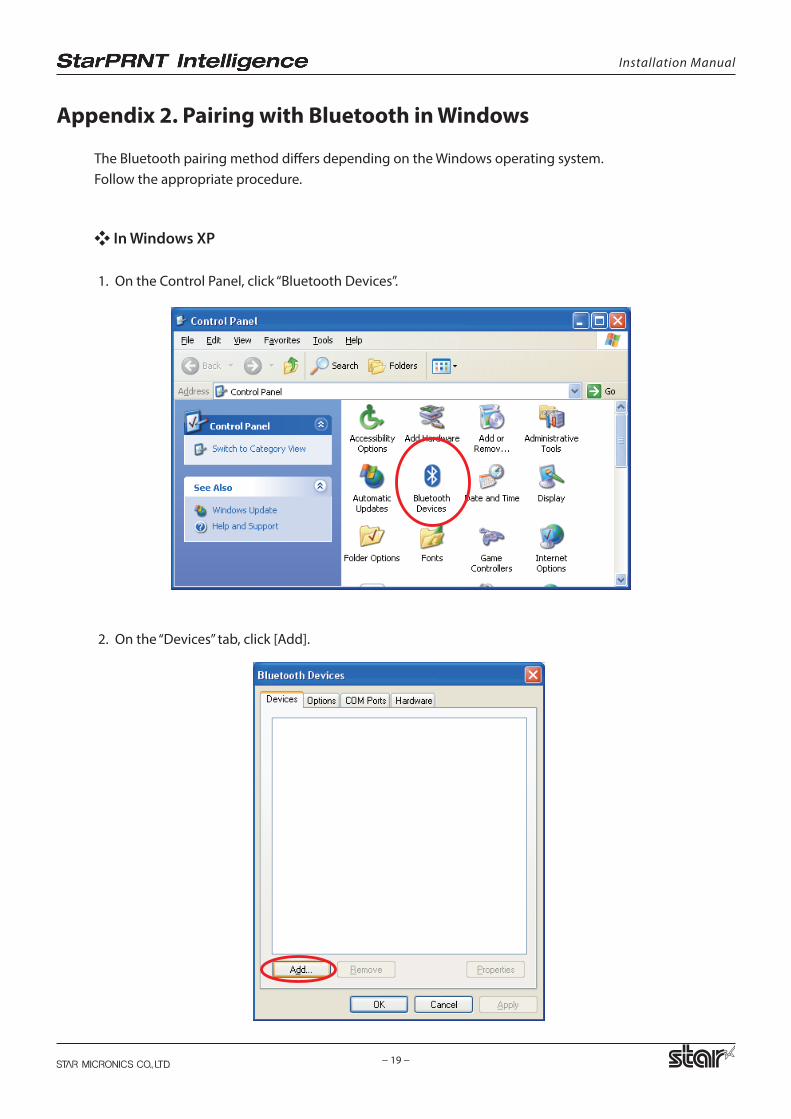
Appendix 2. Pairing with Bluetooth in Windows
The Bluetooth pairing method differs depending on the Windows operating system.Follow the appropriate procedure.
❖ In Windows XP
1. On the Control Panel, click “Bluetooth Devices”.
2. On the “Devices” tab, click [Add].
Installation Manual
− 20 −
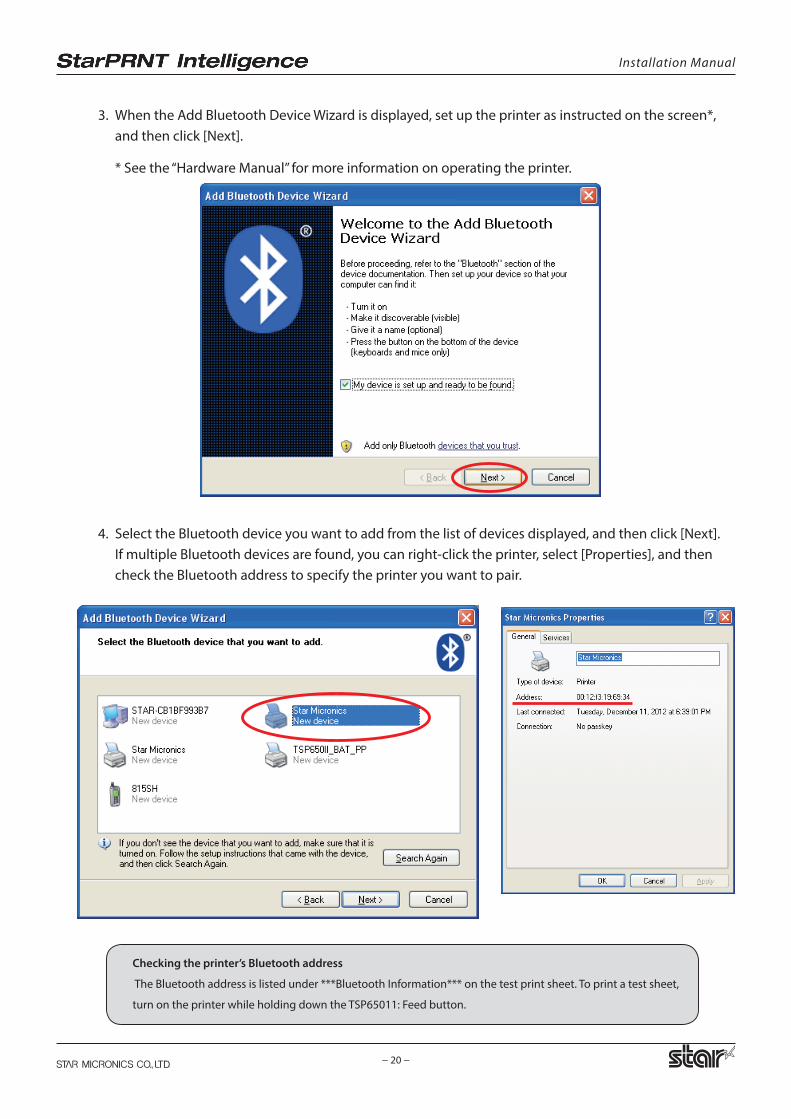
3. When the Add Bluetooth Device Wizard is displayed, set up the printer as instructed on the screen*, and then click [Next].
* See the “Hardware Manual” for more information on operating the printer.
4. Select the Bluetooth device you want to add from the list of devices displayed, and then click [Next]. If multiple Bluetooth devices are found, you can right-click the printer, select [Properties], and then check the Bluetooth address to specify the printer you want to pair.
Checking the printer’s Bluetooth address
The Bluetooth address is listed under ***Bluetooth Information*** on the test print sheet. To print a test sheet,
turn on the printer while holding down the TSP65011: Feed button.
Installation Manual
− 21 −
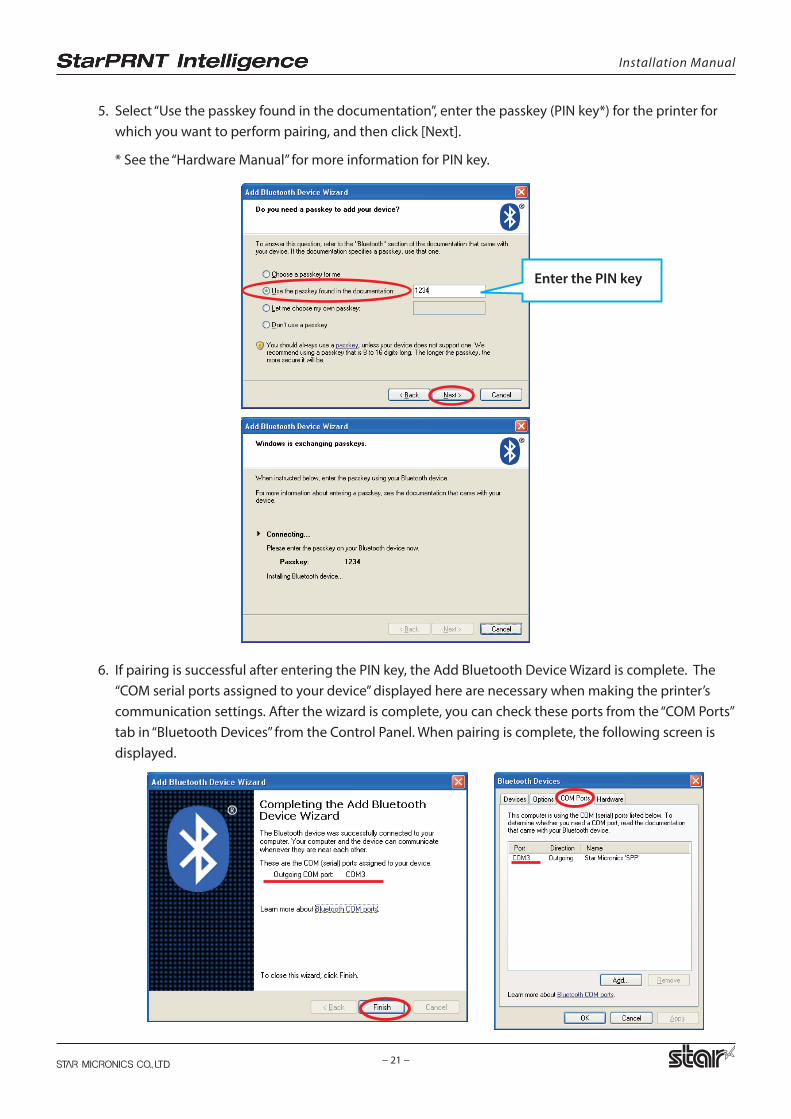
5. Select “Use the passkey found in the documentation”, enter the passkey (PIN key*) for the printer for which you want to perform pairing, and then click [Next].
* See the “Hardware Manual” for more information for PIN key.
6. If pairing is successful after entering the PIN key, the Add Bluetooth Device Wizard is complete. The “COM serial ports assigned to your device” displayed here are necessary when making the printer’s communication settings. After the wizard is complete, you can check these ports from the “COM Ports” tab in “Bluetooth Devices” from the Control Panel. When pairing is complete, the following screen is displayed.
Enter the PIN key
Installation Manual
− 22 −
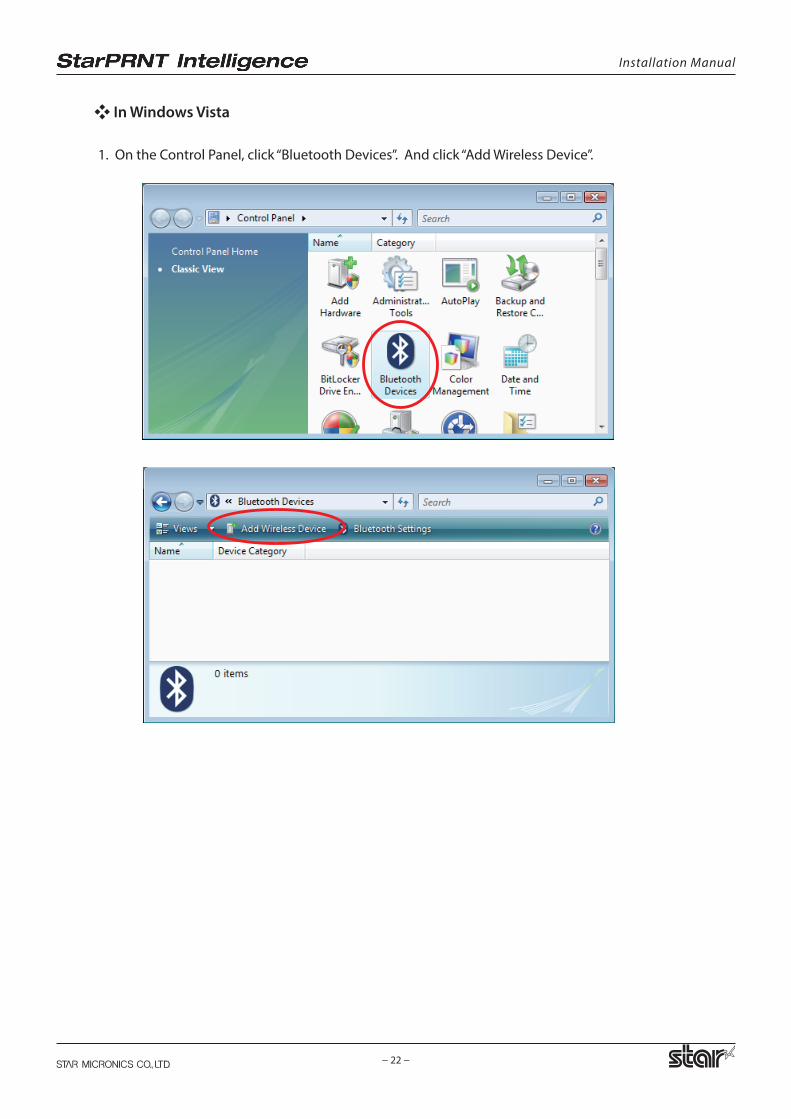
❖ In Windows Vista
1. On the Control Panel, click “Bluetooth Devices”. And click “Add Wireless Device”.
Installation Manual
− 23 −
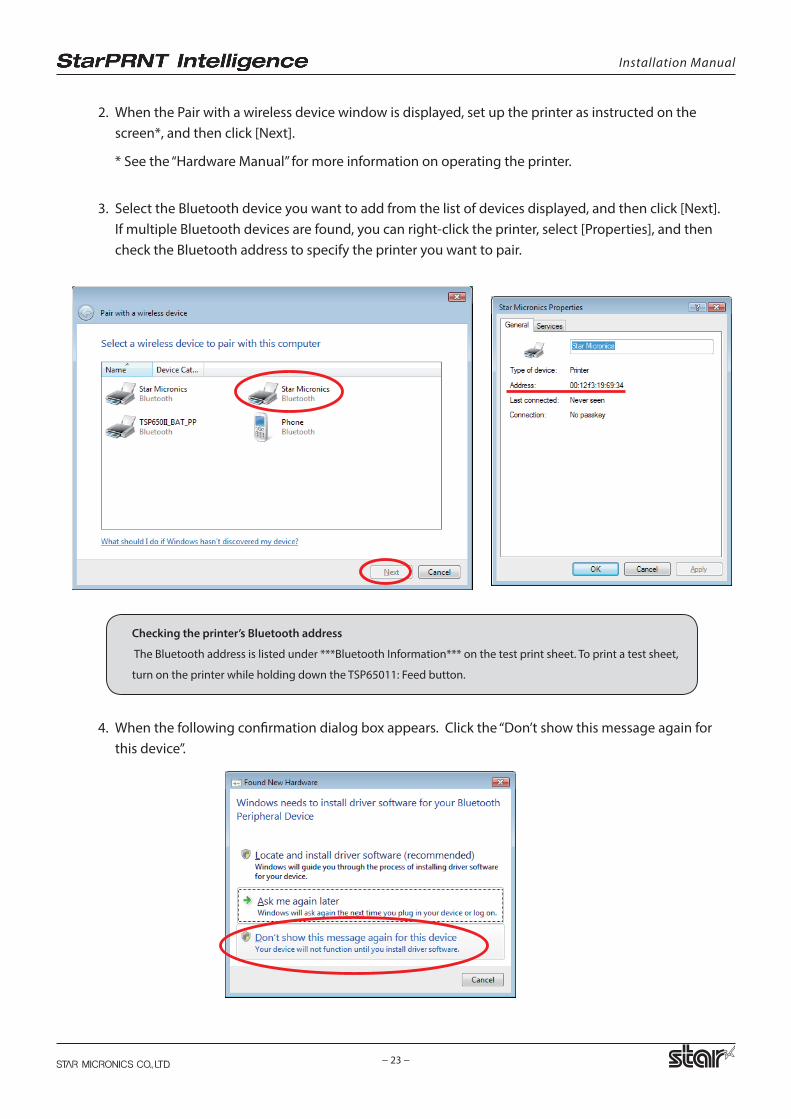
2. When the Pair with a wireless device window is displayed, set up the printer as instructed on the screen*, and then click [Next].
* See the “Hardware Manual” for more information on operating the printer.
3. Select the Bluetooth device you want to add from the list of devices displayed, and then click [Next]. If multiple Bluetooth devices are found, you can right-click the printer, select [Properties], and then check the Bluetooth address to specify the printer you want to pair.
Checking the printer’s Bluetooth address
The Bluetooth address is listed under ***Bluetooth Information*** on the test print sheet. To print a test sheet,
turn on the printer while holding down the TSP65011: Feed button.
4. When the following confirmation dialog box appears. Click the “Don’t show this message again for this device”.
Installation Manual
− 24 −
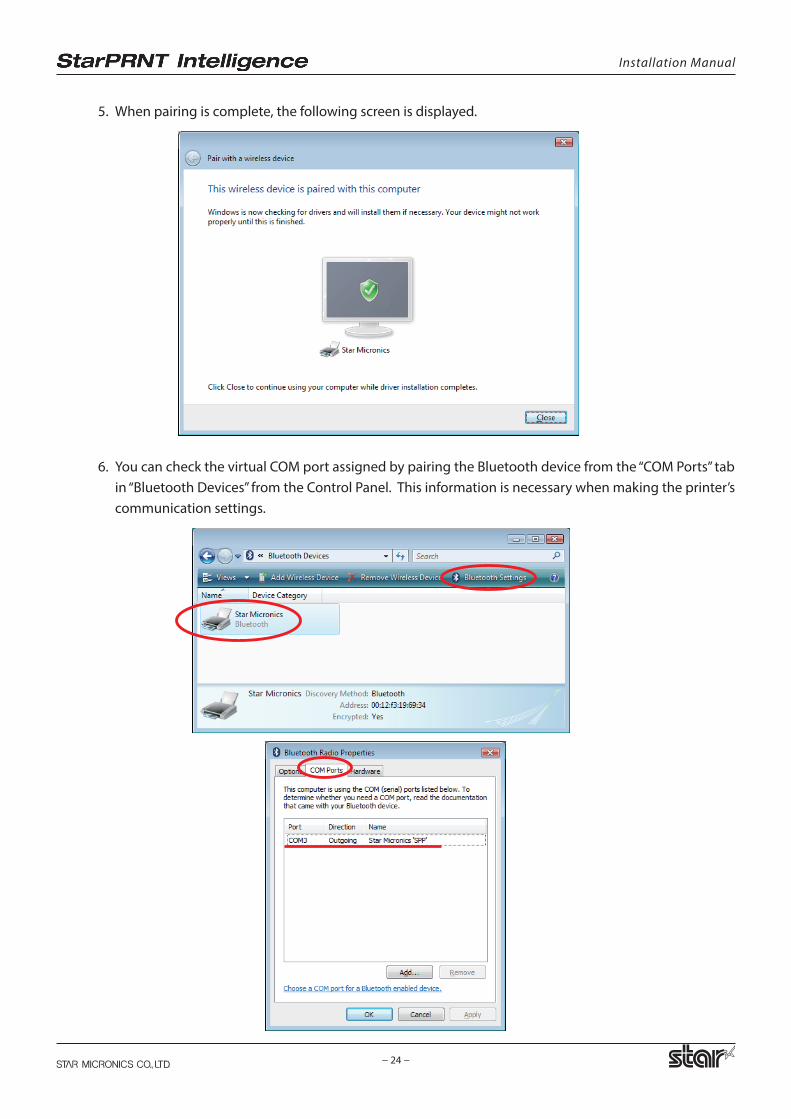
5. When pairing is complete, the following screen is displayed.
6. You can check the virtual COM port assigned by pairing the Bluetooth device from the “COM Ports” tab in “Bluetooth Devices” from the Control Panel. This information is necessary when making the printer’s communication settings.
Installation Manual
− 25 −
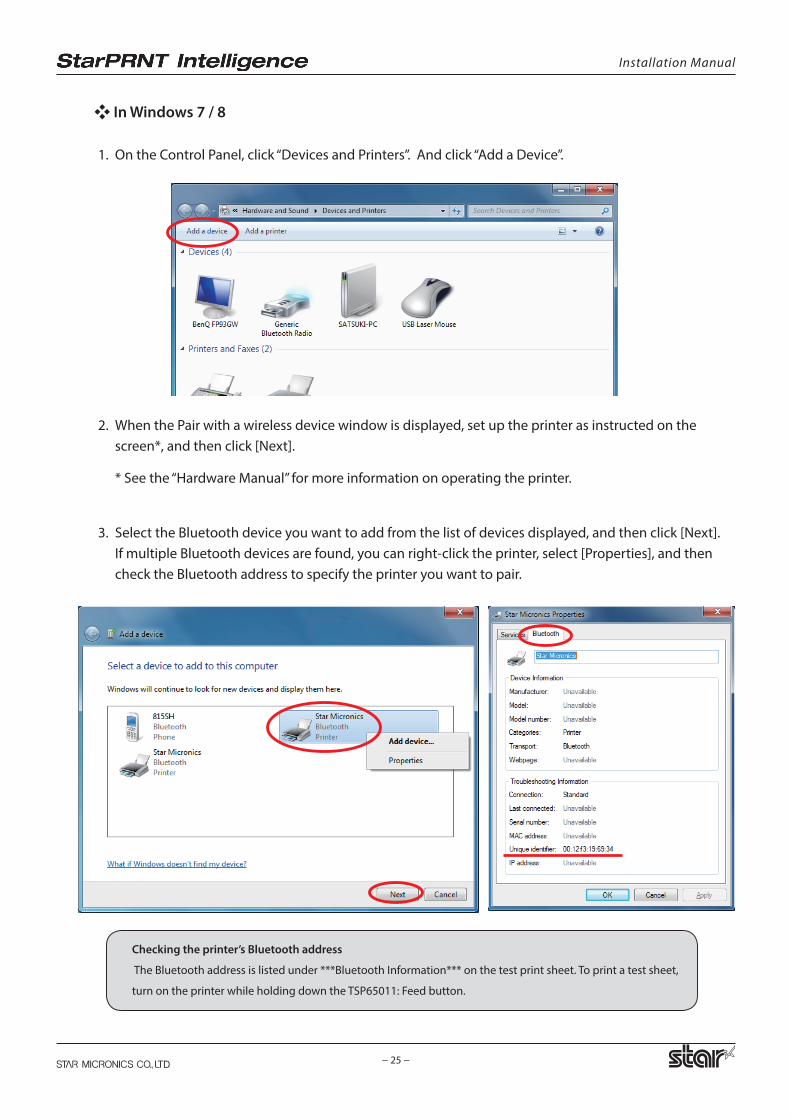
❖ In Windows 7 / 8
1. On the Control Panel, click “Devices and Printers”. And click “Add a Device”.
2. When the Pair with a wireless device window is displayed, set up the printer as instructed on the screen*, and then click [Next].
* See the “Hardware Manual” for more information on operating the printer.
3. Select the Bluetooth device you want to add from the list of devices displayed, and then click [Next]. If multiple Bluetooth devices are found, you can right-click the printer, select [Properties], and then check the Bluetooth address to specify the printer you want to pair.
Checking the printer’s Bluetooth address
The Bluetooth address is listed under ***Bluetooth Information*** on the test print sheet. To print a test sheet,
turn on the printer while holding down the TSP65011: Feed button.
Installation Manual
− 26 −
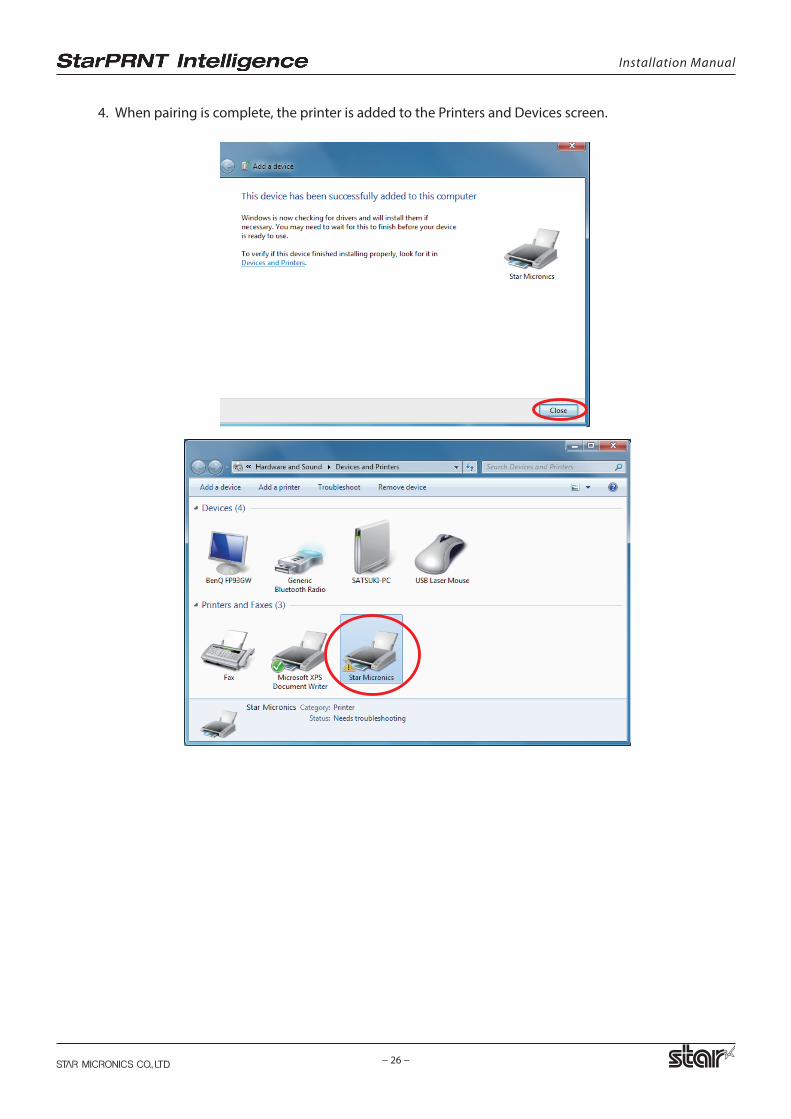
4. When pairing is complete, the printer is added to the Printers and Devices screen.
Installation Manual
− 27 −
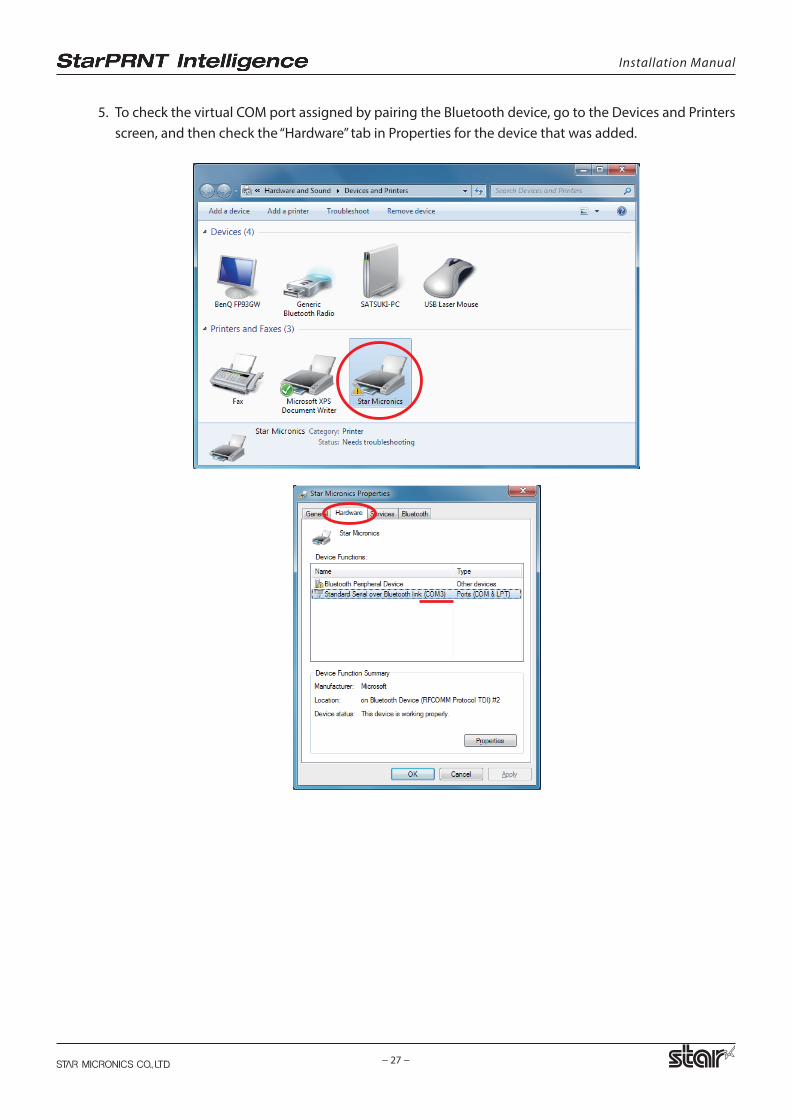
5. To check the virtual COM port assigned by pairing the Bluetooth device, go to the Devices and Printers screen, and then check the “Hardware” tab in Properties for the device that was added.
Installation Manual
− 28 −
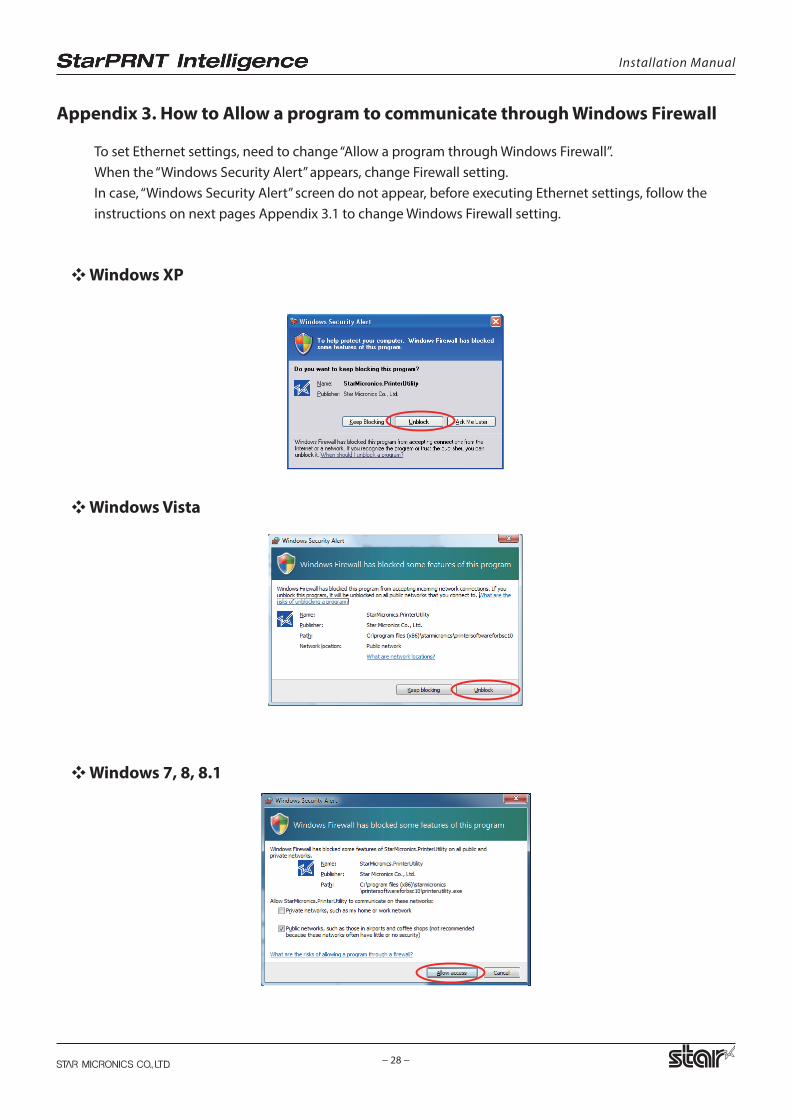
Appendix 3. How to Allow a program to communicate through Windows Firewall
To set Ethernet settings, need to change “Allow a program through Windows Firewall”.When the “Windows Security Alert” appears, change Firewall setting.In case, “Windows Security Alert” screen do not appear, before executing Ethernet settings, follow the instructions on next pages Appendix 3.1 to change Windows Firewall setting.
❖Windows Vista
❖Windows XP
❖Windows 7, 8, 8.1
Installation Manual
− 29 −
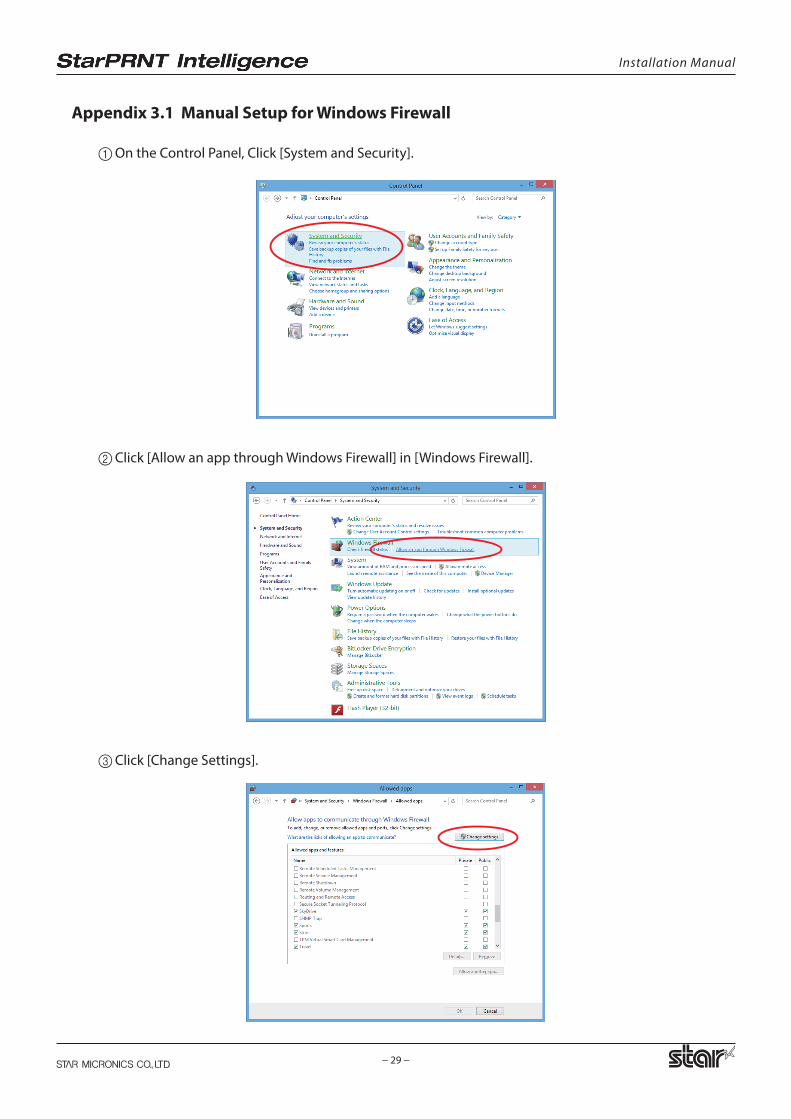
Appendix 3.1 Manual Setup for Windows Firewall
1 On the Control Panel, Click [System and Security].
2 Click [Allow an app through Windows Firewall] in [Windows Firewall].
3 Click [Change Settings].
Installation Manual
− 30 −
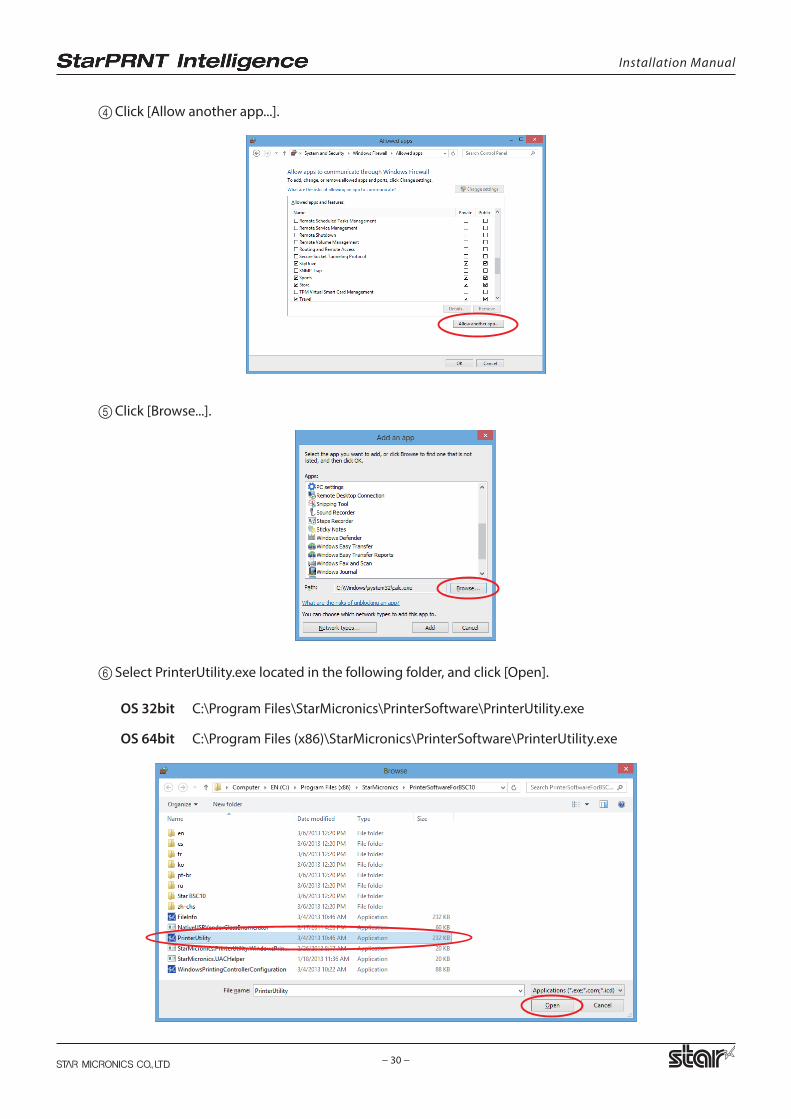
4 Click [Allow another app...].
5 Click [Browse...].
6 Select PrinterUtility.exe located in the following folder, and click [Open].
OS 32bit C:\Program Files\StarMicronics\PrinterSoftware\PrinterUtility.exe
OS 64bit C:\Program Files (x86)\StarMicronics\PrinterSoftware\PrinterUtility.exe
Installation Manual
− 31 −
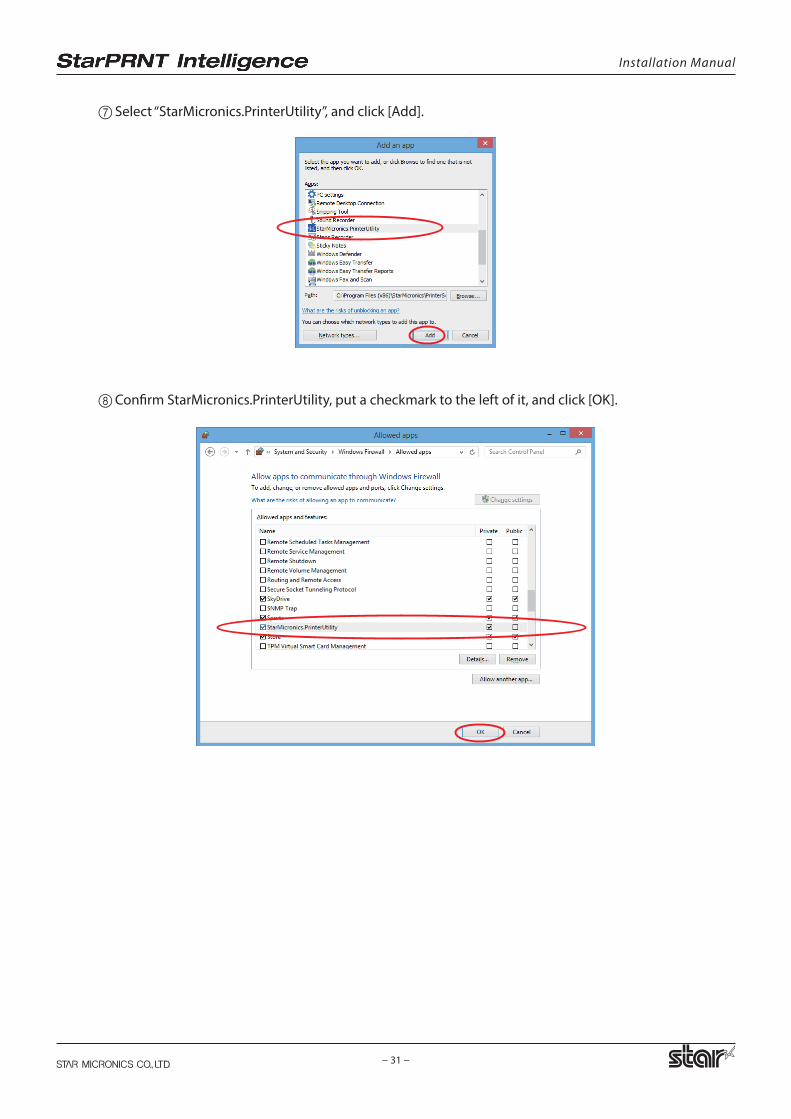
7 Select “StarMicronics.PrinterUtility”, and click [Add].
8 Confirm StarMicronics.PrinterUtility, put a checkmark to the left of it, and click [OK].

URL: http://www.starmicronics.com/support/