Embed Size (px)
Citation preview

soil pH meter
Contents page
Features 1
Bluelab Soil pH Meter 1
Information about measuring the pH of soils/media 2
Introduction 4
Preparing for use 4
Calibration 5
Measuring the pH value 7
Measuring soil solution pH value 7
Battery replacement 8
Cleaning and maintenance 8
Storing the Bluelab SoilpH Meter 9
Bluelab Soil pH Probereplacement 9
Error messages 10
Technical specifi cation 10
Troubleshooting guide 11
Limitation of liability 11
Product guarantee 12
Bluelab Probe Care Kits 13
Contact details 13
Care and use guide

Eng
lish
1
FeaturesMeasures 0.0 - 14.0 pH Simple push button pH calibrationSuccessful pH calibration indicators Replaceable Bluelab Soil pH ProbeLow battery indicator Over range and under range indicatorsCalibration instructions on the backof the Bluelab Soil pH Meter
Fully guaranteed for 5 years*6 months for the Bluelab Soil pH Probe
Lightweight and portable Large easy to read LCD displayAuto off Batteries included (2 x AAA)
Bluelab Soil pH Meter
Low battery indicator Successful pH
calibration indicators
pH unit
ATTENTIONIf it dries, it dies!
Keep your soil pH probe tip wet
at all times to avoid permanent damage
Soil pH probe connection
socket (BNC fi tting)
Display
Dibber / Auger
Power button
Bluelab SoilpH Probe
Calibrate button
Soil pH probe storage cap
The soil pH probe tip must not be allowed to dry out. Always place the storage cap back onto the soil pH probe after each use and ensure it contains either Bluelab pH Probe Storage Solution or fresh water.

Eng
lish
2
1.0 Information about measuring the pH of soils/media
pH is the measurement of the hydrogen ion concentration (H+) - acidity and its opposite, alkalinity. Neutral pH is 7.0 pH. Acidity measures below seven pH (7.0 pH) with alkalinity measuring above it (7.0 pH).
In soils or growing media, pH strongly infl uences the availability of nutrients and the presence of microorganisms and plants in the soil. Certain plants require a particular pH range to enable the required nutrients to be consistently available to the plant. If the solution is too acidic or too alkaline it can cause “lock up” – a situation which restricts certain elements essential for growth from being absorbed by the root structure. This in turn reduces plant health and performance. Defi ciencies in the required elements become apparent in plant growth and can lead to crop failure.
Low soil pH causes aluminium and manganese toxicity in plants and reduces the availability of soil phosphorus. High soil pH also reduces soil phosphorus availability and reduces micronutrients such as zinc and boron to plants.
The chart below shows how nutrient pH levels infl uence the uptake of certain elements.
Very acid(pH 5.0 to 5.8)
Moderately acid (pH 5.5 to 6.8)
Slightly acid (pH 6.0 to 6.8)
Very alkaline (pH 7.0 to 8.0)

Eng
lish
3
1.0 Information about measuring the pH of soils/media cont.
Taking pH measurements of soils with an electronic meter is indicative rather than absolute.
The following factors are outside the control of any soil pH meter, so to minimise their effect on the accuracy of the pH measurement you should consider the following precautions:
Moisture level/raw waterIf the sample you are wishing to measure is dry, add distilled water to moisten. If you add tap water, you may infl uence the soil pH reading based on the pH of the raw water.
Calibration of the soil pH meter and cleanliness of the soil pH probe tipCalibrating the soil pH meter at least monthly will ensure accurate readings. Cleaning the soil residue from the probe tip and storing the soil pH probe in a clean state will also help to provide reliable readings as well as prolonging the probes life.
Sample selectionFor fi eld testing, samples are taken approximately 20 cm / 8 in down into the substrate and from various areas, then an average of the readings is used. For container grown plants, it is recommended to check the pH level of the substrate prior to planting.
Factors affecting pH in the soil or media:
Soil typeSoils formed under high rainfall conditions (E.g. Eastern USA) are more acidic than those formed under dry conditions (E.g. Western USA).
Growth stage of the plantUptake and requirements of particular elements change as the plant progresses through it’s growing cycle. Recording pH level data to create a history is valuable.
Applications and types of fertilizersApplications and types of fertilizers can alter the pH level signifi cantly. The time at which you take the reading is important. Evaluate the brand of fertilizer to see if it is altering the pH in the wrong direction.
Applications of spraysAs sprays can soak into the soil/media a change to the pH level could result.
Soil/media temperatureHigh temperature soils may have a high concentration of CO2. The higher the concentration of Carbon dioxide pressure results in more carbonic acid which lowers pH.
pH range for soil cropsThe recommended pH range for soil crops is 6.2 - 7.2, but this is plant specifi c.
Eng
lish
4
2.0 Introduction
The Bluelab Soil pH Meter has two press buttons; ‘calibrate’ and power. The power button requires a short press; release in about one second. The ‘calibrate button requires a long press; hold for at least three seconds and release when the display starts fl ashing.
Turning the soil pH meter on and off
A short press of the power button will turn the soil pH meter on. The soil pH meter automatically turns off after approximately four minutes if no buttons are pressed. If the soil pH meter turns off before the reading is taken, short press the power button to turn the soil pH meter on again.
3.0 Preparing for use
The following tasks must be performed before the Bluelab Soil pH Meter is used for the fi rst time.
Hydrate soil pH probea) Remove the soil pH probe storage cap by
gripping the top of the cap and gently twisting the base one rotation clockwise to loosen slightly. Next slowly slide the cap off the soil pH probe. DO NOT completely remove the base of the cap from the top of the cap.
b) Soak the soil pH probe tip in fresh water for at least one hour. Soaking the soil pH probe tip for 24 hours will improve the soil pH probe’s activity and is recommended if the soil pH probe tip has been allowed to dry.
CAUTION: DO NOT use de-ionized or distilled water. When the soil pH probe is not in use, place a small amount of Bluelab pH Probe Storage Solution or fresh water into the storage cap. Then replace the cap and store in a secure place.
Insert batteries. See section 7.
Connect soil pH probeConnect the soil pH probe to the soil pH meter by lining up the lugs of the BNC fi ttings. Fasten securely by pushing the soil pH probe connector on and twisting one quarter turn.
Calibrate the pHCalibrate the soil pH meter by following the instructions in section 4 of this manual. This must be done before the pH Meter is used for the fi rst time.
1
1
2
3
4
Fresh water
Hydrating the Bluelab Soil pH Probe
Inserting Twisting Attached
Removing soil pH probe storage cap

Eng
lish
5
4.0 Calibration
pH calibration is required before fi rst use and then monthly to ensure readings are accurate.
For accurate pH readings the soil pH probe is cleaned and recalibrated when:
• The reading is different to what you were expecting.• The batteries have been removed or changed.• The soil pH probe is replaced with a new one or is disconnected from the soil pH
meter.• The pH calibration indicators have disappeared.
When calibrating the pH after fi rst use the soil pH probe needs to be cleaned. See soil pH probe cleaning in section 8. The soil pH probe does not need to be cleaned for initial calibration.
For best pH calibration
pH reading accuracy is dependant on the accuracy and age of the calibration solutions used, and use and cleanliness of the soil pH probe tip.• Ensure the soil pH probe has been cleaned and rinse the soil pH probe tip with clean
water between calibration solutions to reduce contamination of the pH solutions.• Only fresh uncontaminated solutions should be used.• Calibrate the pH at the same temperature as the solution to be measured.• ALWAYS calibrate the soil pH probe with pH 7.0 then pH 4.0 or pH 10.0.
The pH calibration involves cleaning the soil pH probe tip and then calibrating in TWO SOLUTIONS.
If a reading below pH 7.0 is expected, use pH 7.0 and pH 4.0 calibration solutions. If a reading above pH 7.0 is expected, use pH 7.0 and pH 10.0 calibration solutions.Follow the steps below for soil pH meter calibration.
Storage and use of calibration solutions
• Always place the lid back onto the bottle after use or evaporation will occur rendering the solution useless.
• Store in a cool place.• DO NOT measure directly into the bottle. Tip a small amount into a clean container
and discard after use.• Never add water to solutions.
pH reading accuracy is dependant on the accuracy and age of the calibrationsolutions used, and use and cleanliness of the soil pH probe tip.

Eng
lish
6
4.0 Calibration cont.To calibrate the pH
Clean soil pH probe tip.See section 8.
pH 7.0 calibrationa) Turn soil pH meter on. Rinse soil pH probe
tip in fresh water, shake off excess water and place in a pH 7.0 calibration solution. Wait for at least one minute or longer if required for reading to stablize to a constant value.
b) Long press the ‘calibrate’ button. When the display shows CAL release button.
pH 7 indicator is displayed indicating a successful pH 7 calibration.
The pH 4 indicator will now fl ash indicating pH 4.0 or pH 10.0 calibration is now required.
c) If Err appears during the calibration process see section 11.
d) The soil pH meter must be calibrated to two points. If after an hour the soil pH meter has not been calibrated with a second calibration point the calibration indicators disappear and the soil pH meter reverts to an uncalibrated state. Calibration is required.
pH 4.0 / 10.0 calibrationa) Rinse the soil pH probe tip in fresh water,
shake off excess water and place the soil pH probe tip in either pH 4.0 or pH 10.0 calibration solution.
b) Wait for at least one minute for reading to stabilize to a constant value.
c) Long press the ‘calibrate’ button. When the display shows CAL release button.
pH 7 / pH 4 is displayed
or pH 7 / pH 10 is displayed
d) The soil pH meter is now calibrated and ready for use.
e) After 30 days, the calibration indicators disappear to let you know calibration is required.
1
2
3
Successful pH 7 and pH 4 calibration
pH 7.0 calibration solution
Eng
lish
7
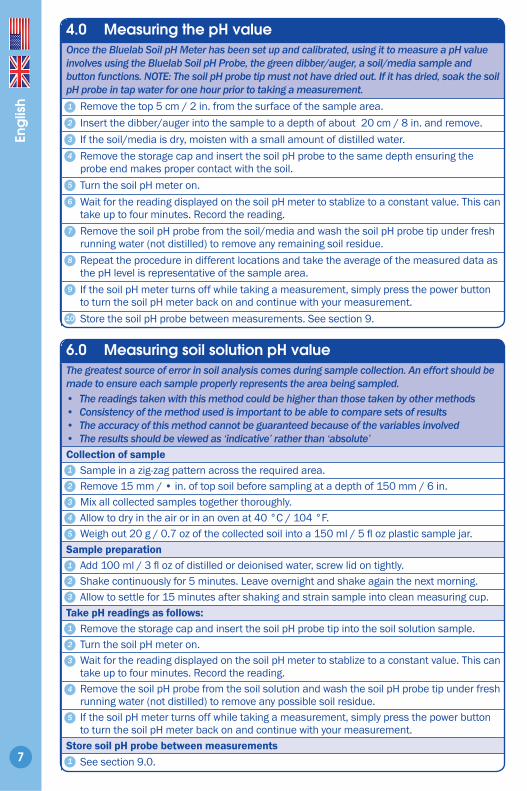
4.0 Measuring the pH valueOnce the Bluelab Soil pH Meter has been set up and calibrated, using it to measure a pH value involves using the Bluelab Soil pH Probe, the green dibber/auger, a soil/media sample and button functions. NOTE: The soil pH probe tip must not have dried out. If it has dried, soak the soil pH probe in tap water for one hour prior to taking a measurement.
Remove the top 5 cm / 2 in. from the surface of the sample area.
Insert the dibber/auger into the sample to a depth of about 20 cm / 8 in. and remove.
If the soil/media is dry, moisten with a small amount of distilled water.
Remove the storage cap and insert the soil pH probe to the same depth ensuring the probe end makes proper contact with the soil.
Turn the soil pH meter on.
Wait for the reading displayed on the soil pH meter to stablize to a constant value. This can take up to four minutes. Record the reading.
Remove the soil pH probe from the soil/media and wash the soil pH probe tip under fresh running water (not distilled) to remove any remaining soil residue.
Repeat the procedure in different locations and take the average of the measured data as the pH level is representative of the sample area.
If the soil pH meter turns off while taking a measurement, simply press the power button to turn the soil pH meter back on and continue with your measurement.
Store the soil pH probe between measurements. See section 9.
6.0 Measuring soil solution pH valueThe greatest source of error in soil analysis comes during sample collection. An effort should be made to ensure each sample properly represents the area being sampled.• The readings taken with this method could be higher than those taken by other methods • Consistency of the method used is important to be able to compare sets of results • The accuracy of this method cannot be guaranteed because of the variables involved • The results should be viewed as ‘indicative’ rather than ‘absolute’Collection of sample
Sample in a zig-zag pattern across the required area.Remove 15 mm / • in. of top soil before sampling at a depth of 150 mm / 6 in.Mix all collected samples together thoroughly.Allow to dry in the air or in an oven at 40 °C / 104 °F.Weigh out 20 g / 0.7 oz of the collected soil into a 150 ml / 5 fl oz plastic sample jar.
Sample preparationAdd 100 ml / 3 fl oz of distilled or deionised water, screw lid on tightly.Shake continuously for 5 minutes. Leave overnight and shake again the next morning.Allow to settle for 15 minutes after shaking and strain sample into clean measuring cup.
Take pH readings as follows:Remove the storage cap and insert the soil pH probe tip into the soil solution sample.Turn the soil pH meter on.Wait for the reading displayed on the soil pH meter to stablize to a constant value. This can take up to four minutes. Record the reading.Remove the soil pH probe from the soil solution and wash the soil pH probe tip under fresh running water (not distilled) to remove any possible soil residue.If the soil pH meter turns off while taking a measurement, simply press the power button to turn the soil pH meter back on and continue with your measurement.
Store soil pH probe between measurementsSee section 9.0.
1
2
3
4
1
11
1
1
5
2
2
2
6
7
8
9
10
3
3
3
4
4
5
5
Eng
lish
8
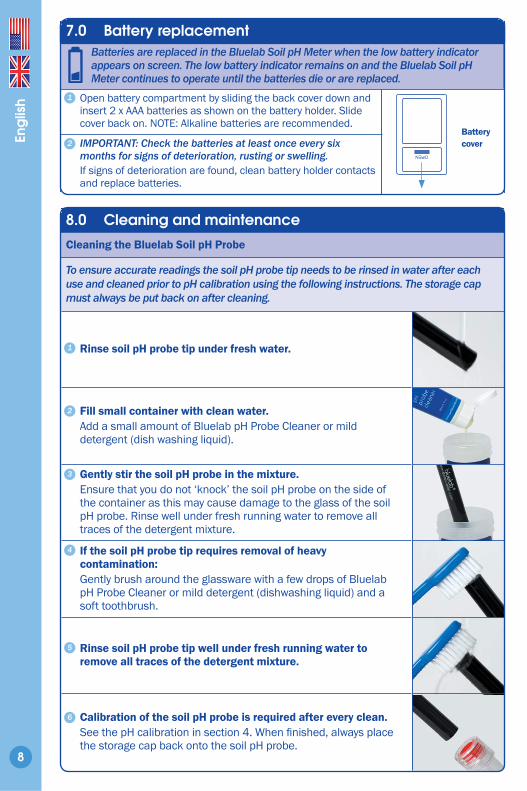
8.0 Cleaning and maintenance
Cleaning the Bluelab Soil pH Probe
To ensure accurate readings the soil pH probe tip needs to be rinsed in water after each use and cleaned prior to pH calibration using the following instructions. The storage cap must always be put back on after cleaning.
Rinse soil pH probe tip under fresh water.
Fill small container with clean water.Add a small amount of Bluelab pH Probe Cleaner or mild detergent (dish washing liquid).
Gently stir the soil pH probe in the mixture. Ensure that you do not ‘knock’ the soil pH probe on the side of the container as this may cause damage to the glass of the soil pH probe. Rinse well under fresh running water to remove all traces of the detergent mixture.
If the soil pH probe tip requires removal of heavy contamination:Gently brush around the glassware with a few drops of Bluelab pH Probe Cleaner or mild detergent (dishwashing liquid) and a soft toothbrush.
Rinse soil pH probe tip well under fresh running water to remove all traces of the detergent mixture.
Calibration of the soil pH probe is required after every clean. See the pH calibration in section 4. When fi nished, always place the storage cap back onto the soil pH probe.
1
3
2
4
5
6
7.0 Battery replacementBatteries are replaced in the Bluelab Soil pH Meter when the low battery indicator appears on screen. The low battery indicator remains on and the Bluelab Soil pH Meter continues to operate until the batteries die or are replaced.
Open battery compartment by sliding the back cover down and insert 2 x AAA batteries as shown on the battery holder. Slide cover back on. NOTE: Alkaline batteries are recommended.
IMPORTANT: Check the batteries at least once every six months for signs of deterioration, rusting or swelling. If signs of deterioration are found, clean battery holder contacts and replace batteries.
1
2Battery cover
Eng
lish
9
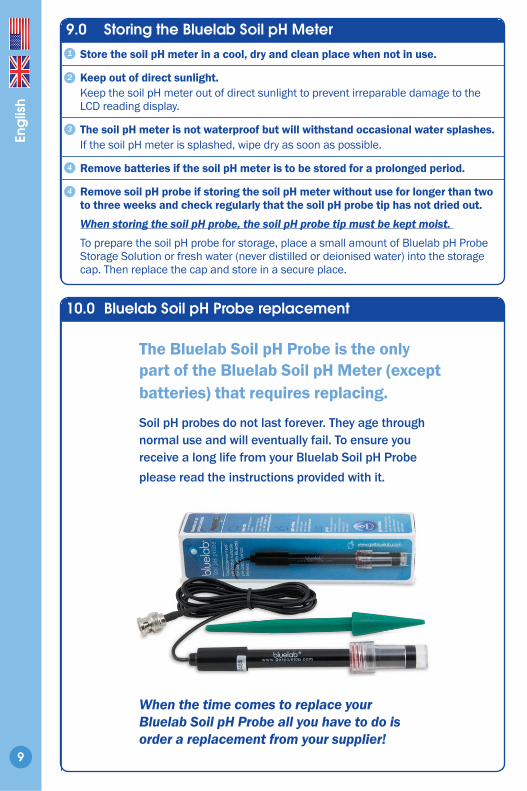
10.0 Bluelab Soil pH Probe replacement
9.0 Storing the Bluelab Soil pH Meter
Store the soil pH meter in a cool, dry and clean place when not in use.
Keep out of direct sunlight.Keep the soil pH meter out of direct sunlight to prevent irreparable damage to the LCD reading display.
The soil pH meter is not waterproof but will withstand occasional water splashes.If the soil pH meter is splashed, wipe dry as soon as possible.
Remove batteries if the soil pH meter is to be stored for a prolonged period.
Remove soil pH probe if storing the soil pH meter without use for longer than two to three weeks and check regularly that the soil pH probe tip has not dried out.
When storing the soil pH probe, the soil pH probe tip must be kept moist. To prepare the soil pH probe for storage, place a small amount of Bluelab pH Probe Storage Solution or fresh water (never distilled or deionised water) into the storage cap. Then replace the cap and store in a secure place.
1
2
3
4
4
When the time comes to replace your Bluelab Soil pH Probe all you have to do is order a replacement from your supplier!
The Bluelab Soil pH Probe is the only part of the Bluelab Soil pH Meter (except batteries) that requires replacing.
Soil pH probes do not last forever. They age through normal use and will eventually fail. To ensure you receive a long life from your Bluelab Soil pH Probe
please read the instructions provided with it.

Eng
lish
10
11.0 Error messages
An error message will only appear following pH calibration failure.‘Err’ will be displayed for a few seconds then the display will show the previous reading. Successful pH calibration indicators will disappear. The Bluelab Soil pH Meter is in an uncalibrated state, therefore recalibration is required. See causes of error messages below.
Possible causes for an ‘Err’ message:Calibration solutions contaminatedWrong solutions usedSoil pH probe contaminatedSoil pH probe not properly attachedSoil pH probe worn out or damagedCalibrate to pH 7.0 FIRST then to pH 4.0/10.0
12.0 Technical specifi cationspH
Measurement range 0.0 - 14.0 pH
Resolution 0.1 pH
Accuracy (at 25 °C/77 °F) ±0.1 pH
Calibration Two point pH 7.0 and pH 4.0 or pH 10.0
Temperature compensation Not applicable
Operating environment0 - 50 °C
32 - 122 °F
Power source 2 x AAA alkaline batteries
Other functions
Successful pH calibration indicatorLow battery indicator
Auto off functionOver range and under range indicators

Eng
lish
11
Limitation of Liability
Under no circumstances shall Bluelab Corporation Limited be liable for any claims, losses, costs and damages of any nature whatsoever (including any consequential loss) that result from the use of, or the inability to use, these instructions.
13.0 Troubleshooting guideTrouble Reason Correction
pH reading inaccurate
Contaminated soil pH probe. Clean soil pH probe (see section 8).
Incorrect pH calibration.
Ensure calibration solutions are accurate. Replace if in doubt.Wait longer for readings to stabilize before calibrating to a constant value.
pH calibration unreliable. Calibrate soil pH probe (see section 4).
Soil pH probe damaged or old. Replace soil pH probe.
pH reading does not change from solution to solution
Broken glass bulb, tube or connector.
Check soil pH probe for damage. Replace probe.
Displays low battery indicator
Insuffi cient power to take a reliable reading.
Replace the batteries. DO NOT use rechargeable batteries.
No display Batteries dead or inserted incorrectly.
Check batteries are inserted correctly. Replace if necessary.
Display shows ‘Err’ Problem with pH calibration.
See error message descriptions in section 11 of this document.
OrUrWhile in pH mode
Over range pH.Under range pH.
Solution > 14.0 pH.Solution < 0.0 pH.Check soil pH probe connection.soil pH probe could be faulty.soil pH meter could be wet inside.
Eng
lish
12
Bluelab Soil pH Meter product guarantee
Bluelab Corporation Limited guarantees this product for a period of 5 years (60 months) from the date of sale to the original purchaser. (This guarantee does not cover the Bluelab Soil pH Probe. The Bluelab Soil pH Probe is covered by a separate 6 month guarantee.)
The product will be repaired or replaced should it be found faulty due to component failure, or faulty workmanship. The faulty product should be returned to the point of purchase.
The guarantee is null and void should any internal parts or fi xed external parts be tampered with or altered in any way, or should the unit have been incorrectly operated, or in any way be maltreated. This guarantee does not cover reported faults which are shown to be caused by any or all of the following: Contaminated measuring tip (see instruction manual for cleaning instructions), fl at or damaged batteries or batteries that have been incorrectly inserted, or damaged battery contacts or connections caused by incorrect battery replacement, or ingress of moisture into the meter case.
NO RESPONSIBILITY will be accepted by Bluelab or any of its agents or resellers should any damage or unfavourable conditions result from the use of this product, should it be faulty or incorrectly operated.
Register your guarantee online at: www.getbluelab.comOr fi ll out the form below and post, email or fax to:
Bluelab Corporation Limited8 Whiore Avenue, Tauriko Industrial Park, Tauranga 3110, New ZealandFax: +64 7 578 0847 Email: [email protected]
Product details
Product name
Serial number
Date purchased
Purchaser details
Purchaser’s name
Address
City
Country
Email (optional)
Purchased from (Dealers details)
Purchased from
Address
City
Country
Phone number (optional)

Eng
lish
13
If you need assistance or advice - we’re here to help you.Phone: +64 7 578 0849 Fax: +64 7 578 0847Email: [email protected]
Looking for specifi cations or technical advice? Visit us online @ www.getbluelab.com
Bluelab Corporation Limited8 Whiore Avenue, Tauriko Industrial ParkTauranga 3110, New Zealand
Instruction Manual English Version 02: 00970/1112© Copyright 2011, all rights reserved, Bluelab Corporation Limited
› Cleaning instructions inside box lid
› 500ml 2.77EC conductivity standard solution
› Decanter vessel
› Bluelab Conductivity Probe Cleaner
› Bluelab Chamois (probe cleaning instrument)
Bluelab Probe Care Kit - Conductivity contents:
Bluelab Probe Care KitsThe instrument is only as accurate as the probe is clean!
Probe cleaning is one of the most important parts of owning and operating any Bluelab meter, monitor or controller. If the probe is contaminated (dirty) it aff ects the accuracy of the reading displayed.
The probe surface is where the instrument takes the reading of the solution. The information is sent back from the probe to the electronic brain of the instrument.
A calculation is then done in the instrument’s brain or micro computer and a reading is displayed. If the information sent back from the probe is inaccurate due to probe surface contamination then the reading will be inaccurate. Cleaning the probes is a very easy task and will prolong the life of the probes.
› Cleaning instructions inside box lid
› 500ml pH4 and pH7 Calibration solutions
› Decanter vessels
› Bluelab pH Probe Cleaner
› Toothbrush (probe cleaning instrument)
Bluelab Probe Care Kit - pH contents: