Embed Size (px)
Citation preview
2550 Garcia Avenue Mountain View, CA 94043 U.S.A.
Part No: 801-5278-10 Revision A, October 1993
Solaris 2.3 Basic Installation Guide
@ Please
Recycle
© 1993 Sun Microsystems, Inc. 2550 Garcia Avenue, Mountain View, California 94043-11 00 U.s.A.
All rights reserved. This product and related documentation are protected by copyright and distributed under licenses restricting its use, copying, distribution, and decompilation. No part of this product or related documentation may be reproduced in any form by any means without prior written authorization of Sun and its licensors, if any.
Portions of this product may be derived from the UNIX® and Berkeley 4.3 BSD systems,licensed from UNIX System Laboratories, Inc. and the University of California, respectively. Third-party font software in this product is protected by copyright and licensed from Sun's Font Suppliers.
RESTRICTED RIGHTS LEGEND: Use, duplication, or disclosure by the United States Government is subject to the restrictions setforthin DFARS252.227-7013 (c)(1)(ii) and FAR 52.227-19.
The product described in this manual may be protected by one or more U.S. patents, foreign patents, or pending applications.
TRADEMARKS Sun, Sun Microsystems, the Sun logo, SMCC, the SMCC logo, SunSoft, the SunSoft logo, Solaris, SunOS, OpenWindows, DeskSet, ONC, and NFS are trademarks or registered trademarks of Sun Microsystems, Inc. UNIX and OPEN LOOK are registered trademarks of UNIX System Laboratories, Inc. All other product names mentioned herein are the trademarks of their respective owners.
All SPARC trademarks, including the SCD Compliant Logo, are trademarks or registered trademarks of SPARC International, Inc. SPARCstation, SPARCserver, SPARCengine, SPARCworks, and SPARCompiler are licensed exclusively to Sun Microsystems, Inc. Products bearing SPARC trademarks are based upon an architecture developed by Sun Microsystems, Inc.
The OPEN LOOK® and Sun™ Graphical User Interfaces were developed by Sun Microsystems, Inc. for its users and licensees. Sun acknowledges the pioneering efforts of Xerox in researching and developing the concept of visual or graphical user interfaces for the computer industry. Sun holds a non-exclusive license from Xerox to the Xerox Graphical User Interface, which license also covers Sun's licensees who implement OPEN LOOK GUIs and otherwise comply with Sun's written license agreements.
X Window System is a trademark and product of the Massachusetts Institute of Technology.
THIS PUBLICATION IS PROVIDED "AS IS" WITHOUT WARRANTY OF ANY KIND, EITHER EXPRESS OR IMPLIED, INCLUDING, BUT NOT LIMITED TO, THE IMPLIED WARRANTIES OF MERCHANTABILITY, FITNESS FOR A PARTICULAR PURPOSE, OR NON-INFRINGEMENT.
THIS PUBLICATION COULD INCLUDE TECHNICAL INACCURACIES OR TYPOGRAPHICAL ERRORS. CHANGES ARE PERIODICALLY ADDED TO THE INFORMATION HEREIN; THESE CHANGES WILL BE INCORPORATED IN NEW EDITIONS OF THE PUBLICATION. SUN MICROSYSTEMS, INC. MAY MAKE IMPROVEMENTS AND lOR CHANGES IN THE PRODUCT(S) AND/OR THE PROGRAM(S) DESCRIBED IN THIS PUBLICATION AT ANY TIME.
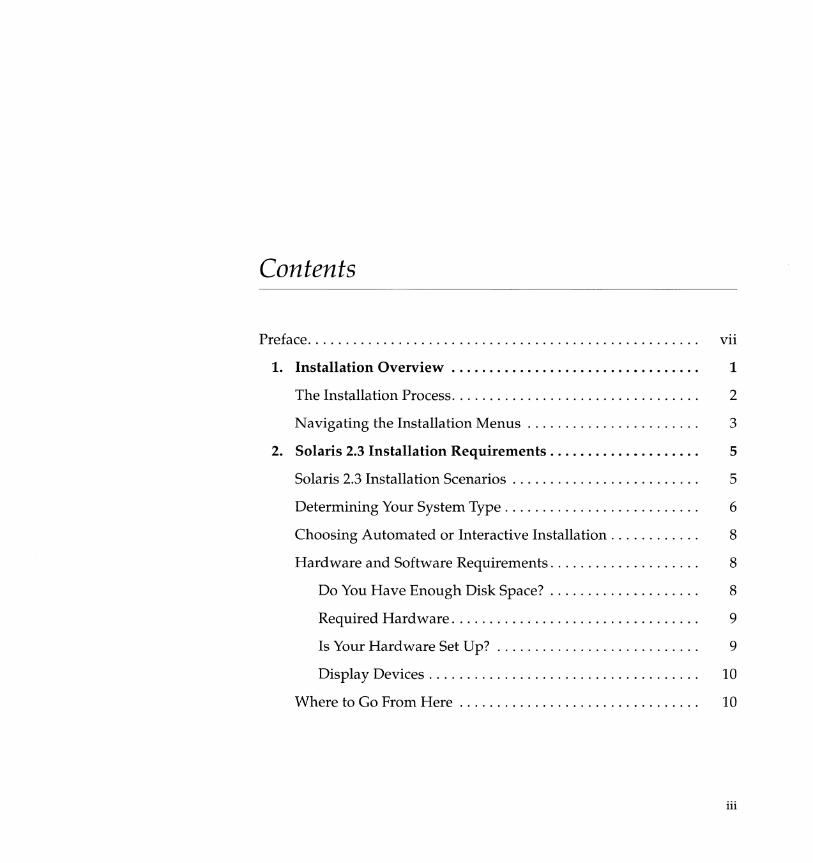
Contents
Preface. . . . . . . . . . . . . . . . . . . . . . . . . . . . . . . . . . . . . . . . . . . . . . . . . . . . vii
1. Installation Overview . . . . . . . . . . . . . . . . . . . . . . . . . . . . . . . . . 1
The Installation Process. . . . . . . . . . . . . . . . . . . . . . . . . . . . . . . . . 2
Navigating the Installation Menus. . . . . . . . . . . . . . . . . . . . . . . 3
2. Solaris 2.3 Installation Requirements. . . . . . . . . . . . . . . . . . . . 5
Solaris 2.3 Installation Scenarios . . . . . . . . . . . . . . . . . . . . . . . . . 5
Determining Your System Type. . . . . . . . . . . . . . . . . . . . . . . . . . 6
Choosing Automated or Interactive Installation. . . . . . . . . . . . 8
Hardware and Software Requirements. . . . . . . . . . . . . . . . . . . . 8
Do You Have Enough Disk Space? . . . . . . . . . . . . . . . . . . . . 8
Required Hardware. . . . .. . . . .. . .. . . . . . .. . . . .. . . . . . . . 9
Is Your Hardware Set Up? ............... . . . . . . . . . . . . 9
Display Devices. . . . . . . . . . . . . . . . . . . . . . . . . . . . . . . . . . . . 10
Where to Go From Here . . . . . . . . . . . . . . . . . . . . . . . . . . . . . . . . 10
iii
3. Gathering System Information. . . . . . . . . . . . . . . . . . . . . . . . . . 11
If Your System Will Not Be Connected to a Network.... . . . . . . 11
If Your System Will Be Connected to a Network... ....... 12
The System Installation Phase . . . . . . . . . . . . . . . . . . . . . . . . . . . 13
Using the Solaris 2.3 Installation Work Sheet. . . . . . . . . . . . . . . 13
4. Installing Solaris 2.3 on Preinstalled Systems .................................. 15
Booting Preinstalled Systems. . . . . . . . . . . . . . . . . . . . . . . . . . . . 15
Installing Non-Networked Preinstalled Systems. . . . . . . . . . . . 16
Installing Networked Preinstalled Systems. . . . . . . . . . . . . . . . 17
Creating a Root Password. . . . . . . . . . . . . . . . . . . . . . . . . . . . . . . 19
Starting the Open Windows Environment. . . . . . . . . . . . . . . . .. 20
5. Installing Solaris 2.3 on Non-Preinstalled Systems. . . . . . . . . . . . . . . . . . . . . . . . . . . . . . 21
Booting Non-Preinstalled Systems. . . . . . . . . . . . . . . . . . . . . . . 21
Installing Non-Networked Non-Preinstalled Systems. . . . . . . 23
Installing Networked Non-Preinstalled Systems. . . . . . . . . . . . 25
Creating a Root Password. . . . . . . . . . . . . . . . . . . . . . . . . . . . . . . 28
Starting the Open Windows Environment. . . . . . . . . . . . . . . . . . 29
6. Adding User AnswerBook and Other Software........... 31
User AnswerBook . . . . . . . . . . . . . . . . . . . . . . . . . . . . . . . . . . . . . 31
Using Volume Manager. .. . . . . . .. .. . . . . ... . ... . ... . . . . .. 31
Checking System Requirements. .. .. . .. . . ... . .. . . .. . . . ... 32
Checking Your Disk Space . . . . . . . . . . . . . . . . . . . . . . . . . . . . . . 32
Adding Software Using Software Manager. . . .. . . . .. . . .. . . 33
iv Sofaris 2.3 Basic Installation Guide-October 1993
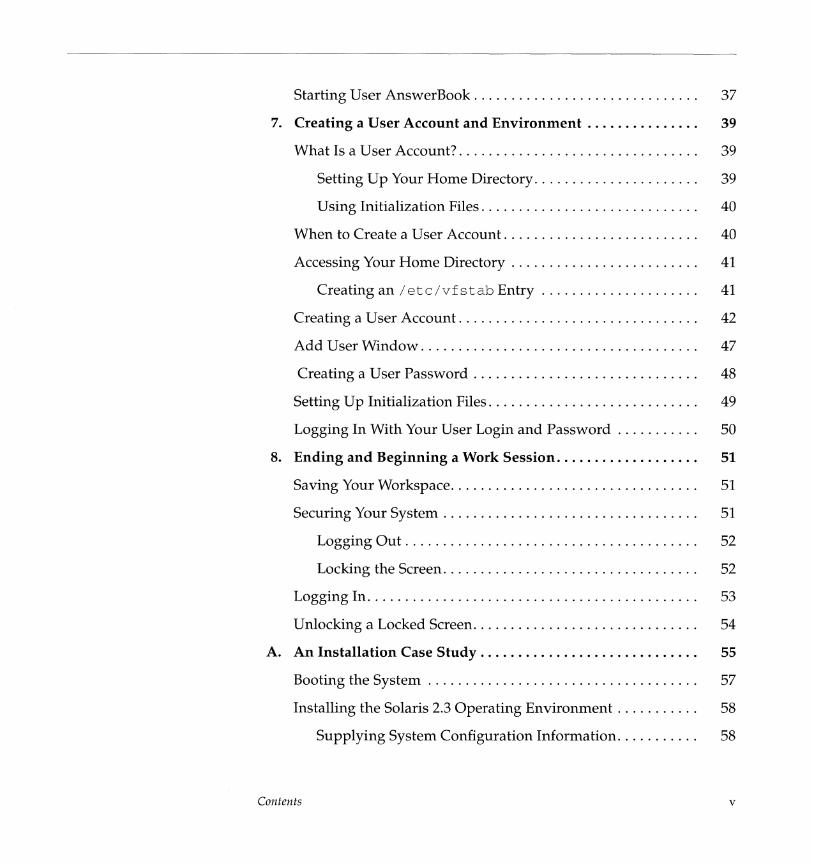
Starting User AnswerBook. . . . . . . . . . . . . . . . . . . . . . . . . . . . . . 37
7. Creating a User Account and Environment. . . . . . . . . . . . . . . 39
What Is a User Account? . . . . . . . . . . . . . . . . . . . . . . . . . . . . . . . 39
Setting Up Your Home Directory. . . . . . . . . . . . . . . . . . . . . . 39
Using Initialization Files. . . . . . . . . . . . . . . . . . . . . . . . . . . . . 40
When to Create a User Account. . . . . . . . . . . . . . . . . . . . . . . . . . 40
Accessing Your Home Directory. . . . . . . . . . . . . . . . . . . . . . . . . 41
Creating an / etc/vfstab Entry. . . . . . . . . . . . . . . . . . . . . 41
Creating a User Account. . . . . . . . . . . . . . . . . . . . . . . . . . . . . . . . 42
Add User Window. . . . . . . . . . . . . . . . . . . . . . . . . . . . . . . . . . . . . 47
Creating a User Password. . . . . . . . . . . . . . . . . . . . . . . . . . . . . . 48
Setting Up Initialization Files. . . . . . . . . . . . . . . . . . . . . . . . . . . . 49
Logging In With Your User Login and Password. . . . . . . . . . . 50
8. Ending and Beginning a Work Session. . . . . . . . . . . . . . . . . . . 51
Saving Your Workspace. . . . . . . . . . . . . . . . . . . . . . . . . . . . . . . . . 51
Securing Your System. . . . . . . . . . . . . . . . . . . . . . . . . . . . . . . . . . 51
LoggingOut....................................... 52
Locking the Screen. . . . . . . . . . . . . . . . . . . . . . . . . . . . . . . . . . 52
Logging In. . . . . . . . . . . . . . . . . . . . . . . . . . . . . . . . . . . . . . . . . . . . 53
Unlocking a Locked Screen. . . . . . . . . . . . . . . . . . . . . . . . . . . . . . 54
A. An Installation Case Study. . . . . . . . . . . . . . . . . . . . . . . . . . . . . 55
Booting the System . . . . . . . . . . . . . . . . . . . . . . . . . . . . . . . . . . . . 57
Installing the Solaris 2.3 Operating Environment. . . . . . . . . . . 58
Supplying System Configuration Information. . . . . . . . . . . 58
Contents v
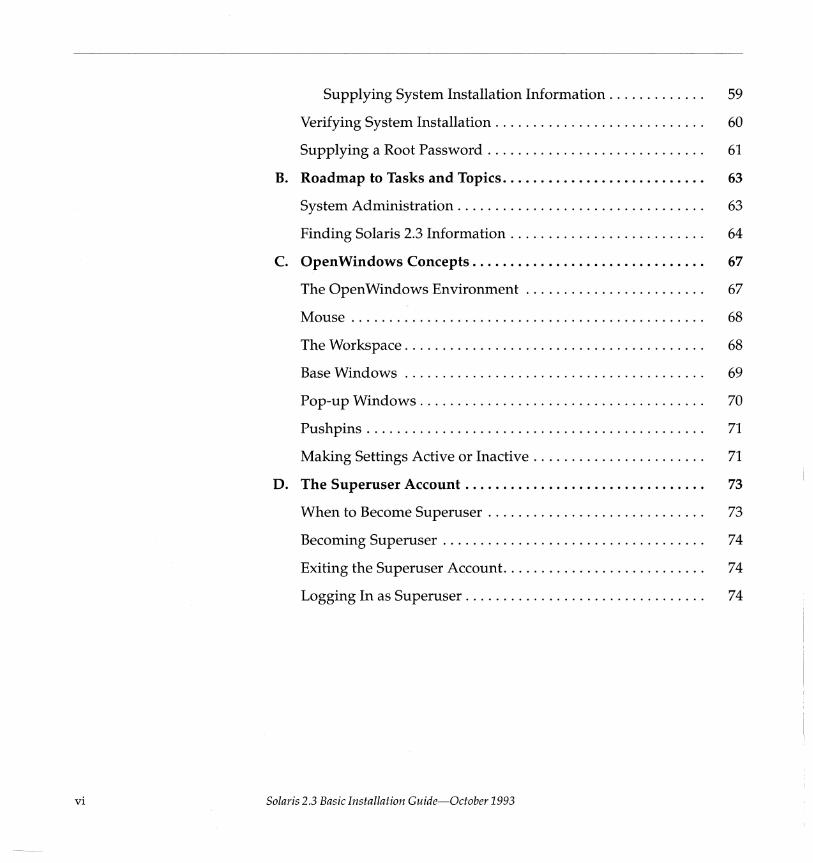
Supplying System Installation Information. . . . . . . . . . . . . 59
Verifying System Installation. . . . . . . . . . . . . . . . . . . . . . . . . . . . 60
Supplying a Root Password. . . . . . . . . . . . . . . . . . . . . . . . . . . . . 61
B. Roadmap to Tasks and Topics. . . . . . . . . . . . . . . . . . . . . . . . . . . 63
System Administration. . . . . . . . . . . . . . . . . . . . . . . . . . . . . . . . . 63
Finding Solaris 2.3 Information. . . . . . . . . . . . . . . . . . . . . . . . . . 64
C. Open Windows Concepts. . . . . . . . . . . . . . . . . . . . . . . . . . . . . . . 67
The Open Windows Environment . . . . . . . . . . . . . . . . . . . . . . . . 67
Mouse............................................... 68
The Workspace. . . . . . . . . . . . . . . . . . . . . . . . . . . . . . . . . . . . . . . . 68
Base Windows . . . . . . . . . . . . . . . . . . . . . . . . . . . . . . . . . . . . . . . . 69
Pop-up Windows. . . . . . . . . . . . . . . . . . . . . . . . . . . . . . . . . . . . . . 70
Push pins . . . . . . . . . . . . . . . . . . . . . . . . . . . . . . . . . . . . . . . . . . . . . 71
Making Settings Active or Inactive. . . . . . . . . . . . . . . . . . . . . . . 71
D. The Superuser Account. . . . . . . . . . . . . . . . . . . . . . . . . . . . . . . . 73
When to Become Superuser . . . . .. . . .. . . . . . . . . . .. . . . . . . . . 73
Becoming Superuser . . . . . . . . . . . . . . . . . . . . . . . . . . . . . . . . . . . 74
Exiting the Superuser Account. . . . . . . . . . . . . . . . . . . . . . . . . . . 74
Logging In as Superuser. . . . . . . . . . . . . . . . . . . . . . . . . . . . . . . . 74
vi Solaris 2.3 Basic Installation Guide-October 1993
About This Book
What You Should Know
Preface
This book provides instructions for end-users and novice administrators who want to install the Solaris® 2.3 operating environment on their standalone systems with local compact disc players.
A standalone system has a CPU and memory, approximately 200 megabytes of disk space, and usually a backup device. It mayor may not be connected to a network.
• A standalone system connected to a network is referred to as a networked standalone system.
• A standalone system not connected to a network is referred to as nonnetworked standalone system.
This book is intended for users who are familiar with basic computer terminology and concepts, and a hierarchical file system. To use this book, you should also be familiar with a three-button mouse, graphical user interfaces, and typing commands at a prompt.
vii
What Is the Solaris 2.3 Environment? The Solaris 2.3 environment consists of the following software:
• SunOS™ 5.3 operating system, based on UNIX@ System V Release 4 (SVR4)
• ONC+TM/NFS@ networking software
• OpenWindowsTM Version 3.3 window environment
• DeskSetTM applications implementing the OPEN LOOK® graphical user interface
Where to Find Information in This Book
Getting Help
viii
Chapter Numbers
Chapters 1-3
Chapters 4 and 5
Chapters 6-8
Appendix A
Appendices B-D
Description
Describe the types and phases of installation, hardware requirements, and gathering required information. A table at the end of Chapter 3 tells you which chapters apply to your particular installation scenario.
Describe installation of the Solaris 2.3 environment on different types of systems.
Describe post-installation procedures such as installing the User AnswerBook product and adding a user account.
Describes an installation case study to be used as an installation example.
Describe where to find more Solaris 2.3 information, how to use the Open Windows environment, and how to use the superuser account.
If you have problems installing or using the Solaris 2.3 environment, call your system vendor and supply the following information:
• Your system model and serial number
• Your system configuration information including the number of disks and type, the frame buffer for your display device, and the amount of main memory
Solaris 2.3 Basic Installation Guide-October 1993
• The version of the operating environment you are installing (in this case, Solaris 2.3)
• Information to help diagnose the problem, such as error messages, or the sequence of events that occurred before the problem
Which Installation Guide Should You Use? This book describes how to install the Solaris 2.3 operating environment on a standalone system only.
Users and administrators who want to install system configuration types such as servers and diskless or dataless clients should refer to the Solaris 2.3 System Configuration and Installation Guide.
Note - Users and administrators who want to upgrade their existing systems to the Solaris 2.3 operating environment should also refer to the Solaris 2.3 System Configuration and Installation Guide for instructions on using the upgrade installation method.
If you are installing Asian locales, refer to the Asian Installation and Configuration Guide.
The installation tasks covered in this book and the installation tasks covered in the more advanced Solaris 2.3 System Configuration and Installation Guide are summarized on the following pages.
ix
x
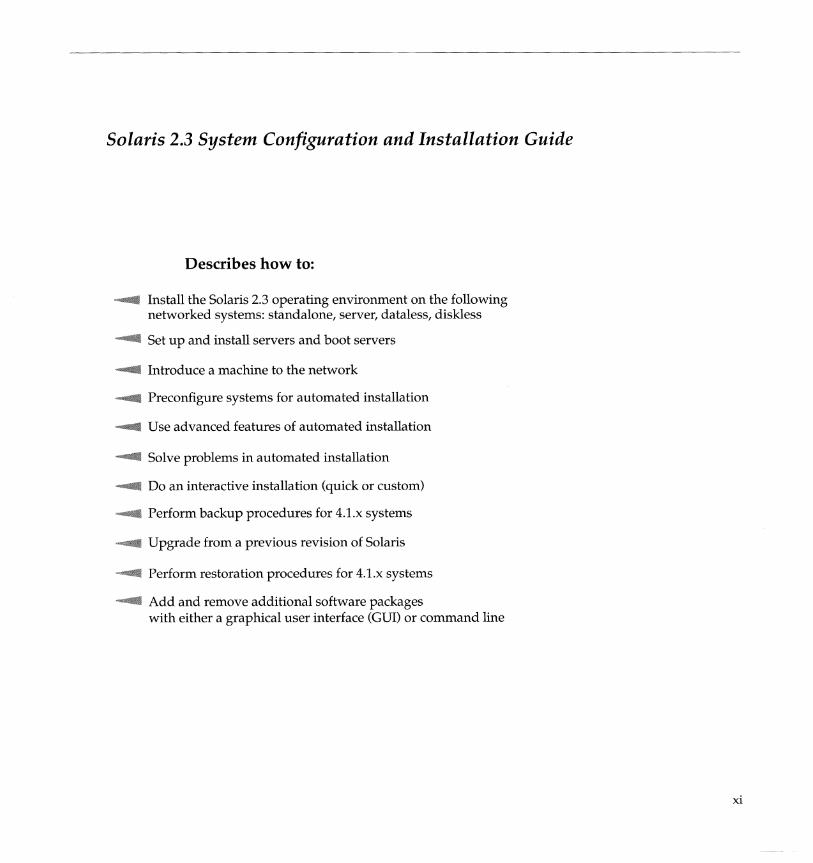
Solaris 2.3 Basic Installation Guide
Describes how to:
....... Install the Solaris 2.3 operating environment on networked and non-networked preinstalled standalone systems
....... Do a quick installation of the Solaris 2.3 operating environment on a non-preinstalled standalone system <networked or non-networked)
....... Set up the Open Windows environment
....... Add an additional software package with a graphical user interface (Gur)
....... Create a user account
Solaris 2.3 Basic Installation Guide-October 1993
Solaris 2.3 System Configuration and Installation Guide
Describes how to:
..... Install the Solaris 2.3 operating environment on the following networked systems: standalone, server, dataless, diskless
..... Set up and install servers and boot servers
..... Introduce a machine to the network
..... Preconfigure systems for automated installation
..... Use advanced features of automated installation
..... Solve problems in automated installation
..... Do an interactive installation (quick or custom)
..... Perform backup procedures for 4.1.x systems
..... Upgrade from a previous revision of Solaris
..... Perform restoration procedures for 4.1.x systems
..... Add and remove additional software packages with either a graphical user interface (GUI) or command line
xi
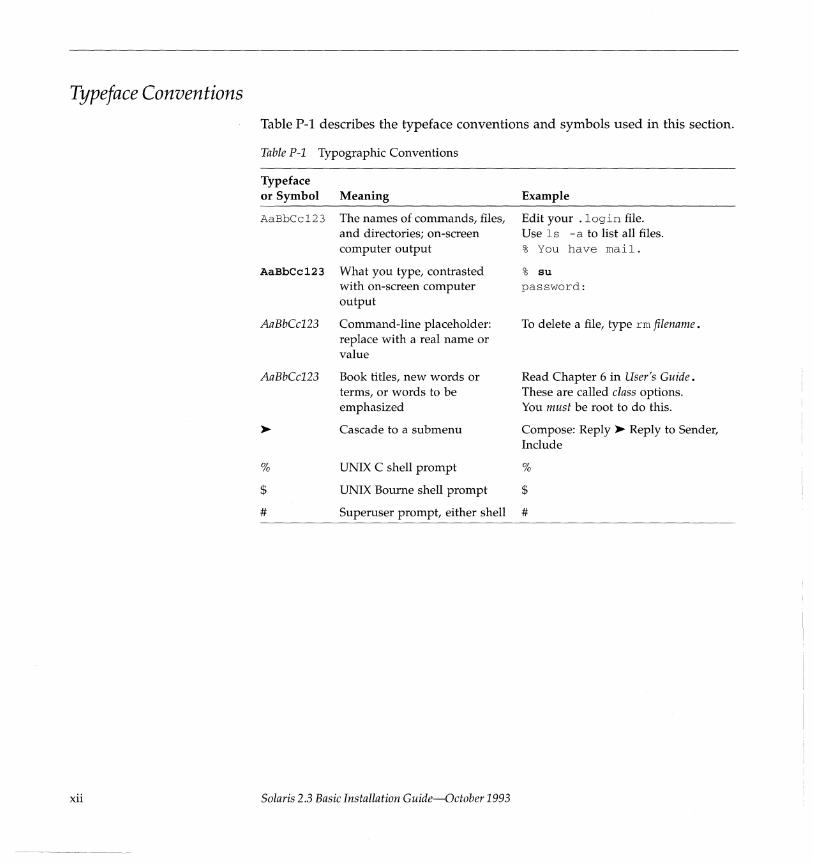
Typeface Conventions
xii
Table P-l describes the typeface conventions and symbols used in this section.
Table P-1 Typographic Conventions
Typeface or Symbol Meaning
AaBbCc123 The names of commands, files, and directories; on-screen computer output
AaBbCc123 What you type, contrasted with on-screen computer output
AaBbCc123 Command-line placeholder: replace with a real name or value
AaBbCc123 Book titles, new words or terms, or words to be emphasized
~ Cascade to a submenu
% UNIX C shell prompt
$ UNIX Bourne shell prompt
# Superuser prompt, either shell
Solaris 2.3 Basic Installation Guide-October 1993
Example
Edit your .login file. Use Is -a to list all files. % You have mail.
% su password:
To delete a file, type rm filename.
Read Chapter 6 in User's Guide. These are called class options. You must be root to do this.
Compose: Reply ~ Reply to Sender, Include
%
$
#
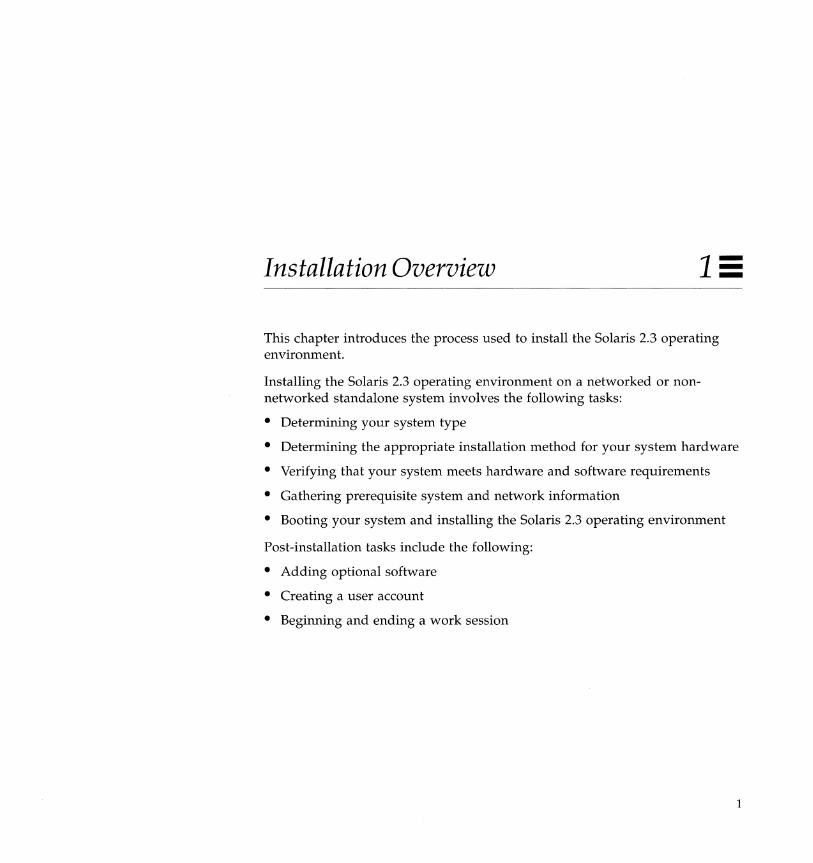
Installation Overview
This chapter introduces the process used to install the Solaris 2.3 operating environment.
Installing the Solaris 2.3 operating environment on a networked or nonnetworked standalone system involves the following tasks:
• Determining your system type
• Determining the appropriate installation method for your system hardware
• Verifying that your system meets hardware and software requirements
• Gathering prerequisite system and network information
• Booting your system and installing the Solaris 2.3 operating environment
Post-installation tasks include the following:
• Adding optional software
• Creating a user account
• Beginning and ending a work session
1
The Installation Process
2
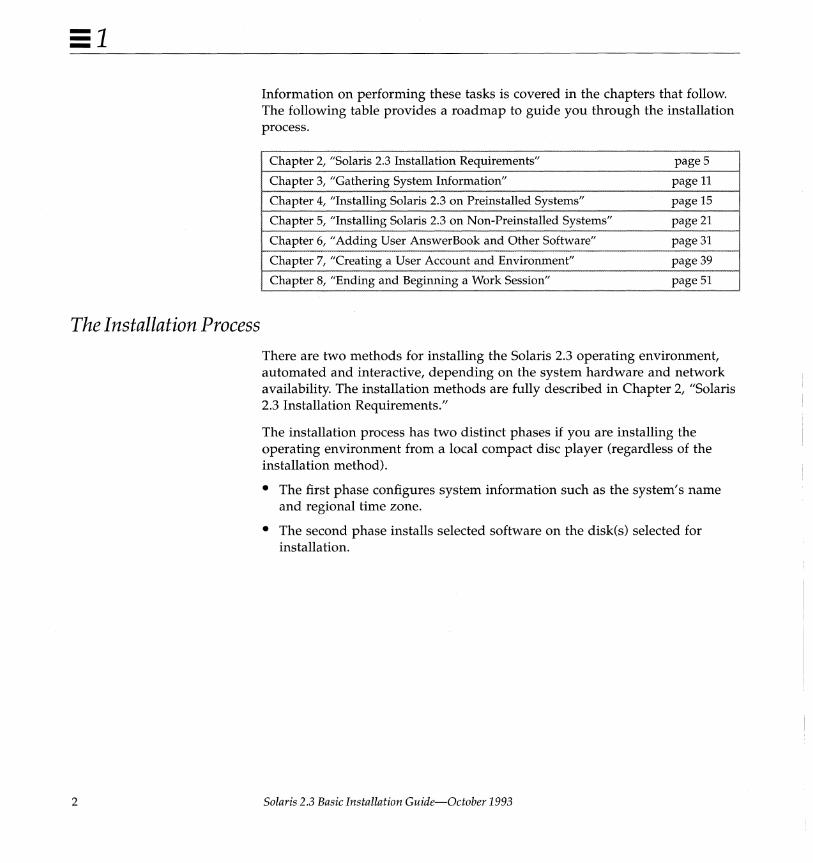
Information on performing these tasks is covered in the chapters that follow. The following table provides a roadmap to guide you through the installation process.
Chapter 2, "Solaris 2.3 Installation Requirements" page 5
Chapter 3, "Gathering System Information" page 11
Chapter 4, "Installing Solaris 2.3 on Preinstalled Systems" page 15
Chapter 5, "Installing Solaris 2.3 on Non-Preinstalled Systems" page 21
Chapter 6, 'Aclclino- User AnswerBook and Other Software" page 31
Chapter 7, 'Creatmg a User Account and Environment" page 39
Chapter 8, "Ending and Beginning a Work Session" page
There are two methods for installing the Solaris 2.3 operating environment, automated and interactive, depending on the system hardware and network availability. The installation methods are fully described in Chapter 2, "Solaris 2.3 Installation Requirements."
The installation process has two distinct phases if you are installing the operating environment from a local compact disc player (regardless of the installation method).
• The first phase configures system information such as the system's name and regional time zone.
• The second phase installs selected software on the disk(s) selected for installation.
Solaris 2.3 Basic Installation Guide-October 1993

Navigating the Installation Menus Table 1-1 describes the keys used during both installation phases and their action within each phase. Note the difference between the use of the Tab key during each phase.
Table 1-1 Installation Menu Keys
Key System Configuration Phase System Installation Phase
Return Confirms menu selection Confirms menu selection
Tab Moves among menu selection Moves to next menu selection items
Arrow Keys Move among menu selection Move among menu selection items items
Backspace/Delete Erases previous character Erases previous character
Help/Fl Displays online help Displays online help
Installation Overview 3
4 Solaris 2.3 Basic Installation Guide-October 1993

Solaris 2.3 Installation Requirements
This chapter describes how to identify your system type and how to determine the appropriate installation method for your system. The hardware and software requirements for successfully installing the Solaris 2.3 operating environment are also described.
Solaris 2.3 Installation Scenarios Both new and old Sun systems support different Solaris 2.3 installation methods. The following section describes various systems and their installation characteristics.
• Preinstalled systems - Many new Sun systems are shipped with a small portion of a bootable operating system on the system's disk. The Solaris 2.3 operating environment can be installed automatically on a preinstalled system when you boot the system for the first time, if the system has a local compact disc player attached.
When you turn on your preinstalled system, the booting sequence automatically starts and you are prompted to enter system configuration information (for example, the date and time).
• Preconfigured systems - If your system does not have a local compact disc player, but is on a network, your system administrator can set up an automated installation by preconfiguring your system on an installation server.
5

When preconfigured systems are booted, the configuration information from the server is used to install the operating system on the system automatically.
Preconfiguration procedures are beyond the scope of this guide, but are covered in Chapter 11 of the Solaris 2.3 System Configuration and Installation Guide.
• Non-preinstalled systems - Older Sun systems such as the SPARCstation™ 2 or SPARCstation™ IPX are non-preinstalled systems.
Non-preinstalled systems must be booted and installed with a special boot command that tells the system where the installation software is located---either on the Solaris 2.3 installation CD-ROM or on an installation server, if the system is preconfigured.
If the non-preinstalled system is not preconfigured, an interactive installation is required.
Interactive installation (also called SunInstall™) is a series of menus that prompt for system configuration information. You can choose between using default selections for software and disks (called a quick installation) or a custom installation option for customizing the Solaris 2.3 environment.
Determining Your System Type
6
Use the following procedure to find out what kind of system you have. (This procedure assumes no Solaris operating system has been installed on your system.)
1. Turn on your system without the Solaris 2.3 installation CD-ROM inserted in the local compact disc player. This causes the boot procedure to fail and leaves the system at the PROM level. The ok prompt is displayed.
Note - On some systems, the> prompt may be displayed rather than the ok prompt. Type n for new mode to get to the ok prompt.
Solaris 2.3 Basic Installation Guide-October 1993
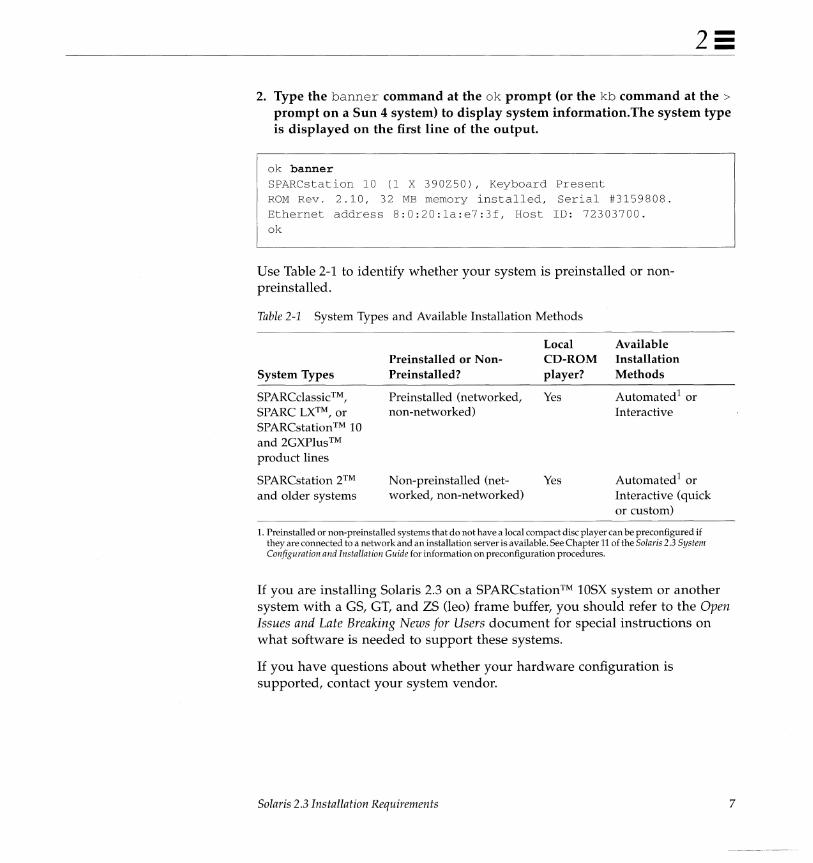
2. Type the banner command at the ok prompt (or the kb command at the> prompt on a Sun 4 system) to display system information. The system type is displayed on the first line of the output.
ok banner SPARCstation 10 (1 X 390ZS0), Keyboard Present ROM Rev. 2.10, 32 ME memory installed, Serial #3159808. Ethernet address 8:0:20:1a:e7:3f, Host ID: 72303700. ok
Use Table 2-1 to identify whether your system is pre installed or nonpreinstalled.
Table 2-1 System Types and Available Installation Methods
System Types
SPARCclassic TM, SPARC LXTM, or SPARCstation™ 10 and 2GXPIus™ product lines
SPARCstation 2TM and older systems
Preinstalled or NonPreinstalled?
Preinstalled (networked, non-networked)
Non-preinstalled (networked, non-networked)
Local CD-ROM player?
Yes
Yes
Available Installation Methods
Automated! or Interactive
Automated! or Interactive (quick or custom)
!. Preinstalled or non'preinstalled systems that do not have a local compact disc player can be preconfigured if they are connected to a network and an installation server is available. See Chapter 11 of the Solaris 2.3 System Configuration and Installation Guide for information on preconfiguration procedures.
If you are installing Solaris 2.3 on a SPARCstation™ 10SX system or another system with a GS, GT, and ZS (leo) frame buffer, you should refer to the Open Issues and Late Breaking News for Users document for special instructions on what software is needed to support these systems.
If you have questions about whether your hardware configuration is supported, contact your system vendor.
Solaris 2.3 Installation Requirements 7
-------------------------"""--"------------------
Choosing Automated or Interactive Installation Use the following recommendations to help you decide which installation method is best for you.
• Perform an automated installation if you have a preinstalled system.
• Have a system administrator preconfigure and install your system for you if there is an installation server available.
• If you do not have a preinstalled system or cannot preconfigure your system, decide whether you want to do a quick or custom interactive installation by determining your level of expertise:
• A quick installation is appropriate for users and novice administrators with no installation experience
• A custom installation is appropriate for administrators with installation experience
Hardware and Software Requirements
8
This section describes the hardware and software requirements for successfully installing the Solaris 2.3 operating environment on a standalone system.
Do You Have Enough Disk Space?
Table 2-2 describes the amount of disk space you need depending on whether you are adding the end-user software, bundled User AnswerBook®, unbundled Solaris 2.3 software, third party software, or a combination of these.
Table 2-2 Disk Space Requirements ----" ---""" -------------------------
Disk Space for
Solaris 2.3 only
User AnswerBook
Unbundled Solaris 2.3 software
Third-party software
Required
Approximately 200 megabytes for the end user software; approximately 300 megabytes for the entire distribution
15 megabytes for User AnswerBook
Software sizes vary
Software sizes vary (See your third-party vendor documentation for space requirements)
Solaris 2.3 Basic Installation Guide-October 1993
Required Hardware
Table 2-3 lists the hardware required for installing the Solaris 2.3 operating environment on a standalone system.
Table 2-3 Hardware Required
Component Required
Main memory 16 megabytes
Disk drive SCSI, SMD, or IPI
Disk space Approximately 200 megabytes if adding User AnswerBook; 300 megabytes is recommended if adding other unbundled software
Compact disc player A SPARC Compliant Definition (SCD) compact disc player connected to your system
PROM A PROM, revision l.x or greater, compatible with the Solaris 2.3 operating environment. (The PROM revision is displayed in the banner when you turn on a new system. For existing systems, you can type banner at the ok prompt to check your PROM revision before booting from the CD-ROM.)
Is Your Hardware Set Up?
The following system components must be set up and ready to use before installing the Solaris 2.3 operating environment:
• System unit
• Graphics terminal
• Disk drives
• Compact disk player
• Keyboard and mouse
For help in setting up your hardware, see the owner's guide that comes with your system.
Solaris 2.3 Installation Requirements 9
Display Devices
This book assumes you have a Sun-supported graphics terminal. If you have an alphanumeric terminal, you can use this book for installing the end user software, but you must refer to the Solaris 2.3 System Configuration and Installation Guide for other tasks.
Where to Go From Here
10
System Type
SPARCclassic™, SPARC LXTM, or SPARCstation lOTM and 2GXPlus™ product lines
SPARCstation 2TM and older systems
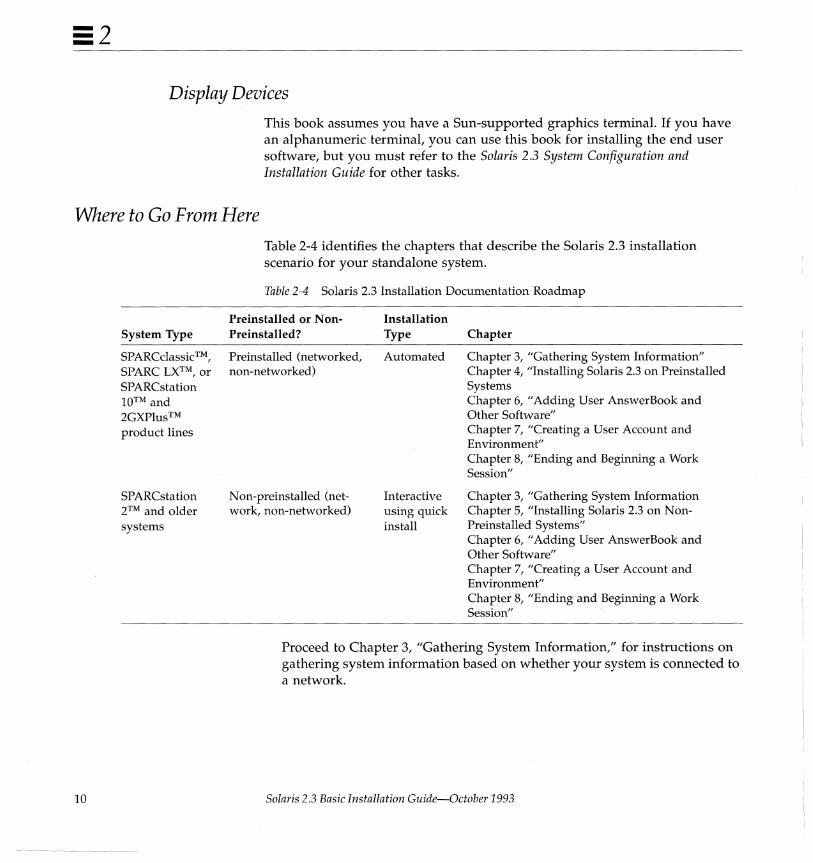
Table 2-4 identifies the chapters that describe the Solaris 2.3 installation scenario for your standalone system.
Table 2-4 Solaris 2.3 Installation Documentation Roadmap
Preinstalled or NonPreinstalled?
Preinstalled (networked, non-networked)
Non-preinstalled (network, non-networked)
Installation Type
Automated
Interactive using quick install
Chapter
Chapter 3, "Gathering System Information" Chapter 4, "Installing Solaris 2.3 on Preinstalled Systems Chapter 6, "Adding User AnswerBook and Other Software" Chapter 7, "Creating a User Account and Environment" Chapter 8, "Ending and Beginning a Work Session"
Chapter 3, "Gathering System Information Chapter 5, "Installing Solaris 2.3 on NonPreinstalled Systems" Chapter 6, "Adding User AnswerBook and Other Software" Chapter 7, "Creating a User Account and Environment" Chapter 8, "Ending and Beginning a Work Session"
Proceed to Chapter 3, "Gathering System Information," for instructions on gathering system information based on whether your system is connected to a network.
Solaris 2.3 Basic Installation Guide-October 1993

Gathering System Information
This chapter describes the system information that is required during the installation process depending upon whether your system will or will not be connected to a network.
Proceed to the section that describes your system. Use the Solaris 2.3 installation work sheet at the end of this chapter to gather the information described below from your system or network administrator.
If Your System Will Not Be Connected to a Network ... You must supply the following information during the system configuration phase if your system will not be connected to a network.
• Host Name - A unique name that identifies your system. It must start with a lowercase letter and be followed by any combination of lowercase letters, numbers, or hyphens (up to 64 characters).
• Geographic Region and Time Zone - These regional areas identify your geographic location and local time zone information such as US/Mountain or Canada/Newfoundland.
Skip to section titled "The System Installation Phase" on page 13.
11
12
If Your System Will Be Connected to a Network ...
You must supply the following information during the system configuration phase if your system will be connected to a network.
• Host Name - A unique name that identifies your system. It must start with a lowercase letter and be followed by any combination of lowercase letters, numbers, or hyphens (up to 64 characters).
• IP Address - A unique network address, required if the system will be connected to a network.
• Name Service - Centralized information about machines and services on a network. Without a name service, each machine on the network would have to maintain its own copy of this information in the jete directory.
The installation process allows you to set up your system as a name service client. A name service server provides information to the name service clients that request it.
The available name service products in the Solaris 2.3 operating environment are Network Information Service (NIS) and NIS+, an enhanced version of NIS. Find out if your site uses NIS or NIS+.
• Name Service Domain Name - A unique name that identifies a group of machines using the same name service information.
• Name Service Location Method - One of two ways to identify a name service server:
• Locate Server Automatically - If this method is selected, the installing system broadcasts to the network to find an available name service server.
• Specify Host Name of Server - If this method is selected, you must supply the host name and IP address of the name service server.
Either method requires a reachable NIS/NIS+ server or the name service configuration will fail.
• Subnetwork - A group of systems that is a portion of a larger network. A subnetwork mask is a number used by software applications to separate additional network information from the host part of the IP address.
• Geographic Region and Time Zone - Regional areas that identify your geographic location and local time zone information such as US/Mountain or Canada/Newfoundland.
Solaris 2.3 Basic Installation Guide-October 1993
• Saving System Configuration Information - An option to save your system configuration information in the NIS+ databases if you selected the NIS+ client configuration option. Storing this information in the NIS+ database is helpful if you want to use it during the next system installation.
The System Installation Phase You are prompted to select the software to be installed and the disks to be used during the installation process depending upon whether you are using the automated or interactive installation method.
Default software and disk selections are available for both installation methods.
Using the Solaris 2.3 Installation Work Sheet After you have completed the installation sheet on the following page, proceed to the chapter that describes how to install the Solaris 2.3 operating environment on your system.
Chapter 4, "Installing Solaris 2.3 on Preinstalled Systems page 15 ~"~""~"~~~"~ .. ~.~~.~. ··~···························~·~i
5, "Installing Solaris 2.3 on Non-Preinstalled Systems page 21 "~ .... ".~.~~~~~,~ ... ~~ .. ~.-.~~.~ .• -~-.~" .... ~~".~.~.-
Note that only three categories of system information are required for nonnetworked systems on the installation work sheet.
Gathering System Information 13
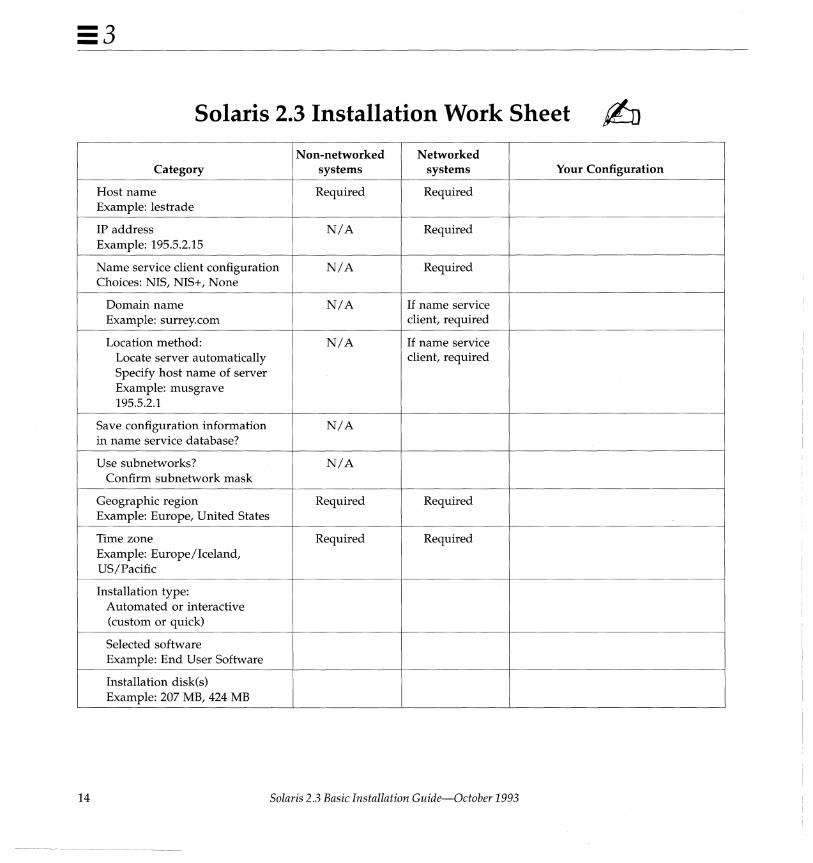
Solaris 2.3 Installation Work Sheet
Non-networked Networked Category systems systems Your Configuration
Host name Required Required Example: lestrade
IP address N/A Required Example: 195.5.2.15
Name service client configuration N/A Required Choices: NIS, NIS+, None
Domain name N/A If name service Example: surrey. com client, required
Location method: N/A If name service Locate server automatically client, required Specify host name of server Example: musgrave 195.5.2.1
Save configuration information N/A in name service database?
Use subnetworks? N/A Confirm subnetwork mask
Geographic region Required Required Example: Europe, United States
Time zone Required Required Example: Europe/Iceland, US/Pacific
Installation type: Automated or interactive (custom or quick)
Selected software Example: End User Software
Installation disk(s) Example: 207 MB, 424 MB
14 Solaris 2.3 Basic Installation Guide-October 1993
Installing Solaris 2.3 on Preinstalled Systems
This chapter describes how to boot and install the default software on nonnetworked and networked preinstalled systems from a locally-connected compact disc player using the automated installation method.
Installation time will vary depending upon the software to be loaded. It takes approximately 40 minutes to load the end user software and 60 minutes to load the entire Solaris 2.3 distribution.
Caution - Installing Solaris 2.3 on a system with existing files will erase all data. Refer to the Solaris 2.3 Administering File Systems guide for information on how to back up important files and directories.
Booting Preinstalled Systems This section describes how to boot preinstalled systems.
1. Insert the Solaris 2.3 CD-ROM into the CD-ROM caddy (supplied with your compact disc player).
2. Insert the caddy into the compact disc player.
3. Turn on your system components in the order recommended by your hardware guide; booting begins automatically. There may be several minutes before you see any visual feedback.
Proceed to the installation section that describes your preinstalled system.
15
Installing Non-Networked Preinstalled Systems
16
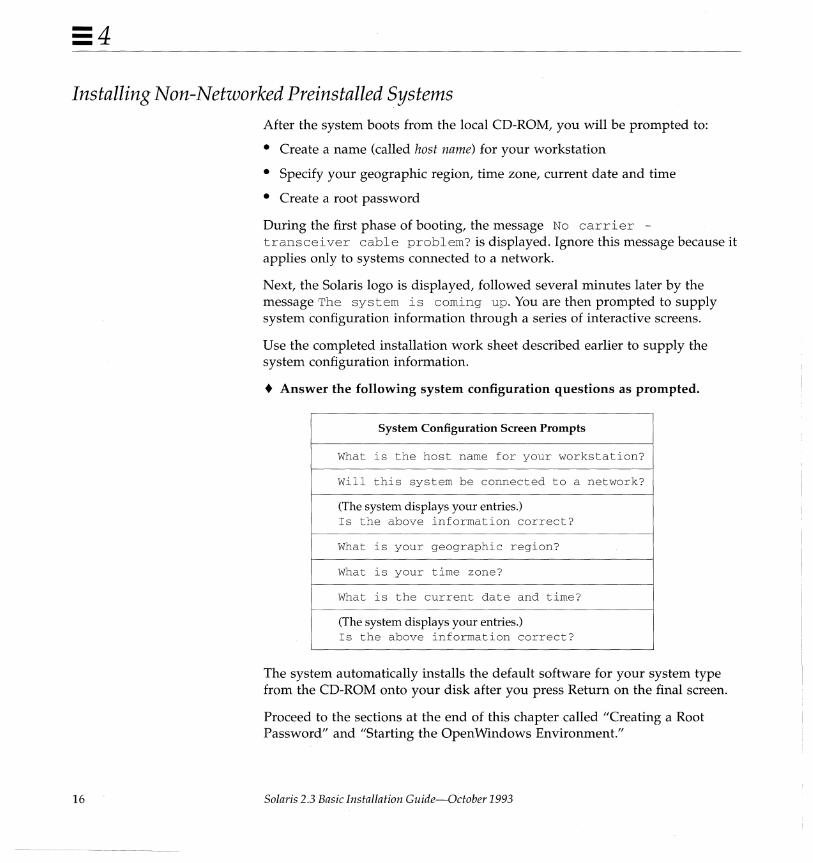
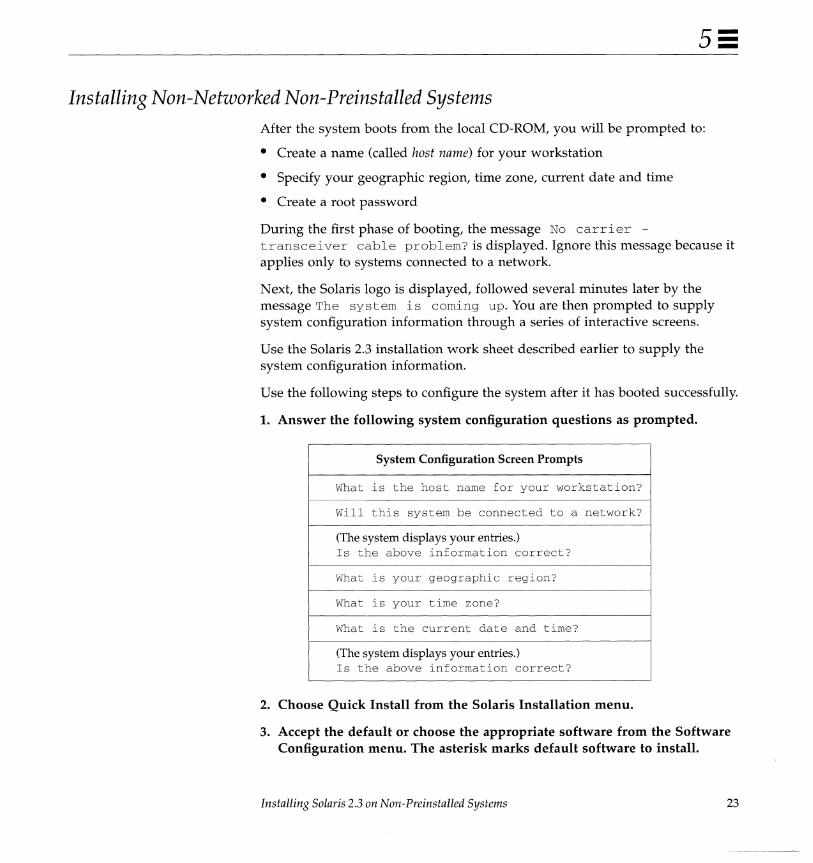
After the system boots from the local CD-ROM, you will be prompted to:
• Create a name (called host name) for your workstation
• Specify your geographic region, time zone, current date and time
• Create a root password
During the first phase of booting, the message No carrier -transcei ver cable problem? is displayed. Ignore this message because it applies only to systems connected to a network.
Next, the Solaris logo is displayed, followed several minutes later by the message The system is coming up. You are then prompted to supply system configuration information through a series of interactive screens.
Use the completed installation work sheet described earlier to supply the system configuration information.
• Answer the following system configuration questions as prompted.
System Configuration Screen Prompts
What is the host name for your workstation?
Will this system be connected to a network?
(The system displays your entries.) Is the above information correct?
What is your geographic region?
What is your time zone?
What is the current date and time?
(The system displays your entries.) Is the above information correct?
The system automatically installs the default software for your system type from the CD-ROM onto your disk after you press Return on the final screen.
Proceed to the sections at the end of this chapter called "Creating a Root Password" and "Starting the Open Windows Environment."
Solaris 2.3 Basic Installation Guide-October 1993
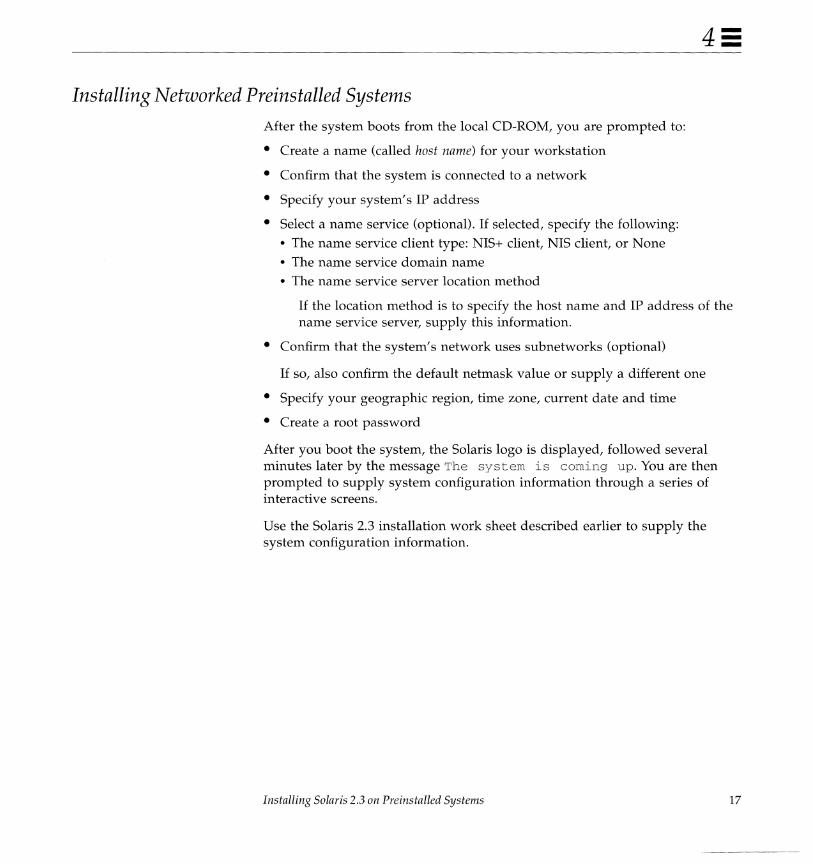
Installing Networked Preinstalled Systems After the system boots from the local CD-ROM, you are prompted to:
• Create a name (called host name) for your workstation
• Confirm that the system is connected to a network
• Specify your system's IP address
• Select a name service (optional). If selected, specify the following:
• The name service client type: NIS+ client, NIS client, or None
• The name service domain name • The name service server location method
If the location method is to specify the host name and IP address of the name service server, supply this information.
• Confirm that the system's network uses subnetworks (optional)
If so, also confirm the default netmask value or supply a different one
• Specify your geographic region, time zone, current date and time
• Create a root password
After you boot the system, the Solaris logo is displayed, followed several minutes later by the message The system is coming up. You are then prompted to supply system configuration information through a series of interactive screens.
Use the Solaris 2.3 installation work sheet described earlier to supply the system configuration information.
Installing Solaris 2.3 on Preinstalled Systems 17
18
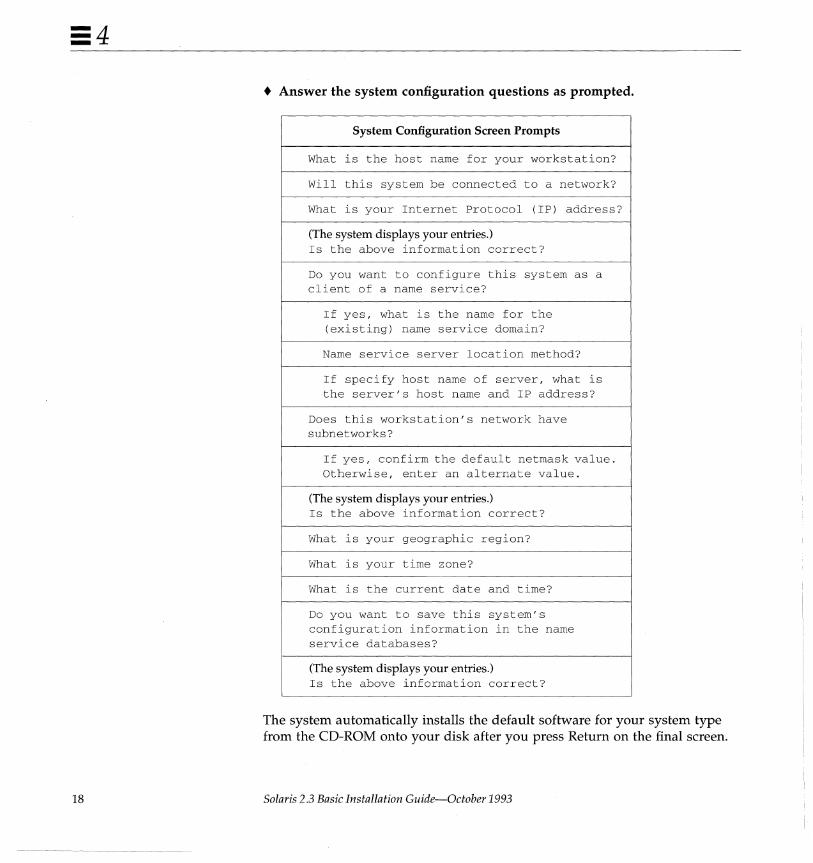
• Answer the system configuration questions as prompted.
System Configuration Screen Prompts
What is the host name for your workstation?
Will this system be connected to a network?
What is your Internet Protocol (IP) address?
(The system displays your entries.) Is the above information correct?
Do you want to configure this system as a client of a name service?
If yes, what is the name for the (existing) name service domain?
Name service server location method?
If specify host name of server, what is the server's host name and IP address?
Does this workstation's network have subnetworks?
If yes, confirm the default netmask value. Otherwise, enter an alternate value.
(The system displays your entries.) Is the above information correct?
What is your geographic region?
What is your time zone?
What is the current date and time?
Do you want to save this system's configuration information in the name service databases?
(The system displays your entries.) Is the above information correct?
The system automatically installs the default software for your system type from the CD-ROM onto your disk after you press Return on the final screen.
Solaris 2.3 Basic Installation Guide-October 1993
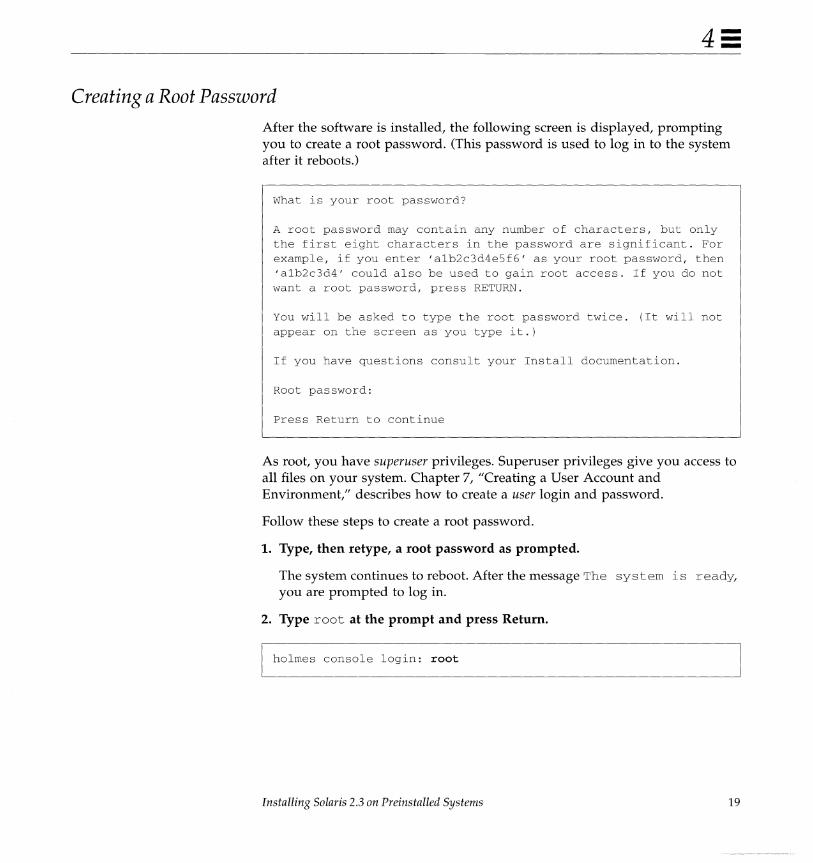
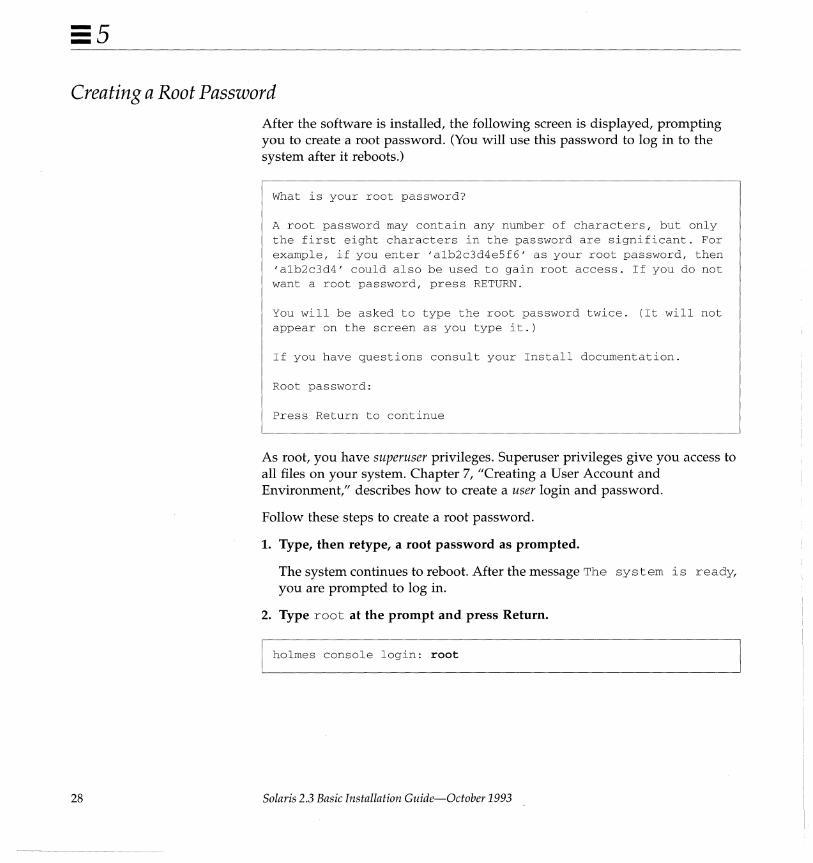
Creating a Root Password After the software is installed, the following screen is displayed, prompting you to create a root password. (This password is used to log in to the system after it reboots.)
What is your root password?
A root password may contain any number of characters, but only the first eight characters in the password are significant. For example, if you enter 'alb2c3d4e5f6' as your root password, then 'alb2c3d4' could also be used to gain root access. If you do not want a root password, press RETURN.
You will be asked to type the root password twice. (It will not appear on the screen as you type it.)
If you have questions consult your Install documentation.
Root password:
Press Return to continue
As root, you have superuser privileges. Superuser privileges give you access to all files on your system. Chapter 7, "Creating a User Account and Environment," describes how to create a user login and password.
Follow these steps to create a root password.
1. Type, then retype, a root password as prompted.
The system continues to reboot. After the message The system is ready, you are prompted to log in.
2. Type root at the prompt and press Return.
I holmes console login: root
Installing Solaris 2.3 on Preinstalled Systems 19
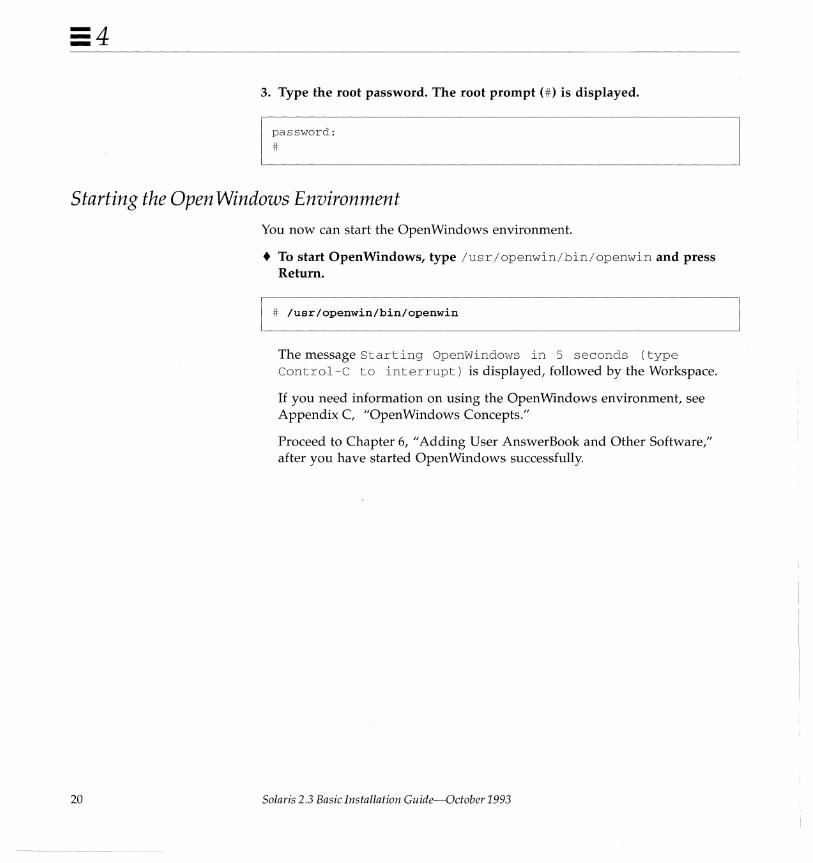
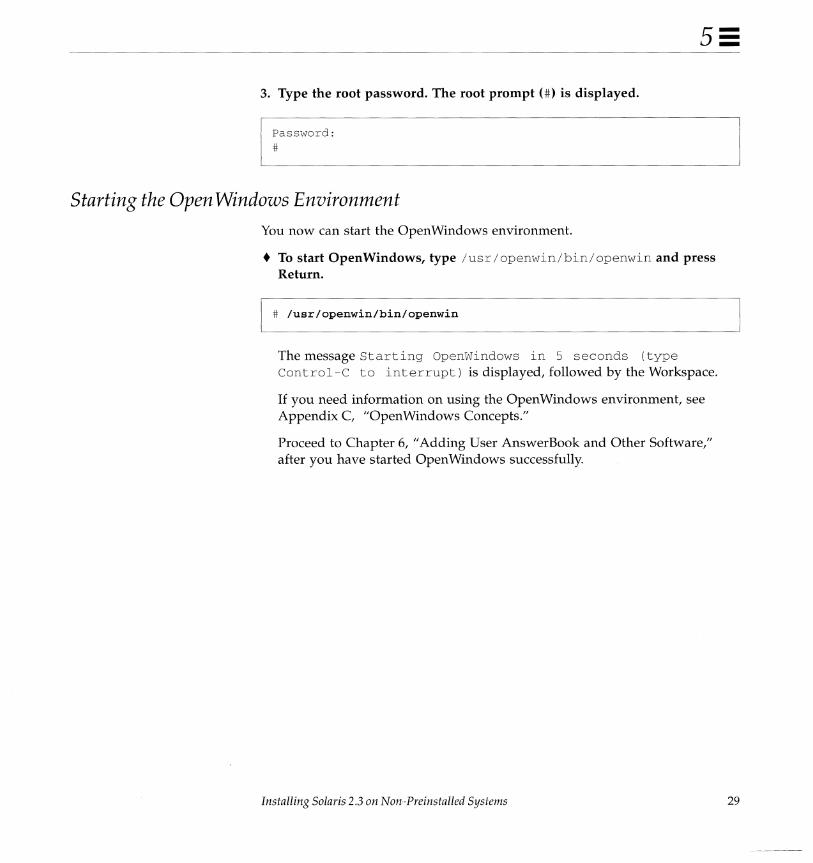
3. Type the root password. The root prompt (#) is displayed.
I ~,s'word'
Starting the Open Windows Environment
20
You now can start the Open Windows environment.
• To start OpenWindows, type /usr/openwin/bin/openwin and press Return.
I # /usr/openwin/bin/openwin
The message Starting OpenWindows in 5 seconds (type Control-C to interrupt) is displayed, followed by the Workspace.
If you need information on using the Open Windows environment, see Appendix C, "Open Windows Concepts."
Proceed to Chapter 6, "Adding User AnswerBook and Other Software," after you have started Open Windows successfully.
Solaris 2.3 Basic Installation Guide-October 1993
Installing Solaris 2.3 on Non-Preinstalled Systems 5=
This chapter describes how to boot and install a non-preinstalled system by using the interactive, quick installation option. The steps for installing both a networked and non-networked system are covered.
Installation time will vary depending upon the software to be loaded. It takes approximately 40 minutes to load the end user software and 60 minutes to load the entire Solaris 2.3 distribution.
See Appendix A, II An Installation Case Study," for a step-by-step example of installing a non-preinstalled system.
Caution - Installing Solaris 2.3 on a system with existing files will erase all data. Refer to the Solaris 2.3 Administering File Systems guide for information on how to back up important files and directories.
Booting Non-Preinstalled Systems The following section describes how to manually boot non-preinstalled systems.
1. Insert the Solaris 2.3 CD-ROM into the CD-ROM caddy (supplied with your compact disc player).
2. Insert the caddy into the compact disc player.
21
::5
22
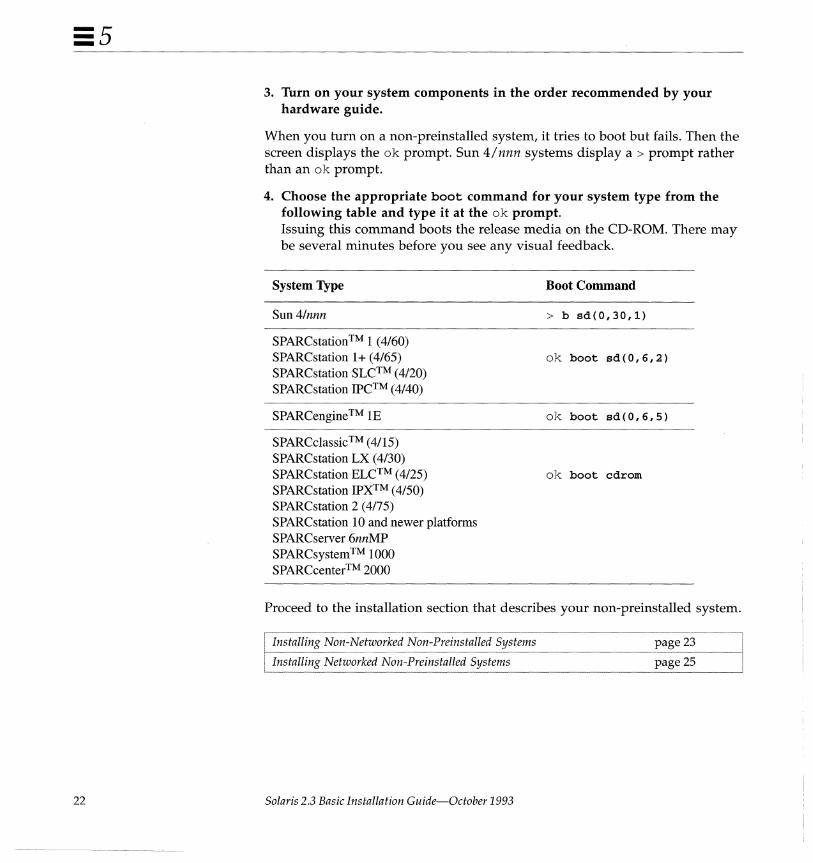
3. Tum on your system components in the order recommended by your hardware guide.
When you turn on a non-preinstalled system, it tries to boot but fails. Then the screen displays the ok prompt. Sun 4/nnn systems display a> prompt rather than an ok prompt.
4. Choose the appropriate boot command for your system type from the following table and type it at the ok prompt. Issuing this command boots the release media on the CD-ROM. There may be several minutes before you see any visual feedback.
System Type
Sun4/nnn
SPARCstation ™ 1 (4/60) SPARCstation 1 + (4/65) SPARCstation SLCTM (4/20) SPARCstation IPCTM (4/40)
SPARCengine ™ IE
SPARCclassic™ (4/15) SPARCstation LX (4/30) SPARCstation ELCTM (4/25) SPARCstation IPX™ (4/50) SPARCstation 2 (4/75) SPARCstation 10 and newer platforms SPARCserver 6nnMP SPARCsystem ™ 1000 SPARCcenter™ 2000
Boot Command
> b ad ( 0, 30, 1)
ok boot ad(O,6,2}
ok boot ad(O,6,5}
ok boot cdrom
Proceed to the installation section that describes your non-preinstalled system.
Installing Non-Networked Non-Preinstalled Systems page 23
Installing Networked Non-Preinstal1ed Systems page 25
Solaris 2.3 Basic Installation Guide-October 1993
5::
Installing Non-Networked Non-Preinstalled Systems After the system boots from the local CD-ROM, you will be prompted to:
• Create a name (called host name) for your workstation
• Specify your geographic region, time zone, current date and time
• Create a root password
During the first phase of booting, the message No carrier -transceiver cable problem? is displayed. Ignore this message because it applies only to systems connected to a network.
Next, the Solaris logo is displayed, followed several minutes later by the message The system is coming up. You are then prompted to supply system configuration information through a series of interactive screens.
Use the Solaris 2.3 installation work sheet described earlier to supply the system configuration information.
Use the following steps to configure the system after it has booted successfully.
1. Answer the following system configuration questions as prompted.
System Configuration Screen Prompts
What is the host name for your workstation?
will this system be connected to a network?
(The system displays your entries.) Is the above information correct?
What is your geographic region?
What is your time zone?
What is the current date and time?
(The system displays your entries.) Is the above information correct?
2. Choose Quick Install from the Solaris Installation menu.
3. Accept the default or choose the appropriate software from the Software Configuration menu. The asterisk marks default software to install.
Installing Solaris 2.3 on Non-Preinstalled Systems 23
=5
24
4. From the Disk Selection menu, accept the default or choose an appropriate target disk for installing the Solaris 2.3 operating environment.
5. Check the final predefined configuration displayed in the Configuration window. If it is not correct, press Cancel. You are returned to the Solaris Installation Menu.
6. Choose Begin Install.
The system automatically installs the selected software from the CD-ROM onto your disk after you press Return on the final screen.
Proceed to the sections at the end of this chapter called "Creating a Root Password" and "Starting the Open Windows Environment."
Solaris 2.3 Basic Installation Guide-October 1993

5::
Installing Networked Non-Preinstalled Systems After the system boots from the local CD-ROM, you will be prompted to:
• Create a name (called host name) for your workstation
• Confirm that the system is connected to a network
• Specify your system's IP address
• Select a name service (optional). If selected, specify the following:
• The name service client type: NIS+ client, NIS client, or None
• The name service domain name • The name service server location method
If the location method is to specify the host name and IP address of the name service server, then supply this information.
• Confirm that the system's network uses subnetworks (optional)
If so, also confirm the default netmask value or supply a different one
• Specify your geographic region, time zone, current date and time
• Create a root password
After you boot the system, the Solaris logo is displayed, followed several minutes later by the message The system is coming up. You are then prompted to supply system configuration information through a series of interactive screens.
Use the Solaris 2.3 installation work sheet described earlier to supply the system configuration information.
Installing Solaris 2.3 on Non-Preinstalled Systems 25
=5
26
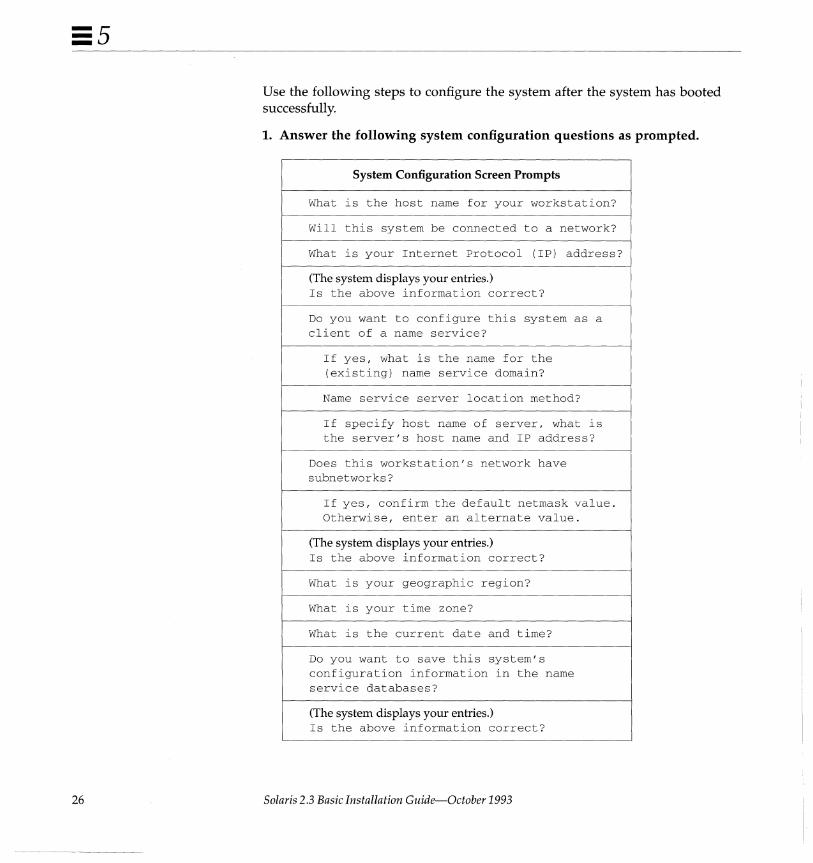
Use the following steps to configure the system after the system has booted successfully.
1. Answer the following system configuration questions as prompted.
System Configuration Screen Prompts
What is the host name for your workstation?
Will this system be connected to a network?
What is your Internet Protocol (IP) address?
(The system displays your entries.) Is the above information correct?
Do you want to configure this system as a client of a name service?
If yes, what is the name for the (existing) name service domain?
Name service server location method?
If specify host name of server, what is the server's host name and IP address?
Does this workstation's network have subnetworks?
If yes, confirm the default netmask value. Otherwise, enter an alternate value.
(The system displays your entries.) Is the above information correct?
What is your geographic region?
What is your time zone?
What is the current date and time?
Do you want to save this system's configuration information in the name service databases?
(The system displays your entries.) Is the above information correct?
Solaris 2.3 Basic Installation Guide-October 1993
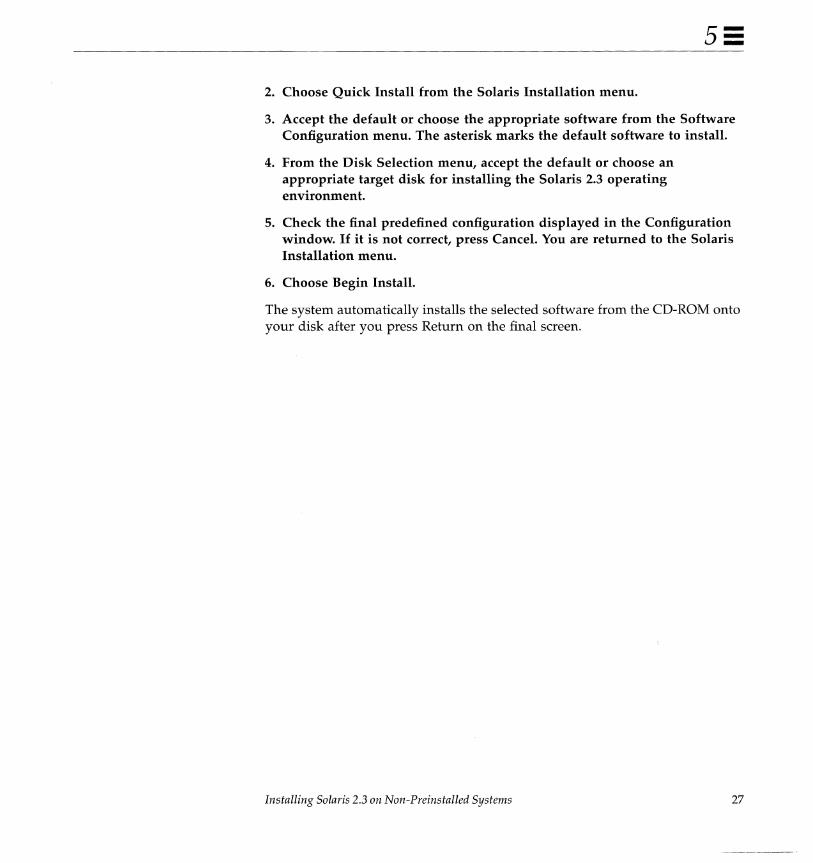
5:: 2. Choose Quick Install from the Solaris Installation menu.
3. Accept the default or choose the appropriate software from the Software Configuration menu. The asterisk marks the default software to install.
4. From the Disk Selection menu, accept the default or choose an appropriate target disk for installing the Solaris 2.3 operating environment.
5. Check the final predefined configuration displayed in the Configuration window. If it is not correct, press Cancel. You are returned to the Solaris Installation menu.
6. Choose Begin Install.
The system automatically installs the selected software from the CD-ROM onto your disk after you press Return on the final screen.
Installing Solaris 2.3 on Non-Preinstalled Systems 27
::5
Creating a Root Password
28
After the software is installed, the following screen is displayed, prompting you to create a root password. (You will use this password to log in to the system after it reboots.)
What is your root password?
A root password may contain any number of characters, but only the first eight characters in the password are significant. For example, if you enter 'alb2c3d4e5f6' as your root password, then 'alb2c3d4' could also be used to gain root access. If you do not want a root password, press RETURN.
You will be asked to type the root password twice. (It will not appear on the screen as you type it.)
If you have questions consult your Install documentation.
Root password:
Press Return to continue
As root, you have superuser privileges. Superuser privileges give you access to all files on your system. Chapter 7, "Creating a User Account and Environment," describes how to create a user login and password.
Follow these steps to create a root password.
1. Type, then retype, a root password as prompted.
The system continues to reboot. After the message The system is ready,
you are prompted to log in.
2. Type root at the prompt and press Return.
I holmes console login: root
Solaris 2.3 Basic Installation Guide-October 1993
5= 3. Type the root password. The root prompt (#) is displayed.
Starting the Open Windows Environment
You now can start the Open Windows environment.
• To start OpenWindows, type /usr / openwin/bin/ openwin and press Return.
I # /usr/openwin/bin/openwin
The message Starting OpenWindows in 5 seconds (type Control-C to interrupt) is displayed, followed by the Workspace.
If you need information on using the Open Windows environment, see Appendix C "OpenWindows Concepts."
Proceed to Chapter 6, "Adding User AnswerBook and Other Software," after you have started Open Windows successfully.
Installing Solaris 2.3 on Non-Preinstalled Systems 29
::5
30 Solaris 2.3 Basic Installation Guide-October 1993
User Answer Book
Adding User AnswerBookand Other Software
This chapter describes the requirements and steps for adding software such as the User AnswerBook product. These steps can also be used to add other unbundled and third-party software.
The User AnswerBook product is the optional online documentation, which you can add by using the Software Manager Tool described in this chapter.
Using Volume Manager The Solaris 2.3 operating environment provides Volume Manager, a graphical user interface to manage diskettes and CD-ROM devices. You will see a separate file manager window with a CD-ROM icon when you start Open Windows if the installation CD-ROM is still inserted in the compact disc player.
Use the following procedure if you do not see the separate file manager window for the CD-ROM after starting OpenWindows. Otherwise, you may have trouble accessing the CD-ROM when using Software Manager.
1. Eject the installation CD-ROM.
I # eject cdrom
31
2. Insert the caddy back into the compact disc player.
3. Close the file manager window to an icon when it appears.
Checking System Requirements Make sure the following requirements for adding User AnswerBook and other software are met.
• Log in as root and start the Open Windows environment. This is required to add software with Software Manager.
• Verify the Solaris 2.3 installation CD-ROM is in the CD-ROM player.
• Identify the amount of disk space required by the software and verify that you have adequate disk space to load the software.
Checking Your Disk Space
32
The / opt directory is created during installation and is used for storing optional software. However, you may not have enough room in / opt to add User AnswerBook or other optional software. User AnswerBook takes approximately 14.9 megabytes (15257 kilobytes).
In the following steps, you will use the df command to find free disk space for installing your optional software.
1. Open a Command Tool shell (if one is not already opened).
2. Move the mouse pointer into the Command Tool shell. The default Bourne shell prompt (#) for the superuser is displayed.
3. Expand the Command Tool window for the next step by using the resize corners.
4. Click SELECT and type df - k at the prompt.
I # df -k
Solaris 2.3 Basic Installation Guide-October 1993

The following is a sample response.
Filesystem /dev/dsk/cOtOd3s0 /dev/dsk/cOtOd3s6 /dev/dsk/cOtOd3s5
kbytes 15007
11 7625 26323
used avail 9865 3642
87431 18434 7943 15759
capacity Mounted on 73% 83% /usr 33% /opt
Disks are listed under the Filesystem heading and are located in the / dev / dsk directory as cntndnsn where:
• cn = controller, where n is the controller number
• tn = target, where n is the target ID number
• dn = device, where n is the device number
• sn = slice, where n is the slice number
In the above example, slice zero of the disk device (d3) contains all the root files; slice six contains user software; slice five contains optional software.
Free disk space is shown in the avail column; the number listed is in kilobytes. In the above example, / opt has only 15,759 kilobytes.
This is just enough space for User AnswerBook, which requires approximately 15,257 kilobytes. The other directory with adequate space for User AnswerBook is /usr (18434 kilobytes).
Note - To convert megabytes into kilobytes, multiply the number of megabytes by 1024. For example, 14.9 megabytes X 1024 = 15,257 kilobytes.
5. Check your vendor documentation to see how much disk space is required for any third-party software you want to install.
6. Record the directories for installing your optional software.
Adding Software Using Software Manager This section describes how to use the Software Manager tool (swmtool) to add User AnswerBook, but the steps shown are similar for adding other unbundled software. It assumes you know the amount of disk space required for your software, you have a directory that has adequate space for it, and the CD-ROM is in the compact disc player.
Adding User AnswerBookand Other Software 33
34
Note - Select a Software Manager window by pressing the left mouse button before typing text.
1. Check that you are logged in as superuser. You must have superuser privileges to run the Software Manager tool.
2. In the Command Tool shell, type /usr/sbin/swmtool and press Return. The Software Manager tool is started and its base window is displayed.
# /usr/sbin/swmtool
3. Make sure the Install setting is selected on the Software Manager base window.
4. Choose the Props button. The Software Manager: Properties window is displayed with the default media type as the local CD-ROM.
5. From the Media Type menu button, choose Mounted Directory. This points the Software Manager to the mounted directory for the User AnswerBook software. The Device Name field is dimmed.
6. In the Directory Name text field, type /cdrom/solaris_2_3/s0 and press Return. Be sure to type the underscores, use all lowercase letters, and type zero (0) as the final character. The / cdrom/ solaris_2_3 / sa directory is where the User AnswerBook software resides.
If you make a typing error, press Reset and retype the directory path name.
If you receive an error that says the path name does not exist, follow the steps under "Using Volume Manager" at the beginning of this chapter.
Solaris 2.3 Basic Installation Guide-October 1993

7. If installing the User AnswerBook product, make sure the entries in your Properties window match the following sample.
Software Manager: Properties
Category: (2) Source Media
Media Type: (2) Mounted Directory
Directory Name: Icdrom/solaris_2_3/s~
8. Choose Apply. The Software Manager base window displays the software in the /cdrom/solaris_2_3/s0 directory.
9. Dismiss the Software Manager Properties window.
Caution - In steps 10-15, do NOT select icons so they display in reverse video. Selecting icons in these steps can cause problems. If you select an icon in error, deselect it by clicking on it. A square around an icon indicates a version of the software already exists on your system; it does not indicate the icon is selected.
10. Move the mouse pointer over the Solaris 2.3 icon (do not select). Using the MENU button, choose Expand. The Solaris 2.3 software options (predefined group of package clusters) are displayed.
11. Move the mouse pointer over the Entire Distribution icon (do not select). Using the MENU button, choose Expand.
12. Increase the Software Manager base window to the full length of the screen by using the resize corners.
Adding User AnswerBook and Other Software 35
36
13. Using the scrollbar on the right of the window, scroll through the complete list and deselect any highlighted icons by clicking on them once.
14. Scroll through the list until you see the Solaris 2.3 User AnswerBook icon.
15. Follow steps a-d if you want to install the User AnswerBook in a directory other than / opt, which is the default directory for installing unbundled software. (Otherwise, proceed to step 16.)
a. Move the mouse over the Solaris 2.3 User AnswerBook icon (do not select). Using the MENU button, choose Set Base Directory. The Package Information window is displayed.
b. In the Base Directory text field, type the directory where you want to install your software. The directory you type in this field can be any directory that has free space.
c. Choose Apply.
Note - When you choose Apply, there is no visual feedback indicating the Apply was successful.
d. Dismiss the Package Information window.
16. On the Software Manager Base window, deselect any icons that may be in reverse video.
17. Click once on the Solaris 2.3 User AnswerBook icon so it displays in reverse video. This step requires the icon to be in reverse video.
18. Choose the Begin Installation button in the upper left corner of the window. The Software Manager window displays messages about the installation in the Command Input/Output pop-up window. You are prompted to continue or quit the installation in this window.
19. To continue installation, type y and press Return.
20. Dismiss the Software Manager Base window and the Command Input/Out window when the installation is complete.
Solaris 2.3 Basic Installation Guide-October 1993
Starting User AnswerBook To start the User AnswerBook product after successful installation:
• From the workspace menu, choose Programs >- AnswerBook
Note - Starting the User AnswerBook may take 40 seconds or more. The only indicators you'll see are in the Command Tool shell (if opened.)
Proceed to the next chapter, "Creating a User Account and Environment" after you have finished adding software or the User AnswerBook product.
Adding User AnswerBook and Other Software 37

38 Solaris 2.3 Basic Installation Guide-October 1993
Creating a User Account and Environment
This chapter describes the steps and terminology needed to create a user account and environment. Logging into the new account is also covered.
The tasks for creating a user account and environment are:
• Mounting the home directory if it resides on a server by using the automounter or an /etc/vfstab entry.
• Using Administration Tool to create the user account and, if needed, the home directory.
• Creating a password for the user.
• Setting up the user's initialization file to execute upon login.
• Logging into the system with the new login name and password.
What Is a User Account?
A user account describes you as a unique user to the system. It identifies your user name for logging into the system, your home directory, and parameters for managing your password.
Setting Up Your Home Directory
Your home (or login) directory contains files and subdirectories that are created and owned by you.
39
It can reside on your local system if you have enough disk space, or it can be supplied by a server system if you have limited disk space.
If your home directory resides on a server, it can be remotely mounted on your system when you log in. The mounting process attaches a directory into a file system hierarchy so it can be accessed by users.
Remote file resources like users' home directories are mounted automatically using the automounter. Server system administrators are responsible for configuring the automounter to automatically mount home directories.
Find out from your system administrator if your home directory resides on a server. If so, also find out the name of the server that supplies your home directory and the path name of your home directory, which is usually / export /home/user-name.
You can add this information to your newly installed system so your home directory is automatically mounted when you log in if your system administrator has not set this up for you.
Using Initialization Files Initialization files are used to customize a user's search path, start the window environment and set other environment variables. The Solaris 2.3 operating environment provides default initialization files in the / etc/ skel directory. This prototype directory contains different initialization files for each shell type available. It is specified when the user account is created using Administration Tool.
When to Create a User Account
40
You should create a user account:
• If you are a new user and are still logged into the system as superuser
You should create a user account so you do not continue working as superuser. As superuser, you have unrestricted access to all files, and you can perform system administrator functions such as shutting down the system, and editing and removing protected files.
Solaris 2.3 Basic Installation Guide-October 1993

Even with a standalone system, you should become superuser only when it is required; this will protect you from destroying data or inadvertently shutting down your system. See Appendix 0, "The Superuser Account," for information on when and how to become superuser.
• If you allow someone to use your system
Each person you allow to use your system should have a login and password so you cannot access each other's files without permission.
Accessing Your Home Directory If your home directory resides on your system's local disk, skip to the next section called "Creating a User Account."
There are several ways to access your home directory if your home directory is stored on a server. Verify with your system administrator which of the following methods is best for your network environment.
• Create an entry in the auto_home file on your local system to mount it automatically whenever you log in.
• Create an entry in the auto_home file in the name service database to mount it automatically whenever you log in to any system on the network. (This must be done by a system or network administrator who can modify the name service database.)
• Use the mount command to mount your home directory. Then create an entry in the /etc/vfstab file on your local system to mount it whenever your system reboots.
The first two methods use the auto_home file and the automounter to mount your home directory when you access it or log in. See your system administrator about creating an auto_home entry for your system. The last method mounts your home directory on a more permanent basis.
Creating an /etc/vfstabEntry
You can mount your home directory from a server by using the mount command. If your system is rebooted, however, you will have to issue the moun t command again. To permanently mount your home directory from a server, add an entry to the /etc/vfstab file.
Creating a User Account and Environment 41
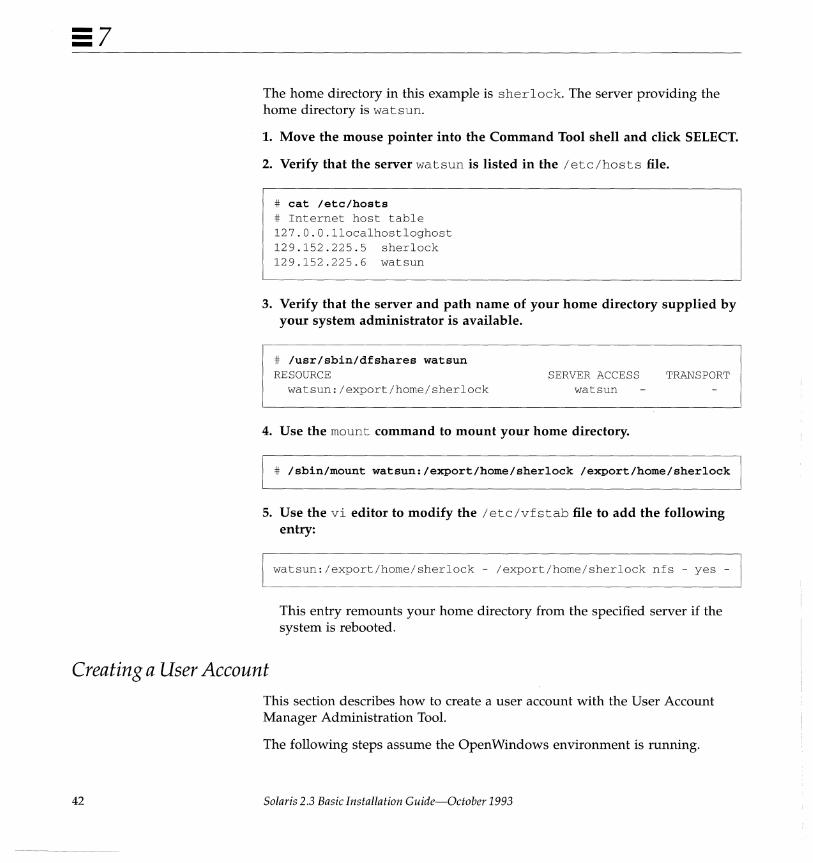
The home directory in this example is sherlock. The server providing the home directory is wa t sun.
1. Move the mouse pointer into the Command Tool shell and click SELECT.
2. Verify that the server watsun is listed in the jete/hosts file.
# eat fete/hosts # Internet host table 127.0.0.1localhostloghost 129.152.225.5 sherlock 129.152.225.6 watsun
3. Verify that the server and path name of your home directory supplied by your system administrator is available.
# /usr/sbin/dfshares watsun RESOURCE
watsun:/export/home/sherlock SERVER ACCESS
watsun
4. Use the mount command to mount your home directory.
TRANSPORT
# /sbin/mount watsun:/export/home/sherloek /export/home/sherlock
5. Use the vi editor to modify the /ete/vfstab file to add the following entry:
watsun:/export/home/sherlock - /export/home/sherlock nfs - yes -
This entry remounts your home directory from the specified server if the system is rebooted.
Creating a User Account
42
This section describes how to create a user account with the User Account Manager Administration Tool.
The following steps assume the Open Windows environment is running.
Solaris 2.3 Basic Installation Guide-October 1993
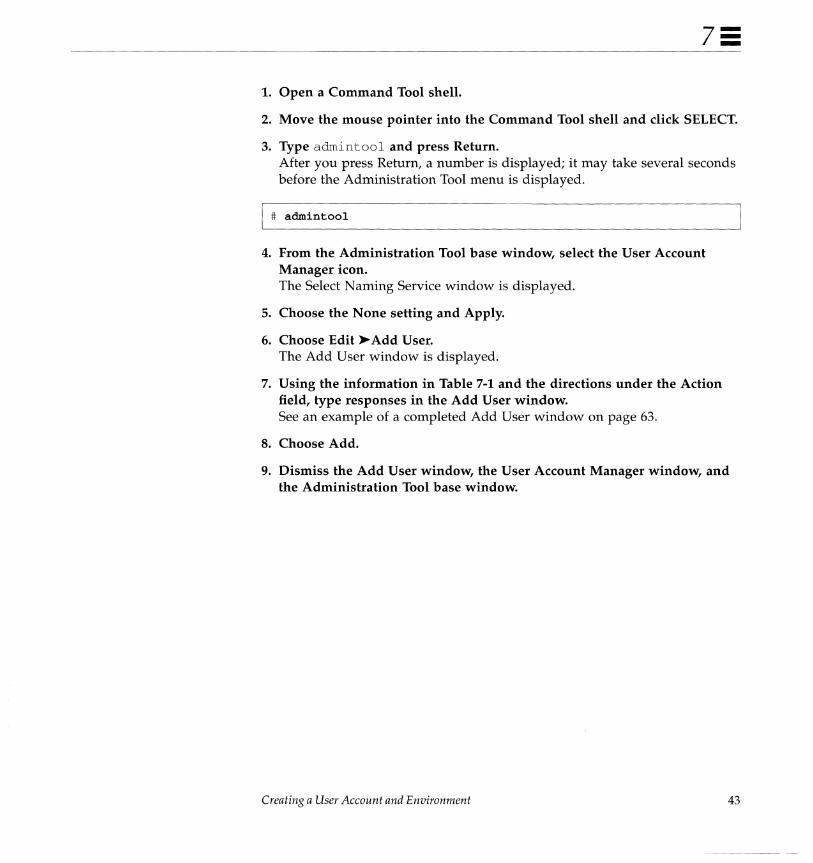
7= 1. Open a Command Tool shell.
2. Move the mouse pointer into the Command Tool shell and click SELECT.
3. Type admintool and press Return. After you press Return, a number is displayed; it may take several seconds before the Administration Tool menu is displayed.
# admintool
4. From the Administration Tool base window, select the User Account Manager icon. The Select Naming Service window is displayed.
5. Choose the None setting and Apply.
6. Choose Edit ~ Add User. The Add User window is displayed.
7. Using the information in Table 7-1 and the directions under the Action field, type responses in the Add User window. See an example of a completed Add User window on page 63.
8. Choose Add.
9. Dismiss the Add User window, the User Account Manager window, and the Administration Tool base window.
Creating a User Account and Environment 43
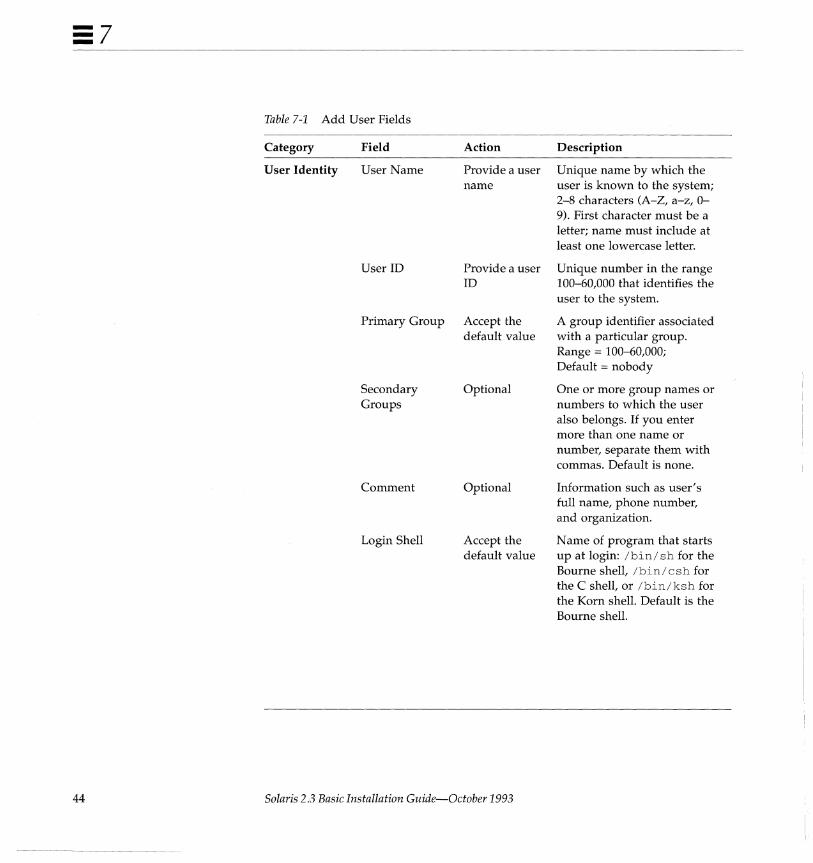
Table 7-1 Add User Fields
Category Field Action Description
User Identity User Name Provide a user Unique name by which the name user is known to the system;
2-8 characters (A-Z, a-z, 0-9). First character must be a letter; name must include at least one lowercase letter.
User ID Provide a user Unique number in the range ID 100-60,000 that identifies the
user to the system.
Primary Group Accept the A group identifier associated default value with a particular group.
Range = 100-60,000; Default = nobody
Secondary Optional One or more group names or Groups numbers to which the user
also belongs. If you enter more than one name or number, separate them with commas. Default is none.
Comment Optional Information such as user's full name, phone number, and organization.
Login Shell Accept the Name of program that starts default value up at login: Ibinl sh for the
Bourne shell, I bin I c s h for the C shell, or Ibin/ksh for the Korn shell. Default is the Bourne shell.
44 Solaris 2.3 Basic Installation Guide-October 1993
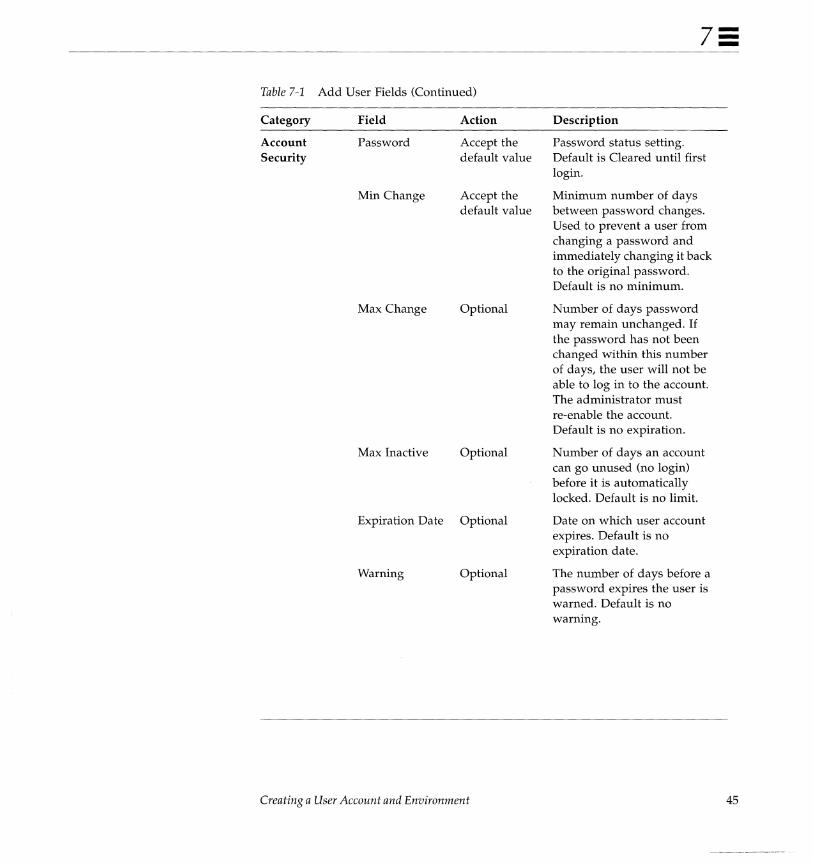
Table 7-1 Add User Fields (Continued)
Category Field Action Description
Account Password Accept the Password status setting. Security default value Default is Cleared until first
login.
Min Change Accept the Minimum number of days default value between password changes.
Used to prevent a user from changing a password and immediately changing it back to the original password. Default is no minimum.
Max Change Optional Number of days password may remain unchanged. If the password has not been changed within this number of days, the user will not be able to log in to the account. The administrator must re-enable the account. Default is no expiration.
Max Inactive Optional Number of days an account can go unused (no login) before it is automatically locked. Default is no limit.
Expiration Date Optional Date on which user account expires. Default is no expiration date.
Warning Optional The number of days before a password expires the user is warned. Default is no warning.
Creating a User Account and Environment 45
46
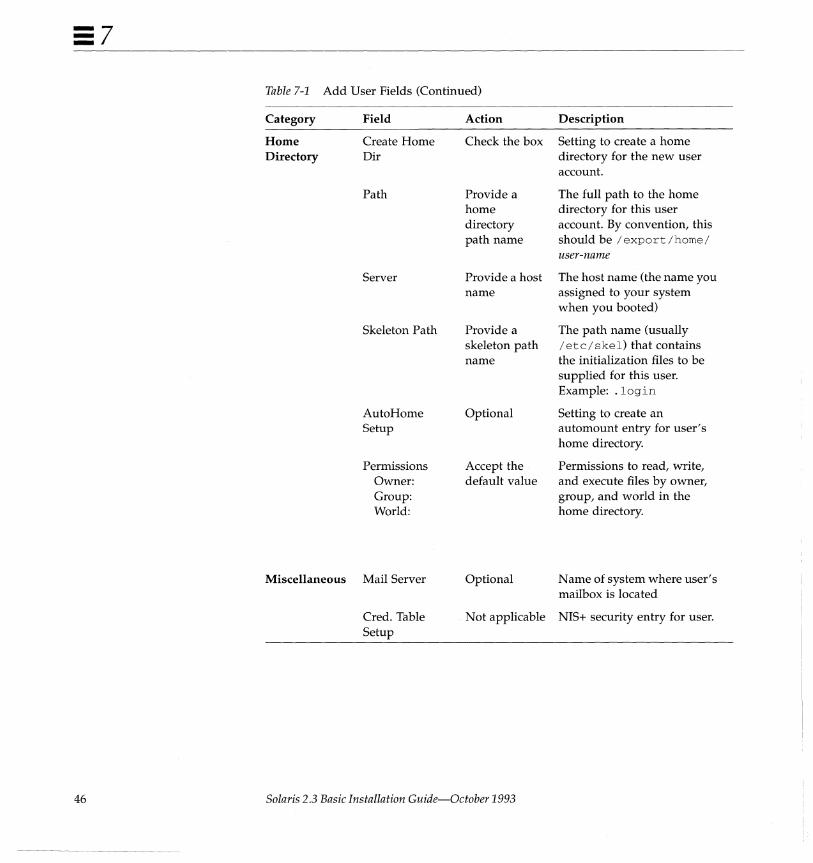
Table 7-1 Add User Fields (Continued)
Category Field Action
Home Create Home Check the box Directory Dir
Path Provide a home directory path name
Server Provide a host name
Skeleton Path Provide a skeleton path name
AutoHome Optional Setup
Permissions Accept the Owner: default value Group: World:
Miscellaneous Mail Server Optional
Description
Setting to create a home directory for the new user account.
The full path to the home directory for this user account. By convention, this should be /export/home/ user-name
The host name (the name you assigned to your system when you booted)
The path name (usually /etc/skel) that contains the initialization files to be supplied for this user. Example: . login
Setting to create an automount entry for user's home directory.
Permissions to read, write, and execute files by owner, group, and world in the home directory.
Name of system where user's mailbox is located
Credo Table Setup
Not applicable NIS+ security entry for user.
Solaris 2.3 Basic Installation Guide-October 1993
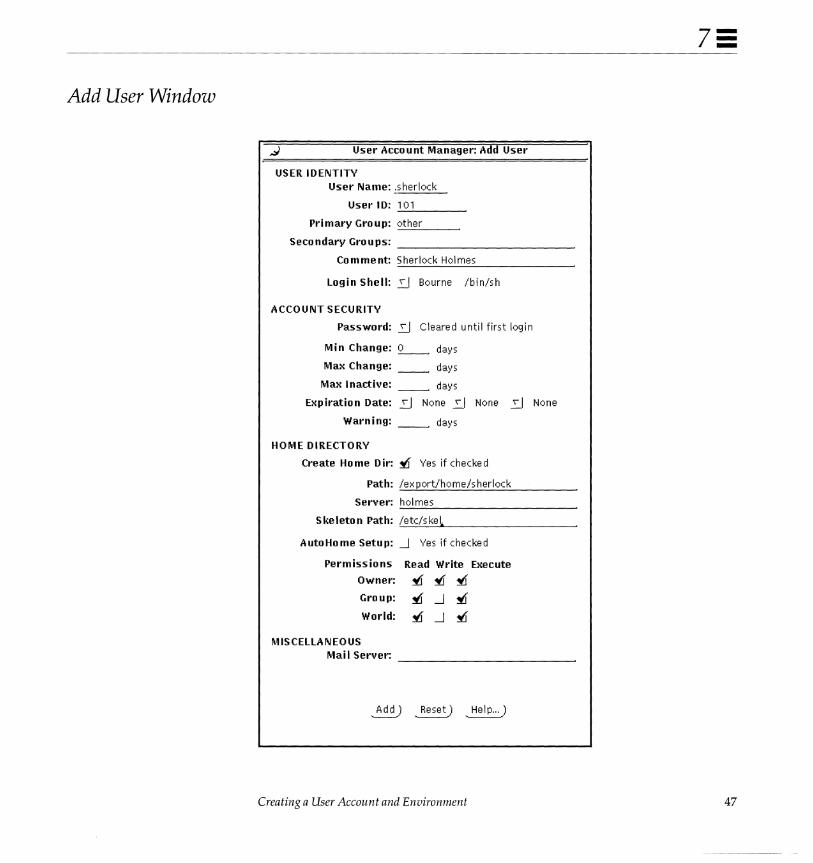
Add User Window
User Account Manager: Add User
USER IDENTITY User Name: .sherlock
User ID: -,-1 O-=--1'--__ ~
Primary Group: -,-ot:..:.hc::e:....r __ _
Secondary Groups:
Co m me nt: Sherlock Hoi mes
Log inS he II: 2J Bourne Ib i n/s h
ACCOUNT SECURITY
Password: 2J Cleared until first login
Min Change: 0 days
Max Change: days
Max I nactive: days
Exp iration Date: 2J None 2J None 2J None
Warning: __ days
HOME DIRECTORY
Create Home Dir: ~ Yes if checked
Path: lex portlhome/s her lock
Server: _ho-=--I-,-m-,-e~s __________________ __
S ke I eto n Path: :...;/e:...:t""c/~s.:..:k-=-e .. l __________________ __
AutoHome Setup: --1 Yes if checked
Perm iss io ns Read Write Execute
Owner: ~ ~ ~
Group: ~ --1 ~ World: ~ --1 ~
MISCELLANEOUS Mail Server:
Creating a User Account and Environment 47
Creating a User Password
48
A password should be one you can easily remember, but difficult for someone else to guess. Passwords must:
• Have at least six characters; at least two must be alphabetic
At least one character should be a number or special character (for example, 3,7, *,/,%, #)
• Differ from the login name, including any reverse or circular shift of the login name (for example, if your login is marvin, your password should not be nivram, arvinm, or rvinam)
To create a user password:
1. Move the mouse pointer into the Command Tool window. If you are a new user, the prompt will be the superuser prompt (#).
2. Type passwd user-name and press Return. The user-name is the name you created for your user account.
# passwd user-name
3. Type a new password as prompted and press Return. The prompt Re-enter new password: is displayed.
New password: Re-enter new password:
4. Retype the password and press Return.
Solaris 2.3 Basic Installation Guide-October 1993
Setting Up Initialization Files This section describes how to set up your user startup or initialization file. Continue using the Command Tool to complete the steps in this section. If you are a new user, you will still be logged in as superuser.
Note - Be sure to type the commands exactly as shown, including the spaces between characters. Also, make sure you type the correct case (upper or lower) because Solaris is case sensitive.
The following steps assume that you specified the / et c / s ke 1 directory as the skeleton path when you created the user account. In this section you will:
• Change to your home directory
• Rename the file local.profile to .profile
• Delete unused initialization files
The sample command lines assume the user login name is sherlock.
To set up your initialization file:
1. Type cd / export Ihome / user-name and press Return. The user-name is the login name specified in the /etc/passwd file when you set up your user account. This command makes your home directory current.
I # cd /export/home/sherlock
2. Type mv local.profile .profile and press Return. This step renames the initialization file so it will be executed upon login.
# mv local.profile .profile
3. Type rm local. * and press Return. This step deletes unused initialization files.
# rm local.*
Creating a User Account and Environment 49
Logging In With Your User Login and Password
50
If you have a new system, you are still logged in as superuser. To log in with your user login and password that you created in this chapter:
1. From the Workspace menu, choose Exit.
2. At the prompt, type exi t and press Return. This ends your superuser session and the login: prompt is displayed.
# exit holmes console login:
3. Type your user login and press Return. If you mistype the login, press the Delete key (not Backspace) to back up and correct the error.
4. Type your password and press Return.
I password:
The message Starting OpenWindows in 5 seconds (type Control-C to interrupt) is displayed, followed by the Workspace.
Proceed to the next chapter, "Ending and Beginning a Work Session," for information on accessing the Open Windows environment.
Solaris 2.3 Basic Installation Guide-October 1993
Saving Your Workspace
Securing Your System
Ending and Beginning a Work Session
This chapter describes how to end and begin a work session.
You can save the screen arrangement of tools and applications on your workspace at any time.
To save your workspace:
1. Arrange the icons and windows on your workspace.
2. From the Workspace menu, choose Save Workspace. The notice Save Workspace complete is displayed.
3. Choose OK. When you log back in, the workspace is displayed as you saved it.
8=
Whenever you stop working you should log out. If you share a system, logging out allows other users to log in to the system under their own user accounts so your files cannot be accessed without permission. You may also need to log out in case of an expected power outage, or for customized changes to take effect. Or, if you leave your system unattended and are not sharing your system, you may want to just lock your screen.
51
::8
52
Logging Out To exit the Open Windows environment and log out:
1. Save any files that have been closed to icons.
2. From the Workspace menu, choose Exit. A pop-up window is displayed, asking you to confirm that you want to exit Open Windows.
3. Choose Exit.
4. At the prompt, type exi t and press Return. The login: prompt is displayed. This prompt includes the host name you created during installation. Now you or another user can log into the system to start a new session.
$ exit moriarity console login:
Locking the Screen An easy way to secure your system is to exit the workspace and leave the Open Windows environment running. This is done by activating the Lock Screen feature from the Workspace menu.
To lock your screen:
1. From the Workspace menu, choose Utilities> Lock Screen. The screen displays the Sun Microsystems® logo in a randomly changing image.
Solaris 2.2 Basic Installation Guide-October 1993
Logging In
8::
In Chapter 7, "Creating a User Account and Environment," you created a user account where you specified a login name. Logging in tells the system who you are and what access and permissions you have. Because more than one person may have an account on your system with different access and file permissions, each user should log in with a unique login and password.
Note - The system recognizes the difference between uppercase and lowercase letters. Make sure you type your login and password using the correct case.
To log in to the system:
1. At the login prompt, type your user name and press Return.
I rnoriarity console login: sherlock
2. Type your password and press Return. For security reasons, the characters are not displayed.
Password:
If you mistype the login or password, the system will prompt you to reenter the login and password.
rnoriarity console login: sherlock Password: Login incorrect. rnoriarity console login:
Ending and Beginning a Work Session 53
=8
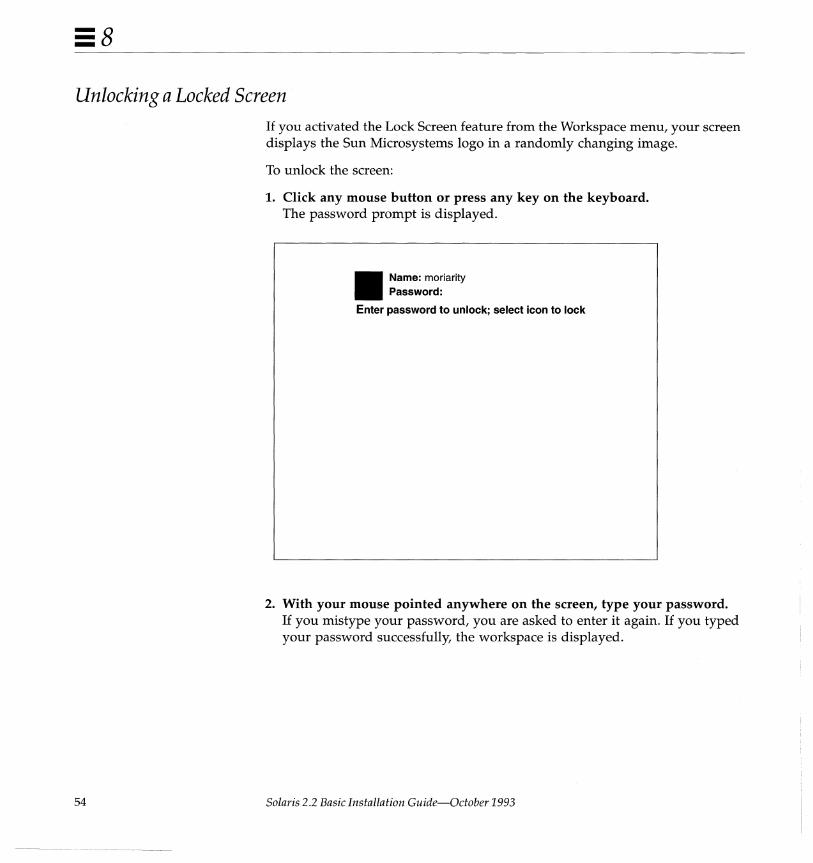
Unlocking a Locked Screen
54
If you activated the Lock Screen feature from the Workspace menu, your screen displays the Sun Microsystems logo in a randomly changing image.
To unlock the screen:
1. Click any mouse button or press any key on the keyboard. The password prompt is displayed.
Name: moriarity Password:
Enter password to unlock; select icon to lock
2. With your mouse pointed anywhere on the screen, type your password. If you mistype your password, you are asked to enter it again. If you typed your password successfully, the workspace is displayed.
Solaris 2.2 Basic Installation Guide-October 1993
An Installation Case Study
This appendix contains a standalone installation case study. This information can be used as step-by-step example of installing the Solaris 2.3 environment on a networked standalone system using the interactive, quick installation method.
The system to be installed is non-preinstalled SPARCstation™ IPCTM system with:
• a locally connected compact disc player
• 28 megabytes of memory
• 207 megabytes of disk space
The completed installation work sheet on the following page identifies specific information to be provided during the installation process.
Note - This case study is an example only.
55
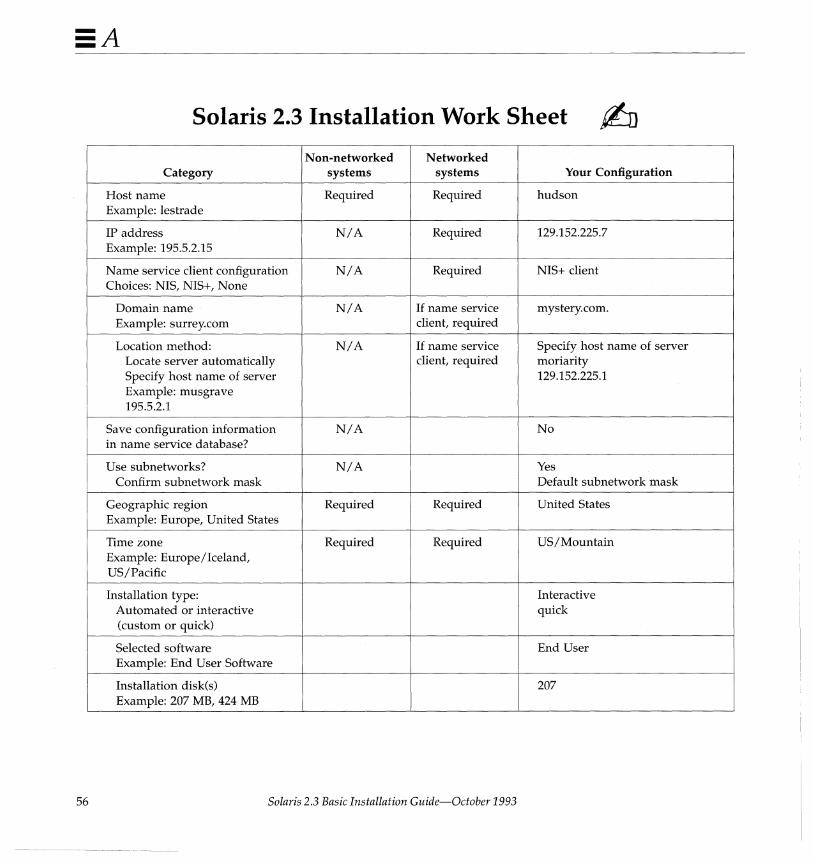
Solaris 2.3 Installation Work Sheet
Non-networked Networked Category systems systems Your Configuration
Host name Required Required hudson Example: lestrade
IP address N/A Required 129.152.225.7 Example: 195.5.2.15
Name service client configuration N/A Required NIS+ client Choices: NIS, NIS+, None
Domain name N/A If name service mystery.com. Example: surrey.com client, required
Location method: N/A If name service Specify host name of server Locate server automatically client, required moriarity Specify host name of server 129.152.225.1 Example: musgrave 195.5.2.1
Save configuration information N/A No in name service database?
Use subnetworks? N/A Yes Confirm subnetwork mask Default subnetwork mask
Geographic region Required Required United States Example: Europe, United States
Time zone Required Required US/Mountain Example: Europe/Iceland, US/Pacific
Installation type: Interactive Automated or interactive quick (custom or quick)
Selected software End User Example: End User Software
Installation disk(s) 207 Example: 207 MB, 424 MB
56 Solaris 2.3 Basic Installation Guide-October 1993
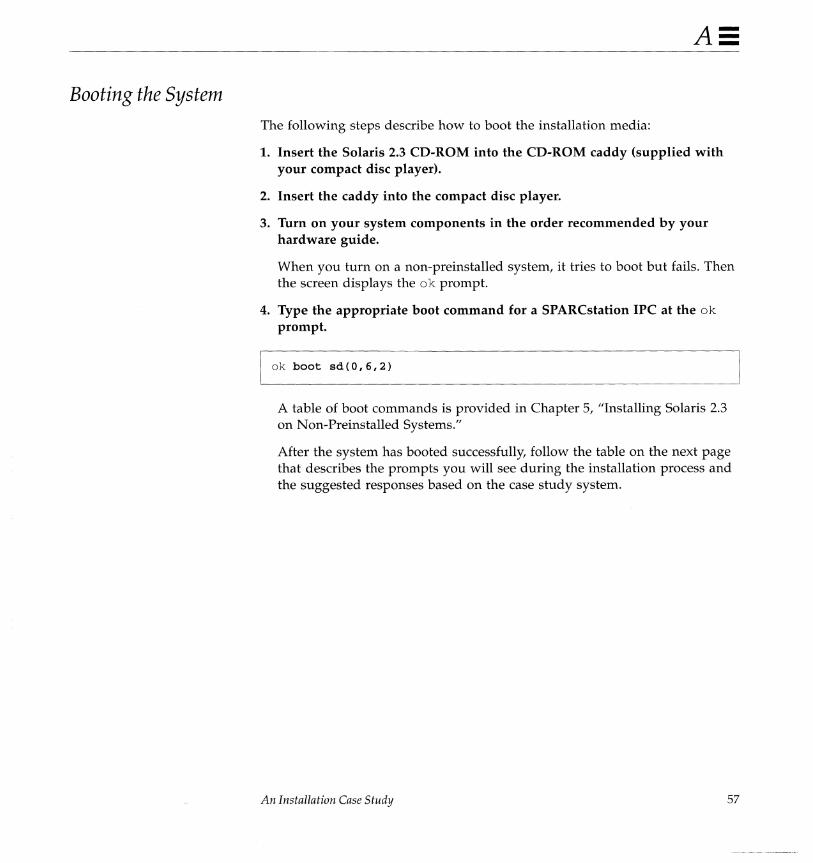
Booting the System The following steps describe how to boot the installation media:
1. Insert the Solaris 2.3 CD-ROM into the CD-ROM caddy (supplied with your compact disc player).
2. Insert the caddy into the compact disc player.
3. Turn on your system components in the order recommended by your hardware guide.
When you turn on a non-preinstalled system, it tries to boot but fails. Then the screen displays the ok prompt.
4. Type the appropriate boot command for a SPARCstation IPC at the ok
prompt.
ok boot sd(O,6,2)
A table of boot commands is provided in Chapter 5, "Installing Solaris 2.3 on Non-Preinstalled Systems."
After the system has booted successfully, follow the table on the next page that describes the prompts you will see during the installation process and the suggested responses based on the case study system.
An Installation Case Study 57

Installing the Solaris 2.3 Operating Environment
Supplying System Configuration Information
Use Table A-I to respond to the system configuration screens.
Table A-1 System Configuration Phase
System Configuration Screen Prompts Response
What is the host name for your workstation? hudson
will this system be connected to a network? Yes
What is your Internet Protocol (IP) address? 192.152.225.7
Is the above information correct? Yes. If no, select No re-enter information.
Do you want to configure this system as a NIS+ client client of a name service?
What is the name for the (existing) name mystery. com. service domain?
Name service server location method? Specify host name of server
Server's host name? moriarity
Server's IP address? 129.152.225.1
Does this workstation's network have Yes. subnetworks?
This is the default netmask value. Press Return at the default value or type an alternative value
Is the above information correct? Yes. If no, select No re-enter information.
What is your geographic region? United States
What is your time zone? Mountain
What is the current date and time? Press Return to confirm current date and time
Do you want to save this system's configuration No information in the name service databases?
Is the above information correct? Yes. If no, select No re-enter information.
58 Solaris 2.3 Basic Installation Guide-October 1993

Supplying System Installation Information
Use Table A-2 to respond to the system installation screens.
Table A-2 System Installation Phase
System Installation Screen Prompt Response
Solaris Installation Menu Select Quick Install
Quick Install: Software Configurations Menu Select End User System Support
Quick Install Configuration Menu Verify installation information; then press Begin Install
An Installation Case Study 59
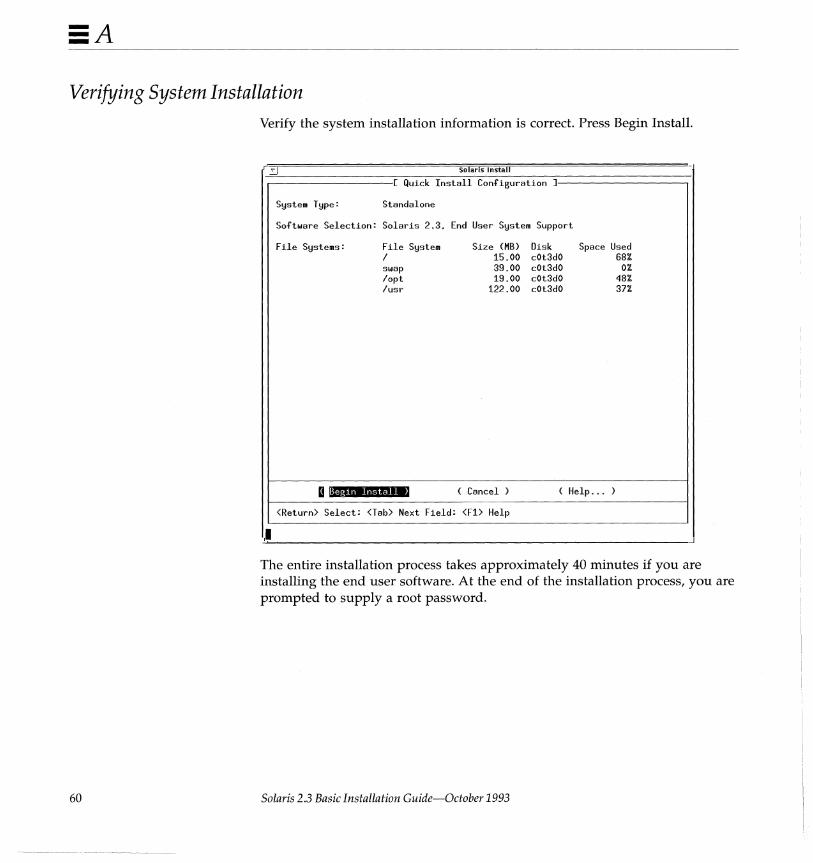
Verifying System Installation
60
Verify the system installation information is correct. Press Begin Install.
Solaris Install
[ Quick Install Configuration
S\Jstem T\Jpe: Standalone
Software Selection: Solaris 2.3. End User System Support
File Systems: File System Size (MB) Disk Space Used f 15.00 cOt3dO 68% swap 39.00 cOt3dO 0% fopt 19.00 cOt3dO 48% fusr 122.00 cOt3dO 37%
Begin Install ) ( Cancel ) ( Help ... )
<Return> Select: <Tab> Next Field: <F1> Help
~,I~---------------------------------------------------~ The entire installation process takes approximately 40 minutes if you are installing the end user software. At the end of the installation process, you are prompted to supply a root password.
Solaris 2.3 Basic Installation Guide-October 1993
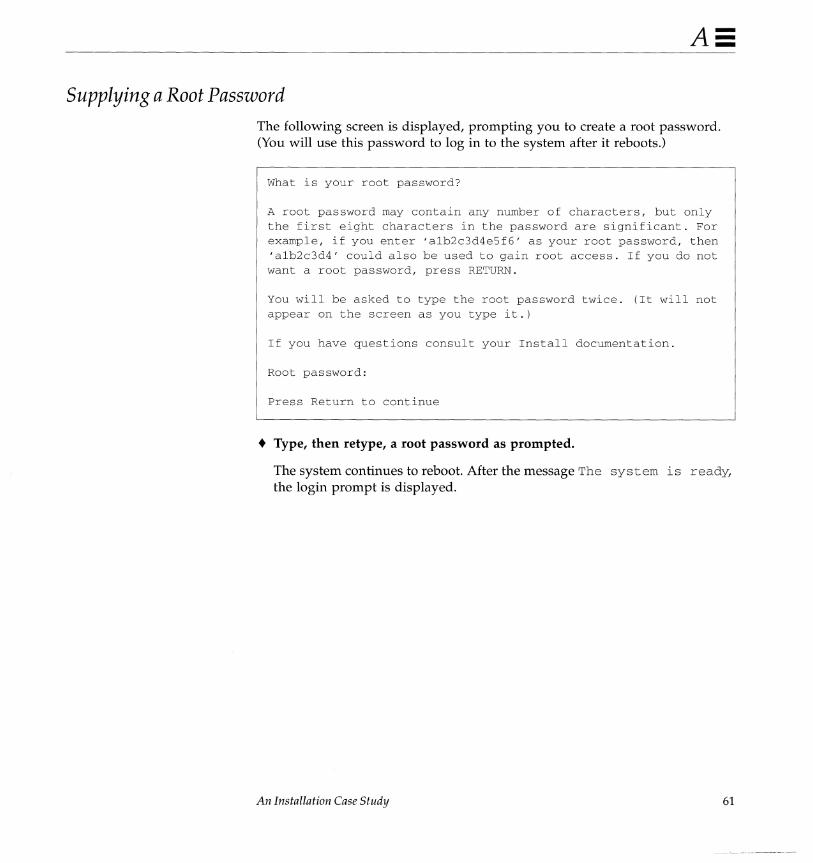
Supplying a Root Password The following screen is displayed, prompting you to create a root password. (You will use this password to log in to the system after it reboots.)
What is your root password?
A root password may contain any number of characters, but only the first eight characters in the password are significant. For example, if you enter 'alb2c3d4e5f6' as your root password, then 'alb2c3d4' could also be used to gain root access. If you do not want a root password, press RETURN.
You will be asked to type the root password twice. (It will not appear on the screen as you type it.)
If you have questions consult your Install documentation.
Root password:
Press Return to continue
• Type, then retype, a root password as prompted.
The system continues to reboot. After the message The system is ready, the login prompt is displayed.
An Installation Case Study 61

62 Solaris 2.3 Basic Installation Guide-October 1993
System Administration
Roadmap to Tasks and Topics
Table B-1 lists tasks and topics in the Solaris 2.3 operating environment and what books contain pertinent information. If you've installed the User AnswerBook product, many of these books are online.
As a standalone user, you are your own system administrator. As such, you may want to purchase the Solaris 2.3 System Administrator AnswerBook, which contains the system administration book set. For descriptions of the system administration book set, see the Solaris 2.3 Roadmap to Documentation in the User AnswerBook. To order paper copies, use the SunSoftTM documentation order card that comes with your system.
63

Finding Solaris 2.3 Information
64
Table B-1 Finding Solaris 2.3 Information
Task or Information
Introducing Open Windows
About windows, working with windows
Migrating from Open Windows Version 2
Migrating from Sun View
Other methods of starting Open Windows
The Sun desktop
Introducing DeskSet tools
Online help
Help Handbooks
Solaris 2.3 features, late-breaking news, known bugs
Connecting printers
Setting up printing by using the Printer Manager
The Print Tool • Printing ASCII files • Checking the printer queue status • Changing Print Tool properties
Solaris 2.3 Basic Installation Guide-October 1993
Where?
Solaris 2.3 User's Guide
Workspace menu ~ Help ~ Introducing Your Sun Desktop
Solaris 2.3 Advanced User's Guide
Solaris 2.3 Advanced User's Guide
Solaris 2.3 Advanced User's Guide
Workspace menu ~ Desktop Intro
Solaris 2.3 User's Guide
Workspace menu ~ Help or Press the Help key
Workspace menu ~ Help
Open Issues and Late Breaking News for Users
See your hardware guide
Solaris 2.3 Setting Up User Accounts, Printers, and Mail
Solaris 2.3 User's Guide
B ---Table B-1 Finding Solaris 2.3 Information (Continued)
Task or Information
Using printers: submitting requests, determining status, canceling a request
Formatting a new disk
Shell tools
Turning the system on and off
System information: • System name and type • Physical memory (RAM) • Virtual memory (swap) • Operating system version • Window system version
Solaris 2.3 documentation set for end users, system administrators, and developers
Customizing the Solaris 2.3 environment
Tools to: • Search for patterns, words, or phrases • Determine disk and directory space • Identify differences between files • Locate specific files on your system • Track system processes
The vi editor
Roadmap to Tasks and Topics
Where?
Solaris 2.3 Advanced User's Guide
Solaris 2.3 Administering File Systems
Solaris 2.3 User's Guide
See your hardware gUide
Workspace menu ~ Workstation Info
Solaris 2.3 Roadmap to Documentation
Solaris 2.3 Advanced User's Guide
Solaris 2.3 Advanced User's Guide
Solaris 2.3 Advanced User's Guide
65

66 Solaris 2.3 Basic Installation Guide-October 1993
Open Windows Concepts c= This appendix summarizes Open Windows, Sun's implementation of the OPEN LOOK graphical user interface. It covers the basics to get you through installation if you are unfamiliar with the OPEN LOOK graphical user interface. For more information on OpenWindows, see Appendix B, "Road map to Tasks and Topics."
The Open Windows Environment Using the OpenWindows environment enables you to manipulate objects with a mouse, rather than typing commands at the keyboard.
After the Open Windows environment is installed, the workspace is displayed; this is the solid background that surrounds windows and icons. When you first start the Open Windows environment, the workspace displays the following items:
• A Command Tool (cmdtool) - A shell tool or command interpreter which processes your keyboard input and passes commands to the operating system.
• The File Manager - A tool for manipulating directories, subdirectories, and files in your home directory without typing commands at a shell prompt. A second File Manager window displays the CD-ROM icon which is automatically mounted during installation; the folders (for example SO)
represent the disk slices on the CD-ROM.
• A wastebasket - A temporary holding place for files you intend to discard.
67
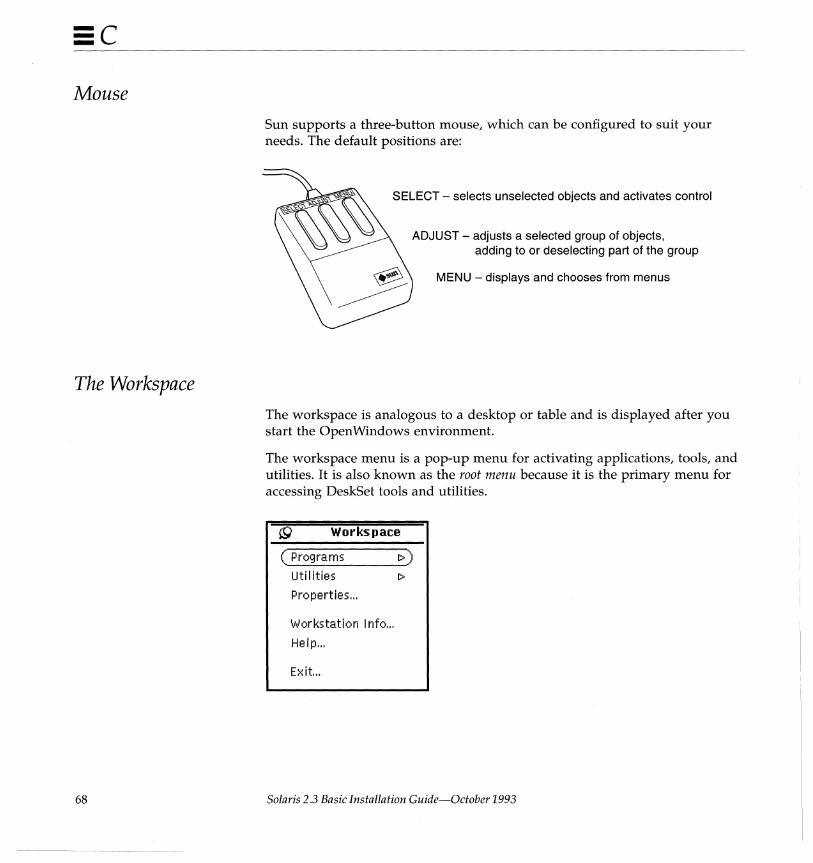
::c Mouse
The Workspace
68
Sun supports a three-button mouse, which can be configured to suit your needs. The default positions are:
SELECT - selects unselected objects and activates control
ADJUST - adjusts a selected group of objects, adding to or deselecting part of the group
MENU - displays and chooses from menus
The workspace is analogous to a desktop or table and is displayed after you start the Open Windows environment.
The workspace menu is a pop-up menu for activating applications, tools, and utilities. It is also known as the root menu because it is the primary menu for accessing DeskSet tools and utilities.
!:9 Works pace
( Programs [> )
Utilities [>
Properties ...
Workstation Info ...
Help ...
Exit ...
Solaris 2.3 Basic Installation Guide-October 1993
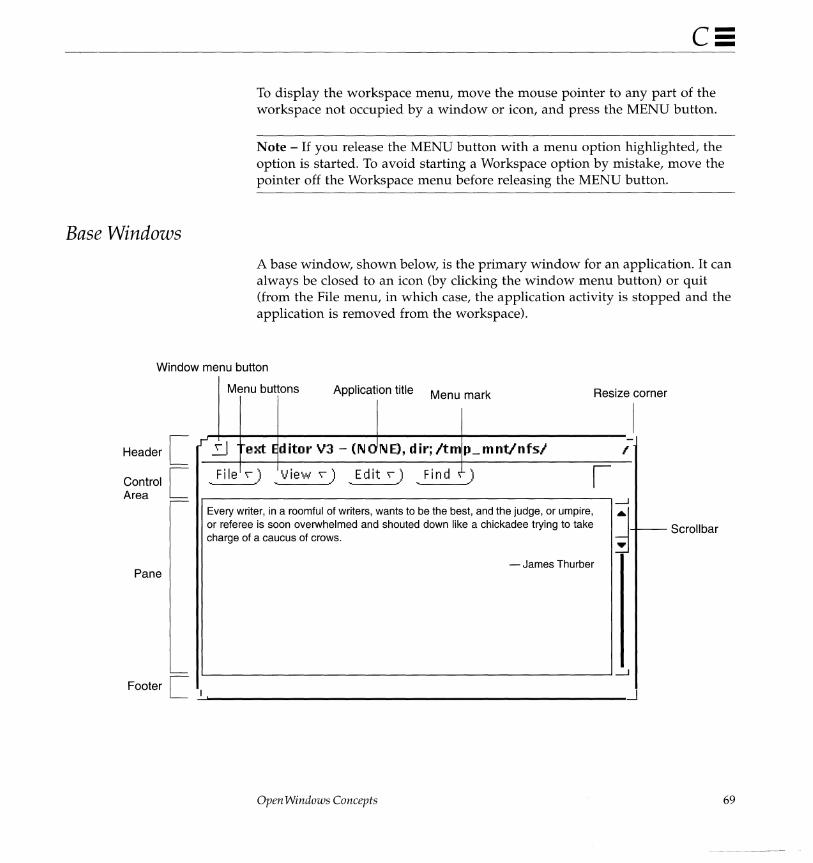
Base Windows
c= To display the workspace menu, move the mouse pointer to any part of the workspace not occupied by a window or icon, and press the MENU button.
Note - If you release the MENU button with a menu option highlighted, the option is started. To avoid starting a Workspace option by mistake, move the pointer off the Workspace menu before releasing the MENU button.
A base window, shown below, is the primary window for an application. It can always be closed to an icon (by clicking the window menu button) or quit (from the File menu, in which case, the application activity is stopped and the application is removed from the workspace).
Window menu button
Header [
Control [ Area
Pane
Menu buttons Application title Menu mark Resize corner
I ,...~ eld E ditor V3 - (NO NE), dir; Itm p_mnt/nfsl I
Jile ,) _ View,) ,Edit,) Find ) I ,
---l Every writer, in a roomful of writers, wants to be the best, and the judge, or umpire,
~ or referee is soon overwhelmed and shouted down like a chickadee trying to take f----charge of a caucus of crows.
- James Thurber
---l
Footer C ..:.I ....... ___________________________ ,~
Open Windows Concepts
Scroll bar
69
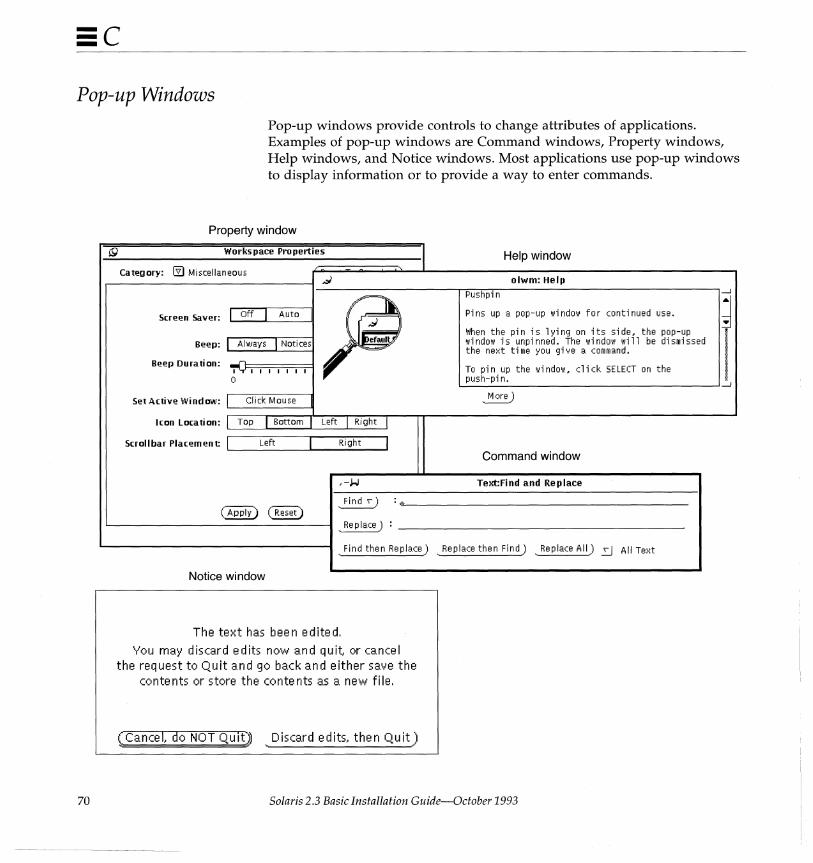
::c Pop-up Windows
70
Pop-up windows provide controls to change attributes of applications. Examples of pop-up windows are Command windows, Property windows, Help windows, and Notice windows. Most applications use pop-up windows to display information or to provide a way to enter commands.
Property window
!9 Workspace Properties
Category: @) M i scellan eou s ..:J
~ Screen Saver: [Off J Auto
(11..:J IJ 1J~ Beep: I Always I Notices -=
Beep Duration: ~, I I I I I I
0
Set Active Window: I Click Mouse
Icon location: I Top I Bottom Left Right I
Scrollbar Placement: I Left I Right I
.-,1..1
(APply) ~ ~ ..
Replace) :
Find then Replace)
Notice window
The text has been edited.
You may discard edits now and quit or cancel the request to Quit and go back and either save the
conte nts or store the conte nts as a new fi Ie,
(cancel, do NOT Quit] " Discard edits, then Quit)
Help window
olwm: Help Pushpin
Pins up a pop-up window for continued use.
When the pin is lying on its side. the pop-up window is unpinned. The window will be dismissed the next time you give a command.
To pin up the window. click SELECT on the push-pin.
More)
Command window
TeKt:Find and Replace
Replace then Find) Replace All) ~ All Text
Solaris 2.3 Basic Installation Guide-October 1993
---'
J ---'

Pushpins
c::
Most menus, Property windows, and Command windows have push pins in the upper left corner so you can keep them displayed on the Workspace for repeated use.
Making Settings Active or Inactive
On some menus, you must choose only one of two or more settings; on other menus, you can make several selections from the same menu.
In either case, when you choose a setting, it appears to be indented or depressed with a dark background. Settings that are raised with a light background are not chosen.
In the following example, the AM setting is chosen.
Open Windows Concepts 71

::c
72 Solaris 2.3 Basic Installation Guide-October 1993
---~ -~-.- -- - .~.--~-~.----
The Superuser Account
This appendix describes when and how to become superuser. It also describes how to exit a superuser account, and how to log in as superuser.
When to Become Superuser You need to become superuser to perform the following system administration tasks:
• Backing up and restoring file systems
• Shutting down the system
• Mounting and unmounting file systems
• Changing ownership and permissions for a file or directory you do not own
• Creating device files
• Setting the sticky bit on a directory
73
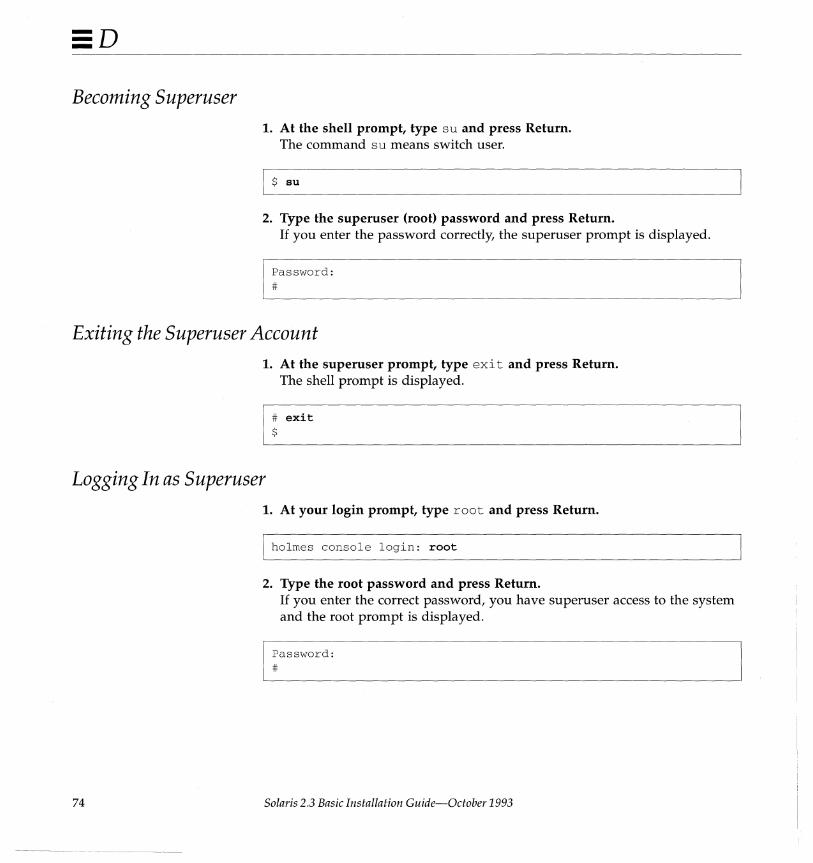
Becoming Superuser 1. At the shell prompt, type su and press Return.
The command su means switch user.
$ su
2. Type the superuser (root) password and press Return. If you enter the password correctly, the superuser prompt is displayed.
Password: #
Exiting the Superuser Account 1. At the superuser prompt, type exi t and press Return.
The shell prompt is displayed.
# exit $
Logging In as Superuser
74
1. At your login prompt, type root and press Return.
I holmes console login: root
2. Type the root password and press Return. If you enter the correct password, you have superuser access to the system and the root prompt is displayed.
Password: #
Solaris 2.3 Basic Installation Guide-October 1993
application
architecture
automated installation
booting
caret
Glossary
Software designed to perform a specific task, such as word processing, accounting, design, or database management.
The specific components of a computer system and the way they interact with one another. From the perspective of the core of the operating system, architecture is the type of processor chip in the system. The Solaris 2.3 operating environment runs on SPARC architectures (for example sun4c).
An installation method that allows a preinstalled or preconfigured system to be installed automatically when booted. In the case of a preinstalled system with a local compact disc player, the user is still prompted to supply system configuration information.
The process that occurs after the system is powered on or after the boot command is entered. During the boot, the system determines which hardware devices are attached, and brings the operating system kernel into memory and operation at the run level specified by the boot command.
The insertion point indicator in a Command Tool or Shell Tool window. In an active window, the caret is a black triangle when you select the window. In an inactive window, the caret is a static gray diamond.
75
case sensitive
command
command prompt
Command Tool
configuration
default
device
directory
disk slice
display device
drive
76
Treating lowercase and uppercase characters as two kinds of characters with separate functions.
A string of characters that directs the system to process information or start an application.
The string of characters that the system displays to tell you it is ready to accept and interpret your next command line. Often, the command prompt includes the name of the system.
A window that accepts typed commands and passes them to the system for processing. It has all the features of the standard Text Editor pane including a scrollbar.
A default selection of typical software.
An assumed value, or an action taken automatically unless you specify otherwise.
A hardware component, such as a printer or disk drive, acting as a unit to perform a specific function.
A division or level in a hierarchical file storage system that contains files and, optionally, other directories.
A portion of the disk reserved for a specific file system and function.
The hardware device that displays windows, text, icons, and graphics. Typically, a display device is a frame buffer and monitor.
The hardware that performs the physical storage of data for the system onto a tape or disk and back again.
Solaris 2.3 Basic Installation Guide-October 1993
file
File Manager
file permissions
file protection
file system
file system hierarchy
file name
formatting
home directory
host name
initialization files
interactive installation
A collection of data stored on a disk and assigned a name.
A graphical file management program for finding, copying, moving, opening, closing, creating, deleting, and printing files.
A set of attributes assigned to each file and directory that determines which users have access to read, write, and execute its contents.
The way the system prevents unauthorized users from reading or altering your files.
A hierarchy of files and directories in the SunOS operating system.
Users access files and directories through this file system structure, consisting of a tree of files and directories, with a root directory at the "top."
The name of a file or directory in a SunOS command line.
Preparing a disk so information can be stored on it.
The directory that is current when you first log in to the system.
Name that identifies your system. After the system is installed, the host name appears in the login prompt. For example, rnoriarity console login:
The "dot" files in a user's home directory that set the path, environment variables, windowing environment, and other characteristics to get users set up and functioning. For example, .profile
An installation method using a series of menus that prompt for system configuration and installation information.
Glossary 77
localization
login name
login prompt
log in
log out
mounting
Open Windows
operating system
package
partition
password
Passwd database
78
Full or partial implementation of a language for the Solaris 2.3 environment.
The name assigned to an individual user. The login name controls access to a system.
The string of characters the system displays to let you know that it's ready to accept your user name.
Gain access to the system, usually by typing a user name and password, so you can begin a work session.
End a session on the system; usually when you finish your work and want to close access to your account.
The process of making a file system accessible by executing the mount command.
A windowing system based on the OPEN LOOK graphical user interface.
The software on a system that controls system resources including hardware, programs, data, and user access.
A functional grouping of files and directories that comprise a software application.
See slice.
A character string you type, usually after your user name, to gain access to the system.
The database that you use to add, modify, or delete user accounts. You access the Passwd database from the Administration Tool (admintool).
Solaris 2.3 Basic Installation Guide-October 1993

permissions
preconfigured system
preinstalled system
PROM
PROM prompt
root directory
root menu
shell
slice
special characters
standalone system
See file permissions.
A system connected to a network that has been preconfigured on an installation server so that it can be installed automatically when booted.
A system with a small portion of a bootable operating system on the system's disk.
A programmable read-only memory chip with a program called the monitor that runs a quick self-test procedure and checks such things as the hardware and memory on the system. If no errors are found, the system begins the automatic boot process.
The prompt displayed when the system halts; either> or ok.
The "top" directory in the tree structure of the SunOS file system.
Same as the Workspace menu.
A command interpreter or user interface to the operating system, specified in the Passwd database. SunOS supports the Bourne, C, and Korn shells.
A discrete portion of a disk, configured during installation. Under SunOS 4.1.x and System V Release 3, slices were referred to as partitions.
A set of characters that have meaning to the system other than their meanings as simple characters. The special characters are \, /, >, <, I, &, ?, $, [, ], and *. Special characters are valid in passwords, but not in file names.
A standalone system has a CPU and memory, approximately 200 megabytes of disk space, and usually a backup device. It mayor may not be connected to a network.
Glossary 79
subdirectory
superuser
system
system administrator
unbundled software
user account
user ID
user name
workspace
Workspace menu
80
A directory that resides within another directory.
A user who has access to all parts of the system. This is usually the system administrator. Also known as root.
The basic set of components that make up your computer: keyboard, monitor, and CPU.
The person who performs maintenance tasks on systems. For a standalone system, the primary user is the system administrator.
Software products that are not delivered as part of the Solaris 2.3 operating environment.
A record of essential user information stored on the system. Each user who accesses a system should have a user account.
A number that identifies a user to the system.
A combination of letters, and possibly numbers, that identifies a user to the system.
The background screen area on which windows and icons are displayed.
The menu that controls global functions.
Solaris 2.3 Basic Installation Guide-October 1993

Index
Symbols /etc/vfstab
creating, 41 to 42
A adding
a user account, 42 to 48 optional software, 33 to 36 User AnswerBook, 33
ADJUST button, 68 Administration Tool (admintool),
starting, 43 automated installation, 5
B base windows, defined, 69 beginning a session, 53 to 54 boot command, 22 booting
c
a non-preinstalled system, 21 a preinstalled system, 15 from the CD-ROM, 22
case sensitivity, 49
case study, 55 cd command, 49 changing directories, 49 checking disk space, for adding
software, 32 to 33 choosing automated or interactive
installation, 8 Command Tool (cmdtool), 67 compact disc player, requirements, 9 conventions, used in book, xii converting megabytes to kilobytes, 33 creating
D
/etc/vfstab entry, 41 root password, 19,28,61 user account, 42 to 48 user password, 48
deleting files, 49 / dev / ds k directory, 33 df command, 32 disk drives, supported, 9 disk space
finding free, 32 minimum for User AnswerBook, 8
display devices, supported, 10
81
82
E ending a session, 51 to 52 exiting
superuser account, 74
F File Manager, 67 finding free disk space, 32
H hardware
requirements, 9 setting up, 9
host name, defined, 11
I installation menus
navigating, 3 installation methods
interactive, 6 installing optional software, 33 to 36 installing standalone systems
case study, 55 networked non-preinstalled, 25 networked preinstalled, 17 non-networked non-preinstalled, 23 non-networked preinstalled, 16
interactive installation, 6 IP address, defined, 12
L locking the screen, 52 logging in
as superuser, 19,28,74 if lock screen is on, 54 with user login and password, 50
logging out, 52
M making settings active or inactive, 71
megabytes, converting to kilobytes, 33 memory, requirements, 9 MENU button, 68 menu settings, making active or
inactive, 71 mounted directory, 34 mouse buttons, defined, 68 mv command, 49
N name service
o
defined, 12 domain name, 12 location method, 12
OPEN LOOK graphical user interface, 67 Open Windows concepts, 67 to 71 / opt directory, 32 optional software, adding, 33 to 36
p password, user, 48 pop-up windows, defined, 70 PROM, requirements, 9 prompts, login, 50 pushpins, defined, 71
Q Quick Install option, 23,59 quitting
R
logging out, 52 superuser account, 74
renaming files, 49 rm command, 49 root menu, defined, 68 root password, 19,28,61
Solaris 2.3 Basic Installation Guide-October 1993
root, defined, 19
s saving workspace, 51 screen lock, 52 securing your system, 51 to 52 SELECT button, 68 setting up
hardware, 9 initialization files, 49
settings, making active or inactive, 71 Software Manager Tool (swmtool), 33
software, adding, 33 to 36 Solaris 2.3 operating environment,
defined, viii
SPARC systems, supported, 22 standalone system
requirements, 9
starting swmtool, 34 User AnswerBook, 37 work session, 53
subnetwork, defined, 12 superuser
becoming, 74 defined, 40 exiting account, 74 when to become, 73
superuser privileges, 19,28 swmtool (Software Manager Tool), 33 system administration, 63 System AnswerBook, 63
T third-party software, adding, 33 to 36
u unbundled software, adding, 33 to 36
unlocking a screen, 54 user account
Index
creating, 42 to 43 defined, 39 when to create one, 40
User Account Manager Administration Tool, 42
User AnswerBook installing software, 33 to 36 required disk space, 32
user ID, 44 user name, 44
w windows
base, 69 pop-up, 70
work session, beginning and ending, 51 to 54
workspace defined, 67, 68 saving, 51
83
84 Solaris 2.3 Basic Installation Guide-October 1993
SOl·5278-10 Version A or October 1993