Embed Size (px)
Citation preview
Megaminx Solution
by Kurt Endl.
1. Objective
To put all 12 sides back into solid colors create your own beautiful patterns. challenge your friends to reproduce them
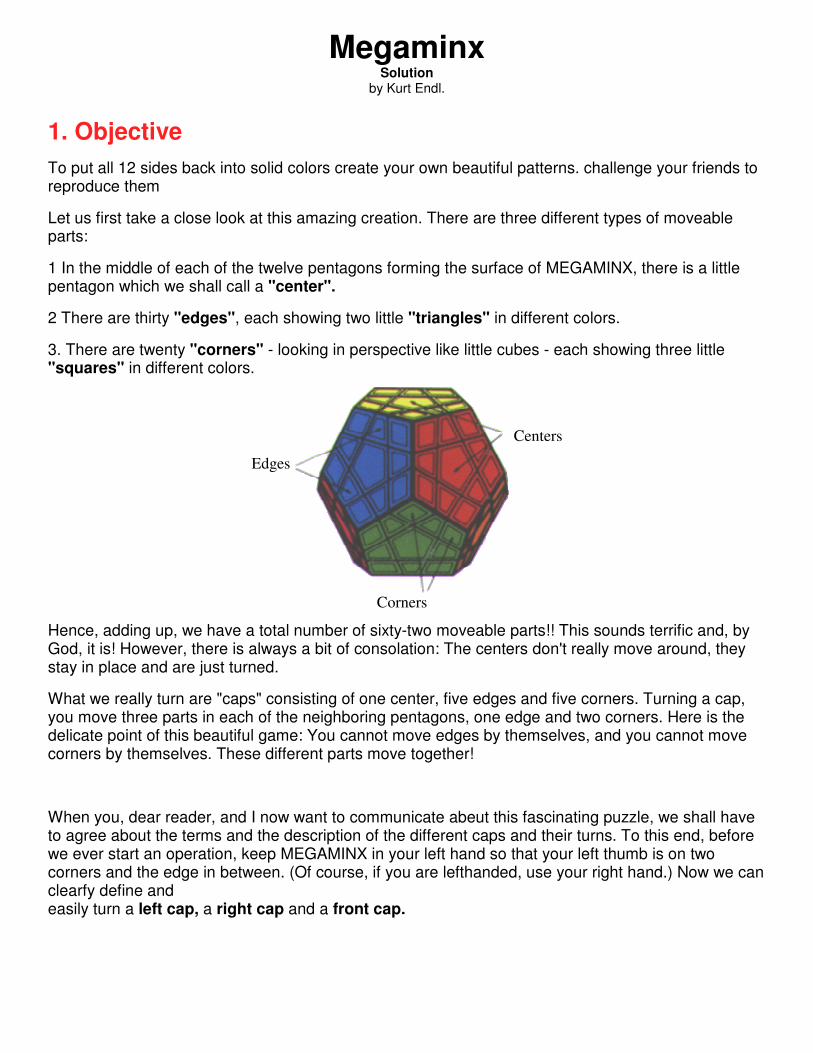
Let us first take a close look at this amazing creation. There are three different types of moveable parts:
1 In the middle of each of the twelve pentagons forming the surface of MEGAMINX, there is a little pentagon which we shall call a "center".
2 There are thirty "edges", each showing two little "triangles" in different colors.
3. There are twenty "corners" - looking in perspective like little cubes - each showing three little "squares" in different colors.
Edges
Corners
Centers
Hence, adding up, we have a total number of sixty-two moveable parts!! This sounds terrific and, by God, it is! However, there is always a bit of consolation: The centers don't really move around, they stay in place and are just turned.
What we really turn are "caps" consisting of one center, five edges and five corners. Turning a cap, you move three parts in each of the neighboring pentagons, one edge and two corners. Here is the delicate point of this beautiful game: You cannot move edges by themselves, and you cannot move corners by themselves. These different parts move together!
When you, dear reader, and I now want to communicate abeut this fascinating puzzle, we shall have to agree about the terms and the description of the different caps and their turns. To this end, before we ever start an operation, keep MEGAMINX in your left hand so that your left thumb is on two corners and the edge in between. (Of course, if you are lefthanded, use your right hand.) Now we can clearfy define and easily turn a left cap, a right cap and a front cap.

Put your thumb here
Center of the left cap
Center of the
front cap
Center of the right cap
Since there are so many moveable parts, it is of great advantage to have a simple intuitive picture of MEGAMINX. I shall use the same picture as I used for IMPOSSIBALL, namely the picture of the
earth:
On your MEGAMINX, ther are two little yellow pentagora. Turn MEGAMINX so that one little yellow pentagon is up. It will play the role of the North Pole. Thus we can talk of the North Pole cap and the South Pole cap. The part in between, we shall call the equatorial belt. It is alan clear then, what we mean by North Pole edges and corners, and by South Pole edges and corners. In the equatorial bolt we must distinguish between five different parts, which will play different roles in the strategy we
are going to develop.
There are three kinds of equatorial edges, namely:
Five northern equatorial edges, neighboring the North Pole cap.
Ten middle equatorial edges, in the "middle" of the equatorial belt.
Five southern equatorial edges, neighboring the South Pole cap.
There are two kinds of equatorial comers, namely:
Five northern equatorial corners, neighboring a northern equatorial edge.
Five southern equatorial corners, neighboring a southern equatorial edge.
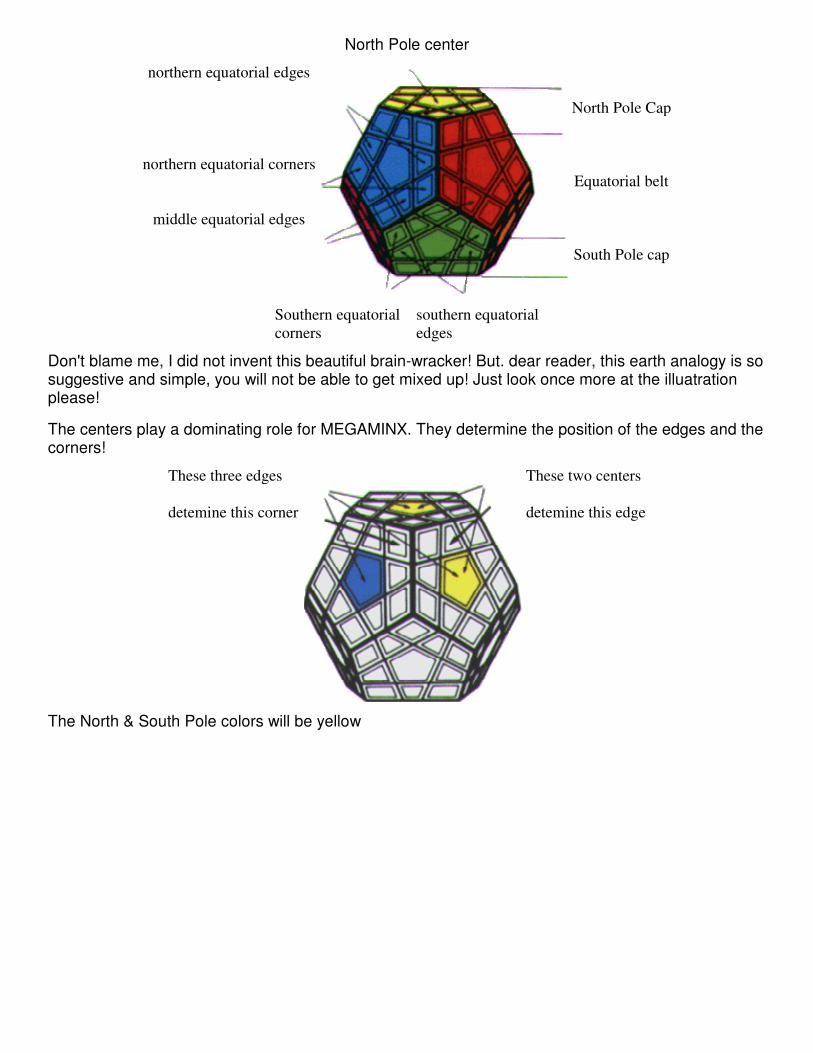
North Pole center
northern equatorial edges
northern equatorial corners
middle equatorial edges
North Pole Cap
Equatorial belt
South Pole cap
Southern equatorial corners southern equatorial
edges
Don't blame me, I did not invent this beautiful brain-wracker! But. dear reader, this earth analogy is so suggestive and simple, you will not be able to get mixed up! Just look once more at the illuatration please!
The centers play a dominating role for MEGAMINX. They determine the position of the edges and the corners!
These three edges detemine this corner
These two centers detemine this edge
The North & South Pole colors will be yellow
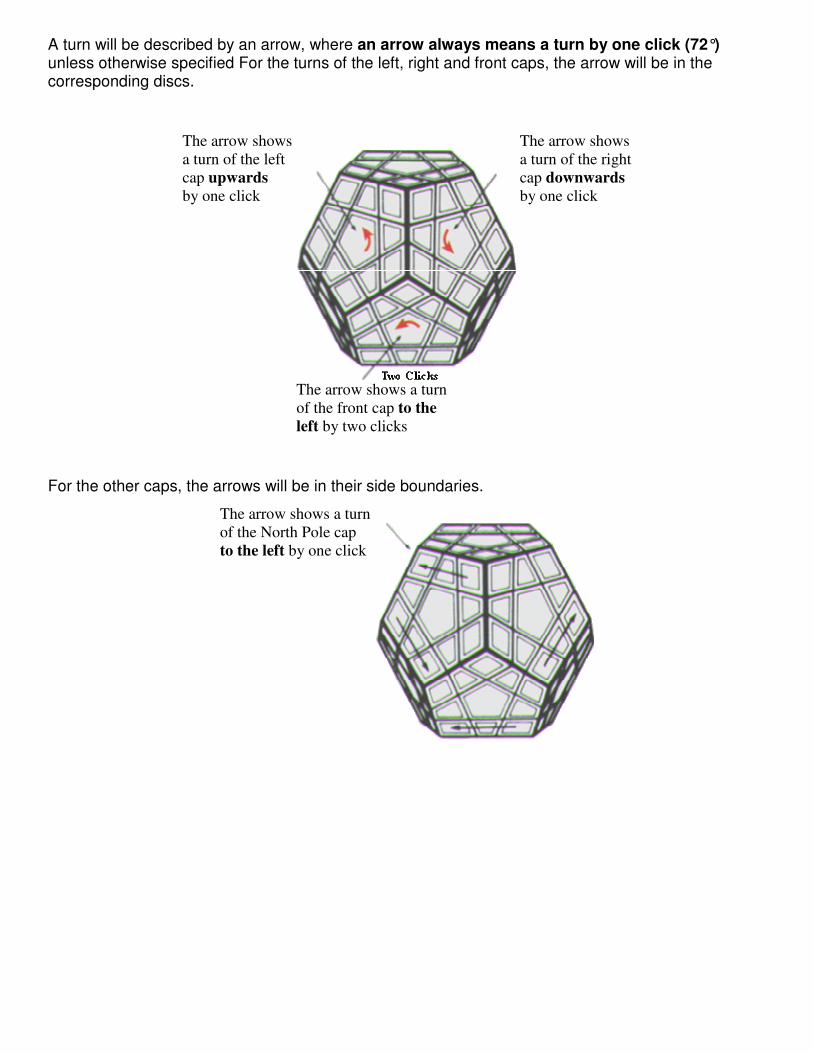
A turn will be described by an arrow, where an arrow always means a turn by one click (72°) unless otherwise specified For the turns of the left, right and front caps, the arrow will be in the corresponding discs.
The arrow shows a turn of the left cap upwards by one click
The arrow shows a turn of the front cap to the left by two clicks
The arrow shows a turn of the right cap downwards by one click
For the other caps, the arrows will be in their side boundaries.
The arrow shows a turn of the North Pole cap to the left by one click
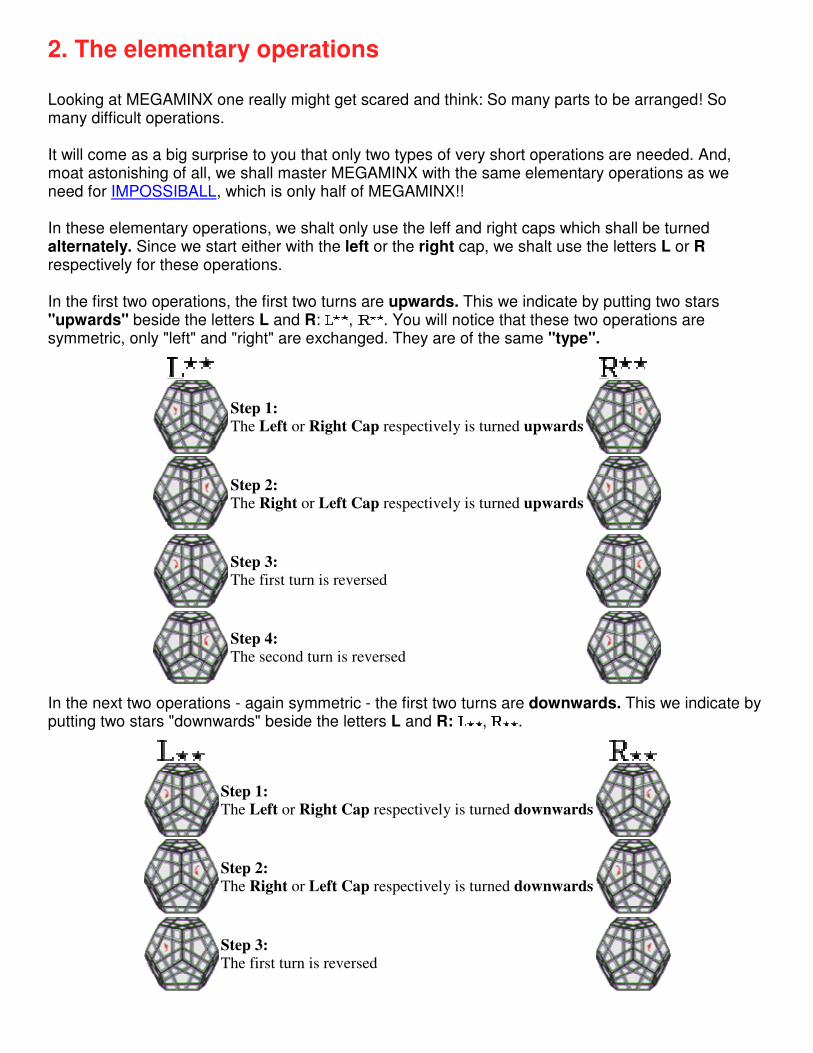
2. The elementary operations Looking at MEGAMINX one really might get scared and think: So many parts to be arranged! So many difficult operations. It will come as a big surprise to you that only two types of very short operations are needed. And, moat astonishing of all, we shall master MEGAMINX with the same elementary operations as we need for IMPOSSIBALL, which is only half of MEGAMINX!! In these elementary operations, we shalt only use the leff and right caps which shall be turned alternately. Since we start either with the left or the right cap, we shalt use the letters L or R respectively for these operations. In the first two operations, the first two turns are upwards. This we indicate by putting two stars "upwards" beside the letters L and R: , . You will notice that these two operations are symmetric, only "left" and "right" are exchanged. They are of the same "type".
Step 1: The Left or Right Cap respectively is turned upwards
Step 2: The Right or Left Cap respectively is turned upwards
Step 3: The first turn is reversed
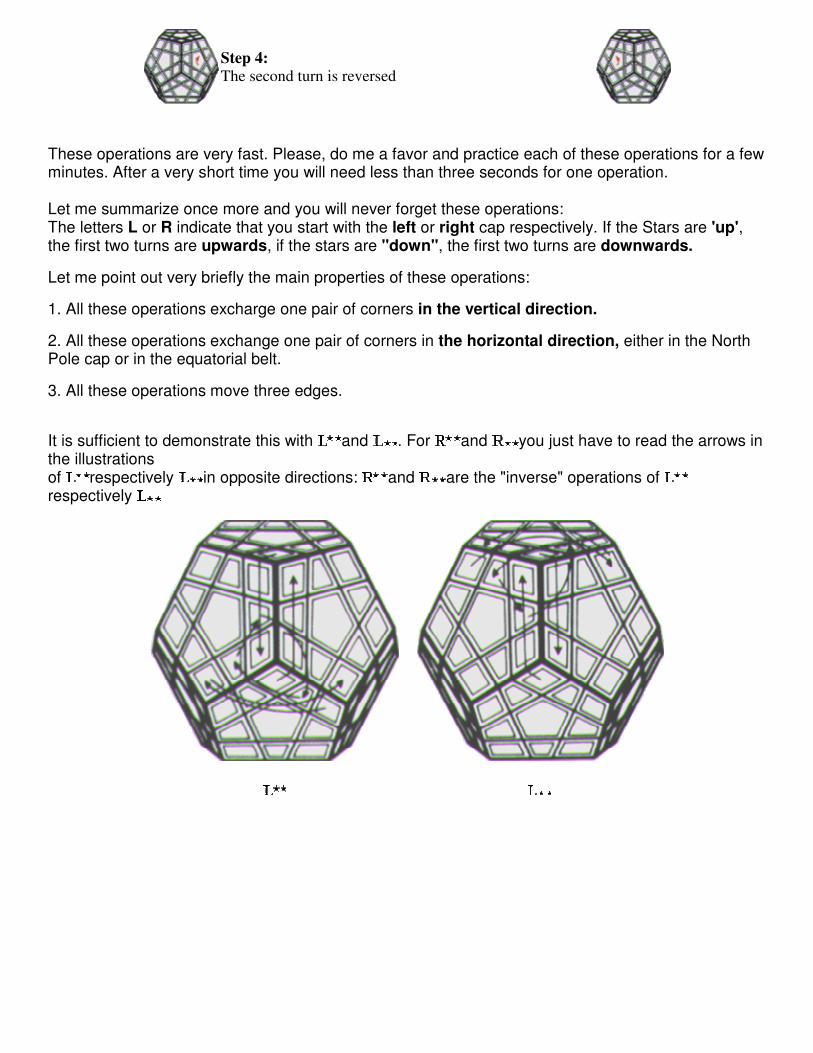
Step 4: The second turn is reversed
In the next two operations - again symmetric - the first two turns are downwards. This we indicate by putting two stars "downwards" beside the letters L and R: , .
Step 1: The Left or Right Cap respectively is turned downwards
Step 2: The Right or Left Cap respectively is turned downwards
Step 3: The first turn is reversed
Step 4: The second turn is reversed
These operations are very fast. Please, do me a favor and practice each of these operations for a few minutes. After a very short time you will need less than three seconds for one operation. Let me summarize once more and you will never forget these operations: The letters L or R indicate that you start with the left or right cap respectively. If the Stars are 'up', the first two turns are upwards, if the stars are "down", the first two turns are downwards.
Let me point out very briefly the main properties of these operations:
1. All these operations excharge one pair of corners in the vertical direction.
2. All these operations exchange one pair of corners in the horizontal direction, either in the North Pole cap or in the equatorial belt.
3. All these operations move three edges.
It is sufficient to demonstrate this with and . For and you just have to read the arrows in the illustrations of respectively in opposite directions: and are the "inverse" operations of respectively
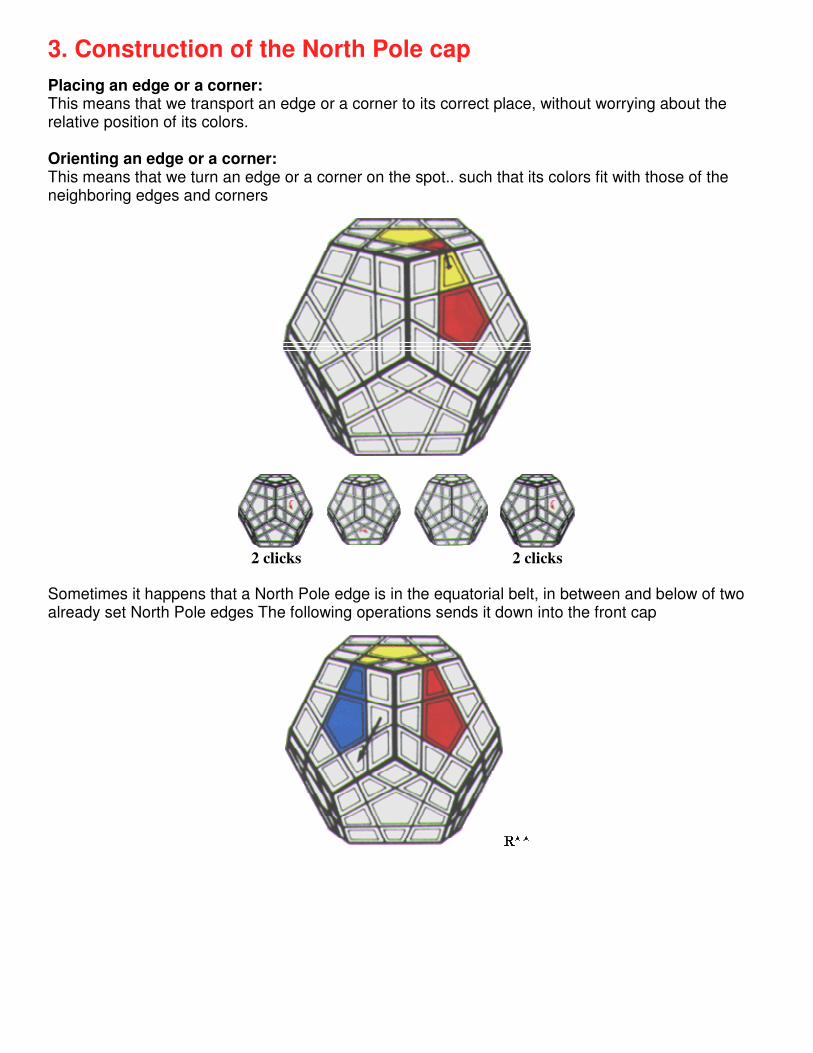
3. Construction of the North Pole cap
Placing an edge or a corner: This means that we transport an edge or a corner to its correct place, without worrying about the relative position of its colors. Orienting an edge or a corner: This means that we turn an edge or a corner on the spot.. such that its colors fit with those of the neighboring edges and corners
2 clicks
2 clicks
Sometimes it happens that a North Pole edge is in the equatorial belt, in between and below of two already set North Pole edges The following operations sends it down into the front cap
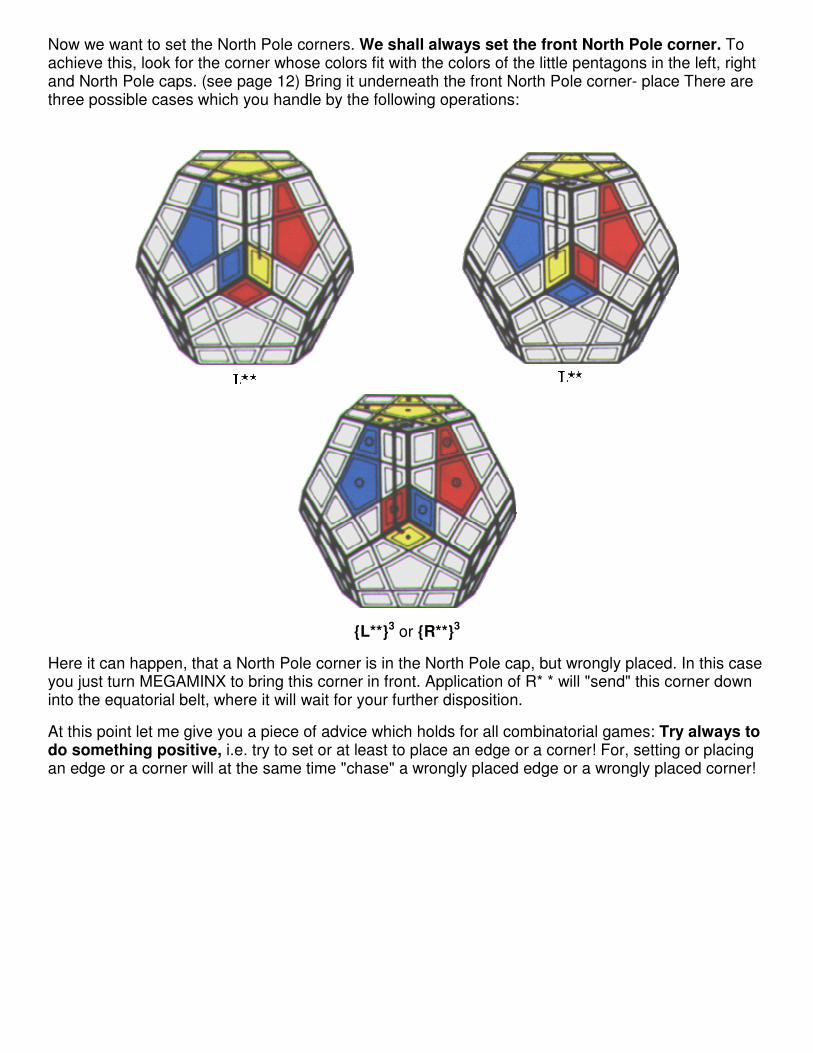
Now we want to set the North Pole corners. We shall always set the front North Pole corner. To achieve this, look for the corner whose colors fit with the colors of the little pentagons in the left, right and North Pole caps. (see page 12) Bring it underneath the front North Pole corner- place There are three possible cases which you handle by the following operations:
{L**}3 or {R**}3
Here it can happen, that a North Pole corner is in the North Pole cap, but wrongly placed. In this case you just turn MEGAMINX to bring this corner in front. Application of R* * will "send" this corner down into the equatorial belt, where it will wait for your further disposition.
At this point let me give you a piece of advice which holds for all combinatorial games: Try always to do something positive, i.e. try to set or at least to place an edge or a corner! For, setting or placing an edge or a corner will at the same time "chase" a wrongly placed edge or a wrongly placed corner!

4. Setting the northern equatorial edges. Surprisingly, this is quite a tricky problem. To solve it, bring the appropriate edge into the left or right cap, as indicated in the pictures below. The corresponding operation will then set the edge without destroying the order of the North Pole cap
· (L**)2 ·
· (R**)2
· (R**)2 ·
· (L**)2
If a northern equatorial edge is at a northern equatorial edge-place, but wrongly placed, bring it in front and apply one of the above operations. This will remove this edge from its place.
This could be done also with somewhat shorter operations. However, you will soon convince yourself that these operations are faster. Turning both L** and R** twice is an automatic sequence of turns.
It is very important to have simple memory aids. Here we can say: If the edge to be set is in the left cap, we start turning the front cap to the left and then apply (L**)2. The analogous rule holds, if the edge to be set is in the right cap.
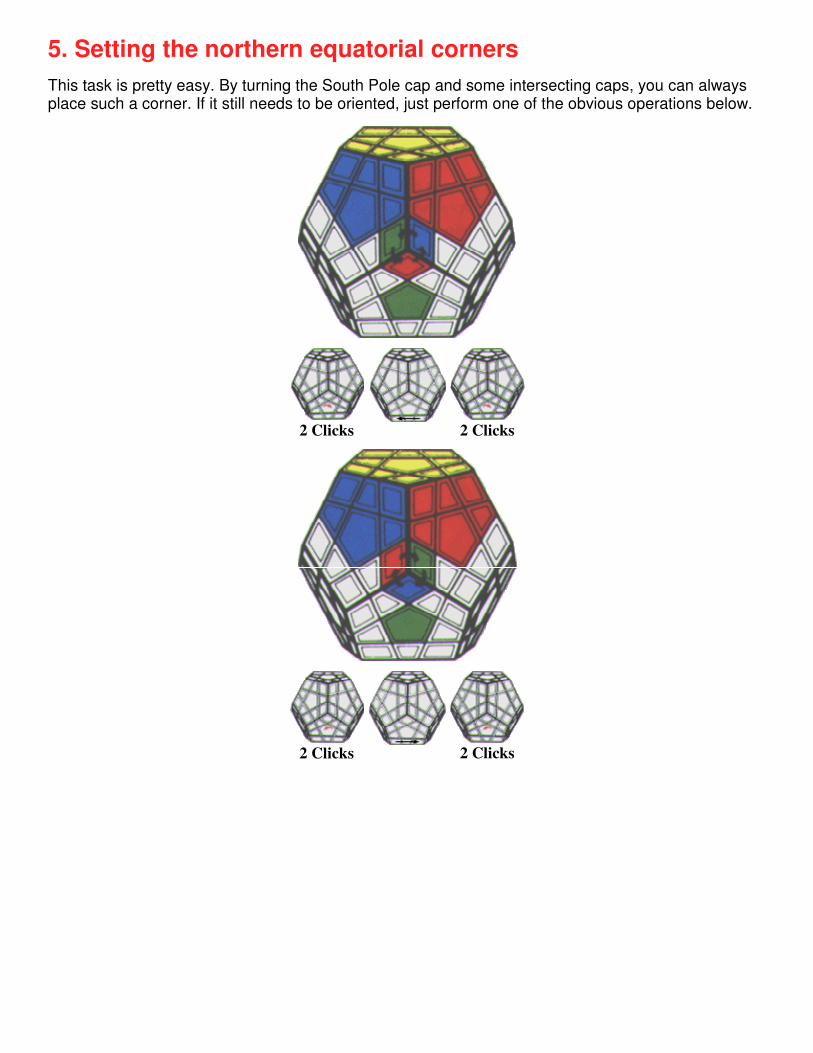
5. Setting the northern equatorial corners
This task is pretty easy. By turning the South Pole cap and some intersecting caps, you can always place such a corner. If it still needs to be oriented, just perform one of the obvious operations below.
2 Clicks
2 Clicks
2 Clicks
2 Clicks
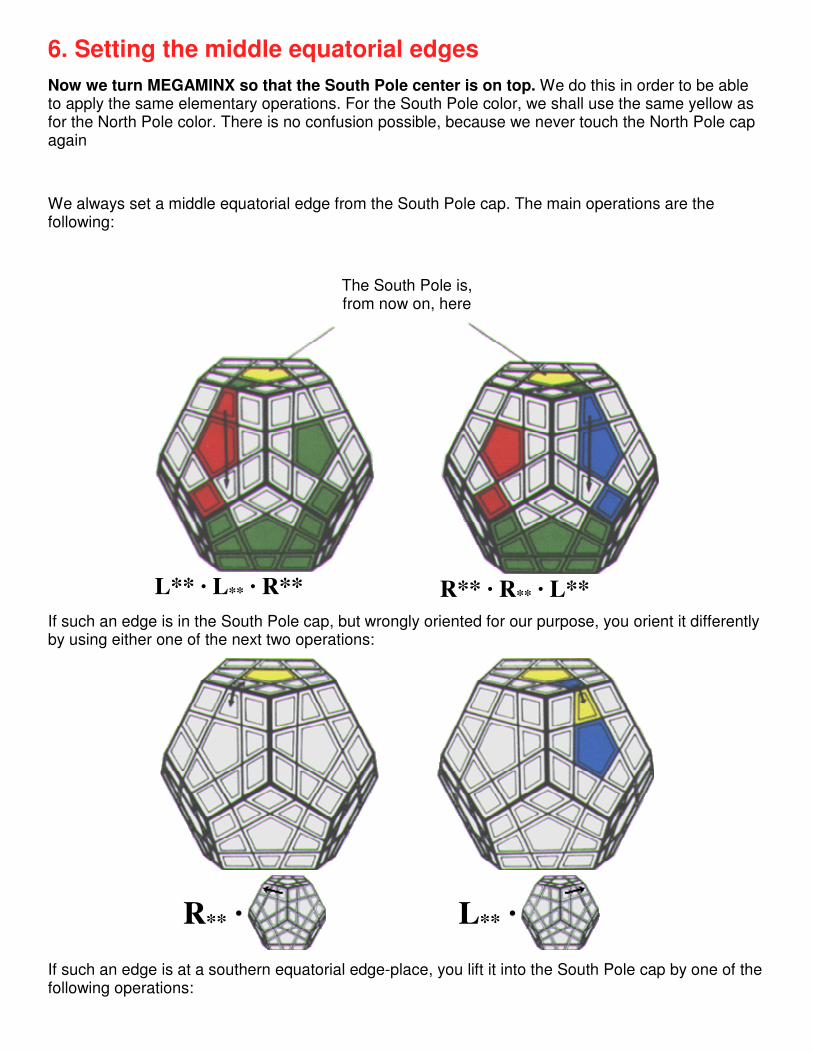
6. Setting the middle equatorial edges
Now we turn MEGAMINX so that the South Pole center is on top. We do this in order to be able to apply the same elementary operations. For the South Pole color, we shall use the same yellow as for the North Pole color. There is no confusion possible, because we never touch the North Pole cap again
We always set a middle equatorial edge from the South Pole cap. The main operations are the following:
The South Pole is, from now on, here
L** · L** · R**
R** · R** · L**
If such an edge is in the South Pole cap, but wrongly oriented for our purpose, you orient it differently by using either one of the next two operations:
R** ·
L** ·
If such an edge is at a southern equatorial edge-place, you lift it into the South Pole cap by one of the following operations:
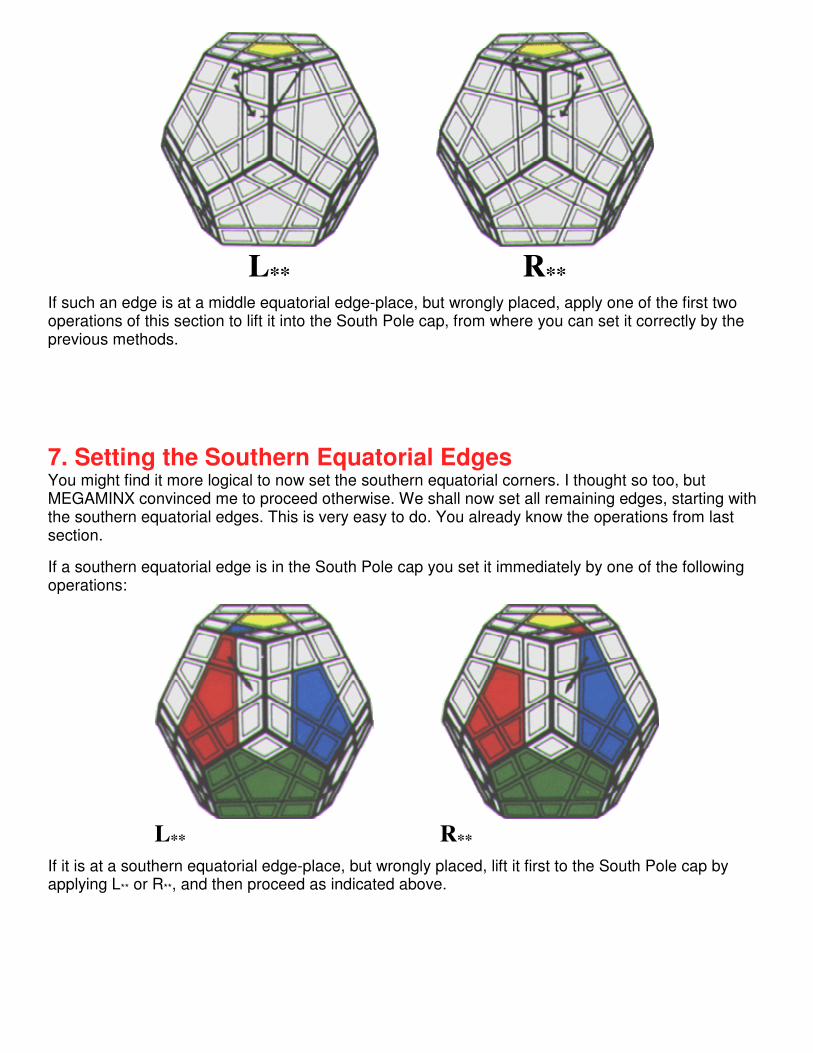
L**
R**
If such an edge is at a middle equatorial edge-place, but wrongly placed, apply one of the first two operations of this section to lift it into the South Pole cap, from where you can set it correctly by the previous methods.
7. Setting the Southern Equatorial Edges You might find it more logical to now set the southern equatorial corners. I thought so too, but MEGAMINX convinced me to proceed otherwise. We shall now set all remaining edges, starting with the southern equatorial edges. This is very easy to do. You already know the operations from last section.
If a southern equatorial edge is in the South Pole cap you set it immediately by one of the following operations:
L**
R**
If it is at a southern equatorial edge-place, but wrongly placed, lift it first to the South Pole cap by applying L** or R**, and then proceed as indicated above.
8. Setting the South Pole edges We now set the South Pole edges, and we do this by the same operations as we have used for the Southern equatorial edges! How ever, since this task is a bit delicate, I will try to be very specific about it.
First of all. you remember that the operations L** and R** always move also a southern equatorial edge. Since we don't want to mess up all the southern equatorial edges again, we shall keep the lower part of MEGAMINX fixed for all operations to come! Thus we will 'disturb' only one southern equatorial edge!
In order to start, see whether there is a South Pole edge whose South Pole color is pointing upwards. If there is none, hold MEGAMINX in any standard position and apply L** or R** respectively to bring about this situation (see section 10). Then turn the South Pole cap until this first South Pole edge is correctly set. We shall call it the reference edge. Finally turn MEGAMINX, to bring this reference edge to the right. From now on we keep the lower part of MEGAMINX fixed, allowing only for turns of the South Pole cap (which is still up), and of the left and right caps.
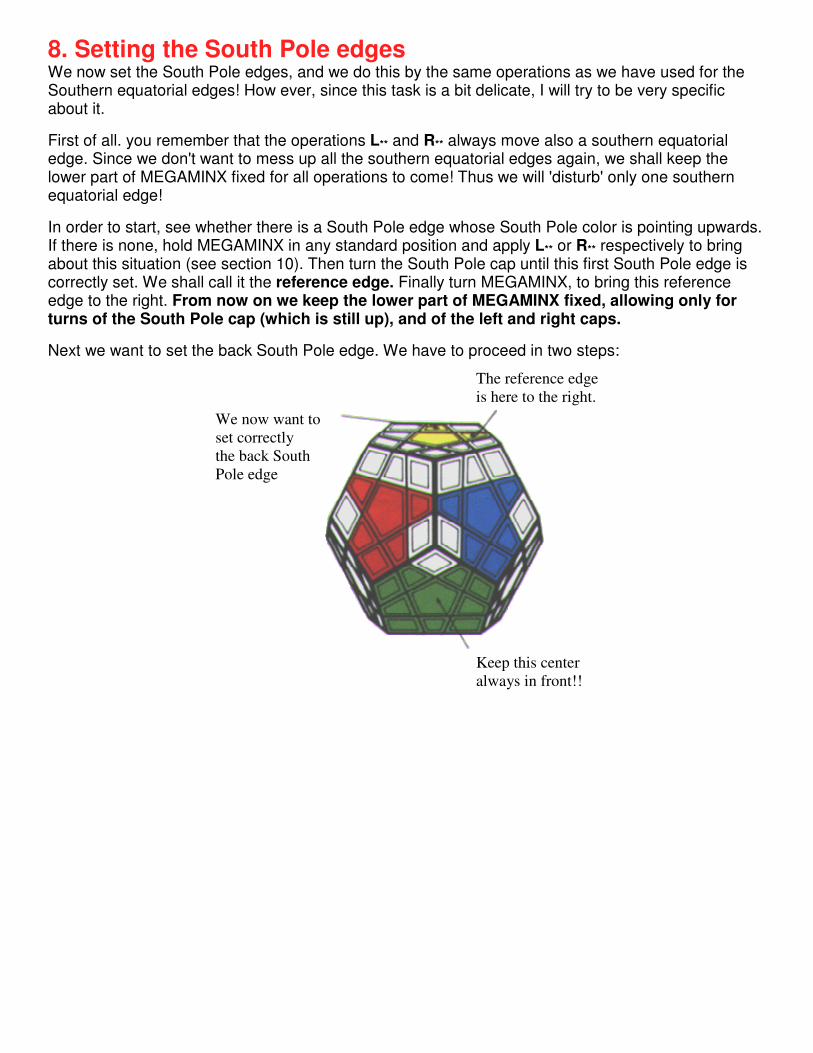
Next we want to set the back South Pole edge. We have to proceed in two steps:
The reference edge is here to the right.
We now want to set correctly the back South Pole edge
Keep this center always in front!!
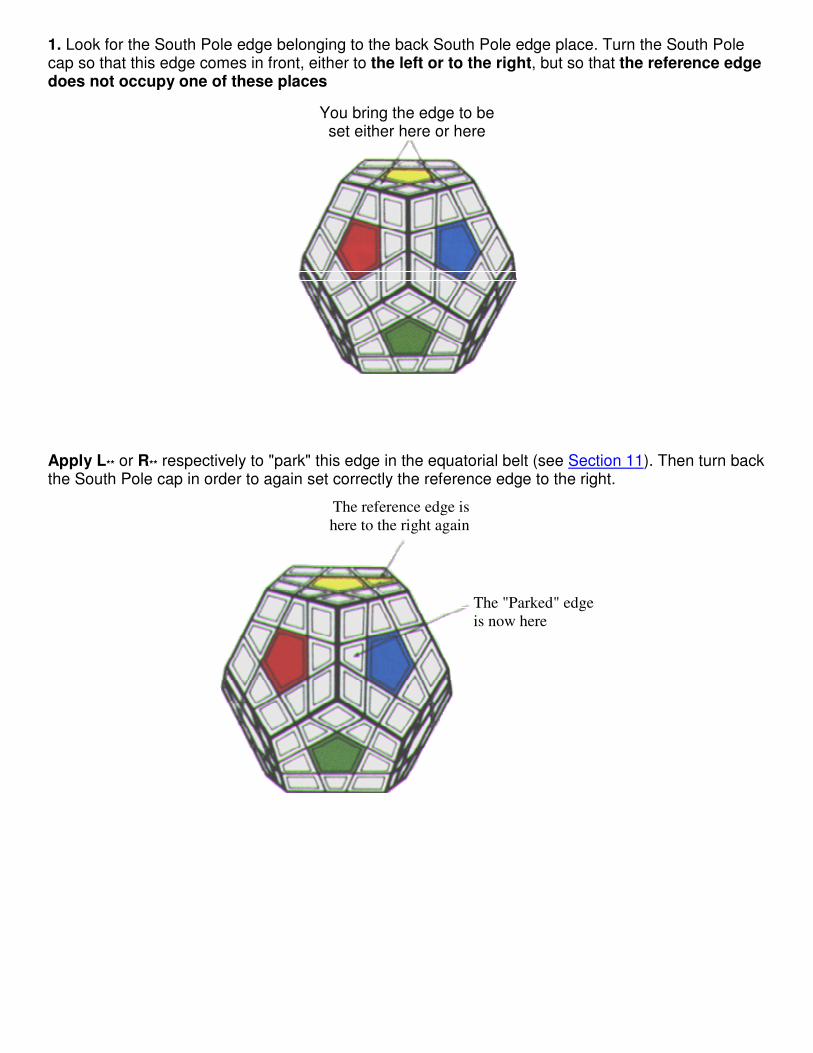
1. Look for the South Pole edge belonging to the back South Pole edge place. Turn the South Pole cap so that this edge comes in front, either to the left or to the right, but so that the reference edge does not occupy one of these places
You bring the edge to be set either here or here
Apply L** or R** respectively to "park" this edge in the equatorial belt (see Section 11). Then turn back the South Pole cap in order to again set correctly the reference edge to the right.
The reference edge is here to the right again
The "Parked" edge is now here
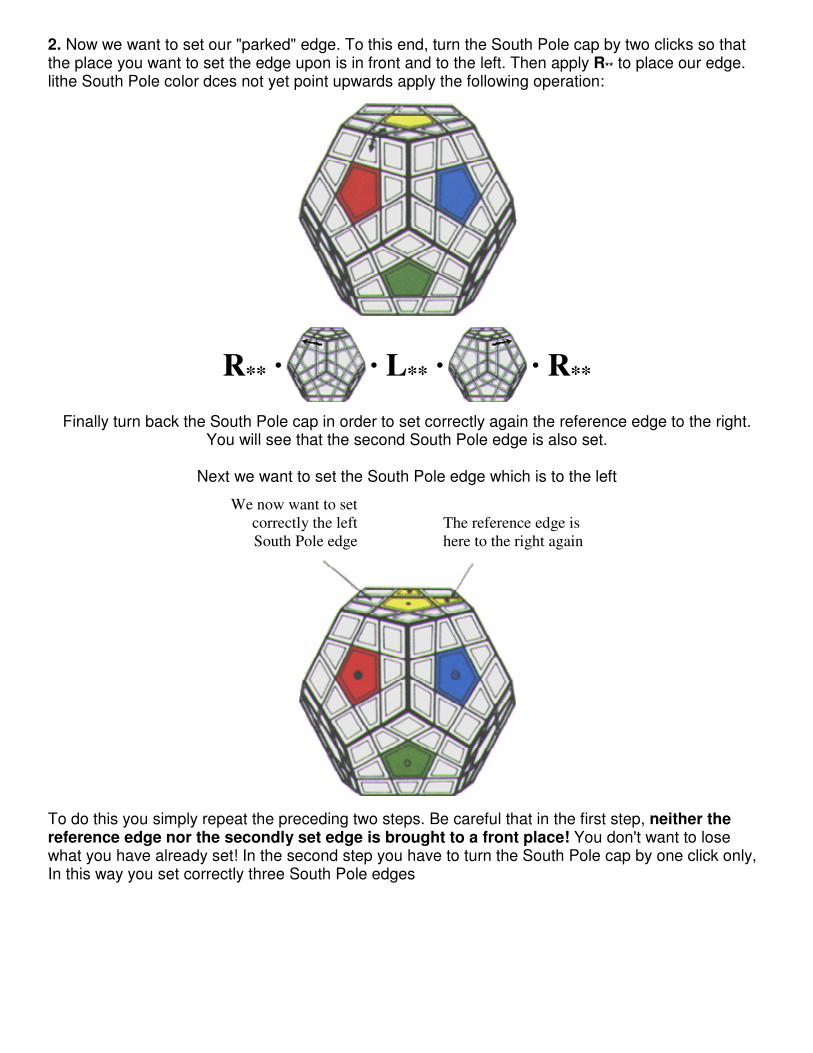
2. Now we want to set our "parked" edge. To this end, turn the South Pole cap by two clicks so that the place you want to set the edge upon is in front and to the left. Then apply R** to place our edge. lithe South Pole color dces not yet point upwards apply the following operation:
R** ·
· L** ·
· R**
Finally turn back the South Pole cap in order to set correctly again the reference edge to the right. You will see that the second South Pole edge is also set.
Next we want to set the South Pole edge which is to the left
We now want to set correctly the left South Pole edge
The reference edge is here to the right again
To do this you simply repeat the preceding two steps. Be careful that in the first step, neither the reference edge nor the secondly set edge is brought to a front place! You don't want to lose what you have already set! In the second step you have to turn the South Pole cap by one click only, In this way you set correctly three South Pole edges

These three South Pole edges are correctly set
Reference Edge
Finally, in order to set the last two South Pole edges, apply, if necessary, L** or R** respectively to place back the southern equatorial edge which we have misused so brutally in our operations. The remaining two South Pole edges will be correctly placed again at the same time. But, something terrible may happen! Two of these remaining three edges may still have to be oriented! This is perhaps the most difficult and hence the most challenging problem of MEGAMINX, a bit of a MEGA-PROBLEM.
If the two South Pole edges have to be oriented, proceed immediately to the next operation. If it is one of the South Pole edges and the front southern equatorial edge, which have to be oriented, apply L** or R** respectively in order to bring these two edges together up into the South Pole cap and then apply the following operation:
{ R** ·
}4·
{ R** ·
}4·
I admit, this somehow looks terrible. But it is very easy to remember! Hence, when you have recovered from your shock, take another look:
You start by applying R** and then you turn the South Pole cap to the right. You repeat these two steps another three times. Then you turn the South Pole cap to the right again, and you repeat the
first bracket. Finally you turn back the South Pole cap.
If the southern equatorial edge has been involved, you just have to apply once more L** or R** respectively in order to set back correctly this edge.
9. Placing the southern equatorial corners
Now we really have a little problem: Whereas the edges are all set, there are still two kinds of corners to be set: the southern equatorial corners and the South Pole corners!
Of course, we do not want to disturb the order of the edges any more! Hence, we must find operations for "working" on the corners which leave "undisturbed" the edges.
Luckily our elementary operations provide us with just this property. In order to fully understand this, let's take a very close look at our elementary operations again:
All of our operations: L**, R**, R**, L** exchange two pairs of corners. Hence, after repeating any of these operations two times, these respective corners are back at their original places. But these operations also move around three edges: Hence, by repeating any of these operations three times, the edges will have been moved back to their original places, whereas an exchange of the corners remains.
This is the simple idea for our next procedure: In order to set our corners, we shall always apply any of our elementary operations three times. In this way, the already established order of the edges will not he disturbed
Now, let's get started. There may be some southern equatorial corner already correctly set. That's just too fine. If you find a southern equatorial corner correctly placed but wrongly oriented, do nothing with this one for the moment. We shall worry about orientation later. For the moment, we just want to place!
If you find a southern equatorial corner not properly placed, turn MEGAMINX to bring this corner in front. Now look where the appropriate corner is which really belongs to this front place. We have to distinguish two cases
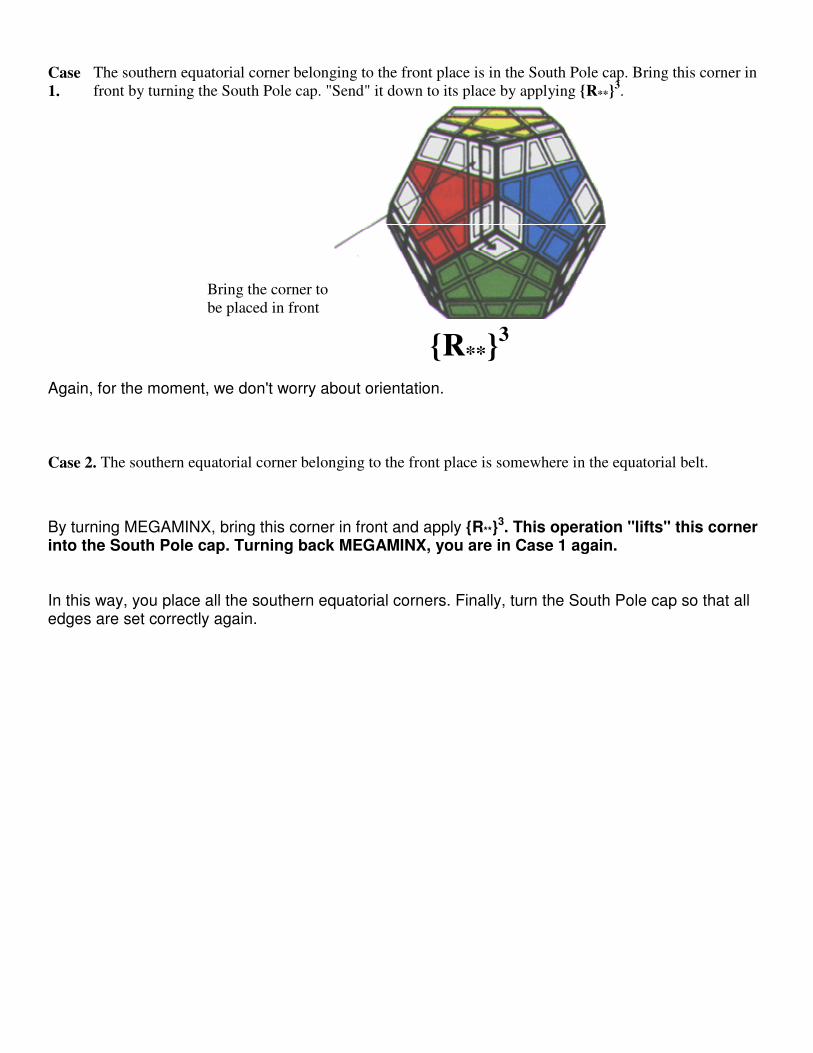
Case 1.
The southern equatorial corner belonging to the front place is in the South Pole cap. Bring this corner in front by turning the South Pole cap. "Send" it down to its place by applying {R**}3.
Bring the corner to be placed in front
{R**}3
Again, for the moment, we don't worry about orientation.
Case 2. The southern equatorial corner belonging to the front place is somewhere in the equatorial belt.
By turning MEGAMINX, bring this corner in front and apply {R**}3. This operation "lifts" this corner into the South Pole cap. Turning back MEGAMINX, you are in Case 1 again. In this way, you place all the southern equatorial corners. Finally, turn the South Pole cap so that all edges are set correctly again.
10. Placement Of the South Pole corners
Now we get to one of the roost tricky parts of our game. We must place all South Pole corners, without destroying anything else!
This is not possible without "breaking into" the equatorial belt again. But, take it easy! At the end of our operations, the equatorial belt will be restored!
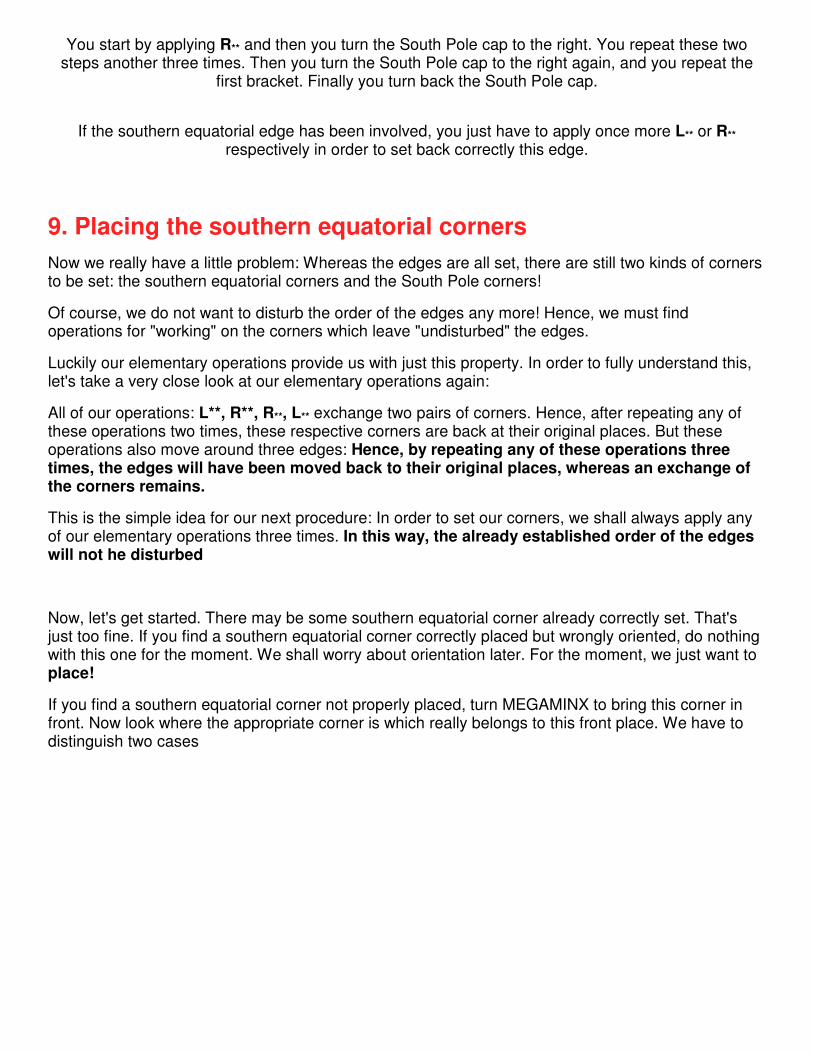
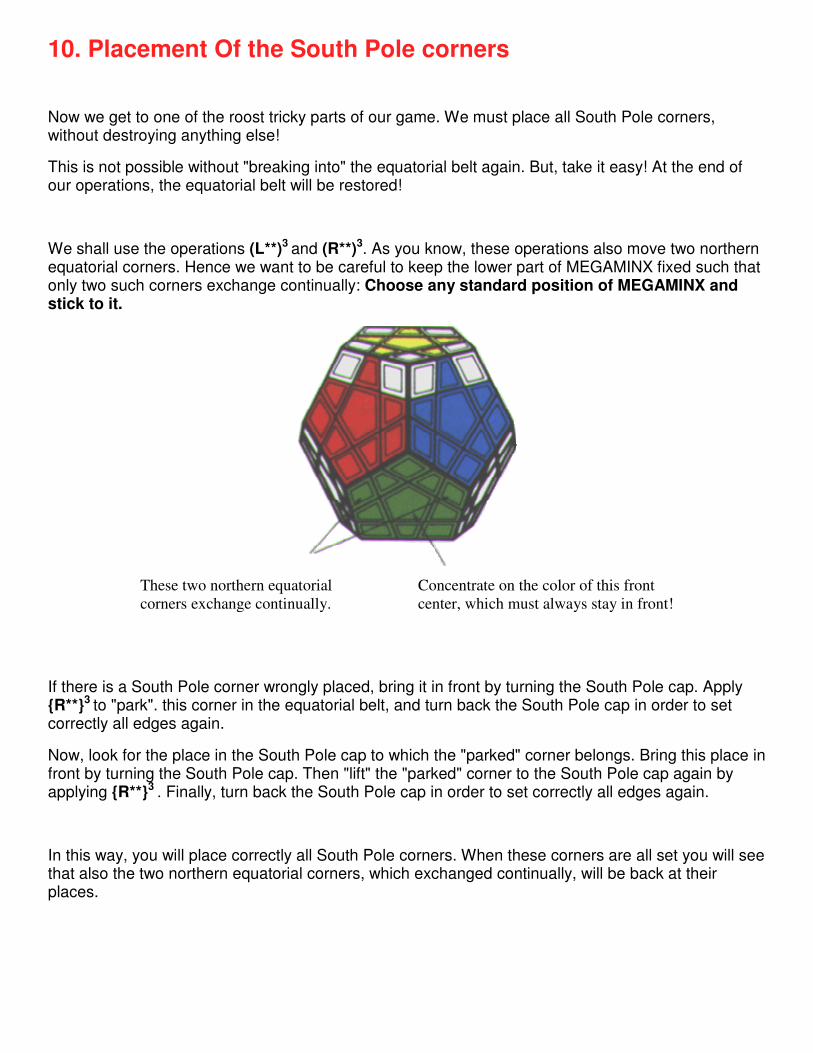
We shall use the operations (L**)3 and (R**)3. As you know, these operations also move two northern equatorial corners. Hence we want to be careful to keep the lower part of MEGAMINX fixed such that only two such corners exchange continually: Choose any standard position of MEGAMINX and stick to it.
These two northern equatorial corners exchange continually.
Concentrate on the color of this front center, which must always stay in front!
If there is a South Pole corner wrongly placed, bring it in front by turning the South Pole cap. Apply {R**}3 to "park". this corner in the equatorial belt, and turn back the South Pole cap in order to set correctly all edges again.
Now, look for the place in the South Pole cap to which the "parked" corner belongs. Bring this place in front by turning the South Pole cap. Then "lift" the "parked" corner to the South Pole cap again by applying {R**}3 . Finally, turn back the South Pole cap in order to set correctly all edges again.
In this way, you will place correctly all South Pole corners. When these corners are all set you will see that also the two northern equatorial corners, which exchanged continually, will be back at their places.
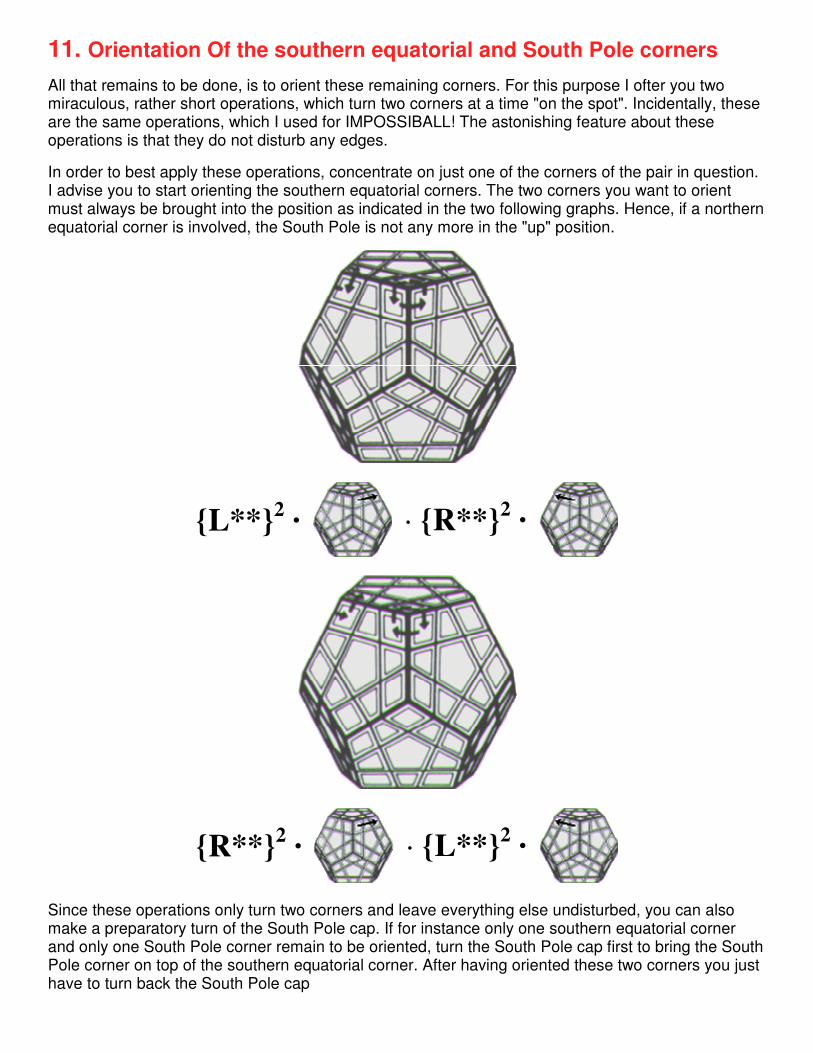
11. Orientation Of the southern equatorial and South Pole corners
All that remains to be done, is to orient these remaining corners. For this purpose I ofter you two miraculous, rather short operations, which turn two corners at a time "on the spot". Incidentally, these are the same operations, which I used for IMPOSSIBALL! The astonishing feature about these operations is that they do not disturb any edges.
In order to best apply these operations, concentrate on just one of the corners of the pair in question. I advise you to start orienting the southern equatorial corners. The two corners you want to orient must always be brought into the position as indicated in the two following graphs. Hence, if a northern equatorial corner is involved, the South Pole is not any more in the "up" position.
{L**}2 ·
· {R**}2 ·
{R**}2 ·
· {L**}2 ·
Since these operations only turn two corners and leave everything else undisturbed, you can also make a preparatory turn of the South Pole cap. If for instance only one southern equatorial corner and only one South Pole corner remain to be oriented, turn the South Pole cap first to bring the South Pole corner on top of the southern equatorial corner. After having oriented these two corners you just have to turn back the South Pole cap