Embed Size (px)
Citation preview

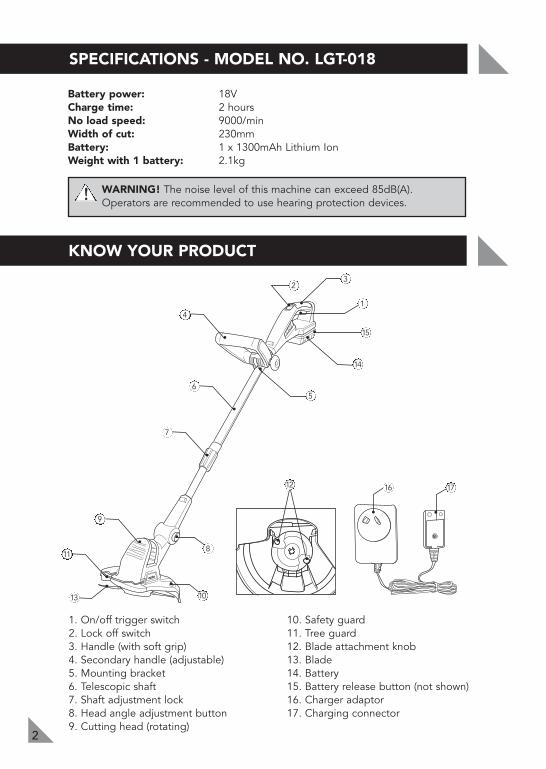
Battery power: 18VCharge time: 2 hoursNo load speed: 9000/min Width of cut: 230mmBattery: 1 x 1300mAh Lithium IonWeight with 1 battery: 2.1kg
WARNING! The noise level of this machine can exceed 85dB(A). Operators are recommended to use hearing protection devices.
1. On/off trigger switch2. Lock off switch3. Handle (with soft grip)4. Secondary handle (adjustable)5. Mounting bracket6. Telescopic shaft7. Shaft adjustment lock8. Head angle adjustment button9. Cutting head (rotating)
10. Safety guard11. Tree guard12. Blade attachment knob13. Blade14. Battery15. Battery release button (not shown)16. Charger adaptor17. Charging connector
2
SPECIFICATIONS - MODEL NO. LGT-018
17
1
2
!!
KNOW YOUR PRODUCT
3
4
56
7
8
10
9
11
13
12 16
14
15

3
TABLE OF CONTENTS
SPECIFICATIONS ………………………………………..
INTRODUCTION…………………………………………
ELECTRICAL SAFETY…………….………………………
GENERAL POWER TOOL SAFETY WARNINGS………
LITHIUM ION BATTERY AND CHARGER SAFETYWARNINGS……………………………………………….
ADDITIONAL SAFETY RULES FOR GRASS TRIMMERS….
CHARGING YOUR LITHIUM ION BATTERY..…………
INSTALLING OR REMOVING THE BATTERY...………
ASSEMBLY………………………………………………..
OPERATION………………………………………………
MAINTENANCE…………….……………………………
SPARE PARTS …………….……………………………...
DESCRIPTION OF SYMBOLS ………………………….
PACK CONTENTS ………………………………………
WARRANTY………………………………………………
Page 2
Page 4
Page 4
Page 5
Page 7
Page 8
Page 9
Page 11
Page 12
Page 13
Page 18
Page 19
Page 19
Page 20
Page 22

!!
INTRODUCTION
4
Congratulations on purchasing an Ozito Lithium IonCordless Grass Trimmer. We aim to provide quality tools atan affordable price. We hope you will enjoy using this toolfor many years.
Your Lithium Ion Cordless Grass Trimmer LGT-018 has beendesigned for trimming and finishing lawn edges and forcutting grass around shrubs and trees. Being cordless, itoffers maximum convenience of operation without the needfor a connection to the mains power.
It is intended for DIY (Do It Yourself) use only. It is not builtfor continuous daily use in a trade or professional capacity.
ELECTRICAL SAFETY
THIS MANUAL CONTAINS IMPORTANT SAFETY AND OPERATINGINSTRUCTIONS FOR YOUR BATTERY CHARGER.
• Before using the charger read all instructions and cautionary markings on thecharger, battery pack and the product using the battery pack.
Danger! If the battery pack case is cracked or damaged, do not insert it intocharger. There is a danger of electric shock or electrocution.
WARNING! Do not allow any liquid to get inside charger. Electric shockmay result. To facilitate cooling of the battery pack after use, avoidplacing the charger or battery pack in a warm environment such as in ametal shed, or an uninsulated trailer.

5
WARNING! Read all safety warnings and all instructions. Failure to follow the warnings and instructions may result in electric shock, fire and/orserious injury.
Save all warnings and instructions for future reference.The term “power tool" in all of the warnings refers to your mains-operated(corded) power tool or battery-operated (cordless) power tool.
1) Work area safety
a) Keep work area clean and well lit. Cluttered or dark areas invite accidents.
b) Do not operate power tools in explosive atmospheres, such as in thepresence of flammable liquids, gases or dust. Power tools create sparks whichmay ignite the dust or fumes.
c) Keep children and bystanders away while operating a power tool. Distractionscan cause you to lose control.
2) Electrical safety
a) Power tool plugs must match the outlet. Never modify the plug in any way.Do not use any adapter plugs with earthed (grounded) power tools.Unmodified plugs and matching outlets will reduce risk of electric shock.
b) Avoid body contact with earthed or grounded surfaces, such as pipes,radiators, ranges and refrigerators. There is an increased risk of electric shock ifyour body is earthed or grounded.
c) Do not expose power tools to rain or wet conditions. Water entering a powertool will increase the risk of electric shock.
d) Do not abuse the cord. Never use the cord for carrying, pulling orunplugging the power tool. Keep cord away from heat, oil, sharp edges ormoving parts. Damaged or entangled cords increase the risk of electric shock.
e) When operating a power tool outdoors, use an extension cord suitable foroutdoor use. Use of a cord suitable for outdoor use reduces the risk of electric shock.
f) If operating a power tool in a damp location is unavoidable, use a residualcurrent device (RCD) protected supply. Use of an RCD reduces the risk ofelectric shock.
3) Personal safety
a) Stay alert, watch what you are doing and use common sense when operatinga power tool. Do not use a power tool while you are tired or under theinfluence of drugs, alcohol or medication. A moment of inattention whileoperating power tools may result in serious personal injury.
b) Use personal protective equipment. Always wear eye protection. Protectiveequipment such as dust mask, non-skid safety shoes, hard hat, or hearingprotection used for appropriate conditions will reduce personal injuries.
c) Prevent unintentional starting. Ensure the switch is in the off-position beforeconnecting to power source and/or battery pack, picking up or carrying thetool. Carrying power tools with your finger on the switch or energising powertools that have the switch on invites accidents.
!!
GENERAL POWER TOOL SAFETY WARNINGS!!

6
GENERAL POWER TOOL SAFETY WARNINGS!!
d) Remove any adjusting key or wrench before turning the power tool on. Awrench or a key left attached to a rotating part of the power tool may result inpersonal injury.
e) Do not overreach. Keep proper footing and balance at all times. Thisenables better control of the power tool in unexpected situations.
f) Dress properly. Do not wear loose clothing or jewellery. Keep your hair,clothing and gloves away from moving parts. Loose clothes, jewellery orlong hair can be caught in moving parts.
g) If devices are provided for the connection of dust extraction andcollection facilities, ensure these are connected and properly used. Use ofdust collection can reduce dust-related hazards.
4) Power tool use and care
a) Do not force the power tool. Use the correct power tool for yourapplication. The correct power tool will do the job better and safer at the ratefor which it was designed.
b) Do not use the power tool if the switch does not turn it on and off. Anypower tool that cannot be controlled with the switch is dangerous and must be repaired.
c) Disconnect the plug from the power source and/or the battery pack fromthe power tool before making any adjustments, changing accessories, orstoring power tools. Such preventive safety measures reduce the risk ofstarting the power tool accidentally.
d) Store idle power tools out of the reach of children and do not allowpersons unfamiliar with the power tool or these instructions to operatethe power tool. Power tools are dangerous in the hands of untrained users.
e) Maintain power tools. Check for misalignment or binding of moving parts,breakage of parts and any other condition that may affect the powertool's operation. If damaged, have the power tool repaired before use.Many accidents are caused by poorly maintained power tools.
f) Keep cutting tools sharp and clean. Properly maintained cutting tools withsharp cutting edges are less likely to bind and are easier to control.
g) Use the power tool, accessories and tool bits etc. in accordance withthese instructions, taking into account the working conditions and thework to be performed. Use of the power tool for operations different fromthose intended could result in a hazardous situation.
5) Service
a) Have your power tool serviced by a qualified repair person using onlyidentical replacement parts. This will ensure that the safety of the power toolis maintained.
b) If the supply cord is damaged, it must be replaced by the manufacturer,its service agent or similarly qualified persons in order to avoid a hazard.

7
LITHIUM ION BATTERY AND CHARGER SAFETY WARNINGS!!
!!
!!
WARNING! Do not allow any liquid to get inside charger. Electric shock mayresult. To facilitate cooling of the battery pack after use, avoid placing thecharger or battery pack in a warm environment such as in a metal shed, or anuninsulated trailer.
• Before using the charger read all instructions and cautionary markings on thecharger, battery pack and the product using the battery pack.
Danger! If the battery pack case is cracked or damaged, do not insert it intocharger. There is a danger of electric shock or electrocution.
• This charger is not intended for any uses other than charging rechargeablebatteries. Any other use may result in risk of fire, electric shock or electrocution.
• Do not place any object on top of the charger or place the charger on a softsurface that may result in excessive internal heat. Place the charger in a positionaway from any heat source.
• To reduce risk of damage to the electric plug and cord, pull by the plug ratherthan the cord when disconnecting the charger.
• Make sure the cord is located so that it will not be stepped on, tripped over, orotherwise subjected to damage or stress.
• An extension cord should not be used unless absolutely necessary. Use of animproper extension cord could result in the risk of fire, electric shock or electrocution.
• Do not operate the charger if it has received a sharp blow, been dropped orotherwise damaged in any way. Have it checked by an electrician or power toolrepairer.
• Do not disassemble charger. Take it to an electrician or power tool repairer whenservice or repair is required. Incorrect reassembly may result in a risk of electricshock, electrocution or fire.
• To reduce risk of electric shock, unplug the charger from the outlet beforeattempting any cleaning. Removing the battery pack will not reduce this risk.
• Never attempt to connect 2 chargers together.
• DO NOT store or use the tool and battery pack in locations where the temperaturemay reach or exceed 40ºC (such as inside sheds or metal buildings in summer).
• The charger is designed to operate on standard household electrical power (240volts). Do not attempt to use it on any other voltage!
• The battery pack is not fully charged out of the carton. First read the safetyinstructions and then follow the charging notes and procedures.
• The longest life and best performance can be obtained if the battery pack ischarged when the air temperature is between 18 - 24ºC. Do not charge the batterypack in an air temperature below 10ºC or above 40ºC. This is important and willprevent damage to the battery pack.
• Do not incinerate the battery pack even if it is seriously damaged or is completelyworn out. The battery can explode in a fire.
• Never attempt to open the battery pack for any reason. If the plastic housing ofthe battery pack breaks or cracks, immediately discontinue use and do not recharge.

8
ADDITIONAL SAFETY RULES FOR GRASS TRIMMERS!!
• This appliance is not intended for use by young children or infirm personsunless they have been adequately supervised by a responsible person toensure that they can use the appliance safely.
• Young children should be supervised to ensure that they do not play with the appliance.
• Never allow children or people unfamiliar with these instructions to use the trimmer.
• Avoid using the trimmer, while people, especially children or pets, are nearby.
• Use the trimmer only in daylight or good artificial light.
• Never operate the trimmer with damaged guards or without guards in place.
• Switch on the trimmer only when the hands and feet are away from thecutting head.
• Never fit metal cutting blades.
• Use only the manufacturer's recommended replacement parts and accessories.
• Always remove the battery when leaving the trimmer unattended.
• Disconnect the trimmer from the battery before carrying out maintenance orcleaning work.
• Inspect and maintain the trimmer regularly. Have the trimmer repaired onlyby an authorised repairer.
• Take care against injury from the blade(s). After replacing blades, alwaysreturn the trimmer to its normal operating position before switching on.
• When not in use, store the trimmer out of the reach of children.
• Face the cutting head away from you, other people and animals while thepower is connected to the grass trimmer (especially during operation).
• Disconnect the battery when changing blades or clearing grass from underthe guard.
• Disconnect the battery from the trimmer before making any adjustments.
• Use both handles when operating the grass trimmer.
• Keep ventilation openings clear of debris. Keep handles dry, clean and free ofoil and grease.
• Never reach underneath the trimmer (the cutting area) until it has completelystopped and the battery has been disconnected.

9
The battery (14) has been shipped in a low charge condition, and requires chargingprior to use.
• Plug the charger adaptor (16) into a mains poweroutlet.
• The green light on the adaptor (16) will illuminateshowing that power is being supplied to the adaptor (16).
• With the battery (14) sitting flat on a bench/table,align the “+” and “-“ symbols on both the battery(14) and charger connector (17), slide the chargerconnector (17) into the recess of the battery (14) terminals ensuring a firmconnection (Fig. 1).
• The charger connecter (17) only fits one way. If the charger connector (17) will notfit it means it is upside down.
• When the battery (14) and charger adaptor (16) is properly connected, the light onthe charger adaptor (16) will illuminate red signifying that the battery (14) is on charge.
• When fully charged, the light on the charger adaptor (16) will illuminate green.
• A battery (14) takes 2 hours to charge. Charging starts automatically. Remove thebattery (14) from the charging connector (17) after no more than 5 hours charging.
Initial charge
• The battery (14) will not reach its full charge the first time it is charged. The redlight will remain illuminated until the charger adaptor (16) is disconnected from themains power outlet.
• Allow several charging cycles of charging and then discharging (through use of thetool) for the battery (14) to reach its maximum charge.
Caution: Remove the charger adaptor (16) from the mains power outlet when chargeris not in use.
Note: If the light on the charger adaptor (16) fails to come on:
- Check the charging adaptor (16) is securely plugged into the mains power outlet and switched on.
- Check the charging connector (17) is securely connected into the socket of the battery (14).
CHARGING YOUR LITHIUM ION BATTERY
Fig. 1

10
Subsequent charges
• After normal usage, approximately 2 hours of charging time is required to fullyrecharge the battery (14).
• If the battery (14) is completely discharged, 5 hours or longer of charging timewill be required to fully recharge it.
Important charging notes
• The charger adaptor (16) and battery (14) may become warm to touch whilecharging. This is a normal condition, and does not indicate a problem.
• Use the charger adaptor (16) at normal room temperature whenever possible.To prevent overheating, do not cover the adaptor (16) and do not charge thebattery (14) in direct sunlight or near heat sources.
• If the battery (14) does not charge properly:
- Check current at the mains power outlet by plugging in a lamp or other appliance.
- If charging problems persist, have the complete tool checked by an electrician or a power tool repairer.
• If the light on the charger adaptor (16) fails to come on:
- Check the charger adaptor (16) is securely plugged into the wall outlet and switched on.
- Check the charging connector (17) is securely connected into the socket of the battery (14).
• To protect the battery (14) against deep discharging, when the battery is flat, aprotective circuit switches off the Grass Trimmer. The blade stops moving anda light whistling sound will be heard. Do not continue to press the on/offswitch (1) after an automatic shut-off, as it will damage the battery (14). Thebattery (14) must be re-charged before further use.
Note: If the battery (14) is flat and displays green charged LED, refer to Thermalvoltage protection note below. Note: cooling may be required.
Note: Up to 30 minutes cooling time may be required depending on ambienttemperature and the operation being performed, before the battery will start thecharging cycle.
Thermal voltage protection indication
In the event that the thermal or voltage protection circuit has been activated thebattery (14) will cease to operate. This can happen when the tool has been usedfor extended periods.
If you place the battery (14) on the charger the LED Lights will give you theappearance that the battery (9) is fully charged. Leave the battery (14) on thecharger to charge for 2 hours.
The battery (14) may take the full 5 hours to charge, as the battery (14) may needto cool down or the protection circuits to be reset. This will allow the charger tobegin charging the battery (14) and resume normal operation.
CHARGING YOUR LITHIUM ION BATTERY (cont.)

Always switch off the
tool before insertion or removal of the battery.
Installing the battery
• Align the notches in the base of the grass trimmerhandle (3) with those of the battery (14) and slide thebattery and grass trimmer together until the battery(14) locks into place (see Fig. 2).
• Do not use excessive force when inserting the battery(14). If the battery (14) does not slide in easily, it is notbeing inserted correctly and could cause damage tothe battery (14), battery terminals or the grass trimmer.
Caution: Do not operate the switches (1 and 2) whilst inserting the battery.
Removing the Battery
Pull down on the battery release button (15) and pull thebattery (14) away from the Grass Trimmer (See Fig. 3).
Getting the best performance from the battery
The length of service from each charging cycle will depend on the type of workundertaken.
To obtain the longest possible battery life, we suggest the following:
• Store and charge your batteries in a cool area. Temperatures above or belownormal room temperature will shorten battery life.
• Never store batteries in a discharged condition. Recharge them immediately afterthey are discharged.
• All batteries gradually lose their charge. The higher the temperature the quickerthey lose their charge. If you store your grass trimmer for long periods of timewithout using it, recharge the batteries every month or two. This practice willprolong battery life.
11
INSTALLING OR REMOVING THE BATTERY
Fig. 2
Fig. 3
12
ASSEMBLY
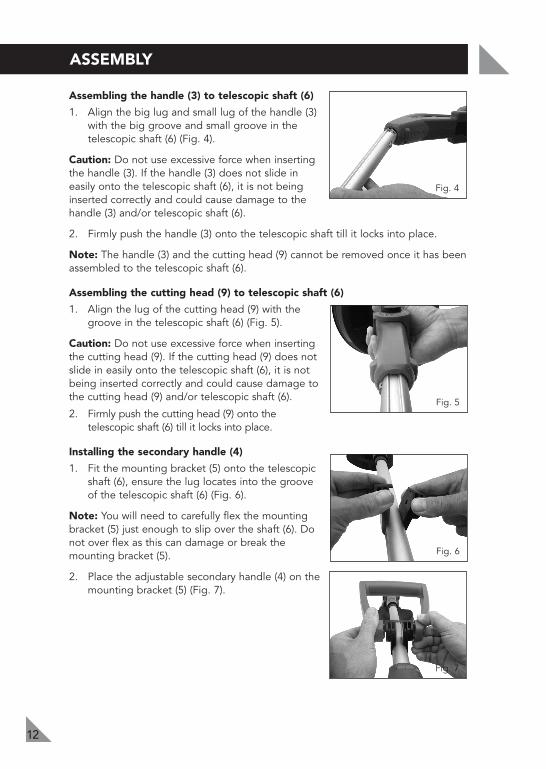
Assembling the handle (3) to telescopic shaft (6)
1. Align the big lug and small lug of the handle (3)with the big groove and small groove in thetelescopic shaft (6) (Fig. 4).
Caution: Do not use excessive force when insertingthe handle (3). If the handle (3) does not slide ineasily onto the telescopic shaft (6), it is not beinginserted correctly and could cause damage to thehandle (3) and/or telescopic shaft (6).
2. Firmly push the handle (3) onto the telescopic shaft till it locks into place.
Note: The handle (3) and the cutting head (9) cannot be removed once it has beenassembled to the telescopic shaft (6).
Assembling the cutting head (9) to telescopic shaft (6)
1. Align the lug of the cutting head (9) with thegroove in the telescopic shaft (6) (Fig. 5).
Caution: Do not use excessive force when insertingthe cutting head (9). If the cutting head (9) does notslide in easily onto the telescopic shaft (6), it is notbeing inserted correctly and could cause damage tothe cutting head (9) and/or telescopic shaft (6).
2. Firmly push the cutting head (9) onto thetelescopic shaft (6) till it locks into place.
Installing the secondary handle (4)
1. Fit the mounting bracket (5) onto the telescopicshaft (6), ensure the lug locates into the grooveof the telescopic shaft (6) (Fig. 6).
Note: You will need to carefully flex the mountingbracket (5) just enough to slip over the shaft (6). Donot over flex as this can damage or break themounting bracket (5).
2. Place the adjustable secondary handle (4) on themounting bracket (5) (Fig. 7).
Fig. 4
Fig. 5
Fig. 6
Fig. 7
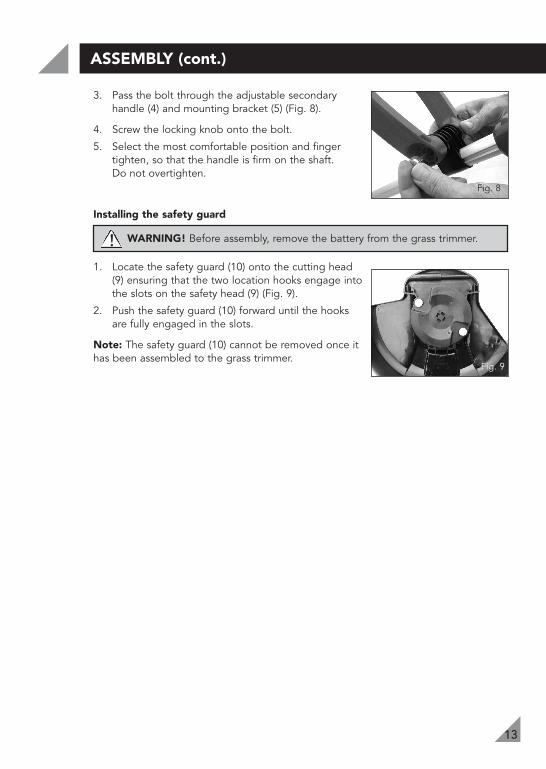
3. Pass the bolt through the adjustable secondaryhandle (4) and mounting bracket (5) (Fig. 8).
4. Screw the locking knob onto the bolt.
5. Select the most comfortable position and fingertighten, so that the handle is firm on the shaft. Do not overtighten.
Installing the safety guard
WARNING! Before assembly, remove the battery from the grass trimmer.
1. Locate the safety guard (10) onto the cutting head(9) ensuring that the two location hooks engage intothe slots on the safety head (9) (Fig. 9).
2. Push the safety guard (10) forward until the hooksare fully engaged in the slots.
Note: The safety guard (10) cannot be removed once ithas been assembled to the grass trimmer.
13
ASSEMBLY (cont.)
Fig. 8
Fig. 9
!!

14
OPERATION
Adjusting the height
The telescopic shaft (6) can be adjusted to suit different user heights.
WARNING! Do not attempt to adjust the telescopic shaft (6) whilst theblades are rotating.
Grip the grass trimmer firmly and turn the shaftadjustment lock (7) clockwise to unlock the shaft.
Adjust the length of the telescopic shaft (6) to themost comfortable operating position.
Turn the shaft adjustment lock (7) anti-clockwise tolock the shaft in position (Fig. 10).
Adjusting the secondary handle
The angle and position of the secondary handle (4) can be adjusted to suit yourpersonal preference.
WARNING! Remove battery from grass trimmer before performingadjustments.
Loosen the knob on the side of the secondaryhandle (4) (Fig. 11).
Slide the mounting bracket (5) along the telescopic shaft (6) and adjust the angleto the position that is most comfortable.
Tighten the knob to fix the mounting bracket (5) and secondary handle (4) in itsnew position.
Fig. 10
!!
!!
Fig. 11

15
OPERATION (cont.)
Adjusting the cutting head angle for trimming or edging
WARNING! Remove battery from grass trimmer before performingadjustments.
The cutting head (9) can be adjusted to different angles for ease of cutting in differentconditions.
1. While firmly holding the telescopic shaft (6) in onehand, push and hold the head angle adjustmentbuttons (8) (Fig. 12).
2. Adjust the head to the desired angle (I, II, III, IV) and release the head angleadjustment buttons (8).
Rotating the cutting head for trimming or edging
WARNING! Remove battery from grass trimmer before performingadjustments.
Caution: Rotating the cutting head (9) in the wrong direction to that indicated in theinstructions below will result in damage to the rotating mechanism.
The cutting head (9) can be rotated for ease of trimming and edge cutting in differentconditions.
!!
Fig. 12
!!
OPERATION (cont.)
16
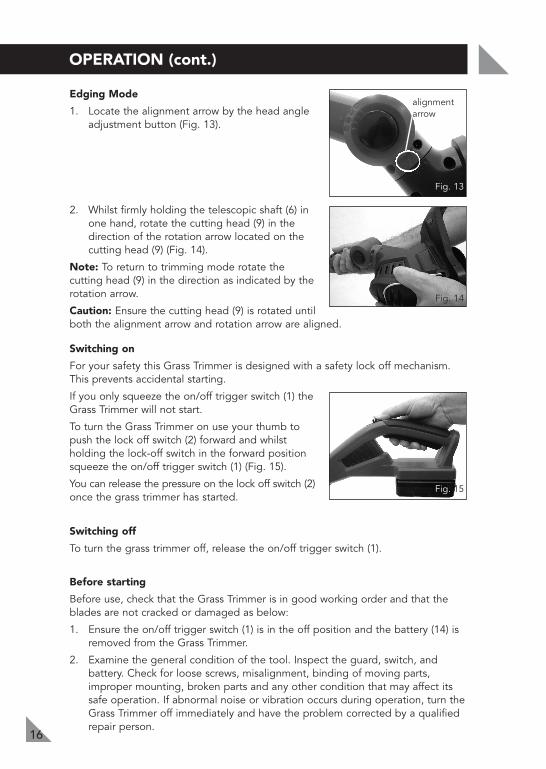
Edging Mode
1. Locate the alignment arrow by the head angleadjustment button (Fig. 13).
2. Whilst firmly holding the telescopic shaft (6) inone hand, rotate the cutting head (9) in thedirection of the rotation arrow located on the cutting head (9) (Fig. 14).
Note: To return to trimming mode rotate the cutting head (9) in the direction as indicated by therotation arrow.
Caution: Ensure the cutting head (9) is rotated untilboth the alignment arrow and rotation arrow are aligned.
Switching on
For your safety this Grass Trimmer is designed with a safety lock off mechanism.This prevents accidental starting.
If you only squeeze the on/off trigger switch (1) theGrass Trimmer will not start.
To turn the Grass Trimmer on use your thumb topush the lock off switch (2) forward and whilstholding the lock-off switch in the forward positionsqueeze the on/off trigger switch (1) (Fig. 15).
You can release the pressure on the lock off switch (2)once the grass trimmer has started.
Switching off
To turn the grass trimmer off, release the on/off trigger switch (1).
Before starting
Before use, check that the Grass Trimmer is in good working order and that theblades are not cracked or damaged as below:
1. Ensure the on/off trigger switch (1) is in the off position and the battery (14) isremoved from the Grass Trimmer.
2. Examine the general condition of the tool. Inspect the guard, switch, andbattery. Check for loose screws, misalignment, binding of moving parts,improper mounting, broken parts and any other condition that may affect itssafe operation. If abnormal noise or vibration occurs during operation, turn theGrass Trimmer off immediately and have the problem corrected by a qualifiedrepair person.
Fig. 13
Fig. 14
Fig. 15
alignment arrow

OPERATION (cont.)
3. Ensure that you are on a flat surface and have secure footing.
4. Check that the blades (13) are not cracked or broken off in different lengths, alsocheck they are both firmly secured onto the blade attachment knobs (12). Refer toMaintenance section on Fitting and replacing blades.
Trimming and edging mode
WARNING! Remove battery from grass trimmer before performingadjustments.
WARNING! Make sure that the work area is free of rocks, debris, lines andother foreign objects.
To adjust for trimming or lawn edging follow the instruction for “Adjusting the cuttinghead angle for trimming or edging” and “Rotating the cutting head for trimming oredging” (page 15).
1. Lower the tree guard (11) to prevent the cuttinghead (9) from getting too close to an object such as a tree trunk or wall and causing damage to theblades (Fig. 16).
2. Start the trimmer before approaching the grass tobe cut.
3. Cut the grass by moving the trimmer from right to left and proceed slowly,keepthe trimmer inclined forwards at an angle of about 30°. Light cuts are better thanheavy cuts as they allow the cut grass to fall away from the cutting head (9).
4. High grass should be cut in layers always beginning from the top. Do not cutdamp or wet grass. Do not overload your trimmer.
5. If you push the blades (13) too close to hard edges/objects they can break. You willhave to refit new blades (13) to continue operation.
6. To prevent the blade (13) from breaking ensure you approach the edge/objectslowly and let the TIP of the blade do the work.
7. Watch out for kickbacks in the event of impact with hard objects.
8. After finishing the cutting operation, keep the head close to ground level, releasethe switch and allow the motor to come to a complete standstill. Place the grasstrimmer on the ground, and remove the battery (14).
Note: Periodically clean out the grass from the cutting head (9) and the rim of theguard (10) to prevent the grass trimmer from vibrating.
17
Fig. 16
!!
!!

MAINTENANCE
18
• When not in use, the tool should be stored in a dry, frost-free location, out ofreach of children.
• Keep ventilation slots of the trimmer clean at all times and prevent any foreignmatter from entering.
• If the housing of the trimmer requires cleaning, do not use solvents but a moistsoft cloth only.
Note: Ozito Industries will not be responsible for any damage or injuries caused byrepair of the tool by an unauthorised person or by mishandling of the tool.
Fitting and replacing blades
The trimmer has two removable plastic blades that can be quickly and easilyreplaced with new blades.
Blades can be purchased in packs of 20 (Ozito p/n ACCPCB-20) and are availablefrom your local Bunnings Warehouse.
WARNING! Remove the battery during adjustments. Wait until theblade has stopped before attempting to remove the blade. Never fitmetal blades. Only fit blades recommended by the manufacturer.
To fit a blade position the hole in the blade (13) overthe blade attachment knob (12) then pull the bladeoutwards to lock it into position (Fig. 17).
To remove a blade push the blade (13) toward thecentre of the trimmer and lift it off the bladeattachment knob (12) (Fig. 18).
Fig. 17
!!
Fig. 18

19
SPARE PARTS
Limited spare parts are available subject to availability. Please contact your localBunnings Special Orders Desk to order the required spare parts.
Most common spare parts listed below
Spare Part Part No.
Battery (18V Lithium ion) ACCLB-018
Charging Assembly ACCLCA-018
Blades (Pack 20) ACCPCB-20
DESCRIPTION OF SYMBOLS
Warning Read instruction manual
V Volts Hz Hertz
~ Alternating current W Watts
Direct current ø Diameter
mA Milliamperes no No load speed
Recycle battery Do not put in the rubbish
Isolation transformer Polarity
Do not incinerate Do not get battery wet
Thermal cut-outprotection at 130ºC
Transformer EnergyRating (MEPS)
Double insulated
/min Revolutions or reciprocation per minute
AH Amp hour
Indoor use only
Lithium Ion batteryDo not use or store battery in temperatures exceeding 50ºC
Electrical Emissions Conformity (EMC)

CARING FOR THE ENVIRONMENT
20
1 x Cordless Grass Trimmer1 x Battery (18V Lithium Ion) 1 x Charging adaptor & connector2 x Cutting blades (fitted)1 x Instruction manual
Power tools that are no longer usable should not bedisposed of with household waste but in an environmentallyfriendly way. Please recycle where facilities exist. Check withyour local council authority for recycling advice.
Recycling packaging reduces the need for landfill and rawmaterials. Reuse of recycled material decreases pollution in theenvironment. Please recycle packaging where facilities exist.Check with your local council authority for recycling advice.
PACK CONTENTS

OZITO INDUSTRIES PTY LTD
21
AUSTRALIA (Head Office)
1 - 23 Letcon Drive, Bangholme, Victoria, Australia 3175Telephone: 1800 069 486Facsimile: +61 3 9238 5588Website: www.ozito.com.auEmail: [email protected]

WARRANTYTHIS WARRANTY FORM AND CONFIRMED BUNNINGS REGISTER RECEIPT SHOULDBE RETAINED BY THE CUSTOMER AT ALL TIMES
The warranty is only made available by returning the product to your nearestBunnings Warehouse with a confirmed Bunnings register receipt.
PURCHASED FROM:________________________________________________
DATE PURCHASED: ________________________________________________
2 YEAR REPLACEMENT WARRANTYYour Ozito tool is guaranteed for a period of 24 months from the ORIGINAL date ofpurchase under the following conditions: Professional, industrial or high frequencyuse will VOID this warranty.
THE LITHIUM ION BATTERY IS COVERED BY A 12 MONTH WARRANY.
WARNING
The following actions will result in the warranty being void.
• If the tool has been operated on a supply voltage other than that specified onthe unit.
• If the tool shows signs of damage or defects caused by or resulting from abuseaccidents or alterations.
• If the tool has been disassembled or tampered with in any way.
Note: Warranty excludes consumable parts such as carbon brushes, sanding pads,blades, discs, drill bits, collets and router bits.
YOUR WARRANTY FORM SHOULD BE RETAINEDBY YOU AT ALL TIMES.
SHOULD YOU HAVE ANY QUESTIONS PRIOR TORETURNING YOUR PRODUCT FOR WARRANTY OR
REPAIR PLEASE TELEPHONE OUR CUSTOMERSERVICE HELPLINE:
Australia 1800 069 486New Zealand 0508 069 486
TO ENSURE A SPEEDY RESPONSE PLEASE HAVE THE MODEL NUMBERAND DATE OF PURCHASE AVAILABLE. AN OZITO CUSTOMER SERVICE
REPRESENTATIVE WILL TAKE YOUR CALL AND ANSWER ANY QUESTIONSYOU MAY HAVE RELATING TO THE WARRANTY POLICY OR PROCEDURE.