Embed Size (px)
Citation preview

Printed on 16 September, 2014
SPM Mobile User Guide
Copyright © September 2014 SPM Applications
All rights reserved.
This software contains proprietary information of SPM Applications. It is provided under a
licence agreement containing restrictions on use and disclosure and is also protected by
copyright law. Reverse engineering of the software is prohibited.
Due to continued product development, this information may change without notice. The
information and intellectual property contained herein is confidential between SPM
Applications and the client and remains the exclusive property of SPM Applications. If you find
any problems in the documentation, please report them to us in writing. SPM Applications does
not warrant that this document is error-free.
No part of this product may be reproduced, stored in a retrieval system, or transmitted in any
form or by any means, electronic, mechanical, photocopying, recording or otherwise without
the prior written permission of SPM Applications.
SPM Applications
P O Box 300-081
North Shore 0752
Auckland
New Zealand
+64 9 9214070
Email: [email protected]
Website: www.spmassets.com (http://www.spmassets.com/)
Contents i
Contents
Mobile Introduction 1
Key Principles ..................................................................................................................................................2 System Requirements ......................................................................................................................................2 Typographical Conventions ...........................................................................................................................3 Process Overview ............................................................................................................................................4
Getting Started 5
SPM Mobile Login Process .............................................................................................................................5 SPM Mobile News ...........................................................................................................................................6 SPM Mobile Interface ......................................................................................................................................7
Using SPM Mobile 8
Survey Planner .................................................................................................................................................8 Property Selection ............................................................................................................................................9 Property Menu ............................................................................................................................................... 13 Information Fields ......................................................................................................................................... 14 Selecting a Property ....................................................................................................................................... 16
Add new Property Record ...................................................................................................................... 16 Add new Components .................................................................................................................................. 23
Add new Components using a template .............................................................................................. 28 Edit/Add Component Data ..................................................................................................................... 33 Using the Component Calculator .......................................................................................................... 37 Edit/Add Component Information ........................................................................................................ 38 Add Component Details ......................................................................................................................... 39 Saving a Component Record .................................................................................................................. 42 Deleting a Component Record ............................................................................................................... 44 Searching for Component Barcodes ...................................................................................................... 50
Status Indicators ............................................................................................................................................ 52 Property Quality Standard Questions ........................................................................................................ 54 Schedule of Rates (SOR)................................................................................................................................ 56 Essential Services (ESS) ................................................................................................................................. 59 Work Orders ................................................................................................................................................... 61 Survey Validation .......................................................................................................................................... 63
ii Contents
Uploading Property Photographs to SPM Assets 71
Uploading property photographs using add photo button 71
How to view the photos in SPM Assets 72
Resizing images on an iPad .......................................................................................................................... 74
Uploading Component Photographs to SPM Assets 77
Uploading component photographs when creating your own email 77
How to select the Component ID in a mobile device 78
Uploading component photographs using add photo button 79
How to view the photos in SPM Assets 80
Uploading Work Order Photographs to SPM Assets 81
Uploading work order photographs using add photo button ................................................................ 82
How to view the photos in SPM Assets 86
Trouble Shooting 88
How to clear browsing history and cache 92
How to end a session on an iPad 95
Frequently Asked Questions 98
Glossary of Terms 103
Index 107
1
SPM Assets
SPM Assets is a strategic asset management tool for organisations and individuals that manage
fixed assets.
SPM Assets provides an end to end system that greatly simplifies best practice asset
management.
Beginning with the collection of condition and building performance data, the tool then
provides a finely detailed analysis of asset performance and provides for the allocation and
prioritisation of asset related projects.
SPM Mobile
SPM Mobile is a mobile computing survey solution that links to SPM Assets, uploading
condition assessments, performance assessments and work orders that have been collected in
the field.
SPM Mobile ensures accuracy in recording stock condition information and removes
duplication in the data capture process by recording survey data remotely on-site offsetting any
need to input detailed data to the main system when returning to the office. It also reduces
errors caused by incorrect data recorded when out of the office.
In This Chapter
Key Principles ..................................................................................................... 2
System Requirements ........................................................................................ 2
Typographical Conventions ............................................................................. 3
Process Overview ............................................................................................... 4
Chapter 1
Mobile Introduction
2 SPM Mobile User Guide
Key Principles
SPM Assets is a web based application. Commonly known as ‘Software as a Service’ (SAAS) or
Application Service Provision (ASP). This means that wherever there is Internet access it is
possible to connect to the full version of the software application providing the freedom to work
from any location.
SPM Mobile allows fast data entry whether you are in the field or processing data in the office.
The process is as simple as selecting the Property Records, entering the data through the ‘add
component’ function or adding an entire predefined template for a Property Record. Once the
component is added, then add the survey information on condition, quantity, comments, etc.
Post the survey data to SPM Assets when complete.
System Requirements
For best performance ensure that your system meets the following minimum requirements.
Hardware
A device with 3G or wifi connection to the internet e.g. iPad, iPhone, Smartphone
A browser with sql lite enabled e.g. safari or google chrome - recommended
Digital camera set at 640x480 resolution
Ensure you have:
Configured email on the device
Enabled JavaScript
Enabled Cookies
Turned off Private Browsing

Mobile Introduction 3
Typographical Conventions
Before you start using this guide, it is important to understand the terms and typographical
conventions used in the documentation.
For more information on specialised terms used in the documentation, see the Glossary at the
end of this document.
The following kinds of formatting in the text identify special information.
Formatting convention Type of Information
Triangular Bullet() Step-by-step procedures. You
can follow these instructions to
complete a specific task.
Special Bold Items you must select, such as
menu options, command
buttons, or items in a list.
Emphasis Use to emphasize the
importance of a point or for
variable expressions such as
parameters.
CAPITALS Names of keys on the
keyboard. for example, SHIFT,
CTRL, or ALT.
KEY+KEY Key combinations for which
the user must press and hold
down one key and then press
another, for example, CTRL+P,
or ALT+F4.
4 SPM Mobile User Guide
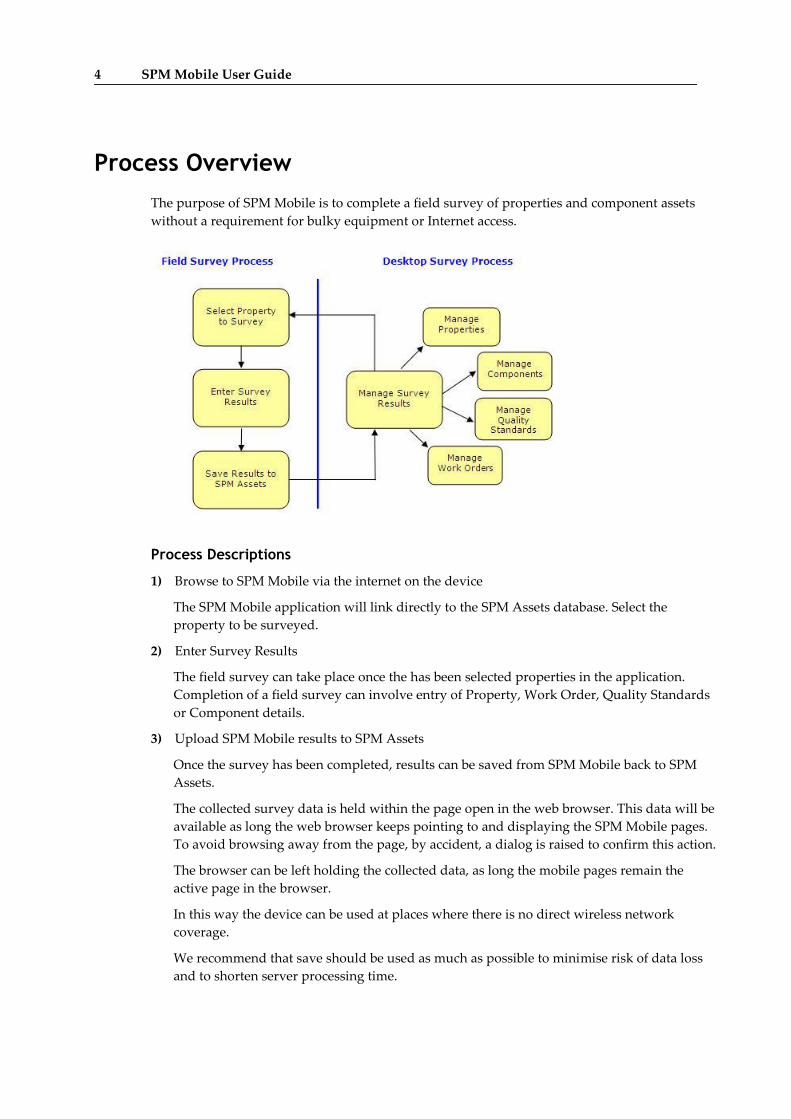
Process Overview
The purpose of SPM Mobile is to complete a field survey of properties and component assets
without a requirement for bulky equipment or Internet access.
Process Descriptions
1) Browse to SPM Mobile via the internet on the device
The SPM Mobile application will link directly to the SPM Assets database. Select the
property to be surveyed.
2) Enter Survey Results
The field survey can take place once the has been selected properties in the application.
Completion of a field survey can involve entry of Property, Work Order, Quality Standards
or Component details.
3) Upload SPM Mobile results to SPM Assets
Once the survey has been completed, results can be saved from SPM Mobile back to SPM
Assets.
The collected survey data is held within the page open in the web browser. This data will be
available as long the web browser keeps pointing to and displaying the SPM Mobile pages.
To avoid browsing away from the page, by accident, a dialog is raised to confirm this action.
The browser can be left holding the collected data, as long the mobile pages remain the
active page in the browser.
In this way the device can be used at places where there is no direct wireless network
coverage.
We recommend that save should be used as much as possible to minimise risk of data loss
and to shorten server processing time.
Chapter 2 Getting Started 5
SPM Assets is a web based software application that offers advanced analysis and
reporting tools to assist in strategic asset planning.
Intuitive navigation options ensure rapid learning pathways that quickly provide
relevant, reportable planning solutions.
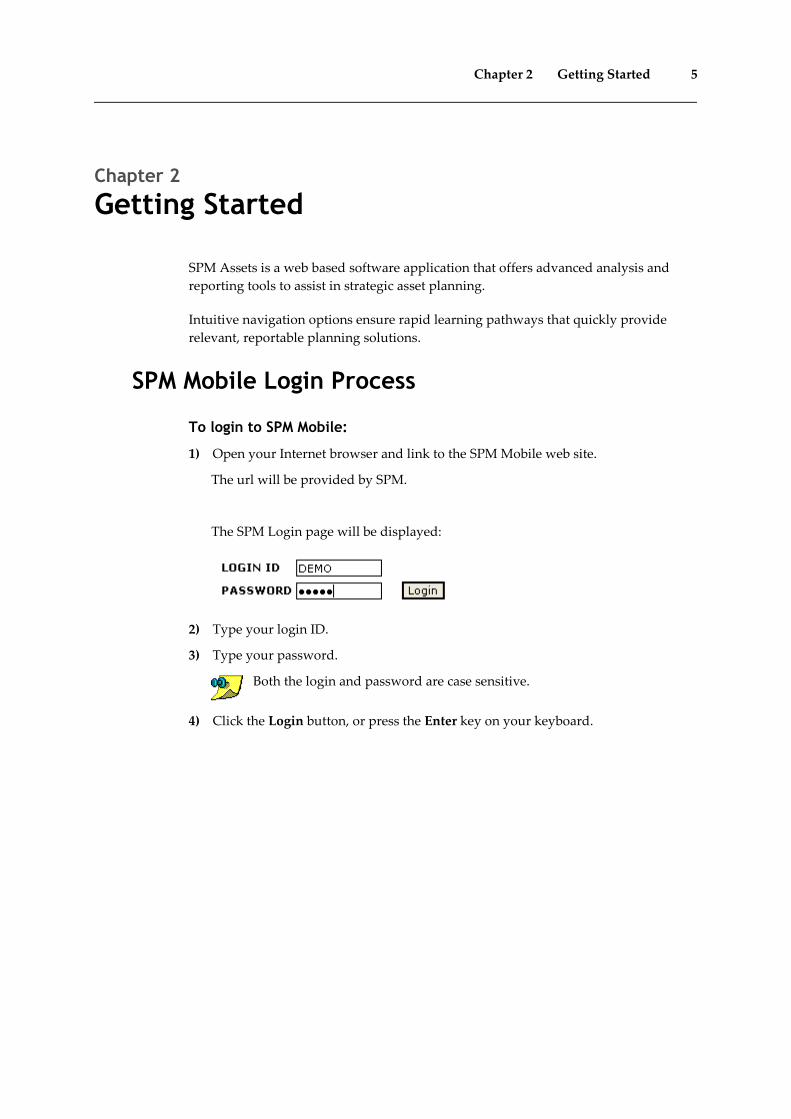
SPM Mobile Login Process
To login to SPM Mobile:
1) Open your Internet browser and link to the SPM Mobile web site.
The url will be provided by SPM.
The SPM Login page will be displayed:
2) Type your login ID.
3) Type your password.
Both the login and password are case sensitive.
4) Click the Login button, or press the Enter key on your keyboard.
Chapter 2
Getting Started
6 SPM Mobile User Guide
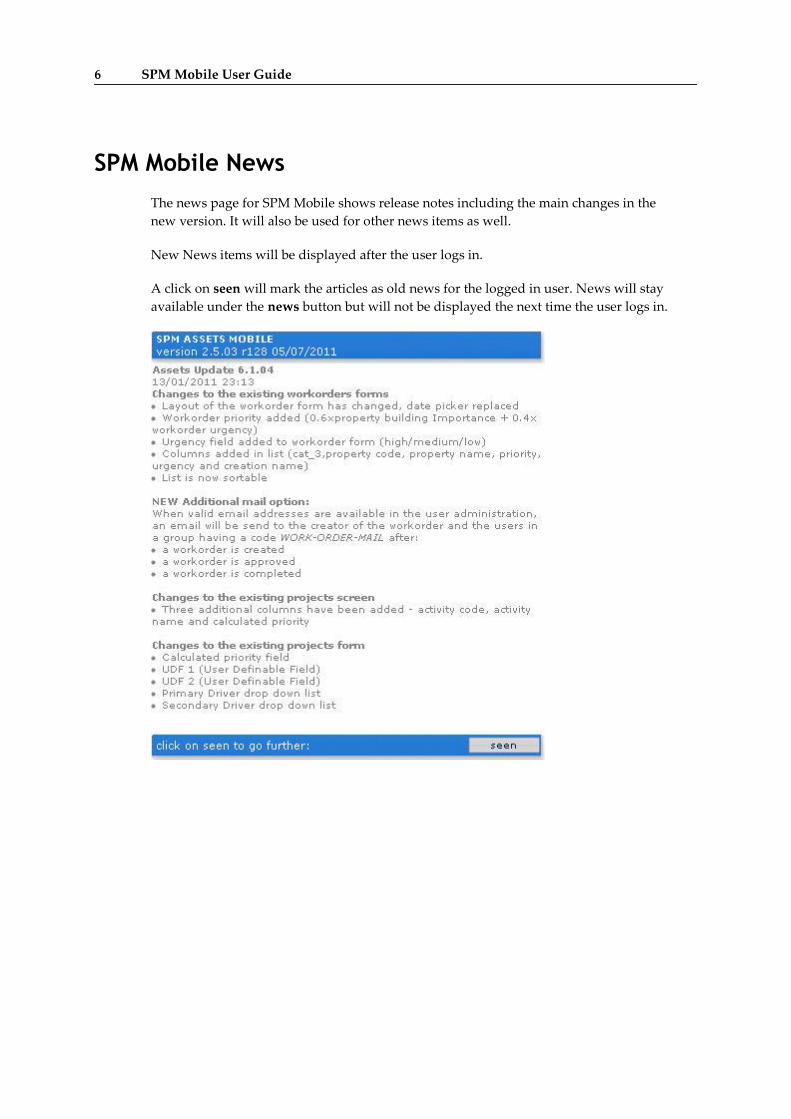
SPM Mobile News
The news page for SPM Mobile shows release notes including the main changes in the
new version. It will also be used for other news items as well.
New News items will be displayed after the user logs in.
A click on seen will mark the articles as old news for the logged in user. News will stay
available under the news button but will not be displayed the next time the user logs in.
Chapter 2 Getting Started 7
SPM Mobile Interface
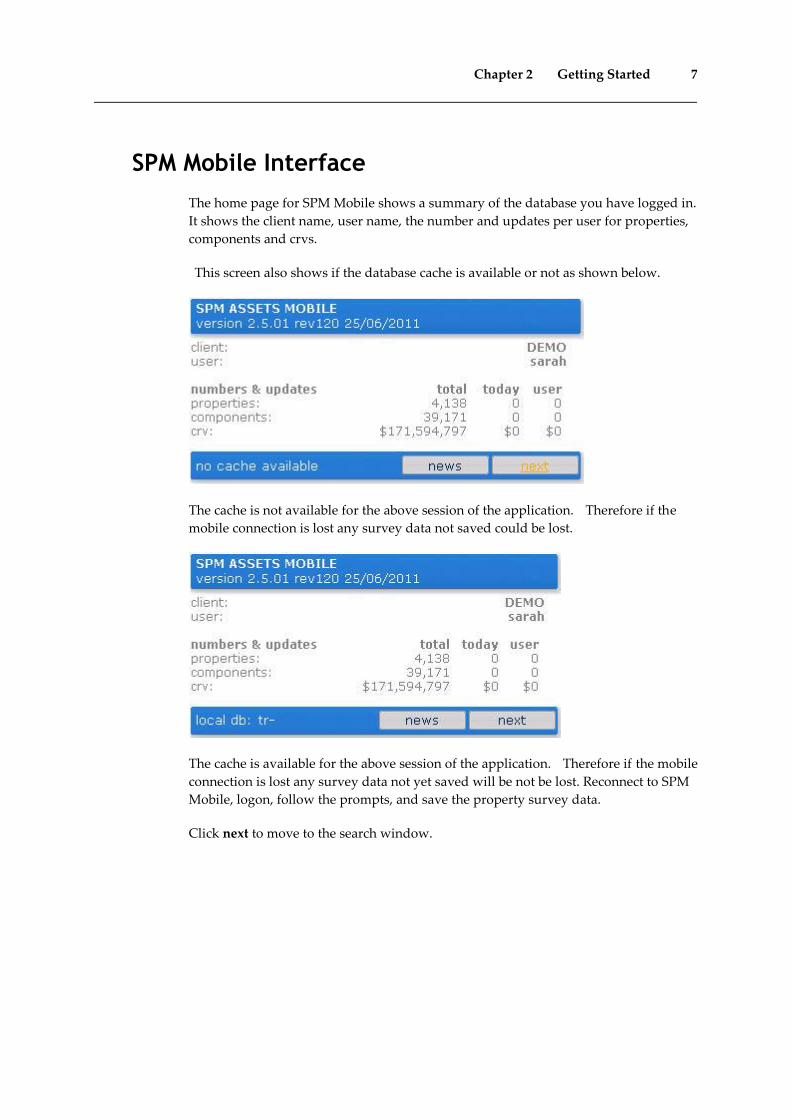
The home page for SPM Mobile shows a summary of the database you have logged in.
It shows the client name, user name, the number and updates per user for properties,
components and crvs.
This screen also shows if the database cache is available or not as shown below.
The cache is not available for the above session of the application. Therefore if the
mobile connection is lost any survey data not saved could be lost.
The cache is available for the above session of the application. Therefore if the mobile
connection is lost any survey data not yet saved will be not be lost. Reconnect to SPM
Mobile, logon, follow the prompts, and save the property survey data.
Click next to move to the search window.
8 SPM Mobile User Guide
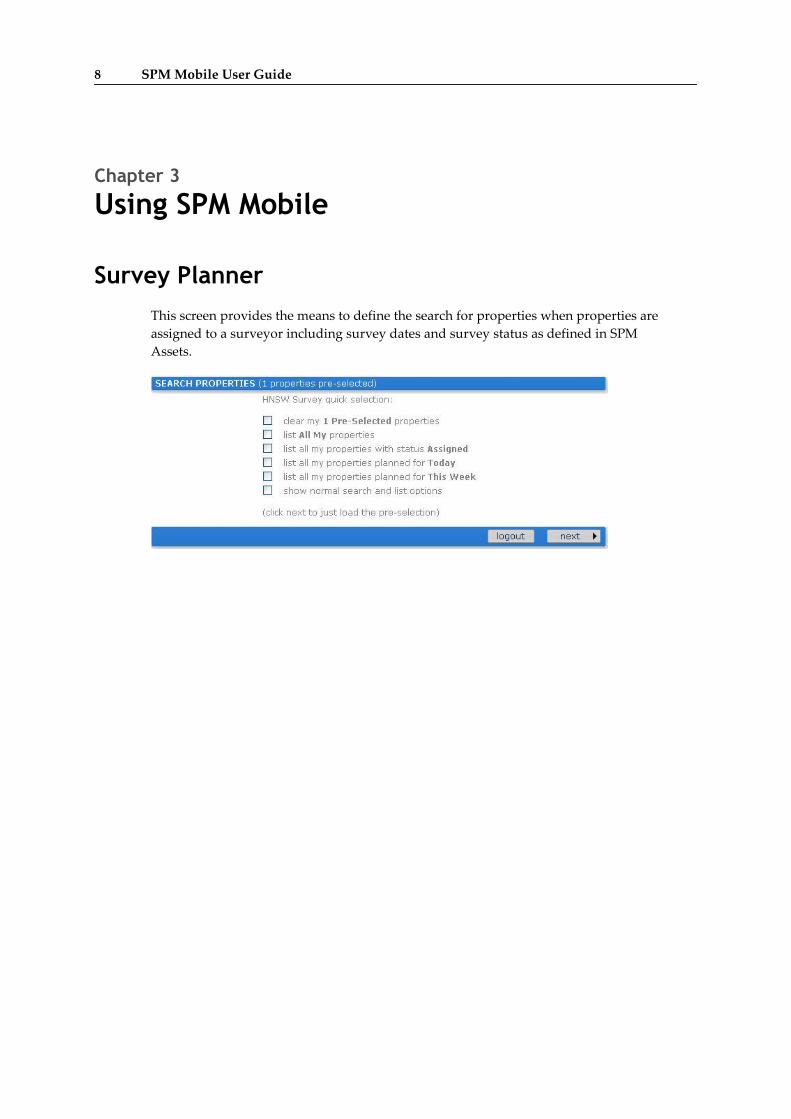
Survey Planner
This screen provides the means to define the search for properties when properties are
assigned to a surveyor including survey dates and survey status as defined in SPM
Assets.
Chapter 3
Using SPM Mobile
Chapter 3 Using SPM Mobile 9
The various options provide the following filters.
Options Outcomes
Clear my 1 pre-selected
properties
When you have previously selected a
property it will be saved. This options
allows the previous selection to be cleared
List All My properties Displays all properties allocated to the
surveyor
List all my properties with
status Assigned
Displays only the properties with the
status of assigned
List all my properties planned
for Today
Displays only the properties planned for
today
List all my properties planned
for This Week
Displays only the properties planned for
this week
Show normal search and list
options
Displays the search function screen which
uses the property code or property name
(click next to just load the
pre-selection)
Displays only the properties which have
been selected previously
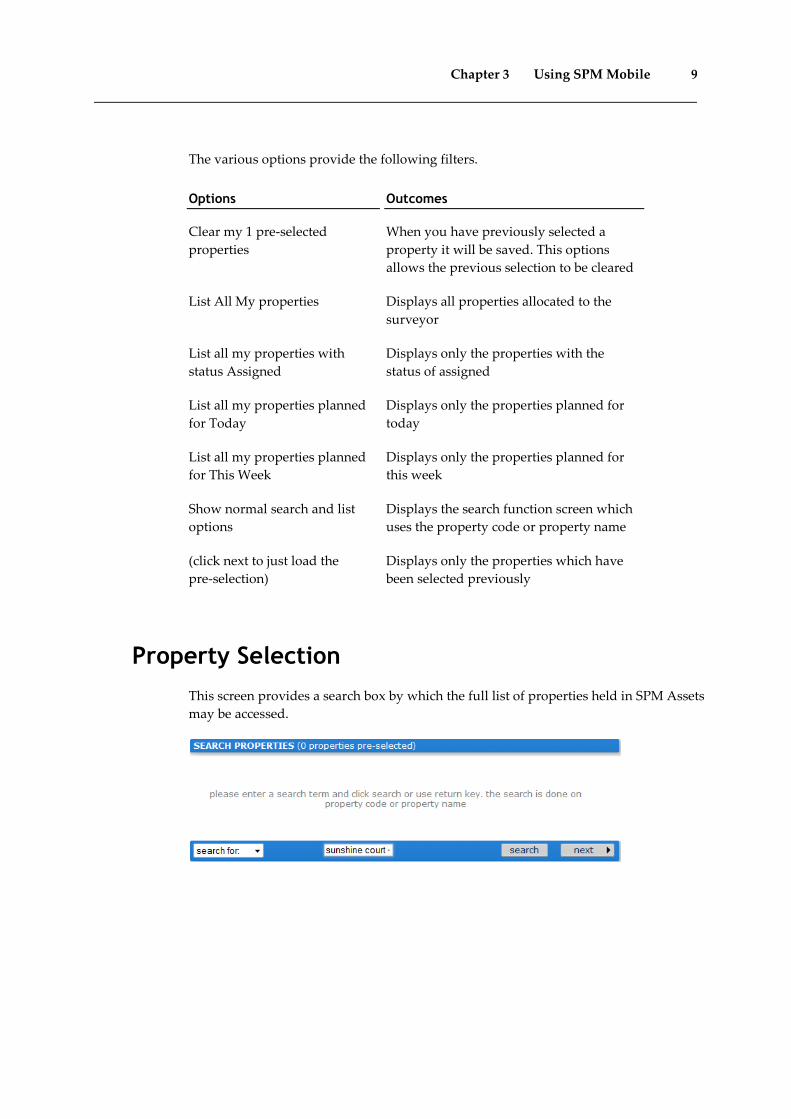
Property Selection
This screen provides a search box by which the full list of properties held in SPM Assets
may be accessed.
10 SPM Mobile User Guide
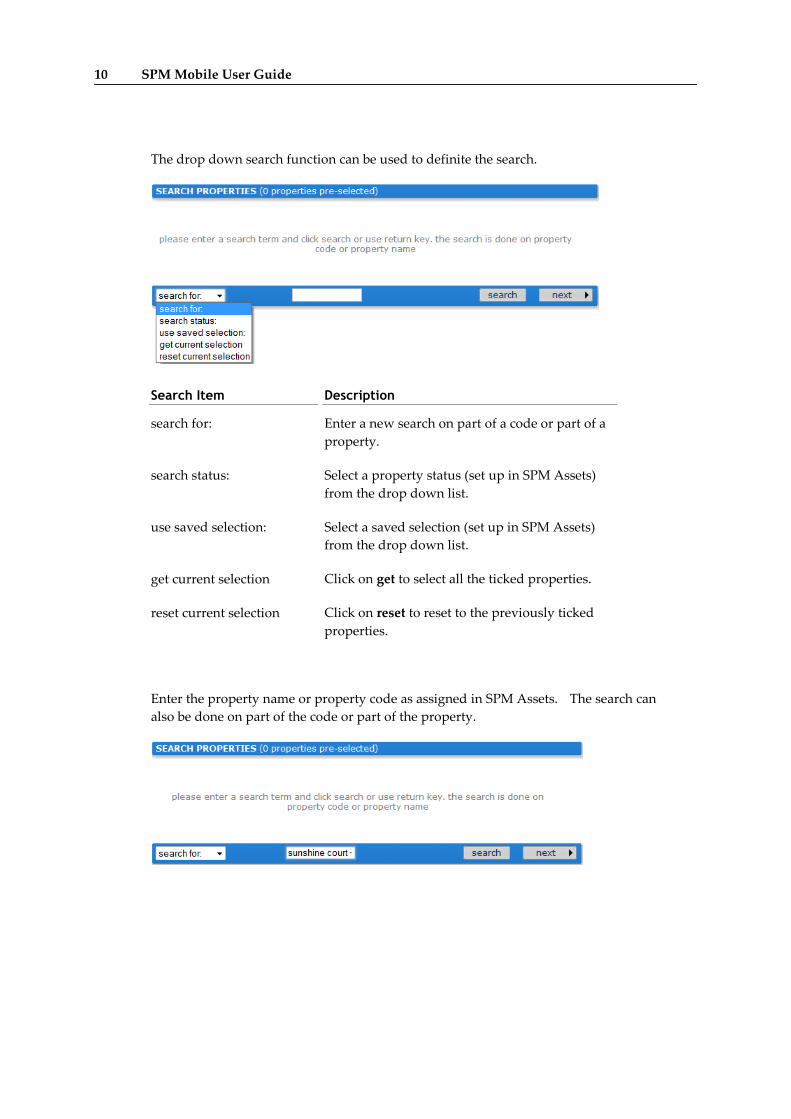
The drop down search function can be used to definite the search.
Search Item Description
search for: Enter a new search on part of a code or part of a
property.
search status: Select a property status (set up in SPM Assets)
from the drop down list.
use saved selection: Select a saved selection (set up in SPM Assets)
from the drop down list.
get current selection Click on get to select all the ticked properties.
reset current selection Click on reset to reset to the previously ticked
properties.
Enter the property name or property code as assigned in SPM Assets. The search can
also be done on part of the code or part of the property.
Chapter 3 Using SPM Mobile 11
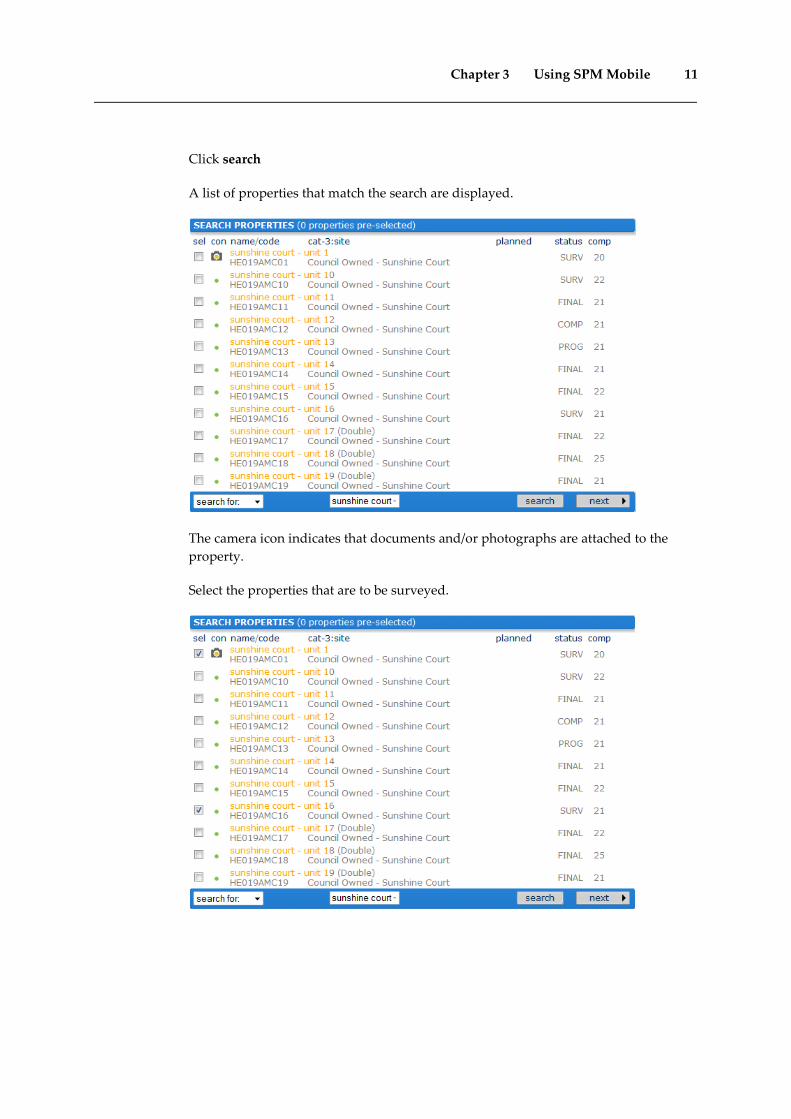
Click search
A list of properties that match the search are displayed.
The camera icon indicates that documents and/or photographs are attached to the
property.
Select the properties that are to be surveyed.
12 SPM Mobile User Guide
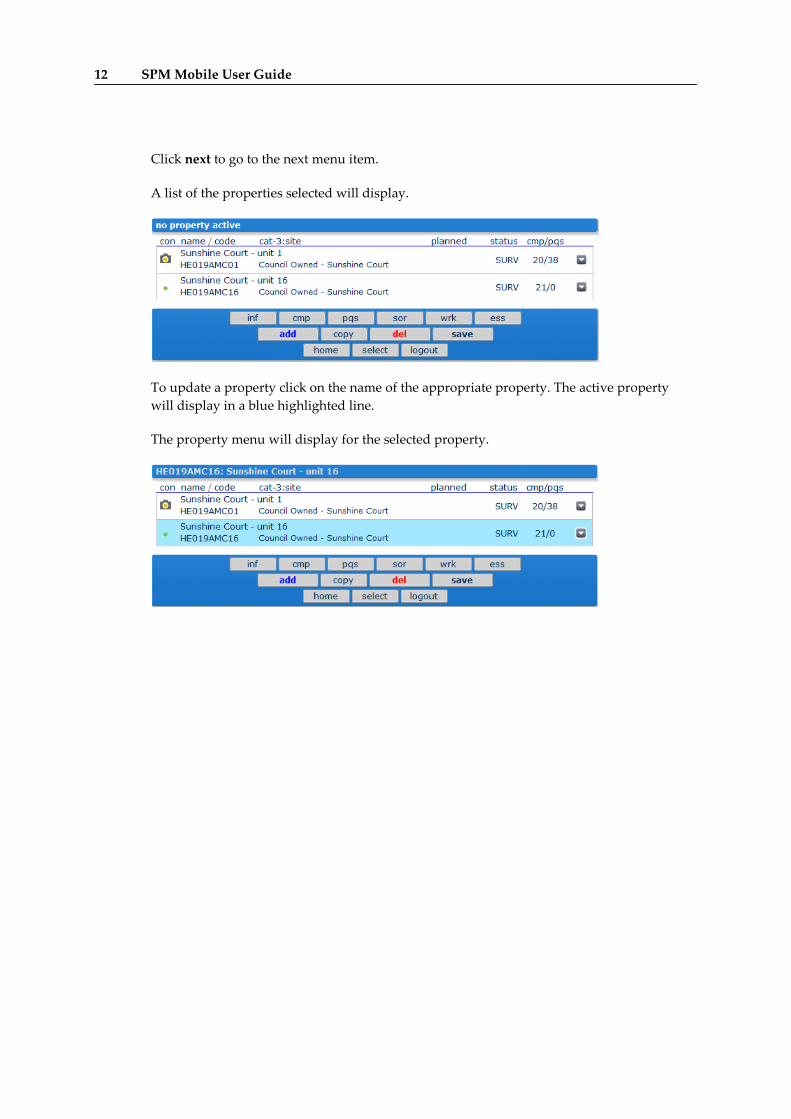
Click next to go to the next menu item.
A list of the properties selected will display.
To update a property click on the name of the appropriate property. The active property
will display in a blue highlighted line.
The property menu will display for the selected property.
Chapter 3 Using SPM Mobile 13
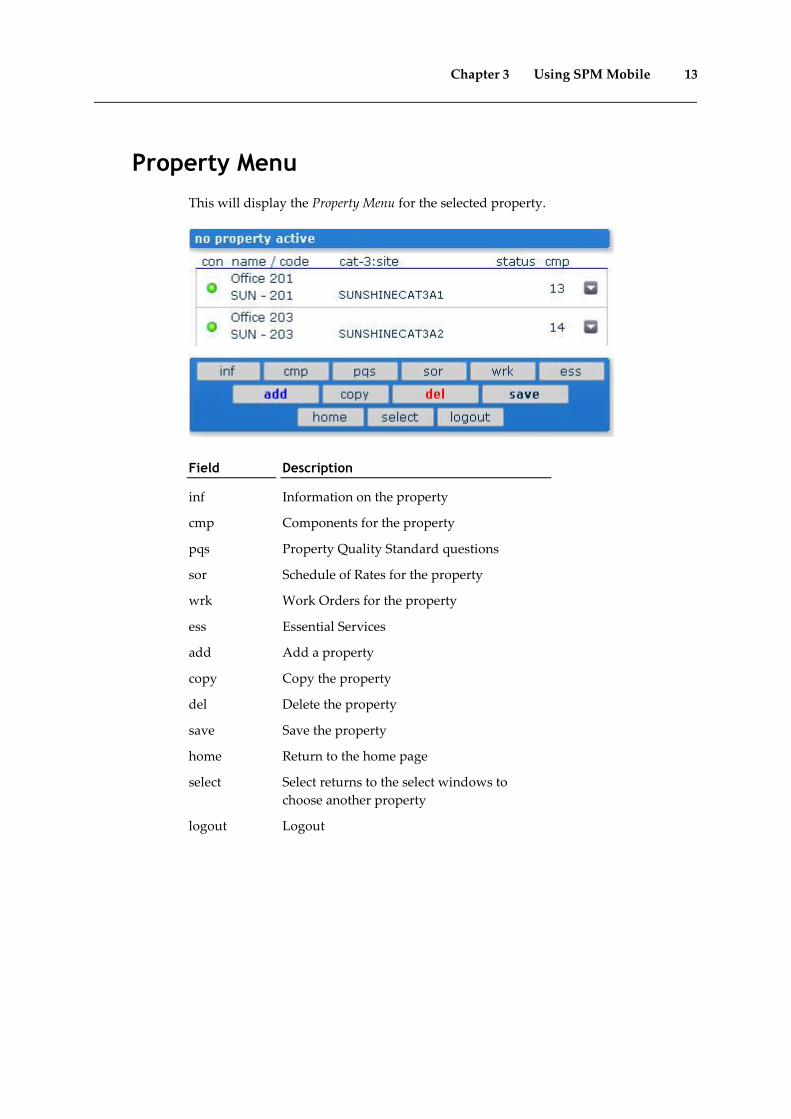
Property Menu
This will display the Property Menu for the selected property.
Field Description
inf Information on the property
cmp Components for the property
pqs Property Quality Standard questions
sor Schedule of Rates for the property
wrk Work Orders for the property
ess Essential Services
add Add a property
copy Copy the property
del Delete the property
save Save the property
home Return to the home page
select Select returns to the select windows to
choose another property
logout Logout
14 SPM Mobile User Guide
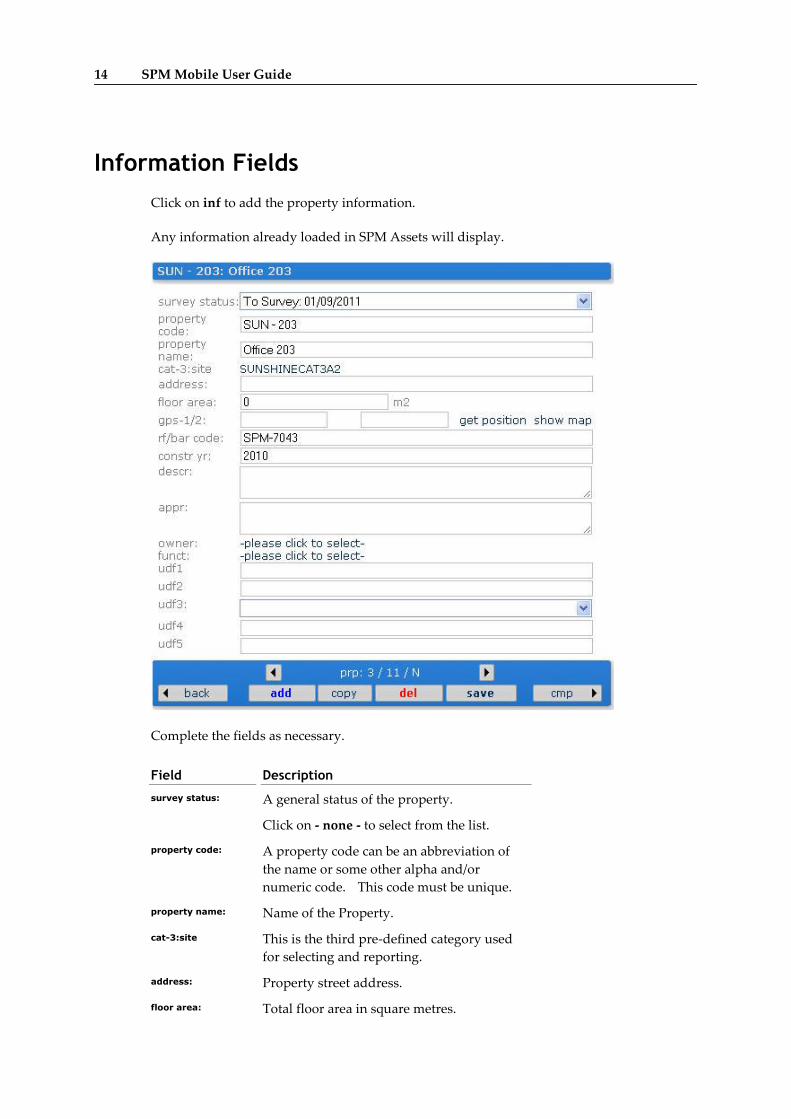
Information Fields
Click on inf to add the property information.
Any information already loaded in SPM Assets will display.
Complete the fields as necessary.
Field Description
survey status: A general status of the property.
Click on - none - to select from the list.
property code: A property code can be an abbreviation of
the name or some other alpha and/or
numeric code. This code must be unique.
property name: Name of the Property.
cat-3:site This is the third pre-defined category used
for selecting and reporting.
address: Property street address.
floor area: Total floor area in square metres.
Chapter 3 Using SPM Mobile 15
gps-1/2 The 1st and 2nd global positioning
co-ordinate that pinpoints the location of this
property.
get position This populates the gps field with the current
co-ordinates.
show map The google map will display showing the
location of the property using the gps
co-ordinates.
rf/bar code: The barcode or RFID (radio frequency
identifier) that uniquely identifies this
property.
constr yr: Year in which the property was built. If left
blank, the current year will be entered.
descr: A general description of the property.
appr: A general comment about the condition of
the property.
owner: The owner of the property.
Click on - please click to select - to select
from the list.
funct: Main function or purpose of the property.
Click on - please click to select - to select
from the list.
udf fields User definable fields 1-5 allow organisation
specific information to be collected.
Select the field an enter the appropriate data.
16 SPM Mobile User Guide
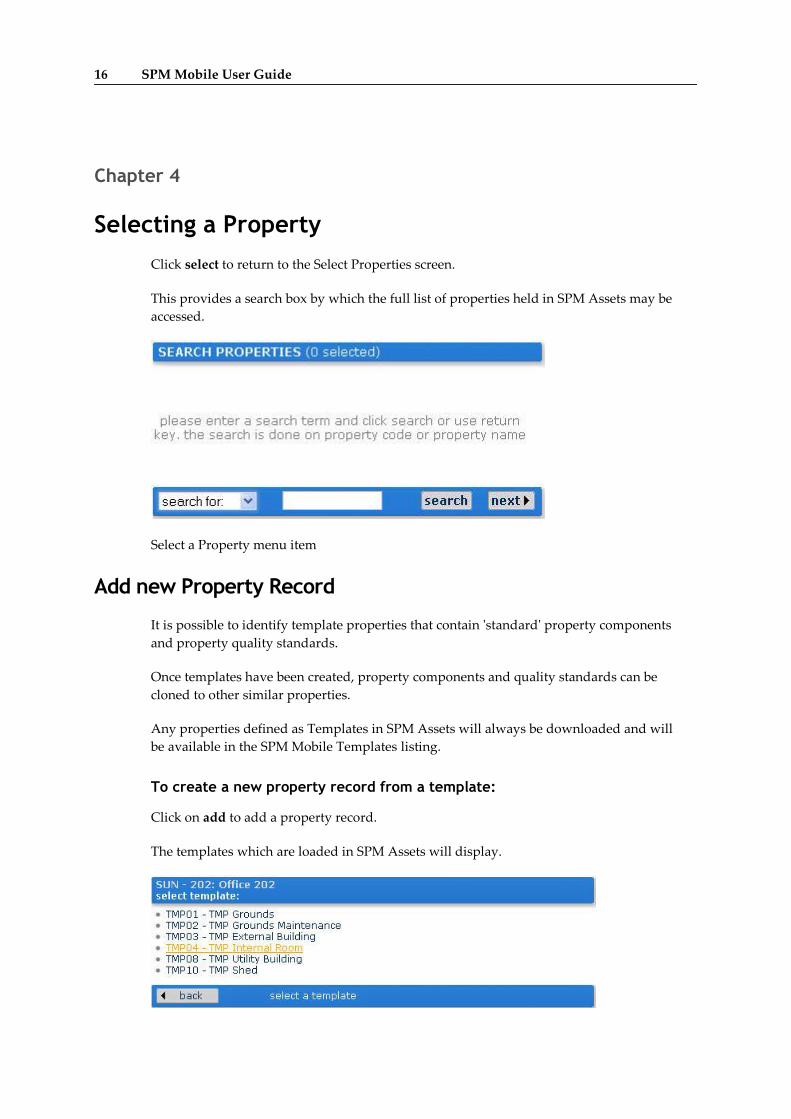
Selecting a Property
Click select to return to the Select Properties screen.
This provides a search box by which the full list of properties held in SPM Assets may be
accessed.
Select a Property menu item
Add new Property Record
It is possible to identify template properties that contain 'standard' property components
and property quality standards.
Once templates have been created, property components and quality standards can be
cloned to other similar properties.
Any properties defined as Templates in SPM Assets will always be downloaded and will
be available in the SPM Mobile Templates listing.
To create a new property record from a template:
Click on add to add a property record.
The templates which are loaded in SPM Assets will display.
Chapter 4
Chapter 4 Using SPM Mobile 17
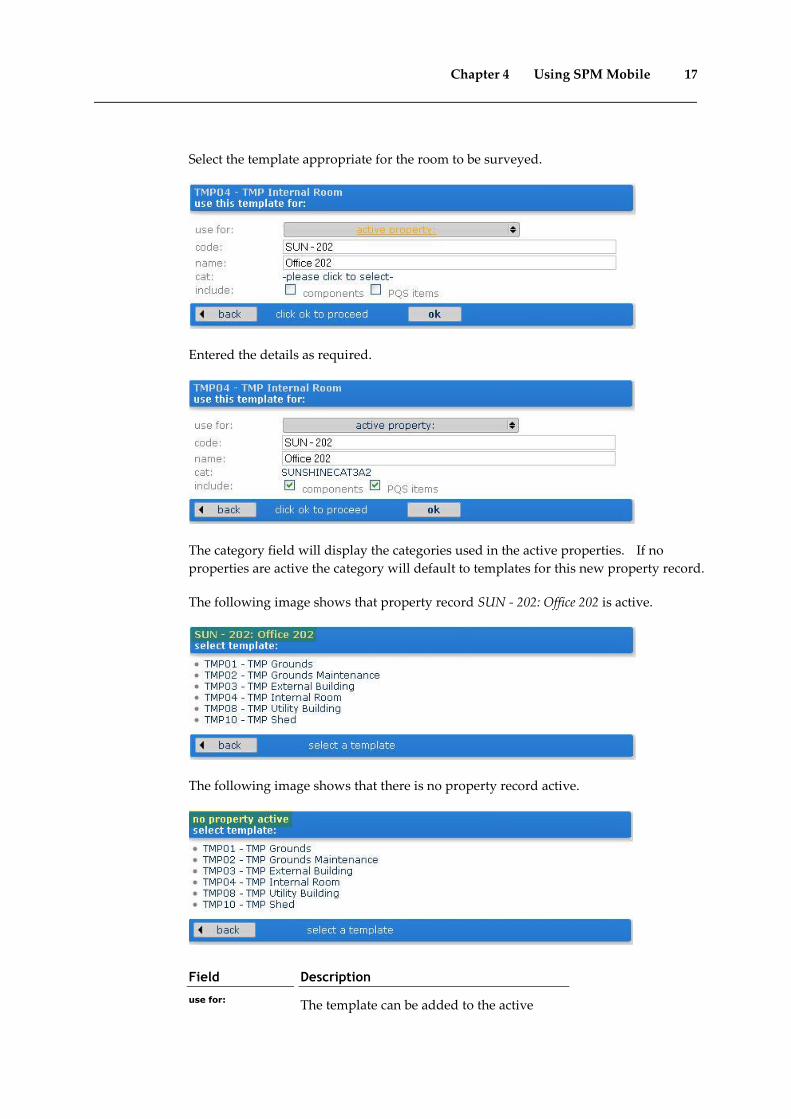
Select the template appropriate for the room to be surveyed.
Entered the details as required.
The category field will display the categories used in the active properties. If no
properties are active the category will default to templates for this new property record.
The following image shows that property record SUN - 202: Office 202 is active.
The following image shows that there is no property record active.
Field Description
use for: The template can be added to the active
18 SPM Mobile User Guide
property or a new property.
Click on - active property - to select from the
list.
code: A property code can be an abbreviation of
the name or some other alpha and/or
numeric code. This code must be unique.
name: Name of the Property.
cat: This is where to new property record is
linked to the parent property.
Click on - please click to select - to select
from the list.
NB: If this field is not modified the
property record will stay linked to the
templates.
If there are no active properties the category
will default to templates.
include: This is to include the components and PQS
items saved within the template in SPM
Assets.
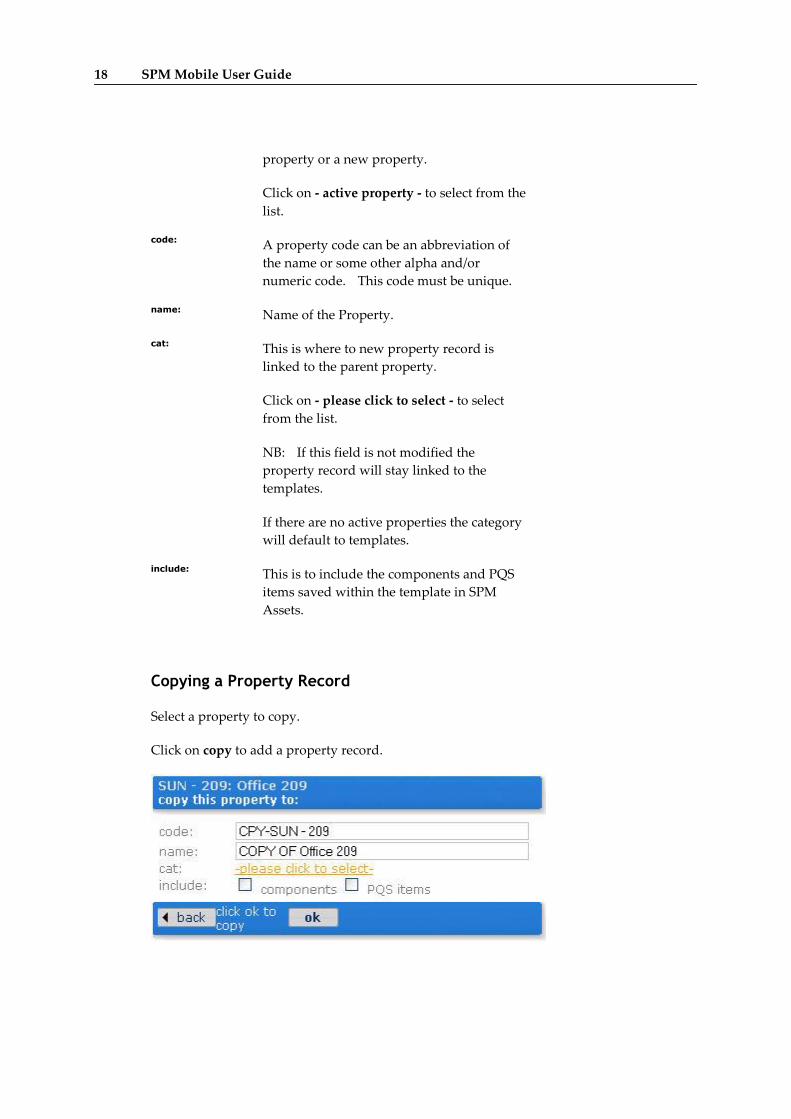
Copying a Property Record
Select a property to copy.
Click on copy to add a property record.
Chapter 4 Using SPM Mobile 19
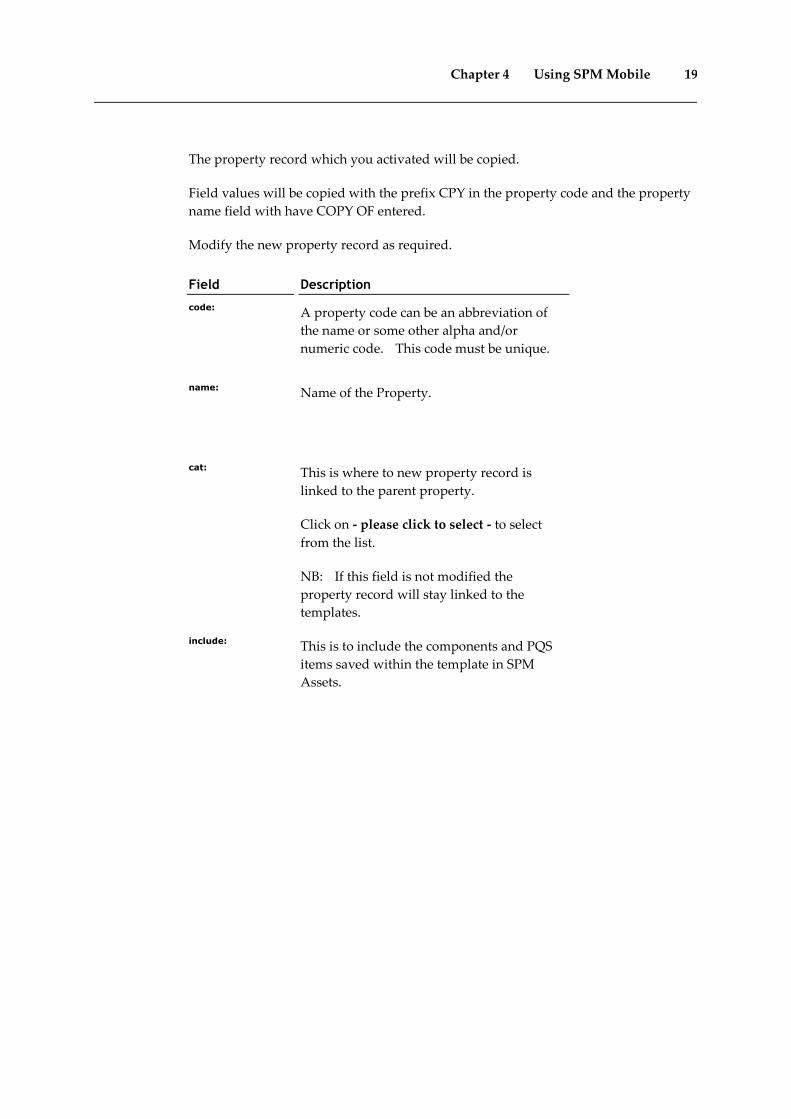
The property record which you activated will be copied.
Field values will be copied with the prefix CPY in the property code and the property
name field with have COPY OF entered.
Modify the new property record as required.
Field Description
code: A property code can be an abbreviation of
the name or some other alpha and/or
numeric code. This code must be unique.
name: Name of the Property.
cat: This is where to new property record is
linked to the parent property.
Click on - please click to select - to select
from the list.
NB: If this field is not modified the
property record will stay linked to the
templates.
include: This is to include the components and PQS
items saved within the template in SPM
Assets.
20 SPM Mobile User Guide
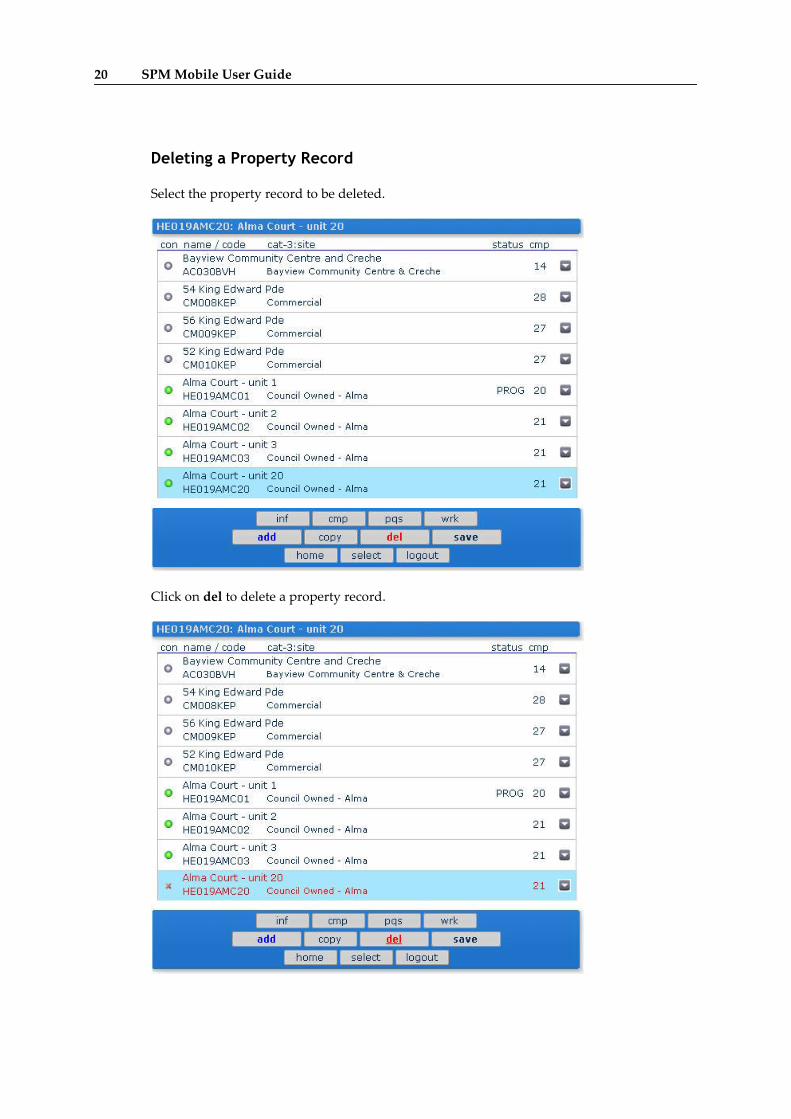
Deleting a Property Record
Select the property record to be deleted.
Click on del to delete a property record.

Chapter 4 Using SPM Mobile 21
The name of the property record will change to red and the status indicator will change
to a red cross.
Select save to post the changed and/or inserted records to SPM Assets.
The following prompt will appear.
Click ok if the data is to be overwritten.
Click cancel if the records need to be modified prior to overwriting the existing data.
When the data has been saved the Property List will display the updated information.
In this case Alma Court - unit 20 has been deleted and does not appear in the list.
22 SPM Mobile User Guide
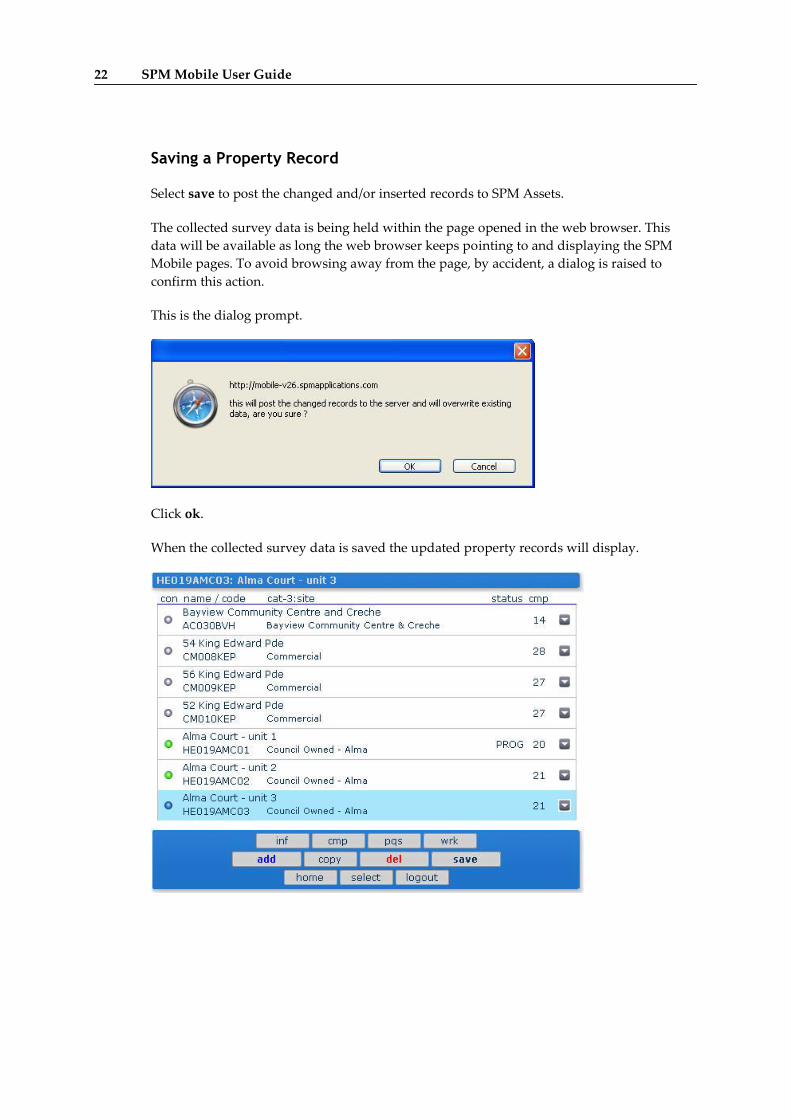
Saving a Property Record
Select save to post the changed and/or inserted records to SPM Assets.
The collected survey data is being held within the page opened in the web browser. This
data will be available as long the web browser keeps pointing to and displaying the SPM
Mobile pages. To avoid browsing away from the page, by accident, a dialog is raised to
confirm this action.
This is the dialog prompt.
Click ok.
When the collected survey data is saved the updated property records will display.
Chapter 5 Using SPM Mobile 23
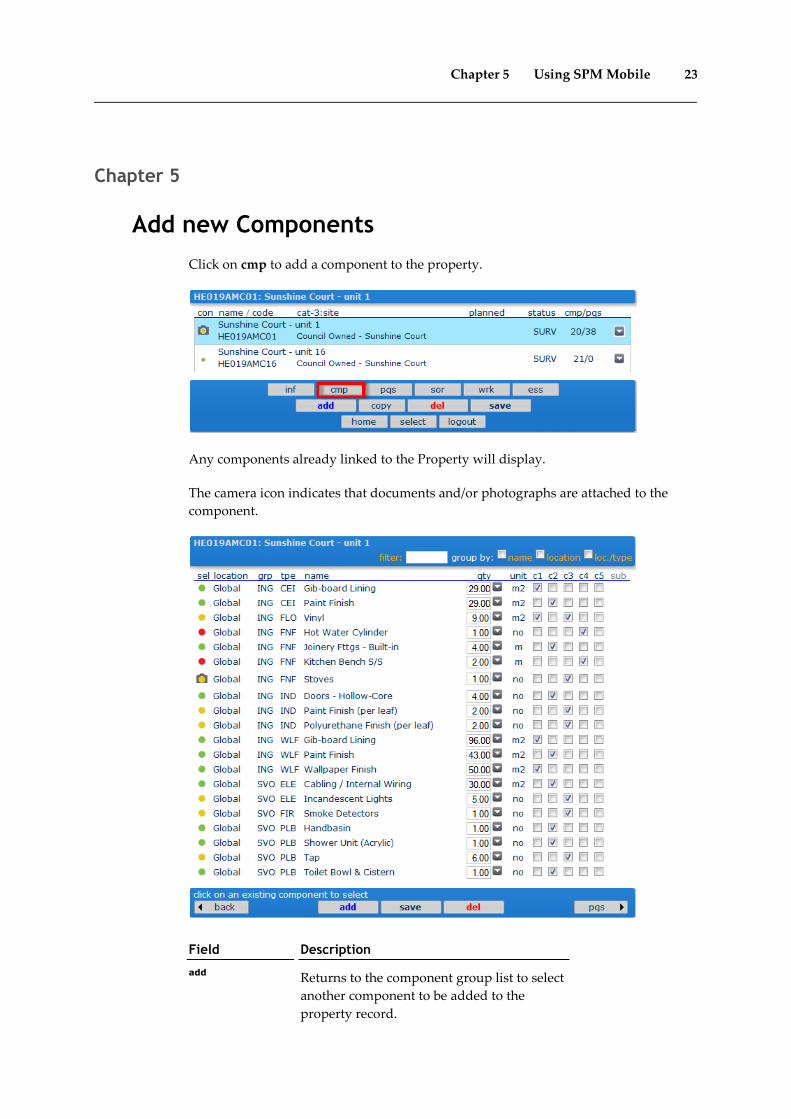
Add new Components
Click on cmp to add a component to the property.
Any components already linked to the Property will display.
The camera icon indicates that documents and/or photographs are attached to the
component.
Field Description
add Returns to the component group list to select
another component to be added to the
property record.
Chapter 5
24 SPM Mobile User Guide
filter Enter a specific requirement and filter the list
of components . This is a multi toogle which
will change to the different search types
when selected. The options are filter, search,
and barcode.
group by Sort the list of components by name,
location, or location and type.
save Save all data on the device.
del Delete the component.
back Returns to the active property list.
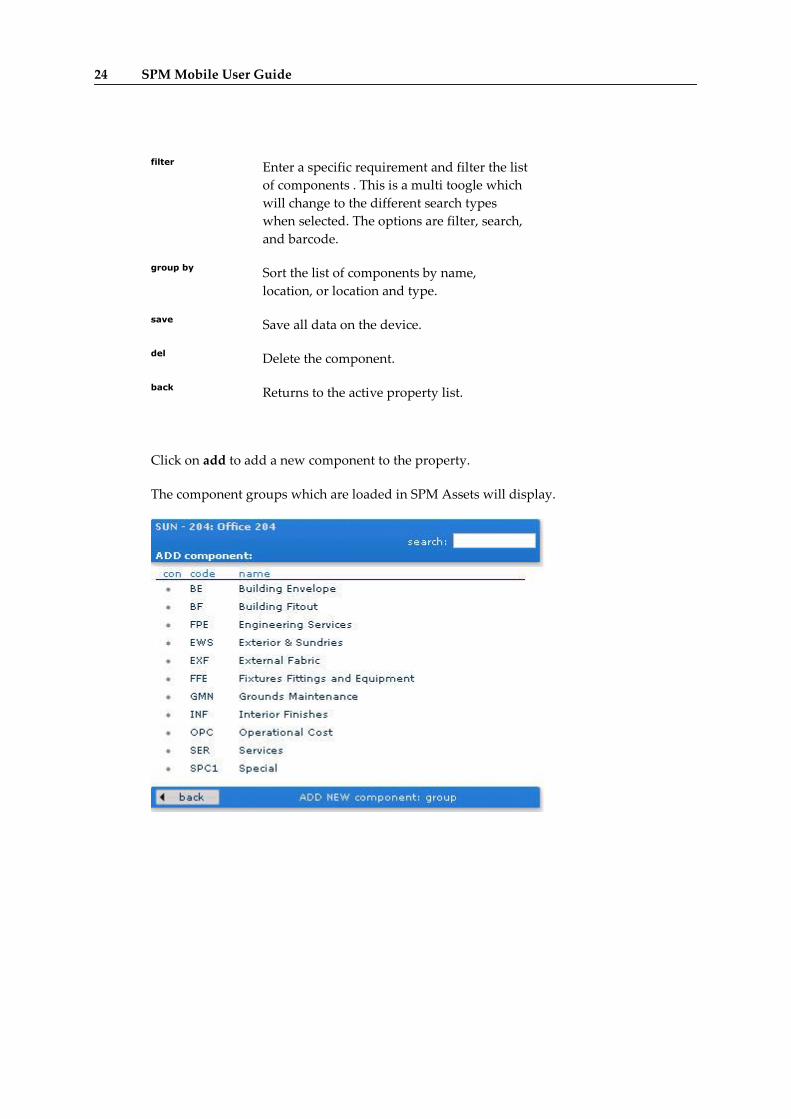
Click on add to add a new component to the property.
The component groups which are loaded in SPM Assets will display.

Chapter 5 Using SPM Mobile 25
Click on the component group.
The list of component types loaded in SPM Assets will display.
Click on the component type.
The list of component references loaded in SPM Assets will display.
Select the components required from the list by clicking in the box on the left. Multiple
components can be added at once. Click on sel to select all components, clicking on it
again will un-select the items.
The search function at the top right of the screen will search on for a reference.
26 SPM Mobile User Guide
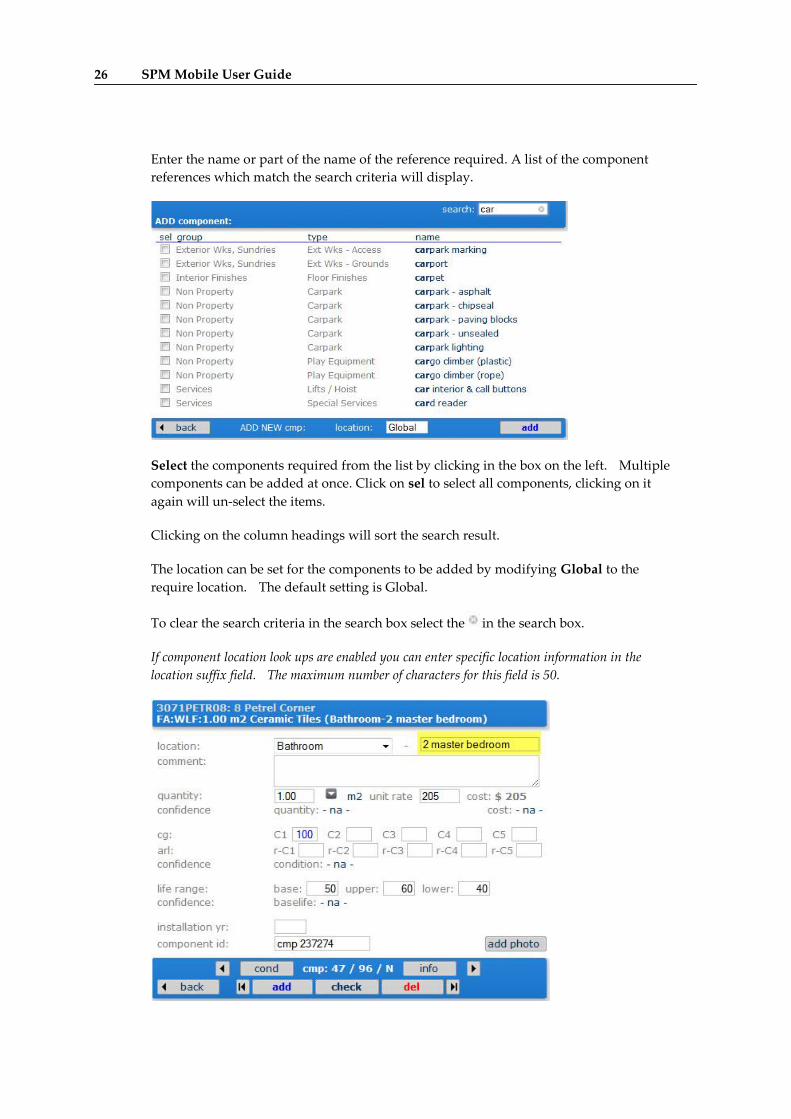
Enter the name or part of the name of the reference required. A list of the component
references which match the search criteria will display.
Select the components required from the list by clicking in the box on the left. Multiple
components can be added at once. Click on sel to select all components, clicking on it
again will un-select the items.
Clicking on the column headings will sort the search result.
The location can be set for the components to be added by modifying Global to the
require location. The default setting is Global.
To clear the search criteria in the search box select the in the search box.
If component location look ups are enabled you can enter specific location information in the
location suffix field. The maximum number of characters for this field is 50.
Chapter 5 Using SPM Mobile 27
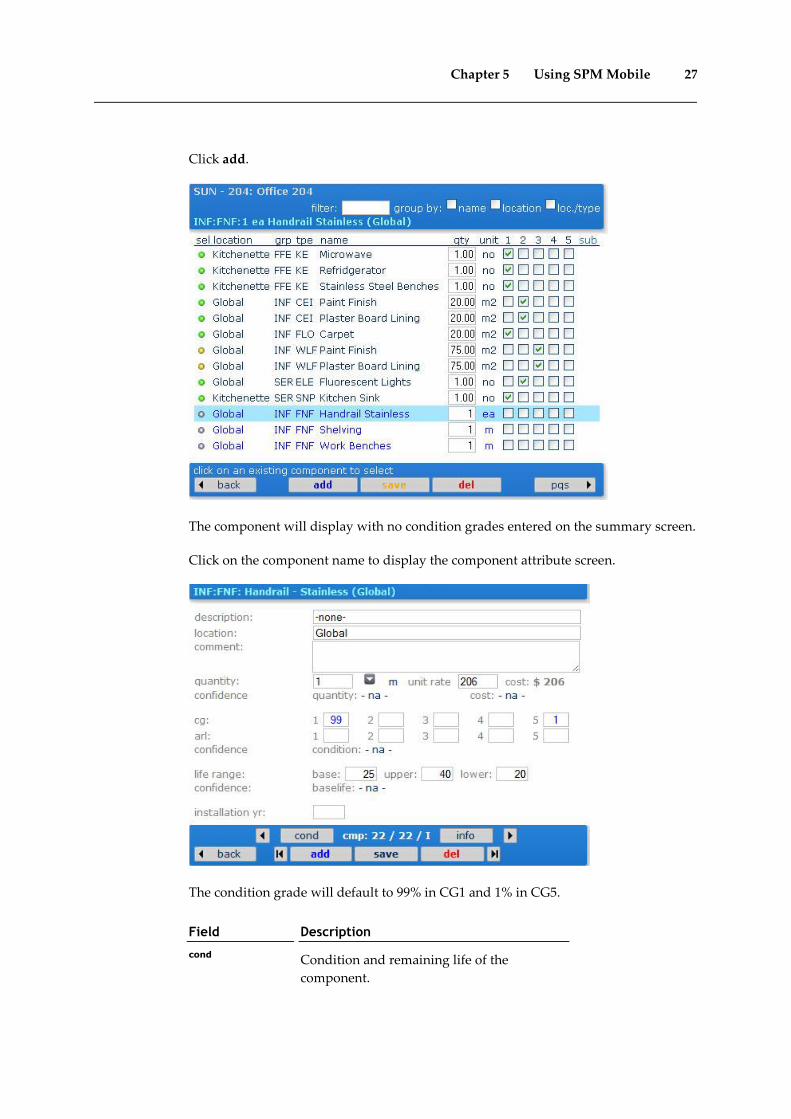
Click add.
The component will display with no condition grades entered on the summary screen.
Click on the component name to display the component attribute screen.
The condition grade will default to 99% in CG1 and 1% in CG5.
Field Description
cond Condition and remaining life of the
component.
28 SPM Mobile User Guide
info Information on the component:
code:
barcode:
serial no:
ownership:
management:
Make:
Model:
9 / 9 / I This shows that this is component record 9 of
9 and it is an insert. The possible function
codes are:
I - insert
U - update
D - delete
E - error
N - no change
add Returns to the component group list to select
another component to be added to the
property record.
back Returns to the active property menu.
save This will post the modified records to SPM
Assets.
del Delete the component.
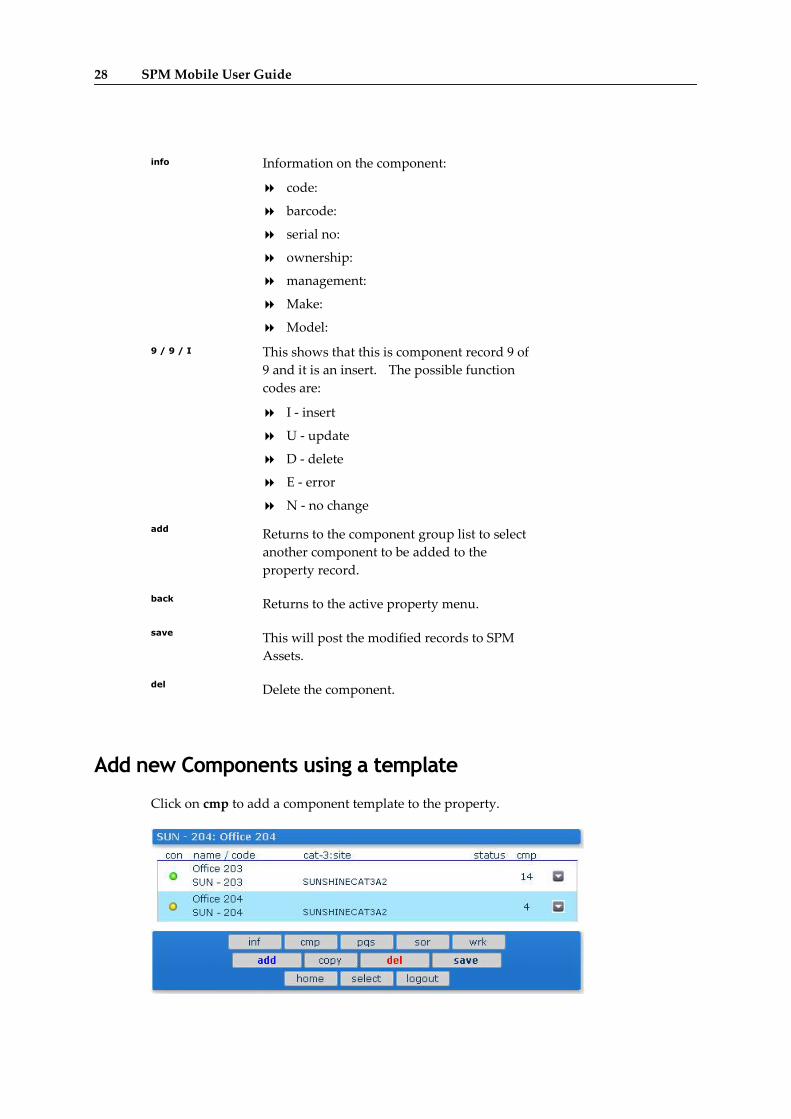
Add new Components using a template
Click on cmp to add a component template to the property.
Chapter 5 Using SPM Mobile 29
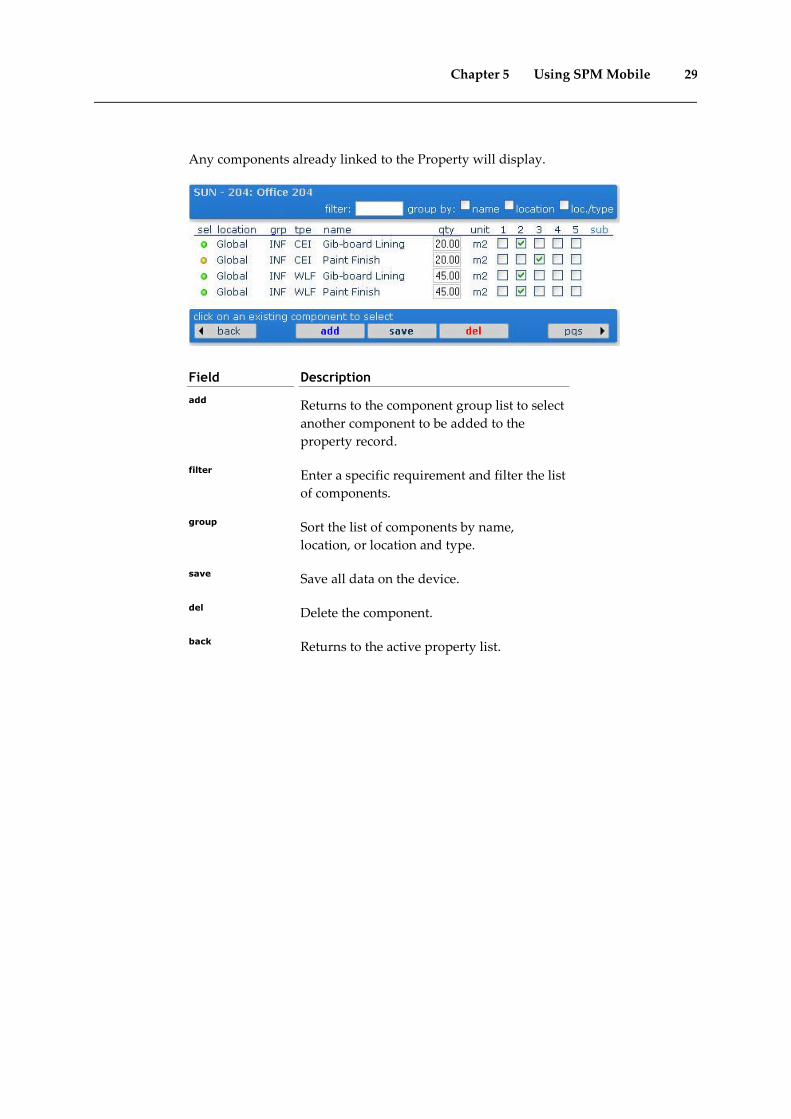
Any components already linked to the Property will display.
Field Description
add Returns to the component group list to select
another component to be added to the
property record.
filter Enter a specific requirement and filter the list
of components.
group Sort the list of components by name,
location, or location and type.
save Save all data on the device.
del Delete the component.
back Returns to the active property list.
30 SPM Mobile User Guide
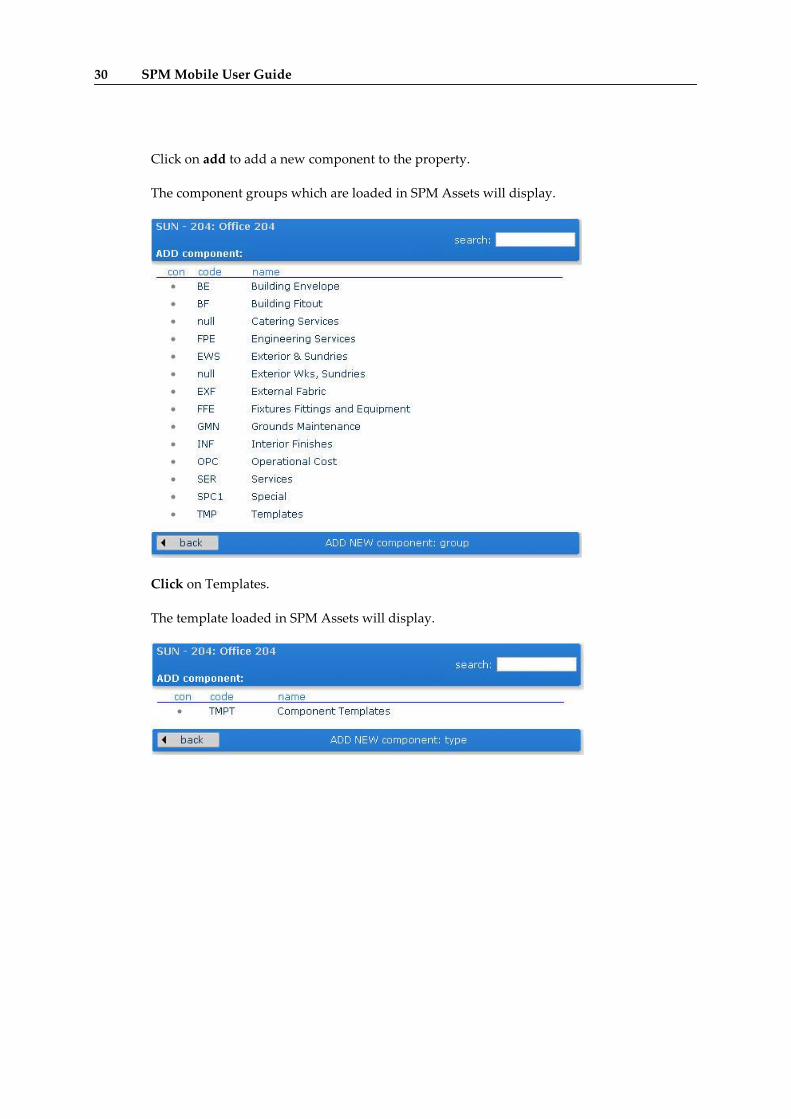
Click on add to add a new component to the property.
The component groups which are loaded in SPM Assets will display.
Click on Templates.
The template loaded in SPM Assets will display.
Chapter 5 Using SPM Mobile 31
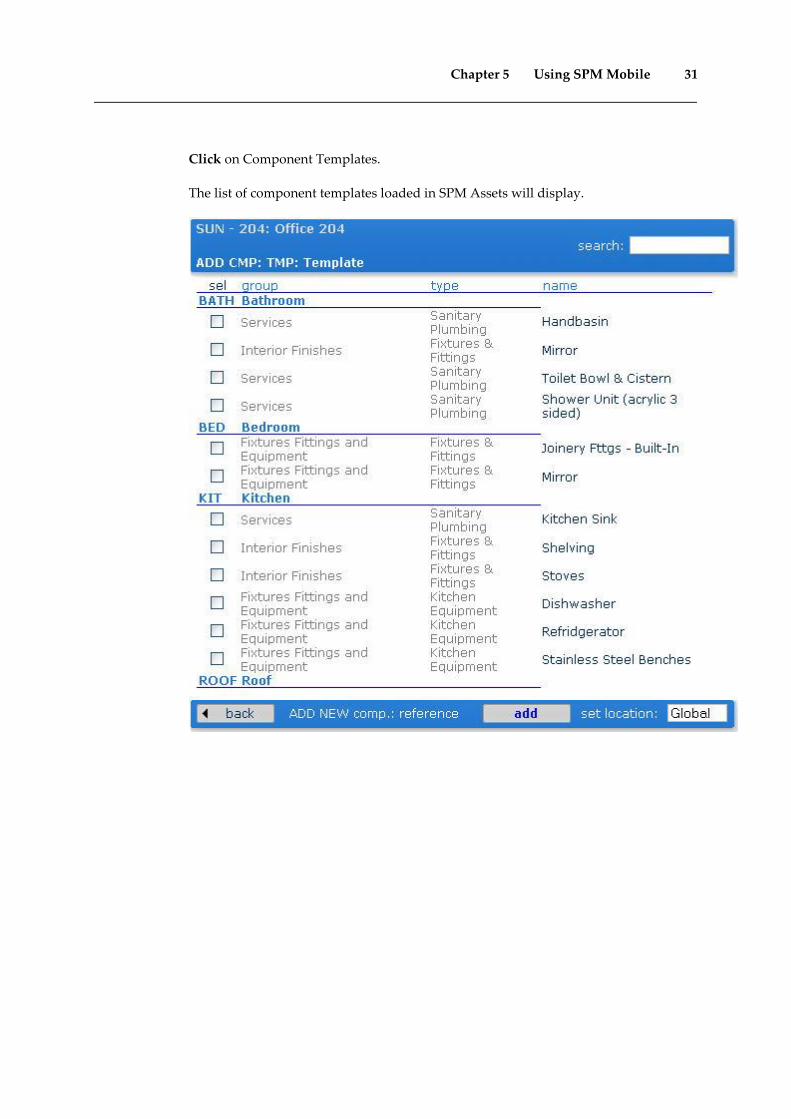
Click on Component Templates.
The list of component templates loaded in SPM Assets will display.
32 SPM Mobile User Guide
Select the components required from the list by clicking in the box on the left. Multiple
components can be added at once. Click on sel to select all components, clicking on it
again will un-select the items.
The search function will search on a reference.
Clicking on the column headings will sort the search result.
The location can be set for the components to be added by modifying Global to the
require location. The default setting is Global.
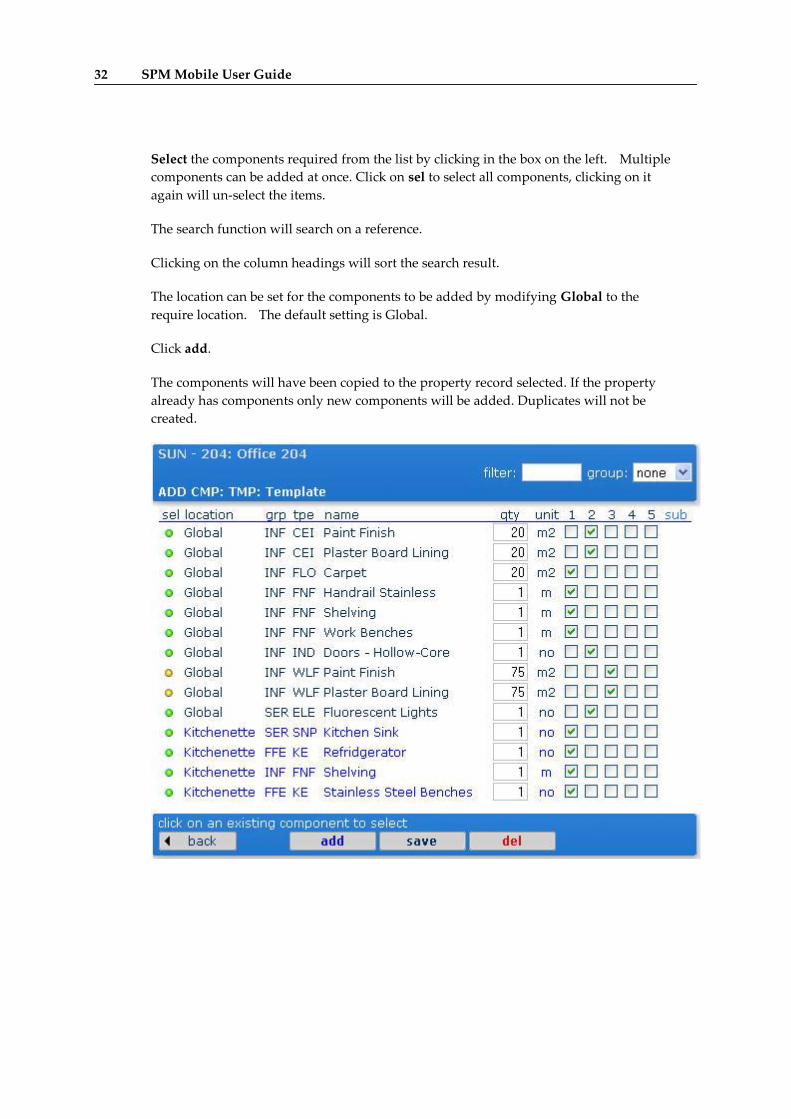
Click add.
The components will have been copied to the property record selected. If the property
already has components only new components will be added. Duplicates will not be
created.
Chapter 5 Using SPM Mobile 33
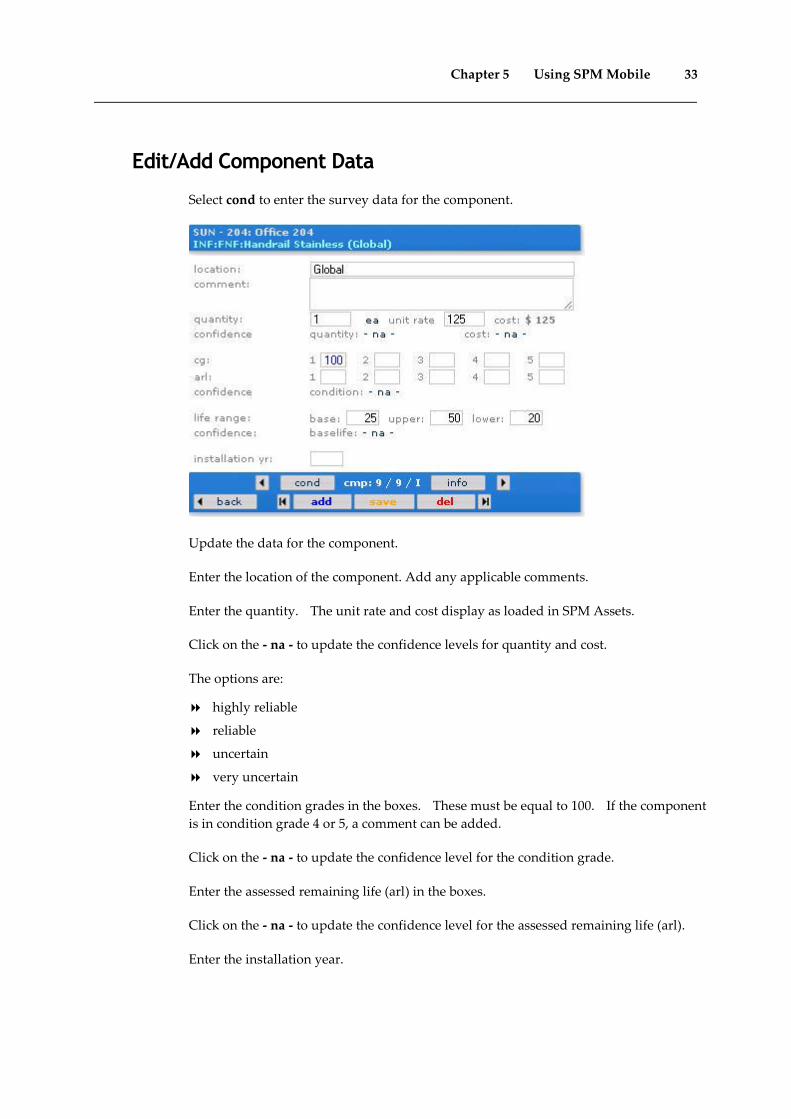
Edit/Add Component Data
Select cond to enter the survey data for the component.
Update the data for the component.
Enter the location of the component. Add any applicable comments.
Enter the quantity. The unit rate and cost display as loaded in SPM Assets.
Click on the - na - to update the confidence levels for quantity and cost.
The options are:
highly reliable
reliable
uncertain
very uncertain
Enter the condition grades in the boxes. These must be equal to 100. If the component
is in condition grade 4 or 5, a comment can be added.
Click on the - na - to update the confidence level for the condition grade.
Enter the assessed remaining life (arl) in the boxes.
Click on the - na - to update the confidence level for the assessed remaining life (arl).
Enter the installation year.
34 SPM Mobile User Guide
Component Attribute Fields
Definitions of the fields on the Component Attributes screen.
Field Description
description Description of the component within the property.
This field will only display if it has been enabled in
SPM Assets.
location Location of the component within the property.
This field can be used to create multiple unique
locations of a component in the same building or site.
The default value will be Global.
comment Any comments regarding this component.
This field is optional, but can provide useful
information after a survey.
Quantity Information
Field Description
quantity Quantity of the component that exists in the property.
This field must be entered by the user.
unit Unit of measurement for this component.
The unit of measure choices are normally: no
(number), m (metres), m2 (square metres), m3 (cubic
metres), sum (each or an aggregate).
Care must be taken to avoid different different unit
measurement types for the same component as this
may make later data analysis difficult.
unit rate The replacement cost of the component per unit of
measure.
Changing this value is not recommended other than
for a very specific reason.
Chapter 5 Using SPM Mobile 35
Care must be taken to avoid different rates for the
same component as this may make later data analysis
difficult.
cost A system generated field showing total replacement
cost of the component (quantity * rate).
confidence Your confidence level that the quantity and cost
information is accurate.
The confidence level choices are A: highly reliable, B:
reliable, C: uncertain, D: very uncertain or E: not
assigned.
This field is not mandatory but will default to not
assigned.
Condition Information
Field Description
condition C1, C2, C3, C4,
C5:
The percentage of the component that is in each
condition level:
Grade 1 = Very Good, Grade 2 = Good, Grade 3 =
Moderate, Grade 4 = Poor and Grade 5 = Very Poor
The percentage must add up to 100%
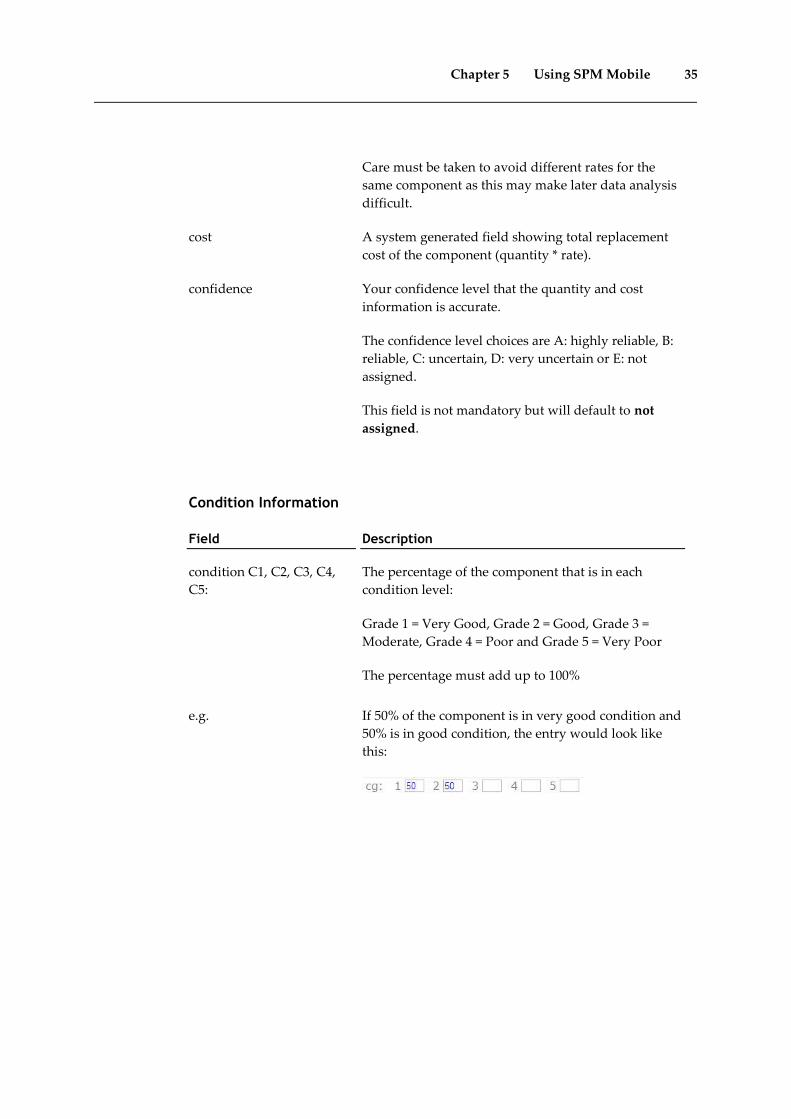
e.g. If 50% of the component is in very good condition and
50% is in good condition, the entry would look like
this:
36 SPM Mobile User Guide
arl R1, R2, R3, R4, R5: The assessed remaining life in years for each category
of condition grade.
As assessed remaining life of 1, 2 or 3 years will
override the system generated remaining life when
running lifecycle analysis.
These lives are also used as a validation check of the
surveyor's condition grade assessments in the
Validate Data Analysis.
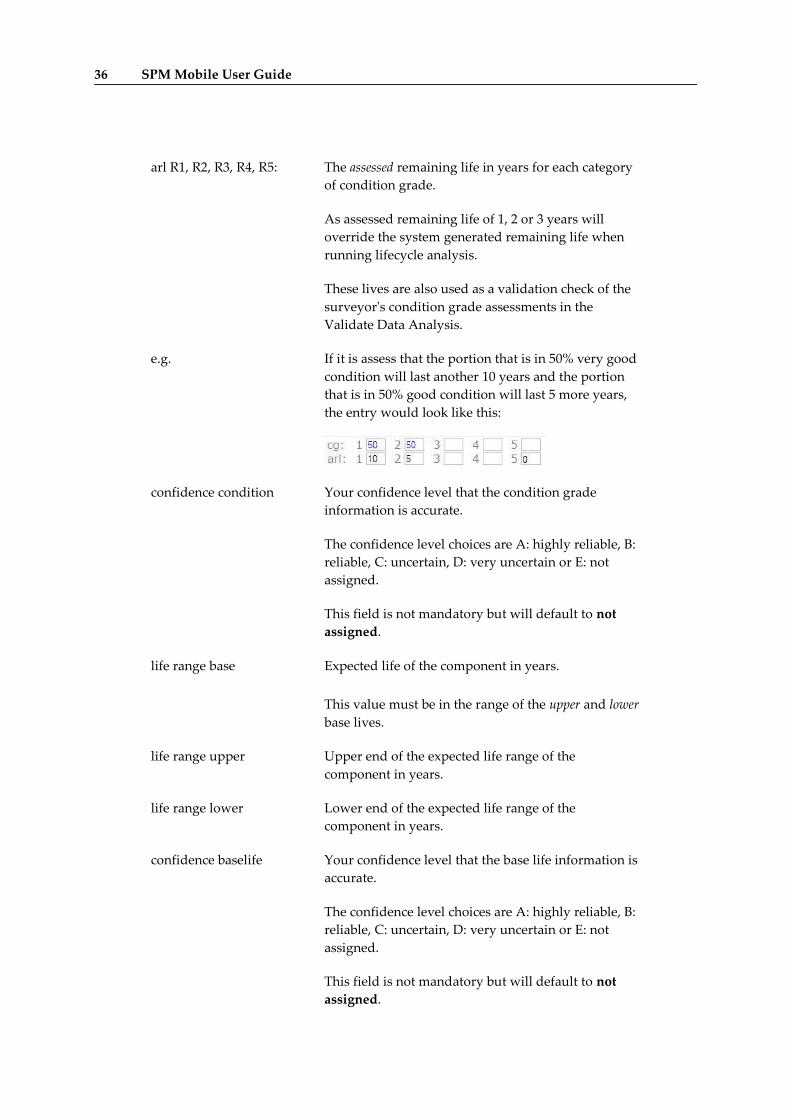
e.g. If it is assess that the portion that is in 50% very good
condition will last another 10 years and the portion
that is in 50% good condition will last 5 more years,
the entry would look like this:
confidence condition Your confidence level that the condition grade
information is accurate.
The confidence level choices are A: highly reliable, B:
reliable, C: uncertain, D: very uncertain or E: not
assigned.
This field is not mandatory but will default to not
assigned.
life range base Expected life of the component in years.
This value must be in the range of the upper and lower
base lives.
life range upper Upper end of the expected life range of the
component in years.
life range lower Lower end of the expected life range of the
component in years.
confidence baselife Your confidence level that the base life information is
accurate.
The confidence level choices are A: highly reliable, B:
reliable, C: uncertain, D: very uncertain or E: not
assigned.
This field is not mandatory but will default to not
assigned.

Chapter 5 Using SPM Mobile 37
installation yr The installation year of the component.
Using the Component Calculator
The Component Calculator enables the ability to add quantities together in the Mobile
module. It is for where a surveyor is assessing say carpet in multiple rooms and only
recording one component in one Property Record. They usually use pen and paper to
record the results and add them up at the end.
To use the calculator:
1) Select component screen and select the grey arrow beside the quantity box to
activate the calculator.
2) The calculator will display as below.
3) Enter the quantities to be added together to get the total quantity for the component.
As the quantities are entered more rows will appear.
38 SPM Mobile User Guide
4) Select ok to save the calculation. Select cancel to close the calculator. Select clear to
remove quantities entered.
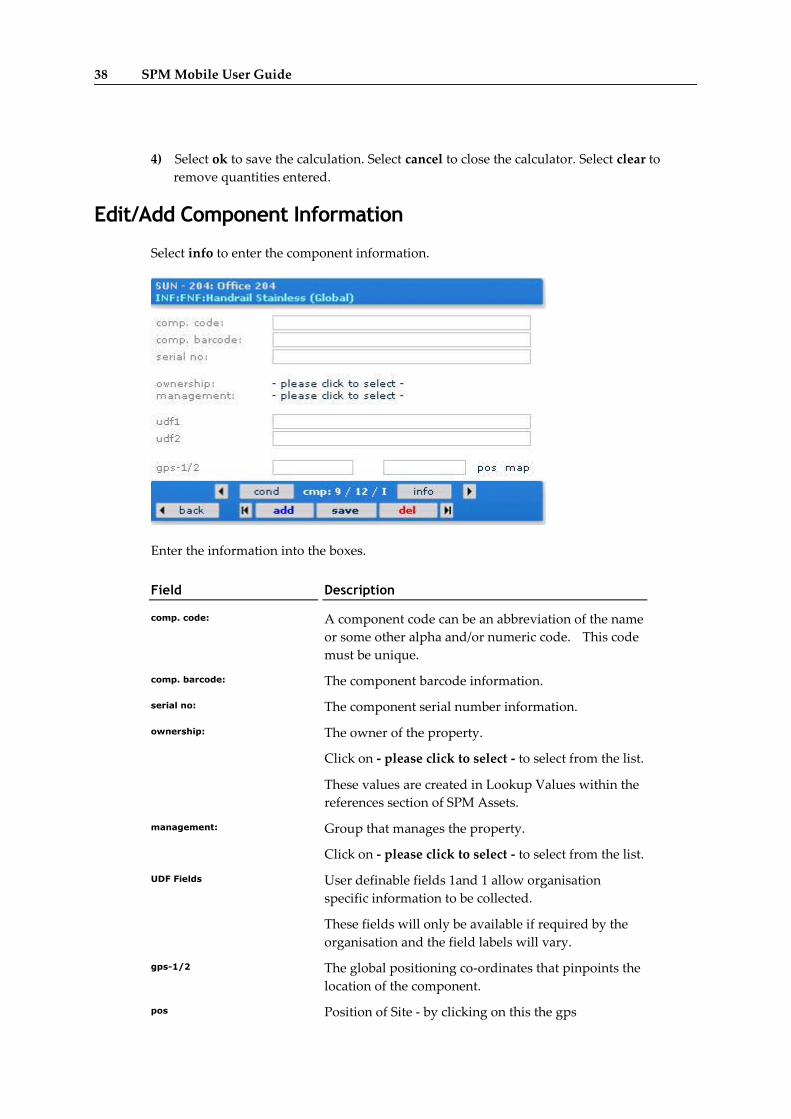
Edit/Add Component Information
Select info to enter the component information.
Enter the information into the boxes.
Field Description
comp. code: A component code can be an abbreviation of the name
or some other alpha and/or numeric code. This code
must be unique.
comp. barcode: The component barcode information.
serial no: The component serial number information.
ownership: The owner of the property.
Click on - please click to select - to select from the list.
These values are created in Lookup Values within the
references section of SPM Assets.
management: Group that manages the property.
Click on - please click to select - to select from the list.
UDF Fields User definable fields 1and 1 allow organisation
specific information to be collected.
These fields will only be available if required by the
organisation and the field labels will vary.
gps-1/2 The global positioning co-ordinates that pinpoints the
location of the component.
pos Position of Site - by clicking on this the gps
Chapter 5 Using SPM Mobile 39
co-ordinates will be populated.
map This displays a map showing the location of the site.
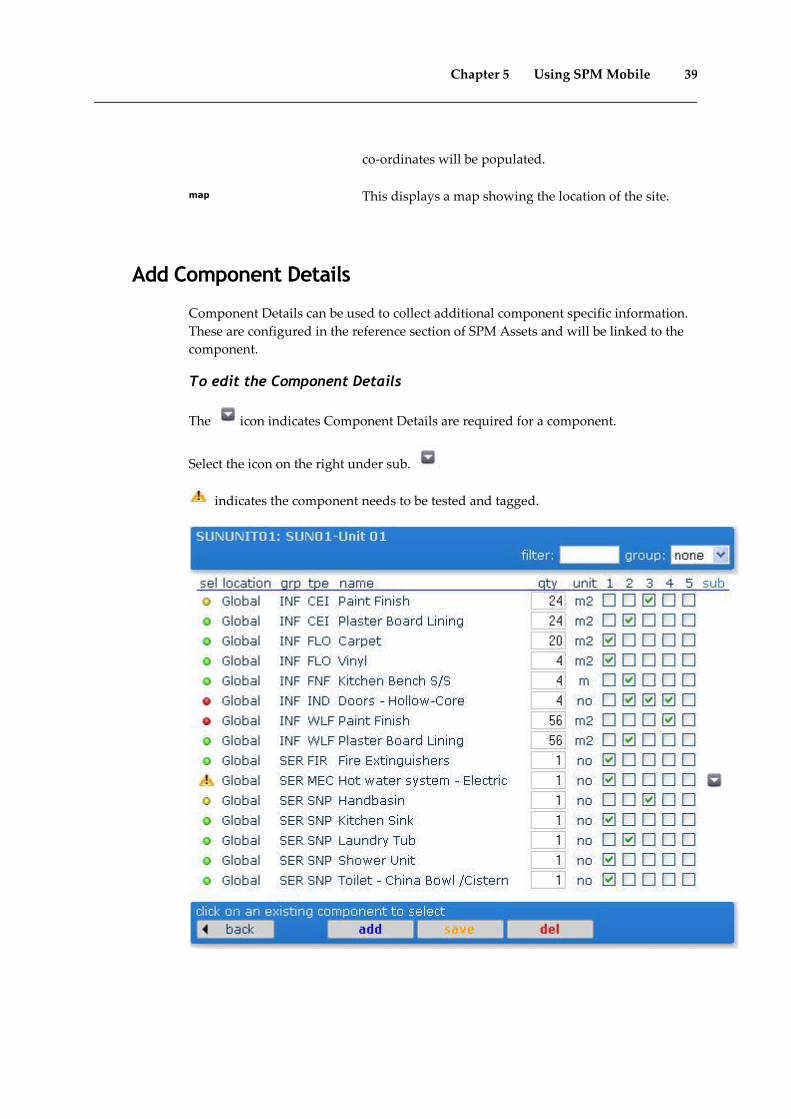
Add Component Details
Component Details can be used to collect additional component specific information.
These are configured in the reference section of SPM Assets and will be linked to the
component.
To edit the Component Details
The icon indicates Component Details are required for a component.
Select the icon on the right under sub.
indicates the component needs to be tested and tagged.
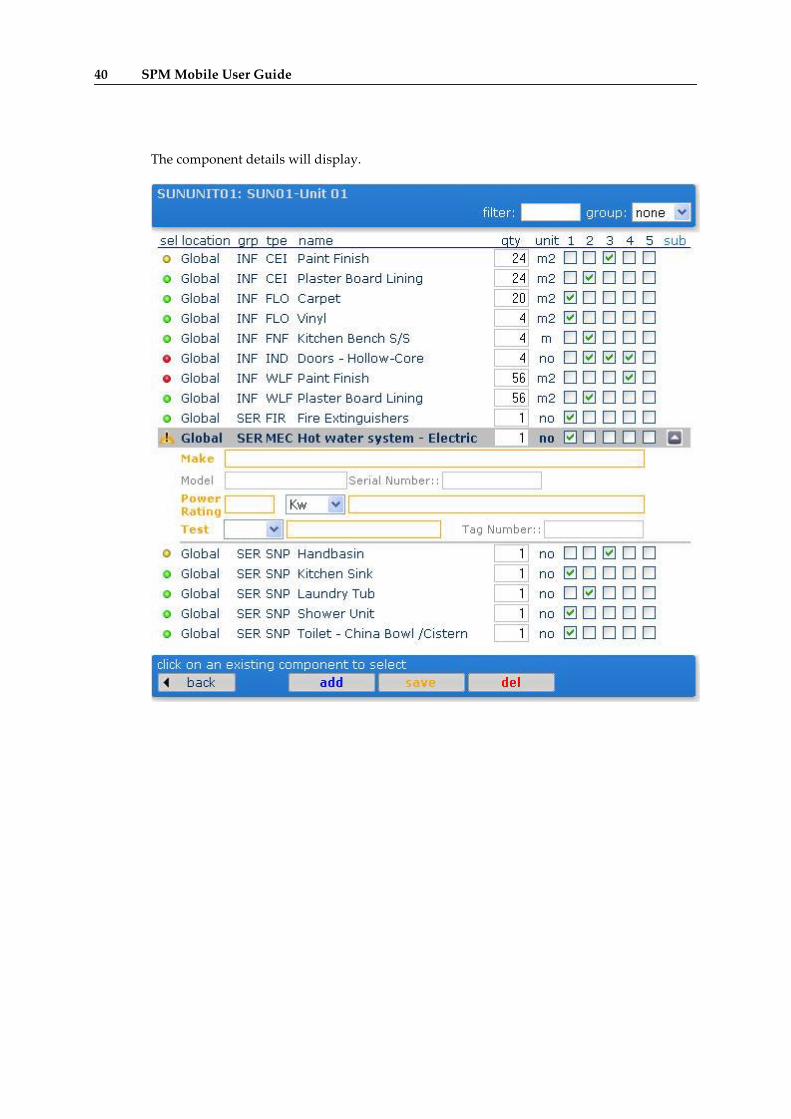
40 SPM Mobile User Guide
The component details will display.
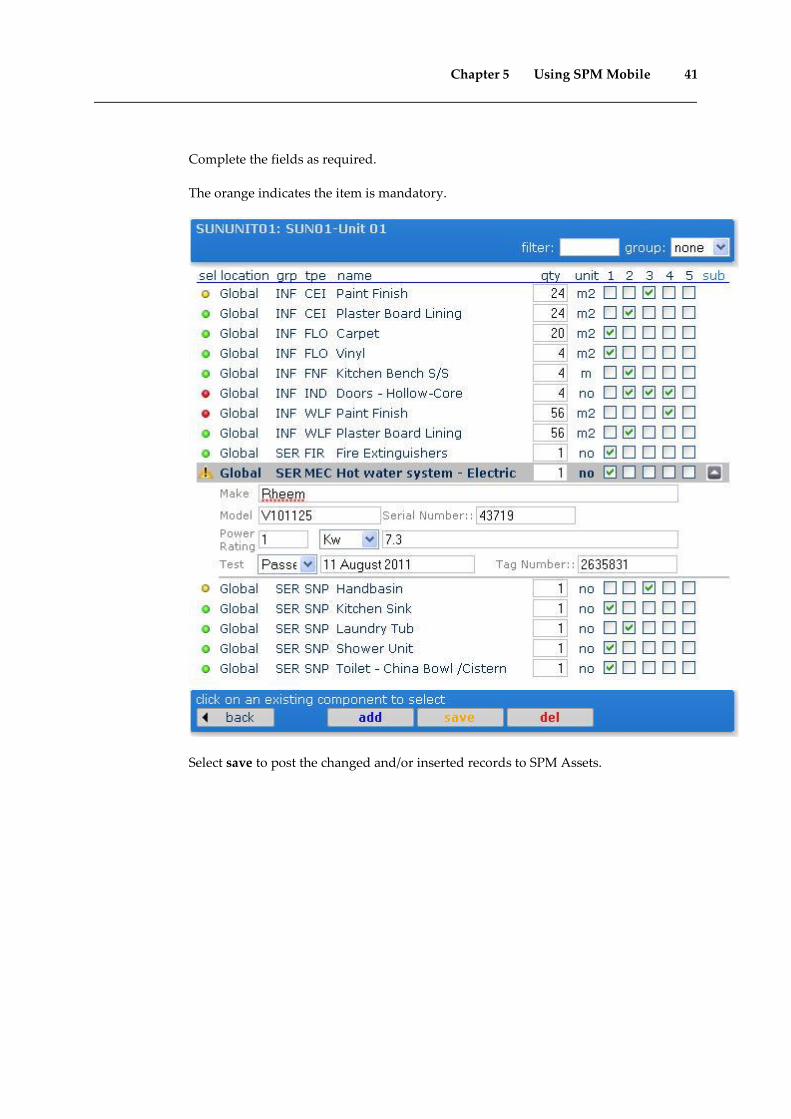
Chapter 5 Using SPM Mobile 41
Complete the fields as required.
The orange indicates the item is mandatory.
Select save to post the changed and/or inserted records to SPM Assets.
42 SPM Mobile User Guide
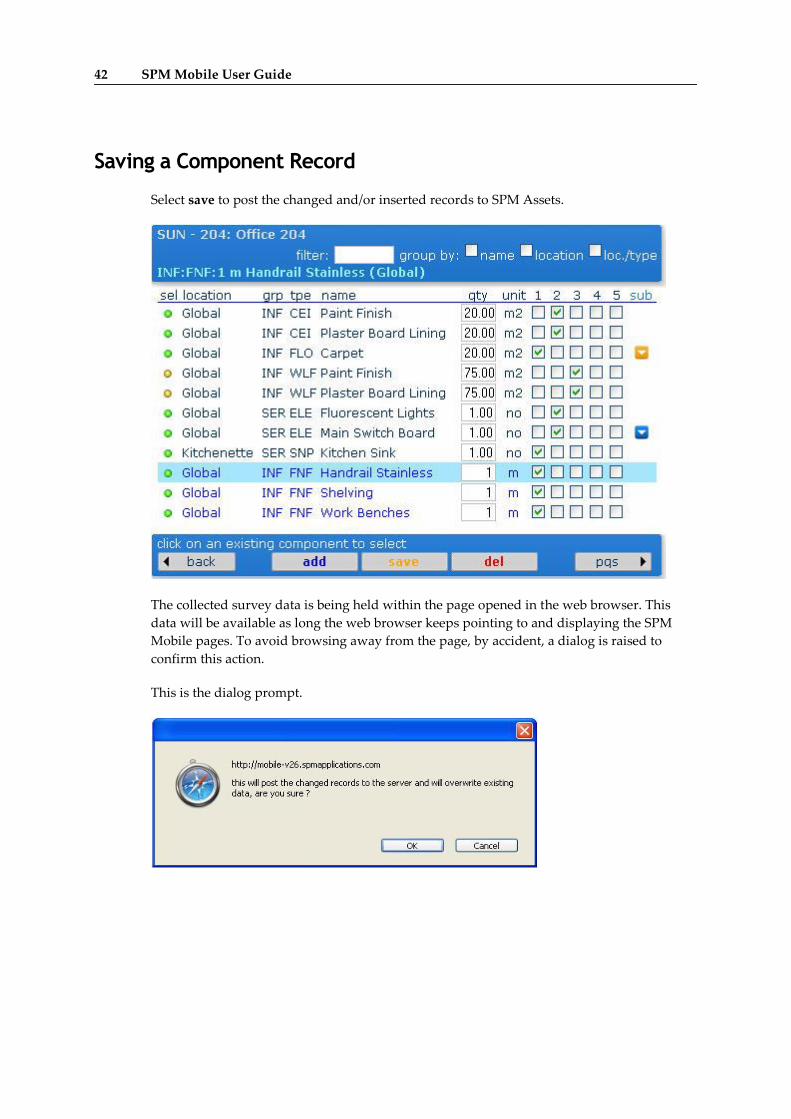
Saving a Component Record
Select save to post the changed and/or inserted records to SPM Assets.
The collected survey data is being held within the page opened in the web browser. This
data will be available as long the web browser keeps pointing to and displaying the SPM
Mobile pages. To avoid browsing away from the page, by accident, a dialog is raised to
confirm this action.
This is the dialog prompt.
Chapter 5 Using SPM Mobile 43
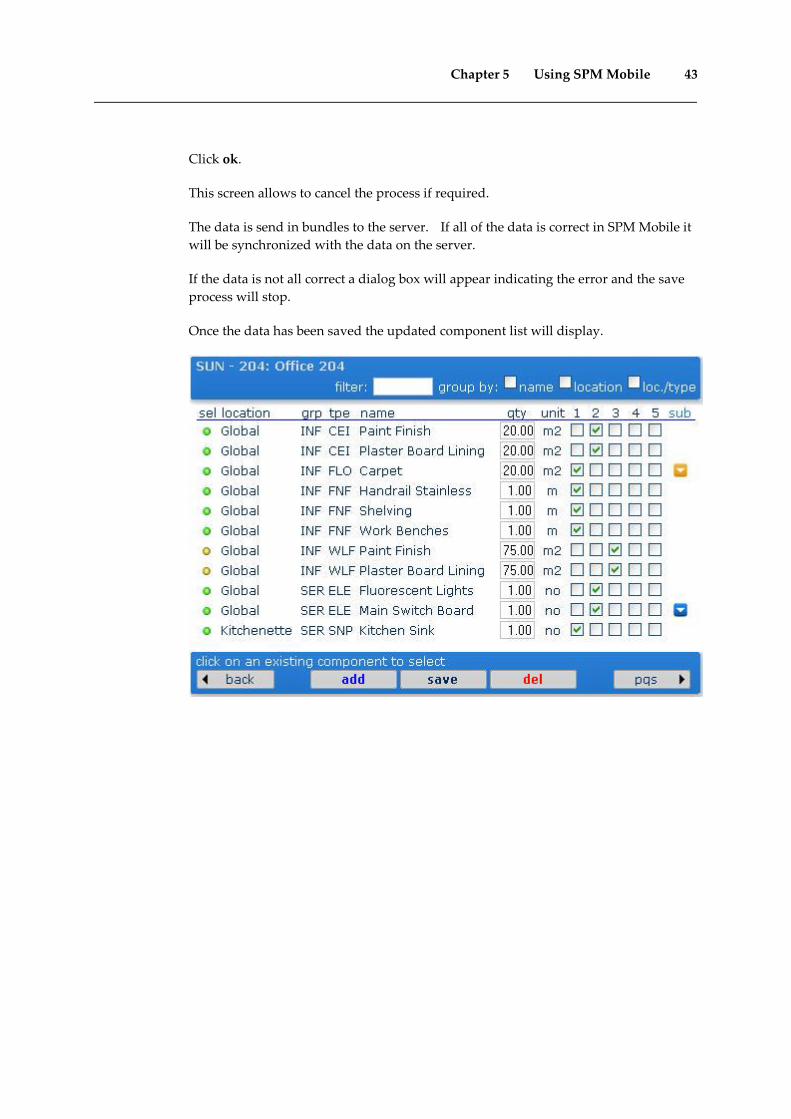
Click ok.
This screen allows to cancel the process if required.
The data is send in bundles to the server. If all of the data is correct in SPM Mobile it
will be synchronized with the data on the server.
If the data is not all correct a dialog box will appear indicating the error and the save
process will stop.
Once the data has been saved the updated component list will display.
44 SPM Mobile User Guide
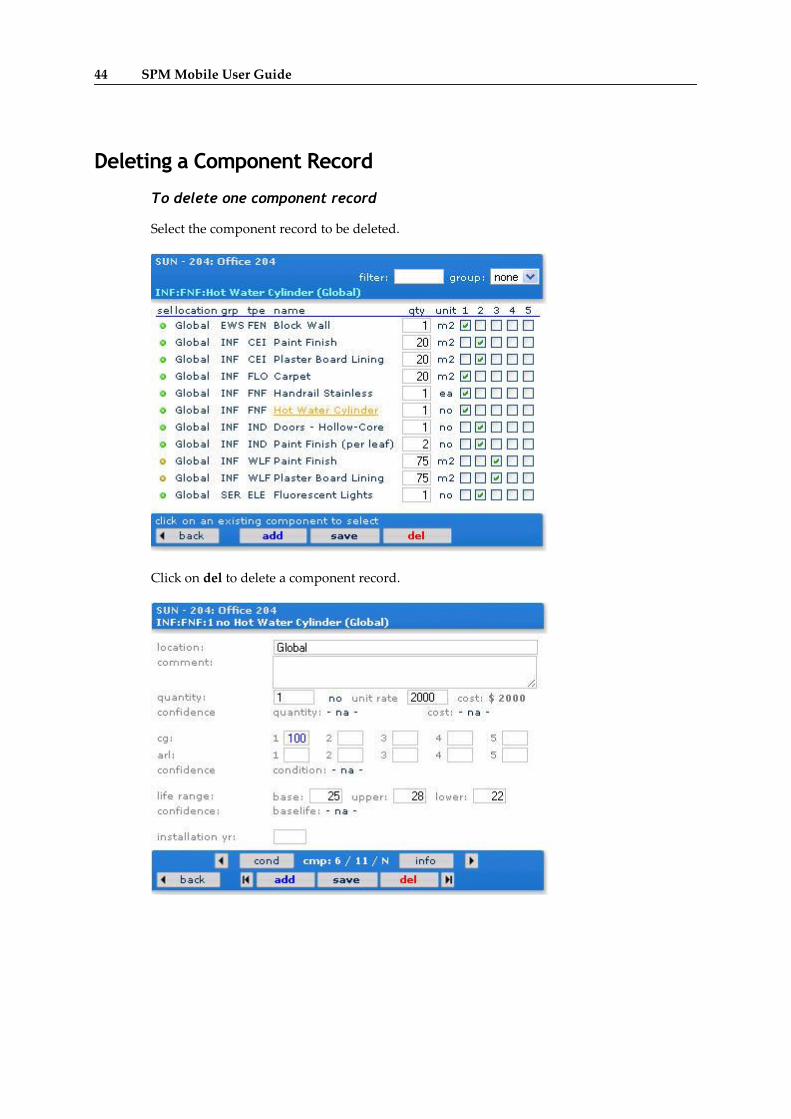
Deleting a Component Record
To delete one component record
Select the component record to be deleted.
Click on del to delete a component record.
Chapter 5 Using SPM Mobile 45
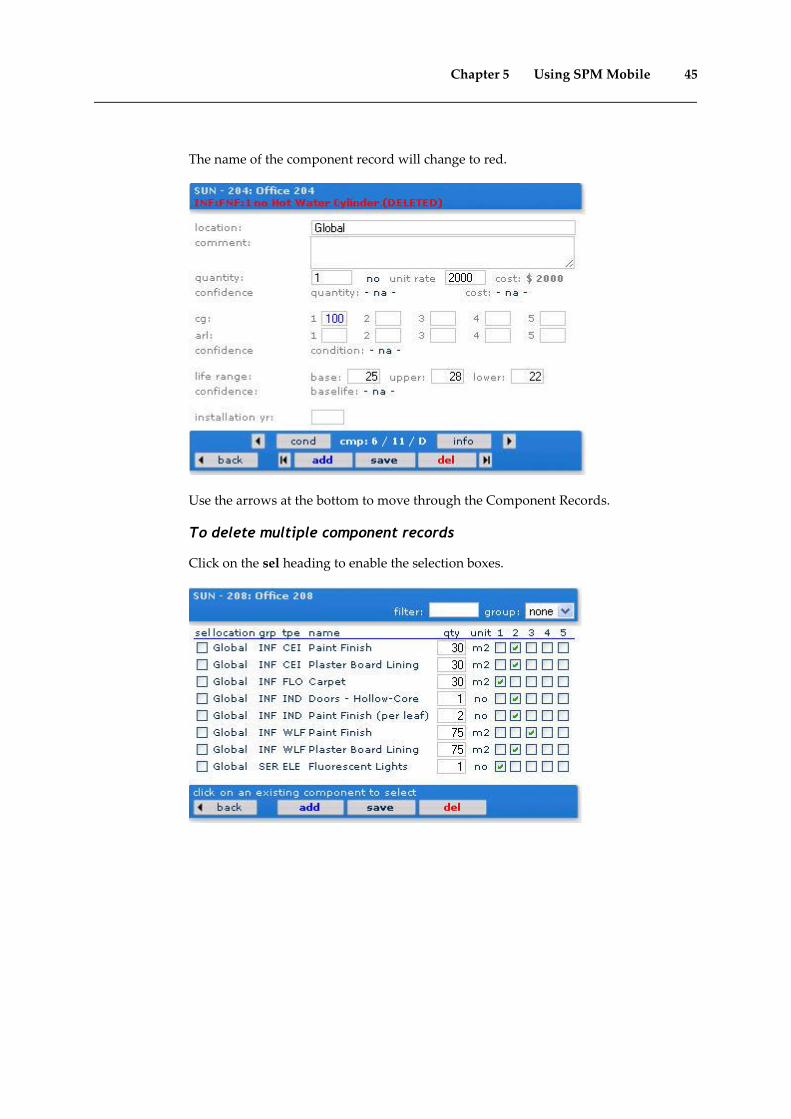
The name of the component record will change to red.
Use the arrows at the bottom to move through the Component Records.
To delete multiple component records
Click on the sel heading to enable the selection boxes.
46 SPM Mobile User Guide
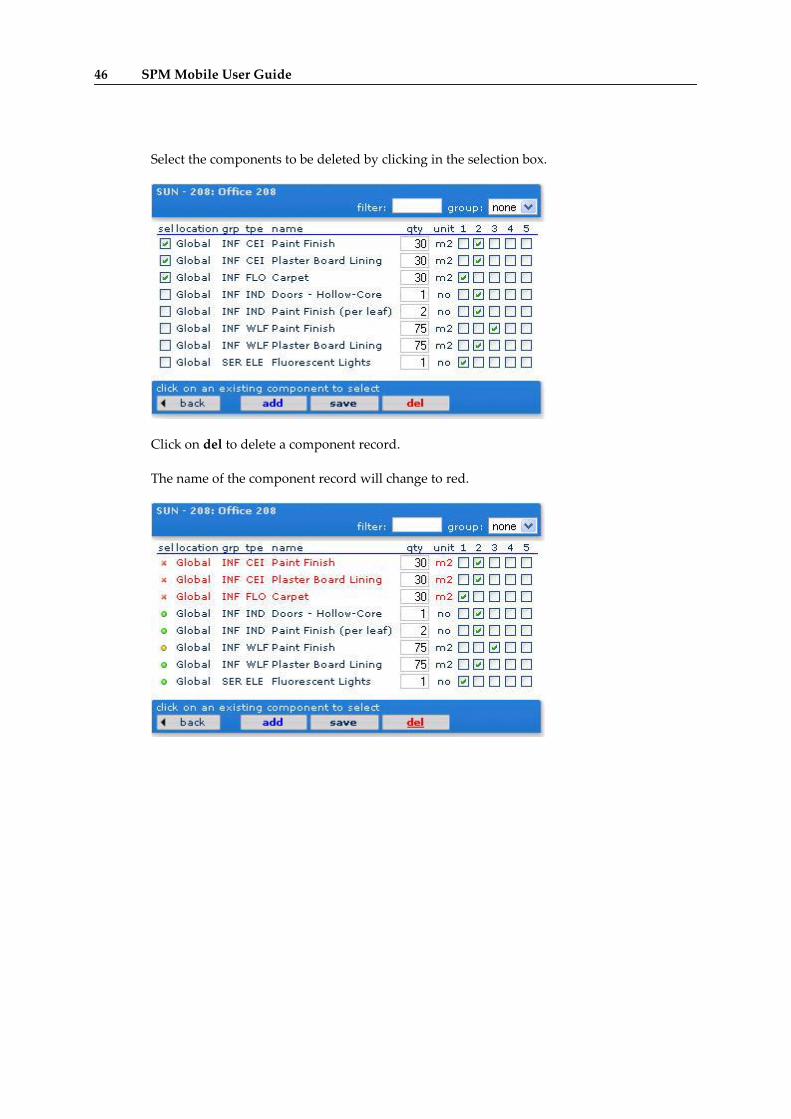
Select the components to be deleted by clicking in the selection box.
Click on del to delete a component record.
The name of the component record will change to red.
Chapter 5 Using SPM Mobile 47
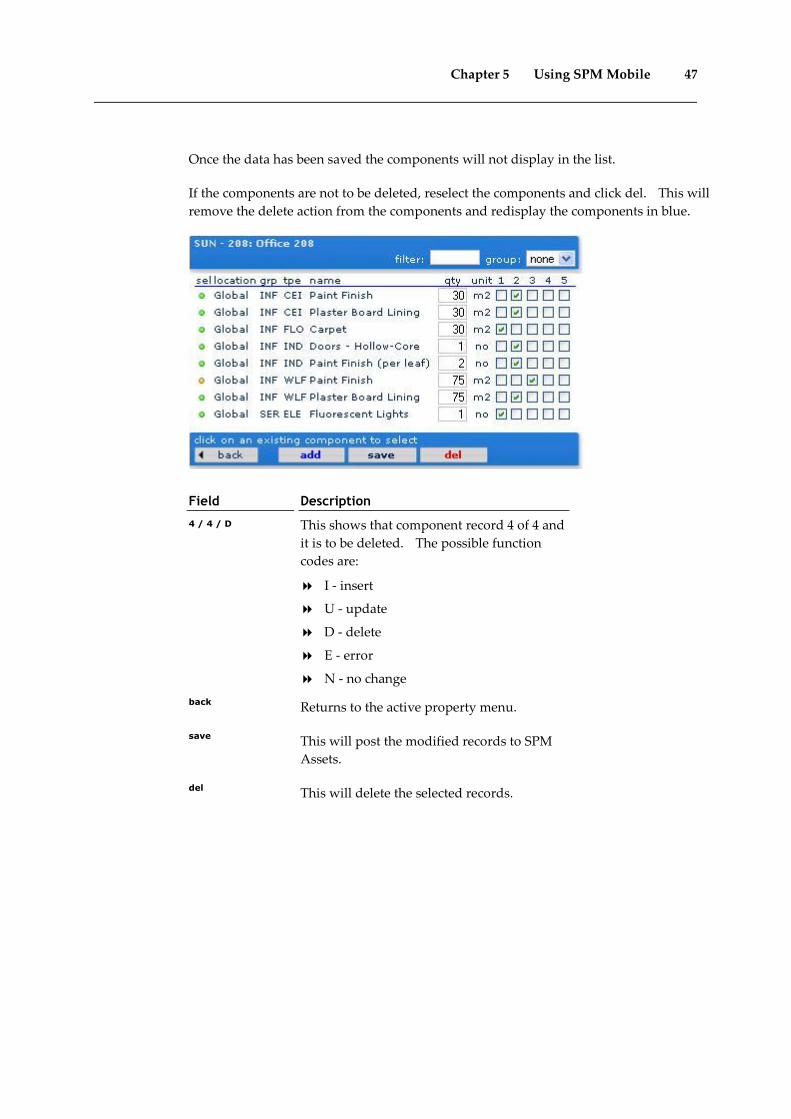
Once the data has been saved the components will not display in the list.
If the components are not to be deleted, reselect the components and click del. This will
remove the delete action from the components and redisplay the components in blue.
Field Description
4 / 4 / D This shows that component record 4 of 4 and
it is to be deleted. The possible function
codes are:
I - insert
U - update
D - delete
E - error
N - no change
back Returns to the active property menu.
save This will post the modified records to SPM
Assets.
del This will delete the selected records.
48 SPM Mobile User Guide
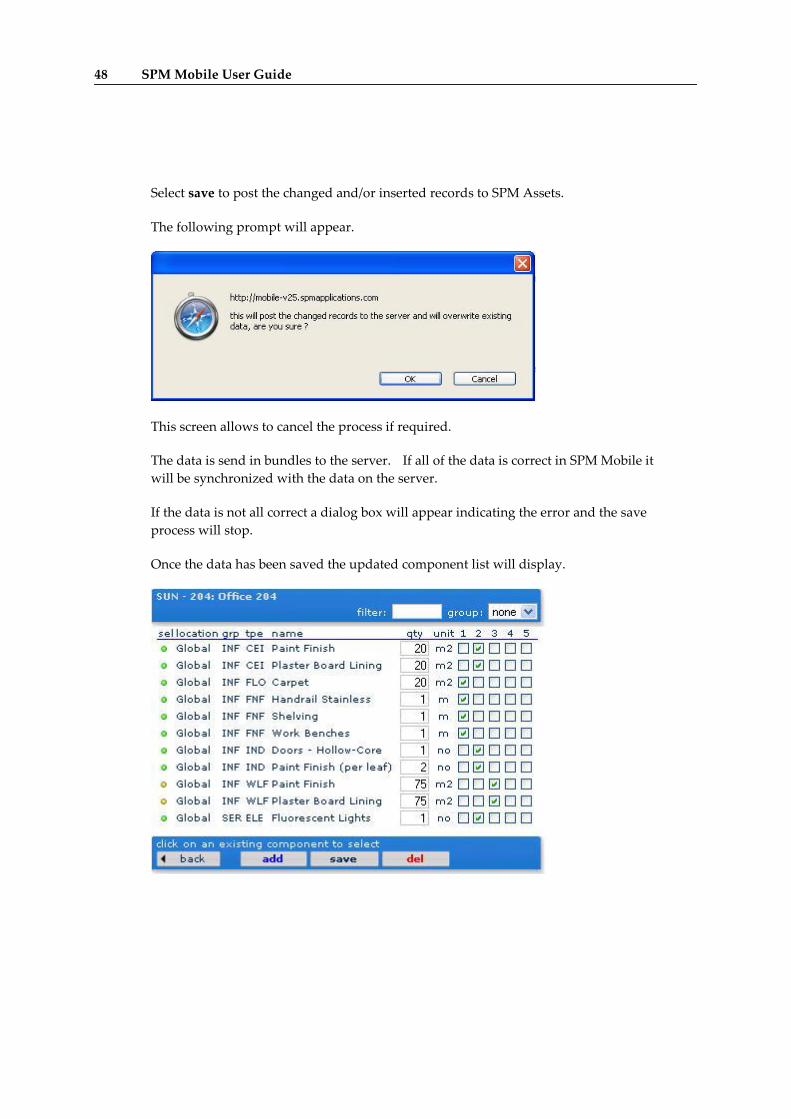
Select save to post the changed and/or inserted records to SPM Assets.
The following prompt will appear.
This screen allows to cancel the process if required.
The data is send in bundles to the server. If all of the data is correct in SPM Mobile it
will be synchronized with the data on the server.
If the data is not all correct a dialog box will appear indicating the error and the save
process will stop.
Once the data has been saved the updated component list will display.
Chapter 5 Using SPM Mobile 49
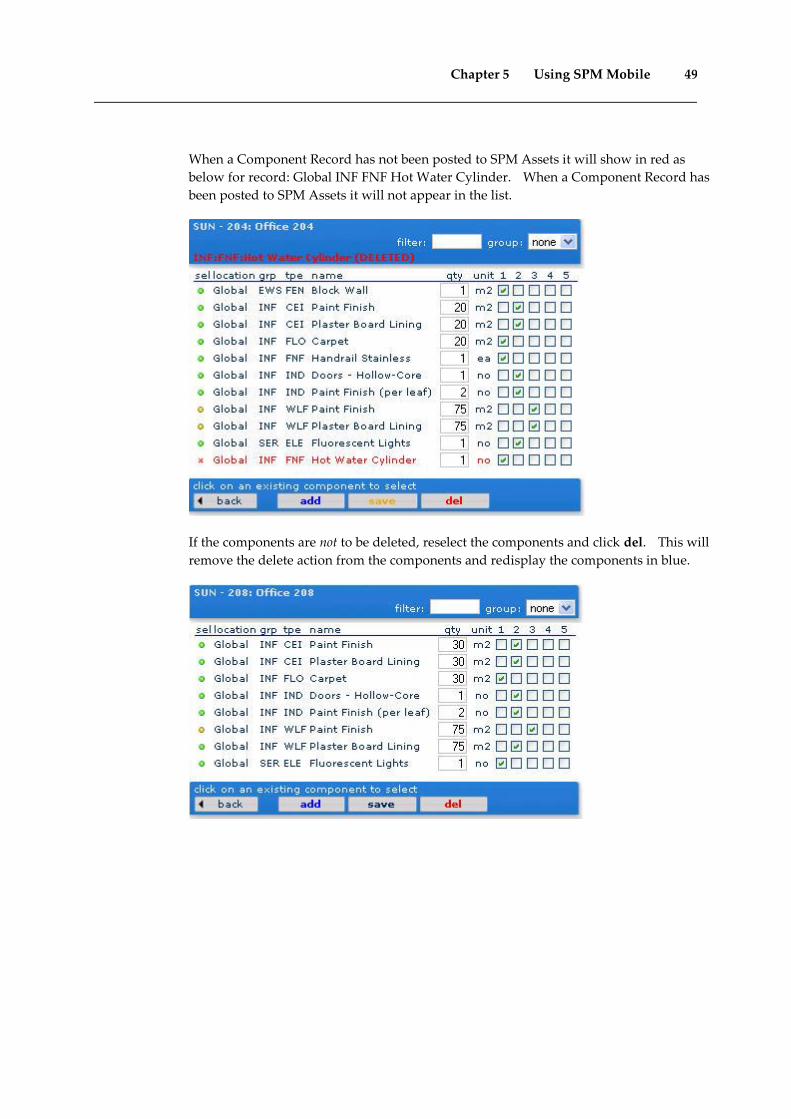
When a Component Record has not been posted to SPM Assets it will show in red as
below for record: Global INF FNF Hot Water Cylinder. When a Component Record has
been posted to SPM Assets it will not appear in the list.
If the components are not to be deleted, reselect the components and click del. This will
remove the delete action from the components and redisplay the components in blue.
50 SPM Mobile User Guide
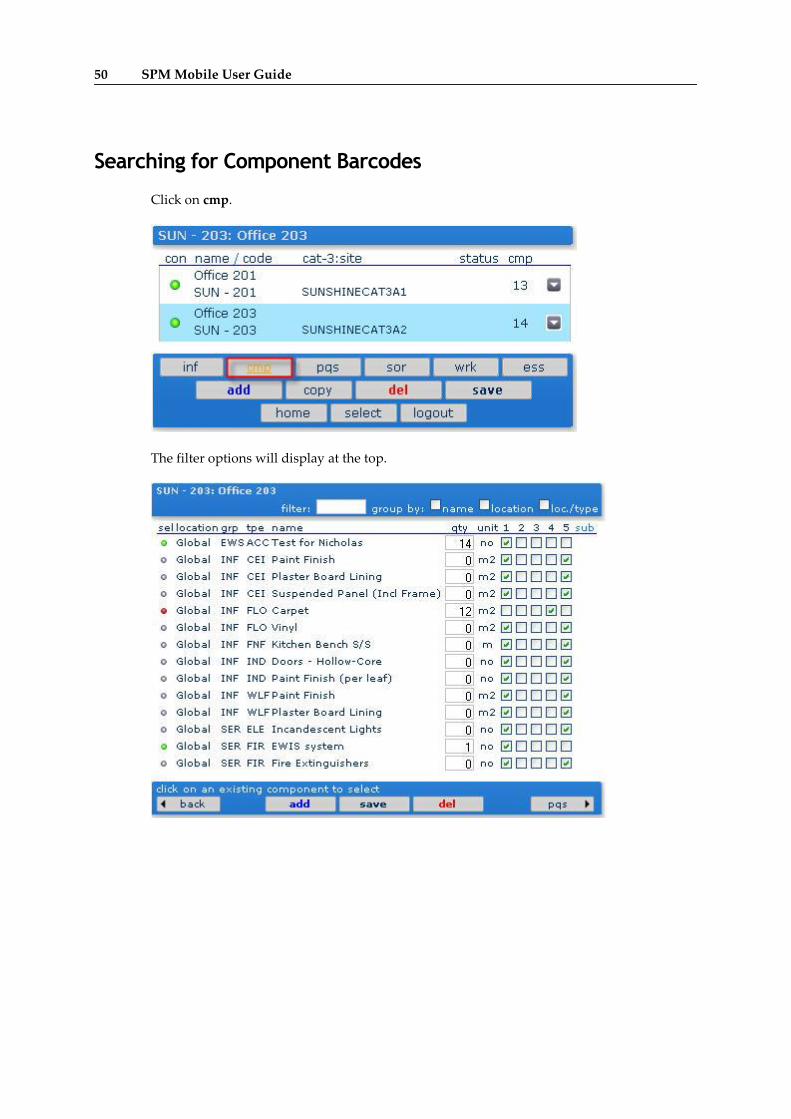
Searching for Component Barcodes
Click on cmp.
The filter options will display at the top.
Chapter 5 Using SPM Mobile 51
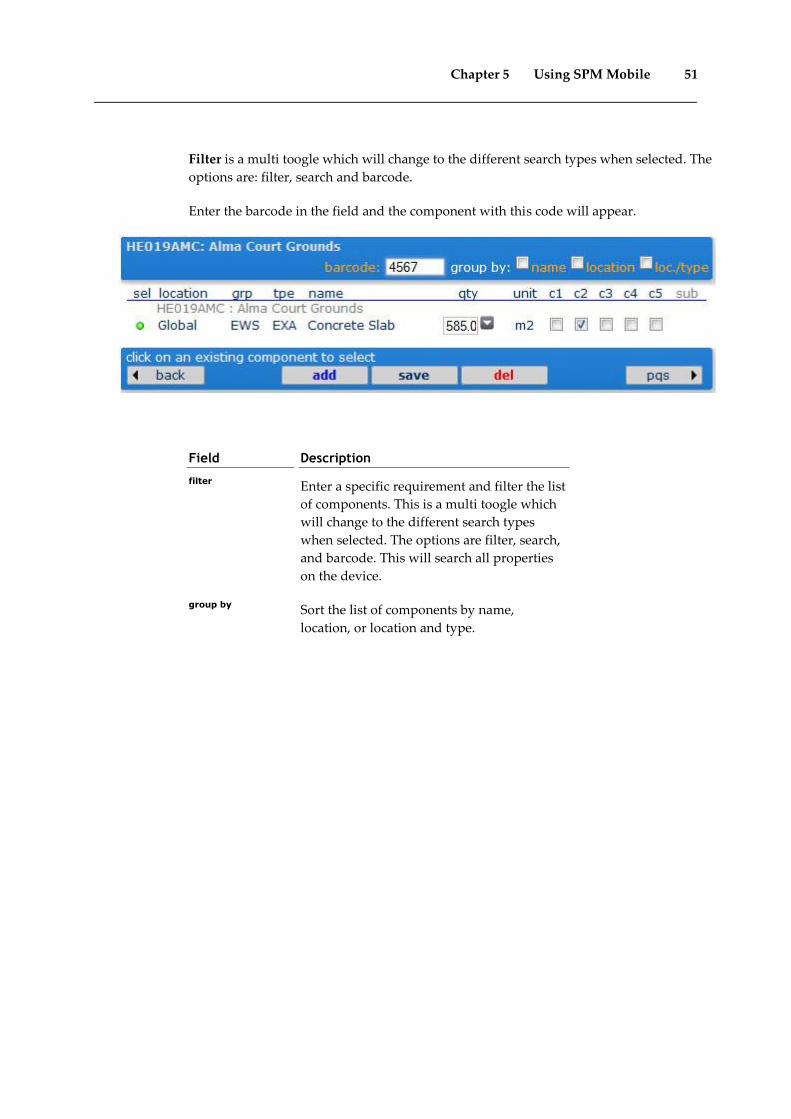
Filter is a multi toogle which will change to the different search types when selected. The
options are: filter, search and barcode.
Enter the barcode in the field and the component with this code will appear.
Field Description
filter Enter a specific requirement and filter the list
of components. This is a multi toogle which
will change to the different search types
when selected. The options are filter, search,
and barcode. This will search all properties
on the device.
group by Sort the list of components by name,
location, or location and type.
52 SPM Mobile User Guide
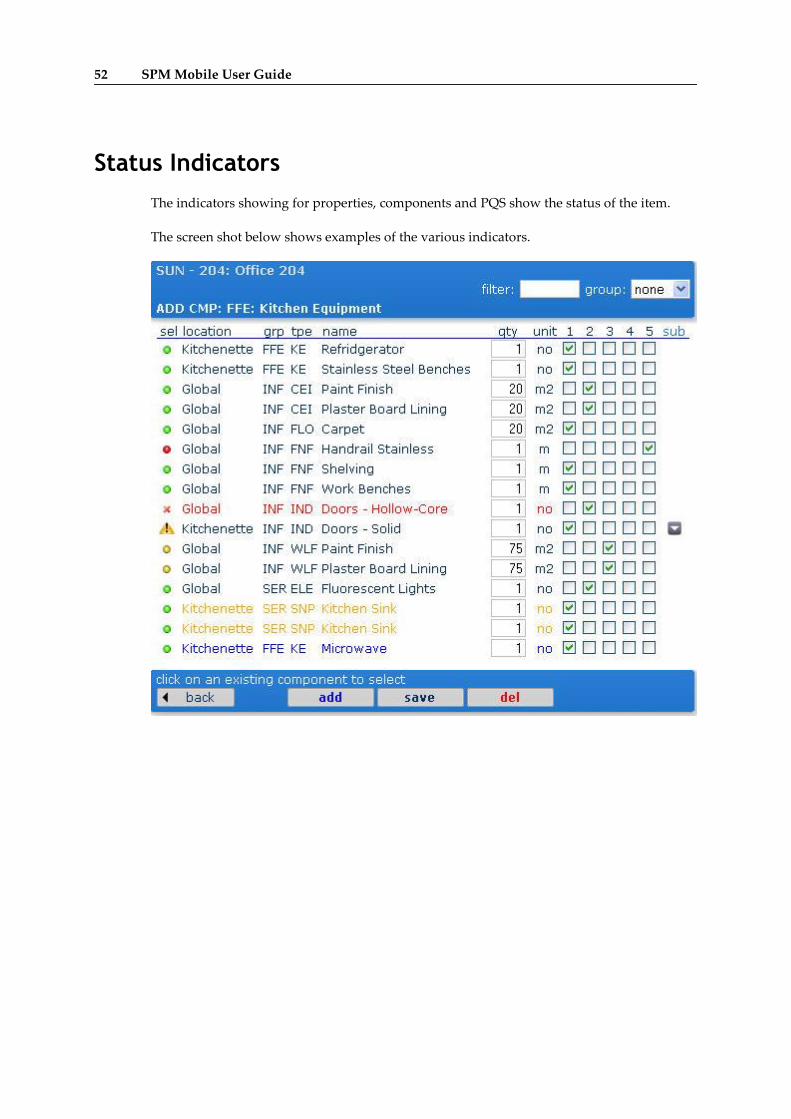
Status Indicators
The indicators showing for properties, components and PQS show the status of the item.
The screen shot below shows examples of the various indicators.
Chapter 5 Using SPM Mobile 53
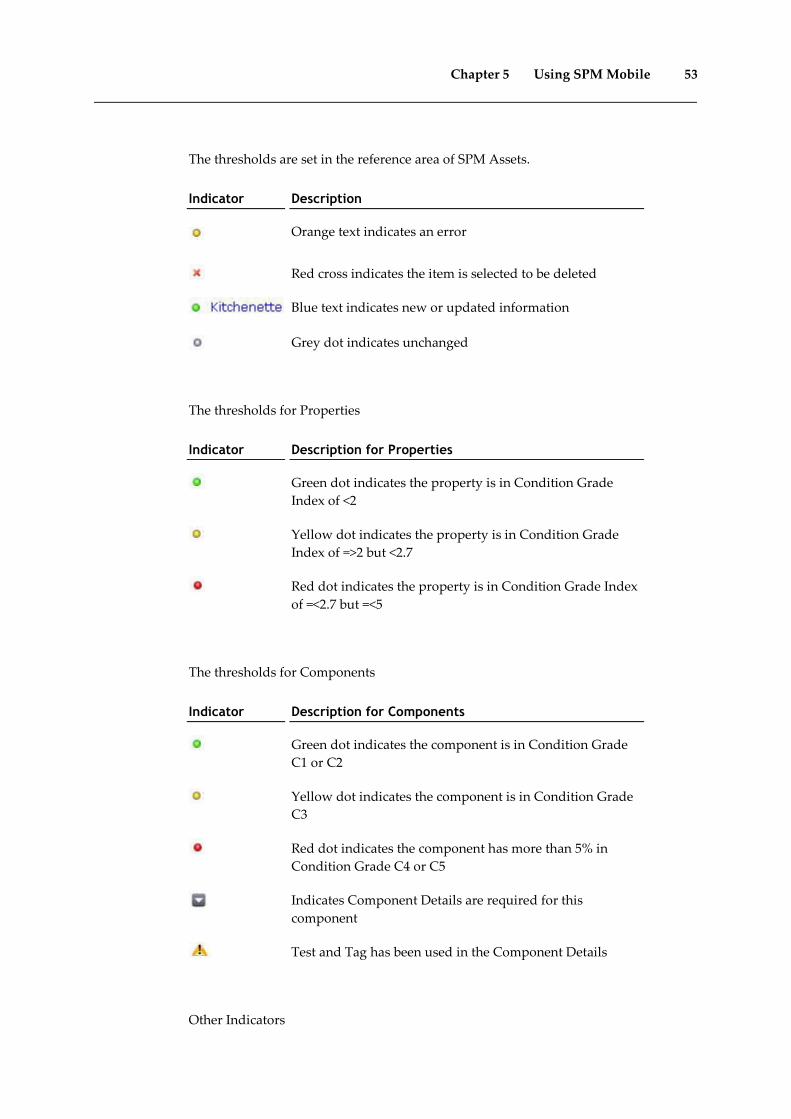
The thresholds are set in the reference area of SPM Assets.
Indicator Description
Orange text indicates an error
Red cross indicates the item is selected to be deleted
Blue text indicates new or updated information
Grey dot indicates unchanged
The thresholds for Properties
Indicator Description for Properties
Green dot indicates the property is in Condition Grade
Index of <2
Yellow dot indicates the property is in Condition Grade
Index of =>2 but <2.7
Red dot indicates the property is in Condition Grade Index
of =<2.7 but =<5
The thresholds for Components
Indicator Description for Components
Green dot indicates the component is in Condition Grade
C1 or C2
Yellow dot indicates the component is in Condition Grade
C3
Red dot indicates the component has more than 5% in
Condition Grade C4 or C5
Indicates Component Details are required for this
component
Test and Tag has been used in the Component Details
Other Indicators
54 SPM Mobile User Guide
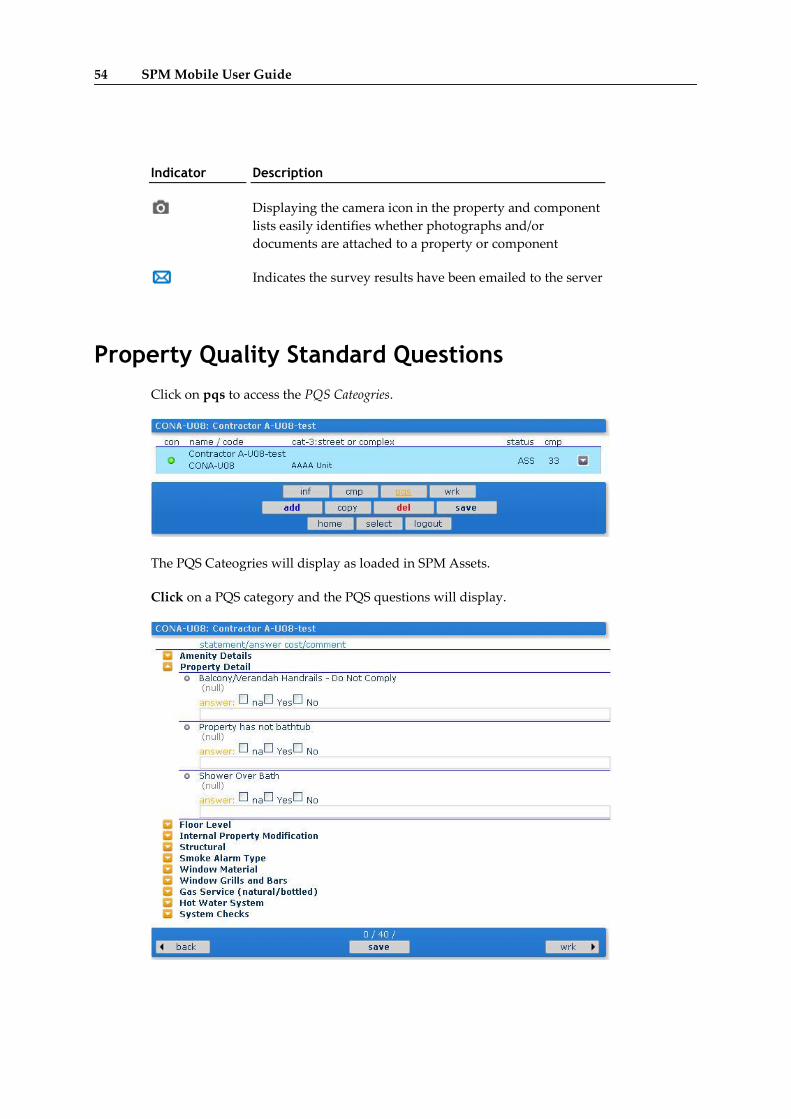
Indicator Description
Displaying the camera icon in the property and component
lists easily identifies whether photographs and/or
documents are attached to a property or component
Indicates the survey results have been emailed to the server
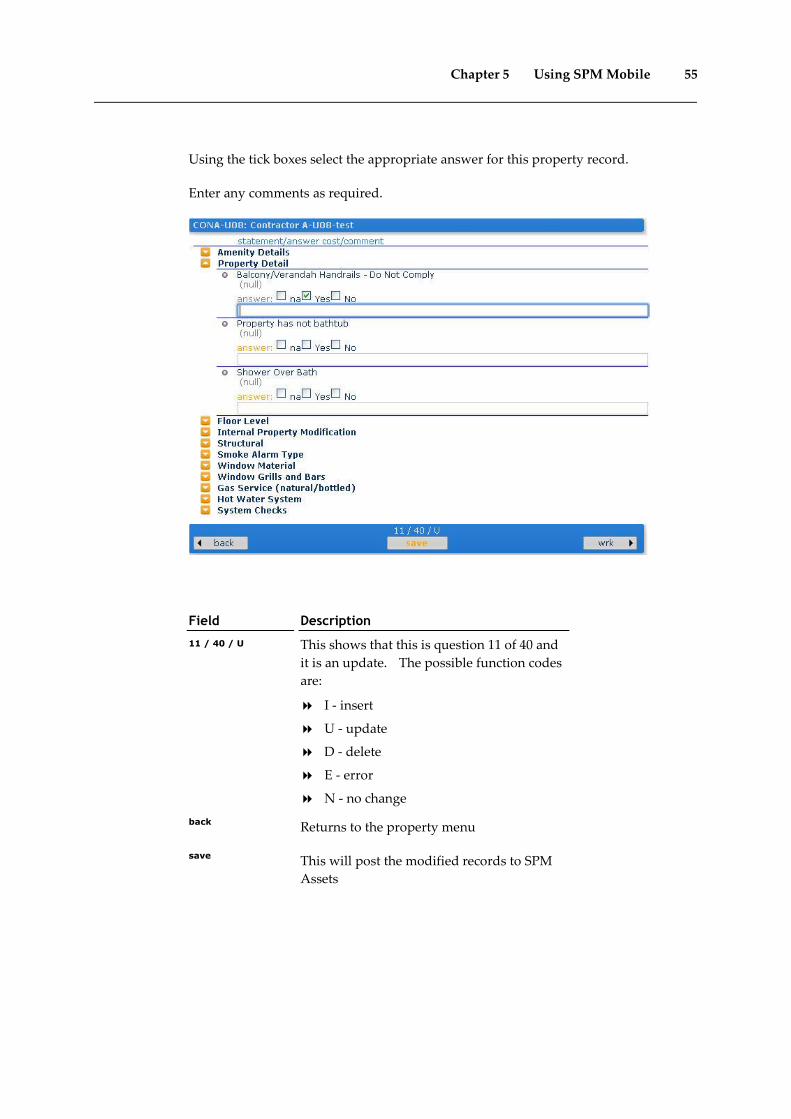
Property Quality Standard Questions
Click on pqs to access the PQS Cateogries.
The PQS Cateogries will display as loaded in SPM Assets.
Click on a PQS category and the PQS questions will display.
Chapter 5 Using SPM Mobile 55
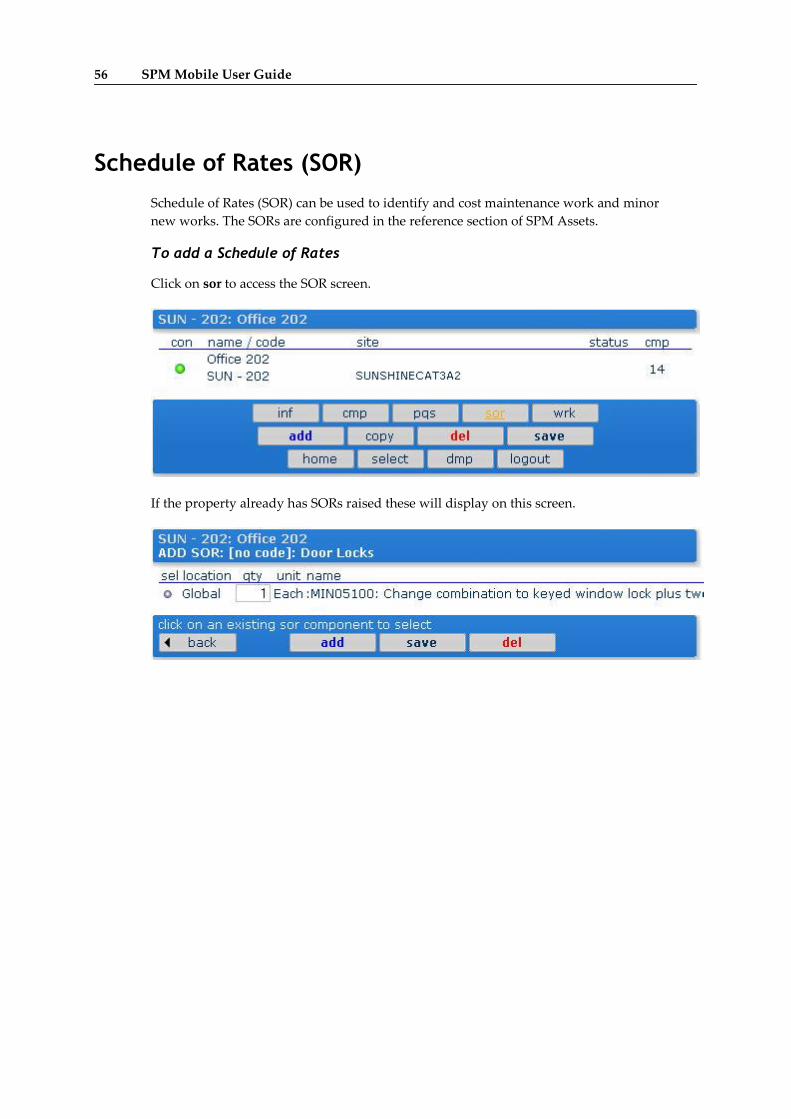
Using the tick boxes select the appropriate answer for this property record.
Enter any comments as required.
Field Description
11 / 40 / U This shows that this is question 11 of 40 and
it is an update. The possible function codes
are:
I - insert
U - update
D - delete
E - error
N - no change
back Returns to the property menu
save This will post the modified records to SPM
Assets
56 SPM Mobile User Guide
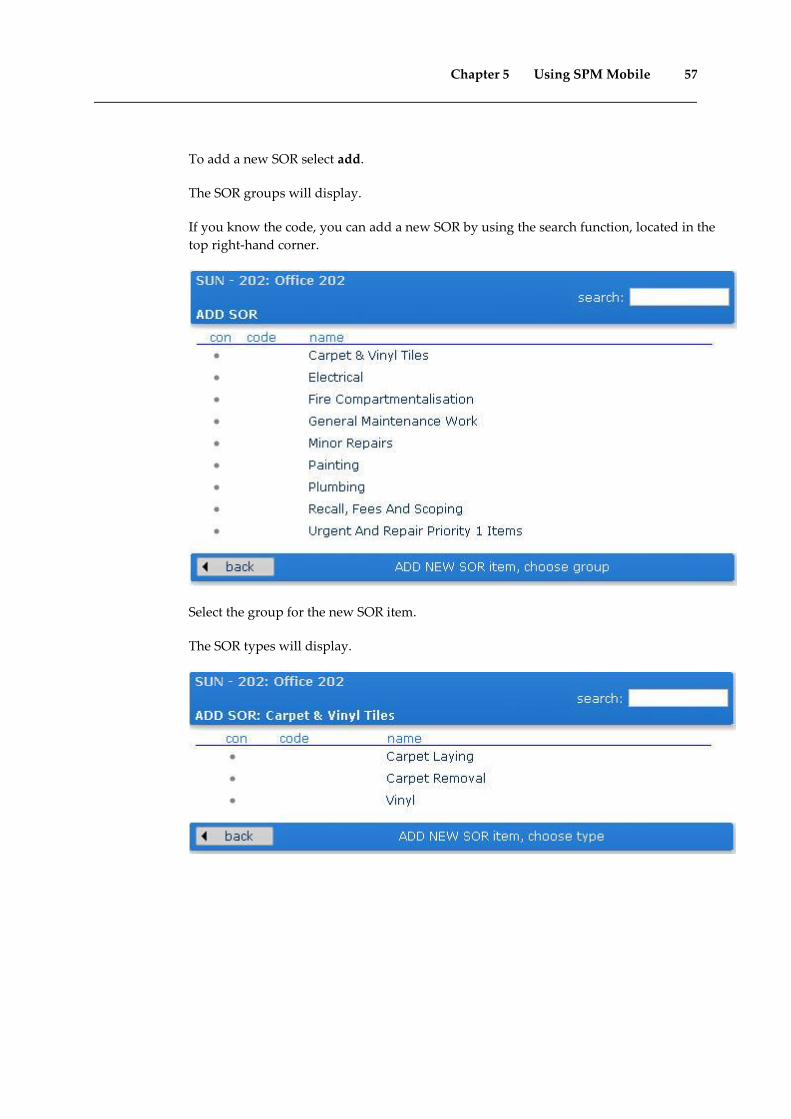
Schedule of Rates (SOR)
Schedule of Rates (SOR) can be used to identify and cost maintenance work and minor
new works. The SORs are configured in the reference section of SPM Assets.
To add a Schedule of Rates
Click on sor to access the SOR screen.
If the property already has SORs raised these will display on this screen.
Chapter 5 Using SPM Mobile 57
To add a new SOR select add.
The SOR groups will display.
If you know the code, you can add a new SOR by using the search function, located in the
top right-hand corner.
Select the group for the new SOR item.
The SOR types will display.
58 SPM Mobile User Guide
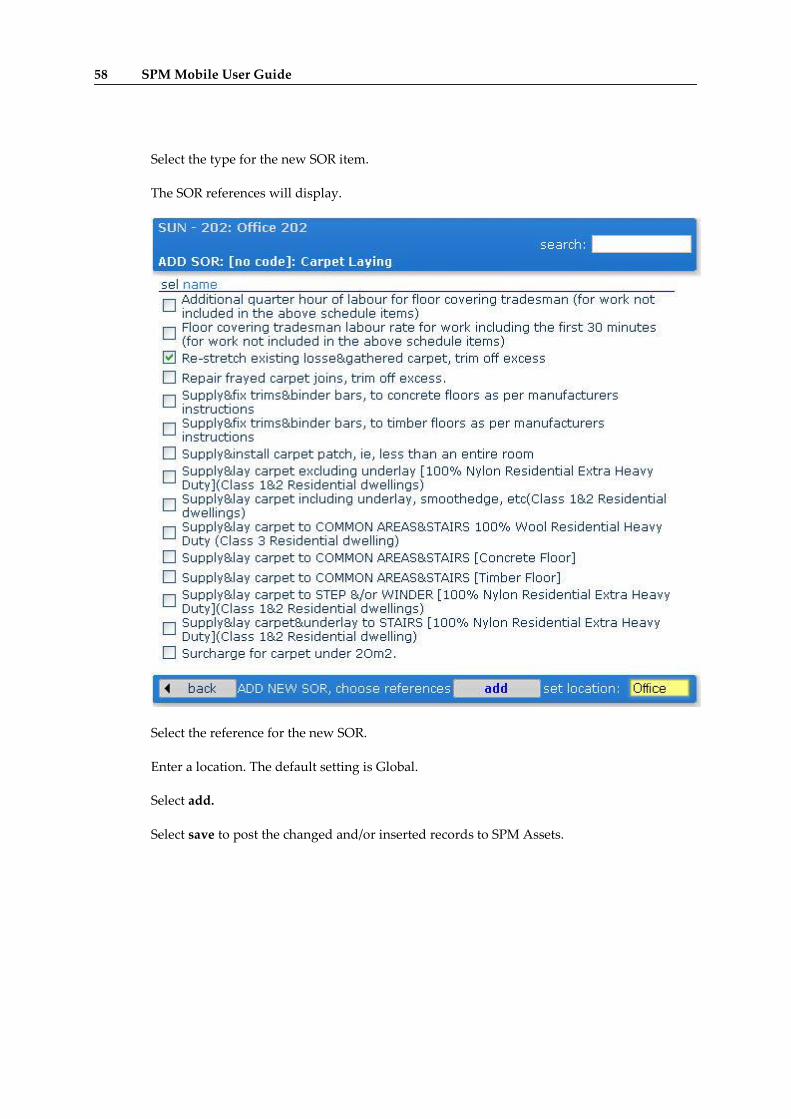
Select the type for the new SOR item.
The SOR references will display.
Select the reference for the new SOR.
Enter a location. The default setting is Global.
Select add.
Select save to post the changed and/or inserted records to SPM Assets.
Chapter 5 Using SPM Mobile 59
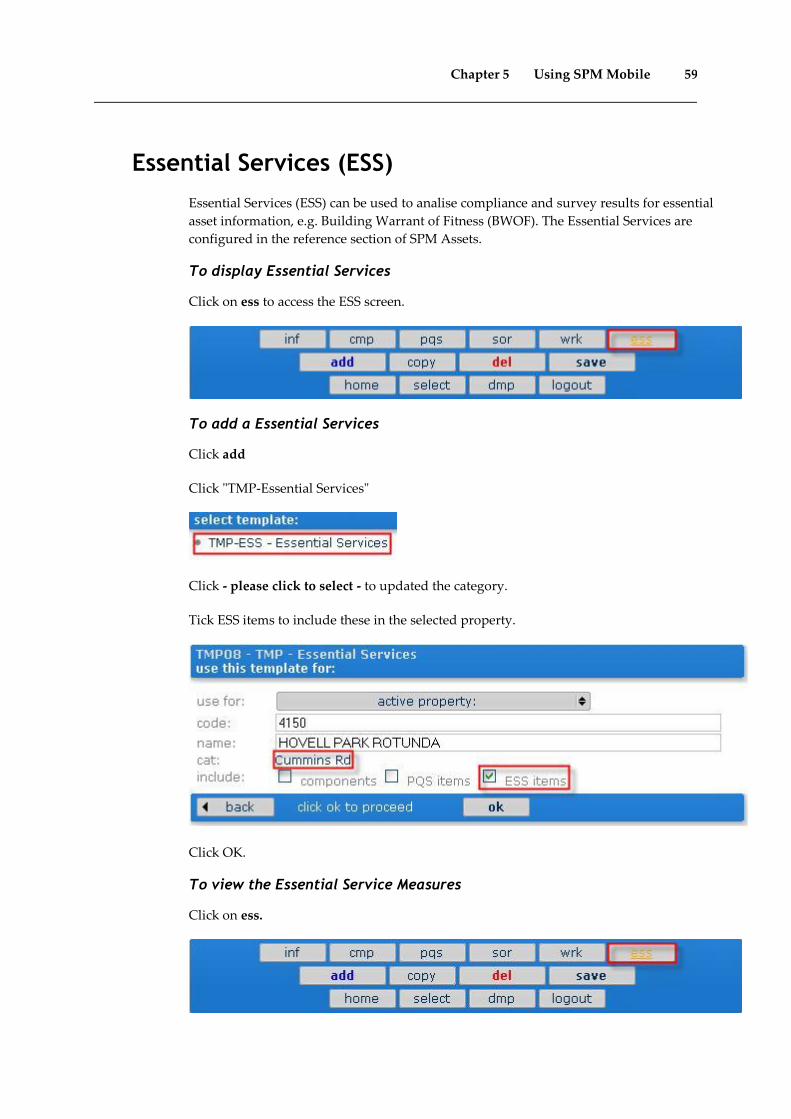
Essential Services (ESS)
Essential Services (ESS) can be used to analise compliance and survey results for essential
asset information, e.g. Building Warrant of Fitness (BWOF). The Essential Services are
configured in the reference section of SPM Assets.
To display Essential Services
Click on ess to access the ESS screen.
To add a Essential Services
Click add
Click "TMP-Essential Services"
Click - please click to select - to updated the category.
Tick ESS items to include these in the selected property.
Click OK.
To view the Essential Service Measures
Click on ess.
60 SPM Mobile User Guide
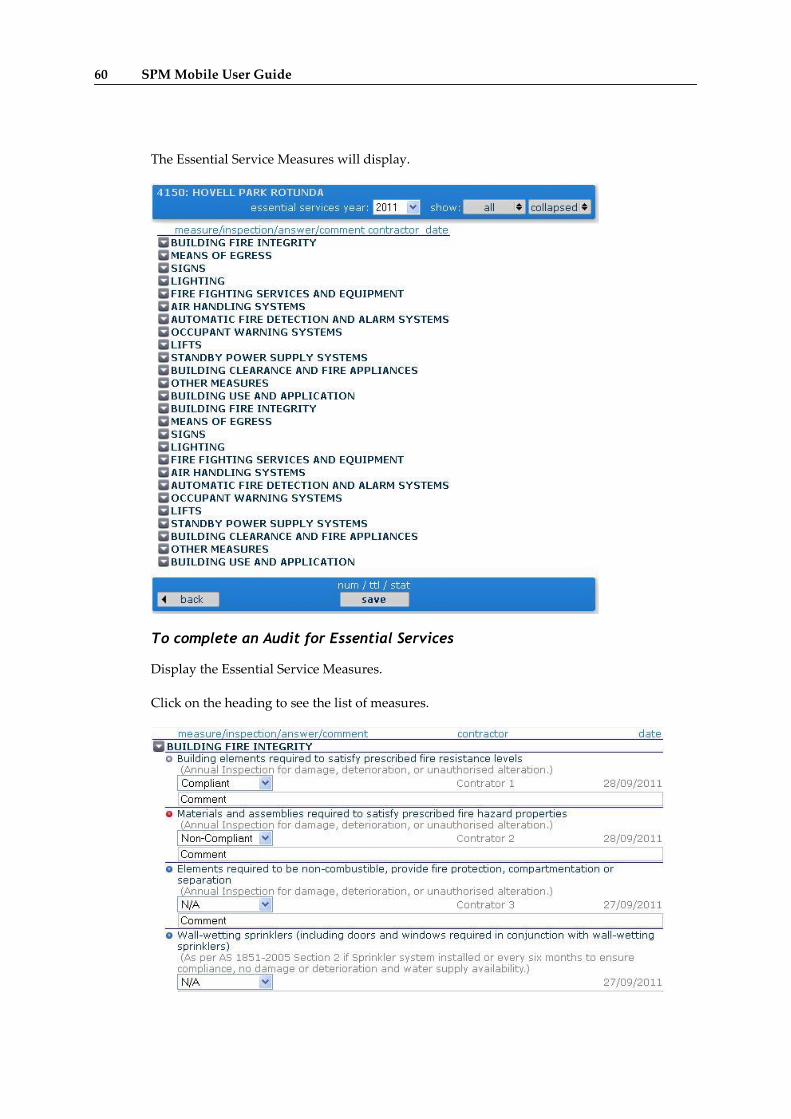
The Essential Service Measures will display.
To complete an Audit for Essential Services
Display the Essential Service Measures.
Click on the heading to see the list of measures.
Chapter 5 Using SPM Mobile 61
Click on the appropriate answer.
Enter comments if needed.
Click save.
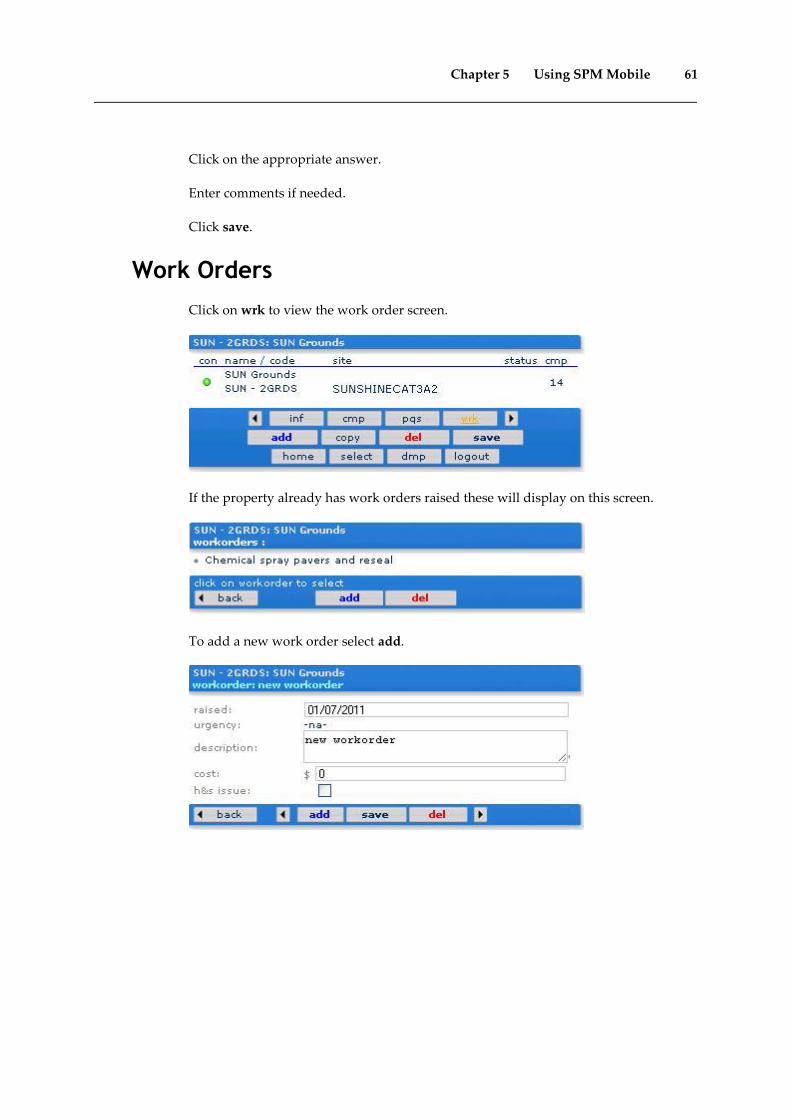
Work Orders
Click on wrk to view the work order screen.
If the property already has work orders raised these will display on this screen.
To add a new work order select add.
62 SPM Mobile User Guide
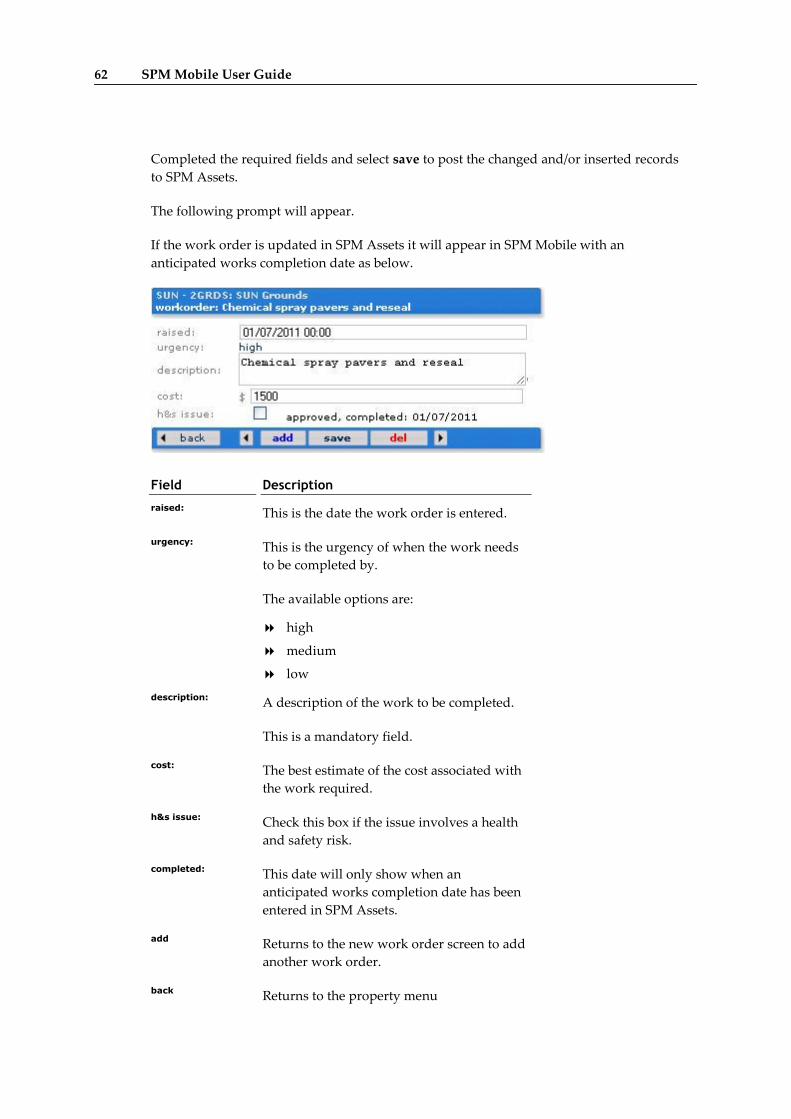
Completed the required fields and select save to post the changed and/or inserted records
to SPM Assets.
The following prompt will appear.
If the work order is updated in SPM Assets it will appear in SPM Mobile with an
anticipated works completion date as below.
Field Description
raised: This is the date the work order is entered.
urgency: This is the urgency of when the work needs
to be completed by.
The available options are:
high
medium
low
description: A description of the work to be completed.
This is a mandatory field.
cost: The best estimate of the cost associated with
the work required.
h&s issue: Check this box if the issue involves a health
and safety risk.
completed: This date will only show when an
anticipated works completion date has been
entered in SPM Assets.
add Returns to the new work order screen to add
another work order.
back Returns to the property menu
Chapter 5 Using SPM Mobile 63
save This will post the modified records to SPM
Assets.
del Delete the work order and associated
photograph.
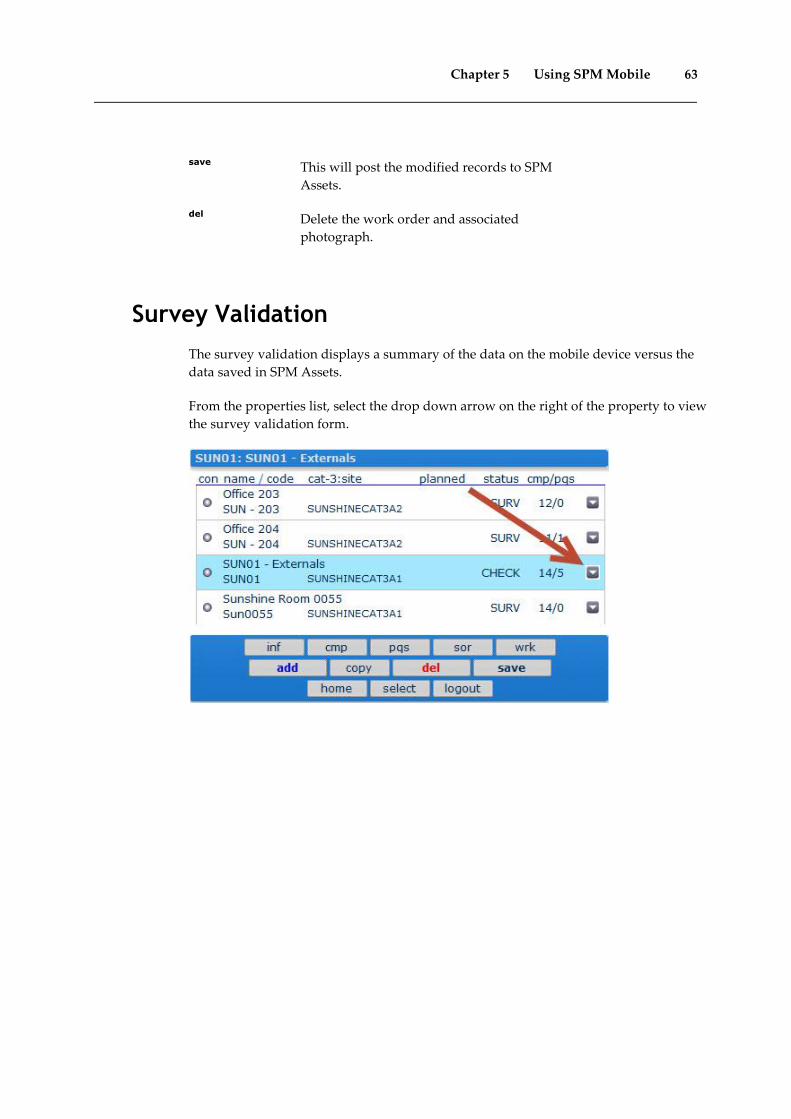
Survey Validation
The survey validation displays a summary of the data on the mobile device versus the
data saved in SPM Assets.
From the properties list, select the drop down arrow on the right of the property to view
the survey validation form.
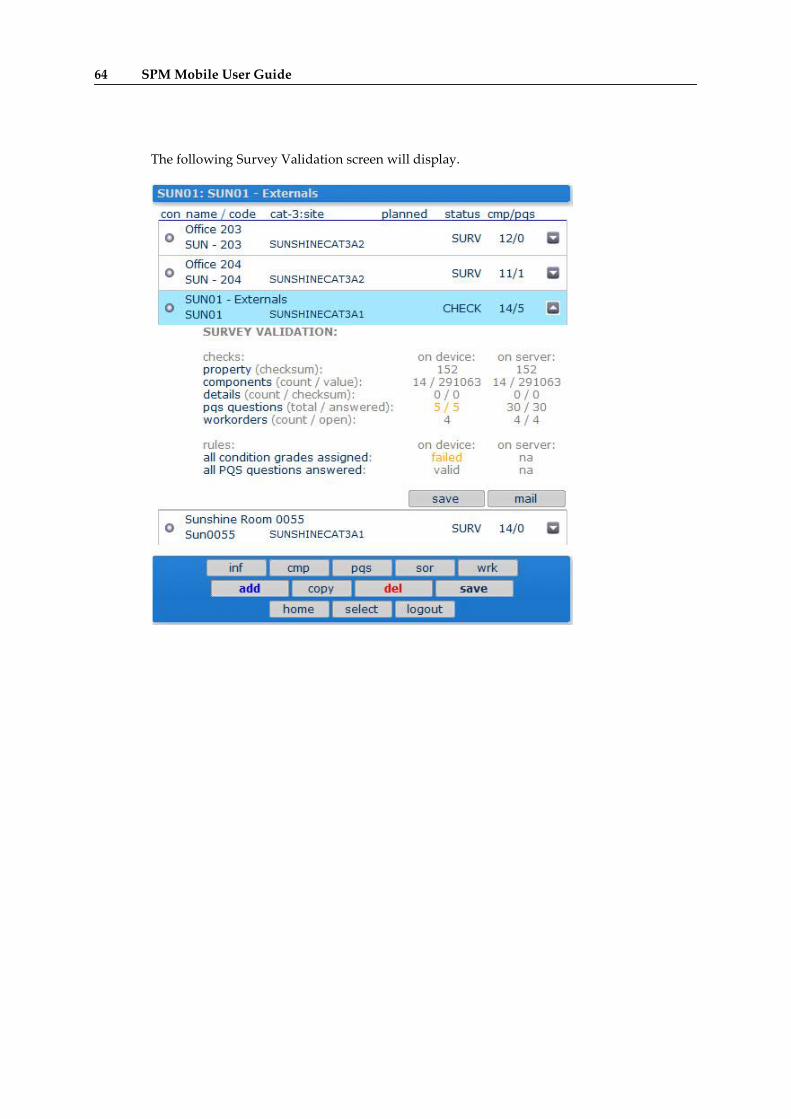
64 SPM Mobile User Guide
The following Survey Validation screen will display.
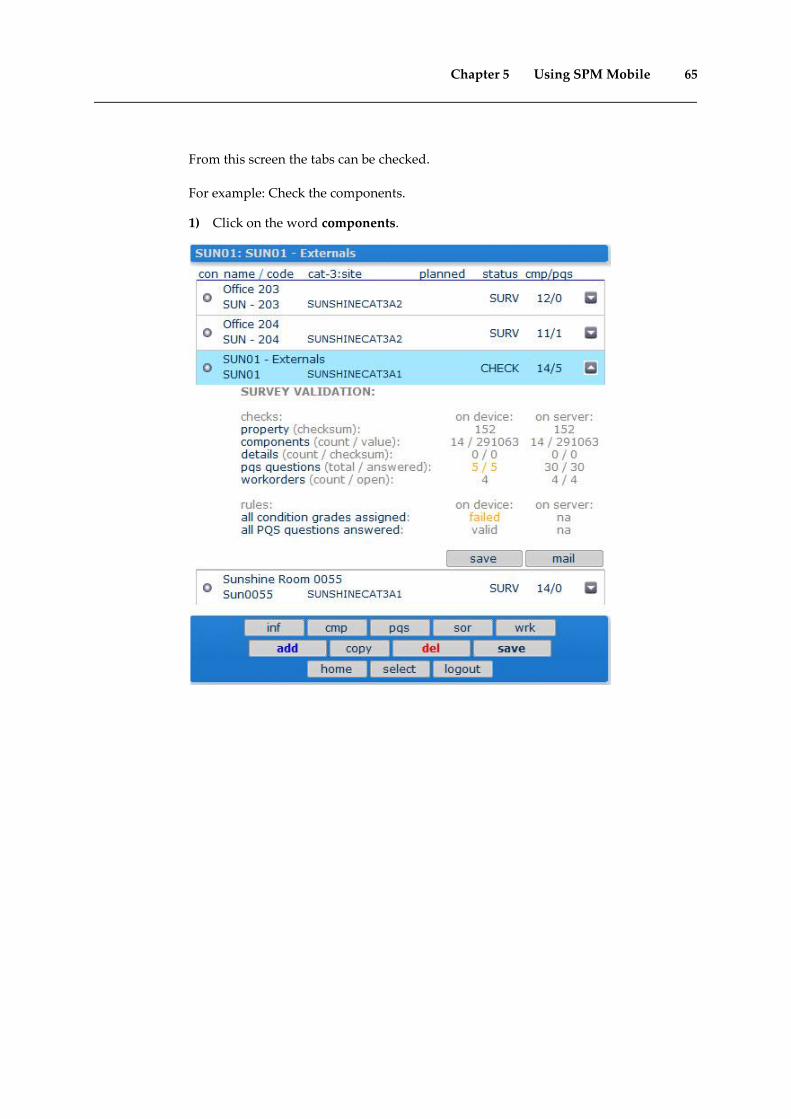
Chapter 5 Using SPM Mobile 65
From this screen the tabs can be checked.
For example: Check the components.
1) Click on the word components.
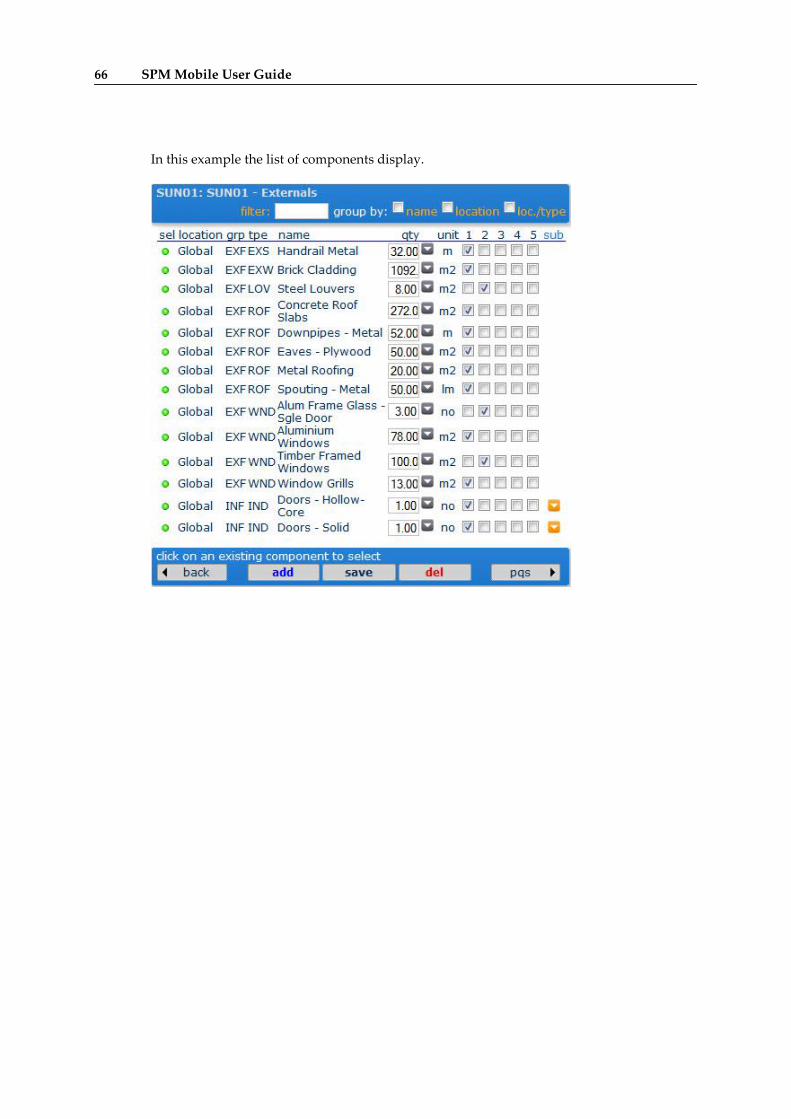
66 SPM Mobile User Guide
In this example the list of components display.
Chapter 5 Using SPM Mobile 67
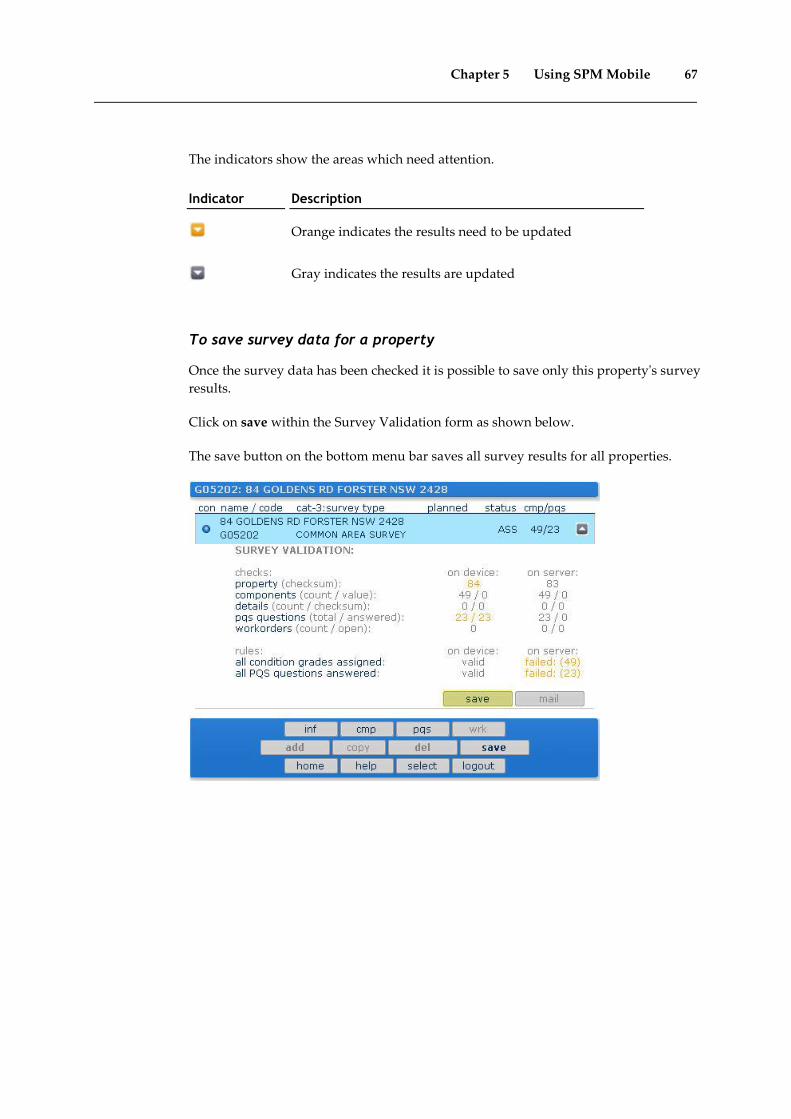
The indicators show the areas which need attention.
Indicator Description
Orange indicates the results need to be updated
Gray indicates the results are updated
To save survey data for a property
Once the survey data has been checked it is possible to save only this property's survey
results.
Click on save within the Survey Validation form as shown below.
The save button on the bottom menu bar saves all survey results for all properties.
68 SPM Mobile User Guide
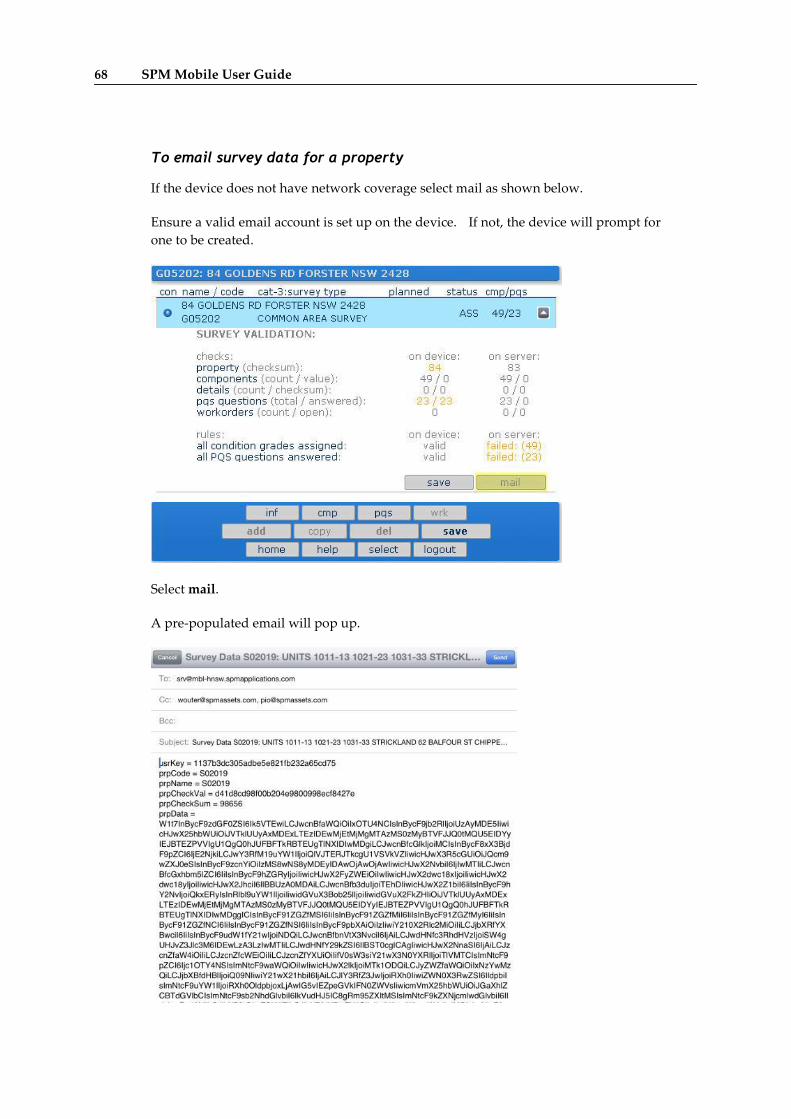
To email survey data for a property
If the device does not have network coverage select mail as shown below.
Ensure a valid email account is set up on the device. If not, the device will prompt for
one to be created.
Select mail.
A pre-populated email will pop up.
Chapter 5 Using SPM Mobile 69
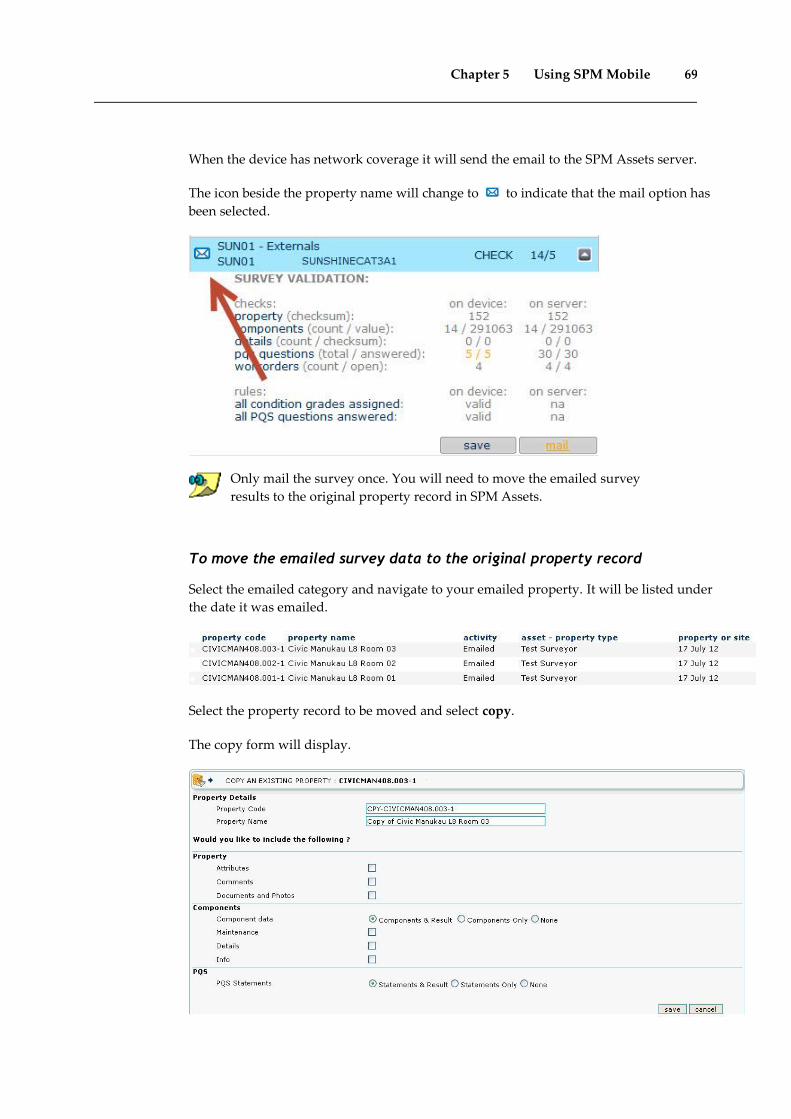
When the device has network coverage it will send the email to the SPM Assets server.
The icon beside the property name will change to to indicate that the mail option has
been selected.
Only mail the survey once. You will need to move the emailed survey
results to the original property record in SPM Assets.
To move the emailed survey data to the original property record
Select the emailed category and navigate to your emailed property. It will be listed under
the date it was emailed.
Select the property record to be moved and select copy.
The copy form will display.
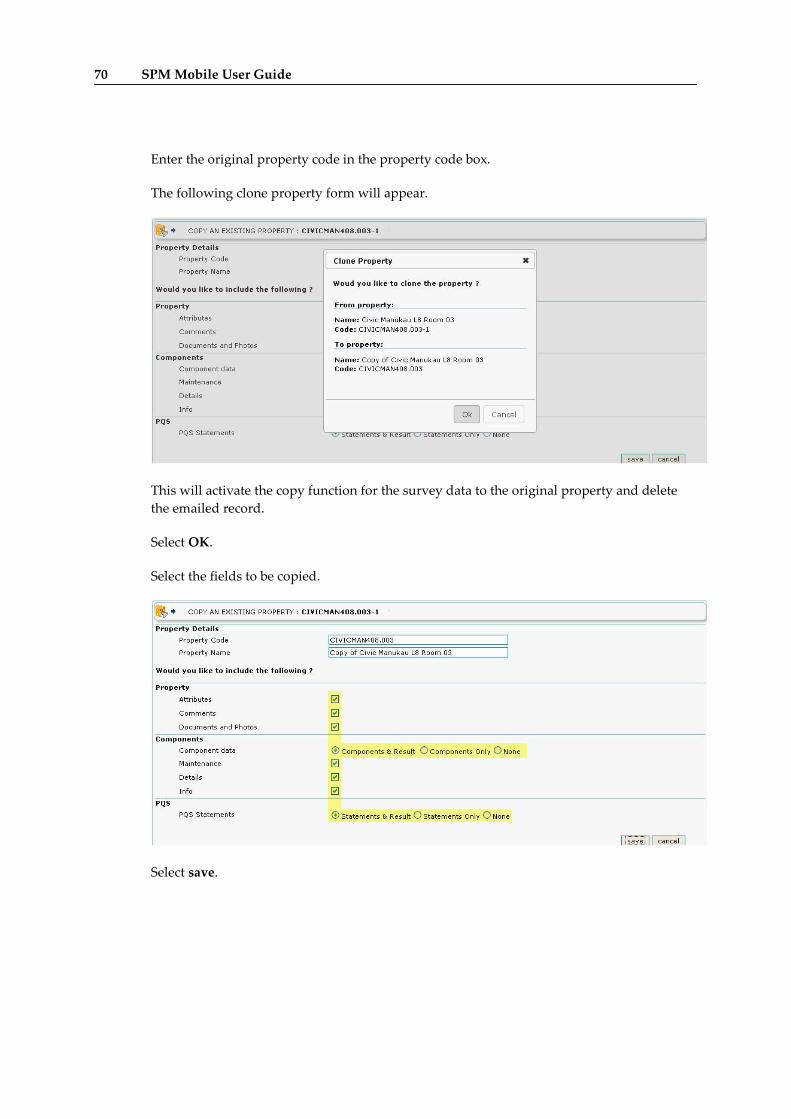
70 SPM Mobile User Guide
Enter the original property code in the property code box.
The following clone property form will appear.
This will activate the copy function for the survey data to the original property and delete
the emailed record.
Select OK.
Select the fields to be copied.
Select save.
Chapter 6 Uploading Property Photographs to SPM Assets 71
1) Take the photograph(s)
2) Compile an email with the subject heading as the Property Code of the Property
Record that the photograph(s) are to be attached to
3) Attach the photograph(s) to the email - limited by the capacity of the email server
4) Address and sent the email to <client_code>@assets.spmapplications.com
The email address will vary depending on your url.
Location URL
New Zealand http://assets.spmapplications.com/
Australia http://assets-au.spmapplications.com/
South Africa http://assets-sa.spmapplications.com/
Privately owned servers will have their own url. Please check with your SPM Assets
Consultant if you are unsure what email address to use.
Chapter 6
Uploading Property Photographs to SPM Assets
Uploading property photographs using add photo button
72 SPM Mobile User Guide
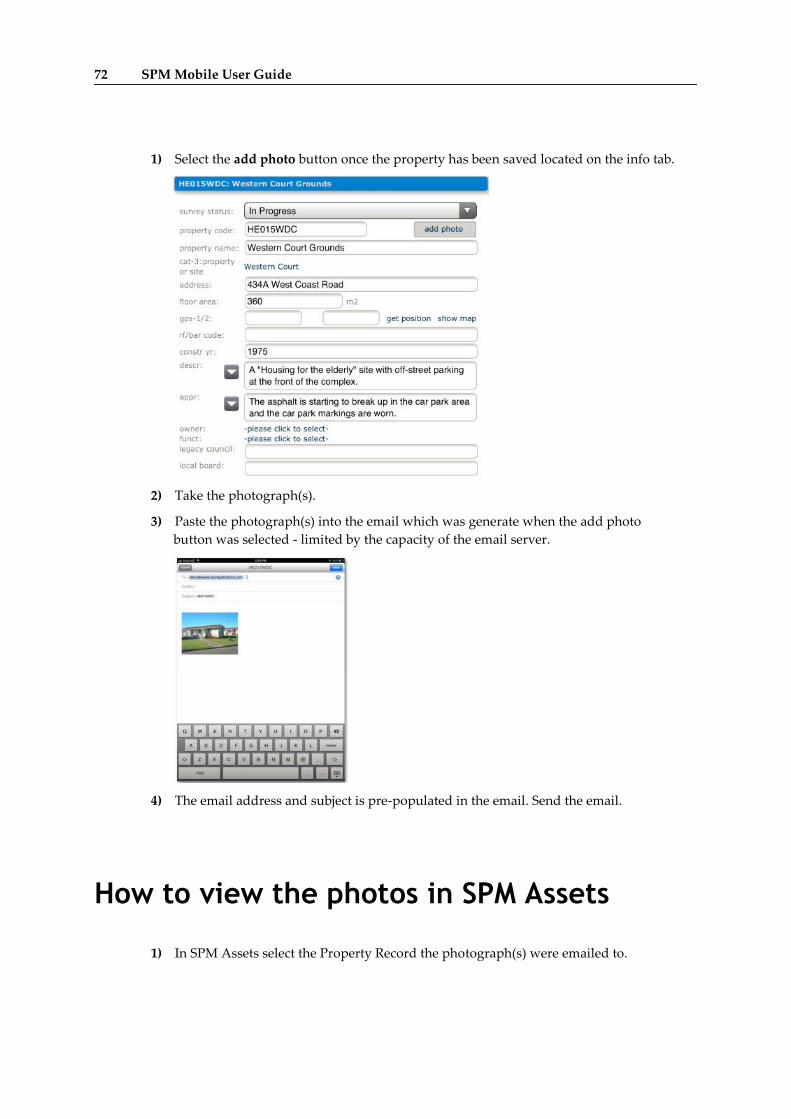
1) Select the add photo button once the property has been saved located on the info tab.
2) Take the photograph(s).
3) Paste the photograph(s) into the email which was generate when the add photo
button was selected - limited by the capacity of the email server.
4) The email address and subject is pre-populated in the email. Send the email.
1) In SPM Assets select the Property Record the photograph(s) were emailed to.
How to view the photos in SPM Assets
Chapter 6 How to view the photos in SPM Assets 73
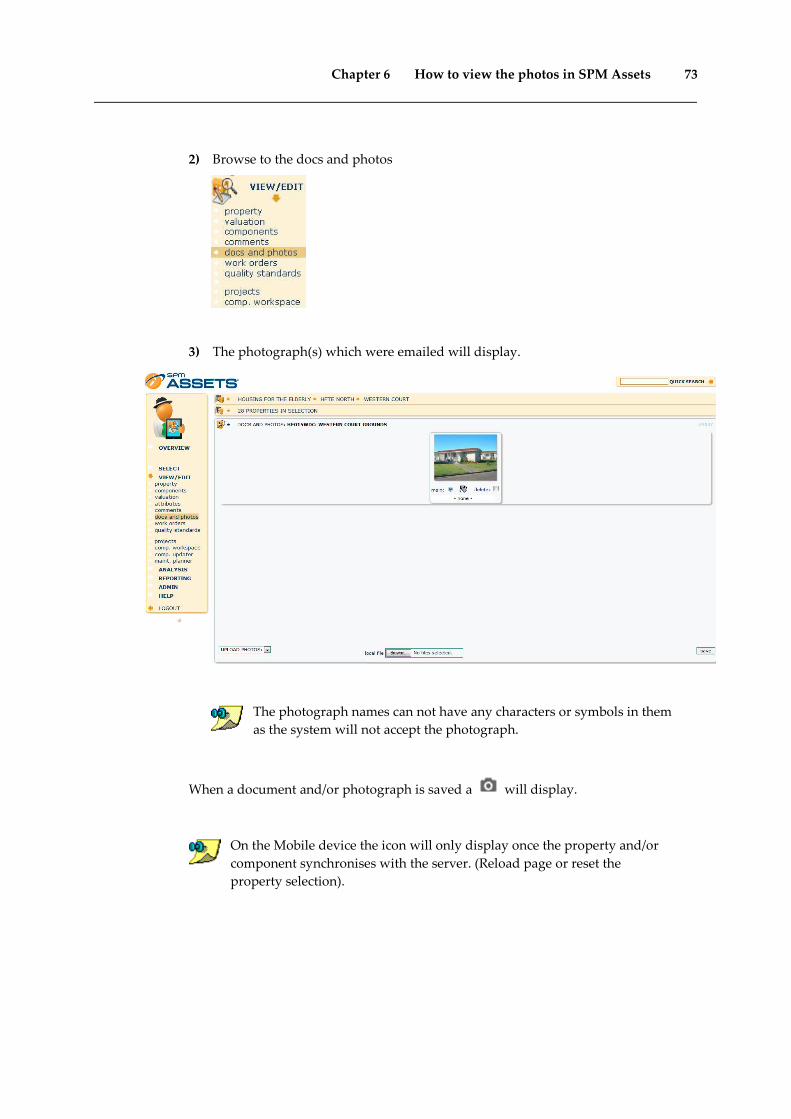
2) Browse to the docs and photos
3) The photograph(s) which were emailed will display.
The photograph names can not have any characters or symbols in them
as the system will not accept the photograph.
When a document and/or photograph is saved a will display.
On the Mobile device the icon will only display once the property and/or
component synchronises with the server. (Reload page or reset the
property selection).
74 SPM Mobile User Guide
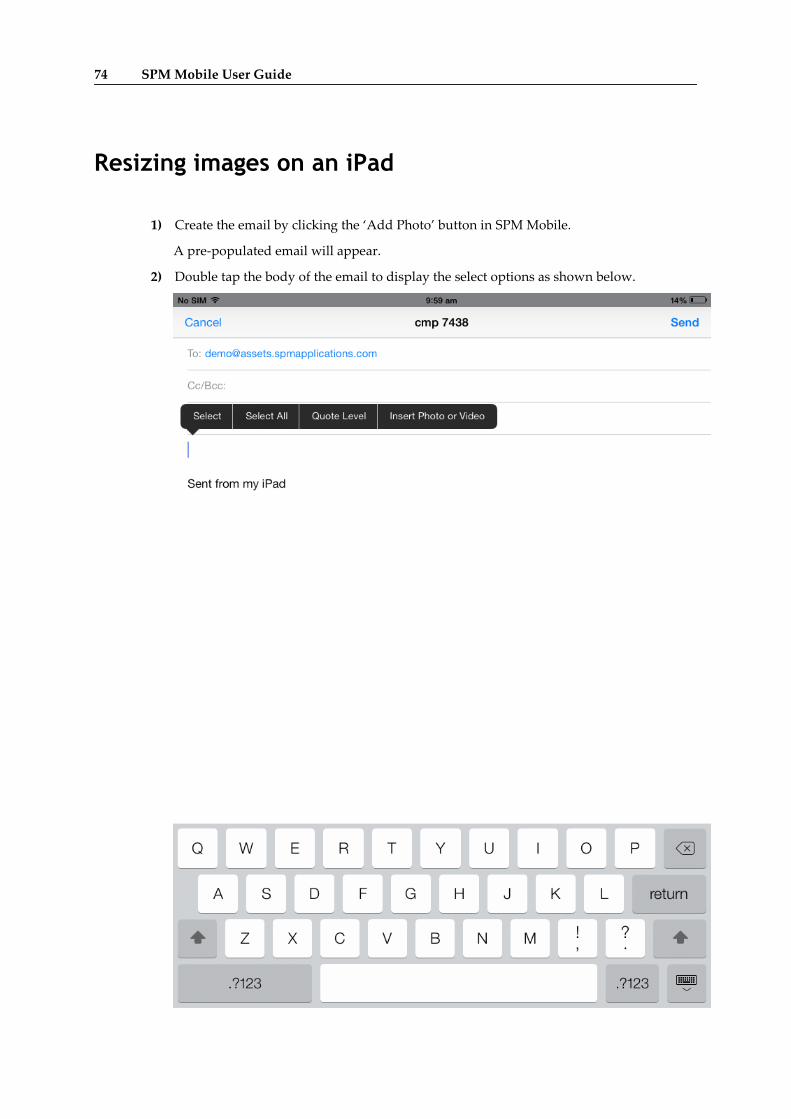
Resizing images on an iPad
1) Create the email by clicking the ‘Add Photo’ button in SPM Mobile.
A pre-populated email will appear.
2) Double tap the body of the email to display the select options as shown below.
Chapter 6 How to view the photos in SPM Assets 75
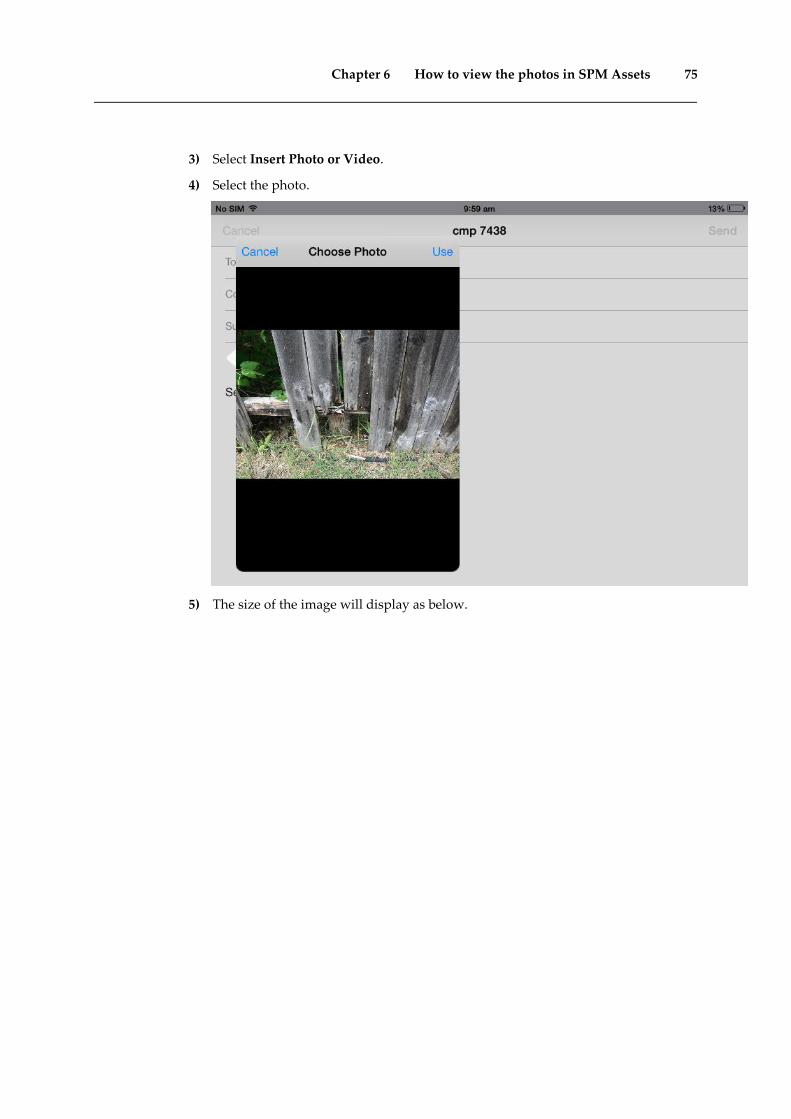
3) Select Insert Photo or Video.
4) Select the photo.
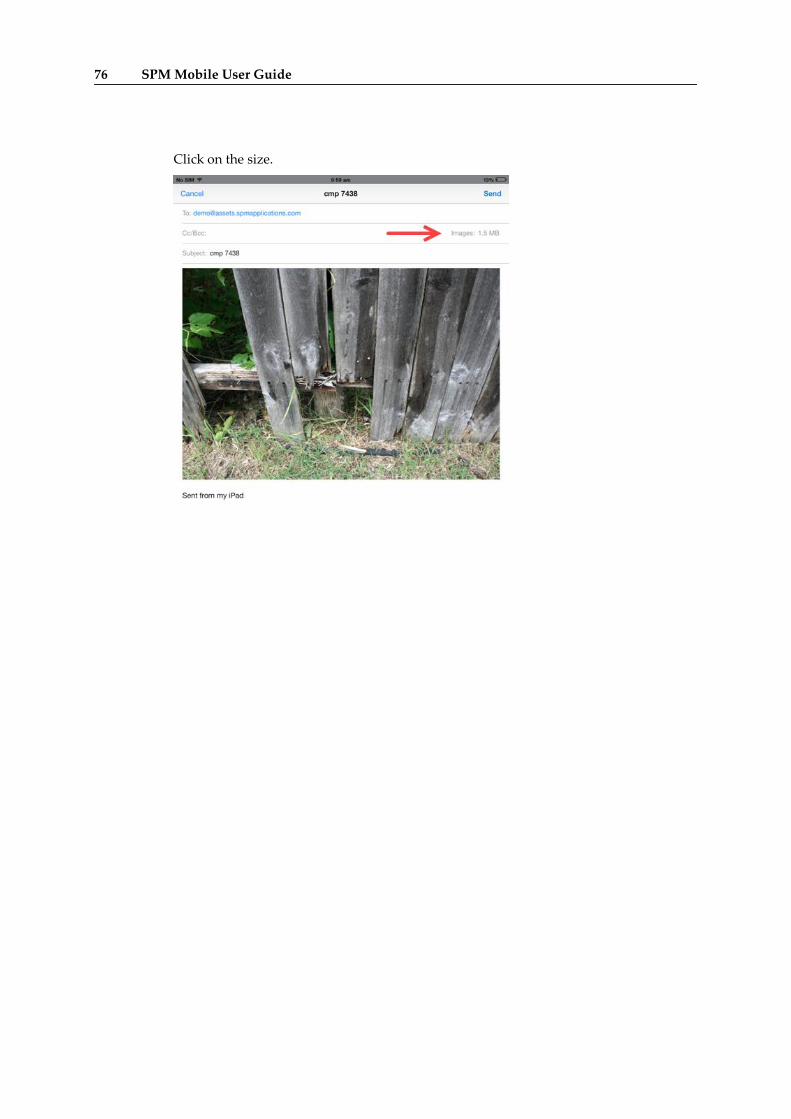
5) The size of the image will display as below.
76 SPM Mobile User Guide
Click on the size.
Chapter 6 Uploading Component Photographs to SPM Assets 77
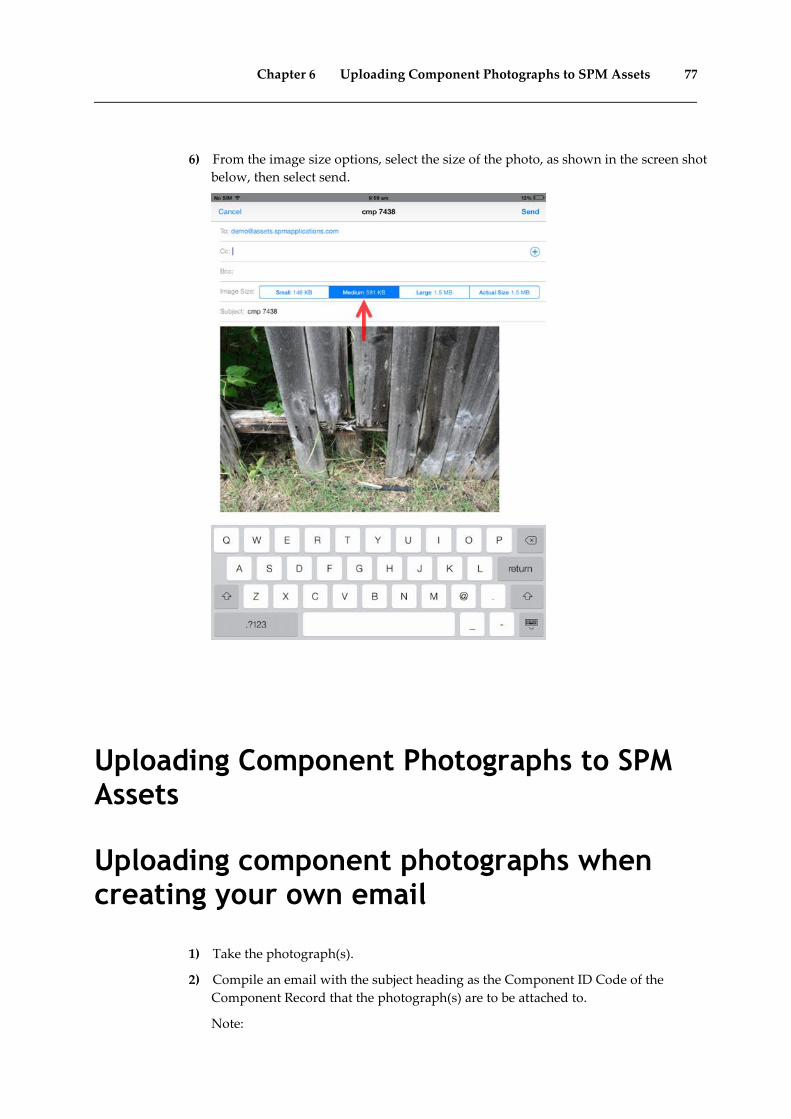
6) From the image size options, select the size of the photo, as shown in the screen shot
below, then select send.
1) Take the photograph(s).
2) Compile an email with the subject heading as the Component ID Code of the
Component Record that the photograph(s) are to be attached to.
Note:
Uploading Component Photographs to SPM Assets
Uploading component photographs when creating your own email
78 SPM Mobile User Guide
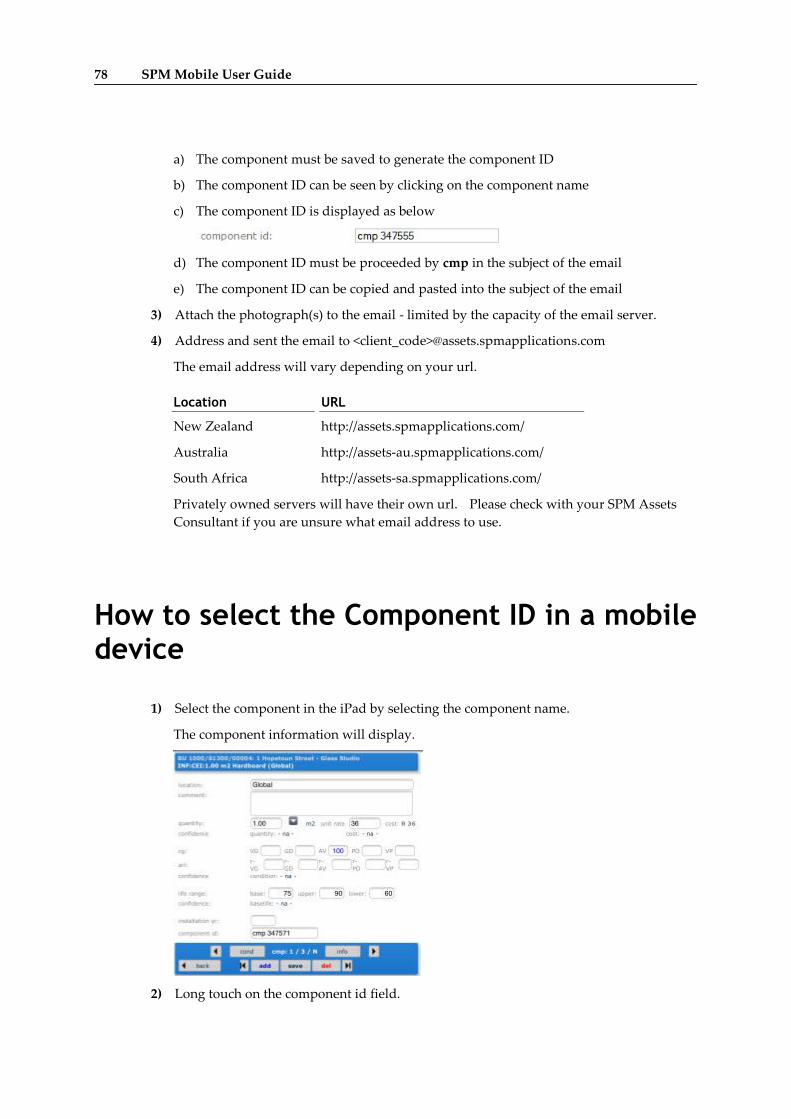
a) The component must be saved to generate the component ID
b) The component ID can be seen by clicking on the component name
c) The component ID is displayed as below
d) The component ID must be proceeded by cmp in the subject of the email
e) The component ID can be copied and pasted into the subject of the email
3) Attach the photograph(s) to the email - limited by the capacity of the email server.
4) Address and sent the email to <client_code>@assets.spmapplications.com
The email address will vary depending on your url.
Location URL
New Zealand http://assets.spmapplications.com/
Australia http://assets-au.spmapplications.com/
South Africa http://assets-sa.spmapplications.com/
Privately owned servers will have their own url. Please check with your SPM Assets
Consultant if you are unsure what email address to use.
1) Select the component in the iPad by selecting the component name.
The component information will display.
2) Long touch on the component id field.
How to select the Component ID in a mobile device
Chapter 6 Uploading component photographs using add photo button 79
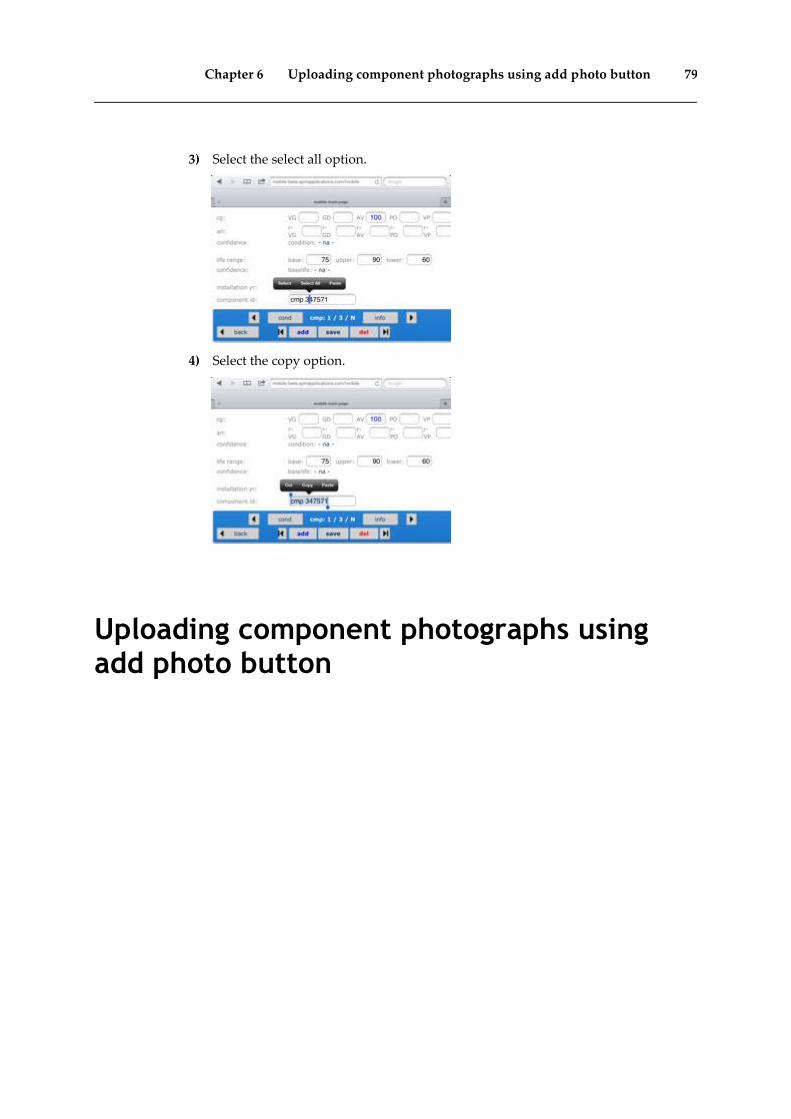
3) Select the select all option.
4) Select the copy option.
Uploading component photographs using add photo button
80 SPM Mobile User Guide
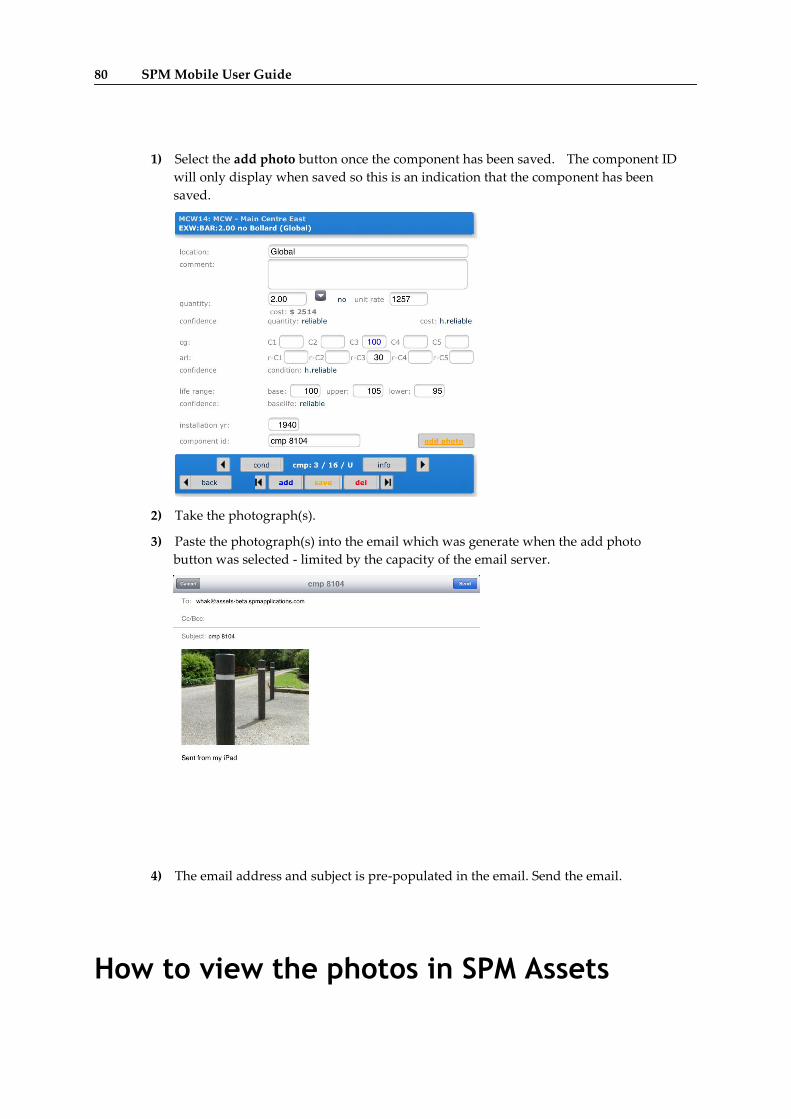
1) Select the add photo button once the component has been saved. The component ID
will only display when saved so this is an indication that the component has been
saved.
2) Take the photograph(s).
3) Paste the photograph(s) into the email which was generate when the add photo
button was selected - limited by the capacity of the email server.
4) The email address and subject is pre-populated in the email. Send the email.
How to view the photos in SPM Assets
Chapter 6 Uploading Work Order Photographs to SPM Assets 81
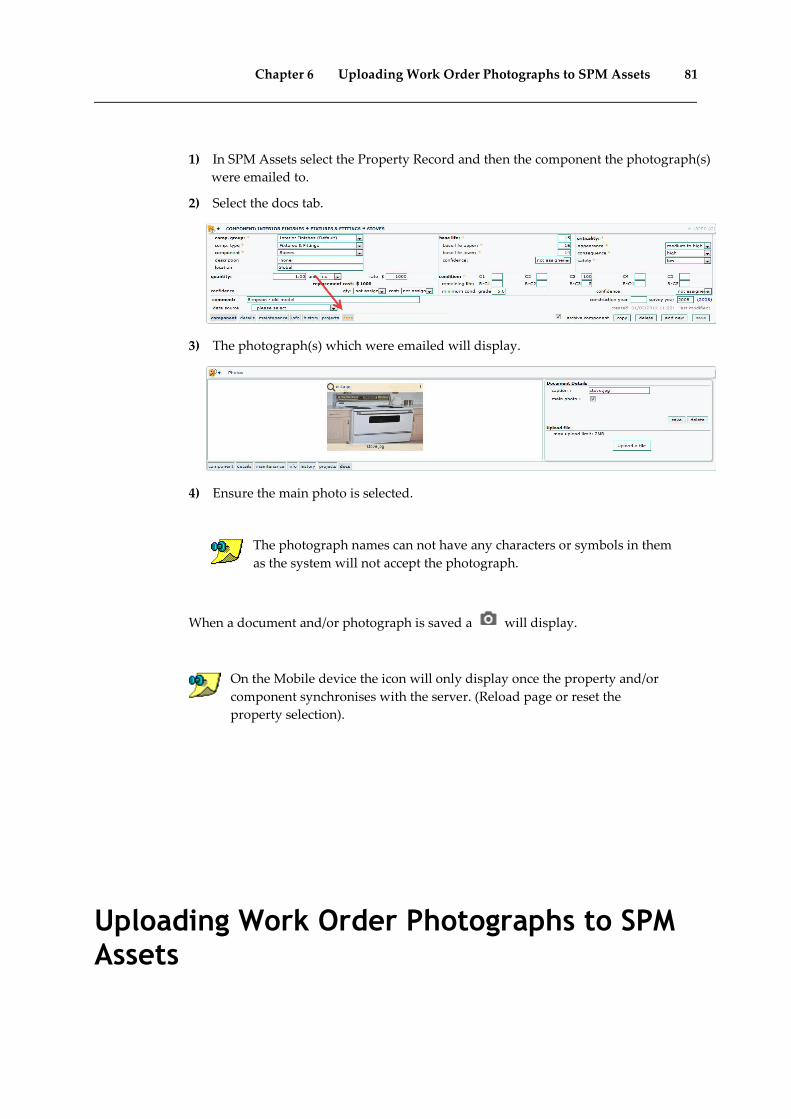
1) In SPM Assets select the Property Record and then the component the photograph(s)
were emailed to.
2) Select the docs tab.
3) The photograph(s) which were emailed will display.
4) Ensure the main photo is selected.
The photograph names can not have any characters or symbols in them
as the system will not accept the photograph.
When a document and/or photograph is saved a will display.
On the Mobile device the icon will only display once the property and/or
component synchronises with the server. (Reload page or reset the
property selection).
Uploading Work Order Photographs to SPM Assets
82 SPM Mobile User Guide
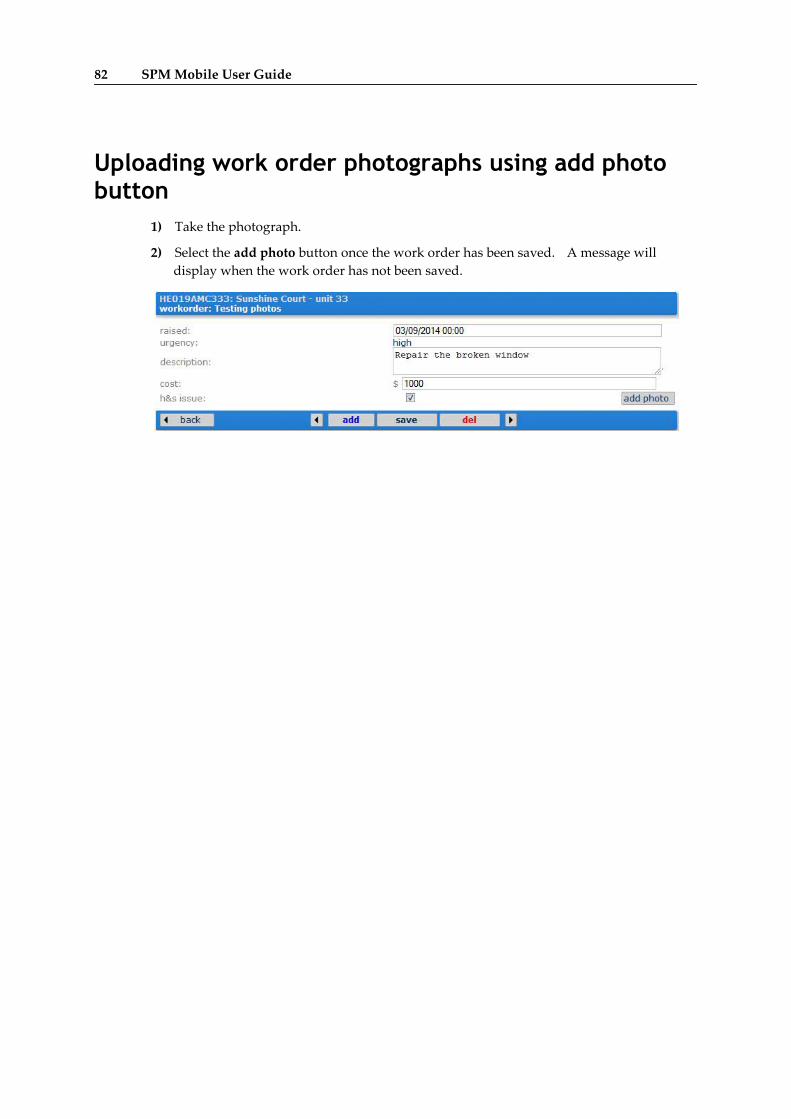
Uploading work order photographs using add photo button
1) Take the photograph.
2) Select the add photo button once the work order has been saved. A message will
display when the work order has not been saved.
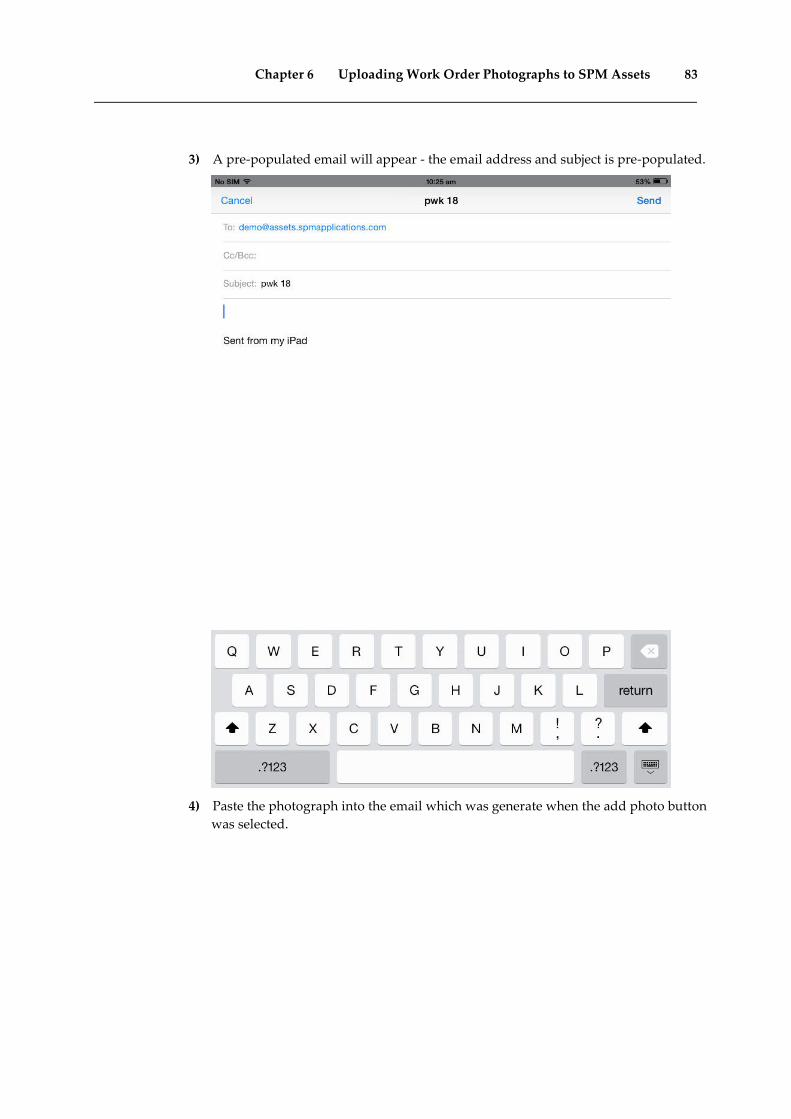
Chapter 6 Uploading Work Order Photographs to SPM Assets 83
3) A pre-populated email will appear - the email address and subject is pre-populated.
4) Paste the photograph into the email which was generate when the add photo button
was selected.
84 SPM Mobile User Guide
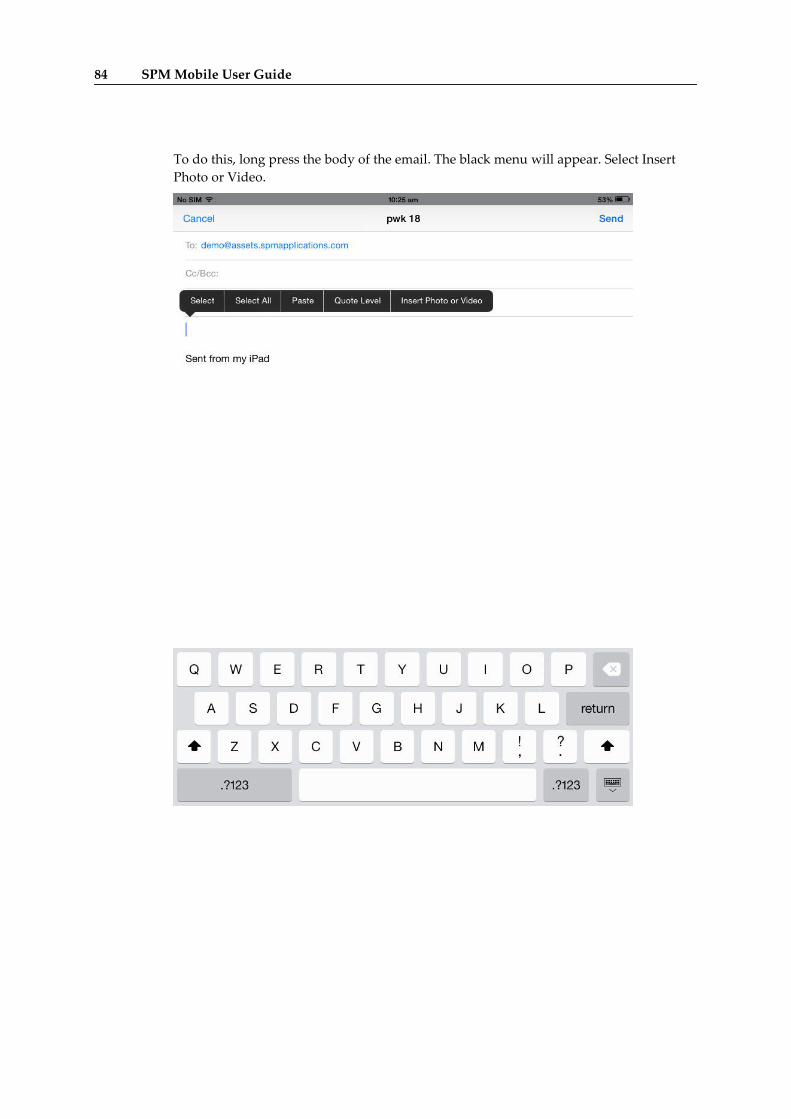
To do this, long press the body of the email. The black menu will appear. Select Insert
Photo or Video.
Chapter 6 Uploading Work Order Photographs to SPM Assets 85
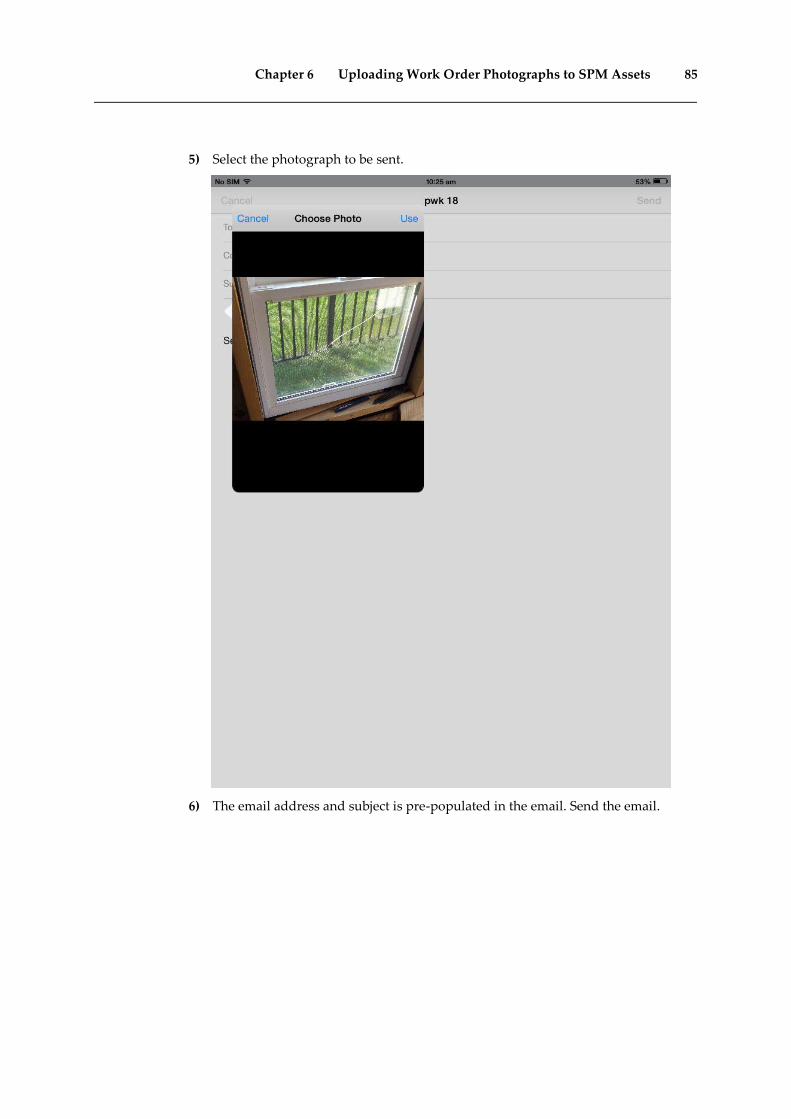
5) Select the photograph to be sent.
6) The email address and subject is pre-populated in the email. Send the email.
86 SPM Mobile User Guide
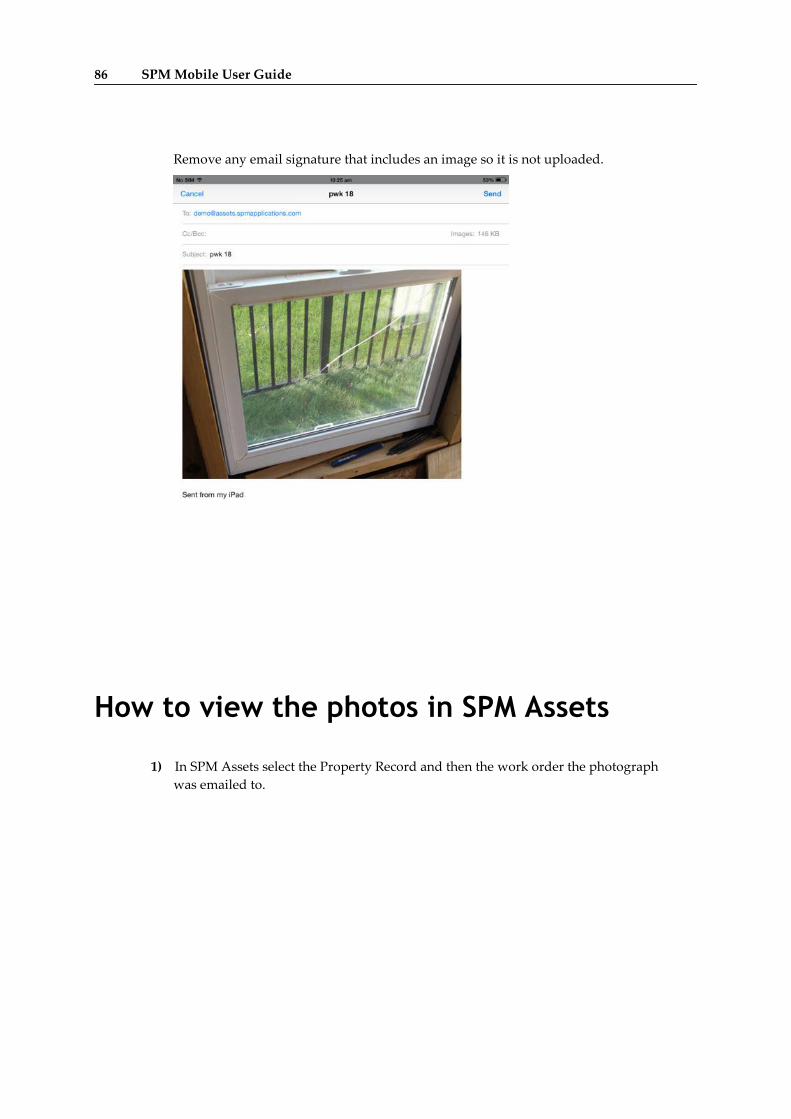
Remove any email signature that includes an image so it is not uploaded.
1) In SPM Assets select the Property Record and then the work order the photograph
was emailed to.
How to view the photos in SPM Assets
Chapter 6 How to view the photos in SPM Assets 87
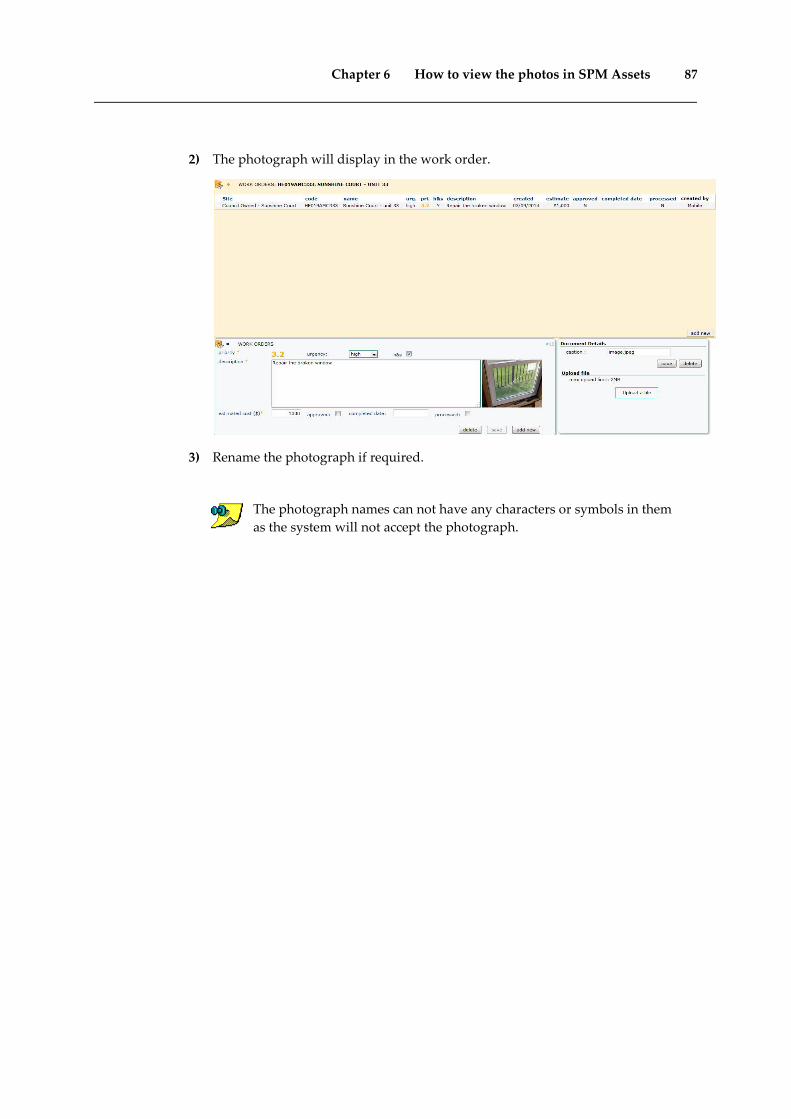
2) The photograph will display in the work order.
3) Rename the photograph if required.
The photograph names can not have any characters or symbols in them
as the system will not accept the photograph.
88 SPM Mobile User Guide
There are a few rules to ensure the mobile surveying process runs smoothly, particularly
if there are "live" connection issues.
Ideally, each property record should be saved immediately after the room is completed,
however, if it is likely that the property being surveyed is outside mobile coverage,
follow this process:-
1. Whilst in the coverage area, connect as per normal, upload the property records to be
surveyed and highlight at least one property.
2. Return to iPad front page and select Settings, switch Airplane mode (top left hand) to
ON which will turn off the 3G.
3. Return to front page, click Safari, this should return the screen to the page of selected
properties.
4. Complete the selected out of range surveys and then go back to wherever mobile
coverage operates.
5. Return to settings and switch AIRLINE mode OFF.
6. Return to Safari, ensure coverage is in operation, reconnect, and logon, follow the
prompts, and save the property survey data.
Chapter 7
Trouble Shooting
Chapter 7 Trouble Shooting 89
Only save if the surveyor is 100% confident that the iPad is connected – the status is
visible on the top left of the screen – save WITHOUT connection will lose the data.
It is possible that several hours surveying may be completed in this mode and thereby
avoid ‘time-out’ issues.
If ‘Save’ is selected before turning ‘Airplane Mode’ to ‘Off’, it will appear
as though the normal process is taking place, however, it will just keep
looping and not save.
The collected survey data is being held within the page opened in the web browser. This
data will be available as long the web browser keeps pointing to and displaying the SPM
Mobile pages. To avoid browsing away from the page, by accident, a dialog is raised to
confirm this action.
The browser can be left holding the collected data, as long the mobile pages remain the
active page in the browser.
In this way the device can be used at places where there is no direct wireless network
coverage.
Although not necessary, we recommend that save should be used a much as possible to
minimise risk of data loss and to shorten server processing time.
In case of an 'emergency' (data can not be saved to server for some kind of reason):
If you are not in 3G coverage area or have a bad connection you can email the survey
results.
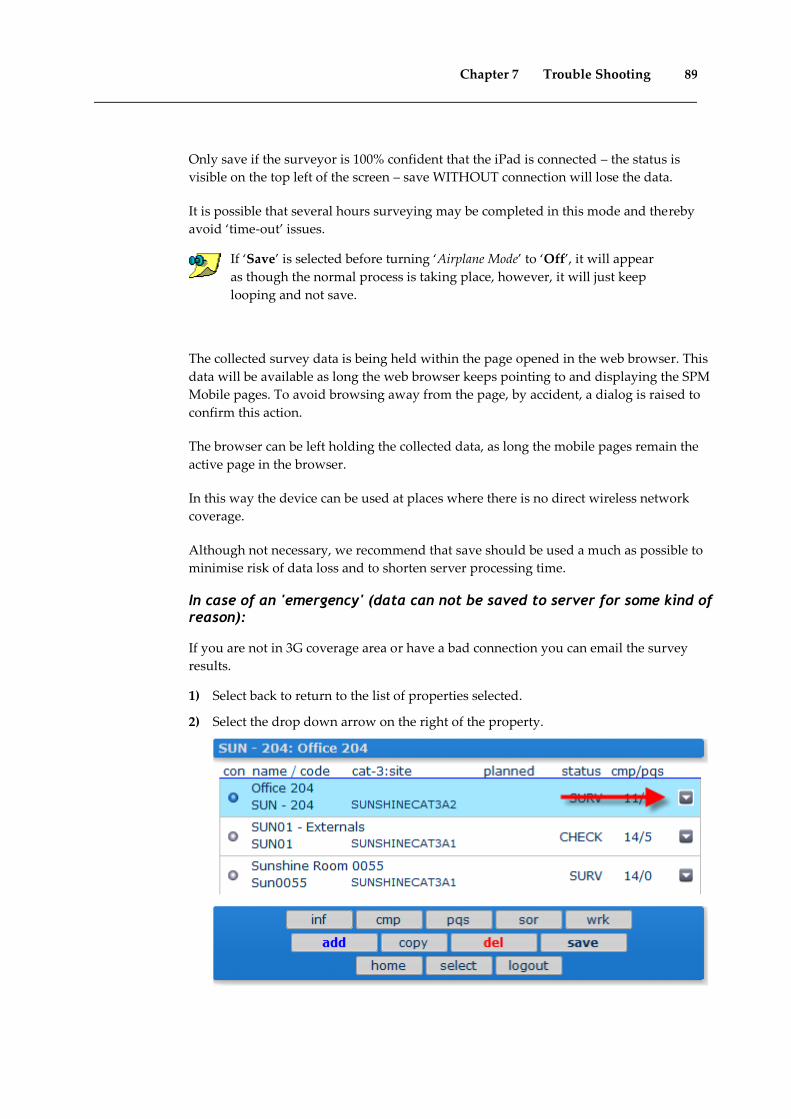
1) Select back to return to the list of properties selected.
2) Select the drop down arrow on the right of the property.

90 SPM Mobile User Guide
The following Survey Validation screen will appear.
3) Select mail.
A pre-populated email will pop up.
Ensure a valid email account is set up on the device. If not, the device will prompt
for one to be created.
4) Select mail.
When the device has network coverage it will send the email to the SPM Assets
server.
Chapter 7 Trouble Shooting 91
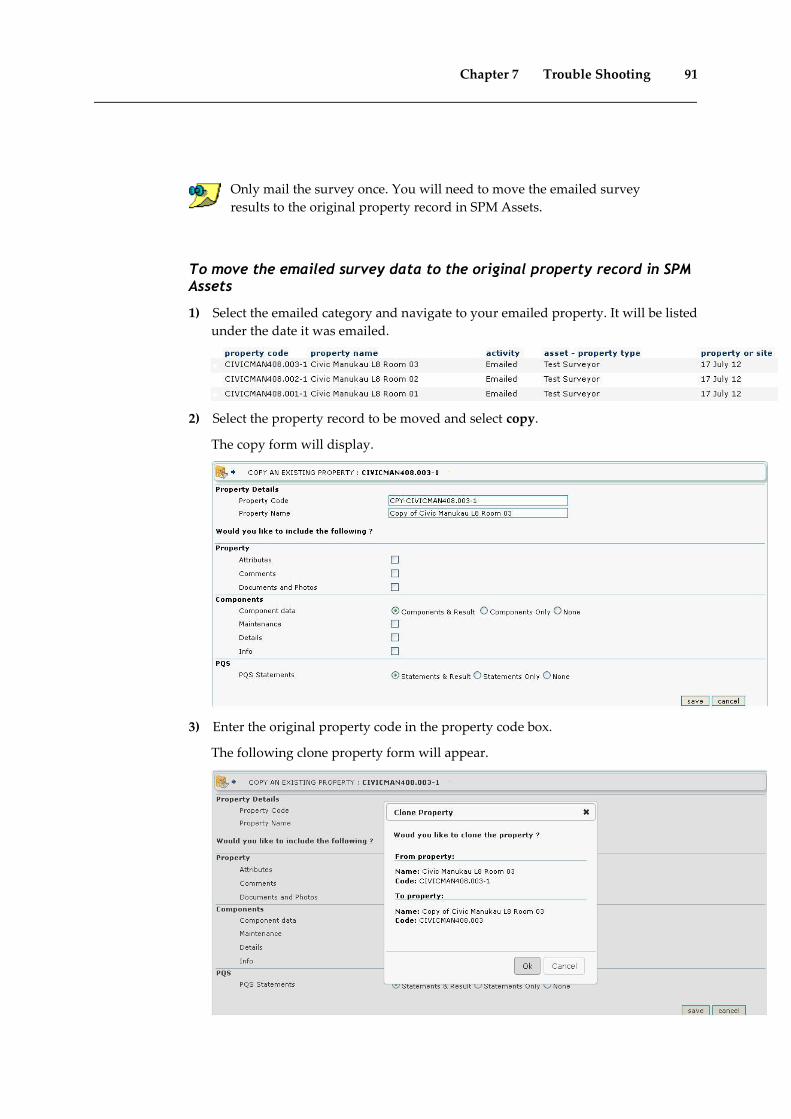
Only mail the survey once. You will need to move the emailed survey
results to the original property record in SPM Assets.
To move the emailed survey data to the original property record in SPM Assets
1) Select the emailed category and navigate to your emailed property. It will be listed
under the date it was emailed.
2) Select the property record to be moved and select copy.
The copy form will display.
3) Enter the original property code in the property code box.
The following clone property form will appear.
92 SPM Mobile User Guide
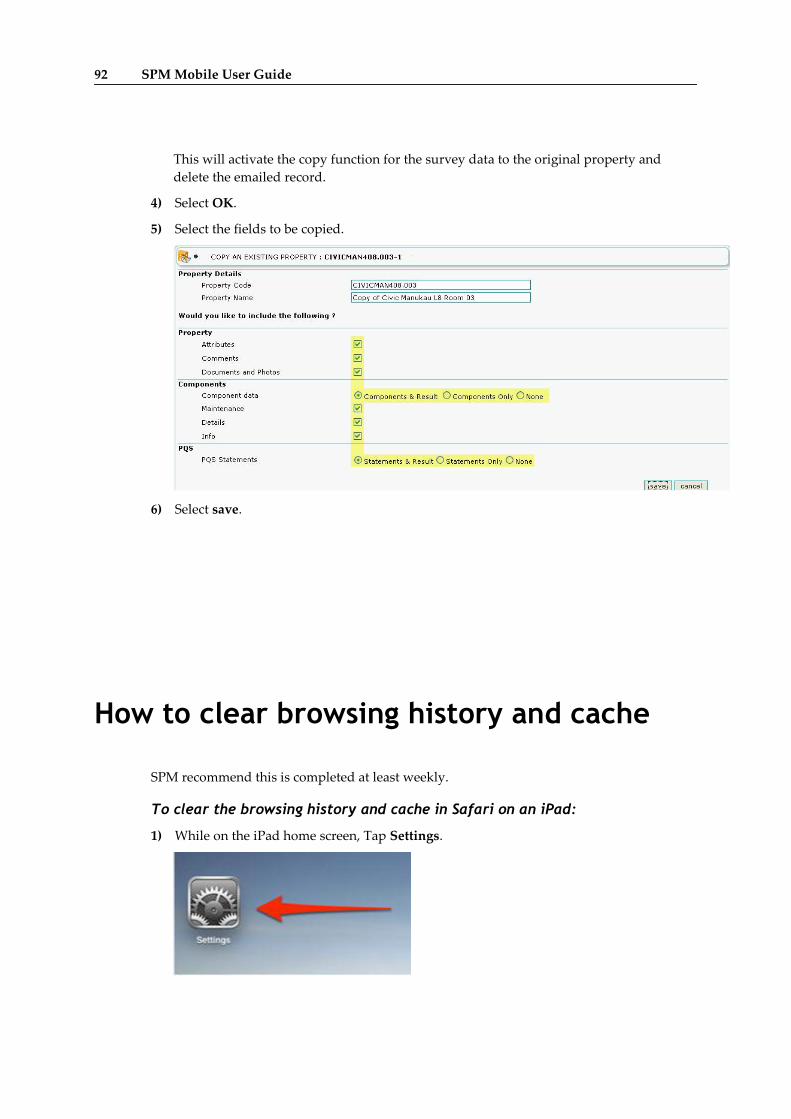
This will activate the copy function for the survey data to the original property and
delete the emailed record.
4) Select OK.
5) Select the fields to be copied.
6) Select save.
SPM recommend this is completed at least weekly.
To clear the browsing history and cache in Safari on an iPad:
1) While on the iPad home screen, Tap Settings.
How to clear browsing history and cache
Chapter 7 How to clear browsing history and cache 93
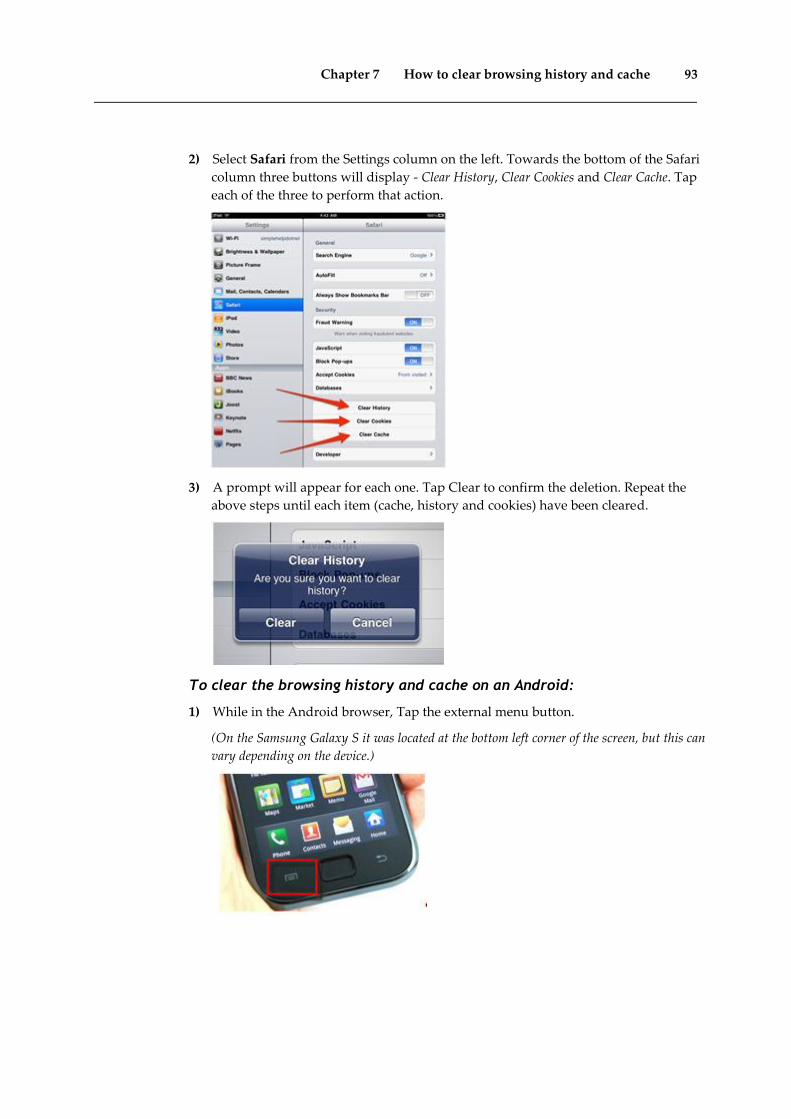
2) Select Safari from the Settings column on the left. Towards the bottom of the Safari
column three buttons will display - Clear History, Clear Cookies and Clear Cache. Tap
each of the three to perform that action.
3) A prompt will appear for each one. Tap Clear to confirm the deletion. Repeat the
above steps until each item (cache, history and cookies) have been cleared.
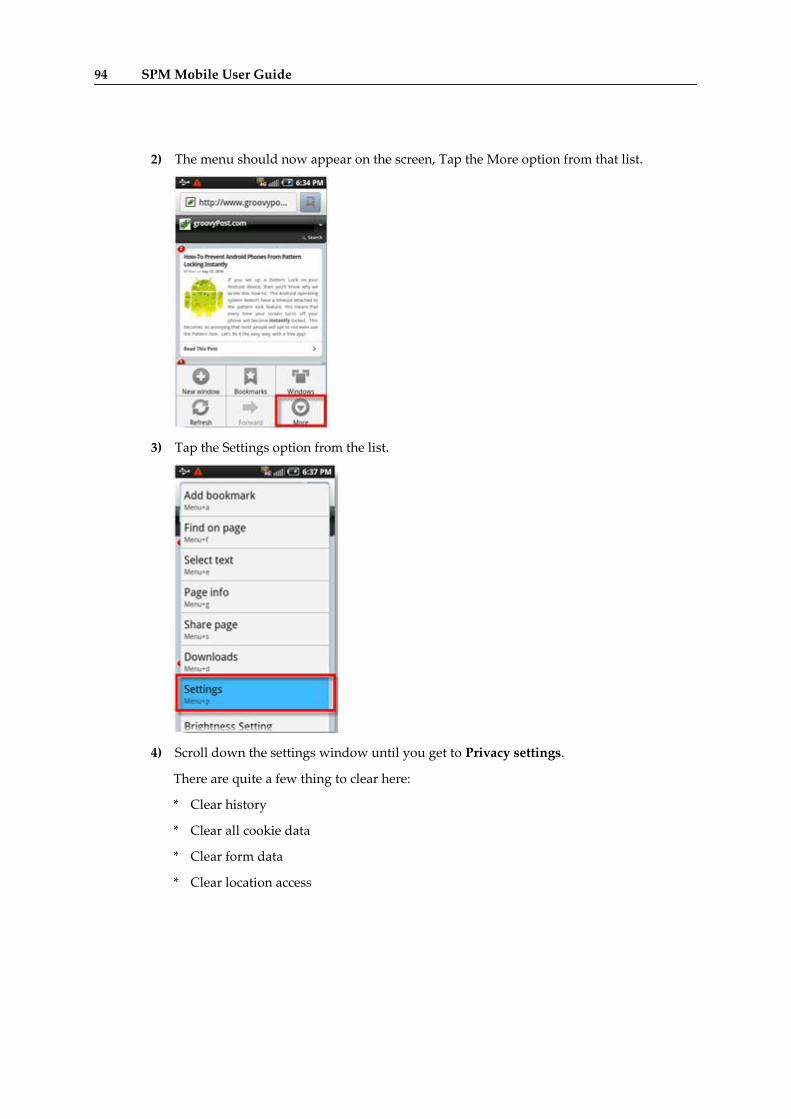
To clear the browsing history and cache on an Android:
1) While in the Android browser, Tap the external menu button.
(On the Samsung Galaxy S it was located at the bottom left corner of the screen, but this can
vary depending on the device.)
94 SPM Mobile User Guide
2) The menu should now appear on the screen, Tap the More option from that list.
3) Tap the Settings option from the list.
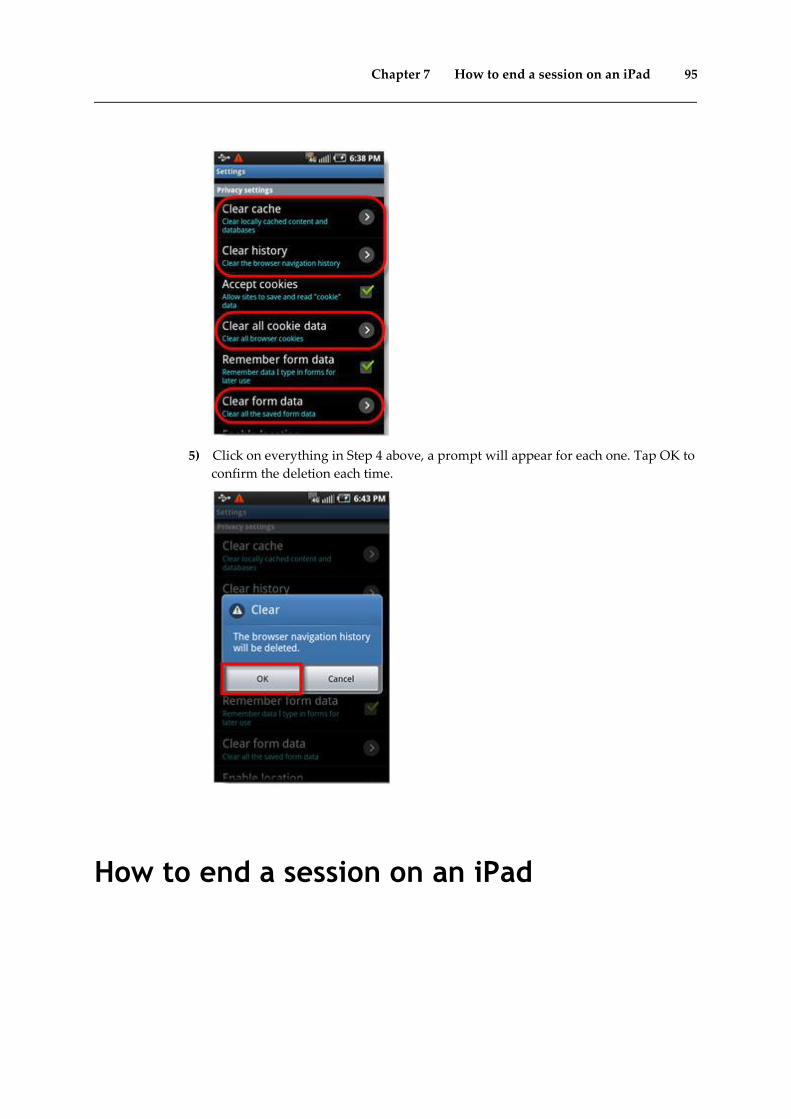
4) Scroll down the settings window until you get to Privacy settings.
There are quite a few thing to clear here:
* Clear history
* Clear all cookie data
* Clear form data
* Clear location access
Chapter 7 How to end a session on an iPad 95
5) Click on everything in Step 4 above, a prompt will appear for each one. Tap OK to
confirm the deletion each time.
How to end a session on an iPad
96 SPM Mobile User Guide
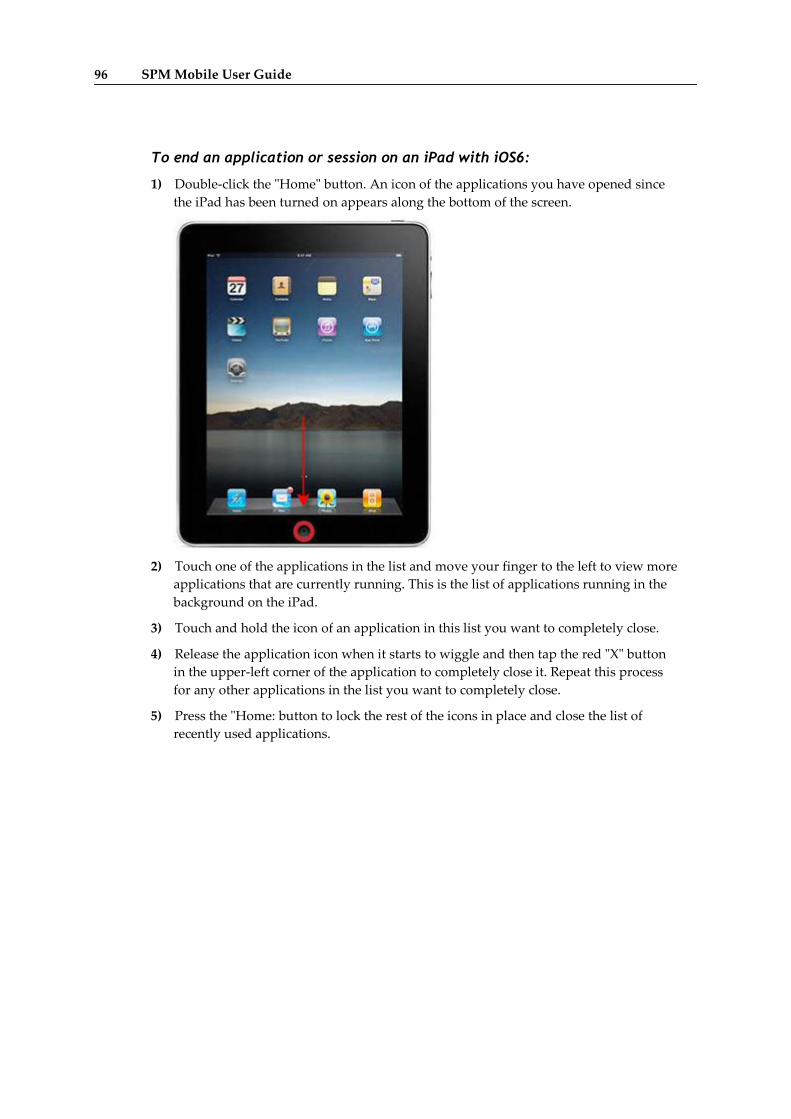
To end an application or session on an iPad with iOS6:
1) Double-click the "Home" button. An icon of the applications you have opened since
the iPad has been turned on appears along the bottom of the screen.
2) Touch one of the applications in the list and move your finger to the left to view more
applications that are currently running. This is the list of applications running in the
background on the iPad.
3) Touch and hold the icon of an application in this list you want to completely close.
4) Release the application icon when it starts to wiggle and then tap the red "X" button
in the upper-left corner of the application to completely close it. Repeat this process
for any other applications in the list you want to completely close.
5) Press the "Home: button to lock the rest of the icons in place and close the list of
recently used applications.
Chapter 7 How to end a session on an iPad 97
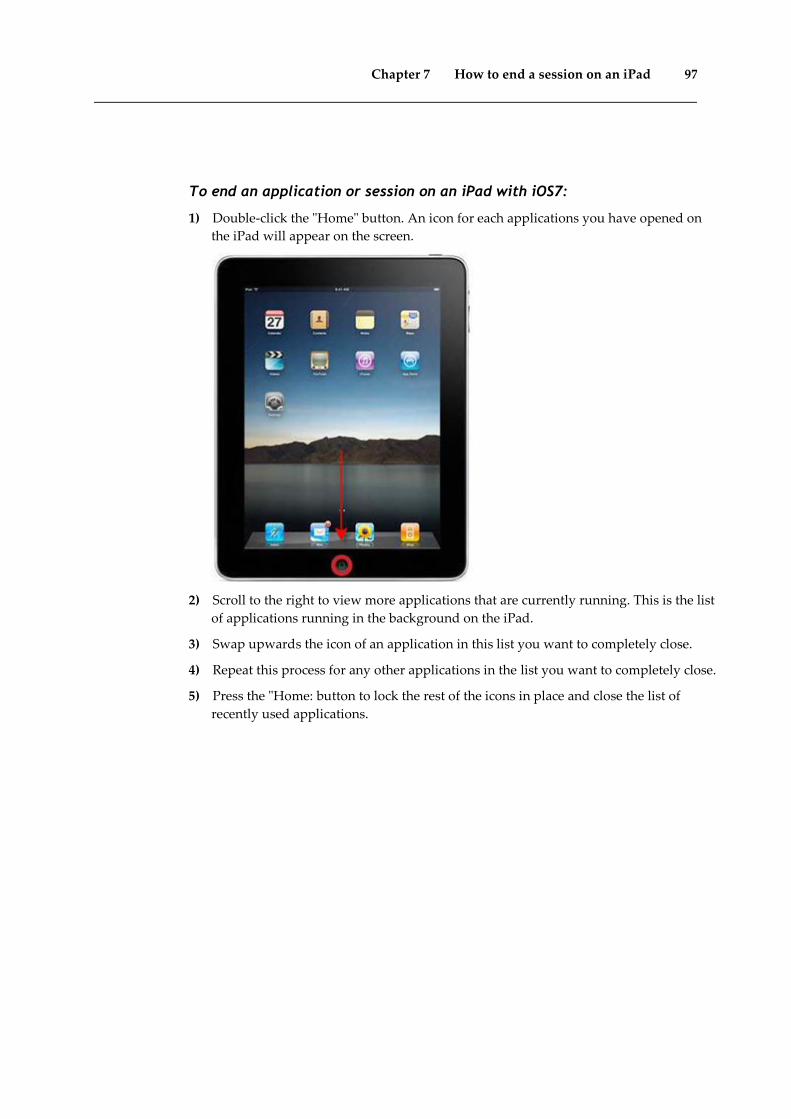
To end an application or session on an iPad with iOS7:
1) Double-click the "Home" button. An icon for each applications you have opened on
the iPad will appear on the screen.
2) Scroll to the right to view more applications that are currently running. This is the list
of applications running in the background on the iPad.
3) Swap upwards the icon of an application in this list you want to completely close.
4) Repeat this process for any other applications in the list you want to completely close.
5) Press the "Home: button to lock the rest of the icons in place and close the list of
recently used applications.
98 SPM Mobile User Guide
What is the url for SPM Mobile?
The url will vary depending on your location. The url for you to use will be provide by
SPM Assets.
Privately owned servers will have their own url. Please check with your SPM Assets
Consultant if you are unsure which url to use.
Do I have to have a separate log in for SPM Mobile?
Yes, you need a different log in for SPM Mobile and SPM Assets.
How many photographs can I email to SPM Assets?
This is dependent on the size of the email server.
How do I turn off Private Browsing on an iPad using iOS7?
When private browsing is turned on the top banner is black instead of blue.
To turn off private browsing on iOS7:
On the Safari screen tap the blue + sign in the top right hand corner to bring up blank
screen. Then tap the main search box at top of screen. The keyboard pops up and the
Private sign in blue is at the top leaf hand corner. Select to turn off.
How do I take a screen shot of your iPad?
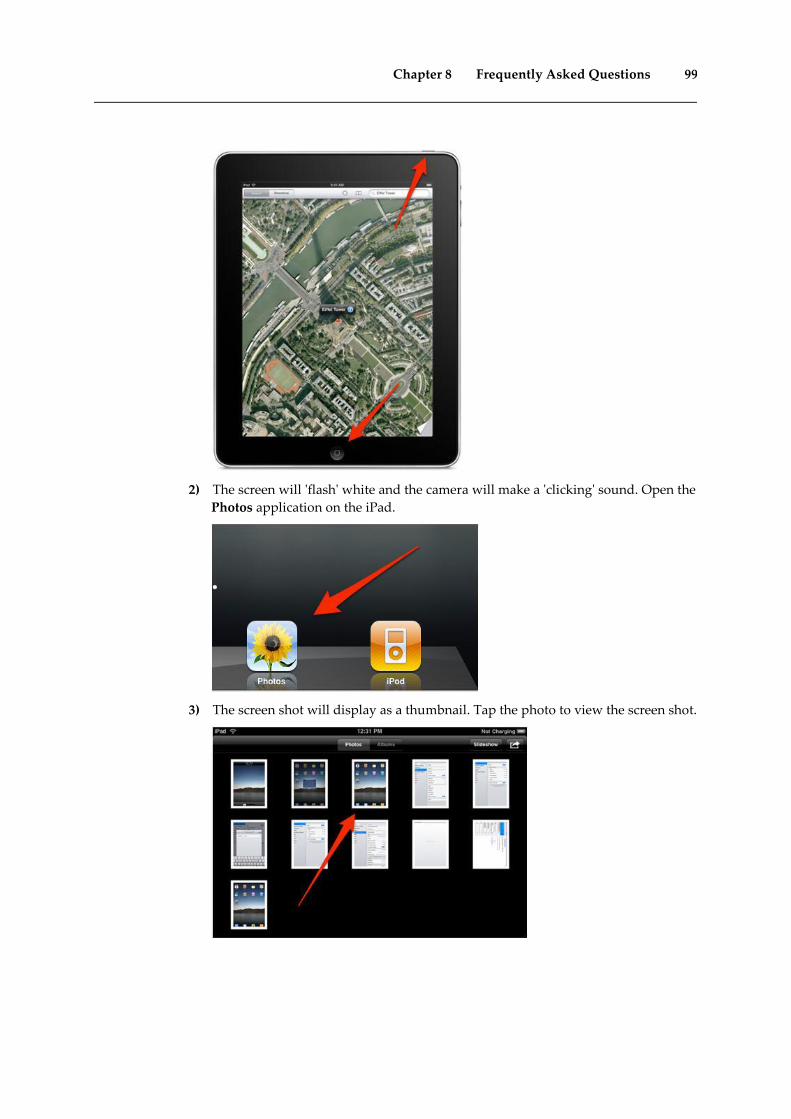
1) Click the power button on the top right corner of the ipad, and while holding it
down, click the "iPad button".
Chapter 8
Frequently Asked Questions
Chapter 8 Frequently Asked Questions 99
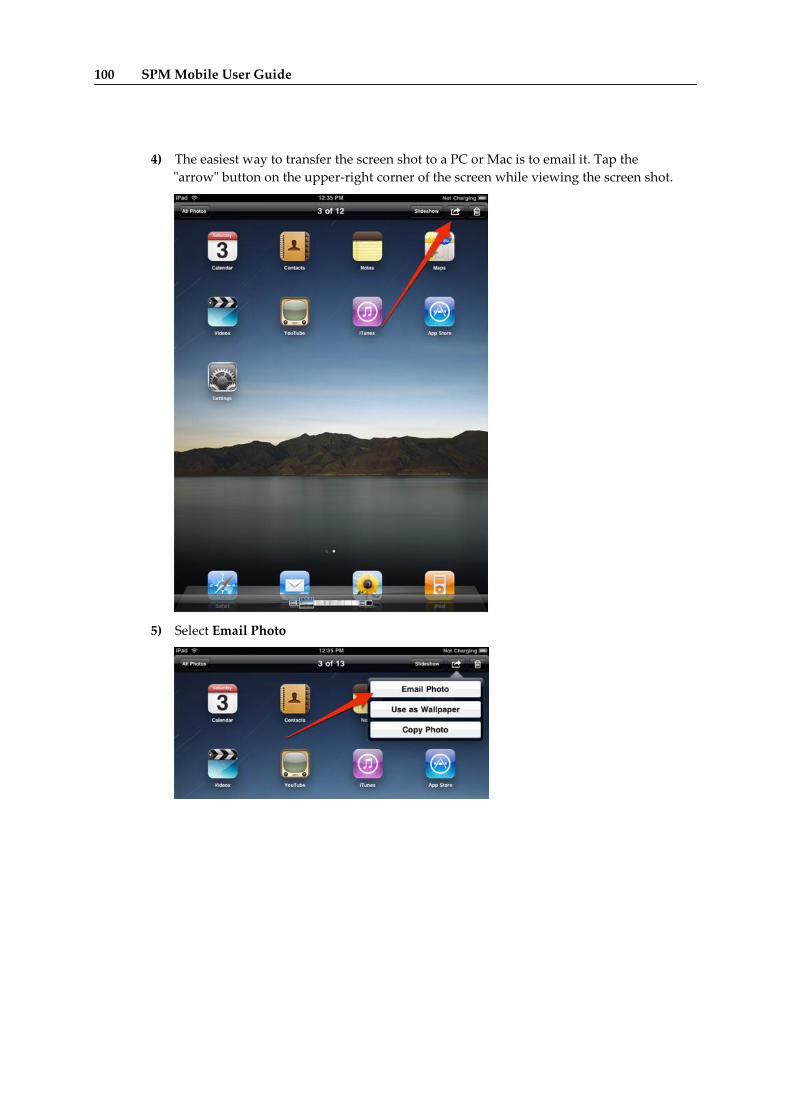
2) The screen will 'flash' white and the camera will make a 'clicking' sound. Open the
Photos application on the iPad.
3) The screen shot will display as a thumbnail. Tap the photo to view the screen shot.
100 SPM Mobile User Guide
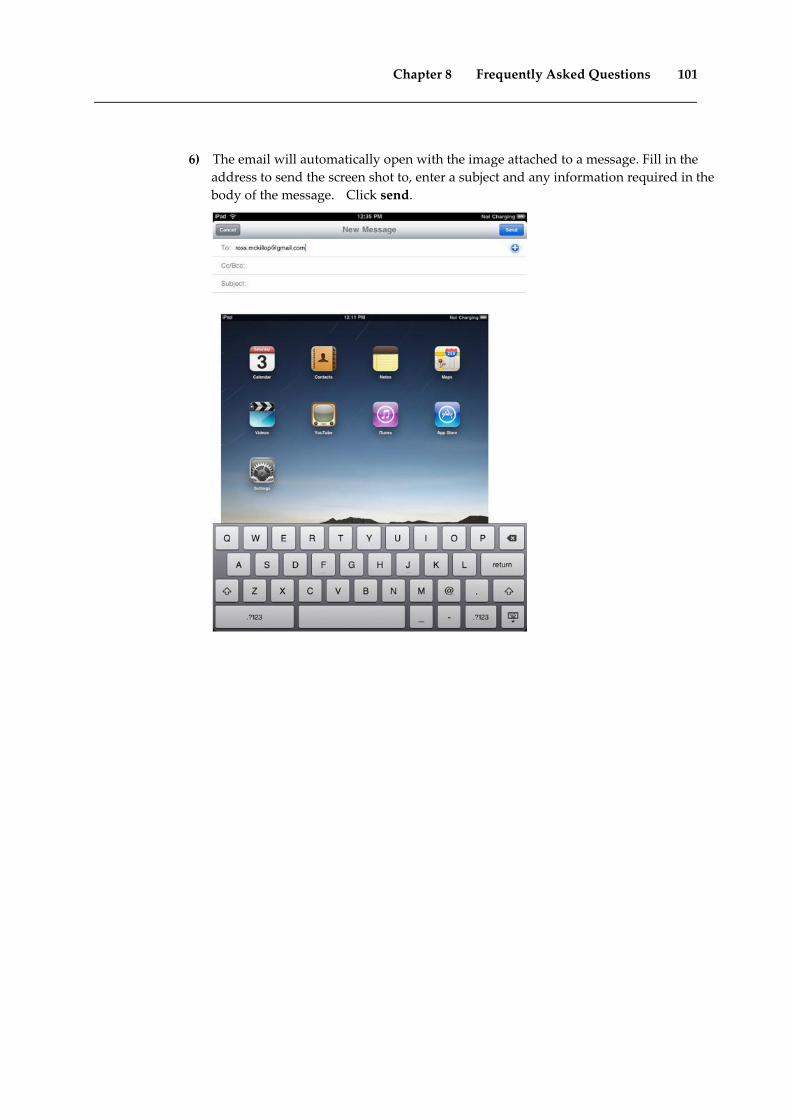
4) The easiest way to transfer the screen shot to a PC or Mac is to email it. Tap the
"arrow" button on the upper-right corner of the screen while viewing the screen shot.
5) Select Email Photo
Chapter 8 Frequently Asked Questions 101
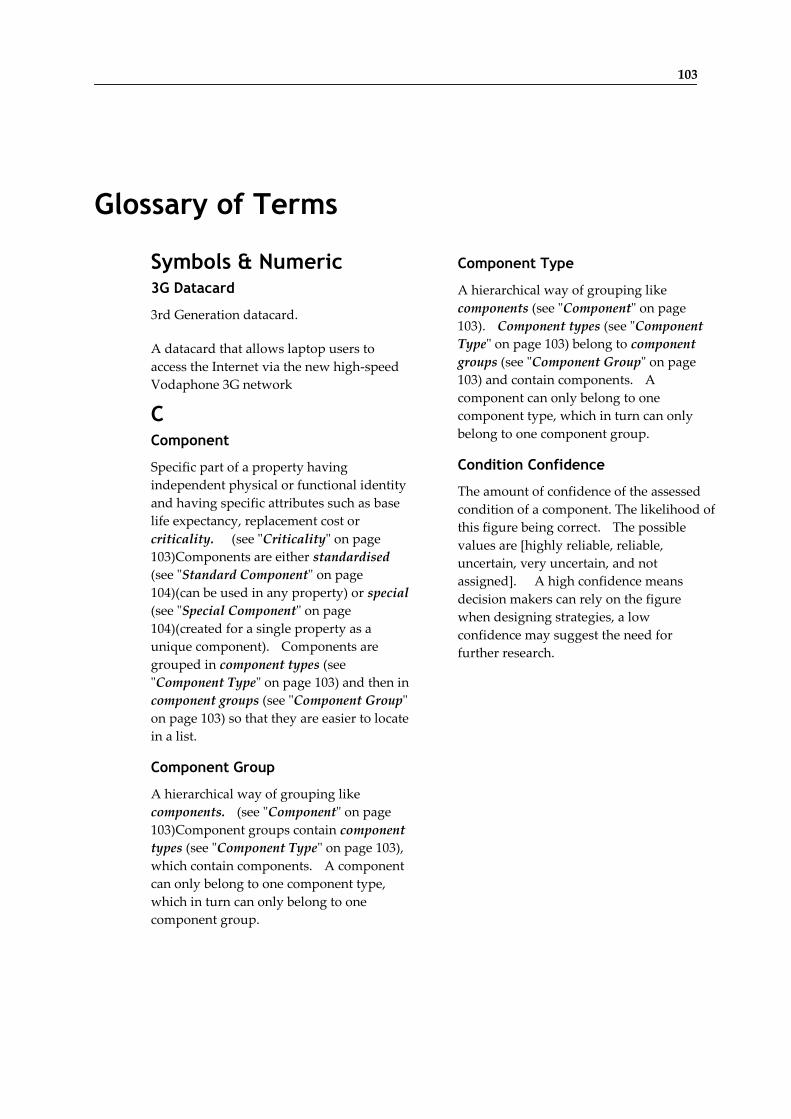
6) The email will automatically open with the image attached to a message. Fill in the
address to send the screen shot to, enter a subject and any information required in the
body of the message. Click send.

103
Symbols & Numeric 3G Datacard
3rd Generation datacard.
A datacard that allows laptop users to
access the Internet via the new high-speed
Vodaphone 3G network
C Component
Specific part of a property having
independent physical or functional identity
and having specific attributes such as base
life expectancy, replacement cost or
criticality. (see "Criticality" on page
103)Components are either standardised
(see "Standard Component" on page
104)(can be used in any property) or special
(see "Special Component" on page
104)(created for a single property as a
unique component). Components are
grouped in component types (see
"Component Type" on page 103) and then in
component groups (see "Component Group"
on page 103) so that they are easier to locate
in a list.
Component Group
A hierarchical way of grouping like
components. (see "Component" on page
103)Component groups contain component
types (see "Component Type" on page 103),
which contain components. A component
can only belong to one component type,
which in turn can only belong to one
component group.
Component Type
A hierarchical way of grouping like
components (see "Component" on page
103). Component types (see "Component
Type" on page 103) belong to component
groups (see "Component Group" on page
103) and contain components. A
component can only belong to one
component type, which in turn can only
belong to one component group.
Condition Confidence
The amount of confidence of the assessed
condition of a component. The likelihood of
this figure being correct. The possible
values are [highly reliable, reliable,
uncertain, very uncertain, and not
assigned]. A high confidence means
decision makers can rely on the figure
when designing strategies, a low
confidence may suggest the need for
further research.
Glossary of Terms
104 SPM Mobile User Guide
Criticality
A series of values that outline the
implications of failure of assets from a
safety, appearance and consequence of
failure perspective.
The possible values are [high, medium to
high, medium, low to medium, and low].
Assets with a high criticality will be
considered more important, and
consequently life cycle (on page
104)schedules will ensure that replacement
occurs before failure. Criticality is a
personal decision to an organisation as
overall objectives will vary. For example,
organisations that prioritise their image
may place a higher criticality on the
appearance of some assets than other
organisations do.
D Data Source
The source of the latest component
condition information, for example from a
survey, report from a tenant, or invoice
information.
G Global Positioning System (GPS)
GPS uses satellite signals to track the
location or position of vehicles or vessels on
earth
L Life Cycle
An analysis based on the principle that
assets have an expected useful life, after
which they will need to be replaced. This
cycle repeats on a predictable schedule
which can be calculated using base life,
criticality, condition and minimum
condition grade.
P Property Code
An abbreviation of the property name or
some other code which is unique to the
property.
Property Quality Standards
A method of testing the performance of a
property against pre-defined standards or
levels of service to see if a property meets
expectations. Examples of standards
include the presence of latches on windows
and the presence of smoke detectors. A
series of questions are answered for each
property, which identifies it's compliance to
the desired standard. The cost to bring a
property up to a desired standard can then
be calculated.
R Remaining Life
The time remaining until an asset ceases to
provide the required level of
service/usefulness. It should be noted that
often assets become obsolete to
organizations before their physical life is
ended. Remaining life is a calculated
value based on base life, condition grades
and criticality (on page 103)factors unless
an assessed remaining life of 3 years or less
has been entered by the user in which case
the assessed value will be used.
S Special Component
A component that is uniquely set up for a
specific property. The component
attributes such as base life and cost per unit
to replace need to be identified when the
special component is created.
Specialised Component Cost
The sum total of all special component (on
page 104) replacement costs in a property.
Glossary of Terms 105
Standard Component
A component which is defined in the
building component guidelines. The
component attributes such as base life and
cost per unit to replace are identified in the
references section of the database and will
be used as a default whenever a standard
component is added to a property.
Survey
A field investigation to record the current
quanties, condition grades and quality
standards of selected property assets.
W Work Order
A request for maintenance that needs to be
completed on a specific property. This
need is generally discovered during a
survey of the property and is not the same
as routine ongoing maintenance.


107
3
3G Datacard ........................................... 103
A
Add Component Details ........................... 39
Add new Components .............................. 23
Add new Components using a template ... 28
Add new Property Record ........................ 16
C
Component ............................................. 103
Component Attribute Fields ..................... 34
Component Group .................................. 103
Component Type .................................... 103
Condition Confidence ............................ 103
Copying a Property Record ...................... 18
Criticality ....................................... 103, 104
D
Data Source ............................................ 104
Deleting a Component Record ................. 44
Deleting a Property Record ...................... 20
E
Edit/Add Component Data ....................... 33
Edit/Add Component Information ........... 38
Essential Services (ESS) .......................... 59
F
Frequently Asked Questions .................... 98
G
Getting Started ........................................... 5
Global Positioning System (GPS) .......... 104
H
How to clear browsing history and cache 92
How to end a session on an iPad .............. 95
I
Information Fields .................................... 14
K
Key Principles ............................................ 2
L
Life Cycle ...............................................104
M
Mobile Introduction ....................................1
P
Process Overview .......................................4
Property Code .........................................104
Property Menu ..........................................13
Property Quality Standard Questions .......54
Property Quality Standards ....................104
Property Selection ......................................9
R
Remaining Life .......................................104
Resizing images on an iPad ......................74
S
Saving a Component Record ....................42
Saving a Property Record .........................22
Schedule of Rates (SOR) ..........................56
Searching for Component Barcodes .........50
Selecting a Property ..................................16
Special Component......................... 103, 104
Specialised Component Cost ..................104
SPM Mobile Interface ................................7
SPM Mobile Login Process ........................5
SPM Mobile News .....................................6
Standard Component ...................... 103, 105
Status Indicators .......................................52
Survey .....................................................105
Survey Planner ...........................................8
Survey Validation .....................................63
System Requirements .................................2
T
Trouble Shooting ......................................88
Typographical Conventions .......................3
U
Uploading Component Photographs to SPM
Assets ....................................................77
Uploading Property Photographs to SPM
Assets ....................................................71
Index

108 Index
Uploading Work Order Photographs to
SPM Assets .......................................... 81
Using SPM Mobile .................................... 8
Using the Component Calculator ............. 37
W
Work Order ............................................ 105
Work Orders............................................. 61


![[Spm] Presentasi 2 Juknis Spm](https://img.pdfslide.net/doc/110x75/5571fe3f49795991699af645/spm-presentasi-2-juknis-spm.jpg)
