Embed Size (px)
Citation preview
aaaaimsimsimsims sql server sql server sql server sql server
installationinstallationinstallationinstallation guideguideguideguide
Document Version: 4000 February 2015
Page 2 of 20
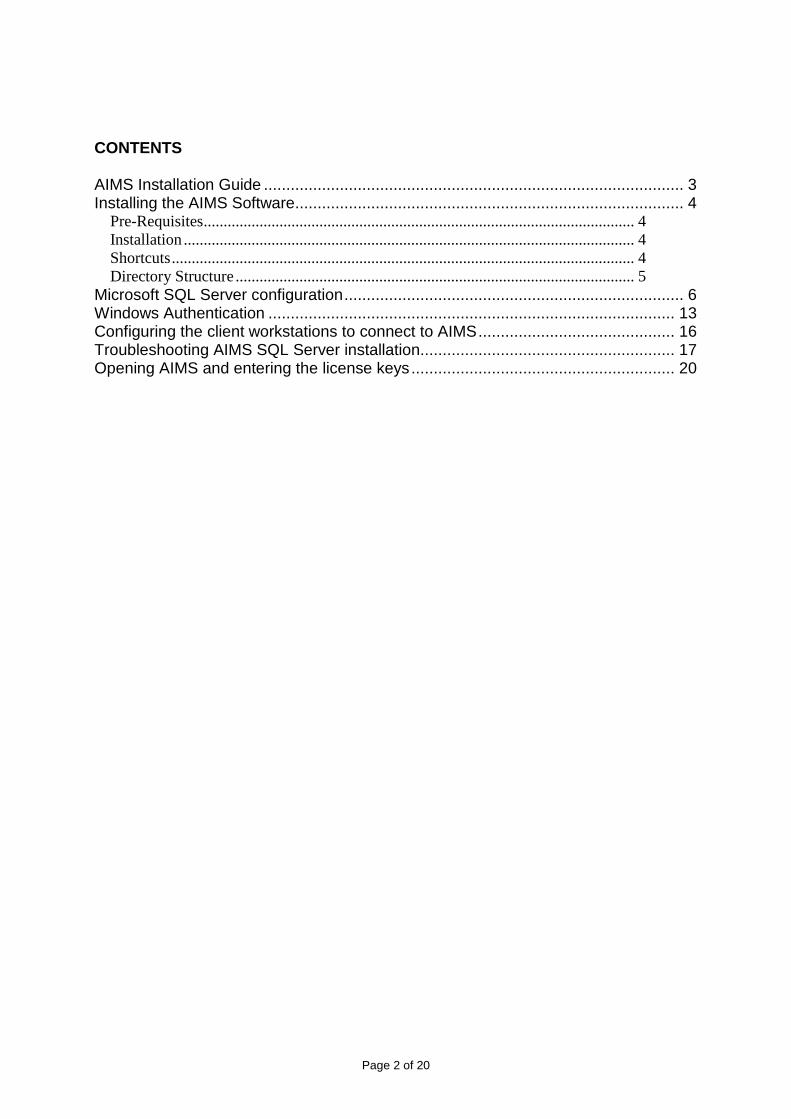
CONTENTS AIMS Installation Guide .............................................................................................. 3
Installing the AIMS Software....................................................................................... 4
Pre-Requisites ............................................................................................................ 4
Installation ................................................................................................................. 4
Shortcuts .................................................................................................................... 4
Directory Structure .................................................................................................... 5
Microsoft SQL Server configuration ............................................................................ 6
Windows Authentication ........................................................................................... 13
Configuring the client workstations to connect to AIMS ............................................ 16
Troubleshooting AIMS SQL Server installation ......................................................... 17
Opening AIMS and entering the license keys ........................................................... 20
AIMS Installation Guide
Page 3 of 20
AIMS Installation Guide The SQL Server version of AIMS requires the installation of Microsoft SQL Server 2000, 2005, 2008, 2012 or 2014. The SQL Server version will be more stable than AIMS Access in a networked environment with heavy usage (more than 15 users needing access to the database at the same time), and / or where AIMS needs to be accessed over a Wide Area Network (e.g. from other offices).
PLEASE READ THE CONFIGURATION GUIDE CAREFULLY AFTER YOU
INSTALL THE SOFTWARE
AIMS is a complex case management database. To make best use of it, there are several configuration issues to consider before you start entering data.
Make sure you use the AIMS installer shown on your licence certificate. The licence number on the certificate will not activate any other version of the software.
Supported Networks AIMS requires an “always on” network connection, and for this reason, peer-to-peer, wireless, or any other network setup that provides only intermittent connectivity is not supported. The AIMS Team do not provide support for any technical issues relating to networking, we are only able to provide support for AIMS users in their day-to-day usage of AIMS i.e. on how to do things within AIMS. Please refer to the AIMS support contract for more information. If you are not sure your network is suitable for AIMS, please contact either by email at [email protected] or by telephone on 020 7377 2806.

AIMS Installation Guide
Page 4 of 20
Installing the AIMS Software Pre-Requisites You must have Microsoft SQL Server installed and running, before your run the AIMS installation. The person running the installation should have administrator privileges in SQL Server. For more information, see the section headed Microsoft SQL Server configuration for more information. Installation To install the AIMS software, simply download the AIMS Installer and run it, following the on-screen instructions. The AIMS server installation routine performs the following tasks:
• Connects to the Microsoft SQL Server • Creates the AIMS database • Creates the AIMS.ini file • Creates the AIMS Admin user • Installs the AIMS application AIMS.exe
By default, the AIMS software will be installed in C:\Program Files\AIMS, you may wish to change this location. AIMS users will need access to the installation directory, in order to be able to run the software and see the documentation. Shortcuts The installation will place an AIMS icon on your desktop, to launch the software, and it will create shortcuts will be installed on the start menu, in a folder called AIMS.
Figure 1: Start Menu Shortcuts AIMS – Use this link to launch the AIMS software. AIMS Configuration Guide – This guide leads you through the process of configuring the software, helping you decide which options are best for your organisation. AIMS Documentation – This link takes you to where the AIMS documentation is stored on disk.
AIMS Installation Guide
Page 5 of 20
AIMS Help – This link opens the full AIMS help guide. You can also open this guide from within the software using the Help menu, or by pressing the F1 key. You will probably want to copy these shortcuts on all the AIMS client machines. Directory Structure The installation creates a number of folders within the location you specified during the installation process. By default, in C:\Program Files\AIMS.
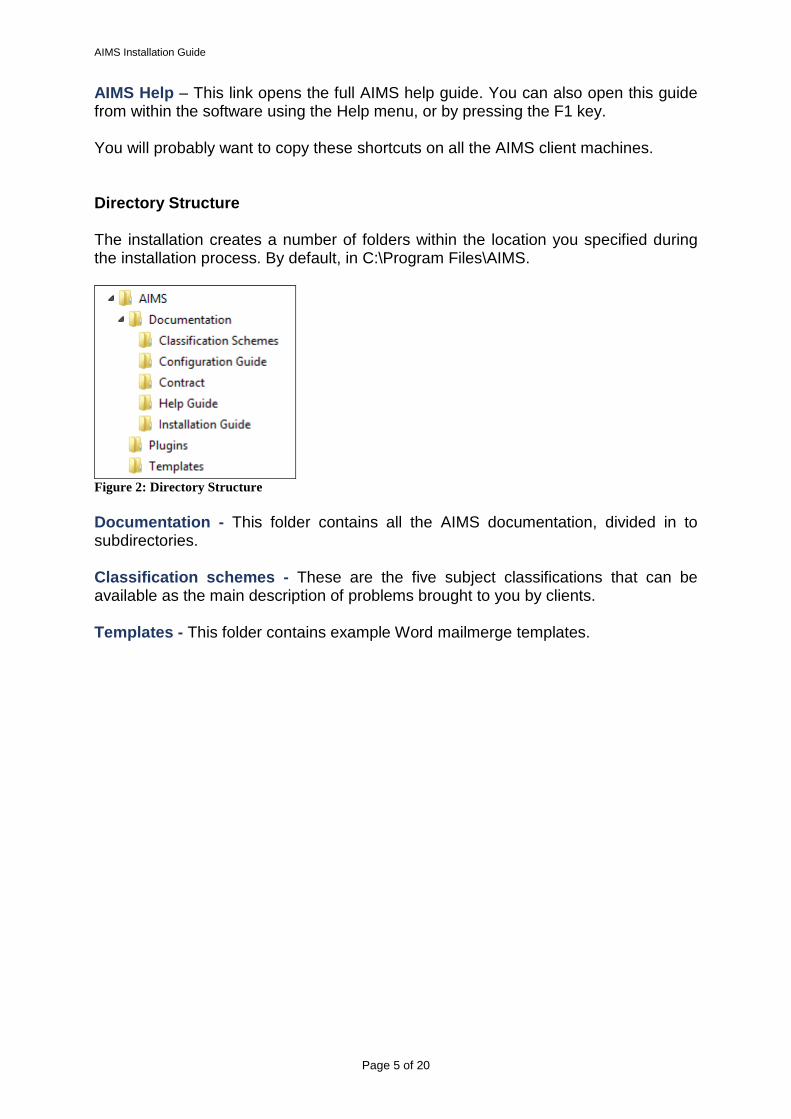
Figure 2: Directory Structure Documentation - This folder contains all the AIMS documentation, divided in to subdirectories. Classification schemes - These are the five subject classifications that can be available as the main description of problems brought to you by clients. Templates - This folder contains example Word mailmerge templates.
Page 6 of 20
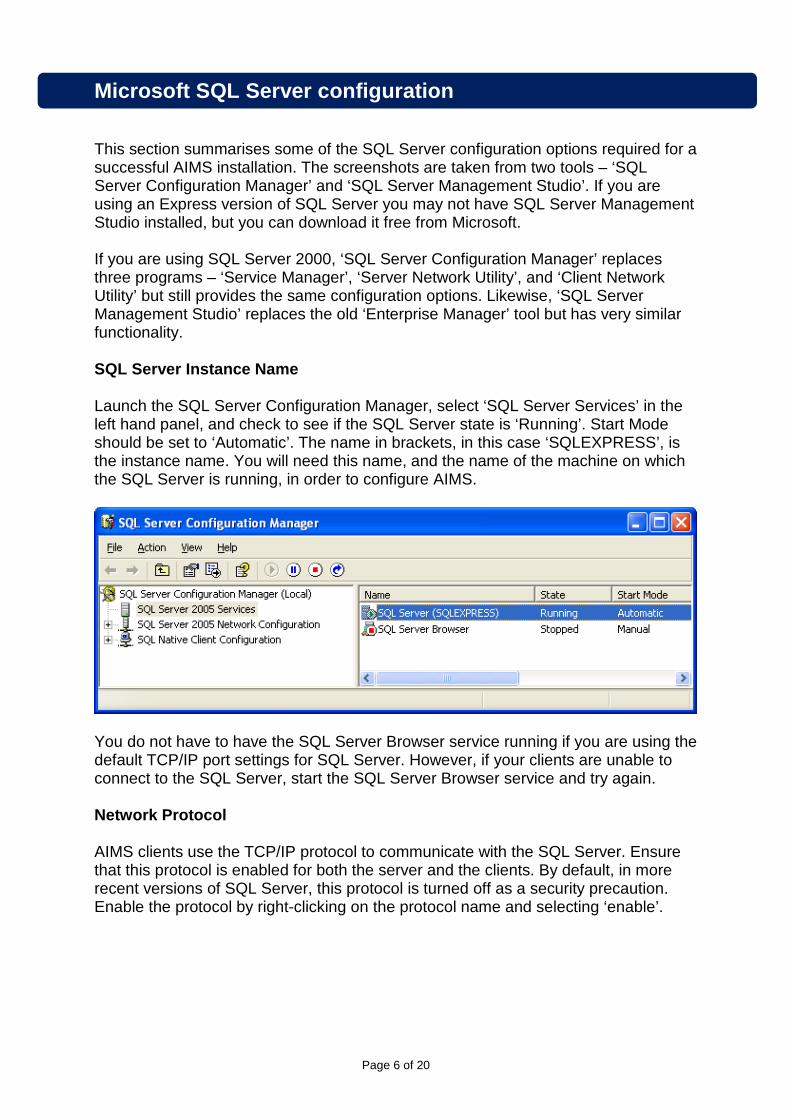
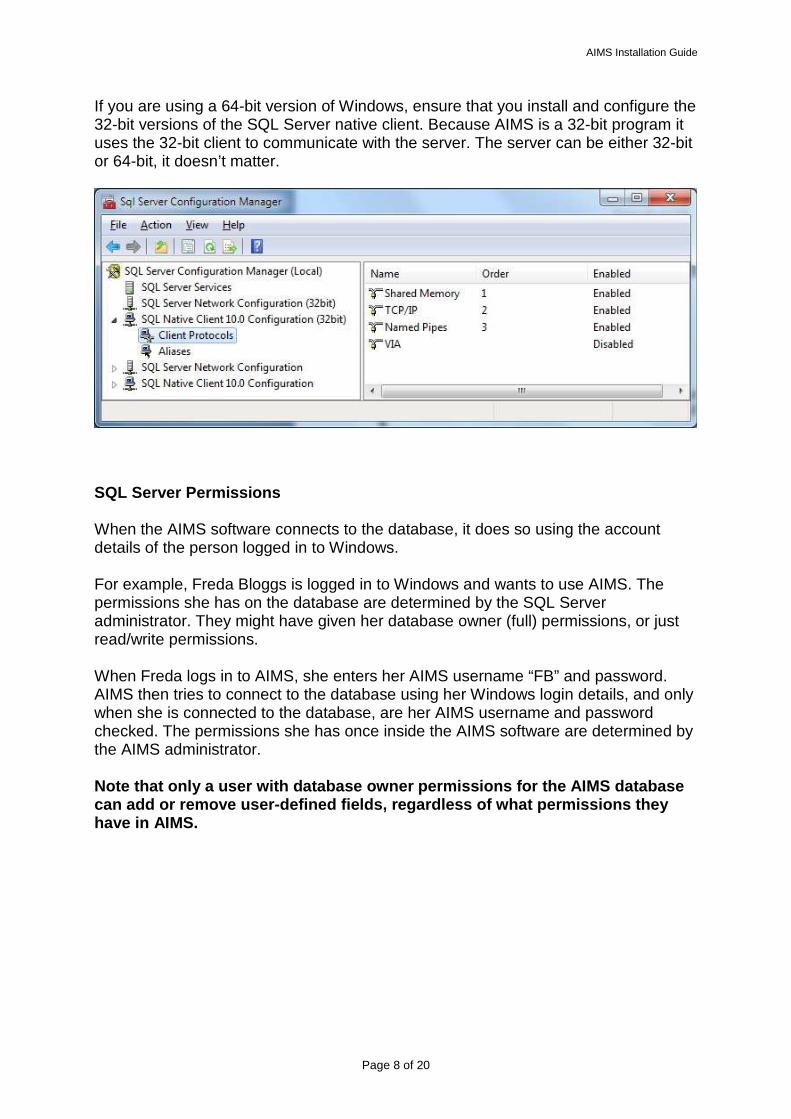
Microsoft SQL Server configuration This section summarises some of the SQL Server configuration options required for a successful AIMS installation. The screenshots are taken from two tools – ‘SQL Server Configuration Manager’ and ‘SQL Server Management Studio’. If you are using an Express version of SQL Server you may not have SQL Server Management Studio installed, but you can download it free from Microsoft. If you are using SQL Server 2000, ‘SQL Server Configuration Manager’ replaces three programs – ‘Service Manager’, ‘Server Network Utility’, and ‘Client Network Utility’ but still provides the same configuration options. Likewise, ‘SQL Server Management Studio’ replaces the old ‘Enterprise Manager’ tool but has very similar functionality. SQL Server Instance Name Launch the SQL Server Configuration Manager, select ‘SQL Server Services’ in the left hand panel, and check to see if the SQL Server state is ‘Running’. Start Mode should be set to ‘Automatic’. The name in brackets, in this case ‘SQLEXPRESS’, is the instance name. You will need this name, and the name of the machine on which the SQL Server is running, in order to configure AIMS.
You do not have to have the SQL Server Browser service running if you are using the default TCP/IP port settings for SQL Server. However, if your clients are unable to connect to the SQL Server, start the SQL Server Browser service and try again. Network Protocol AIMS clients use the TCP/IP protocol to communicate with the SQL Server. Ensure that this protocol is enabled for both the server and the clients. By default, in more recent versions of SQL Server, this protocol is turned off as a security precaution. Enable the protocol by right-clicking on the protocol name and selecting ‘enable’.
AIMS Installation Guide
Page 7 of 20
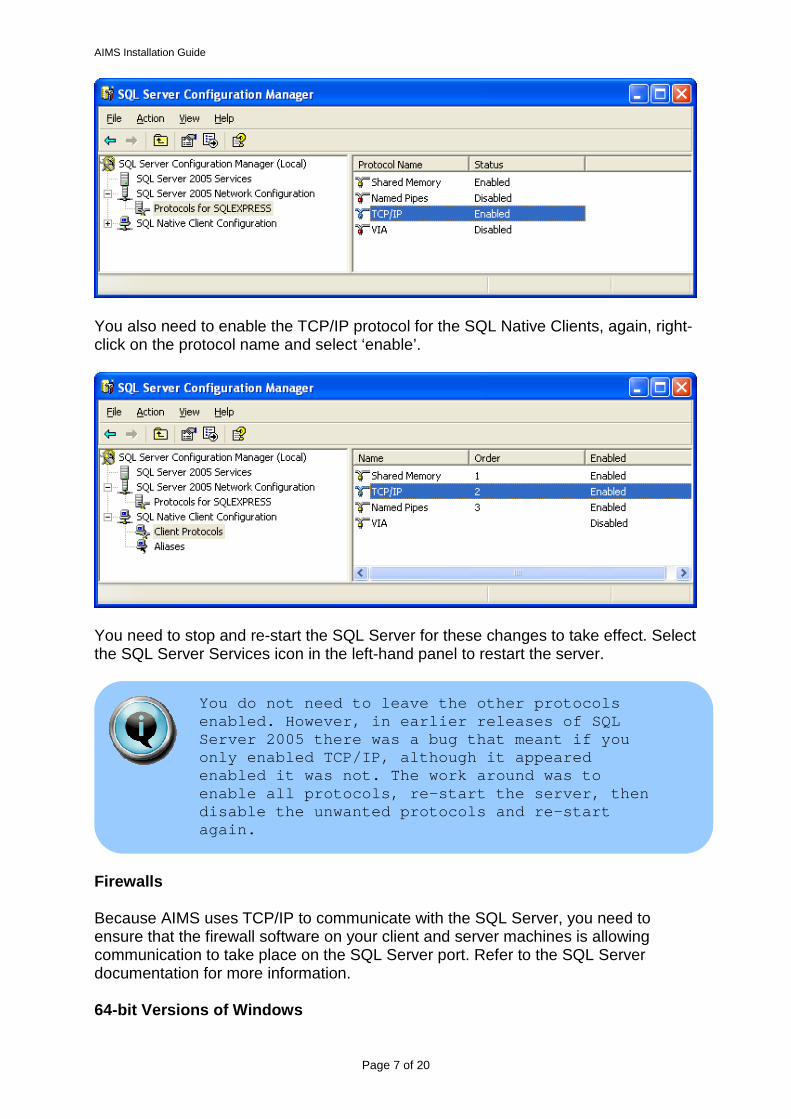
You also need to enable the TCP/IP protocol for the SQL Native Clients, again, right-click on the protocol name and select ‘enable’.
You need to stop and re-start the SQL Server for these changes to take effect. Select the SQL Server Services icon in the left-hand panel to restart the server.
Firewalls Because AIMS uses TCP/IP to communicate with the SQL Server, you need to ensure that the firewall software on your client and server machines is allowing communication to take place on the SQL Server port. Refer to the SQL Server documentation for more information. 64-bit Versions of Windows
You do not need to leave the other protocols enabled. However, in earlier releases of SQL Server 2005 there was a bug that meant if you only enabled TCP/IP, although it appeared enabled it was not. The work around was to enable all protocols, re-start the server, then disable the unwanted protocols and re-start again.
AIMS Installation Guide
Page 8 of 20
If you are using a 64-bit version of Windows, ensure that you install and configure the 32-bit versions of the SQL Server native client. Because AIMS is a 32-bit program it uses the 32-bit client to communicate with the server. The server can be either 32-bit or 64-bit, it doesn’t matter.
SQL Server Permissions When the AIMS software connects to the database, it does so using the account details of the person logged in to Windows. For example, Freda Bloggs is logged in to Windows and wants to use AIMS. The permissions she has on the database are determined by the SQL Server administrator. They might have given her database owner (full) permissions, or just read/write permissions. When Freda logs in to AIMS, she enters her AIMS username “FB” and password. AIMS then tries to connect to the database using her Windows login details, and only when she is connected to the database, are her AIMS username and password checked. The permissions she has once inside the AIMS software are determined by the AIMS administrator. Note that only a user with database owner permissions for the AIMS database can add or remove user-defined fields, regardless of what permissions they have in AIMS.
AIMS Installation Guide
Page 9 of 20
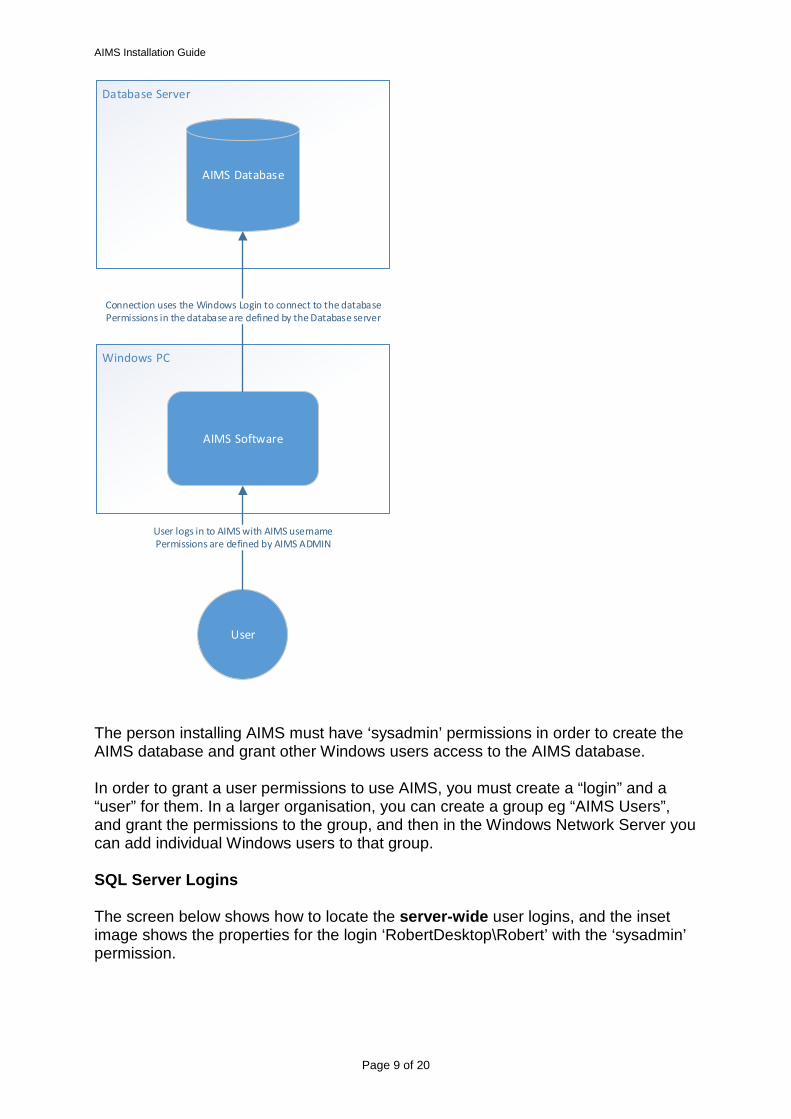
Database Server
Windows PC
AIMS Database
AIMS Software
Connection uses the Windows Login to connect to the database
Permissions in the database are defined by the Database server
User
User logs in to AIMS with AIMS username
Permissions are defined by AIMS ADMIN
The person installing AIMS must have ‘sysadmin’ permissions in order to create the AIMS database and grant other Windows users access to the AIMS database. In order to grant a user permissions to use AIMS, you must create a “login” and a “user” for them. In a larger organisation, you can create a group eg “AIMS Users”, and grant the permissions to the group, and then in the Windows Network Server you can add individual Windows users to that group. SQL Server Logins The screen below shows how to locate the server-wide user logins, and the inset image shows the properties for the login ‘RobertDesktop\Robert’ with the ‘sysadmin’ permission.
AIMS Installation Guide
Page 10 of 20
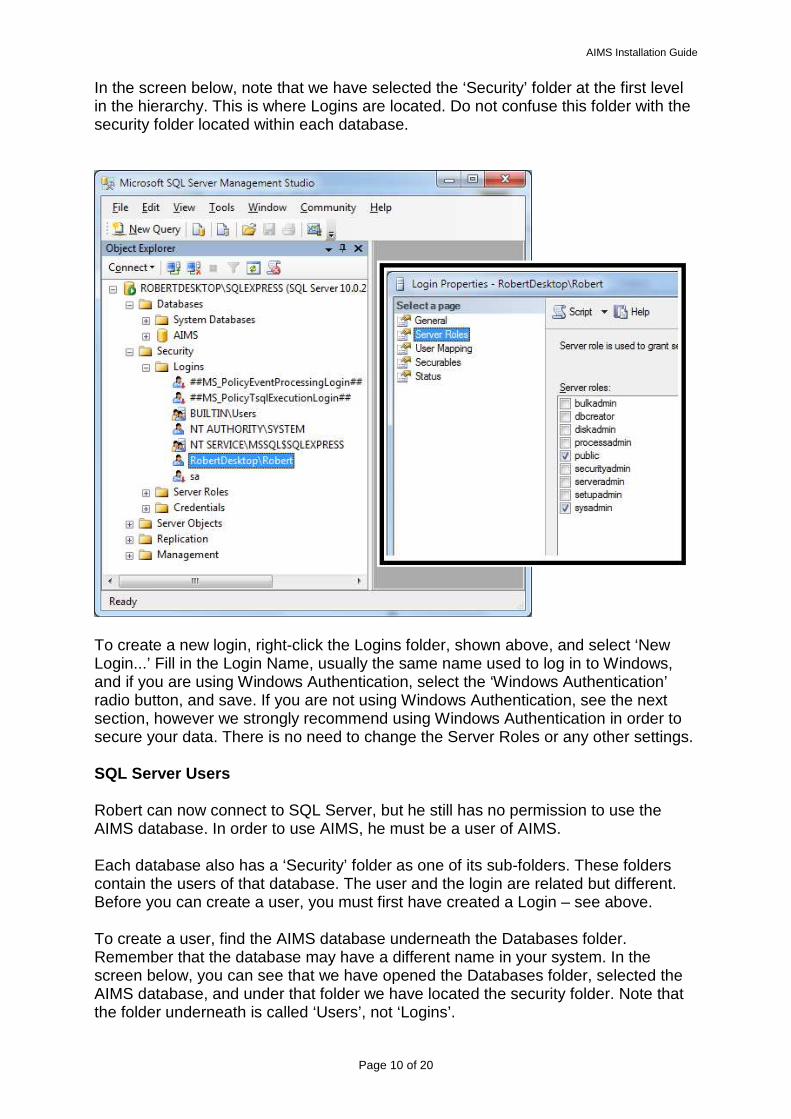
In the screen below, note that we have selected the ‘Security’ folder at the first level in the hierarchy. This is where Logins are located. Do not confuse this folder with the security folder located within each database.
To create a new login, right-click the Logins folder, shown above, and select ‘New Login...’ Fill in the Login Name, usually the same name used to log in to Windows, and if you are using Windows Authentication, select the ‘Windows Authentication’ radio button, and save. If you are not using Windows Authentication, see the next section, however we strongly recommend using Windows Authentication in order to secure your data. There is no need to change the Server Roles or any other settings. SQL Server Users Robert can now connect to SQL Server, but he still has no permission to use the AIMS database. In order to use AIMS, he must be a user of AIMS. Each database also has a ‘Security’ folder as one of its sub-folders. These folders contain the users of that database. The user and the login are related but different. Before you can create a user, you must first have created a Login – see above. To create a user, find the AIMS database underneath the Databases folder. Remember that the database may have a different name in your system. In the screen below, you can see that we have opened the Databases folder, selected the AIMS database, and under that folder we have located the security folder. Note that the folder underneath is called ‘Users’, not ‘Logins’.
AIMS Installation Guide
Page 11 of 20
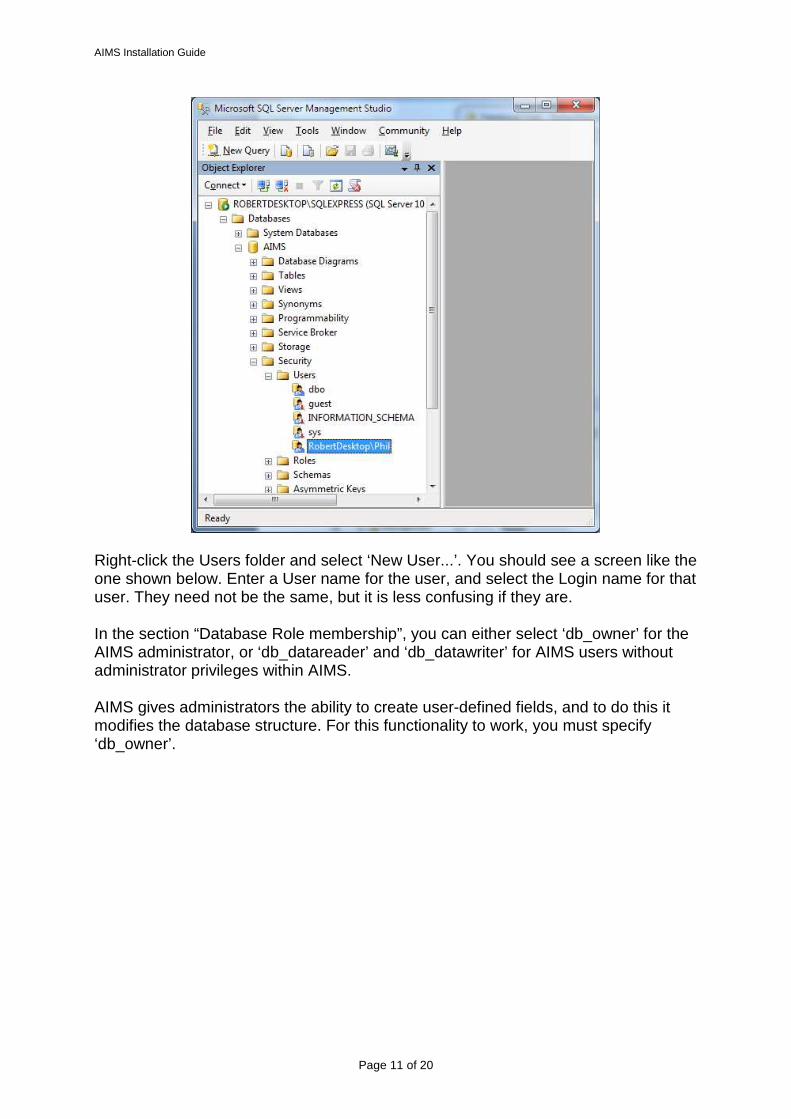
Right-click the Users folder and select ‘New User...’. You should see a screen like the one shown below. Enter a User name for the user, and select the Login name for that user. They need not be the same, but it is less confusing if they are. In the section “Database Role membership”, you can either select ‘db_owner’ for the AIMS administrator, or ‘db_datareader’ and ‘db_datawriter’ for AIMS users without administrator privileges within AIMS. AIMS gives administrators the ability to create user-defined fields, and to do this it modifies the database structure. For this functionality to work, you must specify ‘db_owner’.
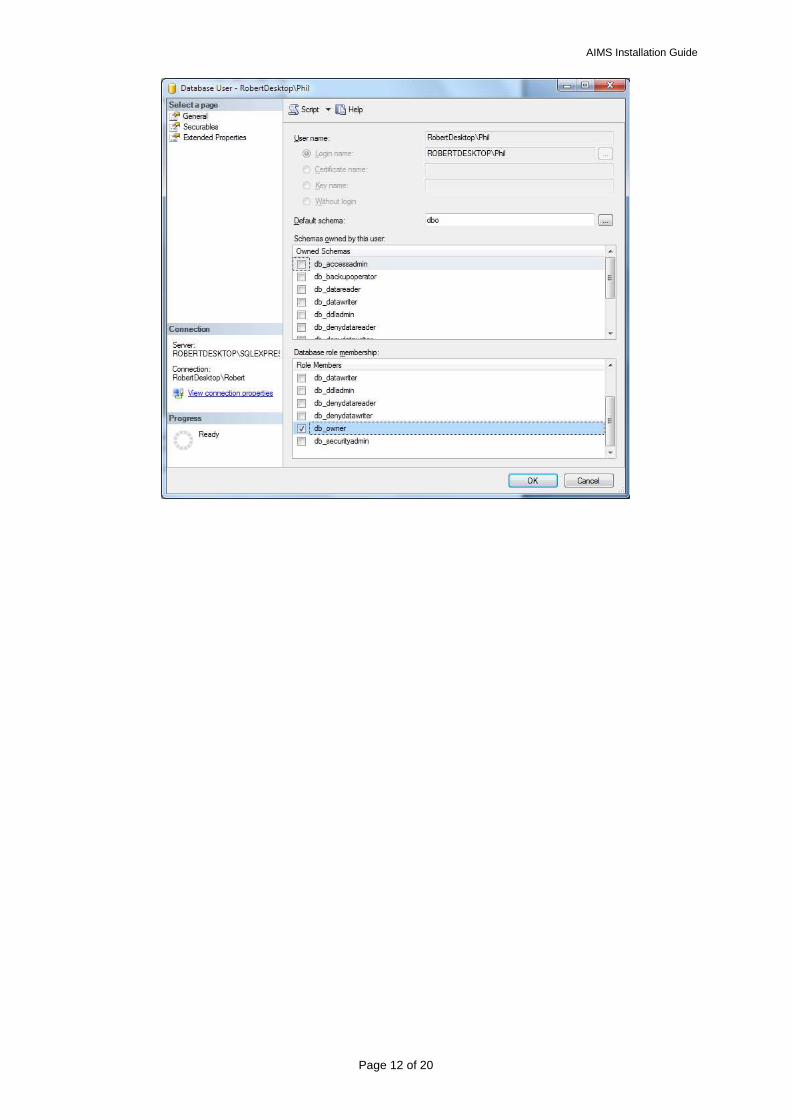
AIMS Installation Guide
Page 12 of 20

AIMS Installation Guide
Page 13 of 20
Windows Authentication Lasa strongly recommends that you use windows authentication with SQL Server in order to secure your data. You can use the user administration options in the AIMS software to link AIMS users to Windows logins, to simplify the sign-in process. If you are using Windows Authentication, then you can skip this section. If you choose not to use Windows Authentication, then your SQL Server must be configured to use ‘SQL Authentication’. In Microsoft SQL Server Management Studio, right-click your SQL Server instance and select ‘Properties’.
In the left-hand pane of the properties window, select the ‘Security’ page. In the top section, Server Authentication, select the option for SQL Server and Windows Authentication mode. In this mode, you will be able to create Logins which are not linked to a Windows user, and from these logins you can create AIMS users.

AIMS Installation Guide
Page 14 of 20
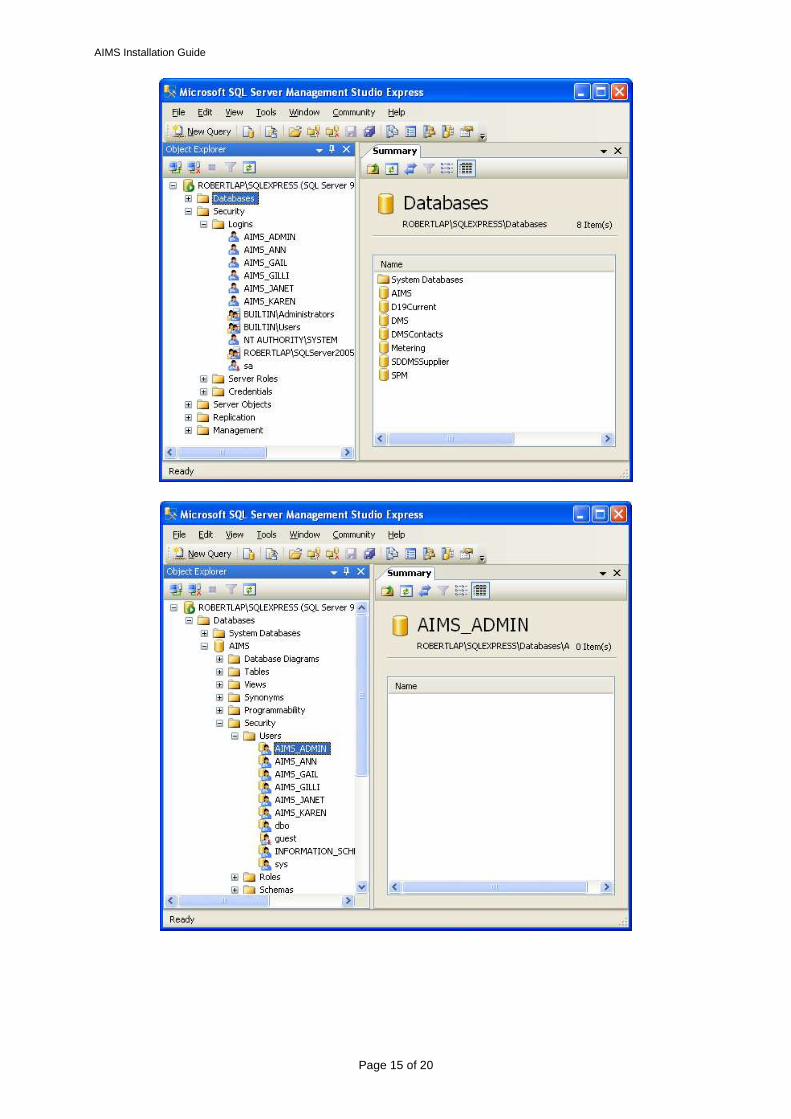
In a non-Windows Authenticated system, all AIMS Logins and Users have the prefix ‘AIMS_’. The suffix is the User ID used inside the AIMS software itself. For example, AIMS is installed with a default User ID ‘ADMIN’. You can see the login AIMS_ADMIN and under the AIMS database, the user AIMS_ADMIN. The “AIMS_” prefix is used to distinguish AIMS users from any other logins in the SQL Server. Each Login is given the same password, ‘AIMS’. Clearly this is insecure, and this is why we recommend using Windows Authentication instead! The screens below show the Logins and the Users in a non-Windows Authenticated AIMS installation. If you migrated your database from Access to SQL Server, and you did not choose the Windows Authentication option, these logins will have been created for your automatically. Also, if you add new users in AIMS and you are not using Windows Authentication, it will create the logins, but to do so the AIMS administrator must have sysadmin permissions in SQL Server.
AIMS Installation Guide
Page 15 of 20
AIMS Installation Guide
Page 16 of 20
Configuring the client workstations to connect to AIMS Once you have installed the AIMS application and SQL Server database on your server the client workstations can be configured. We recommend you complete the client installation on one machine and test it before configuring the remaining clients. If your client cannot connect to AIMS, see the troubleshooting sections that follow this section.
1. Modern versions of Windows come with SQL Server client software built in. If for some reason yours does not, download and install the client for both the version of Windows on the client and the version of SQL Server you are using.
2. On the Windows desktop, create a shortcut to the AIMS.exe file on your server. You should also create a shortcut to the AIMS Help pdf file on the server. You should now be able to open AIMS successfully. Double click the shortcut to the 'AIMS.exe' on the desktop to check that this is so. If AIMS has not been opened before, clicking the shortcut should take you to the 'AIMS - licence Key' screen otherwise the 'AIMS - Login' screen will be displayed.
.
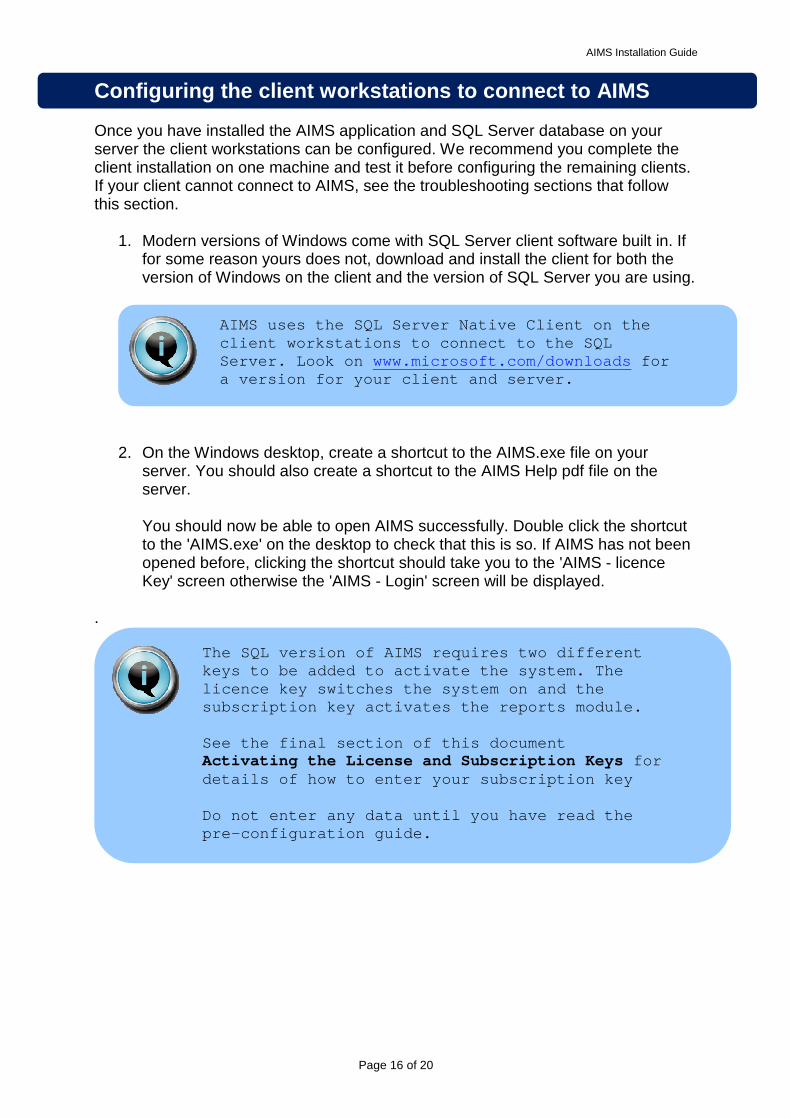
AIMS uses the SQL Server Native Client on the client workstations to connect to the SQL Server. Look on www.microsoft.com/downloads for a version for your client and server.
The SQL version of AIMS requires two different keys to be added to activate the system. The licence key switches the system on and the subscription key activates the reports module. See the final section of this document Activating the License and Subscription Keys for details of how to enter your subscription key Do not enter any data until you have read the pre-configuration guide.
AIMS Installation Guide
Page 17 of 20
Troubleshooting AIMS SQL Server installation
The AIMS network installation is designed to be as simple and flexible to install and maintain as possible. The AIMS software, manuals and client installation programs are installed on the network file server so they are accessible from each client workstation. Client machines simply use a shortcut link to the AIMS program file (AIMS.exe) on the server in order to run AIMS. This means that if you need to upgrade the program at some future time, you only need to it in one place. Information about the database server required to make a database connection is kept in a text file, AIMS.ini, installed in the same location as AIMS.exe. If you have problems getting AIMS to run and connect to the database, please follow the steps below. On the client machine:
1. Check that the shortcut to the AIMS.exe is pointing to the AIMS.exe file installed on your server. There should not be an AIMS.exe file on the client machine.
2. If AIMS runs but is unable to connect to the database, ensure you have the SQL Server native client installed on the client machine, it is usually pre-installed as part of Windows. Also, check the contents of the AIMS.ini file on the server
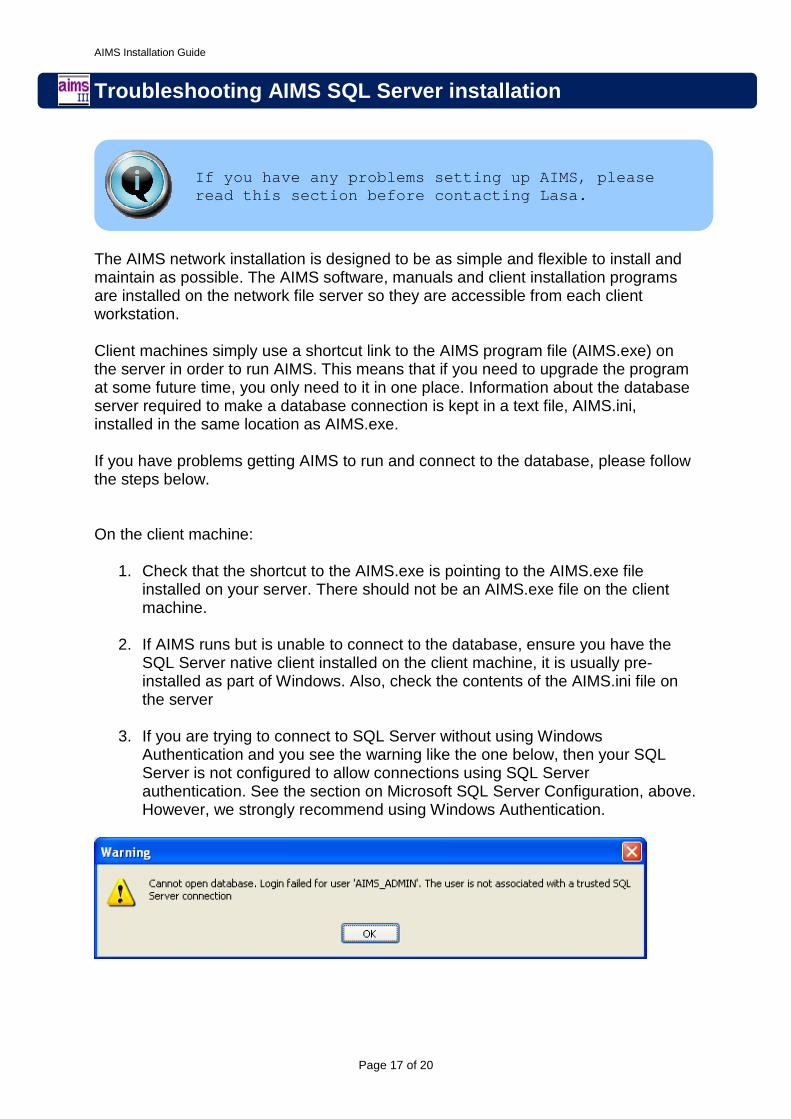
3. If you are trying to connect to SQL Server without using Windows Authentication and you see the warning like the one below, then your SQL Server is not configured to allow connections using SQL Server authentication. See the section on Microsoft SQL Server Configuration, above. However, we strongly recommend using Windows Authentication.
If you have any problems setting up AIMS, please read this section before contacting Lasa.
AIMS Installation Guide
Page 18 of 20
On the server machine:
1. Check the SQL Server is installed and running
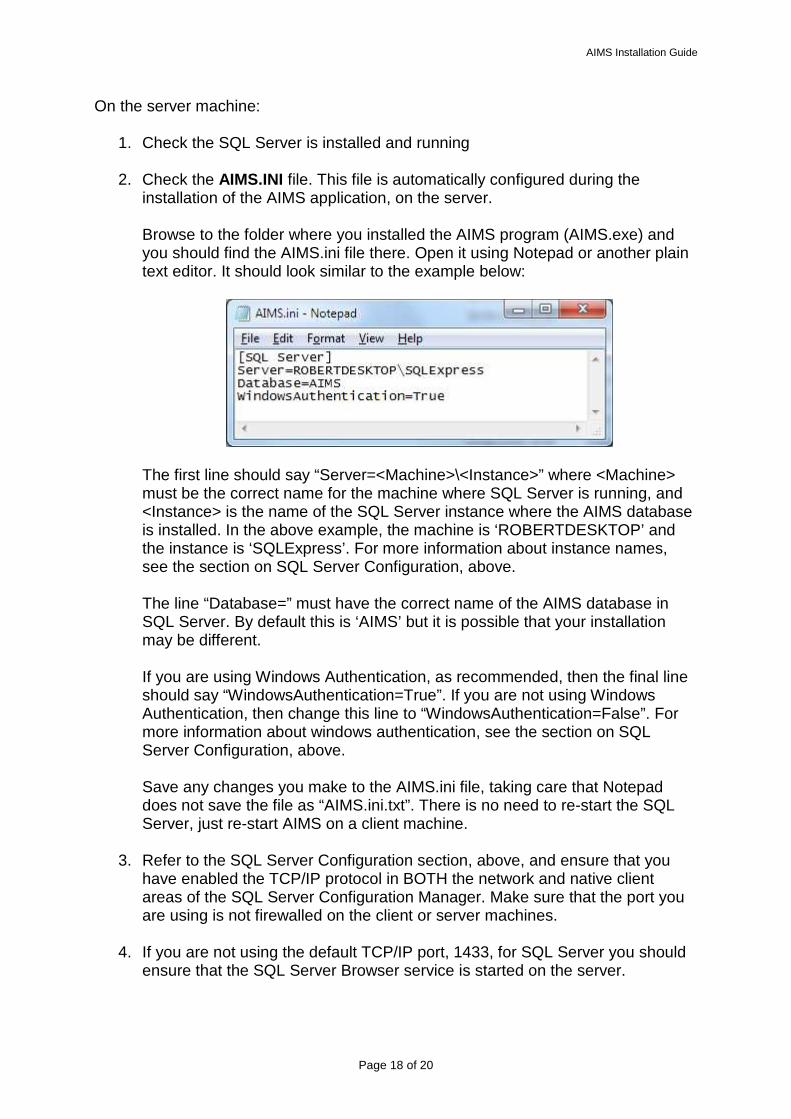
2. Check the AIMS.INI file. This file is automatically configured during the installation of the AIMS application, on the server. Browse to the folder where you installed the AIMS program (AIMS.exe) and you should find the AIMS.ini file there. Open it using Notepad or another plain text editor. It should look similar to the example below:
The first line should say “Server=<Machine>\<Instance>” where <Machine> must be the correct name for the machine where SQL Server is running, and <Instance> is the name of the SQL Server instance where the AIMS database is installed. In the above example, the machine is ‘ROBERTDESKTOP’ and the instance is ‘SQLExpress’. For more information about instance names, see the section on SQL Server Configuration, above. The line “Database=” must have the correct name of the AIMS database in SQL Server. By default this is ‘AIMS’ but it is possible that your installation may be different. If you are using Windows Authentication, as recommended, then the final line should say “WindowsAuthentication=True”. If you are not using Windows Authentication, then change this line to “WindowsAuthentication=False”. For more information about windows authentication, see the section on SQL Server Configuration, above. Save any changes you make to the AIMS.ini file, taking care that Notepad does not save the file as “AIMS.ini.txt”. There is no need to re-start the SQL Server, just re-start AIMS on a client machine.
3. Refer to the SQL Server Configuration section, above, and ensure that you have enabled the TCP/IP protocol in BOTH the network and native client areas of the SQL Server Configuration Manager. Make sure that the port you are using is not firewalled on the client or server machines.
4. If you are not using the default TCP/IP port, 1433, for SQL Server you should ensure that the SQL Server Browser service is started on the server.

AIMS Installation Guide
Page 19 of 20
5. 64-bit Windows Clients: If you are installing AIMS on a 64-bit version of Windows, you still need to install a 32-bit SQL Server client because AIMS is a 32-bit application.
AIMS Installation Guide
Page 20 of 20
Opening AIMS and entering the license keys Once you have successfully loaded AIMS, on opening it you will be asked to login (User ID= Admin, Password= password), after which you will be asked to provide a 12 character Licence Key to activate it. This switches AIMS on and allows you to start configuration. Please read the Pre-configuration Guide carefully as certain choices cannot be changed once any data is entered. The SQL Server version of AIMS requires two different keys to be added to activate the system. The licence key switches the system on and the subscription key activates the reports module.
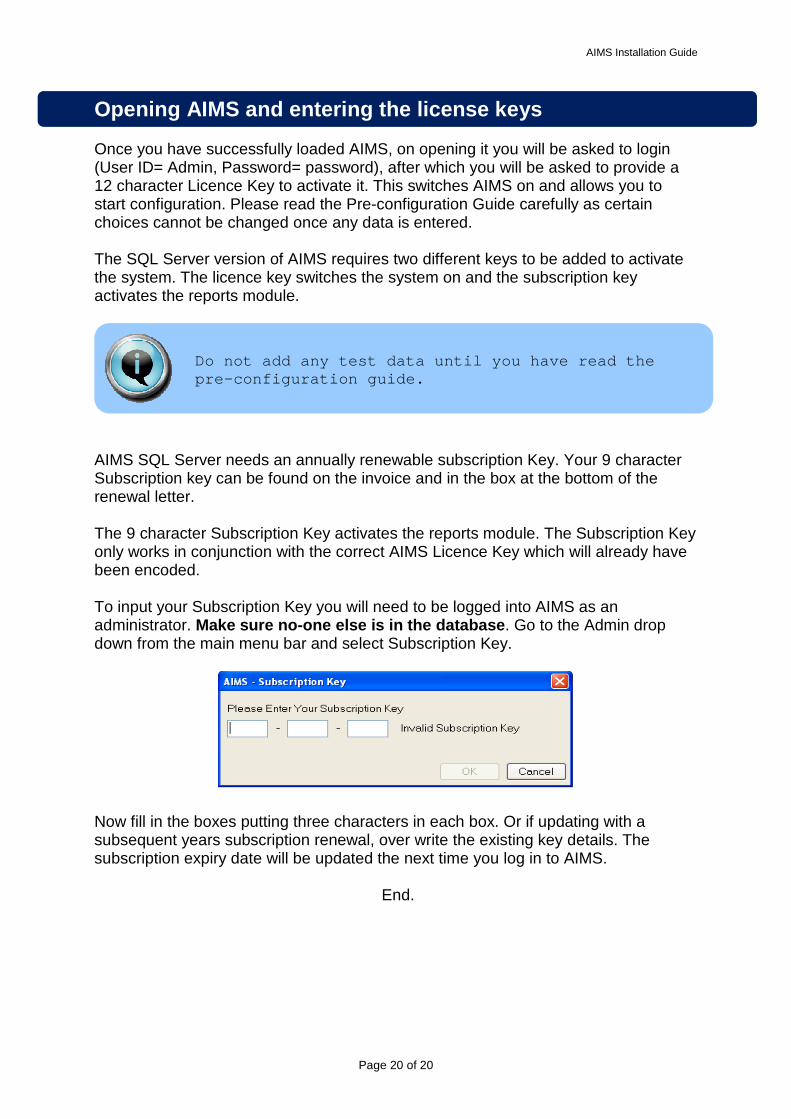
AIMS SQL Server needs an annually renewable subscription Key. Your 9 character Subscription key can be found on the invoice and in the box at the bottom of the renewal letter. The 9 character Subscription Key activates the reports module. The Subscription Key only works in conjunction with the correct AIMS Licence Key which will already have been encoded. To input your Subscription Key you will need to be logged into AIMS as an administrator. Make sure no-one else is in the database. Go to the Admin drop down from the main menu bar and select Subscription Key.
Now fill in the boxes putting three characters in each box. Or if updating with a subsequent years subscription renewal, over write the existing key details. The subscription expiry date will be updated the next time you log in to AIMS.
End.
Do not add any test data until you have read the pre-configuration guide.