Embed Size (px)
Citation preview
SQL2005 Cluster Build

IP Request
• Request 6 IP Addresses– One for EACH SQL virtual server (2)– One for the cluster– One for Distributed Transaction Server– One for physical node server A– One for physical node server B

Name Request
• 2 Server Names for the Nodes– NC006QAD05D, NC006QAD064
• 1 Cluster Name– NC006QK021
• 1 MSDTC Name– NC006DTC01B
• 2 Virtual SQL Instance Names– NC006QVSQL01B , NC006QVSQL01C

Registry Settings
• Login to each node with the service account• Give “LocalService” account READ access, and
“Service Accounts” R/W access to: HKLM\SYSTEM\CurrentControlSet\Control\SecurePipeServers\winreg
• Give “Service Accounts” Full Control to:HKLM\Software\MicrosoftHKLM\Cluster

Storage
• 2 1GB LUNs – Quorum, MSDTC• 2 100 GB LUNs – TempDV• 2 150 GB LUNs – Log• 2 250 GB LUNs – Backup• 2 500 GB LUNs – Data• All should be visible from both nodes in Disk
Management
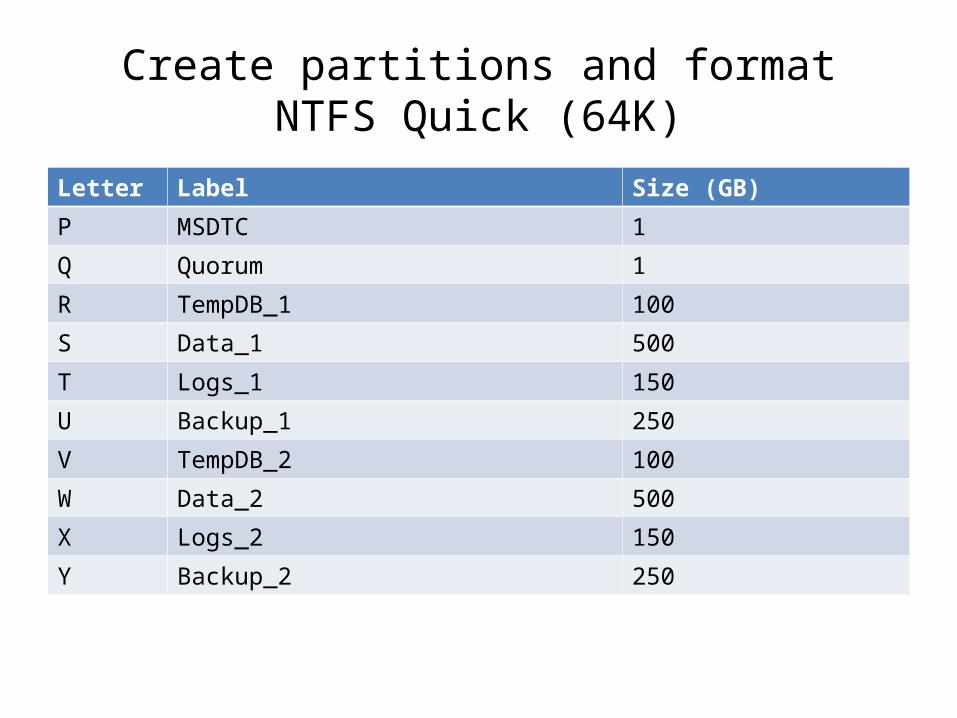
Create partitions and formatNTFS Quick (64K)
Letter Label Size (GB)
P MSDTC 1
Q Quorum 1
R TempDB_1 100
S Data_1 500
T Logs_1 150
U Backup_1 250
V TempDB_2 100
W Data_2 500
X Logs_2 150
Y Backup_2 250
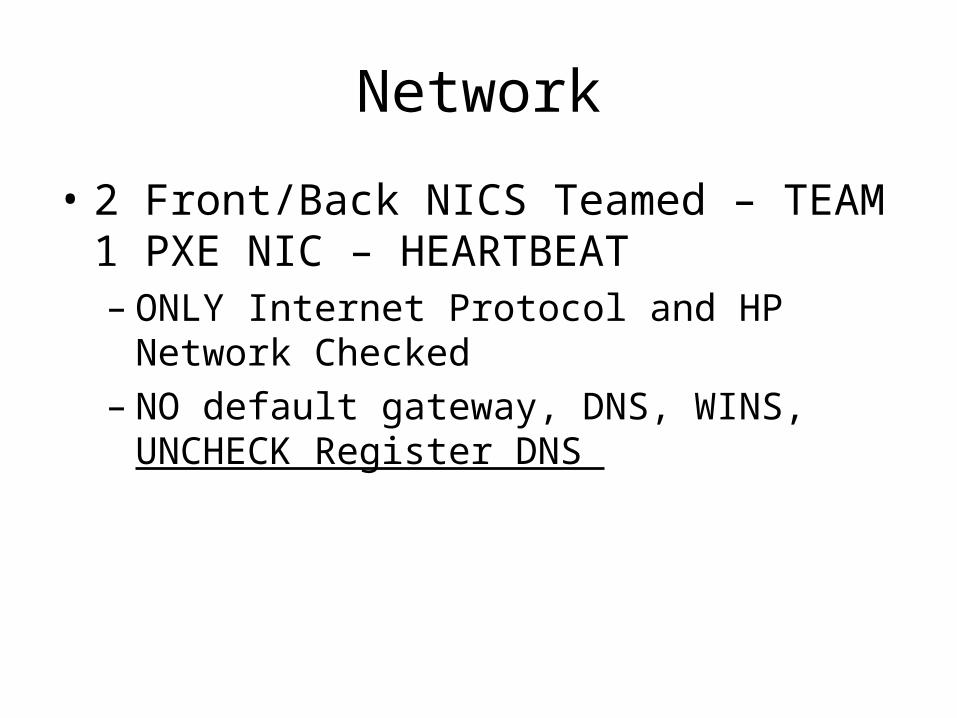
Network
• 2 Front/Back NICS Teamed – TEAM1 PXE NIC – HEARTBEAT– ONLY Internet Protocol and HP Network Checked– NO default gateway, DNS, WINS, UNCHECK
Register DNS


• In Network Connections, set Binding order• TEAM first

MSCS Setup
• Run Cluster Administrator• Select Create New• Enter the cluster name, IP address• Use the SQL Service Account for the cluster
service• Click the Quorum button to select disk Q:

Cluster Network
• Set HEARTBEAT to Internal only

Create MSDTC Group
• Add MSDTC Group• Add P: drive as a Physical Disk Resource• Add MSDTC IP Address• Add MSDTC Name and make dependant on IP
Address• Add Distributed Transaction Coordinator,
dependant on Network Name and Disk
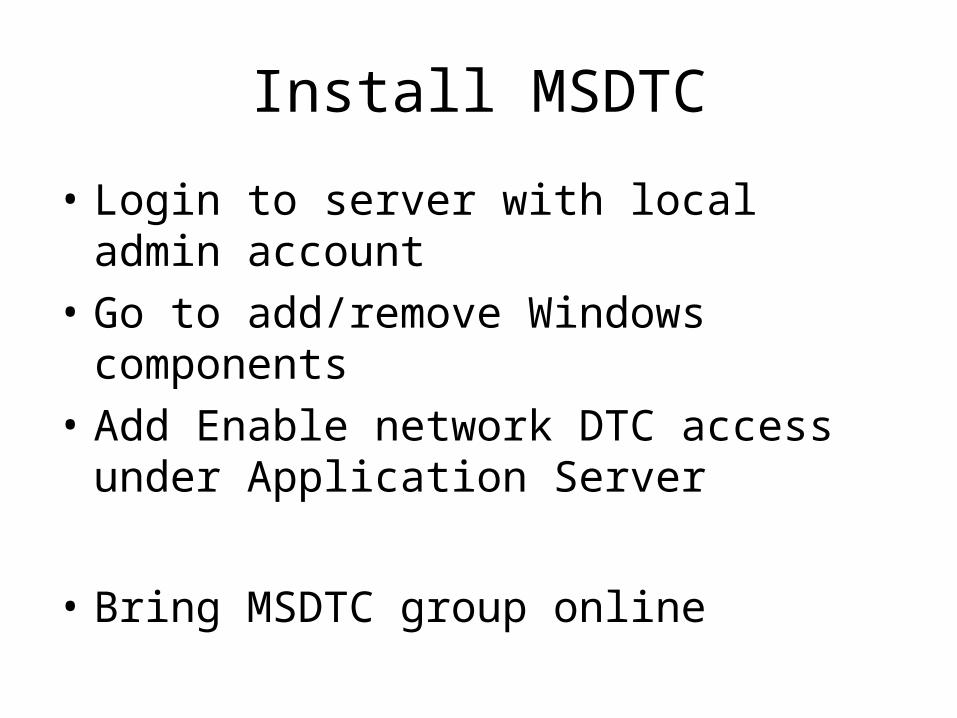
Install MSDTC
• Login to server with local admin account• Go to add/remove Windows components• Add Enable network DTC access under
Application Server
• Bring MSDTC group online

Add Second Node
• Open Cluster Admin and select Add nodes• Select the second node name

Create Virtual Server Groups
• Create 2 new Cluster Groups with the name of your SQL Virtual Instances
• Add the Physical Disk resources for each instance
• Bring the group online• Move the group to make sure it fails over
correctly

Should look like this


Install SQL2005
• Login to the second node and run SQL Setup. Cancel install after it installs the Prerequisites.
• Check Task Manager for any other logged in sessions, then LOGOFF – If there are any remote desktop sessions logged on, SQL Installation will fail on the first node.

• Run Setup on the first node• Install Database, Analysis – clustered• Install Workstation Component• Click Advanced• Change Install drive to E: for Database
Services, Analysis Services, and Client Components
• Change Data Files to S: or W: depending on instance


• Select Named Instance• Use ISQLQ01 (for QA) for the first instance• Use ISQLQ02 for the second instance• Enter your virtual server name– Example: NC006QVSQL01F
• Enter your Virtual Server IP address

• Choose the Cluster group that matches the virtual server name
• Select the Data files location – S: or W:• Use the service account you used for Cluster
Services for the SQL Service account• Domain Groups:– corp\RS.ETI.SQL.SQL.Server.QA– corp\RS.ETI.SQL.SQL.Agent.QA

Install Service Pack
• Install SP3

Configure MSDTC
• Go to administrative tools / component services• Expand Component Services to My Computer• Right click / properties / msdtc tab / security
configuration


Verify
• Failover the cluster groups• Open Enterprise Manager and confirm
instances