Embed Size (px)
Citation preview
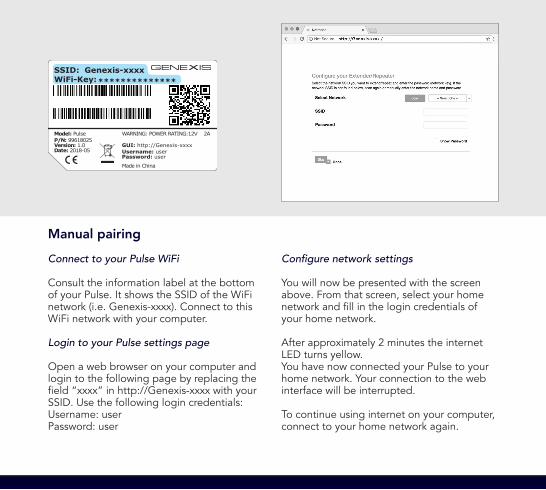
SSID: Genexis-xxxxWiFi-Key: **************
WARNING: POWER RATING:12V 2A
GUI: http://Genexis-xxxxUsername: userPassword: user
Made in China
Model: PulseP/N: 99618025Version: 1.0Date: 2018-05
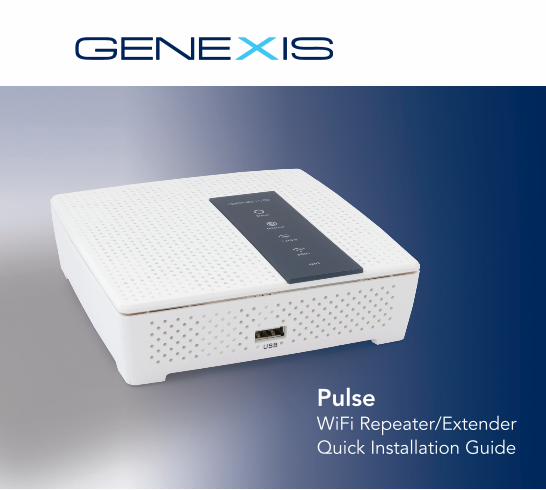
PulseWiFi Repeater/ExtenderQuick Installation Guide
Manual pairing
Connect to your Pulse WiFi
Consult the information label at the bottom of your Pulse. It shows the SSID of the WiFi network (i.e. Genexis-xxxx). Connect to this WiFi network with your computer.
Login to your Pulse settings page
Open a web browser on your computer and login to the following page by replacing the fi eld “xxxx” in http://Genexis-xxxx with your SSID. Use the following login credentials: Username: userPassword: user
Confi gure network settings
You will now be presented with the screen above. From that screen, select your home network and fi ll in the login credentials of your home network.
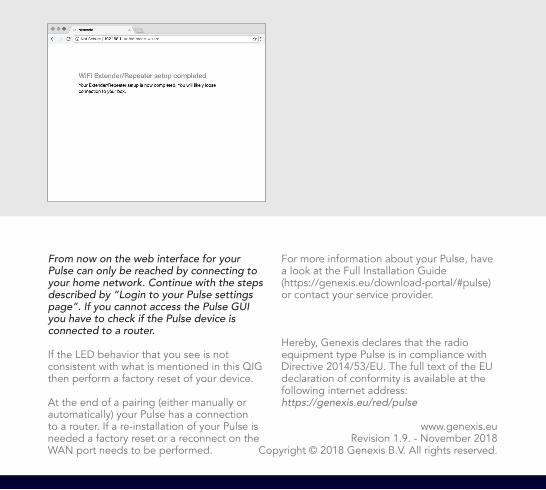
After approximately 2 minutes the internet LED turns yellow. You have now connected your Pulse to your home network. Your connection to the web interface will be interrupted.
To continue using internet on your computer, connect to your home network again.
For more information about your Pulse, have a look at the Full Installation Guide (https://genexis.eu/download-portal/#pulse) or contact your service provider.
Hereby, Genexis declares that the radio equipment type Pulse is in compliance with Directive 2014/53/EU. The full text of the EU declaration of conformity is available at the following internet address: https://genexis.eu/red/pulse
www.genexis.euRevision 1.9. - November 2018
Copyright © 2018 Genexis B.V. All rights reserved.
From now on the web interface for your Pulse can only be reached by connecting to your home network. Continue with the steps described by “Login to your Pulse settings page”. If you cannot access the Pulse GUI you have to check if the Pulse device is connected to a router.
If the LED behavior that you see is not consistent with what is mentioned in this QIG then perform a factory reset of your device.
At the end of a pairing (either manually or automatically) your Pulse has a connection to a router. If a re-installation of your Pulse is needed a factory reset or a reconnect on the WAN port needs to be performed.
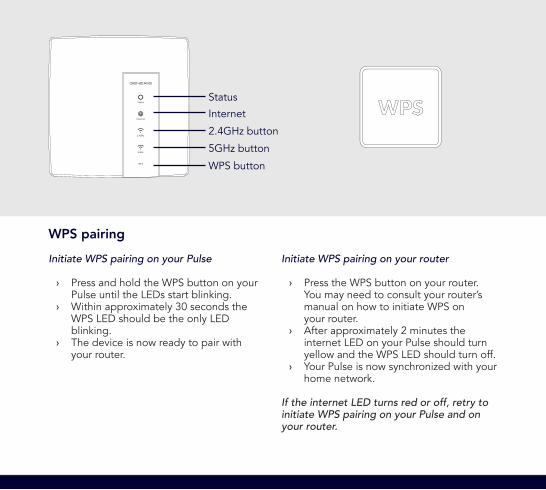
2.4GHz
5GHz
Internet
Status
WPS
Status
Internet
2.4GHz button
5GHz button
WPS button
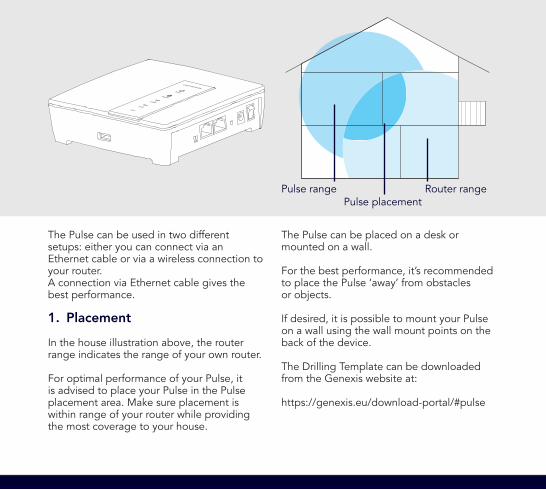
Router rangePulse placement
Pulse range
The Pulse can be used in two different setups: either you can connect via an Ethernet cable or via a wireless connection to your router. A connection via Ethernet cable gives the best performance.
1. Placement
In the house illustration above, the router range indicates the range of your own router.
For optimal performance of your Pulse, it is advised to place your Pulse in the Pulse placement area. Make sure placement is within range of your router while providing the most coverage to your house.
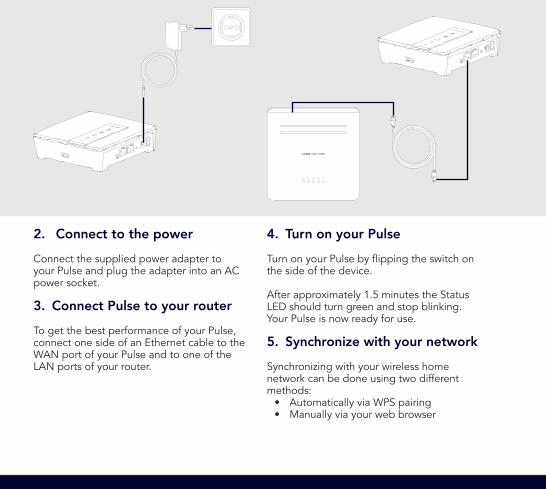
2. Connect to the power
Connect the supplied power adapter to your Pulse and plug the adapter into an AC power socket.
3. Connect Pulse to your router
To get the best performance of your Pulse, connect one side of an Ethernet cable to the WAN port of your Pulse and to one of the LAN ports of your router.
4. Turn on your Pulse
Turn on your Pulse by fl ipping the switch on the side of the device.
After approximately 1.5 minutes the Status LED should turn green and stop blinking. Your Pulse is now ready for use.
5. Synchronize with your network
Synchronizing with your wireless home network can be done using two different methods:
• Automatically via WPS pairing • Manually via your web browser
Initiate WPS pairing on your router
› Press the WPS button on your router. You may need to consult your router’s manual on how to initiate WPS on your router.
› After approximately 2 minutes the internet LED on your Pulse should turn yellow and the WPS LED should turn off.
› Your Pulse is now synchronized with your home network.
If the internet LED turns red or off, retry to initiate WPS pairing on your Pulse and on your router.
WPS pairing
Initiate WPS pairing on your Pulse
› Press and hold the WPS button on your Pulse until the LEDs start blinking.
› Within approximately 30 seconds the WPS LED should be the only LED blinking.
› The device is now ready to pair with your router.
The Pulse can be placed on a desk or mounted on a wall.
For the best performance, it’s recommended to place the Pulse ‘away’ from obstacles or objects.
If desired, it is possible to mount your Pulse on a wall using the wall mount points on the back of the device.
The Drilling Template can be downloaded from the Genexis website at:
https://genexis.eu/download-portal/#pulse
2.4GHz
5GHz
Internet
Status
WPS
Status
Internet
2.4GHz button
5GHz button
WPS button
Router rangePulse placement
Pulse range
The Pulse can be used in two different setups: either you can connect via an Ethernet cable or via a wireless connection to your router. A connection via Ethernet cable gives the best performance.
1. Placement
In the house illustration above, the router range indicates the range of your own router.
For optimal performance of your Pulse, it is advised to place your Pulse in the Pulse placement area. Make sure placement is within range of your router while providing the most coverage to your house.
2. Connect to the power
Connect the supplied power adapter to your Pulse and plug the adapter into an AC power socket.
3. Connect Pulse to your router
To get the best performance of your Pulse, connect one side of an Ethernet cable to the WAN port of your Pulse and to one of the LAN ports of your router.
4. Turn on your Pulse
Turn on your Pulse by fl ipping the switch on the side of the device.
After approximately 1.5 minutes the Status LED should turn green and stop blinking. Your Pulse is now ready for use.
5. Synchronize with your network
Synchronizing with your wireless home network can be done using two different methods:
• Automatically via WPS pairing • Manually via your web browser
Initiate WPS pairing on your router
› Press the WPS button on your router. You may need to consult your router’s manual on how to initiate WPS on your router.
› After approximately 2 minutes the internet LED on your Pulse should turn yellow and the WPS LED should turn off.
› Your Pulse is now synchronized with your home network.
If the internet LED turns red or off, retry to initiate WPS pairing on your Pulse and on your router.
WPS pairing
Initiate WPS pairing on your Pulse
› Press and hold the WPS button on your Pulse until the LEDs start blinking.
› Within approximately 30 seconds the WPS LED should be the only LED blinking.
› The device is now ready to pair with your router.
The Pulse can be placed on a desk or mounted on a wall.
For the best performance, it’s recommended to place the Pulse ‘away’ from obstacles or objects.
If desired, it is possible to mount your Pulse on a wall using the wall mount points on the back of the device.
The Drilling Template can be downloaded from the Genexis website at:
https://genexis.eu/download-portal/#pulse
SSID: Genexis-xxxxWiFi-Key: **************
WARNING: POWER RATING:12V 2A
GUI: http://Genexis-xxxxUsername: userPassword: user
Made in China
Model: PulseP/N: 99618025Version: 1.0Date: 2018-05
PulseWiFi Repeater/ExtenderQuick Installation Guide
Manual pairing
Connect to your Pulse WiFi
Consult the information label at the bottom of your Pulse. It shows the SSID of the WiFi network (i.e. Genexis-xxxx). Connect to this WiFi network with your computer.
Login to your Pulse settings page
Open a web browser on your computer and login to the following page by replacing the fi eld “xxxx” in http://Genexis-xxxx with your SSID. Use the following login credentials: Username: userPassword: user
Confi gure network settings
You will now be presented with the screen above. From that screen, select your home network and fi ll in the login credentials of your home network.
After approximately 2 minutes the internet LED turns yellow. You have now connected your Pulse to your home network. Your connection to the web interface will be interrupted.
To continue using internet on your computer, connect to your home network again.
For more information about your Pulse, have a look at the Full Installation Guide (https://genexis.eu/download-portal/#pulse) or contact your service provider.
Hereby, Genexis declares that the radio equipment type Pulse is in compliance with Directive 2014/53/EU. The full text of the EU declaration of conformity is available at the following internet address: https://genexis.eu/red/pulse
www.genexis.euRevision 1.9. - November 2018
Copyright © 2018 Genexis B.V. All rights reserved.
From now on the web interface for your Pulse can only be reached by connecting to your home network. Continue with the steps described by “Login to your Pulse settings page”. If you cannot access the Pulse GUI you have to check if the Pulse device is connected to a router.
If the LED behavior that you see is not consistent with what is mentioned in this QIG then perform a factory reset of your device.
At the end of a pairing (either manually or automatically) your Pulse has a connection to a router. If a re-installation of your Pulse is needed a factory reset or a reconnect on the WAN port needs to be performed.