Embed Size (px)
Citation preview

Copyright © 2016 LiveAction, Inc. All rights reserved. LiveAction, LiveNX, LiveUX, the LiveAction Logo and LiveAction Software are trademarks of LiveAction, Inc. Information subject to change without notice.
LiveAction, Inc. 3500 WEST BAYSHORE ROAD PALO ALTO, CA 94303
SSL Certificate Install
CONFIGURATION
LIVEACTION, INC.

1-1 | SSL Certificate Install
Summary
Product and Version LiveNX 5.3.0
Affected Devices OVA
Document Name SSL Certificate Install
Updated Suzette Bana (August 2016)
We generate and install self-signed certificates the first time LiveNX is run. Secure Web Login to LiveNX is enabled by default in LiveNX 5.3.0. This document will guide you on how to install your own SSL Certificate for the Web UI using curl, and install an SSL Certificate for the backend webserver using the java keystore.
If you have any questions about this guide, or need any assistance in general please contact LiveAction support: [email protected]

1-2 | SSL Certificate Install
Install Certificate for LiveNX Web UI
Step 1
Open a terminal. All the commands below can be executed as username “admin”. Convert the crt to pem file and install the SSL Certificate.
Step 2
Verify if there is already an API token. There should be no API token on a fresh deployment.
1-3 | SSL Certificate Install
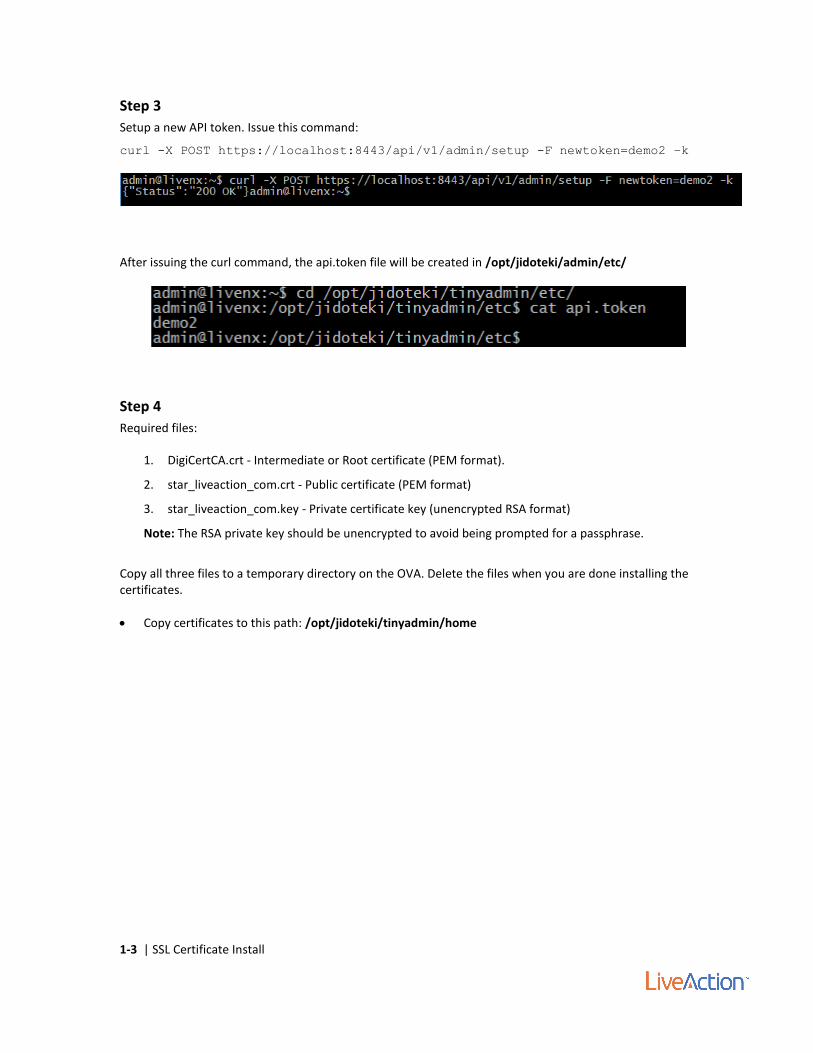
Step 3
Setup a new API token. Issue this command:
curl -X POST https://localhost:8443/api/v1/admin/setup -F newtoken=demo2 –k
After issuing the curl command, the api.token file will be created in /opt/jidoteki/admin/etc/
Step 4
Required files:
1. DigiCertCA.crt - Intermediate or Root certificate (PEM format).
2. star_liveaction_com.crt - Public certificate (PEM format)
3. star_liveaction_com.key - Private certificate key (unencrypted RSA format)
Note: The RSA private key should be unencrypted to avoid being prompted for a passphrase.
Copy all three files to a temporary directory on the OVA. Delete the files when you are done installing the certificates.
Copy certificates to this path: /opt/jidoteki/tinyadmin/home

1-4 | SSL Certificate Install
Step 5
Check if the certificate match.
Check whether a private key matches a certificate or whether a certificate matches a certificate signing request (CSR). When you are dealing with lots of different certificates it can be easy to lose track of which certificate goes with which private key or which CSR was used to generate which certificate.
openssl x509 -noout -modulus –in star_liveaction_com.pem | openssl md5
openssl rsa -noout -modulus -in star_liveaction_com.pem key | openssl md5
openssl req -noout -modulus -in star_liveaction_com.csr | openssl md5
Step 6
Convert all .crt to .pem format:
openssl x509 -in star_liveaction_com.crt -out star_liveaction_com.pem -outform PEM
openssl x509 -in DigiCertCA.crt -out DigiCertCA.crt.pem -outform PEM
Step 7
Install Certificate. Execute the following command:
curl -X POST https://localhost:8443/api/v1/admin/certs?token=demo2 -F
public=@star_liveaction_com.pem -F private=@star_liveaction_com.key -F
Note: If the certificates update API call fails, 400 Bad Request will be returned.

1-5 | SSL Certificate Install
Install Certificate for LiveNX Backend Webserver To access the LiveNX backend WebServer, go to: https://LiveNXServerIP:8092
You need this info:
Keystore file:/data/livenx-server/data/http.keystore
Alias: webserver
password: BmbdB3MyJujd5tGuoSfd
Note: Friendly Name of the certificate should be “webserver” otherwise you will get a java error.
Step 1
Export your key, certificate and ca-certificate into a PKCS12 bundle via
openssl pkcs12 -export -name webserver -in star_liveaction_com.crt -inkey
star_liveaction_com.key -CAfile DigiCertCA.crt -out keystore2.p12
Note: Use chain option if you have chain of intermediates and root certificate.
openssl pkcs12 -export -name webserver -in star_liveaction_com.crt -inkey
star_liveaction_com.key - chain -CAfile DigiCertCA.crt -out keystore2.p12
Step 2
Import the PKCS12 file into a new java keystore. keytool -importkeystore -srckeystore keystore2.p12 -destkeystore
http.keystore -srcstoretype pkcs12 -deststoretype JKS -alias webserver -
deststorepass BmbdB3MyJujd5tGuoSfd -destkeypass BmbdB3MyJujd5tGuoSfd
Note: To list the content of the keystore file use this command: keytool -list -v -keystore http.keystore
Step 3
Copy http.keystore to the data directory: cp http.keystore /data/livenx-server/data/
Note: To overwrite the http.keystore, you need to use root credentials.

1-6 | SSL Certificate Install
Create a backup and reboot the OVA. Execute the following commands:
1. Type command: backup
2. Type[y], to perform a backup now.
3. Reboot the machine
4. Type command: sudo reboot now
Validate SSL Certificate installed in the browser:

Copyright © 2016 LiveAction, Inc. All rights reserved. LiveAction, LiveNX, LiveUX, the LiveAction Logo and LiveAction Software are trademarks of LiveAction, Inc. Information subject to change without notice.
Make sure that all of the parent cert path is installed, otherwise, it won't show up as a green lock in Google Chrome. To check the cert path, do the following: