Embed Size (px)
Citation preview
Össur Americas 27051 Towne Centre DriveFoothill Ranch, CA 92610, USATel: +1 (949) 382 3883Tel: +1 800 233 6263Fax: +1 800 831 [email protected]
Össur canada 120-11231 Dyke RoadRichmond, BCV7A OA1, CanadaTel: +1 604 241 8152Fax: +1 604 241 8153
Össur europeEkkersrijt 4106-4114P.O. Box 1205690 AC Son en BreugelThe NetherlandsTel: +800 3539 3668Tel: +31 499 462840Fax: +31 499 [email protected]
Össur europe BVKundenservice Deutschland Augustinusstrasse 11A 50226 Frechen Deutschland Tel: +49 (0) 2234 6039 102Fax. +49 (0) 2234 6039 [email protected]
Össur Nordic P.O. Box 67751 03 Uppsala, SwedenTel: +46 1818 2200Fax: +46 1818 [email protected]
Össur UK Building 3000Manchester Business ParkAviator WayManchester M22 5TG, UKTel: +44 161 490 8500Fax: +44 161 490 [email protected]
Össur iberia S.A.Parque EuropolisCalle Edimburgo n°1428232 Las Rozas(Madrid) SpainTel: +34 91 636 06 93Fax: +34 91 637 21 [email protected]
Össur Asia上海虹梅路1801号W16B 棟2楼邮政编号:200233电话:+86 21 6127 1700传真:+86 21 6127 [email protected]
Össur Asia-Pacific26 Ross StreetNorth ParramattaSydney NSW 2152 Australia Tel: +61 2 88382800 Fax: +61 2 96305310 [email protected]
Össur head officeGrjothals 5110 Reykjavik, IcelandTel: + 354 515 1300Fax: +354 515 [email protected]
www.ossur.com ©Copyright Össur 2012 TM0055 Rev. 2
0086
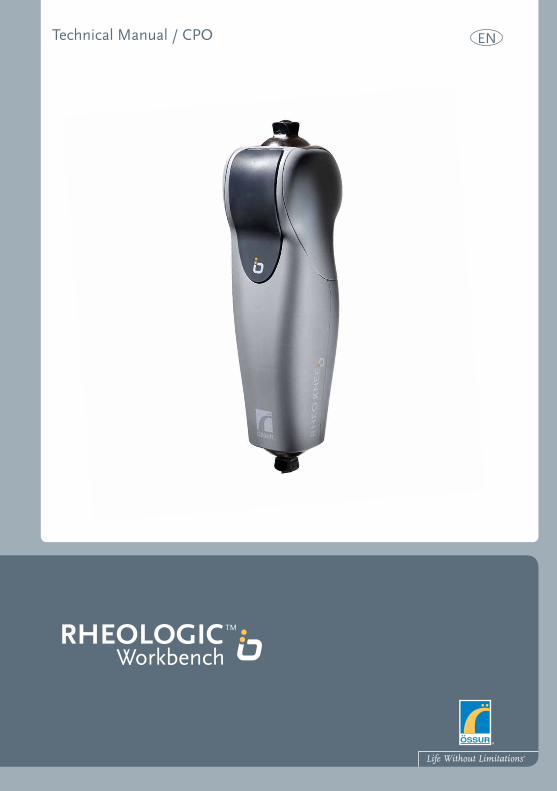
Technical Manual / CPO EN
Rheologic TM
Workbench

2
caution: RHEOLOGICTM Workbench must only be used by a clinician who has attended and passed an Össur certified RHEO KNEE® education program.
0086
Össur hf, Grjóthalsi 5, 110 Reykjavík, Iceland 2011
RHEOLOGIC © 2011
0086
Össur hf, Grjóthalsi 5, 110 Reykjavík, Iceland 2011
RHEOLOGIC Workbench © 2011
3
contents
1. Installing RHEOLOGICTM Workbench . . . . . . . . . . . . . . . . . . . . . . . . . . . . . . . . 4
Install . . . . . . . . . . . . . . . . . . . . . . . . . . . . . . . . . . . . . . . . . . . . . . . . . . . . . . . . . . 4
Uninstall . . . . . . . . . . . . . . . . . . . . . . . . . . . . . . . . . . . . . . . . . . . . . . . . . . . . . . . 4
2 Connecting to the RHEO KNEE® . . . . . . . . . . . . . . . . . . . . . . . . . . . . . . . . . . . . 4
3 RHEOLOGICTM Workbench functions . . . . . . . . . . . . . . . . . . . . . . . . . . . . . . . . 6
Indicators . . . . . . . . . . . . . . . . . . . . . . . . . . . . . . . . . . . . . . . . . . . . . . . . . . . . . . 6
Change name . . . . . . . . . . . . . . . . . . . . . . . . . . . . . . . . . . . . . . . . . . . . . . . . . . . 6
Warning system . . . . . . . . . . . . . . . . . . . . . . . . . . . . . . . . . . . . . . . . . . . . . . . . . 6
Calibration . . . . . . . . . . . . . . . . . . . . . . . . . . . . . . . . . . . . . . . . . . . . . . . . . . . . . . 7
Loading . . . . . . . . . . . . . . . . . . . . . . . . . . . . . . . . . . . . . . . . . . . . . . . . . . . . . . . . 8
Automatic adjustment . . . . . . . . . . . . . . . . . . . . . . . . . . . . . . . . . . . . . . . . . . . . 8
Manual adjustments . . . . . . . . . . . . . . . . . . . . . . . . . . . . . . . . . . . . . . . . . . . . . . 9
Stance flexion . . . . . . . . . . . . . . . . . . . . . . . . . . . . . . . . . . . . . . . . . . . . . . . . . . 9
Stance extension . . . . . . . . . . . . . . . . . . . . . . . . . . . . . . . . . . . . . . . . . . . . . . . 10
Flexion target angle . . . . . . . . . . . . . . . . . . . . . . . . . . . . . . . . . . . . . . . . . . . . . 10
Swing extension . . . . . . . . . . . . . . . . . . . . . . . . . . . . . . . . . . . . . . . . . . . . . . . . 10
Terminal swing (TS) . . . . . . . . . . . . . . . . . . . . . . . . . . . . . . . . . . . . . . . . . . . . . 11
Extension hold . . . . . . . . . . . . . . . . . . . . . . . . . . . . . . . . . . . . . . . . . . . . . . . . . 11
Managing users and clinicians . . . . . . . . . . . . . . . . . . . . . . . . . . . . . . . . . . . . . 11
Managing settings . . . . . . . . . . . . . . . . . . . . . . . . . . . . . . . . . . . . . . . . . . . . . . . 12
Activity report . . . . . . . . . . . . . . . . . . . . . . . . . . . . . . . . . . . . . . . . . . . . . . . . . . . 13
Collecting activity data . . . . . . . . . . . . . . . . . . . . . . . . . . . . . . . . . . . . . . . . . . . 13
Generating the report . . . . . . . . . . . . . . . . . . . . . . . . . . . . . . . . . . . . . . . . . . . 14
Data specifications . . . . . . . . . . . . . . . . . . . . . . . . . . . . . . . . . . . . . . . . . . . . . 15
4 More information . . . . . . . . . . . . . . . . . . . . . . . . . . . . . . . . . . . . . . . . . . . . . . . . 15
5 Troubleshooting the connection with your RHEO KNEE® . . . . . . . . . . . . . . . . 16
4
1 installing RheologicTM Workbench
installYou should have recevied an email with a link to an Össur website that includes your license key for the software. Follow the instructions in the email to start the download and installation process.
Note: If you install the program as an Administrator, make sure RHEOLOGICTM Workbench is accessible for the user from the start menu or as a desktop icon.
UninstallIn the start menu, locate the folder ‘Ossur’ containing RHEOLOGICTM Workbench and select “Uninstall.”
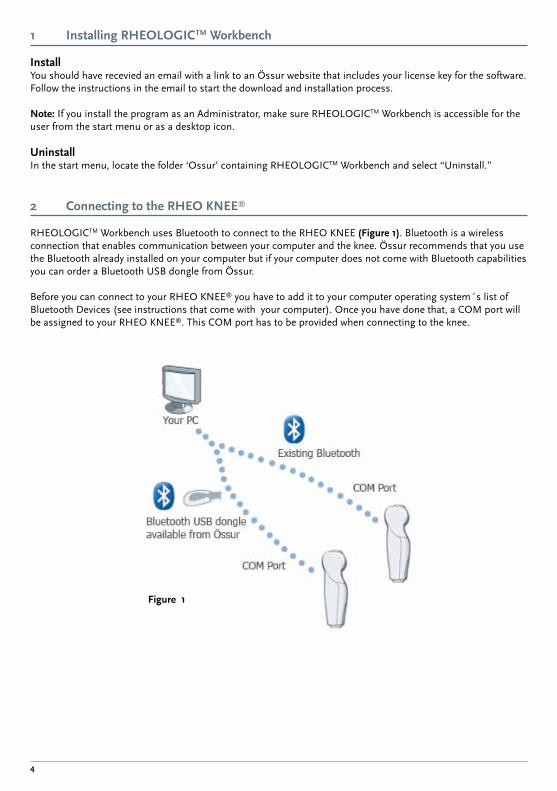
2 connecting to the Rheo KNee®
RHEOLOGICTM Workbench uses Bluetooth to connect to the RHEO KNEE (Figure 1). Bluetooth is a wireless connection that enables communication between your computer and the knee. Össur recommends that you use the Bluetooth already installed on your computer but if your computer does not come with Bluetooth capabilities you can order a Bluetooth USB dongle from Össur.
Before you can connect to your RHEO KNEE® you have to add it to your computer operating system´s list of Bluetooth Devices (see instructions that come with your computer). Once you have done that, a COM port will be assigned to your RHEO KNEE®. This COM port has to be provided when connecting to the knee.
Figure 1
5
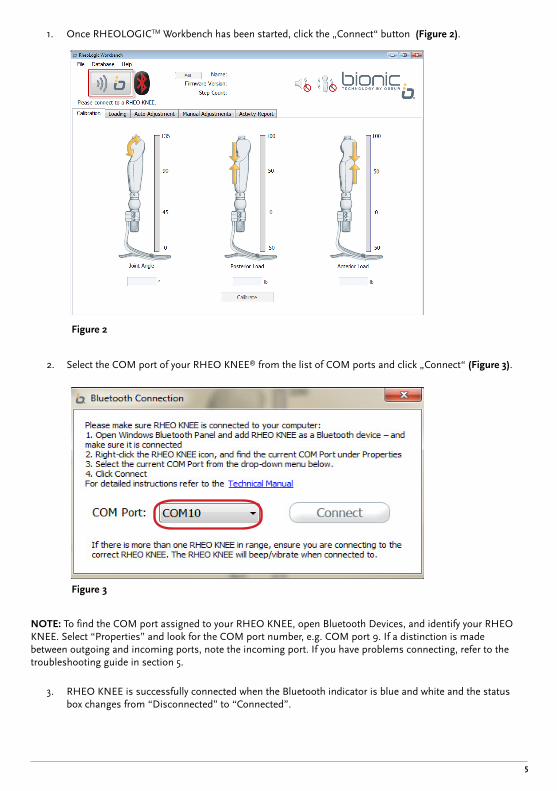
1. Once RHEOLOGICTM Workbench has been started, click the „Connect“ button (Figure 2).
2. Select the COM port of your RHEO KNEE® from the list of COM ports and click „Connect“ (Figure 3).
NoTe: To find the COM port assigned to your RHEO KNEE, open Bluetooth Devices, and identify your RHEO KNEE. Select “Properties” and look for the COM port number, e.g. COM port 9. If a distinction is made between outgoing and incoming ports, note the incoming port. If you have problems connecting, refer to the troubleshooting guide in section 5.
3. RHEO KNEE is successfully connected when the Bluetooth indicator is blue and white and the status box changes from “Disconnected” to “Connected”.
Figure 3
Figure 2
6
3 RheologicTM Workbench functions
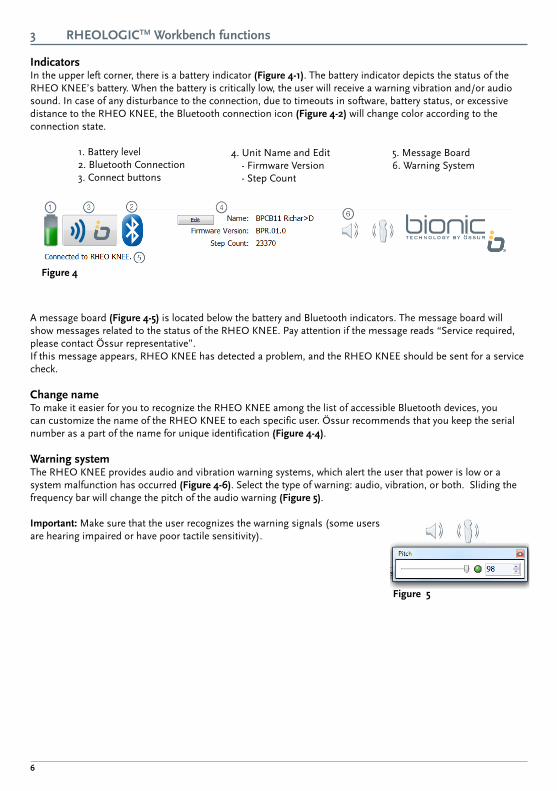
indicatorsIn the upper left corner, there is a battery indicator (Figure 4-1). The battery indicator depicts the status of the RHEO KNEE’s battery. When the battery is critically low, the user will receive a warning vibration and/or audio sound. In case of any disturbance to the connection, due to timeouts in software, battery status, or excessive distance to the RHEO KNEE, the Bluetooth connection icon (Figure 4-2) will change color according to the connection state.
1. Battery level 2. Bluetooth Connection 3. Connect buttons
A message board (Figure 4-5) is located below the battery and Bluetooth indicators. The message board will show messages related to the status of the RHEO KNEE. Pay attention if the message reads “Service required, please contact Össur representative”.If this message appears, RHEO KNEE has detected a problem, and the RHEO KNEE should be sent for a service check.
change nameTo make it easier for you to recognize the RHEO KNEE among the list of accessible Bluetooth devices, you can customize the name of the RHEO KNEE to each specific user. Össur recommends that you keep the serial number as a part of the name for unique identification (Figure 4-4).
Warning systemThe RHEO KNEE provides audio and vibration warning systems, which alert the user that power is low or a system malfunction has occurred (Figure 4-6). Select the type of warning: audio, vibration, or both. Sliding the frequency bar will change the pitch of the audio warning (Figure 5).
important: Make sure that the user recognizes the warning signals (some users are hearing impaired or have poor tactile sensitivity).
Figure 5
Figure 4
4. Unit Name and Edit - Firmware Version - Step Count
5. Message Board6. Warning System
7
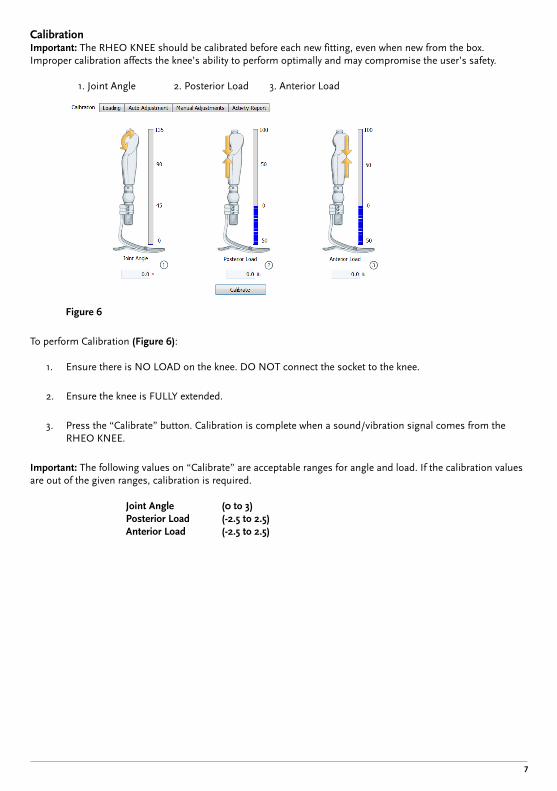
calibrationimportant: The RHEO KNEE should be calibrated before each new fitting, even when new from the box. Improper calibration affects the knee’s ability to perform optimally and may compromise the user’s safety.
1. Joint Angle 2. Posterior Load 3. Anterior Load
To perform Calibration (Figure 6):
1. Ensure there is NO LOAD on the knee. DO NOT connect the socket to the knee.
2. Ensure the knee is FULLY extended.
3. Press the “Calibrate” button. Calibration is complete when a sound/vibration signal comes from the RHEO KNEE.
important: The following values on “Calibrate” are acceptable ranges for angle and load. If the calibration values are out of the given ranges, calibration is required.
Joint Angle (0 to 3) Posterior load (-2.5 to 2.5) Anterior load (-2.5 to 2.5)
Figure 6
8
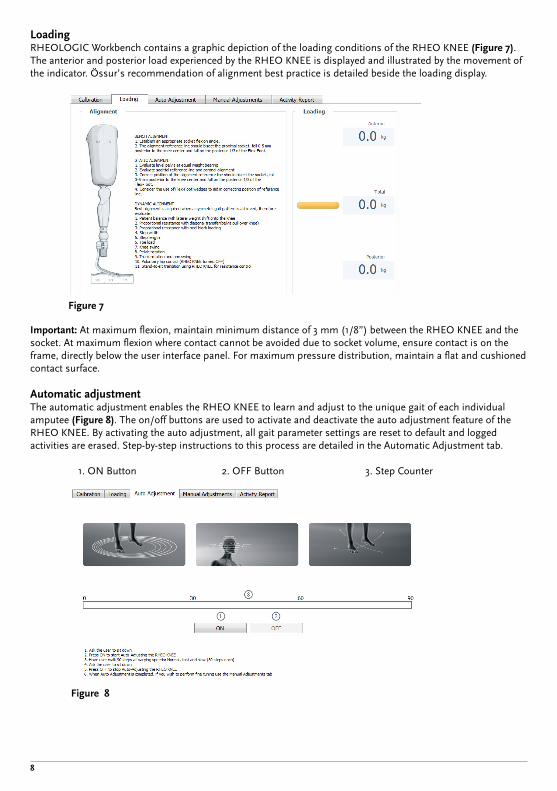
loadingRHEOLOGIC Workbench contains a graphic depiction of the loading conditions of the RHEO KNEE (Figure 7). The anterior and posterior load experienced by the RHEO KNEE is displayed and illustrated by the movement of the indicator. Össur’s recommendation of alignment best practice is detailed beside the loading display.
important: At maximum flexion, maintain minimum distance of 3 mm (1/8”) between the RHEO KNEE and the socket. At maximum flexion where contact cannot be avoided due to socket volume, ensure contact is on the frame, directly below the user interface panel. For maximum pressure distribution, maintain a flat and cushioned contact surface. Automatic adjustmentThe automatic adjustment enables the RHEO KNEE to learn and adjust to the unique gait of each individual amputee (Figure 8). The on/off buttons are used to activate and deactivate the auto adjustment feature of the RHEO KNEE. By activating the auto adjustment, all gait parameter settings are reset to default and logged activities are erased. Step-by-step instructions to this process are detailed in the Automatic Adjustment tab.
1. ON Button 2. OFF Button 3. Step Counter
Figure 7
Figure 8

9
Note: Auto adjustment affects stance flexion and swing flexion only.
Note: If the auto adjustment mode is not manually disabled, it will automatically disable itself on the 200th step. The minimum number of steps is 60. For primary amputees, a personalized gait setting is recommended, which should be updated as the gait improves. When the primary amputee is able to walk 60–90 steps, the auto adjustment procedure should be performed.
Manual adjustmentsimportant: When making adjustments, make sure that the user is in a stable standing position or seated. All RHEO KNEE functions (including stance phase stability) will be interrupted during the period in which the settings are updating.
The Manual Adjustments tab contain five settings to adjust gait parameters – and one feature that allows for keeping the knee locked in extension (Figure 9).
Stance flexionStance flexion (level ground) depicts the prosthetic limb in stance phase moving into knee flexion. This adjustment is the primary mechanism of providing additional knee stability to the user when walking on level ground. It also allows for the user to walk using a stance flexion ambulation pattern. Adjustment varies from 0–100. The default value is 50.
1. Slider 2. Arrows 3. Value 4. Checkbox
Stance flexion (stairs and ramps) depicts a set of stairs and ramp. This setting will allow for independent resistance to be established for ramp and stair walking. Adjustment varies from 0 – 100. The default value is 50.
Increasing the stance flexion resistance allows for a faster increase in stance support for the user. On level ground, the stance flexion rate may be slower and will require increased loading to initiate. On stair/ramp descent, the user will descend more slowly and with greater support. Decreasing the stance flexion resistance allows for slower increase in stance support for the user. On level ground, this means that the stance flexion rate may be more rapid and will require decreased load to initiate. On stair/ramp descent, the user will descend more rapidly and with less support.
The RHEO KNEE requires one step to transition between level ground walking resistance and stair/ramp resistance. The RHEO KNEE stance control settings may be customized to maximize security or terrain recognition depending on the user’s preference.
1 243
Figure 9
1
2
43
10
Optimal stability: The level ground value is increased to match the stair/ramp value. Recommended when stability is critical on all walking surfaces and stance flexion ambulation pattern is not being utilized. The user will experience a high degree of stance resistance on all walking surfaces, including the first step of terrain transition.
Variable stance resistance: When the level ground value is less than the stair/ramp value, easier stance flexion walking is possible. A greater difference in resistance will be noticed during the first step of terrain transition. Ensure alignment through knee center or 5mm posterior to knee center.
important: Foot alignment is critical. Posterior foot position may lead to difficulties in stance release. Anterior foot position may lead to toe stubbing when walking in stance flexion.
Stance extensionStance extension depicts the prosthetic limb in stance phase and moving in to extension. This adjustment controls how rapidly the resistance increases with knee extension rate. The adjustment is required only when the user is walking in a stance flexion ambulation pattern and assists in providing proper timing of stance flexion/extension reciprocation and enhanced comfort. The default value is 30. Increasing the stance extension resistance allows for more rapid increase in resistance to knee extension and slower knee extension rate when load is placed on the prosthesis.
Flexion target angleThe flexion target angle depicts the prosthetic limb at its maximum knee flexion angle during the swing phase. Adjustment of target angle varies from 45–80°. The default value is 60°.
Increasing the flexion target angle allows for increased heel rise and delays knee extension. Decreasing the flexion target angle allows for decreased heel rise and promotes more rapid knee extension.
important: For most individuals, the flexion target angle should remain at the default setting, 60 degrees. When manually adjusting the flexion target angle, make small changes one or two degrees at a time.
Swing extensionSwing extension (level ground) depicts the prosthetic knee moving into extension during the swing phase on a level walking surface. Adjustment varies from 0–100. The default value is 20. Swing extension (ramps and steps) depicts swing extension resistance for stair/ramp walking. Resistance activates after one step onto the step/ramp.
This adjustment is minimized and set to zero so that rapid extension may occur on ramps and stairs for increased security. Adjustment varies from 0 – 100. The default value is 0.
Increasing the extension resistance slows the extension rate towards the end of swing phase. Decreasing the extension resistance increases the extension rate towards the end of swing phase.
Terminal swing (TS)Terminal swing is the last phase of swing extension prior to full knee extension. The terminal swing adjustment feature in RHEO KNEE is divided into two interlinked parameter settings:
Terminal swing resistance (TSR) controls the velocity of the terminal swing. Increasing the TSR values increases the resistance. Decreasing the TSR values decreases the resistance. The default value is 20.
Terminal swing point (TSP) controls the rate of the terminal swing. Increasing the TSP values delays the resistance onset. Decreasing the TSP values hastens the resistance onset. The default value is 20.
Note: The terminal swing parameter settings should only be utilized when the swing extension parameter has been optimized to the user's gait.
11
Extension holdThis setting is active when the box next to “Extension Hold” is checked. The setting is useful for vehicle entry/exit, especially in low-rise vehicles. When active, the user may kick the knee into extension by using rapid hip flexion followed by hip extension. A lock then activates to prevent the knee from flexing against the force of gravity. The user is not forced to hold the shin in extension while entering the vehicle. After 3 seconds, the shin automatically unlocks and moves into flexion with gravity
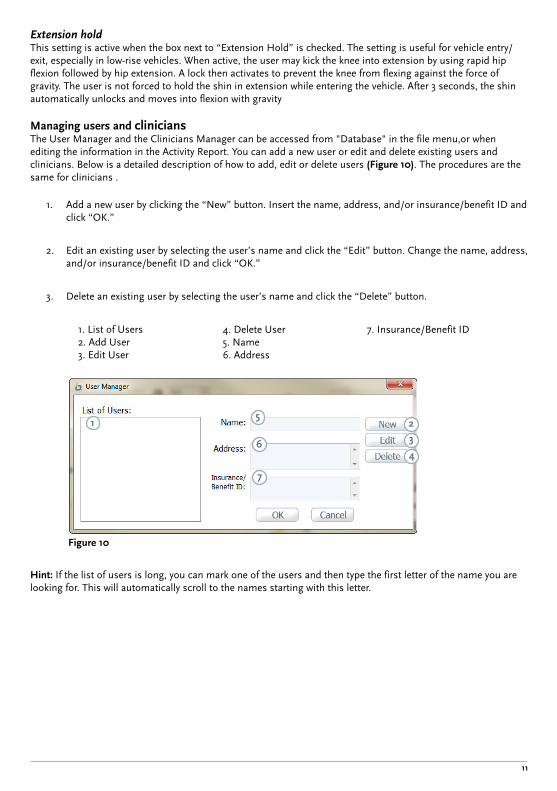
Managing users and cliniciansThe User Manager and the Clinicians Manager can be accessed from "Database" in the file menu,or when editing the information in the Activity Report. You can add a new user or edit and delete existing users and clinicians. Below is a detailed description of how to add, edit or delete users (Figure 10). The procedures are the same for clinicians .
1. Add a new user by clicking the “New” button. Insert the name, address, and/or insurance/benefit ID and click “OK.”
2. Edit an existing user by selecting the user’s name and click the “Edit” button. Change the name, address, and/or insurance/benefit ID and click “OK.”
3. Delete an existing user by selecting the user’s name and click the “Delete” button.
1. List of Users 2. Add User 3. Edit User
hint: If the list of users is long, you can mark one of the users and then type the first letter of the name you are looking for. This will automatically scroll to the names starting with this letter.
1 2
3
4
5
6
7
Figure 10
4. Delete User5. Name6. Address
7. Insurance/Benefit ID
12
Managing settingsIt is possible to add, restore, and delete settings to the RHEO KNEE. You can find the different options in the file menu.
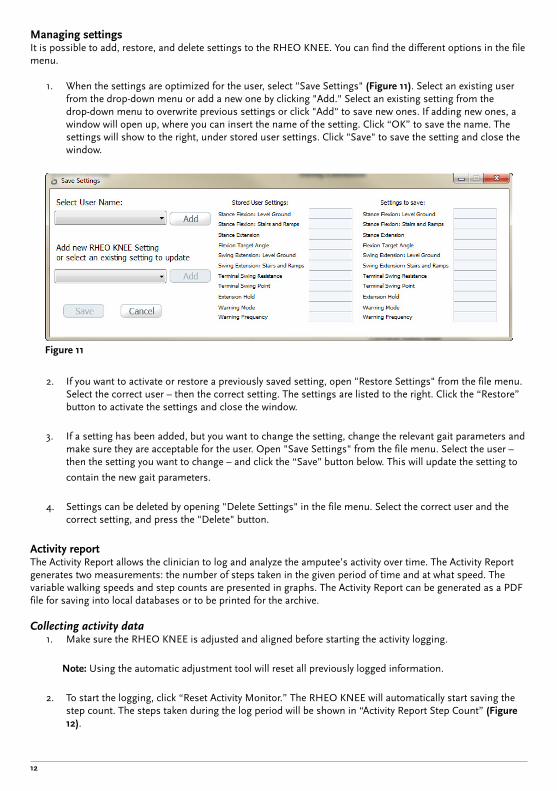
1. When the settings are optimized for the user, select "Save Settings" (Figure 11). Select an existing user from the drop-down menu or add a new one by clicking "Add." Select an existing setting from the drop-down menu to overwrite previous settings or click "Add" to save new ones. If adding new ones, a window will open up, where you can insert the name of the setting. Click “OK” to save the name. The settings will show to the right, under stored user settings. Click "Save" to save the setting and close the window.
2. If you want to activate or restore a previously saved setting, open "Restore Settings" from the file menu. Select the correct user – then the correct setting. The settings are listed to the right. Click the “Restore” button to activate the settings and close the window.
3. If a setting has been added, but you want to change the setting, change the relevant gait parameters and make sure they are acceptable for the user. Open "Save Settings" from the file menu. Select the user – then the setting you want to change – and click the “Save" button below. This will update the setting to
contain the new gait parameters.
4. Settings can be deleted by opening "Delete Settings" in the file menu. Select the correct user and the correct setting, and press the "Delete" button.
Activity reportThe Activity Report allows the clinician to log and analyze the amputee’s activity over time. The Activity Report generates two measurements: the number of steps taken in the given period of time and at what speed. The variable walking speeds and step counts are presented in graphs. The Activity Report can be generated as a PDF file for saving into local databases or to be printed for the archive.
Collecting activity data1. Make sure the RHEO KNEE is adjusted and aligned before starting the activity logging.
Note: Using the automatic adjustment tool will reset all previously logged information.
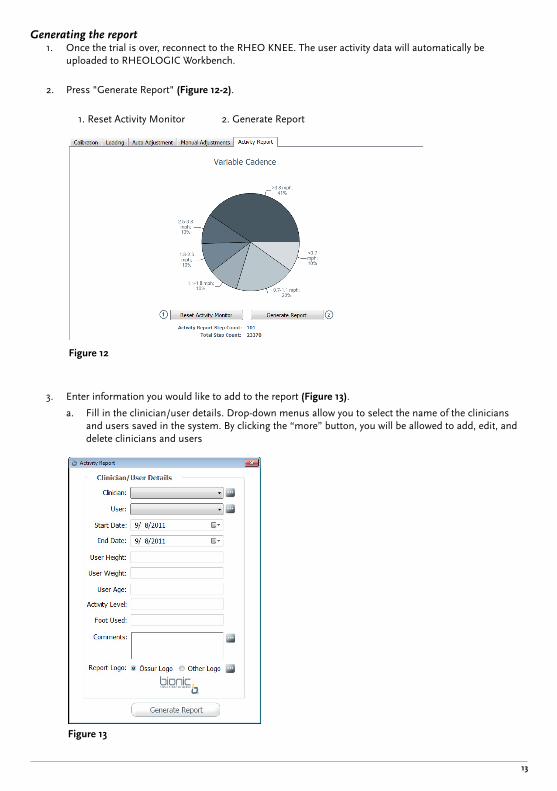
2. To start the logging, click “Reset Activity Monitor.” The RHEO KNEE will automatically start saving the step count. The steps taken during the log period will be shown in “Activity Report Step Count” (Figure 12).
Figure 11
13
Generating the report1. Once the trial is over, reconnect to the RHEO KNEE. The user activity data will automatically be
uploaded to RHEOLOGIC Workbench.
2. Press "Generate Report" (Figure 12-2).
1. Reset Activity Monitor 2. Generate Report
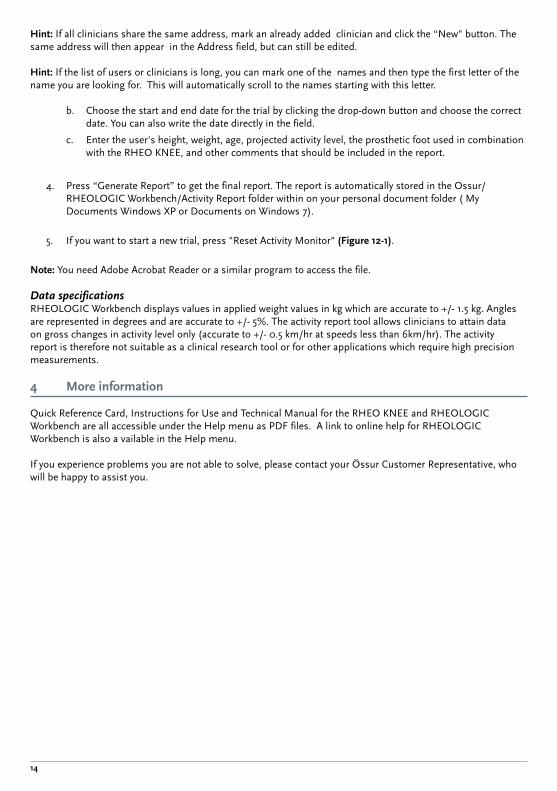
3. Enter information you would like to add to the report (Figure 13).
a. Fill in the clinician/user details. Drop-down menus allow you to select the name of the clinicians and users saved in the system. By clicking the “more” button, you will be allowed to add, edit, and delete clinicians and users
Figure 12
Figure 13
14
hint: If all clinicians share the same address, mark an already added clinician and click the “New" button. The same address will then appear in the Address field, but can still be edited.
hint: If the list of users or clinicians is long, you can mark one of the names and then type the first letter of the name you are looking for. This will automatically scroll to the names starting with this letter.
b. Choose the start and end date for the trial by clicking the drop-down button and choose the correct date. You can also write the date directly in the field.
c. Enter the user's height, weight, age, projected activity level, the prosthetic foot used in combination with the RHEO KNEE, and other comments that should be included in the report.
4. Press “Generate Report” to get the final report. The report is automatically stored in the Ossur/RHEOLOGIC Workbench/Activity Report folder within on your personal document folder ( My Documents Windows XP or Documents on Windows 7).
5. If you want to start a new trial, press "Reset Activity Monitor" (Figure 12-1).
Note: You need Adobe Acrobat Reader or a similar program to access the file.
Data specifications RHEOLOGIC Workbench displays values in applied weight values in kg which are accurate to +/- 1.5 kg. Angles are represented in degrees and are accurate to +/- 5%. The activity report tool allows clinicians to attain data on gross changes in activity level only (accurate to +/- 0.5 km/hr at speeds less than 6km/hr). The activity report is therefore not suitable as a clinical research tool or for other applications which require high precision measurements.
4 More information
Quick Reference Card, Instructions for Use and Technical Manual for the RHEO KNEE and RHEOLOGIC Workbench are all accessible under the Help menu as PDF files. A link to online help for RHEOLOGIC Workbench is also a vailable in the Help menu.
If you experience problems you are not able to solve, please contact your Össur Customer Representative, who will be happy to assist you.

15

16
No
YeS
YeS
YeS
YeS
NoDo you know where to find what COM Port has been assigned to your RHEO KNEE? (This may change each time you connect)
If you are still unable to connect to your RHEO KNEE please contact Össur Customer Service.
Do you have Bluetooth installed on your computer?
Have you added the RHEO KNEE as a Bluetooth Device?
5 Troubleshooting the connection with your Rheo KNee®
Have you installed RHEOLOGIC Workbench?If so, you should see the icon on your desktop or in the start menu.
Do you see a Bluetooth icon in the Notification area? It may be hidden, click the little arrow.
Do you see “My Bluetooth Places” on the desktop or a Bluetooth icon in the Notification area?
No
No
Windows 7/ Windows Vista Windows XP

17
When searching for Bluetooth Devices make sure the RHEO KNEE is turned on, has sufficient battery and is within range.If your RHEO KNEE is not displayed in the list of available devices it may be added already.
Open Bluetooth Devices and “Add New Device”. Follow the instructions on the screen. Make sure you select the correct RHEO KNEE and type the PIN number. Write down what COM Port is being used.
The PIN number is the last 4 digits of the serial number, found on the back of the RHEO KNEE.
If your computer has a built-in Bluetooth capability follow instructions provided with the computer to install Bluetooth.If not you can order and install a Bluetooth USB dongle from Össur.
If the icons did not appear, make sure you did not install it under another user’s profile.
You should have received an email with a link to an Össur website. Click the link and follow the instructions to download and install the program.
Open Bluetooth Devices, identify your RHEO KNEE, select “Properties” and look for the COM port number, e.g. COM port 9. If a distinction is made between outgoing and incoming ports, note the incoming port.You need to provide the COM port number when connecting to the RHEO KNEE.
Flex-Foot Talux®
Elation®
Re-Flex Rotate™ with EVO™
1/3 1/3 1/3
1/2 1/2
90 min = 6 - 12 H
2 - 4 H = 24 - 48 H
30 min = 2 - 4 H
75mm
78,3mm
52mm
56mm
= on = off
1
G
A
= 0-60%
= 60-90%
= 90-100%
C D E
B
F
Vari-Flex with EVO® TM
78,3
52
258,
81
235,
620
0,5 73
35,0
5
mm
mm
mm
mm
mm
mm
mm
52
263,
70
235,
620
0,5
73
35,0
5
78,3
mm
mm
mm
mm
mm
mm
mm
Össur hf, Grjóthalsi 5, 110 Reykjavík, Iceland 2011
RHEO KNEERechargeable Li-Ion Battery OperatedRating: 24 V 1.0 A (max.)
123456
0086
FCC ID: PVH090103S; IC: 5325A-090103S
Össur hf, Grjóthalsi 5, 110 Reykjavík, Iceland 2011
RHEO KNEERechargeable Li-Ion Battery OperatedRating: 24 V 1.0 A (max.)
123456
0086
FCC ID: PVH090103S; IC: 5325A-090103S
STill No?
STill No?