Embed Size (px)
Citation preview

Operator’s Manual
ThermoBrite is a registered trademark.

Operator’s Manual
ThermoBrite® Elite
Model Number S600
For in-vitro diagnostic use
Copyright 2013 Leica Biosystems - All Rights Reserved

Table of Contents
3855-007608-001 Rev D Operator’s Manual 1
1 - Introduction ............................................................ 5
Intended Use ................................................................................................................................... 5
How to use the Operator’s Manual ................................................................................................ 5
Notes, Precautions, and Warnings ................................................................................................. 6
Notes ......................................................................................................................................... 6
Cautions .................................................................................................................................... 6
Warnings ................................................................................................................................... 6
Biological Warnings ................................................................................................................... 6
Symbols ........................................................................................................................................... 7
Warnings, Precautions, Limitations ................................................................................................ 8
Leica Biosystems Contact Information ......................................................................................... 12
Authorized European Representative .................................................................................... 12
Manufacturer .......................................................................................................................... 12
Warranty ....................................................................................................................................... 13
Leica Biosystems Warranty ..................................................................................................... 13
Limitation of Liability .............................................................................................................. 13
Use of Third Party Computer Products ................................................................................... 14
2 - Installation ............................................................ 15
Unpacking ..................................................................................................................................... 15
Contents ........................................................................................................................................ 16
ThermoBrite Elite System ....................................................................................................... 16
Re-Order Kits ........................................................................................................................... 17
Requirements ................................................................................................................................ 17
Electrical Requirements .......................................................................................................... 17
Temperature Requirements ................................................................................................... 18
Space Requirements ............................................................................................................... 18
Environmental Requirements ................................................................................................. 19
Installation .................................................................................................................................... 20
Fluid Management System ..................................................................................................... 24
End-User License Agreement ........................................................................................................ 28
3 – System Description ............................................... 33
Theory of Operation...................................................................................................................... 33
FISH Applications .................................................................................................................... 33
Components .................................................................................................................................. 33
Front ........................................................................................................................................ 34

Table of Contents
3855-007608-001 Rev D Operator’s Manual 2
Back ......................................................................................................................................... 34
Fluidic System ......................................................................................................................... 35
Reagent Manifold.............................................................................................................. 35
Waste Manifold................................................................................................................. 35
Pumps ............................................................................................................................... 36
Reagent Pump ............................................................................................................. 36
Waste Pump ................................................................................................................ 36
Module Manifold .............................................................................................................. 36
Sample Chambers ................................................................................................................... 37
Slide Carriers ........................................................................................................................... 37
Electrical and Communication Connections ........................................................................... 37
Power Port and Power Switch .......................................................................................... 37
Netbook Communication Port .......................................................................................... 38
Software .................................................................................................................................. 38
4 – Preparing the System for Run ................................ 39
Reagents ........................................................................................................................................ 39
Compatible Reagents .............................................................................................................. 39
Reagent Preparation and Connection .................................................................................... 40
Slide Preparation ........................................................................................................................... 43
System Ready ................................................................................................................................ 43
5 – How to use the ThermoBrite Elite Software ........... 44
Getting Started .............................................................................................................................. 44
What to do Before Operating the Instrument ........................................................................ 44
Navigating the Interface ............................................................................................................... 45
Operating the Instrument ............................................................................................................. 46
Start Screen ............................................................................................................................. 46
Running a Protocol ........................................................................................................................ 47
Start Screen ............................................................................................................................. 47
Run .................................................................................................................................... 47
Run/Create/Edit ................................................................................................................ 48
Selecting a Protocol to Run ..................................................................................................... 48
Protocol Dashboard ................................................................................................................ 49
Adding Slides to Module ................................................................................................... 49
Starting the Protocol ............................................................................................................... 51
User Initials ....................................................................................................................... 52
Run Paused ....................................................................................................................... 53
Run Slide Position Activity ................................................................................................ 53

Table of Contents
3855-007608-001 Rev D Operator’s Manual 3
Run Module Current Temperature Activity ...................................................................... 54
Protocol Completion Summary ......................................................................................... 56
Drain Chambers .......................................................................................................... 57
Save and Run Line Wash ............................................................................................. 57
Logs ............................................................................................................................................... 57
Summary Log .......................................................................................................................... 57
Detail Log ................................................................................................................................ 57
Creating a New Protocol ............................................................................................................... 58
Protocol Name ........................................................................................................................ 59
Protocol Description ............................................................................................................... 60
Protocol Steps ......................................................................................................................... 61
Reagent Steps ................................................................................................................... 61
Reagent Fill .................................................................................................................. 63
Reagent Rock .............................................................................................................. 64
Reagent Temp ............................................................................................................. 65
Reagent Incubate ........................................................................................................ 67
Reagent Drain ............................................................................................................. 68
Reagent Step Options ................................................................................................. 68
Reagent Flush .............................................................................................................. 68
Reagent Step Prompt Option ...................................................................................... 69
Save and Close .................................................................................................................. 71
Prime Step ......................................................................................................................... 72
Pause Step ......................................................................................................................... 73
Drain Step .......................................................................................................................... 73
Waste Bottles .................................................................................................................... 74
Alerts ....................................................................................................................................... 75
Warning Protocol Issues ................................................................................................... 75
Warning Invalid Protocol Name ........................................................................................ 75
6 – Maintenance & Troubleshooting ........................... 77
Maintenance ................................................................................................................................. 77
Cleaning ................................................................................................................................... 77
Cleaning Instrument Surfaces ..................................................................................... 78
Cleaning Sample Chambers ........................................................................................ 78
Cleaning Slide Carriers ................................................................................................ 78
Cleaning the Netbook ................................................................................................. 78
Discarding Liquid Waste .......................................................................................................... 78
Line Wash ................................................................................................................................ 79
As Needed Maintenance ......................................................................................................... 82

Table of Contents
3855-007608-001 Rev D Operator’s Manual 4
Replacing the Module Manifold Filters ............................................................................ 82
Replacing the Peristaltic Pump Tubes ............................................................................... 84
Troubleshooting ............................................................................................................................ 87
Troubleshooting by Symptoms ............................................................................................... 88
Error Messages ....................................................................................................................... 91
Cannot load protocol ........................................................................................................ 91
Could not switch the # to # ............................................................................................... 91
Drain Side Low Flow .......................................................................................................... 91
Error loading Protocol ....................................................................................................... 92
Exit valve failed to switch to bypass position ................................................................... 92
Inlet valve failed to switch to bypass position .................................................................. 92
Inlet valve failed to switch to chamber ............................................................................ 92
Instrument failed self-test ................................................................................................ 93
Instrument thread is either terminated or unresponsive within 20sec. Software will terminate .......................................................................................................................... 93
Modules did not reach target temperature(s) within 1 hour ........................................... 93
Internal software error ..................................................................................................... 93
Internal instrument error .................................................................................................. 93
Internal operation error .................................................................................................... 94
Internal runner module error ........................................................................................... 94
No ThermoBrite Elite found .............................................................................................. 94
Reagent valve failed to switch to reagent line # .............................................................. 94
Self-test failed to communicate with Instrument ............................................................ 95
Sensors indicate a critical flow error ................................................................................ 95
Sensors indicate reduced flow rate warning(s) ................................................................ 96
The protocol has failed ..................................................................................................... 96
This protocol contains errors and it cannot be run .......................................................... 96
Unhandled exception ........................................................................................................ 97
USB Communication interruption .................................................................................... 97
Checking USB Connections ..................................................................................................... 98
Replacing the Fuses................................................................................................................. 99
7 – Specifications ...................................................... 101
References ............................................................................................................................ 102

1 - Introduction
3855-007608-001 Rev D Operator’s Manual 5
1 - Introduction
Intended Use For in-vitro use only. The ThermoBrite® Elite provides total automation for the pre and post hybridization steps in FISH testing, while providing accurate temperature control of on-board denaturation and hybridization.
How to use the Operator’s Manual This document is the Operator’s Manual for the ThermoBrite Elite System, manufactured by Leica Biosystems Richmond, Inc. Please read this manual carefully before operating the instrument, since the manual contains instructions for installation, operation, maintenance and troubleshooting. A thorough knowledge of the system is recommended before any installation or use of the system. System operations are explained in detail, and as such, the manual may be used for training operators. The system operations detailed in the manual include Theory of Operation, System Component review, sample and reagent preparation, and protocol development using the ThermoBrite Elite software.
Please retain this manual for future use.
1 - Introduction
3855-007608-001 Rev D Operator’s Manual 6
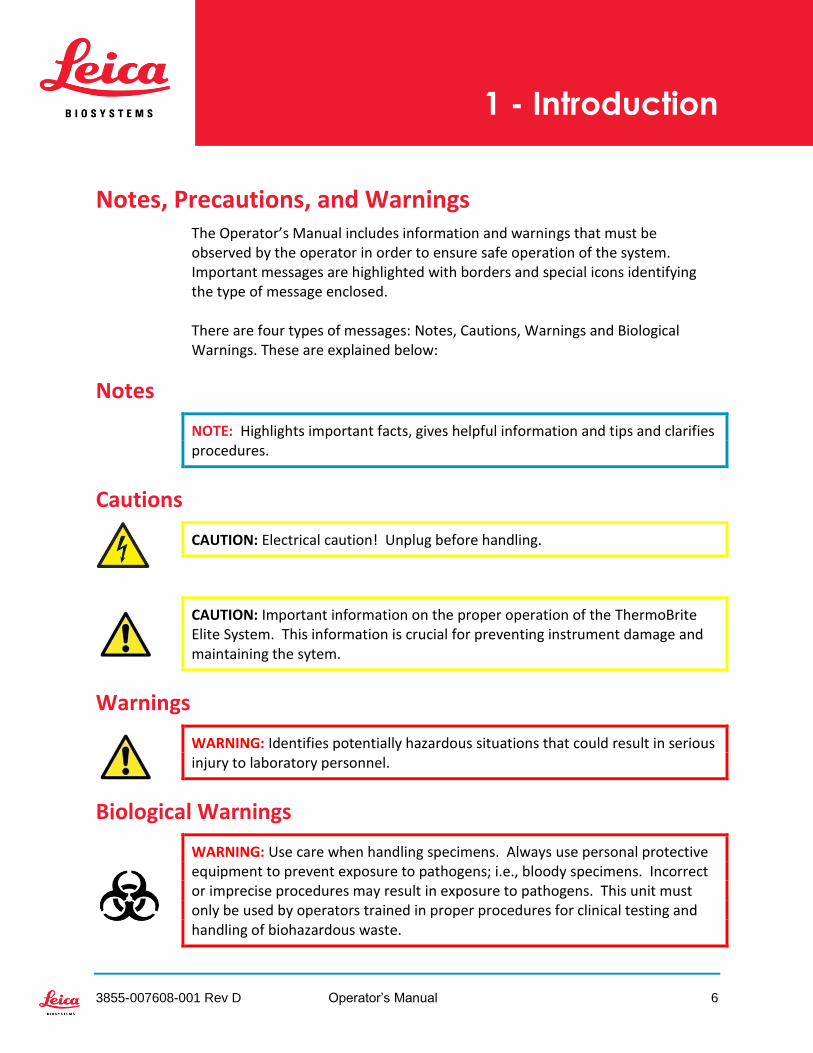
Notes, Precautions, and Warnings The Operator’s Manual includes information and warnings that must be observed by the operator in order to ensure safe operation of the system. Important messages are highlighted with borders and special icons identifying the type of message enclosed. There are four types of messages: Notes, Cautions, Warnings and Biological Warnings. These are explained below:
Notes
NOTE: Highlights important facts, gives helpful information and tips and clarifies procedures.
Cautions
CAUTION: Electrical caution! Unplug before handling.
CAUTION: Important information on the proper operation of the ThermoBrite Elite System. This information is crucial for preventing instrument damage and maintaining the sytem.
Warnings
WARNING: Identifies potentially hazardous situations that could result in serious injury to laboratory personnel.
Biological Warnings
WARNING: Use care when handling specimens. Always use personal protective equipment to prevent exposure to pathogens; i.e., bloody specimens. Incorrect or imprecise procedures may result in exposure to pathogens. This unit must only be used by operators trained in proper procedures for clinical testing and handling of biohazardous waste.

1 - Introduction
3855-007608-001 Rev D Operator’s Manual 7
Symbols The following is a list of symbols used on the product labeling consumables, the instrument, and their meaning.
Symbol Meaning
Indicates the Leica Biosystems product/catalog number
Statement of caution: Read carefully.
Indicates potential electrical hazard
Potentially flammable liquids
Potentially harmful substances
WARNING: Identifies potentially hazardous situations that could result in serious injury to laboratory personnel.
Potentially hot surface
Potentially toxic substances
Potential biohazard
Indicates for use only as in-vitro diagnostic device
Indicates instrument serial number
Consult Operating Instructions
Compliance to IVD Directive European Community
Listed device with Intertek testing agency

1 - Introduction
3855-007608-001 Rev D Operator’s Manual 8
Symbol Meaning
Rating: (located on serial number label, replace with same value and type)
Single Phase Alternating Current
Warnings, Precautions, Limitations Do not place the ThermoBrite Elite System in water.
Do not drop or throw the instrument.
Operate the instrument on a dry, level surface.
Do not move the instrument while a run is in process.
Plug the instrument into a grounded power source.
Avoid sources of bright light/heat.

1 - Introduction
3855-007608-001 Rev D Operator’s Manual 9
Precautions and Safety
Please pay close attention to the instructions that accompany the notes and symbols as well as the standard laboratory practices outlined by your facility and local regulatory agencies. The ThermoBrite Elite unit weighs approximately 60 lbs (27 kgs), not including the Fluid Management System and accessories. Choose a place to set up the unit before completing its assembly. Select a room to set up the unit where the temperature can be controlled between 59oF (15oC) and 104oF (40oC), and relative humidity non-condensing in a range of 80% maximum for a temperature <88oF (31oC) and 50% maximum for a temperature range of 88oF - 104oF (31-40oC).
CAUTION: The equipment inside fixed covered areas of the instrument is not operator serviceable and may present electrical shock hazards.
CAUTION: Always keep a distance of at least 2 inches (5 cm) between the rear of the unit and the wall to allow for proper cooling.
CAUTION: Do NOT use power frequencies or voltage other than those specified in this document. Connection to an inappropriate power source may cause injury or fire.
CAUTION: Make certain that the power supply for the ThermoBrite Elite is from a dedicated line that provides power to no other instruments or appliances. If power is not clean and steady, a UPS and/or power conditioner is recommended.
CAUTION: Do NOT disassemble or modify the unit. Doing so may cause injury and/or instrument malfunction and void the warranty.
CAUTION: Place the unit on a stable and level surface free of vibration. Failure to do so may cause injury or malfunction of the unit.
15oC
40oC

1 - Introduction
3855-007608-001 Rev D Operator’s Manual 10
CAUTION: Do NOT place the unit where it may be affected by chemicals, corrosive gases or electronic noise. Doing so may cause injury or malfunction of the unit.
CAUTION: Do NOT place the unit where it may be affected by water, direct sunlight or draft. This may cause damage to the unit. Select a room to set up the unit where the temperature can be controlled between 59oF (15oC) and 104oF (40oC), and relative humidity non-condensing in a range of 80% maximum for a temperature <88oF (31oC) and 50% maximum for a temperature range of 88oF - 104oF (31-40oC).
CAUTION: Do NOT install the system during lightning activity. For protection during lightning storms and power surges, contact your facility’s electrical department.
CAUTION: For added protection of the equipment during lightning and power surges, always unplug the power cord. If the instrument is not used for a long period of time, unplug the power cord.
CAUTION: To reduce the risk of electric shock, do not remove any panel unless under the direction of qualified personnel.
CAUTION: To reduce the risk of electric shock, do not use an extension cord, receptacle or other outlet unless the blades can be inserted completely with three-wire grounding type to prevent blade exposure.
CAUTION: Do NOT block any ventilation openings. Inadequate ventilation can result in overheating of the instrument or improper temperature control.

1 - Introduction
3855-007608-001 Rev D Operator’s Manual 11
WARNING: For continued protection against risk of fire and hazard, replace only with the same type and rating fuse.
WARNING: Equipment requires connection to protective earth ground for safety reasons.
WARNING: The instrument’s main power switch is used as the main disconnect device.
WARNING: Observe Universal Precautions. Discard contaminated materials according to applicable regulations.
WARNING: Dispose of waste product, unused product and contaminated packaging in compliance with applicable legal regulations. If unsure of the applicable legal requirements, contact the local authorities for information.

1 - Introduction
3855-007608-001 Rev D Operator’s Manual 12
Leica Biosystems Contact Information Customer opinion and input is extremely important to us. Comments on this manual should be directed to: Leica Biosystems Richmond, Inc. 5205 Route 12 Richmond, IL 60071 USA Telephone: 1-815-678-2000 Customer Service: 1-800-248-0123 Technical Support: 1-800-248-0123 Website: www.LeicaBiosystems.com
Authorized European Representative CEpartner4U Esdoornlaan 13 3951 DB Maarn The Netherlands +31 (0) 6516536 26
Manufacturer Leica Biosystems Richmond, Inc. 5205 Route 12 Richmond, IL 60071 USA 1-815-678-2000

1 - Introduction
3855-007608-001 Rev D Operator’s Manual 13
Warranty
Leica Biosystems Warranty Leica Biosystems warrants that this device shall be free from defects in material and/or workmanship, under normal use and service, for the period expiring twelve (12) months from the date of installation, or thirteen (13) months from date of shipment, whichever is shorter. Accessories shall be free from defects in material and/or workmanship, under normal use and service, for the period outlined above. Leica Biosystems will, at its discretion, repair or replace any unit or part covered under this warranty returned to Leica Biosystems with shipping costs prepaid. Repaired or replaced instruments supplied under this warranty carry only the remaining portion of the original warranty and repairs shall not interrupt or prolong this warranty. For warranty terms and conditions outside the United States, contact your Authorized Leica Biosystems Distributor. No warranty extended by Leica Biosystems shall apply to any instrument that has been damaged due to misuse, negligence, accident, or damage resulting from unauthorized repairs, alterations, or improper installation. Leica Biosystems makes no warranty other than the one set forth herein. This warranty is given expressly in lieu of all other warranties, expressed or implied. The purchaser agrees that there is no warranty of merchantability or of fitness for any intended purpose and that there are no other remedies or warranties, expressed or implied, which extend beyond the description on the face of the agreement. No agent or employee of Leica Biosystems is authorized to extend any other warranty or assume for Leica Biosystems any liability except as set forth above. This warranty is only applicable to the original purchaser.
Limitation of Liability Leica Biosystems shall not be liable for any loss of use, revenue or anticipated profits, or for any consequential or incidental damages resulting from the sale or use of the products. The purchaser shall be deemed liable for any and all claims, losses, or damages incurred by the use or misuse of the Leica Biosystems instrument by the purchaser, its employees or others, following receipt of the instrument or other items.

1 - Introduction
3855-007608-001 Rev D Operator’s Manual 14
Use of Third Party Computer Products Leica Biosystems does not recommend that the computers provided as a functional part of ThermoBrite Elite System be employed for performing any software or hardware-based applications other than those specifically furnished to operate and support the Leica Biosystems instrument system, or those recommended and offered by Leica Biosystems specifically as accessories or enhancements for the Leica Biosystems instrument system. No other third party application software should be installed in these computers beyond those provided or recommended by Leica Biosystems, without the expressed approval of Leica Biosystems Technical Support, in order to avoid potential performance and reliability problems which can result from incompatibility factors, errors in use of such software, or software-based “viruses.” Installation of such third party software, or non-approved electronic cards or other devices, without advance Leica Biosystems approval may affect the terms of or void any Leica Biosystems warranty otherwise in effect, covering Leica Biosystems supplied software and hardware on the computers and the overall performance and reliability of the entire Leica Biosystems instrument system.

2 – Installation
3855-007608-001 Rev D Operator’s Manual 15
2 - Installation
Unpacking Unpack the ThermoBrite Elite boxes and check the packaged items. If any of the items are damaged or missing, immediately notify Leica Biosystems or your distributor. If the ThermoBrite Elite unit, the Netbook, or the system accessories have been damaged during transport or are missing, notify your carrier immediately and contact customer service at 1-800-248-0123.
CAUTION: The ThermoBrite Elite unit weighs approximately 60 lbs (27 kgs), not including the Fluid Management System and accessories. Use safe lifting techniques and proper equipment when handling heavy objects. If necessary, obtain assistance to safely lift the instrument.
1. Position the shipping container upright and open the top flaps.
CAUTION: If using a utility knife, extend the blade to an appropriate length to avoid cutting any internal components.
2. Remove each box and set aside. 3. Remove the instrument by slowly lifting it vertically out of the shipping
container by the foam end caps. Place the instrument on a stable surface. 4. Remove the foam end caps and place them in the shipping container for
storage. 5. Check the contents of the box with the contents list.
WARNING: Do NOT attempt to lift the instrument by the coverlid or by any component on the side panels as this could result in personal injury and/or damage to the unit.

2 – Installation
3855-007608-001 Rev D Operator’s Manual 16
Contents
ThermoBrite Elite System Item# 3800-007000-001
Contents List Quantity
ThermoBrite Elite Unit 1
Netbook Kit:
(1) Netbook with Pre-Installed Software (1) Power Cable (1) Power Supply (1) Mouse (1) USB Cable
1
ThermoBrite Elite Power Cord 1
Fluid Management System:
(1) Bottle Rack (9) 1L Bottle Assembly (1) 2L Bottle Assembly (1) TBE Wash Bottle (1) Reagent Tube Kit
1
Peristaltic Pump Tubing Kit 4
0.5L Bottle Assembly 3
Module Filter Kit 1
Waste Bottle Kit 3
Waste Tubing Kit 1
Emergency Drain Tubing 1
Slide Carrier Kit 1
0.5L/1L Spare Bottle Cap 12
2L Spare Bottle Cap 2

2 – Installation
3855-007608-001 Rev D Operator’s Manual 17
Re-Order Kits
Requirements The space and facility requirements should be considered when choosing a location for the ThermoBrite Elite System. Improper layout and/or conditions can cause damage to the unit, making it unsafe to operate.
Electrical Requirements The system requires alternating current at 100-240 VAC, 50-60 Hz, 10.0 A. Input voltage and frequency selection does not require customer intervention. Use properly grounded power outlets supplying 100-240 VAC @ 50-60 Hz for both the ThermoBrite Elite Unit and the Netbook. Uninterruptible power supplies are recommended for the ThermoBrite Elite
System to maintain system operation during short power outages and brownouts. This allows for an orderly shutdown of the instrument and the computer without loss of data.
Item Description Quantity Item Number
Peristaltic Pump Kit 2 3800-007742-001
0.5L Bottle Assembly 1 3800-007745-001
1L Bottle Assembly 1 3800-007749-001
2L Bottle Assembly 1 3800-007750-001
TBE Wash Bottle Assembly 1 3800-007865-001
Slide Carrier Kit 6 3800-007744-001
Manifold Filter Kit 6 3800-007743-001
Fluid Management System 1 3800-007687-001
Fuse Kit 5 3801-007769-001
Waste Bottle Kit 1 3800-007684-001
Waste Tubing Kit 3 3800-007746-001

2 – Installation
3855-007608-001 Rev D Operator’s Manual 18
WARNING: The equipment requires connection to protective earth for safety reasons.
Temperature Requirements Select a room to set up the unit where the temperature can be controlled between 59oF (15oC) and 104oF (40oC), and relative humidity non-condensing in a range of 80% maximum for a temperature <88oF (31oC) and 50% maximum for a temperature range of 88oF - 104oF (31-40oC).
Space Requirements Dimensions for the ThermoBrite Elite System are listed in the Product Specification Table (see Specifications). The bench for the instrument should be leveled, stable, and suitable for operation of laboratory equipment. Allow sufficient space to place the Netbook. Allow for sufficient space on either side of the ThermoBrite Elite Unit to place the Fluid Management System and Waste Bottles. Avoid locating the instrument under overhead cabinets that might interfere with access to the unit.

2 – Installation
3855-007608-001 Rev D Operator’s Manual 19
Environmental Requirements The system should be out of direct sunlight and away from sources of intense heat or cold, open flames or sparks.
WARNING: Some protocols may require the use of toxic, flammable, or dangerous reagents. The user is responsible for making sure that appropriate safety precautions are taken, and that reagents are disposed of, according to federal, state, and local regulations.
WARNING: The ThermoBrite Elite does not ventilate or filter harmful substances from the air. If harmful vapors are expected or are a concern, the ThermoBrite Elite should be installed and operated under an appropriate approved ventilation hood.
CAUTION: Do NOT place the system on top of other equipment and do not place other objects or equipment on top of the system.

2 – Installation
3855-007608-001 Rev D Operator’s Manual 20
Installation Make sure that all the Electrical, Space, and Environmental requirements have been met before installing the system. See Requirements.
CAUTION: Use a power cord with a grounded male connector suitable for the power outlet being used, which is rated at 10 Amps or more and has an IEC320/CEE22 female connector to attach to the ThermoBrite Elite instrument.
1. Connect the electrical cord to the power port located on the back of the
ThermoBrite Elite and to an electrical grounded outlet.

2 – Installation
3855-007608-001 Rev D Operator’s Manual 21
2. Connect the Netbook to the power supply and plug the power supply to a grounded electrical outlet. Connect the mouse USB cable to a USB port on the Netbook.
3. Connect USB communication cable provided to a USB port on the Netbook
and to the communication port located in the center of the back panel.
Power cord
Mouse USB cable

2 – Installation
3855-007608-001 Rev D Operator’s Manual 22
4. Press the ThermoBrite Elite power switch, located on the rear panel, next to the power cord, to the On (I) position.
5. When the instrument successfully powers up, a two-beep ready signal sounds, and the green LED on the right side of the front panel illuminates.
6. If the two-beep ready signal does not sound, or the LED activity is not a continuous green light, see the Troubleshooting section.
Power On (I)

2 – Installation
3855-007608-001 Rev D Operator’s Manual 23
7. Press the power switch on the Netbook, see image below.
8. Enter Windows Password: Thermobrite.
9. Double-click on the ThermoBrite Elite software icon located on the desktop.
10. Read and Accept the End-User License Agreement.

2 – Installation
3855-007608-001 Rev D Operator’s Manual 24
Fluid Management System 1. Position the Fluid Management System immediately to the left
and at the same surface level as the ThermoBrite Elite.
CAUTION: Do NOT position the Fluid Management System above or below the level of the instrument as this could affect proper fluid flow.
2. Orient bottles such that the wire mesh filter is closest to the bottom-most
edge for each respective bottle
CAUTION: If the filter is not placed in bottom-most edge, flow errors may occur.
2 – Installation
3855-007608-001 Rev D Operator’s Manual 25
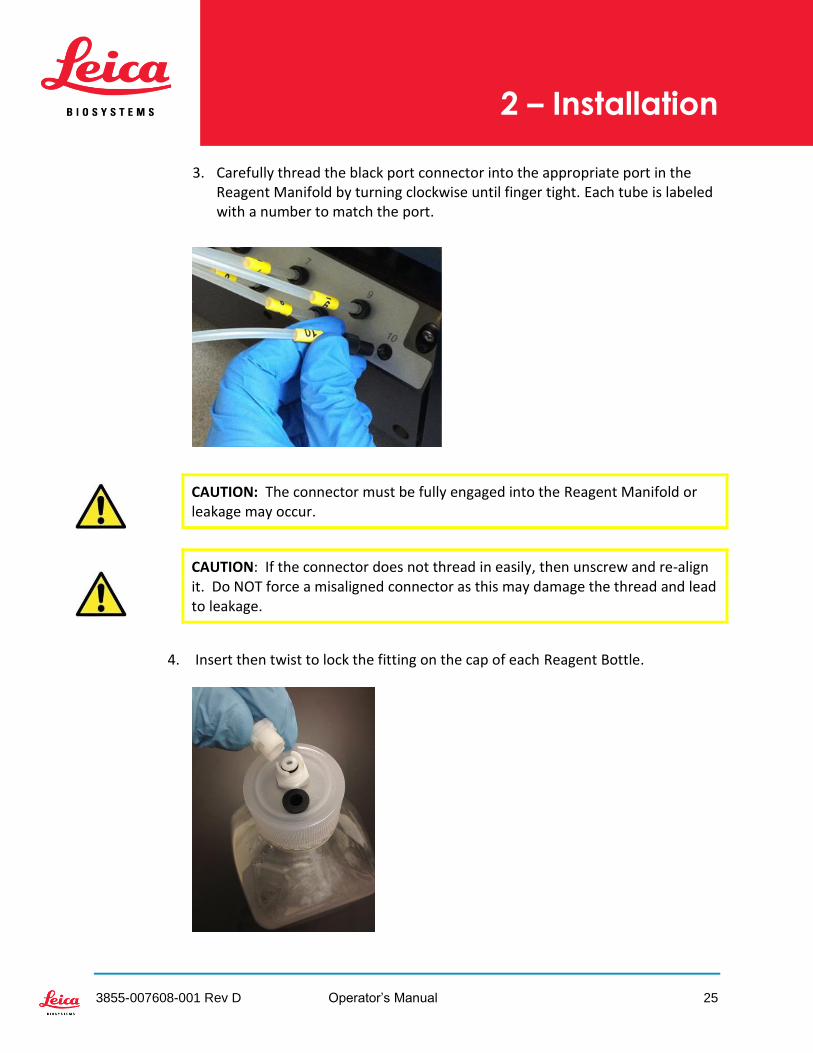
3. Carefully thread the black port connector into the appropriate port in the Reagent Manifold by turning clockwise until finger tight. Each tube is labeled with a number to match the port.
CAUTION: The connector must be fully engaged into the Reagent Manifold or leakage may occur.
CAUTION: If the connector does not thread in easily, then unscrew and re-align it. Do NOT force a misaligned connector as this may damage the thread and lead to leakage.
4. Insert then twist to lock the fitting on the cap of each Reagent Bottle.

2 – Installation
3855-007608-001 Rev D Operator’s Manual 26
5. Thread the Waste Caps onto the Waste Bottles.
6. Connect the end of the Waste Tube to the appropriate Waste Port.
NOTE: Waste Tubes are supplied in a 5’ length. Tubing may be cut to desired length.
7. Position the Waste Bottles to the right of the instrument, leaving at least two
inches of space between the bottles and instrument. The Waste Bottles may be placed at the same surface level or below the benchtop.

2 – Installation
3855-007608-001 Rev D Operator’s Manual 27
8. Label each Waste Bottle with a description of its intended content that is
compliant and necessary for proper disposal; consult Material Safety Data Sheets for labeling requirements.
9. Connect the emergency waste tube to the Emergency Waste Port.

2 – Installation
3855-007608-001 Rev D Operator’s Manual 28
10. Installation is complete.
End-User License Agreement After starting the Netbook, the software displays the End-User License Agreement. After reading this agreement, click Accept. The ThermoBrite Elite Software will be loaded automatically.
IMPORTANT: Read the entire end-user license agreement next.
This end-user license agreement (“agreement”) governs the use of certain computer programs contained in this Leica Biosystems (“Leica Biosystems”) product, ThermoBrite Elite (“Leica Biosystems product”). Acceptance of this EULA for the Leica Biosystems product constitutes assent and acceptance of this agreement by you and the business entity on whose behalf the Leica Biosystems product is purchased (collectively “you” or “your”) and signifies your agreement to be bound by the terms and conditions of this agreement. Leica Biosystems’s permission for your use of this Leica Biosystems product is conditional upon your assent to the terms of this agreement to the exclusion of all other terms. If you do not agree with all of the terms and conditions of this agreement, you may not use the Leica Biosystems product or the computer programs contained in the Leica Biosystems product. Grant of license. Subject to all of the terms and conditions of this agreement, Leica Biosystems grants to you a non-exclusive, non-sub-licensable and non-transferable license to use the computer programs (in object code form only) contained in the Leica Biosystems product (“programs”) and the associated user documentation (“documentation” together with the programs referred to herein, collectively, as the “software”) only as incorporated within the Leica

2 – Installation
3855-007608-001 Rev D Operator’s Manual 29
Biosystems product and only in accordance with the documentation (“license”). You have no right to receive, use or examine any source code or design documentation relating to the programs. The software is licensed and not sold. As between the parties, Leica Biosystems retains all right, title and interest in and to the software, except as expressly and unambiguously licensed herein, and Leica Biosystems reserves all rights in the software not granted to you. Restrictions. You shall not (and shall not allow others to): (i) copy the software, except as reasonably required to use the programs strictly in accordance with this agreement, (ii) alter, adapt, translate or create derivative works based upon the software, or include the programs in any other products or software, (iii) decompile, disassemble, reverse engineer or otherwise attempt to discover or reconstruct the source code (or underlying ideas, sequence, structure organization or algorithms) of any of the programs, or attempt to do so, except to the limited extent the foregoing is expressly permitted by applicable law, in which case you must first notify Leica Biosystems in writing and request interoperability information regarding the programs, (iv) provide, rent, loan or lease the software to any other party or provide any information services to any other party through the use of the software, whether in the form of a timesharing service, service bureau or other information processing service, (v) remove, modify or obscure any product identification, copyright notice, trademark, and/or any other proprietary legend contained in the software, (vi) disseminate performance information or analysis relating to the programs or (vii) use the programs in hazardous environments requiring fail-safe performance in which the failure of the programs could lead to death, personal injury or environmental damage. Termination. The license is effective until terminated. The license will terminate automatically without notice if you fail to comply with any provision of this agreement. Within fourteen (14) days following termination, you shall cease all use of, and destroy all copies of the software in your possession or control and so certify to Leica Biosystems in writing. Except for the license, the terms of this agreement shall survive termination. Termination is not an exclusive remedy and all other remedies will be available to Leica Biosystems whether or not the license is terminated. Product support. Please use the Leica Biosystems support number provided in the product documentation to obtain information regarding support of the Leica Biosystems product.

2 – Installation
3855-007608-001 Rev D Operator’s Manual 30
Disclaimer of warranty. To the maximum extent permitted by law, the software, is provided “as is” without warranty of any kind, and Leica Biosystems disclaims all warranties, either express or implied, including, but not limited to, implied warranties and conditions of title, merchantability, satisfactory quality, fitness for a particular purpose and non-infringement. Leica Biosystems does not warrant that the software will be error-free, that use of the programs will be free from interruption or other failures, that any errors or defects in the software will be corrected or that the software will satisfy your specific requirements. You acknowledge and agree that Leica Biosystems does not warrant, guarantee, or make any representations regarding the performance, use or results of the use of the software or its correctness, accuracy, reliability, currentness, or otherwise. You assume the entire risk associated with your use of the software. This disclaimer of warranty is an essential part of this agreement. Some jurisdictions do not allow the exclusion of implied warranties or conditions, so the foregoing disclaimer may not apply to you. In the event the disclaimer of implied warranties is not enforceable under applicable law, any implied warranties shall be limited to ninety (90) days following delivery of the Leica Biosystems product. Limitation of liability. Notwithstanding anything else in this agreement, to the maximum extent permitted by law, Leica Biosystems shall not be liable with respect to any subject matter of this agreement under any contract, negligence, strict liability or other legal or equitable theory for:
Loss of or interruption to business;
Loss of profits or goodwill;
Loss of use;
Loss or damage to or corruption of data;
Damage to any other software, hardware or other equipment
Unauthorized access to or alteration of data;
Unauthorized disclosure of sensitive, confidential or proprietary information;
Any costs of procuring substitute goods, services, technology or rights;
Any indirect, special, consequential, exemplary or incidental damages; or
Any amount in excess of two hundred fifty dollars (US$250.00). The limitations in this section 6 shall not limit Leica Biosystems’s liability for death or bodily injury solely resulting from Leica Biosystems’s negligence, willful misconduct or fraudulent misrepresentation.

2 – Installation
3855-007608-001 Rev D Operator’s Manual 31
U.S. government users. The software is a “commercial item” consisting of “commercial computer software” and/or “commercial computer software documentation” as such terms are defined in far section 2.101, DFAR section 252.227-7014(a)(1) and DFAR section 252.227-7014(a)(5). Consistent with far section 12.212 and DFAR section 227.7202-1 through 227.7202-4, any use of the software by or on behalf of an agency or other instrumentality of the U.S. government shall be governed solely by the terms of this agreement and shall be prohibited except to the extent expressly permitted by the terms of this agreement. You will ensure that each copy of the software used by or for the U.S. government is labeled to reflect the foregoing. Export. You shall comply with all export and re-export restrictions and regulations of the U.S. commerce department and other U.S. agencies and authorities. Without limiting the foregoing, you agree not to transfer (or authorize anyone to transfer) the software (i) into (or to a national or resident of) Cuba, Iraq, Libya, North Korea, Iran, Syria or any other country to which the United States has embargoed goods or (ii) to anyone on the U.S. treasury department’s list of specially designated nationals or the U.S. commerce department’s denied persons list. Miscellaneous. You may not assign this agreement or any of your rights hereunder without Leica Biosystems’s prior written consent and any attempt to do so without such consent shall be null and void. No failure to exercise any right hereunder will operate as a waiver thereof. If any provision of this agreement shall be adjudged by any court of competent jurisdiction to be unenforceable or invalid, that provision shall be limited or eliminated to the minimum extent necessary so that this agreement shall otherwise remain in full force and effect and enforceable. This agreement shall be construed in accordance with the laws of the state of Illinois and the United States without regard to conflicts of laws provisions thereof and without regard to the United Nations convention on contracts for the international sale of goods. The sole and exclusive jurisdiction and venue for any actions related to the subject matter hereof shall be the state and U.S. federal courts located in the county of Cook, Illinois. You irrevocably submit to the jurisdiction of such courts and consent to venue in such forum with respect to any action or proceeding that relates to this agreement. The prevailing party in any action to enforce this agreement shall be entitled to recover its reasonable costs and expenses including reasonable attorneys’ fees. No amendment to or modification of this agreement will be binding unless in writing and signed by a duly authorized officer of Leica Biosystems. This agreement is in the English language only, which language shall be controlling

2 – Installation
3855-007608-001 Rev D Operator’s Manual 32
and any revision of this agreement in any other language shall not be binding. Both parties agree that this agreement is the complete and exclusive statement of the mutual understanding of the parties relating to the subject matter of this agreement.

3 – System Description
3855-007608-001 Rev D Operator’s Manual 33
3 – System Description
Theory of Operation The ThermoBrite Elite System is a bench-top system for automating a variety of laboratory protocols, including FISH (Fluorescence In Situ Hybridization) for cytogenetic, blood, urine and solid tumor FFPE samples prepared on glass slides. Reagent(s) and Waste Bottles(s) are connected to the system according to the user selected protocol.
Each specimen is manually transferred onto a slide. Slides are loaded into a Slide Carrier prior to placement in the ThermoBrite Elite. Loading slides and application of probe and cover slipping are the only manual steps. According to the user selected protocol:
Reagents are pumped into a sample chamber for deparaffinization, pretreatment, denaturation, hybridization, and post wash.
Waste fluids are discarded into a Waste Bottle.
The ThermoBrite Elite can process up to 12 slides per run. The user can denature and hybridize samples on-board.
FISH Applications
Cytogenetics
Cytology (urine and other fluids)
Histology (solid tumor/FFPE specimens)
Hematology (blood/bone marrow)
Components The main components of the system include:
ThermoBrite Elite Instrument
Netbook with pre-installed software
Fluid Management System and Waste Bottles

3 – System Description
3855-007608-001 Rev D Operator’s Manual 34
Front
Back

3 – System Description
3855-007608-001 Rev D Operator’s Manual 35
Fluidic System
Reagent Manifold
Ten (10) Reagent Ports, located on the left side of the system, allow input of specific reagents depending on the selected protocol.
Waste Manifold
Three (3) user selectable Waste Ports, located on the right side of the system, are available for discarding waste fluids into separate Waste Bottles.

3 – System Description
3855-007608-001 Rev D Operator’s Manual 36
Pumps
Two (2) peristaltic pumps are located on the front of the system, and are activated according to the selected protocol. Reagent Pump Module Manifold Waste Pump
Reagent Pump
The left peristaltic pump delivers reagents to the Sample Chamber(s) via the Module Manifold.
Waste Pump
The right peristaltic pump discards waste fluids from the Sample Chamber(s) to the Waste Bottles(s) via the Module Manifold.
Module Manifold
The Module Manifold is located between the peristaltic pumps. Six (6) tubes located on the top of the Module Manifold, are individually connected to each of the Sample Chambers of the three (3) Thermal Modules.

3 – System Description
3855-007608-001 Rev D Operator’s Manual 37
Sample Chambers Three (3) Thermal Modules are accessed by removing the instrument cover and opening the module lids. Each of the three (3) Thermal Modules has two (2) Sample Chambers, and has a temperature range from 25-95oC.
Slide Carriers Six (6) Slide Carriers are provided with the ThermoBrite Elite System; each Slide Carrier can hold up to two slides, allowing the user to run a small batch, or twelve (12) slides at one time. The Slide Carrier has a pivot that fits into grooves in the side of each Sample Chamber. The Slide Carriers allow convenient loading/unloading of slides into/from the instrument.
Electrical and Communication Connections
Power Port and Power Switch Located on the back left-hand side of the system.

3 – System Description
3855-007608-001 Rev D Operator’s Manual 38
WARNING: The instrument’s main power switch is used as the main disconnect device.
Netbook Communication Port
Located in the middle on the back of the system.
Software
User control of the system is achieved via the Leica Biosystems custom software running on a Netbook supplied with the instrument. The intuitive easy-to-use software allows the user to run standard protocols or the operator can configure and save custom protocols. See Section 5 – How to use the ThermoBrite Elite Software.

4 – Preparing the System for Run
3855-007608-001 Rev D Operator’s Manual 39
4 – Preparing the System for Run
Reagents
Compatible Reagents The following reagents may be used in the ThermoBrite Elite:
Saline Sodium Citrate (SSC) Phosphate Buffered Saline (PBS) 2-(N-morpholino)ethanesulfonic acid (MES) Tris-HCL Citrate Based Buffers Proteases Sodium Thiocyanate 0.2N Hydrochloric Acid (and further dilutions) Ethanol Isopropanol Methanol 4% Formaldehyde 10% Neutral Buffered Formalin Hydrogen Peroxide Deionized/Distilled Water d-Limonene
This list may not be all-inclusive. Contact Technical Support before using reagents not included above.
CAUTION: Reagents other than those listed may damage some components of the instrument. Do NOT use xylene in the instrument.
NOTE: A Flush step of ethanol/reagent grade alcohol/industrial methylated spirits must be programmed immediately and after each fill of xylene substitute (d-Limonene).

4 – Preparing the System for Run
3855-007608-001 Rev D Operator’s Manual 40
NOTE: A Flush step of distilled/deionized water must be programmed immediately and after each fill of any low pH reagents.
Reagent Preparation and Connection Before running a protocol on the instrument, perform the following steps:
1. Select the protocol to be run. The software displays:
The required reagent, including the volume
The input port for the reagent,
The output port for the waste fluids, including the volume.
2. Prepare required reagents based on Reagent List displayed on software
screen. Reagent Bottles should also be labeled with their contents.
3. Disconnect tubing from the appropriate Reagent Bottle caps by removing the tube fitting on the cap.
4. Carefully remove the Reagent Bottle cap with filter at an angle to avoid damaging the bottle filter.
4 – Preparing the System for Run
3855-007608-001 Rev D Operator’s Manual 41
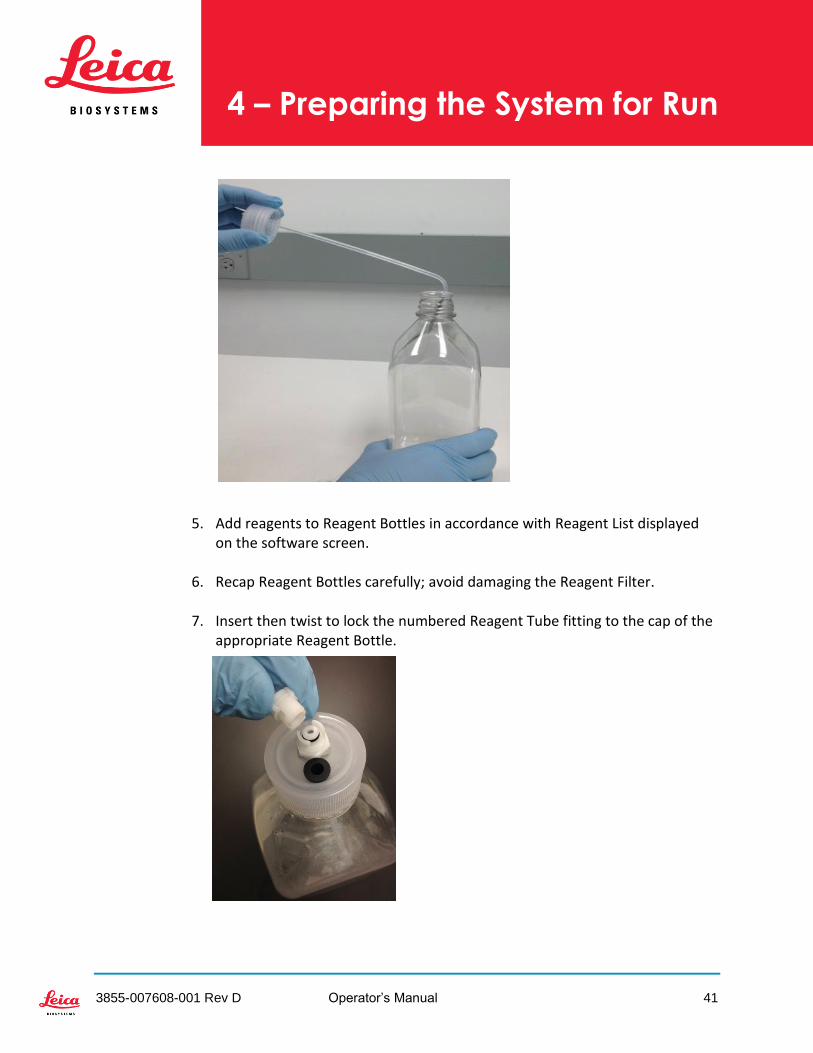
5. Add reagents to Reagent Bottles in accordance with Reagent List displayed on the software screen.
6. Recap Reagent Bottles carefully; avoid damaging the Reagent Filter.
7. Insert then twist to lock the numbered Reagent Tube fitting to the cap of the appropriate Reagent Bottle.
4 – Preparing the System for Run
3855-007608-001 Rev D Operator’s Manual 42
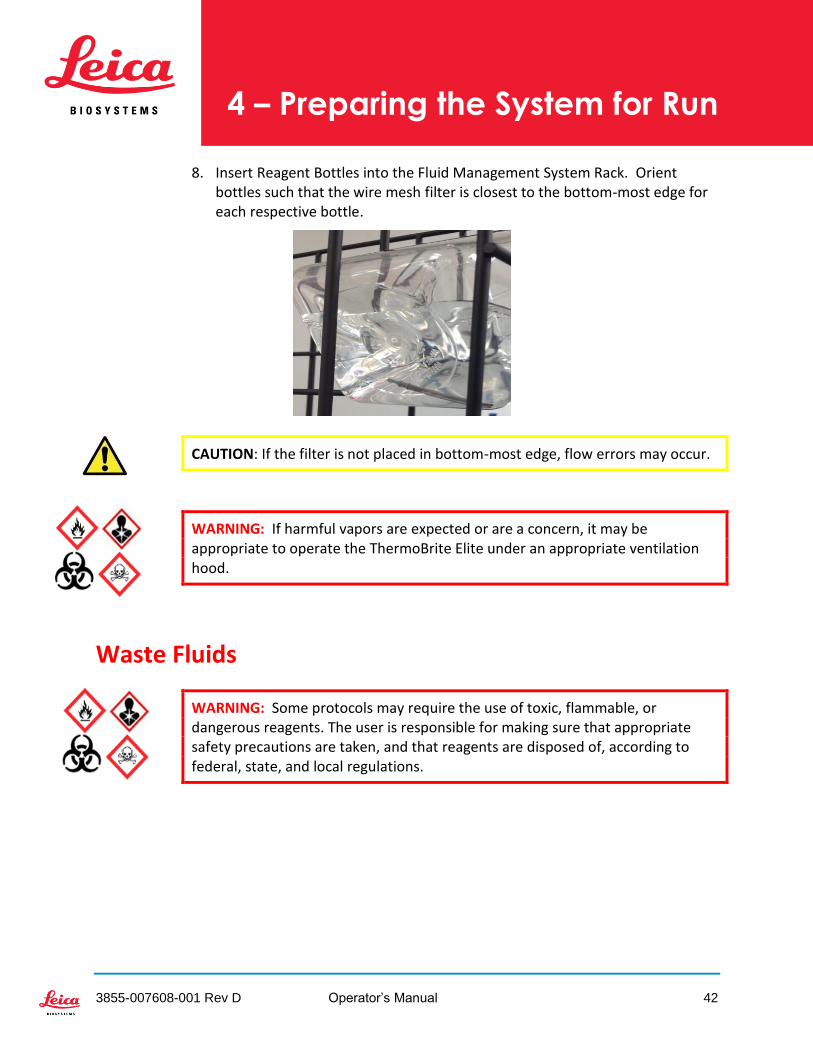
8. Insert Reagent Bottles into the Fluid Management System Rack. Orient bottles such that the wire mesh filter is closest to the bottom-most edge for each respective bottle.
CAUTION: If the filter is not placed in bottom-most edge, flow errors may occur.
WARNING: If harmful vapors are expected or are a concern, it may be appropriate to operate the ThermoBrite Elite under an appropriate ventilation hood.
Waste Fluids
WARNING: Some protocols may require the use of toxic, flammable, or dangerous reagents. The user is responsible for making sure that appropriate safety precautions are taken, and that reagents are disposed of, according to federal, state, and local regulations.

4 – Preparing the System for Run
3855-007608-001 Rev D Operator’s Manual 43
Slide Preparation 1. Transfer specimen onto the slides according to the appropriate protocol to
be run. 2. Place the prepared slides carefully into the Slide Carrier. Slides should be
positioned specimen side face down during pretreatment and post wash. During denaturation and hybridization, slides should be inserted specimen side face up. The slide is maintained in position by spring loaded clips.
3. Hold the Slide Carrier by the pivot and insert it in an empty spot inside a Sample Chamber.
System Ready 1. Make sure that the Netbook is connected to ThermoBrite Elite unit with USB
cord. 2. Make sure that the ThermoBrite Elite is powered up, and that the green LED
is illuminated. 3. Make sure that the Netbook is powered up, and that the ThermoBrite Elite
application is running. 4. Proceed to run the selected protocol. See Section 5 - Using the ThermoBrite
Elite Software.

5–Using the ThermoBrite Elite Software
3855-007608-001 Rev D Operator’s Manual 44
5 – How to use the ThermoBrite Elite Software
Getting Started
What to do Before Operating the Instrument Before the user can use the instrument to run a protocol, the specimen slide and control slide(s) must be prepared according to Good Laboratory Practices. See Section 4 – Preparing the System for Run.

5–Using the ThermoBrite Elite Software
3855-007608-001 Rev D Operator’s Manual 45
Navigating the Interface Run an Existing Protocol Create/Edit a Protocol
Select Protocol Select New Protocol
Start Protocol Define Protocol Reagent Steps
Load the Slides - Start Define Protocol Waste Bottles

5–Using the ThermoBrite Elite Software
3855-007608-001 Rev D Operator’s Manual 46
Operating the Instrument All functions of the ThermoBrite Elite are performed from a series of computer screens which are part the software program installed on the provided computer.
Start Screen
On the toolbar, the screen displays from left to right:
Current date and time
System status or selected protocol
Connectivity status between the instrument and the laptop

5–Using the ThermoBrite Elite Software
3855-007608-001 Rev D Operator’s Manual 47
This screen has six functional buttons:
Run Click to run a protected protocol.
Run/Create/Edit Click to run, create, or edit a protocol before protecting it.
Line Wash Click to begin a Line Wash.
Help Click to access help or the Operator’s Manual.
Logs Click to access logs for a particular day or run.
Mute icon Click to silence the alarm.
Running a Protocol
WARNING: Do NOT move the instrument while a run is in process.
Start Screen
Run
Click Run to run a protected protocol. The system displays the protected protocols available for selection.

5–Using the ThermoBrite Elite Software
3855-007608-001 Rev D Operator’s Manual 48
Run/Create/Edit
Click Run/Create/Edit to display a list of protected and unprotected protocols. Protected protocols are displayed in bold and can be copied but not edited.
Selecting a Protocol to Run In the Available Protocols field, select a protocol name. The system displays the protocol’s description and the list of reagents necessary to run the protocol.
Click Run, the Protocol Dashboard is displayed.

5–Using the ThermoBrite Elite Software
3855-007608-001 Rev D Operator’s Manual 49
Protocol Dashboard This screen is used to assign the specimen slides to a Sample Chamber in one of three (3) Thermal Modules. See Adding Slides to Module.
There are three (3) Thermal Modules; each contains two Sample Chambers, A & B. Each chamber can hold two slides.
NOTE: A slide must be assigned to at least one of the Thermal Modules by clicking inside the first slide position. The left chamber of each module must be selected first.
Adding Slides to Module
1. From the Protocol Dashboard, click inside the Module slide position corresponding to the location where the slide was loaded to add a slide for processing. The grey area changes to look like a slide.

5–Using the ThermoBrite Elite Software
3855-007608-001 Rev D Operator’s Manual 50
2. The area located below the slide diagram indicates the slides that have been
selected. When a slide is selected, the user can enter any data concerning the patient: i.e. Name, ID number, by either overwriting the Module and slide number, or adding a specific data next to the Module/slide numbers, see image below.
3. Click Next to display and verify the setup of the Reagent and Waste Bottles
before starting the run. 4. Click the check box “I have confirmed that the reagent and waste setup
matches the configuration above”. The instrument will not start processing the slides until the box is checked.

5–Using the ThermoBrite Elite Software
3855-007608-001 Rev D Operator’s Manual 51
5. Click Next.
Starting the Protocol 1. Load the slides in the corresponding Module slide position(s). 2. Click Start to add operator input before the protocol can begin.

5–Using the ThermoBrite Elite Software
3855-007608-001 Rev D Operator’s Manual 52
User Initials
1. Type the operator's initials and any notes, if necessary. 2. Click Start Protocol to begin the protocol.

5–Using the ThermoBrite Elite Software
3855-007608-001 Rev D Operator’s Manual 53
Run Paused
If a protocol contains a Pause step, an alert similar to the one below will be displayed. Click Resume to continue.
Run Slide Position Activity
When a protocol is being run, the activity taking place in each Module is displayed. For example below: Module 1 is Running, and Module 2 is Draining, the Waste Bottle is identified (C).

5–Using the ThermoBrite Elite Software
3855-007608-001 Rev D Operator’s Manual 54
The status of the run, fill, and waste activity is displayed in the footer section of the screen.
Run Module Current Temperature Activity
Current temperatures displayed in red indicate that the Module is heating.

5–Using the ThermoBrite Elite Software
3855-007608-001 Rev D Operator’s Manual 55
Current temperatures displayed in green indicate that the Module has reached its target temperature.
Current temperatures displayed in blue indicate that the Module is cooling.

5–Using the ThermoBrite Elite Software
3855-007608-001 Rev D Operator’s Manual 56
Protocol Completion Summary
When a protocol run is completed, the Protocol Completion Summary screen is displayed.
There are five (5) options:
View Summary Log - See Summary Log
View Detail Log - See Detail Log
Drain Chambers - See Drain Chambers
Save and Run Line Wash – See Save and Run Line Wash
Save Notes and Close - Closes with option of selecting Logs from the Start screen to review the summary or details of this run at a later time - See Logs

5–Using the ThermoBrite Elite Software
3855-007608-001 Rev D Operator’s Manual 57
Drain Chambers
This option is used to drain any remaining liquid from the Module’s Sample Chambers. If a protocol is aborted, the Sample Chambers must be drained.
Save and Run Line Wash
This option is used to wash the Reagent Lines. See Maintenance.
Logs Logs are named with the following format: log type, date, protocol name, protocol number of the day.
Summary Log Click Logs and select a specific summary log from the list. A Notepad file will be displayed. A summary option is also available from the Protocol Completed screen when a protocol finishes running.
Detail Log Click Logs and select a specific detail log from the list. A Notepad file will be displayed. A detail option is also available from the Protocol Completed screen when a protocol finishes running.

5–Using the ThermoBrite Elite Software
3855-007608-001 Rev D Operator’s Manual 58
Creating a New Protocol Creating a new protocol requires several steps:
Add a name and description,
Add the protocol steps,
Assign the Reagent and Waste Bottles. 1. From the Start screen click Run/Create/Edit to display the next screen.

5–Using the ThermoBrite Elite Software
3855-007608-001 Rev D Operator’s Manual 59
2. In the Available Protocols field, click New to display the next screen.
Protocol Name
Enter a meaningful name for the new protocol, containing a maximum of 80 characters.
NOTE: Move the cursor to the next field to continue. The Enter and Tab keys are not functional for this screen.

5–Using the ThermoBrite Elite Software
3855-007608-001 Rev D Operator’s Manual 60
Protocol Description
1. If desired, enter a description for the new protocol. 2. If desired, click the Protected check box to protect the protocol from
future edits. 3. Click Next.
NOTE: After selecting the Protected check box, and then clicking Next, the protocol cannot be edited.

5–Using the ThermoBrite Elite Software
3855-007608-001 Rev D Operator’s Manual 61
Protocol Steps The following steps can be added to the protocol:
Reagent
Prime
Pause
Drain
Reagent Steps
1. In the Protocol Steps field click Add. 2. It is recommended to keep the first step as Drain to ensure that no reagent is
present inside the chambers before starting a protocol.
3. Double-click on Reagent. The Protocol Reagent Step window is displayed. By
default, the Reagent steps are pre-populated with the following options:
Fill (Required step)
Rock
Temp
Incubate
Drain

5–Using the ThermoBrite Elite Software
3855-007608-001 Rev D Operator’s Manual 62
4. Double-click on Reagent to select a specific Reagent and assign a Bottle number from their respective dropdown lists. If the reagent does not appear on the list, free text the name of the reagent.

5–Using the ThermoBrite Elite Software
3855-007608-001 Rev D Operator’s Manual 63
NOTE: Selecting the option "Auto" automatically assigns the next available bottle number and may not correspond with the appropriate reagent.
5. Click Update to add the selected reagent and bottle. The bottle number is
displayed in brackets next to the reagent’s name. For example, distilled water [1].
Reagent Fill
This option is used to define the reagent volume distributed inside the module chamber. The default is 100%, which corresponds to 30mL.
NOTE: The Fill step is required.

5–Using the ThermoBrite Elite Software
3855-007608-001 Rev D Operator’s Manual 64
1. Double-click Fill. If necessary, adjust the Dispense volume to a percentage
between 25 and 200. In general, 100% fill volume is recommended during pretreatment and post wash and a 50% fill volume is recommended during denaturation and hybridization.
2. Click Update to validate the entry. The Reagent Step screen is displayed.
Reagent Rock
This option is used to define the cycle rate at which the ThermoBrite Elite will rock back and forth. The default is Medium speed – 12 cycles/minute. 1. Double-click Rock.

5–Using the ThermoBrite Elite Software
3855-007608-001 Rev D Operator’s Manual 65
2. Select the appropriate option:
Stop- the instrument will not rock
Slow- 9 cycles/minute
Medium- 12 cycles/minute
Fast- 20 cycles/minute
WARNING: Selecting Stop will result in poor temperature control. Reagent steps that involve thermal control should not be set to Stop.
3. Click Update to validate the entry. The Reagent Step screen is displayed.
Reagent Temp
This option is used to define the temperature at which each chamber must be for the reagent step. The default is 37oC.

5–Using the ThermoBrite Elite Software
3855-007608-001 Rev D Operator’s Manual 66
1. Double-click Temp. Enter a temperature between 25oC and 95oC. If a check box is not selected, the corresponding chamber will remain at the ambient temperature.
2. Do not uncheck On, this will disable heating and cooling for the module.
NOTE: Selecting the On check box only enables heating/cooling for the module. Only modules that are loaded with slides at the time of operation will actually heat or cool.
3. If the box "Wait for temp before continuing" is checked, the ThermoBrite
Elite will not begin the next step until the temperature has achieved the selected temperature. In general, when heating, the check box should be checked.

5–Using the ThermoBrite Elite Software
3855-007608-001 Rev D Operator’s Manual 67
4. If the box "Wait for temp before continuing" is not checked, the instrument will begin to heat/cool toward the target temperature and then proceed to the next step. In general, when cooling, the check box should not be checked.
5. Click Update to validate the entry. The Reagent Step screen is displayed. After updating, a Wait: Y or Wait: N will appear on the Reagent Step screen to the right of the temperature, indicating whether the “Wait for temp before continuing” check box was checked.
Reagent Incubate
This option is used to define the incubation time for the reagent step. The default is 5 minutes. 1. Double-click Incubate. Enter a time greater than 0.1 minutes for the
specimen to remain at the temperature previously selected in the Temp option.
2. Click Update to validate the entry. The Reagent Step screen is displayed.

5–Using the ThermoBrite Elite Software
3855-007608-001 Rev D Operator’s Manual 68
Reagent Drain
This option does not need input.
Reagent Step Options
The following steps can be added:
Flush
Prompt
Reagent Flush
This option is used to add a Flush step. The Flush step, when needed, should be added after a Fill step has been selected. The default flush volume is 35.0mL.
1. Select the Fill step to precede the Flush step, and then click the Flush button.
2. Select a Reagent and a Bottle Number from their respective dropdown lists.

5–Using the ThermoBrite Elite Software
3855-007608-001 Rev D Operator’s Manual 69
3. Accept the default, or clear the default check box and adjust the Flush volume to a value greater than 35mL.
4. Click Update to validate the entry. The Reagent Step screen is displayed.
NOTE: A Flush step of ethanol/reagent grade alcohol/industrial methylated spirits must be programmed immediately and after each fill of xylene substitute (d-Limonene).
NOTE: A Flush step of distilled/deionized water must be programmed immediately and after each fill of any low pH reagents.
NOTE: New steps are added immediately after the currently highlighted step.
Reagent Step Prompt Option
This option is used to add a specific instruction and to pause the protocol run. 1. Select the step to precede the Prompt step, and then click the Prompt
button.

5–Using the ThermoBrite Elite Software
3855-007608-001 Rev D Operator’s Manual 70
2. Enter a comment and then click the "Pause execution" check box to
interrupt the protocol. During Pause, the Thermal Modules will hold temperature until the user clicks “resume”. A Pause step may be useful post hybridization incubation to allow the user to return for post wash when ready.
NOTE: If the “Pause execution” check box is not checked, the protocol will move on to the next step without user intervention.
3. Click Update to validate the entry. The Reagent Step screen is displayed.

5–Using the ThermoBrite Elite Software
3855-007608-001 Rev D Operator’s Manual 71
Save and Close
NOTE: Before saving any protocol step, make sure the sub-steps are kept in proper sequence. If an option is out of sequence, use the Up or Down buttons.
Use the following options to edit, or save the protocol steps:
Save and Close Save the reagent steps and display them in the Protocol Steps field
Delete Delete the selection
Up Move the selection one step up
Down Move the selection one step down
NOTE: There is no Undo option.
NOTE: After updating, if Back is selected, the system displays “Any changes you have made will not be saved. Do you wish to discard changes and go back?”. Click Yes, none of the changes will be saved. Click No, the dialog box will close and the user can continue adding steps.

5–Using the ThermoBrite Elite Software
3855-007608-001 Rev D Operator’s Manual 72
Prime Step
1. In the Protocol Steps field click Add.
2. Click on Prime.
NOTE: The Prime step is not required. The instrument automatically primes as it reaches each new step. Addition of a Prime step will result in higher volume of reagent use.
3. No options are available for the Prime step. The Protocol screen is displayed.

5–Using the ThermoBrite Elite Software
3855-007608-001 Rev D Operator’s Manual 73
Pause Step
This option is the same as the Prompt sub-step. See Reagent Step Prompt.
Drain Step
This option will drain the contents of the chamber modules into the Waste Bottles. 1. In the Protocol Steps field click Drain. 2. No options are available for the Drain step. The Protocol screen is displayed. 3. Click Next to assign Waste Bottles. See Waste Bottles.

5–Using the ThermoBrite Elite Software
3855-007608-001 Rev D Operator’s Manual 74
Waste Bottles
When all reagent steps are completed, the Main screen is displayed. Click Next to display the Assign Waste Location screen where containers are assigned to receive the waste product from the various steps in a run.
Waste "C" is the default because it is assumed to receive the most toxic waste. Waste "A" is assumed to receive the least toxic waste. 1. Select a reagent and click the appropriate forward arrow > to select the
appropriate Waste Bottle. To change the reagent location, click on the reagent in the Waste Bottle field, and then click on the arrow to return the reagent to the Reagent Bottles field. See image below.
WARNING: Certain reagents may not be compatible and should not be assigned to the same Waste Bottle, such as sodium thiocyanate and acids. It is the user’s responsibility to ensure reagent compatibility when assigning waste to a specific Waste Bottle.

5–Using the ThermoBrite Elite Software
3855-007608-001 Rev D Operator’s Manual 75
WARNING: Dispose of waste product in compliance with applicable legal regulations. If unsure of the applicable legal requirements, contact the local authorities for information.
2. Continue until all reagents in the Reagent field are assigned to the
appropriate Waste Bottles. 3. Click Save to save and exit.
Alerts
Warning Protocol Issues
This warning is displayed if there is a potential issue with one or more steps. It does not mean that the run will abort.
Click Yes to save and exit; or click No to make corrections.
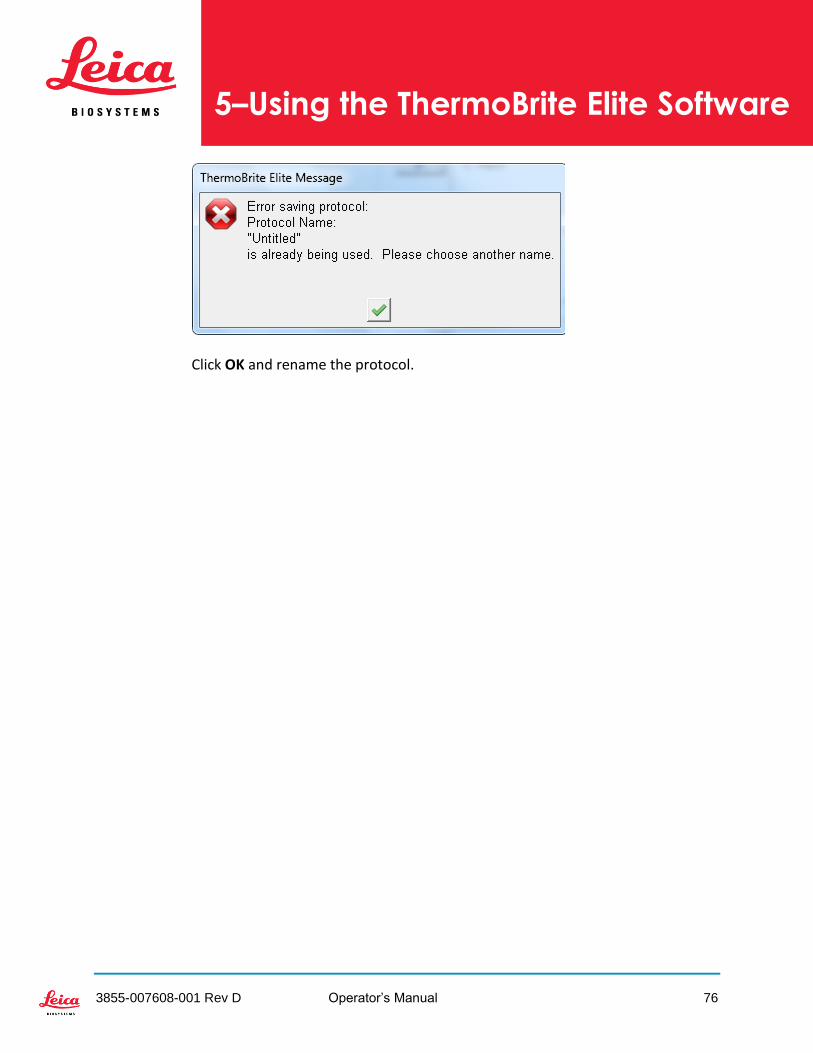
Warning Invalid Protocol Name
This dialog is displayed when there is an existing protocol with the same name.
5–Using the ThermoBrite Elite Software
3855-007608-001 Rev D Operator’s Manual 76
Click OK and rename the protocol.

6 – Maintenance & Troubleshooting
3855-007608-001 Rev D Operator’s Manual 77
6 – Maintenance & Troubleshooting
Maintenance
WARNING: Do NOT expose the ThermoBrite Elite Unit or its Netbook to strong or concentrated acids, bases or oxidizing agents, aromatic or halogenated hydrocarbons, esters or ketones.
WARNING: Wear appropriate personal protective equipment to prevent exposure to pathogens. Discard contaminated materials according to applicable regulations.
Leica Biosystems recommends that instrument operators perform periodic inspections and preventive maintenance on all instruments. Contact Customer Service or your distributor for optional services offered for this instrument.
Cleaning Periodic cleaning is recommended for all laboratory instruments and frequency depends on the working environment. Recommended procedures are given below.
CAUTION: Unplug the ThermoBrite Elite Unit from the wall outlet and disconnect it from the Netbook before cleaning.
CAUTION: Before using any cleaning or decontamination methods other than those recommended, operators should check with Techical Support that the proposed method will not damage the equipment.

6 – Maintenance & Troubleshooting
3855-007608-001 Rev D Operator’s Manual 78
Cleaning Instrument Surfaces
Items required: Mild detergent, lint-free tissue and appropriate personal protective equipment. 1. Clean the outside surfaces of the ThermoBrite Elite Unit with a water-
dampened lint-free tissue and mild detergent to remove any deposits. 2. Wipe again using distilled water. 3. Wipe dry.
Cleaning Sample Chambers
Items required: Acceptable disinfectants are 70% or higher alcohol, lint-free tissue and appropriate personal protective equipment. 1. Remove any Slide Carrier present inside the instrument. 2. Moisten a lint-free tissue with 70% alcohol and clean the inner surfaces of
the Modules. 3. Wipe again using distilled water. 4. Wipe dry.
Cleaning Slide Carriers
Items required: Acceptable disinfectants are 70% or higher alcohol, lint-free tissue and appropriate personal protective equipment. 1. Remove any Slide Carrier present in the instrument. 2. Soak the Slide Carrier in 70% alcohol. 3. Rinse using distilled water. 4. Wipe dry.
Cleaning the Netbook
Follow the manufacturer’s recommendations for cleaning the Netbook.
Discarding Liquid Waste
WARNING: Dispose of waste product in compliance with applicable legal regulations. If unsure of the applicable legal requirements, contact the local authorities for information.

6 – Maintenance & Troubleshooting
3855-007608-001 Rev D Operator’s Manual 79
Line Wash The Line Wash is maintenance procedure that must be performed in order sustain the optimal condition of the fluidics portion of the instrument and is composed of two steps: first a 70% ethanol (or equivalent) flush, followed by an air flush.
Run the Line Wash: As part of a routine weekly maintenance, When recommended as a component of troubleshooting, Just prior to an extended period of time when the ThermoBrite Elite will not
be in use. Items required: 70% ethanol (or reagent grade alcohol, industrial methylated spirits), paper towel, and appropriate personal protective equipment. 1. From the Main screen, click the Line Wash button.
2. Check the line check box that corresponds to the lines to be washed, up to
three at a time.

6 – Maintenance & Troubleshooting
3855-007608-001 Rev D Operator’s Manual 80
3. Select the desired Waste Bottle.
WARNING: Dispose of waste product in compliance with applicable legal regulations. If unsure of the applicable legal requirements, contact the local authorities for information.
4. Insert then twist to lock up to 3 Reagent Line fittings onto the cap of the TBE
Wash Bottle.

6 – Maintenance & Troubleshooting
3855-007608-001 Rev D Operator’s Manual 81
5. Click Start. 6. Add the appropriate amount of 70% ethanol (or equivalent) to the TBE Wash
Bottle, based on messaging that appears on screen. 7. Click Yes to confirm. 8. When the ethanol flush has finished, remove the fittings from the TBE Wash
Bottle cap to allow for an air flush. 9. Click Resume. 10. Click Save Notes and Close. 11. Repeat steps 1-10 for remaining lines to be washed.

6 – Maintenance & Troubleshooting
3855-007608-001 Rev D Operator’s Manual 82
As Needed Maintenance
Replacing the Module Manifold Filters
The Module Manifold is located on the front of the instrument between the peristaltic pumps. Items required: Manifold Filter Kit, Item# 3800-007743-001, paper towel and appropriate personal protective equipment. 1. Turn the main power switch located in the back panel to the Off position. 2. Place paper towel underneath the Module Manifold to catch any possible
fluid leak, see image below.
3. Using a flat screwdriver and turning counter-clockwise, remove each Manifold Filter.
4. Discard the old Manifold Filters according to applicable regulations.
WARNING: Dispose of contaminated material in compliance with applicable legal regulations. If unsure of the applicable legal requirements, contact the local authorities for information.

6 – Maintenance & Troubleshooting
3855-007608-001 Rev D Operator’s Manual 83
5. Each Manifold Filter has a black O-ring, be sure it is properly seated before installing the filter, see image on the right.
6. Using a flat screwdriver and turning clockwise, install a new filter into each of the six (6) ports. Take care to align the threads. Do not force if the threads are not aligned.
7. Turn the main power switch located in the back panel to the On (I) position.
8. Run a short protocol or a Line Wash to make sure the filters are installed correctly and not leaking. See Line Wash.

6 – Maintenance & Troubleshooting
3855-007608-001 Rev D Operator’s Manual 84
Replacing the Peristaltic Pump Tubes
WARNING: The peristaltic pumps have moving rollers that can pinch or trap fingers. Always power off the instrument before opening the pump cover. Never attempt to adjust or access the pump tube while the instrument is powered on.
WARNING: Dispose of contaminated material in compliance with applicable legal regulations. If unsure of the applicable legal requirements, contact the local authorities for information.
Items required: Peristaltic Pump Tube Kit, Item# 3800-007742-001, paper towel, and appropriate personal protective equipment. 1. Turn the main power switch located in the back panel to the Off (0) position.
Make sure the power cord to the ThermoBrite Elite Unit is unplugged. 2. Place some paper towels underneath the peristaltic pump to catch any
possible fluid leak, see image below.

6 – Maintenance & Troubleshooting
3855-007608-001 Rev D Operator’s Manual 85
3. Lift the acrylic front cover to access the pump. This raises the top part of the pump, giving full access to the tube, see image below.
4. Remove the grey plug from the exit port by pulling upward on the plug and
the tube, see image below.
5. Repeat step 4 for the inlet port until the tube and the grey connectors are
free. 6. Insert a new pump tube into the inlet and exit plugs. Push the tube all the
way to avoid any possible leak.

6 – Maintenance & Troubleshooting
3855-007608-001 Rev D Operator’s Manual 86
7. Guide the tubing into the peristaltic pump, above the rollers. Make sure the
tube rests in the V notch on both sides of the pump. See image below.
8. Lower the acrylic front cover to close the pump. This lowers the top part of
the pump, securing the tube above the rollers. 9. Discard the old tube according to applicable regulations. 10. Repeat the procedure for the second peristaltic pump.

6 – Maintenance & Troubleshooting
3855-007608-001 Rev D Operator’s Manual 87
Troubleshooting A self-test is automatically performed when the ThermoBrite Elite Unit is powered on. When the instrument successfully powers up, a two-beep ready signal sounds, and the green LED on the right side of the front panel illuminates.

6 – Maintenance & Troubleshooting
3855-007608-001 Rev D Operator’s Manual 88
Troubleshooting by Symptoms
Symptom Possible Cause Remedies
The green LED light is not on and the instrument will not operate.
Loose power cord connection.
Make sure that the power cord on the back of the instrument is properly inserted into the power outlet.
Unit not plugged in or power source faulty.
Make sure the instrument is properly connected to an electrical outlet. If the problem persists, call Technical Services or your distributor.
Fuse blown or not installed.
See Replacing the Fuses.
Faulty internal power supply.
Call Technical Support or your distributor.
USB Communication Error
Bad connections. Check the connections on the back of the ThermoBrite Elite and on the USB port of the Netbook.
Faulty cable Replace the USB cable.
Sample Chambers are not filling
Reagent Tube not properly connected. Reagent Tube kinked.
Check the tube connections on the Reagent Manifold and Reagent Bottle cap.
Bottle filter obstructed.
Clean the filter with 70% ethanol. Replace Filter Assembly.

6 – Maintenance & Troubleshooting
3855-007608-001 Rev D Operator’s Manual 89
Symptom Possible Cause Remedies
Tube not properly connected on the Module Manifold.
Check the tube connections on the Reagent Manifold. See Module Manifold.
The inlet/outlet opening in the Sample Chamber may be obstructed. See image below.
Clean the system; see Line Wash. If the problem persists, call Technical Support or your distributor.
Reagent Bottle is empty.
Refill the Reagent Bottle with the appropriate reagent.
The Reagent Pump is not pumping reagent, see image below.
Check if the rollers are turning on the left pump located on the front of the instrument. If not, call Technical Support or your distributor.
Sample Chambers are not emptying
Tube not properly connected on the Module Manifold.
Check the tube connections on the Reagent Manifold. See Module Manifold.

6 – Maintenance & Troubleshooting
3855-007608-001 Rev D Operator’s Manual 90
Symptom Possible Cause Remedies
The Waste Pump is not pumping waste liquid, see image below.
Check if the rollers are turning on the right pump located on the front of the instrument. If not, call Technical Support or your distributor.
The inlet/outlet opening in the Sample Chamber may be obstructed. See image below.
Clean the system; see Line Wash. If the problem persists, call Technical Support or your distributor.
Clogged Manifold Filters
Replace the Manifold Filters; see Replacing the Module Manifold Filters.

6 – Maintenance & Troubleshooting
3855-007608-001 Rev D Operator’s Manual 91
Error Messages
Cannot load protocol
Causes Remedies
The software cannot load the selected protocol.
Restart the Netbook. If the problem persists, contact Technical Support or your distributor.
Could not switch the # to #
Causes Remedies
An internal valve is not responding correctly.
Restart the Netbook. If the problem persists, contact Technical Support or your distributor.
Drain Side Low Flow
Causes Remedies
The waste flow is slow. 1. Check for Sample Chamber blockage
2. Replace Manifold Filters; see Replacing the Module Manifold Filters.
3. Replace Waste Peristaltic Tubing; see Replacing the Peristaltic Pump Tubes.
If the problem persists, contact Technical Support or your distributor.

6 – Maintenance & Troubleshooting
3855-007608-001 Rev D Operator’s Manual 92
Error loading Protocol
Causes Remedies
The software cannot load the selected protocol.
Restart the Netbook. If the problem persists, contact Technical Support or your distributor.
Exit valve failed to switch to bypass position
Causes Remedies
The exit valve is not responding correctly.
Restart the Netbook. If the problem persists, contact Technical Support or your distributor.
Inlet valve failed to switch to bypass position
Causes Remedies
The inlet valve is not responding correctly.
Restart the Netbook. If the problem persists, contact Technical Support or your distributor.
Inlet valve failed to switch to chamber
Causes Remedies
The inlet valve is not responding correctly.
Restart the Netbook. If the problem persists, contact Technical Support or your distributor.
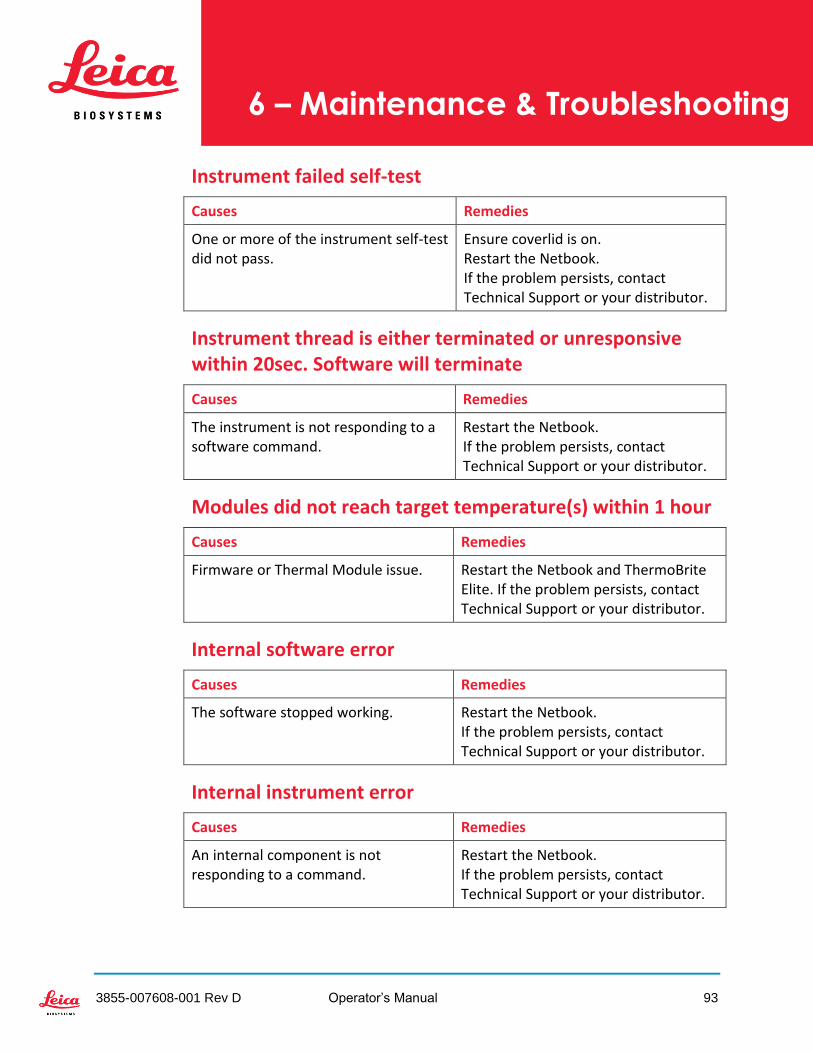
6 – Maintenance & Troubleshooting
3855-007608-001 Rev D Operator’s Manual 93
Instrument failed self-test
Causes Remedies
One or more of the instrument self-test did not pass.
Ensure coverlid is on. Restart the Netbook. If the problem persists, contact Technical Support or your distributor.
Instrument thread is either terminated or unresponsive within 20sec. Software will terminate
Causes Remedies
The instrument is not responding to a software command.
Restart the Netbook. If the problem persists, contact Technical Support or your distributor.
Modules did not reach target temperature(s) within 1 hour
Causes Remedies
Firmware or Thermal Module issue. Restart the Netbook and ThermoBrite Elite. If the problem persists, contact Technical Support or your distributor.
Internal software error
Causes Remedies
The software stopped working. Restart the Netbook. If the problem persists, contact Technical Support or your distributor.
Internal instrument error
Causes Remedies
An internal component is not responding to a command.
Restart the Netbook. If the problem persists, contact Technical Support or your distributor.
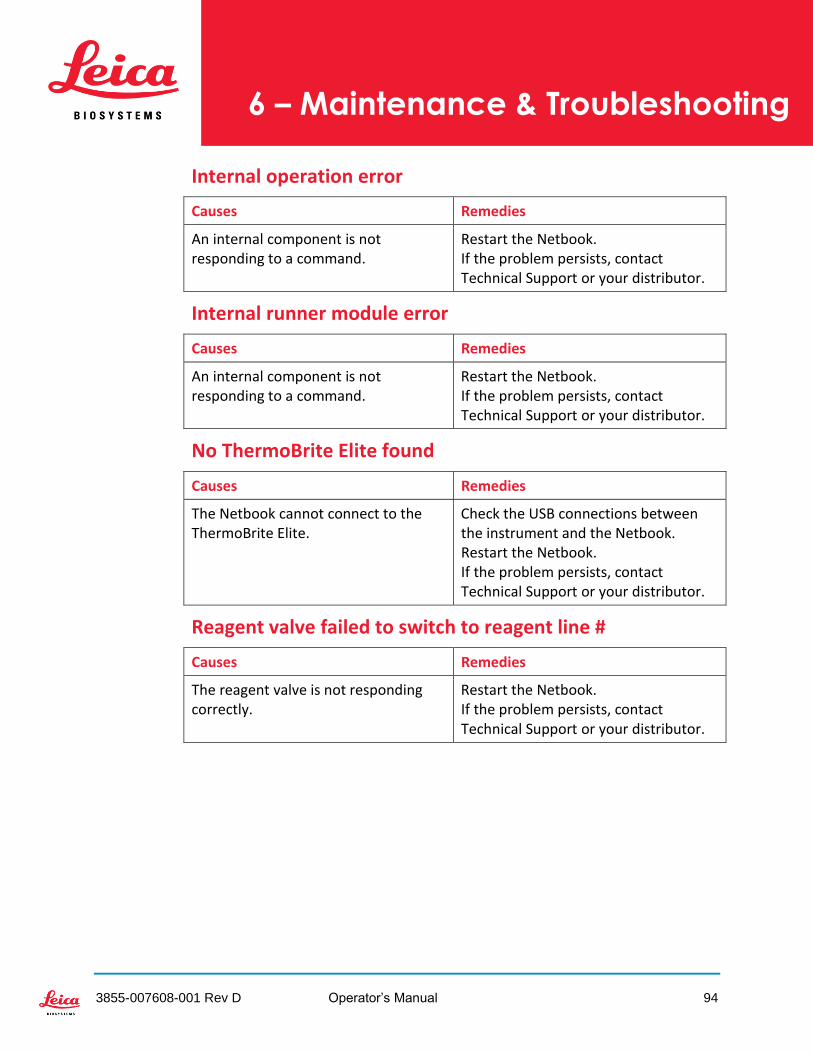
6 – Maintenance & Troubleshooting
3855-007608-001 Rev D Operator’s Manual 94
Internal operation error
Causes Remedies
An internal component is not responding to a command.
Restart the Netbook. If the problem persists, contact Technical Support or your distributor.
Internal runner module error
Causes Remedies
An internal component is not responding to a command.
Restart the Netbook. If the problem persists, contact Technical Support or your distributor.
No ThermoBrite Elite found
Causes Remedies
The Netbook cannot connect to the ThermoBrite Elite.
Check the USB connections between the instrument and the Netbook. Restart the Netbook. If the problem persists, contact Technical Support or your distributor.
Reagent valve failed to switch to reagent line #
Causes Remedies
The reagent valve is not responding correctly.
Restart the Netbook. If the problem persists, contact Technical Support or your distributor.

6 – Maintenance & Troubleshooting
3855-007608-001 Rev D Operator’s Manual 95
Self-test failed to communicate with Instrument
Causes Remedies
The Netbook cannot connect to the ThermoBrite Elite.
Check the USB connections between the instrument and the Netbook. Restart the Netbook. If the problem persists, contact Technical Support or your distributor.
Sensors indicate a critical flow error
Causes Remedies
Sensors indicate a critical flow problem while filling. Causes:
empty Reagent Bottle
disconnected Reagent Tube
blocked Reagent Filter
worn Peristaltic Tube Sensors indicate a critical flow problem while draining. Causes:
obstructed Chamber Port
blocked Manifold Filter
worn Peristaltic Tube
full Waste Bottles
Restart the Netbook.
Perform a Line Wash, see Line Wash.
Refill any empty Reagent Bottle
Check the Reagent Tubes connections to the Reagent Bottles and the Reagent Manifold.
Replace the Peristaltic Tubes; see Replacing the Peristaltic Pump Tubes.
If the problem persists, contact Technical Support or your distributor.

6 – Maintenance & Troubleshooting
3855-007608-001 Rev D Operator’s Manual 96
Sensors indicate reduced flow rate warning(s)
Causes Remedies
Sensors indicate a reduced flow problem while filling. Causes:
empty Reagent Bottle
disconnected Reagent Tube
blocked Reagent Filter
worn Peristaltic Tube Sensors indicate a reduced flow problem while draining. Causes:
obstructed Chamber Port
blocked Manifold Filter
worn Peristaltic Tube
full Waste Bottles
Restart the Netbook.
Perform a Line Wash, see Line Wash.
Refill any empty Reagent Bottle
Check the Reagent Tubes connections to the Reagent Bottles and the Reagent Manifold
Replace the Peristaltic Tubes; see Replacing the Peristaltic Pump Tubes.
If the problem persists, contact Technical Support or your distributor.
The protocol has failed
Causes Remedies
A problem caused the protocol to fail. Restart the Netbook. Restart the protocol. If the problem persists, contact Technical Support or your distributor.
This protocol contains errors and it cannot be run
Causes Remedies
The selected protocol contains errors in the configuration.
Verify the configuration steps and sub-steps. Restart the Netbook. If the problem persists, contact Technical Support or your distributor.

6 – Maintenance & Troubleshooting
3855-007608-001 Rev D Operator’s Manual 97
Unhandled exception
Causes Remedies
An internal component is not responding to a command.
Restart the Netbook. If the problem persists, contact Technical Support or your distributor.
USB Communication interruption
Causes Remedies
The Netbook lost connection with the ThermoBrite Elite.
Check the USB connections between the instrument and the Netbook. Restart the Netbook. If the problem persists, contact Technical Support or your distributor.

6 – Maintenance & Troubleshooting
3855-007608-001 Rev D Operator’s Manual 98
Checking USB Connections Connect USB communication cable provided to a USB port on the Netbook and to the communication port located in the center of the back panel.
When the connection is established, the Main Screen displayed the USB connection icon.
Connected Not Connected

6 – Maintenance & Troubleshooting
3855-007608-001 Rev D Operator’s Manual 99
Replacing the Fuses
CAUTION : Unplug the ThermoBrite Elite Unit from the wall outlet and disconnect it from the Netbook before replacing the fuses.
WARNING: For continued protection against risk of fire and hazard, replace only with the same type and rating fuses.
1. The instrument fuses are located on the rear panel, between the power cord
receptacle and the power switch.
2. Remove the power cord to access the fuse holder. 3. Using a small flat screwdriver on one side tab, pry the fuse holder out.
4. Remove the fuse holder. Two fuses are inserted inside the fuse holder.

6 – Maintenance & Troubleshooting
3855-007608-001 Rev D Operator’s Manual 100
5. Replace with fuses of the same type and rating: 10.0A 250V F 5 x 20 mm. 6. Reinstall the fuse holder in its compartment until it clicks into place. 7. Reconnect the power cord, and then press the power switch to the On (I)
position.

7 – Specifications
3855-007608-001 Rev D Operator’s Manual 101
7 – Specifications
Product Name ThermoBrite Elite
Product Number 3800-007000-001
Model Number S600
Computer Netbook with ThermoBrite Elite software preloaded
Interface USB port
Capacity (12) 1” X 3” slides
Electrical Power Requirement 100 – 240 VAC, 50-60Hz, 10.0 A
Dimensions Height: 15.0” (38.1cm) Width: 24.5 (62.2cm) Depth: 15.5 (39.4cm)
Weight ~60lbs (27kgs)
Environmental For indoor use only
Fluid Waste Waste is pumped from the instrument to a Waste Bottle. Drain must be below or at same height as the bench and should be less than 10 feet (3 meters) from the back of the instrument.
Operational Temperature 59oF to 104oF (15oC to 40oC)
Relative Humidity Maximum 80% for <31oC Maximum 50% for 31-40oC
Storage/Transit Temperature -10oC to +50oC
Specifications are subject to change.

7 – Specifications
3855-007608-001 Rev D Operator’s Manual 102
References 1. CLSI. “Protection of Laboratory Workers from Occupationally
Acquired Infections; Approved Guideline-Third Edition.” CLSI document M29-A3 [ISBN 1-56238-567-4]. CLSI, 940 West Valley Rd, Suite 1400, Wayne, Pennsylvania 19087-1898 USA, 2005.
2. CDC. Recommendations for Prevention of HIV Transmission in Health
Care Settings. MMWR (Suppl. No. 2S):2S-18S, 1987.
3. CDC. Updated: US Public Health Service Guidelines for the Management of Occupational Exposures to HBV, HCV and HIV and Recommendations for Post Exposure Prophylaxis. Appendix A and B. MMWR 50 (RR-11): 1-42, June 29, 2001.

Index
3855-007608-001 Rev D Operator’s Manual 103
A
Adding Slides to Module .......................................... 49 Alerts........................................................................ 75 Authorized European Representative ..................... 12
B
Biological Warnings ................................................... 6
C
Cannot load protocol ............................................... 91 Cautions ..................................................................... 6 Checking USB Connections ...................................... 98 Cleaning ................................................................... 77 Cleaning Instrument Surfaces .................................. 78 Cleaning Sample Chambers ..................................... 78 Cleaning Slide Carriers ............................................. 78 Cleaning the Dell Mini Netbook ............................... 78 Communication Connections .................................. 37 Components ............................................................ 33 Contact Information
Leica Biosystems ................................................. 12 Contents .................................................................. 16 Could not switch the # to # ...................................... 91
D
Discarding Liquid Waste .......................................... 78 Disclaimer of warranty ............................................ 30 Drain ........................................................................ 73 Drain Chambers ....................................................... 57 Drain Side Low Flow ................................................ 91 Drain Step ................................................................ 73
E
Electrical Connections ............................................. 37 Electrical Requirements ........................................... 17 End-User License Agreement .................................. 28 Environmental Requirements .................................. 19 Error loading Protocol ............................................. 92 Error Messages ........................................................ 91 Exit valve failed to switch to bypass position .......... 92 Export ...................................................................... 31
F
Fill Reagent ............................................................... 63
FISH Applications ..................................................... 33
Fluidic Manifold ....................................................... 36 Fluidic System .......................................................... 35 Flush ........................................................................ 68 Fuses
Replace................................................................ 99
G
Grant of license ........................................................ 28
H
How to use the Operator’s Manual ........................... 5
I
Incubate ................................................................... 67 Inlet valve failed to switch to bypass position ......... 92 Inlet valve failed to switch to chamber ................... 92 Installation ............................................................... 20 Instrument failed self-test ....................................... 93 Instrument thread is either terminated or
unresponsive within 20sec ................................. 93 Intended Use ............................................................. 5 Internal instrument error ........................................ 93 Internal operation error .......................................... 94 Internal runner module error .................................. 94 Internal software error ............................................ 93
L
Leica Biosystems Contact Information .................... 12 Leica Biosystems Warranty ...................................... 13 Limitation of liability .......................................... 13, 30 Limitations ................................................................. 8
M
Maintenance ............................................................ 77 Manifold Filters
Replacement ....................................................... 82 Miscellaneous .......................................................... 31 Monthly Maintenance ............................................. 77
N
Navigating the Interface .......................................... 45 Netbook Communication Port ................................. 38 No ThermoBrite Elite found ..................................... 94 Notes ......................................................................... 6
O
Operating the Instrument ........................................ 46
Index
3855-007608-001 Rev D Operator’s Manual 104
Operator’s Manual How to use ............................................................ 5
P
Pause Step ............................................................... 73 Peristaltic Pump Tubes
Replacement ....................................................... 84 Power Port ............................................................... 37 Power Switch ........................................................... 37 Precautions ............................................................ 8, 9 Precautions and Safety .............................................. 9 Precautions and Warnings ......................................... 6 Precautions, and Warnings ........................................ 6 Prime Step ............................................................... 72 Product support. ...................................................... 29 Prompt ..................................................................... 69 Protocol Dashboard ................................................. 49 Protocol Description ................................................ 60 Protocol Name ......................................................... 59 Protocol Steps .......................................................... 61 Pumps ...................................................................... 36
R
Reagent Drain .......................................................... 68 Reagent Fill .............................................................. 63 Reagent Fill Option .................................................. 63 Reagent Flush .......................................................... 68 Reagent Incubate ..................................................... 67 Reagent Manifold .................................................... 35 Reagent Preparation ................................................ 40 Reagent Pump ......................................................... 36 Reagent Rock ........................................................... 64 Reagent Step Prompt Option................................... 69 Reagent Steps .......................................................... 64 Reagent Temp .......................................................... 65 Reagent valve failed to switch to reagent line #...... 94 Reagents .................................................................. 39 References ............................................................. 102 Replacing the Fuses ................................................. 99 Replacing the Module Manifold Filters ................... 82 Replacing the Peristaltic Pump Tubings................... 84 Requirements .......................................................... 17 Restrictions .............................................................. 29 Rock ......................................................................... 65 Run ........................................................................... 47 Run Completion Summary ....................................... 57 Run Paused .............................................................. 53 Run Slide Position Activity ....................................... 53
Run/Create/Edit ....................................................... 48 Running a Protocol .................................................. 47
S
Safety ......................................................................... 9 Sample Chambers .................................................... 37 Save and Close ......................................................... 71 Selecting a Protocol to Run...................................... 48 Self-test failed to communicate with Instrument.... 95 Sensors indicate a reduced flow rate draining ........ 96 Slide Carriers ............................................................ 37 Slide Preparation ..................................................... 43 Software .................................................................. 38 Space Requirements ................................................ 18 Specifications ......................................................... 101 Start Screen ....................................................... 46, 47 Starting the Protocol................................................ 51 Supplies.................................................................... 17 Symbols...................................................................... 7 Symptoms
Troubleshooting .................................................. 88 System Cleaning ....................................................... 77 System Ready .......................................................... 43
T
Temp ........................................................................ 67 Temperature Requirements .................................... 18 Termination ............................................................. 29 The protocol has failed ............................................ 96 Theory of Operation ................................................ 33 ThermoBrite Elite system ................................ 16, 101 Third Party Computer Products ............................... 14 This protocol contains errors and it cannot be run . 96 Troubleshooting ...................................................... 88 Troubleshooting by Symptoms ................................ 88
U
U.S. government users ............................................ 31 Unhandled exception .............................................. 97 Unpacking ................................................................ 15 USB Communication interruption ........................... 97 USB Connections
check ................................................................... 98 Use of Third Party Computer Products .................... 14 User Initials .............................................................. 52
W
Warning Invalid Protocol Name ............................... 75

Index
3855-007608-001 Rev D Operator’s Manual 105
Manufacturer Leica Biosystems Richmond, Inc. 5205 Route 12 Richmond, IL 60071 USA
Warning Protocol Issues .......................................... 75 Warnings .................................................................... 6 Warnings, Precautions, Limitations ........................... 8 Warranty .................................................................. 13
Waste Manifold ....................................................... 35 Waste Pump ............................................................ 36 What to do Before Operating the Instrument ......... 44
CEpartner4U Esdoornlaan 13 3951 DB Maarn The Netherlands 31 (0) 6516536 26