Embed Size (px)
Citation preview

Staff Individualised Record (SIR) system,
Self-teach tutorial September 2004
Version 2.0
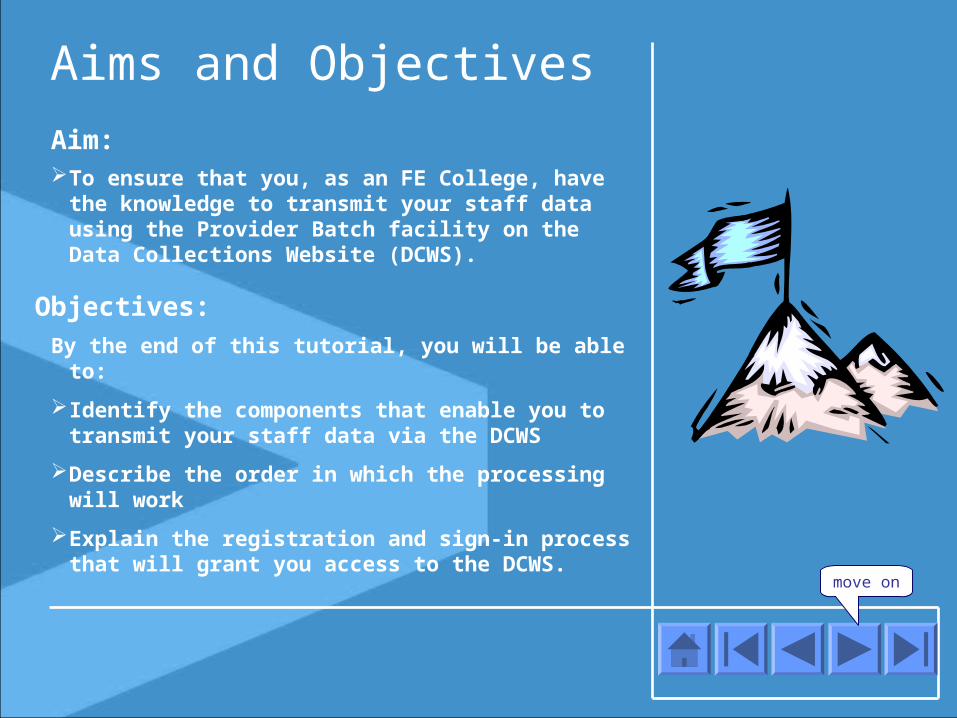
Aims and Objectives
To ensure that you, as an FE College, have the knowledge to transmit your staff data using the Provider Batch facility on the Data Collections Website (DCWS).
By the end of this tutorial, you will be able to:
Identify the components that enable you to transmit your staff data via the DCWS
Describe the order in which the processing will work
Explain the registration and sign-in process that will grant you access to the DCWS.
Aim:
Objectives:
move on

Modules Welcome to the Self-teach tutorial for Staff Individualised Records (SIR) using Provider Batch.
The tutorial is divided into eight modules.
You can work through all the modules sequentially or select an individual module. If you are new to Provider Batch, you are strongly recommended to work through all the modules in order.
You can click on a module title in the index to go directly to the start of the module.
Refer also to the SIR User Guide. This can be found on the Data Collections Website at http://providers.lsc.gov.uk, under the Training and Support tab.
1 Module 1 How to Use the Tutorial
2 Module 2 High Level Overview
3 Module 3 Registration and Sign-In
4 Module 4 Preparation of the SIR file
5 Module 5 Preparation of the On-Line Forms
6 Module 6 Transmitting the SIR Batch File
8 Module 8 Your Local LSC
move on
7 Module 7 Output from the DCWS

Module 1How to Use the Tutorial
move on
You can navigate your way through the tutorial by using the forward and backward buttons below.
Click on the ‘Home’ button to go back to the list of Modules at any time.
You will be prompted to move on at the end of each slide.
You will be directed to other sources of information for more detailed instructions.

Module 2High Level Overview
This module will identify the components that enable you to submit your returns via the DCWS.
The following slides will build up a picture showing the components and their relationships with each other.
move on

FE College
Before transmitting your Staff Individualised Record (SIR) file, you are advised to validate the file using the LSC’s SIR validation software.
Complete the SIRFFT1, Full Time by Type of Employment, on-line form.
If appropriate, complete the SIRAGG1, Aggregate Return, and SIRETH1, Staff Ethnicity, on-line forms.
Transmit the file to DCWS.
2 High Level Overview
FE College LSC
move on
SIR File
SIR
Yes –correct entries
Data CollectionWebsite
YourMIS
SIR File
NoUploadedSIR File
Errors?
SIR On-Line Forms

SIR File
SIR
Yes –correct entries
Data CollectionWebsiteYour
MIS
SIR File
No UploadedSIR File
Errors?
2 High Level Overview
FE College
Back OfficeSystems
SIR File
SIR
move on
Complete
ValidationReport
Reports
Errors?
Yes –correct entries
No
Check theValidation
Report
LSC Back Office Processing
On-Line Forms
The on-line forms are taken from the DCWS and used by the LSC analysts.
File
The SIR file is re-validated through SIR on DCWS. This is to ensure that the validation rules have been applied to the data.
Reports
The SIR reports, including the Validation report and any Error reports, are placed on the DCWS.
When you are satisfied that your return is complete, click the Complete button.
LSC
SIR
On-Line
Forms
You have completed Module 2, the High Level Overview of the process for transmitting SIR data using DCWS.
move on
2 High Level Overview

Module 3 Registration and Sign-In
This module gives an overview of what is required to be able to start using the DCWS.
Sections within this module are:
Prerequisites for Registering Users
Logging On
Registration
Sign-In.
move on

3 Registration and Sign-In
FE
Col
lege
ND
CM
Loca
l LS
C
PIMS generates Authoris-
ation Code
Mail Merge
Sends Authoris-
ation Code to provider
FE College receives national
Authorisation code from the
NDCM
move on
Prerequisites for Registering FE Colleges
As an FE College provider, you will automatically receive a national Authorisation Code associated to your organisation.
The Authorisation Code is generated using the Provider Information Management System (PIMS).
A letter detailing this code is sent to your Principal Head of Institution by the National Data Collections Manager (NDCM).
Note: You will not be able to register onto the DCWS without this Authorisation Code.
If you have not received it contact your Local Data Manager (LDM).

Super User receives
local Authoris-
ation Code from local
LSC
FE
Col
lege
ND
CM
Loca
l LS
C
PIMS generates Authoris-
ation Code (1)
Mail Merge
FE College receives national
Authorisation code from
NDCM
Nominates Super User
Super User contacts Local Data Manager at local LSC
Creates local Authorisation Code using
Data Collections
System
Approval Letter
Sends Authoris-
ation code to
FE College
move on
Sends Authoris-
ation Code to FE College
3 Registration and Sign-In
Prerequisites for Registering FE Colleges (continued)
On receipt of the national Authorisation Code, you must nominate a Super User (SU) who should then contact the LDM at your local LSC.
The LDM will generate a local Authorisation Code, and send it to the SU.
The SU is now ready to register onto the Data Collections Website.

move on
3 Registration and Sign-In
Logging On
Double Click Internet Explorer from your desktop to access the DCWS.
Type the URL address http://providers.lsc.gov.uk.
Click GO.
Click On-Line Data Collections.

Registration
The registration process must be completed by all SUs and Ordinary Users (OUs) to ensure they are authorised to use the system.
In order to register on DCWS an SU must know the following::
1. National authorisation code supplied by the NDCM
2. Local authorisation code supplied by your LDM
3. User name supplied by the LDM.
In order to register on DCWS an OU must know the following::
1. Local authorisation code supplied by your SU
2. User name supplied by your SU.
move on
3 Registration and Sign-In

move on
3 Registration and Sign-In
Logging On
Click Register to take you to the Registration Steps.

Enter your User
Logon
Enter your local
Authorisation Code
move on
3 Registration and Sign-In
Registration
Step 1
This screen is where you enter your local authorisation code as supplied by your LDM.
On-line Help text is displayed on the right of the screen.
Fields with an * are mandatory and must be completed.
Enter your User Logon.
Enter your local Authorisation Code.

Enter your national
Authorisation Code
move on
3 Registration and Sign-In
Registration
Step 2
This screen is only displayed if you are a Super User.
It is where you enter your national authorisation code.
On-line Help text is displayed on the screen.
Enter your national Authorisation Code.

Oranges03Oranges03
move on
3 Registration and Sign-In
Registration
Step 3
This screen is where you enter your account details.
On-line Help text is displayed on the screen.
For security reasons, you must enter your chosen password twice in order to verify it.
Your password should be between 6 and 11 characters long and contain at least one capital letter and at least one number.
Enter a Password for your user account.
Enter the same password to Confirm Password.

Oranges03Oranges03
Mother’s maiden nameSmith
move on
3 Registration and Sign-In
Registration
Step 3 (continued)
A memorable security question and answer are used to identify you, should you forget your password.
Enter a memorable Security Question.
Enter a memorable Security Answer.
Ensure you enter a valid email address. If you forget your username or password, it will be sent to you via your email.
Enter your valid Email Address.
Click Next.

move on
3 Registration and Sign-In
Registration
Step 4
This screen tells you that the registration process is complete.
You should allow approximately 20 minutes before attempting to sign-in to the DCWS from the On-Line Data Collections System Home page.

move on
3 Registration and Sign-In
Sign-In
Once you have registered your details through the registration process, you will then be able to Sign-In to the system.
You must sign-in before you can complete any returns.
If you have any problems signing-in, contact your LDM, who will check that your account is active.
Click Sign-In.

Enter your User Name
Enter your Password
move on
isp/test123
3 Registration and Sign-In
Sign-In
To ensure that you are taken to a secure site, always type in isp/ before your username.
Enter your User Name asisp/<user name>.
Enter your Password as set up in the registration process.
Click OK.
Note: You are allowed five attempts to sign-in. After the fifth incorrect attempt, you will be locked out of the DCWS and will need to contact your SU or LDM.

move on
3 Registration and Sign-In
Sign-In
When you have entered a valid user name and password you are taken to your Collections page.

move on
3 Registration and Sign-In
You have completed Module 3, about registering on to DCWS and signing in to Provider Batch.

Module 4 Preparation of the SIR file
SIR data consists of detailed information about each of the staff members at an FE College. The information includes general details such as date of birth, ethnicity and level of education, and sensitive information such as salary and employment details.
The SIR data enables the LSC to publish an annual SIR analysis. The analysis is used in various ways:
by the DfES
by the LSC, for example to answer Parliamentary questions
for comparison of pay rates between sectors, for example between school sixth forms and sixth form colleges.
FE Colleges should transmit their SIR data to the LSC using the Data Collections Website (DCWS) once a year, on the first working day of September.
move on

move on
Preparation of the SIR File
The SIR file is generated via the FE College’s own management information system and the data is extracted to create a data file.
Each SIR file must have standards applied to the filename, header and footer.
Filename standard
Header record standard
Footer record standard.
The SIR data file is given a nine character filename followed by a three character extension. The filename format is FAAAAAABB.CCC (or DAAAAAABB.CCC for duplicates) as shown below:
Code Value
F (or D) A prefix to indicate that the file is either the original data file (F prefix) or a duplicate (D prefix).
AAAAAA This is the Council provider number.
BB This is the serial number of the disk (it is best practice to set this to 01).
CCC This is the survey reference number, and is always 010.
4 Preparation of the SIR file

Preparation of the SIR File
The SIR file is generated via the FE College’s own management information system and the data is extracted to create a data file.
Each SIR file must have standards applied to the filename, header and footer.
Filename standard
Header record standard
Footer record standard.
move on
The header record has the following reference: AAAAAABBBBBBBBBBBB00CCCCDDMMYYYY
Code Value
AAAAAA This is the Council provider number.
BBBBBBBBBBBB
12 spaces for the header record.
00 Zero, zero.
CCCC This is the year of the survey (for example, 2004/05 is 0405).
DDMMYYYY
This Is the date of preparation of the disk (date format). For example, 01 September 2004 would be entered as 01092004.
4 Preparation of the SIR file

Preparation of the SIR File
The SIR file is generated via the FE College’s own management information system and the data is extracted to create a data file.
Each SIR file must have standards applied to the filename, header and footer.
Filename standard
Header record standard
Footer record standard
The format of the SIR data file can be found in detail in the SIR User Guide
This can be found on the DCWS at http://providers.lsc.gov.uk, under the Training and Support tab.
move on
The footer record has the following reference:AAAAAAZZZZZZZZZZZZ99CCCCDDMMYYEEEEEE
Code Value
AAAAAA This is the Council provider number.
ZZZZZZZZZZZZ
12 Zs for the footer record.
99 99.
CCCC This is the year of the survey (for example, 2004/05 is 0405).
DDMMYYYY
This Is the date of preparation of the disk (date format). For example, 02 September 2004 would be entered as 02092004.
EEEEEE The total count of all records in the file including header and footer records (right justified and zero filled to the left as necessary, where, for example, 472 records would be entered as 000472).
4 Preparation of the SIR file

9 Local validation of your SIR batch file
Local Validation
move on
Local Validation
To improve the accuracy of the SIR data you transmit to the LSC, and to reduce the risk that the transmitted file will cause errors when validated by the LSC, you are encouraged to run the data file through the LSC’s SIR validation software (Version 7.0 or later) before transmission.
The SIR software will validate the following:
filename
header and footer records
field-level data
An Error Report will be produced for any data that fails the validation checks.

Local Validation
move on
STEP 2
LSC Validation
STEP 1
Local Validation
9 Local validation of your SIR batch file
STEP 3
SIR return complete
Local Validation
Local validation enables you to confirm that the filename is in the correct format before you transmit the file.
It will also highlight errors of format in data fields (for example, a date in the wrong format), giving you a chance to correct the data and re-create the file before transmitting it.
Validation at the LSC
When your data file has been transmitted, further validation will be carried out by the SIR system at the LSC (see Module 7). The file must pass LSC validation before your SIR return can be completed.
If you have pre-validated the file locally first, then the chance that it will pass LSC validation will be greatly improved.

move on
4 Preparation of the SIR file
You have completed Module 4, about preparing the SIR file for transmission.

Module 5Preparation of the On-Line Forms
move on
The LSC requires some information to be returned using the On-Line Forms. These have replaced the spreadsheets used previously.
Refer to the SIR User Guide for more details.
This can be found on the DCWS at http://providers.lsc.gov.uk, under the Training and Support tab.

Module 6 Transmitting the SIR Batch File and On-Line Forms
This module gives an overview of how to transmit batch files and on-line forms.
Sections within this module are:
Creating a New Transmission
Uploading the SIR batch file and on-line forms
Uploading a Nil Return
Software Details
Transmitting files and on-line forms
Reports
Completing the Collection Return.
move on

move on
6 Transmitting the Batch File & On-Line Forms
Collection Return
Reference
Transmitting the Files and On-Line Forms
When you have entered a valid user name and password you are taken to your Collections page.
Click the active collection return reference to make a Provider Batch transmission (see Module 7 for details). Return references will appear with a prefix of PB (Provider Batch) e.g. PBSIR12.
On subsequent returns, previous returns will be shown below the list of active returns.

Create New Transmission
move on
6 Transmitting the Batch File & On-Line Forms
Creating a New Transmission
This screen shows that no transmissions have been made for the current collection.
Click Create New Transmission.

move on
6 Transmitting the Batch File & On-Line Forms
Transmitting the Elements
When you have selected all the elements to be transmitted, click the Finish button.

Transmitting the file and on-line forms
The different elements are seen on the Current Active Transmission screen.
The output from your transmission can be found in the Reports window (see Module 7 for details).
Note: It is estimated it will take approximately 24 hrs to process most SIR returns. You are advised to check your site regularly for feedback from the DCWS.
move on
6 Transmitting the Batch File & On-Line Forms

Completing the Collection Return
Once all the elements have been transmitted, you can flag that the collection return is complete by using the Complete button.
Click Complete. Completing a transmission should be done when your return is valid and the Validation Report has been received.
move on
6 Transmitting the Batch File & On-Line Forms

move on
6 Transmitting the Batch File & On-Line Forms
You have completed Module 6, about transmitting the SIR batch file and on-line forms.

Module 7Output from theDCWS
As a result of running SIR, the LSC will produce the following reports and files and place them on the DCWS for your use:
1. Error Report
2. Validation Report.
Only the FE College that submitted the SIR return and the local LSC will be able to view the reports.
This module gives an overview of each report.
For detailed information about validation, please refer to the Staff Individualised Record College Support Manual. This can be found at the LSC website, http://www.lsc.gov.uk, in Data Collection/Staff Individualised Record/Support Manuals.
move on

Output from the DCWS
7 Output from the DCWS
move on
Output from the DCWS
After you transmit your SIR return to the DCWS, the SIR system will validate the return. It will first validate the filename and the header and footer records (see Module 4).
Detailed validation will next be carried out on the data in the fields of the data file.
An Error Report will be returned to DCWS if any aspect of the validation fails. If an Error Report is returned, you must correct the errors and re-transmit the data file.
When the data file passes all the validation checks, a Validation Report will be returned to the DCWS.
The Error and Validation reports can be saved and opened using Microsoft Notepad or Word.

Error Report
7 Output from the DCWS
move on
This is an example of an Error Report, providing details of data in the SIR return that failed validation.
The report is a .txt file, opened using Notepad.

Validation Report
7 Output from the DCWS
move on
This is an example of a Validation Report, confirming that a SIR data file has passed all validations.
The report is a .txt file, opened using Notepad.

move on
7 Output from the DCWS
You have completed Module 7, about the output from the DCWS after the SIR return has been transmitted.

Module 8Your Local LSC
move on
If you have any queries or problems with your data collection returns, please contact your local LSC. Telephone numbers of all local LSCs are on the LSC website, www.lsc.gov.uk, under ‘’Contacts”.

move on
8 Your Local LSC
You have completed Module 8, about how to contact your local LSC.

You are now equipped to transmit your SIR returns via the DCWS.
If you have any problems or queries, please contact your local LSC.